321
P3PC-6192-05ENZ2 FUJITSU Image Scanner fi-7300NX Operator's Guide

P3PC-6192-05ENZ2
FUJITSU Image Scanner
fi-7300NX
Operator's Guide

Contents
Introduction 9
Manuals .............................................................................................................................................................. 9
Trademarks ....................................................................................................................................................... 14
Manufacturer.................................................................................................................................................... 14
Safety Information ........................................................................................................................................... 14
Symbols Used in This Manual........................................................................................................................... 15
Abbreviations Used in This Manual ................................................................................................................. 16
Arrow Symbols in This Manual ......................................................................................................................... 17
Screen Examples in This Manual...................................................................................................................... 17
Notice................................................................................................................................................................ 17
Scanner Overview 18
Main Features................................................................................................................................................... 18
Operating Methods .......................................................................................................................................... 21
Parts and Functions.......................................................................................................................................... 22
Icons on the Touch Screen................................................................................................................................ 27
Scanner Setup 32
When Connecting the Scanner via Wi-Fi ......................................................................................................... 35Connecting to a Wireless Access Point by Selecting One from the List of Wireless Access Points ................................... 38
Connecting to a Wireless Access Point by Pressing the WPS Button............................................................................... 39
Connecting to a Wireless Access Point by Entering the PIN for WPS............................................................................... 40
When Establishing a Connection by Entering the Information for the Wireless Access Point......................................... 41
When Connecting to a Network Which Requires a Certificate ........................................................................................ 42
When Connecting the Scanner via a Wired LAN.............................................................................................. 45
When Connecting the Scanner to the Computer via a USB Cable................................................................... 48
Checking the Network Connection for the Scanner......................................................................................... 50
Installing Software........................................................................................................................................... 51Overview of the Bundled Software ................................................................................................................................ 51
System Requirements.................................................................................................................................................... 53
Installation (Recommended) ........................................................................................................................................ 54
Installation (Custom) .................................................................................................................................................... 55
Basic Operations 56
2

Turning the Power ON/OFF............................................................................................................................... 56How to Turn the Power ON ............................................................................................................................................ 56
How to Turn the Power OFF ........................................................................................................................................... 57
Login/Logout (Using PaperStream NX Manager)............................................................................................ 58
Entering and Resuming from Power Saving Mode.......................................................................................... 61
Opening/Closing the ADF ................................................................................................................................. 63How to Open the ADF .................................................................................................................................................... 63
How to Close the ADF .................................................................................................................................................... 64
Setting Up the ADF Paper Chute (Feeder)....................................................................................................... 65
Setting Up the Stacker ..................................................................................................................................... 66Document Length Is A6 (Landscape) or Longer............................................................................................................. 66
Document Length Is Shorter than A6 (Landscape) ........................................................................................................ 67
How to Perform a Basic Scan 68
Using an Image Scanning Application on the Computer ................................................................................ 69
Using an Image Scanning Application Started on the Touch Screen.............................................................. 71Button Settings ............................................................................................................................................................. 73
Operations on the Scanner ............................................................................................................................................ 76
Using a Job (With PaperStream NX Manager) ................................................................................................ 77
How to Load Documents 78
Loading Documents.......................................................................................................................................... 78Preparation ................................................................................................................................................................... 78
How to Load Documents ............................................................................................................................................... 80
Documents for Scanning .................................................................................................................................. 81Paper Size ..................................................................................................................................................................... 81
Paper Type .................................................................................................................................................................... 81
Paper Weight (Thickness).............................................................................................................................................. 81
Documents That May Not Be Scanned Successfully ....................................................................................................... 82
Documents That Must Not Be Scanned.......................................................................................................................... 82
Precautions ................................................................................................................................................................... 83
Loading Capacity........................................................................................................................................................... 85
Area Not to Be Perforated ............................................................................................................................................. 86
Conditions Required to Accurately Detect Overlapped Documents (Multifeed) ............................................................. 87
Conditions for Mixed Batch Scanning ............................................................................................................................ 89
Conditions for Automatic Page Size Detection............................................................................................................... 92
Conditions for Using the Carrier Sheet ........................................................................................................................... 93
Contents
3

Various Ways to Scan 95
Scanning Documents with Different Widths ................................................................................................... 96
Scanning Documents Folded in Half ................................................................................................................ 98
Scanning Documents such as Envelopes or Multi-Layered Transfer Paper .................................................. 101
Scanning Photographs and Clippings ............................................................................................................ 103
Scanning Long Page Documents.................................................................................................................... 105
Feeding Documents Manually ....................................................................................................................... 107
Configuring Not to Detect Certain Overlap Patterns..................................................................................... 109Operational Procedure ................................................................................................................................................ 110
Disabling the Paper Protection Function....................................................................................................... 112Operational Procedure ................................................................................................................................................ 112
Counting the Number of Documents ............................................................................................................. 113
Daily Care 114
Cleaning Materials ......................................................................................................................................... 114
Location and Frequency ................................................................................................................................. 116
Cleaning the Outside of the Scanner ............................................................................................................. 118
Cleaning the Inside of the Scanner (ADF) with Cleaning Paper ................................................................... 119
Cleaning the Inside of the Scanner (ADF) with a Cloth ................................................................................ 121
Cleaning the Carrier Sheet ............................................................................................................................. 126
Replacing the Consumables 127
Consumables and Replacement Cycles .......................................................................................................... 127
Replacing the Brake Roller............................................................................................................................. 129
Replacing the Pick Roller ............................................................................................................................... 134
Troubleshooting 142
When a Paper Jam Occurs .............................................................................................................................. 142
Errors............................................................................................................................................................... 144
Paper Feeding Error........................................................................................................................................ 147Paper Protection.......................................................................................................................................................... 147
Paper Jam.................................................................................................................................................................... 147
Multifeed..................................................................................................................................................................... 147
Feed Mode Switched ................................................................................................................................................... 148
Contents
4

Sensor(s) dirty............................................................................................................................................................. 148
Cover Open Error............................................................................................................................................. 149Cover Open.................................................................................................................................................................. 149
Internal and Optical Errors............................................................................................................................. 150Optical Error ................................................................................................................................................................ 150
Operator Panel error.................................................................................................................................................... 150
EEPROM Error .............................................................................................................................................................. 150
Image Memory Read-Write Error ................................................................................................................................. 151
Overrun Error .................................................................................................................................................. 152Background Switching Mechanism Error ..................................................................................................................... 152
Chip Error ........................................................................................................................................................ 153Memory Error .............................................................................................................................................................. 153
Motor Circuit Error .......................................................................................................................................... 154Motor Circuit Error ....................................................................................................................................................... 154
Lamp Circuit Error........................................................................................................................................................ 154
Sensor Error .................................................................................................................................................... 155Sensor Error................................................................................................................................................................. 155
Communication Related Errors ...................................................................................................................... 156Module Error ............................................................................................................................................................... 156
Network Setting Error .................................................................................................................................................. 156
Server Setting Error ..................................................................................................................................................... 157
Scanner Central Admin Server Setting Error................................................................................................................. 157
Authentication Failed.................................................................................................................................................. 158
Other Errors .................................................................................................................................................... 159Being used by others................................................................................................................................................... 159
The scanner is in Doc Counting mode.......................................................................................................................... 159
Scanning has been paused by the user. ...................................................................................................................... 159
Outside designated scan area error............................................................................................................................. 159
Invalid Command ........................................................................................................................................................ 160
Connection Test Result................................................................................................................................... 161
Troubleshooting ............................................................................................................................................. 162The Scanner Cannot Be Powered ON ........................................................................................................................... 164
The Touch Screen or the [Power] Button Light or Both Switch Off ............................................................................... 165
The Touch Screen Does Not Function........................................................................................................................... 166
A Malfunction Occurs in the Touch Screen/The Display on the Touch Screen Is in an Incorrect Position ....................... 167
The Display on the Touch Screen Is Distorted .............................................................................................................. 168
Cannot Connect the Scanner and a Computer via Wi-Fi ............................................................................................... 169
A Wireless Access Point Is Not Displayed in the Access Point List ................................................................................ 175
Wi-Fi Setting for WPS Fails........................................................................................................................................... 177
Contents
5

Failed to Establish a Wi-Fi Connection by Configuring the Settings Manually ............................................................. 180
The Connection Between the Scanner and Computer Frequently Cuts Off ................................................................... 183
Cannot Connect the Scanner and a Computer via a Wired LAN.................................................................................... 184
Cannot Connect the Scanner and a Computer via a USB Cable .................................................................................... 189
Cannot Connect the Scanner to a Destination by Specifying an IP Address.................................................................. 190
Cannot Connect the Scanner to a Destination by Specifying a Host Name................................................................... 192
Scanning Does Not Start.............................................................................................................................................. 195
Scanning Takes a Long Time ....................................................................................................................................... 196
Image Quality Is Poor .................................................................................................................................................. 197
Quality of Scanned Text or Lines Is Unsatisfactory ....................................................................................................... 198
Images Are Distorted or Not Clear ............................................................................................................................... 199
Vertical Streaks Appear on the Images ........................................................................................................................ 200
Error Code "U4:40" Is Displayed on the Touch Screen While Scanning.......................................................................... 201
Overlapped Documents Are Frequently Fed into the Scanner...................................................................................... 202
Situation in Which the Document Is not Fed into the ADF Occurs Frequently .............................................................. 205
Paper Protection Is Set Off Frequently ......................................................................................................................... 207
Paper Jams/Pick Errors Occur Frequently...................................................................................................................... 209
Images Turn Out Elongated......................................................................................................................................... 211
A Shadow Appears at the Top or the Bottom of the Image .......................................................................................... 212
There Are Black Traces on the Document..................................................................................................................... 213
The Carrier Sheet Is Not Fed Smoothly/Paper Jams Occur............................................................................................. 214
Part of the Image Appears Missing in the Case Where the Carrier Sheet Is Used ......................................................... 216
Before You Contact the Scanner Service Provider ......................................................................................... 217General ....................................................................................................................................................................... 217
Error Status ................................................................................................................................................................. 217
Checking the Product Label ........................................................................................................................... 219
Scanner Settings (Touch Screen) 220
Setting Items.................................................................................................................................................. 220
How to connect............................................................................................................................................... 223
Power Management ....................................................................................................................................... 224
Scanner Name................................................................................................................................................. 226
Scanner Code .................................................................................................................................................. 226
Network .......................................................................................................................................................... 227
Paper Source/Feeding..................................................................................................................................... 232
Paper Protection............................................................................................................................................. 238
Image.............................................................................................................................................................. 241
Cleaning & Maintenance................................................................................................................................ 245
Contents
6

USB.................................................................................................................................................................. 246
Admin Password ............................................................................................................................................. 246
Restore Factory Defaults ................................................................................................................................ 247
Scanner Settings (Software Operation Panel) 248
Starting Up the Software Operation Panel.................................................................................................... 248
Password Setting for the Software Operation Panel..................................................................................... 250Setting a Password...................................................................................................................................................... 251
Setting [View Only mode] ........................................................................................................................................... 252
Exiting [View Only mode] ........................................................................................................................................... 254
Changing the Password............................................................................................................................................... 256
Clearing the Password ................................................................................................................................................. 258
Resetting the Password............................................................................................................................................... 259
Setting Items.................................................................................................................................................. 261Device Setting ............................................................................................................................................................. 261
Device Setting 2 .......................................................................................................................................................... 263
Settings Related to Sheet Counters............................................................................................................... 266Checking the Sheet Counter ........................................................................................................................................ 266
Clearing the Sheet Counters ........................................................................................................................................ 268
Messages for Cleaning or Replacing Consumables ...................................................................................................... 269
Scanner Cleaning Cycle [Cleaning Cycle] ..................................................................................................................... 270
Replacement Cycle of Consumables [Life Counter Alarm Setting] ............................................................................... 271
Settings Related to Scanning......................................................................................................................... 272Adjusting the Position to Start the Scan [Offset Setting/Vertical magnification Adjustment] ...................................... 272
Removing Shadows/Streaks that Appear around Edges of Images [Page Edge Filler (ADF)] ....................................... 275
Configuring the Scan Setting to Drop Out Specified Colors When Scanning [Dropout color] ........................................ 277
Shortening the Scanning Intervals [Pre-Pick] .............................................................................................................. 279
Specifying the Number of Retries for Paper Feeding [Number of Paper Feeding Retries]............................................ 280
Feeding [Pick Speed] .................................................................................................................................................. 281
Cropping the Image Boundary [AutoCrop Boundary] .................................................................................................. 282
Protecting the Documents from Being Damaged [Paper Protection] .......................................................................... 284
Specifying the Sensitivity Level for Paper Protection [Paper Protection Sensitivity] .................................................... 286
Scanning at High Altitude [High Altitude Mode]......................................................................................................... 288
Specifying the Image Quality for Scanning [Image Quality Mode] .............................................................................. 289
Settings Related to the Detection for Overlapped Documents (Multifeed) ................................................ 290Specifying a Method to Detect Overlapped Documents [Multifeed] ............................................................................ 290
Specifying the Area to Detect Overlapped Documents [Document check area specification for Multifeed
Detection] ................................................................................................................................................................... 293
Setting to Ignore Certain Overlap Patterns [Intelligent Multifeed Function] ............................................................... 299
Contents
7

Settings Related to Waiting Time.................................................................................................................. 301Waiting Time in Manual Feeding [Manual Feeding] ................................................................................................... 301
Waiting Time for the Scanner to Enter Power Saving Mode [Power saving] ................................................................ 303
Settings Related to Power On/Off and Start up of the Scanner .................................................................... 304Method of Turning the Scanner ON/OFF [Power SW Control] ....................................................................................... 304
Startup Mode Setting for the Scanner [Startup mode]................................................................................................. 306
Settings Related to Scanner Maintenance .................................................................................................... 307Detecting Vertical Streaks [Vertical Streak Detection] ................................................................................................. 307
Specifying the Sensitivity Level for Vertical Streak Detection [Vertical Streak Sensitivity] ........................................... 308
Settings Related to Scanner Maintenance and Inspection Cycle [Maintenance and Inspection Cycle]......................... 309
Appendix 310
Basic Specification.......................................................................................................................................... 310
Installation Specification............................................................................................................................... 313
Outer Dimensions........................................................................................................................................... 314
Scanner Options ............................................................................................................................................. 315
Uninstalling the Software .............................................................................................................................. 316
Exporting the Scanner Settings (Using PaperStream NX Manager)............................................................. 318
Notes for Distributing Assets with the Scanner Central Admin Server ......................................................... 320
Contact for Inquiries 321
Contents
8

Introduction
Thank you for purchasing this product.
Manuals
The following manuals are included for this product.Read them as needed.
Manuals Description
Safety Precautions (paper, PDF) Contains important information about the safe use of thisproduct.Make sure to read this manual before using the scanner.The PDF version is included in the Setup DVD-ROM.
Getting Started (paper) Explains the operations from setting up the scanner to turning iton.
Operator's Guide (this manual) (HTML) Provides detailed information on how to set up the scanner, howto operate and maintain the scanner daily, how to replace theconsumables, and how to troubleshoot problems.Included in the Setup DVD-ROM.
Touch Screen Help (HTML) Explains about how to troubleshoot errors and how to clean thescanner.Can be referenced from the touch screen on the scanner.
PaperStream Capture User's Guide (PDF) Provides an overview of PaperStream Capture, and detailedinformation on installation, how to scan documents, activation,and multistation operation.Included in the Setup DVD-ROM.
Scanner Central Admin User's Guide (PDF) Explains about the overview, installation, operation andmaintenance of Scanner Central Admin.Included in the Setup DVD-ROM.
PaperStream NX Manager User's Guide Explains about the overview, installation, setup, operation,maintenance and items on the windows of PaperStream NXManager.This guide can be downloaded from the following web page:https://www.fujitsu.com/global/support/products/computing/peripheral/scanners/fi/manuals/
Help (scanner driver) Explains how to use and configure the settings for the scannerdrivers.Can be referenced from each scanner driver.
Help (application) Explains how to use and configure the settings for theapplication software.
9

Manuals Description
Read them as needed.Can be referenced from each application.
● Manuals to refer to when setting up the scanner
Introduction
10

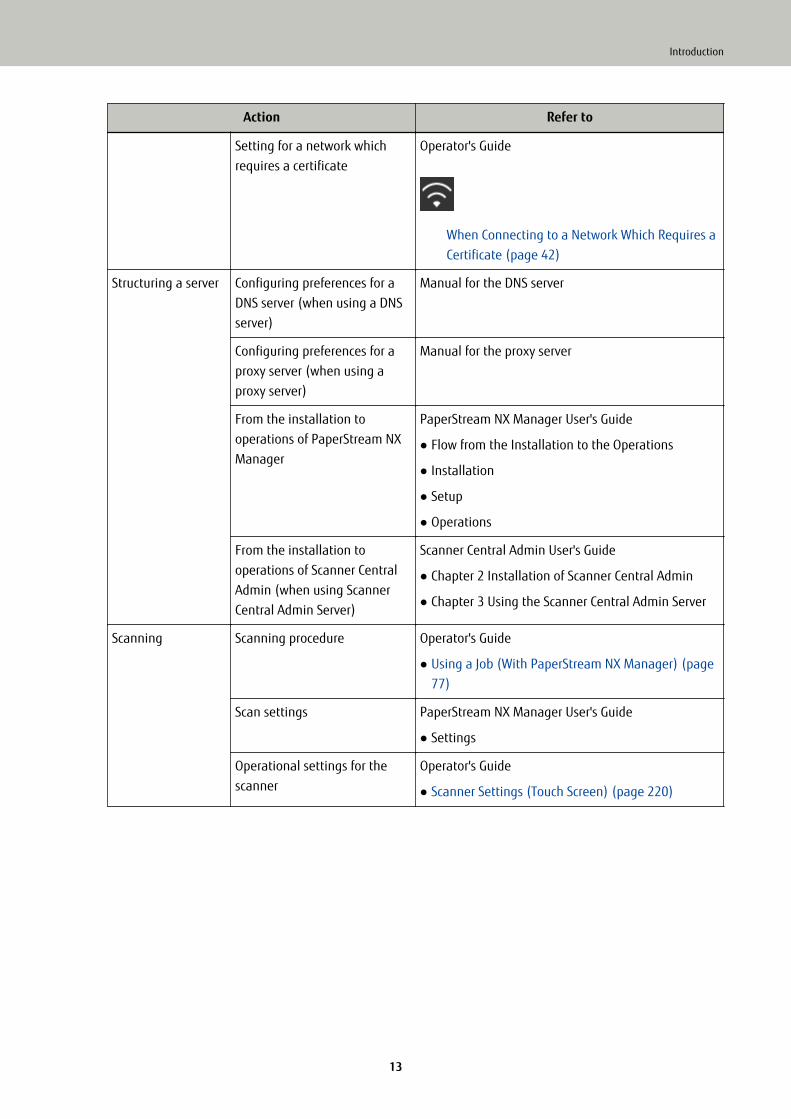
Actions to take and manuals to refer to for each operating method when setting up the scanner are as follows.Read them as needed.For details about operating methods, refer to Operating Methods (page 21).
Operating with a Computer
Action Refer to
From unpackaging to turning the power on Getting Started
Setting up thescanner
Setting a connection method Operator's Guide
When Connecting the Scanner via Wi-Fi (page35)
When Connecting the Scanner via a Wired LAN(page 45)
When Connecting the Scanner to the Computervia a USB Cable (page 48)
Setting for a network whichrequires a certificate
Operator's Guide
When Connecting to a Network Which Requires aCertificate (page 42)
Structuring a server Configuring preferences for aDNS server (when using a DNSserver)
Manual for the DNS server
Configuring preferences for aproxy server (when using aproxy server)
Manual for the proxy server
Introduction
11

Action Refer to
From the installation tooperations of Scanner CentralAdmin (when using ScannerCentral Admin Agent)
Scanner Central Admin User's Guide
● Chapter 2 Installation of Scanner Central Admin
● Chapter 3 Using the Scanner Central Admin Server
● Chapter 4 Using e-Mail Alerts
● Chapter 5 Linking with the Integrated ManagementSystem
Scanning Scanning procedure Operator's Guide
● Using an Image Scanning Application on theComputer (page 69)
● Using an Image Scanning Application Started on theTouch Screen (page 71)
Scan settings ● Help for the scanner driver
● Help for the image scanning application
Operational settings for thescanner
Operator's Guide
● Scanner Settings (Touch Screen) (page 220)
● Scanner Settings (Software Operation Panel) (page248)
Operating with PaperStream NX Manager
Action Refer to
From unpackaging to turning the power on Getting Started
Setting up thescanner
Setting a connection method Operator's Guide
When Connecting the Scanner via Wi-Fi (page35)
When Connecting the Scanner via a Wired LAN(page 45)
Introduction
12
Action Refer to
Setting for a network whichrequires a certificate
Operator's Guide
When Connecting to a Network Which Requires aCertificate (page 42)
Structuring a server Configuring preferences for aDNS server (when using a DNSserver)
Manual for the DNS server
Configuring preferences for aproxy server (when using aproxy server)
Manual for the proxy server
From the installation tooperations of PaperStream NXManager
PaperStream NX Manager User's Guide
● Flow from the Installation to the Operations
● Installation
● Setup
● Operations
From the installation tooperations of Scanner CentralAdmin (when using ScannerCentral Admin Server)
Scanner Central Admin User's Guide
● Chapter 2 Installation of Scanner Central Admin
● Chapter 3 Using the Scanner Central Admin Server
Scanning Scanning procedure Operator's Guide
● Using a Job (With PaperStream NX Manager) (page77)
Scan settings PaperStream NX Manager User's Guide
● Settings
Operational settings for thescanner
Operator's Guide
● Scanner Settings (Touch Screen) (page 220)
Introduction
13

Trademarks
ISIS is a trademark of Open Text.Intel, Pentium, and Intel Core are trademarks of Intel Corporation or its subsidiaries in the U.S. and/or othercountries.Wi-Fi, Wi-Fi Protected Setup, and the Wi-Fi Protected Setup Logo are trademarks of Wi-Fi Alliance.
ABBYY™ FineReader™ Engine © ABBYY. OCR by ABBYYABBYY and FineReader are trademarks of ABBYY Software, Ltd. which may be registered in some jurisdictions.The N-Mark is a trademark or registered trademark of NFC Forum, Inc. in the United States and in othercountries.Besides the software authored by the product developer (PFU Limited), this scanner contains other freesoftware, such as software copyrighted under the GNU General Public License (GPL) or the GNU Lesser GeneralPublic License (LGPL). For details concerning the conditions of the licenses for Open Source Software (OSS),
refer to the screen that appears when you press in the lower right of the home screen on the touch
screen of this scanner and then [Authentication/License].ScanSnap and PaperStream are registered trademarks or trademarks of PFU Limited in Japan.Other company names and product names are the registered trademarks or trademarks of the respectivecompanies.
Manufacturer
PFU LimitedYOKOHAMA i-MARK PLACE, 4-4-5 Minatomirai, Nishi-ku, Yokohama, Kanagawa, 220-8567, Japan© PFU Limited 2018-2019
Safety Information
The attached "Safety Precautions" manual contains important information about the safe and correct use of thisproduct.Make sure that you read and understand it before using the scanner.
Introduction
14

Symbols Used in This Manual
The following indications are used in this manual to obviate any chance of accident or damage to you, peoplenear you, and your property.Warning labels consist of a symbol indicating the severity and a warning statement.The symbols and their meanings are as follows.
WARNINGThis indication alerts operators of an operation that, if not strictly observed, may resultin severe injury or death.
CAUTIONThis indication alerts operators of an operation that, if not strictly observed, may resultin safety hazards to personnel or damage to the product.
Introduction
15

Abbreviations Used in This Manual
The following abbreviations are used in this manual.
Name Indication
Windows Server® 2008 R2 Standard (64-bit) Windows Server 2008 R2 (*1)
Windows® 7 Home Premium (32-bit/64-bit)
Windows® 7 Professional (32-bit/64-bit)
Windows® 7 Enterprise (32-bit/64-bit)
Windows® 7 Ultimate (32-bit/64-bit)
Windows 7 (*1)
Windows Server® 2012 Standard (64-bit) Windows Server 2012 (*1)
Windows Server® 2012 R2 Standard (64-bit) Windows Server 2012 R2 (*1)
Windows® 8.1 (32-bit/64-bit)
Windows® 8.1 Pro (32-bit/64-bit)
Windows® 8.1 Enterprise (32-bit/64-bit)
Windows 8.1 (*1)
Windows® 10 Home (32-bit/64-bit)
Windows® 10 Pro (32-bit/64-bit)
Windows® 10 Enterprise (32-bit/64-bit)
Windows® 10 Education (32-bit/64-bit)
Windows 10 (*1)
Windows Server® 2016 Standard (64-bit) Windows Server 2016 (*1)
Windows Server® 2019 Standard (64-bit) Windows Server 2019 (*1)
Windows® Internet Explorer®
Internet Explorer®
Internet Explorer
Microsoft® Word
Microsoft® Office Word
Word
Microsoft® Excel®
Microsoft® Office Excel®
Excel
Wi-Fi Protected Setup™ WPS
PaperStream IP (TWAIN)PaperStream IP (TWAIN x64)PaperStream IP (ISIS) Bundle
PaperStream IP driver
Wireless access pointWireless router
Wireless access point
Introduction
16

*1:Where there is no distinction between the different versions of the above operating system, the generalterm "Windows" is used.
Arrow Symbols in This Manual
Right-arrow symbols (→) are used to separate icons or menu options which should be selected in succession.
Example:Click [Start] menu → [Control Panel].
Screen Examples in This Manual
Microsoft product screenshots are reprinted with permission from Microsoft Corporation.The screen examples in this manual are subject to change without notice in the interest of productdevelopment.If the actual displayed screen differs from the screen examples in this manual, operate by following the actualdisplayed screen while referring to the user's manual of the scanner application that you are using.The screenshots used in this manual are of Windows 7. The actual windows and operations may differdepending on the operating system. Also note that the screens and operations may differ from this manualafter the scanner application software is updated. In that case, refer to the manual provided upon updating thesoftware.
Notice
● The contents of this manual are subject to change without notice.
● PFU Limited assumes no liability for incidental or consequential damages arising from the use of thisproduct, and any claims by a third party.
● Copying of the contents of this manual, in whole or in part, as well as the scanner applications is prohibitedunder the copyright law.
Issue date: December 2019Issued by: PFU Limited
Introduction
17

Scanner Overview
This section explains the main features of this product, the names of parts and their functions.
Main FeaturesThe scanner is equipped with the following features:
● High speed scanning
The scanner has achieved a scanning speed of 60 ppm/120 ipm (*1).Furthermore, up to 80 sheets of documents (*2) can be loaded for continuous scanning which enables you toquickly digitize a large volume of documents.
● Network connection
The scanner can be connected via Wi-Fi or a wired LAN.Even with a network connection, a scanning speed of 60 ppm/120 ipm (*1) is possible.A USB cable is not required to connect the scanner and a computer so that the scanner can be placedanywhere.
● Touch screen
The scanner has a 4.3-inch TFT color touch screen which enables you to operate the scanner with simple actionssuch as seeing and touching.The touch screen also enables you to specify various operational settings for scanning documents and checkthe number of sheets scanned or the error status with ease.
● Contactless smart card reader
The scanner has a contactless smart card reader which enables you to easily log into the scanner by holding asmart card over the scanner.
● Capable of scanning documents folded in half, envelopes, multi-layered transfer paper
In order to scan documents folded in half, envelopes, and multi-layered transfer paper, the scanner is equippedwith a feed mode switch that is used to switch the mode to Manual Single Mode.Manual Single Mode reduces the load on documents being fed so that documents are fed and scannedsuccessfully.
● Improved efficiency for pre-scan work
The scanner can perform "mixed batch scanning" which allows you to scan documents with different paperweights and sizes at once.This simplifies the process of sorting the documents before scanning.
18
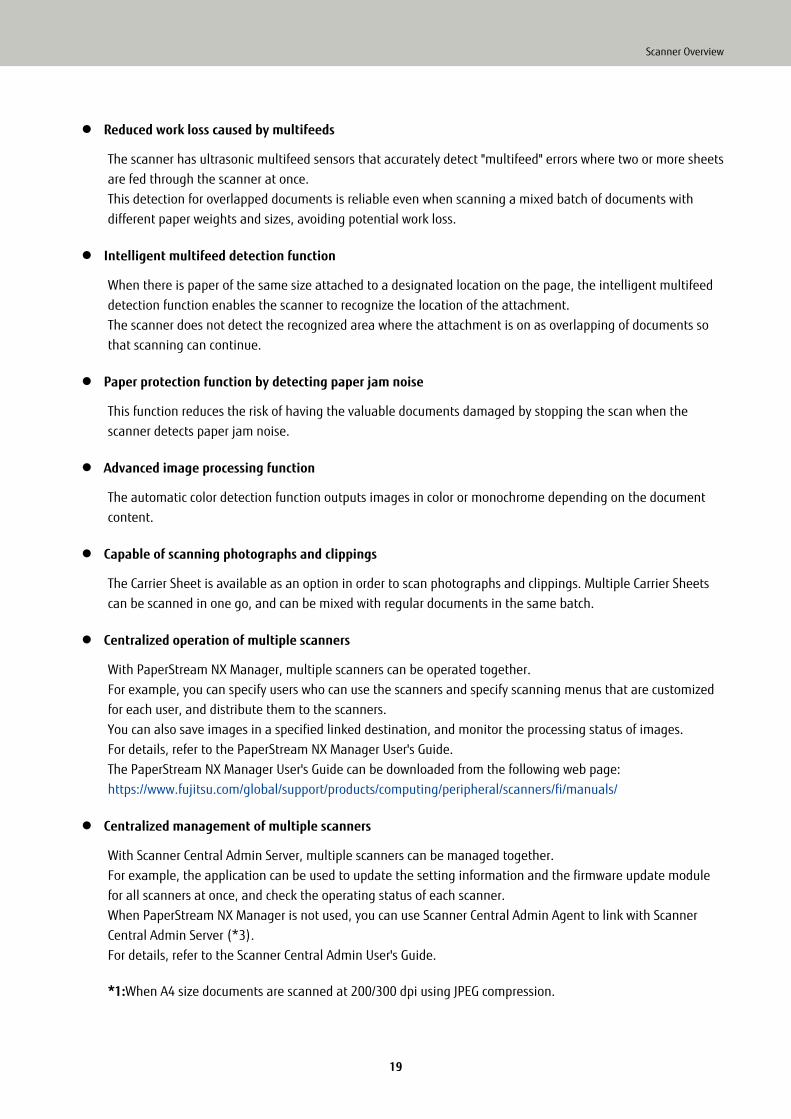
● Reduced work loss caused by multifeeds
The scanner has ultrasonic multifeed sensors that accurately detect "multifeed" errors where two or more sheetsare fed through the scanner at once.This detection for overlapped documents is reliable even when scanning a mixed batch of documents withdifferent paper weights and sizes, avoiding potential work loss.
● Intelligent multifeed detection function
When there is paper of the same size attached to a designated location on the page, the intelligent multifeeddetection function enables the scanner to recognize the location of the attachment.The scanner does not detect the recognized area where the attachment is on as overlapping of documents sothat scanning can continue.
● Paper protection function by detecting paper jam noise
This function reduces the risk of having the valuable documents damaged by stopping the scan when thescanner detects paper jam noise.
● Advanced image processing function
The automatic color detection function outputs images in color or monochrome depending on the documentcontent.
● Capable of scanning photographs and clippings
The Carrier Sheet is available as an option in order to scan photographs and clippings. Multiple Carrier Sheetscan be scanned in one go, and can be mixed with regular documents in the same batch.
● Centralized operation of multiple scanners
With PaperStream NX Manager, multiple scanners can be operated together.For example, you can specify users who can use the scanners and specify scanning menus that are customizedfor each user, and distribute them to the scanners.You can also save images in a specified linked destination, and monitor the processing status of images.For details, refer to the PaperStream NX Manager User's Guide.The PaperStream NX Manager User's Guide can be downloaded from the following web page:https://www.fujitsu.com/global/support/products/computing/peripheral/scanners/fi/manuals/
● Centralized management of multiple scanners
With Scanner Central Admin Server, multiple scanners can be managed together.For example, the application can be used to update the setting information and the firmware update modulefor all scanners at once, and check the operating status of each scanner.When PaperStream NX Manager is not used, you can use Scanner Central Admin Agent to link with ScannerCentral Admin Server (*3).For details, refer to the Scanner Central Admin User's Guide.
*1:When A4 size documents are scanned at 200/300 dpi using JPEG compression.
Scanner Overview
19

*2:When the paper weight is 80 g/m2 (20 lb).
*3:When a computer is connected to the scanner via a network by using the PaperStream IP driver, the settingsinformation of the scanner (Software Operation Panel settings information) cannot be distributed.
Scanner Overview
20

Operating MethodsThis section shows the operating methods of the scanner.
● Operating with a Computer
This operating method is a method that uses a USB cable or network to connect the scanner and the computerto manage images on the computer.
● Operating with PaperStream NX Manager
This operating method is a method that uses a network to connect the scanner to PaperStream NX Manager,and uses PaperStream NX Manager to process images sent from the scanner.You can monitor the processing status of images and save images in a specified linked destination.For details about the operation with PaperStream NX Manager, refer to the PaperStream NX Manager User'sGuide.The PaperStream NX Manager User's Guide can be downloaded from the following web page:https://www.fujitsu.com/global/support/products/computing/peripheral/scanners/fi/manuals/
Scanner Overview
21

Parts and FunctionsThis section shows the names of the scanner parts.
● Front
No. Name Function
1 Contactless Smart Card Reader Reads the information of the smart card.
2 ADF (Automatic Document Feeder) Pulls and feeds the documents one sheet at a time fromthe ADF paper chute (feeder).Open this to replace consumables or to clean the inside ofthe scanner.
3 Chute extension Pull out to adjust to the document length.
4 ADF paper chute (feeder) Holds the documents to be scanned.
5 Side guide Positions the documents in place when the documents areloaded in the ADF paper chute (feeder) as they are fed intothe scanner.
6 Feed mode switch Slide the feed mode switch to the left to switch the feedmode to Manual Single Mode.
Scanner Overview
22

No. Name Function
7 ADF release tab Pull this tab to open the ADF.
8 Touch screen Used to operate the scanner or check the status.
9 [Power] button Turns on or off the scanner.
10 Stacker Stacks up the ejected documents.
11 Stacker extension Slide out to adjust to the document length.
12 Stopper Lift up to adjust to the document length.
● Back
No. Name Function
1 Ventilation port Holes for ventilating hot air from inside the scanner.
2 Power connector Used to connect a power cable."Power cable" refers to the AC cable and AC adapterconnected together.
3 USB connector Used to connect a USB cable.
4 LAN connector Used to connect a LAN cable.
5 Security cable slot Used to connect an anti-theft security cable (commerciallyavailable).
Scanner Overview
23

● Removable Parts
No. Name Function
1 Pick roller A set of rollers which feeds documents on the ADF paperchute (feeder) into the ADF.
2 ADF paper chute (feeder) Holds the documents to be scanned.
3 Brake roller A roller that prevents more than one sheet of documents tobe fed into the ADF at once.
Scanner Overview
24
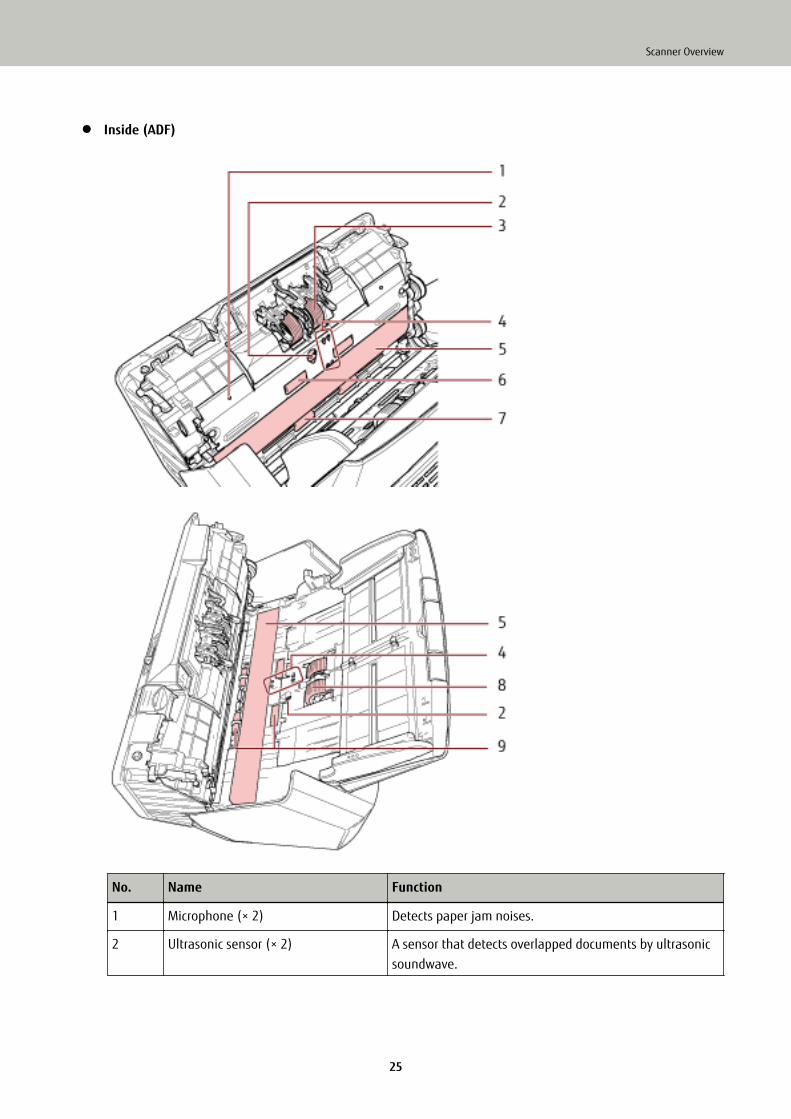
● Inside (ADF)
No. Name Function
1 Microphone (× 2) Detects paper jam noises.
2 Ultrasonic sensor (× 2) A sensor that detects overlapped documents by ultrasonicsoundwave.
Scanner Overview
25

No. Name Function
It detects overlapped documents by monitoring thedifference in the amount of ultrasonic waves transmittedthrough the documents.
3 Brake roller (× 2) A roller that prevents more than one sheet of documents tobe fed into the ADF at once.
4 Document sensor (× 8) A sensor which detects whether there is a document.
5 Glass (× 2) The surface which scans documents.
6 Feed roller (× 2) A roller that feeds the document through the ADF.
7 Eject roller (× 2) Rollers that feed documents from the ADF onto the stacker.
8 Pick roller (× 2) A set of rollers which separates one sheet off thedocuments loaded in the ADF paper chute (feeder), andfeeds the document into the ADF.
9 Plastic idler roller (× 4) A roller that feeds the document through the ADF.
Scanner Overview
26

Icons on the Touch ScreenIn the lower part of the touch screen, the following icons are displayed:The following is an example screen when the scanner is connected via a USB cable.
(1) / /
You can check the connection method of the scanner.For details, refer to Connection Method (page 28).When the scanner is connected via Wi-Fi, press the icon to display the [Wi-Fi Diagnosis] screen, and check theWi-Fi connection status.
(2)
You can check the settings, messages and Help for the scanner.
When there is a message, is displayed.
Press the icon to display the message.For details, refer to Notification (page 28).
Scanner Overview
27

(3)
You can check or change the settings for the scanner.Press the icon to display a list of setting items.For details, refer to Settings (page 29).
(4)
Go back to the previous screen.Press and hold this to go back to the main screen in accordance with the connection method.
● Connection Method
Connection Method Icon Connection Status
Wi-Fi
(Strong)
(Medium)
(Weak)
The scanner is connected via Wi-Fi. Thesignal strength is displayed in three levels.
The scanner is not connected via Wi-Fi.
Wired LAN The scanner is connected via a wired LAN.
The scanner is not connected via a wiredLAN.
USB The scanner is connected via a USB cable.
The scanner is not connected via a USBcable.
● Notification
Tab Overview
Information You can check the following settings.
● Number of sheets scanned
Scanner Overview
28

Tab Overview
● Operation mode for the Intelligent multifeed detection function, and thenumber of overlapping patterns that are memorized
● Whether or not to prioritize or disable the settings for [Paper Protection(Touch Screen Settings) (page 239)] in the function for protectingdocuments.
● Error information which occurred most recently
Message You can check messages for consumable replacement, cleaning, glasscleaning, and maintenance.
Help You can check how to load documents and how to clean the scanner.
● Settings
Item Overview
Scanner Information You can check the settings for the scanner.
● Standard Information
● Scanner name
● Power Management
● Display language
● How to connect
● Network
● Network (Access Point)
● Scanning Area
● Video Output
● Physical Function
● Imaging
● On Board IPC
● Compression Function
● Miscellaneous
● Error Code Information
Paper Source/Feeding
Paper Feeding You can specify the timing of when document feedingis started.Change this setting when overlapped documents andpaper jams occur frequently.
● See Also
- Feeding [Pick Speed] (page 281)
Scanner Overview
29

Item Overview
Document Count The number of documents can be counted withoutoutputting images of the documents.
● See Also
- Counting the Number of Documents (page 113)
Display language You can configure the language setting for the touchscreen.
Cleaning &Maintenance
Vertical Streak Detection You can configure the settings for detecting dirt onthe glass.If the scanner detects dirt on the glass, the touch
screen displays a notification on when you
receive a [Clean glass!] message. Clean the glasswhen you receive a message.
● See Also
- Detecting Vertical Streaks [Vertical StreakDetection] (page 307)
- Specifying the Sensitivity Level for Vertical StreakDetection [Vertical Streak Sensitivity] (page 308)
Cleaning Use this setting when you clean the inside of thescanner.
● See Also
- Daily Care (page 114)
Consumable counters You can check the number of sheets scanned.After you replace a consumable or clean the scanner,you can clear the counter.
● See Also
- Location and Frequency (page 116)
- Consumables and Replacement Cycles (page127)
Scanner Settings An administrator of the scanner uses this to configurethe settings for the scanner.
● See Also
- Scanner Settings (Touch Screen) (page 220)
Authentication/License You can check the conditions of the licenses for theauthentication label and open source software.
Limited Warranty Guide/Warranty Information The limited warranty guide or warranty informationcan be checked.
Scanner Overview
30

Item Overview
Note that this is not displayed depending on thecountry or region where the scanner is purchased.
Maintenance Service engineers use this for maintenance of thescanner.
Scanner Overview
31

Scanner Setup
This section explains about setting up the scanner.The scanner setup procedure depends on the connection method of the scanner.Check the reference page for each method to set up the scanner.For details about required actions to set up the scanner, refer to Manuals to refer to when setting up the scanner(page 10).
● Operating with a Computer
When Connecting the Scanner via Wi-Fi (page 35)
HINT
If the network environment requires a certificate, refer to When Connecting to a Network WhichRequires a Certificate (page 42).
When Connecting the Scanner via a Wired LAN (page 45)
32

When Connecting the Scanner to the Computer via a USB Cable (page 48)
● Operating with PaperStream NX Manager
When Connecting the Scanner via Wi-Fi (page 35)
HINT
If the network environment requires a certificate, refer to When Connecting to a Network WhichRequires a Certificate (page 42).
When Connecting the Scanner via a Wired LAN (page 45)
Scanner Setup
33

HINT
When centralizing the operation of multiple scanners with PaperStream NX Manager, you need to set up anenvironment and configure settings for PaperStream NX Manager.For details, refer to the PaperStream NX Manager User's Guide.The PaperStream NX Manager User's Guide can be downloaded from the following web page:https://www.fujitsu.com/global/support/products/computing/peripheral/scanners/fi/manuals/
Scanner Setup
34

When Connecting the Scanner via Wi-Fi
About the procedure from unpackaging the scanner to turning the power on, refer to Getting Started.
1 Turn on the scanner.For details, refer to How to Turn the Power ON (page 56).
2 In the screen which asks whether or not to connect via Wi-Fi, press the [Yes] button.
3 Select a configuration method, and press the [Next] button.Configure the setting for a wireless access point in one of the following ways:
● Select an Access PointSelect a wireless access point from a list of wireless access points to establish a connection.For details, refer to Connecting to a Wireless Access Point by Selecting One from the List of Wireless AccessPoints (page 38).
● Use WPSEstablish a connection by using WPS of the wireless access point.
- To establish a connection by pressing the WPS buttonFor details, refer to Connecting to a Wireless Access Point by Pressing the WPS Button (page 39).
- To establish a connection by entering the PIN for WPSFor details, refer to Connecting to a Wireless Access Point by Entering the PIN for WPS (page 40).
● Configure manuallyEstablish a connection by entering the information for the wireless access point.For details, refer to When Establishing a Connection by Entering the Information for the Wireless AccessPoint (page 41).
HINT
● If the network environment requires a certificate, the certificate needs to be registered with the scanner.
● Set up the scanner by referring to When Connecting to a Network Which Requires a Certificate (page42).
4 Specify the following items:
● IP AddressSet an IP address for the scanner.When you set an IP address manually, configure [Subnet Mask] and [Default Gateway].
● DNS ServerSet this item to use a DNS server.Specify IP addresses for [Primary DNS] and [Secondary DNS].
● Proxy ServerSet this item to use a proxy server.Specify [Host Name/IP address] and [Port Number]. If an authentication is necessary, specify [Username]and [Password].
Scanner Setup
35

● Network EncryptionSelect whether or not to encrypt network communications.
● PaperStream NX ManagerSet this item to use PaperStream NX Manager.Specify [Host Name/IP address] and [Port Number].
● Scanner Central Admin ServerYou can set the Scanner Central Admin Server to use PaperStream NX Manager.Set this item to monitor the scanners or perform a single operation on them at the same time with ScannerCentral Admin Server.Specify [Host Name/IP address] and [Port Number].
● Startup modeSelect a startup mode for the scanner.
● Scanner nameSet a scanner name.
When you finish setting the relevant items, the screen indicates that the setting process is complete.
5 Check the items that are set and press the [Complete] button.
6 Connect the computer, on which the scanner is to be used, to the network.For details about how to connect the computer to the network, refer to the computer manual.
7 Check the connection status of the network.For details, refer to Checking the Network Connection for the Scanner (page 50).
8 Install necessary software to the computer which is to be connected to the scanner.For details about the software, refer to Installing Software (page 51).Prepare the bundled Setup DVD-ROM.
HINT
When using PaperStream NX Manager, you do not need to install software from the bundled Setup DVD-ROM. Install a necessary software by referring to the PaperStream NX Manager User's Guide.
a If an old version of the software is installed, uninstall it first.For details, refer to Uninstalling the Software (page 316).
b Insert the bundled Setup DVD-ROM into the DVD drive.The [fi Series Setup] window appears.
c Start the installation by following the instructions displayed in the screen.It is recommended that you select [Installation (Recommended)].
d Configure the settings to use the scanner on the computer.Use fi-7300NX Scanner Selection Tool to select a scanner to be used.For details, refer to the fi-7300NX Scanner Selection Tool Help.fi-7300NX Scanner Selection Tool automatically starts up when the installation of the software iscomplete.
Scanner Setup
36

9 Check whether the scanner is ready to start scanning.For details, refer to How to Perform a Basic Scan (page 68).
ATTENTION
To change the scanner settings, the administrator password is required. The default password is "password".Change the administrator password to prevent the settings from being changed by other users.Also, change the administrator password regularly.The administrator password can be changed in the screen that appears in the following procedure:
→ [Scanner Settings] → [Admin Password]
HINT
The network settings can be changed in the menu that is displayed in the following procedure.
→ [Scanner Settings] → [Network]
Scanner Setup
37

Connecting to a Wireless Access Point by Selecting One from the List of WirelessAccess Points
1 In the screen for selecting a configuration method, select [Select an Access Point] and press the [Next]button.
2 Check the setting items and the order of them, and then press the [Start] button.
A list of wireless access points is displayed.
3 Select the wireless access point that you want to connect to, and then press the [Next] button.
4 Enter the information for the wireless access point.Enter the following:
● Security key
● Authentication Method
● User ID
● Password
● Other necessary information for connecting to a wireless access point
5 After you finish entering the necessary information, press the [Next] button.
When the connecting process is complete, the connection result is displayed.
6 Press the [Next] button.
Specify each item.Refer to step 4 in When Connecting the Scanner via Wi-Fi (page 35).
Scanner Setup
38
Connecting to a Wireless Access Point by Pressing the WPS Button
1 In the screen for selecting a configuration method, select [Use WPS] and press the [Next] button.
2 Check the setting items and the order of them, and then press the [Start] button.
The screen for selecting the method with the WPS function is displayed.
3 Select [Push-Button] and press the [Next] button.
The operation guidance screen is displayed.
4 Press the WPS button on the wireless access point to have it ready to connect to the scanner.For details about WPS, refer to the manual of your wireless access point.
5 Go back to the touch screen and press the [Next] button within two minutes.
When the connecting process is complete, the connection result is displayed.
6 Press the [Next] button.
Specify each item.Refer to step 4 in When Connecting the Scanner via Wi-Fi (page 35).
Scanner Setup
39

Connecting to a Wireless Access Point by Entering the PIN for WPS
1 In the screen for selecting a configuration method, select [Use WPS] and press the [Next] button.
2 Check the setting items and the order of them, and then press the [Start] button.
The screen for selecting the method with the WPS function is displayed.
3 Select [PIN] and press the [Next] button.
The operation guidance screen is displayed.
4 Note down the PIN that is displayed in the screen.
5 On the computer, open the setting window for WPS of the wireless access point.For details about WPS, refer to the manual of your wireless access point.
6 Specify the PIN which you noted down to have it ready to connect to the scanner.
7 Go back to the touch screen and press the [Next] button within two minutes.
When the connecting process is complete, the connection result is displayed.
8 Press the [Next] button.
Specify each item.Refer to step 4 in When Connecting the Scanner via Wi-Fi (page 35).
Scanner Setup
40

When Establishing a Connection by Entering the Information for the WirelessAccess Point
1 In the screen for selecting a configuration method, select [Configure manually] and press the [Next]button.
2 Check the setting items and the order of them, and then press the [Start] button.
The setting screen for a wireless access point is displayed.
3 Enter the information for the wireless access point.Enter the following:The information that you enter varies depending on the wireless access point that you want to connect to.
● Network name (SSID)
● Security protocol
● Security key
● Encryption method
● Authentication Method
● User ID
● Password
● Other necessary information for connecting to a wireless access point
4 After you finish entering the necessary information, press the [Next] button.
When the connecting process is complete, the connection result is displayed.
5 Press the [Next] button.
Specify each item.Refer to step 4 in When Connecting the Scanner via Wi-Fi (page 35).
Scanner Setup
41

When Connecting to a Network Which Requires a Certificate
About the procedure from unpackaging the scanner to turning the power on, refer to Getting Started.
1 Turn on the scanner.For details, refer to How to Turn the Power ON (page 56).
2 Install necessary software to the computer which is to be connected to the scanner.For details about the software, refer to Installing Software (page 51).Prepare the bundled Setup DVD-ROM.
HINT
When using PaperStream NX Manager, you do not need to install software from the bundled Setup DVD-ROM. Install a necessary software by referring to the PaperStream NX Manager User's Guide.
a If an old version of the software is installed, uninstall it first.For details, refer to Uninstalling the Software (page 316).
b Insert the bundled Setup DVD-ROM into the DVD drive.The [fi Series Setup] window appears.
c Start the installation by following the instructions displayed in the screen.It is recommended that you select [Installation (Recommended)].
d Connect the scanner to the computer by using the bundled USB cable.
e Register a certificate with the scanner.Use fi-7300NX Certificate Registration Tool to register a certificate with the scanner.For details, refer to the fi-7300NX Certificate Registration Tool Help.fi-7300NX Certificate Registration Tool can be started up in the following procedure:
● Windows Server 2008 R2/Windows 7Click [Start] menu → [All Programs] → [fi Series] → [fi-7300NX Certificate Registration Tool].
● Windows Server 2012
Scanner Setup
42

Right-click the Start screen, and select [All apps] on the app bar → [fi-7300NX CertificateRegistration Tool] under [fi Series].
● Windows Server 2012 R2/Windows 8.1Click [↓] on the lower left side of the Start screen and select [fi-7300NX Certificate RegistrationTool] under [fi Series].To display [↓], move the mouse cursor.
● Windows 10/Windows Server 2016/Windows Server 2019Click [Start] menu → [fi Series] → [fi-7300NX Certificate Registration Tool].
f Remove the USB cable connecting the scanner and the computer.
3 Configure the settings to connect the scanner via Wi-Fi on the touch screen of the scanner.For details, refer to steps 2 to 7 in When Connecting the Scanner via Wi-Fi (page 35).
4 Configure the settings to use the scanner on the computer.Use fi-7300NX Scanner Selection Tool to select a scanner to be used.For details, refer to the fi-7300NX Scanner Selection Tool Help.fi-7300NX Scanner Selection Tool can be started up in the following procedure:
● Windows Server 2008 R2/Windows 7Click [Start] menu → [All Programs] → [fi Series] → [fi-7300NX Scanner Selection Tool].
● Windows Server 2012Right-click the Start screen, and select [All apps] on the app bar → [fi-7300NX Scanner Selection Tool]under [fi Series].
● Windows Server 2012 R2/Windows 8.1Click [↓] on the lower left side of the Start screen and select [fi-7300NX Scanner Selection Tool] under [fiSeries].To display [↓], move the mouse cursor.
● Windows 10/Windows Server 2016/Windows Server 2019Click [Start] menu → [fi Series] → [fi-7300NX Scanner Selection Tool].
5 Check whether the scanner is ready to start scanning.For details, refer to How to Perform a Basic Scan (page 68).
ATTENTION
To change the scanner settings, the administrator password is required. The default password is "password".Change the administrator password to prevent the settings from being changed by other users.Also, change the administrator password regularly.The administrator password can be changed in the screen that appears in the following procedure:
→ [Scanner Settings] → [Admin Password]
HINT
The network settings can be changed in the menu that is displayed in the following procedure.
Scanner Setup
43

→ [Scanner Settings] → [Network]
Scanner Setup
44

When Connecting the Scanner via a Wired LAN
About the procedure from unpackaging the scanner to turning the power on, refer to Getting Started.
1 Turn on the scanner.For details, refer to How to Turn the Power ON (page 56).
2 In the screen which asks whether or not to connect via Wi-Fi, press the [No] button.
3 In the screen for selecting a connection method, select [Wired LAN] and press the [Next] button.
4 Check the setting items and the order of them on the window displayed.
5 Connect the scanner to a network device (such as a switch, a hub, or a router) via a LAN cable.
6 On the window displayed in step 4, press the [Start] button.
7 Specify the following items:
● IP AddressSet an IP address for the scanner.When you set an IP address manually, configure [Subnet Mask] and [Default Gateway].
● DNS ServerSet this item to use a DNS server.Specify IP addresses for [Primary DNS] and [Secondary DNS].
● Proxy ServerSet this item to use a proxy server.Specify [Host Name/IP address] and [Port Number]. If an authentication is necessary, specify [Username]and [Password].
● Network EncryptionSelect whether or not to encrypt network communications.
● PaperStream NX ManagerSet this item to use PaperStream NX Manager.Specify [Host Name/IP address] and [Port Number].
Scanner Setup
45

● Scanner Central Admin ServerYou can set the Scanner Central Admin Server to use PaperStream NX Manager.Set this item to monitor the scanners or perform a single operation on them at the same time with ScannerCentral Admin Server.Specify [Host Name/IP address] and [Port Number].
● Startup modeSelect a startup mode for the scanner.
● Scanner nameSet a scanner name.
When you finish setting the relevant items, the screen indicates that the setting process is complete.
8 Check the items that are set and press the [Complete] button.
9 Connect the computer, on which the scanner is to be used, to the network.For details about how to connect the computer to the network, refer to the computer manual.
10 Check the connection status of the network.For details, refer to Checking the Network Connection for the Scanner (page 50).
11 Install necessary software to the computer which is to be connected to the scanner.For details about the software, refer to Installing Software (page 51).Prepare the bundled Setup DVD-ROM.
HINT
When using PaperStream NX Manager, you do not need to install software from the bundled Setup DVD-ROM. Install a necessary software by referring to the PaperStream NX Manager User's Guide.
a If an old version of the software is installed, uninstall it first.For details, refer to Uninstalling the Software (page 316).
b Insert the bundled Setup DVD-ROM into the DVD drive.The [fi Series Setup] window appears.
c Start the installation by following the instructions displayed in the screen.It is recommended that you select [Installation (Recommended)].
d Configure the settings to use the scanner on the computer.Use fi-7300NX Scanner Selection Tool to select a scanner to be used.For details, refer to the fi-7300NX Scanner Selection Tool Help.fi-7300NX Scanner Selection Tool automatically starts up when the installation of the software iscomplete.
12 Check whether the scanner is ready to start scanning.For details, refer to How to Perform a Basic Scan (page 68).
ATTENTION
To change the scanner settings, the administrator password is required. The default password is "password".
Scanner Setup
46

Change the administrator password to prevent the settings from being changed by other users.Also, change the administrator password regularly.The administrator password can be changed in the screen that appears in the following procedure:
→ [Scanner Settings] → [Admin Password]
HINT
The network settings can be changed in the menu that is displayed in the following procedure.
→ [Scanner Settings] → [Network]
Scanner Setup
47

When Connecting the Scanner to the Computer via a USB Cable
About the procedure from unpackaging the scanner to turning the power on, refer to Getting Started.
1 Turn on the scanner.For details, refer to How to Turn the Power ON (page 56).
2 In the screen which asks whether or not to connect via Wi-Fi, press the [No] button.
3 In the screen for selecting a connection method, select [USB] and press the [Next] button.
4 Check the setting items and their order on the screen displayed, and press the [Start] button.
5 Specify the following items:
● Startup modeSelect a startup mode for the scanner.
● Scanner nameSet a scanner name.
When you finish setting the relevant items, the screen indicates that the setting process is complete.
6 Check the items that are set and press the [Complete] button.
7 Install necessary software to the computer which is to be connected to the scanner.For details about the software, refer to Installing Software (page 51).Prepare the bundled Setup DVD-ROM.
a If an old version of the software is installed, uninstall it first.For details, refer to Uninstalling the Software (page 316).
b Insert the bundled Setup DVD-ROM into the DVD drive.The [fi Series Setup] window appears.
c Start the installation by following the instructions displayed in the screen.It is recommended that you select [Installation (Recommended)].
Scanner Setup
48

8 Connect the scanner to the computer by using the bundled USB cable.
9 Check whether the scanner is ready to start scanning.For details, refer to How to Perform a Basic Scan (page 68).
ATTENTION
To change the scanner settings, the administrator password is required. The default password is "password".Change the administrator password to prevent the settings from being changed by other users.Also, change the administrator password regularly.The administrator password can be changed in the screen that appears in the following procedure:
→ [Scanner Settings] → [Admin Password]
Scanner Setup
49
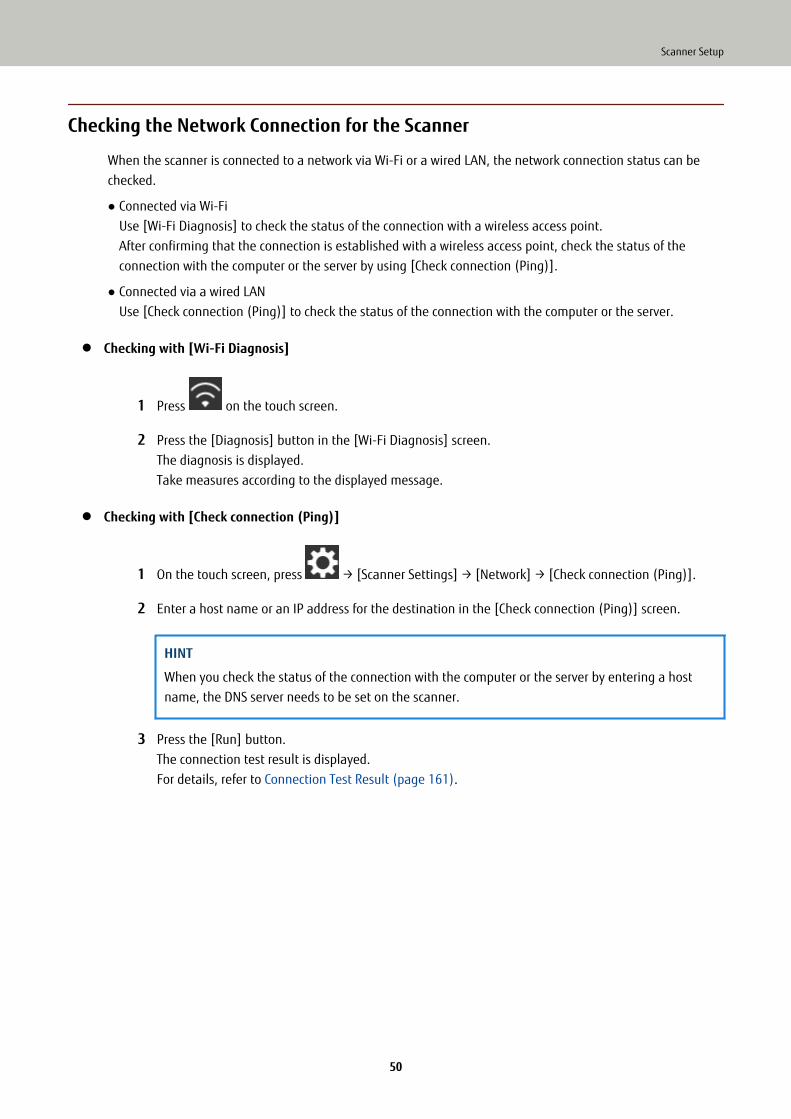
Checking the Network Connection for the Scanner
When the scanner is connected to a network via Wi-Fi or a wired LAN, the network connection status can bechecked.
● Connected via Wi-FiUse [Wi-Fi Diagnosis] to check the status of the connection with a wireless access point.After confirming that the connection is established with a wireless access point, check the status of theconnection with the computer or the server by using [Check connection (Ping)].
● Connected via a wired LANUse [Check connection (Ping)] to check the status of the connection with the computer or the server.
● Checking with [Wi-Fi Diagnosis]
1 Press on the touch screen.
2 Press the [Diagnosis] button in the [Wi-Fi Diagnosis] screen.The diagnosis is displayed.Take measures according to the displayed message.
● Checking with [Check connection (Ping)]
1 On the touch screen, press → [Scanner Settings] → [Network] → [Check connection (Ping)].
2 Enter a host name or an IP address for the destination in the [Check connection (Ping)] screen.
HINT
When you check the status of the connection with the computer or the server by entering a hostname, the DNS server needs to be set on the scanner.
3 Press the [Run] button.The connection test result is displayed.For details, refer to Connection Test Result (page 161).
Scanner Setup
50

Installing Software
This section describes the software that is required for the computer you want to connect the scanner to, thesystem requirements, and the installation method.When using PaperStream NX Manager, refer to the PaperStream NX Manager User's Guide.When using Scanner Central Admin, refer to the Scanner Central Admin User's Guide.
HINT
The software can be installed from the bundled Setup DVD-ROM or downloaded from the download site andthen installed.
Overview of the Bundled Software
This product is bundled with the following software.
● PaperStream IP driverThe PaperStream IP driver is a scanner driver that conforms to the TWAIN/ISIS standard. It supports scannersconnected to a network.There are three types of PaperStream IP drivers.
- PaperStream IP (TWAIN)Conforms to the TWAIN standard. Used when you operate the scanner using TWAIN-compliant 32-bitapplications.
- PaperStream IP (TWAIN x64)Conforms to the TWAIN standard. Used when you operate the scanner using TWAIN-compliant 64-bitapplications.It can be installed on 64-bit operating systems.
- PaperStream IP (ISIS) BundleConforms to the ISIS standard. Used when you operate the scanner using ISIS-compliant applications.
For details, refer to the PaperStream IP driver Help.
● Network Setup Tool for fi-7300NXThe following applications are included.These applications are used to connect fi-7300NX to a network to make the scanner available.
- fi-7300NX Scanner Selection ToolUse this application to set a computer to be able to use a scanner connected to a network.For details, refer to the fi-7300NX Scanner Selection Tool Help.
- fi-7300NX Certificate Registration ToolUse this application to register a certificate with the scanner if the network environment requires thecertificate.For details, refer to the fi-7300NX Certificate Registration Tool Help.
- fi-7300NX Button Event ManagerUse this application to configure the settings for an image scanning application which is started up fromthe touch screen of the scanner when it is connected to a network.For details, refer to the help for fi-7300NX Button Event Manager.
Scanner Setup
51

● Software Operation PanelYou can configure settings that are related to scanning documents and managing consumable parts.It is installed together with the PaperStream IP driver.For details, refer to Scanner Settings (Software Operation Panel) (page 248).
● Error Recovery GuideDisplays the status of the scanner and a solution for a problem if an error occurs in the scanner.It is installed together with the PaperStream IP driver.Solutions for problems can also be checked in Troubleshooting (page 142).
● PaperStream CaptureAn image scanning application which supports PaperStream IP (TWAIN)/PaperStream IP (ISIS) Bundle.By defining scan settings as document profiles, you can customize the settings according to your preference.
● PaperStream Capture Pro (Trial)An image scanning application which supports PaperStream IP (TWAIN).It is the trial version of PaperStream Capture Pro.To use the full version, purchase and activate a license.In addition to the functions in PaperStream Capture, PaperStream Capture Pro also allows you to performmultistation operations and advanced meta data settings.For details, refer to the PaperStream Capture User's Guide.
● ABBYY FineReader for ScanSnap™
This application converts images into files for applications such as Word or Excel (*1).It can be used when you scan documents with PaperStream Capture/PaperStream Capture Pro.Download it from the download site and install it.
● 2D Barcode for PaperStreamThis application recognizes two-dimensional codes.It can be used with PaperStream IP (TWAIN) / PaperStream IP (ISIS) Bundle / PaperStream Capture.It is available as an option (sold separately).
● ManualsSafety Precautions and the Operator's Guide are installed.
● Scanner Central Admin AgentInstall this application on the computer which the scanner is connected to in order to link with ScannerCentral Admin Server.When the computer is linked with Scanner Central Admin Server, you can apply the updates such as thesetting information of the scanner to multiple scanners.When PaperStream NX Manager is used, you do not have to install Scanner Central Admin Agent since thescanner has the linkage function with Scanner Central Admin Server.For details, refer to the Scanner Central Admin User's Guide.
● fi Series Online UpdateThis application checks for the latest software and firmware updates for fi Series and applies them.For details, refer to the fi Series Online Update Help.
*1:Microsoft® Office products need to be installed.
Scanner Setup
52

System Requirements
The system requirements for the computer on which software is to be installed are as follows.
Operating system ● Windows Server® 2008 R2 Standard (64-bit) (Service Pack 1)
● Windows® 7 Home Premium (32-bit/64-bit) (Service Pack 1)
● Windows® 7 Professional (32-bit/64-bit) (Service Pack 1)
● Windows® 7 Enterprise (32-bit/64-bit) (Service Pack 1)
● Windows® 7 Ultimate (32-bit/64-bit) (Service Pack 1)
● Windows Server® 2012 Standard (64-bit) (*1)
● Windows Server® 2012 R2 Standard (64-bit) (*1)
● Windows® 8.1 (32-bit/64-bit) (including updates) (*1)
● Windows® 8.1 Pro (32-bit/64-bit) (including updates) (*1)
● Windows® 8.1 Enterprise (32-bit/64-bit) (including updates) (*1)
● Windows® 10 Home (32-bit/64-bit) (*1)
● Windows® 10 Pro (32-bit/64-bit) (*1)
● Windows® 10 Enterprise (32-bit/64-bit) (*1)
● Windows® 10 Education (32-bit/64-bit) (*1)
● Windows Server® 2016 Standard (64-bit) (*1)
● Windows Server® 2019 Standard (64-bit) (*1)
CPU Intel® Pentium® 4 1.8 GHz or higher
(Recommended: Intel® Core™ i5 2.5 GHz or higher, excluding those formobile devices)
Memory 1 GB or more (Recommended: 4 GB or more)
Hard disk drive 5,400 rpm or more (Recommended: 7,200 rpm or more)
Display resolution 1024 × 768 pixels or more, 65,536 colors or more
Hard disk space 11 GB or more of free hard disk space (*2)
DVD drive Required for installing software
Interface USB3.1 Gen1/USB3.0/USB2.0/USB1.1
*1:The bundled software operates as a desktop application.
*2:Required disk space for scanning documents varies according to the file size of the scanned images.
Scanner Setup
53

Installation (Recommended)
When [Installation (Recommended)] is selected, the following software is installed:Necessary software to use the scanner is installed all at once.
● PaperStream IP (TWAIN)
● PaperStream IP (TWAIN x64)
● Network Setup Tool for fi-7300NX
● Software Operation Panel
● Error Recovery Guide
● PaperStream Capture
● Manuals
● Scanner Central Admin Agent
● fi Series Online Update
1 Turn on the computer and log onto Windows as a user with administrator privileges.
2 Insert the Setup DVD-ROM into the DVD drive.The [fi Series Setup] window appears.
HINT
If the [fi Series Setup] window does not appear, double-click "Setup.exe" in the Setup DVD-ROM via[Explorer] or [Computer].
3 Click the scanner model name to be used (if the window for selecting a model name is displayed).
4 Click the [Installation (Recommended)] button.
5 Install the software by following the instructions displayed in the window.
Scanner Setup
54

Installation (Custom)
With [Installation (Custom)], select and install necessary software.
1 In the same way as in Installation (Recommended) (page 54), perform steps 1 through 3.
2 Click the [Installation (Custom)] button.
3 Check the displayed contents and click the [Next] button.
4 Select the check boxes for the software to be installed and click the [Next] button.
5 Install the software by following the instructions displayed in the window.
Scanner Setup
55

Basic Operations
This section explains how to operate the scanner.
Turning the Power ON/OFF
This section explains how to power on/off the scanner.
HINT
The method by which the scanner is powered on/off can be specified from one of the following:
● Pressing the [Power] button on the scanner.
● Using an AC power strip to control power supply for peripherals such as a scanner in accordance with thecomputer's power.
● Turning on/off the scanner in accordance with the computer's power.For details, refer to Method of Turning the Scanner ON/OFF [Power SW Control] (page 304).
How to Turn the Power ON
1 Press the [Power] button on the scanner.
The scanner is turned on, and the [Power] button lights in green.
56

The following screen is displayed on the touch screen while the scanner is in the startup process.
How to Turn the Power OFF
1 Press the [Power] button on the scanner for 2 seconds or more.
The scanner is turned off, and the [Power] button switches off.
Basic Operations
57

Login/Logout (Using PaperStream NX Manager)
To establish a connection between the scanner and PaperStream NX Manager in order to use the scanner,logging in to PaperStream NX Manager is required.Log in to PaperStream NX Manager with one of the following methods.For details, refer to the PaperStream NX Manager User's Guide.
● Username/PasswordIn the login screen, enter a specific user name for logging in.
● Smart cardLog in with the user information that is stored on a smart card.
● Job Group CodeIn the login screen, enter a specific job group code for logging in.
● Login
Username/Password
1 The Login screen appears.
2 Enter Username and Password, and press the [Login] button.
Basic Operations
58

Smart card
1 The Login screen appears.
2 Hold a smart card over the contactless smart card reader.
Basic Operations
59

Job Group Code
1 The Login screen appears.
2 Enter Job Group Code and then press the [Login] button.For details about job group codes, refer to the PaperStream NX Manager User's Guide.
● Logout
Press the icon in the upper right of the touch screen.
Basic Operations
60

Entering and Resuming from Power Saving Mode
The scanner enters power saving mode when it is left on without being used for a certain period of time.Power saving mode keeps the power consumption low when the scanner has not been used for a certain periodof time.Power saving mode has two types of settings.
● Power SaveIf the scanner is left powered on for 15 minutes (factory default setting) or longer without being used, itautomatically enters power saving mode.When the scanner enters power saving mode, the touch screen switches off. The [Power] button flashes ingreen.To resume from power saving mode, perform one of the following:
- Load a document in the ADF paper chute (feeder).
- Press the touch screen.
- Scans a document with the image scanning application.
● Auto ShutdownThe scanner is turned off automatically if it is left on without being used for a certain period of time (4 hoursfor the factory default setting).To turn the power back on after the power is turned off automatically, press the [Power] button on thescanner. For details, refer to How to Turn the Power ON (page 56).
ATTENTION
● If there is a document that remains on the paper path, the scanner may not enter power saving mode.Remove the documents by referring to When a Paper Jam Occurs (page 142).
● For some image scanning applications, the scanner may not be turned off even if [Auto Shutdown hours]is specified.
● If the scanner is automatically turned off while you are using the image scanning application, exit theapplication, and then turn the scanner back on.
● For the operation of the power saving mode when [Fast] is selected for [Startup mode], refer to PowerManagement (page 224).
HINT
● To change the waiting time for the scanner to enter power saving modeSpecify [Power Save minutes] in the [Power Save Mode] screen on the touch screen.The [Power Save Mode] screen can be displayed in the following procedure:
→ [Scanner Settings] → [Power Management] → [Power Save Mode]
When using the Software Operation Panel, refer to Waiting Time for the Scanner to Enter Power SavingMode [Power saving] (page 303).
● To prevent the scanner from being turned off automatically
Basic Operations
61

Select [Disabled] for [Auto Shutdown hours] in the [Power Save Mode] screen on the touch screen.The [Power Save Mode] screen can be displayed in the following procedure:
→ [Scanner Settings] → [Power Management] → [Power Save Mode]
When using the Software Operation Panel, refer to Waiting Time for the Scanner to Enter Power SavingMode [Power saving] (page 303).
Basic Operations
62

Opening/Closing the ADFThis section describes how to open and close the ADF.
How to Open the ADF
1 Remove all documents from the ADF paper chute (feeder).
2 Pull the ADF release tab towards you to open the ADF.
CAUTIONWhen the ADF is open, it might close accidentally. Be careful not to get your fingerscaught.
Basic Operations
63

How to Close the ADF
1 Close the ADF.Push the center of the ADF until it locks in place.
CAUTIONBe careful not to get your fingers caught when closing the ADF.
ATTENTION
Make sure there is no foreign matter caught inside the ADF when closing the ADF.
Basic Operations
64

Setting Up the ADF Paper Chute (Feeder)
Documents loaded in the ADF paper chute (feeder) are fed into the ADF one by one when scanning starts.Using the chute extension as described in the following procedure will feed documents smoothly.
1 Pull out the chute extension.
HINT
Make sure to hold the scanner while pulling out the chute extension.
Basic Operations
65

Setting Up the StackerDocuments loaded in the ADF paper chute (feeder) are ejected onto the stacker one by one when scanning starts.Using the stacker, stacker extension and stopper as described in the following procedure will keep the documentsstraight and feed them smoothly.
Document Length Is A6 (Landscape) or Longer
1 Pull out the stacker and stacker extension.Make sure to pull out the stacker extension all the way.
2 Lift up the stopper.
ATTENTION
Do not lift up the stopper more than 90 degrees, because it may break.
Basic Operations
66

Document Length Is Shorter than A6 (Landscape)
1 Pull out the stacker.
2 Lift up the stopper.
ATTENTION
Do not lift up the stopper more than 90 degrees, because it may break.
HINT
You can slide the stopper to adjust it to the length of documents.If the ejected documents are not neatly piled up, adjust the stopper to the length which is longer than thedocument length.
Basic Operations
67
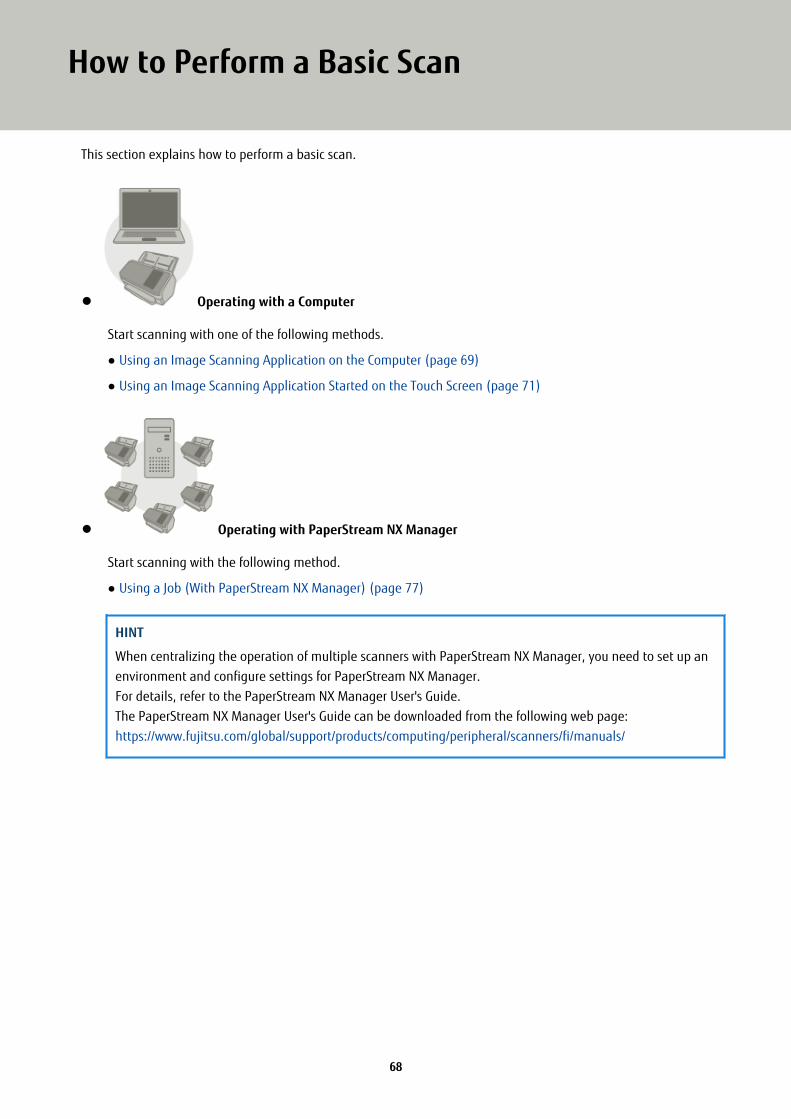
How to Perform a Basic Scan
This section explains how to perform a basic scan.
● Operating with a Computer
Start scanning with one of the following methods.
● Using an Image Scanning Application on the Computer (page 69)
● Using an Image Scanning Application Started on the Touch Screen (page 71)
● Operating with PaperStream NX Manager
Start scanning with the following method.
● Using a Job (With PaperStream NX Manager) (page 77)
HINT
When centralizing the operation of multiple scanners with PaperStream NX Manager, you need to set up anenvironment and configure settings for PaperStream NX Manager.For details, refer to the PaperStream NX Manager User's Guide.The PaperStream NX Manager User's Guide can be downloaded from the following web page:https://www.fujitsu.com/global/support/products/computing/peripheral/scanners/fi/manuals/
68

Using an Image Scanning Application on the Computer
This section explains about the basic flow of performing a scan using an image scanning application on thecomputer.In this case, a scanner driver and an image scanning application that supports the scanner driver must be installedon the computer.The following scanner driver and image scanning applications are bundled with the scanner:
● Scanner driver
- PaperStream IP driver
● Image scanning application
- PaperStream Capture
HINT
For details about the scanner driver and image scanning applications, refer to Overview of the Bundled Software(page 51).
Scanning procedures, operations, and scan setting items slightly vary depending on the image scanning applicationand the scanner driver.For details, refer to the help for the image scanning application and the scanner driver.
1 Turn on the scanner.For details, refer to How to Turn the Power ON (page 56).
2 Load a document in the ADF paper chute (feeder).Load the document face-down in the ADF paper chute (feeder).
For details, refer to How to Load Documents (page 80).
3 Start an image scanning application.
4 Select a scanner driver to be used for scanning.For some image scanning applications, selection of a scanner driver may not be needed.
5 Select a scanner.
How to Perform a Basic Scan
69

To use a scanner connected to a network, select a scanner that is selected in fi-7300NX Scanner SelectionTool.For some image scanning applications, selection of a scanner may not be needed.
6 In the setup window for the scanner driver, configure the scan settings.For some image scanning applications, the setup window for the scanner driver may not appear.
7 Scan documents with the image scanning application.
ATTENTION
Do not perform an operation to disconnect the connection between the scanner and the computer such as thefollowing:
Example:
● Disconnecting the USB cable
● Disconnecting the LAN cable
● Disconnecting the network
● Logging off
HINT
When an image scanning application such as PaperStream Capture that allows you to create profiles is installedon a computer, by setting a profile for the scanner button in the scanning application setting, the profile name isdisplayed on the touch screen button of the scanner.When the scanning application on the computer is ready to scan a document, in some cases, it is possible to scana document by pressing the [Scan Button] button on the touch screen of the scanner instead of operating thescanning application to scan a document.When the [Scan Button] button is available for a scan, even if the name of the [Scan Button] button on the touchscreen of the scanner changes to a profile name, the profile name button will still be recognized as if it were the[Scan Button] button when it is pressed and a scan will be performed accordingly.
How to Perform a Basic Scan
70

Using an Image Scanning Application Started on the Touch Screen
This section explains about the basic flow of performing a scan using an image scanning application on thecomputer started from the touch screen of the scanner.In this case, there are necessary settings to be set in advance in order to perform a scan.
1 Button Settings (page 73)Configure the settings for the touch screen buttons on the computer. Specify an application to be used forimage scanning for each button.The buttons set in this step correspond with the buttons displayed in the touch screen of the scanner.The button setting procedure varies depending on the connection method of the scanner.
● When establishing a connection via a USB cableDisplay the [Devices and Printers] setting window for Windows, and set the buttons in [Scan properties] forthe scanner. For details, refer to Button Settings (page 73).
● When establishing a connection via Wi-Fi or a wired LANSet the buttons on fi-7300NX Button Event Manager. For details, refer to the help for fi-7300NX ButtonEvent Manager.Access the help for fi-7300NX Button Event Manager in the following procedure.
a Start up fi-7300NX Button Event Manager.
● For Windows Server 2008 R2/Windows 7Select [Start] menu → [All Programs] → [fi Series] → [fi-7300NX Button Event Manager].
● For Windows Server 2012Right-click the Start screen, and select [All apps] on the app bar → [fi-7300NX Button EventManager] under [fi Series].
● For Windows Server 2012 R2/Windows 8.1Select [↓] on the lower left side of the Start screen → [fi-7300NX Button Event Manager] under [fiSeries].To display [↓], move the mouse cursor.
● For Windows 10/Windows Server 2016/Windows Server 2019Select [Start] menu → [fi Series] → [fi-7300NX Button Event Manager].
When fi-7300NX Button Event Manager is started, appears in the notification area located
at the far right of the task bar.
b Right-click .
Click [Help] on the menu that appears.
2 Settings on the Image Scanning ApplicationFor some image scanning applications, settings on the image scanning application may be necessary.For details, refer to the help for the image scanning application.
How to Perform a Basic Scan
71

3 Operations on the Scanner (page 76)Load documents on the scanner and press the touch screen button.Pressing the button starts the image scanning application and starts scanning.
How to Perform a Basic Scan
72

Button Settings
When the scanner is connected via a USB cable, set the touch screen buttons in the following procedure.
1 Turn on the scanner and confirm that the scanner is connected to the computer.For details about how to turn on the scanner, refer to How to Turn the Power ON (page 56).For details about how to connect the scanner to the computer, refer to Icons on the Touch Screen (page 27).
2 Open the [Control Panel] window.
● Windows Server 2008 R2/Windows 7Click [Start] menu → [Control Panel].
● Windows Server 2012Right-click the Start screen, and select [All apps] on the app bar → [Control Panel] under [WindowsSystem].
● Windows Server 2012 R2/Windows 8.1Click [↓] on the lower left side of the Start screen → [Control Panel] under [Windows System].To display [↓], move the mouse cursor.
● Windows 10/Windows Server 2016/Windows Server 2019Click [Start] menu → [Windows System] → [Control Panel].
3 Click [View devices and printers].
The [Devices and Printers] window appears.
4 Right-click on the scanner icon, and select [Scan properties] from the displayed menu.
The properties window of the scanner appears.
5 Click the [Events] tab and select a button to be set.From the [Select an event] drop-down list, select a button.
The following buttons can be selected:
How to Perform a Basic Scan
73

● [Scan Button]/[Send to 01] to [Send to 50]Select a button to use for scanning.The buttons displayed in the button list are in the same order as the buttons displayed in the touch screen.For details about the buttons displayed in the touch screen, refer to Operations on the Scanner (page 76).
6 Select an image scanning application to be launched when the button is pressed.Click [Start this program] under [Actions], and select an image scanning application from the program list.
7 Click the [OK] button.
HINT
● To set multiple buttons, repeat steps 5 to 6.
● When an image scanning application such as PaperStream Capture that allows you to create profiles is installedon a computer, by setting a profile for the scanner button in the scanning application setting, the profile nameis displayed on the touch screen button of the scanner.When the scanning application on the computer is ready to scan a document, in some cases, it is possible toscan a document by pressing the [Scan Button] button on the touch screen of the scanner instead of operatingthe scanning application to scan a document.
How to Perform a Basic Scan
74

When the [Scan Button] button is available for a scan, even if the name of the [Scan Button] button on thetouch screen of the scanner changes to a profile name, the profile name button will still be recognized as if itwere the [Scan Button] button when it is pressed and a scan will be performed accordingly.
How to Perform a Basic Scan
75

Operations on the Scanner
1 Turn on the scanner.For details, refer to How to Turn the Power ON (page 56).
2 Load a document in the ADF paper chute (feeder).Load the document face-down in the ADF paper chute (feeder).
For details, refer to How to Load Documents (page 80).
3 Press the button which can perform your desired scan from the buttons displayed on the touch screen.Pressing the button starts the image scanning application specified in Button Settings (page 73), and startsscanning.
How to Perform a Basic Scan
76

Using a Job (With PaperStream NX Manager)
This section explains about the basic flow of performing a scan using a job released from PaperStream NX Manager.To use a job for scanning documents, you need to set up an environment and configure the settings for PaperStreamNX Manager.Scanning procedures and operations slightly vary depending on the structured environment.For details, refer to the PaperStream NX Manager User's Guide.
1 Turn on the scanner.For details, refer to How to Turn the Power ON (page 56).
2 When the login screen appears on the touch screen, authenticate and login.For details, refer to Login/Logout (Using PaperStream NX Manager) (page 58).
3 Load a document in the ADF paper chute (feeder).Load the document face-down in the ADF paper chute (feeder).
For details, refer to How to Load Documents (page 80).
4 Select a job and start a scan by following the messages on the touch screen.For details about jobs and destinations where images are sent, refer to the PaperStream NX Manager User'sGuide.
How to Perform a Basic Scan
77

How to Load Documents
This section explains how to load documents on the scanner.
Loading DocumentsThis section explains how to load documents of normal paper.
Preparation
HINT
For details about the paper size and quality required for normal operations, refer to Documents for Scanning(page 81).
1 Check the documents.
a Check whether the documents to be loaded are of the same width or not.Ways to load documents differ depending on whether the documents are of the same width or not.If the documents are of different width, refer to Conditions for Mixed Batch Scanning (page 89) orScanning Documents with Different Widths (page 96).
b Check the number of sheets.
Up to 80 sheets can be loaded (with paper weight of 80 g/m2 [20 lb] and thickness of the documentstack under 8 mm).For details, refer to Loading Capacity (page 85).
2 Fan the documents.
a Grab a stack of documents, which should be 8 mm or less.
78

b Hold both ends of the documents and fan them a few times.
c Rotate the documents by 90 degrees and fan them in the same manner.
d Perform steps a to c for all documents.
e Align the top of the documents.
How to Load Documents
79

How to Load Documents
1 Pull out the chute extension according to the length of the documents.For details, refer to Setting Up the ADF Paper Chute (Feeder) (page 65).
2 Adjust the stacker according to the length of the documents.For details, refer to Setting Up the Stacker (page 66).
3 Load a document in the ADF paper chute (feeder).Load the document face-down in the ADF paper chute (feeder).
ATTENTION
● Remove all paper clips and staples.
● Reduce the number of documents when documents are not fed into the scanner or overlappeddocuments are fed.
4 Adjust the side guides to the width of the documents.Move the side guides so that there is no space between the side guides and the documents.When there is a space between the side guides and the documents, the documents may be fed skewed.
How to Load Documents
80

Documents for Scanning
Paper Size
The following paper sizes can be scanned:
Maximum size (width × length) ● A4 (portrait) (210 × 297 mm/8.3 × 11.7 in.)
● Legal (portrait) (8.5 × 14 in.)
● Long page document (*1) (304.8 × 863 mm, 304.8 × 5,588mm)
Minimum size (width × length) ● 50.8 × 54.0 mm
● 54.0 × 50.8 mm
*1:Depending on the image scanning application or the scan setting of the scanner driver, the memory may beinsufficient to perform scanning.Long page scanning supports documents with a length up to 5,588 mm (220 in.) when the resolution is setto 200 dpi or lower.
Paper Type
The following paper types are recommended:
● Wood-free paper
● Wood-containing paper
● PPC paper (recycled)
● Plastic cardWhen using paper types other than the above, make sure you test with the same type of paper first to check ifthe document can be scanned.
Paper Weight (Thickness)
Documents with the following paper weights can be scanned:
● 27 to 413 g/m2 (7.2 to 110 lb)
● For A8 size or smaller, 128 to 209 g/m2(34 to 56 lb)
● For plastic cards, 1.4 mm or less
How to Load Documents
81

Documents That May Not Be Scanned Successfully
The following types of documents may not be scanned successfully:
● Documents of non-uniform thickness (such as envelopes or documents with attachments)
● Wrinkled or curled documents
● Folded or torn documents
● Tracing paper
● Coated paper
● Carbon paper
● Photosensitive paper
● Perforated documents
● Documents that are not square or rectangular
● Very thin paper
● Very thick paper
● Photographs (photographic paper)
Documents That Must Not Be Scanned
The following types of documents must not be scanned:
● Paper-clipped or stapled documents
● Documents on which the ink is still wet
● Documents smaller than the following size:
- 50.8 × 54 mm/2 × 2.1 in. (width × length)
- 54 × 50.8 mm/2.1 × 2 in. (width × length)
● Documents wider than 216 mm (8.5 in.)
● Documents other than paper/plastic card (such as fabric, metal foil and OHP film)
● Important documents that must not be damaged or smeared
How to Load Documents
82

Precautions
● Notes on the documents to be scanned
Depending on the documents to be scanned, take note of the following.
● Since carbonless paper contains chemical substances that may harm the rollers such as the brake roller andpick roller, take note of the following:
- CleaningIf paper jams occur frequently, clean the brake roller and pick roller.For details, refer to Daily Care (page 114).
- Replacing the consumablesThe life of the brake roller and pick roller may end sooner compared to scanning wood-free papers.
● When scanning wood containing papers, the life of the brake roller and pick roller may end sooner comparedto scanning wood-free papers.
● The brake roller and pick roller may be damaged when a photo/sticky note on a document comes into contactwith these parts during scanning.
● The surface of the document may be damaged when gloss papers such as photographs are scanned.
● The light of the LED may reflect brightly when gloss papers are scanned.
● When scanning semi-transparent documents, set [Brightness] higher in the scanner driver to avoid bleed-through.
● When you scan documents written in lead pencil, make sure you clean the rollers frequently.For details about cleaning, refer to Daily Care (page 114).
● If documents are not fed, or documents are fed overlapped or jammed frequently, refer to Troubleshooting(page 162).
● All documents must be flat on the leading edge.Make sure that curls on the leading edge of the documents are kept within the following range.
● Notes on plastic cards
When you scan plastic cards, take note of the following.
● Make sure you use a card that contains the following specifications, and check if the card can be fed beforescanning it.
- Type: Compliant with the ISO7810 ID-1 type
- Size: 85.6 × 53.98 mm
How to Load Documents
83
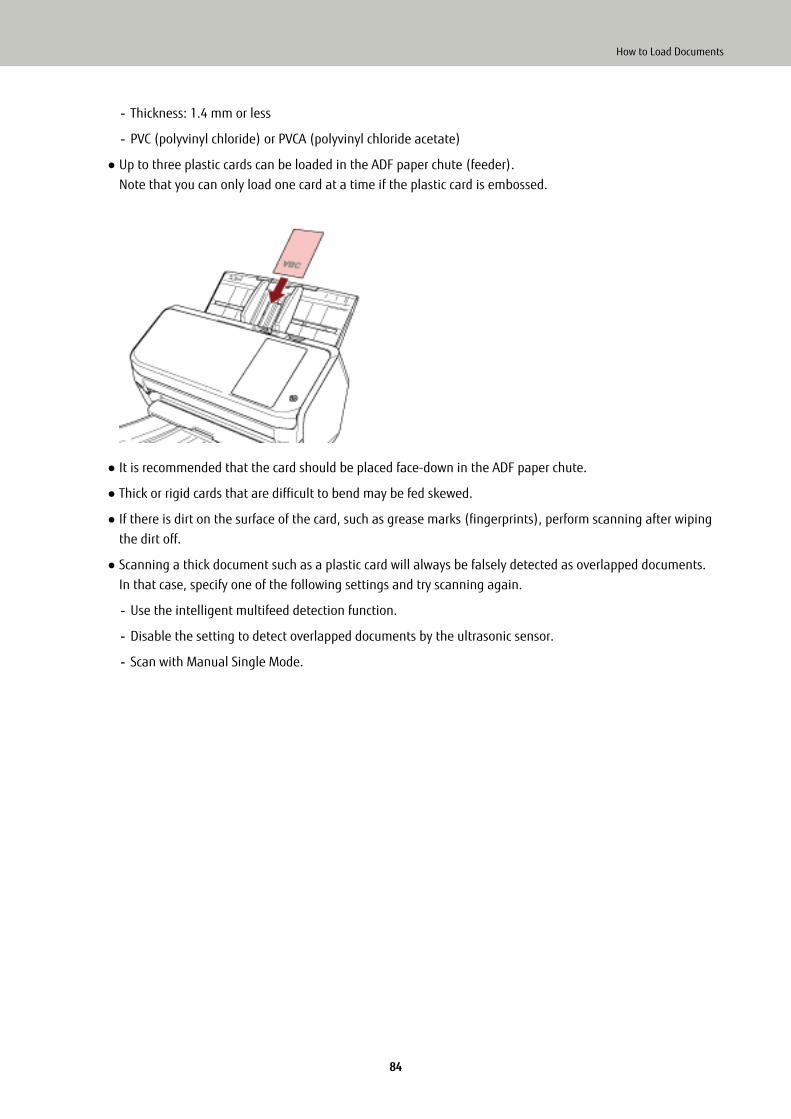
- Thickness: 1.4 mm or less
- PVC (polyvinyl chloride) or PVCA (polyvinyl chloride acetate)
● Up to three plastic cards can be loaded in the ADF paper chute (feeder).Note that you can only load one card at a time if the plastic card is embossed.
● It is recommended that the card should be placed face-down in the ADF paper chute.
● Thick or rigid cards that are difficult to bend may be fed skewed.
● If there is dirt on the surface of the card, such as grease marks (fingerprints), perform scanning after wipingthe dirt off.
● Scanning a thick document such as a plastic card will always be falsely detected as overlapped documents.In that case, specify one of the following settings and try scanning again.
- Use the intelligent multifeed detection function.
- Disable the setting to detect overlapped documents by the ultrasonic sensor.
- Scan with Manual Single Mode.
How to Load Documents
84

Loading Capacity
The number of sheets that can be loaded in the ADF paper chute (feeder) is determined by the paper size andpaper weight.See the graph below.
Unit g/m2 lb kg
Conversion 27 7.2 23
41 11 35
64 17 55
80 21 69
105 28 90
128 34 110
157 42 135
209 56 180
256 68 220
413 110 355
How to Load Documents
85

Area Not to Be Perforated
An error may occur when there are punched holes in the area colored in light pink in the Figure 1.Fig. 1
ATTENTION
The above condition applies when the document is set to the center of the pick roller width.
HINT
If there are any holes in the 35 mm-wide central column, you can move the document to the left or right toavoid an error.
How to Load Documents
86

Conditions Required to Accurately Detect Overlapped Documents (Multifeed)
Multifeed is an error that occurs when two or more sheets are overlapped and fed at once.Overlapped documents are detected with the ultrasonic sensor or according to the difference in length of thedocuments.The following conditions are required for an accurate detection.
Detecting Overlapped Documents with the Ultrasonic Sensor
● Paper weight: 27 to 413 g/m2 (7.2 to 110 lb)
● Do not punch holes within 35 mm (1.38 in.) over the center of the document.Refer to Fig. 1 in Area Not to Be Perforated (page 86).
● Do not attach other documents with glue or other adhesive within 35 mm (1.38 in.) over the center ofthe document.Refer to Fig. 1 in Area Not to Be Perforated (page 86).
Detecting Overlapped Documents according to the Difference in Length
● Load the documents of the same length in the ADF paper chute (feeder).
● Variation in document lengths: 1% or less
● Do not punch holes within 35 mm (1.38 in.) over the center of the document.Refer to Fig. 1 in Area Not to Be Perforated (page 86).
Detecting Overlapped Documents with the Ultrasonic Sensor and According to the Difference in Length
● Load the documents of the same length in the ADF paper chute (feeder).
● Paper weight: 27 to 413 g/m2 (7.2 to 110 lb)
● Variation in document lengths: 1% or less
● Do not punch holes within 35 mm (1.38 in.) over the center of the document.Refer to Fig. 1 in Area Not to Be Perforated (page 86).
● Do not attach other documents with glue or other adhesive within 35 mm (1.38 in.) over the center ofthe document.Refer to Fig. 1 in Area Not to Be Perforated (page 86).
ATTENTION
● The above condition applies when the document is set to the center of the pick roller width.
● When an option to detect overlapping with the ultrasonic sensor is selected, scanning a thick documentsuch as a plastic card will be falsely detected as overlapping of documents.In that case, specify one of the following settings and try scanning again.
- Use the intelligent multifeed detection function.
- Disable the setting to detect overlapped documents by the ultrasonic sensor.
- Scan with Manual Single Mode.
How to Load Documents
87

HINT
● The accuracy of detection for overlapped documents may drop depending on the document type.Overlapping cannot be detected for the top 30 mm (1.18 in.) of a document in the feeding direction.
● On the [Multifeed Detection Area] screen, you can specify an area not to detect overlapping of documentswithin the area described in Fig. 1 in Area Not to Be Perforated (page 86).The [Multifeed Detection Area] screen can be displayed in the following procedure:
→ [Scanner Settings] → [Paper Source/Feeding] → [Multifeed Detection Area]
When using the Software Operation Panel, refer to Settings Related to the Detection for OverlappedDocuments (Multifeed) (page 290).
How to Load Documents
88

Conditions for Mixed Batch Scanning
The following conditions apply when a mixed batch of documents with different paper weights/frictioncoefficients/sizes is scanned.Make sure to test a few sheets first to check if the mixed batch of documents can be fed.
Paper Direction
Align the direction of the paper fiber with the feed direction.
Paper Weight (Thickness)
Documents with the following paper weights can be scanned when scanning a mixed batch of documentswith different paper weights:
27 to 413 g/m2 (7.2 to 110 lb)
Friction Coefficient
It is recommended that the same paper brand from the same manufacturer is used for documents.When different paper manufacturers/brands are mixed in documents to be scanned, it affects the feedingperformance as the difference in friction coefficient increases.The following friction coefficients are recommended:0.35 to 0.60 (reference value for paper friction coefficient)
Document Position
Load all documents covering the width of the pick roller.For a guideline for mixed batch scanning, refer to Combinations of Standard Paper Sizes in a Mixed Batch(page 91) in Paper Size (page 90).
How to Load Documents
89

HINT
When the smallest document covers the width of the pick roller even when it is loaded towards one sideas shown in the image below, load documents aligned on one side. So that it prevents documents fromskewing when being fed.
Paper Size
When a mixed batch with different sizes is scanned, not feeding the documents straight may causetroubles such as paper jams or part of the image to appear missing.It is recommended that you check the scanned images if the documents were fed skewed.
ATTENTION
● When a mixed batch with different sizes is scanned, documents are more likely to skew because theside guides do not contact every sheet.
● Do not specify the detection method by document length when scanning a mixed batch of documentswith different lengths and detecting overlapped documents.
How to Load Documents
90

Combinations of Standard Paper Sizes in a Mixed Batch
Refer to the table below for a guideline of the range available for mixed batch scanning.
LTR: Letter size
A3-CS:Carrier Sheet
(P): Portrait
(L): Landscape
ATTENTION
B8 (portrait) and A8 (portrait) documents cannot be mixed with other sizes in the same batch.
Documents That Cannot Be Scanned in a Mixed Batch
The following types of documents cannot be mixed in the same batch:
● Carbonless paper
● Bond paper
● Perforated documents
● Thermal paper
● Carbon-backed paper
● OHP film
How to Load Documents
91

● Tracing paper
Conditions for Automatic Page Size Detection
[Automatic Page Size Detection] does not work with the following type of documents:
● Non-rectangular documents[Automatic Page Size Detection] may not work with the following types of documents:
● Thin paper (52 g/m2 [14 lb] or less)
● White documents with glossy edges
● Documents with darkish (gray) edges
How to Load Documents
92

Conditions for Using the Carrier Sheet
● Paper Size
The following paper sizes can be scanned:
● Carrier Sheet (216 × 297 mm)
● A3 (297 × 420 mm) (*1)
● A4 (210 × 297 mm)
● A5 (148 × 210 mm)
● A6 (105 × 148 mm)
● B4 (257 × 364 mm) (*1)
● B5 (182 × 257 mm)
● B6 (128 × 182 mm)
● Business card (51 × 89 mm) (*2)
● Letter (8.5 × 11 in./216 × 279.4 mm)
● Double Letter (11 × 17 in./279.4 × 431.8 mm) (*1)
● Custom size
- Width25.4 to 216 mm (1 to 8.5 in.)
- Length25.4 to 297 mm (1 to 11.69 in.)
*1:Fold in half for scanning.
*2:Available when scanning with PaperStream IP (ISIS) Bundle.
● Paper Conditions
Paper Type
The following paper type is recommended:
● Standard office paper
Paper Weight (Thickness)
Documents with the following paper weight can be scanned:
● Up to 209 g/m2 (56 lb)Documents with the following paper weight can be scanned when folded in half:
● Up to 105 g/m2 (28 lb)
Precautions
Take note of the following:
● Up to three Carrier Sheets can be loaded at once.
How to Load Documents
93

● Depending on the image scanning application, there may be insufficient memory to perform a [Double-page spread] scan using the Carrier Sheet in high resolution.In that case, specify a lower resolution and try scanning again.
● Do not write on, color, stain, or cut the end with a black and white pattern on the Carrier Sheet.Otherwise, the Carrier Sheet may not be recognized correctly.
● Do not load the Carrier Sheet upside down.Otherwise, a paper jam may occur and damage the Carrier Sheet and the document inside.
● Do not leave a document inside the Carrier Sheet for a long time.Otherwise, the ink on the document may be transferred onto the Carrier Sheet.
● Do not leave the Carrier Sheet in high temperature places such as under direct sunlight or near a heatingapparatus for a long time.Also, do not use the Carrier Sheet in such environments.Otherwise, the Carrier Sheet may deform.
● Do not fold or pull the Carrier Sheet.
● Do not use a damaged Carrier Sheet.Doing so may damage or cause the scanner to malfunction.
● To avoid deformation, keep the Carrier Sheet on a flat surface without any weight on it.
● Do not slide your finger on the edge of the Carrier Sheet.Doing so may cut your finger.
● If paper jams occur frequently, feed about 50 sheets of PPC paper (recycled paper) before scanning withthe Carrier Sheet.The PPC paper can either be blank or printed.
● Paper jams may occur when several small documents (such as photos or postcards) are placed in theCarrier Sheet for scanning.It is recommended to place only one document at a time in the Carrier Sheet.
How to Load Documents
94

Various Ways to Scan
This section explains how to configure the scanner settings and scan different types of documents with the imagescanning application.For information on other ways to scan which are not explained here, refer to the image scanning application orscanner driver's Help.
95

Scanning Documents with Different Widths
ATTENTION
When you scan a mixed batch with different widths, some of the narrower documents may be skewed or not fedinto the ADF.In that case, separate the documents by their widths, and scan them in different batches.
HINT
For details about document requirements for scanning a mixed batch of documents, refer to Conditions for MixedBatch Scanning (page 89).
1 Align the top of the documents.
2 Place the documents at the center of the ADF paper chute (feeder), and adjust the side guides to thewidest document in the batch.
Various Ways to Scan
96

ATTENTION
Load all documents above the center of the pick roller. If documents are loaded outside of the pick rollerwidth, they may be fed skewed or not fed into the ADF.
3 Adjust the stacker to fit the longest document.For details, refer to Setting Up the Stacker (page 66).
4 In the scanner driver, configure the scan settings to detect the paper size automatically.For details, refer to the help for the scanner driver.
5 Scan documents with the image scanning application.For details, refer to the help for the image scanning application.
Various Ways to Scan
97

Scanning Documents Folded in Half
Sliding the feed mode switch to the left to switch the feed mode to Manual Single Mode allows you to scan adocument folded in half (a document of A3 or Double Letter size that is folded in half) as it is.
ATTENTION
When a document folded in half is scanned, the document may be fed skewed if the folded part is too thick.
1 Fold the document in half so that the sides to be scanned are facing out.Fold it firmly and smooth out any creases.Otherwise, it may cause the document to skew while feeding is in progress and result in a skewed image.
Example
2 Load the document folded in half in the ADF paper chute (feeder).
Various Ways to Scan
98

For details, refer to How to Load Documents (page 80).
3 Slide the feed mode switch to the left to switch the feed mode to Manual Single Mode.
On the top of the touch screen, [Manual Single Mode] is displayed.
4 Scan documents with the image scanning application.For details, refer to the help for the image scanning application.
ATTENTION
● Moving the feed mode switch during a scan causes an error.
● If the feed mode switch is in Manual Single Mode, overlapped documents cannot be detected by theultrasonic sensor.
HINT
The scanner will wait for the next document to be loaded until the time specified for [Timeout seconds] inthe [Manual Feeding] screen on the touch screen, even if there is no document in the ADF paper chute(feeder).The [Manual Feeding] screen can be displayed in the following procedure:
Various Ways to Scan
99

→ [Scanner Settings] → [Paper Source/Feeding] → [Manual Feeding]
When using the Software Operation Panel, refer to Waiting Time in Manual Feeding [Manual Feeding](page 301).
Various Ways to Scan
100

Scanning Documents such as Envelopes or Multi-Layered Transfer Paper
Sliding the feed mode switch to the left to switch the feed mode to Manual Single Mode allows you to scandocuments such as envelopes and multi-layered transfer paper.
ATTENTION
For details about the paper weights of the documents that can be scanned, refer to Documents for Scanning(page 81).
1 Load a document in the ADF paper chute (feeder).To scan a multi-layered transfer paper, position the bound edge first when loading the paper.For details, refer to How to Load Documents (page 80).
2 Slide the feed mode switch to the left to switch the feed mode to Manual Single Mode.
On the top of the touch screen, [Manual Single Mode] is displayed.
3 Scan documents with the image scanning application.For details, refer to the help for the image scanning application.
Various Ways to Scan
101

ATTENTION
● Moving the feed mode switch during a scan causes an error.
● If the feed mode switch is in Manual Single Mode, overlapped documents cannot be detected by theultrasonic sensor.
HINT
The scanner will wait for the next document to be loaded until the time specified for [Timeout seconds] inthe [Manual Feeding] screen on the touch screen, even if there is no document in the ADF paper chute(feeder).The [Manual Feeding] screen can be displayed in the following procedure:
→ [Scanner Settings] → [Paper Source/Feeding] → [Manual Feeding]
When using the Software Operation Panel, refer to Waiting Time in Manual Feeding [Manual Feeding](page 301).
Various Ways to Scan
102

Scanning Photographs and Clippings
Using the Carrier Sheet allows you to scan documents that can be damaged quite easily such as photographs, ordocuments that are difficult to load directly such as newspaper clippings.
1 Place the document inside the Carrier Sheet.Open the Carrier Sheet and place the document against the top center of the Carrier Sheet.
2 Load the Carrier Sheet with the end with the black and white pattern as the leading edge and with thescanning side facing the ADF paper chute (feeder) (face-down).Secure the Carrier Sheet with the side guides to avoid skewing.
3 Configure the scan settings in the scanner driver to use the Carrier Sheet.For details, refer to the help for the scanner driver.
4 Scan documents with the image scanning application.For details, refer to the help for the image scanning application.
ATTENTION
● The image is output at the center of the page in the size specified for [Paper Size] in the scanner driver.
Various Ways to Scan
103

● When [Automatic] is specified for [Paper Size] in the scanner driver, the most suitable size is selected fromstandard sizes which can be specified for [Paper Size]. Note that the size of the image may become smallerthan the original document depending on the document scanned, or part of the image may appear missing.
Example
When an A5 size image is printed in the center of an A4 size document→ The image is output in A5 size.
To output the scanned image in the actual size of the document, specify the document size for [Paper size].
HINT
In the following cases, place a blank (white) sheet of paper behind the document when scanning.
● The scanned image is not output in the actual size of the document when [Automatic] is specified for [Papersize] in the scanner driver.
● Shadows appear around the edges of the scanned image.
● Black lines appear around the edges of a uniquely shaped cutting.
● Image outside the document appears on the scanned image.
Various Ways to Scan
104

Scanning Long Page Documents
Documents with a length up to 5,588 mm (220 in.) can be scanned by long page scanning.Depending on the resolution setting or the image scanning application, the document sizes that can be scannedmay differ.For details, refer to the help for the scanner driver and the image scanning application.
1 Load a document in the ADF paper chute (feeder).For details, refer to How to Load Documents (page 80).
ATTENTION
● Long page documents should be loaded one sheet at a time in the ADF paper chute (feeder).
● When you scan long pages, take note of the following:
- When loading a documentHold the document down with your hand so it does not fall out of the ADF paper chute (feeder).
- When the document is ejected
Various Ways to Scan
105

Secure enough space around the stacker and catch the ejected sheet so that it does not fall off thestacker.
HINT
To scan long pages, perform the following:
● Pull out the chute extension.For details, refer to Setting Up the ADF Paper Chute (Feeder) (page 65).
● Pull out the stacker extension all the way.For details, refer to step 1 in Document Length Is A6 (Landscape) or Longer (page 66).
2 In the scanner driver, configure the scan settings to scan the paper size of the long page.For details, refer to the help for the scanner driver.
3 Scan documents with the image scanning application.For details, refer to the help for the image scanning application.
Various Ways to Scan
106

Feeding Documents Manually
Documents can also be loaded manually one sheet at a time in the ADF paper chute (feeder).The scanner waits for the next document to be loaded within a specified time. Scanning will continue as long asanother document is loaded within the set time, and stops if no document is loaded.By using this method, you can perform scanning as you check the documents one by one.Manual feeding is effective in the following cases:
● To scan documents as you check the contents of each sheet
● To scan documents that are fed overlapped or jammed when the documents are loaded together in a batch
● To continue scanning documents such as magazines or newspaper clippings that cannot be loaded together, oneat a time
● To scan a document folded in half, an envelope, or a multi-layered transfer paper one at a time
1 Configure the settings for the scanner.
● When scanning more than one document manually
a In the [Manual Feeding] screen on the touch screen, set [Continuous Feed Mode] to on andspecify [Timeout seconds].The [Manual Feeding] screen can be displayed in the following procedure:
→ [Scanner Settings] → [Paper Source/Feeding] → [Manual Feeding]
When using the Software Operation Panel, refer to Waiting Time in Manual Feeding [ManualFeeding] (page 301).
● When scanning a document folded in half, an envelope, or a multi-layered transfer paper manually
a Slide the feed mode switch to the left to switch the feed mode to Manual Single Mode.
b In the [Manual Feeding] screen on the touch screen, specify [Timeout seconds].The [Continuous Feed Mode] setting is ignored, and the [Timeout seconds] setting is enabled.The [Manual Feeding] screen can be displayed in the following procedure:
→ [Scanner Settings] → [Paper Source/Feeding] → [Manual Feeding]
When using the Software Operation Panel, refer to Waiting Time in Manual Feeding [ManualFeeding] (page 301).
ATTENTION
For details about the paper weights of the documents that can be scanned, refer to Documents forScanning (page 81).When a document folded in half is scanned, the document may be fed skewed if the folded part is toothick.
2 Load a document in the ADF paper chute (feeder).Load the document face-down in the ADF paper chute (feeder).
Various Ways to Scan
107

To scan a multi-layered transfer paper, position the bound edge first when loading the paper.
3 Scan documents with the image scanning application.For details, refer to the help for the image scanning application.
After the document is scanned, the rollers inside the ADF keep rotating, waiting for the next document to beloaded until the timeout time specified in the touch screen or Software Operation Panel.When the Scanner is in Manual Single Mode, it waits for the next document to be loaded without having therollers inside the ADF rotate.
4 Load the next document in the ADF paper chute (feeder).
5 Repeat step 4 until all documents are scanned.
Scanning will stop if no document is loaded in the ADF paper chute (feeder) within the timeout timespecified in the touch screen or Software Operation Panel.
HINT
● Pressing the [Stop] button on the touch screen while the scanner is waiting for the next document to be loadedwill stop the scan immediately.
● The scanner will wait for documents to be loaded until the specified timeout time elapses even if you startscanning with no document in the ADF paper chute (feeder).
● If you use manual feeding frequently, the replacement cycle of the consumables may be shortened.
Various Ways to Scan
108

Configuring Not to Detect Certain Overlap Patterns
If detecting overlapped documents during a scan is set, when you scan a document with a paper attachmentsuch as a sticky note, receipt, or photo, it is detected as overlapped documents, and the scan may stop. Use theintelligent multifeed detection function not to detect these types of documents.This function has two modes, a mode that is used to configure the settings manually by a user every time thescanner detects overlapped documents, and a mode that is used to configure the settings automatically by thescanner based on the overlap patterns (length and location) for paper attachments such as sticky notes,receipts, or photos that the scanner has memorized.To use this setting, detecting overlapped documents needs to be set in advance.
● [Multifeed Detection] in the scanner driverFor details, refer to the help for the scanner driver.
● [Multifeed Detection] on the touch screen or [Multifeed] on the Software Operation PanelFor details about the settings on the touch screen, refer to Multifeed Detection (page 232).For details about the settings on the Software Operation Panel, refer to Specifying a Method to DetectOverlapped Documents [Multifeed] (page 290).
The following three operation modes are available.
Operation mode Description
Manually Bypass Specify whether or not to detect overlapped documents everytime they are detected.
Automatically Bypass (combination oflength and position)
Specify the setting not to automatically detect overlappeddocuments when the paper attachment is the same length andin the same location as memorized.
Automatically Bypass (length) Specify the setting not to automatically detect overlappeddocuments when the paper attachment is the same length orshorter as memorized.
Select an operation mode in the [Intelligent Multifeed Detection] screen on the touch screen.The [Intelligent Multifeed Detection] screen can be displayed in the following procedure.
→ [Scanner Settings] → [Paper Source/Feeding] → [Intelligent Multifeed Detection]
Various Ways to Scan
109

When using the Software Operation Panel, refer to Setting to Ignore Certain Overlap Patterns [IntelligentMultifeed Function] (page 299).
Operational Procedure
1 If [Multifeed detected (Overlap)] (error code: "J2:55") is displayed on the touch screen, either press the[Eject Document] button to eject the document from the paper path or open the ADF to remove thedocument.For details, refer to How to Open the ADF (page 63).
CAUTIONWhen the ADF is open, it might close accidentally. Be careful not to get your fingerscaught.
2 If you open the ADF to remove the document, close it.For details, refer to How to Close the ADF (page 64).
CAUTIONBe careful not to get your fingers caught when closing the ADF.
ATTENTION
Confirm that the ADF is closed properly. Otherwise, documents may not be fed into the ADF.
3 Load the removed document back in the ADF paper chute (feeder).
4 Respond to a message that is displayed in the touch screen.The following settings can be configured depending on the operation mode that is set in the [IntelligentMultifeed Detection] screen.
● For [Manually Bypass]
- [Disable the multifeed detection for the next document]Select whether to detect overlapped documents for the next scan.
- [Keep Multifeed Images]Select whether to save the image when overlapped documents are detected.This may not be displayed depending on the scanner driver settings.
● For [Automatically Bypass (combination of length and position)]
- [Memorize Patterns]Select whether you set the scanner to memorize the paper overlapping patterns.
- [Keep Multifeed Images]Select whether to save the image when overlapped documents are detected.This may not be displayed depending on the scanner driver settings.
● For [Automatically Bypass (length)]
- [Memorize Patterns]
Various Ways to Scan
110

Select whether you set the scanner to memorize the paper overlapping patterns.
- [Keep Multifeed Images]Select whether to save the image when overlapped documents are detected.This may not be displayed depending on the scanner driver settings.
With the above procedure complete, the scanner operates as follows depending on the operation mode that is set inthe [Intelligent Multifeed Detection] screen.
● For [Manually Bypass]The scanner scans the next sheet without detecting overlapped documents, and from the second sheet onwards,detects overlapped documents based on the setting configured in the scanner driver, on the touch screen, or onthe Software Operation Panel.
● For [Automatically Bypass (combination of length and position)]The scanner memorizes the length and location of the paper attachment that was detected as overlappeddocuments, and continues scanning. After that, documents with the same overlap pattern are not detected asoverlapped documents (*1) (*2).
● For [Automatically Bypass (length)]The scanner memorizes the length of the longest paper attachment that was detected as overlapped documents,and continues scanning. After that, documents with the same overlap pattern or with a shorter overlap patternare not detected as overlapped documents (*2).
*1:Eight of the most recent overlap patterns can be memorized when [When powering off] in [Memorize overlappattern] is enabled.
*2:The memorized overlap patterns can be erased in the [Intelligent Multifeed Detection] screen on the touchscreen, or the Software Operation Panel. You can erase overlap patterns that were not supposed to bememorized, but be careful with this operation because all memorized patterns will be erased.
Various Ways to Scan
111

Disabling the Paper Protection Function
If you attempt to scan a wrinkled document with the paper protection function set to enabled, the scanner maymistake it as a paper jam even though paper is fed normally, which causes paper protection to be performedand forces a scan to be stopped. In this case, you can disable paper protection only for the protected documentto be scanned again.
Operational Procedure
1 When [Paper protection (feeding noise)] (error code: "J0:37") or [Paper protection (feeding accuracy)](error code: "J0:51") is displayed on the touch screen, open the ADF and remove the document.For details, refer to How to Open the ADF (page 63).
CAUTIONWhen the ADF is open, it might close accidentally. Be careful not to get your fingerscaught.
2 Close the ADF.For details, refer to How to Close the ADF (page 64).
CAUTIONBe careful not to get your fingers caught when closing the ADF.
ATTENTION
Confirm that the ADF is closed properly. Otherwise, documents may not be fed into the ADF.
3 Load the removed document back in the ADF paper chute (feeder).
4 Respond to a message that is displayed in the touch screen.The following setting can be configured.
Disable the paper protection for the next document
Select whether to disable the paper protection to scan the protected document again.
5 Press the [Scan] button.Starts scanning documents.The paper protection function is disabled for the first sheet of documents. From the second sheet onwards,the paper protection function is enabled.
HINT
If errors to protect documents are frequently displayed on the touch screen, refer to Paper Protection Is Set OffFrequently (page 207).
Various Ways to Scan
112

Counting the Number of Documents
The number of documents can be counted without outputting images of the documents.This operation is useful for checking the number of documents when you scan a large number of documents.
1 Turn on the scanner.For details, refer to How to Turn the Power ON (page 56).
2 Check that the feed mode switch is positioned to the right.The number cannot be counted when the feed mode switch is in Manual Single Mode.
3 On the touch screen, press → [Paper Source/Feeding] →[Document Count].
The [Document Count] screen is displayed.
4 Load documents in the ADF paper chute (feeder).For details, refer to How to Load Documents (page 80).
5 Press the [Start] button on the touch screen.
The number of documents that are loaded in the scanner is counted.The number of documents is displayed in the [Document Count] screen.
ATTENTION
Documents may not be counted correctly if overlapped documents are fed.
Various Ways to Scan
113

Daily Care
This section describes how to clean the scanner.
CAUTION● Do not use aerosol spray or spray that contains alcohol. Paper dust blown up by strong air
from the spray may enter inside the scanner which may cause the scanner to fail ormalfunction.Also note that sparks generated by static electricity may cause a fire.
● The inside of the ADF becomes very hot when the scanner is being used.Before you start cleaning the inside of the ADF, make sure to turn off the power, unplugthe power cable and wait for at least 15 minutes for the inside of the ADF to cool down.
Cleaning Materials
Name Part No. Notes
Cleaner F1 PA03950-0352 100 mlLiquid cleaner to use for removing dirt and stains
Cleaning Paper CA99501-0012 10 sheetsUsed to clean the inside of the scanner with ease.Spray it with Cleaner F1 and scan it with the scannerin the same way as a document.
Cleaning Wipe PA03950-0419 24 packetsPre-moistened with Cleaner F1. It can be used insteadof moistening a cloth with Cleaner F1.
Cotton swab Commerciallyavailable
Used to clean a tiny part such as the ultrasonic sensor.
Dry cloth Used to wipe off dirt and stains. Moisten it withCleaner F1 for cleaning.
ATTENTION
In order to use the cleaning materials safely and correctly, read the precautions on each product thoroughly.
For more information about the cleaning materials, contact the distributor/dealer where you purchased thisproduct. Refer to the contact information in the Contact List if supplied with this product, or refer to the contact
114

information in the Contact for Inquiries section if provided in Safety Precautions supplied with this product, andthen make an inquiry.
Daily Care
115

Location and Frequency
Location Frequency
Inside of the scanner (ADF) Brake roller Every 5,000 sheets
Pick roller
Plastic idler roller
Glass
Ultrasonic sensor
Document sensor
Feed roller
Eject roller
Outside of the scanner Scanner Clean when dust and dirt are noticeable.
Touch screen
The inside of the scanner (ADF) needs to be cleaned regularly for every certain number of sheets scanned. Thescanner records the number of sheets scanned so that you can check the number of sheets scanned after youcleaned it last.The procedure to check the number of sheets scanned is as follows.
1 On the touch screen, press → [Cleaning & Maintenance] → [Consumable counters].
2 On the [Consumable counters] screen, check the value for [After cleaning].
● When the background color of the counter is yellowIt is about time to clean the scanner.
● When the background color of the counter is redIt is time to clean the scanner. Clean the scanner.
To use the Software Operation Panel in order to check the value, refer to Settings Related to Sheet Counters(page 266).
ATTENTION
Cleaning cycles may vary depending on the condition of the documents. Also, cleaning must be performedmore frequently when the following types of documents are scanned:
● Smooth-faced documents such as coated paper
● Documents with printed text/graphics that almost cover the entire surface
● Chemically-treated documents such as carbonless paper
● Documents containing a large amount of calcium carbonate
● Documents written in lead pencil
Daily Care
116

● Documents on which the toner is not sufficiently fused
Daily Care
117

Cleaning the Outside of the Scanner
● Scanner
The scanner including the ADF paper chute (feeder) and the stacker should be cleaned with either a piece ofdry cloth, a cloth moistened with Cleaner F1/mild detergent, or a sheet of Cleaning Wipe.
ATTENTION
● To avoid deformation and discoloration, never use paint thinner or any other organic solvents.
● Be careful not to let any moisture or water inside the scanner during cleaning.
● It may take a long time to dry if an excessive amount of Cleaner F1/mild detergent is used. Use only asmall amount. Wipe off the cleaner completely to leave no residue on the cleaned parts.
● Touch screen
To avoid the surface of the touch screen becoming dirty, clean it regularly by gently wiping dirt and dust offwith a soft, dry cloth.Clean the touch screen with care. Do not rub or tap the surface with hard objects as doing so may damage thesurface.
ATTENTION
Do not wipe the touch screen with a damp cloth.Dust on the surface may become stuck between the touch screen and the scanner, causing the touch screento malfunction.
Daily Care
118

Cleaning the Inside of the Scanner (ADF) with Cleaning Paper
The inside of the ADF can be cleaned with a sheet of Cleaning Paper moistened with Cleaner F1.As the scanner continues to feed the documents, paper dust will accumulate inside the ADF and it may causescanning errors. Cleaning should be performed approximately every 5,000 sheets scanned. Note that this guidelinevaries depending on the types of documents you scan. For instance, it may be necessary to clean the scanner morefrequently when you scan documents on which the toner is not sufficiently fused.
ATTENTION
● Do not use water or mild detergent to clean the ADF.
● It may take a long time to dry if an excessive amount of Cleaner F1 is used. Use only a small amount.
1 Turn on the scanner.For details, refer to How to Turn the Power ON (page 56).
2 On the touch screen, press → [Cleaning & Maintenance] → [Cleaning] → [Cleaning Paper].
The [Cleaning Paper] screen is displayed.
ATTENTION
Do not start scanning with an image scanning application during cleaning.
3 Spray the Cleaning Paper with Cleaner F1.
4 Pull out the chute extension according to the length of the Cleaning Paper.For details, refer to Setting Up the ADF Paper Chute (Feeder) (page 65).
5 Adjust the stacker according to the length of the Cleaning Paper.For details, refer to Document Length Is A6 (Landscape) or Longer (page 66).
6 Load the Cleaning Paper in the ADF paper chute (feeder).
Daily Care
119

7 Adjust the side guides to the width of the Cleaning Paper.Move the side guides so that there is no space between the side guides and the Cleaning Paper.Otherwise, the Cleaning Paper may be fed skewed.
8 On the touch screen, press the [Start] button on the [Cleaning Paper] screen.
The Cleaning Paper is fed and ejected onto the stacker.
9 Clear the sheet counter after cleaning.
a On the touch screen, press → [Cleaning & Maintenance] → [Consumable counters].
b On the [Consumable counters] screen, press the [Clear] button for [After cleaning].
When using the Software Operation Panel, refer to Clearing the Sheet Counters (page 268).
Daily Care
120

Cleaning the Inside of the Scanner (ADF) with a Cloth
The inside of the ADF can be cleaned with a piece of cloth moistened with Cleaner F1, or a sheet of Cleaning Wipe.As the scanner continues to feed the documents, paper dust will accumulate inside the ADF and it may causescanning errors. Cleaning should be performed approximately every 5,000 sheets scanned. Note that this guidelinevaries depending on the types of documents you scan. For instance, it may be necessary to clean the scanner morefrequently when you scan documents on which the toner is not sufficiently fused.
CAUTIONThe inside of the ADF becomes very hot when the scanner is being used.Before you start cleaning the inside of the ADF, make sure to turn off the power, unplug thepower cable and wait for at least 15 minutes for the inside of the ADF to cool down.
ATTENTION
● Do not use water or mild detergent to clean the ADF.
● It may take a long time to dry if an excessive amount of Cleaner F1 is used. Use only a small amount. Wipe offthe cleaner completely to leave no residue on the cleaned parts.
1 Turn off the scanner, unplug the power cable and wait for at least 15 minutes.For details, refer to How to Turn the Power OFF (page 57).
2 Open the ADF.For details, refer to How to Open the ADF (page 63).
CAUTIONWhen the ADF is open, it might close accidentally. Be careful not to get your fingerscaught.
Daily Care
121

3 Clean the following locations with a cloth moistened with Cleaner F1, or a sheet of Cleaning Wipe.
Brake Roller (× 2)
Remove the brake roller from the scanner.For details about removing the brake roller, refer to Replacing the Brake Roller (page 129).
Daily Care
122

Gently wipe off any dirt or dust along the grooves, taking care not to damage the roller surface.
Pick Roller (× 2)
Gently wipe off any dirt or dust along the grooves as you rotate the roller manually, taking care not todamage the roller surface. Make sure that it is wiped properly because black residue on the rollers willaffect the feeding performance.
Plastic Idler Roller (× 4)
Gently wipe dirt and dust off the roller, taking care not to damage the roller surface. Make sure that it iswiped properly because black residue on the rollers will affect the feeding performance.Be careful not to damage the sponge that is attached to the plastic idler roller.
Glass (× 2)
Gently wipe dirt and dust off the glass sections.
ATTENTION
● Vertical streaks may appear on images if the glass section is dirty.
● When you receive a [Clean glass!] message from on the touch screen, check which glass
section is dirty and clean it.When a [Clean glass!] message shows that the glass section is dirty only on the one side, themessage may not disappear even if you clean it. In that case, clean both glass sections.
Ultrasonic Sensor (× 2)/Document Sensor (× 8)
Gently wipe dirt and dust off the surface of the ultrasonic and document sensors.
Daily Care
123

HINT
If it is difficult to clean, use a cotton swab.
Feed Roller (× 2)/Eject Roller (× 2)
The power must be turned on to rotate the feed/eject rollers for cleaning.
a Plug in the power cable and turn on the scanner.For details, refer to How to Turn the Power ON (page 56).
b On the touch screen, press → [Cleaning & Maintenance] → [Cleaning] → [Cleaning
Wipe].The [Cleaning Wipe] screen is displayed.
ATTENTION
Do not start scanning with an image scanning application during cleaning.
c Open the ADF.For details, refer to How to Open the ADF (page 63).
Daily Care
124

CAUTIONWhen the ADF is open, it might close accidentally. Be careful not to getyour fingers caught.
d On the touch screen, press the [Start] button on the [Cleaning Wipe] screen.The feed/eject rollers rotate a certain amount simultaneously.If you press and hold the [Start] button, the feed/eject rollers rotate continuously.
CAUTIONBe careful not to touch the rollers with your hand while they arerotating.
e Put a piece of cloth moistened with Cleaner F1 or a sheet of Cleaning Wipe against the surfaceof the rotating feed/eject roller, and wipe horizontally to clean dirt and dust off the wholesurface.Make sure that it is wiped properly because black residue on the rollers will affect the feedingperformance.
4 Close the ADF.For details, refer to How to Close the ADF (page 64).
CAUTIONBe careful not to get your fingers caught when closing the ADF.
ATTENTION
Confirm that the ADF is closed properly. Otherwise, documents may not be fed into the ADF.
5 Clear the sheet counter after cleaning.
a On the touch screen, press → [Cleaning & Maintenance] → [Consumable counters].
b On the [Consumable counters] screen, press the [Clear] button for [After cleaning].
When using the Software Operation Panel, refer to Clearing the Sheet Counters (page 268).
Daily Care
125

Cleaning the Carrier Sheet
The Carrier Sheet should be cleaned with either a piece of dry cloth, a cloth moistened with Cleaner F1/milddetergent, or a sheet of Cleaning Wipe.Gently wipe dirt and dust off the surface and the inside of the Carrier Sheet.As you keep using the Carrier Sheet, dirt and dust will accumulate on the surface and the inside.Clean it regularly because it may result in scanning errors.
ATTENTION
● Make sure that the Carrier Sheet is not creased.
● To avoid deformation and discoloration, never use paint thinner or any other organic solvents.
● Do not use force to rub against the Carrier Sheet because it may be damaged or deformed.
● After cleaning the inside of the Carrier Sheet with a cloth moistened with Cleaner F1/mild detergent or asheet of Cleaning Wipe, do not close the Carrier Sheet until it is completely dry.
● The Carrier Sheet should be replaced approximately every 500 scans.For information on purchasing the Carrier Sheets, contact the distributor/dealer where you purchased thisproduct. Refer to the contact information in the Contact List if supplied with this product, or refer to thecontact information in the Contact for Inquiries section if provided in Safety Precautions supplied with thisproduct, and then make an inquiry.
Daily Care
126

Replacing the Consumables
This section explains how to replace the consumables for the scanner.
CAUTIONThe inside of the ADF becomes very hot when the scanner is being used.Before you replace the consumables, make sure to turn off the power, unplug the powercable and wait for at least 15 minutes for the inside of the ADF to cool down.
Consumables and Replacement Cycles
Name Part No. Suggested Replacement Cycle
BRAKE ROLLER PA03670-0001 200,000 sheets or one year
PICK ROLLER PA03670-0002 200,000 sheets or one year
Consumables need to be replaced periodically. It is recommended that you keep a stock of new consumablesand replace them before it reaches the end of the consumable life. Also, the scanner records the number ofsheets scanned for each consumable (brake roller and pick roller), which allows you to determine when toreplace the consumables.The procedure to check the number of sheets scanned is as follows.
1 On the touch screen, press → [Cleaning & Maintenance] → [Consumable counters].
2 On the [Consumable counters] screen, check the [After Replacing the Brake Roller] and [AfterReplacing the Pick Roller] counters.
● When the background color of the counter is yellowIt is about time to replace the brake roller or pick roller.
● When the background color of the counter is redIt is time to replace the brake roller or pick roller. Replace the brake roller or pick roller.
To use the Software Operation Panel in order to check the value, refer to Settings Related to Sheet Counters(page 266).
127

Note that the suggested replacement cycles are guidelines for using A4 (80 g/m2 [20 lb]) wood-free or wood-containing paper, as these cycles vary depending on the type of documents scanned and how often the scanneris used and cleaned.
HINT
Only use the specified consumables.
For information on purchasing the consumables, contact the distributor/dealer where you purchased thisproduct. Refer to the contact information in the Contact List if supplied with this product, or refer to the contactinformation in the Contact for Inquiries section if provided in Safety Precautions supplied with this product, andthen make an inquiry.
Replacing the Consumables
128

Replacing the Brake Roller
Replace the brake roller in following procedure.
1 Turn off the scanner, unplug the power cable and wait for at least 15 minutes.For details, refer to How to Turn the Power OFF (page 57).
2 Remove all documents from the ADF paper chute (feeder).
3 Open the ADF.For details, refer to How to Open the ADF (page 63).
CAUTIONWhen the ADF is open, it might close accidentally. Be careful not to get your fingerscaught.
4 Remove the brake roller.
a Hold both ends of the cover, and open it in the direction of the arrow.
Replacing the Consumables
129

b Lift the right side of the roller first, then pull out the shaft from the slot on the left.
Replacing the Consumables
130

5 Remove the brake roller from its shaft.
6 Attach a new brake roller on the shaft.Insert the protrusion on the shaft into the slot.
7 Attach the shaft.
Replacing the Consumables
131

a Insert the left end of the shaft into the hole in accordance with the hole shape, and then attachthe right side of the shaft.
Replacing the Consumables
132

b Close the brake roller cover.
ATTENTION
Confirm that the brake roller is installed properly. Otherwise, paper jams or other feeding errorsmay occur.
8 Close the ADF.For details, refer to How to Close the ADF (page 64).
CAUTIONBe careful not to get your fingers caught when closing the ADF.
9 Plug in the power cable and turn on the scanner.For details, refer to How to Turn the Power ON (page 56).
10 Clear the brake roller counter.
a On the touch screen, press → [Cleaning & Maintenance] → [Consumable counters].
b On the [Consumable counters] screen, press the [Clear] button for [After Replacing the BrakeRoller].
To clear the counter in the Software Operation Panel, refer to Clearing the Sheet Counters (page 268).
Replacing the Consumables
133

Replacing the Pick Roller
Replace the pick roller in following procedure.
1 Turn off the scanner, unplug the power cable and wait for at least 15 minutes.For details, refer to How to Turn the Power OFF (page 57).
2 Remove all documents from the ADF paper chute (feeder).
3 Remove the ADF paper chute (feeder).Hold both ends of the ADF paper chute (feeder), then lift it in the direction of arrow 1 and pull it out in thedirection of arrow 2.
4 Open the ADF.For details, refer to How to Open the ADF (page 63).
CAUTIONWhen the ADF is open, it might close accidentally. Be careful not to get your fingerscaught.
5 Remove the pick roller.
Replacing the Consumables
134

a Open the sheet guide by lifting the tab.
b Rotate the bushing on the shaft in the direction of the arrow.
Replacing the Consumables
135

c Hold the bushing on the shaft to lift up the shaft end, pull the other shaft end out of the slot,and then lift up the pick roller to remove it.
ATTENTION
Be careful not to touch the gear near the bushing on the shaft because it has grease over it.
6 Remove the pick rollers (× 2) one by one from the shaft.
Replacing the Consumables
136

a Pull out the pick roller from the shaft as you lift the retaining clip.
b Pull out the other pick roller from the shaft as you lift the retaining clip.
7 Attach new pick rollers (× 2) on the shaft one by one.
a Insert the retaining clip of the pick roller into the slot.
b Insert the retaining clip of the other pick roller into the slot.
Replacing the Consumables
137

ATTENTION
Confirm that the pick rollers are attached properly. Otherwise, paper jams or other feeding errorsmay occur.Make sure you insert the pick rollers until they lock in place.
8 Attach the shaft.
Replacing the Consumables
138

a Hold the bushing on the shaft and insert the other shaft end into the slot on the rightdiagonally from the upper left. Lower the shaft end with the bushing to fit the entire shaft inand rotate the bushing backward until the shaft locks in place.
b Close the sheet guide. Make sure that both ends of the sheet guide are locked firmly.
Replacing the Consumables
139

ATTENTION
Confirm that the pick rollers are installed properly. Otherwise, paper jams or other feeding errorsmay occur.
9 Close the ADF.For details, refer to How to Close the ADF (page 64).
CAUTIONBe careful not to get your fingers caught when closing the ADF.
10 Attach the ADF paper chute (feeder).Insert the tabs into the slots on the back of the scanner in the direction of arrow 1 and tilt the ADF paperchute (feeder) downwards in the direction of arrow 2 until it locks in place.Attach the ADF paper chute (feeder) with the side guides facing upwards.
ATTENTION
Do not leave any space between the ADF paper chute (feeder) and the scanner.
11 Plug in the power cable and turn on the scanner.For details, refer to How to Turn the Power ON (page 56).
12 Clear the pick roller counter.
a On the touch screen, press → [Cleaning & Maintenance] → [Consumable counters].
b On the [Consumable counters] screen, press the [Clear] button for [After Replacing the PickRoller].
Replacing the Consumables
140

To clear the counter in the Software Operation Panel, refer to Clearing the Sheet Counters (page 268).
Replacing the Consumables
141

Troubleshooting
This section explains about the countermeasures against paper jams and other troubles, items to check beforecontacting your scanner service provider, and how to read the product label on the scanner.
ATTENTION
For details about other errors/troubles that are not covered in this section, refer to the scanner driver's Help.
When a Paper Jam Occurs
Remove the documents that are left in the ADF in the following procedure:
CAUTION● Do not use force to pull out jammed documents, and make sure to open the ADF first.
● Be careful not to touch any sharp parts upon removing jammed documents.
● Be careful not to get things such as hair, a tie or necklaces caught inside the scannerwhen removing jammed documents.
● The inside of the ADF may become extremely hot during operation. Be careful not to burnyourself.
1 Remove all documents from the ADF paper chute (feeder).
2 Open the ADF.For details, refer to How to Open the ADF (page 63).
CAUTIONWhen the ADF is open, it might close accidentally. Be careful not to get your fingerscaught.
3 Remove the jammed document.
ATTENTION
● Make sure to check the documents and the paper path thoroughly. Remove any metal objects such asstaples or paper clips to prevent paper jams.
● Be careful not to damage the glass surface and the guides when removing documents with metalobjects such as staples or paper clips.
4 Close the ADF.For details, refer to How to Close the ADF (page 64).
CAUTIONBe careful not to get your fingers caught when closing the ADF.
142

ATTENTION
● Confirm that the ADF is closed properly. Otherwise, documents may not be fed into the ADF.
● Occasionally when scanning is complete or canceled, documents may remain in the ADF without anyerror message displayed. In that case, follow steps 1 through 4 above to remove the documents.
● To continue scanning, check which page you want to resume from, and load the document in the ADFpaper chute (feeder) again.
Troubleshooting
143

Errors
● [Error] Screen
When an error occurs on the scanner, the [Error] screen is displayed on the touch screen.
Check the solution for the error, press , and then close the [Error] screen.
HINT
If the computer has Error Recovery Guide installed, Error Recovery Guide is started up when you logged ontoWindows.When an error occurs on the scanner, the error name and code number is displayed in the Error RecoveryGuide window.Take note of the displayed information and click the [More Info] button to check the troubleshootingprocedure.
Troubleshooting
144

● Code List
Code Error Description Refer to
C0:E5 Memory error (Front) Memory Error (page 153)
C0:E6 Memory error (Back)
C0:E9 LSI error (Front)
C0:EA LSI error (Back)
E2:74 Optical error (ADF Front) Optical Error (page 150)
E3:75 Optical error (ADF Back)
E6:D3 Operator Panel error Operator Panel error (page 150)
E7:D2 EEPROM error EEPROM Error (page 150)
E9:F5 Image memory read-write error (Front) Image Memory Read-Write Error (page151)E9:F6 Image memory read-write error (Back)
F4:C2 Background switching mechanism error (ADFFront)
Background Switching Mechanism Error(page 152)
F4:C3 Background switching mechanism error (ADFBack)
H0:84 Motor circuit error Motor Circuit Error (page 154)
H1:80
H2:81
H7:84 Lamp circuit error Lamp Circuit Error (page 154)
H8:88 Motor circuit error Motor Circuit Error (page 154)
J0:37 Paper protection (feeding noise) Paper Protection (page 147)
J0:51 Paper protection (feeding accuracy)
J1:31 Paper jam Paper Jam (page 147)
J1:50 Pick error
J2:55 Multifeed detected (Overlap) Multifeed (page 147)
J2:56 Multifeed detected (Length)
J7:5F Feed mode switched Feed Mode Switched (page 148)
J8:01 Sensor(s) dirty Sensor(s) dirty (page 148)
J8:04
L0:11 Sensor error Sensor Error (page 155)
L2:13
Troubleshooting
145

Code Error Description Refer to
L6:1B
M0:D4 Wi-Fi error Module Error (page 156)
M1:D5 Wired LAN error
M2:D6 Contactless smart card reader error
M4:A2 Network setting error Network Setting Error (page 156)
M4:A3
M4:A4
M4:A5
M4:A6
M4:A7
M4:A8
M4:A9
M4:AA
M4:AB
M4:AC Scanner Central Admin Server setting error Scanner Central Admin Server Setting Error(page 157)M5:A3
M5:A4
M5:A5
M5:A2 Server setting error Server Setting Error (page 157)
M5:AC
M5:AE
M6:AF Authentication failed Authentication Failed (page 158)
U4:40 ADF open Cover Open (page 149)
Troubleshooting
146

Paper Feeding Error
Paper Protection
When the function to protect documents (Paper protection) is activated, paper feeding stops, and the [Error]screen on the touch screen displays one of the following codes.
J0:37 Paper protection (feeding noise)Remove the document and check it.Load it carefully so that it does not get skewed and perform the scan again.
J0:51 Paper protection (feeding accuracy)Remove the document and check it.Load it carefully so that it does not get skewed and perform the scan again.
The function to protect documents (Paper protection) prevents documents from being damaged duringscanning with the ADF by increasing the level of sensitivity to detect paper jams.Take the following measures.
● If this error occurs, check if the document meets the requirements described in Documents for Scanning(page 81).
● If this error occurs frequently even when the document meets the requirements for scanning, lower the paperprotection sensitivity level.
● If documents remain in the ADF, remove the documents by referring to When a Paper Jam Occurs (page 142).
Paper Jam
When a paper jam occurs, the [Error] screen on the touch screen displays one of the following codes.
J1:31 Paper jamRemove the document, load it, then perform the scan again.
J1:50 Pick errorRemove the document, load it, then perform the scan again.
Remove jammed documents by referring to When a Paper Jam Occurs (page 142).If paper jams occur frequently, take measures according to Paper Jams/Pick Errors Occur Frequently (page 209).If the problem persists, write down the error code and contact the distributor/dealer where you purchased thisproduct. Refer to the contact information in the Contact List if supplied with this product, or refer to the contactinformation in the Contact for Inquiries section if provided in Safety Precautions supplied with this product, andthen make an inquiry.
Multifeed
When documents are overlapped and fed into the scanner, the [Error] screen on the touch screen displays oneof the following codes.
J2:55 Multifeed detected (Overlap)
Troubleshooting
147

Press the [Eject Document] button to eject the document.
J2:56 Multifeed detected (Length)Press the [Eject Document] button to eject the document.
If documents remain in the scanner, remove the documents by referring to When a Paper Jam Occurs (page142).If documents are overlapped and fed into the scanner frequently, take measures according to OverlappedDocuments Are Frequently Fed into the Scanner (page 202).If the problem persists, write down the error code and contact the distributor/dealer where you purchased thisproduct. Refer to the contact information in the Contact List if supplied with this product, or refer to the contactinformation in the Contact for Inquiries section if provided in Safety Precautions supplied with this product, andthen make an inquiry.
Feed Mode Switched
When the feed mode is switched during scanning, the [Error] screen on the touch screen displays the followingcode.
J7:5F Feed mode switchedCheck the feed mode switch setting, reload the documents and try again.
Check the position of the feed mode switch.If documents remain in the ADF, remove the documents by referring to When a Paper Jam Occurs (page 142).If the problem persists, write down the error code and contact the distributor/dealer where you purchased thisproduct. Refer to the contact information in the Contact List if supplied with this product, or refer to the contactinformation in the Contact for Inquiries section if provided in Safety Precautions supplied with this product, andthen make an inquiry.
Sensor(s) dirty
If a sensor is dirty, the [Error] screen on the touch screen displays one of the following codes.
J8:01 Sensor(s) dirtyClean the Pick Sensor.
J8:04 Sensor(s) dirtyClean the READ-TOP Sensor.
Take the following measures.
● Clean the document sensors by referring to Cleaning the Inside of the Scanner (ADF) with a Cloth (page 121).
● Turn the scanner off then back on.If the problem persists, write down the error code and contact the distributor/dealer where you purchased thisproduct. Refer to the contact information in the Contact List if supplied with this product, or refer to the contactinformation in the Contact for Inquiries section if provided in Safety Precautions supplied with this product, andthen make an inquiry.
Troubleshooting
148
Cover Open Error
Cover Open
If the ADF is opened during a scan, the [Error] screen on the touch screen displays the following code.
U4:40 ADF open
HINT
The [Error] screen does not display the code when the ADF is opened while the scanner is in standby.Also, note that operations on the touch screen are disabled while the ADF is open.
Confirm that the ADF is closed properly.To check whether or not they are closed completely, open the ADF and then close it again.For more details about opening and closing the ADF, refer to Opening/Closing the ADF (page 63).
Troubleshooting
149

Internal and Optical Errors
Optical Error
When an optical error occurs in the ADF, the [Error] screen on the touch screen displays one of the followingcodes.
E2:74 Optical error (ADF Front)If the problem persists after turning the power back on, please inform your service provider of the errorcode below.Code E2:74
E3:75 Optical error (ADF Back)If the problem persists after turning the power back on, please inform your service provider of the errorcode below.Code E3:75
Take the following measures.
● Refer to Cleaning the Inside of the Scanner (ADF) with a Cloth (page 121) and clean the glass.
● Turn the scanner off then back on.If the problem persists, write down the error code and contact the distributor/dealer where you purchased thisproduct. Refer to the contact information in the Contact List if supplied with this product, or refer to the contactinformation in the Contact for Inquiries section if provided in Safety Precautions supplied with this product, andthen make an inquiry.
Operator Panel error
When a touch screen error occurs, the [Error] screen on the touch screen displays the following code.
E6:D3 Operator Panel errorIf the problem persists after turning the power back on, please inform your service provider of the errorcode below.Code E6:D3
Turn the scanner off then back on.If the problem persists, write down the error code and contact the distributor/dealer where you purchased thisproduct. Refer to the contact information in the Contact List if supplied with this product, or refer to the contactinformation in the Contact for Inquiries section if provided in Safety Precautions supplied with this product, andthen make an inquiry.
EEPROM Error
If an EEPROM error occurs, the [Error] screen on the touch screen displays the following code.
E7:D2 EEPROM errorIf the problem persists after turning the power back on, please inform your service provider of the errorcode below.
Troubleshooting
150

Code E7:D2
Turn the scanner off then back on.If the problem persists, write down the error code and contact the distributor/dealer where you purchased thisproduct. Refer to the contact information in the Contact List if supplied with this product, or refer to the contactinformation in the Contact for Inquiries section if provided in Safety Precautions supplied with this product, andthen make an inquiry.
Image Memory Read-Write Error
If an error occurs when data is read from the image memory or written on the image memory, the [Error]screen on the touch screen displays one of the following codes.
E9:F5 Image memory read-write error (Front)If the problem persists after turning the power back on, please inform your service provider of the errorcode below.Code E9:F5
E9:F6 Image memory read-write error (Back)If the problem persists after turning the power back on, please inform your service provider of the errorcode below.Code E9:F6
Turn the scanner off then back on.If the problem persists, write down the error code and contact the distributor/dealer where you purchased thisproduct. Refer to the contact information in the Contact List if supplied with this product, or refer to the contactinformation in the Contact for Inquiries section if provided in Safety Precautions supplied with this product, andthen make an inquiry.
Troubleshooting
151

Overrun Error
Background Switching Mechanism Error
When a background switching mechanism error occurs, the [Error] screen on the touch screen displays one ofthe following codes.
F4:C2 Background switching mechanism error (ADF Front)If the problem persists after turning the power back on, please inform your service provider of the errorcode below.Code F4:C2
F4:C3 Background switching mechanism error (ADF Back)If the problem persists after turning the power back on, please inform your service provider of the errorcode below.Code F4:C3
Open the ADF to check that there are no documents remaining, and then turn the scanner off then back on.If the problem persists, write down the error code and contact the distributor/dealer where you purchased thisproduct. Refer to the contact information in the Contact List if supplied with this product, or refer to the contactinformation in the Contact for Inquiries section if provided in Safety Precautions supplied with this product, andthen make an inquiry.
Troubleshooting
152
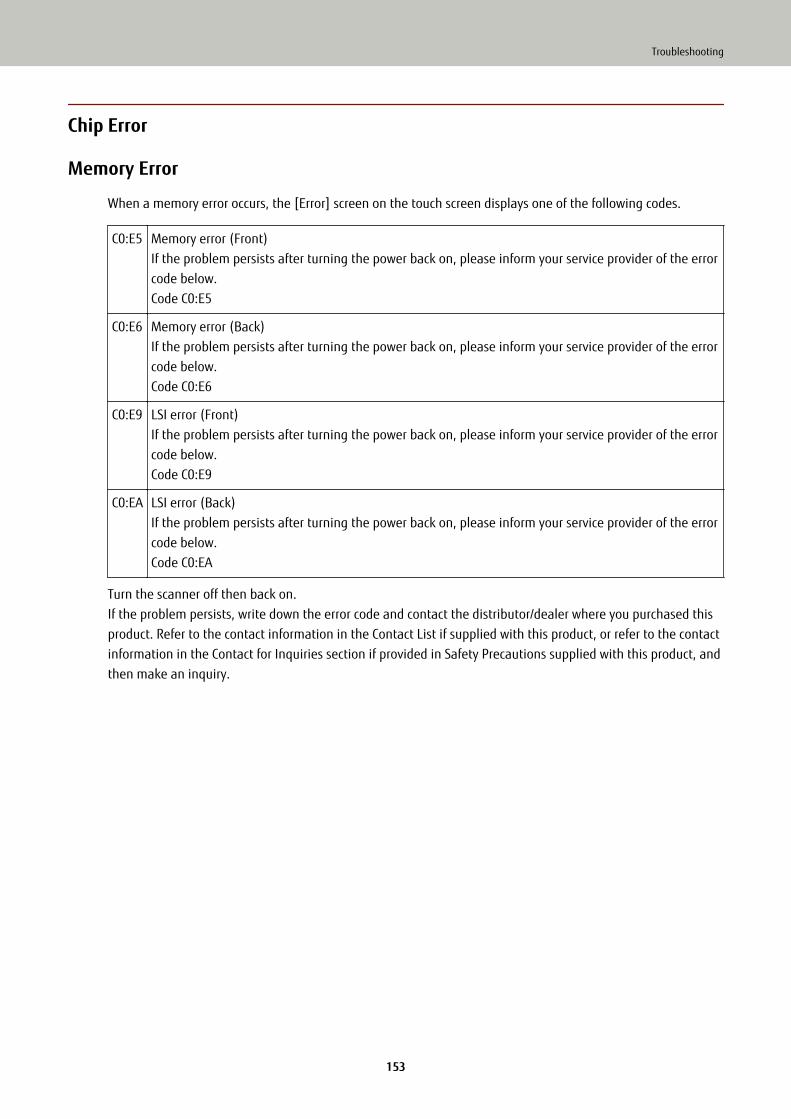
Chip Error
Memory Error
When a memory error occurs, the [Error] screen on the touch screen displays one of the following codes.
C0:E5 Memory error (Front)If the problem persists after turning the power back on, please inform your service provider of the errorcode below.Code C0:E5
C0:E6 Memory error (Back)If the problem persists after turning the power back on, please inform your service provider of the errorcode below.Code C0:E6
C0:E9 LSI error (Front)If the problem persists after turning the power back on, please inform your service provider of the errorcode below.Code C0:E9
C0:EA LSI error (Back)If the problem persists after turning the power back on, please inform your service provider of the errorcode below.Code C0:EA
Turn the scanner off then back on.If the problem persists, write down the error code and contact the distributor/dealer where you purchased thisproduct. Refer to the contact information in the Contact List if supplied with this product, or refer to the contactinformation in the Contact for Inquiries section if provided in Safety Precautions supplied with this product, andthen make an inquiry.
Troubleshooting
153

Motor Circuit Error
Motor Circuit Error
When a motor circuit error occurs, the [Error] screen on the touch screen displays one of the following codes.
H0:84 Motor circuit errorIf the problem persists after turning the power back on, please inform your service provider of theerror code below.Code H0:84
H1:80 Motor circuit errorIf the problem persists after turning the power back on, please inform your service provider of theerror code below.Code H1:80
H2:81 Motor circuit errorIf the problem persists after turning the power back on, please inform your service provider of theerror code below.Code H2:81
H8:88 Motor circuit errorIf the problem persists after turning the power back on, please inform your service provider of theerror code below.Code H8:88
Turn the scanner off then back on.If the problem persists, write down the error code and contact the distributor/dealer where you purchased thisproduct. Refer to the contact information in the Contact List if supplied with this product, or refer to the contactinformation in the Contact for Inquiries section if provided in Safety Precautions supplied with this product, andthen make an inquiry.
Lamp Circuit Error
When a lamp circuit error occurs, the [Error] screen on the touch screen displays the following code.
H7:84 Lamp circuit errorIf the problem persists after turning the power back on, please inform your service provider of theerror code below.Code H7:84
Turn the scanner off then back on.If the problem persists, write down the error code and contact the distributor/dealer where you purchased thisproduct. Refer to the contact information in the Contact List if supplied with this product, or refer to the contactinformation in the Contact for Inquiries section if provided in Safety Precautions supplied with this product, andthen make an inquiry.
Troubleshooting
154

Sensor Error
Sensor Error
If a sensor error occurs, the [Error] screen on the touch screen displays one of the following codes.
L0:11 Sensor errorIf the problem persists after turning the power back on, please inform your service provider of the errorcode below.Code L0:11
L2:13 Sensor errorIf the problem persists after turning the power back on, please inform your service provider of the errorcode below.Code L2:13
L6:1B Sensor errorIf the problem persists after turning the power back on, please inform your service provider of the errorcode below.Code L6:1B
Take the following measures.
● Clean the ultrasonic sensors and the document sensors by referring to Cleaning the Inside of the Scanner(ADF) with a Cloth (page 121).
● Turn the scanner off then back on.If the problem persists, write down the error code and contact the distributor/dealer where you purchased thisproduct. Refer to the contact information in the Contact List if supplied with this product, or refer to the contactinformation in the Contact for Inquiries section if provided in Safety Precautions supplied with this product, andthen make an inquiry.
Troubleshooting
155

Communication Related Errors
Module Error
When a module error occurs, the [Error] screen on the touch screen displays one of the following codes.
M0:D4 Wi-Fi errorIf the problem persists after turning the power back on, please inform your service provider of theerror code below.Code M0:D4
M1:D5 Wired LAN errorIf the problem persists after turning the power back on, please inform your service provider of theerror code below.Code M1:D5
M2:D6 An error occurred with the smart card reader.If the problem persists after turning the power back on, please inform your service provider of theerror code below.Code M2:D6
Turn the scanner off then back on.If the problem persists, write down the error code and contact the distributor/dealer where you purchased thisproduct. Refer to the contact information in the Contact List if supplied with this product, or refer to the contactinformation in the Contact for Inquiries section if provided in Safety Precautions supplied with this product, andthen make an inquiry.
Network Setting Error
If a network settings error occurs, the [Error] screen on the touch screen displays one of the following codes.
M4:A2 The scanner is not connected to the network. Check the network settings.
M4:A3 Cannot connect to the proxy server. Check the network settings.
M4:A4 Cannot connect to PaperStream NX Manager. Check the network settings.
M4:A5 Cannot connect to PaperStream NX Manager or the proxy server. Check the network settings.
M4:A6 Network connection timed out. Make sure that PaperStream NX Manager is running, and check thenetwork connection.
M4:A7 Invalid client certificate for the network connection. Check the network connection.
M4:A8 Failed to send data. Check the network status, reload the document, and try again.
M4:A9 Failed to receive data. Make sure that PaperStream NX Manager is running, and check the networkconnection.
M4:AA A network connection error occurred. Check the network connection.
M4:AB Failed to send data. Check the network status, reload the document, and try again.
Troubleshooting
156

Check the message displayed in the [Error] screen, and take measures accordingly.To check the network settings for the scanner, press the [Set] button.If the problem persists, write down the error code and contact the distributor/dealer where you purchased thisproduct. Refer to the contact information in the Contact List if supplied with this product, or refer to the contactinformation in the Contact for Inquiries section if provided in Safety Precautions supplied with this product, andthen make an inquiry.
Server Setting Error
If an error occurs in the settings in PaperStream NX Manager, the [Error] screen on the touch screen displaysone of the following codes.
M5:A2 Failed to save the file. Check the PaperStream NX Manager settings.
M5:AC An error occurred in the communication with PaperStream NX Manager. Check the PaperStream NXManager settings.
M5:AE The smart card reader settings are invalid. Check the smart card reader settings.
Check the message displayed in the [Error] screen, and correct the following settings:
● "PaperStream NX Manager" setting on the scanner
● Setting in PaperStream NX ManagerTo check the network settings for the scanner, press the [Set] button.If the problem persists, write down the error code and contact the distributor/dealer where you purchased thisproduct. Refer to the contact information in the Contact List if supplied with this product, or refer to the contactinformation in the Contact for Inquiries section if provided in Safety Precautions supplied with this product, andthen make an inquiry.
Scanner Central Admin Server Setting Error
If an error occurs in the settings in the Scanner Central Admin Server, the [Error] screen on the touch screendisplays one of the following codes.
M4:AC Scanner details could not be registered with the Scanner Central Admin Server.Check the Scanner Central Admin Server connection environment.
M5:A3 The Scanner Central Admin Server version which it is connected to is not supported.
M5:A4 You have attempted to register more than the maximum number of scanners that can be registered.
M5:A5 Maintenance work in progress. Try again later.
For M4:AC, M5:A3, or M5:A4
Check the message displayed in the [Error] screen, and correct the following settings:
● The "Scanner Central Admin Server" setting on the scanner
● Setting in the Scanner Central Admin ServerTo check the network settings for the scanner, press the [Set] button.
Troubleshooting
157

If the problem persists, write down the error code and contact the distributor/dealer where you purchasedthis product. Refer to the contact information in the Contact List if supplied with this product, or refer tothe contact information in the Contact for Inquiries section if provided in Safety Precautions supplied withthis product, and then make an inquiry.
For M5:A5
Try again later.
Authentication Failed
If the authentication for PaperStream NX Manager fails, the [Error] screen on the touch screen displays thefollowing code.
M6:AF Authentication failed in Auto Login mode. Check the Auto Login Setting.
Check the message displayed in the [Error] screen, and correct the following settings:
● [Auto Login] setting on the scanner
● Authentication setting for PaperStream NX ManagerTo check the network settings for the scanner, press the [Set] button.If the problem persists, write down the error code and contact the distributor/dealer where you purchased thisproduct. Refer to the contact information in the Contact List if supplied with this product, or refer to the contactinformation in the Contact for Inquiries section if provided in Safety Precautions supplied with this product, andthen make an inquiry.
Troubleshooting
158

Other Errors
Being used by others
The scanner is already being used.
● Make sure that another application is not using the scanner.
● Make sure that the connection method of the scanner is correct.
● Make sure that no operations are being performed on the touch screen of the scanner.
The scanner is in Doc Counting mode.
The Scanner is in "Doc Counting mode" and therefore scanning cannot be performed.Close the [Document Count] screen on the touch screen of the scanner to exit the Doc Counting mode.
Scanning has been paused by the user.
When the [Pause] button on the touch screen is pressed during scanning, scanning pauses.To resume scanning, press the [Scan] button on the touch screen.
To stop scanning, press on the touch screen.
Outside designated scan area error
This error occurs when the bottom edge of the document is detected before the specified area is scanned withthe ADF.
Troubleshooting
159

Example:
Outside of the document may have been scanned because the scanned document is shorter than the specifiedpaper size. Take one of the following measures, and then scan again.
● Load a document of the specified paper size in the ADF paper chute (feeder).
● Change the scan settings so that the scanning area is set inside of the document.
ATTENTION
Ways to designate the scanning area differ depending on image scanning applications. For details, refer tothe help for the image scanning application.
Invalid Command
The command was ended abnormally.There may be a problem with the USB cable connection.
● Make sure that the USB cable is connected properly.
● Turn the scanner off then back on.If the problem persists, write down the error code and contact the distributor/dealer where you purchased thisproduct. Refer to the contact information in the Contact List if supplied with this product, or refer to the contactinformation in the Contact for Inquiries section if provided in Safety Precautions supplied with this product, andthen make an inquiry.
Troubleshooting
160

Connection Test Result
● "0% packet loss" shown in the test result
Meaning
The communication with the host specified in [Host Name/IP address] is normal.
● "100% packet loss" shown in the test result
Meaning
Failed to communicate with the destination specified in [Host Name/IP address].
Solution
[Host Name/IP address] may not be specified correctly. Make sure that the host name or the IP address isspecified correctly.If the problem persists, refer to the following section in Troubleshooting (page 162):
● The Connection Between the Scanner and Computer Frequently Cuts Off (page 183)
● Cannot Connect the Scanner to a Destination by Specifying an IP Address (page 190)
● Cannot Connect the Scanner to a Destination by Specifying a Host Name (page 192)
● "99% packet loss" shown in the test result
Meaning
Communication with the destination specified in [Host Name/IP address] is unstable.
Solution
Refer to Cannot Connect the Scanner and a Computer via Wi-Fi (page 169) and Cannot Connect theScanner and a Computer via a Wired LAN (page 184), and take measures accordingly.
● "ping: bad address" shown in the test result
Meaning
The name-resolution or address-resolution for the destination specified in [Host Name/IP address] mayhave failed.
Solution
● Make sure that [Host Name/IP address] is specified correctly.
● Make sure that the DNS server settings are correct.
● If [Host Name/IP address] is specified correctly, refer to Cannot Connect the Scanner to a Destination bySpecifying a Host Name (page 192) for further solutions.
● Refer to Cannot Connect the Scanner and a Computer via Wi-Fi (page 169) and Cannot Connect theScanner and a Computer via a Wired LAN (page 184), and take measures accordingly.
Troubleshooting
161

TroubleshootingThis section describes examples of troubles that you may encounter when using the scanner and also describes thesolutions to them.
Before you request for a repair, take measures by looking through the examples of the troubles and solutions.If the problem persists, check each item in Before You Contact the Scanner Service Provider (page 217), andthen contact the distributor/dealer where you purchased this product. Refer to the contact information in theContact List if supplied with this product, or refer to the contact information in the Contact for Inquiries sectionif provided in Safety Precautions supplied with this product, and then make an inquiry.The following are examples of troubles that you may encounter.
● Power of the scanner
● The Scanner Cannot Be Powered ON (page 164)
● The Touch Screen or the [Power] Button Light or Both Switch Off (page 165)
● Touch screen
● The Touch Screen Does Not Function (page 166)
● A Malfunction Occurs in the Touch Screen/The Display on the Touch Screen Is in an Incorrect Position (page167)
● The Display on the Touch Screen Is Distorted (page 168)
● Connection of the scanner
Wi-Fi
● Cannot Connect the Scanner and a Computer via Wi-Fi (page 169)
● A Wireless Access Point Is Not Displayed in the Access Point List (page 175)
● Wi-Fi Setting for WPS Fails (page 177)
● Failed to Establish a Wi-Fi Connection by Configuring the Settings Manually (page 180)
● The Connection Between the Scanner and Computer Frequently Cuts Off (page 183)
Wired LAN
● Cannot Connect the Scanner and a Computer via a Wired LAN (page 184)
USB
● Cannot Connect the Scanner and a Computer via a USB Cable (page 189)
Server
● Cannot Connect the Scanner to a Destination by Specifying an IP Address (page 190)
● Cannot Connect the Scanner to a Destination by Specifying a Host Name (page 192)
Troubleshooting
162

● Scanning operations
● Scanning Does Not Start (page 195)
● Scanning Takes a Long Time (page 196)
● Vertical Streaks Appear on the Images (page 200)
● Error Code "U4:40" Is Displayed on the Touch Screen While Scanning (page 201)
● Overlapped Documents Are Frequently Fed into the Scanner (page 202)
● Situation in Which the Document Is not Fed into the ADF Occurs Frequently (page 205)
● Paper Protection Is Set Off Frequently (page 207)
● Paper Jams/Pick Errors Occur Frequently (page 209)
● Scanning results
● Image Quality Is Poor (page 197)
● Quality of Scanned Text or Lines Is Unsatisfactory (page 198)
● Images Are Distorted or Not Clear (page 199)
● Images Turn Out Elongated (page 211)
● A Shadow Appears at the Top or the Bottom of the Image (page 212)
● There Are Black Traces on the Document (page 213)
● Carrier Sheet
● The Carrier Sheet Is Not Fed Smoothly/Paper Jams Occur (page 214)
● Part of the Image Appears Missing in the Case Where the Carrier Sheet Is Used (page 216)
Troubleshooting
163

The Scanner Cannot Be Powered ON
Check the following points
● Is the power cable connected properly? (page 164)
● Did you press the [Power] button on the scanner? (page 164)If the problem persists, check the items in Before You Contact the Scanner Service Provider (page 217)first, then contact the distributor/dealer where you purchased this product. Refer to the contactinformation in the Contact List if supplied with this product, or refer to the contact information in theContact for Inquiries section if provided in Safety Precautions supplied with this product, and then make aninquiry.
● Is the power cable connected properly?
Solution
Connect the power cable properly.For details, refer to Getting Started.
● Did you press the [Power] button on the scanner?
Solution
Press the [Power] button on the scanner.For details, refer to How to Turn the Power ON (page 56).
Troubleshooting
164

The Touch Screen or the [Power] Button Light or Both Switch Off
Check the following points
● Has the scanner been left out of operation for a long time after being powered on? (page 165)If the problem persists, check the items in Before You Contact the Scanner Service Provider (page 217)first, then contact the distributor/dealer where you purchased this product. Refer to the contactinformation in the Contact List if supplied with this product, or refer to the contact information in theContact for Inquiries section if provided in Safety Precautions supplied with this product, and then make aninquiry.
● Has the scanner been left out of operation for a long time after being powered on?
Solution
The scanner has entered power saving mode or has been automatically turned off.
● If the scanner has entered power saving modeThe touch screen turns off and the [Power] button flashes in green.Resume from power saving mode by one of the following methods:
- Load a document in the ADF paper chute (feeder).
- Press the touch screen.
- Scans a document with the image scanning application.For details, refer to Entering and Resuming from Power Saving Mode (page 61).
● If the scanner has been automatically turned offThe touch screen and the [Power] button light are off.Turn on the scanner.For details, refer to How to Turn the Power ON (page 56).
Troubleshooting
165

The Touch Screen Does Not Function
Check the following points
● Did you turn the scanner off then back on? (page 166)If the problem persists, check the items in Before You Contact the Scanner Service Provider (page 217)first, then contact the distributor/dealer where you purchased this product. Refer to the contactinformation in the Contact List if supplied with this product, or refer to the contact information in theContact for Inquiries section if provided in Safety Precautions supplied with this product, and then make aninquiry.
● Did you turn the scanner off then back on?
Solution
Turn the scanner off then back on.Wait for at least 5 seconds after turning off the scanner before turning it back on.For details, refer to How to Turn the Power ON (page 56).
Troubleshooting
166

A Malfunction Occurs in the Touch Screen/The Display on the Touch Screen Is inan Incorrect Position
Check the following points
● Did you turn the scanner off then back on? (page 167)If the problem persists, check the items in Before You Contact the Scanner Service Provider (page 217)first, then contact the distributor/dealer where you purchased this product. Refer to the contactinformation in the Contact List if supplied with this product, or refer to the contact information in theContact for Inquiries section if provided in Safety Precautions supplied with this product, and then make aninquiry.
● Did you turn the scanner off then back on?
Solution
Turn the scanner off then back on.Wait for at least 5 seconds after turning off the scanner before turning it back on.For details, refer to How to Turn the Power ON (page 56).
Troubleshooting
167

The Display on the Touch Screen Is Distorted
Check the following points
● Did you turn the scanner off then back on? (page 168)If the problem persists, check the items in Before You Contact the Scanner Service Provider (page 217)first, then contact the distributor/dealer where you purchased this product. Refer to the contactinformation in the Contact List if supplied with this product, or refer to the contact information in theContact for Inquiries section if provided in Safety Precautions supplied with this product, and then make aninquiry.
● Did you turn the scanner off then back on?
Solution
Turn the scanner off then back on.Wait for at least 5 seconds after turning off the scanner before turning it back on.For details, refer to How to Turn the Power ON (page 56).
Troubleshooting
168

Cannot Connect the Scanner and a Computer via Wi-Fi
Check the following points
● Is the wireless access point turned on? (page 169)
● Is the firmware for the wireless access point the latest version? (page 169)
● Is the scanner far away from the wireless access point? Is there anything that may block the signal (suchas walls and metal boards), or an electromagnetic source? (page 170)
● Is [Wi-Fi] selected for the connection method? (page 170)
● Did you connect the scanner to a wireless access point? (page 171)
● Is the wireless connection environment on the computer enabled? (page 171)
● Did you connect the computer to a wireless access point? (page 171)
● Are the scanner and computer connected to the same network? (page 171)
● Is the setting that does not permit communication configured on the wireless access point? (page 172)
● Are there any security limitations in the network? (page 173)
● Are there any security restrictions on the computer? (page 173)
● Is the scanner connected to another computer? (page 173)
● Is the scanner's IP address correct? (page 173)
● Is the IP address of the scanner used for other communication devices? (page 173)
● Is the DNS server information configured correctly? (page 174)
● Does the DNS server function normally? (page 174)If the problem persists, check the items in Before You Contact the Scanner Service Provider (page 217)first, then contact the distributor/dealer where you purchased this product. Refer to the contactinformation in the Contact List if supplied with this product, or refer to the contact information in theContact for Inquiries section if provided in Safety Precautions supplied with this product, and then make aninquiry.
● Is the wireless access point turned on?
Solution
Turn on the wireless access point.Also check that there is no error or malfunction on the wireless access point.For details about wireless access point errors, refer to the manual of your wireless access point.
● Is the firmware for the wireless access point the latest version?
Solution
If the firmware for the wireless access point is not the latest version, unexpected operations may occur.Contact the network administrator to check the firmware version, and consider updating it to the latestversion.For details about how to update the firmware for your wireless access point, refer to the manual of yourwireless access point.
Troubleshooting
169

● Is the scanner far away from the wireless access point? Is there anything that may block the signal (such aswalls and metal boards), or an electromagnetic source?
Solution
The signal between the wireless access point and the scanner may be weak, or there may be some signalinterference.Check the icon on the lower left side of the touch screen for the signal status.
Icon Signal Strength
Strong
Medium
Weak
Not connected
If the signal is weak, change the installation locations of the scanner and the wireless access point.
● Move the scanner closer to the wireless access point.
● Move the scanner and the wireless access point away from the following.
- Objects that may block the signal (such as walls and metal boards)
- Devices that may cause signal interference (such as microwaves and cordless phones) and wirelessdevices
● Change the direction that the scanner is facing.Also, communication in certain wireless channels may become unstable due to signal interference such asnoise.Change the value of the wireless channel on the wireless access point.
● Is [Wi-Fi] selected for the connection method?
Solution
Check the connection method in the following procedure:
1 On the touch screen, press → [Scanner Settings] → [How to connect].
2 On the [How to connect] screen, check that [Wi-Fi] is selected.
Troubleshooting
170

● Did you connect the scanner to a wireless access point?
Solution
Check that the scanner is connected to a wireless access point in the following procedure:
1 On the touch screen, press → [Scanner Settings] → [How to connect].
2 On the [How to connect] screen, check that [Wi-Fi] is selected.
3 On the touch screen, press → [Scanner Settings] → [Network] → [Wi-Fi] → [Wi-Fi
Diagnosis].
4 In the [Wi-Fi Diagnosis] screen, check that the scanner is connected to the correct wireless accesspoint.If the scanner is not connected to the correct wireless access point, reconnect the scanner to thecorrect wireless access point.
5 On the touch screen, press → [Scanner Settings] → [Network] → [Wi-Fi] → [Access Point].
6 On the [Access Point] screen, select the configuration method.
7 By following the window displayed, connect the scanner to a wireless access point.
● Is the wireless connection environment on the computer enabled?
Solution
Enable the wireless connection environment on the computer that you use.For details, refer to the manual of your computer.
● Did you connect the computer to a wireless access point?
Solution
Connect the computer to a wireless access point.For details, refer to the manual of your computer.
● Are the scanner and computer connected to the same network?
Solution
Check whether the scanner and computer are connected to the same network.Check the network name that the scanner is connected to in the following procedure:
Troubleshooting
171

1 On the touch screen, press → [Scanner Settings] → [Network] → [Wi-Fi] → [Wi-Fi
Diagnosis].
2 On the [Wi-Fi Diagnosis] screen, check the display of [Network name (SSID)].
To check the network name that the computer is connected to, refer to the manual of your computer.If the scanner and computer are connected to different networks, connect them to the same network.Change the network that the scanner is connected to in the following procedure:
1 On the touch screen, press → [Scanner Settings] → [How to connect].
2 On the [How to connect] screen, check that [Wi-Fi] is selected.
3 On the touch screen, press → [Scanner Settings] → [Network] → [Wi-Fi] → [Access Point].
4 On the [Access Point] screen, select the configuration method.
5 By following the window displayed, connect the scanner and the computer to the same wirelessaccess point.
● Is the setting that does not permit communication configured on the wireless access point?
Solution
When the following are set on the wireless access point, take measures accordingly.
● Communication between wireless devices is disabled (for example, because of a privacy separatorfunction or a port separator function).Enable communication between wireless devices on the wireless access point.
● SSID broadcast (for example, ANY connect) is disabled.Enable SSID broadcast on the wireless access point. Or, configure the Wi-Fi settings manually.
● Protocol filter function is enabled.Set the protocol on the wireless access point.
● The stealth function is enabled.Disable the stealth function, and then use WPS to configure the Wi-Fi settings again. Or, configure theWi-Fi settings manually.
● MAC address filtering is enabled.Set the MAC address of the scanner on the wireless access point, and then configure the Wi-Fi settingsagain.
In addition, the channel may overlap with another wireless access point.In this case, change the value of the wireless channel on the wireless access point.For details about wireless access point settings, refer to the manual of your wireless access point.
Troubleshooting
172

● Are there any security limitations in the network?
Solution
The access limitations for users with Wi-Fi may be configured.For details, contact the network administrator.
● Are there any security restrictions on the computer?
Solution
In the Windows Firewall settings or in the firewall settings of your security software, unblock thecommunication of the port numbers which are used by the following software.
● fi-7300NX Scanner Selection ToolPort number: 52217
● fi-7300NX Button Event ManagerPort number: 53218
For details about unblocking the communication, refer to the manual or help of your computer or securitysoftware.
● Is the scanner connected to another computer?
Solution
The scanner can be connected to only one computer at a time. Wait until the other computer isdisconnected from the scanner, and then connect the computer to be used again.
● Is the scanner's IP address correct?
Solution
Check the scanner's IP address in the following procedure:
1 On the touch screen, press → [Scanner Settings] → [Network] → [Wi-Fi] → [IP Address].
2 On the [IP Address] screen, check the setting items.When specifying an IP address manually, specify the correct IP address.When setting the IP address automatically, check whether the DHCP server functions normally.Even when the DHCP server functions normally, an IP address may not be assigned correctlydepending on the settings for the DHCP server. Check the operation status and the settings forthe DHCP server.
● Is the IP address of the scanner used for other communication devices?
Solution
If there are multiple communication devices using the same IP address on the same network,communication may fail. Avoid duplicates in IP addresses.
Troubleshooting
173

● Is the DNS server information configured correctly?
Solution
Check the DNS server settings for the scanner in the following procedure:
1 On the touch screen, press → [Scanner Settings] → [Network] → [Wi-Fi] → [DNS Server].
2 On the [DNS Server] screen, check the setting items for the following.
● Whether the DNS server settings is enabled.
● Whether the primary DNS and secondary DNS settings are correct.
● Does the DNS server function normally?
Solution
Check whether the DNS server functions normally by following the procedure below.
1 On the touch screen, press → [Scanner Settings] → [Network] → [Check connection (Ping)].
2 In the [Check connection (Ping)] screen, enter the IP address of the DNS server, and press the[Run] button.The result is displayed.Refer to Connection Test Result (page 161) and take measures accordingly.If the DNS server does not function normally, contact the DNS server administrator.
Troubleshooting
174

A Wireless Access Point Is Not Displayed in the Access Point List
Check the following points
● Is the wireless access point turned on? (page 175)
● Is the scanner far away from the wireless access point? Is there anything that may block the signal (suchas walls and metal boards), or an electromagnetic source? (page 175)
● Is the setting that does not permit communication configured on the wireless access point? (page 176)If the problem persists, check the items in Before You Contact the Scanner Service Provider (page 217)first, then contact the distributor/dealer where you purchased this product. Refer to the contactinformation in the Contact List if supplied with this product, or refer to the contact information in theContact for Inquiries section if provided in Safety Precautions supplied with this product, and then make aninquiry.
● Is the wireless access point turned on?
Solution
Turn on the wireless access point.Also check that there is no error or malfunction on the wireless access point.For details about wireless access point errors, refer to the manual of your wireless access point.
● Is the scanner far away from the wireless access point? Is there anything that may block the signal (such aswalls and metal boards), or an electromagnetic source?
Solution
The signal between the wireless access point and the scanner may be weak, or there may be some signalinterference.Check the icon on the lower left side of the touch screen for the signal status.
Icon Signal Strength
Strong
Medium
Weak
Not connected
If the signal is weak, change the installation locations of the scanner and the wireless access point.
● Move the scanner closer to the wireless access point.
● Move the scanner and the wireless access point away from the following.
Troubleshooting
175

- Objects that may block the signal (such as walls and metal boards)
- Devices that may cause signal interference (such as microwaves and cordless phones) and wirelessdevices
● Change the direction that the scanner is facing.Also, communication in certain wireless channels may become unstable due to signal interference such asnoise.Change the value of the wireless channel on the wireless access point.
● Is the setting that does not permit communication configured on the wireless access point?
Solution
When the following are set on the wireless access point, take measures accordingly.
● Communication between wireless devices is disabled (for example, because of a privacy separatorfunction or a port separator function).Enable communication between wireless devices on the wireless access point.
● SSID broadcast (for example, ANY connect) is disabled.Enable SSID broadcast on the wireless access point. Or, configure the Wi-Fi settings manually.
● Protocol filter function is enabled.Set the protocol on the wireless access point.
● The stealth function is enabled.Disable the stealth function, and then use WPS to configure the Wi-Fi settings again. Or, configure theWi-Fi settings manually.
● MAC address filtering is enabled.Set the MAC address of the scanner on the wireless access point, and then configure the Wi-Fi settingsagain.
In addition, the channel may overlap with another wireless access point.In this case, change the value of the wireless channel on the wireless access point.For details about wireless access point settings, refer to the manual of your wireless access point.
Troubleshooting
176

Wi-Fi Setting for WPS Fails
Check the following points
● Is the wireless access point turned on? (page 177)
● Is the scanner far away from the wireless access point? Is there anything that may block the signal (suchas walls and metal boards), or an electromagnetic source? (page 177)
● Does a wireless access point support WPS (automatic configuration)? (page 178)
● Is WEP used as the encryption method for the wireless access point? (page 178)
● Did you enter the correct PIN when configuring the wireless settings for using WPS (PIN)? (page 178)
● Did you finish the WPS operation on time? (page 178)
● Is the setting that does not permit communication configured on the wireless access point? (page 179)If the problem persists, check the items in Before You Contact the Scanner Service Provider (page 217)first, then contact the distributor/dealer where you purchased this product. Refer to the contactinformation in the Contact List if supplied with this product, or refer to the contact information in theContact for Inquiries section if provided in Safety Precautions supplied with this product, and then make aninquiry.
● Is the wireless access point turned on?
Solution
Turn on the wireless access point.Also check that there is no error or malfunction on the wireless access point.For details about wireless access point errors, refer to the manual of your wireless access point.
● Is the scanner far away from the wireless access point? Is there anything that may block the signal (such aswalls and metal boards), or an electromagnetic source?
Solution
The signal between the wireless access point and the scanner may be weak, or there may be some signalinterference.Check the icon on the lower left side of the touch screen for the signal status.
Icon Signal Strength
Strong
Medium
Weak
Troubleshooting
177

Icon Signal Strength
Not connected
If the signal is weak, change the installation locations of the scanner and the wireless access point.
● Move the scanner closer to the wireless access point.
● Move the scanner and the wireless access point away from the following.
- Objects that may block the signal (such as walls and metal boards)
- Devices that may cause signal interference (such as microwaves and cordless phones) and wirelessdevices
● Change the direction that the scanner is facing.Also, communication in certain wireless channels may become unstable due to signal interference such asnoise.Change the value of the wireless channel on the wireless access point.
● Does a wireless access point support WPS (automatic configuration)?
Solution
When the wireless access point does not support WPS, manually configure the settings for Wi-Fi.To check whether or not the wireless access point supports WPS, refer to the manual of your wirelessaccess point.
● Is WEP used as the encryption method for the wireless access point?
Solution
If WEP is used as the encryption method for the wireless access point, change the encryption method, andthen try again.
● Did you enter the correct PIN when configuring the wireless settings for using WPS (PIN)?
Solution
Check the PIN in the following procedure:
1 On the touch screen, press → [Scanner Settings] → [Network] → [Wi-Fi] → [Access Point] →
[Use WPS] → [PIN].
2 On your wireless access point, enter the PIN as shown in the [PIN] screen.To check how to enter the PIN, refer to the manual of your wireless access point.
● Did you finish the WPS operation on time?
Solution
Configure the wireless settings again with the WPS.
Troubleshooting
178

● For push-button
1 On the touch screen, press → [Scanner Settings] → [Network] → [Wi-Fi] → [Access Point]
→ [Use WPS] → [Push-Button].
2 Push the WPS button on the wireless access point.
3 Within two minutes after step 2, press the [Next] button which is displayed on the touch screenin step 1.
● For PIN
1 On the touch screen, press → [Scanner Settings] → [Network] → [Wi-Fi] → [Access Point]
→ [Use WPS] → [PIN].
2 On your wireless access point, enter the PIN as shown in the [PIN] screen.To check how to enter the PIN, refer to the manual of your wireless access point.
3 Within two minutes after step 2, press the [Next] button which is displayed on the touch screenin step 1.
Note that if multiple wireless access points are waiting to be connected by WPS, the connection may fail.In that case, wait for a while, and then configure the Wi-Fi settings again by using WPS. Or, configure theWi-Fi settings manually.
● Is the setting that does not permit communication configured on the wireless access point?
Solution
When the following are set on the wireless access point, take measures accordingly.
● Communication between wireless devices is disabled (for example, because of a privacy separatorfunction or a port separator function).Enable communication between wireless devices on the wireless access point.
● SSID broadcast (for example, ANY connect) is disabled.Enable SSID broadcast on the wireless access point. Or, configure the Wi-Fi settings manually.
● Protocol filter function is enabled.Set the protocol on the wireless access point.
● The stealth function is enabled.Disable the stealth function, and then use WPS to configure the Wi-Fi settings again. Or, configure theWi-Fi settings manually.
● MAC address filtering is enabled.Set the MAC address of the scanner on the wireless access point, and then configure the Wi-Fi settingsagain.
In addition, the channel may overlap with another wireless access point.In this case, change the value of the wireless channel on the wireless access point.For details about wireless access point settings, refer to the manual of your wireless access point.
Troubleshooting
179

Failed to Establish a Wi-Fi Connection by Configuring the Settings Manually
Check the following points
● Is the wireless access point turned on? (page 180)
● Is the scanner far away from the wireless access point? Is there anything that may block the signal (suchas walls and metal boards), or an electromagnetic source? (page 180)
● Are the network name (SSID), security protocol (authentication method), encryption method, andsecurity key configured correctly? (page 181)
● Is the setting that does not permit communication configured on the wireless access point? (page 181)
● Is the message, [The encryption method does not match with the access point.] displayed? (page 182)If the problem persists, check the items in Before You Contact the Scanner Service Provider (page 217)first, then contact the distributor/dealer where you purchased this product. Refer to the contactinformation in the Contact List if supplied with this product, or refer to the contact information in theContact for Inquiries section if provided in Safety Precautions supplied with this product, and then make aninquiry.
● Is the wireless access point turned on?
Solution
Turn on the wireless access point.Also check that there is no error or malfunction on the wireless access point.For details about wireless access point errors, refer to the manual of your wireless access point.
● Is the scanner far away from the wireless access point? Is there anything that may block the signal (such aswalls and metal boards), or an electromagnetic source?
Solution
The signal between the wireless access point and the scanner may be weak, or there may be some signalinterference.Check the icon on the lower left side of the touch screen for the signal status.
Icon Signal Strength
Strong
Medium
Weak
Not connected
Troubleshooting
180

If the signal is weak, change the installation locations of the scanner and the wireless access point.
● Move the scanner closer to the wireless access point.
● Move the scanner and the wireless access point away from the following.
- Objects that may block the signal (such as walls and metal boards)
- Devices that may cause signal interference (such as microwaves and cordless phones) and wirelessdevices
● Change the direction that the scanner is facing.Also, communication in certain wireless channels may become unstable due to signal interference such asnoise.Change the value of the wireless channel on the wireless access point.
● Are the network name (SSID), security protocol (authentication method), encryption method, and securitykey configured correctly?
Solution
Use the same network name (SSID), security protocol (authentication method), encryption method, andsecurity key as your wireless access point.If you cannot find the network name (SSID) or the security key, either refer to the manual of your wirelessaccess point or contact the manufacturer.
● Is the setting that does not permit communication configured on the wireless access point?
Solution
When the following are set on the wireless access point, take measures accordingly.
● Communication between wireless devices is disabled (for example, because of a privacy separatorfunction or a port separator function).Enable communication between wireless devices on the wireless access point.
● SSID broadcast (for example, ANY connect) is disabled.Enable SSID broadcast on the wireless access point. Or, configure the Wi-Fi settings manually.
● Protocol filter function is enabled.Set the protocol on the wireless access point.
● The stealth function is enabled.Disable the stealth function, and then use WPS to configure the Wi-Fi settings again. Or, configure theWi-Fi settings manually.
● MAC address filtering is enabled.Set the MAC address of the scanner on the wireless access point, and then configure the Wi-Fi settingsagain.
In addition, the channel may overlap with another wireless access point.In this case, change the value of the wireless channel on the wireless access point.For details about wireless access point settings, refer to the manual of your wireless access point.
Troubleshooting
181

● Is the message, [The encryption method does not match with the access point.] displayed?
Solution
Set the same encryption method as the one for the wireless access point.The scanner cannot be connected to the wireless access point in the following cases.Change to another encryption method or security protocol.
● "WEP" is set for the encryption method of the wireless access point
● "WEP (Transitional Security Network)" is set for the security protocol of the wireless access point.
Troubleshooting
182

The Connection Between the Scanner and Computer Frequently Cuts Off
Check the following points
● Is the scanner far away from the wireless access point? Is there anything that may block the signal (suchas walls and metal boards), or an electromagnetic source? (page 183)
If the problem persists, check the items in Before You Contact the Scanner Service Provider (page 217)first, then contact the distributor/dealer where you purchased this product. Refer to the contactinformation in the Contact List if supplied with this product, or refer to the contact information in theContact for Inquiries section if provided in Safety Precautions supplied with this product, and then make aninquiry.
● Is the scanner far away from the wireless access point? Is there anything that may block the signal (such aswalls and metal boards), or an electromagnetic source?
Solution
The signal between the wireless access point and the scanner may be weak, or there may be some signalinterference.Check the icon on the lower left side of the touch screen for the signal status.
Icon Signal Strength
Strong
Medium
Weak
Not connected
If the signal is weak, change the installation locations of the scanner and the wireless access point.
● Move the scanner closer to the wireless access point.
● Move the scanner and the wireless access point away from the following.
- Objects that may block the signal (such as walls and metal boards)
- Devices that may cause signal interference (such as microwaves and cordless phones) and wirelessdevices
● Change the direction that the scanner is facing.Also, communication in certain wireless channels may become unstable due to signal interference such asnoise.Change the value of the wireless channel on the wireless access point.
Troubleshooting
183

Cannot Connect the Scanner and a Computer via a Wired LAN
Check the following points
● Is the scanner connected to a network device (such as a switch, a hub, or a router) via a LAN cable?(page 184)
● Is [Wired LAN] selected for the connection setting? (page 184)
● Is the network device (such as a switch, a hub, or a router) turned on? (page 185)
● Is the firmware version for the network device the latest? (page 185)
● Is the computer connected to a network device (such as a switch, a hub, or a router)? (page 185)
● Did you configure the settings related to communication conditions on a network device (such as aswitch, a hub, or a router)? (page 185)
● Are there any security limitations in the network? (page 185)
● Is the network stable? (page 186)
● Are there any security restrictions on the computer? (page 186)
● Is the computer connected to a wired LAN? (page 186)
● Is the scanner connected to another computer? (page 186)
● Is the scanner's IP address correct? (page 187)
● Is the IP address of the scanner used for other communication devices? (page 187)
● Is the DNS server information configured correctly? (page 187)
● Does the DNS server function normally? (page 187)If the problem persists, check the items in Before You Contact the Scanner Service Provider (page 217)first, then contact the distributor/dealer where you purchased this product. Refer to the contactinformation in the Contact List if supplied with this product, or refer to the contact information in theContact for Inquiries section if provided in Safety Precautions supplied with this product, and then make aninquiry.
● Is the scanner connected to a network device (such as a switch, a hub, or a router) via a LAN cable?
Solution
Connect the scanner to a network device (such as a switch, a hub, or a router) via a LAN cable. Also,connect the LAN cable properly.When the LAN cable is connected properly, take the following measures:
● Replace the LAN cable.
● Change the port on the network device, which the LAN cable is connected to.
● Change the transmission method for the network device to "full-duplex" or "half-duplex".
● Is [Wired LAN] selected for the connection setting?
Solution
Check the connection method in the following procedure:
Troubleshooting
184

1 On the touch screen, press → [Scanner Settings] → [How to connect].
2 On the [How to connect] screen, check that [Wired LAN] is selected.
● Is the network device (such as a switch, a hub, or a router) turned on?
Solution
Turn on the network device (such as a switch, a hub, or a router).Also, check that there is no error or malfunction on the network device.For errors that occur on the network device, refer to the manual of your network device.
● Is the firmware version for the network device the latest?
Solution
If the firmware version for the network device is not the latest, unexpected operations may occur.Contact the network administrator to check the firmware version, and consider updating it to the latestversion.For details about how to update the firmware for the network device, refer to the manual of your networkdevice.
● Is the computer connected to a network device (such as a switch, a hub, or a router)?
Solution
Connect the computer to a network device (such as a switch, a hub, or a router).For details, refer to the manual of your computer.
● Did you configure the settings related to communication conditions on a network device (such as a switch,a hub, or a router)?
Solution
When the following are set on the network device (such as a switch, a hub, or a router), take measuresaccordingly.
● Protocol filter function is enabled.Allow the protocol which is to be used for communication.
● MAC address filtering is enabled.Configure the network device (such as a switch, a hub, or a router) with the MAC address of the scanner.
For the settings on the network device, refer to the manual of your network device.
● Are there any security limitations in the network?
Solution
The access limitations for users may be configured in the network.For details, contact the network administrator.
Troubleshooting
185

● Is the network stable?
Solution
Connect to the network after it becomes stable.A network can be unstable by the following events:
● A network monitoring program is running.
● A file is transferring.If the network is unstable, restart the network devices. However, before restarting them, make sure thatcommunications with other devices are not affected if the network devices are restarted. The networkdevices may become unstable.
● Are there any security restrictions on the computer?
Solution
In the Windows Firewall settings or in the firewall settings of your security software, unblock thecommunication of the port numbers which are used by the following software.
● fi-7300NX Scanner Selection ToolPort number: 52217
● fi-7300NX Button Event ManagerPort number: 53218
For details about unblocking the communication, refer to the manual or help of your computer or securitysoftware.
● Is the computer connected to a wired LAN?
Solution
Check the connection status of the computer in the following procedure:
1 On the touch screen, press → [Scanner Settings] → [Network] → [Check connection (Ping)].
2 In the [Check connection (Ping)] screen, enter the host name or the IP address of the computer,and press the [Run] button.The result is displayed.Refer to Connection Test Result (page 161) and take measures accordingly.
● Is the scanner connected to another computer?
Solution
The scanner can be connected to only one computer at a time. Wait until the other computer isdisconnected from the scanner, and then connect the computer to be used again.
Troubleshooting
186

● Is the scanner's IP address correct?
Solution
Check the scanner's IP address in the following procedure:
1 On the touch screen, press → [Scanner Settings] → [Network] → [Wired LAN] → [IP
Address].
2 On the [IP Address] screen, check the setting items.When specifying an IP address manually, specify the correct IP address.When setting the IP address automatically, check whether the DHCP server functions normally.Even when the DHCP server functions normally, an IP address may not be assigned correctlydepending on the settings for the DHCP server. Check the operation status and the settings forthe DHCP server.
● Is the IP address of the scanner used for other communication devices?
Solution
If there are multiple communication devices using the same IP address on the same network,communication may fail. Avoid duplicates in IP addresses.
● Is the DNS server information configured correctly?
Solution
Check the DNS server settings for the scanner in the following procedure:
1 On the touch screen, press → [Scanner Settings] → [Network] → [Wired LAN] → [DNS
Server].
2 On the [DNS Server] screen, check the setting items for the following.
● Whether the DNS server settings is enabled
● Whether the primary DNS and secondary DNS settings are correct
● Does the DNS server function normally?
Solution
Check whether the DNS server functions normally by following the procedure below.
1 On the touch screen, press → [Scanner Settings] → [Network] → [Check connection (Ping)].
2 In the [Check connection (Ping)] screen, enter the IP address of the DNS server, and press the[Run] button.The result is displayed.
Troubleshooting
187

Refer to Connection Test Result (page 161) and take measures accordingly.If the DNS server does not function normally, contact the DNS server administrator.
Troubleshooting
188

Cannot Connect the Scanner and a Computer via a USB Cable
Check the following points
● Did you select [Automatic] for the USB setting for the scanner? (page 189)If the problem persists, check the items in Before You Contact the Scanner Service Provider (page 217)first, then contact the distributor/dealer where you purchased this product. Refer to the contactinformation in the Contact List if supplied with this product, or refer to the contact information in theContact for Inquiries section if provided in Safety Precautions supplied with this product, and then make aninquiry.
● Did you select [Automatic] for the USB setting for the scanner?
Solution
If you select [Automatic] for the USB setting for the scanner, the connection between the scanner and acomputer may not be able to be established.Change the USB setting for the scanner to [USB 2.0] in the following procedure:
1 On the touch screen, press → [Scanner Settings] → [USB].
2 Select [USB 2.0].
Troubleshooting
189

Cannot Connect the Scanner to a Destination by Specifying an IP Address
Check the following points
● Are the scanner and server connected to the network? (page 190)
● Is the scanner's IP address correct? (page 190)
● Is the IP address of the scanner used for other communication devices? (page 191)
● Have you connected another communication device with the same IP address as the scanner to theserver in the past? (page 191)
● Is there a firewall device on the same network as the scanner and the server? (page 191)
● Are the settings on the scanner that are related to the server specified correctly? (page 191)
● Are the settings on the server specified correctly? (page 191)If the problem persists, check the items in Before You Contact the Scanner Service Provider (page 217)first, then contact the distributor/dealer where you purchased this product. Refer to the contactinformation in the Contact List if supplied with this product, or refer to the contact information in theContact for Inquiries section if provided in Safety Precautions supplied with this product, and then make aninquiry.
● Are the scanner and server connected to the network?
Solution
Refer to the following and take measures according to the connection method.
● For Wi-FiCannot Connect the Scanner and a Computer via Wi-Fi (page 169)
● For a wired LANCannot Connect the Scanner and a Computer via a Wired LAN (page 184)
● Is the scanner's IP address correct?
Solution
Check the scanner's IP address in the following procedure:
1 On the touch screen, press → [Scanner Settings] → [Network].
2 Perform one of the following according to the connection method.For Wi-Fi, press [Wi-Fi] → [IP Address].For a wired LAN, press [Wired LAN] → [IP Address].
3 On the [IP Address] screen, check the setting items.When specifying an IP address manually, specify the correct IP address.When setting the IP address automatically, check whether the DHCP server functions normally.Even when the DHCP server functions normally, an IP address may not be assigned correctlydepending on the settings for the DHCP server. Check the operation status and the settings forthe DHCP server.
Troubleshooting
190

● Is the IP address of the scanner used for other communication devices?
Solution
If there are multiple communication devices using the same IP address on the same network,communication may fail. Avoid duplicates in IP addresses.
● Have you connected another communication device with the same IP address as the scanner to the serverin the past?
Solution
Communication fails if you connect the scanner to the server and change the preferences settings withoutturning off the server after the server communicated with another host or communication device with thesame IP address as the scanner. Restart the server.
● Is there a firewall device on the same network as the scanner and the server?
Solution
Check that the access from the scanner is not prohibited by the firewall device.
● Are the settings on the scanner that are related to the server specified correctly?
Solution
Check the server setting items in the following procedure:
1 On the touch screen, press → [Scanner Settings] → [Network] → [Server].
2 Press the server to be connected to, and check the setting items.
● Whether [Enable] is on.
● Whether [Host Name/IP address] and [Port Number] are correct.
● Whether the setting for [Authentication] for a proxy sever is correct.
● Are the settings on the server specified correctly?
Solution
Refer to the manual for the server and check the settings.
Troubleshooting
191

Cannot Connect the Scanner to a Destination by Specifying a Host Name
Check the following points
● Is the DNS server information configured correctly? (page 192)
● Does the DNS server function normally? (page 192)
● Are the scanner and server connected to the network? (page 193)
● Is the scanner's IP address correct? (page 193)
● Is the IP address of the scanner used for other communication devices? (page 193)
● Have you connected another communication device with the same IP address as the scanner to theserver in the past? (page 194)
● Is there a firewall device on the same network as the scanner and the server? (page 194)
● Are the settings on the scanner that are related to the server specified correctly? (page 194)
● Are the settings on the server specified correctly? (page 194)If the problem persists, check the items in Before You Contact the Scanner Service Provider (page 217)first, then contact the distributor/dealer where you purchased this product. Refer to the contactinformation in the Contact List if supplied with this product, or refer to the contact information in theContact for Inquiries section if provided in Safety Precautions supplied with this product, and then make aninquiry.
● Is the DNS server information configured correctly?
Solution
Check the DNS server settings for the scanner in the following procedure:
1 On the touch screen, press → [Scanner Settings] → [Network].
2 Perform one of the following according to the connection method.For Wi-Fi, press [Wi-Fi] → [DNS Server].For Wired LAN, press [Wired LAN] → [DNS Server].
3 On the [DNS Server] screen, check the setting items for the following.
● Whether the DNS server settings is enabled
● Whether the primary DNS and secondary DNS settings are correct
● Does the DNS server function normally?
Solution
Check whether the DNS server functions normally by following the procedure below.
1 On the touch screen, press → [Scanner Settings] → [Network] → [Check connection (Ping)].
Troubleshooting
192

2 In the [Check connection (Ping)] screen, enter the IP address of the DNS server, and press the[Run] button.The result is displayed.Refer to Connection Test Result (page 161) and take measures accordingly.If the DNS server does not function normally, contact the DNS server administrator.
● Are the scanner and server connected to the network?
Solution
Refer to the following and take measures according to the connection method.
● For Wi-FiCannot Connect the Scanner and a Computer via Wi-Fi (page 169)
● For a wired LANCannot Connect the Scanner and a Computer via a Wired LAN (page 184)
● Is the scanner's IP address correct?
Solution
Check the scanner's IP address in the following procedure:
1 On the touch screen, press → [Scanner Settings] → [Network].
2 Perform one of the following according to the connection method.For Wi-Fi, press [Wi-Fi] → [IP Address].For a wired LAN, press [Wired LAN] → [IP Address].
3 On the [IP Address] screen, check the setting items.When specifying an IP address manually, specify the correct IP address.When setting the IP address automatically, check whether the DHCP server functions normally.Even when the DHCP server functions normally, an IP address may not be assigned correctlydepending on the settings for the DHCP server. Check the operation status and the settings forthe DHCP server.
● Is the IP address of the scanner used for other communication devices?
Solution
If there are multiple communication devices using the same IP address on the same network,communication may fail. Avoid duplicates in IP addresses.
Troubleshooting
193

● Have you connected another communication device with the same IP address as the scanner to the serverin the past?
Solution
Communication fails if you connect the scanner to the server and change the preferences settings withoutturning off the server after the server communicated with another host or communication device with thesame IP address as the scanner. Restart the server.
● Is there a firewall device on the same network as the scanner and the server?
Solution
Check that the access from the scanner is not prohibited by the firewall device.
● Are the settings on the scanner that are related to the server specified correctly?
Solution
Check the server setting items in the following procedure:
1 On the touch screen, press → [Scanner Settings] → [Network] → [Server].
2 Press the server to be connected to, and check the setting items.
● Whether [Enable] is on.
● Whether [Host Name/IP address] and [Port Number] are correct.
● Whether the setting for [Authentication] for a proxy sever is correct.
● Are the settings on the server specified correctly?
Solution
Refer to the manual for the server and check the settings.
Troubleshooting
194

Scanning Does Not Start
Check the following points
● Is the document loaded in the ADF paper chute (feeder) correctly? (page 195)
● Is the ADF closed properly? (page 195)
● Are the scanner and the computer properly connected? (page 195)If the problem persists, check the items in Before You Contact the Scanner Service Provider (page 217)first, then contact the distributor/dealer where you purchased this product. Refer to the contactinformation in the Contact List if supplied with this product, or refer to the contact information in theContact for Inquiries section if provided in Safety Precautions supplied with this product, and then make aninquiry.
● Is the document loaded in the ADF paper chute (feeder) correctly?
Solution
Reload the document in the ADF paper chute (feeder).
● Is the ADF closed properly?
Solution
Close the ADF firmly.If the document is caught in the ADF, remove the document and close the ADF.
● Are the scanner and the computer properly connected?
Solution
● For Wi-FiConnect the scanner and the computer via Wi-Fi. When you cannot connect them via Wi-Fi, refer toCannot Connect the Scanner and a Computer via Wi-Fi (page 169).
● For a wired LANConnect the scanner and the computer via a wired LAN. When you cannot connect them via a wired LAN,refer to Cannot Connect the Scanner and a Computer via a Wired LAN (page 184).
● For USBConnect the USB cable properly. For details, refer to When Connecting the Scanner to the Computer via aUSB Cable (page 48).
Troubleshooting
195

Scanning Takes a Long Time
Check the following points
● Does the computer meet the recommended requirements? (page 196)
● If a USB connection is used, is the USB cable connected to the USB 1.1 port on the computer? (page196)
● Did you start a scan while the computer was unstable (for example, immediately after computer start-upor logon)? (page 196)
● Are the rollers clean? (page 196)If the problem persists, check the items in Before You Contact the Scanner Service Provider (page 217)first, then contact the distributor/dealer where you purchased this product. Refer to the contactinformation in the Contact List if supplied with this product, or refer to the contact information in theContact for Inquiries section if provided in Safety Precautions supplied with this product, and then make aninquiry.
● Does the computer meet the recommended requirements?
Solution
Use a computer that meets the recommended CPU, memory, and other requirements.For details, refer to System Requirements (page 53).
● If a USB connection is used, is the USB cable connected to the USB 1.1 port on the computer?
Solution
If a USB connection is used, connect the USB cable to the USB 3.1 Gen1/USB 3.0/USB 2.0 port.
● Did you start a scan while the computer was unstable (for example, immediately after computer start-upor logon)?
Solution
When you start or log onto the computer, wait a while before starting a scan.
● Are the rollers clean?
Solution
Clean the rollers.For details, refer to Cleaning the Inside of the Scanner (ADF) with a Cloth (page 121).
Troubleshooting
196

Image Quality Is Poor
Check the following points
● Did you configure the settings in the scanner driver to scan in black & white mode? (page 197)
● Are the glass and rollers inside the ADF clean? (page 197)If the problem persists, check the items in Before You Contact the Scanner Service Provider (page 217)first, then contact the distributor/dealer where you purchased this product. Refer to the contactinformation in the Contact List if supplied with this product, or refer to the contact information in theContact for Inquiries section if provided in Safety Precautions supplied with this product, and then make aninquiry.
● Did you configure the settings in the scanner driver to scan in black & white mode?
Solution
Use a scanner driver to configure the scan settings that do not "binarize" (output in black and white), andthen perform a scan.The scanned image may differ from the original image significantly if you simply "binarize" (output inblack & white) a picture or a photo.
● Are the glass and rollers inside the ADF clean?
Solution
Clean the dirty parts.For details, refer to Cleaning the Inside of the Scanner (ADF) with a Cloth (page 121).
Troubleshooting
197

Quality of Scanned Text or Lines Is Unsatisfactory
Check the following points
● Are the glass and rollers inside the ADF clean? (page 198)
● Is the resolution appropriate? (page 198)
● Did you configure the settings in the scanner driver to scan in grayscale or color mode? (page 198)
● Is there any foreign matter (such as dust or paper dust) on the document? (page 198)If the problem persists, check the items in Before You Contact the Scanner Service Provider (page 217)first, then contact the distributor/dealer where you purchased this product. Refer to the contactinformation in the Contact List if supplied with this product, or refer to the contact information in theContact for Inquiries section if provided in Safety Precautions supplied with this product, and then make aninquiry.
● Are the glass and rollers inside the ADF clean?
Solution
Clean the dirty parts.For details, refer to Cleaning the Inside of the Scanner (ADF) with a Cloth (page 121).
● Is the resolution appropriate?
Solution
Specify a higher resolution in the scanner driver.
● Did you configure the settings in the scanner driver to scan in grayscale or color mode?
Solution
Configure the settings in the scanner driver to scan in black & white mode.When you scan in grayscale or in color mode, the scanned image may not become sharp and clear.
● Is there any foreign matter (such as dust or paper dust) on the document?
Solution
Remove any foreign matter off the document.Foreign matter may get on the glass that is inside the ADF, and cause the image to appear dirty.
Troubleshooting
198

Images Are Distorted or Not Clear
Check the following points
● Are the glass and rollers inside the ADF clean? (page 199)
● Is the ADF being pushed down during scanning? Or, is there a heavy object on top of the ADF? (page199)
● Is a scan performed on a place that is unstable or vibrates? (page 199)
● Is the scanner placed on a flat, level surface? Are the rubber pads attached on the bottom of thescanner? (page 199)
● Are there any wrinkles or curls on the document? (page 199)If the problem persists, check the items in Before You Contact the Scanner Service Provider (page 217)first, then contact the distributor/dealer where you purchased this product. Refer to the contactinformation in the Contact List if supplied with this product, or refer to the contact information in theContact for Inquiries section if provided in Safety Precautions supplied with this product, and then make aninquiry.
● Are the glass and rollers inside the ADF clean?
Solution
Clean the dirty parts.For details, refer to Cleaning the Inside of the Scanner (ADF) with a Cloth (page 121).
● Is the ADF being pushed down during scanning? Or, is there a heavy object on top of the ADF?
Solution
Do not push down the top of the ADF, or place any heavy objects on the ADF during scanning.
● Is a scan performed on a place that is unstable or vibrates?
Solution
Perform a scan on a place that is stable and does not vibrate.
● Is the scanner placed on a flat, level surface? Are the rubber pads attached on the bottom of the scanner?
Solution
Place the scanner on a flat and level surface.Or, attach the rubber pads on the bottom of the scanner.
● Are there any wrinkles or curls on the document?
Solution
Smooth out the wrinkles or curls on the document.
Troubleshooting
199

Vertical Streaks Appear on the Images
Check the following points
● Are the glass and rollers inside the ADF clean? (page 200)
● Is there any foreign matter (such as dust or paper dust) on the document? (page 200)
● Is [Vertical Streaks Reduction] enabled in the scanner driver for a scan? (page 200)If the problem persists, check the items in Before You Contact the Scanner Service Provider (page 217)first, then contact the distributor/dealer where you purchased this product. Refer to the contactinformation in the Contact List if supplied with this product, or refer to the contact information in theContact for Inquiries section if provided in Safety Precautions supplied with this product, and then make aninquiry.
● Are the glass and rollers inside the ADF clean?
Solution
Clean the dirty parts.For details, refer to Cleaning the Inside of the Scanner (ADF) with a Cloth (page 121).
● Is there any foreign matter (such as dust or paper dust) on the document?
Solution
Remove any foreign matter off the document.Foreign matter may get on the glass that is inside the ADF, and cause the image to appear dirty.
● Is [Vertical Streaks Reduction] enabled in the scanner driver for a scan?
Solution
Enable [Vertical Streaks Reduction] in the scanner driver, and then perform a scan.
Troubleshooting
200

Error Code "U4:40" Is Displayed on the Touch Screen While Scanning
Check the following points
● Is the ADF closed firmly? (page 201)If the problem persists, check the items in Before You Contact the Scanner Service Provider (page 217)first, then contact the distributor/dealer where you purchased this product. Refer to the contactinformation in the Contact List if supplied with this product, or refer to the contact information in theContact for Inquiries section if provided in Safety Precautions supplied with this product, and then make aninquiry.
● Is the ADF closed firmly?
Solution
Close the ADF firmly.For details, refer to How to Close the ADF (page 64).
Troubleshooting
201

Overlapped Documents Are Frequently Fed into the Scanner
Check the following points
● Do the documents meet the paper requirements? (page 202)
● Are you using the Carrier Sheet? (page 202)
● If the setting to detect overlapped documents is enabled, do the documents fulfill the conditions todetect overlapped documents accurately? (page 202)
● Did you scan a thick document such as a plastic card? (page 203)
● Did you fan the documents before loading them? (page 203)
● Have the documents just been printed out from a copy machine or a laser printer? (page 203)
● Are the brake roller and pick roller installed correctly? (page 203)
● Are the brake roller and pick roller clean? (page 203)
● Are the brake roller and pick roller worn out? (page 203)
● Are you using the scanner at an altitude of 2,000 m or higher? (page 204)If the problem persists, check the items in Before You Contact the Scanner Service Provider (page 217)first, then contact the distributor/dealer where you purchased this product. Refer to the contactinformation in the Contact List if supplied with this product, or refer to the contact information in theContact for Inquiries section if provided in Safety Precautions supplied with this product, and then make aninquiry.
● Do the documents meet the paper requirements?
Solution
Use documents that meet the requirements.For details, refer to Documents for Scanning (page 81).
● Are you using the Carrier Sheet?
Solution
Configure the scan settings in the scanner driver to use the Carrier Sheet.For details, refer to Scanning Photographs and Clippings (page 103).
● If the setting to detect overlapped documents is enabled, do the documents fulfill the conditions to detectoverlapped documents accurately?
Solution
Fulfill the conditions to detect overlapped documents accurately.For details, refer to Conditions Required to Accurately Detect Overlapped Documents (Multifeed) (page87).If necessary, specify the area to detect overlapped documents.For details, refer to Specifying the Area to Detect Overlapped Documents [Document check areaspecification for Multifeed Detection] (page 293).
Troubleshooting
202

● Did you scan a thick document such as a plastic card?
Solution
Perform one of the following for a scan:
● Use the intelligent multifeed detection function.
● Disable the setting to detect overlapped documents by the ultrasonic sensor.
● Scan with Manual Single Mode.
● Did you fan the documents before loading them?
Solution
Fan the documents.For details, refer to Preparation (page 78).
● Have the documents just been printed out from a copy machine or a laser printer?
Solution
Fan the documents a few times to remove static electricity.For details, refer to Preparation (page 78).
● Are the brake roller and pick roller installed correctly?
Solution
Install the brake roller and pick roller correctly.For details, refer to Replacing the Brake Roller (page 129) and Replacing the Pick Roller (page 134).
● Are the brake roller and pick roller clean?
Solution
Clean the brake roller and pick roller.For details, refer to Cleaning the Inside of the Scanner (ADF) with a Cloth (page 121).
● Are the brake roller and pick roller worn out?
Solution
Check the counters for the brake roller and pick roller in the [Consumable counters] screen on the touchscreen, and replace the brake roller and pick roller if necessary.The procedure to display the [Consumable counters] screen is as follows:
→ [Cleaning & Maintenance] → [Consumable counters]
When using the Software Operation Panel, refer to Checking the Sheet Counter (page 266).For details about replacing the brake roller and pick roller, refer to Replacing the Brake Roller (page 129)and Replacing the Pick Roller (page 134).
Troubleshooting
203

● Are you using the scanner at an altitude of 2,000 m or higher?
Solution
In the [High Altitude Mode] screen on the touch screen, set [Enable] to on.The [High Altitude Mode] screen can be displayed in the following procedure:
→ [Scanner Settings] → [Paper Source/Feeding] → [High Altitude Mode]
When using the Software Operation Panel, refer to Scanning at High Altitude [High Altitude Mode] (page288).If the scanner is being used on level ground lower than 2,000 m with [High Altitude Mode] enabled,overlapped documents may not be detected.
Troubleshooting
204

Situation in Which the Document Is not Fed into the ADF Occurs Frequently
Check the following points
● Do the documents meet the paper requirements? (page 205)
● Did you fan the documents before loading them? (page 205)
● Are the brake roller and pick roller installed correctly? (page 205)
● Are the brake roller and pick roller clean? (page 205)
● Are the brake roller and pick roller worn out? (page 205)If the problem persists, check the items in Before You Contact the Scanner Service Provider (page 217)first, then contact the distributor/dealer where you purchased this product. Refer to the contactinformation in the Contact List if supplied with this product, or refer to the contact information in theContact for Inquiries section if provided in Safety Precautions supplied with this product, and then make aninquiry.
● Do the documents meet the paper requirements?
Solution
Use documents that meet the requirements.For details, refer to Documents for Scanning (page 81).
● Did you fan the documents before loading them?
Solution
Fan the documents.For details, refer to Preparation (page 78).
● Are the brake roller and pick roller installed correctly?
Solution
Install the brake roller and pick roller correctly.For details, refer to Replacing the Brake Roller (page 129) and Replacing the Pick Roller (page 134).
● Are the brake roller and pick roller clean?
Solution
Clean the brake roller and pick roller.For details, refer to Cleaning the Inside of the Scanner (ADF) with a Cloth (page 121).
● Are the brake roller and pick roller worn out?
Solution
Check the counters for the brake roller and pick roller in the [Consumable counters] screen on the touchscreen, and replace the brake roller and pick roller if necessary.The procedure to display the [Consumable counters] screen is as follows:
Troubleshooting
205

→ [Cleaning & Maintenance] → [Consumable counters]
When using the Software Operation Panel, refer to Checking the Sheet Counter (page 266).For details about replacing the brake roller and pick roller, refer to Replacing the Brake Roller (page 129)and Replacing the Pick Roller (page 134).
Troubleshooting
206

Paper Protection Is Set Off Frequently
Check the following points
● Do the documents meet the paper requirements? (page 207)
● Is there any foreign matter in the ADF? (page 207)
● Are the brake roller and pick roller installed correctly? (page 207)
● Are the brake roller and pick roller clean? (page 207)
● Are the brake roller and pick roller worn out? (page 208)
● Is the sensitivity level for the paper protection function set to high in the touch screen or the SoftwareOperation Panel? (page 208)
If the problem persists, check the items in Before You Contact the Scanner Service Provider (page 217)first, then contact the distributor/dealer where you purchased this product. Refer to the contactinformation in the Contact List if supplied with this product, or refer to the contact information in theContact for Inquiries section if provided in Safety Precautions supplied with this product, and then make aninquiry.
● Do the documents meet the paper requirements?
Solution
Use documents that meet the requirements.For details, refer to Documents for Scanning (page 81).
● Is there any foreign matter in the ADF?
Solution
Clean the ADF.Remove any foreign matter from the ADF.For details, refer to Cleaning the Inside of the Scanner (ADF) with a Cloth (page 121).
● Are the brake roller and pick roller installed correctly?
Solution
Install the brake roller and pick roller correctly.For details, refer to Replacing the Brake Roller (page 129) and Replacing the Pick Roller (page 134).
● Are the brake roller and pick roller clean?
Solution
Clean the brake roller and pick roller.For details, refer to Cleaning the Inside of the Scanner (ADF) with a Cloth (page 121).
Troubleshooting
207

● Are the brake roller and pick roller worn out?
Solution
Check the counters for the brake roller and pick roller in the [Consumable counters] screen on the touchscreen, and replace the brake roller and pick roller if necessary.The procedure to display the [Consumable counters] screen is as follows:
→ [Cleaning & Maintenance] → [Consumable counters]
When using the Software Operation Panel, refer to Checking the Sheet Counter (page 266).For details about replacing the brake roller and pick roller, refer to Replacing the Brake Roller (page 129)and Replacing the Pick Roller (page 134).
● Is the sensitivity level for the paper protection function set to high in the touch screen or the SoftwareOperation Panel?
Solution
In the [Paper protection] screen on the touch screen, select [Low] for [Feeding Accuracy Sensitivity] and[Feeding Noise Sensitivity].The [Paper protection] screen can be displayed in the following procedure:
→ [Scanner Settings] → [Paper Protection] → [Paper protection] or, [Paper Protection (Touch Screen
Settings)].When using the Software Operation Panel, refer to Specifying the Sensitivity Level for Paper Protection[Paper Protection Sensitivity] (page 286).
Troubleshooting
208

Paper Jams/Pick Errors Occur Frequently
Check the following points
● Do the documents meet the paper requirements? (page 209)
● Is there any foreign matter in the ADF? (page 209)
● Are the brake roller and pick roller installed correctly? (page 209)
● Are the brake roller and pick roller clean? (page 209)
● Are the brake roller and pick roller worn out? (page 209)If the problem persists, check the items in Before You Contact the Scanner Service Provider (page 217)first, then contact the distributor/dealer where you purchased this product. Refer to the contactinformation in the Contact List if supplied with this product, or refer to the contact information in theContact for Inquiries section if provided in Safety Precautions supplied with this product, and then make aninquiry.
● Do the documents meet the paper requirements?
Solution
Use documents that meet the requirements.For details, refer to Documents for Scanning (page 81).
● Is there any foreign matter in the ADF?
Solution
Clean the ADF.Remove any foreign matter from the ADF.For details, refer to Cleaning the Inside of the Scanner (ADF) with a Cloth (page 121).
● Are the brake roller and pick roller installed correctly?
Solution
Install the brake roller and pick roller correctly.For details, refer to Replacing the Brake Roller (page 129) and Replacing the Pick Roller (page 134).
● Are the brake roller and pick roller clean?
Solution
Clean the brake roller and pick roller.For details, refer to Cleaning the Inside of the Scanner (ADF) with a Cloth (page 121).
● Are the brake roller and pick roller worn out?
Solution
Check the counters for the brake roller and pick roller in the [Consumable counters] screen on the touchscreen, and replace the brake roller and pick roller if necessary.The procedure to display the [Consumable counters] screen is as follows:
Troubleshooting
209

→ [Cleaning & Maintenance] → [Consumable counters]
When using the Software Operation Panel, refer to Checking the Sheet Counter (page 266).For details about replacing the brake roller and pick roller, refer to Replacing the Brake Roller (page 129)and Replacing the Pick Roller (page 134).
Troubleshooting
210

Images Turn Out Elongated
Check the following points
● Are the rollers clean? (page 211)
● Do the documents meet the paper requirements? (page 211)
● Are the brake roller and pick roller installed correctly? (page 211)
● Have you adjusted the magnification level? (page 211)If the problem persists, check the items in Before You Contact the Scanner Service Provider (page 217)first, then contact the distributor/dealer where you purchased this product. Refer to the contactinformation in the Contact List if supplied with this product, or refer to the contact information in theContact for Inquiries section if provided in Safety Precautions supplied with this product, and then make aninquiry.
● Are the rollers clean?
Solution
Clean the rollers.For details, refer to Cleaning the Inside of the Scanner (ADF) with a Cloth (page 121).
● Do the documents meet the paper requirements?
Solution
Use documents that meet the requirements.For details, refer to Documents for Scanning (page 81).
● Are the brake roller and pick roller installed correctly?
Solution
Install the brake roller and pick roller correctly.For details, refer to Replacing the Brake Roller (page 129) and Replacing the Pick Roller (page 134).
● Have you adjusted the magnification level?
Solution
In the [Magnification] screen on the touch screen, adjust the magnification level for feed direction.The [Magnification] screen can be displayed in the following procedure:
→ [Scanner Settings] → [Image] → [Magnification]
When using the Software Operation Panel, refer to Adjusting the Position to Start the Scan [Offset Setting/Vertical magnification Adjustment] (page 272).
Troubleshooting
211

A Shadow Appears at the Top or the Bottom of the Image
Check the following points
● Have you adjusted the offset (position to start the scan)? (page 212)
● Did you use the page edge filler function to fill in the shadow around the edge? (page 212)If the problem persists, check the items in Before You Contact the Scanner Service Provider (page 217)first, then contact the distributor/dealer where you purchased this product. Refer to the contactinformation in the Contact List if supplied with this product, or refer to the contact information in theContact for Inquiries section if provided in Safety Precautions supplied with this product, and then make aninquiry.
● Have you adjusted the offset (position to start the scan)?
Solution
In the [Offset] screen on the touch screen, adjust the offset for [Sub-scan ADF front] and [Sub-scan ADFback].The [Offset] screen can be displayed in the following procedure:
→ [Scanner Settings] → [Image] → [Offset]
When using the Software Operation Panel, refer to Adjusting the Position to Start the Scan [Offset Setting/Vertical magnification Adjustment] (page 272).
● Did you use the page edge filler function to fill in the shadow around the edge?
Solution
In the [Page Edge Filler Area] screen on the touch screen, fill in the shadow around the edge.The [Page Edge Filler Area] screen can be displayed in the following procedure:
→ [Scanner Settings] → [Image] → [Page Edge Filler Area]
When using the Software Operation Panel, refer to Removing Shadows/Streaks that Appear around Edgesof Images [Page Edge Filler (ADF)] (page 275).For the settings in the scanner driver, refer to the scanner driver's Help.
Troubleshooting
212

There Are Black Traces on the Document
Check the following points
● Are you scanning documents written in lead pencil or carbon paper? (page 213)
● Are the glass and rollers inside the ADF clean? (page 213)If the problem persists, check the items in Before You Contact the Scanner Service Provider (page 217)first, then contact the distributor/dealer where you purchased this product. Refer to the contactinformation in the Contact List if supplied with this product, or refer to the contact information in theContact for Inquiries section if provided in Safety Precautions supplied with this product, and then make aninquiry.
● Are you scanning documents written in lead pencil or carbon paper?
Solution
When you scan documents written in lead pencil, make sure you clean the rollers frequently.Otherwise, the rollers will be contaminated which may leave black traces on the document or causefeeding errors.For details, refer to Cleaning the Inside of the Scanner (ADF) with a Cloth (page 121).
● Are the glass and rollers inside the ADF clean?
Solution
Clean the dirty parts.For details, refer to Cleaning the Inside of the Scanner (ADF) with a Cloth (page 121).
Troubleshooting
213

The Carrier Sheet Is Not Fed Smoothly/Paper Jams Occur
Check the following points
● Did you scan just the Carrier Sheet continuously? (page 214)
● Is the Carrier Sheet clean? (page 214)
● Did you start the scan after loading the Carrier Sheet in the ADF paper chute (feeder)? (page 214)
● Are the glass and rollers inside the ADF clean? (page 215)
● Are the brake roller and pick roller worn out? (page 215)
● Is there any foreign matter in the ADF? (page 215)
● Did you place a thick document inside the Carrier Sheet? (page 215)If the problem persists, check the items in Before You Contact the Scanner Service Provider (page 217)first, then contact the distributor/dealer where you purchased this product. Refer to the contactinformation in the Contact List if supplied with this product, or refer to the contact information in theContact for Inquiries section if provided in Safety Precautions supplied with this product, and then make aninquiry.
● Did you scan just the Carrier Sheet continuously?
Solution
Feed about 50 sheets of PPC paper (recycled paper) before scanning with the Carrier Sheet.The PPC paper can either be blank or printed.
● Is the Carrier Sheet clean?
Solution
Perform one of the following.
● Clean the Carrier Sheet.For details, refer to Cleaning the Carrier Sheet (page 126).
● Replace the Carrier Sheet.For information on purchasing the Carrier Sheets, contact the distributor/dealer where you purchasedthis product. Refer to the contact information in the Contact List if supplied with this product, or refer tothe contact information in the Contact for Inquiries section if provided in Safety Precautions suppliedwith this product, and then make an inquiry.
● Did you start the scan after loading the Carrier Sheet in the ADF paper chute (feeder)?
Solution
Start the scan after loading the Carrier Sheet in the ADF paper chute (feeder).For details, refer to Scanning Photographs and Clippings (page 103).
Troubleshooting
214

● Are the glass and rollers inside the ADF clean?
Solution
Clean the dirty parts.For details, refer to Cleaning the Inside of the Scanner (ADF) with a Cloth (page 121).
● Are the brake roller and pick roller worn out?
Solution
Check the counters for the brake roller and pick roller in the [Consumable counters] screen on the touchscreen, and replace the brake roller and pick roller if necessary.The procedure to display the [Consumable counters] screen is as follows:
→ [Cleaning & Maintenance] → [Consumable counters]
When using the Software Operation Panel, refer to Checking the Sheet Counter (page 266).For details about replacing the brake roller and pick roller, refer to Replacing the Brake Roller (page 129)and Replacing the Pick Roller (page 134).
● Is there any foreign matter in the ADF?
Solution
Clean the ADF.Remove any foreign matter from the ADF.For details, refer to Cleaning the Inside of the Scanner (ADF) with a Cloth (page 121).
● Did you place a thick document inside the Carrier Sheet?
Solution
Some papers may be too thick to place inside the Carrier Sheet.Use documents that meet the requirements.For details, refer to Conditions for Using the Carrier Sheet (page 93).
Troubleshooting
215

Part of the Image Appears Missing in the Case Where the Carrier Sheet Is Used
Check the following points
● Did you place several small documents (such as photos or postcards) in the Carrier Sheet for scanning?(page 216)
● Does the fold line of the document hang off the Carrier Sheet? (page 216)If the problem persists, check the items in Before You Contact the Scanner Service Provider (page 217)first, then contact the distributor/dealer where you purchased this product. Refer to the contactinformation in the Contact List if supplied with this product, or refer to the contact information in theContact for Inquiries section if provided in Safety Precautions supplied with this product, and then make aninquiry.
● Did you place several small documents (such as photos or postcards) in the Carrier Sheet for scanning?
Solution
Place only one document (such as a photo or postcard) at a time in the Carrier Sheet.
● Does the fold line of the document hang off the Carrier Sheet?
Solution
Part of the image around where the document is folded may appear missing.Place the document so its fold line is set about 1 mm inside from the edge of the Carrier Sheet.
Troubleshooting
216

Before You Contact the Scanner Service Provider
Please check the following items before contacting the distributor/dealer where you purchased this product.
● General (page 217)
● Error Status (page 217)
General
Item Findings
Scanner name Example: fi-7300NXFor details, refer to Checking the ProductLabel (page 219).
Serial No. Example: XXXX000001For details, refer to Checking the ProductLabel (page 219).
Date of manufacture Example: 20XX-01 (January 20XX)For details, refer to Checking the ProductLabel (page 219).
Date of purchase
Symptom
Frequency of trouble
Warranty
Options used
Error Status
● Computer Connection Issues
Item Findings
Operating system (Windows)
Error message
Interface Example: USB interface
Interface controller
Connection method Example: Wi-Fi
Troubleshooting
217

● Feeding Issues
Item Findings
Paper type
Main purpose of use
Date of last cleaning
Date of consumable replacement
Touch screen status
● Image Quality Issues
Item Findings
Scanner driver and version
Interface controller
Operating system (Windows)
Application Example: PaperStream Capture
Scanning sides Example: front, back, both
Resolution Example: 600 dpi, 75 dpi
Image mode Example: color, grayscale, black & white
● Other
Item Findings
Can you send the output image and a photo that shows thepaper condition by e-mail or fax?
Troubleshooting
218

Checking the Product LabelThis section explains about the product label on the scanner.
The label is located on the place indicated in the following figure:
Label (example): Shows the scanner information.
Troubleshooting
219

Scanner Settings (Touch Screen)
This section explains how to use the touch screen to configure the scanner settings.
HINT
Some setting items can also be configured from the Software Operation Panel. For details, refer to ScannerSettings (Software Operation Panel) (page 248).
Setting Items
The scanner settings can be changed in [Scanner Settings] on the screen that appears when you press in the
lower right of the touch screen.This section shows a list of setting items that you can configure.
ATTENTION
To change the scanner settings, the administrator password is required. The default password is "password".Change the administrator password to prevent the settings from being changed by other users.Also, change the administrator password regularly.The administrator password can be changed in the screen that appears in the following procedure:
→ [Scanner Settings] → [Admin Password]
Setting Items Description
How to connect (page 223) Specify a connection method for the scanner.
Power Management(page 224)
Startup mode (page 224) Specify a startup mode for the scanner.
Power Save Mode (page224)
You can specify the waiting time for the scanner toautomatically enter power saving mode or to beautomatically turned off if it is left on for a certainperiod of time without being used.
Power Button (page 224) Specify whether or not to turn on/off the scanner bypressing the [Power] button on the scanner.
Scanner Name (page 226) Set a scanner name.
Scanner Code (page 226) Specify whether or not to issue a scanner code.If the "PaperStream NX Manager" setting is enabled, ascanner code can be used when scanning with a userapplication on a computer or mobile device.
Network (page 227) Wi-Fi (page 227) Configure the settings for Wi-Fi.
220

Setting Items Description
Wired LAN (page 228) Configure the settings for wired LAN.
Server (page 228) Configure the settings for a server, which is to beconnected to the scanner.
Network Encryption (page230)
Specify whether to encrypt network communications.
Check connection (Ping)(page 230)
Check the communication status between the scannerand the connected computer.
Paper Source/Feeding(page 232)
Pre-Pick (page 232) Enable this to shorten the scanning time whenscanning continuously.
Retry Paper Feeding(page 232)
Specify the number of feeding retries when adocument is not fed from the ADF paper chute(feeder).
Multifeed Detection (page232)
Configure the settings to detect overlappeddocuments during a scan.
Multifeed Detection Area(page 234)
Specify an area to detect overlapped documents.
Intelligent MultifeedDetection (page 235)
Configure the setting to automatically ignore certainpatterns of overlapped documents when the settingto detect overlapped documents is enabled.
Manual Feeding (page236)
Configure the settings when manually loading andscanning one sheet at a time.
High Altitude Mode (page236)
Enable this mode to use the scanner at an altitude of2,000 m or higher.
Paper Protection (page238)
Paper protection (page238)
Configure the setting to detect feeding errors.
Paper Protection (TouchScreen Settings) (page239)
Enable this option when you want some settings tobe prioritized over the settings for [Paper Protection]and the Software Operation Panel.
Prioritize the touch screensettings (page 239)
Image (page 241) Automatic Page SizeDetection (page 241)
When the scanner is set to detect the paper sizeautomatically, specify whether or not to optimize(round up/down) the fractional part of the scannedimage.
Page Edge Filler Area(page 241)
Configure the settings to fill in the shadow or streaksaround the edge of the scanned image.
Scanner Settings (Touch Screen)
221

Setting Items Description
Dropout Color (page 242) You can exclude a color from being scanned byselecting either red, green, or blue (three primarycolors).
Offset (page 243) Specify a starting position for scanning.
Magnification (page 244) Specify the magnification level for the feed direction.
Image Quality Mode(page 244)
To obtain an image quality that is close to the imagequality for scanning with fi-6130Z, set the imagequality mode.
Cleaning & Maintenance(page 245)
Cleaning cycle (page245)
Specify the cleaning cycle for the scanner inside.
Replacement of the PickRoller (page 245)
Specify the replacement cycle for the pick roller.
Replacement of the BrakeRoller (page 245)
Specify the replacement cycle for the brake roller
Maintenance cycle (page246)
Specify the maintenance and inspection cycle for thescanner that is performed by a service engineer.
USB (page 246) Specify how the USB function operates.
Admin Password (page 246) Change or disable the administrator password.
Restore Factory Defaults (page 247) Restore the scanner settings to the factory default.
ATTENTION
You cannot back up or restore the scanner settings on the touch screen.
Scanner Settings (Touch Screen)
222

How to connect
How to connect
Specify a connection method for the scanner.
● Wi-Fi
● Wired LAN
● USB
Continue with the Settings
When [Continue with the Settings] is set to on, you can configure the necessary information for theconnection after this setting.
Scanner Settings (Touch Screen)
223

Power Management
Startup mode
Specify a startup mode for the scanner.
● FastThe scanner enters power saving mode by pressing the [Power] button for 2 seconds or more.The scanner can perform a scan immediately when it resumes from power saving mode.
● NormalThe scanner is turned off by pressing the [Power] button for 2 seconds or more.This is the factory default setting.
ATTENTION
If you select [Fast], the scanner is not turned off regardless of the [Auto Shutdown hours] in [PowerSave Mode].
Power Save Mode
You can specify the waiting time for the scanner to automatically enter power saving mode or to beautomatically turned off if it is left on for a certain period of time without being used.
Power Save minutes
Specify the waiting time before the scanner enters power saving mode.The factory default setting is "15".
Auto Shutdown hours
Specify the waiting time before the scanner turns off automatically.
● Disabled (Never)
● 1
● 2
● 4This is the factory default setting.
● 8
ATTENTION
● If [Fast] is selected for [Startup mode], this setting will be ignored.
● If [Disable Power Button] is selected for [Power Button], this setting will be ignored.
Power Button
Specify whether or not to turn on/off the scanner by pressing the [Power] button on the scanner.
● Enable Power ButtonThe [Power] button on the scanner is used to turn on/off the scanner.
Scanner Settings (Touch Screen)
224

This is the factory default setting.
● Disable Power ButtonSelect this to use an AC power strip to control power supply for peripherals such as a scanner inaccordance with the computer's power.The [Power] button on the scanner is not used to turn on/off the scanner.
Enable USB Power
You can configure the setting when selecting [Enable Power Button] and connecting the scanner andthe computer via a USB cable.Usually, the scanner turns on/off by pressing the [Power] button on the scanner. However, if you set[Enable USB Power] to on, turning on/off the computer simultaneously turns on/off the scanner.Connecting/disconnecting a USB cable can turn on/off the scanner.
ATTENTION
Some types of computers and USB hubs keep supplying power to the USB bus even after the computeris turned off.In that case, [Enable USB Power] may not work properly.
Scanner Settings (Touch Screen)
225

Scanner Name
Scanner name
Set a scanner name.Enter a scanner name within 64 characters.The following characters can be used for a scanner name:
● Alphanumerical characters
● Hyphen "-"
● Underscore "_"
● SpaceThe space before or after the character string is ignored.
Scanner Code
Scanner Code
Specify whether or not to issue a scanner code.If the "PaperStream NX Manager" setting is enabled, a scanner code can be used when scanning with auser application on a computer or mobile device.
Enable
[Enable] is set to off as the factory default.When [Enable] is set to on, make sure you enter characters for [Code].
Code
Enter a code within 64 characters.All characters that are available on the touch screen on the scanner can be used.The space before or after the character string is ignored.
Scanner Settings (Touch Screen)
226

Network
You can configure the setting when selecting [Wi-Fi] or [Wired LAN] for [How to connect].
Wi-Fi
Configure the settings for Wi-Fi.You can configure the setting when selecting [Wi-Fi] for [How to connect].
Access Point
Select a setting method when connecting via Wi-Fi.The factory default setting is [Select an Access Point].
● Select an Access PointSelect a wireless access point from a list of access points to establish a connection.Press the [Start] button to start specifying the Wi-Fi setting.For details about the setting items after you select this, refer to Connecting to a Wireless AccessPoint by Selecting One from the List of Wireless Access Points (page 38).
● Use WPSSpecify the setting by using WPS of the wireless access point.Press the [Start] button to start specifying the Wi-Fi setting.For details about the setting items after you select this, refer to Connecting to a Wireless AccessPoint by Pressing the WPS Button (page 39) or Connecting to a Wireless Access Point by Enteringthe PIN for WPS (page 40).
● Configure manuallyManually configure the information for the wireless access point.Press the [Start] button to start specifying the Wi-Fi setting.For details about the setting items after you select this, refer to When Establishing a Connection byEntering the Information for the Wireless Access Point (page 41).
IP Address
Obtain IP Address
Set an IP address for the scanner.
● Obtain automatically (DHCP)This is the factory default setting.
● Configure manuallyWhen [Configure manually] is selected, specify the following items:
● IP Address
● Subnet Mask
● Default Gateway
Scanner Settings (Touch Screen)
227
DNS Server
Enable
When you set an IP address manually, specify a DNS server.[Enable] is set to off as the factory default.When [Enable] is set to on, specify the following items:
● Primary DNS
● Secondary DNS
Wi-Fi Diagnosis
Check the Wi-Fi connection status for the scanner.
[Diagnosis] button
The diagnosis is displayed.
Wired LAN
Configure the settings for wired LAN.You can configure the setting when selecting [Wired LAN] for [How to connect].
IP Address
Obtain IP Address
Set an IP address for the scanner.
● Obtain automatically (DHCP)This is the factory default setting.
● Configure manuallyWhen [Configure manually] is selected, specify the following items:
● IP Address
● Subnet Mask
● Default Gateway
DNS Server
Enable
When you set an IP address manually, specify a DNS server.[Enable] is set to off as the factory default.When [Enable] is set to on, specify the following items:
● Primary DNS
● Secondary DNS
Server
Configure the settings for a server, which is to be connected to the scanner.
Scanner Settings (Touch Screen)
228

Proxy Server
Enable
Set this item to use a proxy server.[Enable] is set to off as the factory default.When [Enable] is set to on, specify the following items:
● Host Name/IP address
● Port NumberThe factory default setting is "8080".
Authentication
Specify whether or not authentication is necessary for a proxy server.[Authentication] is set to off as the factory default.When [Authentication] is set to on, specify the following items:
● Username
● Password
PaperStream NX Manager
Configure the settings for PaperStream NX Manager.Set this item to use PaperStream NX Manager.
PaperStream NX Manager
Enable
Specify whether to use PaperStream NX Manager.[Enable] is set to off as the factory default.When [Enable] is set to on, specify the following items:
● Host Name/IP address
● Port NumberThe factory default setting is "20447".
[Check connection] button
Check if the scanner is connected to PaperStream NX Manager.
Auto Login/Logout
Specify an auto login method or set the auto logout time for PaperStream NX Manager.
Auto Logout minutes
Specify a time (minutes) to automatically log out from PaperStream NX Manager if thescanner is left on for a certain period of time without being used.
● Disabled (Never)This is the factory default setting.
● 1
Scanner Settings (Touch Screen)
229

● 2
● 3
Auto Login
Specify an auto login method for PaperStream NX Manager.
● DisabledThis is the factory default setting.
● Username/Password
● Job Group Code
Application (Internet)
Set this item when scanning with a user application on a computer or mobile device in anenvironment in which PaperStream NX Manager and a scanner are connected via the Internet.
Enable
[Enable] is set to off as the factory default.
Scanner Central Admin Server
Configure the settings for Scanner Central Admin Server to use PaperStream NX Manager.Set this item to monitor the scanners or perform a single operation on them at the same time withScanner Central Admin Server.
Enable
Specify whether to use Scanner Central Admin Server.[Enable] is set to off as the factory default.When [Enable] is set to on, specify the following items:
● Host Name/IP address
● Port NumberThe factory default setting is "20444".
[Check connection] button
Check if the scanner is connected to Scanner Central Admin Server.
Network Encryption
Specify whether to encrypt network communications.
● Encryption Off (HTTP)This is a transmission method prioritizing the scanning speed.This is the factory default setting.
● Encryption On (HTTPS)This is a transmission method prioritizing the security. The scanning speed is slow with this setting.
Check connection (Ping)
Check the communication status between the scanner and the connected computer.
Scanner Settings (Touch Screen)
230

Host Name/IP address
Enter a host name or an IP address.
[Run] button
A ping test is performed.
Scanner Settings (Touch Screen)
231

Paper Source/Feeding
Pre-Pick
Enable this to shorten the scanning time when scanning continuously."Pre-pick" refers to feeding the next document into the ADF before ejecting the current document beingscanned when scanning documents continuously.
Enable
[Enable] is set to on as the factory default.
HINT
● If you cancel in the middle of scanning while pre-pick is enabled, you have to remove the pre-picked document, then load the document again.
● This setting can also be configured in the scanner driver.Note that priority is given to the scanner driver setting.
Retry Paper Feeding
Specify the number of feeding retries when a document is not fed from the ADF paper chute (feeder).
Number of paper feeding retries
The factory default setting is "3".
Multifeed Detection
Multifeed is an error that occurs when two or more sheets are overlapped and fed at once.Configure the settings to detect overlapped documents during a scan.Overlapped documents are detected with the ultrasonic sensor or according to the difference in length ofthe documents.When overlapped documents are detected, an error message is displayed on the touch screen and thescan stops. If documents are overlapped within 30 mm from the leading edge, they are not detected asoverlapped.
Detection Method
Specify a method to detect overlapped documents.
● Does not detectDoes not detect overlapped documents.This is the factory default setting.
● Check Overlapping (Ultrasonic)Detects overlapped documents with the ultrasonic sensor.When this is selected, you can specify the following two options:
- Specify an area to detect overlapped documents by the length from the leading edge of thedocument in the feeding direction.Set it in [Multifeed Detection Area].
Scanner Settings (Touch Screen)
232

- When a piece of paper is attached on a document, the length and position of the paper can bememorized, and set to ignore overlapping of documents.Set it in [Intelligent Multifeed Detection].
● Check LengthDetects overlapped documents according to the difference in length.Select this to scan documents of the same length.Note that overlapped documents cannot be detected accurately when a mixed batch of differentlengths are scanned.
● Check Overlapping and LengthDetects overlapped documents by the combination of [Check Overlapping (Ultrasonic)] and [CheckLength].When this is selected, you can specify the following two options:
- Specify an area to detect overlapped documents by the length from the leading edge of thedocument in the feeding direction.Set it in [Multifeed Detection Area].
- When a piece of paper is attached on a document, the length and position of the paper can bememorized, and set to ignore overlapping of documents.Set it in [Intelligent Multifeed Detection].
Note that overlapped documents cannot be detected accurately when a mixed batch of differentlengths are scanned.
Threshold (Length)
Specify the difference in length of documents to be detected as overlapped documents.Overlapped documents are detected when the the difference in length of documents is longer thanthe specified value.Specify this item when [Check Length] or [Check Overlapping and Length] is selected for [DetectionMethod].Any length under the specified value is tolerated as a slight error and not detected as overlappeddocuments.
● 10 mm or less is not detectedThis is the factory default setting.
● 15 mm or less is not detected
● 20 mm or less is not detected
ATTENTION
● To scan documents with different lengths, select [Check Overlapping (Ultrasonic)].
● When an attachment such as a sticky note, receipt, or photo is attached on the document, theattachment part of the document may be detected as overlapping of documents if [CheckOverlapping (Ultrasonic)] is selected. In that case, select [Check Length].Otherwise, detect overlapping of documents by specifying an area on the document that does notinclude an area attached with paper in order to ignore the overlapping of documents for that area.
Scanner Settings (Touch Screen)
233

HINT
● This setting can also be configured in the scanner driver.Note that priority is given to the scanner driver setting.
● When the Carrier Sheet setting is enabled in the scanner driver, the touch screen does not display theerror message. The scanner driver does.
Multifeed Detection Area
Specify an area to detect overlapped documents.Specify this item when [Check Overlapping (Ultrasonic)] or [Check Overlapping and Length] is selected for[Multifeed Detection].
Enable
Specify whether to set an area to detect overlapped documents.[Enable] is set to off as the factory default.
How to set the detection area
Specify whether to set a disabled area or enabled area to detect overlapped documents.
● Set the disabled areaThis is the factory default setting.
● Set the enabled area
Start (mm)
Specify the start position of the detection area by the length from the leading edge of the documentin the feeding direction.The factory default setting is "0".
End (mm)
Specify the end position of the detection area by the length from the leading edge of the document inthe feeding direction.The factory default setting is "0".
HINT
● When the start and end positions are both "0", overlapped documents are detected in the wholedocument regardless of the setting for [How to set the detection area].
● To disable the detection of overlapped documents for the whole document, select [Set the disabledarea] for [How to set the detection area], and set the start position to "0" and the end position toequal the document length or longer.
● If the start position is set at the length that is longer than the document length, overlappeddocuments are detected in the whole document when [Set the disabled area] is selected for [How toset the detection area], and overlapped documents are not detected anywhere in the wholedocument when [Set the enabled area] is selected for [How to set the detection area].
● To detect overlapped documents, the area must be at least 5 mm in length.
Scanner Settings (Touch Screen)
234

Configure the setting so that the value of the end position minus the start position is 6 mm or more.
● For examples of the overlapping detection area settings, refer to Examples of the Settings for theArea to Detect the Overlapping of Documents (page 296).
Intelligent Multifeed Detection
Configure the setting to automatically ignore certain patterns of overlapped documents when the settingto detect overlapped documents is enabled.Note that you first need to specify [Check Overlapping (Ultrasonic)] or [Check Overlapping and Length] inthe scanner driver and "Multifeed Detection (page 232)" on the touch screen before setting this item.
Operation mode
Set the operation mode.
Manually Bypass
Specify whether overlapped documents are detected when re-scanning documents detected asoverlapped documents.Does not memorize the size or location of the paper attachment.This is the factory default setting.
Automatically Bypass (combination of length and position)
Specify whether the length and position of a piece of paper attached on a document detected asoverlapped documents are memorized as an overlap pattern.If the overlap pattern is memorized, documents with the same overlap pattern are not detectedas overlapped documents from the next scan.
HINT
Eight of the most recent overlap patterns can be memorized when [When powering off] in[Memorize overlap pattern] is enabled.
Automatically Bypass (length)
Specify whether the length of the longest piece of paper attached on a document detected asoverlapped documents is memorized as an overlap pattern.If the overlap pattern is memorized, a document with a piece of paper in the same length orshorter attached is not detected as overlapped documents from the next scan.
Memorize overlap pattern
When confirming image
Specify whether or not to memorize overlap patterns automatically when the window isdisplayed to check images for documents that were detected as overlapped documents.[When confirming image] is set to off as the factory default.
When powering off
Specify whether or not to keep overlap patterns upon turning the power off.
Scanner Settings (Touch Screen)
235

When [When powering off] is set to on, keep overlap patterns upon turning the power off. Setthis to on to use the same overlap patterns after turning the power on again.[When powering off] is set to off as the factory default.
Overlap pattern
[Clear] button
Delete all the overlap patterns that have been memorized in the scanner.
HINT
When the setting for using the Carrier Sheet is enabled in the scanner driver, [Intelligent MultifeedDetection] is disabled.
Manual Feeding
Configure the settings when manually loading and scanning one sheet at a time.When you scan by manually loading one sheet at a time, you can specify the waiting time (interval) forloading the next document in the ADF paper chute (feeder). This enables continuous scanning as long asyou load a document within the specified time.If the specified time is exceeded, the scan is finished automatically.
Continuous Feed Mode
Specify whether or not to enable the continuous feed mode.Set [Continuous Feed Mode] to on to scan more than one document in succession manually.[Continuous Feed Mode] is set to off as the factory default.When Manual Single Mode is used, the setting for [Continuous Feed Mode] is ignored.
Timeout seconds
Specify the time period until which the scanner confirms that no documents are loaded in the ADFpaper chute (feeder) (the interval between the last scan and the detection of whether the nextdocument is loaded or not).The factory default setting is "10".
HINT
● When [Continuous Feed Mode] is set to on, the scanner will wait for documents to be loaded until thespecified timeout time elapses even if you start scanning with no document in the ADF paper chute(feeder).
● When the feed mode switch is set to Manual Single Mode, the scanner will wait for documents to beloaded until the specified timeout time elapses regardless of the setting for [Continuous Feed Mode].
High Altitude Mode
Enable this mode to use the scanner at an altitude of 2,000 m or higher.Low atmospheric pressure at high altitudes may lower the accuracy in detections for overlappeddocuments with the ultrasonic sensor.
Scanner Settings (Touch Screen)
236

Enable
Setting [Enable] to on for this item improves the accuracy to detect overlapped documents.[Enable] is set to off as the factory default.
Scanner Settings (Touch Screen)
237

Paper Protection
Paper protection
Configure the setting to detect feeding errors.This function detects feeding errors in the following cases:
● When the scanner detects a warped document caused by a feeding error
● When the scanner detects paper jam noisePaper jams due to feeding errors could damage or tear valuable documents.Detecting a feeding error and stopping the scan can prevent damage to documents.This function is effective when you scan documents which are difficult to feed such as thin paperdocuments.
Detect
Specify a method to detect feeding errors.
● DisableDoes not detect feeding errors.
● Feeding AccuracyStops the scan when the scanner detects a warped document caused by a feeding error.This is the factory default setting.
● Feeding NoiseStops the scan when the scanner detects paper jam noise.
● Feeding Accuracy & NoiseStops the scan when the scanner detects a warped document caused by a feeding error, or whenthe scanner detects paper jam noise.
Feeding Accuracy Sensitivity
Specify the sensitivity level for detecting warped documents.
● LowDecreases the sensitivity level to detect warped documents.Specify this to detect a warped document only if it is highly deformed.
● NormalDetects warped documents with the optimum sensitivity level.This is the factory default setting.
● HighIncreases the sensitivity level to detect warped documents.Specify this to detect a warped document even if it is slightly deformed.
Feeding Noise Sensitivity
Specify the sensitivity level for detecting feeding noise.
● LowDecreases the sensitivity level to detect paper jam noise.Specify this to detect only loud paper jam noise.
Scanner Settings (Touch Screen)
238

● NormalDetects paper jam noise with the optimum sensitivity level.This is the factory default setting.
● HighIncreases the sensitivity level to detect paper jam noise.Specify this to detect even slight paper jam noise.
ATTENTION
● Note that the paper protection function is to prevent damages to documents, but the protection of alldocuments is not guaranteed.
● When you use the paper protection function, make sure to load the documents with their top edgesaligned (especially for a mixed batch of documents with different lengths).If the top edges are not aligned properly, the scan may stop even when the documents are being fedcorrectly.
HINT
● If you scan a wrinkled document, the scan may stop even when the document is being fed correctly.In that case, the paper protection function can be disabled only for the document on the touchscreen.For details, refer to Disabling the Paper Protection Function (page 112).
● If the paper protection function stops scans frequently, refer to Paper Protection Is Set Off Frequently(page 207).
Paper Protection (Touch Screen Settings)
Configure the setting to detect feeding errors.Specify this when [Prioritize the touch screen settings] is set to on.Specify the following items:
● Detect
● Feeding Accuracy Sensitivity
● Feeding Noise SensitivityFor details about the setting items, refer to Detect (page 238).
Prioritize the touch screen settings
Enable this option when you want some settings to be prioritized over the settings for [Paper Protection]and the Software Operation Panel.[Prioritize the touch screen settings] is set to off as the factory default.
HINT
● This setting can also be configured in the scanner driver.When the paper protection setting is set to on in the scanner driver, [Feeding Accuracy & Noise] is enabledregardless of the setting on the scanner.
Scanner Settings (Touch Screen)
239

● For the paper protection setting, priority will be given in the following order:1. [Paper Protection] in the scanner driver2. [Paper Protection (Touch Screen Settings)] on the touch screen3. [Paper protection] on the touch screen or [Paper Protection] on the Software Operation Panel
Scanner Settings (Touch Screen)
240

Image
Automatic Page Size Detection
When the scanner is set to detect the paper size automatically, specify whether or not to optimize (roundup/down) the fractional part of the scanned image.When the paper size is detected, there may be a fractional part of the scanned image compared to thestandard paper size.Output image size varies depending on how the fractional part is processed.
● OptimizePrevents loss of information.However, a shadow may appear around the edges of images.This is the factory default setting.
● Round DownThe image size becomes the standard paper size.However, when you scan a document with text around the edges, a part of the information may bemissing in the output image.
ATTENTION
For details about setting automatic page size detection, refer to the help for the scanner driver.
HINT
This setting is effective only for scanning images in black & white.
Page Edge Filler Area
Configure the settings to fill in the shadow or streaks around the edge of the scanned image.Depending on the condition of the documents that you scan, the shadow of a document may appear asblack streaks on the edges of the scanned image.In this case, remove the black streaks by filling in the edges of the scanned image.The specified area is filled in white or black, according to the background color.
Top (mm)
Specify the width of the top margin to fill in. The factory default setting is "0".
Bottom (mm)
Specify the width of the bottom margin to fill in. The factory default setting is "0".
Right (mm)
Specify the width of the right margin to fill in. The factory default setting is "0".
Scanner Settings (Touch Screen)
241

Left (mm)
Specify the width of the left margin to fill in. The factory default setting is "0".
(1): Top = 0 to 15 mm(2): Bottom = -7 to 7 mm(3): Right = 0 to 15 mm(4): Left = 0 to 15 mm(in 1 mm increments)
ATTENTION
Note that if the target range of page edge filler is too wide, some characters near the edge may appearmissing.
HINT
● You can change the background color to black or white in the scanner driver.For details, refer to the help for the scanner driver.
● Depending on the value you specify for the bottom margin of the page edge filler, the page edgefiller function operates as follows:
- 1 to 7 mmFills in the specified area with the background color from the bottom edge of the image towardsthe inside.
- -1 to -7 mmOutputs the image without filling in the specified area with the background color from the bottomedge of the image towards the outside. (Outputs the image with the specified area added when[Page End Detection] is set in the scanner driver.)
● This setting can also be configured in the scanner driver.In such a case, the page edge filler of the scanner driver is used on the image which the scanneralready filled in the edges.
Dropout Color
You can exclude a color from being scanned by selecting either red, green, or blue (three primary colors).
Scanner Settings (Touch Screen)
242

Documents can be scanned without excluding any colors.For example, when scanning a document with black characters and a green frame, if you select green forthe dropout color, only the black characters of the document are scanned.
● Red
● GreenThis is the factory default setting.
● Blue
● None
ATTENTION
● This function works the best with light (low intensity) colors, and dark colors may not be excluded.
● You cannot specify a color other than Red, Green, and Blue.To drop out other colors, configure the setting in the scanner driver.For details, refer to the help for the scanner driver.
HINT
● This is only available in black & white or grayscale mode.
● This setting can also be configured in the scanner driver.Note that priority is given to the scanner driver setting.
Offset
Specify a starting position for scanning.The specified value can range from -2 to +2 mm (in increments of 0.5).The factory default setting is "0".
Main-scan ADF front (mm)
Specify the horizontal position (widthways) for the ADF front.
Sub-scan ADF front (mm)
Specify the vertical position (lengthways) for the ADF front.
Main-scan ADF back (mm)
Specify the horizontal position (widthways) for the ADF back.
Sub-scan ADF back (mm)
Specify the vertical position (lengthways) for the ADF back.
ATTENTION
Normally, you should not have to modify anything as the factory default settings already use adjustedvalues.
Scanner Settings (Touch Screen)
243

Magnification
Magnification (%)
Specify the magnification level for the feed direction.The specified value can range from -3.1 to +3.1% (in increments of 0.1).The factory default setting is "0.0".
ATTENTION
Normally, you should not have to modify anything as the factory default settings already use adjustedvalues.
Image Quality Mode
To obtain an image quality that is close to the image quality for scanning with fi-6130Z, set the imagequality mode.
● DisableThis is the factory default setting.
● fi-6130Z
Scanner Settings (Touch Screen)
244

Cleaning & Maintenance
Cleaning cycle
Specify the cleaning cycle for the scanner inside.The background color of the [After cleaning] counter in the [Consumable counters] screen changes toyellow when the counter reaches 95% of the specified value for this item, and to red when the counterreaches 100%.
Cycle (x 1000 Sheets)
Specify the cleaning cycle in increments of 1000 sheets.The factory default setting is "5".
Issue a cleaning time notification
Specify whether or not to display the cleaning instruction message.
When [Issue a cleaning time notification] is set to on, a notification can be displayed on on the
touch screen when the time for cleaning approaches.[Issue a cleaning time notification] is set to off as the factory default.
Replacement of the Pick Roller
Specify the replacement cycle for the pick roller.The background color of the [After Replacing the Pick Roller] counter in the [Consumable counters] screenchanges to yellow when the sheet count after replacing the pick roller reaches 95% of the specified valuefor this item, and to red when the counter reaches 100%.
In addition, a notification can be displayed on on the touch screen when the time for replacing the
pick roller approaches.
Cycle (x 10000 Sheets)
Specify the replacement cycle for the pick roller in increments of 10,000 sheets.The factory default setting is "20".
Replacement of the Brake Roller
Specify the replacement cycle for the brake rollerThe background color of the [After Replacing the Brake Roller] counter in the [Consumable counters]screen changes to yellow when the sheet count after replacing the brake roller reaches 95% of thespecified value for this item, and to red when the counter reaches 100%.
In addition, a notification can be displayed on on the touch screen when the time for replacing the
brake roller approaches.
Cycle (x 10000 Sheets)
Specify the replacement cycle for the brake roller in increments of 10,000 sheets.
Scanner Settings (Touch Screen)
245

The factory default setting is "20".
Maintenance cycle
Specify the maintenance and inspection cycle for the scanner that is performed by a service engineer.If the specified period has passed after the last maintenance and inspection date, the touch screen
displays a notification on when you receive a [Maintenance] message.
For regular maintenance and inspection on the scanner by a service engineer, contact the distributor/dealer where you purchased this product. Refer to the contact information in the Contact List if suppliedwith this product, or refer to the contact information in the Contact for Inquiries section if provided inSafety Precautions supplied with this product, and then make an inquiry.
Enable
Specify whether or not to get a notification on the touch screen when the time for maintenanceapproaches.[Enable] is set to off as the factory default.
Cycle (months)
Specify a cycle for receiving notifications on maintenance.The factory default setting is "12".
USB
USB
Specify how the USB function operates.After the setting is changed, the scanner is restarted.
● AutomaticOperates in accordance with the connection environment. This is the factory default setting.
● USB 2.0Operates with USB 2.0.
Admin Password
Admin Password
Change or disable the administrator password.Specify whether or not to disable the administrator password depending on the operation.Change the administrator password regularly.
Enable
[Enable] is set to on as the factory default.
Scanner Settings (Touch Screen)
246

Current Password
Enter the current password.The factory default of the password is "password".
New Password
Enter a new password within 16 characters to change the current password.All characters that are available on the touch screen on the scanner can be used.The space before or after the character string is ignored.
Confirm New Password
Re-enter the password entered for [New Password] for confirmation to change the current password.
Restore Factory Defaults
Restore Factory Defaults
Restore the scanner settings to the factory default.
[Start] button
Restore factory defaults.The scanner is restarted and the setup window appears.
Scanner Settings (Touch Screen)
247

Scanner Settings (Software Operation Panel)
This section explains how to use the Software Operation Panel to configure the scanner settings.
HINT
The scanner settings can also be configured from the touch screen. For details, refer to Scanner Settings (TouchScreen) (page 220).
Starting Up the Software Operation Panel
The Software Operation Panel is installed together with the PaperStream IP driver.With this application, you can configure settings for operations of the scanner and management of the consumableparts.
ATTENTION
● Do not start up the Software Operation Panel during scanning.
● If you change the Software Operation Panel settings while the scanner driver window is displayed, the changesmay not be applied immediately. In that case, close the scanner driver window and open it again.
● Do not use the touch screen while the Software Operation Panel is running.
1 Confirm that the scanner is connected to the computer, then turn on the scanner.For details about how to connect the scanner to the computer, refer to Getting Started and Scanner Setup(page 32).For details about how to turn on the scanner, refer to How to Turn the Power ON (page 56).
2 Display the [Software Operation Panel] window.
● Windows Server 2008 R2/Windows 7Click [Start] menu → [All Programs] → [fi Series] → [Software Operation Panel].
● Windows Server 2012Right-click the Start screen, and select [All apps] on the app bar → [Software Operation Panel] under [fiSeries].
● Windows Server 2012 R2/Windows 8.1Click [↓] on the lower left side of the Start screen and select [Software Operation Panel] under [fi Series].To display [↓], move the mouse cursor.
● Windows 10/Windows Server 2016/Windows Server 2019
248

Click [Start] menu → [fi Series] → [Software Operation Panel].
The Software Operation Panel icon is displayed in the menu that appears when you click in the
notification area.To have the Software Operation Panel icon always displayed in the notification area, drag and drop the icononto the notification area.
Scanner Settings (Software Operation Panel)
249

Password Setting for the Software Operation Panel
By setting a password, the Software Operation Panel can run in [View Only mode] which allows users to onlyview the scanner settings.The scanner settings can be configured if no password is set.In order to prevent unnecessary changes to the settings, a password can be used to restrict user operations.
Scanner Settings (Software Operation Panel)
250

Setting a Password
Set a password in the following procedure.
1 Right-click the Software Operation Panel icon in the notification area, and select [Password Setting]from the menu.
The [Password setting] window appears.
2 Enter a new password then again to confirm, and click the [OK] button.Up to 32 characters can be used for the password.Note that only alphanumeric characters (a to z, A to Z, 0 to 9) are allowed.
A message window appears.
3 Click the [OK] button.
The password is set.
Scanner Settings (Software Operation Panel)
251

Setting [View Only mode]
Set the Software Operation Panel to [View Only mode].
1 Set a password.For details, refer to Setting a Password (page 251).
2 Right-click the Software Operation Panel icon in the notification area, and select [View Only mode] fromthe menu.
The Software Operation Panel enters [View Only mode].
Scanner Settings (Software Operation Panel)
252

HINT
In [View Only mode], a check mark appears next to [View Only mode] in the menu that is displayed by right-clicking the Software Operation Panel icon in the notification area.
Scanner Settings (Software Operation Panel)
253

Exiting [View Only mode]
Exit [View Only mode] on the Software Operation Panel in the following procedure.
1 Right-click the Software Operation Panel icon in the notification area, and select [View Only mode] fromthe menu.
The [Password setting] window appears.
2 Enter the current password and click the [OK] button.
Scanner Settings (Software Operation Panel)
254

The Software Operation Panel exits [View Only mode], and the scanner settings can now be changed.
HINT
When the Software Operation Panel exits [View Only mode], the check mark next to [View Only mode]disappears from the menu that is displayed by right-clicking the Software Operation Panel icon in the notificationarea.
Scanner Settings (Software Operation Panel)
255

Changing the Password
Change the password in the following procedure.
1 Right-click the Software Operation Panel icon in the notification area, and select [Password Setting]from the menu.
The [Password setting] window appears.
2 Enter the current password and click the [OK] button.
The [Password setting] window appears.
3 Enter a new password then again to confirm, and click the [OK] button.Up to 32 characters can be used for the password.Note that only alphanumeric characters (a to z, A to Z, 0 to 9) are allowed.
A message window appears.
4 Click the [OK] button.
Scanner Settings (Software Operation Panel)
256

The password is set.
Scanner Settings (Software Operation Panel)
257
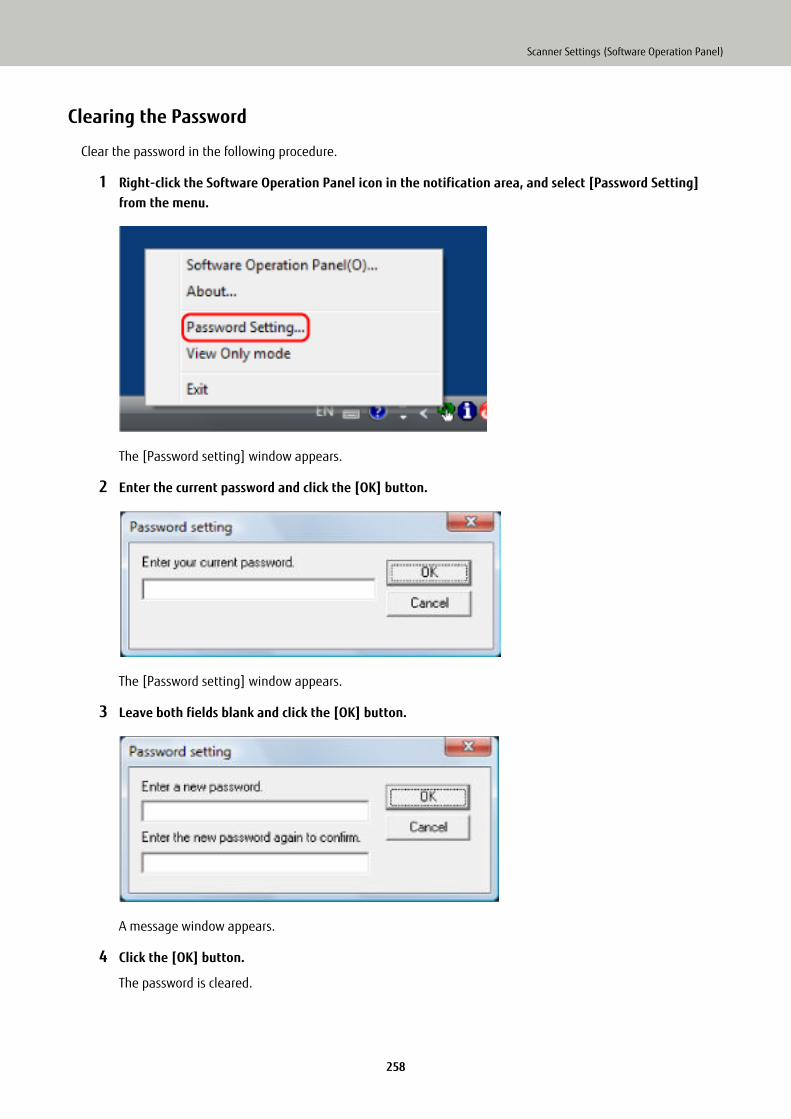
Clearing the Password
Clear the password in the following procedure.
1 Right-click the Software Operation Panel icon in the notification area, and select [Password Setting]from the menu.
The [Password setting] window appears.
2 Enter the current password and click the [OK] button.
The [Password setting] window appears.
3 Leave both fields blank and click the [OK] button.
A message window appears.
4 Click the [OK] button.
The password is cleared.
Scanner Settings (Software Operation Panel)
258

Resetting the Password
If you forgot your password, reset it.
1 Right-click the Software Operation Panel icon in the notification area, and select [Password Setting]from the menu.
The [Password setting] window appears.
2 Enter the default password which is "fi-scanner", and click the [OK] button.
The [Password setting] window appears.
3 Enter a new password then again to confirm, and click the [OK] button.Up to 32 characters can be used for the password.Note that only alphanumeric characters (a to z, A to Z, 0 to 9) are allowed.
A message window appears.
4 Click the [OK] button.
Scanner Settings (Software Operation Panel)
259

The password is set.
Scanner Settings (Software Operation Panel)
260

Setting Items
The Software Operation Panel allows the configuration of the settings that are related to scanning documentsor managing consumable parts for the scanner that is connected to the computer.The following lists are used for configuration.
● [Device Setting]You can configure settings that are related to counting the number of sheets scanned and managingconsumable parts. You can also configure settings that are related to managing the power of a scanner andadjusting the position to start the scan.
● [Device Setting 2]You can configure settings that are related to scanning documents.
Device Setting
1 Start up the Software Operation Panel.For details, refer to Starting Up the Software Operation Panel (page 248).
2 From the list on the left, select [Device Setting] and click the [Offset] button.
Scanner Settings (Software Operation Panel)
261

The [Offset] window appears.
Items that can be configured in these windows are as follows:
Setting Item Description
Count(Checking/Clearing)
The status of each consumable part can be viewed to determinewhen to replace or clean the consumables.When you have replaced or cleaned a consumable part, clearthe corresponding counter.
Power saving Specify the waiting time before the scanner enters power savingmode.
Offset Setting Specify a starting position for scanning.
Vertical magnification Adjustment Specify the magnification level for the feed direction.
Scanner Settings (Software Operation Panel)
262

Device Setting 2
1 Start up the Software Operation Panel.For details, refer to Starting Up the Software Operation Panel (page 248).
2 From the list on the left, select [Device Setting 2].
The settings that are currently configured in [Device Setting 2] are listed on the right of the window.
HINT
● The Software Operation Panel settings can be restored to the factory default.To restore the settings to the factory default, click the [Default] button. After a message is displayed,click the [OK] button.Note that the settings you have configured will be cleared.
● The Software Operation Panel settings can be backed up.To back up the settings, click the [Save] button, then specify the file name and click the [Save] button inthe displayed window.
● You can use a backup file of the Software Operation Panel settings to restore the settings on otherscanners only if the scanner type is the same.To restore the settings, click the [Restore] button, then specify the backup file and click the [Open]button in the displayed window. After a message is displayed, click the [OK] button.Note that restoration cannot be performed for other types of scanners.
Items that can be configured in [Device Setting 2] are as follows:
Scanner Settings (Software Operation Panel)
263

Setting Item Description
Multifeed Configure the settings to detect overlapped documents during ascan.
Page Edge Filler (ADF) Configure the settings to fill in the shadow or streaks aroundthe edge of the scanned image.
Dropout color You can exclude a color from being scanned by selecting eitherred, green, or blue (three primary colors).
Pre-Pick Enable this to shorten the scanning time when scanningcontinuously.
Document check area specification forMultifeed Detection
Specify an area to detect overlapped documents.
Intelligent Multifeed Function Configure the setting to automatically ignore certain patterns ofoverlapped documents when the setting to detect overlappeddocuments is enabled.
Number of paper feeding retries Specify the number of feeding retries when a document is notfed from the ADF paper chute (feeder).
Cleaning Cycle Specify the cleaning cycle for the scanner inside.
Life Counter Alarm Setting Specify the replacement cycle for the consumables.
Vertical Streak Detection You can configure the settings for detecting dirt on the glass.
Vertical Streak Sensitivity Specify the sensitivity level to detect vertical streaks (dirt on theglass) when [Enable] is selected for [Vertical Streak Detection].
Pick Speed You can specify the timing of when document feeding is started.
AutoCrop Boundary When the scanner is set to detect the paper size automatically,specify whether or not to optimize (round up/down) thefractional part of the scanned image.
Manual Feeding Configure the settings when manually loading and scanningone sheet at a time.
Power SW Control Specify whether or not to turn on/off the scanner by pressingthe [Power] button on the scanner.
Paper Protection Configure the setting to detect feeding errors.
Paper Protection Sensitivity Specify the sensitivity level for detecting feeding errors whenthe paper protection function is enabled.
Maintenance and Inspection Cycle Specify the maintenance and inspection cycle for the scannerthat is performed by a service engineer.
High Altitude Mode Enable this mode to use the scanner at an altitude of 2,000 mor higher.
Scanner Settings (Software Operation Panel)
264

Setting Item Description
Image Quality Mode To obtain an image quality that is close to the image quality forscanning with fi-6130Z, set the image quality mode.
Startup mode Specify a startup mode for the scanner.
Scanner Settings (Software Operation Panel)
265

Settings Related to Sheet Counters
Checking the Sheet Counter
The status of each consumable part can be viewed to determine when to replace or clean the consumables.The background color of the counter changes as it gets closer to the time to replace the consumables or to clean thescanner.The color of each counter changes as follows:
● [After cleaning] counterThis counter turns yellow when the sheet count after cleaning reaches the value specified in Scanner CleaningCycle [Cleaning Cycle] (page 270) in the Software Operation Panel.
● [Brake Roller]/[Pick Roller] countersThese counters turn light yellow when the sheet count after the consumable replacement reaches 95% of thevalue specified in Replacement Cycle of Consumables [Life Counter Alarm Setting] (page 271) in the SoftwareOperation Panel, and turn yellow when the sheet count reaches 100%.
1 Start up the Software Operation Panel.For details, refer to Starting Up the Software Operation Panel (page 248).
2 From the list on the left, select [Device Setting].
In this window, you can check the following items:
Total Count (ADF)
Total number of sheets scanned using the ADF
Scanner Settings (Software Operation Panel)
266

After cleaning
Total number of sheets scanned after cleaning
Brake Roller
Number of sheets scanned after the brake roller is replaced
Pick Roller
Displays the number of sheets scanned after the pick roller is replaced.
The factory default setting for each counter is "0".
ATTENTION
If you turned off the scanner by unplugging the power cable, or selected [Disable power switch], thenumber of scanned sheets may not be counted in [Total Count].For details about disabling the power switch, refer to Method of Turning the Scanner ON/OFF [Power SWControl] (page 304).
Scanner Settings (Software Operation Panel)
267

Clearing the Sheet Counters
When you have replaced or cleaned a consumable part, clear the corresponding counter.
1 Start up the Software Operation Panel.For details, refer to Starting Up the Software Operation Panel (page 248).
2 From the list on the left, select [Device Setting] and click the [Clear] button for [After cleaning] whencleaning is performed or click the [Clear] button for the consumable that you replaced.
The counter is reset to "0".
3 Click the [OK] button.
A message window appears.
4 Click the [OK] button.
The settings are saved.
Scanner Settings (Software Operation Panel)
268

Messages for Cleaning or Replacing Consumables
The following message may appear on the computer while the scanner is in use.
Example: Message for replacing consumables
Example: Message for cleaning
Check the message, and replace the consumable or perform cleaning accordingly.
Note that, when this message appears, the touch screen displays a notification on for a message related
to replacing the consumables or cleaning the scanner.For details about replacing consumables, refer to the following:
● Brake rollerReplacing the Brake Roller (page 129)
● Pick rollerReplacing the Pick Roller (page 134)
For details about cleaning, refer to Daily Care (page 114).
Scanner Settings (Software Operation Panel)
269

Scanner Cleaning Cycle [Cleaning Cycle]
Specify the cleaning cycle for the scanner inside.The background color of the [After cleaning] counter in [Device Setting] changes to yellow when the counterreaches the specified value for this item.You can also display a cleaning instruction message that is described in Messages for Cleaning or ReplacingConsumables (page 269).
1 Start up the Software Operation Panel.For details, refer to Starting Up the Software Operation Panel (page 248).
2 From the list on the left, select [Device Setting 2] → [Cleaning Cycle].
3 Specify a value for the cleaning cycle.The value can range from 1,000 to 255,000 sheets (in increments of 1,000).The factory default setting is "5".
4 Specify whether or not to display the cleaning instruction message.The [Show cleaning instructions] check box is cleared for the factory default settings.
Scanner Settings (Software Operation Panel)
270

Replacement Cycle of Consumables [Life Counter Alarm Setting]
Specify the replacement cycle for the consumables.The background color of the counter for [Brake Roller] or [Pick Roller] in [Device Setting] changes to light yellowwhen the sheet count (after a consumable replacement) reaches 95% of the value specified for this setting andturns yellow when the sheet count reaches 100%.You can also display the message for replacing consumables, which is described in Messages for Cleaning orReplacing Consumables (page 269).
1 Start up the Software Operation Panel.For details, refer to Starting Up the Software Operation Panel (page 248).
2 From the list on the left, select [Device Setting 2] → [Life Counter Alarm Setting].
3 Specify a value as the replacement cycle for each of the consumables (brake roller and pick roller).The value can range from 10,000 to 2,550,000 sheets (in increments of 10,000).The factory default setting is "20".
Scanner Settings (Software Operation Panel)
271

Settings Related to Scanning
Adjusting the Position to Start the Scan [Offset Setting/Vertical magnificationAdjustment]
When the output position of the scanned image is not correct or the image appears shortened/elongated(vertically), adjust the offset and the vertical magnification.
ATTENTION
Normally, you should not have to modify anything as the factory default settings already use adjusted values.
1 Start up the Software Operation Panel.For details, refer to Starting Up the Software Operation Panel (page 248).
2 From the list on the left, select [Device Setting] and click the [Offset] button.
Scanner Settings (Software Operation Panel)
272

3 Adjust the level of offset/vertical magnification as needed.
Offset Setting
Unit
Select [ADF (front)] or [ADF (back)] as the unit for an offset adjustment.The factory default setting is [ADF (front)].
Main
Specify the horizontal (width) offset.The specified value can range from -2 to +2 mm (in increments of 0.5).The factory default setting is "0".
Sub
Specify the vertical (length) offset.The specified value can range from -2 to +2 mm (in increments of 0.5).The factory default setting is "0".
Scanner Settings (Software Operation Panel)
273

Vertical magnification Adjustment
Unit
The unit for a vertical magnification adjustment is fixed to [ADF].
Vertical magnification Adjustment
Specify the vertical (length) magnification.The specified value can range from -3.1 to +3.1% (in increments of 0.1).The factory default setting is "0.0".
Scanner Settings (Software Operation Panel)
274

Removing Shadows/Streaks that Appear around Edges of Images [Page EdgeFiller (ADF)]
Configure the settings to fill in the shadow or streaks around the edge of the scanned image.Depending on the condition of the documents that you scan, the shadow of a document may appear as blackstreaks on the edges of the scanned image.In this case, remove the black streaks by filling in the edges of the scanned image.
1 Start up the Software Operation Panel.For details, refer to Starting Up the Software Operation Panel (page 248).
2 From the list on the left, select [Device Setting 2] → [Page Edge Filler (ADF)].
3 Specify the width of each margin (Top/Bottom/Right/Left) to fill in.The factory default setting is "0".
Scanner Settings (Software Operation Panel)
275

The specified area is filled in white or black, according to the background color.
(1): Top = 0 to 15 mm(2): Bottom = -7 to 7 mm(3): Right = 0 to 15 mm(4): Left = 0 to 15 mm(in 1 mm increments)
ATTENTION
Note that if the target range of page edge filler is too wide, some characters near the edge may appearmissing.
HINT
● You can change the background color to black or white in the scanner driver.For details, refer to the help for the scanner driver.
● Depending on the value you specify for the bottom margin of the page edge filler, the page edge fillerfunction operates as follows:
- 1 to 7 mmFills in the specified area with the background color from the bottom edge of the image towards theinside.
- -1 to -7 mmOutputs the image without filling in the specified area with the background color from the bottomedge of the image towards the outside. (Outputs the image with the specified area added when [PageEnd Detection] is set in the scanner driver.)
● This setting can also be configured in the scanner driver.In such a case, the page edge filler of the scanner driver is used on the image which the scanner alreadyfilled in the edges.
Scanner Settings (Software Operation Panel)
276

Configuring the Scan Setting to Drop Out Specified Colors When Scanning[Dropout color]
You can exclude a color from being scanned by selecting either red, green, or blue (three primary colors).Documents can be scanned without excluding any colors.For example, when scanning a document with black characters and a green frame, if you select green for thedropout color, only the black characters of the document are scanned.
1 Start up the Software Operation Panel.For details, refer to Starting Up the Software Operation Panel (page 248).
2 From the list on the left, select [Device Setting 2] → [Dropout color].
3 Select a color that you want to remove.
Red, Green, Blue
The selected color is removed.The factory default setting is [Green].
None
No color is removed.
ATTENTION
● This function works the best with light (low intensity) colors, and dark colors may not be excluded.
● You cannot specify a color other than Red, Green, and Blue.
Scanner Settings (Software Operation Panel)
277

To drop out other colors, configure the setting in the scanner driver.For details, refer to the help for the scanner driver.
HINT
● This is only available in black & white or grayscale mode.
● This setting can also be configured in the scanner driver.Note that priority is given to the scanner driver setting.
Scanner Settings (Software Operation Panel)
278

Shortening the Scanning Intervals [Pre-Pick]
Enable this to shorten the scanning time when scanning continuously."Pre-pick" refers to feeding the next document into the ADF before ejecting the current document being scannedwhen scanning documents continuously.
1 Start up the Software Operation Panel.For details, refer to Starting Up the Software Operation Panel (page 248).
2 From the listing on the left, select [Device Setting 2] → [Pre-Pick].
3 Specify whether or not to enable pre-pick.Select [Yes] or [No].The factory default setting is [Yes].
HINT
● If you cancel in the middle of scanning while pre-pick is enabled, you have to remove the pre-pickeddocument, then load the document again.
● This setting can also be configured in the scanner driver.Note that priority is given to the scanner driver setting.
Scanner Settings (Software Operation Panel)
279

Specifying the Number of Retries for Paper Feeding [Number of Paper FeedingRetries]
Specify the number of feeding retries when a document is not fed from the ADF paper chute (feeder).
1 Start up the Software Operation Panel.For details, refer to Starting Up the Software Operation Panel (page 248).
2 From the list on the left, select [Device Setting 2] → [Number of paper feeding retries].
3 Specify the number of paper feeding retries.The value can range from 1 to 12 times.The factory default setting is "3 times".
Scanner Settings (Software Operation Panel)
280

Feeding [Pick Speed]
You can specify the timing of when document feeding is started.When overlapped documents or paper jams occur frequently, delaying the timing of document feeding may improvethe performance.This setting is effective when you scan thin paper.
1 Start up the Software Operation Panel.For details, refer to Starting Up the Software Operation Panel (page 248).
2 From the list on the left, select [Device Setting 2] → [Pick Speed].
3 Select the feeding speed.
Normal
This is the optimum feeding speed.This is the factory default setting.
Slower
The timing of document feeding is delayed more than [Normal].
ATTENTION
The total time for scanning is longer because the timing of document feeding is delayed.
Scanner Settings (Software Operation Panel)
281

Cropping the Image Boundary [AutoCrop Boundary]
When the scanner is set to detect the paper size automatically, specify whether or not to optimize (round up/down)the fractional part of the scanned image.When the paper size is detected, there may be a fractional part of the scanned image compared to the standardpaper size.Output image size varies depending on how the fractional part is processed.
1 Start up the Software Operation Panel.For details, refer to Starting Up the Software Operation Panel (page 248).
2 From the list on the left, select [Device Setting 2] → [AutoCrop Boundary].
3 Select whether to include or exclude the fractional data.Select [Optimize] to prevent information from missing a part.The factory default setting is [Optimize].
ATTENTION
● While selecting [Optimize] can prevent information from missing a part, a shadow may appear aroundthe edges.
● When you scan a document with text around the edges while [Round Down] is selected, a part of theinformation may be missing in the output image.
● For details about setting automatic page size detection, refer to the help for the scanner driver.
Scanner Settings (Software Operation Panel)
282

HINT
This setting is effective only for scanning images in black & white.
Scanner Settings (Software Operation Panel)
283

Protecting the Documents from Being Damaged [Paper Protection]
Configure the setting to detect feeding errors.This function detects feeding errors in the following cases:
● When the scanner detects a warped document caused by a feeding error
● When the scanner detects paper jam noisePaper jams due to feeding errors could damage or tear valuable documents.Detecting a feeding error and stopping the scan can prevent damage to documents.This function is effective when you scan documents which are difficult to feed such as thin paper documents.
1 Start up the Software Operation Panel.For details, refer to Starting Up the Software Operation Panel (page 248).
2 From the listing on the left, select [Device Setting 2] → [Paper Protection].
3 Select a detection method.
Disable
Does not detect feeding errors.
Feeding Accuracy
Stops the scan when the scanner detects a warped document caused by a feeding error.This is the factory default setting.
Feeding Noise
Stops the scan when the scanner detects paper jam noise.
Scanner Settings (Software Operation Panel)
284

Feeding Accuracy & Noise
Stops the scan when the scanner detects a warped document caused by a feeding error, or when thescanner detects paper jam noise.
ATTENTION
● Note that the paper protection function is to prevent damages to documents, but the protection of alldocuments is not guaranteed.
● When you use the paper protection function, make sure to load the documents with their top edgesaligned (especially for a mixed batch of documents with different lengths).If the top edges are not aligned properly, the scan may stop even when the documents are being fedcorrectly.
HINT
● If you scan a wrinkled document, the scan may stop even when the document is being fed correctly.In that case, the paper protection function can be disabled only for the document on the touch screen.For details, refer to Disabling the Paper Protection Function (page 112).
● If the paper protection function stops scans frequently, refer to Paper Protection Is Set Off Frequently(page 207).
● This setting can also be configured in the scanner driver.When the paper protection setting is set to on in the scanner driver, [Feeding Accuracy & Noise] isenabled regardless of the setting on the Software Operation Panel.
● For the paper protection setting, priority will be given in the following order:1. [Paper Protection] in the scanner driver2. [Paper Protection (Touch Screen Settings)] on the touch screen3. [Paper protection] on the touch screen or [Paper Protection] on the Software Operation Panel
Scanner Settings (Software Operation Panel)
285

Specifying the Sensitivity Level for Paper Protection [Paper ProtectionSensitivity]
Specify the sensitivity level for detecting feeding errors when the paper protection function is enabled.Documents are warped and deformed or paper jam noise is made when documents are not being fed properly.Specify the sensitivity level for detecting deformed documents by warpage or feeding noise.
1 Start up the Software Operation Panel.For details, refer to Starting Up the Software Operation Panel (page 248).
2 From the list on the left, select [Device Setting 2] → [Paper Protection Sensitivity].
3 Select a detection method.
Feeding Accuracy
This is available when [Detect] for [Paper Protection] is either [Feeding Accuracy] or [Feeding Accuracy& Noise].
Feeding Noise
This is available when [Detect] for [Paper Protection] is either [Feeding Noise] or [Feeding Accuracy &Noise].
4 Select the sensitivity level.
Low
Decreases the sensitivity level to detect warped documents or paper jam noise.Specify this to only detect highly deformed documents by warpage or loud paper noise.
Scanner Settings (Software Operation Panel)
286

Normal
Detects warped documents and paper jam noise with the optimum sensitivity.This is the factory default setting.
High
Increases the sensitivity level to detect warped documents or paper jam noise.Specify this to detect even slightly deformed documents by warpage or slight paper jam noise.
HINT
● To detect warped documents or paper jam noise immediately and stop the scan, select [High].
● If scanning stops frequently due to the paper protection function, select [Low].
● When the setting is to prioritize the touch screen setting, the touch screen setting is prioritized over theSoftware Operation Panel setting.
Scanner Settings (Software Operation Panel)
287

Scanning at High Altitude [High Altitude Mode]
Enable this mode to use the scanner at an altitude of 2,000 m or higher.Low atmospheric pressure at high altitudes may lower the accuracy in detections for overlapped documents with theultrasonic sensor.Setting [Enable] to on for High Altitude Mode improves the accuracy to detect overlapped documents.
1 Start up the Software Operation Panel.For details, refer to Starting Up the Software Operation Panel (page 248).
2 From the list on the left, select [Device Setting 2] → [High Altitude Mode].
3 Select [Enable] to use the scanner at high altitude.The factory default setting is [Disable].
Scanner Settings (Software Operation Panel)
288

Specifying the Image Quality for Scanning [Image Quality Mode]
To obtain an image quality that is close to the image quality for scanning with fi-6130Z, set the image qualitymode.
1 Start up the Software Operation Panel.For details, refer to Starting Up the Software Operation Panel (page 248).
2 From the list on the left, select [Device Setting 2] → [Image Quality Mode].
3 Select whether to obtain an image quality that is close to the image quality with fi-6130Z.The factory default setting is [Disable].
Scanner Settings (Software Operation Panel)
289

Settings Related to the Detection for Overlapped Documents (Multifeed)
Specifying a Method to Detect Overlapped Documents [Multifeed]
Multifeed is an error that occurs when two or more sheets are overlapped and fed at once.Configure the settings to detect overlapped documents during a scan.Overlapped documents are detected with the ultrasonic sensor or according to the difference in length of thedocuments.When overlapped documents are detected, an error message is displayed on the touch screen and the scan stops. Ifdocuments are overlapped within 30 mm from the leading edge, they are not detected as overlapped.
1 Start up the Software Operation Panel.For details, refer to Starting Up the Software Operation Panel (page 248).
2 From the list on the left, select [Device Setting 2] → [Multifeed].
3 Select a detection method.
None
Does not detect overlapped documents.This is the factory default setting.
Check Overlapping(Ultrasonic)
Detects overlapped documents with the ultrasonic sensor.When this is selected, you can specify the following two options:
Scanner Settings (Software Operation Panel)
290

● Specify an area to detect overlapped documents by the length from the leading edge of the documentin the feeding direction.For details, refer to Specifying the Area to Detect Overlapped Documents [Document check areaspecification for Multifeed Detection] (page 293).
● When a piece of paper is attached on a document, the length and position of the paper can bememorized, and set to ignore overlapping of documents.For details, refer to Configuring Not to Detect Certain Overlap Patterns (page 109).
Check Length
Detects overlapped documents according to the difference in length.Select this to scan documents of the same length.Note that overlapped documents cannot be detected accurately when a mixed batch of different lengthsare scanned.
Check Overlapping and Length
Detects overlapped documents by the combination of [Check Overlapping (Ultrasonic)] and [CheckLength].When this is selected, you can specify the following two options:
● Specify an area to detect overlapped documents by the length from the leading edge of the documentin the feeding direction.For details, refer to Specifying the Area to Detect Overlapped Documents [Document check areaspecification for Multifeed Detection] (page 293).
● When a piece of paper is attached on a document, the length and position of the paper can bememorized, and set to ignore overlapping of documents.For details, refer to Configuring Not to Detect Certain Overlap Patterns (page 109).
Note that overlapped documents cannot be detected accurately when a mixed batch of different lengthare scanned.
Length
Specify the difference in length of documents to be detected as overlapped documents.Overlapped documents are detected when the the difference in length of documents is longer than thespecified value.Specify this item when [Check Length] or [Check Overlapping and Length] is selected.Any length under the specified value is tolerated as a slight error and not detected as overlappeddocuments.Select from 10/15/20 mm. The factory default setting is "10".
ATTENTION
● To scan documents with different lengths, select [Check Overlapping (Ultrasonic)].
● When an attachment such as a sticky note, receipt, or photo is attached on the document, theattachment part of the document may be detected as overlapping of documents if [Check Overlapping(Ultrasonic)] is selected. In that case, select [Check Length].
Scanner Settings (Software Operation Panel)
291

Otherwise, detect overlapping of documents by specifying an area on the document that does notinclude an area attached with paper in order to ignore the overlapping of documents for that area.
HINT
● This setting can also be configured in the scanner driver.Note that priority is given to the scanner driver setting.
● When the Carrier Sheet setting is enabled in the scanner driver, the touch screen does not display theerror message. The scanner driver does.
Scanner Settings (Software Operation Panel)
292

Specifying the Area to Detect Overlapped Documents [Document check areaspecification for Multifeed Detection]
Specify an area to detect overlapped documents.Specify this item when [Check Overlapping(Ultrasonic)] or [Check Overlapping and Length] is selected for[Multifeed].
1 Start up the Software Operation Panel.For details, refer to Starting Up the Software Operation Panel (page 248).
2 From the list on the left, select [Device Setting 2] → [Document check area specification for MultifeedDetection].Select the [Selected range] check box in the window.
3 Specify the detection range.
Scanner Settings (Software Operation Panel)
293

[Selected range] check box
Select the check box to specify the detection range (colored in light pink) in the figure below.
The check box is cleared for the factory default settings.Clearing this check box sets both start and end positions to "0", and overlapped documents are detectedwithin the whole document.The above condition applies when the document is set to the center of the pick roller width.If documents are overlapped within 30 mm from the leading edge, they are not detected as overlapped.
Disable (Middle)
This can be selected when the [Selected range] check box is selected.Overlapped documents are not detected within the specified area.This is the factory default setting.
Enable (Middle)
This can be selected when the [Selected range] check box is selected.Overlapped documents are detected within the specified area.
Start (Middle)
Specify the start position of the detection area by the length from the leading edge of the document inthe feeding direction.Range: 0 to 510 mm, in 2 mm increments, Start < EndThe factory default setting is "0".
End (Middle)
Specify the end position of the detection area by the length from the leading edge of the document inthe feeding direction.Range: 0 to 510 mm, in 2 mm increments, Start < EndThe factory default setting is "0".
Scanner Settings (Software Operation Panel)
294

HINT
● When the start and end positions are both "0", overlapped documents are detected in the wholedocument regardless of the setting for [Selected range].
● To disable the detection of overlapped documents for the whole document, select [Disable] for [Selectedrange], and set the start position to "0" and the end position to equal the document length or longer.
● If the start position is set at a length longer than the document length, overlapped documents aredetected in the whole document when [Disable] is selected for [Selected range], and overlappeddocuments are not detected anywhere in the whole document when [Enable] is selected for [Selectedrange].
● To detect overlapped documents, the area must be at least 5 mm in length.Configure the setting so that the value of the end position minus the start position is 6 mm or more.
● You can also set the start position and the end position by the following methods:
- On the window for specifying the detection area, draw a square by dragging the mouse pointer.
- On the window for specifying the detection area, drag the handles that indicate the start position andthe end position.
● For examples of the overlapping detection area settings, refer to Examples of the Settings for the Area toDetect the Overlapping of Documents (page 296).
Scanner Settings (Software Operation Panel)
295

■ Examples of the Settings for the Area to Detect the Overlapping of Documents
Example 1
Setting details are as follows.Detection area: Specify the enabled area, Start: 50 mm, End: 200 mm
Overlapping of documents is detected only within the light pink area.
Example 2
Setting details are as follows.
Scanner Settings (Software Operation Panel)
296

Detection area: Specify the disabled area, Start: 0 mm, End: 300 mm
Overlapping of documents is detected only within the light pink area.
Example 3 (Bad Example)
Setting details are as follows.Detection area: Specify the enabled area, Start: 100 mm, End: 102 mm
Scanner Settings (Software Operation Panel)
297

Since the detection area (length) is less than 5 mm, overlapped documents cannot be detected accurately.
Scanner Settings (Software Operation Panel)
298

Setting to Ignore Certain Overlap Patterns [Intelligent Multifeed Function]
Configure the setting to automatically ignore certain patterns of overlapped documents when the setting to detectoverlapped documents is enabled.Note that you first need to specify [Check Overlapping (Ultrasonic)] or [Check Overlapping and Length] in thescanner driver and Specifying a Method to Detect Overlapped Documents [Multifeed] (page 290) on the SoftwareOperation Panel before setting this item.
1 Start up the Software Operation Panel.For details, refer to Starting Up the Software Operation Panel (page 248).
2 From the list on the left, select [Device Setting 2] → [Intelligent Multifeed Function].
3 Select a operation mode.
Manual mode
Specify whether overlapped documents are detected when re-scanning documents detected asoverlapped documents.Does not memorize the size or location of the paper attachment.This is the factory default setting.
Auto mode 1
Specify whether the length and position of a piece of paper attached on a document detected asoverlapped documents are memorized as an overlap pattern.If the overlap pattern is memorized, documents with the same overlap pattern are not detected asoverlapped documents from the next scan.
Scanner Settings (Software Operation Panel)
299

HINT
Eight of the most recent overlap patterns can be memorized when [Remember] in [Remembermultifeed pattern at power-off] is enabled.
Auto mode 2
Specify whether the length of the longest piece of paper attached on a document detected asoverlapped documents is memorized as an overlap pattern.If the overlap pattern is memorized, a document with a piece of paper in the same length or shorterattached is not detected as overlapped documents from the next scan.
HINT
● By selecting the [Clear overlap pattern] check box, you can erase the overlap patterns that werememorized in Auto mode.You can erase overlap patterns that were not supposed to be memorized, but be careful with thisoperation because all memorized patterns will be erased.The check box is cleared for the factory default settings.
● By selecting the [Auto-Memorize MF Pattern (only when MF images are displayed)] check box, you canrecord overlap patterns in the window to check images for documents that were detected as overlappeddocuments.The check box is cleared for the factory default settings.
● In [Remember multifeed pattern at power-off], you can specify whether or not to keep the overlappattern upon turning the power off.When [Remember] is specified, you can use eight of the most recent overlap patterns the next time thescanner is powered on.The factory default setting is [Do not remember].
● When the setting for using the Carrier Sheet is enabled in the scanner driver, [Intelligent MultifeedFunction] is disabled.
Scanner Settings (Software Operation Panel)
300

Settings Related to Waiting Time
Waiting Time in Manual Feeding [Manual Feeding]
Configure the settings when manually loading and scanning one sheet at a time.When you scan by manually loading one sheet at a time, you can specify the waiting time (interval) for loading thenext document in the ADF paper chute (feeder). This enables continuous scanning as long as you load a documentwithin the specified time.If the specified time is exceeded, the scan is finished automatically.
1 Start up the Software Operation Panel.For details, refer to Starting Up the Software Operation Panel (page 248).
2 From the list on the left, select [Device Setting 2] → [Manual Feeding].
3 Set [Timeout Time].For [Timeout Time], specify the time period until which the scanner confirms that no documents are loadedin the ADF paper chute (feeder) (the interval between the last scan and the detection of whether the nextdocument is loaded or not).The factory default setting is "10 seconds".
● When scanning more than one document in succession manually1. Select [Enable] for [Continuous Feed Mode].2. Select the time for [Timeout Time].
Scanner Settings (Software Operation Panel)
301

● When scanning a document folded in half, an envelope, or a multi-layered transfer paper one at a timemanually1. Slide the feed mode switch to the left to switch the feed mode to Manual Single Mode.2. Select the time for [Timeout Time].
HINT
● When [Enable] is selected for [Continuous Feed Mode], the scanner will wait for documents to be loadeduntil the specified timeout time elapses even if you start scanning with no document in the ADF paperchute (feeder).
● When the feed mode switch is set to Manual Single Mode, the scanner will wait for documents to beloaded until the specified timeout time elapses regardless of the setting for [Continuous Feed Mode].
Scanner Settings (Software Operation Panel)
302

Waiting Time for the Scanner to Enter Power Saving Mode [Power saving]
Specify the waiting time before the scanner enters power saving mode.
1 Start up the Software Operation Panel.For details, refer to Starting Up the Software Operation Panel (page 248).
2 From the list on the left, select [Device Setting].
3 Use the slider to specify the waiting time for the scanner to enter power saving mode.The value can range from 5 to 115 minutes (in increments of 5).The factory default setting is "15" minutes.
HINT
Selecting the [Power off after a certain period of time] check box turns the power off automatically if thescanner is left on for a certain period of time without being used.The check box is selected for the factory default setting.You can select the timeout period for the scanner to be automatically turned off by [1 Hour]/[2 Hours]/[4Hours]/[8 Hours].The factory default setting is "4 Hours".If one of the following items is selected, the scanner is not turned off even when the specified period oftime for an auto shutdown has passed.
● [Fast] is selected for [Startup mode]
● [Disable power switch] is selected for [Power SW Control]
Scanner Settings (Software Operation Panel)
303

Settings Related to Power On/Off and Start up of the Scanner
Method of Turning the Scanner ON/OFF [Power SW Control]
Specify whether or not to turn on/off the scanner by pressing the [Power] button on the scanner.
1 Start up the Software Operation Panel.For details, refer to Starting Up the Software Operation Panel (page 248).
2 From the list on the left, select [Device Setting 2] → [Power SW Control].
3 Select one of the following:
Enable power switch
The [Power] button on the scanner is used to turn on/off the scanner.This is the factory default setting.
Disable power switch
Select this to use an AC power strip to control power supply for peripherals such as a scanner inaccordance with the computer's power.The [Power] button on the scanner is not used to turn on/off the scanner.
Enable USB power feeding
This can be selected when the scanner and the computer are connected via a USB cable.
Scanner Settings (Software Operation Panel)
304

In addition to the [Power] button on the scanner, turning on/off the computer can simultaneously turnon/off the scanner.Connecting/disconnecting a USB cable can turn on/off the scanner.
ATTENTION
Some types of computers and USB hubs keep supplying power to the USB bus even after the computer isturned off.In that case, [Enable USB Power Feeding] may not work properly.
Scanner Settings (Software Operation Panel)
305
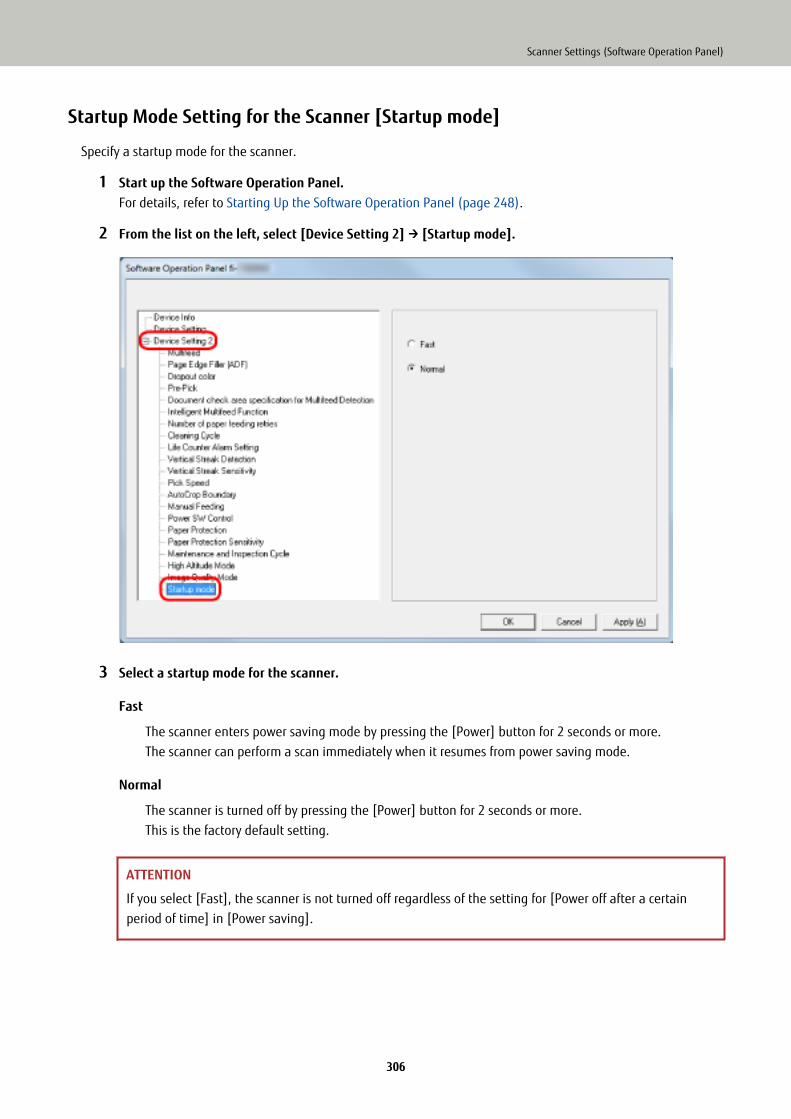
Startup Mode Setting for the Scanner [Startup mode]
Specify a startup mode for the scanner.
1 Start up the Software Operation Panel.For details, refer to Starting Up the Software Operation Panel (page 248).
2 From the list on the left, select [Device Setting 2] → [Startup mode].
3 Select a startup mode for the scanner.
Fast
The scanner enters power saving mode by pressing the [Power] button for 2 seconds or more.The scanner can perform a scan immediately when it resumes from power saving mode.
Normal
The scanner is turned off by pressing the [Power] button for 2 seconds or more.This is the factory default setting.
ATTENTION
If you select [Fast], the scanner is not turned off regardless of the setting for [Power off after a certainperiod of time] in [Power saving].
Scanner Settings (Software Operation Panel)
306

Settings Related to Scanner Maintenance
Detecting Vertical Streaks [Vertical Streak Detection]
You can configure the settings for detecting dirt on the glass.Vertical streaks may appear on images if the glass is dirty.
If [Enable] is selected for the vertical streak detection setting, the touch screen displays a notification on
when you receive a [Clean glass!] message. When you receive a message, clean the glass to prevent vertical streaksfrom appearing on images.
1 Start up the Software Operation Panel.For details, refer to Starting Up the Software Operation Panel (page 248).
2 From the list on the left, select [Device Setting 2] → [Vertical Streak Detection].
3 Select whether or not to detect dirt on the glass (vertical streaks).When you select [Enable], the scanner detects dirt on the glass (vertical streaks).The factory default setting is [Disable].
Scanner Settings (Software Operation Panel)
307

Specifying the Sensitivity Level for Vertical Streak Detection [Vertical StreakSensitivity]
Specify the sensitivity level to detect vertical streaks (dirt on the glass) when [Enable] is selected for [Vertical StreakDetection].Adjust the sensitivity level according to how dirty the glass is.
1 Start up the Software Operation Panel.For details, refer to Starting Up the Software Operation Panel (page 248).
2 From the list on the left, select [Device Setting 2] → [Vertical Streak Sensitivity].
3 Select the sensitivity level to detect dirt on the glass.
Low
Decreases the sensitivity level to detect dirt on the glass.Specify this to detect dirt only when the glass is very dirty.
Normal
Detects dirt on the glass with the optimum sensitivity.This is the factory default setting.
High
Increases the sensitivity level to detect dirt on the glass.Specify this to detect dirt even when the glass is slightly dirty.
Scanner Settings (Software Operation Panel)
308

Settings Related to Scanner Maintenance and Inspection Cycle [Maintenanceand Inspection Cycle]
Specify the maintenance and inspection cycle for the scanner that is performed by a service engineer.If the specified period has passed after the last maintenance and inspection date, the touch screen displays a
notification on when you receive a [Maintenance] message.
For regular maintenance and inspection on the scanner by a service engineer, contact the distributor/dealer whereyou purchased this product. Refer to the contact information in the Contact List if supplied with this product, or referto the contact information in the Contact for Inquiries section if provided in Safety Precautions supplied with thisproduct, and then make an inquiry.
1 Start up the Software Operation Panel.For details, refer to Starting Up the Software Operation Panel (page 248).
2 From the list on the left, select [Device Setting 2] → [Maintenance and Inspection Cycle].
3 Select [Enable] to receive a message on the touch screen when it gets closer to the time formaintenance.The factory default setting is [Disable].
4 Select the cycle to receive a message.The factory default setting is "12 months".
Scanner Settings (Software Operation Panel)
309

Appendix
Basic Specification
Item Specification
Scanner type ADF (Automatic Document Feeder)Manual feeding (Single/Continuous) is available withthe ADF.
Image sensor Color CCD × 2 (front, back)
Light source White LED × 2 (front, back)
Scanning area (width ×length)
Minimum size 50.8 × 54 mm/2 × 2.1 in.54 × 50.8 mm/2.1 × 2 in.
Maximum size A4 (portrait) (210 × 297 mm/8.3 × 11.7 in.) (*1)Legal (portrait) (8.5 × 14 in.) (*1)
Paper weight (thickness) 27 to 413 g/m2 (7.2 to 110 lb)
For A8 size or smaller, 128 to 209 g/m2(34 to 56 lb)1.4 mm or less for plastic cards (*2)
Scanning speed (A4,Portrait, 300 dpi) (*3)
For USB connection Simplex: 60 ppm, Duplex: 120 ipm
For wired LAN connection Simplex: 60 ppm, Duplex: 120 ipm
For Wi-Fi connection Simplex: 60 ppm, Duplex: 120 ipm
Loading capacity (*4) 80 sheets
Paper weight: 80 g/m2 (20 lb)Total thickness: 8 mm (0.3 in.) or less
Optical resolution 600 dpi
Output resolution Binary (black & white) 50 to 600 dpi (configurable in 1 dpi increments)1,200 dpi (created by scanner driver)Grayscale
Color
Multi-valued level Color: 24-bitGrayscale: 8-bitBinary (black & white): 1-bit
Interface USB USB 3.1 Gen 1/USB 3.0/USB 2.0/USB 1.1 (*5)Type B
Wired LAN IEEE802.3 Ethernet10BASE-T/100BASE-TX/1000BASE-TRJ-45
310

Item Specification
Wi-Fi For details, refer to Specifications of Wi-Fi (page311).
Network protocol (wired LAN, Wi-Fi) IPv4 (*6), TCP, UDP, ICMP, DHCP, DNSHTTP/HTTPS
Touch screen 4.3-inch TFT color touch screenPressure-sensitive
Contactless Smart Card Reader Communication mode
● Compliant with the ISO/IEC 14443 Type A/Type B
● Compliant with the ISO/IEC 18092
*1:Long page scanning supports documents with a length up to 5,588 mm (220 in.) when the resolution is setto 200 dpi or lower.
*2:Up to three plastic cards can be loaded in the ADF paper chute (feeder).
*3:Note that this is the hardware limitation, and the software's processing time such as data transfer time isadded to the actual time of scanning.
*4:The capacity varies depending on the paper weight.For details, refer to Documents for Scanning (page 81).
*5:Use the USB cable that is supplied.When connecting the USB cable to a USB hub, make sure you connect it to a USB hub that is connected tothe USB port of a computer.Connection with USB 3.1 Gen 1/USB 3.0/USB 2.0 requires the USB port and the hub to support USB 3.1 Gen1/USB 3.0/USB 2.0.Also note that the scanning speed slows down when USB 1.1 is used.
*6:IPv6 is not supported.
● Specifications of Wi-Fi
Item Specification
Observed standards IEEE802.11aIEEE802.11bIEEE802.11gIEEE802.11nIEEE802.11ac
Communication mode Infrastructure mode (*1)
Frequency 2.4 GHz band5 GHz band (*2)
Channel 2.4 GHz band: 1 to 13 ch5 GHz band: 36 to 60 ch, 100 to 140 ch, 149 to 165 ch (increments of 4 ch)
Appendix
311

Item Specification
Encryption WEP (64bit/128bit)WPA (TKIP/AES)WPA2 (AES)WPA-PSK (TLIP/AES)WPA2-PSK (AES)
Simple setup Supports WPS2.0 (button/PIN code) (*3)
*1:You need a wireless access point which supports the same standards as this scanner.
*2:Depending on the country or region where the scanner is purchased, it may not work with a 5GHz SSID.Change the wireless access point setting to use a 2.4 GHz SSID.
*3:You need a wireless access point which supports the WPS function.
Appendix
312

Installation Specification
Item Specification
Outer dimensions (W × D × H) (*1) 300 × 202 × 170 mm/11.81 × 7.95 × 6.69in.
Installation space (W × D × H) (*2) 400 × 700 × 380 mm/15.75 × 27.56 ×14.96 in.
Weight 4.9 kg (10.80 lb) or less
Input power Voltage range AC 100 to 240 V ±10%
Phase Single phase
Frequency range 50/60 Hz ±3 Hz
Power consumption Operating 42 W or less
Power saving 2.4 W or less
Power off 0.3 W or less
Ambient conditions Temperature Operating: 5 to 35℃ (41 to 95°F)Not operating: -20 to 60℃ (-4 to 140°F)
Humidity Operating: 20 to 80%Not operating: 8 to 95%
Calorific value Operating 36.12 kcal/h or less
Power saving 2.07 kcal/h or less
Shipping weight (*3) 7.2 kg (15.88 lb) or less
Support period 5 years
*1:The depth indicates the size of the scanner without the ADF paper chute (feeder) and the stacker.
*2:The required installation space is a reference for scanning A4 size documents.
*3:Includes the package weight.
Appendix
313

Outer Dimensions
The outer dimensions are as follows:
Unit: mm (in.)
Appendix
314

Scanner Options
Name Part No. Description
Carrier Sheets PA03360-0013 Use this option to scan non-standard size documentssuch as photographs and clippings.Using the Carrier Sheets enable you to scandocuments that can be damaged quite easily such asphotographs, or documents that are difficult to loaddirectly such as newspaper clippings.When a Carrier Sheet is too damaged or worn out tobe used for scanning, extra carrier sheets can bepurchased separately (5 sheets per set).The Carrier Sheet should be replaced approximatelyevery 500 scans.However, replace it if damage or dirt is noticeable.
For details about purchasing the scanner options and more information, contact the distributor/dealer whereyou purchased this product. Refer to the contact information in the Contact List if supplied with this product, orrefer to the contact information in the Contact for Inquiries section if provided in Safety Precautions suppliedwith this product, and then make an inquiry.
Appendix
315

Uninstalling the Software
1 Turn on the computer and log onto Windows as a user with administrator privileges.
2 Exit all running software.
3 Display the [Control Panel] window.
● Windows Server 2008 R2/Windows 7Click [Start] menu → [Control Panel].
● Windows Server 2012Right-click the Start screen, and select [All apps] on the app bar → [Control Panel] under [WindowsSystem].
● Windows Server 2012 R2/Windows 8.1Click [↓] on the lower left side of the Start screen → [Control Panel] under [Windows System].To display [↓], move the mouse cursor.
● Windows 10/Windows Server 2016/Windows Server 2019Click [Start] menu → [Windows System] → [Control Panel].
4 Select [Uninstall a program].
The [Programs and Features] window appears with a list of the currently installed software.
5 Select a software to uninstall.
● When uninstalling the PaperStream IP driverSelect one of the following:
- PaperStream IP (TWAIN)
- PaperStream IP (TWAIN x64)
- PaperStream IP (ISIS) Bundle
● When uninstalling Network Setup Tool for fi-7300NXSelect [Network Setup Tool for fi-7300NX].
● When uninstalling Software Operation PanelSelect [Software Operation Panel].The Software Operation Panel is installed together with the PaperStream IP driver.
● When uninstalling Error Recovery GuideSelect [Error Recovery Guide for fi-7300NX].
● When uninstalling PaperStream Capture/PaperStream Capture Pro (Trial)Select [PaperStream Capture].
● When uninstalling ABBYY FineReader for ScanSnap™
Select [ABBYY FineReader for ScanSnap(TM)].
● When uninstalling manualsSelect [fi Series manuals for fi-7300NX].
● When uninstalling Scanner Central Admin AgentSelect [Scanner Central Admin Agent].
Appendix
316

● When uninstalling fi Series Online UpdateSelect [fi Series Online Update].
6 Click the [Uninstall] button or the [Uninstall/Change] button.
7 If a confirmation message appears, click the [OK] button or the [Yes] button.
The software is uninstalled.
Appendix
317

Exporting the Scanner Settings (Using PaperStream NX Manager)This section explains the scanner settings that can be exported and the exporting procedure.
When using PaperStream NX Manager, export the scanner settings and upload them to the Scanner Central AdminServer so that the scanner settings can be distributed to other scanners operated with PaperStream NX Manager.For details about how to upload the exported scanner settings to the Scanner Central Admin Server or how todistribute the exported scanner settings, refer to the Scanner Central Admin User's Guide.
Settings That Can Be Exported
The scanner settings that are set for on the touch screen can be exported.
Note that the following settings cannot be exported:
● [Consumable counters] for [Cleaning & Maintenance]
● [Scanner name] for [Scanner Settings]
● The following settings in [Network] for [Scanner Settings]:
- [IP Address] for [Wi-Fi]
- [IP Address] for [Wired LAN]
● The following settings in [Image] for [Scanner Settings]:
- [Offset]
- [Magnification]
Export the scanner settings in the following procedure:
1 Turn on the computer and enter the following URL in the URL input field on the browser to establish aconnection with a scanner.http or https(*1)://xxx.xxx.xxx.xxx(*2)/login.cgi*1: Enter "http" when [Encryption Off (HTTP)] is selected for [Network Encryption] in [Network] in [ScannerSettings]. Or, enter "https" when [Encryption On (HTTPS)] is selected.*2: Enter an IP address for the scanner.
2 Enter the administrator password for logging in.You can skip this step when [Enable] for [Admin Password] in [Scanner Settings] is set to off.
3 Enter [Version/Name] when the window for exporting the scanner settings appears.Enter a version or name within 31 characters to identify the scanner settings.The characters you entered will be used for the name of the file to be exported.
4 Click the [Download] button.
The window appears asking you whether to open or save the file.
5 Click the [Save] button.
The scanner settings are exported as a file in the following file name.ScannerSetting_yyyyyyyy(*3).cab*3: The characters you entered for [Version/Name] in step 3 are used.
Appendix
318

6 Click the [Logout] button.You can skip this step when [Enable] for [Admin Password] in [Scanner Settings] is set to off.
ATTENTION
When exporting the scanner settings, in the case that the window does not proceed even if the [Login] button isclicked or downloading a file does not start even if the [Download] button is clicked, check the settings on yourbrowser.The following describes the procedure to check the settings on Internet Explorer 11 as an example.
● In the case that the window does not proceed even if the [Login] button is clickedConfirm that [Active scripting] is enabled.
1 In Internet Explorer, select the [Tools] menu → [Internet options].
2 On the [Security] tab in the [Internet Options] window, select [Trusted sites].
3 Confirm that the [Enable Protected Mode] check box is cleared.
4 Click the [Sites] button.
5 Clear the [Require server verification (https:) for all sites in this zone] check box.
6 Enter the URL of the scanner in the [Add this website to the zone] field, and click the [Add] button.
7 Click the [Close] button to close the window.
8 Click the [Custom level] button.
9 Confirm that [Enable] is selected for [Active scripting] under [Scripting].
10 Click the [OK] button to close the window.
11 Click the [OK] button and exit Internet Explorer.
● In the case that downloading does not start even if the [Download] button is clicked.Confirm that the setting is configured to save a file.
1 In Internet Explorer, select the [Tools] menu → [Internet options].
2 In the [Internet Options] window, select the [Advanced] tab.
3 Clear the [Do not save encrypted pages to disk] check box under [Security].
4 Click the [OK] button and exit Internet Explorer.
HINT
Uploading the exported file to the Scanner Central Admin Server allows you to distribute the scanner settings toother scanners.The scanner settings can be distributed to this scanner model (operated with PaperStream NX Manager) only.For details, refer to the Scanner Central Admin User's Guide.
Appendix
319

Notes for Distributing Assets with the Scanner Central Admin ServerThis section describes notes for distributing assets such as the scanner settings and firmware to scanners that areoperated with PaperStream NX Manager by using the Scanner Central Admin Server.
For details about how to distribute assets by using the Scanner Central Admin Server, refer to the ScannerCentral Admin User's Guide.
● Depending on the network environment, the communication between the Scanner Central Admin Server andthe scanner may fail due to the network load.In this case, use Scanner Central Admin Console to reduce the number of scanners in the same update group,and the maximum number of scanners which can be connected together at the same time.For details, refer to the Scanner Central Admin User's Guide.
● Assets such as the scanner settings and firmware will be distributed and applied to scanners in the followingcases:
- When a scanner is turned on
- When an operation to log out from PaperStream NX Manager is performedTo prevent assets from being distributed or applied during working hours, secure sufficient time between thetime the scanner is turned on and the time operations begin.In addition, Scanner Central Admin Console allows you to specify a time zone in which assets are to bedistributed.For details, refer to the Scanner Central Admin User's Guide.
Appendix
320

Contact for Inquiries
● Contact for Inquiries
Refer to the contact list on the last page of the Safety Precautions manual.
● ABBYY FineReader for ScanSnap™
- Windows Server 2008 R2/Windows 7Select [Start] menu→[All Programs]→[ABBYY FineReader for ScanSnap (TM)]→[User's Guide]→[TechnicalSupport].
- Windows Server 2012Right-click the Start screen, select [All apps] on the app bar, and then select [User's Guide] under [ABBYYFineReader for ScanSnap (TM)]→[Technical Support].
- Windows Server 2012 R2/Windows 8.1Click [↓] on the lower left side of the Start screen, and then select [User's Guide] under [ABBYY FineReaderfor ScanSnap(TM)]→[Technical Support].To display [↓], move the mouse cursor.
- Windows 10/Windows Server 2016/Windows Server 2019Select [Start] menu→[ABBYY FineReader for ScanSnap (TM)]→[User's Guide]→[Technical Support].
● Image Scanner fi SeriesFor other inquiries regarding the scanner, refer to the following web page:http://imagescanner.fujitsu.com/g-support.htmlIf the solution to your problem cannot be found on the above web page, refer to the contact information foryour Fujitsu office on the following web page:https://www.fujitsu.com/global/about/resources/shop/computing/peripheral/scanners/index.html
● Contact for Purchasing Consumables or Cleaning Materials
https://www.fujitsu.com/global/support/products/computing/peripheral/scanners/contacts/fi-series-contact.html
321


