wwwateasystemscom Copyright copy 2016 Atea Systems Limited All rights reserved
Atea Systems Limited PO Box 22042 2 Ganges Road
Khandallah Wellington New Zealand NZBN 9429036367115
Atea Systems Pty Limited PO Locked Bag Q800 QVB Post Office
Sydney NSW 1230 Australia ABN 57 122 952 783
Atea Systems ndash FTR Administration Guide
Page 2 of 22
Contents
1 Scope of this document 4
2 Product Overview 4
3 Supplied Software 5
4 Installing and Configuring FTR recording 5
41 Pre-requisites 5
42 Install the Virtual Machine 6
43 Configure backups 8
44 Configure alerting 8
5 Configure the CUCM for Recording 9
51 Configure CUCM System Service Parameters ndash single and multiple devices 9
52 Configure SIP Trunk device ndash single and multiple devices 10
53 Create a Route Group ndash multiple devices only 12
54 Create a route list for each server 13
55 Configure a route pattern for the SIP trunk 14
56 Configure the recording profile 14
57 Turn on the built-in bridge on the phone 15
58 Apply the recording profile to the phone line(s) 15
59 Enable the recording tone (optional) 15
6 Recording files 16
61 General 16
62 Disk allocation for recordings 16
63 Managing recordings 16
7 User Management 17
71 Accessing the FTR landing page ndash recording supervisors 17
72 Licensing and managing the phones to be recorded 17
73 Additional user accounts 20
8 Troubleshooting 20
Atea Systems ndash FTR Administration Guide
Page 3 of 22
Document History
Date Author Version Summary 4052016 Murray Lum 25e New SIP timer settings and update for 2500
Increase default disk size to 150MB New settings to increase SIP session expiry and disable G729 silence suppression Added instructions for backups and alerting
24042015 Murray Lum 25 Updated for release 2240 removed APEX section changed install to VM import expanded management of phones and licenses
25092012 Te Kairangi Katene
24 Removed cdr references for cm 85+
15092010 Jamie Brown 23 Updated APEX section
16082010 Jamie Brown 22 Updated section SIP Trucks
26072010 Jamie Brown 21 Updated section on managing recordings 16072010 Jamie Brown 2 Updated diagrams and troubleshooting
17062010 Jamie Brown 10 Initial administration guide
Related Documents
Document Description
FTR User guide User guide
Atea Systems ndash FTR Administration Guide
Page 4 of 22
1 Scope of this document
This guide describes the administrative tasks to configure and maintain the Atea Full
Time Recording (FTR) application This uses SIP based call recording
This document covers
FTR overview
FTR VM appliance installation (pre-configured instance supplied by Atea)
UCM configuration for the FTR application
Recording file basic management
Troubleshooting tips
For additional information on configuring the Cisco UCM please see the Cisco
documentation
2 Product Overview
In SIP based call recording recording streams get forked from agent IP phone to the
recorder The agent voice and the customer voice are sent separately Two different
methods of call recording are supported by Cisco being automatic (full time) recording
and application invoked recording This administration guide is for full time recording
Figure 1 Full time recording
The steps for establishing a full time recording session are
1 A customer calls into the call centre
2 The call routes to the agent The agent answers the call The agent IP phone
starts to exchange media streams with the customer
3 As the agent line appearance is configured for automatic recording the
recording session for the media streams automatically gets triggered The CUCM
first makes a recording call to the built-in bridge (BIB) of the agent IP phone for
the agent voice
4 The CUCM makes a second recording call to the BIB of the agent IP phone for
the customer voice
Atea Systems ndash FTR Administration Guide
Page 5 of 22
5 The recorder receives and answers the recording call setup messages from CUCM
for the agent voice using SIP The agent IP phone forks the agent voice stream
to the recorder
6 The recorder receives and answers the recording call setup messages from CUCM
for the customer voice using SIP The agent IP phone forks the customer voice
stream to the recorder
To record conversations set up each Cisco IP phone with a recording profile The
profile directs copies of the voice streams to the Atea FTR server The directory number
for the IP phone must also be included on the FTR server
3 Supplied Software
The Atea FTR server appliance is usually supplied as a virtual machine using OVF or OVA
files(s) This VM may be set up as a separate appliance independent of other Atea
supplied applications The resource availability can be critical for the recording
Disk 150GB HDD (Resilient data store recommended) Additional disk for recordings
Usually greater than 80GB HDD ndash depending on recording retention requirements See the section on recording files for a sizing table
4 Installing and Configuring FTR recording
41 Pre-requisites
Before you begin you will need
Access to the CUCM to configure the SIP recording and recording profiles
Virtual machine resources for the FTR VM (pre-configuration of VM host is not
required)
The VM OVF (or OVA) files supplied by Atea
A back-up and restoration strategy for the server
An archive strategy for the recordings
A remote access mechanism to allow Atea Support to configure and support the
appliance
Atea Systems ndash FTR Administration Guide
Page 6 of 22
To allow Atea to create the VM please supply the information below to
supportateasystemscom using the form at httpswwwateasystemscomvirtual-server-
config
hostname
IP-address (amp mask amp gateway)
DNS details
NTP IP-address
SMTP IP-address
Forward any security documentation to supportateasystemscom
Information required later to setup and generate a license file
Server MAC address
42 Install the Virtual Machine
The Atea FTR is normally supplied as a virtual machine shipped in OVF format
Download and check the files provided
1 From your preferred client (such as the vSphere Client) navigate to ldquoDeploy OVF
Templaterdquo
2 Browse to the location where the downloaded files are stored and select the
[filename]ovf (or ova)
3 Enter a name for the instance
Atea Systems ndash FTR Administration Guide
Page 7 of 22
4 Select the data-store where you want the VM guest to reside
5 Select the Disk Format (Thick Provision is recommended)
6 Start the server instance (Power On)
7 Log into the console with user thirdparty and the password provided You must
change the password on first login Enter the old password again then the new
password twice
This confirms that you have access to the VM in the future for maintenance
You may now set up both the server backup and remote access for Atea support
Atea Systems ndash FTR Administration Guide
Page 8 of 22
43 Configure backups
The automatic backup cycle runs daily at 11pm
The components backed up locally on the servers are
Linux configuration (7 days kept with day of week indicator from 1 to 7)
Atea applications (7 days kept)
Atea application properties (7 days kept)
Oracle database (2 days kept)
Atea recommends that sFTP is used to copy the application and database backups to a
network location
The procedure to enable the sFTP copying is (see also the Atea website)
ssh thirdpartyateaserver-ip-address
sudo su -
vim etcateascriptssftpBackupsh (enter the sftp server details)
Change the host user password and path parameters on lines 4-7
vim etcateascriptsfullBackupsh (change line 23 DO_BACKUP_COPY=true)
Now check that the ssh rsa key is stored and connectivity is okay by connecting to the
sftp server
sftp usersftpserver (enter password to establish connection)
exit
44 Configure alerting
A monitor script runs every 10 mins by default and sends alerts if certain conditions are
met These include CPU IOWAIT Free disk and memory and whether the application
can connect to the Oracle database
To change the monitor script to send alerts to your service provider yoursquoll need to
modify the script
ssh thirdpartyateaserver-ip-address
sudo su -
vim etcateascriptsmonitorsh
Change the MAILTO and MAILFROM lines with the Service-Provider specific email
addresses
Atea Systems ndash FTR Administration Guide
Page 9 of 22
5 Configure the CUCM for Recording
The recording application uses a SIP trunk to record the telephone calls This can be
either a single trunk or multiple trunks spread across several devices for resilience
There are additional steps if there are multiple trunks
For a single recording server the normal setup steps are
1 Configure the CUCM System Service Parameters
2 Configure the SIP trunk for the server
3 Configure the Route Pattern to use the recording device
4 Configure the recording profile
5 Set up the phones for recording
For several recording servers we suggest you follow these steps
1 Configure the CUCM System Service Parameters
2 Configure the SIP trunk for each of the servers
3 Create a route group for each recording trunk and add the SIP devices (a route
group specifies the order the trunks are selected)
4 Create a route list for each server which specifies the order the route groups are
used
5 Configure the Route Pattern to use the route list
6 Configure the recording profile
7 Set up the phones for recording
51 Configure CUCM System Service Parameters ndash single and
multiple devices
Two settings must be changed here
The SIP session expires timer must be increased otherwise each recording is cut
off at 16 minutes
Silence Suppression for G729 must be stripped otherwise some recordings will
overlap when they shouldnrsquot
To change these settings
1 Log onto the CUCM administration
2 Select the Server and Service Cisco CallManager (Active)
Atea Systems ndash FTR Administration Guide
Page 10 of 22
3 Go to Service Parameter Configuration
4 Set the SIP Session Expires Timer to 86400 (This is the number of seconds in 24
hours)
Disable silence suppression
5 Go to the parameter Strip G729 Annex B (Silence Suppression) from Capabilities
and set this to True
52 Configure SIP Trunk device ndash single and multiple devices
Here are the steps to create a trunk on a device Repeat these for each recording
device or FTR server that you have
1 Create a SIP trunk CUCM administration -gt Trunk Configuration
Trunk type = SIP trunk
Device protocol = SIP
Atea Systems ndash FTR Administration Guide
Page 11 of 22
2 Set the device information
Device Name - eg Atea_Recording_Trunk (this appears in the route pattern for
single devices or the Route Group if there are several devices)
Device Pool ndash usually the same as the phones to be recorded
3 Set the SIP information
Destination address ndash this is the server with the Atea FTR application
SIP Trunk Security Profile ndash this must match the setting on the Atea FTR application
for which the default setting is ldquoNon secure SIP Trunk Profilerdquo
This trunk name will be referred to in the route pattern
Atea Systems ndash FTR Administration Guide
Page 12 of 22
4 Set the SIP Trunk Security Profile Information
The transport may be TCP or UDP The default setting on the Atea FTR is TCP (it
looks for SIP on TCP port 5060)
53 Create a Route Group ndash multiple devices only
Skip this step if you have a single recording server
For multiple devices ensure you have configured the SIP trunk devices for each
recording server
For resilience create a Route Group for each recording trunk on each device
To configure the Route Group
1 Choose Call Routing gt RouteHunt gt Route Group
2 Enter a name for the route group
3 Add each device to the route group
Atea Systems ndash FTR Administration Guide
Page 13 of 22
54 Create a route list for each server
Skip this step if you have a single recording server
Configure a route list for each recorder to determine the priority order that the route
groups apply
Where there are say two recorders with two route groups set the route list with the
route groups in the opposite order For example
route list 1 route group 1 then route group 2
route list 2 route group 2 then route group 1
To configure the route list
1 Choose Call Routing gt RouteHunt gt Route List
2 Enter a name for the route list
3 Add each device to the route group
Atea Systems ndash FTR Administration Guide
Page 14 of 22
55 Configure a route pattern for the SIP trunk
Wersquoll need a route pattern to direct calls to the SIP trunk gateway (or the route lists if
several devices)
The convention for the route pattern is to use the destination IP address for the trunk
with the period marks (ldquordquo) removed For example the route pattern is 911138 for the
SIP trunk on 911138 as shown in the destination above
Set the GatewayRoute List to the device name we created earlier eg
Atea_Recording_Trunk or the route lists where these are used
56 Configure the recording profile
Create a recording profile to point to the newly created route pattern Apply the
recording profile to the phone lines that are to be recorded
Atea Systems ndash FTR Administration Guide
Page 15 of 22
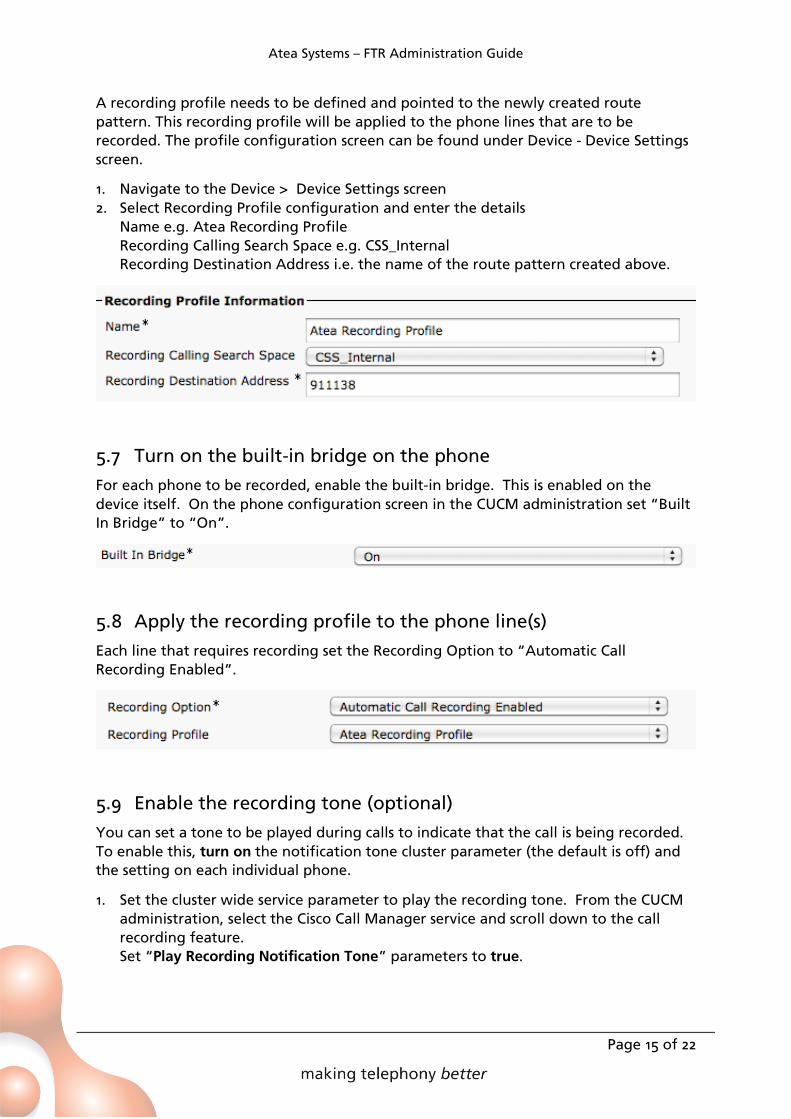
A recording profile needs to be defined and pointed to the newly created route
pattern This recording profile will be applied to the phone lines that are to be
recorded The profile configuration screen can be found under Device - Device Settings
screen
1 Navigate to the Device gt Device Settings screen
2 Select Recording Profile configuration and enter the details
Name eg Atea Recording Profile
Recording Calling Search Space eg CSS_Internal
Recording Destination Address ie the name of the route pattern created above
57 Turn on the built-in bridge on the phone
For each phone to be recorded enable the built-in bridge This is enabled on the
device itself On the phone configuration screen in the CUCM administration set ldquoBuilt
In Bridgerdquo to ldquoOnrdquo
58 Apply the recording profile to the phone line(s)
Each line that requires recording set the Recording Option to ldquoAutomatic Call
Recording Enabledrdquo
59 Enable the recording tone (optional)
You can set a tone to be played during calls to indicate that the call is being recorded
To enable this turn on the notification tone cluster parameter (the default is off) and
the setting on each individual phone
1 Set the cluster wide service parameter to play the recording tone From the CUCM
administration select the Cisco Call Manager service and scroll down to the call
recording feature
Set ldquoPlay Recording Notification Tonerdquo parameters to true
Atea Systems ndash FTR Administration Guide
Page 16 of 22
2 Now enable the tone for each phone device This is done on the device itself not
the individual lines For information on these settings refer to the Cisco
documentation
6 Recording files
61 General
Recording files are created in several phases Initially the application writes the audio
header for the file and then writes the voice-call data in real-time When the call ends
the file is closed
The file type is a wave file with the ldquoaurdquo suffix This type of audio file is playable by
most media players This file type is easily copied and stored Users may copy the file
to their local workstation to listen to it or if they want to share it with a colleague for
evaluation
The recordings can searched directly from the FTR application
62 Disk allocation for recordings
Recordings are stored on a separate disk mounted to the server that runs the FTR
application The suggested budget for sizing this disk is to allow 480kB per minute of
recording Recordings are stored in an uncompressed format
Recording duration Disk budget
1 minute 480 kB
1 hour 288 MB 100 hours 288 GB
1000 hours 288 GB
10000 hours 288 GB
63 Managing recordings
Recording files are located in the folder specified in the application
Here is an excerpt from the BibCallRecorder properties file
Atea Systems ndash FTR Administration Guide
Page 17 of 22
Property Value Comment
SipCallRecorderrecording_directory varrecording The path must exist
Recordings are stored separately to the call record database The database includes a
pointer to the file location
If the recording file is moved to another location the recording will display as ldquonot
foundrdquo on the call search screen Restoring the file back to the original folder allows
the file to be played or retrieved using the normal screen to access the database
Recordings may be archived or moved manually using operating system commands or
other utilities It is common practice to move or remove older recording files to
maintain space on the disk
7 User Management
71 Accessing the FTR landing page ndash recording supervisors
To connect to the FTR application use your web browser to navigate to this page ndash
http[IPaddressOfServer]8080apexfp=103
Enter the user name and password This takes you a search screen for the recordings
72 Licensing and managing the phones to be recorded
The FTR application is licensed for the number of phones to be recorded To manage
these phones use a web browser to navigate to this page
http[IPaddressOfServer]8080apexfp=106
Atea Systems ndash FTR Administration Guide
Page 18 of 22
This page shows how many licenses are consumed and the list of phones (DN directory
numbers or extensions) to be recorded
Note ndash in order for a phone to be recorded it must be set up in the CUCM with a
recording profile as well as this list
To change the size of your license please contact Atea Systems
To add phones to the list
1 From the main Manage Recorded Extensions page click the Create button to go to
the next page
2 Enter the extension number (DN) of the phone and click the Create Button
Atea Systems ndash FTR Administration Guide
Page 19 of 22
This phone will now appear in the list
3 You may continue to add or edit phones in the list within your license limit Once
you reach the limit the Create button becomes inactive
4 To start recordings for the updated list click the Activate button
To change or delete a phone from the recording list
1 From the main Manage Recorded Extensions page click the edit icon next to the
extension
2 Edit the extension number (DN) to change it and click the Apply Changes button or
press the Delete button to remove the extension from the list
Atea Systems ndash FTR Administration Guide
Page 20 of 22
The list will be updated
3 Continue making changes within your license limit
4 To start recordings for the updated list click the Activate button
73 Additional user accounts
FTR users have access to the recording application page that allows recordings to be
browsed searched and retrieved
There are two common methods for defining user accounts Only one of these will be
configured during the initial implementation of the solution
1 User account defined by implementer or Atea Systems This is a local account
To add more user accounts contact Atea support
2 Users are linked to LDAPActive-Directory and access is controlled by group
membership This is usually reserved for larger organisations To add more
users add them to the appropriate AD group
8 Troubleshooting
Troubleshooting tips and setup tasks
Issue Tip
Some recordings are not displaying on the recording page
Possible issues
1 The date range is incorrect
Atea Systems ndash FTR Administration Guide
Page 21 of 22
Issue Tip
2 The recording has not been processed yet It may take up to ten minutes for a recording to display on-screen
3 There may be an issue with recordings not being captured
a Check the Linux directory varrecordings to see if the recording files are present
b Check the directory numbers for the caller and calling party If this is a five or six digit number that is high contact Atea Support regarding a possible UDP port number issue
A specific phone is not being recorded
Possible issues
1 The phone must have the recording profile set up in the CUCM
2 The phone number (DN) must be included in the license list
Recording files are of zero duration
Possible issues
Wrong voice codec not enough resources
FTR Solutions using G711 only
1 On the UCM check that the calls are set for G711 2 If UCM transcoding is used to convert calls to G711
check there are sufficient transcoding resources
Note FTR does not record G722 calls
FTR solutions using g729 option
1 Check that G729 option is enabled 2 Check that the G729 license file is present 3 Check that there are sufficient G729 licenses installed
(Atea)
Blocked access
1 A firewall is blocking the access to the SIP trunk or to the disk with the recordings This is a configuration issue that sometimes occurs during initial commissioning
Recordings display as ldquonot foundrdquo on the recording display screen
The recording file may have been moved or archived from the disk Restore the file to the original location
Alternatively search for the file name in the location where the recording files have been moved or archived to
Recording disk space is full exceeds capacity threshold
Move or archive some recording files
Oracle database is full approaching full
Contact Atea support to arrange purging of selected database records
Atea Systems ndash FTR Administration Guide
Page 22 of 22
Issue Tip
Recordings are cut off after 16 minutes
Adjust the ldquoSIP Session Expires Timerrdquo to the value 86400 (which is 24 hours in seconds) The default setting for this means recording automatically ends at 16 minutes as the RFC4028 re-invite is not used This timer is a system setting under Cisco CallManager (Active) gt System gt Service Parameter Configuration gt SIP Session Expires Timer
Some recordings overlap falsely when using G729 codec
Silence suppression for G729 needs to be disabled On the CallManager set the parameter Strip G729 Annex B (Silence Suppression) from Capabilities to True
Atea Systems ndash FTR Administration Guide
Page 2 of 22
Contents
1 Scope of this document 4
2 Product Overview 4
3 Supplied Software 5
4 Installing and Configuring FTR recording 5
41 Pre-requisites 5
42 Install the Virtual Machine 6
43 Configure backups 8
44 Configure alerting 8
5 Configure the CUCM for Recording 9
51 Configure CUCM System Service Parameters ndash single and multiple devices 9
52 Configure SIP Trunk device ndash single and multiple devices 10
53 Create a Route Group ndash multiple devices only 12
54 Create a route list for each server 13
55 Configure a route pattern for the SIP trunk 14
56 Configure the recording profile 14
57 Turn on the built-in bridge on the phone 15
58 Apply the recording profile to the phone line(s) 15
59 Enable the recording tone (optional) 15
6 Recording files 16
61 General 16
62 Disk allocation for recordings 16
63 Managing recordings 16
7 User Management 17
71 Accessing the FTR landing page ndash recording supervisors 17
72 Licensing and managing the phones to be recorded 17
73 Additional user accounts 20
8 Troubleshooting 20
Atea Systems ndash FTR Administration Guide
Page 3 of 22
Document History
Date Author Version Summary 4052016 Murray Lum 25e New SIP timer settings and update for 2500
Increase default disk size to 150MB New settings to increase SIP session expiry and disable G729 silence suppression Added instructions for backups and alerting
24042015 Murray Lum 25 Updated for release 2240 removed APEX section changed install to VM import expanded management of phones and licenses
25092012 Te Kairangi Katene
24 Removed cdr references for cm 85+
15092010 Jamie Brown 23 Updated APEX section
16082010 Jamie Brown 22 Updated section SIP Trucks
26072010 Jamie Brown 21 Updated section on managing recordings 16072010 Jamie Brown 2 Updated diagrams and troubleshooting
17062010 Jamie Brown 10 Initial administration guide
Related Documents
Document Description
FTR User guide User guide
Atea Systems ndash FTR Administration Guide
Page 4 of 22
1 Scope of this document
This guide describes the administrative tasks to configure and maintain the Atea Full
Time Recording (FTR) application This uses SIP based call recording
This document covers
FTR overview
FTR VM appliance installation (pre-configured instance supplied by Atea)
UCM configuration for the FTR application
Recording file basic management
Troubleshooting tips
For additional information on configuring the Cisco UCM please see the Cisco
documentation
2 Product Overview
In SIP based call recording recording streams get forked from agent IP phone to the
recorder The agent voice and the customer voice are sent separately Two different
methods of call recording are supported by Cisco being automatic (full time) recording
and application invoked recording This administration guide is for full time recording
Figure 1 Full time recording
The steps for establishing a full time recording session are
1 A customer calls into the call centre
2 The call routes to the agent The agent answers the call The agent IP phone
starts to exchange media streams with the customer
3 As the agent line appearance is configured for automatic recording the
recording session for the media streams automatically gets triggered The CUCM
first makes a recording call to the built-in bridge (BIB) of the agent IP phone for
the agent voice
4 The CUCM makes a second recording call to the BIB of the agent IP phone for
the customer voice
Atea Systems ndash FTR Administration Guide
Page 5 of 22
5 The recorder receives and answers the recording call setup messages from CUCM
for the agent voice using SIP The agent IP phone forks the agent voice stream
to the recorder
6 The recorder receives and answers the recording call setup messages from CUCM
for the customer voice using SIP The agent IP phone forks the customer voice
stream to the recorder
To record conversations set up each Cisco IP phone with a recording profile The
profile directs copies of the voice streams to the Atea FTR server The directory number
for the IP phone must also be included on the FTR server
3 Supplied Software
The Atea FTR server appliance is usually supplied as a virtual machine using OVF or OVA
files(s) This VM may be set up as a separate appliance independent of other Atea
supplied applications The resource availability can be critical for the recording
Disk 150GB HDD (Resilient data store recommended) Additional disk for recordings
Usually greater than 80GB HDD ndash depending on recording retention requirements See the section on recording files for a sizing table
4 Installing and Configuring FTR recording
41 Pre-requisites
Before you begin you will need
Access to the CUCM to configure the SIP recording and recording profiles
Virtual machine resources for the FTR VM (pre-configuration of VM host is not
required)
The VM OVF (or OVA) files supplied by Atea
A back-up and restoration strategy for the server
An archive strategy for the recordings
A remote access mechanism to allow Atea Support to configure and support the
appliance
Atea Systems ndash FTR Administration Guide
Page 6 of 22
To allow Atea to create the VM please supply the information below to
supportateasystemscom using the form at httpswwwateasystemscomvirtual-server-
config
hostname
IP-address (amp mask amp gateway)
DNS details
NTP IP-address
SMTP IP-address
Forward any security documentation to supportateasystemscom
Information required later to setup and generate a license file
Server MAC address
42 Install the Virtual Machine
The Atea FTR is normally supplied as a virtual machine shipped in OVF format
Download and check the files provided
1 From your preferred client (such as the vSphere Client) navigate to ldquoDeploy OVF
Templaterdquo
2 Browse to the location where the downloaded files are stored and select the
[filename]ovf (or ova)
3 Enter a name for the instance
Atea Systems ndash FTR Administration Guide
Page 7 of 22
4 Select the data-store where you want the VM guest to reside
5 Select the Disk Format (Thick Provision is recommended)
6 Start the server instance (Power On)
7 Log into the console with user thirdparty and the password provided You must
change the password on first login Enter the old password again then the new
password twice
This confirms that you have access to the VM in the future for maintenance
You may now set up both the server backup and remote access for Atea support
Atea Systems ndash FTR Administration Guide
Page 8 of 22
43 Configure backups
The automatic backup cycle runs daily at 11pm
The components backed up locally on the servers are
Linux configuration (7 days kept with day of week indicator from 1 to 7)
Atea applications (7 days kept)
Atea application properties (7 days kept)
Oracle database (2 days kept)
Atea recommends that sFTP is used to copy the application and database backups to a
network location
The procedure to enable the sFTP copying is (see also the Atea website)
ssh thirdpartyateaserver-ip-address
sudo su -
vim etcateascriptssftpBackupsh (enter the sftp server details)
Change the host user password and path parameters on lines 4-7
vim etcateascriptsfullBackupsh (change line 23 DO_BACKUP_COPY=true)
Now check that the ssh rsa key is stored and connectivity is okay by connecting to the
sftp server
sftp usersftpserver (enter password to establish connection)
exit
44 Configure alerting
A monitor script runs every 10 mins by default and sends alerts if certain conditions are
met These include CPU IOWAIT Free disk and memory and whether the application
can connect to the Oracle database
To change the monitor script to send alerts to your service provider yoursquoll need to
modify the script
ssh thirdpartyateaserver-ip-address
sudo su -
vim etcateascriptsmonitorsh
Change the MAILTO and MAILFROM lines with the Service-Provider specific email
addresses
Atea Systems ndash FTR Administration Guide
Page 9 of 22
5 Configure the CUCM for Recording
The recording application uses a SIP trunk to record the telephone calls This can be
either a single trunk or multiple trunks spread across several devices for resilience
There are additional steps if there are multiple trunks
For a single recording server the normal setup steps are
1 Configure the CUCM System Service Parameters
2 Configure the SIP trunk for the server
3 Configure the Route Pattern to use the recording device
4 Configure the recording profile
5 Set up the phones for recording
For several recording servers we suggest you follow these steps
1 Configure the CUCM System Service Parameters
2 Configure the SIP trunk for each of the servers
3 Create a route group for each recording trunk and add the SIP devices (a route
group specifies the order the trunks are selected)
4 Create a route list for each server which specifies the order the route groups are
used
5 Configure the Route Pattern to use the route list
6 Configure the recording profile
7 Set up the phones for recording
51 Configure CUCM System Service Parameters ndash single and
multiple devices
Two settings must be changed here
The SIP session expires timer must be increased otherwise each recording is cut
off at 16 minutes
Silence Suppression for G729 must be stripped otherwise some recordings will
overlap when they shouldnrsquot
To change these settings
1 Log onto the CUCM administration
2 Select the Server and Service Cisco CallManager (Active)
Atea Systems ndash FTR Administration Guide
Page 10 of 22
3 Go to Service Parameter Configuration
4 Set the SIP Session Expires Timer to 86400 (This is the number of seconds in 24
hours)
Disable silence suppression
5 Go to the parameter Strip G729 Annex B (Silence Suppression) from Capabilities
and set this to True
52 Configure SIP Trunk device ndash single and multiple devices
Here are the steps to create a trunk on a device Repeat these for each recording
device or FTR server that you have
1 Create a SIP trunk CUCM administration -gt Trunk Configuration
Trunk type = SIP trunk
Device protocol = SIP
Atea Systems ndash FTR Administration Guide
Page 11 of 22
2 Set the device information
Device Name - eg Atea_Recording_Trunk (this appears in the route pattern for
single devices or the Route Group if there are several devices)
Device Pool ndash usually the same as the phones to be recorded
3 Set the SIP information
Destination address ndash this is the server with the Atea FTR application
SIP Trunk Security Profile ndash this must match the setting on the Atea FTR application
for which the default setting is ldquoNon secure SIP Trunk Profilerdquo
This trunk name will be referred to in the route pattern
Atea Systems ndash FTR Administration Guide
Page 12 of 22
4 Set the SIP Trunk Security Profile Information
The transport may be TCP or UDP The default setting on the Atea FTR is TCP (it
looks for SIP on TCP port 5060)
53 Create a Route Group ndash multiple devices only
Skip this step if you have a single recording server
For multiple devices ensure you have configured the SIP trunk devices for each
recording server
For resilience create a Route Group for each recording trunk on each device
To configure the Route Group
1 Choose Call Routing gt RouteHunt gt Route Group
2 Enter a name for the route group
3 Add each device to the route group
Atea Systems ndash FTR Administration Guide
Page 13 of 22
54 Create a route list for each server
Skip this step if you have a single recording server
Configure a route list for each recorder to determine the priority order that the route
groups apply
Where there are say two recorders with two route groups set the route list with the
route groups in the opposite order For example
route list 1 route group 1 then route group 2
route list 2 route group 2 then route group 1
To configure the route list
1 Choose Call Routing gt RouteHunt gt Route List
2 Enter a name for the route list
3 Add each device to the route group
Atea Systems ndash FTR Administration Guide
Page 14 of 22
55 Configure a route pattern for the SIP trunk
Wersquoll need a route pattern to direct calls to the SIP trunk gateway (or the route lists if
several devices)
The convention for the route pattern is to use the destination IP address for the trunk
with the period marks (ldquordquo) removed For example the route pattern is 911138 for the
SIP trunk on 911138 as shown in the destination above
Set the GatewayRoute List to the device name we created earlier eg
Atea_Recording_Trunk or the route lists where these are used
56 Configure the recording profile
Create a recording profile to point to the newly created route pattern Apply the
recording profile to the phone lines that are to be recorded
Atea Systems ndash FTR Administration Guide
Page 15 of 22
A recording profile needs to be defined and pointed to the newly created route
pattern This recording profile will be applied to the phone lines that are to be
recorded The profile configuration screen can be found under Device - Device Settings
screen
1 Navigate to the Device gt Device Settings screen
2 Select Recording Profile configuration and enter the details
Name eg Atea Recording Profile
Recording Calling Search Space eg CSS_Internal
Recording Destination Address ie the name of the route pattern created above
57 Turn on the built-in bridge on the phone
For each phone to be recorded enable the built-in bridge This is enabled on the
device itself On the phone configuration screen in the CUCM administration set ldquoBuilt
In Bridgerdquo to ldquoOnrdquo
58 Apply the recording profile to the phone line(s)
Each line that requires recording set the Recording Option to ldquoAutomatic Call
Recording Enabledrdquo
59 Enable the recording tone (optional)
You can set a tone to be played during calls to indicate that the call is being recorded
To enable this turn on the notification tone cluster parameter (the default is off) and
the setting on each individual phone
1 Set the cluster wide service parameter to play the recording tone From the CUCM
administration select the Cisco Call Manager service and scroll down to the call
recording feature
Set ldquoPlay Recording Notification Tonerdquo parameters to true
Atea Systems ndash FTR Administration Guide
Page 16 of 22
2 Now enable the tone for each phone device This is done on the device itself not
the individual lines For information on these settings refer to the Cisco
documentation
6 Recording files
61 General
Recording files are created in several phases Initially the application writes the audio
header for the file and then writes the voice-call data in real-time When the call ends
the file is closed
The file type is a wave file with the ldquoaurdquo suffix This type of audio file is playable by
most media players This file type is easily copied and stored Users may copy the file
to their local workstation to listen to it or if they want to share it with a colleague for
evaluation
The recordings can searched directly from the FTR application
62 Disk allocation for recordings
Recordings are stored on a separate disk mounted to the server that runs the FTR
application The suggested budget for sizing this disk is to allow 480kB per minute of
recording Recordings are stored in an uncompressed format
Recording duration Disk budget
1 minute 480 kB
1 hour 288 MB 100 hours 288 GB
1000 hours 288 GB
10000 hours 288 GB
63 Managing recordings
Recording files are located in the folder specified in the application
Here is an excerpt from the BibCallRecorder properties file
Atea Systems ndash FTR Administration Guide
Page 17 of 22
Property Value Comment
SipCallRecorderrecording_directory varrecording The path must exist
Recordings are stored separately to the call record database The database includes a
pointer to the file location
If the recording file is moved to another location the recording will display as ldquonot
foundrdquo on the call search screen Restoring the file back to the original folder allows
the file to be played or retrieved using the normal screen to access the database
Recordings may be archived or moved manually using operating system commands or
other utilities It is common practice to move or remove older recording files to
maintain space on the disk
7 User Management
71 Accessing the FTR landing page ndash recording supervisors
To connect to the FTR application use your web browser to navigate to this page ndash
http[IPaddressOfServer]8080apexfp=103
Enter the user name and password This takes you a search screen for the recordings
72 Licensing and managing the phones to be recorded
The FTR application is licensed for the number of phones to be recorded To manage
these phones use a web browser to navigate to this page
http[IPaddressOfServer]8080apexfp=106
Atea Systems ndash FTR Administration Guide
Page 18 of 22
This page shows how many licenses are consumed and the list of phones (DN directory
numbers or extensions) to be recorded
Note ndash in order for a phone to be recorded it must be set up in the CUCM with a
recording profile as well as this list
To change the size of your license please contact Atea Systems
To add phones to the list
1 From the main Manage Recorded Extensions page click the Create button to go to
the next page
2 Enter the extension number (DN) of the phone and click the Create Button
Atea Systems ndash FTR Administration Guide
Page 19 of 22
This phone will now appear in the list
3 You may continue to add or edit phones in the list within your license limit Once
you reach the limit the Create button becomes inactive
4 To start recordings for the updated list click the Activate button
To change or delete a phone from the recording list
1 From the main Manage Recorded Extensions page click the edit icon next to the
extension
2 Edit the extension number (DN) to change it and click the Apply Changes button or
press the Delete button to remove the extension from the list
Atea Systems ndash FTR Administration Guide
Page 20 of 22
The list will be updated
3 Continue making changes within your license limit
4 To start recordings for the updated list click the Activate button
73 Additional user accounts
FTR users have access to the recording application page that allows recordings to be
browsed searched and retrieved
There are two common methods for defining user accounts Only one of these will be
configured during the initial implementation of the solution
1 User account defined by implementer or Atea Systems This is a local account
To add more user accounts contact Atea support
2 Users are linked to LDAPActive-Directory and access is controlled by group
membership This is usually reserved for larger organisations To add more
users add them to the appropriate AD group
8 Troubleshooting
Troubleshooting tips and setup tasks
Issue Tip
Some recordings are not displaying on the recording page
Possible issues
1 The date range is incorrect
Atea Systems ndash FTR Administration Guide
Page 21 of 22
Issue Tip
2 The recording has not been processed yet It may take up to ten minutes for a recording to display on-screen
3 There may be an issue with recordings not being captured
a Check the Linux directory varrecordings to see if the recording files are present
b Check the directory numbers for the caller and calling party If this is a five or six digit number that is high contact Atea Support regarding a possible UDP port number issue
A specific phone is not being recorded
Possible issues
1 The phone must have the recording profile set up in the CUCM
2 The phone number (DN) must be included in the license list
Recording files are of zero duration
Possible issues
Wrong voice codec not enough resources
FTR Solutions using G711 only
1 On the UCM check that the calls are set for G711 2 If UCM transcoding is used to convert calls to G711
check there are sufficient transcoding resources
Note FTR does not record G722 calls
FTR solutions using g729 option
1 Check that G729 option is enabled 2 Check that the G729 license file is present 3 Check that there are sufficient G729 licenses installed
(Atea)
Blocked access
1 A firewall is blocking the access to the SIP trunk or to the disk with the recordings This is a configuration issue that sometimes occurs during initial commissioning
Recordings display as ldquonot foundrdquo on the recording display screen
The recording file may have been moved or archived from the disk Restore the file to the original location
Alternatively search for the file name in the location where the recording files have been moved or archived to
Recording disk space is full exceeds capacity threshold
Move or archive some recording files
Oracle database is full approaching full
Contact Atea support to arrange purging of selected database records
Atea Systems ndash FTR Administration Guide
Page 22 of 22
Issue Tip
Recordings are cut off after 16 minutes
Adjust the ldquoSIP Session Expires Timerrdquo to the value 86400 (which is 24 hours in seconds) The default setting for this means recording automatically ends at 16 minutes as the RFC4028 re-invite is not used This timer is a system setting under Cisco CallManager (Active) gt System gt Service Parameter Configuration gt SIP Session Expires Timer
Some recordings overlap falsely when using G729 codec
Silence suppression for G729 needs to be disabled On the CallManager set the parameter Strip G729 Annex B (Silence Suppression) from Capabilities to True
Atea Systems ndash FTR Administration Guide
Page 22 of 22
Issue Tip
Recordings are cut off after 16 minutes
Adjust the ldquoSIP Session Expires Timerrdquo to the value 86400 (which is 24 hours in seconds) The default setting for this means recording automatically ends at 16 minutes as the RFC4028 re-invite is not used This timer is a system setting under Cisco CallManager (Active) gt System gt Service Parameter Configuration gt SIP Session Expires Timer
Some recordings overlap falsely when using G729 codec
Silence suppression for G729 needs to be disabled On the CallManager set the parameter Strip G729 Annex B (Silence Suppression) from Capabilities to True