Figure 1.- LCD interface using I2C communication Pins definition (Init.h): Example: // Timers Tester & Cayenne Interface sbit TEST_P23 = P2^3; // Control of Relay 1 sbit TEST_P22 = P2^2; // Control of Relay 2 sbit TEST_P21 = P2^1; // Reset Initial conditions (BasicRut.c): void System_Setup (void) Example: // %%%%%%%%%%%%%%%%%%%%%%%%%%%%%%%%%% UART Setup // Initialize the serial port (115200, 8, N, 1) [see page 32 of data sheet] PLLCON = 0x50; SCON = 0x50; // 0101,0000 (Mode 1 and RxD enable) T3CON = 0x83; T3FD = 0x09; TI = 1; // Set UART to send first char
Delays (BasicRut.c): // delay of 0.1 mseg at 16MHz, fixed by oscilloscope void delay01(unsigned int num_01delay) // delay of 0.02 mseg at 16MHz, fixed by oscilloscope void delay002(unsigned int num_01delay) Relays (BasicRut.c): // SET_Relay (RELAY, STATUS_R) // RELAY {LS1 == 0, LS2 == 1}, STATUS_R { 0 == OFF, 1 == ON} void Set_Relay (bit RELAY, bit STATUS_R) LED: TEST_LED = 1; // LED == P2.5 // TEST_LED = {1 == OFF, 0 == ON} Switch (BasicRut.c): bit Get_Key(void) // KEY_FLAGE = 0 (Pressed), KEY_FLAGE = 1 (No Pressed) void Wait_KitKey (void) // Wait for key pressed
Figure 2.- Hardware setup (initial conditions) and test of Delays (based in machine cycles), Relays, Kit Switch and Led Internal Temperature, ADC8 (TEMP_INTERNAL.c): unsigned int Get_InternalTemp (void) Temperature in LCD: void SendToLCD_InternalTemp (unsigned char dir_disp, unsigned short int valuetoshow) Unsigned int to LCD (BasicRut.c): void HEXtoASCII (unsigned int adc16value) // valuetoshow == (0 - 65535, unsigned int) void SendToLCD_ASCII (unsigned int valuetoshow, unsigned char ini_dir)
Figure 3.- Temperature sensor of ADuC842 and unsigned integer shows in LCD
Analog to Digital Converter (ADC_DAC.c): // channel number: 1, 2, 3, 4, 6, 7 // numsamples: {1, 65535} // 12 bits ADC unsigned int GetVal (unsigned char CHAN, unsigned int numsamples) Digital to Analog Converter (ADC_DAC.c): // voltage: {0, (2.5-1/4096)} 12 bits DAC // DAC_chan: 0, 1 void GenVal (float outputvolt, bit DAC_flag) Voltage to LCD (BasicRut.c): // Used for ADCs and DACs, format X.XXX Volts void SendToLCD_Volt (unsigned short int valuetoshow, unsigned char ini_dir)
Figure 4.- ADCs and DACs (ADC1 is connected to DAC1 for test purpose) UART Communication (UART.c): char getChar() void sendChar(char c) void UART_OutString(char *pttt) char * getline( char *Storage ) Example: TESTER_UART.c Voltage to UART (BasicRut.c): // Used for ADCs and DACs, format X.XXX Volts void SendToTerminal (unsigned short int valuetoshow) Software Reset (BasicRut.c): void Soft_Res (void) IR Remote Controller (IRREMOTE.c): // Interrupt INT0 // Flag: IRSET unsigned char GET_KEY_IR (void)
Figure 5.- UART interface. Test of ADCs and DACs (ADC1 is connected to DAC1 for test purpose) Keypad 4x4 (KEYPAD4x4_Func.c): // Interrupt INT1 // Flag: KEYSET char Read_Keypad(void) IR Remote Controller + Keypad 4x4 (IR_KEYPAD4x4_Func.c): char Get_Key_Multi(void) // wait keypressed void Wait_Keypressed_Multiple (void)
Figure 6.- Testing the IR Remote Controller or Keypad 4x4 using LCD (right)
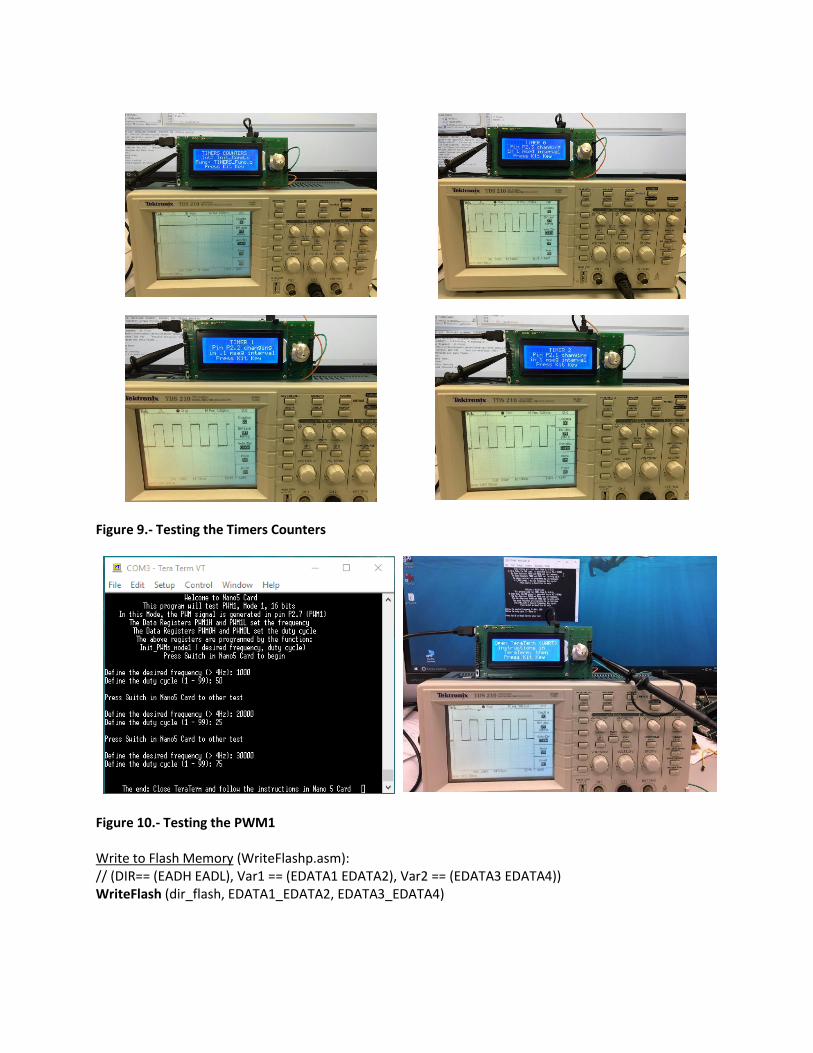
Figure 7.- Testing the IR Remote Controller or Keypad 4x4 using UART Rotary Encoder (ROT_ENCODER.c): unsigned char Ask_Encoder (void)
Figure 11.- Testing the Flash Memory ADC Calibration (ADC_CALIBRATION.c): // ADC1 must be connected to GND void CALIBRATION (void)
Figure 12.- Calibrating the ADCs
Set Time in RTC (SET_TIME.c): // IR Remote or Keypad 4x4, LCD, Real Time Clock void SetTime(void) Read Time from RTC and shows in LCD (CURR_TIME.c): // IR Remote or Keypad 4x4 (until keypressed), LCD, Real Time Clock void CurrTime(void) // Read Time (decimal values) void get_values_rtc (void) Example: See this support video
Figure 13.- Setting the time in the Real Time Clock Kit to Slave, RPi Interface (RASPI2C_FUNC.c): // Slave address: 0x34 void Change_Init_Cond (void) Send Char to RPi (RASPI2C_FUNC.c): void sendChar_i2c_rasp(char cc) Receive Char from RPi (RASPI2C_FUNC.c): unsigned char getChar_i2c_rasp(void) Sync Kit - RPi (RASPI2C_FUNC.c): void Sync_up (void) Send float to RPi (RASPI2C_FUNC.c): void sendfloat_i2c_rasp (float ff) Send integer to RPi (RASPI2C_FUNC.c): void sendinteger_i2c_rasp (unsigned int integer_2) Kit Function, Send float and integer values to RPi (RASPPI_I2C.c): void I2C_Raspberry(void) RPI Functions (Receive float values from Kit and shows them): Plot_Drawnow.py Plot_General.py
Figure 14.- Making the connection with internet and sending the data to Raspberry Pi
Figure 15.- Raspberry Pi: Receiving and plotting the data from Nano 5 Card Relays Controlled by Cayenne (Rasp_Cayenne.c): // Must be connected: // Pin 40 (GPIO 21) Raspberry Pi conected to P2^3, Control of Relay 1 // Pin 38 (GPIO 20) Raspberry Pi conected to P2^2, Control of Relay 2 // Pin 12 (GPIO 18) Raspberry Pi conected to P2^1, Reset Kit void Rasp_Cayenne(void)
Figure 16.- Pins connection for Cayenne interface
Figure 17.- Cayenne interface: Setting on Relay 2 of Nano 5 Card
Figure 18.- Cayenne interface: Scheduling an event for Relay 1: Turn On at 7:33 pm