Congratulations on your purchase of a Chevrolet HHR. Please read this information about your vehicle’s fea-tures and your Owner Manual to ensure an outstanding ownership experience. Note that your vehicle may notinclude all the features described in this booklet. Keep this booklet with your Owner Manual for easy reference.
U. StabiliTrak ButtonV. Fog Lamps ButtonW. Glove Box
See Section 3 of your Owner Manual.
DRIVER INFORMATION
Instrument Panel
3
Your vehicle’s instrument panel isequipped with this cluster or one very similar to it. The instrument panel clusterincludes these key features:A. Engine Coolant Temperature GaugeB. SpeedometerC. Odometer/Driver Information CenterD. TachometerE. Fuel GaugeF. Security LightG. Charging System LightH. Oil Pressure LightI. Engine Coolant Temperature
Warning LightJ. Brake System Warning LightK. Malfunction Indicator Lamp
(Check Engine Light)
L. Fog Lamps LightM. Upshift LightN. Airbag Readiness LightO. Safety Belt Reminder LightP. Antilock Brake System Warning LightQ. Tire Pressure Warning LightR. StabiliTrak Light
Note: The instrument panel cluster isdesigned to let you know about manyimportant aspects of your vehicle’s operation. It is important to read yourOwner Manual and become familiarwith the information being relayed to youby the lights, gauges and indicators,as well as what action can be taken toensure safety and to prevent damage.
Instrument Panel Cluster
B
A
D
E
C
F G H I J K L M N
See Section 3 of your Owner Manual.
O P Q R
Getting to Know Your HHR4
Your vehicle’s Driver Information Center(DIC) provides vehicle information,vehicle feature personalization andvehicle warning messages. The DICmessages will be shown on your instru-ment panel cluster display. To operatethe DIC, the ignition switch must be inthe Run position.
The DIC is controlled through the follow-ing two buttons located on the left sideof the steering wheel:
(Information): Press this button toscroll through the vehicle informationmode displays.
(Reset/Set): Press this button toselect a mode option or to acknowledgea warning message.Press both buttons for one second toenter the Menu mode.
Vehicle InformationPress the (Information) button toscroll through the following vehicle information: • Outside Temperature/Odometer• Trip A• Trip B• Fuel Range (until empty)• Average Fuel Economy • Average Speed• Engine Oil Life• Engine Coolant TemperaturePress and hold the (Reset/Set)button to reset the information while it isdisplayed. Vehicle Feature PersonalizationA variety of your vehicle’s features canbe personalized to your preference. Topersonalize features:1. Press and hold both the button
and button for one second toenter the Menu mode.
2. Press the button to scroll throughthe available personalization features.
3. Press the button to togglebetween the available settings foreach feature.
4. Press the button to record yourselection and move to the nextfeature.
Vehicle features that may be personal-ized to your preference include:• Oil Life Reset• Units Selection (English/Metric)• Remote Start Capability• Horn Chirp During Remote Keyless
Entry Locking or Unlocking
Driver Information Center
5
• Exterior Light Flash During RemoteKeyless Entry Locking or Unlocking
• Delayed Locking• Automatic Vehicle Unlocking:
Specific Doors• Automatic Vehicle Unlocking: When
Key Is Off or When Shift To Park(Automatic Transmission Only)
• Select Language (English, French,Spanish or German)
Warnings and MessagesIf a problem is sensed in one of yourvehicle’s systems, a warning or mes-sage will appear in the DIC display (seeyour Owner Manual for a complete list ofpossible warnings and messages).After a warning or message appears,press the button to clear the displayscreen for further use. Pressing the button only makes the message disap-pear; it does not resolve the problem.
If you have a current OnStar subscrip-tion and a warning message appears,you can press the OnStar button andspeak to an OnStar Advisor. In manyvehicles, OnStar Advisors can accesscertain diagnostic information and tellyou how serious the problem is andwhat you should do about it.See Section 3 of your Owner Manual.
Note: Your vehicle’s warnings and mes-sages provide critical information thatcan prevent damage to your vehicle.Review your Owner Manual to becomefamiliar with the information displayedand the action required.
SAFETY & SECURITY
Remote Keyless Entry
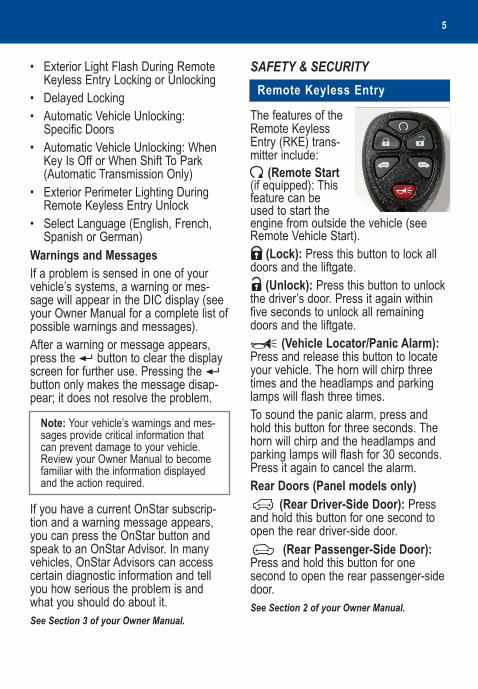
The features of theRemote KeylessEntry (RKE) trans-mitter include:
(Remote Start(if equipped): Thisfeature can beused to start theengine from outside the vehicle (seeRemote Vehicle Start).
(Lock): Press this button to lock alldoors and the liftgate.
(Unlock): Press this button to unlockthe driver’s door. Press it again withinfive seconds to unlock all remainingdoors and the liftgate.
(Vehicle Locator/Panic Alarm):Press and release this button to locateyour vehicle. The horn will chirp threetimes and the headlamps and parkinglamps will flash three times.To sound the panic alarm, press andhold this button for three seconds. Thehorn will chirp and the headlamps andparking lamps will flash for 30 seconds.Press it again to cancel the alarm.Rear Doors (Panel models only)
(Rear Driver-Side Door): Pressand hold this button for one second toopen the rear driver-side door.
(Rear Passenger-Side Door):Press and hold this button for onesecond to open the rear passenger-sidedoor.See Section 2 of your Owner Manual.
Getting to Know Your HHR6
Your vehicle is equipped with aPassenger Sensing System located inthe front passenger seat for the frontpassenger frontal airbag, and a passen-ger airbag status indicator located onthe center of the instrument panel.
See Sections 1 and 3 of your Owner Manual.
Passenger Airbag StatusIndicator
For your safety, all doors will automati-cally lock when the shift lever is movedout of Park with an automatic transmis-sion, or when the vehicle speed isgreater than 5 mph (8 km/h) with a manual transmission. This featurecannot be disabled; however, you canpersonalize the unlock features by usingthe Driver Information Center.See Section 2 of your Owner Manual.
Automatic Door Locks
Note: It is recommended that childrennot be placed in the front passengerseat, even with the Passenger SensingSystem. All children should be securedin a rear seat, including an infant ridingin a rear-facing infant seat, a child ridingin a forward-facing child seat or an olderchild riding in a booster seat.
Your vehicle may feature the OnStarSafe & Sound Plan or the uplevelOnStar Directions & Connections Plan,with one year of OnStar service from thedate you purchased your new vehicle.OnStar offers a variety of capabilities,such as Remote Door Unlock, AutomaticNotification of Airbag Deployment, andHands-Free Calling. In addition, mostvehicles can get driving directions usingTurn-by-Turn Navigation. Press theOnStar button to ask an OnStar Advisorabout the service plan you have or toupgrade your plan.For more information, refer toyour OnStar Owner’s Guide, call 1-888-4ONSTAR (1-888-466-7827),or visit onstar.com.See Section 2 of your Owner Manual.
OnStar® (if equipped)
Your HHR is equipped with the PASS-Key® III Plus theft-deterrentsystem, which prevents vehicle theft ifthe ignition lock cylinder is forced torotate without the correct key. If some-one attempts to start the vehicle withoutauthorization from the PASS-Key® IIIPlus system, the vehicle’s fuel system orstarter will be disabled.See Section 2 of your Owner Manual.
Theft-Deterrent System
7
Your vehicle is equipped with LATCHanchors, and may have top tethers foruse with a LATCH-compatible childrestraint. If your child restraint is notcompatible with the LATCH system, youmay still use it by installing the childrestraint with the safety belt system.Choose a child restraint that is appropri-ate for the child’s age and size (weightand height).See Section 1 of your Owner Manual.
Child Restraints (LATCH)
COMFORT
Height AdjustmentTo raise the driver’s seat, lift and releasethe front lever on the outboard side ofthe seat. Each time you raise the lever,the seat will move up. Repeat until theseat is at the desired height.To lower the driver’s seat, push downand release the lever. Repeat until theseat is at the desired height. Forward or Rearward AdjustmentTo move the front seats forward or rear-ward, lift and hold the bar under thefront of each seat and manually slide theseat. Release the bar to lock the seat inplace. Try to move the seat to ensure itis locked in place.ReclinerTo recline the front seats, lift the reclinelever to release the seatback; then movethe seatback to where you want it.Release the lever to lock the seatback inplace. Press rearward on the seatbackto ensure it is locked in place.See Section 1 of your Owner Manual.
Manual Seat Adjustments
To adjust the driver’s power seat, usethe power seat controls located on theoutboard side of the seat. Move the Seat Forward or Rearward• Move the control (A) forward or
rearward.Raise or Lower the Entire Seat• Move the entire control (A) up or
down.Raise or Lower the Front or Rear ofthe Seat Cushion• Move the front or rear of the control
(A) up or down.Adjust Lumbar Support• Press the forward part of the switch
(B) to increase support and the rear-ward part of the switch to decreasesupport.
Recline or Raise the Seatback• Lift the recline lever (C) and move the
seatback. Release the lever to lockthe seatback in place.
See Section 1 of your Owner Manual.
Power Seat Controls (if equipped)
A
B
C
Getting to Know Your HHR8
There is a heated seat control buttonlocated on the climate control panel foreach front seat. • Press the button once to turn the
system on high. Both indicator lightswill turn on.
• Press the button twice to turn thesystem on low. The lower indicatorlight will turn on.
• Press the button again to turn off theheated seat.
See Section 1 of your Owner Manual.
Heated Seats (if equipped)
The climate control system includes thefollowing features:Temperature: Turn the temperature knob(A) to raise or lower the temperaturesetting.
(Air Conditioning): Press this button to turn on the air conditioningsystem.Fan: Turn the fan knob (B) to increaseor decrease fan speed.
(Off): Turn the fan knob to the Offposition to turn the system off. Only theheated seats and the rear defogger willfunction when the fan knob is off.
(Outside Air): Press this button toallow outside air to circulate through thevehicle.
(Recirculation): Press this buttonto recirculate inside air throughout thevehicle. This mode keeps outside airfrom entering the vehicle.
Climate Controls
Adjusting the Steering WheelTo adjust the position of the steeringwheel:1. Pull down the lever located on the left
side of the steering column.
Tilt Steering Wheel
A B C
2. Adjust the wheel to a comfortableposition. The wheel can be moved upor down.
3. Push the lever all the way up to lockthe wheel in place.
See Section 3 of your Owner Manual.
9
Airflow ModesTurn the airflow control knob (C) to oneof the following modes to change thedirection of the airflow:
(Vent): This mode directs air to theinstrument panel outlets.
(Bi-Level): This mode directs air tothe instrument panel outlets and flooroutlets.
(Floor): This mode directs most ofthe air to the floor outlets and some air tothe side window outlets and windshield.
(Defog): This mode directs air tothe windshield, side window outlets andfloor outlets. Recirculation will not func-tion in this mode.
(Defrost): This mode directs mostof the air to the windshield and some airto the side window outlets. Recirculationwill not function in this mode.
(Rear Window Defogger): Pressthis button to activate the rear windowdefogger. The defogger will shut offautomatically after about 20 minutes.See Section 3 of your Owner Manual.
To keep the vehicle glass fog-free, turn the airflow control knob to the (Defog) mode or the (Defrost)mode. Recirculation will not function inthese modes, allowing outside air intothe vehicle to help reduce moisture.See Section 3 of your Owner Manual.
Preventing Window Fogging
Shoulder Belt Height Adjustment
To move the shoulder belt heightadjuster down, push down the releasebutton (A) using your thumb or fingerand slide the adjuster to the desiredposition.To move the adjuster up, push up on theD-ring (B) from the bottom and slide theadjuster to the desired position.See Section 1 of your Owner Manual.
A
B
The head restraints on the front seats areadjustable. Press the button on the sideof the post to adjust the head restraint.Slide the head restraint up or down.See Section 1 of your Owner Manual.
Adjustable Front HeadRestraints
While most of the features on your radiowill look familiar, following are some thatmay be new:
(Power/Volume): Press this knob toturn the system on or off. Turn the knobto adjust the volume.
(Information): Press this button toswitch the radio display between stationfrequency and time. It will also displayadditional text information related to thecurrent FM-RDS or XM station, or MP3song (if equipped).
(Tune): Turn this knob to select radiostations or, when a CD is playing, toselect a track or MP3 file (if equipped). Press the knob to display the tone con-trol (bass/treble) or speaker control (balance/fade) setting. Turn the knobto adjust the setting.
(Balance/Fade): Press this button,or the Tune knob, to adjust the speakercontrol. Turn the Tune knob to adjust thesetting.BAND: Press this button to switch toAM, FM, or XM (if equipped). When play-ing a CD or portable audio player, pressthis button to play the radio instead.
Getting to Know Your HHR10
(Seek/Scan): Press the right orleft arrow button to go to the next orprevious radio station or, when a CD isplaying, to the next track or MP3 file, orto the start of the current track or MP3file (if equipped).To enter the scan mode, press and holdeither arrow button for a few seconds.Radio stations will be scanned. Presseither arrow button again to stopscanning.
(Reverse): Press and hold thisbutton to reverse playback quickly withina track or MP3 file (if equipped).
(Forward): Press and hold thisbutton to advance playback quicklywithin a track or MP3 file (if equipped).CD/AUX: Press this button to play a CDinstead of the radio. Press again and thesystem will automatically search for aportable audio player. RDM (Random): Press this button toplay CD tracks or MP3 files (if equipped)in random order. Press again to turn offrandom play. If equipped with a six-discchanger, a second press will enter ran-dom play of all discs.RPT (Repeat): Press this button to hearthe current CD track again. Press againto turn off repeat play.EQ (Equalization): Press this button toselect preset equalization settings.CAT (Category) (if equipped): Pressthis button to find XM stations within adesired category.Auxiliary Input Jack: A portable audioplayer can be connected to the auxiliaryinput jack located on the radio.Setting Preset/Favorite StationsBefore setting your preset or favoritestations, shift the vehicle into Park
ENTERTAINMENT
Audio System Features
11
(automatic transmission) or into Neutraland set the parking brake (manualtransmission).
To set up to 18 preset stations:1. Turn on the radio.2. Press BAND to select FM1, FM2
or AM.3. Tune in the desired radio station.4. Press and hold one of the six num-
bered pushbuttons until a beepsounds.
5. Repeat steps 2–4 for each pushbutton.
Setting Favorite Stations (if equipped)Press the FAV (Favorite) button to gothrough up to six pages of any combi-nation (AM, FM, or XM, if equipped) offavorite radio stations. On each page, upto six stations are available by using thesix pushbuttons below the radio display.To set the number of favorite stationpages:1. Press the MENU button to display the
radio setup menu.2. Press the pushbutton below the FAV
1–6 label on the radio display.3. Select the desired number of favorite
station pages.4. Press the FAV button. You may now
begin storing your favorite stations forthe chosen number of pages.
Note: Engaging in extended searching forspecific audio stations or songs by usingbuttons and knobs — or giving extendedattention to entertainment tasks — canlead you to look away from the road frequently or for prolonged periods, whichmay cause you to miss seeing things on the road that you need to see. Avoidengaging in extended searching forspecific items while driving.
To store favorite stations:1. Tune in the desired radio station.2. Press the FAV button to display the
page where the station is to bestored.
3. Press and hold one of the six push-buttons until a beep sounds.
4. Repeat the steps for each pushbuttonon each page.
Setting the Speed CompensatedVolume (if equipped)With Speed Compensated Volume, theradio automatically adjusts the volume tocompensate for road noise as vehiclespeed changes.To set Speed Compensated Volume:1. Set the radio volume to the desired
level.2. Press the MENU button to display the
radio setup menu.3. Press the pushbutton below the auto
volume label on the radio display.4. Press the pushbutton under the
desired setting (Off, Low, Medium or High) to select the level of compensation.
5. The compensation will be set once thedisplay times out after 10 seconds.
Setting the TimeTo set the time (without date display):1. Turn on the radio.2. Press the (Clock) button until the
hour numbers begin flashing on theradio display. Press the button againto adjust the minute numbers.
3. With either the hour or minute num-bers flashing, use the (Tune) knobto select the time.
4. Press the Clock button again to setthe currently displayed time.
Getting to Know Your HHR12
To set the time (with date display, if equipped):1. Turn on the radio.2. Press the (Clock) button. Or, if
equipped, press the MENU buttonuntil the clock option is displayed; andthen press the pushbutton locatedunder the clock option label. The HR,MIN, MM, DD, YYYY labels willappear on the display.
3. Press the pushbutton under any of thelabels to be changed.
4. Press the pushbutton again or theFWD button to increase the numbers.Press the REV button to decrease thenumbers. Rotating the (Tune)knob also will increase or decreasethe selected label.
5. Press the Clock or MENU buttonagain to set the currently displayedtime and date.
MP3 Capability (if equipped)If your AM/FM stereo with CD has MP3playing capability, a CD-R or CD-RWcontaining MP3 audio tracks will playautomatically when inserted into the CDplayer. An MP3 label will be displayed.Portable Audio Device (if equipped)A portable audio device (iPod®, Palm®,MP3 player or other portable-type player)can be connected to the auxiliary inputjack located on the radio. When connect-ed, the radio automatically begins playingaudio from the player over the vehiclespeakers. To optimize volume, fullyincrease the volume on your device.Radio Data System (if equipped)When you tune in a Radio Data System(RDS) station, the station name and callletters will appear on the display insteadof the frequency. RDS stations may alsoprovide the time of day, a program type
for current programming and the name ofthe program being broadcast.RDS features are available for use onlyon FM stations that broadcast RDSinformation. RDS relies on receivingspecific information from these stationsand will work only when the informationis available.See Section 3 of your Owner Manual.
With the in-dash 6-Disc CD Player, notethat you cannot directly load a CD as insingle-play systems.To load a CD(s):• Press and release the LOAD
button to load one CD. Wait for thedisplay prompt before loading the CD.
• Press and hold the LOAD buttonfor two seconds to load multiple CDs.Follow the display prompts to loadeach CD. Press the LOAD buttonagain to cancel loading more CDs.
To play a specific CD:• Press the pushbutton below the arrow
label on the display to select thedesired CD number.
To eject a CD:• To eject the CD that is currently play-
ing, press the EJECT buttononce.
• To eject all CDs, press and hold the EJECT button for two seconds.
Multiple-Disc CD Player (if equipped)
13
If a CD is not removed after severalseconds, it will be pulled back into theplayer automatically.
See Section 3 of your Owner Manual.
Note: CDs with any affixed labels mayjam in the CD player. Label a CD using apermanent marker. If more than one CDis inserted into the slot at one time, or ifscratched or damaged CDs are played,the CD player could be damaged. Whenusing the CD player, use only CDs ingood condition without labels; load oneCD at a time; and keep the CD playerand the loading slot free of foreignmaterials, liquids or debris.
The followingaudio controlsare located onthe steeringwheel:+ – (Volume):Press the plusor minus buttonto increase ordecrease the volume.
(Seek/Scan): Press the up ordown arrow to go to the next or previouspreset radio station or, when a CD isplaying, to the next or previous track.Press and hold the up or down arrow forone second to seek the next or previousradio station with a strong signal.
(Mute): Press this button to mute theaudio system. Press and hold this buttonfor two seconds to activate voice on theOnStar system (if equipped).See Section 3 of your Owner Manual.
Audio Steering Wheel Controls(if equipped)
XM Satellite Radio offers more than 170channels of digital-quality sound thatgoes wherever you go — coast to coast.XM displays song title, artist and enter-tainment genre.Activation fee and service subscriptionare extra. XM Satellite Radio serviceis based in the continental United Statesand Canada. For more information, visitXM online at www.XMradio.com or call 1-800-852-XMXM (9696).See Section 3 of your Owner Manual.
XM® Satellite Radio (if equipped)
CONVENIENCE
This feature allows you to start theengine from outside the vehicle by usingthe Remote Keyless Entry transmitter.(Normal transmitter range is within 200feet of the vehicle.) The remote startcapability can be turned on or off usingthe Driver Information Center. (SeeDriver Information Center.)After a remote start, the engine will runfor about 10 minutes before turning itselfoff, but can be extended 10 minutes byperforming another remote startsequence at any time. After two consec-utive remote starts, no additional remotestarts are allowed until the vehicle hasbeen started with the ignition key. During a remote start, the vehicle’sclimate control system heats or coolsthe vehicle interior to the same settingas when the vehicle was last turned off.
Starting the VehicleTo remote-start the vehicle:1. Aim the transmitter at the vehicle.2. Press and release the (Lock)
button on the transmitter.3. Immediately press and hold the
(Remote Start) button for about twoseconds.
4. When the vehicle starts, the parkinglamps will light and stay on while theengine is running.
5. Repeat these steps for a 10-minutetime extension.
After a remote start, the key must beinserted in the ignition and turned to theRun position before driving.
Canceling a Remote StartIf you wish to turn off the engine insteadof driving after a remote start, performone of the following functions:• Press and hold the button until the
parking lamps turn off.• Press and release the Hazard
Warning Flashers button inside thevehicle. Press the button again toturn off the flashers.
• Turn the key in the ignition switch tothe Run position and then off.
• The engine will automatically stopwhen time expires.
See Section 2 of your Owner Manual.
Note: The Remote Vehicle Start featurewill not operate if the key is in the igni-tion, a door or the hood is open, or theCheck Engine light is illuminated on theinstrument panel cluster.
Automatic Headlamp SystemYour vehicle is equipped with anAutomatic Headlamp System, whichturns on the headlamps and otherexterior lamps at dusk or when neces-sary. The exterior lamps also can beoperated manually.Light SensorThe Automatic Headlamp System’s lightsensor is located on top of the instru-ment panel. To ensure proper systemoperation, it’s important to avoid placingany objects on or near the sensor.Exterior Lamp Control SwitchThe exterior lamp control switch islocated on the lever to the left of thesteering column. The switch can berotated to each of the following positions:
(Headlamps): Turns on the head-lamps, parking lamps and taillamps.
(Parking Lamps): Turns on park-ing lamps and taillamps only. AUTO (Automatic Headlamp System):Automatically turns on Daytime RunningLamps in the daytime, and headlamps,parking lamps and taillamps at night orwhen necessary.
Exterior Lamps
15
(On/Off): When operating in theAUTO position, a momentary turn of thelamp control switch to the positionwill turn off the Automatic HeadlampSystem and all of the exterior lights. TheDriver Information Center (DIC) will dis-play AUTO LIGHTS OFF. To activate the Automatic HeadlampSystem, turn the switch to the posi-tion again. The DIC will display AUTOLIGHTS ON. The Automatic HeadlampSystem is always turned on when thevehicle is started.See Section 3 of your Owner Manual.
Overhead Lamps: The overhead lampswitch, located on the dome lamp, can beset to three positions: Off, On or DoorOpen. In the Door Open position, thedome lamp (or reading lamps, dependingon equipment) will come on when any ofthe doors are opened. When you enteror exit your car through the driver’s door,the interior lamp(s) will stay on for a shorttime after the doors have been closed.Instrument Panel Brightness: To adjustthe brightness of the instrument panellamps, turn the dial located above theaudio system.Map Lights (if equipped): The map lightswitches are located under the rearviewmirror.Rear Reading Lights (if equipped): Therear reading lights are located on thedome lamp. Press the lamp to turn it onor off.
See Section 3 of your Owner Manual.
Interior Lamps
Note: If you leave a door open and theinterior lamps are on, the lamps will turnoff after 20 minutes to protect the battery.
The following cruise control buttons arelocated on the steering wheel:
(On/Off): Press this button to turnthe cruise control system on or off. SET – (Set): Press this button to set aspeed, or to decrease the set speed if the system is engaged. When thecruise control is engaged, the CRUISEENGAGED message will temporarilyappear on the DIC.RES + (Resume): Press this button toresume a set speed, or to increase theset speed if the system is engaged.See Section 3 of your Owner Manual.
Cruise Control
Retained Accessory Power (RAP) allowscertain features, such as the radio andpower windows, on your vehicle to con-tinue working for up to 10 minutes afterthe key is turned to Off or removed fromthe ignition, and until the driver’s door(or any door, depending on equipment)is opened.See Section 2 of your Owner Manual.
Retained Accessory Power
Getting to Know Your HHR16
The cargo load floor can be positionedas a rear shelf/cargo cover for additionalcargo space and utility. To position theload floor in the shelf position, insert thefront corners into the top guides andslide the shelf forward; then press downon the back of the shelf to lock it down.
Rear Shelf
Your vehicle is equipped with twoAccessory Power Outlets (APO) thatprovide power for a variety of electronicdevices. One APO is located on thecenter of the instrument panel andanother is located on the back of thecenter console for use by rear seat passengers.See Section 3 of your Owner Manual.
Accessory Power Outlets
There are several handy storage areaslocated throughout your vehicle. Theseinclude the driver’s seatback pocket,center console storage bin, instrumentpanel storage bin, door pockets andglove box.In addition, there are three covered stor-age compartments located under thefloor in the rear cargo area.
See Section 2 of your Owner Manual.
Interior Storage Features
Your HHR is equipped with 60/40 split-folding rear seatbacks that can belowered to increase the cargo area. To lower the seatback(s):1. Pull one or both of the small knobs
on top of the seatback to release theseatback latch.
2. Push the seatback forward from thecargo area or lower the seatbackfrom the rear seat area.
To raise either seatback:1. Rotate the seatback up and rearward
until you hear a click.2. Pull on the seat to ensure the latches
have engaged.See Section 1 of your Owner Manual.
Split-Folding Rear Seatbacks(if equipped)
17
See Section 2 of your Owner Manual.
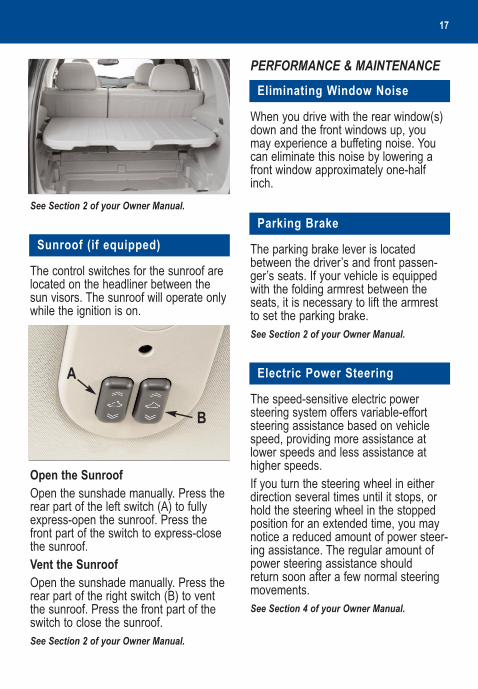
The control switches for the sunroof arelocated on the headliner between thesun visors. The sunroof will operate onlywhile the ignition is on.
Open the SunroofOpen the sunshade manually. Press therear part of the left switch (A) to fullyexpress-open the sunroof. Press thefront part of the switch to express-closethe sunroof.Vent the SunroofOpen the sunshade manually. Press therear part of the right switch (B) to ventthe sunroof. Press the front part of theswitch to close the sunroof.See Section 2 of your Owner Manual.
Sunroof (if equipped)
A
B
PERFORMANCE & MAINTENANCE
The parking brake lever is locatedbetween the driver’s and front passen-ger’s seats. If your vehicle is equippedwith the folding armrest between theseats, it is necessary to lift the armrestto set the parking brake.See Section 2 of your Owner Manual.
Parking Brake
The speed-sensitive electric powersteering system offers variable-effortsteering assistance based on vehiclespeed, providing more assistance atlower speeds and less assistance athigher speeds.If you turn the steering wheel in eitherdirection several times until it stops, orhold the steering wheel in the stoppedposition for an extended time, you maynotice a reduced amount of power steer-ing assistance. The regular amount ofpower steering assistance should return soon after a few normal steeringmovements.See Section 4 of your Owner Manual.
Electric Power Steering
When you drive with the rear window(s)down and the front windows up, youmay experience a buffeting noise. Youcan eliminate this noise by lowering afront window approximately one-halfinch.
Eliminating Window Noise
Getting to Know Your HHR18
StabiliTrak is an advanced computer-controlled vehicle stability and tractionenhancement system that assists withdirectional control of the vehicle in diffi-cult driving conditions. It turns on everytime you start your vehicle. To limitwheelspin and help maintain directionalcontrol, you should always leave the sys-tem on. If your vehicle becomes stuckand rocking the vehicle is required, thesystem should be turned off.To turn off the traction control part ofthe system, press the (StabiliTrak)button located on the center of theinstrument panel. To turn off the traction control and stabil-ity enhancement systems, press andhold the button for five seconds.When the system is off, the StabiliTraklight on the instrument panel cluster willilluminate. Press the button again to turnthe system back on.See Section 4 of your Owner Manual
StabiliTrak® – Stability ControlSystem
The Tire Pressure Monitor alerts youwhen a significant reduction in pressureoccurs in one or more of your vehicle’stires by illuminating the (Low TirePressure) warning light on the instru-ment panel cluster. The low tire pressurewarning light will remain on until youcorrect the tire pressure. A LOW TIREmessage will also appear on the DIC. Correcting the Tire PressureWhen the low tire pressure warning lightilluminates, you must inflate the tire tothe proper tire pressure (just as you
Tire Pressure Monitor
The spare tire and tools are locatedunder the floor of the cargo area. Followthe guidelines in your Owner Manual tosafely and properly change a tire.SS Models SS models have large performancebrakes. The compact spare tire will notclear the front brakes and cannot beused as a front tire. In the event of a flatfront tire, install the compact spare tirein a rear wheel location and use the full-size rear tire to replace the flat front tire.See Section 5 of your Owner Manual.
Changing a Flat Tire
must refuel the vehicle when the lowfuel warning light illuminates). The Tireand Loading Information label shows thecorrect tire pressure for the tires whenthey’re cold. “Cold” means your vehiclehas been sitting for at least three hoursor driven no more than one mile.You can temporarily clear the DICmessage by acknowledging it with yourDIC controls. However, at the nextvehicle start-up, the DIC message willreappear if the tire pressure has notbeen corrected.During cooler conditions, the low tirepressure warning light may appear whenthe vehicle is first started and then turnoff as you start to drive. This could bean early indicator that your tire pres-sures are getting low and the tires needto be inflated to the proper pressure.
See Section 5 of your Owner Manual.
Note: The Tire Pressure Monitor canalert you about low tire pressure, butit doesn’t replace normal monthly tiremaintenance.
19
The battery is located in the spare tirewell, under the floor in the rear cargoarea. Should it be necessary to jump-start your vehicle, use the remote positive terminal, located under the redcap, and the remote negative groundterminal, marked GND, in the enginecompartment. See Section 5 of your Owner Manual.
Battery Location
If the Check Gas Cap message is dis-played on the Driver Information Centerwhen the engine is running, check thatyour fuel cap is securely fastened. If thecap is not secure, turn it clockwise untila clicking sound is heard, indicating thatit is properly installed.The Check Gas Cap message will turnoff after a few driving trips with the capproperly installed.See Sections 3 and 5 of your Owner Manual.
Securing the Fuel Cap
The Oil Life System calculates engineoil life based on vehicle use anddisplays CHANGE OIL SOON in theDriver Information Center when it’snecessary to change your engine oiland filter. The Oil Life System should bereset to 100% only following an oilchange.To reset the Oil Life System:1. Turn on the ignition.2. Press and hold the (Information)
button and the (Reset) button atthe same time to enter the personal-ization menu.
3. OIL LIFE RESET will be displayed.4. Press and hold the button for
at least one second. An ACKNOWL-EDGED message will appear whenthe system has been reset.
5. Turn off the ignition.See Section 5 of your Owner Manual.
Resetting the Oil Life System
In general, cleaning the entire seatpanel is recommended, starting from theseams and moving into the stain toavoid a ring effect after drying. For the cloth fabric seats, in mostinstances, soda water and a clean whitecloth will remove spills and spots. For oiland grease spots, sprinkle baking sodaon the spot, and then brush and wipewith a clean white cloth. See yourOwner Manual for additional cleaninginformation.See Section 5 of your Owner Manual.
Cleaning the Interior Upholstery
Getting to Know Your HHR20
Certain restrictions, precautions and safety procedures apply to your vehicle. Please read your OwnerManual for complete instructions. All information contained herein is based on information available at thetime of printing and is subject to change without notice. Copyright 2007 by GM Corp. All rights reserved.
My GMLink
The Chevrolet Owner Center at MyGMLink is a complimentary service forChevrolet owners, a one-stop resource toenhance your Chevrolet ownership experi-ence. Exclusive member benefits includeonline service reminders, vehicle mainte-nance tips, online owner manual, specialprivileges and more. Sign up today atwww.mygmlink.com.
15865151 B
For prompt and efficient assistance whencalling, please provide the followinginformation:• Location of the vehicle• Telephone number and your location• Vehicle model, year and color• Vehicle mileage• Vehicle Identification Number (VIN)• Vehicle license plate numberChevrolet reserves the right to limit servic-es or reimbursement to an owner or driverwhen, in Chevrolet’s judgment, the claimsbecome excessive in frequency or type ofoccurrence. Roadside Assistance and OnStar (if equipped)If you have a current OnStar subscription,press the OnStar button and the vehiclewill send your current GPS location to anOnStar Advisor who will speak to you,assess your problem, contact RoadsideAssistance and relay your exact locationso you will get the help you need.
OWNER INFORMATION
1-800-CHEV-USA (1-800-243-8872)TTY Users: 1-888-889-2438As the proud owner of a new Chevroletvehicle, you are automatically enrolled inthe Chevrolet Roadside Assistance pro-gram. This value-added service is intendedto provide you with peace of mind as youdrive in the city or travel the open road. Chevrolet’s Roadside Assistance toll-freenumber is staffed by a team of technicallytrained advisors who are available 24hours a day, 365 days a year. The advi-sors can provide minor repair informationor make arrangements to tow your vehicleto the nearest Chevrolet dealer.Chevrolet will provide the followingservices for 5 years/100,000 miles at noexpense to you:• Fuel delivery• Lockout service (identification required)• Tow to nearest dealership for warranty
service• Flat tire assistance• Jump startIn many instances, mechanical failures arecovered under Chevrolet’s comprehensivewarranty. However, when other servicesare utilized, an advisor will explain anypayment obligations you might incur.