22
Register your product and get at www.philips.com/welcome support 21PT5525/V7 21PT3426/V7

Register your product and get at
www.philips.com/welcomesupport
21PT5525/V7
21PT3426/V7


1
SAFETY
GENERAL....................................................................................................................................2CARING AND CLEANING OF THE TV............................................................................2
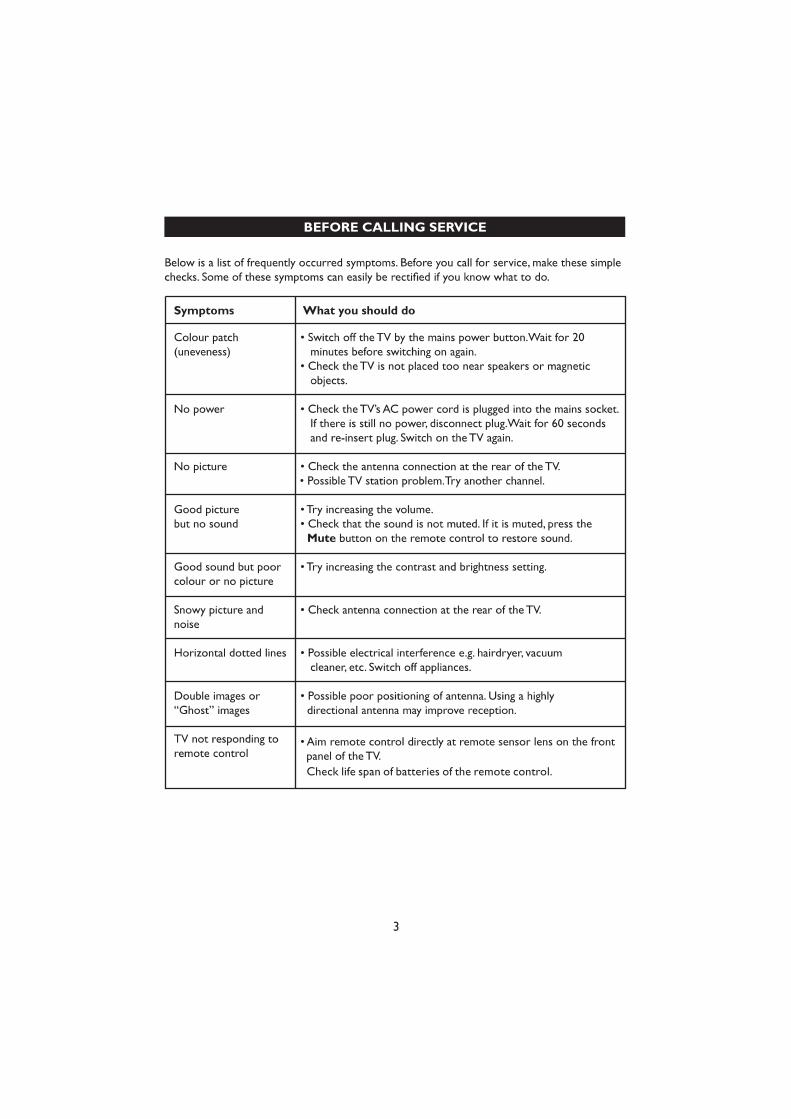
BEFORE CALLING SERVICE
TV HOOKUP (BASIC CONNECTION)
LOCATION AND FUNCTION OF CONTROLS ON REMOTE HAND SET
LOCATION AND FUNCTION OF CONTROLS ON TV SET
BASIC OPERATION
DIRECT KEY FUNCTION
SPECIFICATIONS
........................................................................................................................................................3
........................................................................................................................................................4
REMOTE CONTROL CARE AND USE
........................................................................................................................................................4
....................................................................................................................................................5-6
.......................................................................................................................................................7
MENU OPERATION................................................................................................................8
PICTURE MENU OPERATION............................................................................................10SOUND MENU OPERATION...............................................................................................9
FEATURES MENU OPERATION...................................................................................11-13SEARCH MENU OPERATION.............................................................................................14
......................................................................................................................................................15
......................................................................................................................................................16

2
Two people are required to lift and carry a that weighs more than 25 kg. Improper handlingTVof can cause serious injury.the TVThe surface on which is placed has to be level and able to withstand its weight.the TVAir must be able to circulate freely through the ventilation slots. Do not place in athe TVconfined place.Do not place naked flame sources such as lighted candles close to the TV.Do not place a vase filled with water near . Spills can results in electric shock. If waterthe TVgets into the TV, disconnect from the mains and have it checked by a qualified technician.the TVDo not expose or the batteries of the remote control to heat,direct sunlight, rain orthe TVwater.During a thunder storm, do not touch any part of , power cord or antenna cable.the TVDo not leave in standby mode for an extended period of time. Instead disconnect itthe TVfrom the mains.Do not connect too much equipment to thesame mains socket because it can result in fire orelectric shock.
Disconnect the TV from the mains before you clean . Use only a dry cloth.the TVDo not touch, push, rub or strike the screen with anything hard as this may scratch or damagethe screen permanently.
GENERAL
CARING AND CLEANING OF THE TV
3

4
POWER SWITCH SIDE PANEL

ZOOM LOCK SCAN GAME
-/--/---
SOUND PICTURE
2
19
17
5
7
18
6
1
4
3
9
16
1314
10
12
15
21
8
11 20
5
4. VOLUME UP/DOWN
3. -/--/---
6. SMART PICTURE (PICTURE)
Press the PICTURE Key to cyclically select STANDARD,GAME,CUSTOM,MOVIE,SPORTS.
1. POWERSwitches the set ON toStandby or Standby to ON.
7. MENUSelect & deselects main menu.
Selects program or Menu item.Switches set ON from standby.
2. DIRECT PROGRAM NUMBERSELECTION KEYS(0-9)
Select program number.
15. PROGRAM UP/DOWN
5. MUTESwitches sound ON/OFF.
Adjust theVolume & Menu settings.
8. INCR SURRNote: Depending on the Model.
13. ZOOMPress the Key to select view the Normal
14. GAMEInTV mode, press the this key to enter or exit from Game Mode
11.
10. SMART SOUND(SOUND)
12. SCANPress the SCAN Key,the television will scan allthe program in memory once. Every program willstay for about 1 second.
9. LOCKSelects Lock menu.
CUSTOM,VOICE,MUSIC,THEATER
Note: Depending on the Model.
Note :- Remote Control (Depending on the Models) and operation of remote control may be affected by bright artificial light near to the TV.
Note: Depending on the Model.
16. SLEEP ( )
17. DISPLAY/CALL ( )
18. QUICK VIEW(A/CH)
Sets the sleep timer from 0 to120 minutes.
To Display and clear the on screen informations.
Returns to previous viewed program.
19. TV/AV ( AV )Selects TV or AV mode.
20.Note: Depending on the Model.
Press the SOUND Key to cyclically select
and Zoom Picture Levels.
21.These 4 Keys are used to move around the menus.
CURSOR
22
22. OK
Depending on the Model.
LOCATION AND FUNCTION OF CONTROLS ON REMOTE HAND SET

ON AND OFF
1. Press the main power switch to switch
on the set.
2. If set in standby mode, press key,
or 0-9 key of remote controller to
switch on the set.
3. Pressing key on remote control
the set reverts to standby mode.
4. In case to switch Off the set again
press the main power switch.
NOTE :
While the set is switched on and main
power gets disconnected, the set will be
switched to standby mode after regaining
power.
PROGRAMME SELECTION
You can select a programme numberwith CH+/CH- key orby directly
pressing 0-9 keys from remote.
VOLUME ADJUSTMENT
Press VOL+/VOL- key to adjust volume level.
QUICK VIEW ( )
Press the A/CH key to view the lastprogram.
MUTE FUNCTION
Press the key and the sound will beswitched off.You can cancel it by pressing again orby VOL+key.
6
LOCATION AND FUNCTION OF CONTROLS ON REMOTE HAND SET

7
810 6 5 4 3 2 1
FRONTPANEL
11
CR CBY
13
DVD IN
REAR PANEL
14
7
8
9
SIDE PANEL
4
5
6
CH+
CH-
VOL+
VOL-
MENU
TV/AV
7 9
1. MAIN POWER SWITCH (Optional)Switches the set ON or OFF.
2. REMOTE CONTROL SENSORReceives remote instructions.
3. POWER INDICATORLED indication shows the standby status of the set.
4. CHANNEL UP / DOWNSwitches set ON from standby. Select program or Menu item.
VOLUME UP / DOWNAdjust the volume Adjust Menu settings.
Note : The Actual configuration or position of controls of your TV may be different depending on TV model.
5. MENUSelects or deselects Main Menu.Return from submenu to main menu.
6. TV / AV - Switch to TV/AV1/AV2/DVD(AV2 / DVD - Optional)
7. VIDEO IN (Yellow colour socket)8. AUDIO L IN (White colour socket)9. AUDIO R - IN (Red colour socket)
(Optional)10. SENSI EYE (Optional)
Adjust the picture according tosurrounding conditions.
11. DVD Input (Y, CB, CR) (Optional)12. Video, Audio-L, Audio - R (Optional) OUT13. Video, Audio-L, Audio - R (Optional) IN14. Cable Socket
OUT
IN
12
Note : 1) You must connect the Audio / Video outputs of external equipments by matching the colours of plug and socket.
2) Audio inputs at rear terminals are common for AV1 and DVD.
Front AV & Rear AV are parallel connection. It is recommended to connectany one connection at a time.
3)
STAND BY (Optional)Switches the set ON toStandby or Standby to ON.
STAND BYPOWER SWITCH /
MAIN POWER SWITCH
1
3 23
2
LOCATION AND FUNCTION OF CONTROL ON TV SET

8
MENU SELECTION1. Press key to display MAIN MENU.2. Press / key to select SUB MENU and / key to enter into sub menu.3. Press / key to select feature in Submenu.4. Change the settings of the selected feature by / key.
To enter in selection, press key. To comeout of menu, press or key.
MENU
CH+ CH-
CH+ CH-
MENU
VOL-VOL+
VOL-VOL+
MENU CALL
DNR
PR. NAMEPR LOCK
ABCDOFF
BASIC OPERATION
5. You can also slect SUB MENU and enter into sub menu by using / and /
BASIC OPERATION
9
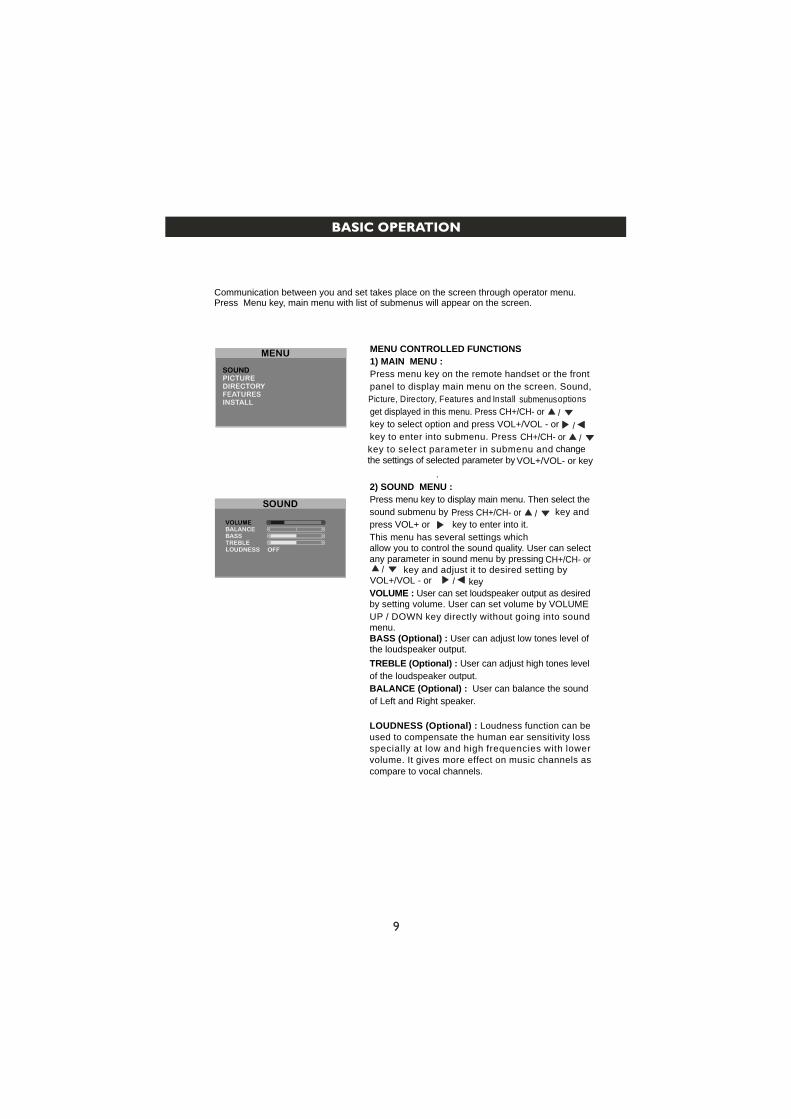
Communication between you and set takes place on the screen through operator menu. Press Menu key, main menu with list of submenus will appear on the screen.
MENU CONTROLLED FUNCTIONS
1) MAIN MENU :
Press menu key on the remote handset or the front
panel to display main menu on the screen. Sound,
Picture, Directory, Features Install and options
get displayed in this menu. Press CH+/CH- or
key to select option and press VOL+/VOL - or
key to enter into submenu. Press
key to select parameter in submenu and change the settings of selected parameter by VOL+/VOL- or key
.
2) SOUND MENU :
Press menu key to display main menu. Then select the
sound submenu by key and
press VOL+ or key to enter into it.
This menu has several settings which allow you to control the sound quality. User can select any parameter in sound menu by pressing
key and adjust it to desired setting by
key.
VOLUME : User can set loudspeaker output as desired by setting volume. User can set volume by VOLUME
UP / DOWN key directly without going into sound menu.BASS (Optional) : User can adjust low tones level of the loudspeaker output.
TREBLE (Optional) : User can adjust high tones level
of the loudspeaker output.
BALANCE (Optional) : User can balance the sound
of Left and Right speaker.
submenus
/
/CH+/CH- or /
LOUDNESS (Optional) : Loudness function can be used to compensate the human ear sensitivity loss specially at low and high frequencies with lower volume. It gives more effect on music channels as compare to vocal channels.
Press CH+/CH- or /
CH+/CH- or /
VOL+/VOL - or /
BASIC OPERATION
10
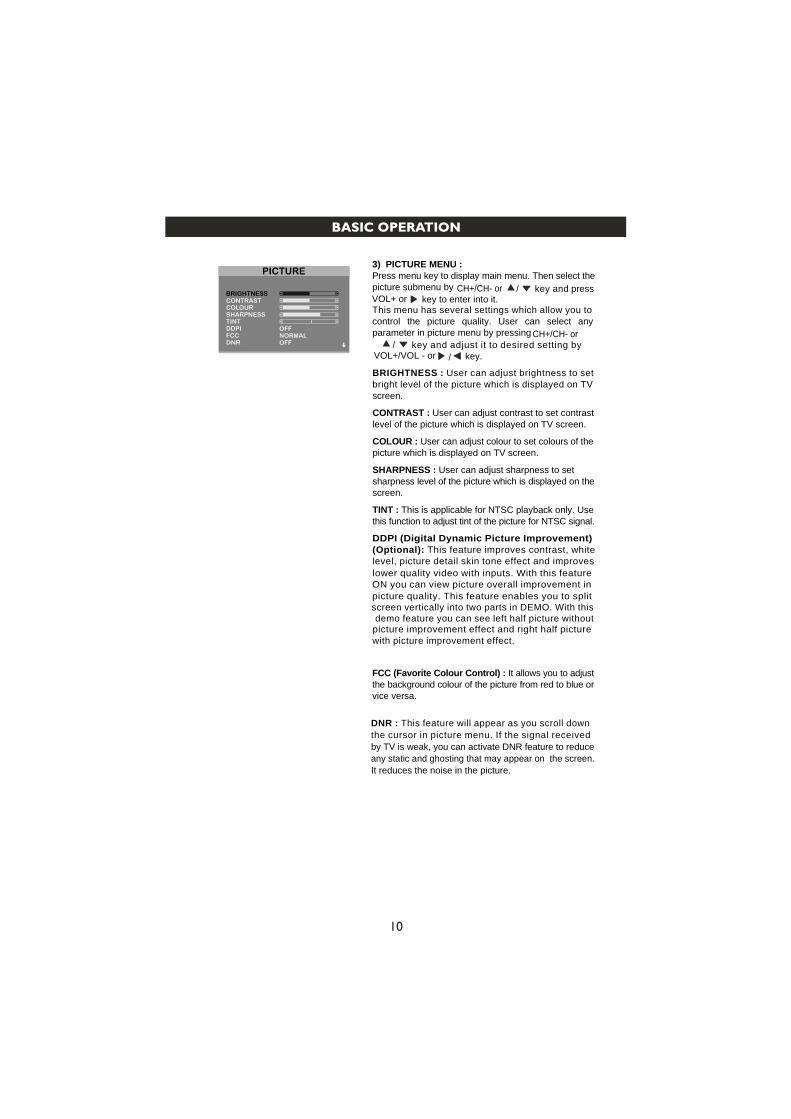
3) PICTURE MENU : Press menu key to display main menu. Then select the picture submenu by key and press
key to enter into it.This menu has several settings which allow you to control the picture quality. User can select any parameter in picture menu by pressing
key and adjust it to desired setting by key.
BRIGHTNESS : User can adjust brightness to set bright level of the picture which is displayed on TV screen.
CONTRAST : User can adjust contrast to set contrast level of the picture which is displayed on TV screen.
COLOUR : User can adjust colour to set colours of the picture which is displayed on TV screen.
SHARPNESS : User can adjust sharpness to set sharpness level of the picture which is displayed on the screen.
TINT : This is applicable for NTSC playback only. Use this function to adjust tint of the picture for NTSC signal.
DDPI (Digital Dynamic Picture Improvement) (Optional): This improves contrast, whitefeature level, picture detail tone effect and improvesskin lower quality video with inputs. With this featureON you can view picture overall improvement inpicture quality. This feature enables you to splitscreen vertically into two parts in DEMO. With thisdemo feature you can see left half picture without
FCC (Favorite Colour Control) : It allows you to adjust the background colour of the picture from red to blue or vice versa.
picture improvement effect and right half picture
DNR
with picture improvement effect.
CH+/CH- or /VOL+ or
CH+/CH- or /
VOL+/VOL - or /
DNR : This feature will appear as you scroll downthe cursor in picture menu. If the signal received by TV is weak, you can activate DNR feature to reduceany static and ghosting that may appear on the screen.It reduces the noise in the picture.

BASIC OPERATION
11
4) DIRECTORY MENU : Press menu key(Optional) to display main menu. Then select the directory
submenu by key and press
key to enter into it.
You can see array of program numbers on the screen.
Program no. from 1 to 249 can be access by using
and key.
You can see the program name which you have written
in install menu for each program. Two important
functions can be executed in directory menu.
i) MOVE : You can move the program from current
position to desired position. Go to the program which
you want to move and press picture key on remote to
select program. Selected program will appear in red
colour. Then go to the program where you want to move
that program and again press Picture key on remote to execute move operation.
ii) DELETE You can delete a program in the directory
menu. Go to the program which you want to delete and
press Sound key on remote to select that program.
Selected program will appear in red colour. Now again
press key on remote to execute delete operation.
You can see deleted program again after ASM.
5) FEATURES MENU :
Press menu key to display main menu. Then select the
features submenu by key and press key to enter into it. User can select any parameter in features menu by
pressing key and adjust it to
desired setting by key .
CH+/CH- or /
VOL+ or
key.VOL+/VOL - or / CH+/CH- or /
CH+/CH- or /VOL+ or
CH+/CH- or /
VOL+/VOL - or /
key and select appropriate
language by key. You can select
ENGLISH or HINDI language, which will be used for
displaying menus and indications in selected
language.
LANGUAGE (Option al) : Go to the language opti on by
CH+/CH- or /
VOL+/VOL - or /

12
BASIC OPERATION
CHILD LOCK : Select Child Lock menu by
key in menu and press Features
key to enter in CHILD Lock menu. This
menu has Lock, Lock code, AV Lock, Panel Lock, Volume Lock, Volume Limit.
Install menu, Directory menu and Child lock menu can
not be operated if Lock is ON. It can also prevent
unauthorized viewing of particular program if PR Lock
in install menu for that channel is ON. Once you
entered lock code to unlock the program or to enter into
Install / Directory / Child lock menu, it will not ask lock
code again till the set is in ON condition. You can give
lock code with four digits. Master password to open the
lock is “8888”.
AV LOCK : Is used to lock AV operations.
Front panel key operation so in thiswill not be possible
condition only remote will work.
You can lock the volume upto certain level beyond
which you do not want to increase further by Volume
Lock set to ON. You can set desired volume level for
volume lock in Volume Limit. To exit from lock menu,
Press MENU or CALL key.
GAME : (Optional) Select Game option in Features menu by
And enter into Game menu by pressing
.
PANEL LOCK (Optional) : When panel lock is ON,
CH+/CH-
/or VOL+/
/VOL-
CH+/CH-
/or
VOL+/ /VOL- key
BRAINVITA (OPTIONAL) : This game will provide tonic for your brain. Every time in new board game, vacant place will be selected randomly. The objective of this game is to cross one marble over other for next Vacant place and press menu key on that vacant place to eliminate crossed marble to create two vacant places. Play this game till last marble left or no chance for making vacant places in board game. Count the number of the marble left in board game and you will Judge yourself asMarbles left : 1. Intelligent
2. Sincere3. Hardworking4. Try
Use following remote control keys to play gameDigit 1 : New gameDigit 3 : Exit and go to game menu.
: Up / Down movement. : Right / Left movement.
MENU : Eliminate crossed marble to create two vacant places.Game :Direct Exit.
MARBLES LEFT : 32 UP/DN L/ R MENU : SEL. GAME /3 : EXI T
//
13
BASIC OPERATION
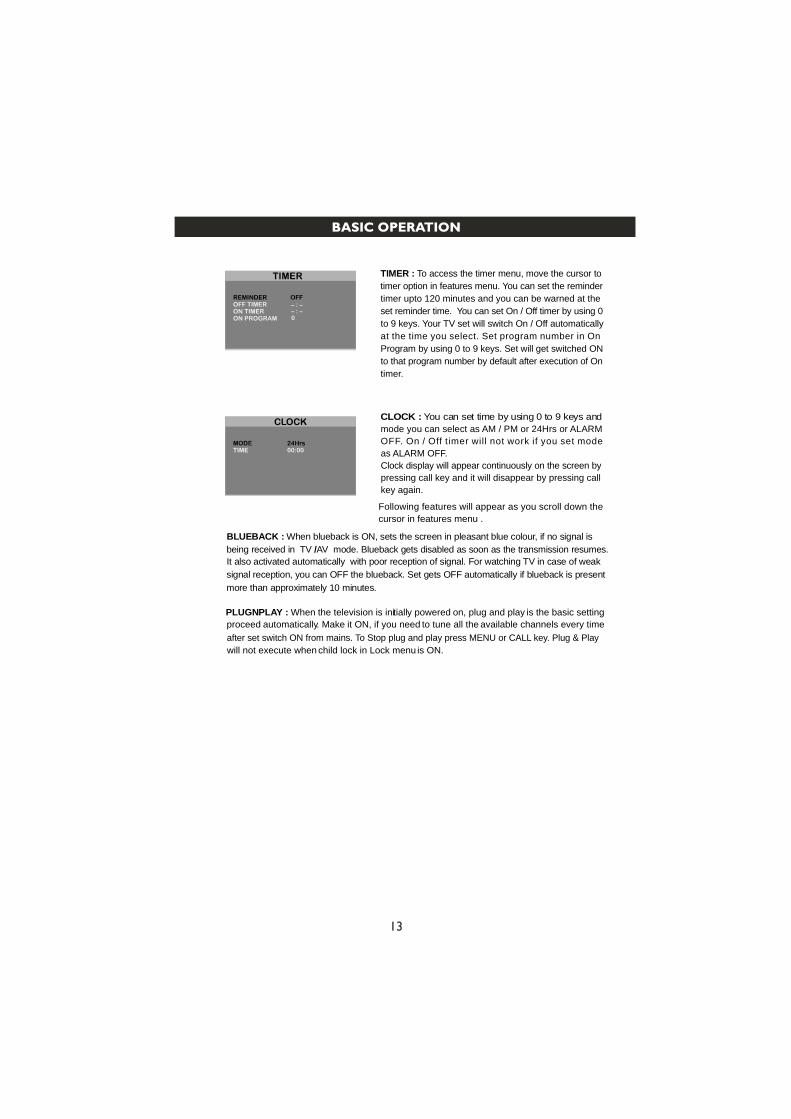
TIMER : To access the timer menu, move the cursor to
timer option in features menu. You can set the reminder
timer upto 120 minutes and you can be warned at the
set reminder time. You can set On / Off timer by using 0
to 9 keys. Your TV set will switch On / Off automatically
at the time you select. Set program number in On
Program by using 0 to 9 keys. Set will get switched ON
to that program number by default after execution of On
timer.
CLOCK : You can set time by using 0 to 9 keys and
mode you can select as AM / PM or 24Hrs or ALARM
OFF. On / Off timer will not work if you set mode
as ALARM OFF.
Clock display will appear continuously on the screen by
pressing call key and it will disappear by pressing call
key again.
Following features will appear as you scroll down the
cursor in features menu .
BLUEBACK : When blueback is ON, sets the screen in pleasant blue colour, if no signal is
being received in transmission resumes.TV /AV mode. Blueback gets disabled as soon as the
It also activated automatically of weak with poor reception of signal. For watching TV in case
signal reception, you can OFF the blueback. Set gets OFF automatically if blueback is present
more than approximately 10 minutes.
PLUGNPLAY : When the television is initially powered on, plug and play is the basic setting
proceed available channels every time automatically. Make it ON, if you need to tune all the
after set switch ON from key. mains. To Stop plug and play press MENU or CALL Plug & Play
will not execute when child lock in Lock menu is ON.

14
BASIC OPERATION
COLOUR SYS : By using key , you can set colour system in AUTO / NTSC-4.43 /
NTSC 3.58 / PAL-4.43 mode. Try to change the settingtill proper colour appears in the picture.Note : For some NTSC transmission channels make colour system to AUTO to get proper colour in picture.
SOUND SYS : Sound system BG is followed by India.
ASM (Auto search memory) : This feature is useful to tune all the channels in the frequency range available to you and store them. Auto tuning starts from program no. 1. To stop auto tuning, press MENU or CALL key. If any program skips during ASM, retune the set with ASM or search.
MFT: This allows to fine tune the channels manually in case of weak or distorted signals. For the fine tuning, select MFT in install menu and for adjustments use
key . Select MFT and press & hold ,
it allows manual searching to tune next / previous channel from current channel.
AFC(Automatic frequency control) : Make AFC ON, to keep automatically fine tuning the searched channel.
AFC becomes OFF when you manually fine tune the channel.
Following features will appear as you scroll down the cursor in install menu.
SKIP : You can skip unwanted programs with this feature. The skipped programs willnot be selected by can be key on remote or TV set, but it selected by pressing skipped program no. by direct digit selection keys on remote.The program no. To unskipwill change colour to red for skipped channel indication.
the channel, select SKIP in install menu and make it OFF.
PR LOCK : This lock is used to lock or unlock the programs to prevent unauthorizedviewing of children. is ON.This function is active only if Lock in CHILD Lock menu
PR. NAME : This allows you to assign the name to a program of maximum six characters. Use name and select the key to move the cursor to write the program characters / numbers by pressing CHANNEL UP/DOWN key on remote or on TV set. To see program name on the screen, press CALL key.
6) INSTALL MENU :Press menu key to display main menu. Then select the
install submenu by key and press key to enter into it.
PR. NO : You can see program number in install menu and by using VOL +/- or key you can select next / previous channel.
PR. NAMEPR LOCK
ABCDOFF
CH+/CH- or /VOL+ or
/
VOL +/- or /
VOL +/- or / key VOL +/- or /
CH+/CH- or / press
VOL +/- or /

15
DIRECT KEY FUNCTION
3) SELECTABLE SOUND (Optional) : You can
select the type of special sound effect to be used when
watching TV which best corresponds to your
requirements in which sound settings like Bass, Treble
are adjusted to the levels you prefer. There are 4
modes--CUSTOM--VOICE--STANDARD--THEATER
of selectable sound can be accessed by direct key on
the remote handset.
4) MUTE : Press the MUTE key, MUTE symbol will appear on the screen and the sound
will be switched again or by VOLUMEOFF. You can cancel mute by pressing MUTE key
5) SLEEP : The sleep timer can set by (Optional) using SLEEP key on the remote.
This feature can be used to switch off the television automatically after predefined
time. 120 minutes. You can set the sleep timer upto
6) SCAN : To scan all the tunned programs, (Optional) press the key marked SCAN on the remote handset. Press any key to discontinue the scanning.
DIRECT KEY FUNCTIONS
1) SELECTABLE PICTURE : You can select(Optional)
requirements in which picture settings like Contrast,
Brightness, Colour and Sharpness are adjusted to the
levels you prefer. There are 5 modes - CUSTOM–
MOVIE--SPORTS--STANDARD--GAME of selectable
picture can be accessed by direct key on the remote
handset.
2) ZOOM (Optional) : You can enjoy two levels of
picture size. Normal picture format is 4:3 of general TV. You can access this feature by ZOOM key on the remote.
the type of picture which best corresponds to your viewing
UP key.
NOTE : In normal use, user is recommended to keeppicture mode setting in 'GAME' mode for optimum powerconsumption.
7) Programme SelectionYou can select a programme number with / key or by directlypressing 0-9 keys from remote.8) Volume AdjustmentPress / key to adjust volume level.
9) Quick ViewPress the A/CH key to view the last program.
CH+ CH-
VOL-VOL+

PAL/BG
AV In ,DVD In,Monitor Out;Antenna In (75 )
AV In
AC 110-240V~50/60Hz
Video Playback PAL, NTSC
Contrast +
Ultra Slim Real Flat
120W
20Kg
23.5Kg
603x464x342mm
54cm
51cm
Sleep timer,Auto Store, Smart Picture
400W PMPO
Mute, Balance control, Smart sound
Sound output
21PT5525/V7
16
21PT3426/V7

Consumer Guidelines
1. Kindly ensure that the dealer fills up Warranty card correctly.
2. To avail the Warranty please register your product with the Philips -
Logon to www.Philips.com
OR
Contact Philips Consumer Care Centre
3. In the unlikely event of a defect developing in the TV set contact the Philips Customer
Care Centre for obtaining warranty service and inform of the defect observed in the
set, the type no.and serial no.of the set.
4. On your lodging a complaint, a trained technician will call on you promptly. In the
event of the technician deciding that set requires attention at the service station; kindly
arrange to deliver the set to the service station designated by technician for further
attention. "Home calls" by the technician would however be restricted within the
municipal limits of the city / town in which the set has been registered.
Type no._Serial No._Date of Purchase_
Purchased By: Name_
Address:_
Tel. No._
Sold by: Name_
Address:_
Contact Customer Service Executive at:
1800 102 2929 (Toll free No.)1860 180 1111 (Standard Call Rates Apply)
Regd Office: PE Electronics Limited,Auto Cars Compound,Adalat Road,Aurangabad,431005.
Sold by(User rubber stamp)Model no: 21PT5525/V7
Serial no.:
MADE IN INDIA
Tel. No._
_
_
21PT3426/V7
WARRANTY
The TV set is not used according to instructions given in the 'Direction for use'
/ ser Manual'.
Defects are caused by improper or reckless use.
Any repair work carried out by persons other than a Philips dealer or Authorised
Service Center.
Any modification or alteration of any nature made in the electrical circuitry of the est.
This Warranty Card is not completed and signed immediately on delivery of the set
by the Philips Dealer.
Fading effects and/or Ghosts (Multiple Image) in picture, if any, arising due to location
/ signal reception.
Defects due to causes beyond control like lightning, abnormal voltage, Acts of God or
while in transit to purchaser's residence.
'U
ThisTv receiver is covered under
warranty against any defect arising out
of faulty or defective material or workman
ship for a period of 12 months from the
date of purchase.
Should a defect develop in this set during
the period of warranty,PE Electronics
Limited undertakes to get the
set repaired free of charge either
From whom the set has been purchased or
through an Authorised Service Center for
warranty service. However, if the
purchaser has to shift his residence to
another town on account of transfer or
other reasons, the warranty benefit will be
available at the Authorised Service Center.
The warranty is not valid in case of any ofthe following events:
(Refer Consumer Guidelines for further details)


( 1100064829 ) Rev 01
"PHILIPS and the PHILIPS' Shield Emblem are registered trademarks ofKoninklijke Philips Electronics N.V. and are used under license from
Koninklijke Philips Electronics N.V."


![s3.amazonaws.com · Monitor (25KHz / 12.5KHz) MENU OPERATION Menu's operation I. In the standby mode, press ["Ito enter into the menu, the display will show " F ". 2. Press [A] or](https://static.documents.pub/doc/80x56/5dd134d3d6be591ccb64bb3a/s3-monitor-25khz-125khz-menu-operation-menus-operation-i-in-the-standby.jpg)

