For further information on being Water Wise ® please visit www.randwater.co.za and click on the Water Wise logo or contact us on 0860 10 10 60. C ertain gardens exist purely for enjoyment, while others provide services such as vegetables for food (Fig 1). Whatever the function of your garden, these natural green spaces are perfect for relaxation and rest in our busy, urban worlds. A well-designed garden will also attract insects, birds and animals to your garden and will use water wisely. Follow this comprehensive step-by-step guide to designing a functional, Water Wise garden. Fig 1. A well-designed and planned vegetable garden. 1. Starting with a plan – Evaluate the site in terms of the amount of precipitation that falls on the area or arrives as surface runoff. – e amount of water that nature provides makes an immense difference to the style and content of the garden. – Take note of where North and South are as this will affect the cool shade and hot sun patterns in the garden – Prevailing winds will dry out the garden and they should be identified early on in the design. – Be aware that the cold winds that could damage the garden often don’t arrive from the same direction as the prevailing wind. – Take note of the minimum temperatures to be expected as this will affect potential frost damage. – At the outset make decisions about what the garden’s function and purpose will be. – Consider all aspects of its recreational role; this will have a bearing on the amount and type of lawn that may or may not be required. – Assess the existing conditions of the garden for both the hard and soft landscaping aspects of the site. – e following perceptual characteristics should also be taken into consideration: • Views, both into and out of a site. Locate both the desirable and undesirable views so you can decide how to frame the desirable views and screen the undesirable ones. • Smells and sounds, on and off the site. Locate sources and intensities of both so you can attempt to mitigate the effect they have on your garden. • Dominant features, e.g. mountain views, ocean front views, sculptural features, unusual or specimen plants, or special hardscape elements. ese features should be enhanced by the design to follow. – General impressions of the site as to its potential and shortcomings. – Position activities on the plan of the site, e.g. compost heap and children’s play ground. – Check for the logic and compatibility of each service and activity. – Create a circulation plan between activities, making sure they all have the appropriate accesses. Make notes of potential paved areas to follow. – Make sure that proportion and scale are correct. – Make sure that existing services such as water and electrical lines won’t be damaged in the process of creating the garden. Re-route them if necessary. – Divide the area up into different hydro-zones according to their water needs. e aim is to reduce the overall water consumption of the garden, so the high water zone that receives the most amount of water should be proportionately smaller and at the focal point of the garden. – Select plants appropriate for the zone they will be planted in. Group plants according to their water requirements. – e focal point positioning should be identified for good design to follow. Remember to give extra attention to detail in the focal areas as they are often high water zones in the garden. Examples of focal areas could be entrances, relaxation spots and positions at the end of vistas. – Tree positions should be compatible with the activities on the site. Trees will provide extra shade and shelter later on. is should be kept in mind when considering the micro climate and plant selection. – Draw in the plants for each bed onto the plan. – Irrigation design must always be done by a professional. – Evaluate the plan and then proceed to install. Garden design step-by-step
Transcript
For further information on being Water Wise® please visit www.randwater.co.za and click on the Water Wise logo or contact us
on 0860 10 10 60.
C ertain gardens exist purely for enjoyment, while others provide services such as vegetables for food (Fig 1).
Whatever the function of your garden, these natural green spaces are perfect for relaxation and rest in our busy, urban worlds. A well-designed garden will also attract insects, birds and animals to your garden and will use water wisely. Follow this comprehensive step-by-step guide to designing a functional, Water Wise garden.
Fig 1. A well-designed and planned vegetable garden.
1. Starting with a plan – Evaluate the site in terms of the amount of precipitation
that falls on the area or arrives as surface runoff. – The amount of water that nature provides makes an
immense difference to the style and content of the garden.
– Take note of where North and South are as this will affect the cool shade and hot sun patterns in the garden
– Prevailing winds will dry out the garden and they should be identified early on in the design.
– Be aware that the cold winds that could damage the garden often don’t arrive from the same direction as the prevailing wind.
– Take note of the minimum temperatures to be expected as this will affect potential frost damage.
– At the outset make decisions about what the garden’s function and purpose will be.
– Consider all aspects of its recreational role; this will have a bearing on the amount and type of lawn that may or may not be required.
– Assess the existing conditions of the garden for both the hard and soft landscaping aspects of the site.
– The following perceptual characteristics should also be taken into consideration:
• Views, both into and out of a site. Locate both the desirable and undesirable views so you can decide how to frame the desirable views and screen the undesirable ones.• Smells and sounds, on and off the site. Locate sources and intensities of both so you can attempt to mitigate the effect they have on your garden.• Dominant features, e.g. mountain views, ocean front views, sculptural features, unusual or specimen plants, or special hardscape elements. These features should be enhanced by the design to follow.
– General impressions of the site as to its potential and shortcomings. – Position activities on the plan of the site, e.g. compost
heap and children’s play ground. – Check for the logic and compatibility of each service and
activity. – Create a circulation plan between activities, making
sure they all have the appropriate accesses. Make notes of potential paved areas to follow. – Make sure that proportion and scale are correct. – Make sure that existing services such as water and
electrical lines won’t be damaged in the process of creating the garden. Re-route them if necessary. – Divide the area up into different hydro-zones according
to their water needs. The aim is to reduce the overall water consumption of the garden, so the high water zone that receives the most amount of water should be proportionately smaller and at the focal point of the garden. – Select plants appropriate for the zone they will be
planted in. Group plants according to their water requirements. – The focal point positioning should be identified for
good design to follow. Remember to give extra attention to detail in the focal areas as they are often high water zones in the garden. Examples of focal areas could be entrances, relaxation spots and positions at the end of vistas. – Tree positions should be compatible with the activities
on the site. Trees will provide extra shade and shelter later on. This should be kept in mind when considering the micro climate and plant selection. – Draw in the plants for each bed onto the plan. – Irrigation design must always be done by a professional. – Evaluate the plan and then proceed to install.
Garden designstep-by-step
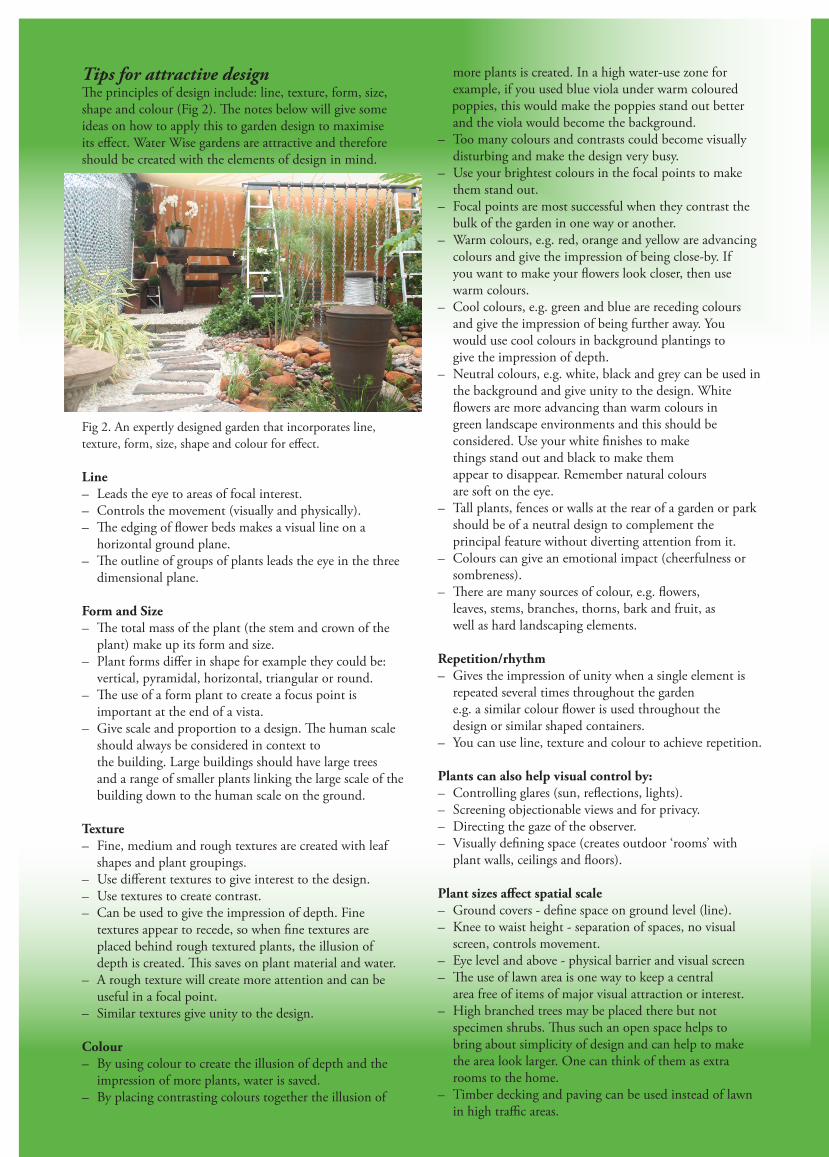
Tips for attractive designThe principles of design include: line, texture, form, size, shape and colour (Fig 2). The notes below will give some ideas on how to apply this to garden design to maximise its effect. Water Wise gardens are attractive and therefore should be created with the elements of design in mind.
Fig 2. An expertly designed garden that incorporates line, texture, form, size, shape and colour for effect.
Line – Leads the eye to areas of focal interest. – Controls the movement (visually and physically). – The edging of flower beds makes a visual line on a
horizontal ground plane. – The outline of groups of plants leads the eye in the three
dimensional plane.
Form and Size – The total mass of the plant (the stem and crown of the
plant) make up its form and size. – Plant forms differ in shape for example they could be:
vertical, pyramidal, horizontal, triangular or round. – The use of a form plant to create a focus point is
important at the end of a vista. – Give scale and proportion to a design. The human scale
should always be considered in context to the building. Large buildings should have large trees and a range of smaller plants linking the large scale of the building down to the human scale on the ground.
Texture – Fine, medium and rough textures are created with leaf
shapes and plant groupings. – Use different textures to give interest to the design. – Use textures to create contrast. – Can be used to give the impression of depth. Fine
textures appear to recede, so when fine textures are placed behind rough textured plants, the illusion of depth is created. This saves on plant material and water.
– A rough texture will create more attention and can be useful in a focal point.
– Similar textures give unity to the design.
Colour – By using colour to create the illusion of depth and the
impression of more plants, water is saved. – By placing contrasting colours together the illusion of
more plants is created. In a high water-use zone for example, if you used blue viola under warm coloured poppies, this would make the poppies stand out better and the viola would become the background. – Too many colours and contrasts could become visually
disturbing and make the design very busy. – Use your brightest colours in the focal points to make
them stand out. – Focal points are most successful when they contrast the
bulk of the garden in one way or another. – Warm colours, e.g. red, orange and yellow are advancing
colours and give the impression of being close-by. If you want to make your flowers look closer, then use warm colours. – Cool colours, e.g. green and blue are receding colours
and give the impression of being further away. You would use cool colours in background plantings to give the impression of depth. – Neutral colours, e.g. white, black and grey can be used in
the background and give unity to the design. White flowers are more advancing than warm colours in green landscape environments and this should be considered. Use your white finishes to make things stand out and black to make them appear to disappear. Remember natural colours are soft on the eye. – Tall plants, fences or walls at the rear of a garden or park
should be of a neutral design to complement the principal feature without diverting attention from it. – Colours can give an emotional impact (cheerfulness or
sombreness). – There are many sources of colour, e.g. flowers,
leaves, stems, branches, thorns, bark and fruit, as well as hard landscaping elements.
Repetition/rhythm – Gives the impression of unity when a single element is
repeated several times throughout the garden e.g. a similar colour flower is used throughout the design or similar shaped containers. – You can use line, texture and colour to achieve repetition.
Plants can also help visual control by: – Controlling glares (sun, reflections, lights). – Screening objectionable views and for privacy. – Directing the gaze of the observer. – Visually defining space (creates outdoor ‘rooms’ with
plant walls, ceilings and floors).
Plant sizes affect spatial scale – Ground covers - define space on ground level (line). – Knee to waist height - separation of spaces, no visual
screen, controls movement. – Eye level and above - physical barrier and visual screen – The use of lawn area is one way to keep a central
area free of items of major visual attraction or interest. – High branched trees may be placed there but not
specimen shrubs. Thus such an open space helps to bring about simplicity of design and can help to make the area look larger. One can think of them as extra rooms to the home. – Timber decking and paving can be used instead of lawn
in high traffic areas.
Balance – Equilibrium of elements (mass plantings, colours, forms)
imparts serenity to the design. – Formal balance may be achieved by balancing similar
objects The duplication of certain elements is an aid to gaining unity, balance and rhythm. In a formal design, the same element is commonly repeated.
– In an informal design, the repetition is not so absolute. An example of an informal balance of equal interest is to use a small mass of colour to balance a large neutral mass. Often this type of informal balance can be controversial and is more successful in capturing a viewer’s attention.
– The art of making the viewer ponder over the balance is mastered in the Japanese styles of landscape. Use your focal points to make the garden functional.
2. Focal points – These are the single most important elements in every
good design. Without focal points the design does not make any sense or have any purpose.
– Focal points are places in our designs that attract the eye and maintain our interest (Fig 3).
– In Water Wise gardening, they help us to save water because we can concentrate our maintenance and heavy watering areas around our focal points. We are able to use less water and less maintenance in the bulk of the landscape.
– Typical positions for focal areas are at the gate, at entrances and relaxation zones (areas in the garden of high use). By placing focal points in these positions, we are able to enjoy them to their maximum potential.
Fig 3. Bright white arum lilies provide an eye-catching indigenous focal point in a garden.
Tips to make plants become more focal: – Position of the plant: where there is a bend in the bed, or
as a stand-alone (away from a grouping) or by using the line of nearby shrubs to lead your eye to the focal plant.
– Size: If the plant is bigger than other plants. – Shape: by using a shape/form of shrub not being used in
the immediate area. – Colour: by using a contrasting colour to that of the
surrounding shrubs. – Texture: To change texture with the focal plant from fine
to big leaves. – Use specimen plants in the middle of lawn. – Use perspective in the garden by placing the focal plant
near elements that assist in drawing in and catching the eye easily.
Making dormant areas attractive – Dormant areas are beneficial because a) they do not
have to be watered in the dormant season, b) they allow for seasonal change in the garden. – Dormant areas in the garden should be in proportion to
the size/scale of garden, and be no more than half of the space. – A substantial backdrop of growing plants helps to enhance
the beauty of these dormant areas. – Select trees and shrubs specifically for their interesting
dormant shapes and colour e.g. Heteromorpha arborescens, Liquidamber styraciflua, Combretum erythrophyllum. – Frame specific dormant trees with evergreen plants and
ensure that the view of the tree will be exposed to the skyline to improve emphasis. – Use winter flowering bulbs under trees to add colour
(these bulbs require limited shallow watering.) – Use containers that can be moved around the garden and
from dormant areas to other focal areas and back again.
Doing away with those difficult areas. – Do away with long thin strips of lawn between beds and
paving. They are difficult to maintain and water. – Numerous small pots could be replaced by a few large
ones to create a bolder statement. – Replace many single plants with a single bed with all the
plants that can be further enhanced by planting a ground cover. This also reduces edge trimming. – For those people that don’t have enough space for a
dedicated vegetable garden, try mixing vegetables such as lettuce, carrots, cabbage, green pepper, brinjal and marrows with your flowers. – Having pebbles or bark mulch under trees where leaves fall
down makes for daily cleaning, so why not try a shade loving groundcover such as Ivy, Houtinia, Tulbaghia violacea or Ophiopogon. – In large gardens allow the bulk of the areas to grow “wild”
with specific seed grasses and meadow style flowers such as Coreopsis, California poppy and Plectranthus. This does not need much regular maintenance or water. (Meadow mixes are useful for this.) – If you have a need to create an instant shade garden/area
but your trees are still very small, create a temporary pergola or extend the archway with a creeper into that area of the garden. Remove it in a few years.
Six ways to revamp a garden to become Water Wise1. Straighten up edges of flower beds and reduce them to long flowing lines.2. Remove excessive dot planting in the lawn.3. Plant more perennial colour and group annuals in specific focal areas.4. Use paving, stepping stones or mulch in high traffic areas.5. Introduce water harvesting in the form of swales/berms, rain tanks, collection ponds and basins around plants.6. Re-arrange the garden preferably in the dormant period to create high, medium and low water use zones in the garden with strategic focal points.
Shapes of bedsRedesign lines for easy maintenance: – This is a process of doing away with all wavy and jagged
edges and to introduce flowing lines. – It enhances design and calms the mood of the garden. – A round bed in a small square area helps to create the
illusion of more space to the eye. – Scale and balance should be encouraged.
Match irrigation to bed design: – Enlarge beds or adjust irrigation. – When designing, do the garden and irrigation design at the
same time even if they are implemented later. – Use a professional for best design and installation.
Dot planting vs. single beds: – Do away with individual plants in the lawn and rather
create a bed. – Group plants into beds. – Maintenance is reduced by not having as much garden
edge to cut and mowing of the lawn is made easier. – Watering is improved by having all plants of the same
water requirements in one area.
Using permeable paving to save water: – Replace lawns in heavy traffic areas. – Compaction of lawn areas is reduced. – Run off water can be channelled into the garden. – Reduced lawn area will result in less water use.
Redirect runoff – To a water loving tree or collection pond. – Create a dry river bed of pebbles and plant bulbs in
between. – Create a hollow in the lawn where runoff water from the
paving can collect and slowly seep into the soil.
Remove curbing – This allows runoff water on paving to go directly into the
garden and opens up the design.
Use grass blocks (permeable paving) as a driveway – This allows water to seep in directly. – Environmentally friendly. – Good for slopes. – Creates a natural effect by allowing the grass to grow
through the “paving”.
Lead the eye by creating – Flowing lines and curves. – Gentle bends and repetition.
How do containers contribute to your garden design? – Container gardening gives the Water Wise gardener a
wonderful opportunity to “have it all” in a fun and creative, but very functional manner. No matter how much space you have, you can have a container garden. – The versatility of containers is astounding, solving both
functional as well as decorative requirements. – Containers range from hanging baskets, wall mounted
units, to free standing units in every shape, colour, texture and fashion imaginable. – Containers help jazz up those dull dormant areas in winter
with a splash of colour when placed in decoratively mulched beds. – Containers solve the problems of frost as prized plants can
simply be moved to a place of shelter. – One can have a show of fashionable exciting possibilities -
keeping abreast with the gardens every season by moving some containers around rather than revamping the whole garden. – Containers come in different shapes and sizes. Your choice
of containers depends on where you want to put it. Hanging baskets and wall mounted units are ideal for decorating patios, whereas larger free standing units are more suited to the garden - particularly in those dormant areas that appear during winter. – With strategic placement of your containers you maximise
the visual effect whilst using fewer plants. – Containers enable the gardener to group plants with
different water requirements together in the same space, by displaying them in different pots. – Containers save water, because each plant or plant group
is allocated water according to their needs. Also, the water applied is used by those specific plants and is not taken up by surrounding plants as is the case in some shrubberies. – Cacti and succulents need full sun and extremely good
drainage and will often not fit into a mixed border. In a container where a collection of attractive succulents are used, their specific needs can be met and they can still be part of the garden. – Have fun with containers. Containers allow one to afford
the best choice of plants as fewer plants are needed to achieve the same effect. Placing them in focal areas (such as patios, entrances, braais, barbecues or areas of relaxation), allows one to enjoy them to their maximum and also enhances the home environment.
Creating a hardy backbone – Any garden or landscape needs a backbone. This can be in
the form of plants or architectural features. – This will form most of the low and some of the medium
water zones in the garden. – Shrubberies should look good all year round and be made
up of a mixture of textures, colour, deciduous and evergreen plants. – Having a structure that remains in place saves water, as
establishing new plants always requires more watering initially. – Maintenance is reduced because yearly replanting is
avoided. – Benefits of a backbone:•Scale the space at the human eye level and in proportion to the house.•Provide shade to small areas without shading the whole garden.•Accentuate or soften topography - shrubs on a mound make the mound look bigger.•A backbone can be used as a barrier against movement.•Lead the eye and emphasise special features.•Separate activities by screening at eye level.•Enclose and define spaces.•Provide privacy by screening.•Frame views.•Act as a windbreak and a noise buffer - bigger leaves e.g. Laurel are more effective.
•Act as an insulation material against frost and heat.•Softens architecture and helps to relate the building to the land (i.e. harmonise developments).
Backbone plantings should preferably be made up of hardy perennial shrubs. These are most suitable for garden scale planting and provide a base from which the rest of the garden can be designed. These shrubs will grow fairly large (in relation to the size of garden) and after 1 - 2 years will require much less water. Within 4 - 5 years they should be able to grow well without extra water except for rain.
What is zoning and how can it save water? – Zoning is about watering some areas of the garden less than
others, in order to reduce the overall water consumption of the garden (Fig 4). – Grouping plants with similar water requirements together
is essential to achieve effective zoning. – Zoning is not only done when new gardens are designed
but can be applied to existing gardens, by moving plants in their dormant period to a more appropriate zone. – Zoning the garden can be applied to any size garden, from
a balcony to a town house garden, to a garden of a few acres. What changes is the scale and size of the individual zones (three pots on a balcony could have plants from each zone, as would a large garden have three different zones). – Refer to ‘Plan before planting’ to see how to divide your
garden into different water-use zones.
Fig 4. A zoned Water Wise garden
High water use zone (10-30% of garden): – This zone of the garden receives the most amount of water
in your garden. It is usually a focal area and will therefore receive the most attention and maintenance time. – Focal areas should be well placed for maximum effect.
These are most effective when they contrast the bulk of the garden. Size, shape, colour and texture are some of the elements that can be used to achieve contrast. – Focal points should be placed to lead the eye around the
garden. – The way to make thirsty plants (like annuals) more Water
Wise is to position them under shade (where possible), in groups and in containers wherever possible.
Medium water use zone (20-40% of garden): – The backbone (bulk of the plants) in the garden can still
look well maintained even though it receives rationed water. A large variety of perennials can be used to create colour. – Hardy ground covers under shrubs fill up large bare spaces
and prevent water loss through evaporation.
Low water use zone (30-60% of garden): – Create areas that will survive mostly on rainwater. – This zone only receives occasional watering. – It is wise to have a large backbone shrubbery or group of
trees to create this backbone. – The style of this zone does not detract from the rest of the
garden, but adds to it.
No water use zones – This should be a large zone in your garden. – This can consist of established indigenous plants.
Microclimates on the South SideAvoid planting trees on moist south sides close to the house as they produce extra shade that is not required and also use up available moisture.
Naturally moist area. – Use plants that enjoy these area, such as: Arums,
hydrangea, ruscus, azaleas, camellias, nerines and tree ferns. – This area often has less wind and it is more shaded and
therefore the soil dries out more slowly (shelter).
Low light. – Choose forest plants such as ferns, Hydrangea, Ivy, and
Impatiens. – Choose light coloured foliage to light-up the area, such as
Hen-and-Chickens.
Use trees to extend shade. – Position further away from the house to extend shade and
therefore increase plant choices. – Choosing trees with less dense foliage can extend the area
of medium light. – Prune trees up in order to allow light in.
Why create a windbreak? – A staggered line of plants will guide wind up and over the
garden more effectively than a straight line of plants because of the turbulence directly behind the shrubberies. – A windbreak in the garden could be any grouping of large
shrubs (preferably) that reduces wind flow into gardens or diverts the wind away from certain areas in the garden. – Walls, wooden screens and shadecloth can also be used as a
windbreak. – Windbreaks will help to create small areas of specific
micro-climates that will allow you to plant different plant species. – By creating windbreaks, the flow of air over the soil is
reduced, which reduces water evaporation. – Windbreaks divide the garden into different spaces. It
allows the user to view the garden in different phases. – Some good windbreak plants: cretaegus, buddleja,
euonymus and cotoneaster. – When creating a windbreak, a non-solid windbreak is best
as it will allow some wind through in a diffused manner, while most will pass over. This prevents wind turbulence, which occurs directly behind solid structures. – Air breezes that are allowed to enter the garden from under