26
Isometric Layout Drawing Isometric Offsets Calculating Isometric Offsets Isometric Dimensioning & Labeling
| Date post: | 02-Jun-2018 |
| Category: |
Documents |
| Upload: | sangkarmanuk |
| View: | 244 times |
| Download: | 0 times |

8/10/2019 GARMES - 08 Piping Isometrics
http://slidepdf.com/reader/full/garmes-08-piping-isometrics 1/26

8/10/2019 GARMES - 08 Piping Isometrics
http://slidepdf.com/reader/full/garmes-08-piping-isometrics 2/26
An isometric drawing is a type of pictorial drawing in
which three sides of an object can be seen in one view.
It’s popular within the process piping industry because it
can be laid out and drawn with ease and portrays the
object in a realistic view.Sometimes it is used in lieu of plans and elevations but
typically it is used to supplement the plan drawings
Isometrics are used as fabrication & shop drawings for
pipe run fabrication
Isometrics also provide a drafter with the ability to
calculate angular offsets in the pipe run.

8/10/2019 GARMES - 08 Piping Isometrics
http://slidepdf.com/reader/full/garmes-08-piping-isometrics 3/26
Isometric Layout:
Example of isometric axis
Isometric lines: one vertical & two at 30° from horizontal
Isometric lines can be measured
Non-isometric lines: lines NOT
parallel to the isometric lines –
these lines cannot be measured
You will use the isometric axis on ALL of your isometric drawings!
In the example at left, note that all directions of
the pipe match the three isometric axis lines

8/10/2019 GARMES - 08 Piping Isometrics
http://slidepdf.com/reader/full/garmes-08-piping-isometrics 4/26
Direction & location:
isometrics are seldom drawn to scale
however, pipe lengths should be shown proportionately
many companies draw isometrics on B-size paper (11” x 17”)
which is a limited space so sometimes proportion may be sacrificed
because of the lack of scale in an isometric, it’s IMPORTANT that
the written dimensions are accurate
Scale:
location and direction help to properly orient the isometric drawing
a north arrow give direction and should ALWAYS point to the upper-right
corner of the paper
structural reference points that provide location can be shown on
isometric
dimensions MUST always be given to points of reference; such as
structures, existing equipment…etc
coordinates should also be shown on the isometric drawing

8/10/2019 GARMES - 08 Piping Isometrics
http://slidepdf.com/reader/full/garmes-08-piping-isometrics 5/26
Isometric planes:
there are three planes that exist in isometric drawings
with three planes, there are a number of ways for valves andfitting to be shown
the illustration shown above shows the planes and possiblepositions of fittings & valves
remember that if pipes or features are parallel in the piping
layout, they they’ll be parallel in the isometric view

8/10/2019 GARMES - 08 Piping Isometrics
http://slidepdf.com/reader/full/garmes-08-piping-isometrics 6/26
Fitting symbols and orientation:
when orienting fittings
and valves it’s important
to know that there are
good methods and
poor methods in this
orientation process
the general rule for
producing an isometric
using GOOD
techniques, is to draw
the fittings so they areparallel to the last
direction change or
branch in the pipe
Not following the “generalrule” leads to a chaotic
looking isometric … it
doesn’t look professional
Show how the flow of
the isometric is
continuous and
provides a clear
picture of the pipe run

8/10/2019 GARMES - 08 Piping Isometrics
http://slidepdf.com/reader/full/garmes-08-piping-isometrics 7/26
fittings are drawn the same
shape as they appear on the plan
& elevation drawings EXCEPT
they’re at an isometric angle
elbows can be drawn a couple
of ways… check with company
standards
In this class we will use square
corner elbows –
not only is this the most
typical method used, but it’salso quicker to draw.
Curved Elbow Representation
Squared Elbow Representation

8/10/2019 GARMES - 08 Piping Isometrics
http://slidepdf.com/reader/full/garmes-08-piping-isometrics 8/26
Connected piping:
one run of pipe per isometric
drawing
branches of the pipe run orcontinuations are placed on other
drawings … typically shown as short
portion of dashed line on main pipe
run
usually a note indicates hename or specification of the
branch line
existing piping is sometimes shown
using double line method or dashed
lines – in this class we will use
dashed lines
either method is useful in that
it distinguishes new pipe from
existing pipingDashed line showing pipe
continuation and note providing
reference drawing information.
Example of double-line method
showing existing piping
Notice spec change between
“new” and existing pipe & note
for reference drawing
Pg. 220 text

8/10/2019 GARMES - 08 Piping Isometrics
http://slidepdf.com/reader/full/garmes-08-piping-isometrics 9/26
Isometric drawing techniques:
To increase drawing efficiency:
Create a prototype for isometric drawings
set up grid, snap, isometric plane orientation, border and
title block, BOM, text styles & dimension settings
Develop library of isometric symbols
valves, fittings, instruments, equipment… common
drawing components
Create dimension styles in all three isometric planes
Construct menus that you can pick symbols from

8/10/2019 GARMES - 08 Piping Isometrics
http://slidepdf.com/reader/full/garmes-08-piping-isometrics 10/26
Drawing Isometric Offsets:
Offset:
indicates that a piece of pipe is shifted from one line of direction to another
is done with a fitting (typically a 45° elbow)
one of the few times you might have “artistic license” in making a piping
drawing
Horizontal offsets:
If you draw a horizontal pipe with a 45°
elbow running form southeast to
northwest technically correct, it would
look like a vertical line… to prevent
confusion, the offset is drawn 22 ½ °
from vertical to give the illusion of theangle.

8/10/2019 GARMES - 08 Piping Isometrics
http://slidepdf.com/reader/full/garmes-08-piping-isometrics 11/26
That’s why many companies use a “squaring-
in” plane within the plane of the offset
Vertical Offsets:
These offsets can get just as confusing as the horizontal
offsets. Using the same techniques; 22 ½ ° and the “squaring
– in” planes help remedy the visualization of these offsets as
well.
FYI: As a drafter, you should always be aware of some of the
confusing qualities inherent to isometric piping drawings and take
measures to ensure the drawings are easily understood.
8/10/2019 GARMES - 08 Piping Isometrics
http://slidepdf.com/reader/full/garmes-08-piping-isometrics 12/26
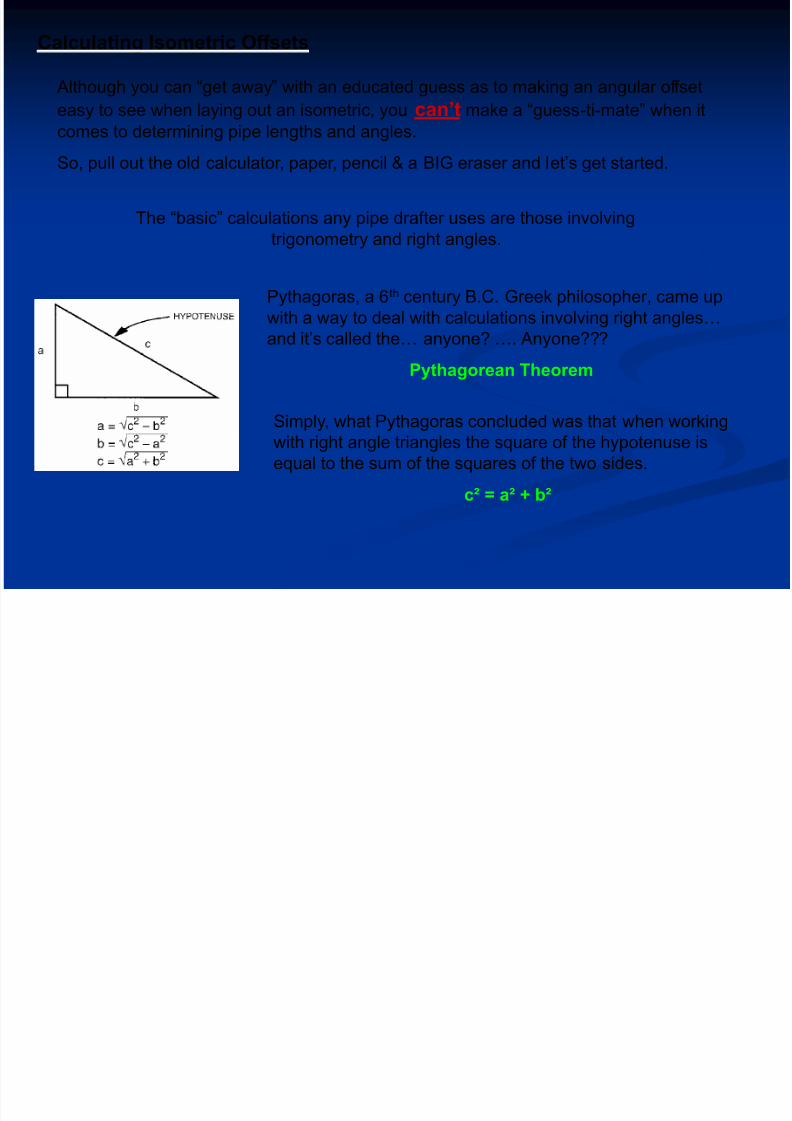
Calculating Isometric Offsets
Although you can “get away” with an educated guess as to making an angular offset
easy to see when laying out an isometric, you can’t make a “guess-ti-mate” when it
comes to determining pipe lengths and angles.So, pull out the old calculator, paper, pencil & a BIG eraser and let’s get started.
The “basic” calculations any pipe drafter uses are those involving
trigonometry and right angles.
Pythagoras, a 6th century B.C. Greek philosopher, came up
with a way to deal with calculations involving right angles…
and it’s called the… anyone? …. Anyone???
Pythagorean Theorem
Simply, what Pythagoras concluded was that when workingwith right angle triangles the square of the hypotenuse is
equal to the sum of the squares of the two sides.
c² = a² + b²

8/10/2019 GARMES - 08 Piping Isometrics
http://slidepdf.com/reader/full/garmes-08-piping-isometrics 13/26
Example: Pythagorean Theorem (p. 223)
1. Start off with what’s given or what you can determine
from the pipe drawing itself.
a) We are given an 45° angle rise, that clues us in
on the fact that the two sides of our triangle aregoing to be the same length
b) By doing simple subtraction, we can come up
with the length for side B: 11’-9 ¼” – 6’-3” = 5’-6
¼” OR you can subtract the elevations given
and get the same dimension for side A.
c) Since B = A: side A = 5’ -6 ¼” as well.
2. Now all you have to do is plug the
numbers into your formula:
a) c² = (5’ -6 ¼”)² + (5’ -6 ¼”)²
b) c² = (5.5208)² + (5.5208)²
c) c² = 30.4792 + 30.4792
d) c² = 60.9584
e) c = √ 60.9584
f) c = 7.8075
g) c = 7’ -9 11/16”
BREAKING DOWN THE NUMBERS:
FYI: 5’ -6 ¼” = 5.0 ft.
6” = 6/12 = .5 in.
¼” = .25/12 = .0208 in.
= 5.5208 ft.

8/10/2019 GARMES - 08 Piping Isometrics
http://slidepdf.com/reader/full/garmes-08-piping-isometrics 14/26
SMOLEY’S TABLES:
Before there were calculators there was Constantine K. Smoley, an
educator and civil engineer.
Smoley published a book in 1901 that became the “bible” for any
professional (engineers and architects) or student that needed to beable to calculate squares, square roots, logarithms & trig functions.
If we had used the Smoley’s Tables to solve the
previous problem:
1. We would have flipped through the pages to
find 5’
2. Then we would look for 6” column heading
3. Then in the far left column we would have
looked down to find the row labeled ¼”
4. At the intersection of the Square column under
6” and the ¼” Row, we’d find the square for 5’-6 ¼” given in decimal form … 30.4796
a) c² = 30.4796 + 30.4796
b) c² = 60.9592
c) c = √ 60.9592
d) c = 7.8076

8/10/2019 GARMES - 08 Piping Isometrics
http://slidepdf.com/reader/full/garmes-08-piping-isometrics 15/26
“TRIG” function formulas:
There are three basic “trig” function formulas that are frequently used in piping:
SIN = SO/HYPCOS = SA/HYP
TAN = SO/SA
When angle A is used, a is the side opposite (SO) and b is the side adjacent (SA).
When angle B is used, a is the side adjacent (SA) and b is the side opposite (SO).
Get familiar with the formulas for
solving angles and lengths in pipingoffsets.
Table on page 227 in your text.

8/10/2019 GARMES - 08 Piping Isometrics
http://slidepdf.com/reader/full/garmes-08-piping-isometrics 16/26
Solving Compound Angles:
When piping has to be “snaked” through equipment, steel, conduit and other pipe,
the pipe may be rolled along with the offset. This type of piping design is called a
rolling offset and forms a compound angle.
Four terms associated with a rolling offset configuration:
RUN: Length of total offset in direction of pipe run SET: Depth of offset
ROLL: Breadth of offset
TRAVEL: True length of pipe through offset
FYI: Separate tutorial “Working with Offsets”
provides in depth detail of solving for lengths of
pipe and angles… it’ll come in handy with some
assignments!

8/10/2019 GARMES - 08 Piping Isometrics
http://slidepdf.com/reader/full/garmes-08-piping-isometrics 17/26
Isometric Dimensioning & Labeling
Two planes are used in dimensioning and labeling-horizontal and vertical.
DIMENSIONING PRACTICES:
1. Best way to dimension a pipe is to its
centerline at the intersection point
2. Try to keep all dimensions outside the
piping view when possible
3. Dimensions should ALWAYS be shownbetween points in the same plane
4. One of the extension lines of the
dimension should be a centerline of the
run of pipe
5. Vertical lines of text should always be
parallel with extension lines

8/10/2019 GARMES - 08 Piping Isometrics
http://slidepdf.com/reader/full/garmes-08-piping-isometrics 18/26
Isometric lettering:
Basic guidelines for lettering isometric
drawings:
1. If the pipe’s vertical, the lettering should
be written vertically and at 30° angle
2. If pipe is in horizontal plane, the lettering
will appear as if it is lying down and will beoriented on both 30° angles
3. Dimensions appear to be lying down if the
pipe is horizontal or standing on end if the
pipe is vertical.

8/10/2019 GARMES - 08 Piping Isometrics
http://slidepdf.com/reader/full/garmes-08-piping-isometrics 19/26
Scale piping layout drawing

8/10/2019 GARMES - 08 Piping Isometrics
http://slidepdf.com/reader/full/garmes-08-piping-isometrics 20/26
Diagrammatic drawing of pipinglayout
8/10/2019 GARMES - 08 Piping Isometrics
http://slidepdf.com/reader/full/garmes-08-piping-isometrics 21/26
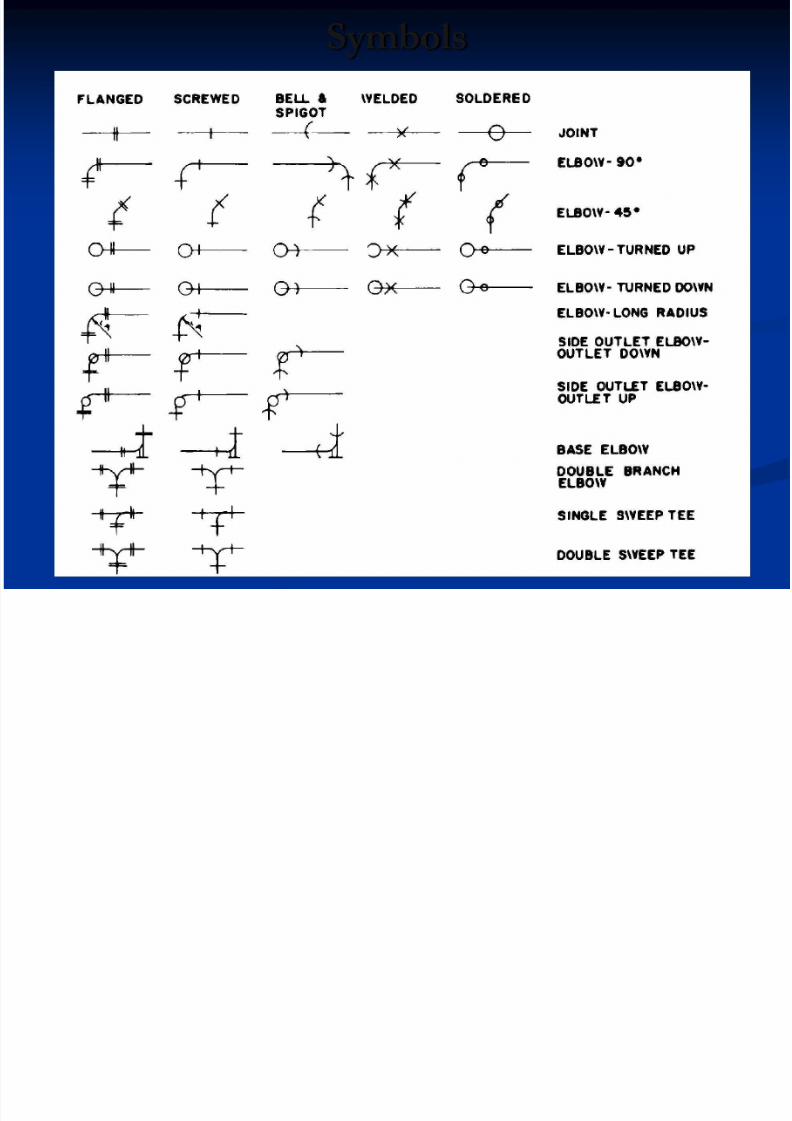
Symbols

8/10/2019 GARMES - 08 Piping Isometrics
http://slidepdf.com/reader/full/garmes-08-piping-isometrics 22/26
Symbols

8/10/2019 GARMES - 08 Piping Isometrics
http://slidepdf.com/reader/full/garmes-08-piping-isometrics 23/26
Tugas
Carilah sistem perpipaan
(1) Foto
(2) Ukur dimensinya(3) Gambarkan pada isometric graph sheet

8/10/2019 GARMES - 08 Piping Isometrics
http://slidepdf.com/reader/full/garmes-08-piping-isometrics 24/26
Foto sistem perpipaan asli

8/10/2019 GARMES - 08 Piping Isometrics
http://slidepdf.com/reader/full/garmes-08-piping-isometrics 25/26
Gambar isometrik

8/10/2019 GARMES - 08 Piping Isometrics
http://slidepdf.com/reader/full/garmes-08-piping-isometrics 26/26
Isometric Graph Sheet


