GYN/AID Gynecologic Simulator is an interactive educational system developed to assist a certified instructor. It is not a substitute for a comprehensive understanding of the subject matter and not intended for clinical decision making.
Equipment Set UpRemoving and Replacing the Skin .......................................... 9
Working with the SimulatorSimulator Features ................................................................. 11Speculum Examination .............................................................................. 12Bimanual Examination ............................................................................... 12
Description of Cervices and Uteri ......................................... 13
4 | User Guide | Care and Cautions |
Care and Cautions
| Care and Cautions | User Guide | 5
Overall WarningsDamage caused by misuse may void the manufacturer’s warranty. Failure to comply with the following guidelines may result in injury or damage to the simulator. Additional warnings are found throughout the document.
GENERAl
Do not wrap this or any other Gaumard product in newsprint or other printed material (e.g., colored plastic or Saran™wrap).
Do not write on the simulator with ballpoint pens, ink, or markers. Indelible marks cannot be removed.
Do not use alcohol, acetone, povidone iodine (Betadine®) or any other antiseptic which contains iodine in this or any Gaumard® simulator. These products could damage or stain the skin of the simulator.
Please read the section, Working with the Simulator, before beginning training exercises with the GYN/AID Simulator.
CAUTION
The GYN/AID is constructed of materials that approximates human skin texture; therefore when handling the simulator, use the same gentle technique that you would use when examining a patient.
Have trainees wash their hands prior to putting on examination gloves.
To make it easier to insert gloved fingers or instruments into the vagina, apply a few drops of dilute soap solution to the fingers or to the tip of instruments. (Alternatively, only use a water-based silicone lubricant, such as K-Y Jelly®).
When palpating the abdomen, or performing bimanual examinations, use the pads of your fingers. (Do not palpate using fingernails as this may tear the skin)
ClEANING
Clean the skin of the simulator after every training session. The skin should be cleaned with a cloth, dampened with diluted liquid dish washing soap.
Do not clean with harsh abrasives.
When thoroughly dry, apply a small amount of talcum powder to return the surface to a skinlike feel and appearance.
The simulator is “splash-proof” but not water-proof. Do not submerge or allow water to enter the interior of the simulator.
Before attempting to remove the outer skin, covering the rigid plastic torso; please review how to do this in the section Working with the Simulator. Do not apply force when removing the skin from the torso.
STORAGE
Improper storage may damage the simulator.
Keep it stored in the box and/or bag provided.
Store the simulator in a cool, dry place. Extended storage above 85 degrees Fahrenheit (29 Celsius) will cause the simulator to soften and slowly warp.
Do not stack or store heavy materials on top of the box and/or bag.
It is acceptable to operate the simulator at an ambient temperature of 95 degrees Fahrenheit (35 Celsius).
Do not pack any sharp objects with the GYN/AID Gynecologic Simulator.
6 | User Guide | Getting Started |
Getting Started
| Getting Started | User Guide | 7
OverviewThe GYN/AID simulator is a full-sized, adult female lower torso (abdomen and pelvis) that combines state-of-art materials to create a realistic look, feel and texture in addition to lifelike softness and durability. It is a versatile training tool developed to assist health professionals demonstrate and teach the skills required to perform most ambulatory gynecologic procedures. As such, the simulator provides an excellent platform on which trainees can learn how to perform:
• Inspection of the vulva and vagina
• Vaginal speculum examination, including visual recognition of normal and abnormal cervices
• Bimanual pelvic examination to identify normal, abnormal and pregnant uteri as well as adenexa with several pathologies
• Uterine sounding
• Interval IUD insertion and removal
• Diaphragm sizing and fitting
Contents of GYN/AID Simulator PackageThe simulator consists of an adult lower torso (abdomen and pelvis) with removable skin supported by a foam insert and metal base.
The simulator package contains the following:
• Normal patent cervix (parous os) and anteverted (transparent) uterus with attached Fallopian tubes, fimbriae and ovaries
• Anteverted uterus (solid) with shortened round ligaments to make palpation easier
• Plastic “air bag” attached by Velcro behind the uterus and connected to an external squeeze bulb
• 6 non-patent cervices (one normal parous and five with various pathologies)
• 7 uteri (one normal and six with pathologies)
• Talcum powder
• Flash light
• Soft carrying bag
• User Guide
All cervices and uterine bodies (corpuses) are detachable (see Section, Working with the Simulator, for description).
Also included is a Pelvic Examination Learning Package CD. The purpose of the learning package is to provide health professional instructors with additional information and performance-based learning materials to assist trainees:
• Learn to perform pelvic examinations competently, and
• Enable facilitator to measure provider performance objectively.
Medium skin tone is the standard simulator color; however, light or dark skin is available at no extra cost.
Terminology
FACIlITATOR
The person conducting the simulation; an instructor or lab staff member.
PROvIDER
A person participating in the simulation as a healthcare provider.
8 | User Guide | Equipment Set Up |
Equipment Set Up
| Equipment Set Up | User Guide | 9
Removing and Replacing the SkinThe skin and foam top can be removed in order to change the cervices, uteri or both; to reattach the rubber tubing; or to clean the inside of the torso.
To remove the skin:
1. Carefully detach it from the back end of the simulator (end with the view port) by lifting it up.
2. Then remove the skin from each leg before completely removing the skin.
To replace the skin, simply reverse the procedure (i.e., begin by carefully fitting the skin over each leg and then slide it up and over the back end of the torso).
With experience all of these things can be done without removing the skin, thereby minimizing the chance of tearing it.
10 | User Guide | Working with the Simulator |
Working with the Simulator
| Working with the Simulator | User Guide | 11
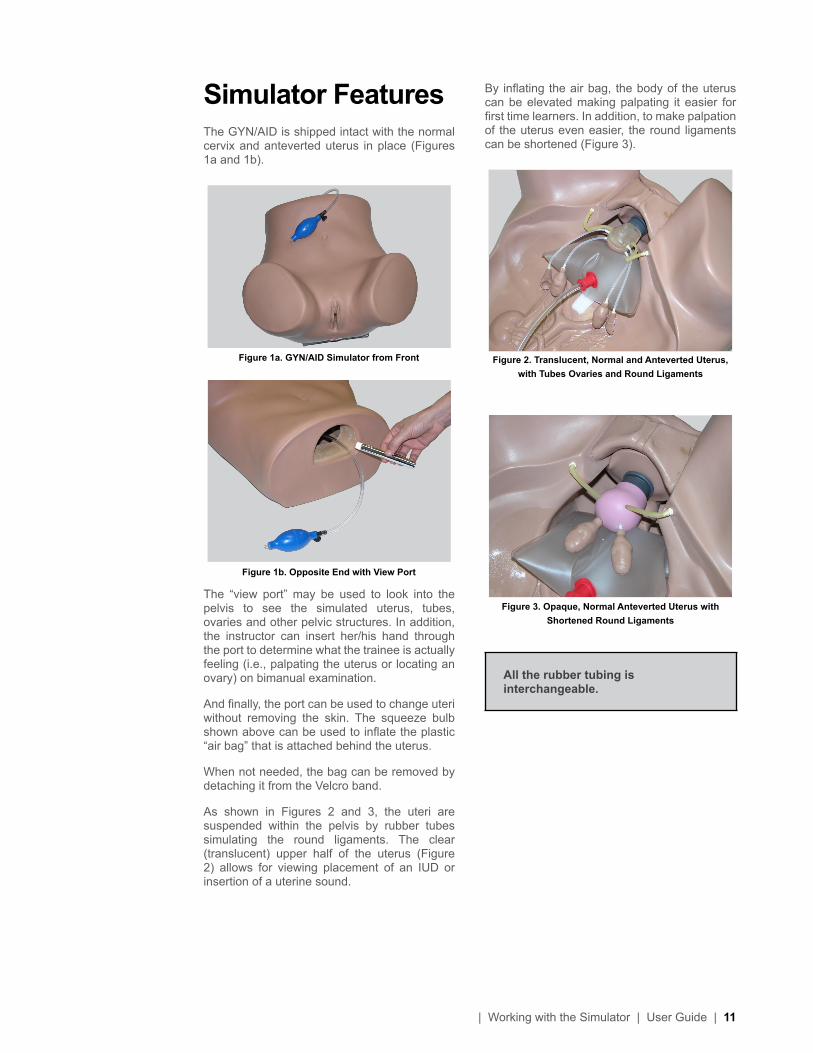
Simulator FeaturesThe GYN/AID is shipped intact with the normal cervix and anteverted uterus in place (Figures 1a and 1b).
The “view port” may be used to look into the pelvis to see the simulated uterus, tubes, ovaries and other pelvic structures. In addition, the instructor can insert her/his hand through the port to determine what the trainee is actually feeling (i.e., palpating the uterus or locating an ovary) on bimanual examination.
And finally, the port can be used to change uteri without removing the skin. The squeeze bulb shown above can be used to inflate the plastic “air bag” that is attached behind the uterus.
When not needed, the bag can be removed by detaching it from the Velcro band.
As shown in Figures 2 and 3, the uteri are suspended within the pelvis by rubber tubes simulating the round ligaments. The clear (translucent) upper half of the uterus (Figure 2) allows for viewing placement of an IUD or insertion of a uterine sound.
By inflating the air bag, the body of the uterus can be elevated making palpating it easier for first time learners. In addition, to make palpation of the uterus even easier, the round ligaments can be shortened (Figure 3).
All the rubber tubing is interchangeable.
Figure 1a. GYN/AID Simulator from Front
Figure 1b. Opposite End with view Port
Figure 2. Translucent, Normal and Anteverted Uterus, with Tubes Ovaries and Round ligaments
Figure 3. Opaque, Normal Anteverted Uterus with Shortened Round ligaments
12 | User Guide | Working with the Simulator |
To view the cervix (Figure 5), insert the closed blades of the speculum in the vertical position while angling them posteriorly. When the speculum is fully inserted, rotate the blades 90o (degrees) and gently open them fully. To increase the diameter of the opening, use the thumb screw.
Single tooth cervical tenacula can be applied to the those cervices with patent cervical os
(Figure 6). When removing a tenaculum, be sure the teeth are free of the cervix to avoid tearing it. Instruments such as uterine sounds or IUD inserters may be passed through the cervical os as well.
Remember before passing a sound, swab the cervix with a small amount of dilute soap and water solution. This should be done in the same manner in which you would swab the cervix with antiseptic before IUD insertion in a patient.
BImANUAl ExAmINATION
When performing the bimanual examination to determine the position and size of the interval genitalia (uterus, tubes and ovaries), use the pads of the fingers of the abdominal hand (Figure 7).
Figure 5. Inserting a Bivalve Speculum
Figure 4 illustrates how to change the cervix and uterus with the skin removed. A narrow locking ring (dark gray) holds the cervix firmly in place at the top of the vagina while the body of the uterus is attached to the cervix with a wide locking ring. To separate the cervix and uterus, insert two fingers of one hand into the vagina and grasp the cervix. With the other hand, gently unscrew the wide locking ring allowing the body of the uterus to be detached and attach a different uterine body. To change the cervix, first detach the uterine body; then unscrew the narrow locking ring, remove the cervix and replace it with a different one. With experience both these procedures can be accomplished through the “view port” without removing the skin from the torso.
SPECUlUm ExAmINATION
Use a medium Pederson or Graves bivalve speculum. Before inserting the speculum moisten the tips of the speculum blades with a few drops of dilute soap and water solution. Doing this makes passing the blades through the labia easier and prevents tearing the labia.
Figure 4. Changing the Cervix and Uterus
Figure 6. Applying a Cervical Tenaculum
| Working with the Simulator | User Guide | 13
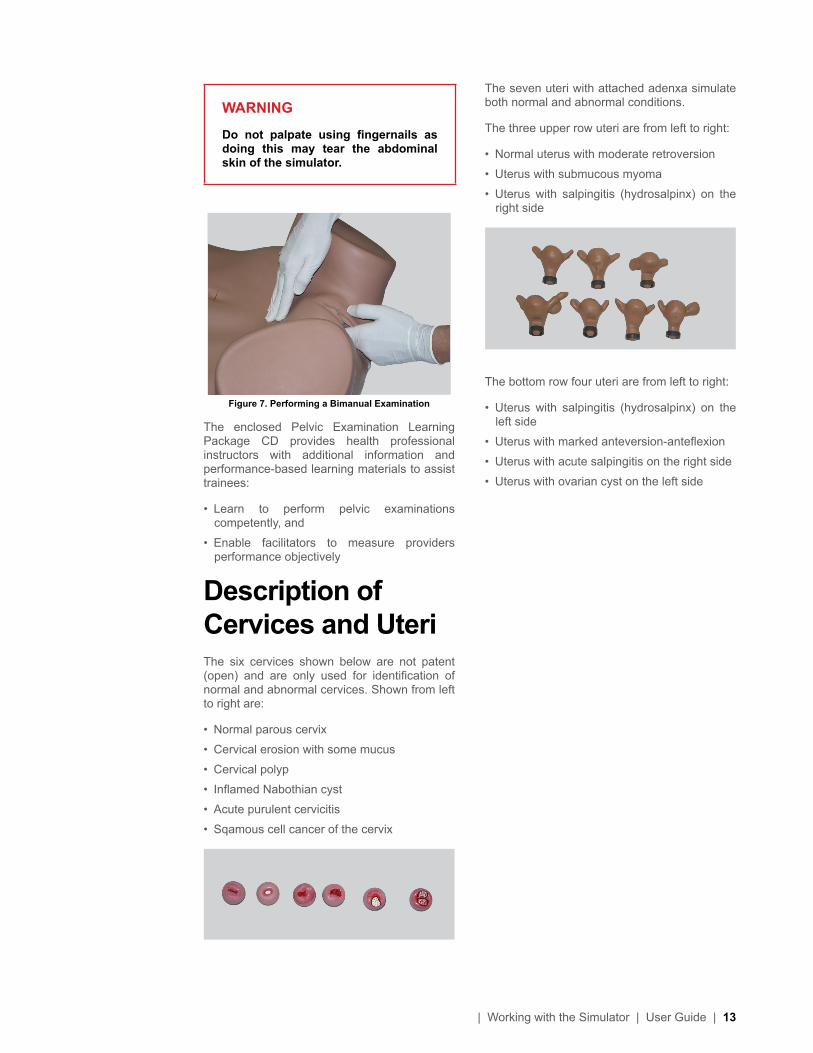
The seven uteri with attached adenxa simulate both normal and abnormal conditions.
The three upper row uteri are from left to right:
• Normal uterus with moderate retroversion
• Uterus with submucous myoma
• Uterus with salpingitis (hydrosalpinx) on the right side
The bottom row four uteri are from left to right:
• Uterus with salpingitis (hydrosalpinx) on the left side
• Uterus with marked anteversion-anteflexion
• Uterus with acute salpingitis on the right side
• Uterus with ovarian cyst on the left side
WARNING
Do not palpate using fingernails as doing this may tear the abdominal skin of the simulator.
The enclosed Pelvic Examination Learning Package CD provides health professional instructors with additional information and performance-based learning materials to assist trainees:
• Learn to perform pelvic examinations competently, and
• Enable facilitators to measure providers performance objectively
Description of Cervices and UteriThe six cervices shown below are not patent (open) and are only used for identification of normal and abnormal cervices. Shown from left to right are:
• Normal parous cervix
• Cervical erosion with some mucus
• Cervical polyp
• Inflamed Nabothian cyst
• Acute purulent cervicitis
• Sqamous cell cancer of the cervix
Figure 7. Performing a Bimanual Examination
14 | User Guide | Appendix |
Appendix
| Appendix | User Guide | 15
Consumables and Replacements
SElECTED PARTS lIST
Item ID Name503.001 Outer skin503.002 7 palpation uteri503.003 6 Cervices (abnormal) 503.004 Torso only503.005 Carrying bag503.006 Foam insert503.007 Rigid base assembly503.008 Introitus with locking pins503.009 Anteverted uterine assembly503.010 Metal frame assembly
503.011 Set of 2 normal cervices (patent os)
503.012 Talcum powder503.013 Early pregnancy kit503.014 Set of 2 cervical locking rings503.015 Squeeze bulb and tubing503.016 “Air bag” with tubing503.017 Bladder tank503.018 Skin repair kit
503.019 Set of 6 simulated Fallopian tubes, 2 ovaries and fimbriae
16 | User Guide | Appendix |
Warranty
ExClUSIvE ONE-YEAR lImITED WARRANTY
Gaumard warrants that if the accompanying Gaumard product proves to be defective in material or workmanship within one year from the date on which the product is shipped from Gaumard to the customer, Gaumard will, at Gaumard’s option, repair or replace the Gaumard product.
This limited warranty covers all defects in material and workmanship in the Gaumard product, except:
Damage resulting from accident, misuse, abuse, neglect, or unintended use of the Gaumard product;
Damage resulting from failure to properly maintain the Gaumard product in accordance with Gaumard product instructions, including failure to property clean the Gaumard product; and
Damage resulting from a repair or attempted repair of the Gaumard product by anyone other than Gaumard or a Gaumard representative.
This one-year limited warranty is the sole and exclusive warranty provided by Gaumard for the accompanying Gaumard product, and Gaumard hereby explicitly disclaims the implied warranties of merchantability, satisfactory quality, and fitness for a particular purpose. Except for the limited obligations specifically set forth in this one-year limited warranty, Gaumard will not be liable for any direct, indirect, special, incidental, or consequential damages, whether based on contract, tort, or any other legal theory regardless of whether Gaumard has been advised of the possibilities of such damages. Some jurisdictions do not allow disclaimers of implied warranties or the exclusion or limitation of consequential damages, so the above disclaimers and exclusions may not apply and the first purchaser may have other legal rights.
This limited warranty applies only to the first purchaser of the product and is not transferable. Any subsequent purchasers or users of the product acquire the product “as is” and this limited warranty does not apply.
This limited warranty applies only to the products manufactured and produced by Gaumard. This limited warranty does not apply to any products provided along with the Gaumard product that are manufactured by third parties. For example, third-party products such as computers (desktop, laptop, tablet, or handheld) and monitors (standard or touch-screen) are not covered by this limited warranty. Gaumard does not provide any warranty, express or implied, with respect to any third-party products. Defects in third-party products are covered exclusively by the warranty, if any, provided by the third-party.
Any waiver or amendment of this warranty must be in writing and signed by an officer of Gaumard.
In the event of a perceived defect in material or workmanship of the Gaumard product, the first purchaser must:
Contact Gaumard and request authorization to return the Gaumard product. Do NOT return the Gaumard product to Gaumard without prior authorization.
Upon receiving authorization from Gaumard, send the Gaumard product along with copies of (1) the original bill of sale or receipt and (2) this limited warranty document to Gaumard at 14700 SW 136 Street, Miami, FL, 33196-5691 USA.
If the necessary repairs to the Gaumard product are covered by this limited warranty, then the first purchaser will pay only the incidental expenses associated with the repair, including any shipping, handling, and related costs for sending the product to Gaumard and for sending the product back to the first purchaser. However, if the repairs are not covered by this limited warranty, then the first purchaser will be liable for all repair costs in addition to costs of shipping and handling.
Extended Warranty In addition to the standard one year of coverage, the following support plans are available: Two-Year Extension (covers second and third years)