GE Inspection Technologies 102M9420, Rev E February 2015 50 Industrial Park Road, Lewistown, PA 17044, U.S.A. Telephone: 717-237-0327 or 866-243-2638 Web: www.geinspectiontechnologies.com Mentor Update Procedure Introduction Following the initial 0.76.4 pilot release of Mentor EM, there were many changes to the menus and user interface for installing the update to the Mentor EM instrument software. In order to provide instruction for both old and new user interface versions, the Mentor EM instrument software is divided into three sections: Updating Mentor from Version 1.2 o Update from NDT Solution Center (Internet) o Update from USB Updating Mentor from Version 1.0 and 1.1 o Update from NDT Solution Center (Internet) o Update from USB Updating Mentor from Versions Prior to 1.0 o Update from NDT Solution Center (Internet) o Update from USB This document also covers the installation instructions for the following software: Mentor Create Windows PC software Mentor Workflows o Installing Mentor Workflows from NDT Solution Center o Installing Mentor Workflows from USB
Transcript
GE
Inspection Technologies
102M9420, Rev E February 2015
50 Industrial Park Road, Lewistown, PA 17044, U.S.A. Telephone: 717-237-0327 or 866-243-2638 Web: www.geinspectiontechnologies.com
Mentor Update Procedure
Introduction Following the initial 0.76.4 pilot release of Mentor EM, there were many changes to the menus and user interface for installing the update to the Mentor EM instrument software. In order to provide instruction for both old and new user interface versions, the Mentor EM instrument software is divided into three sections:
Updating Mentor from Version 1.2 o Update from NDT Solution Center (Internet) o Update from USB
Updating Mentor from Version 1.0 and 1.1 o Update from NDT Solution Center (Internet) o Update from USB
Updating Mentor from Versions Prior to 1.0 o Update from NDT Solution Center (Internet) o Update from USB
This document also covers the installation instructions for the following software:
Mentor Create Windows PC software
Mentor Workflows o Installing Mentor Workflows from NDT Solution Center o Installing Mentor Workflows from USB
Update from NDT Solution Center (Internet) Make sure that your Mentor is connected to AC power or has a full charge. Running out of battery
in mid upgrade could cause your instrument permanent damage. The upgrade process will not start if there is less than a 10% charge on the battery.
Begin by connecting your Mentor to your local Wireless network with internet access.
Tap the System Menu (tiles) button on the navigation bar
Continued on next page…
System Menu
Mentor Update Procedure February 2015
3 of 30 102M9420, Rev E
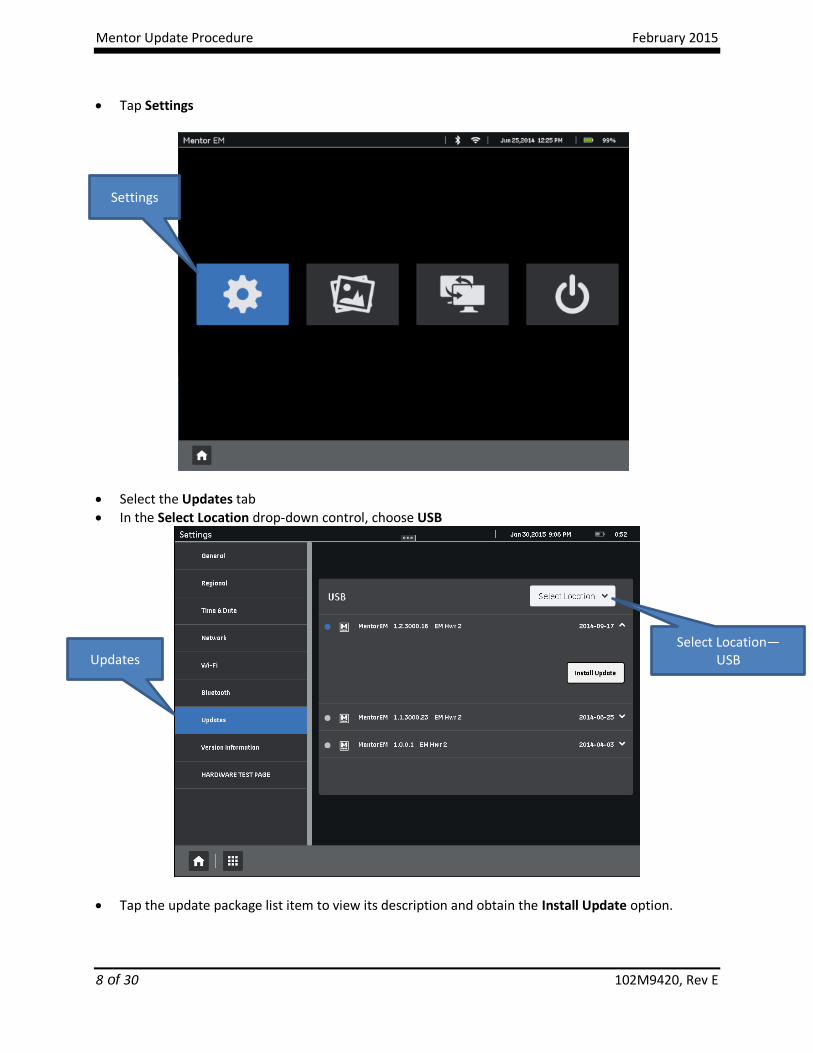
Tap Settings
On the Settings page, select the Wi-Fi tab. Turn on Wi-Fi
continued on next page…
Settings
Mentor Update Procedure February 2015
4 of 30 102M9420, Rev E
Select your wireless network and connect using the information provided by your local network administrator.
The network name will turn blue when connected.
continued on next page…
Mentor Update Procedure February 2015
5 of 30 102M9420, Rev E
After the connection is established, select the Updates tab
In the Select Location drop-down control, select the NDT Solutions Center
Tap the update package list item to view its description and obtain the Install Update option.
Press Install Update to start the update process.
Install
Update Package Contents
Mentor Update Procedure February 2015
6 of 30 102M9420, Rev E
Mentor will close and the Update Utility will display the update progress
The instrument will re-boot at the completion of the update process.
After the re-boot, the instrument may need to perform additional updates, please wait for these updates to complete.
Once the installation is complete, the instrument is ready for use.
Informs that update has started.
Mentor Update Procedure February 2015
7 of 30 102M9420, Rev E
Update from USB These instructions require the optional Mentor EM connectivity module with USB port.
On your PC, navigate to the NDT Solution Center Updates Download Area,
Navigate into the Updates folder.
Select all revisions of .MUP files of the same Mentor EM Version and click on the green download arrow.
NOTE: Do not rename the files. Save the downloaded file to the root of your USB drive.
Safely eject the memory stick from your PC.
Make sure that your Mentor is connected to AC power or has a full charge. Running out of battery in mid upgrade could cause your instrument permanent damage. The upgrade process will not start if there is less than a 10% charge on the battery.
Insert USB Flash drive into the USB connector in connectivity module at the back of the Mentor EM.
Tap the System Menu (tiles) button on the navigation bar:
In the Select Location drop-down control, choose USB
Tap the update package list item to view its description and obtain the Install Update option.
Updates Select Location—
USB
Settings
Mentor Update Procedure February 2015
9 of 30 102M9420, Rev E
Press Install Update to start the update process.
The installation will take several minutes, and there may be times when it looks like nothing is happening. Do not turn off power during the update process.
continued on next page…
Install
Informs that update has
started.
Update Package
Mentor Update Procedure February 2015
10 of 30 102M9420, Rev E
Mentor will close and the Update Utility will display the update progress
The instrument will re-boot at the completion of the update process.
After the re-boot, the instrument may need to perform additional updates, please wait for these updates to complete.
Once the installation is complete, the instrument is once again ready for use.
Mentor Update Procedure February 2015
11 of 30 102M9420, Rev E
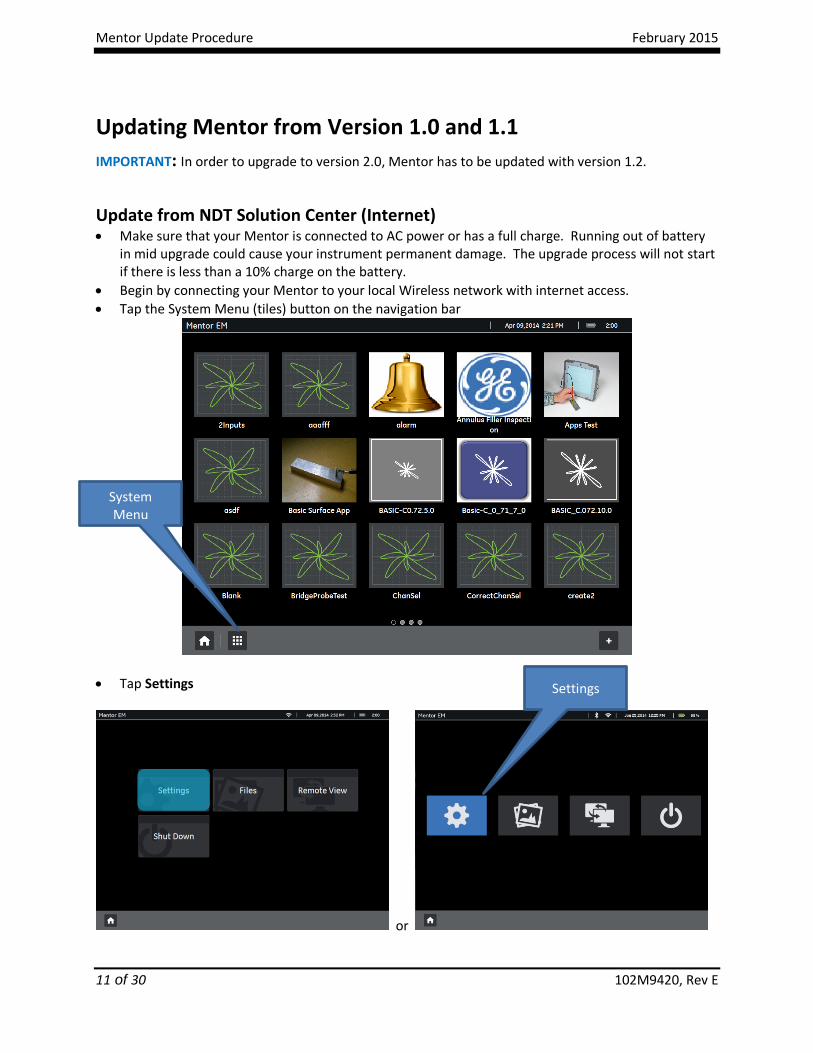
Updating Mentor from Version 1.0 and 1.1
IMPORTANT: In order to upgrade to version 2.0, Mentor has to be updated with version 1.2.
Update from NDT Solution Center (Internet) Make sure that your Mentor is connected to AC power or has a full charge. Running out of battery
in mid upgrade could cause your instrument permanent damage. The upgrade process will not start if there is less than a 10% charge on the battery.
Begin by connecting your Mentor to your local Wireless network with internet access.
Tap the System Menu (tiles) button on the navigation bar
Tap Settings
or
System Menu
Settings
Mentor Update Procedure February 2015
12 of 30 102M9420, Rev E
On the Settings page, select the Wi-Fi tab. Turn on Wi-Fi
OR
Select your wireless network and connect using the information provided by your local network administrator.
OR
Mentor Update Procedure February 2015
13 of 30 102M9420, Rev E
The network name will turn blue when connected.
OR
After the connection is established, select the Updates tab
In the Select Location drop-down control, select the NDT Solutions Center
continued on next page…
Mentor Update Procedure February 2015
14 of 30 102M9420, Rev E
Tap the update package list item to view its description and obtain the Install Update option.
Press Install Update to start the update process.
OR
continued on next page…
Install
Update Package Contents
Informs that update has
started.
Mentor Update Procedure February 2015
15 of 30 102M9420, Rev E
Mentor will close and the Update Utility will display the update progress
The instrument will re-boot at the completion of the update process.
After the re-boot, the instrument may need to perform additional updates, please wait for these updates to complete.
Once the installation is complete, the instrument is once again ready for use.
Update from USB On your PC, navigate to the NDT Solution Center Updates Download Area,
Navigate into the Updates folder.
Select all revisions of .MUP files of the same Mentor EM Version and click on the green download arrow.
NOTE: Do not rename the files. Save the downloaded file to the root of your USB drive.
Safely eject the memory stick from your PC.
Make sure that your Mentor is connected to AC power or has a full charge. Running out of battery in mid upgrade could cause your instrument permanent damage. The upgrade process will not start if there is less than a 10% charge on the battery.
Insert USB Flash drive into the USB connector in connectivity module at the back of the Mentor EM. continued on next page…
Tap the System Menu (tiles) button on the navigation bar:
Tap Settings
Or continued on next page…
System Menu
Settings
Mentor Update Procedure February 2015
17 of 30 102M9420, Rev E
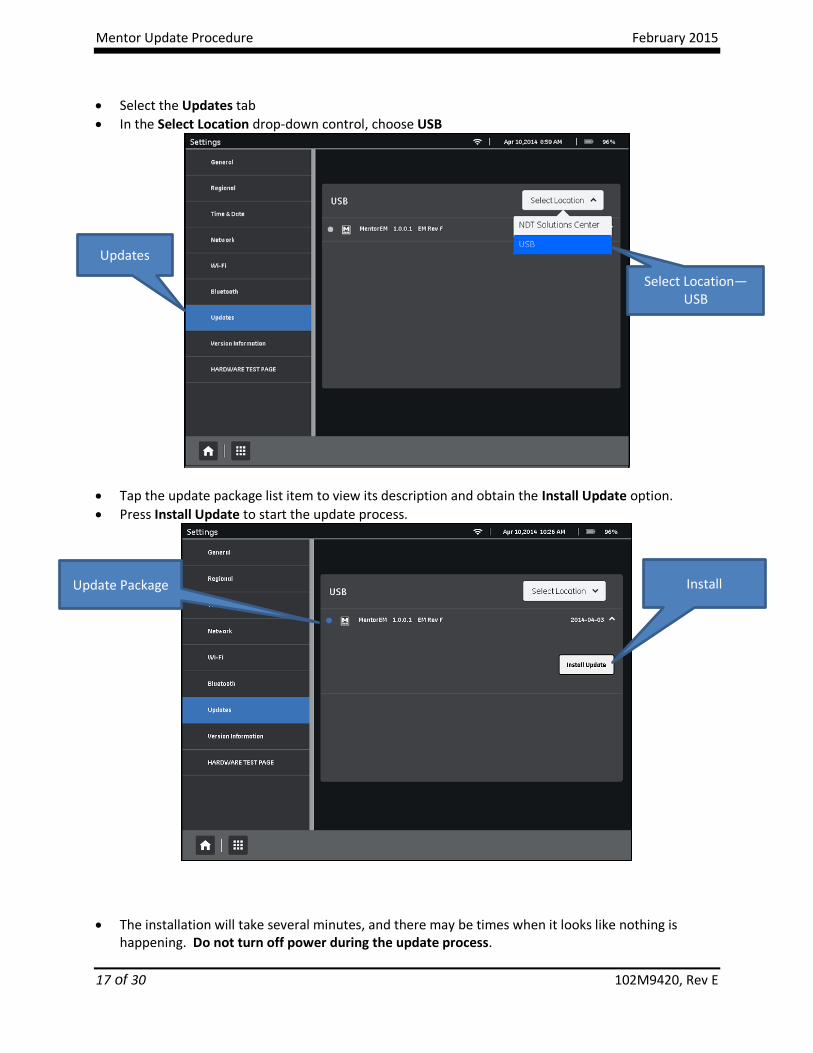
Select the Updates tab
In the Select Location drop-down control, choose USB
Tap the update package list item to view its description and obtain the Install Update option.
Press Install Update to start the update process.
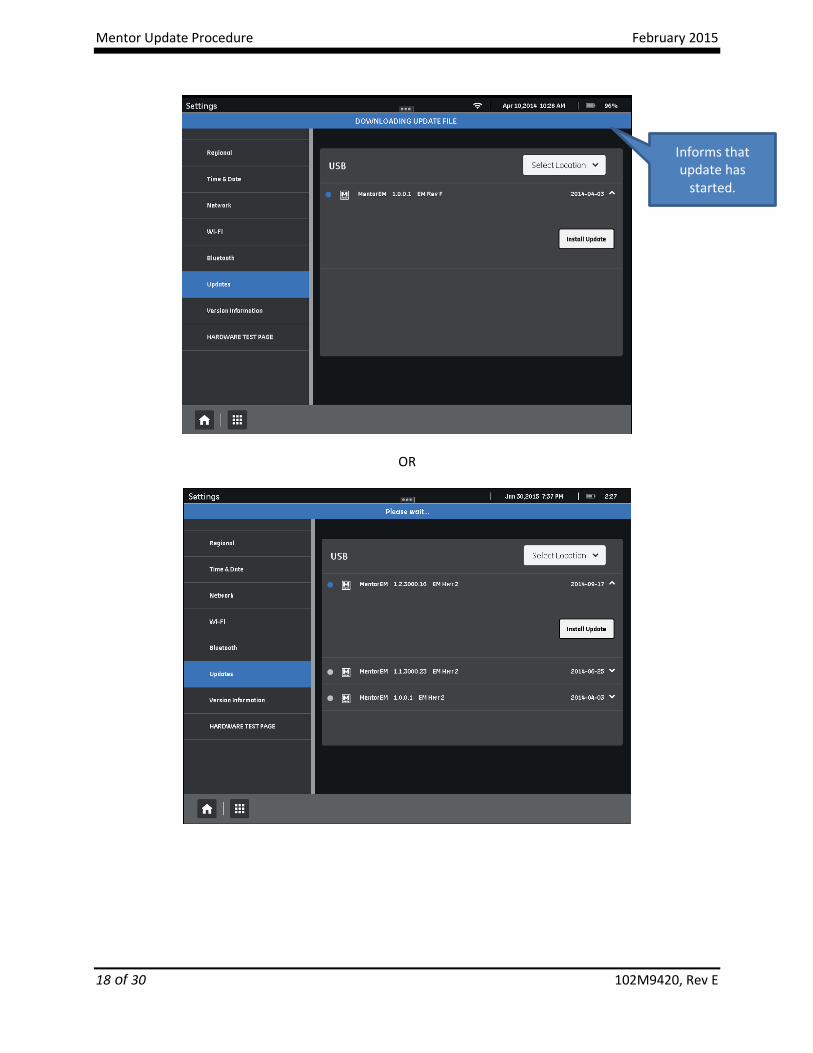
The installation will take several minutes, and there may be times when it looks like nothing is happening. Do not turn off power during the update process.
Install
Updates
Select Location— USB
Update Package
Mentor Update Procedure February 2015
18 of 30 102M9420, Rev E
OR
Informs that update has
started.
Mentor Update Procedure February 2015
19 of 30 102M9420, Rev E
Mentor will close and the Update Utility will display the update progress
The instrument will re-boot at the completion of the update process.
After the re-boot, the instrument may need to perform additional updates, please wait for these updates to complete.
Once the installation is complete, the instrument is once again ready for use.
Mentor Update Procedure February 2015
20 of 30 102M9420, Rev E
Updating Mentor from Versions Prior to 1.0
IMPORTANT: In order to upgrade to version 2.0, Mentor has to be updated with version 1.2. To do
that, you must
Update the instrument to version 1.0
From version 1.0, update the instrument to version 1.2
Update from NDT Solution Center (Internet) Make sure that your Mentor is connected to AC power or has a full charge. Running out of battery
in mid upgrade could cause your instrument permanent damage. The upgrade process will not start if there is less than a 10% charge on the battery.
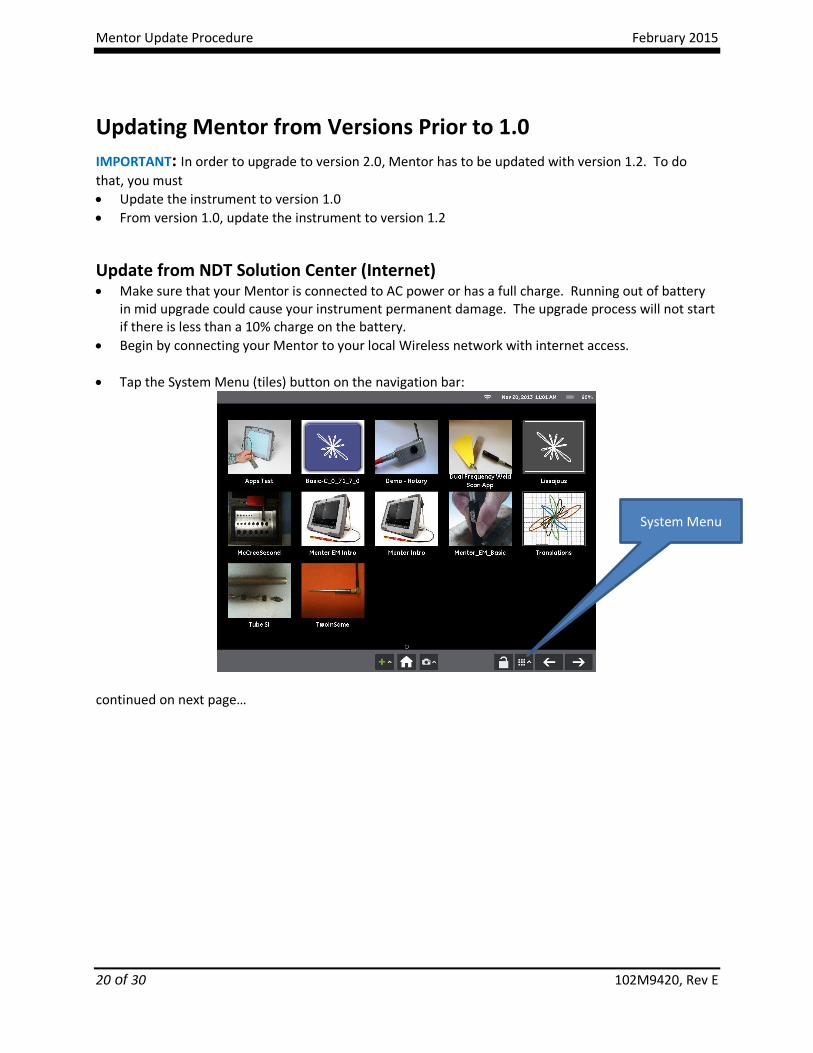
Begin by connecting your Mentor to your local Wireless network with internet access.
Tap the System Menu (tiles) button on the navigation bar:
continued on next page…
System Menu
Mentor Update Procedure February 2015
21 of 30 102M9420, Rev E
Tap Settings
On the Settings page, select the Wi-Fi Settings tab. Turn on Wi-Fi, and Available Connections.
Select your wireless network and connect using the information provided by your local network
administrator.
After the connection is established, select the Install/Upgrade tab, then select the Settings page:
Mentor Update Procedure February 2015
22 of 30 102M9420, Rev E
On the Settings Page select the Receive Updates from GE Solution Center option, then Select Save:
Tap the “Refresh” button (arrow) to get a list of the updates available on the NDT Solution Center. continued on next page…
Install/Update
Settings
Select for GE Solution Center
Save
Mentor Update Procedure February 2015
23 of 30 102M9420, Rev E
Tap the update package list item to view its description and obtain the Install Update option.
Press Install Update to start the update process.
continued on next page…
Install Update Package
Refresh
Mentor Update Procedure February 2015
24 of 30 102M9420, Rev E
Notifications Bar will indicate that the update file download process has begun
Mentor EM will close and the Update Utility will display the update progress
The instrument will re-boot at the completion of the update process.
After the re-boot, the instrument may need to perform additional updates, please wait for these updates to complete.
Once the installation is complete, the instrument is once again ready for use.
Update from USB On your PC, navigate to the NDT Solution Center Updates Download Area
Navigate into the InstrumentUpdates folder.
Select all revisions of .MUP files of the same Mentor EM Version and click on the green download arrow.
NOTE: Do not rename the files. Save the downloaded file to the root of your USB drive.
Safely eject the memory stick from your PC.
Make sure that your Mentor is connected to AC power or has a full charge. Running out of battery in mid upgrade could cause your instrument permanent damage. The upgrade process will not start if there is less than a 10% charge on the battery.
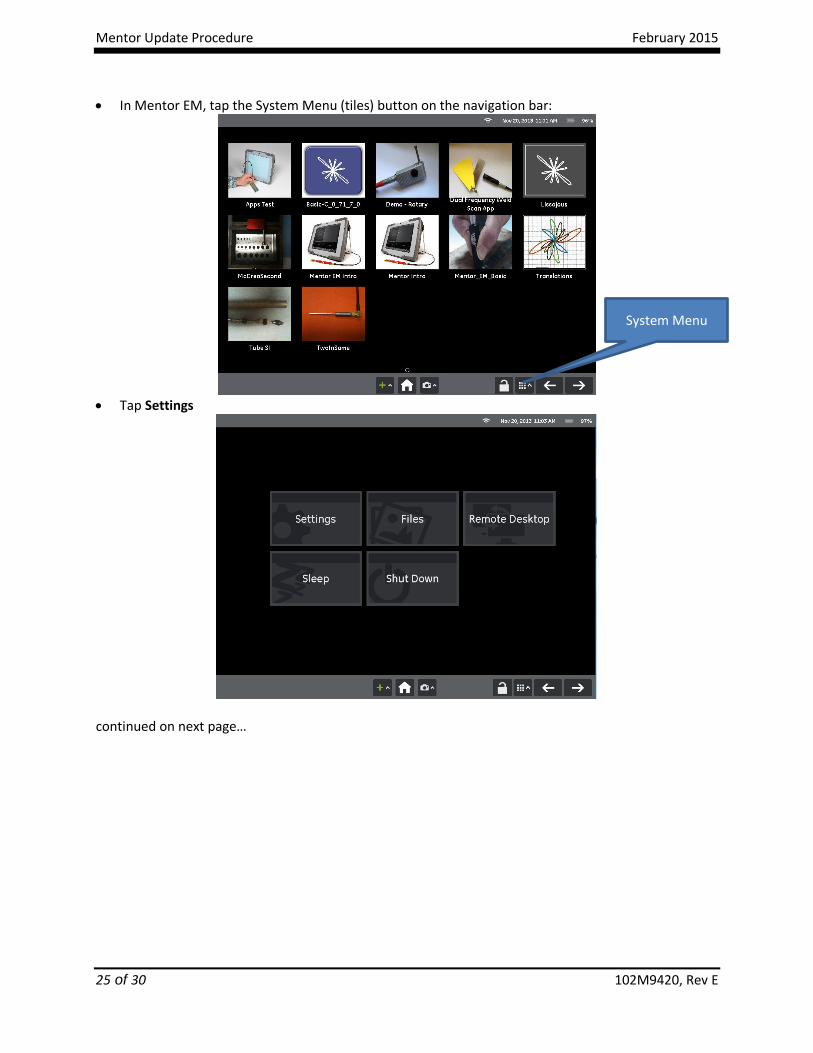
In Mentor EM, tap the System Menu (tiles) button on the navigation bar:
Tap Settings
continued on next page…
System Menu
Mentor Update Procedure February 2015
26 of 30 102M9420, Rev E
On the Settings page, select the Install/Upgrade tab, then select the Settings page:
On the Settings Page select the “Install Update(s) from USB” option, then Select Save:
continued on next page…
Install/Upgrade
Settings
Select for USB Update
Save
Mentor Update Procedure February 2015
27 of 30 102M9420, Rev E
On the Update Manager page, tap the “Refresh” button (arrow) to get a list of available updates on the USB device.
Tap the update package list item to view its description and obtain the Install Update option.
Press Install Update to start the update process.
Install Update Package
Refresh
Mentor Update Procedure February 2015
28 of 30 102M9420, Rev E
The installation will take several minutes, and there may be times when it looks like nothing is happening. Do not turn off power during the update process.
Mentor EM will close and the Update Utility will display the update progress
The instrument will re-boot at the completion of the update process.
After the re-boot, the instrument may need to perform additional updates, please wait for these updates to complete.
Once the installation is complete, the instrument is once again ready for use.
Informs that update has
started.
Mentor Update Procedure February 2015
29 of 30 102M9420, Rev E
Mentor Create Installation Instructions
Installation Instructions for Mentor Create for Microsoft Windows PC Installation Instructions
o Go to the NDT Solution Center Create Download Area to get the latest version of Create o Navigate to the Create folder o Click on the desired Create version installation executable and save to your computer. o Uninstall any prior Create versions o Run the installation executable
Installing Mentor Workflows from NDT Solution Center (Internet) Note: Adding a workflow that is already installed on the instrument, will update that workflow
Perform the Mentor update before loading new workflows
Connect Mentor to a network with internet access
In Mentor, o Go to the workflow launcher (desktop) screen. o Press the Add a Workflow (‘+’) icon at the bottom of the screen in the navigation bar o Press the “Select Location” button o Choose “NDT Solutions Center” o Press the circle icon to the left of the desired workflow (circle will fill when selected) o Press the “Install” button o If workflow does not appear immediately, please wait at least 30 seconds before trying
again…Mentor needs to download and put the workflow files in place before the workflow will show.
Installing Mentor Workflows from USB On your PC, navigate to the following URL: NDT Solution Center Mentor Workflows
Navigate to the Workflows folder.
Select (check the checkbox) for each desired workflow and click the DOWNLOAD ALL FILES (green down arrow) button
Copy the workflow file(s) to a USB flash drive.
CAUTION! Do not rename the workflow files.
Eject USB Flash drive from PC
Insert USB Flash drive into Mentor.
In Mentor, o Go to the workflow launcher (desktop) screen. o Press the Add a Workflow (‘+’) icon at the bottom of the screen in the navigation bar o Press the “Select Location” button o Choose “USB” o Press the circle icon to the left of the desired workflow (circle will fill when selected) o Press the “Install” button
If workflow does not appear immediately, please wait at least 30 seconds before trying again…Mentor needs to download and put the workflow files in place before the workflow will show.


![[XLS]minoritywelfare.bih.nic.inminoritywelfare.bih.nic.in/Schemes/MMVPY/2nd/Patna.xlsx · Web viewYASMEEN PERWEEN MD SHAMSUDDIN 17044-R-0165/14 ZABINA PARVEEN MD JAVED 17044-R-0166/14](https://static.documents.pub/doc/80x56/5b0ae8b87f8b9aba628ce77c/xls-viewyasmeen-perween-md-shamsuddin-17044-r-016514-zabina-parveen-md-javed.jpg)


