133
Gelato 2.1 Mango User's Guide Date: 14 December, 2006

Gelato 2.1 Mango User's Guide
Date: 14 December, 2006

Gelato 2.1 Mango User’s Guide December 14, 2006
2
Contents 1. Introduction..................................................................................................................... 5 1.1 Mango Functions .......................................................................................................... 6 1.2 Where to find Gelato/Sorbetto Controls ....................................................................... 7
1.2.1 Gelato Shelf ........................................................................................................... 7 1.2.2 Render Settings ...................................................................................................... 7 1.2.3 Attribute Editor ...................................................................................................... 8
1.3 Hands-On Mango Tour ................................................................................................. 9 2. Installation..................................................................................................................... 13 2.1 System Requirements.................................................................................................. 13 2.2 Installation and Setup.................................................................................................. 15
2.2.1 Maya Installation ................................................................................................. 15 2.2.2 Mango Windows Installation............................................................................... 15 2.2.3 Mango Linux Installation..................................................................................... 17 2.2.4 Installed Files ....................................................................................................... 19
3. Rendering...................................................................................................................... 20 3.1 Mango's Gelato/Sorbetto Shelf ................................................................................... 20 3.2 Selecting Gelato as the renderer ................................................................................. 22 3.3 Rendering All v. Rendering Selected Objects ............................................................ 24 3.4 Rendering the current frame ....................................................................................... 24 3.5 Preview Mode ............................................................................................................. 24 3.6 Batch Rendering.......................................................................................................... 26 3.7 Exporting Pyg Files..................................................................................................... 27 3.8 Rendering separate output elements ........................................................................... 29 3.9 Baking textures ........................................................................................................... 31
3.9.1 Creating a texture bake set................................................................................... 31 3.9.2 Baking Color Modes ............................................................................................ 33 3.9.3 Baking Attributes ................................................................................................. 33
4. Render Settings ............................................................................................................. 35 4.1 General options ........................................................................................................... 35 4.2 Anti-aliasing Quality................................................................................................... 39 4.3 Raytracing Quality ...................................................................................................... 41 4.4 Motion Blur................................................................................................................. 42 4.5 Render Options ........................................................................................................... 44 4.6 Memory and Performance Options............................................................................. 46 4.7 Indirect Illumination ................................................................................................... 48 4.8 Override Surface Shader ............................................................................................. 49 4.9 Ambient Occlusion ..................................................................................................... 50 4.10 Subsurface Scattering................................................................................................ 53 4.11 Default Per-Object Attributes ................................................................................... 54 4.12 Volume Options ........................................................................................................ 56 4.13 Stereo Rendering....................................................................................................... 58 4.14 Baking Options ......................................................................................................... 60

Gelato 2.1 Mango User’s Guide December 14, 2006
3
4.15 Output elements ........................................................................................................ 61 5. Modeling and Animation .............................................................................................. 63 5.1 Geometric Modeling ................................................................................................... 63
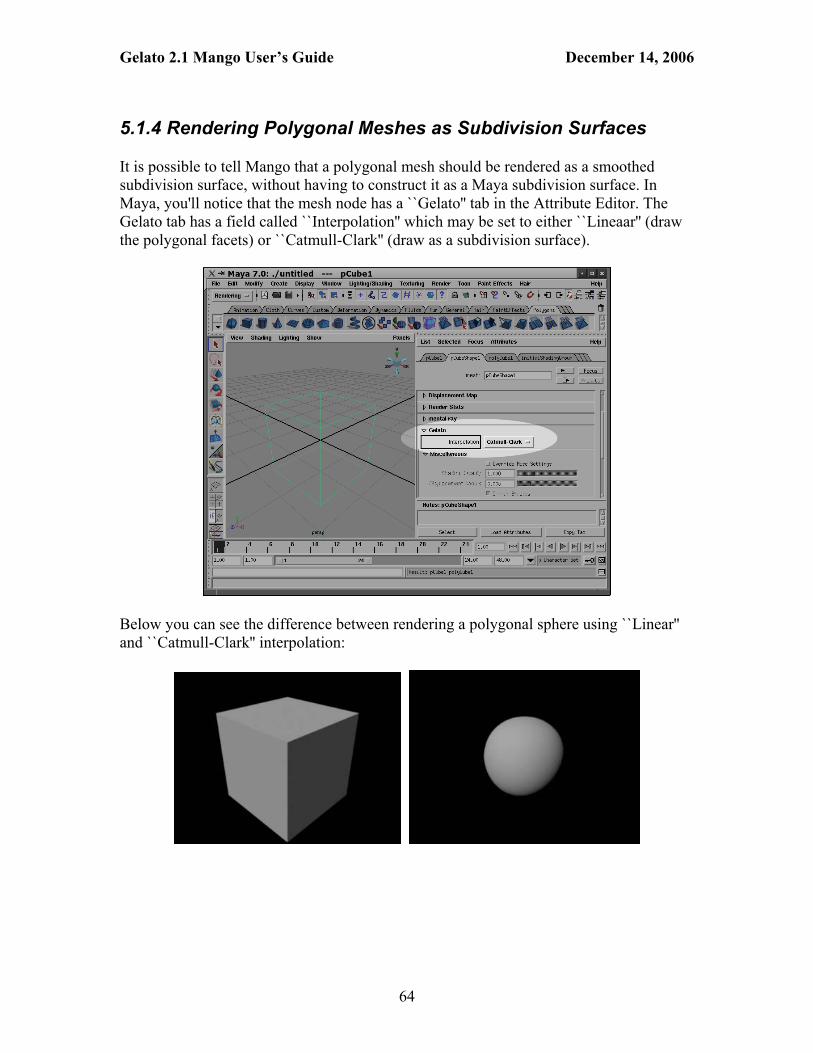
5.1.1 NURBS Modeling................................................................................................ 63 5.1.2 Polygonal Modeling............................................................................................. 63 5.1.3 Subdivision Surface Modeling............................................................................. 63 5.1.4 Rendering Polygonal Meshes as Subdivision Surfaces ....................................... 64
5.2 Animation and Character Setup .................................................................................. 65 5.3 Dynamics and Simulation ........................................................................................... 66
5.3.1 Particles................................................................................................................ 66 5.3.2 Maya Hair, Fur, and Cloth ................................................................................... 66
5.4 Shave and a Haircut .................................................................................................... 67 5.5 Paint Effects ................................................................................................................ 69 5.6 Coordinate Systems via Locator Nodes...................................................................... 70 5.7 Arbitrary Pyg .............................................................................................................. 72
5.7.1 Global Pyg ........................................................................................................... 72 5.7.2 Per-object Pyg...................................................................................................... 73
5.8 Pyg proxy objects........................................................................................................ 73 5.9 Technical odds and ends ............................................................................................. 75 6. Materials ....................................................................................................................... 76 6.1 Translation of Maya shading networks....................................................................... 76
6.1.1 Supported Maya material nodes........................................................................... 76 6.1.2 Reflection and refraction blur and sampling........................................................ 78
6.2 Using Gelato shaders .................................................................................................. 81 6.3 Displacement............................................................................................................... 84
6.3.1 Substituting a Gelato shader ................................................................................ 86 6.4 Subsurface Scattering.................................................................................................. 88 7. Lighting......................................................................................................................... 92 7.1 Shadows ...................................................................................................................... 93
7.1.1 Clean Shadow Blur in Depth Map Shadows........................................................ 93 7.1.2 Where are my raytraced shadows? ...................................................................... 94 7.1.3 Dynamic shadow maps ........................................................................................ 95 7.1.4 Volume shadows.................................................................................................. 95
7.2 Indirect Illumination ................................................................................................... 97 7.3 Ambient Occlusion ................................................................................................... 100
7.3.1 In A Separate Pass ............................................................................................. 100 7.3.2 In A Light........................................................................................................... 101 7.3.3 Quality and Speed .............................................................................................. 102
7.4 Caustics ..................................................................................................................... 103 7.5 Fog Lights ................................................................................................................. 106
7.5.1 Adding fog effects to a spotlight........................................................................ 106 7.5.2 Adjusting the length of the fog effect ................................................................ 107 7.5.3 Fog density and color......................................................................................... 109 7.5.4 Volume render globals....................................................................................... 110
7.6 Substituting a Gelato light shader ............................................................................. 112 8. Sorbetto Re-rendering................................................................................................. 113

Gelato 2.1 Mango User’s Guide December 14, 2006
4
8.1 What Sorbetto Is (and isn't) ...................................................................................... 113 8.2 Basic Operations ....................................................................................................... 115 8.3 Advanced Sorbetto.................................................................................................... 116
8.3.1 Automatic updates ............................................................................................. 116 8.3.2 Progressive refinement....................................................................................... 116 8.3.3 Zooms, Priority Regions, and Cropping ............................................................ 117 8.3.4 Seeing the effect of one light ............................................................................. 120 8.3.5 Updating shadows and rays ............................................................................... 121
8.4 Sorbetto Tips............................................................................................................. 123 9. How Do I...? / Troubleshooting .................................................................................. 124 9.1 Common ``How do I'' Questions .............................................................................. 124
9.1.1 How do I render a Maya polygonal mesh in Gelato as a subdivision surface? . 124 9.1.2 How do I get arbitrary Pyg inserted into the output that affects the whole scene?..................................................................................................................................... 124 9.1.3 How do I get arbitrary Pyg inserted into the output for just one object?........... 124 9.1.4 How do I batch export/render from the command line or shell script? ............. 125 9.1.5 How do I include a "delayed archive"?.............................................................. 125
9.2 Miscellaneous Troubleshooting ................................................................................ 127 9.2.1 Problem: Missing Gelato shelf icons ................................................................. 127 9.2.2 Problem: Cluttered temp directory..................................................................... 127 9.2.3 Problem: Running out of disk space when batch rendering .............................. 127
Index ............................................................................................................................... 128

Gelato 2.1 Mango User’s Guide December 14, 2006
5
1. Introduction Mango is a package of plug-ins, scripts, and shaders that integrates NVIDIA ® Gelato ® into Alias ® MayaTMas a first-class renderer, with a user interface that is very similar to that of Maya's native renderers.
Mango has been designed to be as transparent and natural as possible for the Maya user. It is registered with Maya at start-up, and its plug-ins load automatically as they are needed.
While it is our intent for Mango to use the familiar Maya GUI, Gelato does not work in exactly the same manner as the internal Maya renderer, nor is it meant to. Not all features in Maya are currently supported by Mango, and we are continuing to improve Mango and you should see more supported features in future releases. On the other hand, Gelato has many features not present in other renderers, and has very different performance characteristics (in particular, you may notice that Gelato can handle very large scenes with motion blur and displacement much more efficiently than other renderers).
Complete documentation on the Gelato renderer and its API is available in the Gelato Technical Reference, which is also included in the Gelato download package. Although the Gelato Technical Reference is certainly of interest to advanced and technical users, our intent is that the casual user can access nearly all of Gelato's functionality from within Mango's interface, without much concern for what's going on under the hood.
Mango should be able to render many, if not most, of your Maya scene files ``out of the box.'' There are, however, differences between Gelato and the native Maya renderer and to make optimal use of Gelato' s performance capabilities, you may need to ``tune'' your scene files to play to Gelato's strengths. This manual will help you do this. See Chapter 6 for details on shader compatibility.
This User's Guide is not intended as documentation for using Maya. Instead, it focuses on those features and techniques that are unique or different when rendering with Mango/Gelato and assumes the user is familiar with Maya. Please consult the Maya documentation, tutorials, and other material from Alias for information about Maya and how to use it.
Gelato 2.1 Mango User’s Guide December 14, 2006
6
1.1 Mango Functions Mango allows you to do the following from within the familiar Maya user interface:
• Render the Scene with Gelato . Scene files may be rendered in Gelato directly to Maya's Render View, or to Gelato's external viewer iv. Mango handles all of Maya's geometry types (with some limitations) and emulates many of Maya's surface, light and other shaders with Gelato shaders.
• Export Maya scenes to Gelato Pyg files. Scenes may also be exported in Gelato's Python-based Pyg format for subsequent offline rendering. Mango translates the Maya scene into Pyg format and optionally launches Gelato.
• Use Maya Hypershade. Mango includes Gelato versions of most of the Hypershade nodes that ship with Maya and automatically uses those versions when rendering with Gelato. (Note: Not all Hypershade nodes are currently supported. We are adding new nodes with each release of Mango. Check the release notes of the version you have installed to see which ones are supported by your version.)
• Assign Gelato Shaders. Mango allows you to shade any object with any Gelato shader in your library. You are not limited to the versions of the Maya shaders provided with Mango. You can assign and set the attributes of any shader written in GSL (Gelato Shading Language) from within the Maya interface.
• Render in Preview Mode. You can use Gelato's preview mode within Maya. This shows a crude version of the scene very quickly, but still using the Gelato shaders.
• Rapidly re-render scenes with lighting changes using Sorbetto. Using the SorbetoTM re-rendering feature, you can make changes to lights in your scene and see the results interactively, without needing to rerender the frame from scratch.
• Add User Scripts. You can add scripts from within the Maya interface, in any language that Gelato has a plug-in for (such as Python). You can do this either in the Render Settings window to affect the entire render, or in the individual material, light, or shape nodes to affect that particular object.

Gelato 2.1 Mango User’s Guide December 14, 2006
7
1.2 Where to find Gelato/Sorbetto Controls There are a few particular places in Maya where you can find the controls for Gelato/Sorbetto.
1.2.1 Gelato Shelf
Mango has its own ``shelf'' that you can select from Maya's shelf tabs. This shelf has icons for several of the most common things you'll do with Gelato (render a frame, preview, etc.).
Select the Gelato Shelf Tab to bring up the Gelato shelf. Hovering the mouse cursor over each shelf item will reveal a short explanation of its functionality.
1.2.2 Render Settings
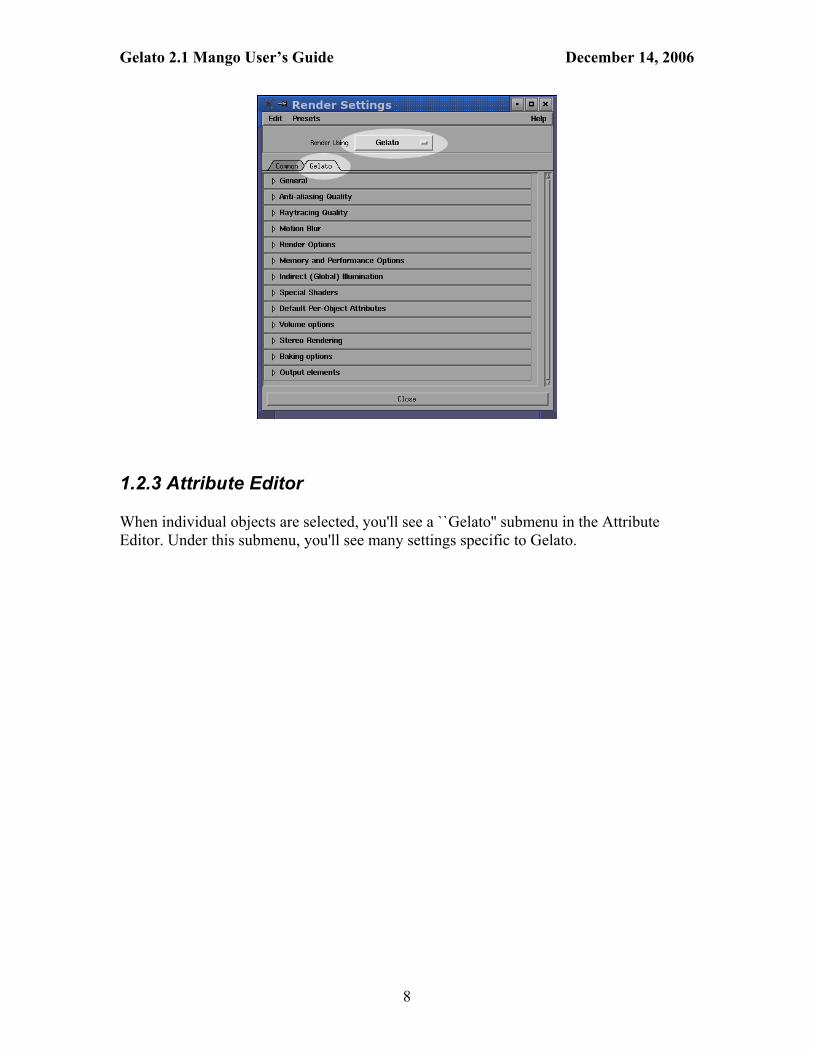
Maya's ``Render Settings'' dialog (called ``Render Globals'' in earlier Maya releases) allows you to select Gelato as your renderer, and also presents a ``Gelato'' tab with several subcategories of global settings that apply specifically to Gelato.
Gelato 2.1 Mango User’s Guide December 14, 2006
8
1.2.3 Attribute Editor
When individual objects are selected, you'll see a ``Gelato'' submenu in the Attribute Editor. Under this submenu, you'll see many settings specific to Gelato.

Gelato 2.1 Mango User’s Guide December 14, 2006
9
1.3 Hands-On Mango Tour This section provides an extremely quick and cursory tour to get you up and running with Mango.
1. Make sure Gelato and Mango are properly installed. See Chapter 2 for installation instructions.
2. Start Maya. 3. Create a NURBS plane with the default parameters.
4. Select the plane and assign it a new material based on Lambert.
5. Create a sphere and move it so that it rests on the plane.

Gelato 2.1 Mango User’s Guide December 14, 2006
10
6. Select the sphere and assign a new material based on Blinn. Then select a pattern for the Color parameter, and select the 3D marble texture.
7. Choose ``Render Settings'' and select Gelato under Render Using.

Gelato 2.1 Mango User’s Guide December 14, 2006
11
8. Render! You should see a Gelato rendering in the Maya Render View window.
The marble pattern is extremely close to that of the Maya Software renderer. (The differences come from differences in numerical calculations and antialiasing in Gelato.)
9. Add a spotlight to the scene and point it at the sphere. Add shadow-mapped shadows to the light. To do this, select the light, and in the attribute editor check the Use Depth-Mapped Shadows box under the Shadows section.
10. Switch to Gelato's viewer. Do this in Render Settings: select the Gelato tab, open the General frame and change Viewer to iv.

Gelato 2.1 Mango User’s Guide December 14, 2006
12
There you have it, the quick tour. You've now rendered your first images with Gelato from within Maya, used both the Maya Render View as well as Gelato's iv display, assigned a Maya material and had it correctly translate to Gelato shaders, and set up a shadowed Maya light and had it render correctly with Gelato. It's as easy as that!

Gelato 2.1 Mango User’s Guide December 14, 2006
13
2. Installation
2.1 System Requirements Mango has the same system requirements as Gelato and Maya. Gelato requirements are listed at http://film.nvidia.com/page/gelato_sys_req.html. Maya system requirements can be found at http://www.alias.com/eng/products-services/maya/system_requirements.shtml. If there is a discrepancy between the requirements listed here and those on the NVIDIA and Alias web sites, the web sites will contain the latest and most correct information.
2.1.0.1 Alias Maya
• Maya 7.0 (32 bit only) • Maya 8.0 (32 bit on Windows or Linux, or 64 bit on Linux)
Because Maya does not yet support 64-bit systems, you must use 32-bit mode on these systems when using Maya and Mango.
2.1.0.2 CPU
• AMD Athlon or Opteron • Intel Pentium III, Pentium 4, or Pentium M • Intel Xeon
2.1.0.3 Graphics Board
Basic Gelato requires an NVIDIA Quadro ® FX board or NVIDIA GeForce ® 5200 or higher. Gelato Pro requires a Quadro FX and is not certified or supported on earlier generations of NVIDIA Quadro graphics boards or on the GeForce line of products.
See http://www.alias.com/eng/products-services/maya/system_requirements.shtml for the list of NVIDIA boards that Maya is certified on.
2.1.0.4 Graphics Driver
The latest NVIDIA driver is included in the Gelato distribution and we recommend that you install this version before running Gelato/Mango. For optimal performance on all features, you should have at least the following drivers:
• Linux: Driver 8174 • Windows XP: 8167

Gelato 2.1 Mango User’s Guide December 14, 2006
14
2.1.0.5 RAM
Maya requires a minimum of 512 MB RAM. We recommend a minimum of 1GB RAM for basic Gelato and 2 GB if you are usin Gelato Pro on complex scenes.
2.1.0.6 Operating System
• Microsoft Windows XP • Linux - RedHat Enterprise 3 or higher (32 bit or 64 bit) • Linux - RedHat 9.0 or higher (32 bit or 64 bit)
Note that Gelato will also function with RedHat 7.2 and with SUSE 9.2 or higher, but these have not been certified by Alias for use with Maya.
2.1.0.7 License Keys
You need a license key for Maya to run that program. You must obtain this from Alias.
Mango does not require a license key to run, either with basic Gelato or Gelato Pro. Without a license key, however, Gelato Pro features such as Sorbetto or multithreading will be disabled or run with limited functionality. See the Licensing section in the Gelato Getting Started Guide for information on Gelato Pro license keys.

Gelato 2.1 Mango User’s Guide December 14, 2006
15
2.2 Installation and Setup 2.2.1 Maya Installation
Install Maya in accordance with the instructions in that program's documentation.
2.2.2 Mango Windows Installation
Normally Mango should install properly when you install Gelato under Windows. No further action on your part should be required. The Windows InstallShield will set default paths and environment variables consistent with the Maya default configuration. It should make no difference which program you install first, Maya or Gelato/Mango.
But to reduce the probability of an error occurring, you should execute the following steps:
1. If an earlier version of Gelato was installed on your machine, remove it via the Add/Remove Programs utility in the Windows Control Panel. If Python 2.3.4 was installed with Gelato previously, there is no need to remove that.
2. Run the Gelato installer: NVIDIA-Gelato-WinNT-x86-2.0*-pkg.exe 3. You will be prompted to install two features, Gelato and Python. The default
setting is to install both. Mango is not installed as a separate feature. Instead, it is included within Gelato, so be sure to leave that checked. You can uncheck the Python box if Python is already on your machine.
4. The default setting for Gelato installation is C:\Program Files\NVIDIA Corporation\Gelato. You can change it if you wish, but most users will probably just want to leave it as is.
5. You will be prompted to choose which version of Maya you wish to use. Select which one you want. You can change this after installation and switch back and forth between versions of Maya if you need to.

Gelato 2.1 Mango User’s Guide December 14, 2006
16
6. The files should install. When complete, run the following tests to ensure that the installation has executed properly.
7. Check the System Environment Variables. You can check the environment variables by hitting the Environment Variables button located in Control Panel -->System -->Advanced. The following environment variables will be set automatically by the Gelato installer:
o GELATOHOME: C:\Program Files\NVIDIA Corporation\Gelato or wherever you instructed Gelato to install under step 4.
o MANGOHOME: %GELATOHOME%\mango\maya7.0 or %GELATOHOME%\mango\maya8.0 depending on which version of Maya you selected during installation
o MAYA_PLUG_IN_PATH: %MANGOHOME%\plug-ins o MAYA_SCRIPT_PATH: %MANGOHOME%\scripts
Depending on your local configuration and what other applications you have installed, you may have additional paths listed under MAYA_PLUG_IN_PATH and MAYA_SCRIPT_PATH. This is fine so long as the paths listed here are also included.
8. Run the following file: C:\Program Files\NVIDIA Corporation\Gelato\examples\vasefield\run_me.bat and compare the resulting image with vasefield_ref.tif located in the same directory. If the images are the same both Gelato and Python have installed properly.

Gelato 2.1 Mango User’s Guide December 14, 2006
17
9. Open Maya. Go to the Render Using options and ensure that Gelato is presented as an option. Open C:\Program Files\NVIDIA Corporation\Gelato\examples\mango-marble\mango.ma. Render it as is. If it renders correctly Mango has been properly installed.
10. Changing Maya Versions. If you upgrade versions of Maya or wish to toggle back and forth between versions, you can change the path settings using the Change MANGOHOME utility in the Gelato Start directory. Simply go to Start -->Programs -->NVIDIA Corporation -->Gelato and run Change MANGOHOME. This will execute a utility allowing you to automatically update the environment variables.
If Mango does not install correctly:
• Check for error messages in the Maya Script window and in the command prompt window opened by Gelato;
• Run the ``Change MANGOHOME'' utility and make sure the correct version of Maya is selected;
• Check that the environment variables described above were correctly set. • Check that the required Mango files are actually in the directories pointed to by
the environment variables; • Finally, check the Known Issues section of the Release Notes. • If all else fails, contact [email protected].
2.2.3 Mango Linux Installation
Under Linux, after installing Gelato, you will also need to set environment variables and paths for Mango to function properly:
1. Set the MANGOHOME environment variable to point to either: o $GELATOHOME/mango/maya7.0

Gelato 2.1 Mango User’s Guide December 14, 2006
18
o $GELATOHOME/mango/maya8.0 2. Set Maya's plug-in and script search paths ($MAYA_PLUG_IN_PATH and
$MAYA_SCRIPT_PATH) so that Maya can find the Mango files. 3. Add $GELATOHOME/bin to your execution path ($PATH). 4. Add $GELATOHOME/lib:/usr/aw/maya/lib:$MANGOHOME/lib to the front of
$LD_LIBRARY_PATH.
For sh or bash, you might do this:
PATH=${PATH}:${GELATOHOME}/bin LD_LIBRARY_PATH=${GELATOHOME}/lib:/usr/aw/maya/lib:${MANGOHOME}/lib:${LD_LIBRARY_PATH} MANGOHOME=${GELATOHOME}/mango/maya6.0 MAYA_SCRIPT_PATH=${MANGOHOME}/scripts:${MAYA_SCRIPT_PATH} MAYA_PLUG_IN_PATH=${MANGOHOME}/plug-ins:${MAYA_PLUG_IN_PATH} XBMLANGPATH=${MANGOHOME}/icons/%B
For csh or tcsh:
setenv PATH ${PATH}:${GELATOHOME}/bin setenv LD_LIBRARY_PATH ${GELATOHOME}/lib:/usr/aw/maya/lib:${MANGOHOME}/lib:${LD_LIBRARY_PATH} setenv MANGOHOME ${GELATOHOME}/mango/maya6.0 setenv MAYA_SCRIPT_PATH ${MANGOHOME}/scripts:${MAYA_SCRIPT_PATH} setenv MAYA_PLUG_IN_PATH ${MANGOHOME}/plug-ins:${MAYA_PLUG_IN_PATH} setenv XBMLANGPATH ${MANGOHOME}/icons/%B
Once these are set, start Maya, enter Rendering mode, and verify that Gelato appears as an option in the Render -->Render using menu.
If it does not appear, please:
• Check for informative error messages in the Maya Script window, and in the shell window from which Maya was started;
• Check that gelato -version works correctly, in the shell window from which Maya was started;
• Check that the environment variables described above were correctly set, in the shell window from which Maya is launched, before Maya was launched;
• Check that the required Mango files are actually in the directories pointed to by the environment variables;
• Finally, check the Known Issues section of the Release Notes. • If all else fails, contact [email protected].

Gelato 2.1 Mango User’s Guide December 14, 2006
19
2.2.4 Installed Files
Mango consists of the following components:
lib/ maya.imageio.so (Linux) maya.imageio.dll (Windows)
A Gelato Image I/O plugin that routes rendered pixels back from a running Gelato render to Mango.
plug-ins/ Mango.so (Linux) Mango.dll (Windows)
The scene-file exporter to Gelato's Pyg format. This is used both for interactive rendering and for exporting Pyg files for offline rendering.
MDisplay.so (Linux) MDisplay.dll (Windows)
A Maya plug-in command to run a rendering script and display pixels to Maya's Render View.
scripts/ *.mel Various MEL scripts, some of which
override MEL scripts in the Maya install.
shaders/ *.gso Gelato shaders to emulate Maya
shading nodes.
*.so (Linux) *.dll (Windows)
DSO shadeops for Mango's Maya emulation shaders

Gelato 2.1 Mango User’s Guide December 14, 2006
20
3. Rendering
3.1 Mango's Gelato/Sorbetto Shelf Mango has its own ``shelf'' that you can select from Maya's shelf tabs. This shelf has icons for several of the most common things you'll do with Gelato (render a frame, preview, etc.).
Select the Gelato Shelf Tab to bring up the Gelato shelf. Hovering the mouse cursor over each shelf item will reveal a short explanation of its functionality.
The commonly-used Gelato shelf items are:
Select Gelato as the renderer.
Render a Preview with Gelato
Render with Gelato
Render with Sorbetto
Refresh Sorbetto (clear the caches)
Solo lights (turn ``off'' all lights but the selected ones)
Unsolo lights (turn all lights ``on'')
Toggle live updates (whether changing light attributes immediately and automatically starts a new Sorbetto render)

Gelato 2.1 Mango User’s Guide December 14, 2006
21
Toggle progressive refinement (whether Gelato/Sorbetto renders show a preview immediately followed by a full render)
Toggle whether Sorbetto re-shades rays when lights are changed.
Toggle whether Sorbetto automatically regenerates shadow maps when lights are moved.
Gelato render just the currently selected objects
Gelato render all objects (even if only some are selected)
Toggle whether Gelato uses the iv image viewer, or else uses the Maya Render View to display rendered images.
Causes all bake sets to render using Gelato.
Displays in a window a log containing all error, warning, and other text output of Gelato.
Bring up the Gelato documentation

Gelato 2.1 Mango User’s Guide December 14, 2006
22
Image shelf-selectGelato
3.2 Selecting Gelato as the renderer Mango installs a Gelato renderer option in the Maya rendering menus and dialogs alongside the other renderers that Maya ships with. All you need to do to get started using Gelato is to select Gelato as the renderer for your scene. There are four methods for doing this (all are equivalent):
1. Select Gelato from the shelf
The easiest way to select Gelato as the renderer is to click the ``Select Gelato'' shelf item:
2. Select Gelato from the Render Menu
You may select the Gelato renderer in the ``Render -->Render Using -->'' menu (in Rendering mode), or select Gelato in the popup menu in the icon line of the Render View. Subsequent rendering will then use Gelato.
Figure 3.1: Selecting Gelato as the renderer from the Maya interface.

Gelato 2.1 Mango User’s Guide December 14, 2006
23
3. Select Gelato from the Render Settings dialog
Any time you bring up the ``Render Settings'' dialog, you can simply choose Gelato in the ``Render Using'' pull-down menu:
4. Select Gelato from the Render View window
If you are using the Maya Render View window, you may select Gelato in the ``Render Using'' pull-down menu that is in the Render View window. Note that if you are already rendering with Gelato and using Gelato's iv image viewer, the Render View window will not be used at all, and therefore the menu will be unavailable unless you specifically request the Render View.

Gelato 2.1 Mango User’s Guide December 14, 2006
24
3.3 Rendering All v. Rendering Selected Objects
When this icon is displayed on the shelf, any render, preview, or export with Gelato will include all objects. Click the icon to switch so that only selected objects will be rendered or exported.
When this icon is displayed on the shelf, any render, preview, or export with Gelato will only include selected objects. Click the icon to switch so that all objects will be rendered or exported (regardless of the current selection).
3.4 Rendering the current frame
The ``Gelato Render'' shelf button will render the current frame.
3.5 Preview Mode You can also render using Gelato's preview mode from within the Maya GUI. Preview mode is a way to get Gelato to render scenes at a lower quality level, but very quickly (sometimes 100 times faster than usual). This is very useful for quickly viewing a scene to see how objects are placed, whether lights are on and in the correct position, etc.
Preview mode overrides the usual settings for several attributes including ``shading quality.'' In preview mode, Gelato is still using the regular shaders, lights, and textures of the scene, but merely is computing them much less frequently.
The easiest way to use preview for a single render is to simply click the ``Preview render with Gelato'' icon on the Gelato shelf. This simply starts a single preview render of the current frame with the selected camera, using whatever preview settings are selected in the Render Settings.
Alternately, you may have much more fine control over preview mode by opening the Render Settings window and checking the ``Preview'' box on the Gelato tab under Anti-Aliasing options (see Figure 4.2). You can then enter a number between 0 and 1 (or use

Gelato 2.1 Mango User’s Guide December 14, 2006
25
the slider to set the number), with 1 representing full quality. When the ``Preview'' box in Render Settings is checked, all renders will be preview renders until the box is unchecked (in contrast to simply clicking the ``Preview Render'' shelf button, which just previews for the current render, but subsequent renders will be full renders unless the preview button is used again).
Figure 3.2: Preview mode (above) versus normal rendering (below). The preview image took 6 seconds, versus 2:07 for the full render. Although the preview image is shaded at
lower resolution and has no antialiasing, all the geometry is present and the ``real'' shading is used (although at degraded resolution).

Gelato 2.1 Mango User’s Guide December 14, 2006
26
3.6 Batch Rendering With Gelato selected as the current renderer, Maya's Batch Render command will save out a series of Pyg files and rendering scripts, and launch the process to execute them. Mango, however, does not yet include provisions for interactively monitoring or canceling a batch render. So you can initiate a batch render, but there are no further controls over the process.
To configure Mango into a custom pipeline in batch mode, you can call either gelatoBatchRender() or gelatoBatchExport() from MEL, using 'mayabatch -script' on Windows, or 'maya -batch -script' on Linux. (These procedures are in $MANGOHOME/scripts/registerGelatoRenderer.mel.) The former writes all the output Pyg files and shell scripts, and invokes a shell to run the master render script. The latter only writes the files.
In either case -- launching a batch render from maya or from a shell script -- you can set the $GELATOTEMP environment variable to choose where the script files will go. Note also that you can set defaultRenderGlobals.imageFilePrefix from MEL to direct the output image files wherever you would like. This attribute cannot be set interactively to anything with periods or slashes in the name, but in batch mode you can set it to anything you like.
As an example, here's a very simple rendering script in Python:
import os os.environ['GELATOTEMP']='/usr/tmp/gelatotemp' mayacmd = 'maya -batch -proj ' + os.getcwd() + ' -file cube.ma'; mayacmd += " -command \"gelatoBatchRender\"" os.system (mayacmd)
Though there is no option yet in Maya for monitoring a batch render, there are some things you can do if you don't already have a render farm set up with its own facilities for this. The simplest - used by many maya users - is to start the rendering script in a command (or shell) window of some sort and simply watch the output. One step better is to redirect the output of the rendering script to a file, and use the Unix tail -f command to watch it. (This is available on Windows in the Cygwin package.) Also, as the image files are being written, you can open iv on a partially rendered image and hit return when you want to manually reload the image, or let iv do it automatically, if that feature is enabled.

Gelato 2.1 Mango User’s Guide December 14, 2006
27
3.7 Exporting Pyg Files Mango sets up a ``GelatoExport'' option in the file-exporting menus ``File -->Export All'' and ``File -->Export Selected.'' This can be used to export scene files for single frames or animations, as sets of Pyg files and controlling shell scripts.
To export the current frame, ensure that animation is not activated in the Render Settings window (it is off by default). To do this, open the ``Common'' tab and ensure that the ``Image File Output'' frame's ``Frame Animation Ext'' setting is "name (Single Frame)" or "name.ext (Single Frame)", not any of the animation settings like "name.#.ext" or "name.ext.#".
Then run ``File -->Export All...'' and select ``GelatoExport'' in the ``Write As'' option menu. Browse to or enter a file name to act as the base name of the suite of Pyg files which will be exported. If you select the full dialog (by choosing the little box next to the menu item), you can set several options controlling the Pyg export. Most notably, there are checkboxes that let you specify whether or not the Pyg export should include lights and/or materials. This is useful if you want to export objects as Pyg archives and purposely not include lights or materials in the archive.
Figure: Menu item for exporting Pyg files (left). Selecting the dialog boxes (circled in
red) allows extra export-related options (right).

Gelato 2.1 Mango User’s Guide December 14, 2006
28
For a file "mango.ma", for example, this will export three files to /usr/tmp (on Linux) or C:/temp (on Windows):
• "gelato.pyg" - the master rendering script • "gelato_perspShape.pyg" - the camera commands • "gelato_main.pyg" - the lights, materials, and geometry.
To export an animation, ensure that Render Settings "Frame Animation Ext" is set to an animation setting like "name.#.ext". Then export using "Export All..." as before. This time, you will see the familiar three Pyg files for each frame, as well as a top-level Pyg script to render the whole animation, by running each frame's script file.
Gelato 2.1 Mango User’s Guide December 14, 2006
29
3.8 Rendering separate output elements Especially if you do a lot of adjustment in compositing, you may find it helpful to render out many separate elements of your frame. In addition to the ``beauty pass'' (the full color rendered image), you may wish for separate images of just the diffuse, specular, subsurface, incandescent, or translucent light; the reflections or refractions; ambient or reflection occlusion; shadow mattes; unshadowed diffuse; or depth.
Mango and Gelato allow you to output any or all all of these elements separately, and to do so in a single render pass, producing the various outputs simultaneously (and much less expensively than doing a separate render pass for each element.
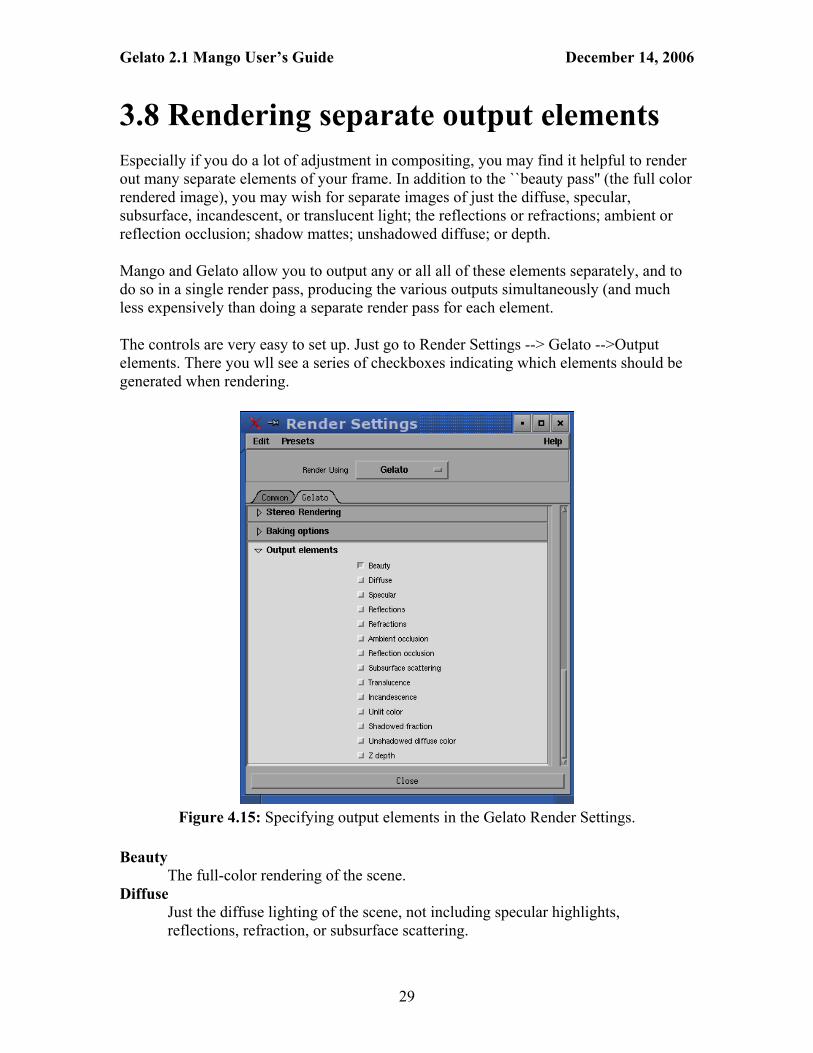
The controls are very easy to set up. Just go to Render Settings --> Gelato -->Output elements. There you wll see a series of checkboxes indicating which elements should be generated when rendering.
Figure 4.15: Specifying output elements in the Gelato Render Settings.
Beauty
The full-color rendering of the scene. Diffuse
Just the diffuse lighting of the scene, not including specular highlights, reflections, refraction, or subsurface scattering.

Gelato 2.1 Mango User’s Guide December 14, 2006
30
Specular Just the specular hilights of the scene.
Reflections Just the reflections.
Refractions Just the refracted light (such as from seeing through glass).
Subsurface scattering Just the subsurface scattering.
Translucence Just the translucence.
Incandescence Just the incandescence.
Ambient occlusion An ambient occlusion channel.
Reflection occlusion A reflection ambient occlusion channel.
Unlit color The textured (flat) color of objects, before lighting is applied.
Shadowed Shadow matte (white in shadow).
Unshadowed diffuse The diffuse lighting, with no shadows.
Depth The camera-space Z depth.

Gelato 2.1 Mango User’s Guide December 14, 2006
31
3.9 Baking textures Texture baking (or just baking for short) refers to precomputing some quantity and saving the results as a texture map indexed by texture coordinates (e.g. uvCoord). There are several compelling uses for such a facility:
• If the quantity is expensive to compute but will be the same for all frames of an animation, it can reduce rendering time to compute it just once, save it as a texture map, and then use the texture map lookup (comparitively inexpensive) when rendering frames.
• If the quantity is hard to antialias (e.g., it shimmers or crawls during animation), artifacts can sometimes be greatly reduced by baking to a texture map. Texture map lookups antialias very nicely.
• For ``realtime'' rendering, such as for games, some effects cannot be computed by graphics hardware or APIs such as OpenGL, either because it is impossible, or too expensive to compute at a sufficient frame rate. Commonly an ``offline'' (non-realtime) renderer such as Gelato is used to bake such patterns into texture maps, which can easily be indexed by realtime graphics hardware.
3.9.1 Creating a texture bake set
The steps for baking texture are as follows:
1. The "Mayatomr" plugin must be loaded in order to create or edit bake sets. This is true even though you will not be using Mental Ray to render the bake sets (it's a Maya quirk that Mental needs to be loaded to create bake sets). The plugin does not need to be loaded when you render, only when you create the bake set.
You can load the Mayatomr plugin from the Plug-in Manager: Window -->Settings/Preferences -->Plug-in Manager. Check the ``loaded'' box next to Mayatomr.
2. Create the bake set by selecting the objects to include in the bake set, and choose Lighting/Shading -->Assign New Bake Set -->Texture Bake Set.

Gelato 2.1 Mango User’s Guide December 14, 2006
32
3. When the bake set is selected, you can view the Texture Bake Set Attributes in Maya's Attribute Editor window, as seen in Figure 3.3. Explanations of all the options follow in the next two subsections below.
4. Position the camera so that all objects that undergo baking are within the camera view. As long as Render Settings -->Gelato -->Baking Options -->Use Fixed Dicing is turned on, it doesn't matter the orientation or size of the objects in the frame or what resolution you use for the camera. But all the baking objects MUST be within the camera view.
5. Bake using the ``Bake textures with Gelato'' button on the Gelato tab.
You will see an image appear from the point of the view of the camera. Don't worry, this isn't the baked image. It's just so you can see the progress.
Figure 3.3: Baking controls in the attribute editor when the bake set is selected.
Gelato 2.1 Mango User’s Guide December 14, 2006
33
3.9.2 Baking Color Modes
The most important baking control is the Color Mode. There are three choices:
Light and Color The fully lit surface.
Only Light The incoming light arriving at the surface, with no surface texture or other interaction with the surface material.
Only Global Illumination Only the incoming global illumination, with no direct light nor any surface texture or other interaction with the surface material.
Occlusion ``Ambient Occlusion'' - a gray-scale image indicating the degree to which each surface point has visibility into the environment (like a sky light) versus being occluded by other geometry in the scene.
3.9.3 Baking Attributes Occlusion Rays Occlusion Falloff
If the Color Mode is ``Occlusion'', these options control the number of occlusion rays used per point (higher is more expensive, but better quality), and the falloff (higher falloff indicates that objects farther away will have their relative occlusion count less than close objects).
Note also that there are additional ambient occlusion options in Render Settings -->Gelato -->Special Shaders -->Ambient Occlusion (see Section 4.9. These options will also be applied to baked ambient occlusion.
Normal Direction Although we have a camera present to trigger rendering, it's likely that you want the baked maps to be used for other camera positions. There are three options: Surface Front Bake as if viewed from the ``front'' of all surfaces, i.e. viewed from the direction that the surface normal points toward. Surface Back Bake as if viewed from the ``back of all surfaces, i.e. viewed opposite the direction that the surface normal points. Face Camera Bake as if viewed from the camera active during the baking process. Note that this may result in baking that is not correct when viewed from other camera positions.
Orthogonal Reflection (not currently supported by Mango)
Filename Prefix The beginning of the filename for the baked files.

Gelato 2.1 Mango User’s Guide December 14, 2006
34
X and Y Resolution The resolution of the baked map. The cost of baking is proportional to the resolution. It is important to choose an appropriate resolution - small parts viewed from afar should bake to low resolution maps, large parts that will need their baked maps to look good close up may need high resolution maps.
File Format Gives a choice of several file formats for the resulting baked map.
Bits Per Channel Allows a choice of the bit depth for the baked maps - 8 bits, 16 bits, or 32 bits (float).
Number of Samples (not necessary for Mango ; ignored)
Bake to One Map If enabled, this option causes all objects in the bake set to bake their data to a single map. In this case, it is vitally important that the objects in the bake set have non-overlapping uv coordinate so that each object is referencing a unique position in the map.
If disabled, each object will bake to a different map. When baking to different maps, it's fine for multiple objects to have overlapping uv coordinates, since they will be indexing different texture maps.
Bake Alpha (not currently supported by Mango)
Final Gather Quality Final Gather Reflect
(not necessary for Mango ; ignored) Uv Range
Selects the uv range on the surfaces that is baked into the map. Choices are: Normal (0 to 1) Bakes the region of uv space within [0,1] to the map. Entire Range (currently unsupported by Mango) User Specified Selects the region of uv space to bake based upon the U Min, U Max, V Min, and V Max controls that are enabled when ``User Specified'' Uv range is used.
Fill Texture Seams
Increasing this number will cause empty parts of the baked map (those parts of uv space in the map that don't correspond to any objects in the bake sets) to be filled in (extrapolated).

Gelato 2.1 Mango User’s Guide December 14, 2006
35
4. Render Settings Gelato has its own set of tabs in the Render Settings window for global settings, such as search paths, file formats, etc.
4.1 General options
Figure 4.1: Gelato has its own tab in the Render Settings dialog. Highlighted are the
general options.
This section of the tab (see Figure 4.1) contains some basic information about file organization and a few global settings. Most Maya users will rarely, if ever, need to alter the path or Verbosity settings. Power users may find themselves using the scripting, binary, and network rendering settings. The only setting here that most users will alter routinely is the choice of viewer.
Search paths

Gelato 2.1 Mango User’s Guide December 14, 2006
36
Search paths in Gelato are specified as colon-separated lists of directory names (much like an execution path for shell commands), used to tell Gelato where to search for certain files it may need during the rendering process. These default to the Gelato and Mango directories established upon installation. These should only be altered if required files are located somewhere besides the default directories. Input path Where to look for various input files (e.g., a Pyg file containing scene geometry). Shader path Where to look for Gelato shaders. Texture path Where to look for Gelato texture files. Generator path Where to look for Gelato libraries. ImageIO path Where to look for Gelato ImageIO plug-ins.
There are some special strings that have special meaning in Gelato's search paths:
• & is replaced with the previous search path (i.e., the search path before this statement, which in this case is the default search path).
• $VAR, ${VAR}, $(VAR), and %VAR% are replaced by the value of environment variable VAR, if it exists (for any environment variable).
Gelato Textures
This option gives the location to place converted .tx files. When a maya file node refers to an image file not in .tx format (Gelato's tiled, mip-mapped texture format), Mango will call maketx to convert the image to a .tx file. This string can contain the special variable $MAYA_PROJECT, which is obtained via 'workspace -q -rd' (e.g., "$HOME/maya/projects/default"), and is appended to the texture search path. When textures are converted, if the source file name is absolute, or begins with "." (e.g., "./a.tif", or "../txt/a.tif"), the file name is copied unchanged and the .tx file will be created in the same directory/folder as the source texture. Otherwise, the converted .tx file will be placed in the directory specified by this control. Of course you can set textures to reference the .tx files directly, but then you can't see the texture in maya (yet).
Viewer
This tells which application to use when rendering the image to the screen. The default is "iv," which will cause rendered pixels to display on Gelato's iv image viewer. Another choice that you may wish to make is "maya", which causes rendered pixels to be sent to Maya's Render View window. Which you choose is largely a matter of personal preference, although renders to iv will be somewhat faster in most cases, and will allow certain Sorbetto functionality that is not

Gelato 2.1 Mango User’s Guide December 14, 2006
37
possible to use from Maya's Render View window. If you have installed an Image I/O plugin for another viewer, it can be designated here.
The iv shelf button also toggles between Gelato's iv image viewer and the Maya render view, without needing to wade through the render settings.
Mango does not automatically create an image file of the final render. To save the image as a file either click on the Save button in Render View or select Save in iv.
Verbosity
This sets the level and amount of error messaging. Level 0 reports only errors. Level 1 (the default) reports errors and warnings. Level 2 reports additional information. Normally, this can simply be left at 1.
User Script
This box allows you to enter a short Python script that is input into the output Pyg file at the end of the scene-wide attributes, immediately prior to the World statement. See Section 5.7 for more details on how this should be used.
Binary Pyg
Checking this causes output Pyg files to be written in binary code rather than ASCII. This is on by default to reduce file size and to greatly speed up Gelato's parsing of large scene files.
Full path names
By default, object names from Maya are exported verbatim in the Gelato name attribute. Checking this box tells Mango to export full path names (e.g., |torso|leftArm|hand), which can be a great aid in debugging scenes from files with nonunique names.
Clean up temp files
When checked (the default), temporary files that Mango creates (including Pyg scene files, SDBs for caustics, etc.) will be deleted immediately after frames are rendered. This keeps your temp disk from being filled or cluttered. If you uncheck this option, these files will not be deleted after rendering, which can be useful if you want to examine exactly what input is being sent to Gelato (helpful for debugging, etc).
Network rendering

Gelato 2.1 Mango User’s Guide December 14, 2006
38
Network rendering refers to using multiple computers to contribute to the rendering of a single frame. To use network rendering with Mango, just turn on the Network Rendering checkbox and enter server names in the Network Render Servers text box.
For network rendering to function properly, you will need ssh connections to all the network hosts you will be using. Instructions on how to set this up may be found in Getting Started with Gelato.

Gelato 2.1 Mango User’s Guide December 14, 2006
39
4.2 Anti-aliasing Quality
Figure 4.2: Antialiasing options in the Gelato Render Settings.
This section of the Gelato tab (see Figure 4.2) controls the settings for anti-aliasing. Most users will find themselves altering these settings to meet the particular needs of their scene.
Presets Provides several preset quality configurations that users can select. These are:
• Custom: A user-defined group of settings, in which you may adjust the spatial quality, depth of field quality, motion blur quality (see Section 4.4), and filtering invididually to your tastes.
• Rough Preview: Turns on preview mode at 10% quality. • Preview: Turns on preview mode at 50% quality, • Intermediate: Mid-range quality: 4x4 samples, 16 samples for motion
blur and depth of field, and good filtering. You will probably use this by default unless your scenes require higher quality or faster rendering.
• Production: Full-quality images suitable for most production needs: 8x8 samples, 64 samples for motion blur and depth of field, good filtering.

Gelato 2.1 Mango User’s Guide December 14, 2006
40
You may also customize the preview mode, spatial quality, depth of field quality, motion blur quality (see Section 4.4), and filtering individually to your tastes and needs.
Preview mode When checked, Gelato will render using preview mode (fast, rough images) and many of the other options will be grayed-out. The preview quality slider sets the degree of quality for the preview render. It is a fraction between 0 and 1 or can be set via the slider. This option is grayed-out if the Preview checkbox is unchecked.
Spatial Quality
Control the number of subpixel regions used for anti-aliasing (in x and y). The higher the number is, the better the quality. You may wish to increase it for scenes that are difficult to antialias (e.g., scenes with lots of hair or other thin geometry).
Depth of Field Quality
Controls the number of samples used to calculate depth-of-field (DOF) blur. If it is set sufficiently high, DOF blurring should be smooth. If you see multiple versions of the blurred object "stamped out" in the image, then the setting is too low. Note that Gelato uses the highest of either DOF quality or motion blur temporal quality to calculate DOF blur, so reducing this setting below that of the motion blur setting will have no effect on the image or render time. The default is 16.
Pixel filter type Pixel filter width
Controls set the type and size of filter used to calculate the weighted values of sub-pixel regions. The default is a Gaussian with width and height of 2 each. Feel free to experiment with different filter types and widths to see which give you an image appearance and quality that you like. Note that with Gelato, there is essentially no rendering speed difference depending on pixel filter, so you might as well choose a good one.

Gelato 2.1 Mango User’s Guide December 14, 2006
41
4.3 Raytracing Quality
Figure 4.3: Ray tracing options in the Gelato Render Settings.
Under Render Settings -->Gelato -->Raytracing Quality, you will find an Enable Raytracing checkbox. It defaults to be unchecked, meaning that no raytracing will be performed in the scene. But if the option is checked, ray tracing will occur on demand, and additional options will be available under the same menu tab:
Motion blurred rays When checked, will ensure that motion-blurred objects cast motion-blurred shadows and reflections.
Bias Gives the global ray tracing bias amount. Increasing this number can help reduce certain artifacts due to reflection rays incorrectly intersecting their own surfaces.
Recursion Depth Gives the maximum ray recursion depth. A recursion depth of 0 means no ray tracing is allowed. A recursion depth of 1 means that shadows and reflections will be visible in objects. A recursion depth of 2 means that reflections of reflections will be visible. And so on.
Gelato 2.1 Mango User’s Guide December 14, 2006
42
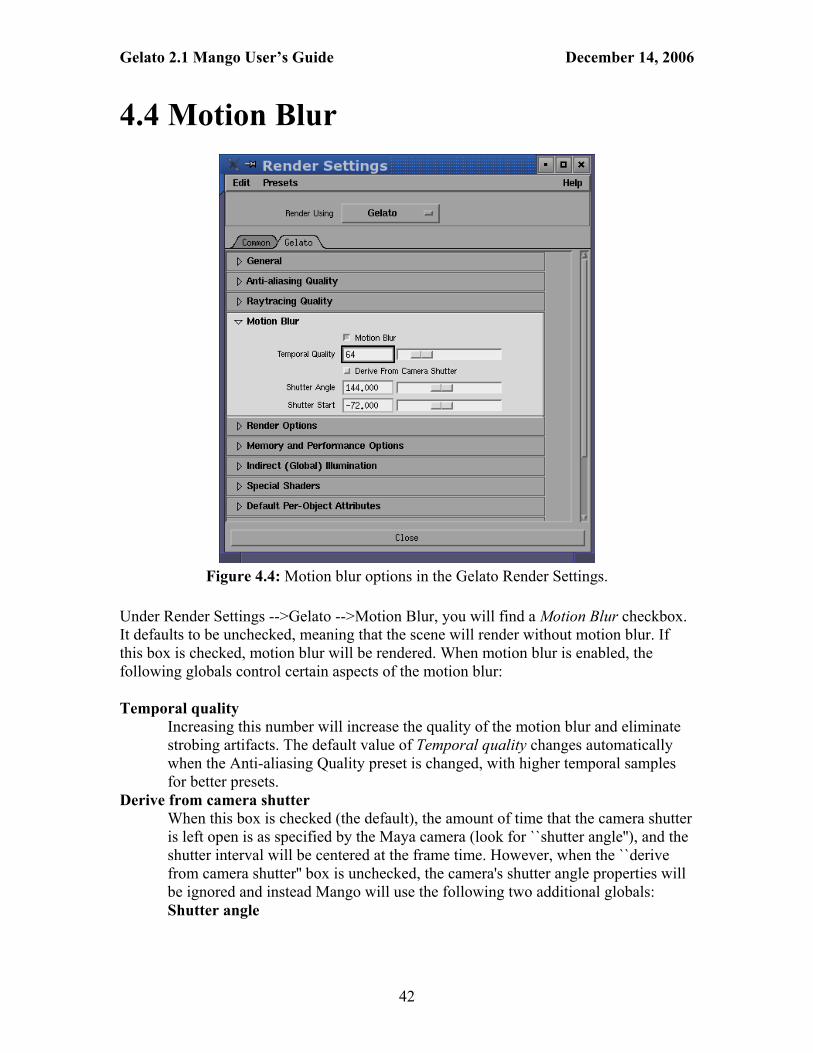
4.4 Motion Blur
Figure 4.4: Motion blur options in the Gelato Render Settings.
Under Render Settings -->Gelato -->Motion Blur, you will find a Motion Blur checkbox. It defaults to be unchecked, meaning that the scene will render without motion blur. If this box is checked, motion blur will be rendered. When motion blur is enabled, the following globals control certain aspects of the motion blur:
Temporal quality Increasing this number will increase the quality of the motion blur and eliminate strobing artifacts. The default value of Temporal quality changes automatically when the Anti-aliasing Quality preset is changed, with higher temporal samples for better presets.
Derive from camera shutter When this box is checked (the default), the amount of time that the camera shutter is left open is as specified by the Maya camera (look for ``shutter angle''), and the shutter interval will be centered at the frame time. However, when the ``derive from camera shutter'' box is unchecked, the camera's shutter angle properties will be ignored and instead Mango will use the following two additional globals: Shutter angle

Gelato 2.1 Mango User’s Guide December 14, 2006
43
The shutter angle describing how long for the camera to gather light, measured in degrees (e.g. 180 leaves the shutter open for half the time between subsequent frames). Shutter start Describes when, compared to the frame time, the shutter should open. A value of 0 indicates to open the shutter exactly at the frame time. Negative values indicate to open the shutter before the frame time; for example, a shutter start that is -0.5*shutterangle indicates that the shutter interval should be centered around the frame time.

Gelato 2.1 Mango User’s Guide December 14, 2006
44
4.5 Render Options
Figure 4.5: Render options in the Gelato Render Settings.
Ignore Film Gate.
This setting is identical to that for the Maya Software renderer. See the Maya documentation for details.
Shadows obey light linking.
This attribute is not currently used by Gelato.
Enable depth maps.
This checkbox turns on depth map shadows. It is checked by default. If unchecked, depth map shadows will be disabled.
Gain.
Controls the gain of the rendered image, which is an overall scaling of the brightness of the image. The default is 1.
Gamma correction.
Controls the gamma correction used in the rendered image. The default is 1, indicating a ``linear'' image.

Gelato 2.1 Mango User’s Guide December 14, 2006
45
Dither amplitude.
This setting controls the dither of the image. Dither is noise added to pixel values (which are computed usin floating point arithmetic) before conversion to 8- or 16-bit integer image files, and is very helpful for eliminating banding artifacts. The default is 0.5.

Gelato 2.1 Mango User’s Guide December 14, 2006
46
4.6 Memory and Performance Options
Figure 4.6: Memory and performance options in the Gelato Render Settings.
Bucket size.
The size of the buckets, in pixels, rendered at once. The default is 32x32.
Bucket order.
This setting controls the order in which the buckets are processed. The default is horizontal, but it may also be set to vertical or spiral.
Grid size.
Controls how small to chop up surfaces before a collection of points is shaded all at once. Default is 256.
Texture memory.
How much memory (in KB) should be reserved for Gelato's texture cache.
Trim curve quality.
Overall quality knob for the fidelity of trim curves.

Gelato 2.1 Mango User’s Guide December 14, 2006
47
Trim curve memory.
How much memory (in KB) should be reserved for Gelato's trim cache.
Multiprocessing.
Controls how many CPUs on each machine to use for Gelato rendering.

Gelato 2.1 Mango User’s Guide December 14, 2006
48
4.7 Indirect Illumination
Figure 4.7: Indirect Illumination options in the Gelato Render Settings.
If the Indirect Illumination checkbox is set, the attributes in this frame control the corresponding Gelato attributes for indirect illumination. The meanings of these attributes are discussed in Section 7.2.
Also make sure that ray tracing is on (see 4.3). If ray tracing is not turned on, indirect illumination will not be computed.

Gelato 2.1 Mango User’s Guide December 14, 2006
49
4.8 Override Surface Shader To override all the shaders in the scene with a specific shader, check the Use Override Surface Shader box and select a shader using the folder-icon button. As in the Attribute Editor for surface materials and lights, the parameters for the shader will appear in the Shader Parameters frame below the shader name. (Bug: typing in a shader name by hand will not add the shader parameters automatically.)
Figure 4.8: Override Surface Shader options in the Gelato Render Settings.

Gelato 2.1 Mango User’s Guide December 14, 2006
50
4.9 Ambient Occlusion These attributes set the defaults for the corresponding Gelato attributes, if the checkbox is checked. These defaults can be overridden by object-specific attributes on shape nodes. See the Gelato Technical Reference for details.
Figure 4.9: Ambient Occlusion options in the Gelato Render Settings.
This menu contains several settings that control the quality, speed, and appearance of any ambient occlusion used in your scene.
These global render settings do not actually turn on ambient occlusion - you have to tell any given light to use ambient occlusion (see Section 7.3.2) or to compute a separate ambient occlusion image element (see Section 7.3.1).
Occlusion rays
How many ray samples are used when occlusion is fully computed. More samples make for more accurate results, but are more expensive. A value of 64 is good for a preview; 256 or more is necessary for a high-quality production frame; sometimes 1024 or more is needed for especially difficult frames.
Gelato 2.1 Mango User’s Guide December 14, 2006
51
Max error Controls a maximum error allowed by the interpolation. When the maximum error is exceeded, new points will fully compute occlusion rather than interpolating nearby values. Thus, lower values for Max Error will make higher-quality images but will take longer to render. If max error is set to 0, a full occlusion sampling will be performed at every shading point (giving the highest quality images). Allowing a larger max error can render occlusion faster, but sometimes leads to blotchy artifacts.
Max pixel dist Another control over interpolation, forcing full occlusion computations to happen no less frequently than this distance (in pixel units). Thus, lower values for Max Pixel Dist will make higher-quality images but will take longer to render. A value of 0 will result in full occlusion sampling at every shading point (giving the highest quality images).
Max hit dist
Objects farther away than this distance will not occlude each other. Keep this number very large (the default is 1000000) to allow all objects to occlude each other. Lower this parameter to make distant object no longer occlude each other.
Bias
Objects closer than this distance will not occlude each other (this is used mainly to help eliminate artifacts due to incorrect self-occlusion).
Falloff
By default (and any time that Falloff is zero), object occlude each other regardless of how far apart they are (up to the distance given by Max hit dist. Non-zero values for falloff cause objects to occlude less with distance, according to one of two formulas, specified by Falloff mode. For artistic reasons, you may want to have the effect of occlusion diminish with distance. But note that currently, Gelato computes ambient occlusion faster when falloff is 0.
Falloff mode
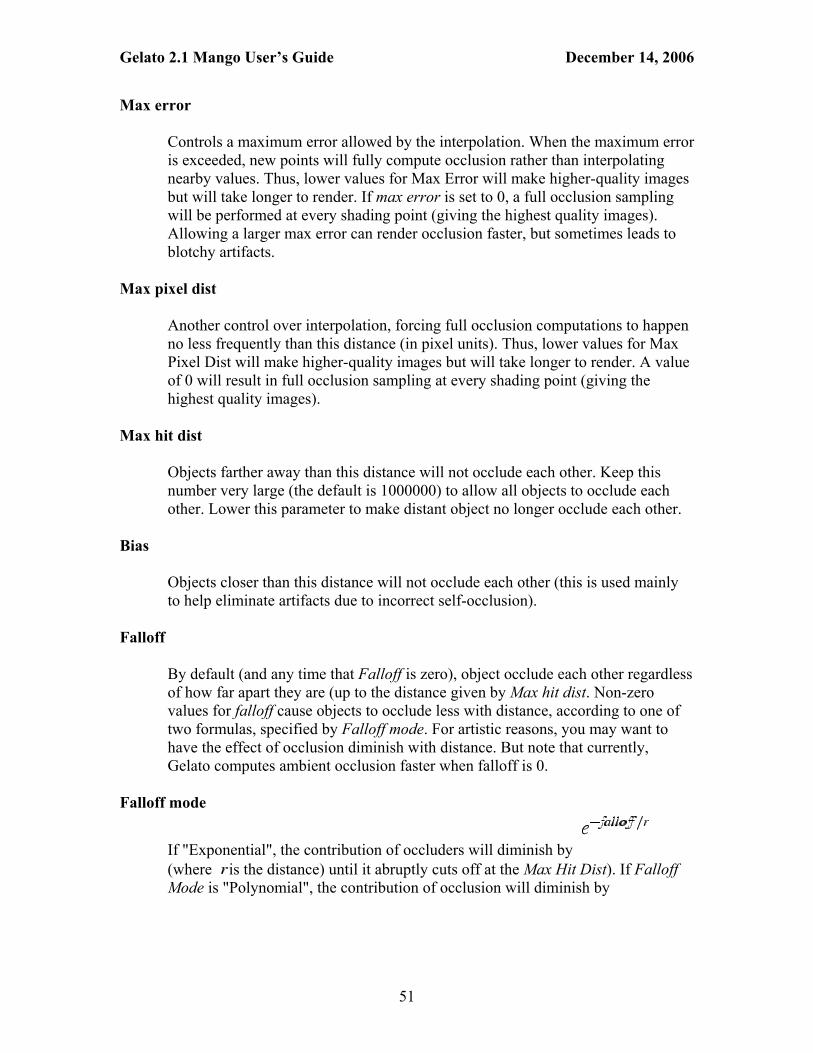
If "Exponential", the contribution of occluders will diminish by (where is the distance) until it abruptly cuts off at the Max Hit Dist). If Falloff Mode is "Polynomial", the contribution of occlusion will diminish by

Gelato 2.1 Mango User’s Guide December 14, 2006
52
(thus smoothly fading to zero at Max Hit Dist). If falloff is 0, objects will not occlude regardless of the mode.
Min interp samples
How many nearby fully-computed samples are used for interpolation. There should ordinarily be no need to adjust this control from its default of 3.
Spatial DB name
Specifies the name of the spatial database used to cache occlusion samples for interpolation. The typical Mango user will never need to adjust this.
For information on setting up ambient occlusion renderings, see 7.3.

Gelato 2.1 Mango User’s Guide December 14, 2006
53
4.10 Subsurface Scattering Subsurface scattering is enabled by default. Turning on the Subsurface Scattering checkbox in the Gelato frame of any surface material will enable a global preprocess for this effect. To disable subsurface scattering without changing the light settings, turn off the global checkbox here.
The Subsurface Material attribute is the name of a material which will be automatically created to carry the shader and parameters for a call to Gelato's bakediffuse shader, for creating the spatial database for subsurface scattering.
Figure 4.10: Subsurface Scattering options in the Gelato Render Settings.

Gelato 2.1 Mango User’s Guide December 14, 2006
54
4.11 Default Per-Object Attributes
Figure 4.11: Default per-object attributes in the Gelato Render Settings.
This tab lets you set several options for processing objects. You may override them on individual objects (see Section ), but these settings will be used for objects that do not have overrides.
Emit defaults
When checked (the default), these default values described below will apply to all objects that are not individually overridden.
Shading quality
Controls how frequently shading calculations are done. The default value of 1 indicates that shading should happen approximately once per pixel. Lower values shades less often, which results in faster rendering but poor images. Higher values shade more often, which can make images a little sharper, but at large additional expense.

Gelato 2.1 Mango User’s Guide December 14, 2006
55
Displacement radius Gives the maximum distance that you expect objects to displace. The default is 0, indicating that objects will not tend to displace, and requiring that you override the displacement radius on any individual objects that displace large amounts.
It is also ok to make the default larger than zero, which may eliminate the need to set the displacement radius separately on displacing objects. Note that there is no penalty for having a large displacement radius on objects that don't actually displace, however, a too-large displacement radius on displacing objects will result in an unnecessary expense.
Opaque shadows
If checked (the default), objects will cast shadows as if they are opaque. This means that for transparency-mapped objects, you will need to uncheck the box on the individual object. If you uncheck this box, all objects will respect their transparency mapping for shadows, which is more accurate but possibly more expensive for objects that are actually opaque (if they renderer can't easily tell that they are opaque ahead of time).

Gelato 2.1 Mango User’s Guide December 14, 2006
56
4.12 Volume Options There are several global controls for volumetric effects, which are accessible through Gelato tab of the Render Settings, under ``Volume options'' tab.
Figure 4.12: Volume options in the Gelato Render Settings.
Light density
Scales the overall tendency of volumetric effects to scatter light. Higher values cause volumes to appear brighter, lower values cause them to appear dimmer. It is possible that you need to adjust this setting based on the scale of your scene.
Opacity density
Scales the overall tendency of volumetric effects to absorb light coming from objects ``behind'' the volume. Higher values make the volume block light after only a short distance. Lower values allow light to travel far through a volume. A value of 0 (the default) makes it so that volumes do not actually block the view of objects seen through the volume (i.e., the volume only scatters additional light into the view, but does not obscure objects behind or within the volume).

Gelato 2.1 Mango User’s Guide December 14, 2006
57
Step size Gives the ideal size of steps through the volume, the distance between locations that the light in the volume is sampled. Larger step sizes may compute more quickly, but may show artifacts if too large. Smaller step sizes will be more accurate, but will take longer to render.
Minimum steps
Gives the minimum number of steps that will be taken through the volumetric region. The actual step size will be adjusted if the ideal step size would indicate that fewer steps will be taken.
Maximum steps
Gives the maximum number of steps that will be taken through the volumetric region, using a larger actual step size than the ideal if necessary. This helps to keep rendering time from getting too high when a very thick volume is found.
Integration start
Gives a minimum depth from the camera to consider any volumetric effects.
Integration end
Gives a maximum depth from the camera to consider any volumetric effects.

Gelato 2.1 Mango User’s Guide December 14, 2006
58
4.13 Stereo Rendering Gelato supports stereo rendering, which is the ability to generate both right and left eye views for each frame. The two eye views are rendered simultaneously and using much less time than it would take to render the two images separately. The Render Settings has an area where you can set Gelato's stereo rendering options:
Figure 4.13: Stereo options in the Gelato Render Settings.
Stereo
If this box is checked, stereo rendering will be used, generating both eye views of each frame.
Projection
The kind of projection to use. Off-axis the cameras will face parallel directions but with their frusta constrained to share the same viewing area at the convergence depth. Parallel

Gelato 2.1 Mango User’s Guide December 14, 2006
59
the camera views will be parallel with regular on-axis frusta (convergence is ignored). Toe-in the two cameras will be rotated about their y axes to converge at the convergence depth.
Separation
The separation between the two eyes. The wider the separation, the more apparent the 3D effect will be.
Convergence
For off-axis or toe-in projections, this gives the distance from the camera at which the two eye views will converge (that is, at what depth the two eyes will be "focused" on the same object).
Shading Location
Determines which view is the one for which shading is correct -- left, right, or center. The default value, "center", is the most accurate, though may be slightly more expensive than the other choices.

Gelato 2.1 Mango User’s Guide December 14, 2006
60
4.14 Baking Options
Figure 4.14: Baking options in the Gelato Render Settings.
This section of Gelato Render Settings controls options related to baking. For more information on baking, see Section 3.7.
Use fixed dicing When checked (the default), this option causes the shading for baking to happen at a rate equal to the resolution of the baked textues. When not checked, the shading for baking will happen at a rate determined by camera projections (which is probably not what you want). This option only controls dicing for baking, not for ordinary renders.

Gelato 2.1 Mango User’s Guide December 14, 2006
61
4.15 Output elements
Figure: Specifying output elements in the Gelato Render Settings.
These checkboxes let specify which elements should be output by Gelato as images. All elements are generated simultaneously, in a single pass.
Beauty The full-color rendering of the scene.
Diffuse
Just the diffuse lighting of the scene, not including specular highlights, reflections, refraction, or subsurface scattering.
Specular
Just the specular hilights of the scene.

Gelato 2.1 Mango User’s Guide December 14, 2006
62
Reflections Just the reflections.
Refractions
Just the refracted light (such as from seeing through glass).
Subsurface scattering
Just the subsurface scattering.
Translucence
Just the translucence.
Incandescence
Just the incandescence.
Ambient occlusion
An ambient occlusion channel.
Reflection occlusion
A reflection ambient occlusion channel.
Unlit color
The textured (flat) color of objects, before lighting is applied.
Shadowed
Shadow matte (white in shadow).
Unshadowed diffuse
The diffuse lighting, with no shadows.
Depth
The camera-space Z depth.

Gelato 2.1 Mango User’s Guide December 14, 2006
63
5. Modeling and Animation
5.1 Geometric Modeling The techniques for modeling in Maya/Mango are exactly the same as with ordinary Maya. You create objects exactly as you would if you were using the native Maya renderer. There are, however, some subtle differences in how geometric objects are sent to the renderer and these can require subtle changes in how you design your models for optimal performance during rendering.
5.1.1 NURBS Modeling
Mango fully supports NURBS with trims that are created with Maya. Because Gelato is extremely efficient at rendering NURBS, for best performance we recommend that you use NURBS instead of polygon meshes wherever practical.
In cases where the surface u,v range is not normalized, Mango appends a default linear set of texture coordinates to the NURBS object.
5.1.2 Polygonal Modeling
Although Gelato prefers NURBS models, Gelato/Mango fully supports polygon meshes and preserves vertex connectivity when it sends polygonal objects to the Gelato renderer. Normals should be per-face-vertex normals (a.k.a. "linear" to Gelato).
Mango only takes texture coordinates from the first uv-set.
Note that Gelato does not support polygons with holes. If your model contains holes, you will need to triangulate or quadrangulate it with one of Maya's polygon tools.
5.1.3 Subdivision Surface Modeling
Mango converts subdivision surface base meshes created with Maya along with their texture coordinates. It does not, however, support Maya's hierarchical subdivision-editing features and there is, as yet, no provision for creases, corners, or holes.
Mango always sets Gelato's "int border" attribute to 2. With this setting, Gelato will interpolate the boundary edge to the B-spline formed by the edge vertices and draw the border faces with round corners (the edge interpolates as one continuous B-spline, even around the corner vertices).
Gelato 2.1 Mango User’s Guide December 14, 2006
64
5.1.4 Rendering Polygonal Meshes as Subdivision Surfaces
It is possible to tell Mango that a polygonal mesh should be rendered as a smoothed subdivision surface, without having to construct it as a Maya subdivision surface. In Maya, you'll notice that the mesh node has a ``Gelato'' tab in the Attribute Editor. The Gelato tab has a field called ``Interpolation'' which may be set to either ``Lineaar'' (draw the polygonal facets) or ``Catmull-Clark'' (draw as a subdivision surface).
Below you can see the difference between rendering a polygonal sphere using ``Linear'' and ``Catmull-Clark'' interpolation:

Gelato 2.1 Mango User’s Guide December 14, 2006
65
5.2 Animation and Character Setup Animation and character setup is performed normally. The choice of Gelato as a renderer and the use of Mango should have no impact on how you perform these functions.

Gelato 2.1 Mango User’s Guide December 14, 2006
66
5.3 Dynamics and Simulation 5.3.1 Particles
Mango converts particle nodes in a basic fashion. It only supports the Point and Sphere render types. Other render types (e.g., MultiPoint, Sprite, Tube, and Blob Surface) are not yet supported.
Mango will pass age, lifespan, opacity, and other parameters to Gelato for use by shaders.
The default mayaLambert shader will render black on particles, since N is not defined. In this case, you can create your own shader, use the emission attribute, or use the ambientColor attribute with an ambient light
5.3.2 Maya Hair, Fur, and Cloth
Mango does not currently support Maya hair, fur, or cloth.

Gelato 2.1 Mango User’s Guide December 14, 2006
67
5.4 Shave and a Haircut Mango directly supports Shave and a Haircut, a hair and fur plugin available from http://www.joealter.com.
When Shave assets are detected in the scene, Mango will automatically cause Shave to export the Shave geometry as a RIB file, and the Gelato Pyg output will input the resulting RIB file. This is all done transparently and requires no special instructions from the user.
Because Shave exports the hair geometry as RIB, you will need the free, open source RIB-reading plugin for Gelato. A link to this plugin is available from http://www.nvidia.com/page/gz_get.html (look for the section for ``3rd party plugins''). Once downloaded, the RIB-reading plugin needs to be placed either in $GELATOHOME/lib or in any other directory listed in the Render Settings -->Gelato -->General Options -->Generator path (see Section 4.1).
By default, the exported Shave fur will use the shavehair.gsl shader (in $GELATOHOME/shaders). This is a reasonably good hair shader. But you can substitute your own hair shader in the following manner:
1. Select a hair group so that you can see the Shave paramters in Maya's Attribute Editor.
2. In the Shave -->RIB Options tab, you will see a field called ``Insert RIB.'' Here you can specify a shader assignment of your choice (in RIB syntax, but referencing a compiled Gelato shader), including shader parameters. For example,
Surface "myhair" "float Kd" [0.25] "float Ks" [0.7]
When hair or fur is required to cast shadows, we strongly recommend using Gelato's volume shadows technique, described in Section 7.1.4.
Gelato 2.1 Mango User’s Guide December 14, 2006
68
Shave Instancing
In addition to generating hair, Shave and a Haircut is capable of distributing any geometry as instances. Gelato handles this also, but sometimes requres a bit of manual intervention on the shading:
1. If your instances are polygons and you see faceting, be sure to turn on smooth normals (Shave -->Shave Globals... -->RenderMan -->Export Normals). If you want your meshes to correctly export uv coordinates on the instanced geometry, you should also be sure to check the ``Export UVs'' box on the same panel.
2. By default, Mango exports all Shave geometry (including instances) with the "shavehair" shader. If the geometry is not supposed to look like hair, you probably want some other shader. Select the Shave hair (e.g. the ShaveSelect menu), look in the Attribute Editor for the Rib Properties tab, and in ``ribStuff'' you can type a custom Gelato surface shader as a RIB command, for example:
Surface "plastic" "Kd" [0.5]
3. It's also possible to use any Maya shading network material that you have on any other geometry (including the templated geometry for the Shave instances), but it's a little tricky. What you should type in the ``ribStuff'' is:
ReadArchive "pyg << RestoreAttributes(\"blinn1SG\")"
This restores a Gelato attribute state corresponding to a particular material in the Maya materials list. The name ("blinn1SG" in this example) is the name of the Maya material ("blinn1"), with "SG" appended. Be careful to properly use the backslash with the double quote, since we are nesting the quotes here.

Gelato 2.1 Mango User’s Guide December 14, 2006
69
5.5 Paint Effects Mango will export Maya Paint Effects as polygons (with normals and texture coordinates), without having to do the conversion explicitly in Maya. Currently, you get only the 'main' mesh, without branches and leaves, but we plan to add export of these 'auxilliary' meshes in a future release.
The 'maya_brush' shader emulates only the simplest of Paint Effects shading, i.e., interpolation between color1/transparency1/incandescence1 and color2/transparency2/incandescence2 based on the 'v' texture coordinate. We plan to support a more complete version of the "brush" shading functionality in future releases.

Gelato 2.1 Mango User’s Guide December 14, 2006
70
5.6 Coordinate Systems via Locator Nodes Any locator node whose shape name ends in "SaveAttributes", or which has a string attribute called gelatoSaveAttributes will get written out as a SaveAttributes call. The attribute bundle name will be the name of the locator node, and the "what to save" param will be empty by default, which means save everything. If gelatoSaveAttributes is not empty, its contents will be the second argument to SaveAttributes(). So the short story on how to make a coordinate system for displacement shaders is: create a locator node. Put it in the hierarchy wherever you want. Rename the locator shape node (not the transform above it) to end in "SaveAttributes". If you care about saving only "transform", as opposed to everything, you can create the gelatoSaveAttributes attribute on the locator shape and set it to "transform".
You can then use this coordinate system in a shader that has a coordinate system or "space" parameter.

Gelato 2.1 Mango User’s Guide December 14, 2006
71
Note that with locator nodes, it's theoretically possible to generate a coordinate system via a back-door SaveAttributes("myCoordSys") script. The problem with this is that the user script comes out before the localPosition attribute's Translate command, while the hard-coded SaveAttributes call comes out after.

Gelato 2.1 Mango User’s Guide December 14, 2006
72
5.7 Arbitrary Pyg For advanced users who wish to control Gelato in ways that are not easily handled by direct translation of the Maya scene, it is possible to instruct Mango to insert user-specified Pyg snippets into the exported file.
5.7.1 Global Pyg
In the Render Settings -->Gelato Tab, you will find a ``User script'' box. This box allows you to enter a short Python script that is inserted into the output Pyg file at the end of the scene-wide attributes, immediately prior to the World statement. This can be used to override attributes set from the user interface, or more often, to insert attributes that do not appear in the user interface.
The checker button next to the box calls up a multi-line text editor in which you can directly enter Pyg to be inserted into the output by prefixing it with "pyg «". For example:
pyg << ... your own Pyg ...
The "Help" menu on the text editor does not function. And unfortunately (bug), the first line of the script does not appear in the text box in the Render Settings window.

Gelato 2.1 Mango User’s Guide December 14, 2006
73
5.7.2 Per-object Pyg
Select the node in question, open the Attribute Editor, and edit the ``Notes'' field. Enter the following into the Notes:
#gelato pyg << ...one or many lines of Pyg code...
This will result in the user-specified Pyg (the text after the «) to be inserted into the Pyg output when the node is exported. Whatever attributes you may set will apply only to that node and its descendents, because the scene hierarchy will be preserved. (But you are not, of course, restricted to only setting Attributes -- any valid Pyg is fine.)
Here's an example screenshot showing such editing of the Notes field:
NOTE: there's a strange artifact of the Maya UI, where changes to the "notes" field don't quite register until you click on another Maya UI element. So after you type this, just mouse click on another input field (or often it works to just bring another non-Maya window into focus).
5.8 Pyg proxy objects It is possible to have Mango export arbitrary Pyg instead of whatever Maya geometry is below a transformation node. For example, say you have a very detailed model that you want to render, but for your interactive Maya session, you want a simple, lightweight stand-in.
1. "Bake" the detailed model into a Pyg file. You can do this by making all objects invisible, exporting the Pyg for the scene, editing the resulting Pyg to remove

Gelato 2.1 Mango User’s Guide December 14, 2006
74
lights and other extraeous details, putting the Pyg file somewhere in your input file search path.
2. Select the transform node of the proxy object. In the Attribute Editor, you will see a Gelato tab. Open it.
3. In the Gelato tab of the transform node, there is an input box for "Gelato Proxy". There, you may type any Pyg (Python) commands that you wish to have exported for this node. One kind of command you may issue is an Input() call, for example:
4. 5. Input ("myfile.pyg")
6. If any text is in the "Proxy" attribute, all objects that are children of this transform node will not be exported. Instead, only the Gelato Proxy commands will be issued in their place.

Gelato 2.1 Mango User’s Guide December 14, 2006
75
5.9 Technical odds and ends Further notes on geometry that may be of help to advanced users:
• Maya's opposite attribute on shape nodes is sent to Gelato as Attribute ("string orientation", "reverse"); doubleSided is sent as Attribute ("int twosided",1). Maya's coordinate system is right-handed by default; Gelato's is left-handed. Gelato's interpretation of "orientation" "rh" is that the determinant of the current transformation is negative, so the default orientation is specified as "outside" instead.
• For ray tracing, the primaryVisibility, visibleInReflections and visibleInRefractions attributes map to Attribute ("string geometryset", "+reflection"), etc.
Texture reference geometry, when found attached to the referenceObject attribute of a shape node, is written out as "refPointCamera" and "refPointObject". Note that the Gelato API will have transformed "refPointObject" to camera space, which the shaders undo.

Gelato 2.1 Mango User’s Guide December 14, 2006
76
6. Materials
6.1 Translation of Maya shading networks Mango comes with a set of shaders that mimic a growing subset of Maya's shading functionality, so you can try rendering with Gelato without using any other Gelato shaders.
6.1.1 Supported Maya material nodes
Support for the complete set of HyperShade nodes is currently in progress. To see the list of nodes handled for any particular version of Gelato, look in $MANGOHOME/shaders after installation. Here are some compatibility notes:
Surface Materials
Supported anisotropic, lambert, blinn, phong, and phongE, but without glow; rampShader, shadingMap; surfaceShader; layeredShader; oceanShader; useBackground Unsupported hairTubeShader
Volumetric Materials
None of these are supported, but Gelato does support light fog.
Displacement Materials
displacement is supported
Lights
Supported ambientLight (except for soft shadows), directionalLight, pointLight, spotLight (no barn doors or decay regions) Unsupported areaLight, volumeLight

Gelato 2.1 Mango User’s Guide December 14, 2006
77
2D Textures
Supported bulge, checker, fractal, grid, noise, ramp; file (supports attributes that come from place2dTexture, and color effects, but not animated textures) Unsupported cloth, fluidTexture2D, mountain, movie, ocean, psdFile, water
3D Textures
Supported brownian, cloud, crater, marble, rock, snow, solidFractal, stucco, volumeNoise Unsupported fluidTexture3D, granite, leather, wood
Environment Textures
Supported envBall, envCube, envSky, envSphere Unsupported envChrome
General Utilities
Supported bump2d, bump3d, condition, layeredTexture, multiplyDivide, placeTexture2d, placeTexture3d (no shader; just uses the transform), plusMinusAverage, projection (except for perspective), reverse, samplerInfo, setRange, uvChooser, vectorProduct Unsupported arrayMapper, distanceBetween, heightField, lightInfo, stencil
Color Utilities
Supported blendColors, clamp, contrast, gammaCorrect, hsvToRgb, luminance, remapColor, remapHsv, remapValue, rgbToHsv, surfaceLuminance Unsupported -none-

Gelato 2.1 Mango User’s Guide December 14, 2006
78
Switch Utilities
Supported singleShadingSwitch, doubleShadingSwitch, tripleShadingSwitch, quadShadingSwitch
Other Utilities
Unsupported: imagePlane, opticalFX, particleSampler
Technical info about shaders:
• Shader parameters are written only if different from their defaults, or, if there's no default, if the attribute is nonzero/nonempty.
• Any shader parameter names which happen to also be reserved words in GSL are handled by automatically prepending an underscore (`_').
• Texture (.tx) files for Gelato are generated automatically from source textures referenced by Maya's file node. This is done only if necessary, as determined by "maketx -u", which sets the file modification time for the .tx file from the mod time of the input file. (This is to cover the case where the user reverts to an earlier version of a source texture; in this case, testing the output file to be newer than the source file fails to remake the texture.)
• Attributes which are connected via HyperShade (or the HyperGraph) are connected in Gelato via the ConnectShaders API call. Shader names are searched for by prepending "maya_" to the maya node type name. For example, texture mapping is handled by the maya_file shader. This means you can put your own shaders in the shaderpath, interconnect them in Maya, and Mango will find and connect them for Gelato.
• Maya's execution of shading networks is able to make demand-drive calls "upstream" as well as passing data "downstream". For example, the projection shader computes texture coordinates, puts them into the uvCoord state and calls whatever shader is connected to the image attribute. Gelato's shader execution, in contrast, consists of running each shader in the shading group in the order specified. For this reason, some of Mango's Maya emulation shaders come in two parts. In addition to the main shader (maya_projection, for example), there are some "pre" shaders that run before the main shader. If you are developing a shader that relies on Maya's demand-driven execution model, you may need to make use of this mechanism. These shaders are also found and connected automatically.
6.1.2 Reflection and refraction blur and sampling
Gelato allows you to have blurry ray-traced reflections and refractions. The Maya software renderer does not support this, so the usual material dialog (for Blinn, Lambert, etc) does not have these controls. Instead, you must open the Gelato tab, and you will see additional reflection and refraction controls:

Gelato 2.1 Mango User’s Guide December 14, 2006
79
Figure: The Gelato tab has additional reflection and refraction controls.
Reflection blur
The angle (in degrees) specifying how blurry ray-traced reflections will be. The default value of 0 indicates that reflections should be perfectly sharp. This has no effect if the ``Reflectivity'' (in the ``Specular Shading'' tab) is 0 for this material, or if ray tracing is turned off globally.
Reflection rays
The number of rays (default 1) to average for refrection. More rays will take longer, but will make a smoother, less noisy, and better-antialiased reflection. It can be useful to use more than one ray (say, 4) even if no blur is used, in order to better antialias the reflection.
Refraction blur
The angle (in degrees) specifying how blurry ray-traced refractions will be. The default value of 0 indicates that refractions should be perfectly sharp. This has no effect if the ``Refractions'' box (in the ``Raytrace Options'' tab) is not checked for this material, or if ray tracing is turned off globally.
Refraction rays
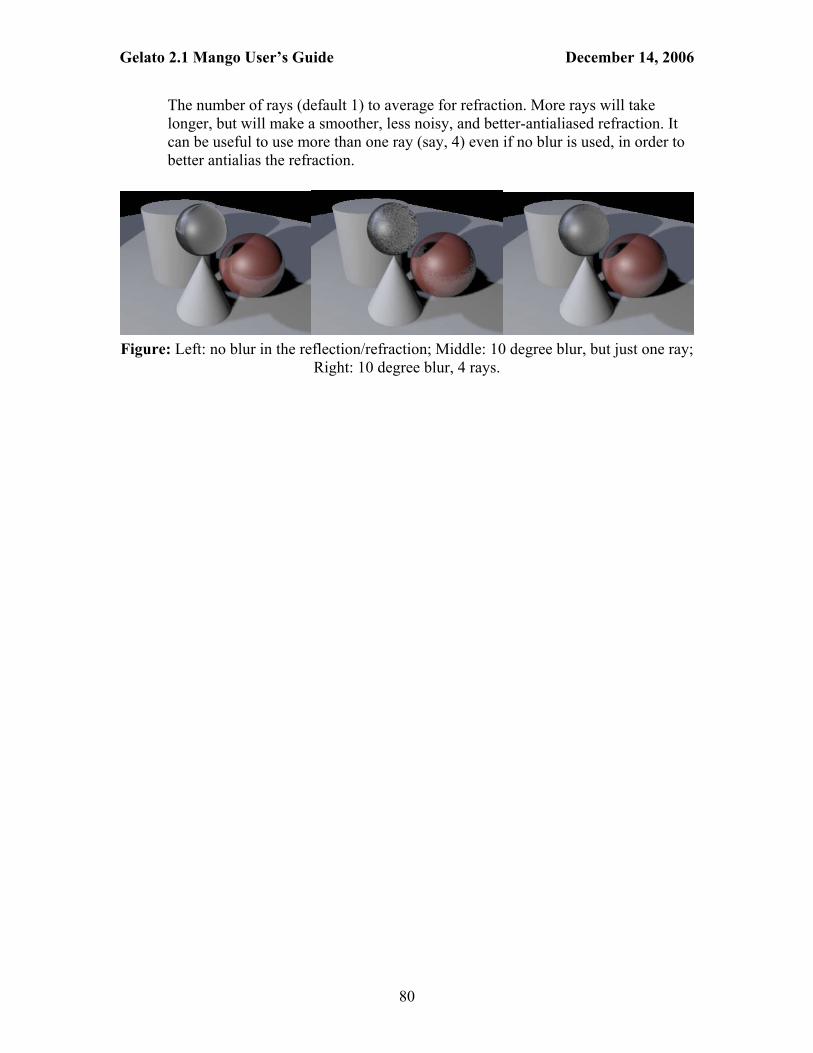
Gelato 2.1 Mango User’s Guide December 14, 2006
80
The number of rays (default 1) to average for refraction. More rays will take longer, but will make a smoother, less noisy, and better-antialiased refraction. It can be useful to use more than one ray (say, 4) even if no blur is used, in order to better antialias the refraction.
Figure: Left: no blur in the reflection/refraction; Middle: 10 degree blur, but just one ray; Right: 10 degree blur, 4 rays.

Gelato 2.1 Mango User’s Guide December 14, 2006
81
6.2 Using Gelato shaders Mango allows you to use Gelato shaders, either instead of Maya shaders, or together with Maya shaders. Gelato shaders are written in GSL, the Gelato Shading Language, and compiled into .gso files. The $GELATOHOME/shaders folder contains a number of these shaders. You can also write your own.
A Gelato shader can be assigned to any Lambert, Blinn, or Phong node. In the Attribute Editor, open the Gelato -->Override Shader section, and click on the folder icon next to Shader Name (6.1) to bring up the Gelato Shader Picker (6.2). (If instead you type the Shader Name directly, you can leave out the ``.gso''.) Remember to turn on the Use Override Shader button, or else Gelato will continue to use the Maya shader.
Figure 6.1: Assigning a Gelato shader.
The picker lists all the .gso files that are on your shader path, grouped by the folder they are in. Double-click on the desired shader (we picked greenmarble.gso). If the shader you want is not in a folder on your shader path, use the Browse button to find it; this will add the folder to the shader path if necessary. (Or you can edit the shader path under Render Settings -->Gelato -->General; see 4.1.)

Gelato 2.1 Mango User’s Guide December 14, 2006
82
Figure 6.2: The Gelato Shader Picker in action.
Once a Gelato shader is assigned, its parameters become visible under Shader Parameters (6.3). These parameters are now ordinary attributes of the node: they can be set, animated, or connected to other nodes in the usual ways.

Gelato 2.1 Mango User’s Guide December 14, 2006
83
Figure 6.3: The Gelato shader's parameters show up as attributes.
By connecting shader parameter attributes, it is possible to make shader graphs where some nodes have Gelato override shaders and other nodes have the usual Maya behavior. For example, a shader utility like checker or ramp can be plugged into any parameter of a Gelato shader! Or, a Gelato shader output can be plugged into a Maya shader node.
Advanced tip. There are some pitfalls in mixing Maya shaders with the standard Gelato shaders. Maya shaders use uvCoord for texture coordinates and refPointObj for texture reference coordinates; the shaders that ship with Gelato use s, t, and Pref. You may need to connect these explicitly in the Hypergraph, or using the Connection Editor.
Advanced tip. Using MEL, it is possible to assign a Gelato override shader to any shader node, by adding and setting a gelatoShader attribute (of type "string"). But it is more convenient to just use a Lambert, Blinn, or Phong node, even for Gelato layers that end up in the middle of the graph.
Advanced tip. Mango translates Hypershade graphs by looking for a Gelato shader to emulate each Maya shader. So a checker node is translated into an instance of

Gelato 2.1 Mango User’s Guide December 14, 2006
84
maya_checker.gso. These emulation shaders are in $MANGOHOME/shaders, which is why that folder needs to be on your shader path.
6.3 Displacement Surfaces in Maya can be displaced by attaching a map or utility to the Displacement Mat attribute of the object's shading group. The alpha or luminance value of the map will be used to displace the surface. You must also adjust the Displacement Radius value on the object's shape node to avoid any displacement artifacts.
To demonstrate, start with an empty scene and create a NURBS sphere. With the sphere selected, assign a material, say Lambert. After assigning the material to the object, select the material tab (eg. lambert1) and click on the output connection button to bring up the shading group for this object.
Gotcha: Be careful to set the displacement map in the "surface" shading group for the object, and not the associated "particle" shading group. This is something to watch out for especially if you are using the default material instead of assigning a new material to the object. Right-clicking on the output connection button will bring up a menu of shading groups that the surface shader is connected to. This is where you'll see both shading groups.
Next, click on the map button on the right side of the Displacement Mat field in the shading group and select the displacement material.

Gelato 2.1 Mango User’s Guide December 14, 2006
85
This will create a displacement shader, a texture placement, and a map/utility instance.
Now you can displace by building up any texture function you wish. For example, try the Fractal node. Select the tab for the displacement map (eg. fractal1) to adjust the controls. Most maps produce either a luminance or alpha channel which is used for the displacement. Adjusting the magnitude of this value will adjust the maximum amount of displacement.
You must set the maximum displacement radius in the object's shape under the Gelato -->Miscellaneous tab. Select Override Misc Settings and set the Displacement Radius to the maximum displacement value. Typically, this will be the same setting as the alpha scalar multiplier in the displacement map.

Gelato 2.1 Mango User’s Guide December 14, 2006
86
Rendering should produce an image like this:
6.3.1 Substituting a Gelato shader
It is also possible to displace using your own Gelato shader. To do this, instead of building up a Maya node network for the displacement amount, turn on the checkbox Use Override Shader in the Gelato -->Override Shader frame, and select the displacement shader to use.
As with custom surface shaders, you will then be able to adjust any of the parameters to the displacement shader. For example, if we select the e,phdented shader, we will see a number of shader parameters specific to that shader:

Gelato 2.1 Mango User’s Guide December 14, 2006
87
Rendering should now look like this:

Gelato 2.1 Mango User’s Guide December 14, 2006
88
6.4 Subsurface Scattering This section gives a quick tutorial on how to render with subsurface scattering.
1. Select iv as your viewer (in Render Settings -->Gelato -->General; see Section 4.1). (Iv will show both the subsurface pass and the beauty pass. The mdisplay plug-in, rendering to the Maya Render View, cannot yet do this.)
2. Bring up the material that needs subsurface scattering in the Attribute Editor. Open the Gelato frame. For any material that is based on Lambert, Blinn, or Phong, you will see a frame for Subsurface Scattering.

Gelato 2.1 Mango User’s Guide December 14, 2006
89
3. To enable subsurface scattering for the material, check the Subsurface Scattering checkbox. In the example above, merely checking this box results in the following image (the no-subsurface image is shown for comparison on the right):
You will see two images render. The first is the "baking" pass, and will not be used again. The second image is the final "beauty" image.
4. Parameters that may be adjusted to change the subsurface material properties:
Intensity. An overall scale of the amount of subsurface scattering. Subsurface Color. Color tinting of the subsurface-scattered light. Scale. This number scales both scattering and absorption, and may be used as an easy control of the "scale" of the object. Higher values will make the object look larger (subsurface light travels over less distance) and lower values will make the object look smaller. A huge marble statue looks different from a tiny marble figurine because of this property, even though they are both made from the same material.
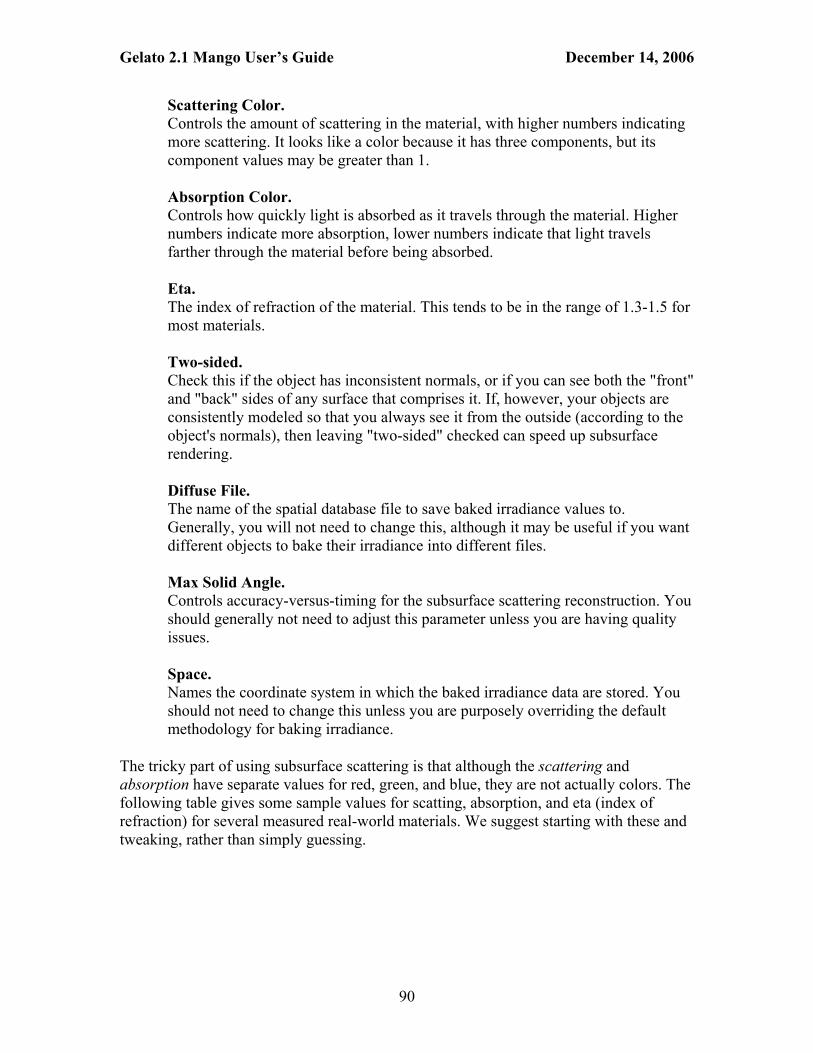
Gelato 2.1 Mango User’s Guide December 14, 2006
90
Scattering Color. Controls the amount of scattering in the material, with higher numbers indicating more scattering. It looks like a color because it has three components, but its component values may be greater than 1. Absorption Color. Controls how quickly light is absorbed as it travels through the material. Higher numbers indicate more absorption, lower numbers indicate that light travels farther through the material before being absorbed. Eta. The index of refraction of the material. This tends to be in the range of 1.3-1.5 for most materials. Two-sided. Check this if the object has inconsistent normals, or if you can see both the "front" and "back" sides of any surface that comprises it. If, however, your objects are consistently modeled so that you always see it from the outside (according to the object's normals), then leaving "two-sided" checked can speed up subsurface rendering. Diffuse File. The name of the spatial database file to save baked irradiance values to. Generally, you will not need to change this, although it may be useful if you want different objects to bake their irradiance into different files. Max Solid Angle. Controls accuracy-versus-timing for the subsurface scattering reconstruction. You should generally not need to adjust this parameter unless you are having quality issues. Space. Names the coordinate system in which the baked irradiance data are stored. You should not need to change this unless you are purposely overriding the default methodology for baking irradiance.
The tricky part of using subsurface scattering is that although the scattering and absorption have separate values for red, green, and blue, they are not actually colors. The following table gives some sample values for scatting, absorption, and eta (index of refraction) for several measured real-world materials. We suggest starting with these and tweaking, rather than simply guessing.

Gelato 2.1 Mango User’s Guide December 14, 2006
91
Table 6.1: Selected measured subsurface material parameters, from Jensen, et al, ``A Practical Model for Subsurface Light Transport,'' ACM SIGGRAPH 2001.
Material scattering ( , in ) absorption ( , in ) eta ( )
Marble (2.19, 2.62, 3.00) (0.0021, 0.0041, 0.0071) 1.5
Cream (7.38, 5.47, 3.15) (0.0002, 0.0028, 0.0163) 1.3
Skim milk (0.7, 1.22, 1.9) (0.0014, 0.0025, 0.0142) 1.3
Skin1 (0.74, 0.88, 1.01) (0.032, 0.17, 0.48) 1.3
Skin2 (1.09, 1.59, 1.79) (0.013, 0.070, 0.145) 1.3
The scattering and absorption values in the table above are physically accurate for those materials if the scene units are mm. It is easy to compensate for different modeling units by using the scale paramter. If the scene units are in cm, set scale=10. If the scene units are in meters, set scale=1000. If the scene units are in inches, set scale=25.4. And so on. It's also fine to tweak scale to achieve the amount of translucency you desire, regardless of whether it is physically accurate.
Here are some additional tips on subsurface scattering:
• Consult the Gelato Technical Reference for more information on how subsurface scattering works in Gelato, as well as for a more technical discussion of the meaning of the material parameters. Note also that the Technical Reference has a table with subsurface parameter values for specific real-world materials.
• You can disable subsurface scattering globally from Render Settings -->Gelato -->Special Shaders by unchecking the Subsurface Scattering box.
• Note the Subsurface Material setting in the Render Settings area, which is the name of a material that gets created automatically. This provides a place to edit the shader for the diffuse baking pass. If you want to change the parameters to bakediffuse, or use a different shader altogether, edit this material.
To use subsurface scattering with your own Gelato shaders, refer to plasticss.gsl in $GELATOHOME/shaders for an example of how to make use of Gelato's subsurface() function.

Gelato 2.1 Mango User’s Guide December 14, 2006
92
7. Lighting Mango comes with a set of shaders that emulate a growing subset of Maya's lighting functionality. Emulated lights include Maya's spotLight, directionalLight, pointLight, and ambientLight. Some parameters of spotLights such as barn doors and decay regions are not yet operational.

Gelato 2.1 Mango User’s Guide December 14, 2006
93
7.1 Shadows Working with shadows should be pretty transparent to the Maya user. There are, however, a couple tricks and traps that the user should know about.
7.1.1 Clean Shadow Blur in Depth Map Shadows
To blur a depth map shadow, use the Dmap Filter Size as usual.
Getting the right parameter to Gelato to clean up the edges is the tricky part. Gelato listens to the Shadow Rays parameter to determine the number of shadow samples to use. This parameter is located under the Raytraced Shadow Attributes section of the light. To adjust it for a depth map shadow, temporarily turn on Use Ray Trace Shadows under the Raytraced Shadow Attributes, adjust the Shadow Rays param to the number of shadow samples you want to use and then switch back to Use Depth Map Shadows. Even though the parameter is greyed out it will be passed to Gelato.

Gelato 2.1 Mango User’s Guide December 14, 2006
94
7.1.2 Where are my raytraced shadows?
If you have turned on Use Ray Trace Shadows and you are not seeing any shadows in your render, it is likely that raytracing has not been turned on. Make sure the Use Raytracing box is checked under Render Settings->Gelato->Raytracing Quality. Your raytraced shadows should now appear.

Gelato 2.1 Mango User’s Guide December 14, 2006
95
7.1.3 Dynamic shadow maps
If Use Depth Map Shadows in the Shadows frame of a light is on, and Disk Based Dmaps is set to Off, Gelato will compute depth maps internally, without saving the data to disk. Note that in this case dicing and tessellation are done from the point of view of the main camera. If it's not acceptable for some reason for these results to serve also for the dynamic shadow map camera, then set Disk Based Dmaps to Overwrite.
7.1.4 Volume shadows
Volume shadow maps allow much higher quality shadows on thin or transparent geometry such as hair or fur.
In the above example, the left image uses ordinary depth mapped shadows, the right image uses volume shadows.
To use volume shadows:
• Select the light so that you can change its attributes in the Attribute Editor. • Under the Attribute Editor's Shadows tab, make sure that shadows are turned on
for the light using depth map shadows. Choose shadow map resolution, filter size, and other parameters as you would for an ordinary depth map shadow.
• In the Attribute Editor, open the Gelato tab, and subsequently open the Shadows sub-menu unter the Gelato tab. There you will see the volume shadows controls. Check ``Use Volume Shadows'' to cause the shadow map for this light to be a volume shadow.
• You will also need to increase the shadow bias. Maya's default of 0.001 is okay for ordinary shadow maps but much too small for volume shadows. You may need to experiment with increasingly larger bias values until no self-shadowing artifacts remain in the image.
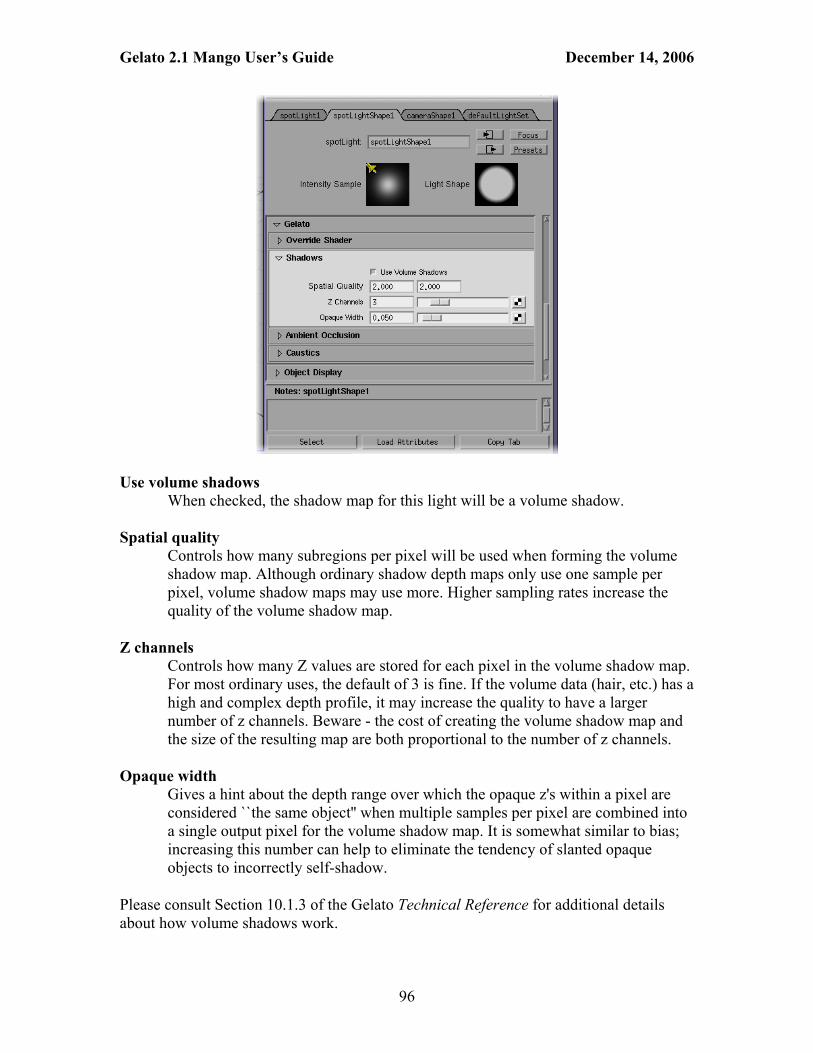
Gelato 2.1 Mango User’s Guide December 14, 2006
96
Use volume shadows
When checked, the shadow map for this light will be a volume shadow. Spatial quality
Controls how many subregions per pixel will be used when forming the volume shadow map. Although ordinary shadow depth maps only use one sample per pixel, volume shadow maps may use more. Higher sampling rates increase the quality of the volume shadow map.
Z channels
Controls how many Z values are stored for each pixel in the volume shadow map. For most ordinary uses, the default of 3 is fine. If the volume data (hair, etc.) has a high and complex depth profile, it may increase the quality to have a larger number of z channels. Beware - the cost of creating the volume shadow map and the size of the resulting map are both proportional to the number of z channels.
Opaque width
Gives a hint about the depth range over which the opaque z's within a pixel are considered ``the same object'' when multiple samples per pixel are combined into a single output pixel for the volume shadow map. It is somewhat similar to bias; increasing this number can help to eliminate the tendency of slanted opaque objects to incorrectly self-shadow.
Please consult Section 10.1.3 of the Gelato Technical Reference for additional details about how volume shadows work.

Gelato 2.1 Mango User’s Guide December 14, 2006
97
7.2 Indirect Illumination Basic illumination in Maya (and Gelato, for that matter) accounts for only "direct illumination" - that is, light travelling in a stright line between the light source and the visible point (possibly accounting for shadows from objects blocking the light).
Indirect illumination (also sometimes called global illumination) accounts for light that bounces between surfaces in the scene. This additional light can be very important in the real world, accounting for objects being lit even when no straight-line path exists between the object and the light source, color bleeding, and other effects. Gelato will compute indirect illumination for you, though it can be quite a bit more expensive than direct illumination only.
Figure 7.1: Indirect Illumination on (left) and off (right). Notice the additional light and
color bleeding in the shadows between the boxes, under the sphere, etc.
Indirect illumination in Mango is enabled from the Render Settings (formerly called ``Render Globals''). To enable indirect illumination, check the "Indirect Illumination" box.
It is also necessary to turn ray tracing on for the scene (in Render Settings -->Raytracing Quality; see 4.3). If ray tracing is not turned on for the scene, you will also not see any indirect illumination.

Gelato 2.1 Mango User’s Guide December 14, 2006
98
Figure 7.2: Indirect Illumination options in the Gelato Render Settings.
A number of controls for indirect illumination are available:
Indirect Illumination When this box is checked (and also ray tracing is turned on for the scene), indirect illumination will be computed for the scene.
Spatial DB Name Specifies the name of the spatial database used to cache indirect samples. The typical Mango user will never need to adjust this.
Indirect Rays Max Error Max Pixel Dist Min Interp Samples
The basic time/quality controls for indirect illumination involve two factors: how many ray samples are used to compute indirect illumination at any given point, and how close together are the points in which indirect illumination is fully computed (indirect illumination at in-between positions are derived by interpolating nearby points that fully computed it).

Gelato 2.1 Mango User’s Guide December 14, 2006
99
The Indirect rays attribute tells how many ray samples are used when indirect illumination is fully computed. More samples make for more accurate results, but are more expensive.
The Max Error attribute controls a maximum error allowed by the interpolation. When the maximum error is exceeded, new points will be fully computed rather than interpolated. Thus, lower values for Max Error will make higher-quality images but will take longer to render.
The Max Pixel Dist attribute is another control over interpolation, forcing full indirect computations to happen no less frequently than this distance (in pixel units). Thus, lower values for Max Pixel Dist will make higher-quality images but will take longer to render.
The Min Interp Samples controls how many nearby fully-computed samples are used for interpolation. There should ordinarily be no need to adjust this control.
Max Hit Dist Objects farther than this distance from each other (in scene units) will not transmit indirect illumination between each other. Keep this number very large (the default is 1000000) to allow all objects to exchange indirect illumination with each other.
Bias Objects closer than this distance will not transmit indirect illumination between each other, and also will not block indirect illumination. This is useful to prevent incorrect "self-shadowing" due to small numerical tolerance errors.
Falloff Falloff Mode
By default (and any time that Falloff is zero), indirect illumination does not "fade with distance", which is the physically correct behavior. But sometimes for artistic reasons, you may want to have the effect of indirect illumination diminish with distance. If Falloff Mode If "Exponential", the contribution of indirect light
will diminish by (where is the distance) until it abruptly cuts off at the Max Hit Dist. If Falloff Mode is "Polynomial", the contribution of indirect
light will diminish by (thus smoothly fading to zero at Max Hit Dist).

Gelato 2.1 Mango User’s Guide December 14, 2006
100
7.3 Ambient Occlusion Ambient occlusion is an approximation to full indirect illumination which tests the hemisphere over each shaded point to see how much the point is in "shadow". A number of rays are traced in the "sky" over the point to be shaded. The fraction of rays that hit something vs. escaping to empty space determines the amount of shadow at that point.
There are several ways to work with Ambient Occlusion in Mango.
7.3.1 In A Separate Pass
Here's how to render an ambient occlusion pass for the entire scene. This can be composited with a beauty pass later on.
1. In Render Settings -->Gelato -->Raytracing Quality, make sure Raytracing is on. 2. In Render Settings -->Gelato -->Output Elements, check the box for ``Ambient
Occlusion.'' 3. In Render Settings -->Gelato -->Ambient Occlusion, you may adjust the
parameters that govern ambient occlusion calculation (such as number of rays, falloff, etc.). These are explained in detail in Section 4.9.
Figure 7.3: Ambient occlusion as a separate pass.

Gelato 2.1 Mango User’s Guide December 14, 2006
101
7.3.2 In A Light
Ambient occlusion can be used within the normal render pass to darken lights in occluded areas, as a sort of soft shadow. This can be set individually per light. It makes the most sense to do this for ``fill'' or ``environment'' lights that have no other shadows. (It doesn't make much physical sense for key lights with shadows to also use ambient occlusion, but you may wish to do so for artistic reasons.)
1. In Render Settings -->Gelato -->Raytracing Quality, make sure Raytracing is on. 2. Select the light. In the Attribute Editor under Gelato -->Ambient Occlusion, turn
on Use Occlusion.
Figure 7.4: Ambient occlusion on two lights.

Gelato 2.1 Mango User’s Guide December 14, 2006
102
7.3.3 Quality and Speed
Since detailed ray tracing can be slow, the ambient occlusion shaders have numerous parameters for controlling quality versus speed. The default parameters are designed to be reasonably fast, yet give a reasonable impression of the final result. For any of the above techniques, get everything working first, then turn up the knobs until you get a picture you like.
The two most important quality knobs are Samples, which sets the number of rays to trace from each surface point, and Maxerror, which controls how many surface points to trace from. If Maxerror is 0, then ray tracing is used for every shade (high quality, but slow). Starting from the Gelato default of 0.25, you might turn it down to 0.02 or so. Maxpixeldist is the maximum distance (in the image) between ray-traced points. The Gelato default is 20, but 3 or 4 looks better.
Figure 7.5: The same ambient pass with Samples = 500, Maxerror = 0.02, Maxpixeldist
= 5.
Advanced tip. For certain surface points, ray tracing is used to compute the occlusion value. The renderer shoots a bunch of rays, and checks how many of them hit nearby objects versus how many get away. For other surface points, those values are interpolated. That is, it estimates the occlusion value by looking at the occlusion of nearby points where full ray tracing was used. Interpolation is much faster than ray tracing.
Advanced tip. See the comments in $GELATOHOME/shaders/ambocclude.gsl for brief descriptions of the other shader parameters and how they control this process. Even more terse is the Gelato Technical Reference.

Gelato 2.1 Mango User’s Guide December 14, 2006
103
7.4 Caustics Setting up caustics with Mango is relatively simple once you know the basics of how Gelato interacts with Maya.
Figure 7.6: Reflective and transparent caustics
There are two things that need to be set in the Render Settings:
1. Turn on Raytracing under Gelato -->Raytracing Quality. 2. Under Memory and Performance Options -->Ray Tracing, set Recursion Depth to
at least 3.

Gelato 2.1 Mango User’s Guide December 14, 2006
104
In the Attribute Editor of the light you want to generate caustics, under the Gelato Tab, open the Caustics section and turn on Use Caustics.
Bring up the Attribute Editor for the material that is assigned to the object you want to generate caustics. Under the Gelato tab, and under Caustics, check the Caustics box.
Since caustics are typically made by either transparent or reflective objects, there are different settings for either of these cases.
For a transparent object, set Transmittance to 1 and Transmit Color to the color of your transparent material. The Refractive Index can be the same as that under Raytrace Options, or different to change the shape of the caustic.

Gelato 2.1 Mango User’s Guide December 14, 2006
105
For a reflective object, set Reflectivity to 1 and Specular Color eo the color of the metal or reflective material you're using.
When you render, you'll see two passes run. The first renders out a photon buffer to caustics.sdb (the default value of the Photon File attribute). The second pass adds a call to Mango's maya_causticLight shader to the scene alongside the original spotLight, which integrates the caustics along with the primary illumination.

Gelato 2.1 Mango User’s Guide December 14, 2006
106
7.5 Fog Lights It is possible to turn a Maya spotlight into a ``fog light'' - one in which the light is associated with a cone in which a volumetric effect allows you to see the light scattered in the air.
7.5.1 Adding fog effects to a spotlight
To add fog light effects, select the spotlight. In the Attribute Editor, open the ``Light Effects'' tab. Click on the ``light fog'' link. This will automatically add a fog cone to the spot light, and set the cone's apex and angle to match the position and cone angle of the spot light.
TIP: Maya's linking of the fog cone angle to the spotlight's cone angle does not take into account that a positive penumbra angle will make light shine outside the cone angle, and so this light will not properly illuminate the fog volume. Therefore, if you wish to use a penumbra angle with a fog light (which you will want to do to make a nice soft edge to the fog illumination), be sure to only use negative penumbra angle values, which will make the edge falloff happen completely within the fog cone volume.

Gelato 2.1 Mango User’s Guide December 14, 2006
107
7.5.2 Adjusting the length of the fog effect
Remember, outside the cone, no volumetric effects will be visible. This not only means outside the cone angle, but also past the end, or ``cap'' of the cone. The default length of the volumetric cone is 10 units, measured in the local coordinate system of the cone. Depending on the scale of your scene (and your desired effect), the default cone may not extend far enough away from the light, as in the following example:

Gelato 2.1 Mango User’s Guide December 14, 2006
108
The easy way to fix this is simply to scale the transformation of the spotlight (the transformation is the parent node to the spotlight node). After applying an appropriate scale to our example, we get this:

Gelato 2.1 Mango User’s Guide December 14, 2006
109
7.5.3 Fog density and color
It's possible to adjust the density (how ``thick'' the smoke material is, and therefore how much the spotlight scatters light) and the ``color'' of the smoke. Both may be adjusted from the attribute editor:
Remember, however, that this is the density and color of the fog. If you want the light to be brighter or a different color, you should adjust the usual spotlight controls, not the controls for the volume.
It is fine for light volumes to overlap; light contributions will sum properly as in the real world.

Gelato 2.1 Mango User’s Guide December 14, 2006
110
7.5.4 Volume render globals
There are several global controls for volumetric effects, which are accessible through Gelato tab of the Render Settings, under ``Volume options'' tab.
Light density
Scales the overall tendency of volumetric effects to scatter light. Higher values cause volumes to appear brighter, lower values cause them to appear dimmer. It is possible that you need to adjust this setting based on the scale of your scene.
Opacity density
Scales the overall tendency of volumetric effects to absorb light coming from objects ``behind'' the volume. Higher values make the volume block light after only a short distance. Lower values allow light to travel far through a volume. A value of 0 (the default) makes it so that volumes do not actually block the view of objects seen through the volume (i.e., the volume only scatters additional light into the view, but does not obscure objects behind or within the volume).
Step size
Gives the ideal size of steps through the volume, the distance between locations that the light in the volume is sampled. Larger step sizes may compute more quickly, but may show artifacts if too large. Smaller step sizes will be more accurate, but will take longer to render.

Gelato 2.1 Mango User’s Guide December 14, 2006
111
Minimum steps Gives the minimum number of steps that will be taken through the volumetric region. The actual step size will be adjusted if the ideal step size would indicate that fewer steps will be taken.
Maximum steps
Gives the maximum number of steps that will be taken through the volumetric region, using a larger actual step size than the ideal if necessary. This helps to keep rendering time from getting too high when a very thick volume is found.
Integration start
Gives a minimum depth from the camera to consider any volumetric effects. Integration end
Gives a maximum depth from the camera to consider any volumetric effects.

Gelato 2.1 Mango User’s Guide December 14, 2006
112
7.6 Substituting a Gelato light shader Using an override shader on a light works just as it does for surface materials: open the Gelato -->Override Shader frame on the light in the Attribute Editor, choose a Gelato shader, and turn on the Use Override Shader checkbox.
Gotcha: If you're writing a Gelato light shader to use with Maya/Mango, be aware that by convention, Maya's lights point toward their local –Z axis of the light's local coordinate system. Many other Gelato light shaders that are not designed with Maya compatibility in mind (including Gelato's standard example spotlight.gsl and uberlight.gsl) tend to follow the convention of illuminating in the +Z direction. If you mix the two conventions, you may find all your lights pointing backwards! The best way to avoid this is to ensure that any lights you use with Mango illuminate in the –Z direction, or at least have a parameter that allows you to switch whether it illuminates in the +Z or –Z direction.

Gelato 2.1 Mango User’s Guide December 14, 2006
113
8. Sorbetto Re-rendering
8.1 What Sorbetto Is (and isn't) Sorbetto is a technology within Gelato that allows rapid re-rendering of a frame when only shading and lighting have changed.
NOTE: Sorbetto is a Gelato Pro feature and requires a valid Gelato Pro license key to operate properly. When using basic Gelato without a license key, you will be limited in the number of re-rendering iterations you can execute.
Theory of operation
An ordinary render is composed of many steps: traversing the Maya scene, exporting the scene to Gelato, having Gelato read in and organize the scene; bounding, sorting, splitting, and tessellating the geometry; determining which objects are visible, or which are occluded; shading visible surfaces; and displaying final pixels.
The basic theory behind Sorbetto is that if you are successively re-rendering the same frame with no changes to the camera or geometric shapes, much of the ordinary work does not have to be redone. The scene is already exported and loaded, the geometry is already tessellated, objects which are out of view or occluded have already been culled.
Furthermore, even to the extent that the shading must be recomputed, there is plenty of opportunity to save work: if there are 20 lights in the scene, adjusting one light can be performed rapidly if the results of the lights are remembered so that only the light being changed needs to be recomputed; if the change to the light doesn't change the shadowing (not all changes do), the results of the shadow may be reused; and so on.
Sorbetto is saving work and time largely by three means: (1) only re-sending the lights, not re-exporting and re-reading the entire scene; (2) not considering any objects that weren't visible in the first pass (in which it remembers which objects were visible and which were not); (3) caching (remembering) the values of certain shading operations so that only the things that change need to be recomputed, and other things that don't change may reuse their results from the previous render.
What Sorbetto Can Do
• Sorbetto lets you add lights, delete lights, change light linking (which objects are illuminated by which lights), move lights, or change any light parameter (for example, in Maya's Attribute Editor). After a change, the frame is rapidly re-rendered (including changes to shadows and reflections) in a fraction of the time it would take to do a full render of the frame.

Gelato 2.1 Mango User’s Guide December 14, 2006
114
• Sorbetto re-render images are pixel-for-pixel identical with regular Gelato images. Sorbetto shows fully antialiased images, with arbitrary levels of transparency, ray tracing, and motion blur. Anything you can render with Gelato, you can re-render with Sorbetto.
• Sorbetto works on any shaders - our shaders, your shaders, Mango's emulation of Maya shading nodes. No special preprocessing, instrumentation, recompilation, or limitations are necessary.
What Sorbetto CAN'T Do
• The first time Sorbetto renders a frame, it takes about as long as an ordinary render. Only subsequent renders are accelerated.
• Sorbetto can re-render a particular frame, but if you change which frame number, you have to do an initial re-render of the new frame.
• Sorbetto currently only allows light changes, and will not re-render changes to surfaces. (Note: it is intended for this restriction to be lifted in a future release.)
• The geometry may not change between re-renders; objects may not move, displacement may not change, and the camera may not move.

Gelato 2.1 Mango User’s Guide December 14, 2006
115
8.2 Basic Operations The basic method for using Sorbetto is as follows:
Initial Sorbetto render
Load a scene, choose a view and frame. When you are ready for the first render, start the initial render with the ``Sorbetto Re-Render'' shelf button:
The initial render will take approximately the same time as an ordinary Gelato render, perhaps slightly longer because it is ``remembering'' all sorts of additional information that will allow it to rapidly re-render.
Sorbetto re-render
As long as you are rendering the same frame, without moving the camera, selecting a different camera, or moving any geometry, you may re-rendering with Sorbetto by using the ``Sorbetto Re-Render'' shelf button:
You will find these Sorbetto re-renders to be much faster than a full ordinary render. It is typical to get an order-of-magnitude speedup, though the exact amount depends heavily on the scene and the lights. Generally, the biggeer the scene and the more lights you have, the faster the relative speedup will be.
Between successive Sorbetto renders, you may change any light parameter, move lights, change light linking, add lights, or delete lights. Sorbetto renders will automatically detect what lights have changed and do minimal recomputation to display the new image.

Gelato 2.1 Mango User’s Guide December 14, 2006
116
8.3 Advanced Sorbetto 8.3.1 Automatic updates
The ``Toggle Live Updates'' button turns on and off the automatic live updates. The button will appear pressed in when live updates are turned on, or sticking out when live updates are off.
When live updates are on, most light changes will automatically trigger a new Sorbetto render, without your having to take any additional action. You also do not need to wait for a previous change to finish rendering -- Sorbetto is fully interruptable, so you can continue to make multiple changes and see rapid updates as you go.
When live updates are off, changes to lights will not automatically start new Sorbetto renders. Rather, after making the desired light changes, you should click the ``Sorbetto Re-Render'' button manually to see an updated image.
You will probably want to use live updates nearly all the time. Occasionally, you will find scenes where this is annoying, and you specifically want to make several (potentially expensive, even with Sorbetto) changes simultaneously before seeing the updated image. In such cases, turn live updates off and use the ``Sorbetto Re-Render'' button manually when you are ready for an update.
8.3.2 Progressive refinement
The ``Progressive Refinement'' button turns on and off progressive refinement mode. The button will appear pressed in when live updates are turned on, or sticking out when live updates are off.
When progressive refinement is used, each Sorbetto render will actually be a preview render followed immediately by a full render that draws overtop the preview. The first (preview) pass tends to be extremely fast, and therefore lets you see big lighting changes nearly instantly, even when it takes many seconds for the high-res render to complete.

Gelato 2.1 Mango User’s Guide December 14, 2006
117
When progressive refinement is not used (the default), Sorbetto renders will only happen at the usual resolution.
You will probably want to use progressive refinement nearly all the time. Occasionally, you will find scenes where the preview render is not significantly faster than the high-res render, so that there is no benefit to doing the preview render at all, because it does not give you faster feedback. In such cases, turn progressive refinement off and just view the high-res Sorbetto final images.
8.3.3 Zooms, Priority Regions, and Cropping
When adjusting lighting, you are often concerned primarily with the changes to only a portion of the image. There are several ways to use this to your advantage and speed up Sorbetto's re-rendering.
1. Zoom in iv
When viewing Sorbetto re-renders in iv, all the usual iv controls are available -- you may zoom in and out (left and right mouse) and pan around (hold down middle mouse and drag). You can do this even while the pixels are still updating.
2. Priority Regions
You may designate a selection region as high priority. In the iv window, hold down the left mouse button and drag out a rectangular selection region. Then select the menu item Edit --> Prioritize Selection.

Gelato 2.1 Mango User’s Guide December 14, 2006
118
When a selection region is prioritized, pixels within the region will be recomputed first. After those pixels are recomputed, then the pixels outside the selection region will be recomputed (if a new Sorbetto render hasn't already been started, which will interrupt the old one and take over).
The selection region may be changed to a different group of pixels merely by dragging out another selection region (dragging with the left mouse held down). The menu item Edit -->Clear Selection may be used to clear the selection region, meaning that no region will be designated high-priority, and re-rendering will proceed as usual from upper left to lower right.
3. Cropping
If you are sure you are only interested in a particular region of the image, in the iv window you may hold down the left mouse button and drag out a rectangular selection region. Then select the menu item Edit -->Crop Selection.
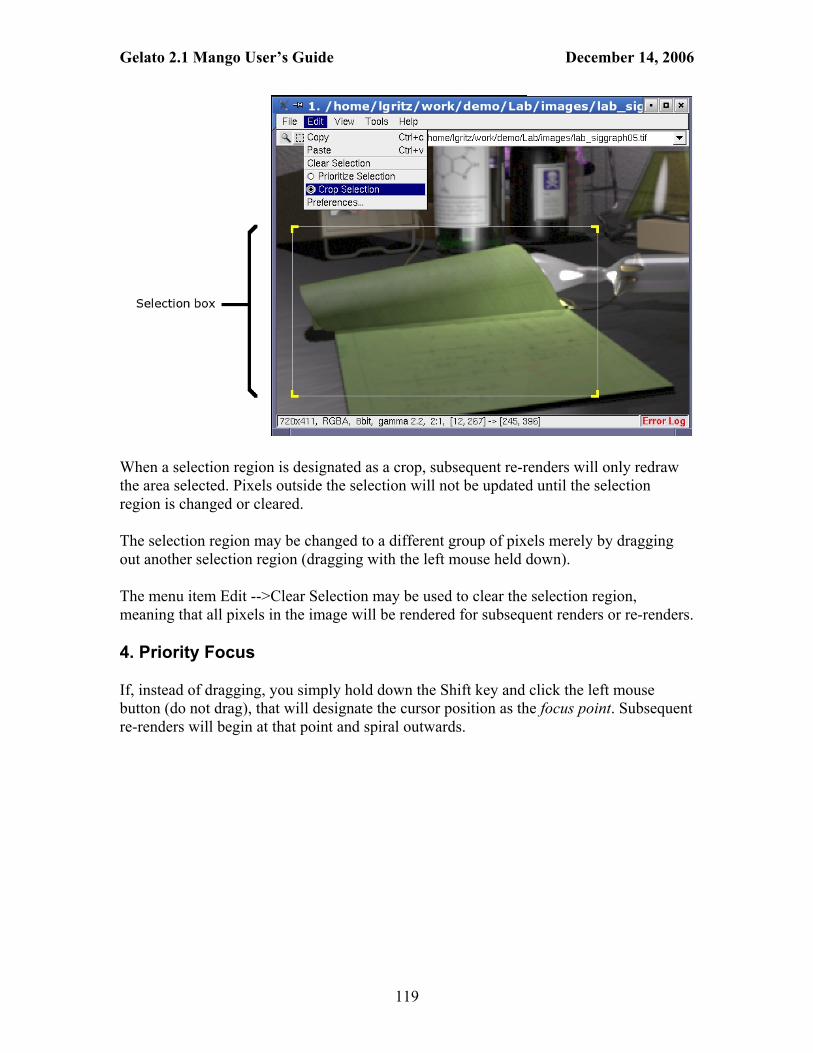
Gelato 2.1 Mango User’s Guide December 14, 2006
119
When a selection region is designated as a crop, subsequent re-renders will only redraw the area selected. Pixels outside the selection will not be updated until the selection region is changed or cleared.
The selection region may be changed to a different group of pixels merely by dragging out another selection region (dragging with the left mouse held down).
The menu item Edit -->Clear Selection may be used to clear the selection region, meaning that all pixels in the image will be rendered for subsequent renders or re-renders.
4. Priority Focus
If, instead of dragging, you simply hold down the Shift key and click the left mouse button (do not drag), that will designate the cursor position as the focus point. Subsequent re-renders will begin at that point and spiral outwards.

Gelato 2.1 Mango User’s Guide December 14, 2006
120
The menu item Edit -->Clear Selection may be used to clear the selection, meaning that subsequent re-renders will have no focus point, and will proceed as usual from upper left to lower right.
8.3.4 Seeing the effect of one light
Sometimes it is helpful to isolate a single light (or a subset of lights) and temporarily. We call this light solo, and it's easy to solo a light, see its effects and changes its attributes with Sorbetto, and then un-solo (turn on the other lights), all still using Sorbetto.
The ``Solo lights'' button will temporarily turn off all lights that are not currently selected. Subsequent changes to that light will be visualized by Sorbetto.
When the ``Unsolo lights'' button is pressed, all the lights will be turned on.
Below is an example of soloing just the overhead light:

Gelato 2.1 Mango User’s Guide December 14, 2006
121
8.3.5 Updating shadows and rays
When ray tracing is used for reflections or refractions, relighting is a little more complicated (not to mention expensive) because a light that doesn't shine on a particular object can nonetheless affect its appearance if it shines on other objects visible in the reflections. By default, Sorbetto tracks which objects are visible in the reflections of other objects, and therefore can correctly recompute the reflections if lights have changed on any objects visible in those reflections.
The ``Toggle reshading of rays'' shelf button toggles between the default behavior (track and reshade rays) and the much less expensive alternative of not reshading traced rays. The button will appear pressed in when reshading of rays is turned on, and will appear to be sticking out when reshading of rays is turned off.
At times that you are willing to accept that reflections may be slightly wrong (inasmuch as they will not correctly update as lights are changed), it can greatly speed up re-renders to turn off the reshading of rays. This can be very helpful reducing re-rendering time, when you are not specifically concerned with the appearance of the ray-traced reflections.
Similarly, you have a choice about whether shadow maps are recomputed automatically if the position or orientation of a light changes. This is because a shadow map requires a separate render, and can greatly increase the amount of time that a re-render will take. Note that this only applies to shadow maps; ray-traced shadows are always recomputed of the shadows light is re-oriented.

Gelato 2.1 Mango User’s Guide December 14, 2006
122
The ``Toggle shadow map updates'' shelf button toggles between the default behavior (recompute shadow maps when lights move) and the much less expensive alternative of not regenerating shadow maps. The button will appear pressed in when shadow map updates are turned on, and will appear to be sticking out when shadow map updates are turned off.

Gelato 2.1 Mango User’s Guide December 14, 2006
123
8.4 Sorbetto Tips You will probably want to use automatic live updates and progressive refinement nearly all the time.

Gelato 2.1 Mango User’s Guide December 14, 2006
124
9. How Do I...? / Troubleshooting
9.1 Common ``How do I'' Questions 9.1.1 How do I render a Maya polygonal mesh in Gelato as a subdivision surface?
Select the mesh and in the Attribute Editor, under the Gelato tab, you will see a way to select Interpolation as either ``Linear'' (polygonal) or ``Catmull-Clark'' (subdivision).
See Section 5.1.4 for details.
9.1.2 How do I get arbitrary Pyg inserted into the output that affects the whole scene?
In the Render Global Settings -->Gelato Tab, you will find a ``User script'' box. The checker button next to the box calls up a multi-line text editor in which you can directly enter Pyg to be inserted into the output right before World by prefixing it with "pyg «". For example:
pyg << ... your own Pyg ...
See Section 5.7 for details.
9.1.3 How do I get arbitrary Pyg inserted into the output for just one object?
Select the node in question, open the Attribute Editor, and edit the ``Notes'' field. Enter the following into the Notes:
#gelato pyg << ...one or many lines of Pyg code...
See Section 5.7 for details.
NOTE: there's a strange artifact of the Maya UI, where changes to the "notes" field don't quite register until you click on another Maya UI element. So after you type this, just mouse click on another input field (or often it works to just bring another non-Maya window into focus).

Gelato 2.1 Mango User’s Guide December 14, 2006
125
9.1.4 How do I batch export/render from the command line or shell script?
Here is the shell command to run Maya in batch mode with a given project directory and scene file. In this example, for the Maya command, we execute a MEL file called "gelatorender.mel".
maya -batch -proj "projectdirectory" -file "myscene.ma" -command "source \"gelatorender.mel\""
You can put any commands you like in the MEL script. Below is an example "gelatorender.mel" that will export the scene as pyg files:
setAttr defaultRenderGlobals.imageFilePrefix -type "string" "./imagename"; gelatoBatchExport("./export");
In this example, the top-level pyg file will be called "export.pyg" and the rendered image will be called "imagename.EXT" (where EXT is the proper file extension for whatever format you are writing according to the render global settings in the Maya scene file). It should be obvious how you would name the pyg files something different or name the image file something different, You could add other MEL commands to the script, in order to render a specific frame, set other options, etc. You could also easily collapse the whole operation down to just the "maya -batch" command without needing the separate .mel file.
And then you can render with the following shell command:
gelato export.pyg
(Or, of course, a different name if you so specified in the export command.)
9.1.5 How do I include a "delayed archive"?
Sometimes you want to include geometry that you have saved as a Pyg file (or other format) but that doesn't exist in the Maya scene. This can allow you to render very large amounts of geometry (because Gelato can render models much larger than Maya can hold in memory).
See Section 5.7 for details on how to use the "notes" field in the Attribute Editor to insert Pyg renderer commands at that point in the scene traversal.
To cause a Pyg file to be inserted here, this is what you'd put in the notes field:

Gelato 2.1 Mango User’s Guide December 14, 2006
126
#gelato pyg << Input("model.pyg")
It is even more effective if you can tell the Input statement the local bounding box that encloses the object (in the order: xmin, xmax, ymin, ymax, zmin, zmax). If you do this, Gelato will not read that input file until (and unless) the contents of that volume is needed. For example:
#gelato pyg << Input("bar.pyg", (-1, 1, -2, 2, 2.12, 3.14))
So if you had a bunch of complex geometry (especially if "instanced" in some way), you could export that object as pyg once, then have a "proxy" object that doesn't really have any renderable geometry but does have the command to do a delayed input of the archived pyg file. (Will work fine with RIB, too, if you have the rib.generator.dll handy.)
Gelato 2.1 Mango User’s Guide December 14, 2006
127
9.2 Miscellaneous Troubleshooting 9.2.1 Problem: Missing Gelato shelf icons
If the Gelato "shelf" doesn't display the icons properly, the problem is almost certainly that your XBMLANGPATH environment variable is not set properly to point to the icons. The Gelato for Windows installer should do this automatically. For Linux, you will need to set the environment variable yourself. Please consult Section 2.2.3 for instructions.
9.2.2 Problem: Cluttered temp directory
If Pyg files and other files created during the Mango export or Gelato rendering process are filling up your temp directory, just delete them all (but not in the middle of a render!) and be sure to turn on Render Settings -->Gelato -->General --> ``Clean up temp files''.
9.2.3 Problem: Running out of disk space when batch rendering
When you batch render, normally each frame will export Pyg commands, and after all frames have exported, those frames will render one by one. This is fine as long as you have plenty of disk space. But if your scene is very complex, so your exported Pyg files are very large, batch rendering many frames can lead to these files consuming a huge amount of disk space. The solution is to turn on Render Settings -->Gelato -->General -->``Interleave export/render for batch'' and also be sure ``Clean up temp files'' is enabled. When both of these are enabled, each frame will be rendered immediately after being exported (and then the temp files deleted), before proceeding to the next frame.

Gelato 2.1 Mango User’s Guide December 14, 2006
128
Index ambient occlusion
4.9 | 7.3 antialiasing
4.2 archive files
9.1.5 baking
3.9 | 4.14 batch rendering
3.6 | 9.1.4 binary pyg
4.1 bucket size
4.6 caustics
7.4 cloth
5.3.2 coordinate systems
naming via locator nodes 5.6
crop regions in Sorbetto 3.
delayed archive 9.1.5
delayed input 9.1.5
depth maps enabling depth maps 4.5
depth of field 4.2
displacement 6.3
exporting Pyg files 3.7
film gate 4.5
filter pixel filter 4.2

Gelato 2.1 Mango User’s Guide December 14, 2006
129
fog lights 4.12 | 7.5
fur 5.3.2 | 5.4
gamma correction 4.5
GI see global illumination
global illumination 4.7 | 7.2
graphics board requirements 2.1.0.3
graphics driver requirements 2.1.0.4
grid size 4.6
hair 5.3.2 | 5.4
hardware requirements 2.1
image viewer 4.1
indirect illumination 4.7 | 7.2
installation 2. | 2.2 to 2.2.4 Windows 2.2.2 | 2.2.3
iv 4.1
light linking shadows obeying light linking 4.5
light solo in Sorbetto 8.3.4
lighting tool see Sorbetto re-rendering
lights substituting a Gelato light shader 7.6
locator nodes 5.6
materials 6. | 6.1
motion blur 4.4

Gelato 2.1 Mango User’s Guide December 14, 2006
130
multiprocessing 4.6
multithreading 4.6
naming coordinate systems using locator nodes 5.6
network rendering 4.1
NURBS 5.1.1
OS requirements 2.1.0.6
output elements 3.8 | 4.15
overriding shaders for all objects 4.8
Paint Effects 5.5
particles 5.3.1
pixel filter 4.2
polygons 5.1.2 rendering polygon meshes as subdivision surfaces 5.1.4
preview mode 3.5 | 4.2
priority regions 2.
proxy objects 5.8
pyg binary vs ASCII 4.1 inserting arbitrary Pyg into scenes 5.7
Pyg files exporting Pyg files 3.7
pyg proxy objects 5.8
ray tracing 4.3
re-rendering see Sorbetto re-rendering

Gelato 2.1 Mango User’s Guide December 14, 2006
131
reflection blur 6.1.2
refraction blur 6.1.2
render globals see render settings
render settings 4. to 4.15 ambient occlusion 4.9 antialiasing 4.2 baking 4.14 bucket size 4.6 default per-object attributes 4.11 general options 4.1 global illumination 4.7 grid size 4.6 indirect illumination 4.7 memory and performance 4.6 motion blur 4.4 multiprocessing/multithreading 4.6 output elements 3.8 | 4.15 overriding shaders 4.8 ray tracing 4.3 stereo rendering 4.13 subsurface scattering 4.10 texture memory 4.6 volume effects 4.12

Gelato 2.1 Mango User’s Guide December 14, 2006
132
rendering the current frame 3.4
rendering the selection, or all objects 3.3
requirements (HW, SW, graphics, OS) 2.1
search paths 4.1
selecting Gelato as the renderer for Maya 2.
shaders using Gelato shaders instead of Maya shading networks 6.2
shading networks 6.1
shadow maps enabling depth maps 4.5
shadows 7.1 blurry shadows 7.1.1 depth maps 7.1.1 | 7.1.3 dynamic shadow maps 7.1.3 ray-traced shadows 7.1.2 volume shadows 7.1.4
Shave and a Haircut 5.4
shelf buttons 3.1
solo a light 8.3.4
Sorbetto re-rendering 8. automatic updates 8.3.1 crop regions 3. initial Sorbetto render Initial priority regions 2.

Gelato 2.1 Mango User’s Guide December 14, 2006
133
progressive refinement 8.3.2 updating shadows and rays 8.3.5 zooming 1.
spatial quality 4.2
stereo rendering 4.13
subdivision surfaces 5.1.3 | 5.1.4
subsurface scattering 4.10 | 6.4
system requirements 2.1
texture baking see baking
threads 4.6
viewer 4.1
volume effects fog lights 4.12 | 7.5
volume shadows 7.1.4
volumes 4.12
© 2005-2006 NVIDIA Corp.


