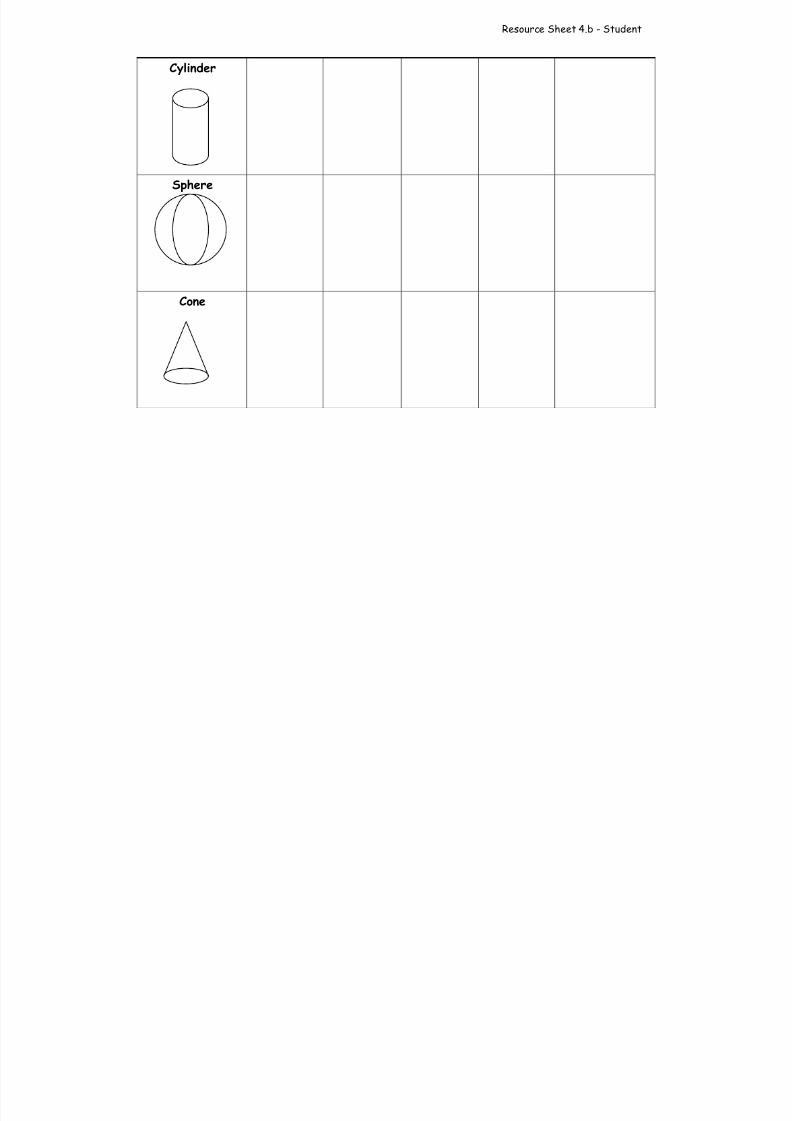
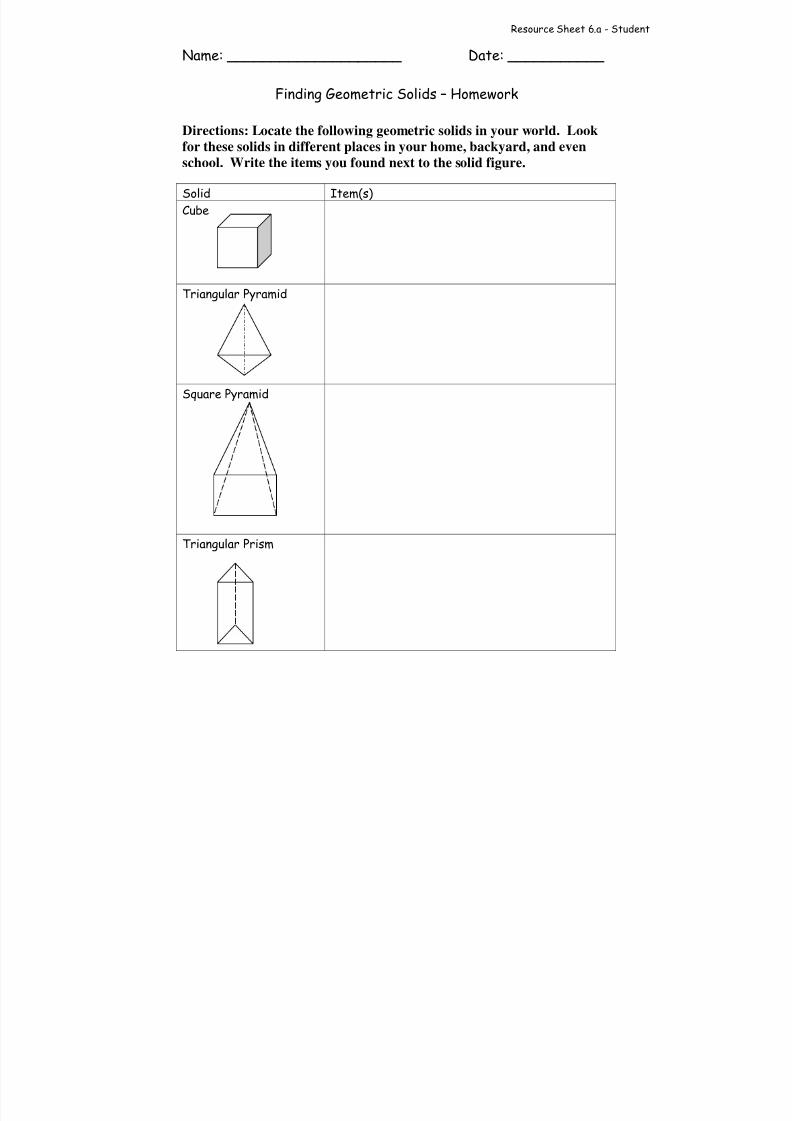
Ge ome t r i c S oli ds : Ge ome t r i c Gumdr op Ga l ore Br ie f Ove r vie w: This is a four -day lesson to identify and pr act ice using geom etr ic solids. Students will identify the sim ila rit ies and differ ences of two- dimensional and t hree- dimension al shapes. They will explor e fa ces, edges, and v er tices of eight geometric solids. A fter crea ting their own geometr ic solids, they will use diffe rent solids to cr eate a model town. NCTM Conte nt S t anda r d/National S cie nce Educati on S tandar d : Geometry Gr ade /L e ve l : Third - F ourth Duration/Length: F our one-hour sessions S t udent Out come s : Students will: • I dentify, compar e, and ana lyz e at tr ibutes of two and thr ee dimensional shapes and dev elop v ocabular y to describe the attr ibutes • I nv estiga te, descr ibe, and r eason about the resul ts of subdividing, combining, and tra nsforming shapes • Build and dr aw geometric objects • Cr eate a nd describe men tal images of objects and r ecogni z e and apply them to other discipli nes M ater i als and Re s our ce s : • Geom etric solids to display and for student use • Cubes for making pr ints with paint (use numbe r cubes, paper cubes, etc. ) • Mystery box or bag • Venn Diagr am (s tudent copies and t eacher copy for displa y) (R S 1) • Venn Dia gr am Sample Response (R S 1. b) • Les son 1 Exit Ca rd (RS 2) • Les son 2 Re sponse Ca rd s (index car ds) (R S 3) • Geometr ic Solids Attr ibute Cha rt (R S 4. a.b) • Geometr ic Solids Attr ibute Cha rt (R S 4. c. d) • Les son 2 Exit Ca rd (RS 5)
This is a four-day lesson to identify and practice using geometric solids. Students
will identify the similarities and differences of two-dimensional and three-dimensional shapes. They will explore faces, edges, and vertices of eight geometric solids. A fter creating their own geometric solids, they will usedifferent solids to create a model town.
Lesson 1 Comparing 2-dimensional Shapes and 3-dimensional Figures
Preassessment – See Launch
Launch – Share objective with students. Introduce the “Mystery Bag.” Explain to students that you have placed an item in the bag and their job is to reach into the bagwithout looking and describe what they feel to their classmates. Use the cube, but nameit “Item 1”. Have a few students come up and describe Item 1. Record studentobservations on chart paper or overhead. After descriptions, reveal the mystery figure. Have students check the accuracy of their descriptions. Observations should include butare not limited to: pointy, flat, square, six sides.
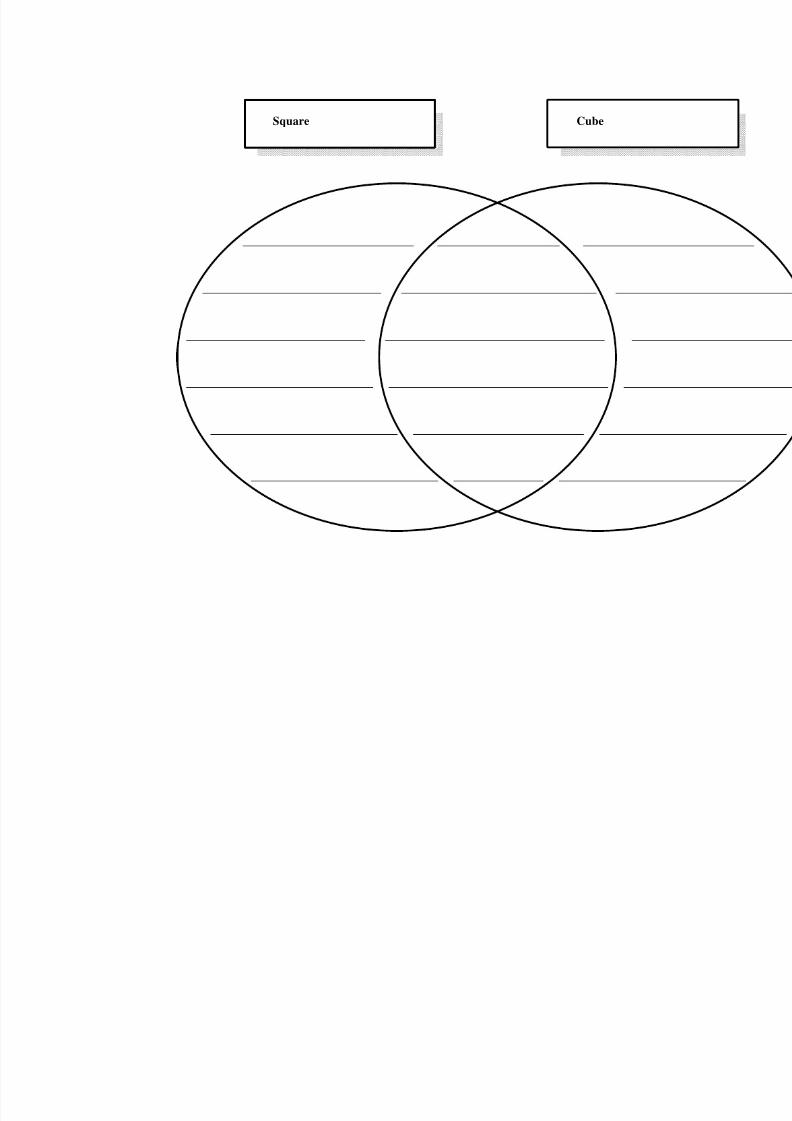
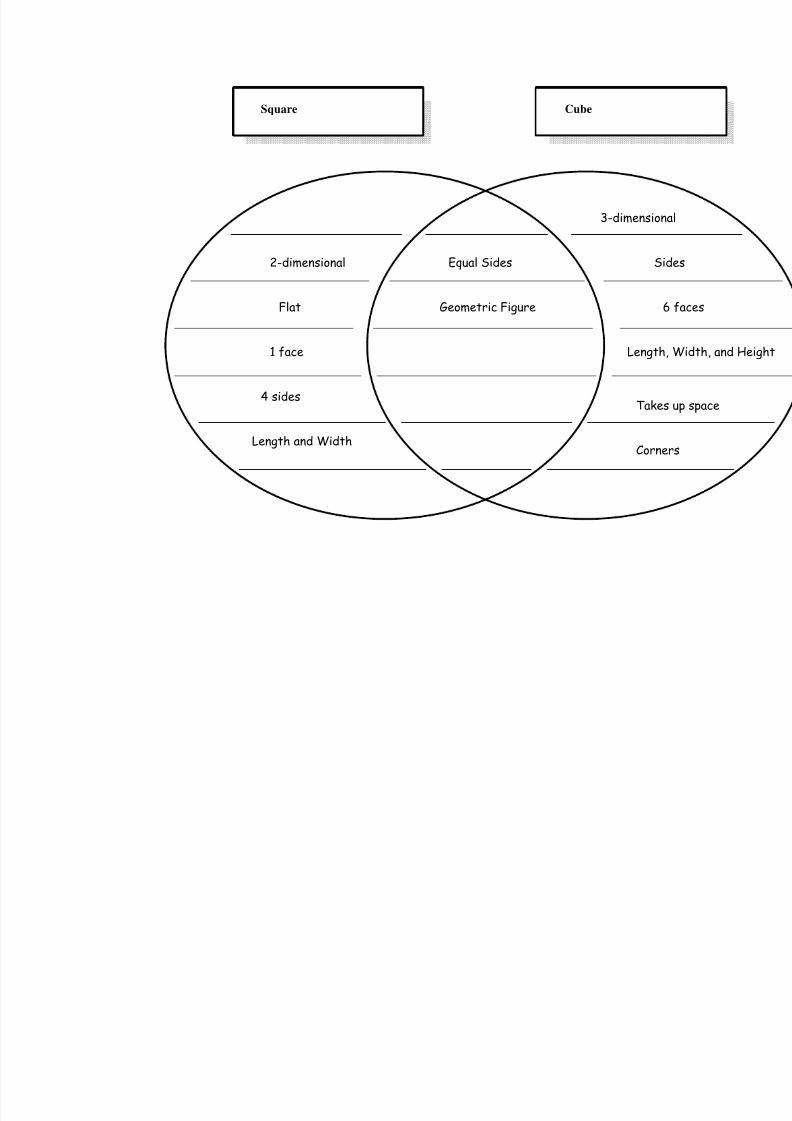
Teacher Facil itati on /Student Appl icati on – Display the cube so that all students can seeit. It is important to have the students make the connection between 2-dimensional
shapes and 3-dimensional shapes at this point. Distribute paint trays with any color paint, plain paper, and cubes to each table. Model how to dip one face of the cube in paint andmake a print on the paper. Have students complete this process. Have each student holdup their prints. Ask students, “What shape was made using the cube?” Students shouldbe able to recognize that it is a square. Pose the question, “What would happen if youused a different side of the cube to make your print?” Collect paint materials, but leaveclean cubes on desks. Distribute Venn Diagrams to each student (SR 1.a). On a largermodel or overhead, write square on one side and cube on the other. Explain that they willbe comparing the shapes. Ask students what is similar about the square and the cube, andwhat is different. The discussion should produce answers like: there are 6 squares in thecube, all sides are equal, the cube looks like a square in every direction, etc. Use the
following questions to guide the discussion:• What do we call shapes like the square?
• What shape takes up more space?
• Do both shapes have length?
• Do both shapes have width?
• Do both shapes have height? If students have not generated the terms 2-dimensional and 3-dimensional, introducethem at this time. Explain that the square has length and width, but not height, and the
cube has all three. Complete the Venn Diagram. Explain to students that the parts of thecube they described earlier have fancy mathematical names. Without giving students theactual term, point to the “face” and ask, “What name would you give part of this cube?”Students can Think, Pair, Share responses. If face is not a response, reveal the term to the students. Have students write face in their journals. Continue the same process with
edge and vertex. Have the students define each term in their own words. Below are theactual definitions of each term. Make sure that the student definitions resemble these: Face: Polygonal regions that make up the surface of a solid or the flat side of a geometric solid. Edge: The line where two faces of a geometric solid come together.Vertex: A point where edges meet. Have students write these definitions in their journals. You may also want to displayterms on a Math Word Wall.
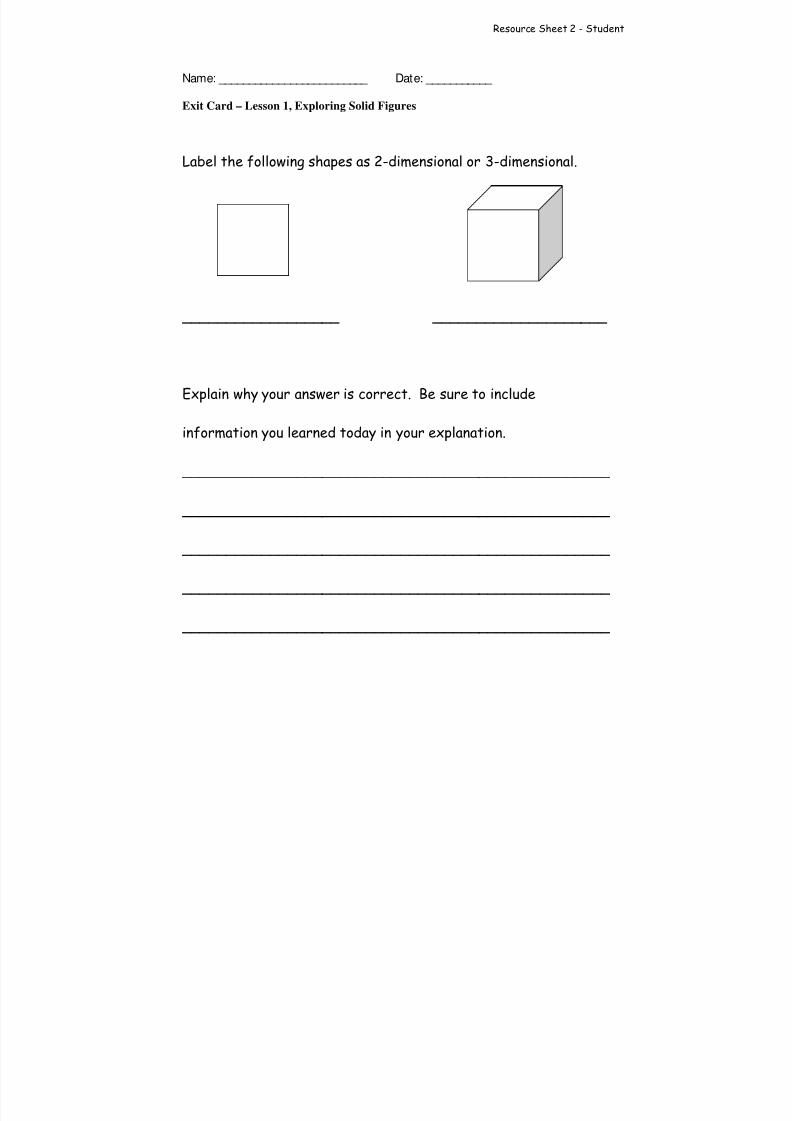
Embedded Assessment - Observe student responses throughout the lesson. A t the end of the lesson, distribute Lesson 1 – Exit Card (RS2). Use student answers on Exit Card to
guide instructions and groups for next lesson.
Reteaching/Extension –§ For those who have not completely understood the lesson, pull small
groups and complete the same process with another solid, like a coneor a pyramid. Show them the faces and explain that 3-dimensional figures have length, width, and height. Use snap cubes to constructcubes.
§ Provide different geometric solids for the students who understand theconcept and have them identify the 2-dimensional figures they see.Students can also classify 2-dimensional and 3-dimensional figures.
Lesson 2 Identifying Solid Figures
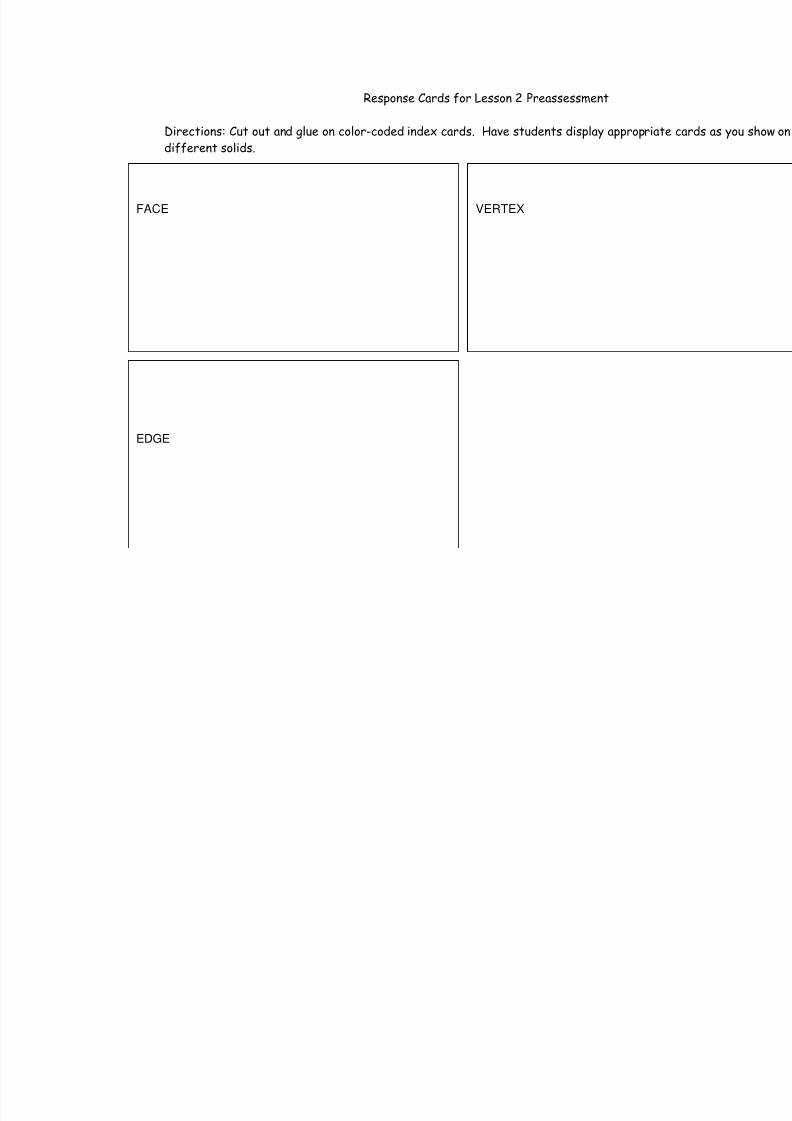
Preassessment - Display the cube. Ask students to name it. Ask students if it is a 2-dimensional or 3-dimensional shape? How do they know? Pass out Lesson 2 ResponseCards (RS 3), and explain to students that they will hold up the appropriate card as you point to it on the cube.
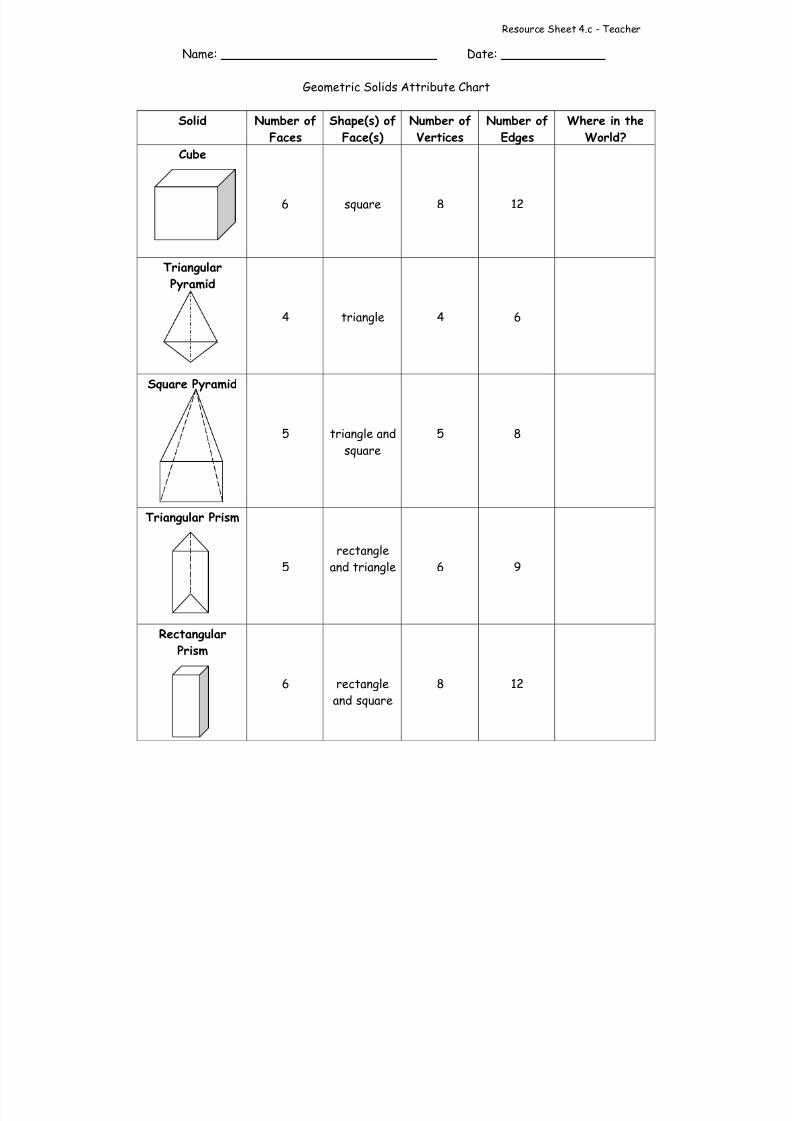
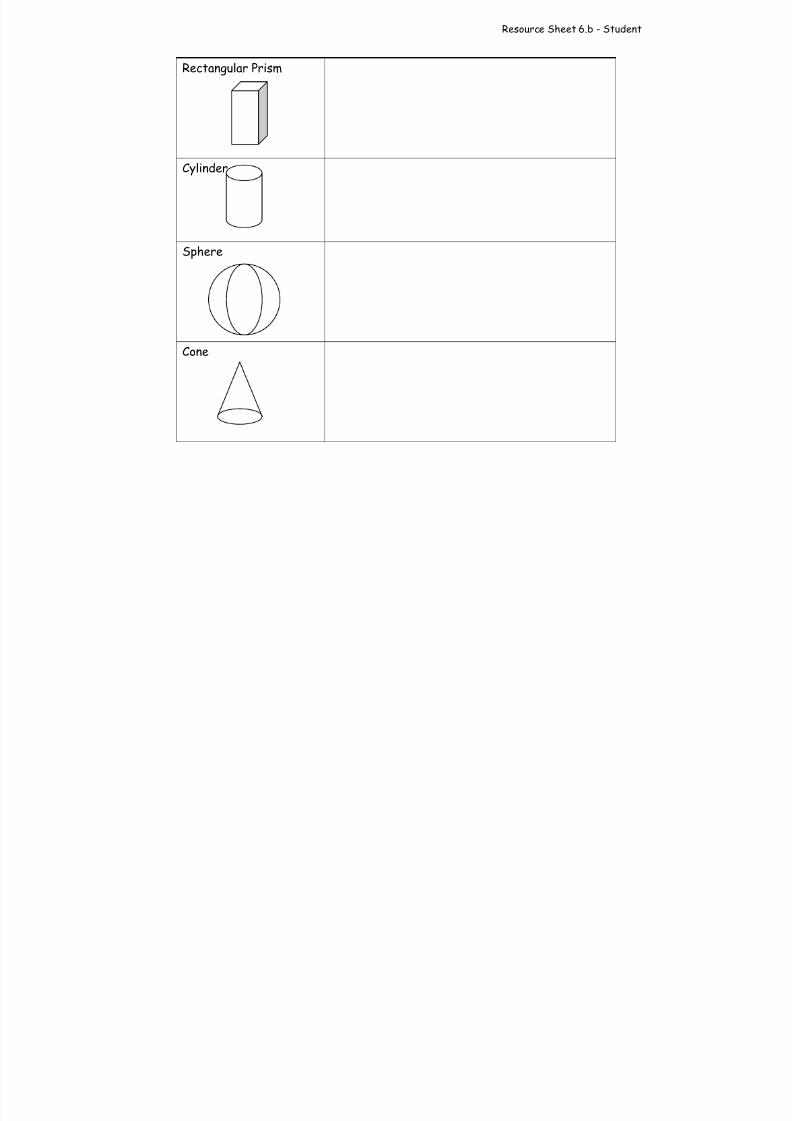
Launch – Share objective with students. Display the following geometric solids for all to see: cube, square and triangular pyramids, triangular and rectangular prisms, cylinder, sphere, and cone. Explain that these are other geometric solids and can be described justas the cube was using the terms, face, vertex, and edge. Identify solids by name.
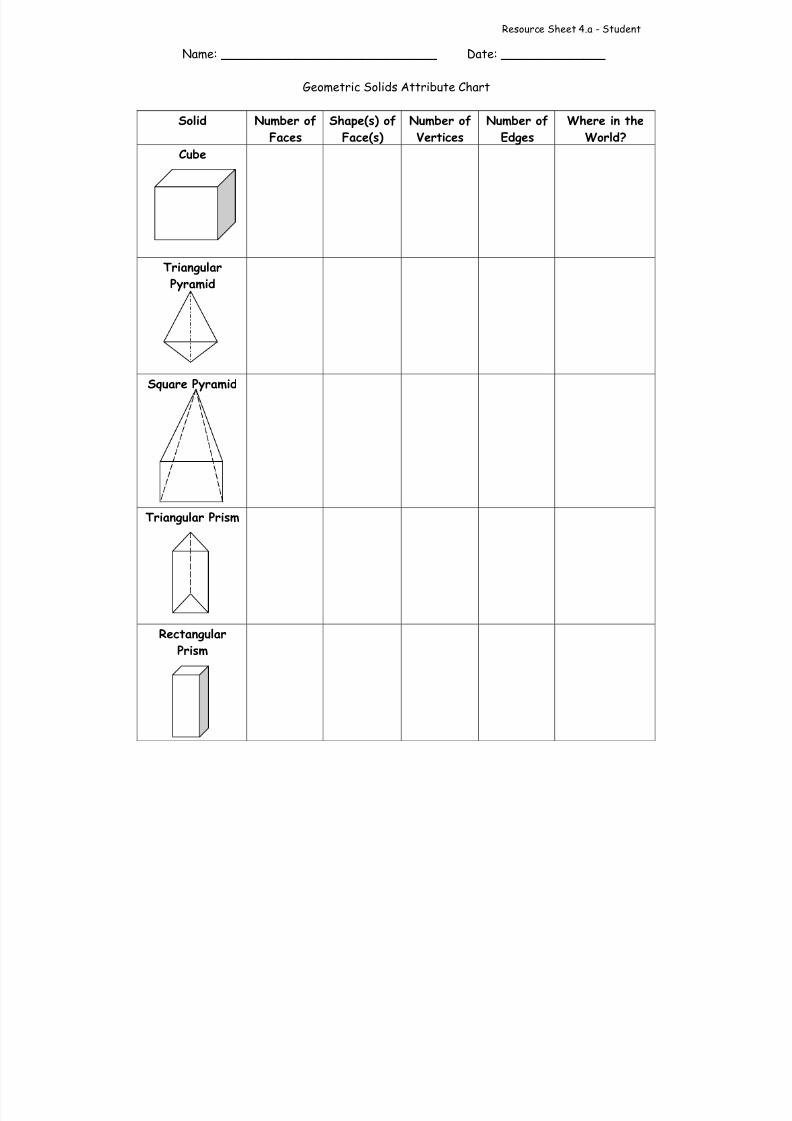
Teacher Facil itati on - Review the terms face, vertex, and edge (See Lesson 1 fordefinitions). Distribute cubes to students. Using an overhead of the Geometric Solids Attribute Chart (RS 4.a.b), model how to complete the chart using the cube. Include thenumber of faces, edges, vertices, as well as the shape of the faces, and where the solidcan be found in everyday life. Make sure that students are pointing to and counting thecorrect areas as you write on the overhead.
Student Appl ication - Explain to students that they will be completing the chart fordifferent solids. Divide the class into cooperative groups using Lesson 1 Exit Card. Be sure to distribute students who showed mastery of Lesson 1 objective throughout the groups. You will rotate the shapes throughout the groups. Assign a different geometric
solid to each group for Rotation 1. Be sure that all students get the opportunity to holdthe figure. The number and size of your groups depends on the number of students in your classroom. Each student should complete his or her own chart for each solid, but should work as a group to generate answers. Explain to students that they do have theoption of recording a different answer if they cannot agree, but they have to be able to justify their answers. A llow 3-5 minutes for each rotation. Bring students back togetherwhen finished. Share results on overhead. Be sure that all students have CORRECTinformation on their charts.
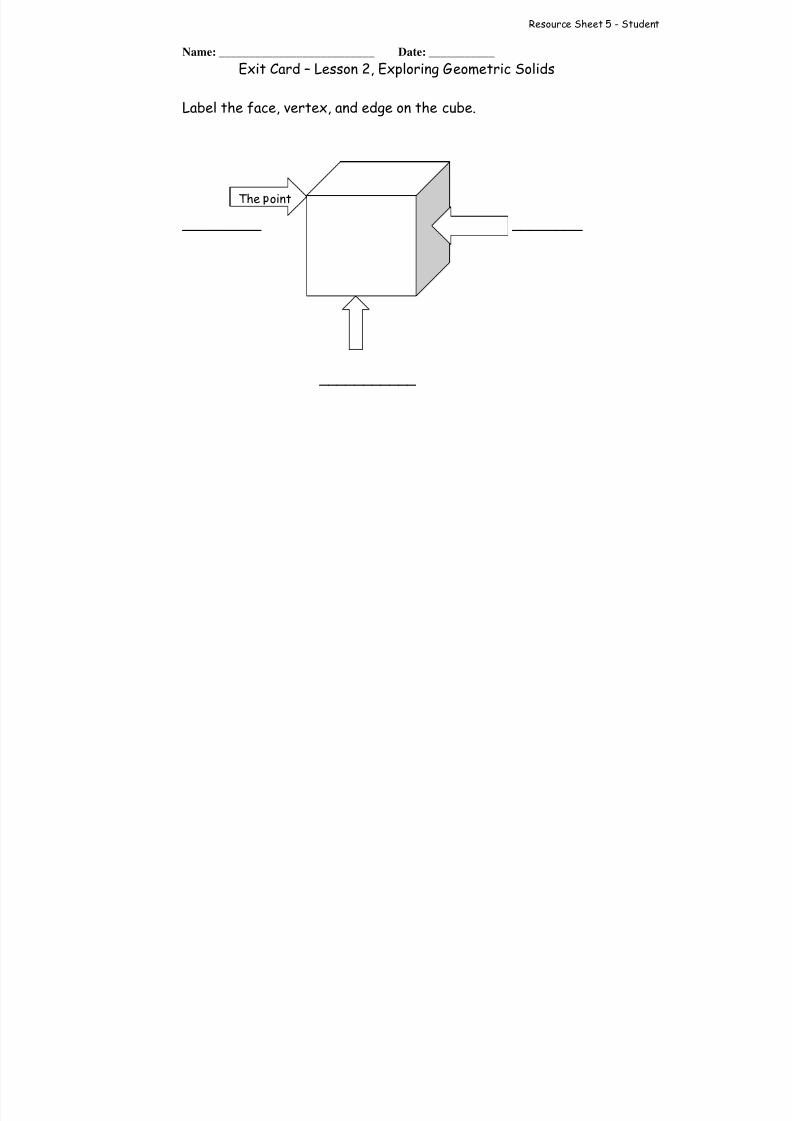
Embedded Assessment – Teacher should rotate through each group and observe studentunderstanding of face, vertex, and edge. At the end of the lesson distribute Lesson 2 Exit
Card (RS 5).
Reteaching/Extension- § For those who have not completely understood the lesson, pull them aside and
have them explore the different solids. With more direct instruction, count the faces, edges, and vertices of each solid. If students are struggling withidentifying shapes, reference the following website:http://www.mathsurf.com/k/ch7msie/cone.html
§ For those who have understood the lesson, have them organize the solidsaccording to their attributes and have them detect any patterns in the numberof faces, edges, and vertices. Students can do this using the “Study theShapes” and “Look for Patterns” buttons at the following website:http://illuminations.nctm. org/imath/35/GeometricSolids/GeoSolids3.htmlT
Lesson 3 Creating Nets from Shapes
Preassessment - Give clues about geometric solids the students have been learning about
the last two days and have the students guess which solid you are describing.
• I have one circular face. I also have a curved surface. What geometric solid am
I? Answer: cone
• I have six faces. All of my edges are the same length. Which geometric solid am
I? Answer: cube• I have an odd number of vertices. I have the same number of faces and vertices.
Which geometric solid am I? Answer: square pyramid
Launch - The students will use the knowledge they gained about geometric solids the
previous two days to create nets to share with their peers. The students will use the nets
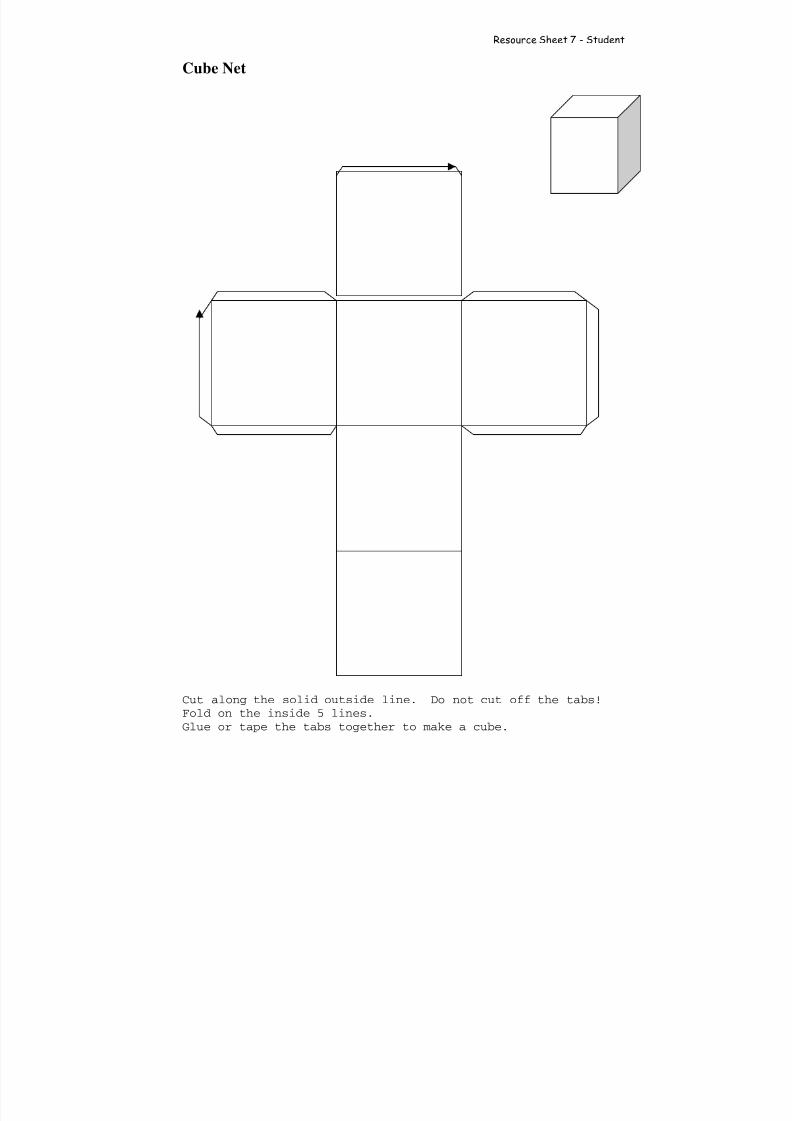
Teacher Facilitation – The teacher will show one example of a net to the class. The
example will be a cube. The teacher will explain that to create a net the students must
draw all of the parts their classmates will need to successfully make the geometric solid.
The teacher will model how to create the net. “A jacket for a geometric solid that can be
folded to create the surface of the solid is called a net. A net is a way of representing a
polyhedron in two dimensions” (nctm.org). While modeling, the teacher will remind thestudents that to create a correct figure they need to be thinking about the number of faces,
edges, and vertices their shape has. The teacher will place a cube on a piece of paper.
The teacher will trace the cube. The teacher will roll the cube forward once and trace the
cube again. The teacher will roll the cube back to its original place. The teacher will roll
the cube to the left once and trace the square. The teacher will roll the cube back to its
original place. The teacher will roll the cube to the right once and trace the square. The
teacher will roll the cube back to its original place. The teacher will roll the cube back
once and trace the square. The teacher will roll the cube back once again and trace the
square. The teacher has now drawn an outline of the cube. The cube will not yet work
without tabs to glue or tape. The teacher will draw tabs on the top of the net and around
the left and right parts of the net. The teacher will outline the outside edge of the net.That is what will be cut out. The inside lines will be folded to create the solid. The
teacher will model cutting out and gluing the net into a cube.
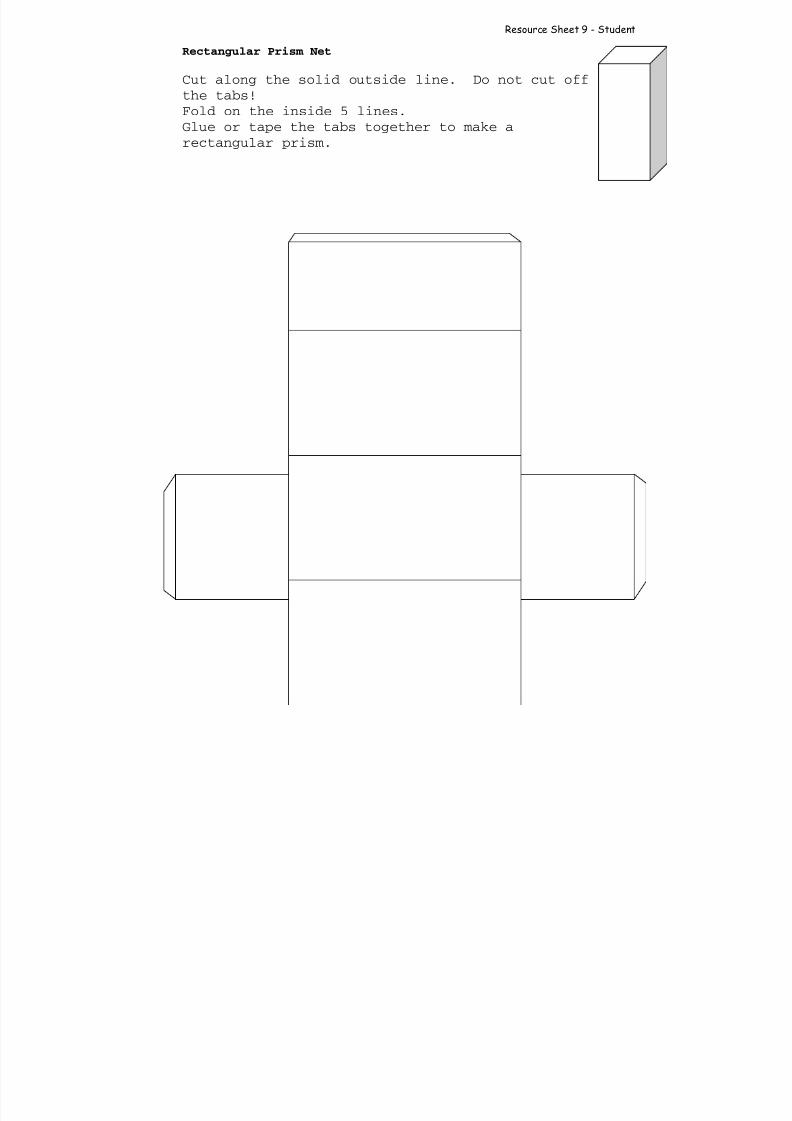
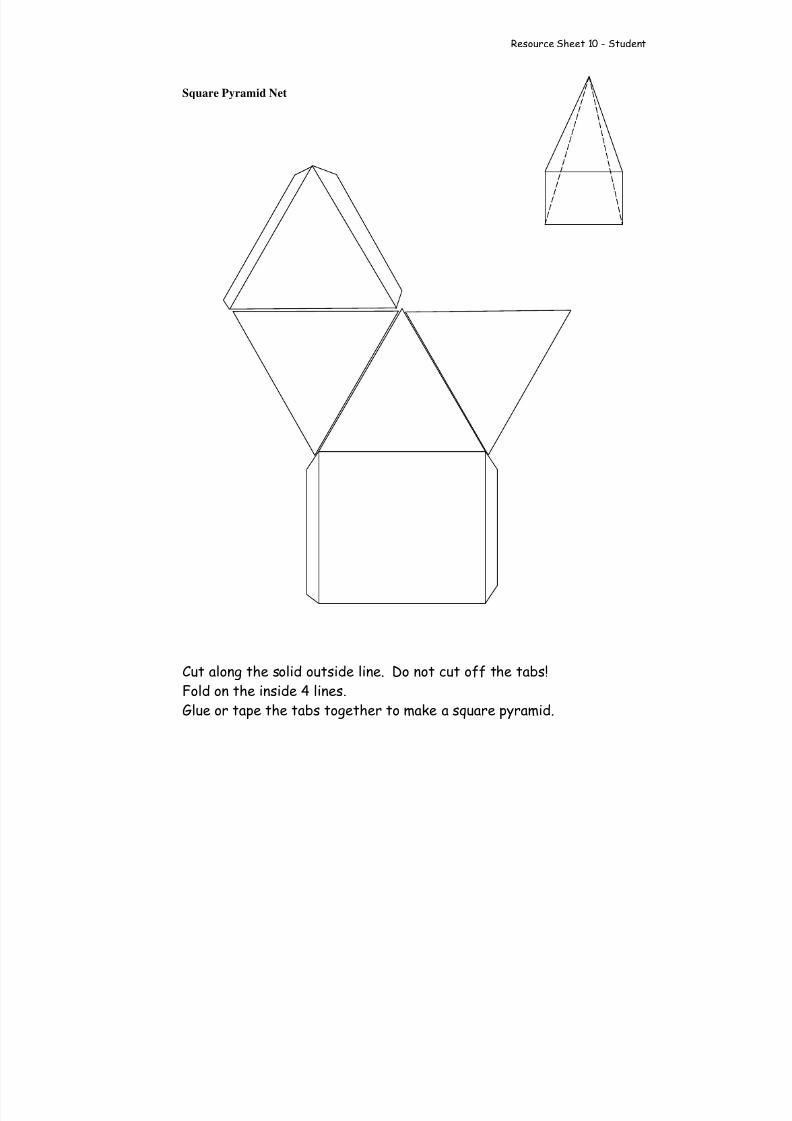
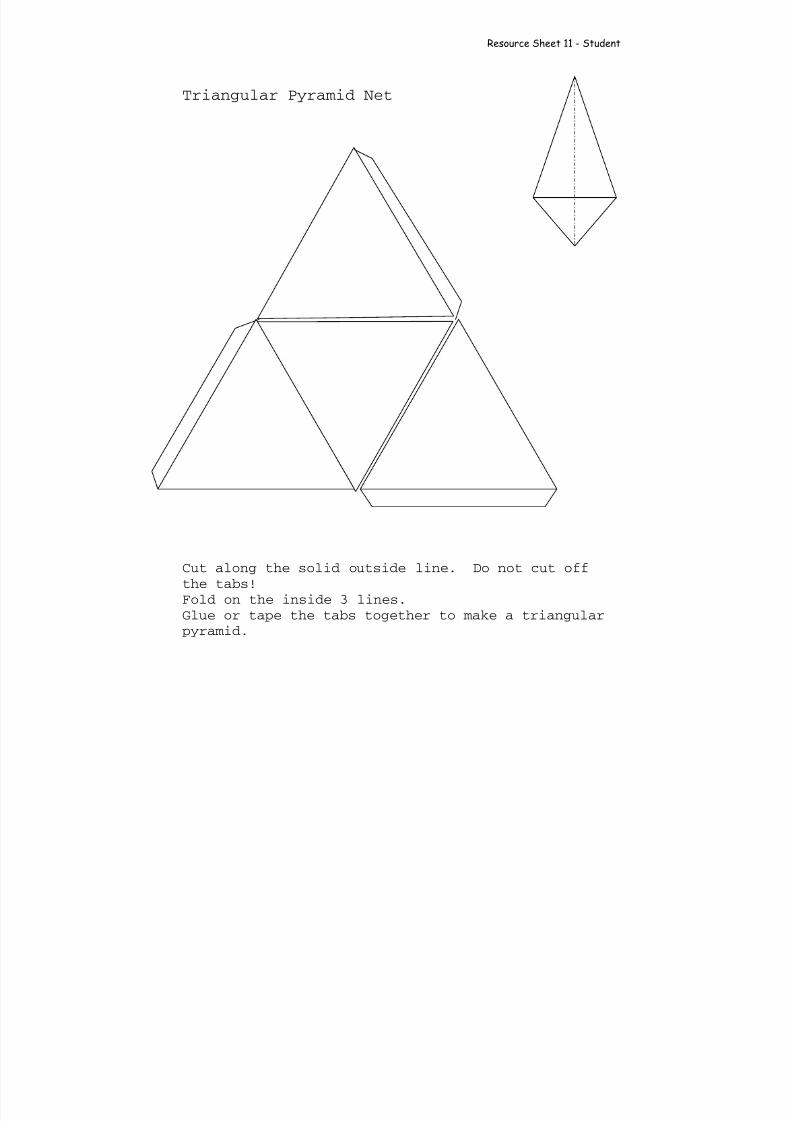
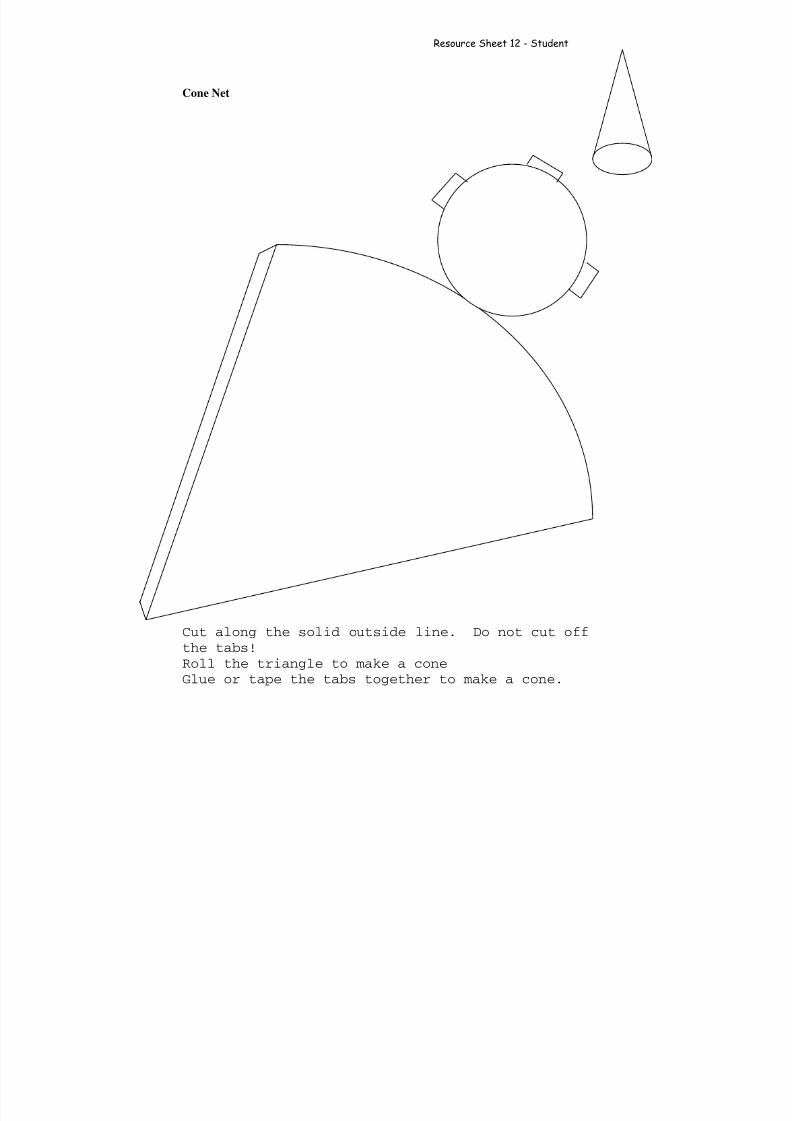
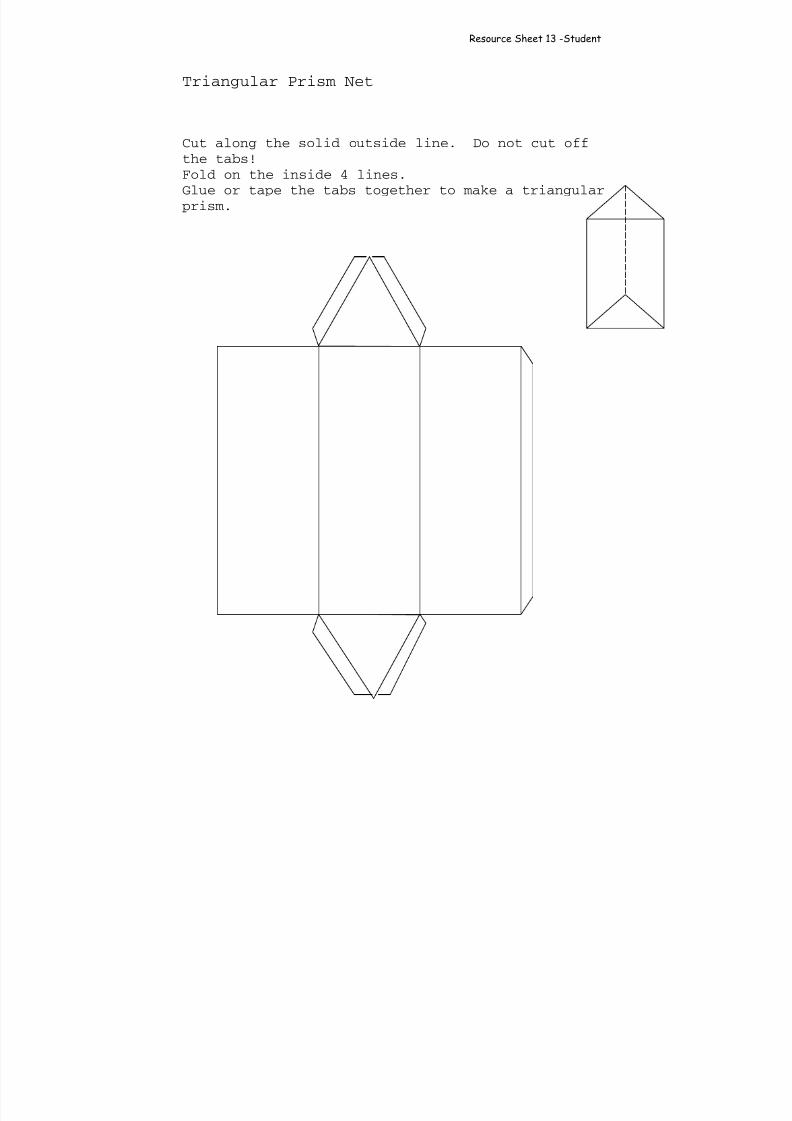
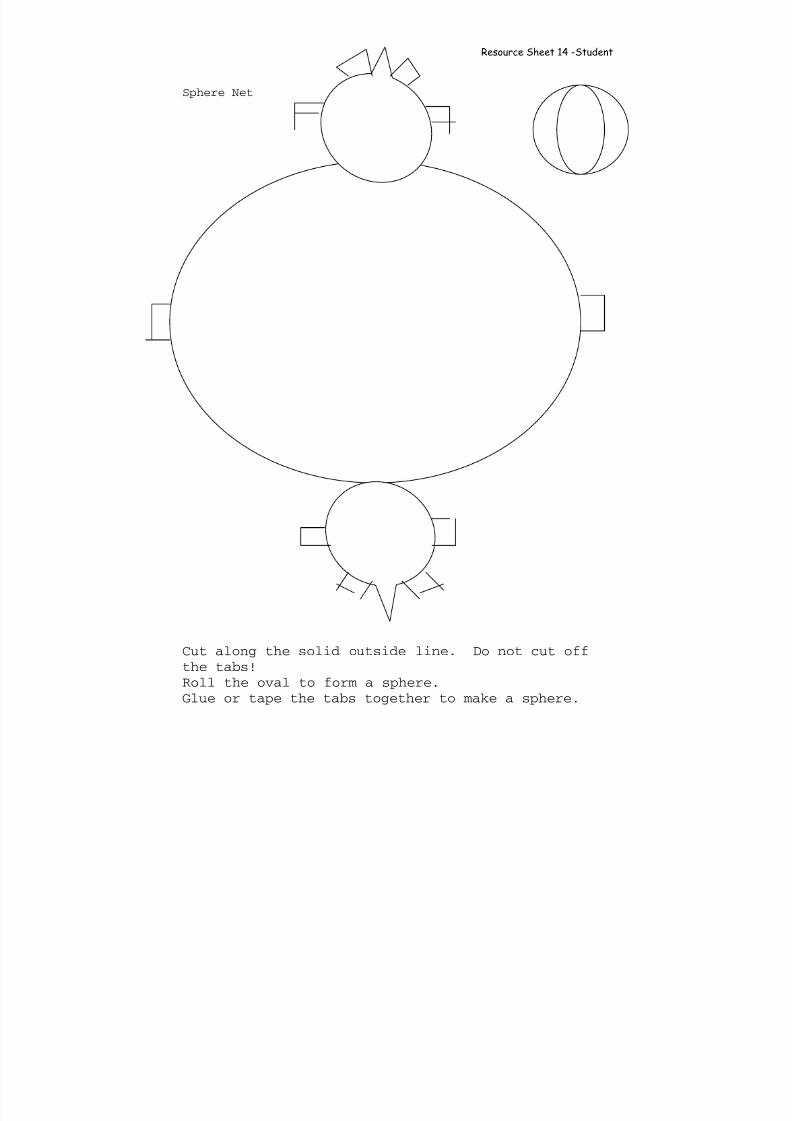
Student Application – Put the students into groups to create the other nets. There will be
six or seven groups. The students will create nets to make triangular pyramids., square
pyramids, triangular prisms, rectangular prisms, cylinders, cones, and spheres. If there is
a GT or advanced group they should get the sphere. It will be the most challenging
geometric figure to create. Give each group a solid to use to create their nets. The
teacher will walk around and help groups of students to create their nets. Ask questions
to help them problem solve while drawing their nets.
•
How many vertices does your net need?• How many edges does your net need?
• How many faces does your net need?
• Where will you put the tabs?
• Will you have to make the net more than once to make it correctly?
After they have created the net for their figure have students create one of each of the
other figures from worksheets already copied.
Embedded Assessment – Observe each student to see how he/she is progressing. Do they
understand how many faces, edges, and vertices are needed to make their figure?
Reteaching/Extension –§ For those students and/or groups who do not understand how to create the solid
figure show them a solid figure and ask them what they need to create the figure.
§ Have them identify the faces, edges, and vertices in their figure.
§ Help the students to move the figure and trace the parts to create the net.
§ For those groups that have finished have them try to create another net for another
Lesson 4 Using Geometric Solids to Create a Model Town
Preassessment – Give clues about geometric solids they have been learning about the past three days and have students guess which solid you are describing.
• I have two triangular faces. I have three rectangular faces. Which geometric
solid am I? Answer: triangular prism• I have two circular faces. I have a curved surface. Which geometric solid am I?
Answer: cylinder
• I have an even number of vertices. I have the same number of faces and vertices.
Which geometric solid am I? Answer: triangular pyramid
Launch – The students will use the knowledge they gained about geometric solids the previous day to create a model town.
Teacher Facil itati on – The teacher will have the students brainstorm the different parts of a town. The students will be in groups and do the cooperative learning activity round
table. Each student will write an important part of a town on a piece of paper and then pass the paper and pencil to the next person. The teacher will give the students fiveminutes to come up with as many parts of a town as they can. After five minutes theteacher will have the groups share the parts they came up with without repeating whatanother group has shared. Some examples of parts of a town are housing development, shopping center, school, hospital, library, post office, airport, and park. Some parts of atown could be combined to give each group the same amount to create. The teacher will pick the five or six most important parts and have the groups each create that part of thetown. The teacher will model how to create the geometric solids out of gumdrops andtoothpicks.
Student Appl ication – Have each group get out their geometric solids from the previousday to refer to when making the gumdrop figures. Assign each group a part of the townby pulling the names out of a hat. Make the students aware of the requirements of thetown. They must use the gumdrops to create geometric solids. They must use each geometric solid at least twice when creating their part of town. Before beginning each group will discuss what part each person in the group will be making. The teacher willwalk around and help groups of students to assign jobs and create their parts of town. Ask questions to help them problem solve while creating their buildings. Make sure students are working cooperatively . A fter they have created their part of town, have students write about the figures they used to create their building and why they chosethose figures.
Embedded Assessment – Observe each student as they are working in their groups to seehow he/she is progressing. Do they understand how many faces, edges, and vertices areneeded to make their figure? Are they using the toothpicks and gumdrops correctly tomake the geometric figures? Is each group making at least two of each figure?
§ For those students and/or groups who do not understand how to create the solid figures, show them a solid figure and ask them what they need to create the figure. Have them identify the faces, edges, and vertices in their figure.
§
If the students did not make two of each geometric figure in their part of the town,help them to change some of their buildings to meet the requirements.§ If students complete their part of the town, have them continue to make other
parts of the model town not assigned to other groups.
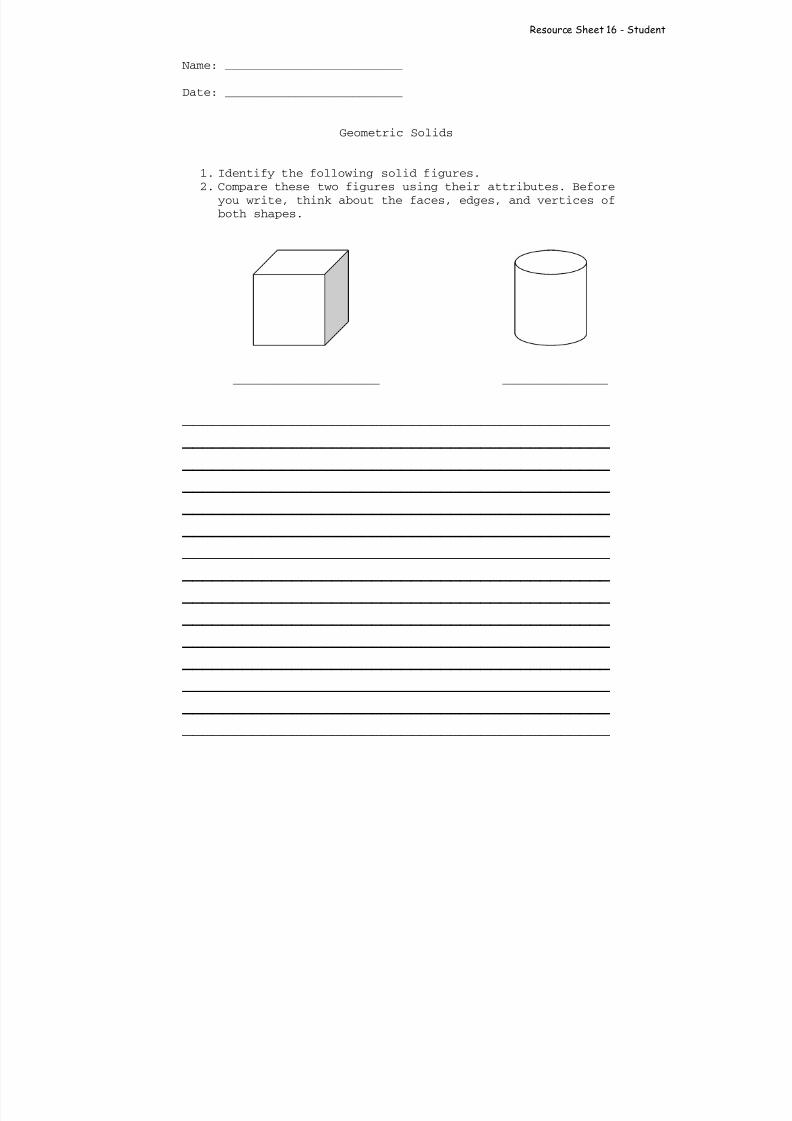
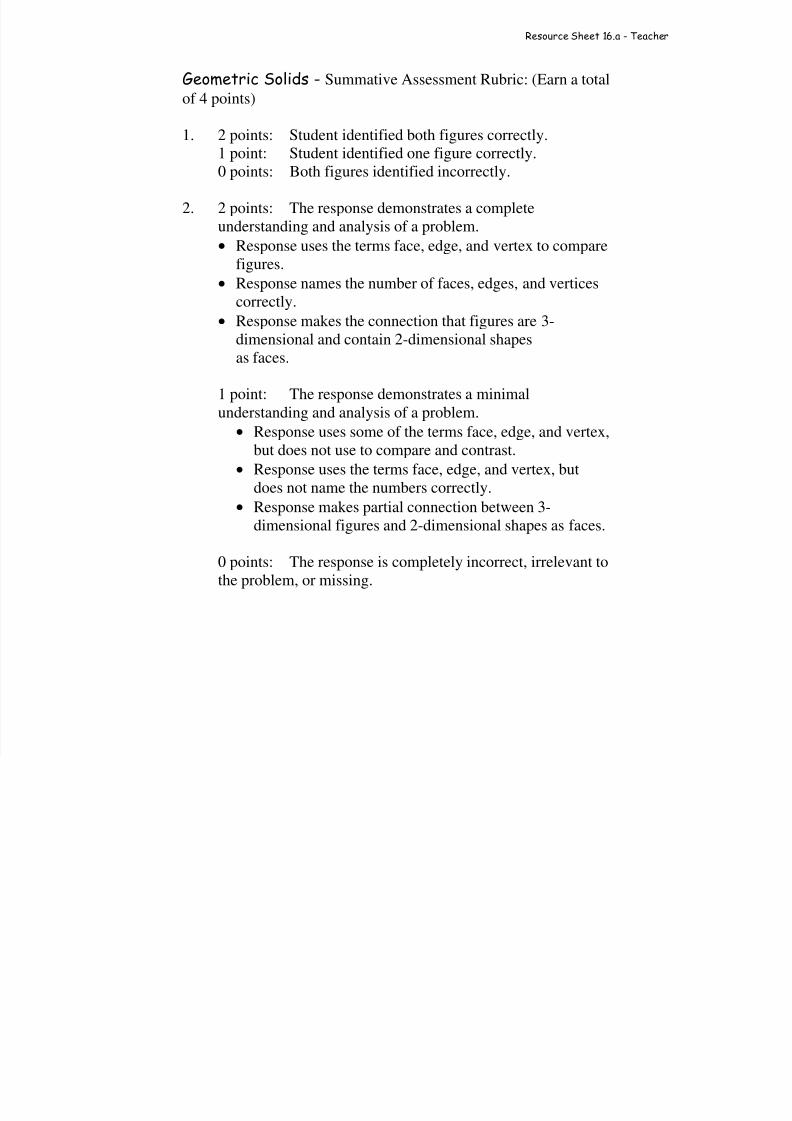
Summative Assessment:
The students will be given a worksheet with two shapes. They will have to identify andcompare the two shapes using their attributes.
Authors:
Mona Hlavinka Ferris Kristen Massagli Manor View Elementary Germantown Elementary Anne Arundel County Montgomery County