111
GET SKILLED: GET ACTIVE A K-6 resource to support the teaching of fundamental movement skills NSW Department of Education and Training, 2000

GET SKILLED:GET ACTIVE
A K-6 resource to support the teachingof fundamental movement skills
NSW Department of Education and Training, 2000
Get skilled: Get active© 2000 NSW Department of Education and Training
Curriculum Support DirectoratePrivate Bag 3Ryde NSW 2112
RESTRICTED WAIVER OF COPYRIGHTThe printed material in this publication is subject to a restricted waiver ofcopyright to allow the purchaser to make photocopies of the material containedin the publication for use within a school, subject to the conditions below.
1. All copies of the printed material shall be made without alteration orabridgement and must retain acknowledgement of the copyright.
2. The school or college shall not sell, hire or otherwise derive revenue fromcopies of the material, nor distribute copies of the material for any otherpurpose.
3. The restricted waiver of copyright is not transferable and may be withdrawnin the case of breach of any of these conditions.
Additional copies are available from:Edu SalesPO Box 564Moorebank NSW 1875Phone (02) 9822 7270Fax (02) 9822 7511
ISBN 0 7313 5884 8SCIS 992440
This resource is dedicated to thememory of Sigrid Morrison(1987 – 1999).

ForewordThe importance of regular physical activity in reducing the risk of disease and in promoting ahealthy lifestyle is well recognised. Research has shown that regular participation in physicalactivity during childhood improves students’ learning, builds their understanding of teamworkand improves their general physical activity and fitness levels.
The Government is committed to maximising students’ health and well-being and to increasingthe physical activity and fitness levels of students in NSW schools. Schools and teachers are wellplaced to make a significant contribution to the development of healthy, happy and activestudents.
In 1998 the Government released the Student Fitness and Physical Activity Action Plan. Thisaction plan identified key initiatives which the Government would implement to improve thephysical activity and fitness levels of students. One of these initiatives focused on improvingboys’ and girls’ proficiency in fundamental movement skills in the primary school. The resource,Get skilled: Get active, honours this commitment and provides support for the teaching offundamental movement skills.
Students need to master certain fundamental movement skills if they are to enjoy the wide rangeof physical activities, sports and recreational pursuits offered in our communities. This resourcefocuses on twelve fundamental movement skills considered to be foundational for all gamesand sports played in Australia. It gives teachers an understanding of each skill and looks at waysof teaching these skills in PDHPE and sport programs. It is important that these skills are taughtin the formative years of schooling and that students are given opportunities to practise theseskills throughout their primary schooling.
I commend this resource to you, as it has the potential to make a positive impact on thedevelopment of fundamental movement skills of children, give them access to the range ofphysical activity options available, and establish a commitment to a physically active lifestyle.
John Aquilina, MPMinister

Acknowledgements
The New South Wales Department of Education and Training would like toacknowledge the valuable contributions of the following individuals and organisationsin the preparation of this resource.
Project writersJanet Davy Curriculum Support DirectorateRosemary Davis Curriculum Support DirectoratePaul Doorn Curriculum Support DirectorateDebra Atkins Mascot Public School
Contributing writersJanice Atkin Ashfield Boys High SchoolPatti Shanks Seven Hills High SchoolDebbie Sullivan Lake Macquarie District Office
Consultants to the projectTony Okely University of WollongongDr Bernie Holland Royal Melbourne Institute of TechnologyDr Beth Hands University of Western AustraliaKaren Swabey University of TasmaniaJulie Hamilton Learning Materials Production Centre, OTEN
EditingPeter Rennie Curriculum Support Directorate
Cover design and artworkKathryn Watkins
Design and layoutDianne McKinnon Curriculum Support Directorate
The school communities of:Botany Public SchoolBirrong Public SchoolFive Dock Public SchoolLaguna Street Public School
Education Department of Western Australia: The checklists in Chapter 3 have beenadapted from the Fundamental Movement Skills Support Package, EducationDepartment of Western Australia, 1997.

Contents
Foreword 3
Introduction 7
What’s in this resource 9
Chapter 1: Introducing fundamental movement skills 11
Chapter 2: Learning about fundamental movement skillsand their components 15
Chapter 3: Observing fundamental movement skills 43
Chapter 4: Programming fundamental movement skills 63
Chapter 5: Teaching fundamental movement skills 79
Chapter 6: Assessing fundamental movement skills 101
References 117

7Introduction
The development of children’s fundamentalmovement skills is a significant step towardsestablishing a lifelong commitment to health andphysical activity. Fundamental movement skillsare the building blocks for the wide range of sportsand physical activities offered in our community.
The NSW Schools Fitness and Physical ActivitySurvey, 1997 found that less than half the numberof young people in NSW have mastered thefundamental motor skills tested in this survey.The skills tested included the run, vertical jump,catch, overhead throw, kick and forehand strike.A major recommendation from this survey wasthat schools devote more time and expertise toimproving the fundamental motor skills ofprimary students.
The resource, Get skilled: Get active, has beendeveloped to help support teachers in achievingthis outcome. It introduces twelve fundamentalmovement skills. These skills are considered to beessential if students are to participate successfullyin the many physical activities, games and sportsoffered in our community. Each skill has beenbroken down into individual components whichare developed at different stages of learning.Examples of how teachers can “teach” the skill andalso ideas of ways to “develop” the skill in lessonsare outlined in this resource. Checklists have beendeveloped for each skill to help teachers identifystudents’ performance.
It is impossible to teach all the fundamentalmovement skills in one year. A suggested scopeand sequence chart, outlining “when” to teach the
skill and “what” skill should be taught, has beendeveloped to give teachers guidance whenprogramming fundamental movement skills.
Ideas for professional development have beenincluded in some chapters to help teachers betterunderstand fundamental movement skills. Thesecan be used flexibly to cater for the range ofaudiences using the resource.
This resource also contains two videos focusingon fundamental movement skills. The video, Getskilled: Get active—Show me how, demonstratesthe twelve fundamental movement skills andtheir components to give teachers anunderstanding of how the skill looks. The video,Get skilled: Get active—Teach me how, providessnapshots of lessons which show howfundamental movement skills can be taught. Thisvideo also demonstrates a range of teaching andlearning strategies which promote activeparticipation and give students opportunities topractise their skills.
The resource is designed to help teachers feelmore confident in making professionaljudgements about the proficiency levels ofstudents’ fundamental movement skills and toenable them to provide quality feedback tostudents about their performance. Thisconfidence, coupled with the opportunity topractise their skills, will provide a basis forensuring students have the necessaryfundamental movement skills by the time theyfinish their primary schooling.
Introduction

9What’s in this resource
What’s in this resourceThis resource contains information, videos and professional development activities relating tofundamental movement skills. The ideas and information found in this resource can be used in a varietyof ways with a range of audiences. An outline of the content of each chapter is shown below.
Chapter 1 Introducing fundamental movement skillsThis chapter introduces fundamental movement skills and answers some commonlyasked questions about teaching them.
Chapter 2 Learning about fundamental movement skills and their componentsThis chapter introduces the twelve fundamental movement skills and the individualskill components. It also provides information and strategies for developing, teachingand practising each fundamental movement skill.
Chapter 3 Observing fundamental movement skillsThis chapter focuses on ways to observe and make judgements about thedevelopment of students’ fundamental movement skills. It includes checklists foreach of the twelve fundamental movement skills to assist in observation of the skillcomponents.
The video, Get skilled: Get active—Show me how is introduced in this chapter tohelp develop observational skills. This video can be used as part of the professionaldevelopment activities suggested in this chapter.
Chapter 4 Programming fundamental movement skillsThis chapter looks at ways to plan and program fundamental movement skills. Itsuggests a programming guide for teaching fundamental movement skills fromKindergarten to Year 6.
Professional development activities are also provided in this chapter to help teachersplan and program fundamental movement skills as part of PDHPE and sportprograms.
Chapter 5 Teaching fundamental movement skillsThis chapter includes information and practical ideas about how to teachfundamental movement skills in a lesson. It includes professional developmentactivities which help teachers reflect on current teaching practices.
This chapter also introduces Video 2, Get skilled: Get active—Teach me how. Thisvideo demonstrates how the teaching of fundamental movement skills can beincorporated into a lesson.
Chapter 6 Assessing fundamental movement skillsThis chapter looks at ways of assessing fundamental movement skills and makingjudgements about student achievement.
This chapter also provides information on planning for assessment, sample assessmentstrategies and tools to manage assessment information.
Video 1
Get skilled: Get
active—Show
me how
Video 2
Get skilled: Get
active—Teach
me how

11Introducing fundamental movement skills
Chap
ter
1
What’s in this chapter?
This chapter introduces fundamental movementskills and answers some of the questionscommonly asked about teaching them.
This chapter includes information and guidancefor including fundamental movement skills inyour PDHPE and sport programs, together withinformation on how students learn and developthese skills.
What are fundamentalmovement skills?
Fundamental movement skills are the buildingblocks for movement. They are the skills whichchildren need to participate successfully in alltypes of games, physical activities and sports.Examples of these skills can be frequently seen inpopular games and activities played by childrenin the school playground.
Fundamental movement skills are sometimescategorised under three headings:
• locomotor skills, such as the run, jump, hop,skip, gallop, leap and dodge
• non-locomotor skills, such as the staticbalance, bend, sway, twist and turn
• manipulative skills, such as the catch, throwand kick.
Twelve fundamental movement skills arepresented in this resource. They are:
• the static balance
• the sprint run
• the vertical jump
Introducing fundamentalmovement skills
Chapter 1
• the catch
• the hop
• the side gallop
• the skip
• the overarm throw
• the leap
• the kick
• the two-hand strike
• the dodge.
These twelve skills were selected because togetherthey represent a solid foundation for thedevelopment of specialised skills, enablingstudents to participate in a wide range of physicalactivities.
Why teach fundamentalmovement skills?
The development of fundamental movementskills is an important step towards ensuringlifelong involvement in physical activity. Withoutproficiency in skills like throwing, catching,kicking, leaping and balancing, students are lesslikely to explore the range of options available tothem to establish and maintain active lifestyles.The development of movement skills occurssequentially, with proficiency in fundamentalmovement skills forming the basis for thedevelopment of more advanced sport-specificskills.
Research shows that children who are competentin fundamental movement skills are more likelyto enjoy sports and activities and to develop alifelong commitment to physical activity.Research also suggests that children who do not

12
master fundamental movement skills are morelikely to drop out of physical activity in later life.Many girls, in particular, often indicate that oneof the reasons why they don’t continue withphysical activity is that they don’t have thenecessary skills or confidence to participate.
Students who have achieved proficiency infundamental movement skills have been foundto have better self-esteem, socialisation skills anda more positive attitude towards physical activity.Research indicates that the improvement in self-esteem and confidence in performingfundamental movement skills has a flow-on effectto other areas of a child’s education. For example,improvement in confidence in physicalcoordination has been found to help developproficiency in reading and writing.
Data collected from the NSW Schools Fitnessand Physical Activity Survey, 1997 showed thatonly a small proportion of students in NSWdemonstrated proficiency in the six fundamentalmovement skills assessed. The survey also foundthat students reported “not having the skills” asa major barrier to participation in physicalactivity. The survey recommended that moretime and expertise be devoted to improvingstudents’ development of fundamentalmovement skills.
How do children developfundamental movement skills?
Contrary to popular belief, children do not pickup fundamental movement skills naturally as partof their normal growth and development.Children need to be taught these skills and givenopportunities to practise them.
Children also need to be provided with:
• developmentally appropriate activities andequipment
• visual demonstrations of skills
• instruction and feedback
• a variety of activities, with a focus on fun andchallenge
• encouragement
• a safe and positive learning environment.
It is reasonable to assume that, given instruction,encouragement and the opportunity to practise,boys and girls can be equally proficient in alltwelve fundamental movement skills by the endof primary schooling. Skills which do show genderdifferences in levels of proficiency are almostentirely due to environmental factors. Thesefactors include increased opportunities toparticipate and greater exposure to activities thatuse the underlying fundamental movement skills.
Children need apportunities to practisefundamental movement skills

13Introducing fundamental movement skills
Chap
ter
1
How long does it take to learnfundamental movement skills?
It is easy to underestimate the amount of time ittakes to develop proficiency in fundamentalmovement skills. Factors like the complexity ofthe skill, the age of the learner and theinstructional methods used play a large part inthe amount of time it takes to become proficientin a skill. Research in Victorian schools found thatit takes between 240 and 600 minutes ofinstruction time for the average student tobecome proficient in one fundamentalmovement skill. (Fundamental Motor Skills,Department of Education, Victoria, 1996).
This resource recommends that only four skillsshould be focused on in any one school year toallow for quality instruction. Chapter 4 suggestssome planning options to allow for best use offocused instruction in PDHPE and sport lessons.
When should fundamentalmovement skills be taught?
The optimal period for introducing fundamentalmovement skills is in the early years of schooling.There are several reasons for this.
• Early Stage 1 and Stage 1 are a time of relativelyslow growth.
• Children have plenty of opportunities topractise in structured and unstructuredactivities during these early years.
• Current movement patterns are notentrenched.
As students continue to develop physically,cognitively and emotionally, opportunities torefine and develop skill proficiency will occur asthey move through the stages of primary school.
More specific information on how children’sgrowth and development impact on thedevelopment of each of the twelve fundamentalmovement skills is provided in Chapter 2.
Where do fundamentalmovement skills fit into schoolPDHPE and sport programs?
The development of movement skills is a keyobjective of school PDHPE and sport programs.
Planning for the development of fundamentalmovement skills needs to occur at a whole-schoollevel as well as at stage and class level. It shouldbe sequential, taking into consideration students’physical development and prior learningexperiences.
Schools should aim to allocate a minimum of 120minutes of planned physical activity per week forall students from Kindergarten to Year 6. In Years3 to 6, this time should be inclusive of theDepartment’s current requirement for 60 minutesof sport each week. (Student Fitness and PhysicalActivity Action Plan, NSW Government, 1998).
Schools need to consider how best to program the120 minutes per week of planned physical activityin each year from Kindergarten to Year 6 so thatthere are opportunities to develop fundamentalmovement skills, as well as the other importantoutcomes of the PDHPE syllabus. The allocationof time for sport in Years 3 to 6 could be reviewedto ensure that students have the opportunities toexplore, practise and apply the fundamentalmovement skills in different contexts.
Chapter 4 includes ideas and suggestions for waysschools can plan for the development offundamental movement skills in their PDHPE andsport programs.

15Learning about fundamental movement skills and their components
Chap
ter
2
What’s in this chapter?
This chapter introduces the twelve fundamentalmovement skills and their components. It alsoprovides you with background information andstrategies which you can refer to when planningfor and teaching fundamental movement skills.
This chapter includes a brief overview of thegeneral considerations which teachers shouldkeep in mind when incorporating fundamentalmovement skills in their PDHPE and sportprograms. It also includes a skill description foreach of the twelve fundamental movement skillscovered in this resource.
Each skill description is presented in two sections.
Section 1: About the skillThis includes:
• a brief description and rationale for theinclusion of the skill
• a breakdown of the specific components ofeach skill, illustrated with photographs
• some key points to consider about howchildren’s growth and development influencethe development of the skill.
Section 2 : Developing the skillThis includes:
• teaching cues which can be used as a focus forteaching or as a prompt for your students asthey practise the skill
• common errors that children display whenlearning to perform the skill
• some suggested activities which can be usedto focus your teaching on components of theskill
• some suggested practice activities andstrategies which can be included whenplanning for your lessons.
Skill components
Each skill has been broken down into 5-7 easilyidentifiable components. These components aredescribed as either “introductory” or “fine-tuning.”
• “Introductory components” are thosecomponents which students are most capabledevelopmentally of demonstrating fromKindergarten to Year 2.
• The “fine-tuning” components are thosecomponents which will generally bedemonstrated by students after they havereached proficiency in the introductorycomponents. Most students will not be at acognitive or physical level of development inStage 1 to acquire the fine-tuningcomponents. Fine-tuning will typically occurfrom Stages 2 to 3 as students grow anddevelop.
The ordering of components as introductory orfine-tuning has been based upon studies whichreported the percentage of children at differentages who had mastered each component of a skill.It has also been based on studies of childhooddevelopment which look at how childrenprogressively develop control of their bodies.
The components of each skill represent theprogression that most students will follow inbecoming proficient in that skill. It is importantto keep in mind that variations in developmentwill always occur within and between individualsand skills.
Learning about fundamentalmovement skills and their components
Chapter 2

16
Implications for teaching
You should focus your teaching on one or twoskills at a time. You should also focus on teachingthose components of each skill which match thedevelopmental readiness of your students.
The common errors listed for each skill are linkedto components. They could be used as a promptto draw your attention to a student who may notbe performing a skill proficiently. These commonerrors can be corrected by demonstrating thecorrect performance of that component,
providing feedback to the student and allowingtime for practice.
The remaining pages of this chapter contain thetwelve skill descriptions. Use these in conjunctionwith Chapter 3, Observing fundamentalmovement skills and the video Get skilled: Getactive—Show me how to familiarise yourselfwith each of the skills covered in this resource.Refer back to these descriptions when lookingat Chapter 4, Programming fundamentalmovement skills and Chapter 5, Teachingfundamental movement skills.
The static balance The vertical jump
The catchThe sprint run

17Learning about fundamental movement skills and their components
Chap
ter
2
The hop The leap
The side gallop The kick
The skip The two-hand strike
The overarm throw The dodge

18
Static balance
1 2 3 4 5 1 3 4
1. Support leg still, foot flat on the ground.
2. Non-support leg bent, not touching the support leg.
3. Head stable, eyes focused forward.
4. Trunk stable and upright.
5. No excessive arm movements.
(Introductory components marked in bold)
About the skillBalance is an essential prerequisite of almost all movement skills. A static balance is defined as being able to
maintain a stationary position throughout the movement. The static balance on one foot is an important non-
locomotor skill that is used in gymnastics, dance, diving and many team sports. The ability to perform a stationary
balance for a specific period of time has been linked to a reduced risk of suffering from falls, which may lead to
bone fractures in older individuals.
Important considerationsIt is expected that most children will demonstrate proficiently the introductory components of the static balance
by the end of Kindergarten. By this time students should have gained control over their trunk and shoulder
movements (components 3 and 4) prior to control over the arms (component 5).
Students are also likely to gain control over muscular movements of the hip and knee (components 2 and 4) before
they gain control over feet movements (component 1).
Because young children are top heavy, they have more difficulty balancing, especially when they have to perform
additionally a manipulative skill, such as catching an object. A major reason why some children drop objects is
because of their need to regain the static balance lost while catching the object.
Proficient demonstration of the fine-tuning components can generally be expected by the end of Year 3.
Skill components

19Learning about fundamental movement skills and their components
Chap
ter
2
Developing the skill
Teaching cuesSay to the students:
• Stand still with your foot flat on the ground.
• Hold your bent leg away from your other leg.
• Look at something in front of you.
• Stand up tall when you balance.
• Relax your arms.
Common errors• looking down at the ground or feet
• rocking on the support leg
• leaning trunk sideways or forward to assist balance
• using excessive arm movements or holding an arm
against the side of the body
• hooking non-support foot in behind support knee
or pushing against it to assist balance
• not being able to maintain balance for more than a
few seconds
• raising non-support thigh high off the ground
(almost parallel to the ground).
Teaching the skillAsk students to talk about what is needed for good
balance. Discussion should centre around the
components of the balance.
Students stand with one foot in front of the other, the
heel of one foot touching the toe of the other. Ask
students to:
• hold arms out to the side
• place hands on hips
• balance a bean bag on their head
• repeat these activities on the other leg.
Ask students to identify which leg provides the best
base for a balance: which is the preferred leg? Students
stand on the preferred leg and position the non-
support leg:
• behind preferred leg
• near preferred leg
• high above preferred leg.
Ask students which position they feel most comfortable
with.
Practising the skill• Students balance:
• on different body parts
• with a partner shadowing their balance position
• using an object to counterbalance.
• Students can apply their understandings of the
concepts of balance to more challenging situations
such as:
• moving along a low bench or beam, then stop,
balance and pick up an object from the beam
• balancing with eyes focused on specific things,
for example, on a near or distant object.
Ask students to try these activities with their eyes
closed or on the non-preferred leg.
• Incorporate balance into such activities as “Simon
says” or “Freeze” games, as well as dance and
gymnastics. Make the tasks more challenging by
getting students to balance on different body parts.

20
Sprint run
About the skillThe sprint run is a locomotor skill characterised by a brief period where both feet are simultaneously off the ground
(called the flight phase). The ability to perform a sprint run is fundamental to many games, sports and everyday
activities. Examples include sprinting in athletics, a fast break in soccer or hockey, running to bases in softball and
tee-ball or even just running for a bus, which can be performed better with a proficient running technique. A
proficient running technique can improve speed and endurance, which in turn may also enhance health-related
fitness by improving cardiorespiratory endurance.
1 4 5 6 2 3
1. Lands on ball of the foot.
2. Non-support knee bends at least 90 degrees during the recovery phase.
3. High knee lift (thigh almost parallel to the ground).
4. Head and trunk stable, eyes focused forward.
5. Elbows bent at 90 degrees.
6. Arms drive forward and back in opposition to the legs.
(Introductory components marked in bold)
Important considerationsChildren are ready to demonstrate proficiently the introductory components of the sprint run by the end of
Kindergarten and the fine-tuning components by the end of Year 3. Most children display proficient running
patterns by the time they enter Kindergarten.
Developing runners may hold their elbows high for protection, in case they fall. This limits their ability to drive
their arms forward and backward in opposition to the legs. These children should not be observed as proficiently
demonstrating component 6. It is important for children to practise running as fast as possible when learning the
sprint run so that all components can be evident. If young children are having difficulty coordinating running, it
may be beneficial to focus on improving their balance (static then dynamic) and leg strength first.
Skill components

21Learning about fundamental movement skills and their components
Chap
ter
2
Developing the skill
Teaching cuesSay to the students:
• Lift your knees high.
• Bring your heel close to your bottom.
• Look ahead.
• Make your feet follow an imaginary line.
• Don’t let your heels touch the ground.
• Land on the balls of your feet.
• Bend your elbows and swing your arms.
• Run tall.
• Bring your heels up to your bottom.
Common errors• landing flat-footed or on heels
• looking down at ground or feet
• holding arms stiff and high
• driving arms across the midline of body
• rotating trunk excessively (twisting of body)
• not lifting knees high enough
• not having the heel of the non-support leg come
close to buttocks during recovery phase
• landing on a wide lateral path (wide base of
support)
• having exaggerated body lean, forward or too
upright
• turning toes inward or outward when bringing
recovery foot forward.
Teaching the skillAsk the students to try running:
• driving their arms forward and back in rhythm with
their leg movements
• running while looking up in the air
• running while looking down to the ground
• watching a partner who is running beside them
• looking straight ahead.
Link back to the components of the sprint run and
discuss which running style seems the most effective.
Ask the students to:
• increase the length of their stride when running by
placing markers or lines on the ground to mark each
time the foot touches the ground
• visualise hammering nails into the wall with their
elbows to visualise arm action
• explore different hand positions to find which hand
position is most comfortable, for example,
pretending to carry a rolled-up newspaper or relay
baton, fingers together and straight, fingers curled
gently as if the thumbs are hooked into the pockets
of their jeans or fingers stretched out wide.
Let students explore running at different speeds.
Discuss with students how you land on different parts
of the foot when running at different speeds. Students
should land on the ball of the foot when sprinting, and
when running slowly or jogging, land on the heel and
then roll onto the ball of the foot for take-off.
Practising the skill• Students use a hoop or skipping rope to create a
personal space. They run on the spot in this space.
They practise swinging bent arms, lifting legs up
high and pretending to run up a hill.
• Play “Simon says.” Ask students to run while
focusing on specific body parts or movements. For
example, ask students to run: taking small steps (a
low knee lift); taking normal steps (a high knee
lift), with and without an arm swing; with head
moving from side to side; and with head held still
and eyes focused ahead.
• Running activities are incorporated into many of
the games children play, for example, soccer, rugby,
netball and hockey. The sprint run can also be a
major aspect in such activities as dance and
gymnastics.
• Students practise the sprint run in many events in
athletics, such as the 50m, 70m and 100m sprints,
relays, hurdles, long jump etc.
22
Vertical jump
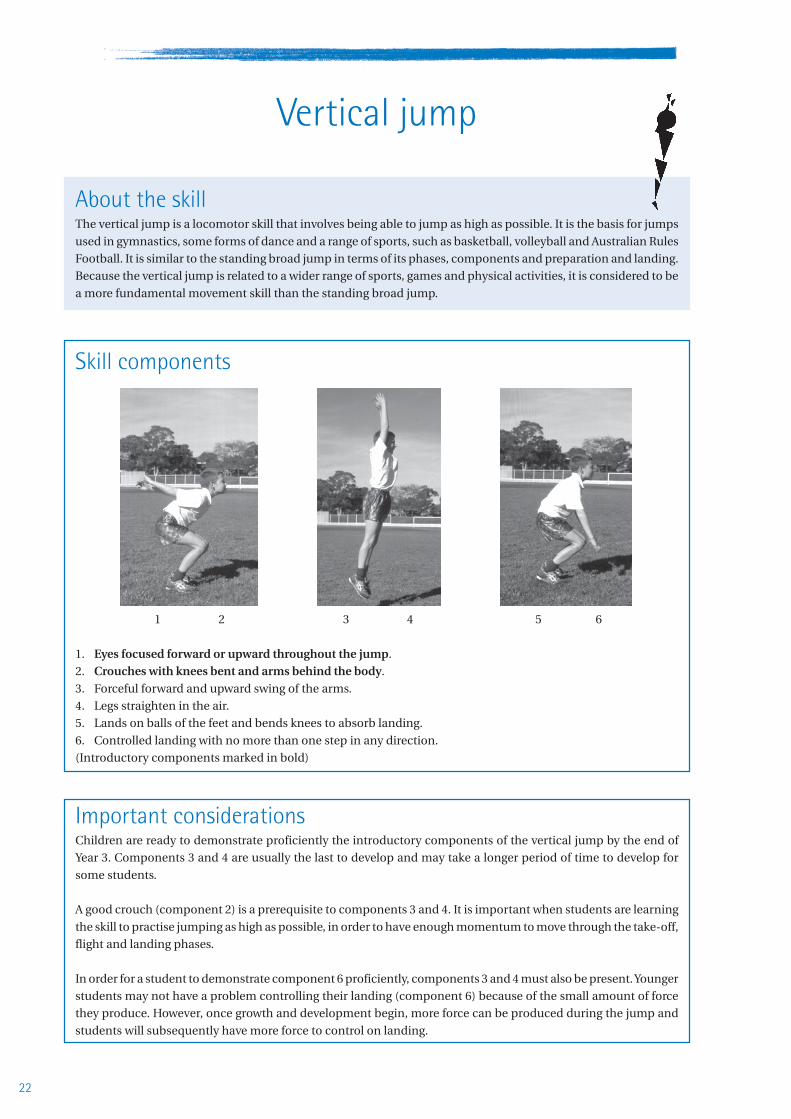
About the skillThe vertical jump is a locomotor skill that involves being able to jump as high as possible. It is the basis for jumps
used in gymnastics, some forms of dance and a range of sports, such as basketball, volleyball and Australian Rules
Football. It is similar to the standing broad jump in terms of its phases, components and preparation and landing.
Because the vertical jump is related to a wider range of sports, games and physical activities, it is considered to be
a more fundamental movement skill than the standing broad jump.
Skill components
1 2 3 4 5 6
1. Eyes focused forward or upward throughout the jump.
2. Crouches with knees bent and arms behind the body.
3. Forceful forward and upward swing of the arms.
4. Legs straighten in the air.
5. Lands on balls of the feet and bends knees to absorb landing.
6. Controlled landing with no more than one step in any direction.
(Introductory components marked in bold)
Important considerationsChildren are ready to demonstrate proficiently the introductory components of the vertical jump by the end of
Year 3. Components 3 and 4 are usually the last to develop and may take a longer period of time to develop for
some students.
A good crouch (component 2) is a prerequisite to components 3 and 4. It is important when students are learning
the skill to practise jumping as high as possible, in order to have enough momentum to move through the take-off,
flight and landing phases.
In order for a student to demonstrate component 6 proficiently, components 3 and 4 must also be present. Younger
students may not have a problem controlling their landing (component 6) because of the small amount of force
they produce. However, once growth and development begin, more force can be produced during the jump and
students will subsequently have more force to control on landing.
23Learning about fundamental movement skills and their components
Chap
ter
2
Developing the skill
Teaching cuesSay to the students:
• Look up.
• Focus your eyes on where you want to go.
• Get ready to explode up high, get ready to take off.
• Swing your arms back and up.
• Straighten your legs when in the air.
• Bend your knees on landing.
• Control your body and balance yourself when
landing.
• Land with feet the width of your shoulders apart.
Common errors• looking down at the ground or feet
• keeping arms by their side or out in front of the body
during the preparatory crouch
• feet not leaving the ground or not landing
simultaneously
• pushing arms up in the air during propulsion or
having a limited forward and upward swing
• tucking legs up during propulsion
• landing flat-footed or on heels first
• knees, ankles or hips not bending to absorb force
on landing (stiff-legged landing)
• needing several steps to correct balance on landing.
Teaching the skillDemonstrate the bend and crouch starting position,
using verbal cues such as “swing your arms back and
up.”
Ask students to jump:
• as high as they can
• with their head and eyes turned upwards
• looking straight ahead
• with their head and eyes looking down at the
ground.
Link back to the components of the vertical jump and
discuss with students which jump seemed the most
effective.
Instruct students to:
• land with feet the width of their shoulders apart as
a wide base of support. This enhances stability on
landing and maximises the height students will be
able to jump
• land in different ways when they jump. Use
questions to focus students’ attention on the
components, such as:
• Why did you bend your knees?
• Did you land on the same spot as your take-off?
Why or why not?
• Did you get more or less height when you landed
in front of your take-off position? Why or why
not?
Practising the skill• Students practise swinging the arms back above the
horizontal position. They jump as high as possible
to get maximum momentum.
• Incorporate the vertical jump into action songs and
simple games, such as “Simon says.”
• Students jump and touch the wall with finger tips.
Record the height of the jump with chalk.
• Students use mini-trampolines or beat boards to
gain height. Focus students on landing softly.
• Students jump from a range of steps or boxes onto
soft mats, aiming for maximum height and a soft
landing. They can also jump up onto steps, stable
boxes or low benches using legs and arms to gain
height.
• Incorporate this skill into games: for example,
basketball or netball when reaching for a rebound
or receiving a pass; or in volleyball or
Newcombeball, when blocking or spiking at the
net.

24
Catch
About the skillCatching is a manipulative skill that involves being able to absorb and control the force of an object with a part of
the body, preferably the hands. The ability to catch proficiently is important to most sports and games that involve
an object, for example, cricket, football codes, netball, basketball, rhythmic gymnastics and playground games.
Skill components
1 2 3 4 5 6
1. Eyes focused on the object throughout the catch.
2. Feet move to place the body in line with the object.
3. Hands move to meet the object.
4. Hands and fingers relaxed and slightly cupped to catch the object.
5. Catches and controls the object with hands only (well-timed closure).
6. Elbows bend to absorb the force of the object.
(Introductory components marked in bold)
Important considerationsChildren are ready to demonstrate proficiently the introductory components of the catch by the end of Kindergarten
and the fine-tuning components by the end of Year 3.
It is strongly recommended that, when introducing the catch in PDHPE and sport, small objects are used.
Learning to catch using a big object and then progressing to a smaller object may be detrimental to the development
of a proficient catching technique. This is because it encourages the use of the chest and arms to help trap the
object. This may be difficult to change at a later stage. Furthermore, it has been shown that children catch smaller
balls better than larger balls.
Research suggests that it takes, on average, five years for a child to progress to proficiency in this skill, irrespective
of gender. Differences in proficiency levels of boys and girls are due to environmental factors, such as lack of
opportunities to practise and lack of exposure to activities which include the catch.

25Learning about fundamental movement skills and their components
Chap
ter
2
Developing the skill
Teaching cuesSay to the students:
• Watch the object move into your hands.
• Cup your hands.
• Move to the ball.
• Relax your hands.
• Point your fingers up for a high ball.
• Point your fingers down for a low ball.
• Bend elbows to absorb the force of the object.
Common errors• turning head away, closing eyes or leaning
backwards away from the object
• not moving feet towards the object
• not reaching hands out towards the object
• having stiff and extended arms when catching
• having wrists or heels of hands hinged together to
catch (crocodile jaws technique)
• using other parts of the body, such as the chest or
upper body to catch
• closing hands around the object too early or late
• having little or no elbow bend or “give” after
catching.
Teaching the skillInstruct students to get into the position ready for
catching:
• standing balanced
• hands lightly cupped
• eyes focused.
To familiarise students with the concept of
approaching objects, begin by getting them to:
• experiment with rolling and trapping balls
• roll balls at different speeds
• roll balls directly towards or slightly to one side of a
partner
• move towards the rolling ball.
This will allow students to get the idea of focusing on
the object and moving their hands towards the object.
Instruct students to:
• toss a ball or object in the air and catch
• bounce and catch a ball
• try experimenting with different arm positions
• catch the ball without letting it touch the body
• explore catching small objects using different arm
positions to discover that elbows need to bend to
absorb the force.
Practising the skill• Students throw balls onto the wall and catch the
rebound. They work with a partner and take turns
to throw and catch.
• Students use a container to catch objects. They
move to meet the object and have the bucket “give”
as the object enters, so it won’t bounce out.
• Students catch from different positions, for
example, standing or in a sitting position using a
variety of objects, and balls of different sizes.
• Students catch balls that are rolling and bouncing
at varying speeds and heights.
• Students catch balls not directly in line with the
body. Proficient students can try catching balls or
objects while moving at different angles to the line
of flight of the ball.
• The basic concepts of the catch (eyes focused, move
to meet the ball, absorbing the force of the object)
can also be used by proficient students when using
the one-handed catch and when catching using
gloves.

26
Hop
About the skillHopping is a continuous rhythmical locomotor skill, characterised by taking off and landing on the same foot. It is
used in many dance forms, in athletics in the triple jump and in many playground games, such as hopscotch. It is
a good indicator of being able to maintain balance while moving, which is often referred to as dynamic balance.
1 2 3 5 1 2 3 4
1. Support leg bends on landing, then straightens to push off.
2. Lands and pushes off on the ball of the foot.
3. Non-support leg bent and swings in rhythm with the support leg.
4. Head stable, eyes focused forward throughout the jump.
5. Arms bent and swing forward as support leg pushes off.
(Introductory components marked in bold)
Skill components
Important considerationsChildren are ready to develop the introductory components of the hop by the end of Year 1 and the fine-tuning
components by the end of Year 4. Hopping is a more developmentally advanced skill than jumping, as a higher
level of dynamic balance and strength is required, and it is a continuous skill, performed on only one leg. Between
the ages of five and seven, children show marked improvement in speed, control and technique. Students should
initially be taught to hop normally and rhythmically before you emphasise speed, distance or height.
Hopping is very fatiguing, so ensure that opportunities for practice are short and intermixed with other activities.
This gives the students a chance to recover adequately between practice sessions.
27Learning about fundamental movement skills and their components
Chap
ter
2
Developing the skill
Teaching cuesSay to the students:
• Bend your leg to push off.
• Land on the ball of your foot.
• Find your rhythm.
• Look ahead, with head and eyes level.
• Use your arms for balance.
Common errors• landing flat-footed or heel first
• being unable to maintain balance for more than
three or four hops
• not bending the knees, ankles or hips to absorb
force on the landing
• allowing support leg to remain bent when pushing
off (failure to extend leg and push off toes)
• holding non-support thigh parallel to the ground,
which does not rhythmically assist support leg in
producing force
• looking down at the ground or feet
• not moving arms in time with each other or with
the support leg
• swinging arms upward, which does not help to
produce force.
Teaching the skillAsk the students to try hopping with their free leg:
• straight and to the side
• bent and held high to the side
• bent and in front of them
• bent, with the foot behind the support leg and not
swinging.
Ask students to try hopping:
• with their eyes closed
• looking down to the ground
• watching a partner who is hopping beside them
• looking straight ahead.
Link back to the components of the hop and ask
students to decide which is the easiest or the best way
to hop.
Students could try hopping using their arms in different
ways, for example:
• swinging arms up high
• swinging arms alternately, as in the skip
• keeping arms to the sides
• holding arms directly in front of the body.
Ask students which arm position feels most efficient
and why.
Students try hopping for height, for distance and for
speed. What arm and leg positions work best? They can
focus on the landing and take-off components. They
can also get a partner to spot check for correct
techniques.
Practising the skill• Have the students practise single leg balances first.
• Tell students to hop on the spot, using a chair, the
wall or a partner for support.
• Students hop on one foot and then the other, using
sequences, for example, L-L, R-R, L-L, R-R, L-L-L,
R-R-R, L-L-R-L-L, R-R-L-R-R, on the spot, then
travel.
• Students make hopping patterns by combining
hopping in one place with hopping along a straight
or curved pathway.
• Students make hopping patterns by combining left
and right foot for support and hopping forwards,
backwards and sideways.
• Create a space in the playground to encourage
hopping games to be played out of class time.
Examples include hopscotch, elastics and
skipping.

28
Side gallop
About the skillThe side gallop or slide is a unique locomotor movement skill in that the individual is moving sidewards while the
body and sometimes eyes are facing forwards. It is a basic locomotor pattern used in many sports and games, such
as softball, basketball, touch and racquet sports. It is also used extensively in dance.
Skill components
3 5 2 4 1 3 4
1. Smooth rhythmical movement.
2. Brief period where both feet are off the ground.
3. Weight on the balls of the feet.
4. Hips and shoulders point to the front.
5. Head stable, eyes focused forward or in the direction of travel.(Introductory components marked in bold)
Important considerationsChildren are ready to demonstrate proficiently the introductory components of the side gallop by the end of
Year 1 and the fine-tuning components by the end of Year 4. Children are generally able to side gallop before they
can skip. In the side gallop, the same leg is always leading, whereas the skip involves a change of lead legs with
every step-hop sequence.
The side gallop should be taught as a rhythmical movement rather than as a speed movement.

29Learning about fundamental movement skills and their components
Chap
ter
2
Developing the skill
Teaching cuesSay to the students:
• Use light springing steps.
• Take off and land on the front of your foot.
• Make your body face to the front.
• Keep eyes straight ahead (or look over your
shoulder.)
• Step, close, step, close.......or step, together, step,
together.
Common errors• looking down at the ground or feet
• not keeping weight on balls of the feet
• hips and shoulders facing direction of travel
• leading foot not parallel with other foot, but
pointing in direction of travel
• trailing leg maintaining contact with ground and
“dragged” to lead leg
• movement choppy and not rhythmical
• arms needed to assist balancing
• legs kept straight with little knee bend throughout
the movement
• being unable to perform equally well in both
directions
• allowing feet to cross during movement.
Teaching the skillProvide a rhythm using a percussion instrument, music
or verbal cue such as “step, together, step, together.”
Ask students to:
• begin with short side steps and then increase the
length of each side step
• work with a partner, hold hands and side gallop.
This should keep students’ hips and body
perpendicular to their direction of travel
• explore the side gallop, using different distances
between steps, keeping feet low, springing to gain
height
• work with a partner to evaluate the flight and
rhythm of the side gallop
• explore a range of trunk and arm positions. Focus
on the correct placement of feet and hips
• allow students to explore the side gallop with stiff
legs.
Ask students: “What could be done to side gallop
better? What happens when you cross your feet in the
side gallop?”
Practising the skill• Use existing playground markings as tracks for side
galloping. Students move along tracks or lines,
looking in the direction of the track or looking in
the same direction as their hips and body.
• Students side gallop in different directions, using
the left and right foot to lead.
• Students develop side gallop patterns, changing
direction, using a half turn, or stopping and using
a different leg to lead.
• Get students to mirror a partner to develop the idea
of using the side gallop to defend a player, as in
basketball, netball or soccer.

30
Skip
About the skillSkipping is a rhythmical locomotor skill that is basic to many children’s games. It is also fundamental to good
footwork in numerous sports, such as basketball, netball and touch, and many forms of dance.
1 3 4
2 5
1. Shows a rhythmical step-hop.
2. Lands on ball of the foot.
3. Knee of support leg bends to prepare for hop.
4. Head and trunk stable, eyes focused forward.
5. Arms relaxed and swing in opposition to legs.
(Introductory components marked in bold)
Important considerationsChildren are ready to demonstrate proficiently the introductory components of the skip by the end of Year 1 and
the fine-tuning components by the end of Year 4. The skip is a more difficult skill to learn, compared with the side
gallop. Children should be able to hop and side gallop before learning to skip.
The skip should be taught as a rhythmical movement, with the focus on developing the step-hop rhythm, rather
than performing the movement with speed.
Skill components
31Learning about fundamental movement skills and their components
Chap
ter
2
Developing the skill
Teaching cuesSay to the students:
• Use light springing steps.
• Keep eyes straight ahead.
• Step, hop, step, hop.
• Take off and land on the front of your foot.
• Make sure your body faces to the front.
Common errors• choppy, non-rhythmical movements
• inability to perform step-hop on both legs
alternately
• landing flat-footed or heel first
• eyes looking at ground or feet
• arms swinging together rather than in opposition
to legs
• little arm movement to rhythmically support legs
• legs stiff with little bend to prepare for hop.
Teaching the skillExplore the skip by asking students to:
• use different distances between steps
• keep feet low
• spring to gain height
• use different arm positions.
Students work with a partner to evaluate flight and
rhythm of the skip.
Ask students to identify:
• which is the best method to gain flight while
keeping the rhythm of the skip?
Provide a rhythm for students to follow, using a verbal
cue such as “Step, hop, step, hop”. Get the students to:
• perform the skip in a stationary position, using the
back of a chair for balance
• do a step and then a hop on the same leg. Students
then perform it on the other leg
• skip holding their hands at waist height in front of
them. Tell them: “Try to touch your hand with your
knee with each hop”
• try four different ways of moving their arms when
they skip. Ask: “What arm movement feels best
when you skip?”
Practising the skill• Students skip with exaggerated arm and knee
actions. They skip and clap hands up high in front
of them.
• Students use existing playground markings as
tracks for skipping. Encourage students to move
along these tracks, looking in the direction of the
track.
• Have students develop skipping patterns, changing
direction, length of step and height of hop.
• Incorporate the skip into dance, gymnastics and
simple games.

32
Overarm throw
About the skillThe overarm throw is a manipulative skill frequently used in many sports, such as cricket, softball and baseball.
The action is also used in athletics with the javelin, with the overhead serve and smash in tennis, volleyball and
badminton and passes in netball and basketball.
Skill components1 2 3 4 5
1. Eyes focused on target area throughout the throw.
2. Stands side-on to target area.
3. Throwing arm moves in a downward and backward arc.
4. Steps towards target area with foot opposite throwing arm.
5. Hips then shoulders rotate forward.
6. Throwing arm follows through, down and across the body.
(Introductory components marked in bold)
5 6
Important considerationsChildren are ready to demonstrate proficiently the introductory components of the overarm throw by the end of
Year 1 and the fine-tuning components by the end of Year 4.
Objects need to be thrown with force, so that components 3, 5 and 6 will develop. For this reason, it is not
recommended to teach throwing and catching together, especially if students are working with partners. Immature
techniques can be seen in students who have not had the opportunity to throw frequently and hard when learning
the skill. To minimise the danger of objects thrown with force, use bean bags, scrunched up paper, soft foam balls
or scarves.
The objects used for throwing need to be of a size which allows them to be comfortably grasped in the individual’s
fingers (not the palm of the hand). If the object is too large it will force the student to resort to an immature
throwing technique. If students are having problems balancing when throwing, instruct them to raise their non-
throwing arm and point it to the target area.
When focusing on specific components of the throw, ensure that the whole movement is practised. Any pause or
breaks in the sequence will cause speed to be lost. Even the follow-through greatly determines the speed of the
throw.
1 2 3 4 5

33Learning about fundamental movement skills and their components
Chap
ter
2
Developing the skill
Teaching cuesSay to the students:• Look at your target.• Point to the target (with your non-throwing arm).• Stand side-on.• Step forward and throw.• Follow through, down and across your body with
your throwing arm.• Swing your arm down and back as you prepare to
throw.• Step, throw and follow-through down and across
your body.
Common errors• looking down at the ground or feet• standing front on to the target area• standing with throwing shoulder closest to target
area (as if throwing a dart)• throwing arm taken straight back, up to beside the
head, or forward as if throwing a dart• throwing arm significantly bent at end of back
swing• stepping towards target area with same foot as
throwing arm• hips do not rotate forward during propulsion• hips and shoulders rotate together (whole upper
body twists as one)• throwing arm points to target area after throw,
rather than following through down and acrossbody
• little or no weight transference on to the back footduring preparation.
Teaching the skillUse existing playground markings or make lines on the
ground with chalk or masking tape as markers. Use a
verbal cue, such as: “Step forward and throw”. Ask
students to step off these markers towards their target.
Use demonstration and verbal cues such as “follow-through, down and across your body” to focus students’attention on the follow-through motion of the throwingarm.
Use the analogy of a rubber band held vertical andtwisted to focus on the hip and shoulder rotation. Askstudents to imagine the force that it has as it is releasedand uncoils. Try to mimic this force in the preparationand propulsion phases of the throw.
Ask students to:• work with a partner and experiment with different
hip, shoulder and feet movements as they throw• stand facing towards the target, keeping their hips
and feet still• stand side-on and rotate their shoulders but not
their hips• stand side-on and rotate hips and shoulders• take a small step as they throw to transfer their body
weight• work with a partner to provide feedback about each
of the different positions.Students identify which position is the most efficientfor distance and speed.
Have the students practise the throw from a sitting,kneeling and standing position. Ask the students whatdifference they notice in the distance of the throw. Whatdifferent body parts did they use?
Practising the skill• Provide a range of large targets, e.g. brightly
coloured markings on the playground, large hoopsor skipping ropes laid out in different shapes. Makesure the targets are a substantial distance from thestudents. This encourages them to use force in theirthrowing action.
• Organise the students to work in two lines 5-7metres away from their partner. Students standside-on, with their non-throwing arm pointingtowards their partner. A variety of soft objectsshould be used. Focus needs to be maintained onthe throw, rather than on the catch.
• Incorporate the throw into major games such as
cricket and softball or in minor games.
34
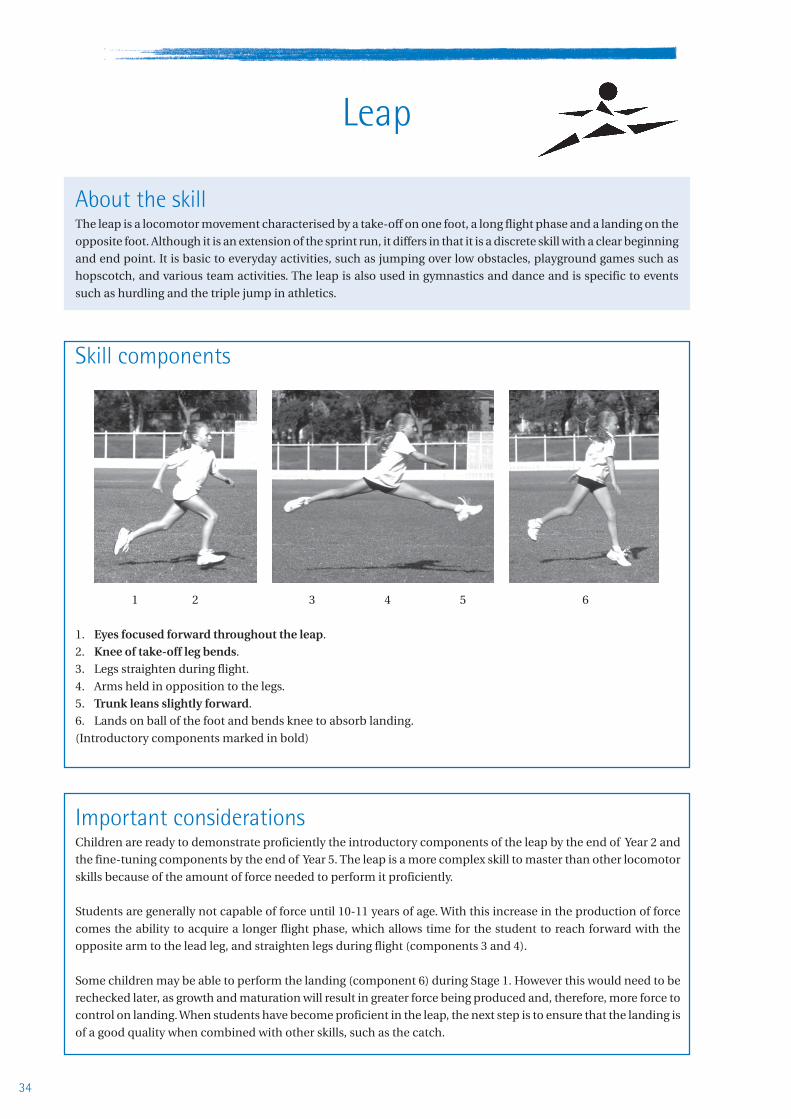
Leap
About the skillThe leap is a locomotor movement characterised by a take-off on one foot, a long flight phase and a landing on the
opposite foot. Although it is an extension of the sprint run, it differs in that it is a discrete skill with a clear beginning
and end point. It is basic to everyday activities, such as jumping over low obstacles, playground games such as
hopscotch, and various team activities. The leap is also used in gymnastics and dance and is specific to events
such as hurdling and the triple jump in athletics.
1 2 3 4 5 6
1. Eyes focused forward throughout the leap.
2. Knee of take-off leg bends.
3. Legs straighten during flight.
4. Arms held in opposition to the legs.
5. Trunk leans slightly forward.
6. Lands on ball of the foot and bends knee to absorb landing.
(Introductory components marked in bold)
Skill components
Important considerationsChildren are ready to demonstrate proficiently the introductory components of the leap by the end of Year 2 and
the fine-tuning components by the end of Year 5. The leap is a more complex skill to master than other locomotor
skills because of the amount of force needed to perform it proficiently.
Students are generally not capable of force until 10-11 years of age. With this increase in the production of force
comes the ability to acquire a longer flight phase, which allows time for the student to reach forward with the
opposite arm to the lead leg, and straighten legs during flight (components 3 and 4).
Some children may be able to perform the landing (component 6) during Stage 1. However this would need to be
rechecked later, as growth and maturation will result in greater force being produced and, therefore, more force to
control on landing. When students have become proficient in the leap, the next step is to ensure that the landing is
of a good quality when combined with other skills, such as the catch.
35Learning about fundamental movement skills and their components
Chap
ter
2
Developing the skill
Teaching cuesSay to the students:
• Look straight ahead.
• Bend knee to take off.
• Scissor legs.
• Stretch your arms out.
• Lean into the leap.
• Land softly.
Common errors• looking down at the ground or feet
• insufficient knee bend in take-off leg (resulting in
lack of propulsion or forward and upward elevation)
• being unable to take off on one leg
• taking off and landing on the same foot (hops)
• legs remain bent during flight
• short flight stage (or no period where both feet are
off the ground)
• arm opposite the lead leg does not reach forward
during flight
• trunk is upright during flight
• landing flat-footed or heel first
• ankle, knee or hip do not bend to absorb landing
• inability to control landing without losing balance
• little horizontal distance covered.
Teaching the skillAsk students to:• stand with one foot inside a hoop, push off and land
outside the hoop on the other foot• take a large step over a range of obstacles from a
standing start, landing on one foot. Use smallhoops, marks on the ground or a low pile of beanbags. Tell students to use a small run-up to leap overthe same obstacles
• explore different body positions while leaping e.g.to bend at the waist, lean backwards, keep the bodyupright, lean slightly forward. Ask: “which way feelsthe most comfortable?”
• leap with their arms in different positions todetermine which arm position helps them to leapthe furthest or highest. They could try leaping withboth arms pushed forward, one arm forwards andone arm upwards or both arms down.
Ask students to explore different ways of pushing offwith their take-off leg. They could use marks on theground to measure the difference between:• taking off with a straight leg from a standing
position• using a small slow run-up, with a bent leg on take-
off• using a fast run-up, with take-off leg bent and the
leading leg stretching out in front.
Organise students into pairs. Instruct students to givefeedback about the softness of the landing as they leapacross different distances. Partners should look forlanding on the ball of the foot and the knee bent to
absorb the force.
Practising the skill• Combine high and low leaps. Use soft objects or
objects which fall apart readily to form slightly
higher barriers.
• Use imagery to assist students to practise the leap:
for example, ask them to leap over a puddle of water,
a river full of crocodiles, a deep dark valley or from
cloud to cloud. Mark a “river” with two extended
ropes.
• Have students leap to a rhythmical
accompaniment. Tap a tambourine for the run-up,
shake it gently to indicate the leap.
• Students shadow a partner as they move around an
obstacle course with leaps, hops and skips.
• Encourage students to develop proficiency in
leading with either leg.
36
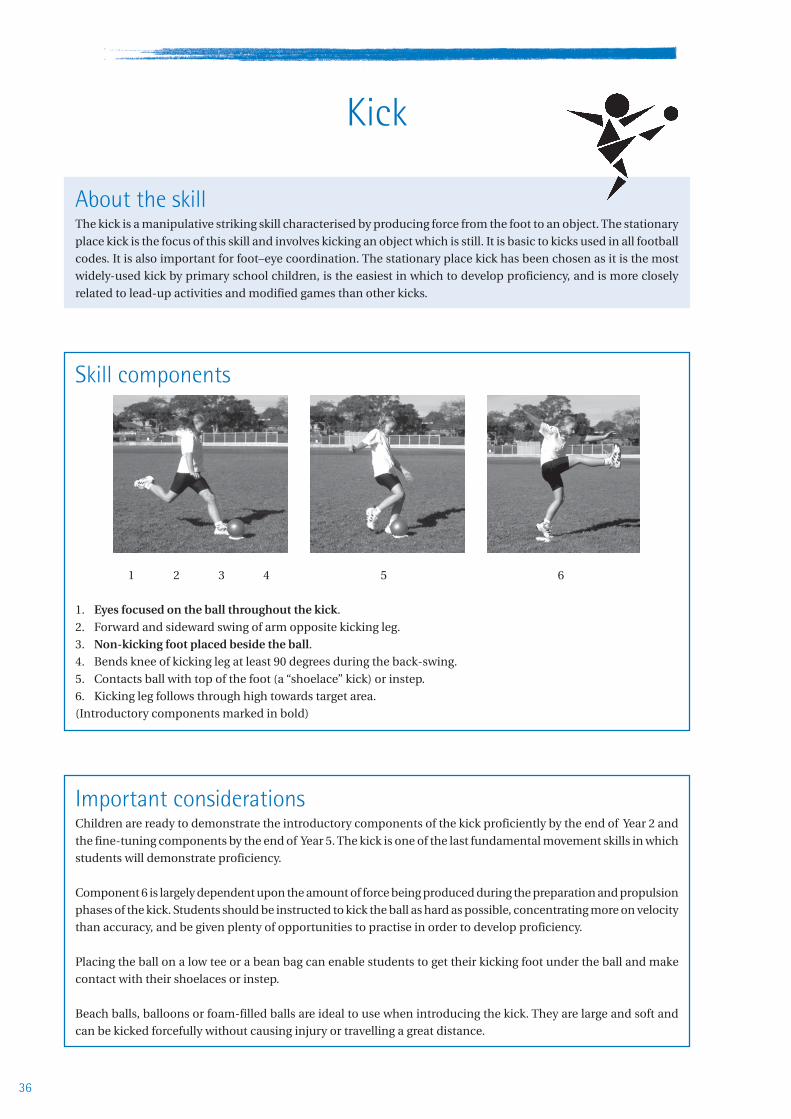
Kick
About the skillThe kick is a manipulative striking skill characterised by producing force from the foot to an object. The stationary
place kick is the focus of this skill and involves kicking an object which is still. It is basic to kicks used in all football
codes. It is also important for foot–eye coordination. The stationary place kick has been chosen as it is the most
widely-used kick by primary school children, is the easiest in which to develop proficiency, and is more closely
related to lead-up activities and modified games than other kicks.
Skill components
1 2 3 4 5 6
1. Eyes focused on the ball throughout the kick.
2. Forward and sideward swing of arm opposite kicking leg.
3. Non-kicking foot placed beside the ball.4. Bends knee of kicking leg at least 90 degrees during the back-swing.
5. Contacts ball with top of the foot (a “shoelace” kick) or instep.
6. Kicking leg follows through high towards target area.
(Introductory components marked in bold)
Important considerationsChildren are ready to demonstrate the introductory components of the kick proficiently by the end of Year 2 and
the fine-tuning components by the end of Year 5. The kick is one of the last fundamental movement skills in which
students will demonstrate proficiency.
Component 6 is largely dependent upon the amount of force being produced during the preparation and propulsion
phases of the kick. Students should be instructed to kick the ball as hard as possible, concentrating more on velocity
than accuracy, and be given plenty of opportunities to practise in order to develop proficiency.
Placing the ball on a low tee or a bean bag can enable students to get their kicking foot under the ball and make
contact with their shoelaces or instep.
Beach balls, balloons or foam-filled balls are ideal to use when introducing the kick. They are large and soft and
can be kicked forcefully without causing injury or travelling a great distance.

37Learning about fundamental movement skills and their components
Chap
ter
2
Developing the skill
Teaching cuesSay to the students:
• Keep your eyes on the ball.
• Place your foot beside the ball before you kick.
• Step forward and kick.
• Swing the arm opposite to your kicking leg.
• Swing your kicking leg back.
• Follow through.
Common errors• looking at target area rather than the ball
• non-kicking foot is placed behind or in front of theball
• knee of kicking leg is not bent during back swing• inability to maintain balance on one leg during
kicking sequence• ball contact made with toe• poking or pushing at the ball rather than kicking
through it (results in no follow-through or straight-legged kick)
• body does not lean back slightly just prior to contact• arm opposite kicking leg is kept beside body during
preparation• little or no lateral hip rotation (twisting away from
the ball) during preparation• run-up to the ball is straight rather than at a 45-
degree angle.
Practising the skill• Make a kicking tee out of a pile of sand, bean bags
or a low batting tee. This lifts the ball off the ground
so that students can get their kicking foot under the
ball.
• Place 2 or 3 balls along a line. Students need to begin
with a low follow-through, then increase the height
of the follow-through with each kick.
• Rub chalk on students’ shoelaces or the part of the
foot that should make contact with the ball. They
try to leave a mark on the ball when they kick it.
• Lighter balls can be used to encourage students to
kick with force without fear of injury.
• Practise the kick in modified games which involve
small groups of students and focus on kicking for
distance.
• Include as part of a station in a circuit or tabloid.
Teaching the skillPlace a mark on soft large objects such as beach balls,foam-filled balls or balloons. Tell students to:• watch the mark on the ball as they prepare to kick• kick with force but without fear of injury.
Students hold on to a partner’s shoulder or a chairbeside them to balance. They place the non-kickingfoot beside the ball. They swing the kicking leg backand then forwards to kick the ball.
Students mark a starting point on the ground about onestep away from the ball. They step forward with non-kicking foot, placing it beside the ball. Use verbal cuessuch as “step forward, kick” to help students developrhythm and force.
Get the students to work with a partner. Ask thepartners to explain how their arms move when theykick the ball. Students try using different armmovements when they kick. Can they discover whicharm movements work best? (Forward and sidewardswing of arm opposite kicking leg.)
Instruct students to try kicking the ball in a number ofways, for example:• with a stiff non-bending kicking leg• with no back swing• with a small back swing from a step-up position• from a run-up with a big back swing.Ask students which method produced the most forceand identify reasons why.

38
Two-hand strike
About the skill
The two-hand strike is a manipulative skill in which force is applied to an object using an implement, in this case
a bat. It forms the foundation to more advanced games and sports-specific skills, such as: the strike in T-ball,
baseball and softball; the drive in cricket and hockey; the golf swing; and ground strokes in racquet sports, handball
and volleyball. Because of the variability of ball tosses, performing the two-hand strike from a T-ball stand is the
focus in this resource. Although these striking actions may differ slightly in performance, the same mechanical
principles apply to both.
1 2 3 4 5
1. Stands side-on to target area.
2. Eyes focused on the ball throughout the strike.
3. Hands next to each other, bottom handmatches the front foot.
4. Steps towards target area with front foot.
5. Hips then shoulders rotate forward.
6. Ball contact made on front foot with straight
arms.
7. Follows through with bat around the body.
(Introductory components marked in bold)
6 7
Skill components
Important considerationsChildren are ready to demonstrate proficiently the introductory components of the two-hand strike by the end of
Year 2 and the fine-tuning components by the end of Year 5. The two-hand strike is the most complex of the twelve
fundamental movement skills in this resource.
Initial instruction should focus on velocity rather than accuracy. A contributing factor to success with this skill is
ensuring the bat is not too long or heavy and the tee not too high. If younger students are having difficulty, you
could commence instruction using the hand as the implement, starting with slow moving objects such as beach
balls or balloons. Have students progress to a small, short-handled implement that can be held comfortably in
one hand, such as a paddle bat, then on to a longer implement requiring two hands for control.

39Learning about fundamental movement skills and their components
Chap
ter
2
Developing the skill
Teaching cuesSay to the students:
• Stand side-on.
• Keep your eyes on the ball.
• Position your hands so they match your feet.
• Use a big swing.
• Step forward and swing.
• Contact the ball with straight arms.
• Swing and follow through.
Common errors• looking at the target area rather than the ball
• having an open stance with feet more front on to
target area
• front shoulder doesn’t point to target area
• feet are not shoulder-width apart
• hands are not next to each other on the bat
• hands wrong way round on the bat
• weight is not transferred onto back foot during back
swing
• front foot doesn’t step towards target area during
propulsion
• bat does not swing horizontally through ball
(“swatting” action used)
• no hip rotation, or hips and shoulders rotate
forward together
• no weight transferred onto front foot during
forward swing
• ball contact made while on back foot
• ball contact made with bent arms
• bat points toward target area during follow-through
rather than wrapping around body.
Teaching the skillMake marks on the ground to show the starting
position for the strike. Instruct students to:
• stand to the side of the T-ball stand
• rest the centre of the bat above the top of the tee
• take a small step back so that the front foot can step
towards the target area when they swing and strike
• step towards target and swing.
Students use bats made of rolls of newspaper to mirror
the stance and rhythm of the strike demonstrated by
the teacher. Teachers use verbal cues such as “step
forward, swing” or “swing and follow-through” to focus
on body movement or rhythm as the students practise
the strike.
Allow students to explore different ways of swinging
the bat:
• swinging with arms bent
• both arms straight
• making a half swing with no follow-through
• trying a full swing and follow-through.
Students discover if there is a difference and if one
method works better than the others.
Practising the skill• Students strike soft slow-moving objects, such as
balloons or foam balls, with the preferred hand.
They use short-handled bats and then progress to
long-handled bats.
• Students practise hitting a ball or balloon
suspended from a height. They experiment with
different open and closed hand grips.
• Students use a variety of bats and balls for striking.
Improvise by using witches hats, plastic pipes or
cardboard rolls for batting tees. Try hanging tennis
balls in stockings from an overhead beam for
variety.
• Practise the strike in modified games such as “target
practice” where students aim to strike the ball
through goals for points.
• Students practise the strike as a station in a circuit.

40
Dodge
About the skill
The dodge is a locomotor skill that involves a high degree of balance and stability. It is an extension of the side
gallop and sprint run and incorporates dynamic, fluid and coordinated movement to change direction. It is common
to many playground games and activities and is an important skill in the majority of team sports.
Skill components
1. Changes direction by bending knee and pushing
off the outside foot.
2. Change of direction occurs in one step.
3. Body lowered during change of direction or in thedirection of travel.
4. Eyes focused forward.
5. Dodge repeated equally well on both sides.
(Introductory components marked in bold)
1 2 3
4 5
Some important considerationsChildren are ready to demonstrate proficiently the introductory components of the dodge by the end of Year 2 and
the fine-tuning components by the end of Year 5. Students need to perform this skill at speed in order to be able to
demonstrate component 1.
Non-locomotor movements, such as bending, twisting, turning and swaying, are all good lead-up activities for the
dodge. Children should practise dodging on both sides initially, although it is not unusual for them to be more
proficient on one side. When teaching the dodge, get students to specifically attempt to dodge markers as opposed
to running around them. Touching markers with the outside foot can also assist in the development of this skill.
Students will be more successful at dodging if they are given opportunities to experiment with their base of support.
Students can vary their base of support by changing their feet positions from close together to wide apart. When
changing direction, they should lower their body weight (centre of gravity), and push off the outside foot.
41Learning about fundamental movement skills and their components
Chap
ter
2
Developing the skill
Teaching cuesSay to the students:
• Look straight ahead.
• Use the outside of your foot.
• Lower body height down and then up when
changing direction.
• Use your knees to change direction.
• Use only one step to change direction.
• Lower body height and transfer body weight.
Common errors• looking down at the ground or in the direction of
travel
• little or no knee bend or push off outside foot during
change of direction
• little or no deception in body movements
• inability to perform the dodge on both sides of the
body
• change of direction is slow and requires numerous
small steps
• hesitation or pause while changing directions
• more than one step is required to complete change
of direction
• no head or shoulder fake during change of
direction.
Teaching the skillArrange witches hats or markers in a zigzag pattern.
Ensure students dodge markers by instructing them to
touch the marker with the outside of their foot.
Ask students to run on the spot. On the command
“freeze”, students stop with their feet apart and their
body lowered. On the command “melt”, students
continue running on the spot.
Students play follow-the-leader. The leader starts by
making large zigzag steps and then increases the
number of steps before changing the direction of travel.
Ask students to change direction:
• with their feet close together
• with their feet wider apart
• with body held upright
• with body dropped down low
• with arms kept close by their side.
Students determine which way is the most efficient
and why.
Practising the skill• Students run in an open space. On the command
“change”, they push off on the outside foot to
change direction.
• Students dodge off and onto a line. Place some
markers about 40 cm either side of a straight line
about 50 metres long every two metres. Students
run along the line and lower their body when they
step out to the marker and push off and back to the
centre line.
• Place marks on the ground with chalk, masking tape
or pieces of non-slip matting at random. Students
run to a mark, place their foot on the mark, dodge
on that foot to run towards another marker.
• Students follow a partner who runs and dodges
through an imaginary paddock full of prickles.
Students can devise their own safe tracks through
the paddock. Encourage students to bend their
knee and push off on their outside foot when
changing direction.
• Have students play partner tag games and
dodgeball games, modifying the rules to change
direction using only one step, or make students
dodge rather than jump over the ball.

Chap
ter
3
43Observing fundamental movement skills
What’s in this chapter?
This chapter introduces some ways to help youobserve and make judgements about thedevelopment of students’ fundamentalmovement skills.
The chapter includes a checklist for each of thetwelve fundamental movement skills to assist youin observing the skill components. It also includesprofessional development activities to help youto understand and recognise the components ofeach fundamental movement skill.
You should use the skills checklists and theprofessional development activities in thischapter along with the video, Get skilled: Getactive—Show me how. This video has examplesof students who are still developing and studentswho are already proficient in each fundamentalmovement skill.
Why should you observefundamental movement skills?
Teachers observe students in the classroom andthe playground performing a variety of skills. Youcan use these observations to make judgementsabout what students can or can’t do.
Observation is a valuable tool for teachingpurposes. When observing students’ fundamentalmovement skills, you can use the information youcollect to:
• plan and program lessons or activities for thewhole class, small groups or individuals
• assist individual students by providingfeedback about their performance
• evaluate the effectiveness of your teachingprogram.
Observing fundamentalmovement skills
How and when should youobserve fundamentalmovement skills?
When observing fundamental movement skillsit is useful to keep in mind the followingconsiderations.
• Observation should be part of the naturalteaching and learning situation. Observationneeds to be unobtrusive, as some studentsmay alter their movement pattern if they areaware that they are being observed.
• When observing students performingfundamental movement skills, you shouldfocus on how the movement looks or whichcomponents are evident in the performance,rather than on the final outcome of themovement, such as how fast the student ranor the accuracy of the throw.
• Observation should be objective. This willcome with practice and discussion withcolleagues. Ask a colleague to observeand make comments on the performanceof a small group of students. Compareyour observations with those of yourcolleague.
• Fundamental movement skills need to beobserved in a variety of contexts and over aperiod of time if you are to make a fairjudgement as to whether a skill has beenperformed proficiently. Observation shouldoccur in as many situations as possible and ina variety of contexts. This can include inphysical education lessons, in the playgroundor at sport.
Chapter 3
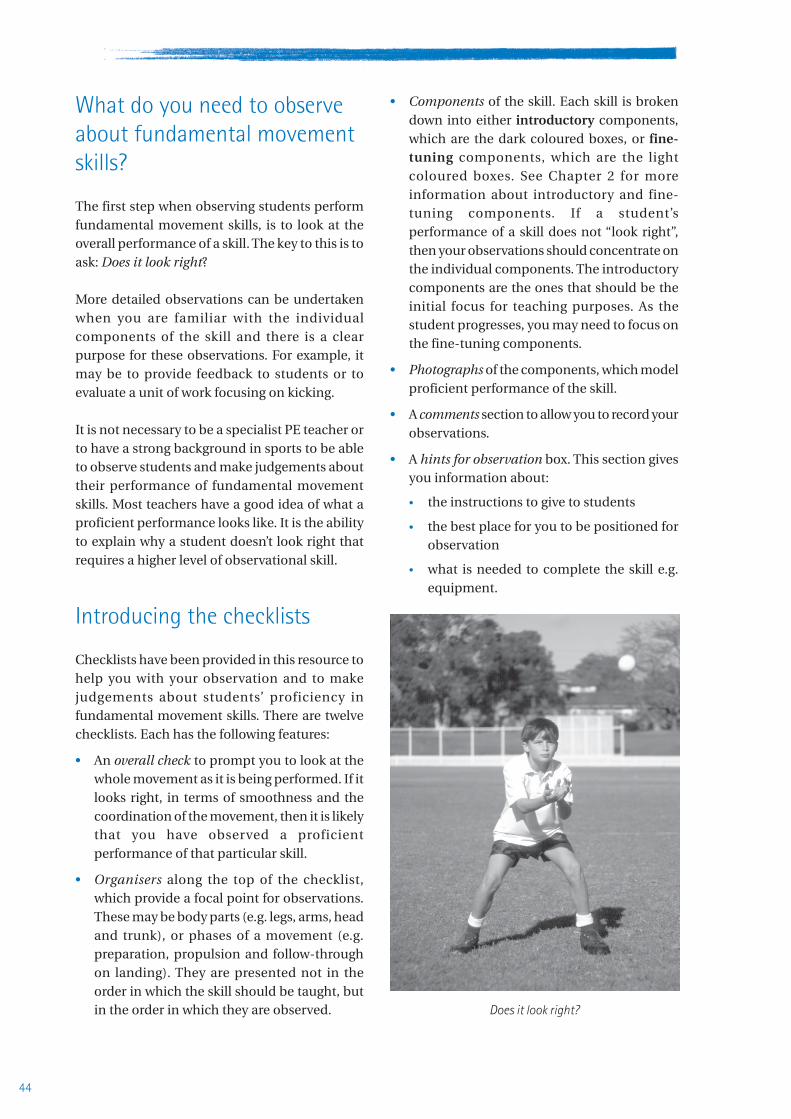
44
What do you need to observeabout fundamental movementskills?
The first step when observing students performfundamental movement skills, is to look at theoverall performance of a skill. The key to this is toask: Does it look right?
More detailed observations can be undertakenwhen you are familiar with the individualcomponents of the skill and there is a clearpurpose for these observations. For example, itmay be to provide feedback to students or toevaluate a unit of work focusing on kicking.
It is not necessary to be a specialist PE teacher orto have a strong background in sports to be ableto observe students and make judgements abouttheir performance of fundamental movementskills. Most teachers have a good idea of what aproficient performance looks like. It is the abilityto explain why a student doesn’t look right thatrequires a higher level of observational skill.
Introducing the checklists
Checklists have been provided in this resource tohelp you with your observation and to makejudgements about students’ proficiency infundamental movement skills. There are twelvechecklists. Each has the following features:
• An overall check to prompt you to look at thewhole movement as it is being performed. If itlooks right, in terms of smoothness and thecoordination of the movement, then it is likelythat you have observed a proficientperformance of that particular skill.
• Organisers along the top of the checklist,which provide a focal point for observations.These may be body parts (e.g. legs, arms, headand trunk), or phases of a movement (e.g.preparation, propulsion and follow-throughon landing). They are presented not in theorder in which the skill should be taught, butin the order in which they are observed.
• Components of the skill. Each skill is brokendown into either introductory components,which are the dark coloured boxes, or fine-tuning components, which are the lightcoloured boxes. See Chapter 2 for moreinformation about introductory and fine-tuning components. If a student’sperformance of a skill does not “look right”,then your observations should concentrate onthe individual components. The introductorycomponents are the ones that should be theinitial focus for teaching purposes. As thestudent progresses, you may need to focus onthe fine-tuning components.
• Photographs of the components, which modelproficient performance of the skill.
• A comments section to allow you to record yourobservations.
• A hints for observation box. This section givesyou information about:
• the instructions to give to students
• the best place for you to be positioned forobservation
• what is needed to complete the skill e.g.equipment.
Does it look right?
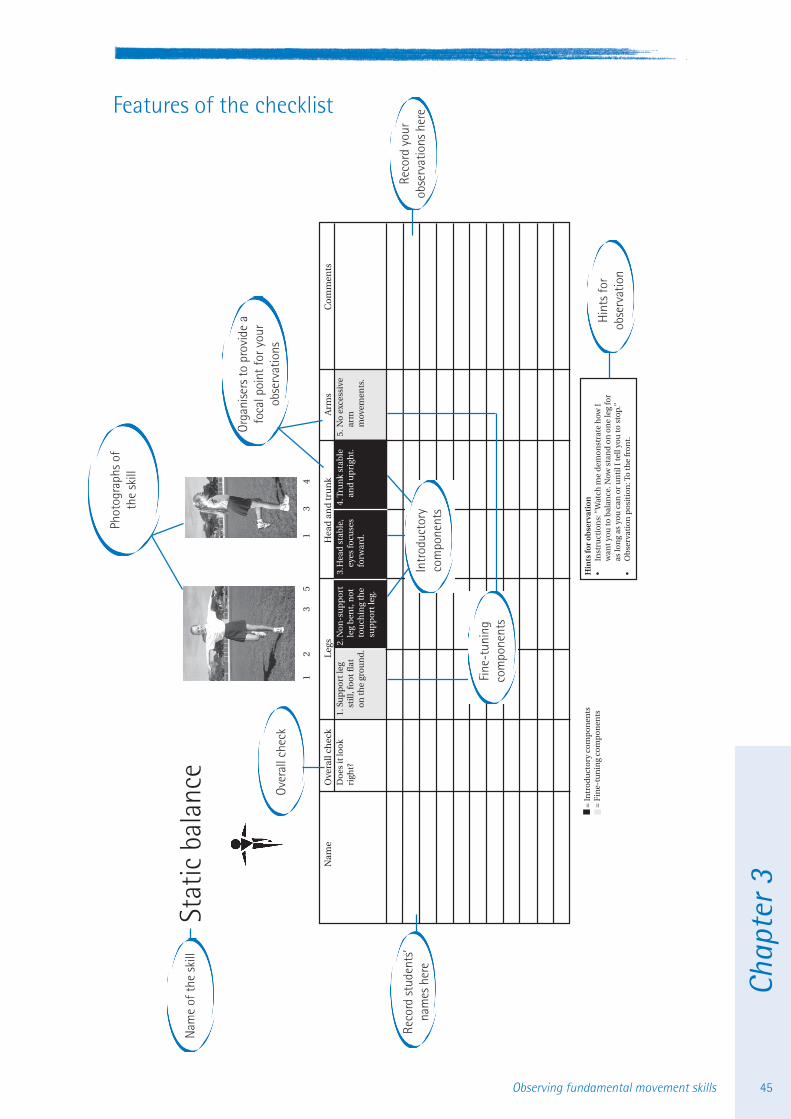
Chap
ter
3
45Observing fundamental movement skills
Stat
ic b
alan
ce
12
35
13
4
Nam
eO
vera
ll ch
eck
Legs
Hea
d a
nd
tru
nk
Arm
sC
om
men
tsD
oes
it lo
ok
1. S
up
po
rt le
g2.
No
n-s
up
po
rt3.
Hea
d s
tab
le,
4.Tr
un
k st
able
5.N
o e
xces
sive
righ
t?st
ill,
foo
t fla
tle
g b
ent,
no
tey
es fo
cuse
san
d u
pri
ght.
arm
on
the
gro
un
d.
tou
chin
g th
efo
rwar
d.
mov
emen
ts.
sup
po
rt le
g.
= In
tro
du
cto
ry c
om
po
nen
ts=
Fin
e-tu
nin
g co
mp
on
ents
Hin
ts fo
r o
bse
rvat
ion
•In
stru
ctio
ns:
“W
atch
me
dem
on
stra
te h
ow I
w
ant y
ou
to b
alan
ce. N
ow s
tan
d o
n o
ne
leg
for
as lo
ng
as y
ou
can
or
un
til I
tell
you
to s
top.
”•
Ob
serv
atio
n p
osi
tio
n: T
o th
e fr
on
t.
Features of the checklist
Nam
e of
the
skill
Reco
rd s
tude
nts’
nam
es h
ere
Ove
rall
chec
k
Hin
ts fo
rob
serv
atio
n
Reco
rd y
our
obse
rvat
ions
her
e
Org
anis
ers
to p
rovi
de a
foca
l poi
nt fo
r you
rob
serv
atio
ns
Intr
oduc
tory
com
pone
nts
Fine
-tun
ing
com
pone
nts
Phot
ogra
phs
ofth
e sk
ill
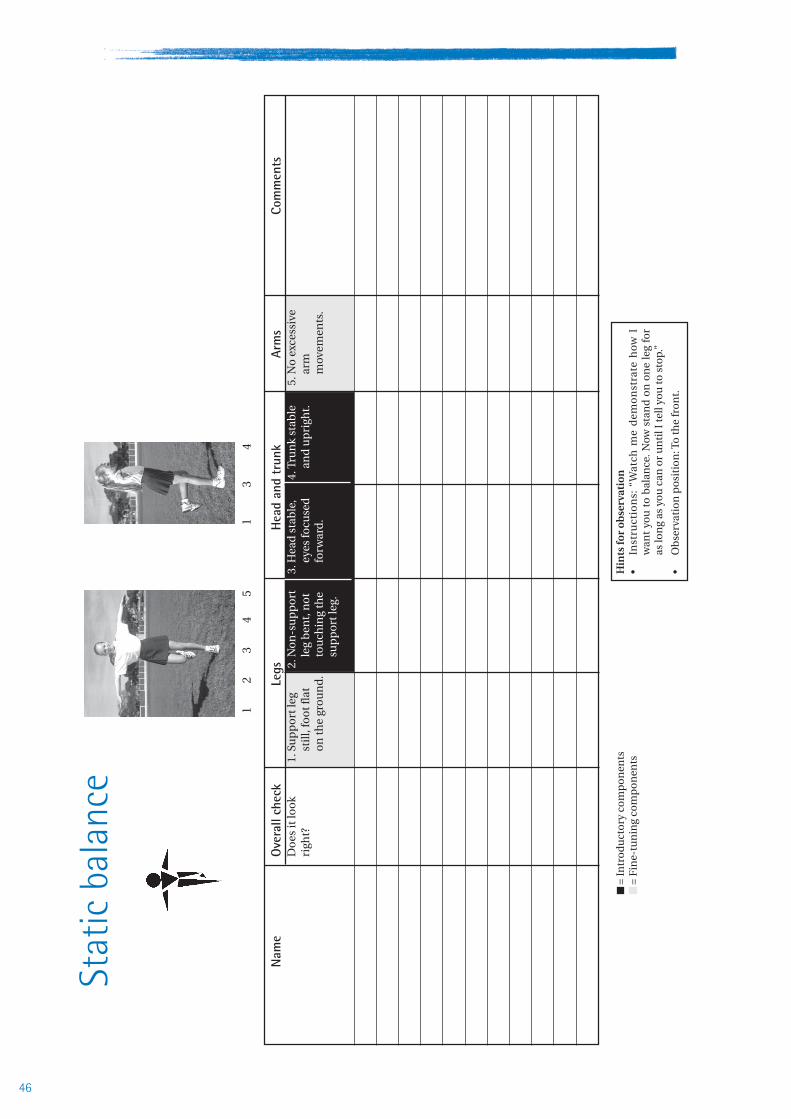
46
12
34
51
34
Nam
eO
vera
ll ch
eck
Leg
sH
ead
and
trun
kAr
ms
Com
men
tsD
oes
it lo
ok
1.Su
pp
ort
leg
2.N
on
-su
pp
ort
3.H
ead
sta
ble
,4.
Tru
nk
stab
le5.
No
exc
essi
veri
ght?
still
, fo
ot f
lat
leg
ben
t, n
ot
eyes
focu
sed
and
up
righ
t.ar
mo
n th
e gr
ou
nd
.to
uch
ing
the
forw
ard
.m
ovem
ents
.su
pp
ort
leg.
= In
tro
du
cto
ry c
om
po
nen
tsH
ints
for
ob
serv
atio
n =
Fin
e-tu
nin
g co
mp
on
ents
•In
s tru
ctio
ns :
“W
atch
me
dem
on
s tra
te h
ow
Iw
ant
you
to
bal
ance
. Now
sta
nd
on
on
e le
g fo
ras
lon
g as
yo
u c
an o
r u
nti
l I te
ll yo
u to
sto
p.”
•O
bse
rvat
ion
po
siti
on
: To
the
fro
nt.
Stat
ic b
alan
ce

Chap
ter
3
47Observing fundamental movement skills
14
56
23
Nam
eO
vera
ll ch
eck
Leg
sH
ead
and
trun
kAr
ms
Com
men
tsD
oes
it lo
ok
1.La
nd
s o
n b
all
2.N
on
-su
pp
ort
3.H
igh
kn
ee li
ft4.
Hea
d a
nd
5.E
lbow
s b
ent
6.A
rms
dri
veri
ght?
of t
he
foo
t.kn
ee b
end
s at
(th
igh
alm
ost
tru
nk
stab
le,
at 9
0º.
forw
ard
an
dle
ast 9
0º d
uri
ng
par
alle
l to
the
eyes
focu
sed
bac
k in
the
reco
very
gro
un
d).
forw
ard
.o
pp
osi
tio
n to
ph
ase.
the
legs
.
= In
tro
du
cto
ry c
om
po
nen
tsH
ints
for
ob
serv
atio
n =
Fin
e-tu
nin
g co
mp
on
ents
•In
s tru
ctio
ns :
“R
un
as
fas t
as
you
can
fro
m o
ne
end
to
ano
ther
.”•
Ob
serv
atio
n p
osi
tio
n: T
o th
e si
de
hal
fway
alo
ng,
an
d to
the
fro
nt
•N
eed
ed: A
flat
op
en a
rea,
ap
pro
xim
atel
y 20
met
res
lon
g.
Sprin
t run

48
12
34
56
Nam
eO
vera
ll ch
eck
Prep
arat
ion
Prop
ulsi
onLa
ndin
gCo
mm
ents
Do
es it
loo
k1.
Eyes
focu
sed
2.C
rou
ches
wit
h3.
Forc
efu
l4.
Legs
5.La
nd
s o
n6.
Co
ntr
olle
dri
ght?
forw
ard
or
knee
s b
ent
forw
ard
an
dst
raig
hte
n in
bal
ls o
f th
ela
nd
ing
wit
hu
pwar
dan
d a
rms
upw
ard
the
air.
feet
an
d b
end
sn
o m
ore
th
anth
rou
gho
ut
beh
ind
th
esw
ing
of t
he
the
knee
s to
on
e st
ep in
the
jum
p.b
od
y.ar
ms.
abso
rb la
nd
ing.
any
dir
ecti
on
.
= In
tro
du
cto
ry c
om
po
nen
tsH
ints
for
ob
serv
atio
n =
Fin
e-tu
nin
g co
mp
on
ents
•In
stru
ctio
ns:
“Ju
mp
as
hig
h a
s yo
u c
an.”
•O
bse
rvat
ion
po
siti
on
: To
the
sid
e.•
Ob
serv
e ap
pro
xim
atel
y fi
ve ju
mp
s: “
Rep
eat
un
til I
ask
yo
uto
sto
p.”
Vert
ical
jum
p
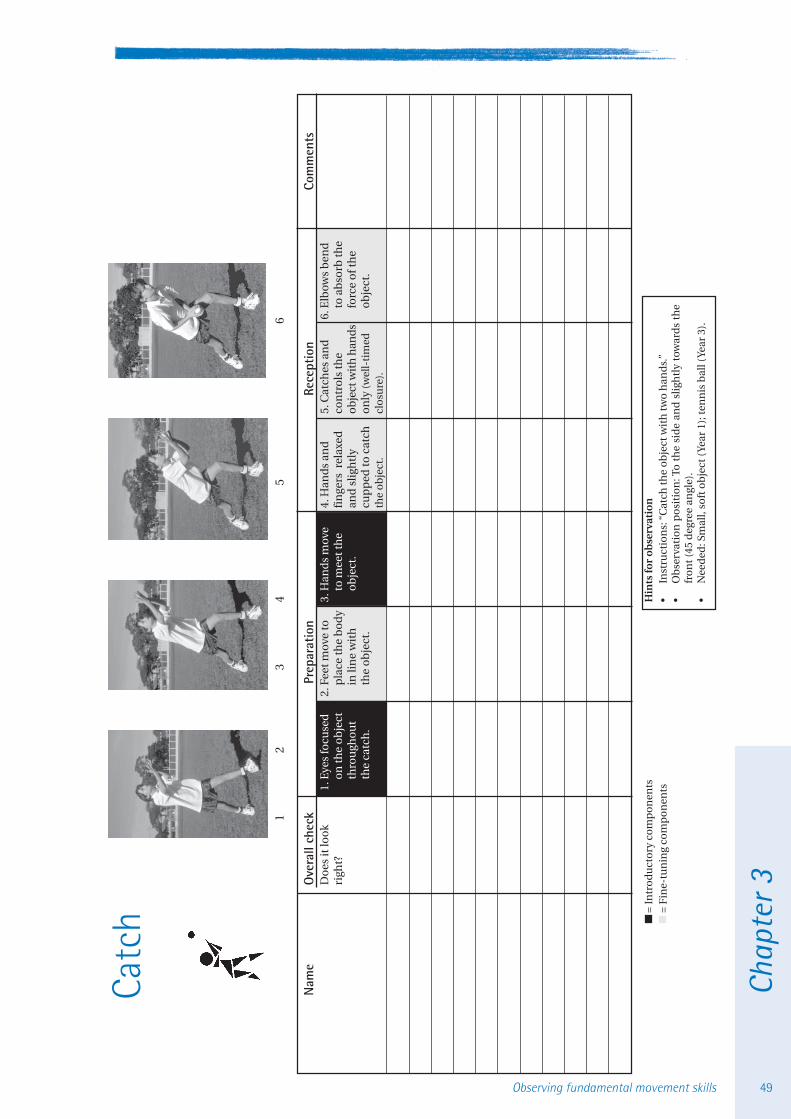
Chap
ter
3
49Observing fundamental movement skills
12
34
56
Nam
eO
vera
ll ch
eck
Prep
arat
ion
Rece
ptio
nCo
mm
ents
Do
es it
loo
k1.
Eyes
focu
sed
2.Fe
et m
ove
to3.
Han
ds
mov
e4.
Han
ds
and
5.C
atch
es a
nd
6.E
lbow
s b
end
righ
t?o
n th
e o
bje
ctp
lace
the
bo
dy
to m
eet t
he
fin
gers
rel
axed
con
tro
ls th
eto
ab
sorb
the
thro
ugh
ou
tin
lin
e w
ith
ob
ject
.an
d s
ligh
tly
obje
ct w
ith
han
ds
forc
e o
f th
eth
e ca
tch
.th
e o
bje
ct.
cup
ped
to c
atch
on
ly (w
ell-
tim
edo
bje
ct.
the
ob
ject
.cl
osu
re).
= In
tro
du
cto
ry c
om
po
nen
tsH
ints
for
ob
serv
atio
n =
Fin
e-tu
nin
g co
mp
on
ents
•In
stru
ctio
ns:
“C
atch
the
ob
ject
wit
h tw
o h
and
s.”
•O
bse
rvat
ion
po
siti
on
: To
th
e si
de
and
sli
ghtl
y to
war
ds
the
fro
nt (
45 d
egre
e an
gle)
.•
Nee
ded
: Sm
all,
soft
ob
ject
(Ye
ar 1
); te
nn
is b
all (
Year
3).
Catc
h

50
12
35
12
34
Nam
eO
vera
ll ch
eck
Leg
sH
ead
and
trun
kAr
ms
Com
men
tsD
oes
it lo
ok
1.Su
pp
ort
leg
2.La
nd
s an
d3.
No
n-s
up
po
rt4.
Hea
d s
tab
le,
5.A
rms
ben
tri
ght?
ben
ds
on
pu
shes
off
on
leg
ben
t an
dey
es fo
cuse
dan
d s
win
gla
nd
ing,
then
the
bal
l of t
he
swin
gs in
forw
ard
forw
ard
as
stra
igh
ten
s to
foo
t.rh
yth
m w
ith
thro
ugh
ou
tsu
pp
ort
leg
pu
sh o
ff.
the
sup
po
rt le
g.th
e ju
mp.
pu
shes
off
.
= In
tro
du
cto
ry c
om
po
nen
tsH
ints
for
ob
serv
atio
n =
Fin
e-tu
nin
g co
mp
on
ents
•In
stru
ctio
ns:
“H
op
fro
m o
ne
end
to th
e o
ther
.”•
Ob
serv
atio
n p
os i
tio
n:
On
th
e s u
pp
ort
sid
e,h
alfw
ay a
lon
g.•
Nee
ded
: A
fla
t o
pen
are
a ap
pro
xim
atel
y 15
met
res
lon
g.
Hop
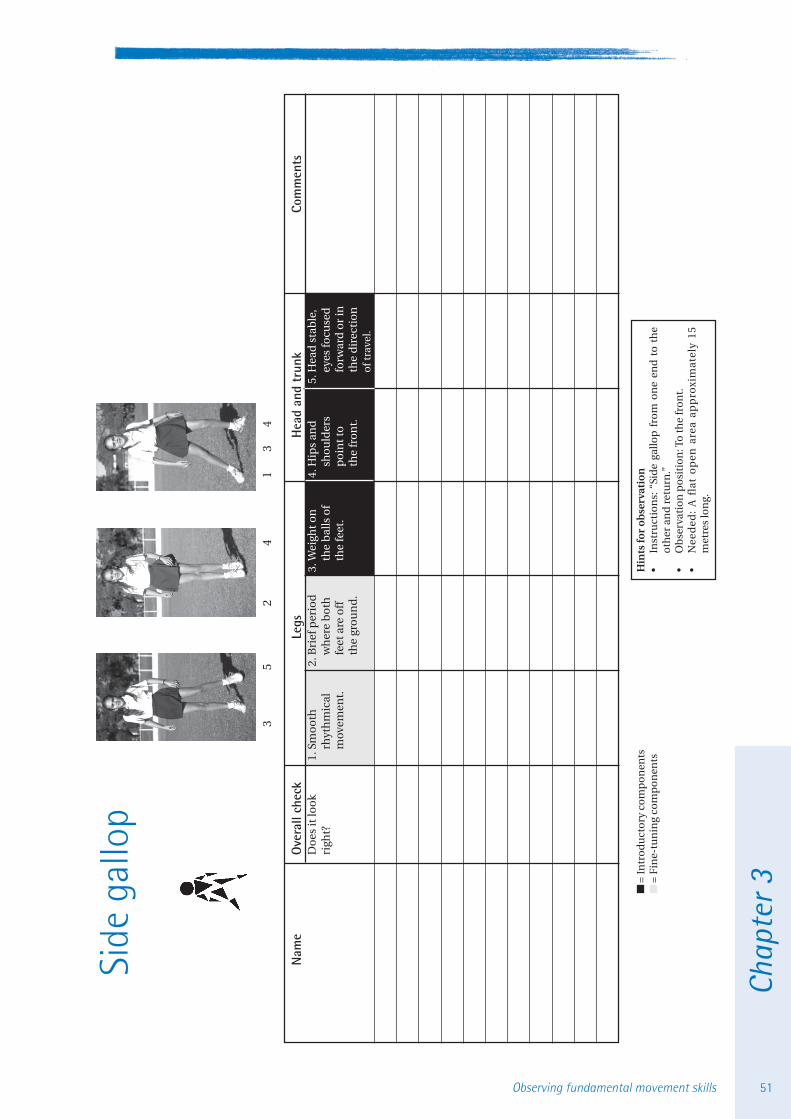
Chap
ter
3
51Observing fundamental movement skills
35
24
13
4
Nam
eO
vera
ll ch
eck
Leg
sH
ead
and
trun
kCo
mm
ents
Do
es it
loo
k1.
Smo
oth
2.B
rief
per
iod
3.W
eigh
t on
4.H
ips
and
5.H
ead
sta
ble
,ri
ght?
rhyt
hm
ical
wh
ere
bo
thth
e b
alls
of
sho
uld
ers
eyes
focu
sed
mov
emen
t.fe
et a
re o
ffth
e fe
et.
po
int t
ofo
rwar
d o
r in
the
gro
un
d.
the
fro
nt.
the
dir
ecti
on
of t
rave
l.
= In
tro
du
cto
ry c
om
po
nen
tsH
ints
for
ob
serv
atio
n =
Fin
e-tu
nin
g co
mp
on
ents
•In
stru
ctio
ns:
“Si
de
gallo
p f
rom
on
e en
d t
o t
he
oth
er a
nd
ret
urn
.”•
Ob
serv
atio
n p
osi
tio
n: T
o th
e fr
on
t.•
Nee
ded
: A
fl a
t o
pen
are
a ap
pro
xim
atel
y 15
met
res
lon
g.
Side
gal
lop
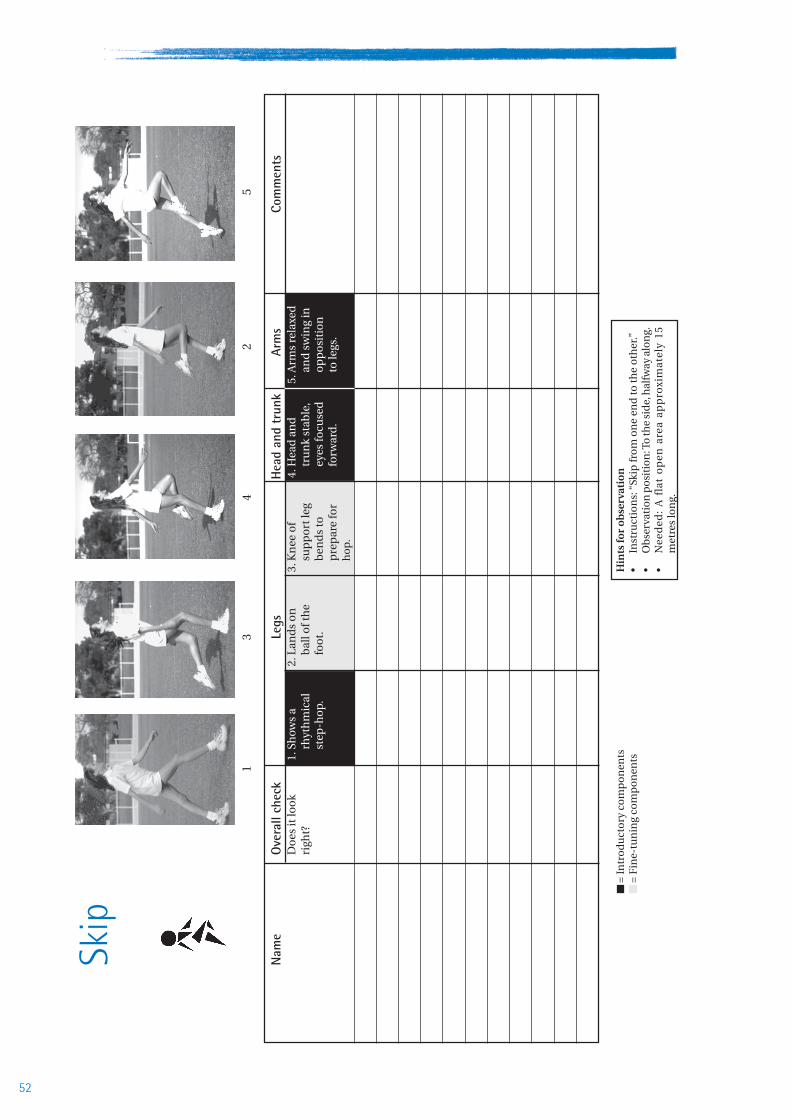
52
13
42
5
Nam
eO
vera
ll ch
eck
Leg
sH
ead
and
trun
kAr
ms
Com
men
tsD
oes
it lo
ok
1.Sh
ows
a2.
Lan
ds
on
3.K
nee
of
4.H
ead
an
d5.
Arm
s re
laxe
dri
ght?
rhyt
hm
ical
bal
l of t
he
sup
po
rt le
gtr
un
k st
able
,an
d s
win
g in
step
-ho
p.
foo
t.b
end
s to
eyes
focu
sed
op
po
siti
on
pre
par
e fo
rfo
rwar
d.
to le
gs.
ho
p.
= In
tro
du
cto
ry c
om
po
nen
tsH
ints
for
ob
serv
atio
n =
Fin
e-tu
nin
g co
mp
on
ents
•In
stru
ctio
ns:
“Sk
ip fr
om
on
e en
d to
the
oth
er.”
•O
bse
rvat
ion
po
siti
on
: To
the
sid
e, h
alfw
ay a
lon
g.•
Nee
ded
: A
fla
t o
pen
are
a ap
pro
xim
atel
y 15
met
res
lon
g.
Skip

Chap
ter
3
53Observing fundamental movement skills
12
34
55
6
Nam
eO
vera
ll ch
eck
Prep
arat
ion
Prop
ulsi
onFo
llow
-thr
ough
Com
men
tsD
oes
it lo
ok
1.Ey
es fo
cuse
d2.
Stan
ds
sid
e-o
n3.
Th
row
ing
arm
4.St
eps
tow
ard
s5.
Hip
s th
en6.
Th
row
ing
arm
righ
t?o
n ta
rget
are
ato
targ
et a
rea.
mov
es in
ata
rget
are
ash
ou
lder
sfo
llow
sth
rou
gho
ut
dow
nw
ard
wit
h fo
ot
rota
te fo
rwar
d.
thro
ugh
, dow
nth
e th
row
.an
d b
ackw
ard
op
po
site
and
acr
oss
arc.
thro
win
g ar
m.
the
bo
dy.
= In
tro
du
cto
ry c
om
po
nen
tsH
ints
for
ob
serv
atio
n =
Fin
e-tu
nin
g co
mp
on
ents
•In
stru
ctio
ns:
“T
hro
w th
e o
bje
ct a
s fa
r as
yo
u c
an.”
(Stu
den
tm
ay ta
ke a
2-3
ste
p r
un
-up
.)•
Ob
serv
atio
n p
osi
tio
n: T
o th
e th
row
ing
arm
sid
e.•
Nee
ded
: A b
ean
bag
or
smal
l bal
l.
Ove
rarm
thro
w

54
12
34
56
Nam
eO
vera
ll ch
eck
Prep
arat
ion
Prop
ulsi
onFo
llow
-thr
ough
Com
men
tsD
oes
it lo
ok
1.Ey
es fo
cuse
d2.
Kn
ee o
f3.
Legs
str
aigh
ten
4.A
rms
hel
d in
5.Tr
un
k le
ans
6.La
nd
s o
n b
all
righ
t?fo
rwar
dta
ke-o
ff le
gd
uri
ng
op
po
siti
on
slig
htl
yo
f th
e fo
ot
thro
ugh
ou
tb
end
s.fl
igh
t.to
the
legs
.fo
rwar
d.
and
ben
ds
the
leap
.kn
ee to
ab
sorb
lan
din
g.
= In
tro
du
cto
ry c
om
po
nen
tsH
ints
for
ob
serv
atio
n =
Fin
e-tu
nin
g co
mp
on
ents
•In
stru
ctio
ns:
“R
un
up
to
th
e m
arke
r an
d le
ap a
s fa
r as
yo
uca
n.”
•O
bse
rvat
ion
po
siti
on
: To
the
sid
e o
f th
e m
arke
r.•
Nee
ded
: On
e m
arke
r (o
r a
line)
, an
d a
flat
op
en a
rea
eith
ersi
de.
Leap

Chap
ter
3
55Observing fundamental movement skills
12
34
56
Nam
eO
vera
ll ch
eck
Prep
arat
ion
Prop
ulsi
onFo
llow
-thr
ough
Com
men
tsD
oes
it lo
ok
1.Ey
es fo
cuse
d2.
Forw
ard
an
d3.
No
n-k
icki
ng
4.B
end
s kn
ee o
f5.
Co
nta
cts
bal
l6.
Kic
kin
g le
gri
ght?
on
the
bal
lsi
dew
ard
foo
t pla
ced
kick
ing
leg
wit
h to
p o
ffo
llow
sth
rou
gho
ut
swin
g o
f arm
bes
ide
the
at le
ast 9
0ºth
e fo
ot (
ath
rou
gh h
igh
the
kick
.o
pp
osi
teb
all.
du
rin
g th
e“s
hoe
lace
” ki
ck)
tow
ard
s th
eki
ckin
g le
g.b
ack
swin
g.o
r in
step
.ta
rget
are
a.
= In
tro
du
cto
ry c
om
po
nen
tsH
ints
for
ob
serv
atio
n =
Fin
e-tu
nin
g co
mp
on
ents
•In
stru
ctio
ns:
“R
un
up
to
th
e b
all
and
kic
k it
as
far
as y
ou
can
.”•
Ob
serv
atio
n p
osi
tio
n: T
o th
e ki
ckin
g le
g si
de .
•N
eed
ed: L
arge
so
ft b
all.
Kick
(sta
tiona
ry b
all)

56
12
34
56
7
Nam
eO
vera
ll ch
eck
Prep
arat
ion
Prop
ulsi
onFo
llow
-thr
ough
Com
men
tsD
oes
it lo
ok
1.St
and
s si
de-
2.E
yes
focu
sed
3.H
and
s n
ext
4.St
eps
tow
ard
s5.
Hip
s th
en6.
Bal
l co
nta
ct7.
Follo
ws
righ
t?o
n to
targ
eto
n th
e b
all
to e
ach
oth
er,
targ
et a
rea
sho
uld
ers
mad
e o
nth
rou
gh w
ith
area
.th
rou
gho
ut
bo
tto
m h
and
wit
h fr
on
tro
tate
forw
ard
.fr
on
t fo
ot
bat
aro
un
dth
e st
rike
.m
atch
es th
efo
ot.
wit
h s
trai
ght
the
bo
dy.
kick
ing
leg.
fro
nt
foo
t.ar
ms.
= In
tro
du
cto
ry c
om
po
nen
tsH
ints
for
ob
serv
atio
n =
Fin
e-tu
nin
g co
mp
on
ents
•In
stru
ctio
ns:
“M
ake
sure
th
e st
and
is
leve
l w
ith
yo
ur
wai
st. H
old
the
bat
in tw
o h
and
s an
d h
it th
e b
all a
s fa
r as
you
can
.”•
Ob
serv
atio
n p
osi
tio
n: T
o t
he
fro
nt
of
the
stu
den
t (s
ide-
on
to th
e ta
rget
are
a).
•N
eed
ed: T
-bal
l sta
nd
, bas
ebal
l bat
, sm
all s
oft
bal
l.
Two-
hand
str
ike
(from
a T
-bal
l sta
nd)

Chap
ter
3
57Observing fundamental movement skills
12
34
5
Nam
eO
vera
ll ch
eck
Leg
sH
ead
and
trun
kW
hole
bod
yCo
mm
ents
Do
es it
loo
k1.
Ch
ange
s2.
Ch
ange
of
3.B
od
y lo
wer
ed4.
Eye
s fo
cuse
d5.
Do
dge
righ
t?d
irec
tio
n b
yd
irec
tio
nd
uri
ng
chan
gefo
rwar
d.
rep
eate
db
end
ing
knee
occ
urs
ino
f dir
ecti
on
.eq
ual
ly w
ell
and
pu
shin
g o
ffo
ne
step
.o
n b
oth
sid
es.
the
ou
tsid
e fo
ot.
= In
tro
du
cto
ry c
om
po
nen
tsH
ints
for
ob
serv
atio
n =
Fin
e-tu
nin
g co
mp
on
ents
•In
stru
ctio
ns:
“Ru
n u
p to
eac
h m
arke
r an
d d
od
gefr
om
it a
s fa
st a
s yo
u c
an.”
•O
bse
rvat
ion
po
siti
on
: To
the
fro
nt.
•N
eed
ed: S
ix to
ten
mar
kers
arr
ange
d in
a z
ig-z
agfo
rmat
ion
.
Dod
ge

58
Putting it into practice
Introducing the videoThe video, Get skilled: Get active—Show me how,has been produced to help you to develop yourobservational skills. On the video, students fromKindergarten to Year 5 demonstrate the twelveselected fundamental movement skills. Thestudents are described as either developing orproficient in their performance of each skill.These demonstrations will assist you to gain anunderstanding of each fundamental movementskill and its components.
Each skill is presented on the video in thefollowing way:
• a graphic interface indicates the skill that isbeing featured
• a coloured ball identifies the level ofperformance of the skill (i.e. proficient ordeveloping)
• a student performs the skill proficiently. Thetext and the voice-over are used to highlighteach skill’s components
• a number of students who have developed afew but not all of the components also performthe skill. The voice-over is used to help focusyour observations on these developingcomponents
• the skill is demonstrated once again by theproficient student. The text and a freeze framerepeat the components of the skill.
The video should be used with the checklists ofthe fundamental movement skills found earlierin this chapter and the professional developmentactivities that follow.
Introducing the professional developmentactivitiesThe professional development activities in thischapter will help you with your understandingand observation of fundamental movement skills.These activities can be used flexibly dependingon the needs of the different audiences using theresource.
Some suggestions for using these activitiesinclude:
• At a staff development day, develop a PDHPEK-6 scope and sequence with a focusedsequential approach to teaching fundamentalmovement skills.
• At staff meetings, introduce three or four skillsper meeting and use the video to help teacherscome to recognise the components of eachskill.
• At stage or grade meetings, examine thefundamental movement skills which shouldbe taught in the year or stage. Reflect on yourPDHPE programs and identify where
fundamental movement skillswill be taught. Create a list ofactivities which enable studentsto practise their fundamentalmovement skills.
• At PDHPE committeemeetings, work through thematerials and developstrategies to inform staffabout the issues relating tofundamental movementskills.
• As an individual or with acolleague, try some of theactivities in your own classand discuss the findings witha colleague.Exploring the components of the static balance
Chap
ter
3
59Observing fundamental movement skills
What’s needed:• butchers paper or whiteboard
• checklists for static balance and sprint run
• snapshots of static balance and sprint run invideo, Get skilled: Get active—Show me how.
Steps:1. Ask the group to list the twelve fundamental
movement skills in this resource. Whencompleted, record them on butchers paper oron a whiteboard.
2. Discuss the following questions:
• Why might these skills be considered“fundamental”?
• How do they vary from what you may havepreviously thought to be fundamentalmovement skills?
• What are your concerns about makingjudgements about students’ proficiency inperforming these fundamental movementskills?
• What is needed for you to be able to makejudgements effectively and confidently?
3. Examine the checklist for the static balance.Discuss the layout and the terminology usedto describe the components. Refer to theexample on page 46.
4. Invite each member of the group to work witha partner. Take turns performing the staticbalance. Use the checklist to evaluate yourpartner’s performance. Share your findingswith your partner.
5. Watch the introduction and the first skill onthe video, which is the static balance, tobecome familiar with the format. Stop the
video after the final closing shot of theproficient performance of the static balance(i.e. before the sprint run).
6. Ask the group to locate the “Overall check”column on the static balance checklist. Invitethe group to complete the overall checkcolumn for the static balance for the studentson the video. Ask the group how they identifiedwhich was the proficient student. Recall thecomments made on the video for the staticbalance. Direct the group to the links betweenthe student’s performance, the text on screen,the voice-over and the checklists.
7. Now examine the sprint run checklist. Invite amember of the group to perform this skill. Asa group, make a decision about the overallcheck: Does it look right?
Watch the relevant section of the video.Encourage the group to make commentsabout the students’ performances. Discuss:
• What were the observable differencesbetween the performance of the proficientstudent and the developing students?Encourage the use of language similar tothe components when making comments.For example “trunk unstable, lands flat-footed.”
• Compare your observations and commentswith those on the video.
8. Negotiate with the group how this session isto be continued. For example:
• Devote some time now and some time inthe near future to work through a similarprocess to become familiar with all theskills and their components.
• Watch all of the video, with discussionbreaks after a number of skills.
ACTIVITY 1: Looking at the big picture
Purpose:This activity is designed for a group situation, such as staff meetings, PDHPE committee meetings ordistrict PDHPE interest groups. It works best if you use a facilitator or presenter to lead the groupthrough the activity.
60
ACTIVITY 2: Focussing on a skill
Purpose:This activity is designed to enable teachers to become familiar with the components of fundamentalmovement skills and to further develop their observation skills. It can be undertaken as a group activityor on an individual basis.
What’s needed:• a selection of checklists for fundamental
movement skills
• video, Get skilled: Get active —Show me how.
Steps:1. After reviewing all the fundamental movement
skills and their components, choose one ortwo skills to focus on and observe in moredetail.
2. Cue the video to the relevant skill. Play thevideo with the volume off (so that you cannothear the voice-over). Use the checklist torecord your observations of the students onthe video. Replay the video to observe the skilla number of times.
3. Discuss your observations with the rest of thegroup.
4. Replay the video with the volume up to enableyou to hear the voice-over. Compare anddiscuss your observations with the commentsmade on the video. Are there any other thingsyou observed?
5. Repeat this process, focusing on otherfundamental movement skills.

Chap
ter
3
61Observing fundamental movement skills
ACTIVITY 3: Testing yourself
Purpose:This next activity can be done individually or with a colleague. It is designed to allow you to apply theknowledge and skills gained from activities 1 and 2, and to observe students in a natural setting.
What’s needed:• checklist for one fundamental movement skill
• students demonstrating this skill in a varietyof situations.
Steps:1. Select a fundamental movement skill and work
through the accompanying checklist. Onceyou are familiar with the features of thechecklist and the components of the skill (youmay wish to refer to the video for this), set upsome opportunities to practise observing theskill.
2. Some suggestions include:
• Observe a small group of students in theplayground.
• Observe students in a class situation.
• Observe selected students at sport.
• Observe students in a variety of contexts.
The focus of your observation should be onthe skill components, not the outcome.
3. Remember to concentrate on onefundamental movement skill, as students willdemonstrate a wide variety of movements intheir activities.

63Programming fundamental movement skills
Chap
ter
4
What’s in this chapter?
This chapter looks at ways to plan and programfundamental movement skills so that allstudents have the opportunity to becomeproficient in each skill by the end of primaryschool.
This chapter includes a table suggesting adevelopmental approach to introducing andteaching each of the twelve fundamentalmovement skills from Kindergarten to Year 6. Italso includes professional development activitiesto help you with planning and programmingfundamental movement skills in your schoolPDHPE and sport programs.
What do I need to considerwhen programmingfundamental movement skills?
When planning and programming for thedevelopment of fundamental movement skills,you need to take into account the current policiesand requirements of your system, as well as theindividual circumstances in your school.Departmental requirements include thefollowing:
• The Personal Development, Health andPhysical Education K-6 Syllabus (Board ofStudies NSW, 1999) requires that fundamentalmovement skills be taught across four of theeight content strands: Active Lifestyle, Gamesand Sports, Gymnastics and Dance.
• The Student Fitness and Physical ActivityAction Plan (NSW Government 1998) asks
schools to allocate a minimum of 120 minutesof planned physical activity in each year fromKindergarten to Year 6. In Years 3 to 6, this timeis inclusive of the Department’s currentrequirement for 60 minutes of school sporteach week.
School circumstances, which will impact ondecisions, include such aspects as the availabilityof facilities and equipment, school structure,staffing and climate.
What fundamental movementskills should I teach and whenshould I teach them?
To program and plan for the development offundamental movement skills, it is important toremember the following key points.
• Early Stage 1 and Stage 1 are the best times tointroduce fundamental movement skills.
• 240–600 minutes of instruction time areneeded to develop a fundamental movementskill to a level of proficiency.
• The development and practice of fundamentalmovement skills should be a significantelement of PDHPE and sport programs acrossall stages.
• Teaching programs should focus on amanageable number of fundamentalmovement skills each year. Four skills eachyear are suggested.
• The growth and development of students havean important influence on which skills andskill components can be learnt.
Programming fundamentalmovement skills
Chapter 4

64
A planning guide forprogramming and teachingfundamental movementskills
The table on the next page takes the previousfactors into account. It is designed as a planningguide to help you program for the developmentof fundamental movement skills fromKindergarten to Year 6.
• The planning guide suggests when skillsshould be introduced.
It is recommended that four skills beintroduced for focused teaching each year inEarly Stage 1 to Stage 2, to consolidate studentlearning. However, students will also beexposed to activities that include the othereight fundamental movement skills. It isimportant to make the teaching offundamental movement skills manageablewithin the context of a school’s PDHPEprogram and to match what is taught withstudents’ growth and development. If studentsare given adequate opportunities to practisefour skills each year, it is likely that they willdevelop proficiency in the introductorycomponents of each skill by the end of thatyear.
• The guide indicates the key years for students’development of each fundamentalmovement skill.
Once students have developed theintroductory components of a skill, it isimportant that teaching and learning shiftfocus to the development of the fine-tuningcomponents. The planning guide suggests thateach skill needs a three-year period of practiceand consolidation for this to occur.
• The guide provides a benchmark of whenmost students should be expected todemonstrate proficiency in each skill.
An important objective of primary schoolPDHPE programs is that students shoulddemonstrate proficiency in all twelvefundamental movement skills by the end ofYear 6. However, with adequate learning andpractice time, most students, given their stageof growth and development, should be able todemonstrate the fundamental movementskills earlier than this, as indicated by the table.
To integrate the development of fundamentalmovement skills into existing PDHPE andsport programs, you need to consider teachingfundamental movement skills in such contextsas daily physical activity, dance, gymnastics,movement exploration, games and sportsessions. Planning needs to occur at a whole-school, stage and class level to support thisintegration. Examples of ways to do this canbe found in the professional developmentsection later in this chapter.
Incorporating fundamental movement skills into PDHPE programs

65Programming fundamental movement skills
Chap
ter
4
Planning guide for programming and teachingfundamental movement skills
EarlyStage 1
Stage 1 Stage 2 Stage 3
Skill Kinder-garten
Year 1 Year 5Year 4Year 3Year 2 Year 6
Static balance
Sprint run
Vertical jump
Catch
Hop
Side gallop
Skip
Overarm throw
Leap
Kick
Two-hand strike
Dodge
Focused teaching and learning, with an emphasis on the introductory components.
Practice and development, with an emphasis on the fine-tuning components.
Consolidation and application of skill in sports, games and physical activities.
Benchmark of when most students should demonstrate proficiency of the skill.
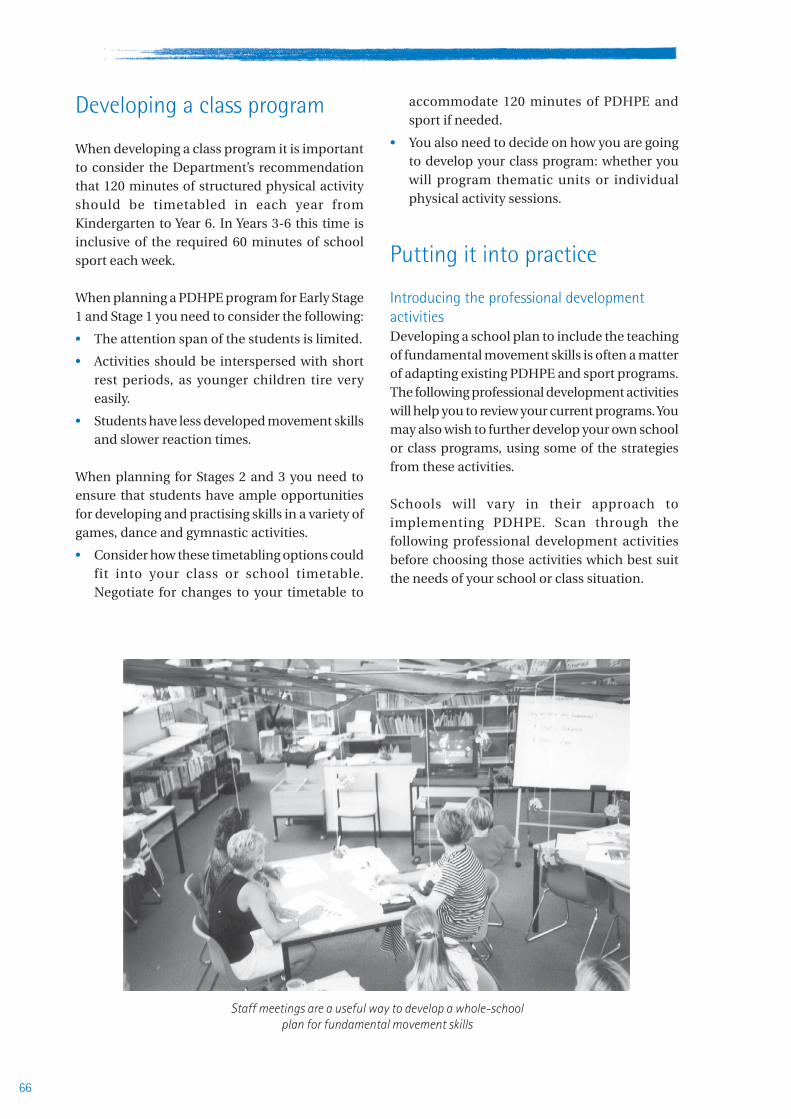
66
Developing a class program
When developing a class program it is importantto consider the Department’s recommendationthat 120 minutes of structured physical activityshould be timetabled in each year fromKindergarten to Year 6. In Years 3-6 this time isinclusive of the required 60 minutes of schoolsport each week.
When planning a PDHPE program for Early Stage1 and Stage 1 you need to consider the following:
• The attention span of the students is limited.
• Activities should be interspersed with shortrest periods, as younger children tire veryeasily.
• Students have less developed movement skillsand slower reaction times.
When planning for Stages 2 and 3 you need toensure that students have ample opportunitiesfor developing and practising skills in a variety ofgames, dance and gymnastic activities.
• Consider how these timetabling options couldfit into your class or school timetable.Negotiate for changes to your timetable to
accommodate 120 minutes of PDHPE andsport if needed.
• You also need to decide on how you are goingto develop your class program: whether youwill program thematic units or individualphysical activity sessions.
Putting it into practice
Introducing the professional developmentactivitiesDeveloping a school plan to include the teachingof fundamental movement skills is often a matterof adapting existing PDHPE and sport programs.The following professional development activitieswill help you to review your current programs. Youmay also wish to further develop your own schoolor class programs, using some of the strategiesfrom these activities.
Schools will vary in their approach toimplementing PDHPE. Scan through thefollowing professional development activitiesbefore choosing those activities which best suitthe needs of your school or class situation.
Staff meetings are a useful way to develop a whole-schoolplan for fundamental movement skills
67Programming fundamental movement skills
Chap
ter
4ACTIVITY 1: Where do fundamental movement skills fit into thePDHPE syllabus?
Purpose:This activity is designed to explore where fundamental movement skills are addressed in the PDHPEK-6 Syllabus. It can be undertaken as a group activity or on an individual basis.
What’s needed:• PDHPE K-6 Syllabus
• planning guide for programming and teachingfundamental movement skills, page 65.
Steps:1. Focus on the outcomes for one stage in the
PDHPE K-6 Syllabus.
Which PDHPE outcomes are relevant to thedevelopment of fundamental movementskills?
2. Make a list of the sorts of things studentswould be doing to demonstrate achievementof these outcomes.
3. Refer to the “Stage Statements” in the syllabusto examine some of the expectations aboutachievements for each particular stage.
4. Examine the content strands of ActiveLifestyle, Games and Sports, Gymnastics andDance. What “subject matter” is linked to thedevelopment of fundamental movementskills?
5. Discuss the implications of the Planning guidefor programming and teaching fundamentalmovement skills for your school.
It is important to note that the development offundamental movement skills is only one part ofthe PDHPE syllabus. There are other importantoutcomes which also need to be addressed as partof your PDHPE program.

68
ACTIVITY 2: What are some of the considerations whenprogramming fundamental movement skills?
Purpose:This activity is designed to explore some of the whole-school issues which need to be addressed whenplanning and programming fundamental movement skills.
What’s needed:• Handout 1, page 69
Steps:1. Read the statements on Handout 1 and reflect
on the implications of these statements.
2. Discuss and complete each of the questionson the handout. Share your responses withother teachers. Make a note of the commonissues as they arise. These responses shouldbe considered in future discussions and in thelater stages of planning and programming.
69Programming fundamental movement skills
Chap
ter
4
HANDOUT 1
Fundamental movement skills in perspective
“From the start of 1999, primary schools should aim toprovide a minimum of 120 minutes per week to plannedphysical activity in each year from Kindergarten to Year 6.”
(Memorandum to Principals 98/263)
“Improved skills among children are likely to increase theirenjoyment of sports and other activities and to promote amore active lifestyle.”
(NSW Schools Fitness and Physical Activity Survey, 1997)
Consider the implications of these statements.
What issues or concerns arise as a result of a focus on the development offundamental movement skills in your PDHPE or sport program:
• at a school level?
• at a class or stage level?
• at a personal level?

70
ACTIVITY 3: School analysis. What is happening in our school?
Purpose:This activity is designed to help you identify the current situation in your school concerning fundamentalmovement skills. It also provides an opportunity to develop a whole-school action plan to addressissues or concerns. This activity works best if done with the whole staff or a group of teachers responsiblefor PDHPE and sport programs in the school.
What’s needed:• Handout 2, page 71• Handout 3, page 72
Steps:1. Work with colleagues to reach a consensus
about the school’s position for each of the keyareas listed in Handout 2.
2. Analyse the key issues you have marked “No”or “Review.” As a starting point for an actionplan, prioritise these key issues and write themin the first column of the action plan onHandout 3.
3. Discuss what can be done to improve oraddress the key issues identified on the actionplan. On Handout 3, list the actions to be takenand the person or people responsible for eacharea identified.
4. Convert your comments from Handout 3 intoan action plan to be part of your schoolmanagement plan for PDHPE and sport.

71Programming fundamental movement skills
Chap
ter
4
HANDOUT 2
What is happening in our school?
Tick the box which best describes your school situation.Yes: If this is happening in your school and you are satisfied with it.Review: If something is in place but you feel that it could be improved.No: If it is not happening.
PDHPE and sport Yes Review No
• The school PDHPE and sport programs are comprehensive,sequentially developed and include opportunities for studentsto develop fundamental movement skills.
• Teachers’ knowledge and expertise in teaching fundamentalmovement skills are supported through professionaldevelopment activities.
• Students are given maximum opportunities to develop andpractise fundamental movement skills.
• Staff are actively engaged in teaching fundamental movementskills in the school’s PDHPE and sport programs.
• An adequate amount of curriculum time is allocated to theschool’s PDHPE and sport programs.
School ethos• Students are encouraged to practise fundamental movement
skills in games and activities during recess and lunch breaks.Rosters are devised to give students equal access to equipment.
• PDHPE and sport are supported by school policies and practices,such as the school uniform policy, first aid procedures andrecognition of both boys and girls.
• PDHPE and sport are components of the school managementplan.
Home-school-community interface
• Development of fundamental movement skills in PDHPE andsport is stated and supported as part of the school’s managementplan and shared with the community.
• Parents are given opportunities to be involved in programs whichsupport the development of fundamental movement skills.
• Parents are provided with information to help them support theirchild’s skill development and physical activity at home.
Adapted from: NSW Department of School Education (1996). Towards a health promoting school, pp. 20-26.

72
HANDOUT 3
Action plan: Incorporating fundamental movement skills intoPDHPE and sport programs
Area for action What needs to be Who will be Where can we getdone? responsible? help?
1.
2.
3.
4.

73Programming fundamental movement skills
Chap
ter
4ACTIVITY 4: School analysis: What are we currently doing?
Purpose:This activity looks at where fundamental movement skills are currently taught in the school’s PDHPEand sport programs. It begins by examining a sample scope and sequence chart to initiate discussionabout the features of a good scope and sequence chart. This activity is best carried out as a whole-school activity to enable teachers to appreciate the importance of developing and teaching fundamentalmovement skills in each year.
4. Analyse your findings and consider thefollowing questions.
• Are all fundamental movement skillstaught from Kindergarten to Year 6? If not,which ones are missing?
• Is there an emphasis on teachingfundamental movement skills in EarlyStage 1 and Stages 1 and 2?
• Are there opportunities for students topractise and consolidate their skills in Stage3 in a variety of contexts?
• Are fundamental movement skills taught ina developmentally appropriate sequence,as suggested in the planning chart onpage 65?
• Do students participate in 120 minutes ofplanned physical activity each week?
• Have you included activities from allmovement strands such as Active Lifestyle,Gymnastics and Dance?
5. Identify any areas which may needstrengthening in the school’s scope andsequence chart for PDHPE and the sportprogram. Discuss how this might be done.Identify any issues or concerns which mayarise and propose possible solutions tothese.
What’s needed:Handout 4, page 74Handout 5, page 75School’s scope and sequence chart for PDHPEand the sport program.
Steps:
1. Divide the group into smaller groups of 4 or 5.Distribute copies of Handout 4 to each group.Ask the group to discuss the features of thesample scope and sequence chart. Have thegroups discuss the positives and negatives ofthe chart and discuss such questions as:
• Are all outcomes addressed in each stage?
• Is the scope and sequence chart balanced?
• Are syllabus strands given equal emphasis?
Ask each group to report back its findings.
2. Ask each small group to predict the types ofactivities which may be covered in each of theunits outlined in the scope and sequencechart. It may be more time efficient if eachgroup was allocated a particular year to focuson.
Now ask the group to determine which unitsof work would support the development offundamental movement skills in each year.Have them predict the types of skills whichmay be covered in each unit of work.
3. Refer to your school’s scope and sequencechart for PDHPE and the school sportprogram. Using Handout 5, map wherefundamental movement skills are currentlytaught in the school’s program for PDHPE andsport.

74
HANDOUT 4
Sample PDHPE K-6 scope and sequence chart
PDHPE units and syllabus outcomes towards which students will be working
TERM 1 TERM 2 TERM 3 TERM 4
EARLY Kindergarten I am special Me & my friends Healthy habits Play it safeSTAGE 1 GDES1.9 IRES1.11 PSES1.5 SLES1.13
COES1.1 DMES1.2 PHES1.12
Enjoy being active Move & explore Let’s play games Moving aroundALES1.6 GYES1.10 GSES1.8 INES1.3 DAES1.7INES1.3 MOES1.4
STAGE 1 Year 1 The one & only Getting along Keeping myself Watch your stepGDS1.9 with others healthy SLS1.13
IRS1.11 PHS1.12INS1.3 COS1.1
Let’s move Hop, step & jump Getting started Let’s danceALS1.6 GYS1.10 GSS1.8 DAS1.7
Year 2 Look out! Fit & well Friendship Me, myself, ISLS1.13 PHS1.12 IRS1.11 GDS1.9PSS1.5 DMS1.2
Move to the beat Game skills Do the Getting out &DAS1.7 GSS1.8 Locomotion about
MOS1.14 GYS1.10 ALS1.6
STAGE 2 Year 3 On the go Feelings Safety first Keeping healthyALS2.6 GDS2.9 SLS2.13 PHS2.12 PSS2.5
Building my Tumble & turn Enjoy the game Dance manianetwork GYS2.10 GSS2.8 DAS2.7IRS2.11 INS2.3
Year 4 My growing self Dance with Daily decisions Champions’ choicesGDS2.9 confidence PHS2.12 GSS2.8COS2.1 DAS2.7 DMS2.2 MOS2.4
Gym fun Keeping safe Getting out there RelationshipsGYS2.10 SLS2.13 ALS2.6 IRS2.11
STAGE 3 Year 5 Playing my part Swing into gym Safe choices What’s happeningIRS3.11 GYS3.10 SLS3.13 DMS3.2 to me?
GDS3.9
Keeping active Keeping myself safe Playing the game StompALS3.6 around drugs GSS3.8 DAS3.4
PHS3.12 MOS3.4
Year 6 Getting it together Life be in it Making decisions Taking action
GDS3.9 ALS3.6 about drugs SLS3.13
INS3.3 PHS3.12 COS3.1 PSS3.5
Dance with style Considered choices Living the dream Spring up
DAS3.7 IRS3.11 GSS3.8 GYS3.10

75Programming fundamental movement skills
Chap
ter
4
HANDOUT 5
What are we currently doing?
Year Term 1 Term 2 Term 3 Term 4
K
1
2
3
SPORT
4
SPORT
5
SPORT
6
SPORT
○ ○ ○ ○ ○ ○ ○ ○ ○ ○ ○ ○ ○ ○ ○ ○ ○ ○ ○ ○ ○ ○ ○ ○ ○ ○ ○ ○ ○ ○ ○ ○ ○ ○ ○ ○ ○ ○ ○ ○ ○ ○ ○ ○ ○ ○
○ ○ ○ ○ ○ ○ ○ ○ ○ ○ ○ ○ ○ ○ ○ ○ ○ ○ ○ ○ ○ ○ ○ ○ ○ ○ ○ ○ ○ ○ ○ ○ ○ ○ ○ ○ ○ ○ ○ ○ ○ ○ ○ ○ ○ ○
○ ○ ○ ○ ○ ○ ○ ○ ○ ○ ○ ○ ○ ○ ○ ○ ○ ○ ○ ○ ○ ○ ○ ○ ○ ○ ○ ○ ○ ○ ○ ○ ○ ○ ○ ○ ○ ○ ○ ○ ○ ○ ○ ○ ○ ○
○ ○ ○ ○ ○ ○ ○ ○ ○ ○ ○ ○ ○ ○ ○ ○ ○ ○ ○ ○ ○ ○ ○ ○ ○ ○ ○ ○ ○ ○ ○ ○ ○ ○ ○ ○ ○ ○ ○ ○ ○ ○ ○ ○ ○ ○

76
ACTIVITY 5: Incorporating fundamental movement skills into aunit of work
Purpose:The development of a whole-school scope and sequence plan for the teaching of fundamentalmovement skills is the first step to effective implementation. In this activity, teachers analyse the whole-school plan and develop an individual unit of work incorporating fundamental movement skills. Thefocus of this activity is to identify the fundamental movement skills to be included and to explore theactivities which can be used to teach these skills.
What’s needed:School’s scope and sequence plan for PDHPE
Steps:1. Individually or in stage or year groups, select
an area from the school’s scope and sequencechart and begin to plan a unit of work. You willneed to consider the targeted fundamentalmovement skills (see planning guide, page 65)for your year or stage.
2. Select a programming proforma which bestsuits your needs. An example is listed below.
Sample programming proforma
Unit: _____________________ Length/time: _______________ Class: ______________
Outcomes: Indicators:★ ✪
✪
★ ✪
✪
★ ✪
Strands: ________________________________________________________________________
Subject matter: Suggested teaching and learning strategies Resources

77Programming fundamental movement skills
Chap
ter
4
3. When starting the unit of work, you will need to:
• identify the outcomes for the unit from thePDHPE K-6 syllabus
• list some sample indicators which students maydemonstrate to indicate achievement of theoutcomes
• determine the time allocation for the unit.
4. Identify the subject matter and the targetedfundamental movement skill or skills which will beaddressed in the unit. Refer to the content sectionof the PDHPE K-6 syllabus (pages 36-45) for thisinformation. In groups, brainstorm the range ofteaching and learning activities which could beused to address the subject matter and develop thefundamental movement skill. Use Chapter 2 andVideo 2 of this resource for ideas about teachingand practising the skill. For further ideas you mayalso like to refer to other resources which supportthe teaching of the skill. A limited list of suggestedresources is on pages 118-119.
Select the activities which best suit the needs ofyour students and complete the programmingproforma. When deciding which activities toinclude, consider the following:
• Will the activities develop the necessarycomponents of the targeted skill or skills e.g. theintroductory components or the fine-tuningcomponents?
• Is there a wide range of activities to keepstudents interested and motivated?
• Are there ample opportunities for students topractise and refine their skills in a range ofcontexts?
• Do I have the necessary resources?
5. Reflect on the teaching and learning strategies youhave chosen. Identify which of these activitiescould be used as an assessment strategy. Markthese with an ✻.
ACTIVITY 5: Continued

79Teaching fundamental movement skills
Chap
ter
5
What’s in this chapter?
This chapter looks at some of the considerationswhen teaching fundamental movement skills. Itincludes information and practical ideas about:
• planning the lesson
• organising and managing the lesson
• teaching the lesson.
Each of these areas includes some professionaldevelopment activities which will help you reflecton your own practice.
This chapter also introduces Video 2, Get skilled:Get active—Teach me how. This video showsexamples of snapshots of lessons incorporatingthe teaching of fundamental movement skills.
Introducing the videoThe video Get skilled: Get active—Teach me howis best used when exploring the information inthis chapter. This video shows how you can teachfundamental movement skills in a lesson. It is aseries of snapshots focusing on different yeargroups and different skills. It highlights a numberof teaching considerations and shows a variety ofstrategies you can use in your lessons.
Overview of snapshots and skills on the video
Snapshot Lesson focus Year
1 Static balance Kindergarten -
and skip Year 1
2 Sprint run Year 3
3 Vertical jump Year 5
4 Kick Years 2–3
5 Two-hand strike Year 5
6 Catch Year 5
Teaching fundamentalmovement skills
Teaching fundamentalmovement skillsAs previously mentioned in Chapter 1, theteaching of fundamental movement skills is anessential component of students’ learning inPDHPE. It is important to remember thefollowing.
• Students do not pick up fundamentalmovement skills naturally as part of theirnormal growth and development.
• It takes between 240 and 600 minutes ofinstruction time to become proficient in onefundamental movement skill.
• A small number of skills should be focused onin any one year e.g. this resource recommendsfour per year.
• The focus of your teaching should be on oneor two skills at a time.
• The best time for developing fundamentalmovement skills is the early years ofschooling.
Chapter 5
Students do not pick up fundamentalmovement skills naturally

80
Planning the lesson
When teaching fundamental movement skills, itis important to plan your PDHPE lessons so thatyou focus on the outcomes you set out to achieve.The following questions should be consideredwhen developing a lesson plan.
What is the purpose of the lesson?Lessons should be designed to provideopportunities for students to improve the level oftheir skills and to practise these skills. You shouldalways know “why” an activity is being taught andhow it relates to skill development for students(e.g. which skill components are being taught andpractised in the lesson).
How does this lesson integrate into past andfuture lessons?Lessons should be part of a sequential plan forteaching fundamental movement skills. This mayrequire planning a unit of work based on a themewhere one fundamental movement skill istargeted, e.g. the vertical jump.
Are instruction and practice a major part of thelesson?Instruction during a lesson is essential in orderto ensure that students have an understanding ofthe correct technique for a skill. However,instruction alone is not enough to produceimprovements in skill performance. Of all theelements that go into learning new skills, correctpractice is the most important. Therefore, lessonsneed to provide necessary instruction andmaximise the amount of productive practice timefor students.
What does a “good” lesson look like?There are a number of things which you can focuson to ensure your lesson is effective in achievingits outcomes. Some of these considerations arelisted as follows.
Introduction
In an introduction:
• the tone of the lesson should be set throughthe use of a fun warm-up, focusing on the skillto be taught in that lesson
• the warm-up activity should be used to set upstudent work groups e.g. groups of 4 or 5students
• there should be some questioning andreinforcing of knowledge and understandingof the particular skill and its componentsduring the warm-up.
Teaching the skillWhen teaching a fundamental movement skill:
• the skill should be demonstrated
• teaching cues should be used to help studentsfocus on particular components of the skill
• teachers should provide feedback and correctstudents’ technique
• some questioning should be used to helpstudents explore and understand thecomponents of the skill.
Practising the skillWhen practising the skill:
• students should practise the skill individuallyor in small groups. This enables them topractise many repetitions of the skill
• the skill should be incorporated into simplegames
• students should explore different ways ofapplying the skill
• you should focus on teaching the specificcomponents
• a variety of equipment should be used.

81Teaching fundamental movement skills
Chap
ter
5
ACTIVITY 1: Getting started
Purpose:This activity explores ways of using lesson time effectively by incorporating the teaching of fundamentalmovement skills into all components of the lesson.
What’s needed:• the video, Get skilled: Get active—Teach me
how. Preset the video to Snapshot 1.
Steps:1. Refer to the video, Get skilled: Get active—
Teach me how, and watch Snapshot 1, theKindergarten/Year 1 lesson which focuses onthe static balance and skip.
2. In small groups, discuss:
• the purpose of this lesson
• the planning needed for the lesson (i.e.markings on the floor, equipment, musicetc.)
• the use of the warm-up to introducecomponent 5 of the skip (i.e. arms arerelaxed and swing in opposition to legs).
3. Examine a unit of work focusing onfundamental movement skills. What types ofstrategies could you plan to use in this unit toteach the fundamental movement skill?

82
ACTIVITY 2: Exploring the phases
Purpose:This activity is designed to allow you to analyse the snapshots in the video, Get skilled: Get active—Teach me how, and to identify the teaching strategies appropriate in each phase of the lesson.
What’s needed:• the video, Get skilled: Get active—Teach me
how
• Handout 6, page 83
Steps:1. Watch the examples of snapshots in the video,
Get skilled: Get active—Teach me how.
2. Identify the strategies used for each snapshotand list these on Handout 6. The informationoutlined in the characteristics of a “good“lesson (page 80) may be useful as a guide forthis activity.
3. As the snapshots are only a small part of eachlesson, it may not be possible to fill in all theboxes for each snapshot. Create your ownexamples for those lesson phases that youcannot find in the video.

83Teaching fundamental movement skills
Chap
ter
5
Exploring strategies
Snapshot Introduction Teaching the skill Practising the skill
1. Static balance • Moving to musicand skip • Exploring space
as a warm-up
2. Sprint run
3. Vertical jump
4. Kick • Demonstration ofthe kick
• Teacher providingfeedback
5. Two-hand strike
6. Catch • Small numbers ofstudents practisingthe skill
• Students involvedin simple game
HANDOUT 6

84
Organising and managing thelesson
Organisation is one of the key features for theeffective teaching of fundamental movementskills. Teachers need to consider a range oforganisational issues when planning for thedevelopment of students’ fundamentalmovement skills.
While many teachers feel comfortable andconfident teaching within the four walls of aclassroom, for some teachers these same feelingsdisappear when teaching lessons outdoors. Thisis understandable, as there are characteristicswhich make teaching a lesson outdoors, or in alarge space such as a hall, very different fromteaching in the classroom. It is worthwhileexamining the characteristics of teaching in thesetwo environments so that both are used to bestadvantage. Organisation is a key aspect of teaching
fundamental movement skills
Classroom environment• the boundaries of classrooms are fixed
(walls)
• students know where they are to work
• class movement is often minimal
• class formations are familiar or limitedin number
• individual student movement isminimal
• resources are easily available and readyto use
• movement of equipment is limited
• the teacher can observe students frommost points in the classroom
• the classroom environment is relativelyconstant
• the weather has minimal effect
• verbal instructions can be easilyheard.
Outdoor environment• the teacher has to establish the
boundaries
• students have to be given clearinstructions
• students need to practise moving aspart of a whole group
• students need to learn different classformations
• individual student movement isessential, movement patterns vary
• resources have to be organised prior tothe lesson
• equipment is constantly moving
• teachers need to consciously placethemselves so they can see all students
• the environment changes constantly
• alternative plans need to be made forweather changes
• teachers need to develop good voicetechniques and non-verbal cues.
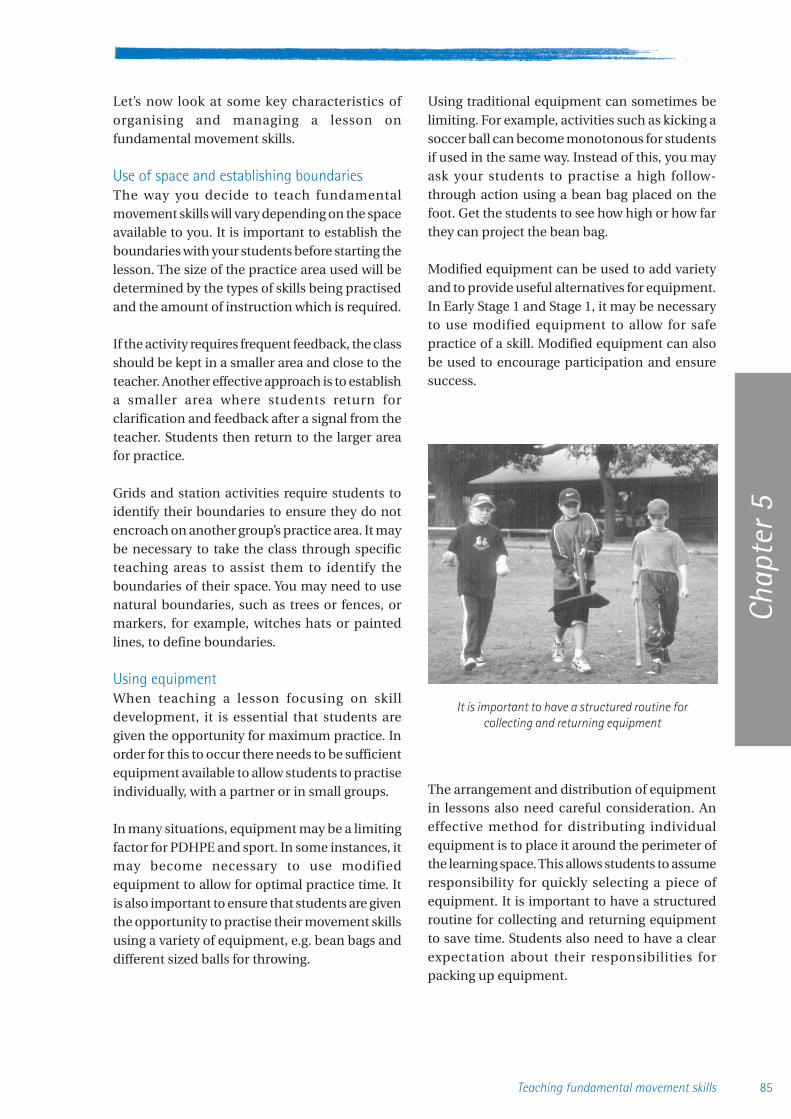
85Teaching fundamental movement skills
Chap
ter
5
Let’s now look at some key characteristics oforganising and managing a lesson onfundamental movement skills.
Use of space and establishing boundariesThe way you decide to teach fundamentalmovement skills will vary depending on the spaceavailable to you. It is important to establish theboundaries with your students before starting thelesson. The size of the practice area used will bedetermined by the types of skills being practisedand the amount of instruction which is required.
If the activity requires frequent feedback, the classshould be kept in a smaller area and close to theteacher. Another effective approach is to establisha smaller area where students return forclarification and feedback after a signal from theteacher. Students then return to the larger areafor practice.
Grids and station activities require students toidentify their boundaries to ensure they do notencroach on another group’s practice area. It maybe necessary to take the class through specificteaching areas to assist them to identify theboundaries of their space. You may need to usenatural boundaries, such as trees or fences, ormarkers, for example, witches hats or paintedlines, to define boundaries.
Using equipmentWhen teaching a lesson focusing on skilldevelopment, it is essential that students aregiven the opportunity for maximum practice. Inorder for this to occur there needs to be sufficientequipment available to allow students to practiseindividually, with a partner or in small groups.
In many situations, equipment may be a limitingfactor for PDHPE and sport. In some instances, itmay become necessary to use modifiedequipment to allow for optimal practice time. Itis also important to ensure that students are giventhe opportunity to practise their movement skillsusing a variety of equipment, e.g. bean bags anddifferent sized balls for throwing.
Using traditional equipment can sometimes belimiting. For example, activities such as kicking asoccer ball can become monotonous for studentsif used in the same way. Instead of this, you mayask your students to practise a high follow-through action using a bean bag placed on thefoot. Get the students to see how high or how farthey can project the bean bag.
Modified equipment can be used to add varietyand to provide useful alternatives for equipment.In Early Stage 1 and Stage 1, it may be necessaryto use modified equipment to allow for safepractice of a skill. Modified equipment can alsobe used to encourage participation and ensuresuccess.
The arrangement and distribution of equipmentin lessons also need careful consideration. Aneffective method for distributing individualequipment is to place it around the perimeter ofthe learning space. This allows students to assumeresponsibility for quickly selecting a piece ofequipment. It is important to have a structuredroutine for collecting and returning equipmentto save time. Students also need to have a clearexpectation about their responsibilities forpacking up equipment.
It is important to have a structured routine forcollecting and returning equipment

86
ACTIVITY 3: Equipment: What do I have? What do I need?
Purpose:This activity helps identify the equipment currently in your school which could be used to teachfundamental movement skills. It also allows you to identify how some equipment can be modified tomeet your needs.
What’s needed:• Handout 7, page 87
• Snapshot 5 in the video, Get skilled: Getactive—Teach me how.
Steps:1. Examine the equipment audit in Handout 7
and identify the equipment that is currentlyavailable in your school.
2. Make a list of any other equipment that youfeel you would need in order to teachfundamental movement skills.
3. Using the information you have gathered,cross-reference the two lists to see if anyequipment from List 1 could be modified tomeet the needs of List 2.
4. You might like to watch snapshot 5, the lessonon the two-hand strike, for ideas. Try to becreative in your modifications, but remembersafety!

87Teaching fundamental movement skills
Chap
ter
5
Number
badminton racquets _______shuttles _______
baseballs _______T-balls _______bases _______T-ball stands _______baseball/softball/T-ball bats _______fielding gloves _______
basketballslarge _______medium _______small _______
whistles _______kanga cricket bats _______cricket bats _______cricket balls _______kanga cricket tees _______skipping ropes _______
Australian Rules balls _______Rugby League balls _______Rugby Union balls _______touch football balls _______soccer balls _______
witches hats _______domes _______
bibs: training bibs _______braids _______
benches _______balance beams _______beat boards _______spring boards _______gym mats _______mini-trampolines _______foam blocks/shapes _______foam vault box _______lummi sticks _______gym balls _______gym ribbons _______hoops _______tambourines _______
Equipment audit
Number
hockey sticks _______hockey balls _______soft crosse sticks _______soft crosse balls _______
netballs _______portable/permanent posts _______
compasses _______
“gator skin” foam balls _______earth balls _______tug-o-war ropes _______parachutes _______frisbees _______hula hoops _______
tunnel balls _______pimple balls _______bean bags _______tennis balls _______paddle/totem tennis bats _______tennis racquets _______rocker boards _______balance boards _______
hand pump & needle _______vigoro bats _______volleyballs _______
netsbadminton _______volleyball _______tennis _______
megaphone _______portable cassette player _______
ten-pins _______
sporting kitscricket _______softball/T-ball _______soft crosse _______hockey _______sphairee _______
HANDOUT 7

88
Purpose:This activity is designed to allow you to reflect on the strategies used in the snapshots in Get skilled: Getactive—Teach me how. This activity is best done as part of a staff meeting or with a large group to allowsmaller groups to focus on specific issues.
ACTIVITY 4: Getting organised
What’s needed:• the video, Get skilled: Get active—Teach me
how
• the list of focus questions.
Steps:1. Split the group into four smaller groups.
2. While the whole group watches all thesnapshots in the video, each group isresponsible for reporting back on a focusquestion for each snapshot.
3. Allocate each group a particular focusquestion. These are as follows.
• What organisational strategy or strategiesdid the teacher use in the lesson? Did thesechange throughout the lesson? Was thisstrategy appropriate for the skill? Why orwhy not?
• How did the teacher establish boundariesfor each activity? Were the boundariesnatural e.g. trees, fences etc. or were theyartificial e.g. witches hats, painted lines?Did these boundaries change or did theyremain static? How were the studentsoriented to these boundaries?
• What signals were used by the teacher?How and when were they used?
Can you think of any other signals thatcould have been used in these situations?
• What types of equipment were used in thelesson? How was the equipmentdistributed? Was any modified equipmentused? If so, what was it and how did itreplace other forms of equipment?
4. After the video, Get skilled: Get active—Teachme how, ask participants to work through thequestions to create a summary of the keyfeatures of each lesson.
5. Ask each group to report its summary of thelesson back to the whole group.

89Teaching fundamental movement skills
Chap
ter
5
Working with groups
Making groupsIt is important when planning lessons to identifythe size of groups needed to allow for optimalpractice in each activity. Smaller groups allowmore practice time for students. If possible,you should also try to maintain the same groupsfor the majority of the lesson. If a change ingroup size is necessary, it is easier to combineexisting groups, rather than re-organising groupsentirely.
Moving students into groupsGroup work is used in many different areas inteaching and learning. Some simple ways offorming groups include:
• numbering each student and then combiningstudents with the same number
• giving each student an animal to imitate.Students make the noise of their animal andfind other students making the same noise
• playing clumping games e.g. 4 elbowstogether, 6 sets of knees together etc.
• organising students into a designated numberof lines.
It is often necessary to move groups betweenstations and activities or between playgroundareas. In order to cause the least possibledisruption to the lesson, it is necessary for
students to have a routine to follow when movingin groups. An example of a routine could be:
• when you hear the whistle, sit down in yourgroups
• move in a clockwise direction to the nextstation or activity
• wait until you hear the whistle again, beforeyou begin the next activity.
Whistles and other identifiable signals can be veryuseful when trying to move and organise groups.Time should be spent at the beginning of a lessonor unit to ensure students understand the variousroutines and signals which will be used during thelessons.
The video, Get skilled: Get active—Teach me how,demonstrates how groups can be organised in alesson. Snapshot 6, focusing on the catch,highlights the use of a warm-up game to organisegroups of students. These groups are used in thegrids for the skill practice activities (four pergroup) and are then combined with anothergroup to form larger groups for the minor game.
Use of different group formationsThe following formations can be used for a rangeof activities. Some formations can be used for thewhole class while others are more suited tosmaller groups of students. It may be necessaryto teach students how to organise themselves towork in these formations before they can be usedeffectively.
Students need to have a set routine to follow when moving in groups

90
Formation Things to consider ExampleT = teacher X = student
Scatter • Can be used for exploring movement.• Make students aware of boundaries before
commencing activities.• Ensure students have enough personal space
for moving by stretching arms out horizontallyand making sure they can’t touch anyone else.
• Teacher should move among the studentsproviding feedback and encouragement.
Single circle • Can be used for practising simple skills, forgames, dance and whole-class discussion.
• Use floor markings to form circle or ask groupto join hands and spread apart without letting go.
• When talking to the class, stand outside thecircle. When observing performance move aroundthe circle.
Double circle • Can be used for partner activities and dance.• Use floor markings to designate places.• Consider changing partners for variety.• When talking to the class or group stay on the edge of
the circle.• When observing performance of a skill, move around
the circle.
Half circle • Can be used when giving demonstrations andinstructions.
• Use existing circle markings if possible (e.g. centrecircle in soccer or keyhole in basketball).
• Teacher should stand slightly outside the half circle.
File • Can be used to provide practice opportunities forthrowing and kicking.
• Teachers should ensure that the number of studentsin each file is no more than four.
• Use witches hats or markers to define positioning ofeach file.
• Teacher should stand in front of the files to talk to theclass or beside an individual student to observe theperformance of the skill.
Parallel lines • Can be used to provide practice opportunities forthrowing, catching and kicking skills.
• Make distance between lines sufficient to promoteproper execution of the skill.
• Establish safety routines for retrieving balls andobjects in the middle e.g. “no-go” zone.
• Teacher should move between groups to observeand correct performance of the skill when necessary.
X
X
X
X
X
X
T
X
X
X
X
X
X
X X
XT
X
X
X
X
X
X
TX
XX
X
X
XX
X X
X
XX
X
X X
X
T
O
X
X
X
X
O
X
X
X
X
T
X
X
X
X
X
X
X
X
X
X
T
X
XX
X
X
X
X
O

91Teaching fundamental movement skills
Chap
ter
5
Formation Things to consider Example
Relays • Can be used to provide practice opportunities forlocomotor skills.
• Maximise participation by making the numbers inthe groups small.
• Try to incorporate skill development into relays.• Teacher should move between groups to observe and
correct performance if necessary.• Use formations such as the single circle and parallel
lines to add variety to the usual file and parallelline relays.
• To reduce the pressure of competition, run differentrelay activities for each group.
• Use markers to define start line to stop groupsgradually drawing together.
Grids • Can be used to provide practice opportunities for allfundamental movement skills.
• Grids can be marked out using witches hats, markersor existing ground markings.
• The number of students in each group should notexceed five and there should be sufficient equipmentfor maximum participation.
• Each activity should be of short duration, with 3 or 4different activities within the grid session.
• The size of the grids will vary depending on the spaceavailable and the type of activity.
• The teacher should play an active role and movearound each group to observe and provide feedback.
Stations • Stations can be used to provide practiceopportunities to refine movement skills using avariety of equipment and activities.
• Students can work by themselves or with others andshould be encouraged to work towards theirpersonal best.
• There should be enough activities to allowparticipation for groups of 3-4 students.
• A circular format works well, with the teacherstationed in the middle to observe activities andencourage students.
• The teacher may prefer to be positioned at aparticular station to closely observe and providefeedback about individual performance.
XXXX
XXXX
T
▲
▲
Snapshot 6 in the video, Get skilled: Get active—Teach me how, highlights techniques for moving groupsaround grids. The teacher asks one group to remain in their grid and moves the other five groups on.This allows for quick movement between activities and maximises practice time.
X XX X
XXXX
X X
X X
XX
XX T
X
XX X
XXX
X▲
▲
▲
▲
▲
▲
X
X
X
X
X X
XX
XX
XX
XX X
XX
X
XX
T X
X XX

92
ACTIVITY 5: Working with groups
What’s needed:• the video, Get skilled: Get active—Teach me
how
Steps:1. Discuss with a colleague the strategies used in
the video, Get skilled: Get active—Teach mehow, for organising students into groups.
2. Discuss the successful strategies you haveused to organise students into groups. Thisstrategy could have been used in a PDHPElesson or a lesson from another key learningarea.
3. Ask a colleague to team-teach a fundamentalmovement skill lesson with you.
Reflect on and discuss the lesson. Someexamples of questions could include:
• How did you initially organise yourstudents into groups?
• Did the size of each group suit the activity?
• What signals did you use and were theyeffective?
• How did you move students from one spaceto another? Was this time-efficient?
• Did the group formation suit the activity?
Purpose:This activity is designed to allow you to reflect on your own practices when using group work.

93Teaching fundamental movement skills
Chap
ter
5
Teaching the lesson
What do I need to consider when teachingfundamental movement skills?When teaching fundamental movement skills tostudents in Early Stage 1 and Stage 1, it isimportant for you to remember the followingpoints:
• introduce the main aspects of the entire skill
• provide a demonstration of the skill to help thestudent form a mental picture
• provide plenty of opportunities for explorationof the skill itself and self-discovery of thegeneral principles of the skill
• when possible, compare the new skill withsimilar skills that the student may be familiarwith or contextualise when the skill would beused in games and activities
• provide immediate, precise and positivefeedback concerning the performance of theskill
• focus feedback on the process of performanceand avoid focusing on the product of theperformance.
When teaching students in Stages 2 and 3, it isimportant to:
• provide numerous opportunities for practiceand application of the skill
• provide opportunities for refining skills in asupportive, non-threatening environment
• devise practice sessions that progressivelyfocus on greater refinement of skills
• be able to analyse skills and provide frequent,precise and positive feedback. Remember,“perfect practice makes perfect”
• allow for individual differences in the rate oflearning skills
• focus attention on the whole skill wheneverpossible
• practise at the rate and in the manner in whichthe skill would be performed in real situations.
When teaching fundamental movement skills itis important to:
• provide appropriate instruction through theefficient use of teaching cues
• use a question approach to explore thestudents’ understanding of the skill
• demonstrate and provide feedback to thestudents about their performance of a skill.
How can I get students’ attention?Gaining the attention of students during a PDHPEor sport lesson requires using a variety ofcommunication skills. The following suggestionscan help you to gain students’ attention.
• Stand where you can be seen by all students.This position will change depending on thegroup formation.
• Position yourself so you can maintain eyecontact with all students. It may be necessaryto seat the group in order to see the studentsat the back.
• Use a recognisable signal. For example, use awhistle in an outdoor environment or whenstudents are spread out in a large space, or usea tambourine or drum in the classroom orlarge indoor learning space. Using a simpleclap of the hands is often effective in gainingstudents’ attention.
• Be consistent with the signal or cue you usefor gaining attention. Also be consistent inyour expectations of what the students dowhen they hear or see your cue (e.g. do youwant students to freeze, sit on the spot, moveto a home area or sit down in their groups?)
How do I maintain students’ attention?Once you have gained the students’ attention, itis important to maintain it while you give theminstructions. You should consider the followingpoints.Perfect practice makes perfect

94
• Minimise the distractions in the environment.If students are holding equipment, they needto have a clear understanding of what to dowith it (e.g. put it on the ground next to you,do not bounce the basketballs etc). You shouldbe conscious of what is happening in thesurrounding environment, which may alsodistract students. If there are other groups outin the playground, it may be necessary to sitstudents down so they are facing away fromthe distractions.
• Talk “to” the students, not “at” them. Involvestudents in the delivery of instructions byasking them for clarification of what has beensaid. Use terminology which is “student-friendly”. Don’t use terminology which theywill not understand.
• Ensure that all students can hear what you aresaying. Voice projection in an outdoorenvironment or larger indoor learning spacecan be difficult. In some cases it may benecessary to use a second signal to movestudents in closer when giving instructions.
• Be succinct with your instructions. The longeryou keep students inactive, the more restlessand inattentive they will become.Demonstrations can be an effective way ofquickly giving and clarifying instructions.
What do I need to “say” whenteaching fundamental movementskills?Teaching cues are short phrases thatdirect a student’s attention toparticular components of a skill. Theycan be short verbal reminders of thecomplete skill or components of theskill. Cues can also create a simpleimage of a technical concept forstudents.
Students are often overloaded withinformation and technical jargonwhen they are trying to learn or refinea skill. Teaching cues can be used tosimplify this information. Researchindicates that the use of teaching cues,combined with demonstration andexplanation, can produce significantgains in skill development.
Research also suggests that students can learnonly a limited amount of new material. Givingstudents too much information, or progressingto new information before students have graspeda concept, may hinder the learning process.Teaching cues have been developed for each ofthe fundamental movement skills featured in thisresource. These cues can be found within thedescriptions of each of the fundamentalmovement skills in Chapter 3.
Consider the following guidelines when usingteaching cues.
• Encourage students to practise the whole skillbut focus on one component of the skill witha relevant teaching cue.
• Give only one cue at a time.
• Use no more than three different cues in alesson.
• Minimise the delay between thedemonstration of the skill by students and theapplication of the cue to the skill.
• Use the same cues when providing feedbackto students about their performance. Forexample, “Well done, you kept your eye on theball. Now try to bend your elbows.”
Practising the skills

95Teaching fundamental movement skills
Chap
ter
5
How do I know if the students understand theskill?Checking for understanding involves studentsrecalling information or being able todemonstrate their understanding in a practicalsituation. If students are able to recall informationto answer a question or can effectivelydemonstrate what they have been asked to do,then you can assume that they have understoodthe instructions and teaching.
Checking student understanding not only helpsyou to ascertain whether your teaching has beeneffective but also holds students accountable fortheir own learning. Checks for understandingshould occur throughout the lesson. For example,before beginning a skills practice, ask a specificquestion about the procedures to be followedduring the practice or ask a group for a briefdemonstration of the activity. At the conclusionof the lesson, summarise the learning by askingsome questions about the key elements of thelesson, including teaching cues for the skill learnt.
It is also useful to check for retention ofknowledge from previous lessons. Checking forretention can be achieved through questioningor demonstrating skills, or recalling teaching cuesfrom previous lessons.
Do I need to demonstrate the skill?Demonstrations are an essential componentwhen teaching fundamental movement skills.They provide a means of communicatinginformation effectively to more students in lesstime. It is not necessary for you, as the teacher, topersonally demonstrate all fundamentalmovement skills and their components. However,in some instances, you may need to demonstratethe proper technique for particular skills. This canbe done in a number of ways, for example:
• show the correct starting position and thenverbalise the instructions from that point
• provide a complete demonstration of the skill
• break down the skill and demonstrate one ortwo components of it
• use television footage or videos such as video1 of this resource, Get skilled: Get active—Show me how, as a visual demonstration of the
skill before students practise the skillthemselves
• use students to demonstrate a fundamentalmovement skill or components of the skill.
When demonstrating a skill you should considerthe following points.
• Ensure you have the attention of all studentsand do not compete with distractions such asnoise or other activity.
• Select a good position to demonstrate the skill,taking into account glare from the sun, winddirection and amount of space needed.
• Keep verbal instructions to a minimum.
• Reduce the amount of information given anduse language which the students willunderstand.
• Demonstrate the whole skill at full speed first.This could be done as a drill or in a gamesituation.
• Use teaching cues to highlight the criticalelements of the demonstration.
• Ask students to perform their interpretationof the skill from the initial demonstration.
• Provide individual and whole-group feedbackfrom observations of initial interpretations.
The demonstration should be directed towardsincreasing the students’ understanding of the skilland its components by encouraging them toobserve critically and analyse what they have justseen. The demonstration should be followed byan opportunity to practise. Remember, the morecomplex the skill, the more demonstrations willbe needed to allow students to form a mentalpicture of what the skill looks like.
Student demonstrations are more effective as ateaching tool, because it allows students to seesomeone of their own age and ability performingthe skill. Care must be taken to select a studentwho can perform the desired demonstration.Rotating demonstrations among many studentsis sound practice. All students should have theopportunity to demonstrate at some time;however, using the more skilled students is oftenhard to avoid. As groups practise a skill, you canobserve a correct performance by a student and
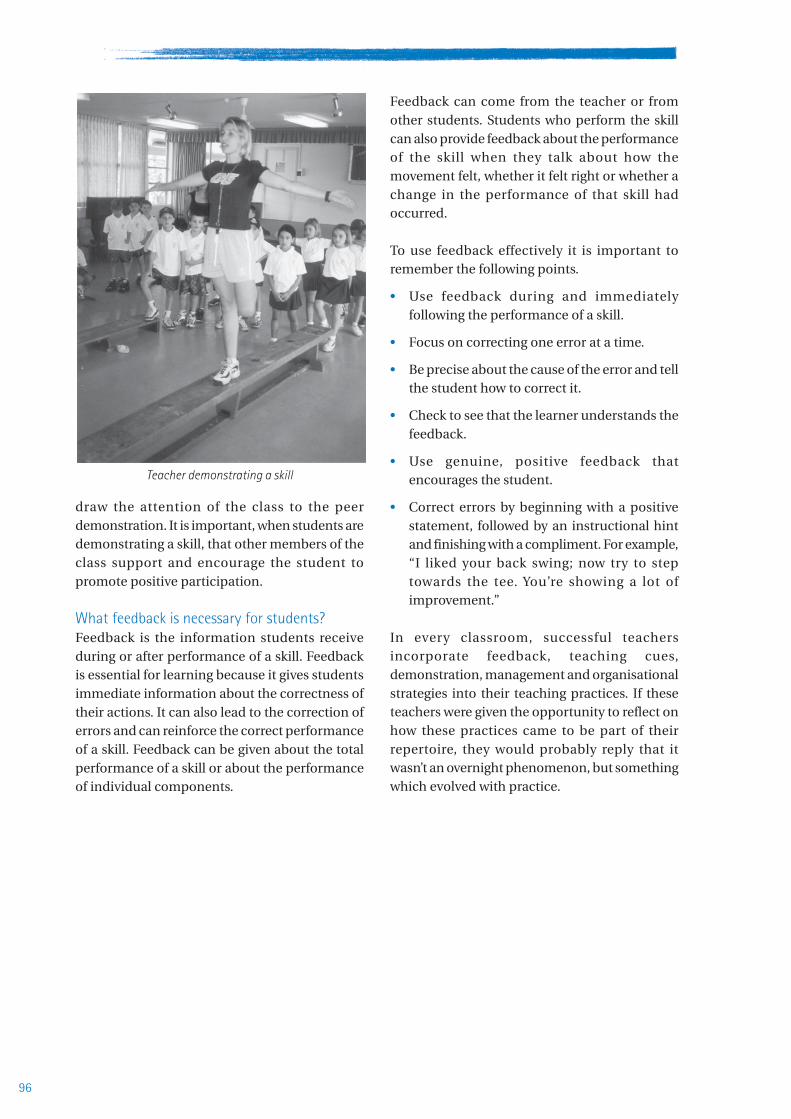
96
draw the attention of the class to the peerdemonstration. It is important, when students aredemonstrating a skill, that other members of theclass support and encourage the student topromote positive participation.
What feedback is necessary for students?Feedback is the information students receiveduring or after performance of a skill. Feedbackis essential for learning because it gives studentsimmediate information about the correctness oftheir actions. It can also lead to the correction oferrors and can reinforce the correct performanceof a skill. Feedback can be given about the totalperformance of a skill or about the performanceof individual components.
Feedback can come from the teacher or fromother students. Students who perform the skillcan also provide feedback about the performanceof the skill when they talk about how themovement felt, whether it felt right or whether achange in the performance of that skill hadoccurred.
To use feedback effectively it is important toremember the following points.
• Use feedback during and immediatelyfollowing the performance of a skill.
• Focus on correcting one error at a time.
• Be precise about the cause of the error and tellthe student how to correct it.
• Check to see that the learner understands thefeedback.
• Use genuine, positive feedback thatencourages the student.
• Correct errors by beginning with a positivestatement, followed by an instructional hintand finishing with a compliment. For example,“I liked your back swing; now try to steptowards the tee. You’re showing a lot ofimprovement.”
In every classroom, successful teachersincorporate feedback, teaching cues,demonstration, management and organisationalstrategies into their teaching practices. If theseteachers were given the opportunity to reflect onhow these practices came to be part of theirrepertoire, they would probably reply that itwasn’t an overnight phenomenon, but somethingwhich evolved with practice.
Teacher demonstrating a skill

97Teaching fundamental movement skills
Chap
ter
5
What’s needed:• Handout 8, page 98
Steps:1. Choose an area discussed in this chapter and
reflect on your teaching practice. Write thisdown in the first column of Handout 8 as the“Identified area of improvement”.
2. Locate the relevant section in this chapter thatdeals with your identified area of need.
3. List a selection of strategies that would enableyou to strengthen this area of your teaching.See example listed on Handout 8.
4. Plan to incorporate these strategies into alesson and then analyse how successful theywere. Write the comments down in thepersonal reflection column. It may benecessary to include a follow-up commentwhich describes what you might do differentlynext time.
ACTIVITY 6: Practical application
Purpose:This activity is designed to allow you to choose an aspect discussed in this chapter and to developstrategies to strengthen this area of your teaching.
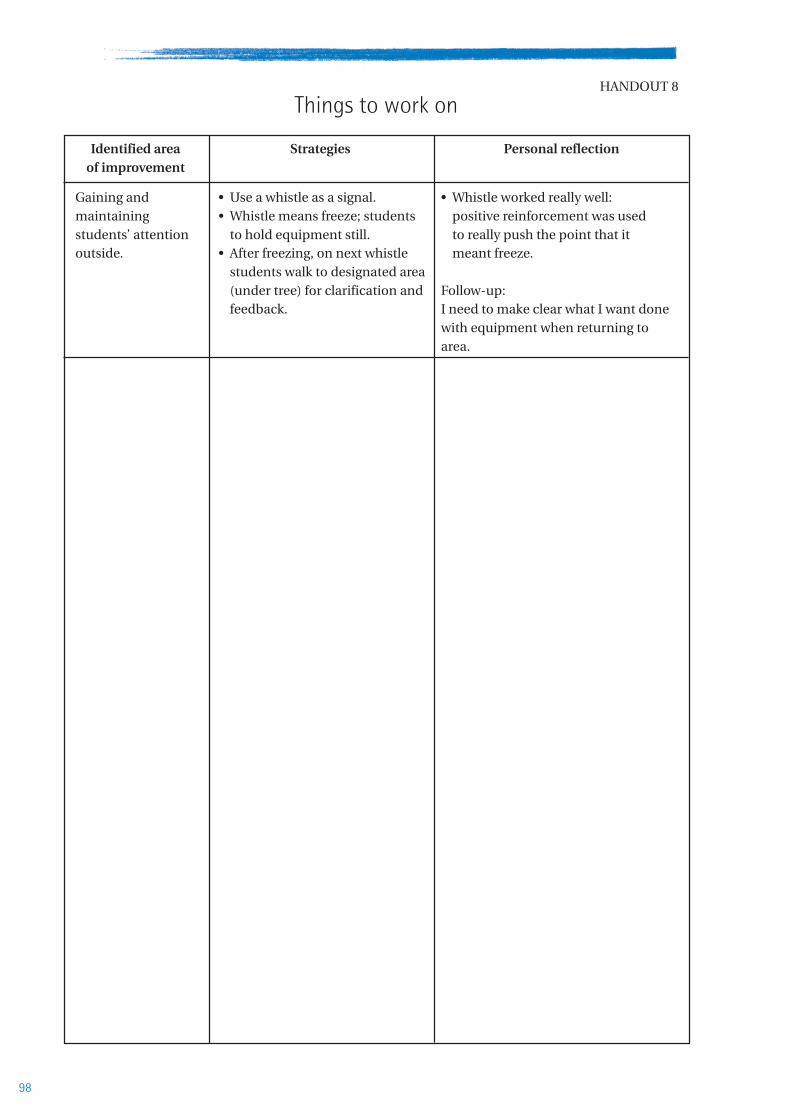
98
Things to work on
Identified area Strategies Personal reflectionof improvement
Gaining and • Use a whistle as a signal. • Whistle worked really well:maintaining • Whistle means freeze; students positive reinforcement was usedstudents’ attention to hold equipment still. to really push the point that itoutside. • After freezing, on next whistle meant freeze.
students walk to designated area(under tree) for clarification and Follow-up:feedback. I need to make clear what I want done
with equipment when returning toarea.
HANDOUT 8

99Teaching fundamental movement skills
Chap
ter
5
ACTIVITY 7: Identifying the key elements
Purpose:This activity revises the key elements of a lesson needed to successfully teach fundamental movementskills. It can be undertaken as a group activity or on an individual basis.
What’s needed:• the video, Get skilled: Get active—Teach me
how
• Handout 9, page 100
Steps:1. View the video, Get skilled: Get active—Teach
me how.
2. As you watch each snapshot, allocate the keyfeatures of the lesson to one of the followingtwo categories: features that relate tomanaging and organising the lesson, andfeatures related to teaching the lesson.
3. Discuss your findings with a colleague.

Chap
ter
6
101Assessing and monitoring progress
What’s in this chapter?This chapter examines the place of assessmentwhen you are teaching fundamental movementskills and looks at ways to assess fundamentalmovement skills as part of your PDHPE program.
This chapter identifies the links to the PDHPEK-6 syllabus and provides ideas for assessing andrecording information about the development ofstudents’ fundamental movement skills.
Links to the PDHPE K-6syllabusFundamental movement skills are an integralcomponent of the PDHPE K-6 syllabus. Theoverall description of student achievement which
is typically expected by the end of a stage isincluded as part of the Stage Statements in thesyllabus. The stage statements for the PDHPEK-6 syllabus are as follows.
Assessing fundamentalmovement skills
Chapter 6

102
Specific statements relating to fundamentalmovement skills are outlined below.
Early Stage 1Students are taught and practise the fundamentalmovement skills of the static balance, sprint run,vertical jump and the catch (with a small object).
Stage 1Students further develop the Early Stage 1fundamental movement skills and progress to arange of additional skills. In Year 1 the hop, side-gallop, skip and overarm throw are introduced,followed by the leap, kick, two-handed strike anddodge in Year 2.
Stage 2Students demonstrate proficiency at the staticbalance, sprint run, vertical jump, catch, hop, side-gallop, skip and overarm throw. They practise eachskill in a variety of contexts.
Stage 3Students demonstrate proficiency at the leap, kick,two-handed strike and the dodge. They practiseeach skill in a range of challenging contexts.
NSW Board of Studies (1999).
PDHPE K-6 Syllabus.
Typically at the end of each stage i.e.Kindergarten, Year 2, Year 4 and Year 6, teachersneed to make a judgement about studentperformance. Are students progressing towards,have they achieved or are they working beyond theoutcomes for that stage?
Outcomes are statements of the knowledge andunderstandings and skills which, it is expected,most students will gain by the end of a stage. Thesyllabus outcomes which have the most relevanceto fundamental movement skills are those relatedto the Games and Sports strand and from the skilloutcome of Moving.
Each outcome in the syllabus is accompanied bya set of indicators. Indicators provide examplesof the behaviours which students might displayas they work towards achieving the outcomes.Indicators can assist teachers to monitor progresswithin a stage, as well as to help make ajudgement at the end of the stage.
The table below shows the outcomes and sampleindicators from the Games and Sports strand inthe syllabus.
EARLY STAGE 1 STAGE 1 STAGE 2 STAGE 3
GSES1.8 GSS1.8 GSS2.8 GSS3.8
Demonstrates Performs fundamental Participates and uses Applies movement skillsfundamental movement movement skills with equipment in a variety in games and sports thatskills while playing with equipment in minor of games and modified require communication,and sharing equipment. games. sports. co-operation, decision
making and observationof rules.
• Moves and stops a ball • Participates in a range • Demonstrates fun ways • Combines a series ofwith hands and feet, of minor games that of practising skills skills for use in a game,e.g. roll and dribble assist skill development e.g. partner, team e.g. run, kick, catch
• Runs with equipment, • Throws a small ball or • Practises and refines and passe.g. rope, large balls beanbag overarm to a movement skills in a • Identifies people who
• Performs skills such as wall, target or partner variety of games from a can help them improvethe static balance, • Strikes a ball from a tee range of cultures their game and sportssprint run and vertical with a small bat • Demonstrates a range skillsjump • Performs and practises of skills in practice • Proficiently
• Catches a small object skills such as the hop, and modified games demonstrates skillswith two hands side-gallop, skip and • Proficiently demonstrates such as the leap,
overarm throw skills such as the static kick, dodge andbalance, sprint run, two-hand strike.vertical jump and catch • Applies fundamental
• Proficiently demonstrates movement skills inskills such as the hop, side sports, games andgallop, skip and overarm physical activitiesthrow
NSW Board of Studies (1999). PDHPE K-6 Syllabus.
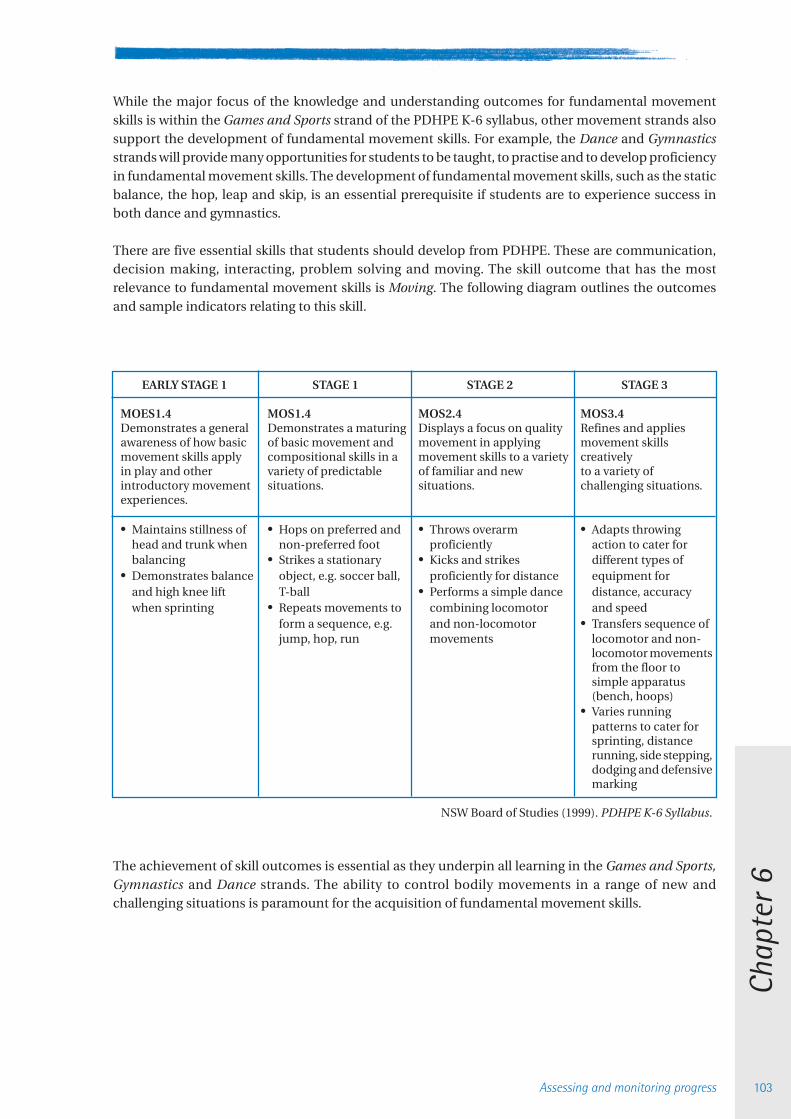
Chap
ter
6
103Assessing and monitoring progress
While the major focus of the knowledge and understanding outcomes for fundamental movementskills is within the Games and Sports strand of the PDHPE K-6 syllabus, other movement strands alsosupport the development of fundamental movement skills. For example, the Dance and Gymnasticsstrands will provide many opportunities for students to be taught, to practise and to develop proficiencyin fundamental movement skills. The development of fundamental movement skills, such as the staticbalance, the hop, leap and skip, is an essential prerequisite if students are to experience success inboth dance and gymnastics.
There are five essential skills that students should develop from PDHPE. These are communication,decision making, interacting, problem solving and moving. The skill outcome that has the mostrelevance to fundamental movement skills is Moving. The following diagram outlines the outcomesand sample indicators relating to this skill.
EARLY STAGE 1 STAGE 1 STAGE 2 STAGE 3
MOES1.4 MOS1.4 MOS2.4 MOS3.4Demonstrates a general Demonstrates a maturing Displays a focus on quality Refines and appliesawareness of how basic of basic movement and movement in applying movement skillsmovement skills apply compositional skills in a movement skills to a variety creativelyin play and other variety of predictable of familiar and new to a variety ofintroductory movement situations. situations. challenging situations.experiences.
• Maintains stillness of • Hops on preferred and • Throws overarm • Adapts throwinghead and trunk when non-preferred foot proficiently action to cater forbalancing • Strikes a stationary • Kicks and strikes different types of
• Demonstrates balance object, e.g. soccer ball, proficiently for distance equipment forand high knee lift T-ball • Performs a simple dance distance, accuracywhen sprinting • Repeats movements to combining locomotor and speed
form a sequence, e.g. and non-locomotor • Transfers sequence ofjump, hop, run movements locomotor and non-
locomotor movementsfrom the floor tosimple apparatus(bench, hoops)
• Varies runningpatterns to cater forsprinting, distancerunning, side stepping,dodging and defensivemarking
NSW Board of Studies (1999). PDHPE K-6 Syllabus.
The achievement of skill outcomes is essential as they underpin all learning in the Games and Sports,Gymnastics and Dance strands. The ability to control bodily movements in a range of new andchallenging situations is paramount for the acquisition of fundamental movement skills.

104
Exploring assessment
What is assessment?Assessment is the process of identifying,gathering and interpreting information aboutstudents’ learning. The central purpose ofassessment is to provide information on studentachievement and progress and set the directionfor ongoing teaching and learning.
NSW Department of School Education
(1996). Principles for assessment and
reporting in NSW government schools.
Why do I need to assess the development ofstudents’ fundamental movement skills?The main reasons we need to assess and monitorstudent performance are:
• to enhance student learning. This can helpdiagnose student needs and will enable youto provide valuable feedback to students.
• to evaluate the effectiveness of PDHPEprograms. This will assist you in identifying thestrengths and weaknesses of your programand help you to select future teachingstrategies to achieve the outcomes of the unit.
• to provide information for reporting studentachievement. This can help you to providefeedback on the quality of studentperformance and also assist you in providingfeedback to parents.
It is important to note that the development offundamental movement skills is only one part ofthe PDHPE syllabus. Other important outcomesalso need to be assessed as part of your PDHPEprogram.
How do I make judgements about studentperformance and achievement of syllabusoutcomes?It is not possible to make a judgement about theachievement of an outcome on the basis of oneperformance alone or by using a singleassessment strategy. You will need to make ajudgement based on a range of evidence.Students need to be given opportunities todemonstrate achievement of an outcome in arange of contexts. You need to build into your
teaching and learning practice ways of monitoringand assessing fundamental movement skills.
Your own informal observations, such aswatching students in the playground and atsporting carnivals, coaching sporting teams orobserving students in PE lessons, can also alertyou to any strengths and weaknesses withstudents’ development of fundamentalmovement skills. In some cases, it may benecessary to diagnose precisely the nature andextent of the problem. As students’ movementskills will be developing at different rates andin different stages, it may also be necessaryto monitor the development of these skills overtime.
From time to time, you will need to make ajudgement or an estimate about where studentsare in terms of the development of fundamentalmovement skills. You will need to consider all theevidence collected and observations of what thestudents can demonstrate.
Although you may be able to say confidently thata Year 2 student can perform the skipcompetently, making a decision about theachievement of a related outcome such as GSS1.8,Performs fundamental movement skills withequipment in minor games, may be less clear.
Moving from making decisions about indicatorsto making an on-balance judgement about theachievement of an outcome is not an automaticprocess. The indicators can be regarded as “notes”or as an ongoing record of students’ achievement.At some point the information gathered about theperformance is used to make a judgement aboutthe achievement of the outcome. There is nomagic number of indicators that add up to theoutcome, nor is there a formula for the numberof times an indicator should be observed beforeyou know it is there. Hence, the focus of yourattention moves from making judgements aboutindicators to making a judgement about theachievement of the outcome.
When making judgements about theachievement of the outcome you may use anexpected standard as a means of comparison andmake this decision at a point in time. For example,

Chap
ter
6
105Assessing and monitoring progress
the expected standard may be:
• a three-point scale• working beyond• achieved• progressing towards
or
• a five-point scale• working beyond• achieved• progressing towards beginning
developingconsolidating
If we focus on the outcome GSS1.8, Performsfundamental movement skills with equipment inminor games, you may consider a student:
is working beyond this outcome if he or she:
• can demonstrate and suggest ways ofpractising fundamental movement skills
• can demonstrate proficiently all thefundamental movement skills introduced inStage 1
• is able to assist in peer coaching and providemeaningful feedback to other students
• can demonstrate a range of skills in practicesand modified games e.g. throwing andcatching in moving and stationary positions
• is able to adapt to using a wide range ofequipment in games
has achieved this outcome if he or she:
• can participate in a range of minor games andpractices that assist in the development ofskills
• can demonstrate all fundamental movementskills as part of simple games
• can use equipment to demonstratesuccessfully various fundamental movementskills e.g. throw a small ball or beanbagoverarm to a wall
• is able to identify and perform the mostefficient ways of using a variety of gamesequipment e.g. correct grip and stance whenstriking a ball off a tee
is progressing towards this outcome if he or she:
• can demonstrate the introductorycomponents of the static balance, sprint runvertical jump and hop but does notdemonstrate the fine-tuning components
• can demonstrate some of the introductorycomponents of the fundamental movementskills introduced in this stage: hop, side gallop,skip, overarm throw (Year 1) and leap, kick,two-hand strike and dodge (Year 2)
• is experiencing difficulty using simpleequipment e.g. catching a large ball,maintaining the grip on a paddle bat.
Planning to assessfundamental movement skills
Planning ensures that assessment and reportingare manageable and maximises the usefulness ofthe strategies selected. When planning to assessfundamental movement skills, you will need toconsider the timing, frequency and nature of yourassessment strategies.
The following five points should form the basisof planning for assessment.
• Syllabus outcomes are identified for the unitor topic.
• Teaching and learning activities for the unit ortopic are programmed for the outcomes.
• A decision is made concerning which teachingand learning activities will provide goodassessment information.
• A manageable range of assessment strategiesis then selected and a decision is madewhether to include any external strategies,such as a topic test.
• At the end of a unit, on the basis of theassessment evidence, the teacher either placesstudents at the appropriate stage outcome oruses the evidence collected to make a decisionat a later date.
NSW Department of School Education (1997).
Strategies for assessment and reporting.
106
To be able to assess your students’ progress toward achievement in a stage, you will need to assess allthe outcomes within that stage.
In the following example, Stage 2 teachers use the information from the PDHPE K-6 syllabus and theschool’s scope and sequence chart in PDHPE to plan which outcomes will be targeted and when theywill be targeted. This applies across the whole of Stage 2 for PDHPE. This allows the teachers to be veryspecific about which outcomes they will target by having one or at most two outcomes for each topic.This makes the assessment of all outcomes a manageable process.
Here is a sample scope and sequence for Stage 2. The outcomes and units of work which focus onfundamental movement skills are in bold.
Year 3
TERM 1 TERM 2 TERM 3 TERM 4
Dance with confidence Tumble and turn Building my network On the goDAS2.7 GYS2.10 COS2.1 INS2.3
My growing self Daily decisions Safety firstDMS2.2 PHS2.12 SLS2.13
Year 4
TERM 1 TERM 2 TERM 3 TERM 4
Look out! Enjoying the game Get skilled Get activePSS2.5 GSS2.8 MOS2.4 ALS2.6
Making decisions FriendsGDS2.9 IRS2.11
When examining the range of outcomes which must be covered in a particular stage in the PDHPEK-6 syllabus it is important to plan which outcomes will be assessed and when. To check the plan ask:
• are all syllabus outcomes addressed within that stage?
• is the number of outcomes addressed in each unit or term manageable?
• will my teaching and learning activities allow the students to demonstrate achievement of theoutcomes?
• when appropriate, will I be able to make a judgement about students’ achievement of the outcome,based on evidence?
It is important to remember that, over the two-year period that encompasses PDHPE Stage 2, studentswill be working towards 13 different knowledge and understanding, and skills outcomes. It is importantto note that, while you may be focusing on one particular outcome in a unit of work, this will not be theonly time that evidence is collected and recorded for this outcome. Students will demonstrate manydifferent behaviours when you are teaching other units related to fundamental movement skills, suchas gymnastics and dance lessons. It is important that your observations of these behaviours are noted,to support you in making a balanced judgement about achievement of the outcome at the end of thestage. KIDMAP is an example of a software tool which can support teachers in recording and organisingstudent data relating to outcomes. This is explored later in this chapter.
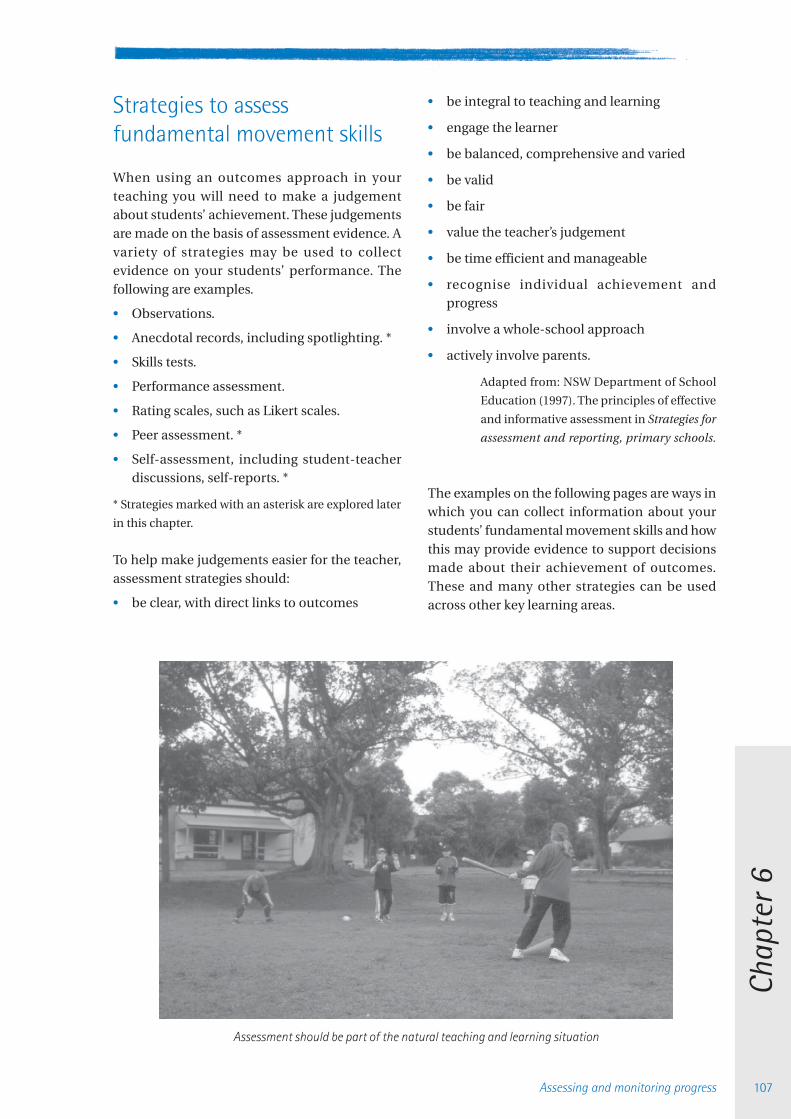
Chap
ter
6
107Assessing and monitoring progress
Strategies to assessfundamental movement skills
When using an outcomes approach in yourteaching you will need to make a judgementabout students’ achievement. These judgementsare made on the basis of assessment evidence. Avariety of strategies may be used to collectevidence on your students’ performance. Thefollowing are examples.
• Observations.
• Anecdotal records, including spotlighting. *
• Skills tests.
• Performance assessment.
• Rating scales, such as Likert scales.
• Peer assessment. *
• Self-assessment, including student-teacherdiscussions, self-reports. *
* Strategies marked with an asterisk are explored later
in this chapter.
To help make judgements easier for the teacher,assessment strategies should:
• be clear, with direct links to outcomes
• be integral to teaching and learning
• engage the learner
• be balanced, comprehensive and varied
• be valid
• be fair
• value the teacher’s judgement
• be time efficient and manageable
• recognise individual achievement andprogress
• involve a whole-school approach
• actively involve parents.
Adapted from: NSW Department of School
Education (1997). The principles of effective
and informative assessment in Strategies for
assessment and reporting, primary schools.
The examples on the following pages are ways inwhich you can collect information about yourstudents’ fundamental movement skills and howthis may provide evidence to support decisionsmade about their achievement of outcomes.These and many other strategies can be usedacross other key learning areas.
Assessment should be part of the natural teaching and learning situation

108
Unit: Getting started Week 8, Term 2
Outcome: GSS1.8Performs fundamental movement skills with equipment in minor games
Indicators:
• throws a small ball or beanbag overarm to a wall, target or partner
• skips with a smooth rhythmical action
• performs and practises skills such as the hop, side gallop and sprint run
• participates in a range of minor games that assist skill development.
Peter Kate
Working beyond Working beyond
Achieved Achieved
Progressing towards Progressing towards
Joseph Bronte
Working beyond Working beyond
Achieved Achieved
Progressing towards Progressing towards
Sam Angela
Working beyond Working beyond
Achieved Achieved
Progressing towards Progressing towards
✓
✓
✓
✓
✓
✓
Observation using spotlighting
Spotlighting is a process of focussing your attention on a few students each lesson instead of trying tocritically observe everyone. You may choose to observe six students in one lesson, six in the next lessonand work through your class gradually. This process ensures that all students are observed systematically.It is also one way of ensuring that student progress is ongoing and monitored over a period of time.
In the following example, the teacher is using spotlighting to make decisions on student progress relatingto the Games and Sports outcome for Stage 1(GSS1.8). Spotlighting is used in this instance to focus theteacher’s attention on six students each lesson throughout a unit of work. This has allowed the teacherto critically observe each student in the class before making any decisions about student progress.
The set of indicators in this example is not a checklist that, when completed, means the outcome isachieved. Rather, they assist the teacher to observe behaviours that students might display when workingtowards the outcome. At the end of the stage, the teacher makes a professional judgement about theachievement of the outcome. This assessment evidence is collected over time and in a variety of contexts.
Spotlighting dates: 9/10 1/11 23/11 7/12

Chap
ter
6
109Assessing and monitoring progress
Term 3 Class: 4D
Outcome: MOS2.4Displays a focus on quality of movement in applying movement skills to a variety of familiar and new situations.
Indicators
Throws proficiently 12/7 12/7 12/7 12/7 13/7 21/7
Hops proficiently 2/8 2/8 2/8 2/8 2/8 2/8
Applies skills such as static 1/9 1/9 1/9 1/9 1/9balance, sprint run, verticaljump and the catch into avariety of game situations
Skips in time with a beat 22/9 2/9 22/9 22/9 22/9 22/9
Outcome:Displays a focus on quality of movement in applying movement skills to a variety of familiar and new situations.
Has
not
bee
n ab
le to
part
icip
ate
in w
eeks
4-9
beca
use
of a
brok
en le
g.
Katr
ina
Aim
ee
Abdu
l
Char
les
Dom
inic
Fred
Julie
Nic
ola
Pete
r
Susa
nPerformancescale
Working beyond
Achieved
Consolidating
Developing
Beginning
Katr
ina
Aim
ee
Abdu
l
Char
les
Dom
inic
Fred
Julie
Nic
ola
Pete
r
Susa
n
Prog
ress
ing
tow
ards
✓
✓
✓
✓
✓
✓
✓
✓
✓
In this example, the teacher has chosen to be more specific and has created three extra categoriesunder “Progressing towards.” Each indicator is taken from within units of work which the class is focusingon that term. The teacher records the date when each indicator is observed. This information thenenables the teacher to make judgements about student achievement at various times.
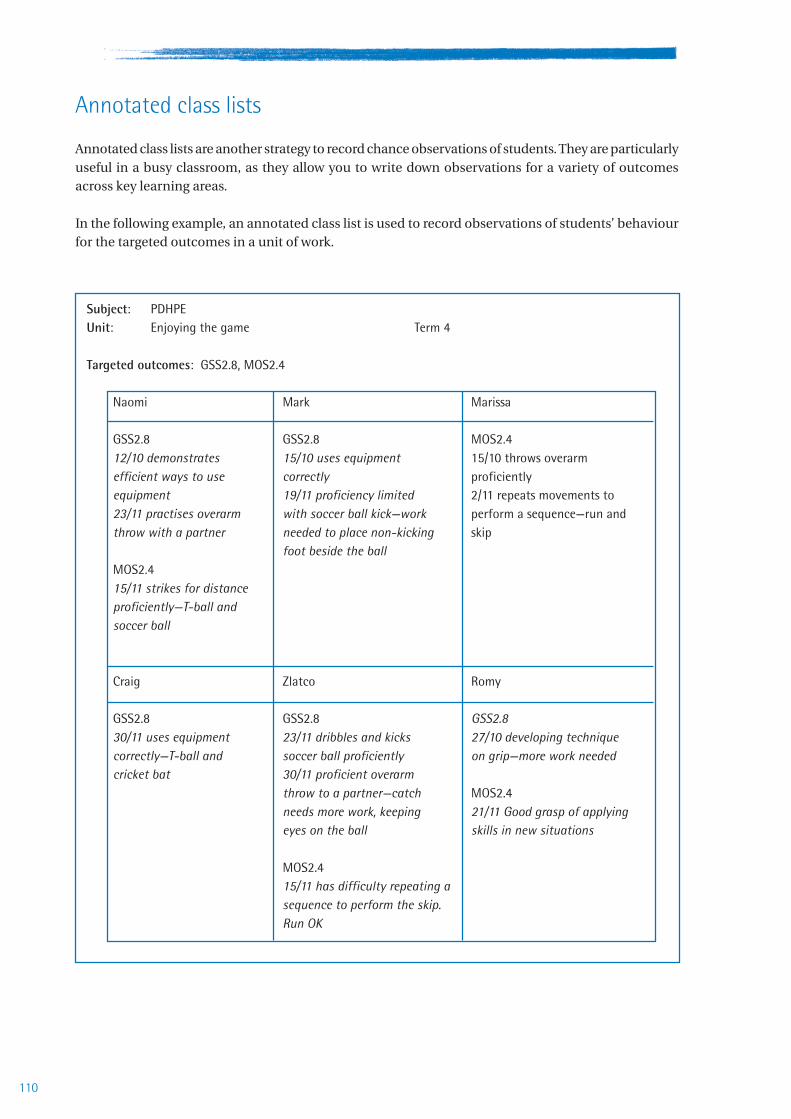
110
Annotated class lists
Annotated class lists are another strategy to record chance observations of students. They are particularlyuseful in a busy classroom, as they allow you to write down observations for a variety of outcomesacross key learning areas.
In the following example, an annotated class list is used to record observations of students’ behaviourfor the targeted outcomes in a unit of work.
Subject: PDHPEUnit: Enjoying the game Term 4
Targeted outcomes: GSS2.8, MOS2.4
Naomi Mark Marissa
GSS2.8 GSS2.8 MOS2.412/10 demonstrates 15/10 uses equipment 15/10 throws overarmefficient ways to use correctly proficientlyequipment 19/11 proficiency limited 2/11 repeats movements to23/11 practises overarm with soccer ball kick—work perform a sequence—run andthrow with a partner needed to place non-kicking skip
foot beside the ballMOS2.415/11 strikes for distanceproficiently—T-ball andsoccer ball
Craig Zlatco Romy
GSS2.8 GSS2.8 GSS2.830/11 uses equipment 23/11 dribbles and kicks 27/10 developing techniquecorrectly—T-ball and soccer ball proficiently on grip—more work neededcricket bat 30/11 proficient overarm
throw to a partner—catch MOS2.4needs more work, keeping 21/11 Good grasp of applyingeyes on the ball skills in new situations
MOS2.415/11 has difficulty repeating asequence to perform the skip.Run OK

Chap
ter
6
111Assessing and monitoring progress
Peer and self-assessment
Peer and self-assessment provide invaluable feedback for students by allowing them to develop a betterunderstanding of themselves as learners and develop responsibility for their own learning. By observingthemselves and their peers, students are encouraged to reflect on their own learning by providingappropriate feedback. The following two examples show how peer assessment and self-assessmentcan be used as strategies to collect evidence of students’ progress in fundamental movement skills.
Example 1: Peer observationIn the following example, a peer observation sheet is used in conjunction with a series of activitiesbased around the overarm throw for a group of Year 4 students. Each group has been asked to providefeedback on a partner by observing each component of the overarm throw and writing a comment atthe bottom.
My buddy was Erica (4D) Overarm throw Date: 2 March 2000
eyes look forward
stands side on
throwing arm moves down and back
steps towards the target
hips rotate
shoulders rotate
throwing arm follows through, down and
across the body
My observations:Erica was really good at throwing. She moved her arm down and back, stepped towards the target and followedthrough, but when she throws she looks at the ground.
Signed: Kristen Class: 4D
✓
✓
✓
✓
✓
❋
❋
KEY:
✓ = success ❋ = things needing work
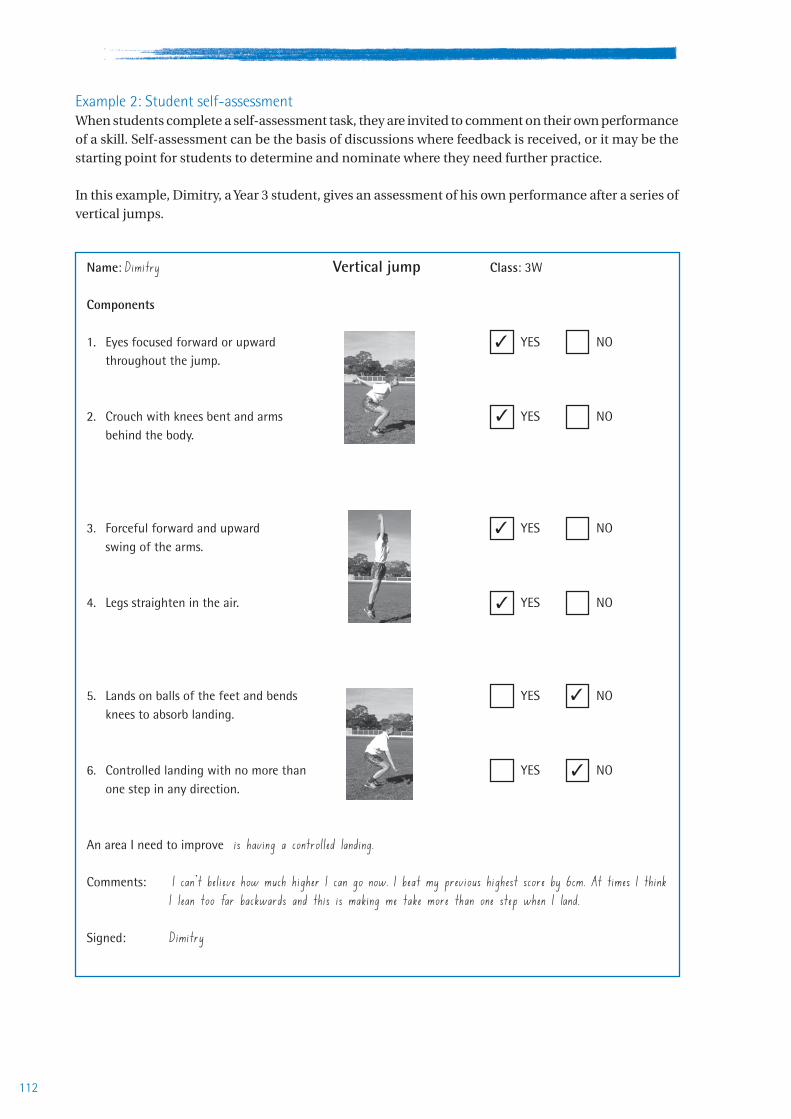
112
Example 2: Student self-assessmentWhen students complete a self-assessment task, they are invited to comment on their own performanceof a skill. Self-assessment can be the basis of discussions where feedback is received, or it may be thestarting point for students to determine and nominate where they need further practice.
In this example, Dimitry, a Year 3 student, gives an assessment of his own performance after a series ofvertical jumps.
Name: Dimitry Vertical jump Class: 3W
Components
1. Eyes focused forward or upward YES NOthroughout the jump.
2. Crouch with knees bent and arms YES NObehind the body.
3. Forceful forward and upward YES NOswing of the arms.
4. Legs straighten in the air. YES NO
5. Lands on balls of the feet and bends YES NOknees to absorb landing.
6. Controlled landing with no more than YES NOone step in any direction.
An area I need to improve is having a controlled landing.
Comments: I can’t believe how much higher I can go now. I beat my previous highest score by 6cm. At times I thinkI lean too far backwards and this is making me take more than one step when I land.
Signed: Dimitry
✓
✓
✓
✓
✓
✓

Chap
ter
6
113Assessing and monitoring progress
Managing the assessmentinformationTeachers use a variety of methods to recordassessment information. This information needsto be systematically recorded to ensure thatappropriate decisions about studentachievement can be made. It is not practical torecord comments on every student, every timeyou have a PDHPE lesson. However, it isimportant to develop a process for recording yourobservations about students’ progress as part ofyour normal practice.
The assessment information collected for eachstudent needs to be maintained so that teachersin future years remain informed. This informationneeds to be consolidated on student record sheetsto ensure that this evidence does not gounnoticed or is not misplaced. Examples ofeffective methods include:
• curriculum management and supportsoftware (e.g. KIDMAP)
• portfolios
• file cards.
Curriculum management andsupport softwareThe KIDMAP software supports teachers andschool leaders in managing the curriculum ateach stage of the teaching and learning cycle (seediagram below). KIDMAP enables teachers toplan, program, record, report and profilestudents’ learning outcomes using the followingNSW Board of Studies syllabuses.
• PDHPE K-6
• English K-6
• Maths K-6 and Stage 4
• HSIE K-6
• ESL scales
• Selected language syllabuses.
HelpDisplays theon-line helpdocuments.
Assessing and Recording:allows you to record studentachievements according to strandsand stages, outcomes statements andtrack students’ progress.
ExitThe best andrecommendedway to quitKIDMAP.
Planning for Teaching:allows you to allocate, organise andlocate resources, etc.
- Resource Centre- Teaching Plans- Individual Learning Plans
Profiling and Analysing:
- Group Profiles- Student Profiles- Groups Over Time- Students Over Time
Reporting:allows you toselect from avariety of reporttemplates, viewon the screenand print themout.
Organising:allows you to make notes, recordinformation, make groups, etc.
• Students • Teachers• Users • Outcomes• Strands • Stages

114
PortfoliosPortfolios are a specific collection of student work or evidence of student work (e.g. observation sheetsfrom students’ performance) that demonstrate that learning has occurred. In order for portfolios to beeffective, they must have a clear intent and purpose linked to syllabus outcomes.
Portfolios provide evidence for judgements about students’ achievement in a variety of contexts.
records of interviewsand discussions withthe student
video tapes
audio tapes
teachercomments
a range of annotatedwork samples,completed products,drafts of work inprogress
photographs

Chap
ter
6
115Assessing and monitoring progress
File cardsFile cards can be used to record your informal observations. This may include:
• keeping one folder for each student and writing comments on dated cards inside
• having a set of cards for each student, perhaps with different colours representing each subject orskill, with space on each to record your comments
• having a card for each student on a clipboard or noticeboard for easy access. When a card becomesfull, simply file it for future reference
• using a computer as an electronic file, employing the “cut” and “paste” options to create a separatefile for each student.
Year 4profilerecord


117References
ReferencesAustralian Sports Commission (1994). Sport it! Towards 2000. Canberra:
Australian Sports Commission.
Board of Studies NSW (1999). Personal Development, Health and Physical
Education K-6 Syllabus. Sydney: Board of Studies NSW.
Board of Studies NSW (1999). Personal Development, Health and Physical
Education K-6 Modules. Sydney: Board of Studies NSW.
Corbin, C. B. (1976). Becoming physically educated in the elementary
school. Philadelphia: Lea and Febiger.
DeOreo, K. and Keogh, J. (1980). Performance of fundamental movement
tasks. In C.B. Corbin (Ed.) A textbook of motor development (2nd edition).
Dubuque, Iowa: Wm C. Brown Company.
Department of Education, Community and Cultural Development,
Tasmania (1997). Fundamental motor skills. Hobart: Department of
Education, Community and Cultural Development.
Department of Education, Victoria (1996). Fundamental motor skills: A
manual for classroom teachers. Melbourne: Department of Education.
Education Department of Western Australia (1997). Fundamental
movement skills support package. Perth: Education Department of
Western Australia.
Gallahue, D. (1996). Developmental physical education for today’s
children. Dubuque, Iowa: Brown & Benchmark.
Isaacs, L. D. (1980). Effects of ball size, ball colour, and preferred colour
on catching by young children. Perceptual and Motor Skills, 51, 583-
586.
Larkin, D. and Hoare, D. (1991). Out of step: Coordinating kids’ movement.
Nedlands, Western Australia: Active Life Foundation.
Martin, T. P. and Stull, G. A. (1969). Effects of various knee angle and
foot spacing combinations on performance in the vertical jump.
Research Quarterly, 40, 324-331.
NSW Department of Education and Training (1997). NSW schools fitness
and physical activity survey, 1997: Summary. Curriculum Support
Directorate, NSW Department of Education and Training.
New South Wales Department of School Education (1997). Strategies for
assessment and reporting – primary schools. Sydney: NSW Department
of School Education.
New South Wales Department of School Education (1996). Towards a
health promoting school. Sydney: NSW Department of School
Education.

118
Pangrazi, R. (1998). Dynamic physical education for elementary school
children (12th edition). Boston: Allyn and Bacon.
Payne V.G. and Isaacs, L. D. (1995). Human motor development: A lifespan
approach (3rd edition). Mountain View, California: Mayfield.
Rink, J. (1985). Teaching physical education for learning (2nd edition).
St Louis: Mosby.
Sattin, R.W. (1992). Falls among older persons: A public health
perspective. Annual Review of Public Health, 13, 489-508.
Seefeldt, V. and Haubenstricker, J. (1982). Patterns, phases, or stages:
An analytical model for the study of development movement. In J.A.S.
Kelso and J.E. Clark (Eds), The development of movement control and
coordination. New York: John Wiley & Sons.
Seefeldt, V., Reuschlein, S. and Vogel, P. (1972). Sequencing motor skills
within the physical education curriculum. Paper presented at the
meeting of the American Association of Health, Physical Education and
Recreation, Houston.
Stewart, M.J. and DeOreo, K. (1980). Motor skill developmental analysis.
In C.B. Corbin (Ed.), A textbook of motor development (2nd edition).
Dubuque, Iowa: Wm C. Brown Company.
Ulrich, D. (1985). Test of gross motor development. Texas: PRO-ED.
Williams, J.G. (1982). Effects of instruction and practice on ball catching
skill: Single-subject study of an 8-year-old. Perceptual and Motor Skills,
75, 392-394.
Other helpful resources
Australian Council for Health, Physical Education and Recreation
(ACHPER) (1997). Dance: Lower primary. Richmond, South Australia:
Hyde Park Press.
——(1997). Dance: Upper primary. Richmond, South Australia: Hyde
Park Press.
——(1994). Fitness: Lower primary. Richmond, South Australia: Hyde
Park Press.
——(1994). Fitness: Upper primary. Richmond, South Australia: Hyde
Park Press.
——(1998). Gymnastics: Lower primary. Richmond, South Australia:
Hyde Park Press.
——(1998). Gymnastics: Upper primary. Richmond, South Australia:
Hyde Park Press.

119References
Australian Sports Commission (1990). Modified sport: Resource manual.
Belconnen, ACT: Australian Sports Commission.
Australian Sports Commission (1993). Sportstart: Developing your kids’
skills at home. Fyshwick, ACT: Australian Sports Commission.
Burridge, K. and Landy, J. (1996). Homeplay: Fundamental movement
skills activities for teaching young children movement. Perth: Lifestyle
education publishers.
——(1997). Homeplay: Fine motor skills and handwriting for teaching
young children movement. Perth: Lifestyle education publishers.
Cocks, N. (1996). Watch me, I can do it! : Helping children overcome
clumsy and uncoordinated motor skills. Sydney: Viacom International.
Fronske, H. (1997). Teaching cues for sport skills. Boston: Allyn and
Bacon.
Landy, M. and Burridge, K.R. (1999). Fundamental motor skills and
movement activities for young children. West Nyack: The Center for
Applied Research in Education.
Landy, M. and Burridge, K.R. (1999). Motor skills & movement station
lesson plans for young children. West Nyack: The Center for Applied
Research in Education.
Landy, M. and Landy, J. (1992). Ready to use PE activities for Grades K-2.
New York: Parker Publishing.
——(1992). Ready to use PE activities for Grades 3-4. New York: Parker
Publishing.
——(1993). Ready to use PE activities for Grades 5-6. New York: Parker
Publishing.
Larkin, D. and Hoare, D. (1991). Out of step: Coordinating kids’ movement.
Perth: Active Life Foundation.
Pangrazi, R.P. (1998). Dynamic physical education for elementary school
children (12th edition). Boston: Allyn and Bacon.
Wall, J. and Murray, N. (1994). Children and movement: Physical
education in the elementary school. Dubuque, Iowa: Brown and
Benchmark.


