There’s no limit to what you can do with digital photos. Paint Shop Pro 8’s Deform Tool lets you turn your photos into all kinds of artistic creations. You can quickly resize them, rotate them, and stretch them to simulate perspective. With the help of Paint Shop Pro and this tutorial, you can turn ordinary photos into interesting creations. Get to Know Paint Shop Pro: the Deform Tool What you’ll need: Jasc ® Paint Shop ™ Pro ® The digital photo Dogs.jpg, located in your Sample Images folder When you complete this tutorial you’ll be able to: Open a photo Promote the background layer Set Deform Tool options Scale the background layer Duplicate raster layers Rename duplicated layers Shear duplicated layers www.jasc.com
Transcript
There’s no limit to what you can do with
digital photos. Paint Shop Pro 8’s
Deform Tool lets you turn your photos
into all kinds of artistic creations. You
can quickly resize them, rotate them, and
stretch them to simulate perspective. With
the help of Paint Shop Pro and this tutorial,
you can turn ordinary photos into interesting
creations.
Get to Know Paint Shop Pro:the Deform Tool
What you’ll need:� Jasc® Paint Shop™ Pro®
� The digital photo Dogs.jpg, located in your Sample Images folder
When you complete this tutorial you’ll be able to:� Open a photo
� Promote the background layer
� Set Deform Tool options
� Scale the background layer
� Duplicate raster layers
� Rename duplicated layers
� Shear duplicated layers
www.jasc.com
Create Custom Brush Tips from Selections Page 1
Set Up Your Workspace
1. If Paint Shop Pro 8 isn’t already open on your computer, start it up by choosing
Start > Programs > Jasc Software > Jasc Paint Shop Pro or double click the
Paint Shop Pro 8 Icon on your desktop.
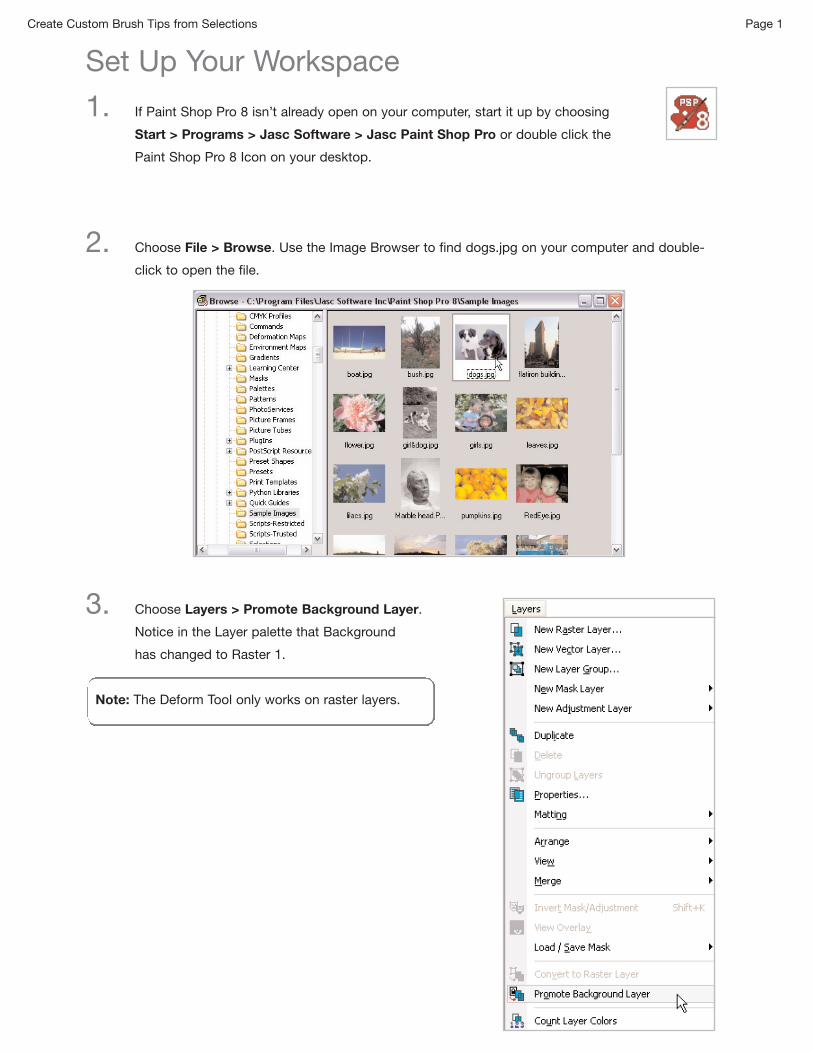
2. Choose File > Browse. Use the Image Browser to find dogs.jpg on your computer and double-
click to open the file.
3. Choose Layers > Promote Background Layer.
Notice in the Layer palette that Background
has changed to Raster 1.
Note: The Deform Tool only works on raster layers.
Create Custom Brush Tips from Selections Page 2
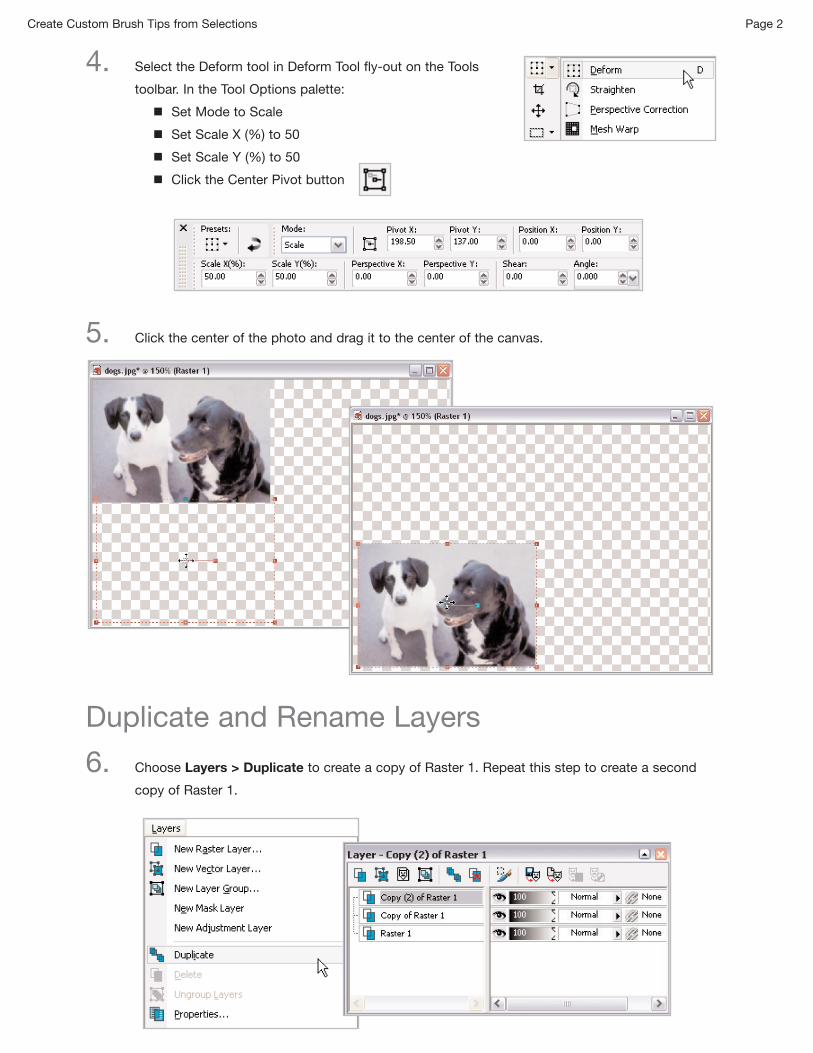
4. Select the Deform tool in Deform Tool fly-out on the Tools
toolbar. In the Tool Options palette:
� Set Mode to Scale
� Set Scale X (%) to 50
� Set Scale Y (%) to 50
� Click the Center Pivot button
5. Click the center of the photo and drag it to the center of the canvas.
Duplicate and Rename Layers
6. Choose Layers > Duplicate to create a copy of Raster 1. Repeat this step to create a second
copy of Raster 1.
Create Custom Brush Tips from Selections Page 3
7. On the Layer palette, right-click Copy of Raster 1 and choose Rename from the pop-up menu.
8. When Copy of Raster 1 is selected,
type Top side and press Enter.
9. Rename the other layers:
� Rename Copy (2) of Raster 1: Left side
� Rename Raster 1: Front
Create Custom Brush Tips from Selections Page 4
Shear Duplicated Layers
10. On the Layer palette, select Left side.
11. Click the center of the Left side layer and drag it to the right side of the Front layer. Be sure to
line it up at the top and bottom.
12. Click the middle handle on the right side of the image layer and drag it to the middle of the layer
to rescale the width to about half.
Create Custom Brush Tips from Selections Page 5
13. In the Tool Options palette:
� Set Mode to Shear
14. Click the right side handle and drag the right side of the layer toward the top of the canvas so
that the shear is at about a 45-degree angle.
15. On the Layers palette, select Top side.
16. Click the center of the Top side layer and drag it to the top of the Front layer. Be sure to line it
up on the left and right.
17. On the Tool Options palette:
� Set Mode to Scale
Create Custom Brush Tips from Selections Page 6
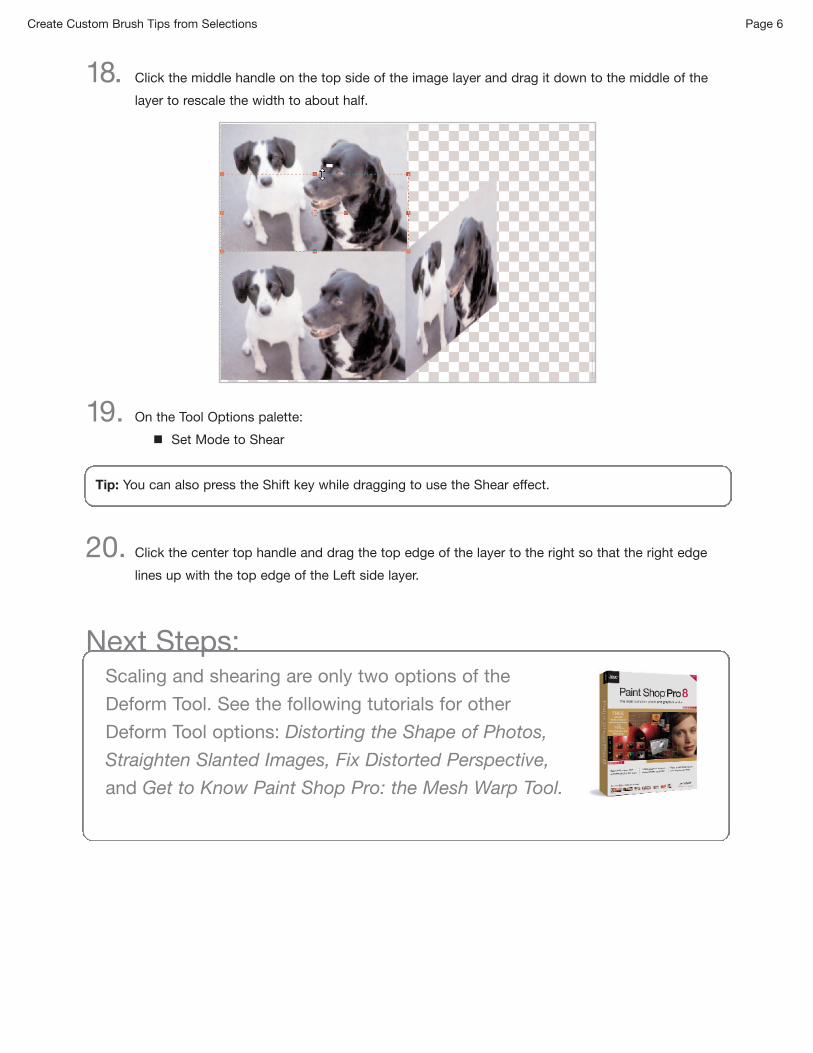
18. Click the middle handle on the top side of the image layer and drag it down to the middle of the
layer to rescale the width to about half.
19. On the Tool Options palette:
� Set Mode to Shear
Tip: You can also press the Shift key while dragging to use the Shear effect.
20. Click the center top handle and drag the top edge of the layer to the right so that the right edge
lines up with the top edge of the Left side layer.
Next Steps:Scaling and shearing are only two options of the
Deform Tool. See the following tutorials for other
Deform Tool options: Distorting the Shape of Photos,