Fix Known Synchronization IssuesWrap Calls to 2D GUIsAdd a Stereo-Correct SkyboxSynchronize Game Level LoadingSynchronize AudioRandom number generation
Verify, Build, and Optimize GamesCheck the SceneBuild the Game ExecutablegetReal3D compositor performance
Logical InputsLogical Inputs configurationLogical Inputs Used in Scripts
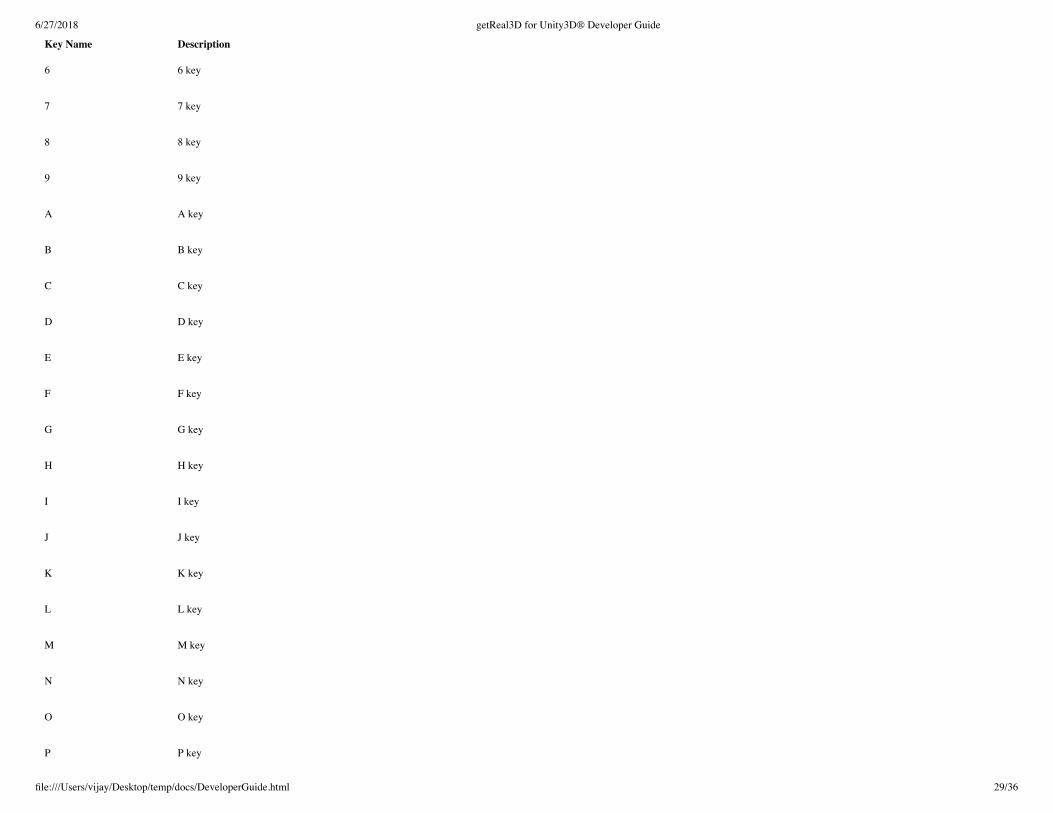
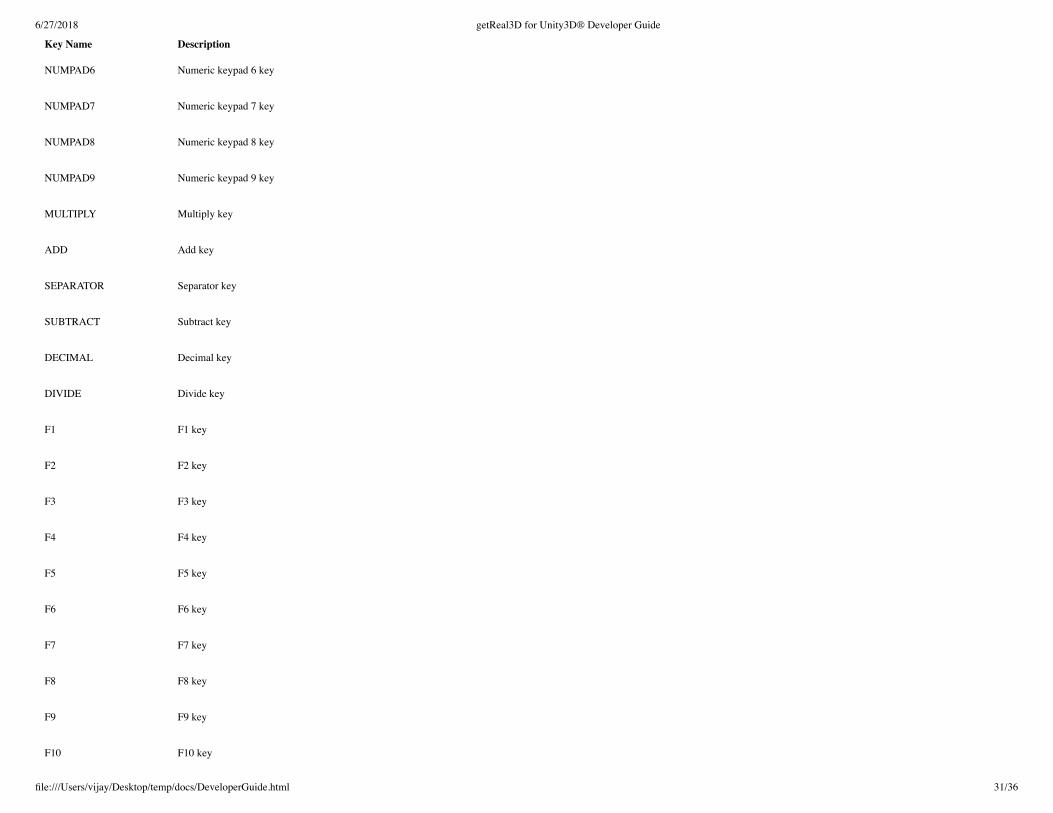
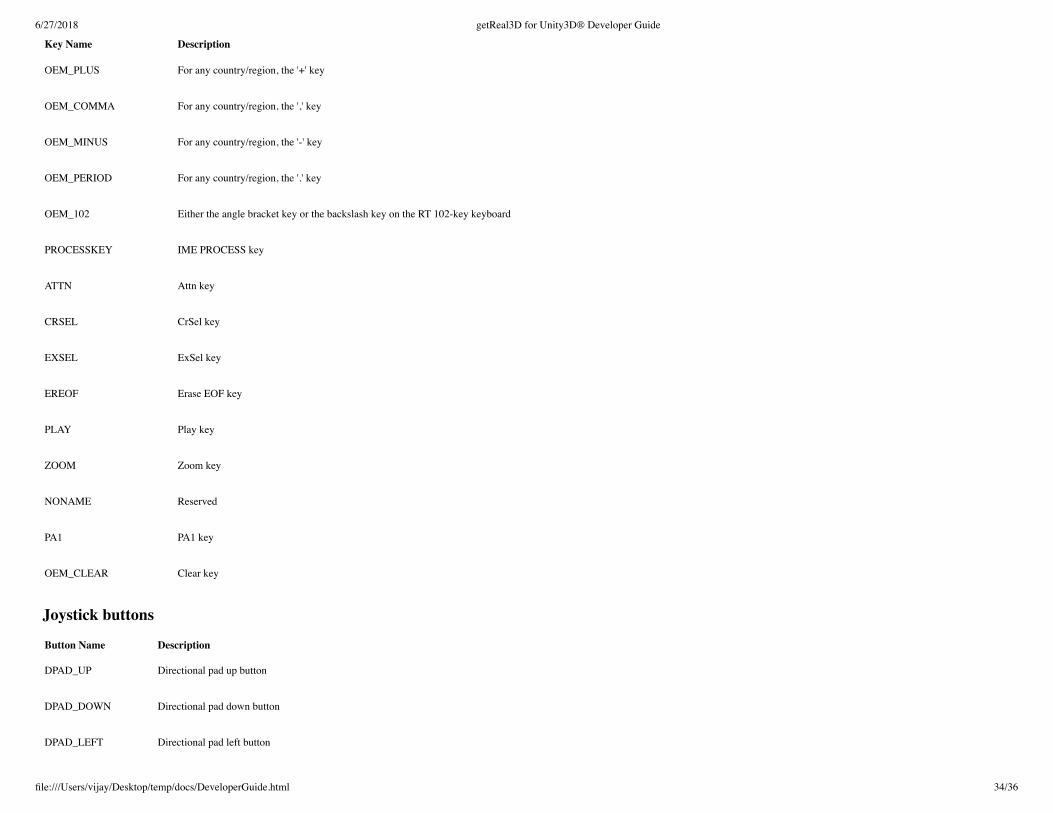
Keys, buttons and axis valuesKeysJoystick buttonsJoystick/Mouse axis
Support Information
IntroductiongetReal3D for Unity enables games created with the Unity game engine to run in heterogeneous virtual reality environments. It obtains data from VR-specific devices, generates the necessary cameras for your display system,and enables a single Unity game to synchronize its state across multiple running instances. The ability to synchronize game state is referred to in this document as multiview.
This guide covers getReal3D for Unity version 3.
From a developers' perspective, the important components of getReal3D are:
1. The getReal3D configuration file. This file defines how and where your games will run: the display system and all its hardware, the input devices used, and many other settings.
2. The getReal3D daemon. The daemon must always be running on workstations where your game will run.
3. The getReal3D launcher. The launcher is a separate application that lets you deploy and run your Unity games.
4. The getReal3D plugin. Embedded inside your Unity project, it is bundled inside the games you create with Unity and provides run-time VR behaviors.
This guide will focus on using the getReal3D plugin. For information regarding getReal3D configurations, please consult the getReal3D for Unity configuration guide. For use of the getReal3D launcher and daemon, pleaseconsult the getReal3D for Unity User Guide.
This guide will cover the following issues of importance to getReal3d for Unity developers:
How to install and license getReal3D software on your development workstation
How to develop and test games using getReal3D for Unity.
How to add VR capabilities to your games.
How to synchronize Unity components in your games
How to synchronize Scripts you write for your games
How to fix known synchronization issues that may arise
How to verify, build and optimize games
Finally, the guide also includes reference material for the most widely used components of the getReal3D plugin:
Default scripts and prefabs that can help you get started quickly
The input class for reading values from a tracking system
Install and LicenseSystem RequirementsDeveloping Unity games with getReal3D for Unity requires:
Unity3D version 5, optionally with a Unity Pro license
A D3D9-capable or better graphics card with the developer only getReal3D license. A quad-buffered stereo capable graphics card (such as an Nvidia Quadro card) may be required for active-stereo modes under the non-developer getReal3D licenses.
InstallationFollow the installer instructions for a developer install. The installer provides the following components:
getReal3D for Unity plugin
getReal3D for Unity launcher
getReal3D for Unity daemon
getReal3D for Unity demo game
Mechdyne trackd simulator
Flexera FLEXlm (license manager)
The last two items will be skipped during installation if they already exist on the system.
By default, getReal3D for Unity will be installed to: C:\Program Files \Mechdyne\getReal3D for Unity 3. By default, the getReal3D Daemon will manage (and on a cluster, distribute) Unity games in:C:\ProgramData\Mechdyne\getReal3D for Unity 3\CACHE.
LicensingNo additional licenses are required to develop and test getReal3D for Unity games on a single development workstation.
However, licenses are required when running Unity game executables built with getReal3D for Unity. The following license features are available:
GETREAL3D_UNITY_DEV
This feature can be used while testing getReal3D for Unity game executables. It has the following restrictions on what the configuration could contain:
Only one node may be used and it must be localhost.
Up to two Unity instances (one or two vr_config element in the configuration file).
One screen per instance (a single screen_ref element per vr_config).
Only one single screen for each instance (all screen_refs name the same screen).
Only one display plane is allowed (screen_ref must use eye="mono").
No compositing (no dtcroot node in the configuration file).
GETREAL3D_UNITY_BASE
This feature is required to run any getReal3D for Unity game executable. Attempting to start the launcher without this feature will show a licensing error. This license feature is sufficient for a single-channelstereo output (e.g. a 3DTV or active-stereo monitor/projector).
GETREAL3D_UNITY_EXPLORER
This feature is required to run with a getReal3D configuration for modest VR environments with either only a few stereo channels or limited display planes (e.g. a small powerwall, a workbench).
GETREAL3D_UNITY_VOYAGER
This feature is required to run with a getReal3D configuration for large VR environments (e.g. CAVE systems).
TRACKD
This feature is required to run trackd, which provides tracker and controller inputs to your getReal3D for Unity game. If the launcher is configured to start trackd automatically and no trackd license isavailable, you will see a trackd licensing error in the launcher.
A Note Regarding PortsFor your information, a default installation and configuration of getReal3D for Unity uses the following ports:
6001 & 6002 – run-time synchronization required by the multiview capabilities of getReal3D.
8679 – the listening port for the getReal3D for Unity daemon
The installer will create necessary firewall exceptions to allow traffic on these ports. The getReal3D daemon listening port can be changed by re-running the installer. The other ports can be changed in your getReal3Dconfiguration file.
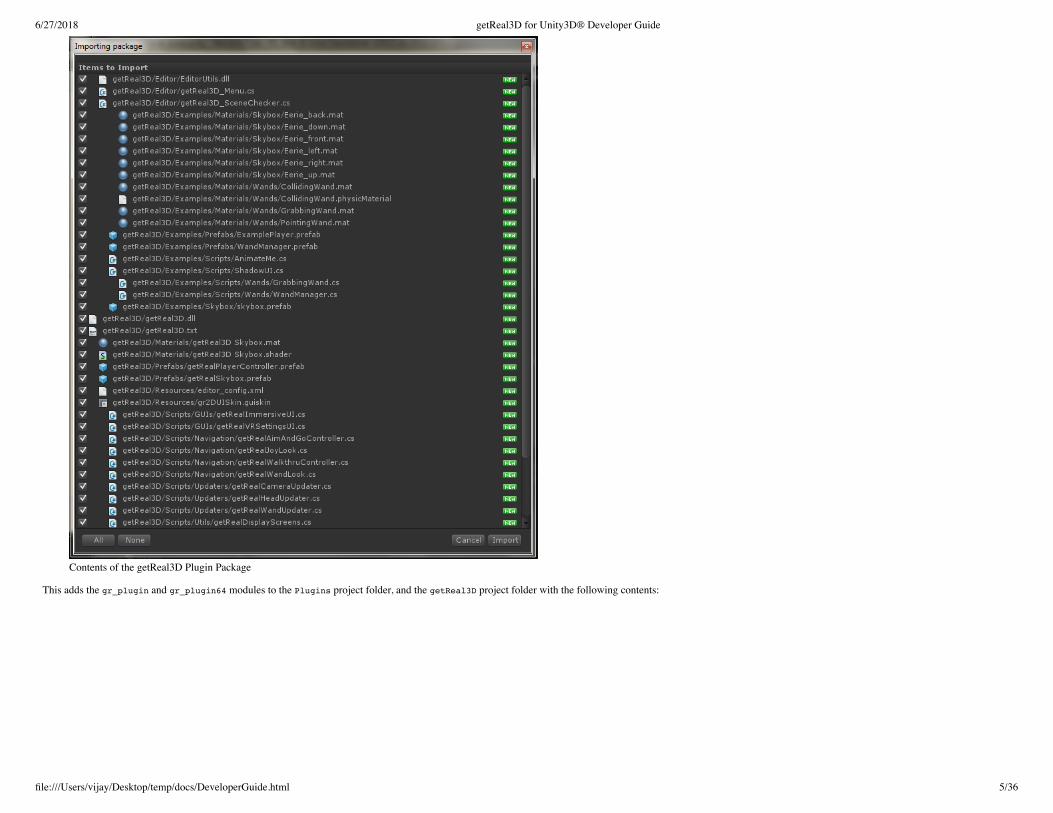
Develop and Test on a Local WorkstationImport the getReal3D pluginDeveloping and games with getReal3D for Unity always requires the getReal3D plugin. The plugin is located atC:\Program Files\Mechdyne\getReal3D for Unity 3\For Unity Projects\getReal3D_Plugin_X.X.X.X.unitypackage.
From the menu, select Assets → Import Package → Custom Package. Navigate to the getReal3d plugin location and click Import to import everything. Note: If you have previously played the current game inside the currentUnity Editor session, you must quit the Unity Editor before importing or the import will fail to update the core plugin (gr_plugin.dll).
The plugin also adds a custom getReal3D menu to the editor:
The getReal3D menu
The contents of the getReal3D project folder and menu will be examined later.
Run in the EditorGames using getReal3D for Unity can be run inside the editor for testing and debugging just like any other Unity game. Note that games run inside the editor still require a getReal3D configuration. The getReal3D configurationfile used when running in the editor is located in your Project at getReal3D/Resources/editor_config.xml.
Running in the editor allows you to test VR features like tracking and navigation. Running in the editor also provides a limited ability to test how the getReal3D plugin generates cameras corresponding to your getReal3Dconfiguration. When running games in the editor, the first screen referenced in your editor_config.xml becomes the main game view inside the editor. See the getReal3D for Unity configuration guide for more details. Allother screens are ignored.
Note that when running in the editor the small "Camera Preview" box and inspector view in Unity will not show the correct camera projection matrix.
Test Using trackd Simulator
Most games built with getReal3D for Unity will use trackd inputs from head/hand trackers and controllers. Although you can test with any properly configured trackd tracking system when running in the editor, this isgenerally not convenient for developers because:
The tracking hardware may not be physically near your development workstation, and
You may not have a trackd license on your development machine.
An easy alternative is to run the trackd simulator which provides a GUI to simulate head/hand sensors, joystick valuators, and buttons:
Start the simulator by clicking the shortcut trackdsimulator from the start menu at Mechdyne → getReal3D for Unity 3. You should see a console window containing raw tracker outputs and the simulator GUI shown above.
Next, play the game in the editor as normal. You should be able to generate trackd inputs using the simulator GUI.
Example: running the Shadow Demo in the editor
getReal3D for Unity includes the Shadow Demo game, which is located at: C:\Users\Public\Documents\Unity Projects\getReal3D Shadow Demo. This game was adapted for VR environments from Unity's shadow demo(available at http://unity3d.com/support/resources/example-projects/shadowdemo).
We'll use this game as a simple example to show how to test in the editor using the trackd simulator. The shadow demo illustrates the following standard VR features:
User-centered perspective. This means the game view will always be from the perspective of a tracked user inside the VR environment.
Walkthrough navigation. This is a simple navigation style where joysticks are used to control a character walking on solid surfaces.
A pointing device (a.k.a. wand). The virtual wand is drawn with the users' tracked hand position and orientation. The wand is able to interact with objects in the scene (as described below).
To play the game in the editor, first start the trackd simulator. Then, inside Unity, select the Apartment Scene, and hit the play button in the editor.
You can control the game using the simulator GUI. First, you must raise your Head and Hand sensors above their default position on the floor (Y = 0) in order to see the apartment correctly in the game window.
The trackd simulator controls the game as described below. Note that the default mapping of sensors and controller inputs to their logical function inside the game can also be customized in your getReal3D configuration:
Use the Head and Wand sensor XY and Z controls to position your Head and Hand.
Use the Wand orientation ball to rotate your Wand (rotating your Head is essentially meaningless in this configuration)
Use the left joystick control to move forward/back & turn left/right
Use the right joystick to look up/down & strafe left/right
Use button 2 to Jump
Use button 3 to reset up/down look angle
Use button 4 to change wand type:
Green wand: points and casts shadow
Blue wand: grab objects by toggling button 1
Red wand: solid wand to knock objects around
Enable VR CapabilitiesWhen getReal3D_Plugin_X.X.X.X.unitypackage is imported into a project, aside from the plugins several sample scripts and prefabs are made available. These resources are provided as working examples of what can bedone with the getReal3D for Unity API, but in many cases they are all you need to provide VR behaviors to your Unity game.
Enable Standard VR CapabilitiesThe easiest way to get started with a new game in getReal3D is to enable standard VR features using the getRealPlayerController prefab as was done with the Unity shadow demo example.
The getRealPlayerController prefab
Use this simple approach if:
1. You want the 3D scene to use a "head-centered" perspective – i.e. the scene is rendered according to the trackers' head position.
2. You want to use "first-person" navigation with a standard VR navigation script. For example, virtually walking on solid surfaces but not through solid objects.
3. You don't have existing cameras or character controllers that you need to retain.
Convert your game by following these steps:
1. Delete or disable any Camera objects in the Hierarchy root. Your old cameras are no longer needed since getReal3D for Unity manages all the VR cameras.
2. Add the getRealPlayerController prefab to the Hierarchy root from the Project folder getReal3d/Prefabs. This includes Head and Hand objects, and a getReal3D managed camera.
3. If desired, attach the WandManager prefab to the Hand object from the Project folder getReal3D/Examples/Prefabs. This adds a VR wand that can interact with objects in the scene.
You can learn more about the getRealPlayerController and its scripts in the reference section below.
Add a VR CameraAll getReal3D games will a getReal3D-managed camera. This is required so that getReal3D can render your scene correctly on the visualization system defined in your configuration.
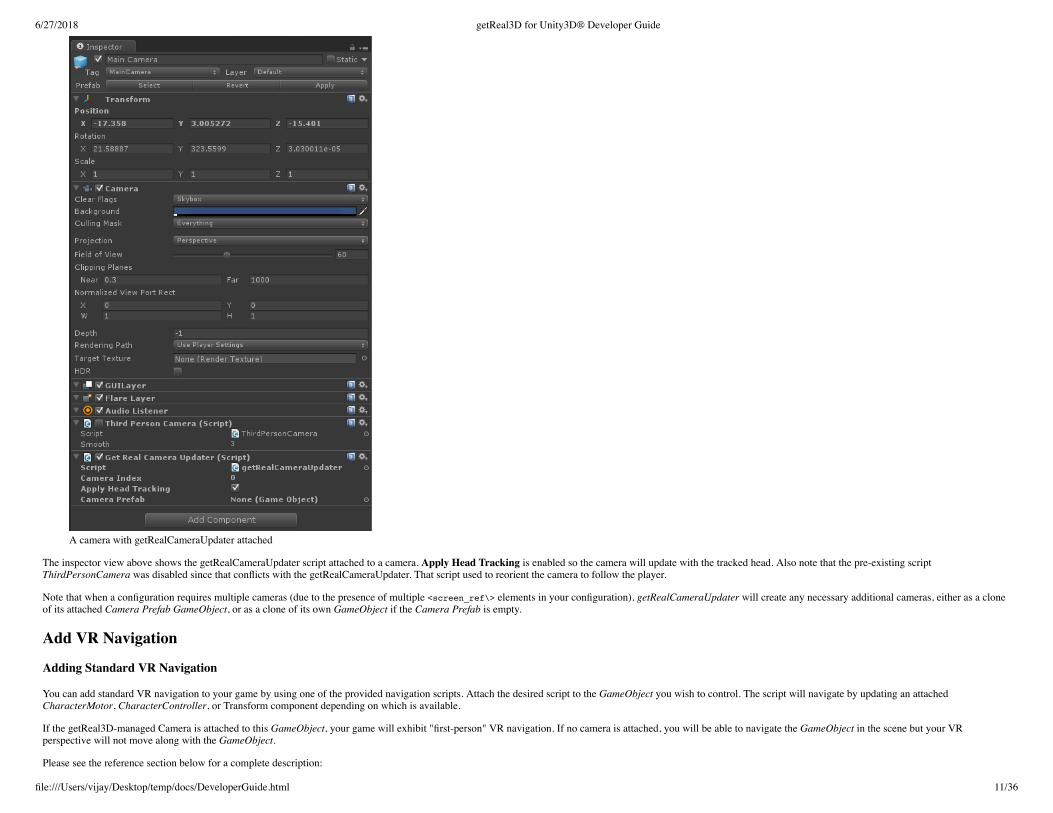
The getRealCameraUpdater script can be used to add the required camera. Attach this script to the main camera in the game. The script applies the camera projection necessary for the assigned screen geometry. If tracking isavailable and the script's Apply Head Tracking option is enabled, it will also position and orient the camera according to head tracking.
Make sure to disconnect any scripts that change the position or orientation of the camera according to other game phenomena as these will conflict with the getRealCameraUpdater. If that behavior is still desirable in a VRenvironment you can retain it by re-parenting the getReal3D-controlled camera under a transform and then reposition/reorient that transform instead of the cameras' transform.
The inspector view above shows the getRealCameraUpdater script attached to a camera. Apply Head Tracking is enabled so the camera will update with the tracked head. Also note that the pre-existing scriptThirdPersonCamera was disabled since that conflicts with the getRealCameraUpdater. That script used to reorient the camera to follow the player.
Note that when a configuration requires multiple cameras (due to the presence of multiple <screen_ref\> elements in your configuration), getRealCameraUpdater will create any necessary additional cameras, either as a cloneof its attached Camera Prefab GameObject, or as a clone of its own GameObject if the Camera Prefab is empty.
Add VR Navigation
Adding Standard VR Navigation
You can add standard VR navigation to your game by using one of the provided navigation scripts. Attach the desired script to the GameObject you wish to control. The script will navigate by updating an attachedCharacterMotor, CharacterController, or Transform component depending on which is available.
If the getReal3D-managed Camera is attached to this GameObject, your game will exhibit "first-person" VR navigation. If no camera is attached, you will be able to navigate the GameObject in the scene but your VRperspective will not move along with the GameObject.
Please see the reference section below for a complete description:
getRealWalkthruController Constrained movement appropriate for buildings and terrain. Enables the user to use joystick axes to translate forward-and-back and side-to-side along the direction of the hand tracker whilemaintaining contact with the floor or ground.
getRealAimAndGoController Provides for movement that follows the direction of the hand tracker and does not constrain itself to a floor or ground plane. Still checks for collisions and halts motion as appropriate.
getRealWandDriveController Appropriate for tracked controller devices without joysticks. Navigation follows the relative motion of the tracked controller; i.e. hold a button and move the controller forward to navigateforward.
getRealWandLook Provides for rotational navigation driven by the tracked hand. May be discrete (only moves when the wand moves) or continuous (continues to apply the motion of the wand as long as a buttonis held down).
getRealJoyLook Provides for rotational navigation driven by input devices with joystick or thumbstick controls.
Integrate Game Navigation Without First-Person Perspective
In some cases you might want to modify existing GameObject character navigation or animation to work with getReal3D without using a VR first-person perspective. You will be able to control and observe the GameObject in aVR scene, but you won't witness the scene from its perspective.
This can be accomplished by replacing calls to UnityEngine.Input with getReal3D.Input wherever inputs are provided to the character controller or animation. For example, a script that provides inputs to a Mecanim animatorwas modified as shown below:
// setup h variable as our horizontal input axis //float h = Input.GetAxis("Horizontal"); float h = getReal3D.Input.GetAxis("Yaw"); // setup v variables as our vertical input axis //float v = Input.GetAxis("Vertical"); float v = getReal3D.Input.GetAxis("Forward"); // set our animator's float parameters anim.SetFloat("Speed", v); anim.SetFloat("Direction", h);
Yaw and Forward are default logical input names corresponding to Horizontal and Vertical. They will also map Unity's Horizontal and Vertical input values if you are running without trackd. Please see the Input referencesection below for additional details.
Integrate Game Navigation With First-Person Perspective
In some cases you might want to modify a GameObject's existing character navigation or animation to work with getReal3D, and you also want to see the VR scene from the perspective of the controlled GameObject (orperhaps a perspective slightly above and behind it).
In this situation you should first adapt your navigations or animations to work with getReal3D-managed inputs as described above. Next, you re-parent the getReal3D-managed Camera underneath the GameObject of interest.That will make the VR scene appear relative to the GameObject.
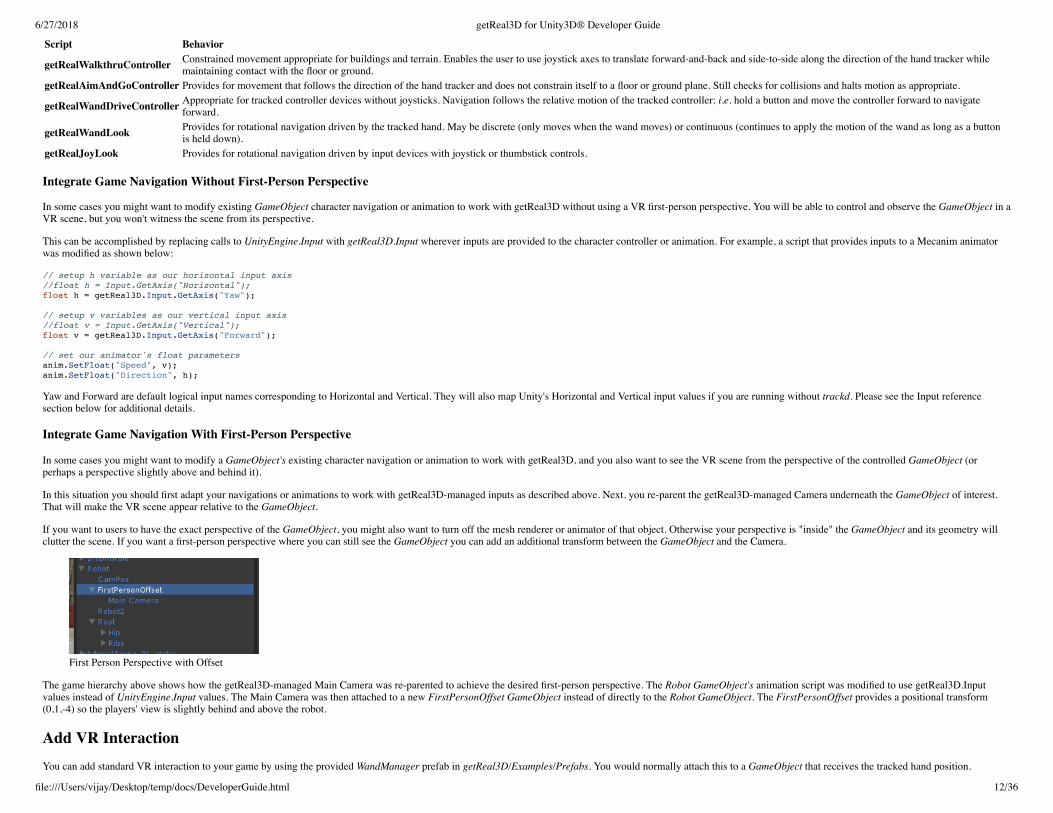
If you want to users to have the exact perspective of the GameObject, you might also want to turn off the mesh renderer or animator of that object. Otherwise your perspective is "inside" the GameObject and its geometry willclutter the scene. If you want a first-person perspective where you can still see the GameObject you can add an additional transform between the GameObject and the Camera.
First Person Perspective with Offset
The game hierarchy above shows how the getReal3D-managed Main Camera was re-parented to achieve the desired first-person perspective. The Robot GameObject's animation script was modified to use getReal3D.Inputvalues instead of UnityEngine.Input values. The Main Camera was then attached to a new FirstPersonOffset GameObject instead of directly to the Robot GameObject. The FirstPersonOffset provides a positional transform(0,1,-4) so the players' view is slightly behind and above the robot.
Add VR InteractionYou can add standard VR interaction to your game by using the provided WandManager prefab in getReal3D/Examples/Prefabs. You would normally attach this to a GameObject that receives the tracked hand position.
First, add a Hand object by creating a new GameObject and attaching the getReal3D/Scripts/Updaters/getRealWandUpdater script. You will probably want to attach this GameObject to The GameObject whose virtual "hand"you wish to control.
Next, attach the WandManager prefab to this GameObject. This will provide interaction modes where a visible wand can point at, collide, or grab objects in the scene.
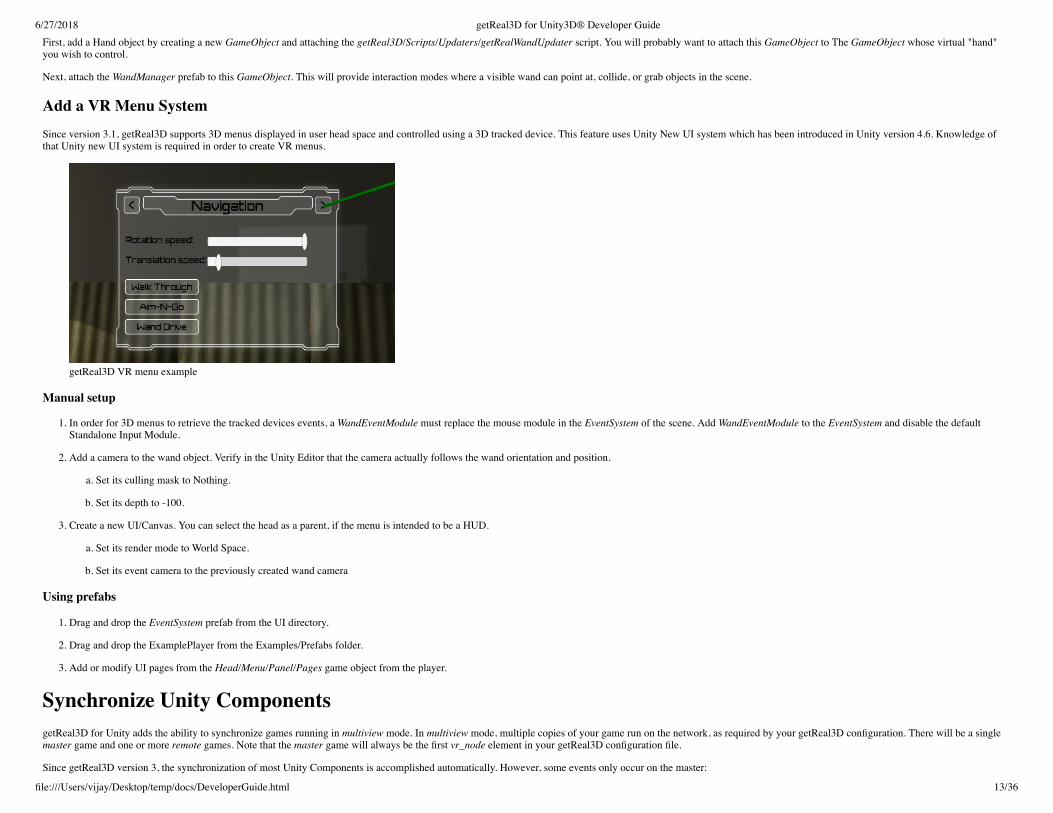
Add a VR Menu SystemSince version 3.1, getReal3D supports 3D menus displayed in user head space and controlled using a 3D tracked device. This feature uses Unity New UI system which has been introduced in Unity version 4.6. Knowledge ofthat Unity new UI system is required in order to create VR menus.
getReal3D VR menu example
Manual setup
1. In order for 3D menus to retrieve the tracked devices events, a WandEventModule must replace the mouse module in the EventSystem of the scene. Add WandEventModule to the EventSystem and disable the defaultStandalone Input Module.
2. Add a camera to the wand object. Verify in the Unity Editor that the camera actually follows the wand orientation and position.
a. Set its culling mask to Nothing.
b. Set its depth to -100.
3. Create a new UI/Canvas. You can select the head as a parent, if the menu is intended to be a HUD.
a. Set its render mode to World Space.
b. Set its event camera to the previously created wand camera
Using prefabs
1. Drag and drop the EventSystem prefab from the UI directory.
2. Drag and drop the ExamplePlayer from the Examples/Prefabs folder.
3. Add or modify UI pages from the Head/Menu/Panel/Pages game object from the player.
Synchronize Unity ComponentsgetReal3D for Unity adds the ability to synchronize games running in multiview mode. In multiview mode, multiple copies of your game run on the network, as required by your getReal3D configuration. There will be a singlemaster game and one or more remote games. Note that the master game will always be the first vr_node element in your getReal3D configuration file.
Since getReal3D version 3, the synchronization of most Unity Components is accomplished automatically. However, some events only occur on the master:
Keyboard and mouse inputs on the master game window
Those events might be desirable when the user has access to the master game window or when an operator is using the master game window and/or keyboard in order to trigger game related actions (loading a new scene,starting a scenario, changing parameters…). Since the script logic that responds to those events is not running on the remote games, an RPC call is used in order to keep everything synchronized.
Simple RPC callThe following sample toggle the state of a game object when a key is pressed on the master game window. In the Update callback, it tests if the game is the master and that the key just got pushed. If so, it generates an RPC callon all remote games and on the master game. This way, the cluster is kept fully synchronized.
using UnityEngine; public class ToggleUsingKeyboard : getReal3D.MonoBehaviourWithRpc { public GameObject target; public KeyCode keyCode; void Update() { if(target != null && getReal3D.Cluster.isMaster && UnityEngine.Input.GetKeyDown(keyCode)) { getReal3D.RpcManager.call("toggleActive"); } } [getReal3D.RPC] void toggleActive() { target.SetActive(!target.activeSelf); } }
Using RPC argumentsAn arbitrary number of arguments can be added to the method provided getReal3D knows how to serialize those arguments. For instance, it is possible to call:
getReal3D currently supports the following data types: enum, bool, byte, char, short, int, uint, string, float, Vector2, Vector3, Quaternion, Color and Color32. Any other data type must be serialized into a string.
RPC limitationsA class using RPC must inherit getReal3D.MonoBehaviourWithRpc.
An RPC method must use the [getReal3D.RPC] attribute.
If a class using RPC is using OnEnable or OnDisable callbacks, then it must call the base function on the MonoBehaviourWithRpc.
Class using RPC must be singletons.
RPC are identified by method name. Therefore, two classes using RPC can't have the same RPC method name.
You can recognize a multiview synchronization issue when object(s) appear differently in your left and right eyes, or appear differently on different screens. To test this more easily, you can position objects so that they overlapmultiple screens. A multiview synchronization error will typically result in a visual discrepancy in the object at the seam between the screens.
Wrap Calls to 2D GUIsIn most cases, displaying a 2D user interface in a 3D VR environment is not appropriate. Typically the user is in an immersive environment and has no access to a mouse or keyboard. If you do want the 2D GUI to remainvisible to users, you will probably not want the GUI to be displayed in both eyes and on every screen, which will happen by default.
We recommend that you modify your Unity 2D GUI to allow getReal3D for Unity to control where your GUI will be displayed. The getReal3D configuration file includes a setting called show_ui which allows users todetermine what screens on the display show your GUI. In order for this setting to work, you must surround your GUI code with a Begin/EndGUI guard as in the following example:
void OnGUI() { if (!getReal3D.GUI.BeginGUI()) return; GUILayout.BeginArea(new Rect(0,0,150,getReal3D.GUI.height)); GUILayout.FlexibleSpace(); GUILayout.BeginVertical("Lights", GUI.skin.window ); foreach( Light l in lights ) { l.enabled = GUILayout.Toggle(l.enabled, l.name ); } GUILayout.EndVertical(); GUILayout.EndArea(); getReal3D.GUI.EndGUI(); }
The BeginGUI() and EndGUI() calls when used in this way ensure that Unity's rendering invocation only happens on nodes designated to show the UI. Note that the height and width fields in getReal3D.GUI can ensure thatthe GUI will be the same size on all screens.
When running in multiview mode, extra steps must be taken to synchronize any state changes made from the GUI (please see Synchronize Unity Components above and the providedgetReal3D/Scripts/GUIs/getRealVRSettingsUI script).
Add a Stereo-Correct SkyboxThe default Unity skybox will not display correctly in mutiview more or in a stereo window. The Project folder getReal3d/Examples/Skybox contains the skeleton of a skybox that will work correctly with getReal3D for Unity.Please follow these instructions to create a skybox for your game:
1. Import a resource for Skybox textures if necessary. For example, you can use the standard Unity skyboxes: Assets → Import Package → Skyboxes.
2. Instantiate the prefab in getReal3d/getRealSkybox either as a child of your navigation GameObject in the Hierarchy view or as a root-level GameObject (then set the getRealSkybox script's Follow Position Transform tothat of the navigation GameObject).
3. Create a new material for each face of the skybox: back, front, left, right, up, down
a. Set the shader for each material to getReal3d/Materials/getReal3D Skybox or use the supplied material of the same name.
b. Set the texture for each material to the desired texture, for example from Standard Assets/Skyboxes/Textues/DawnDusk. Please note that the face names in the getReal3D Skybox prefab maintain the Unity skyboxtexture naming convention (with the camera facing along the +Z axis with +Y up, the Left texture appears to the right).
c. Attach the material to the skybox faces in the game hierarchy under MainCamera/skybox/skybox_mesh.
You may also need to adjust the position of MainCamera/skybox/skybox_mesh to achieve the desired effect.
Synchronize Game Level LoadingTo change levels in a multiview game, either call Application.LoadLevel or Application.LoadLevelAdditive. Do not use asynchronous loading calls (Application.LoadLevelAsync and Application.LoadLevelAdditiveAsync) sincethey can behave differently on each nodes of the cluster.
In multiview mode, getReal3D for Unity provides a mechanism for determining which Unity instances produce sound. By default, it is the first <vr_node\> host in the configuration, but this can be changed by use of theplays_audio attribute.
Random number generationIf the game is generating random numbers, the random seed must be initialized using the same seed across the cluster. Mind that using the system clock as a seed won't work since it won't return the same value on every node ofthe cluster.
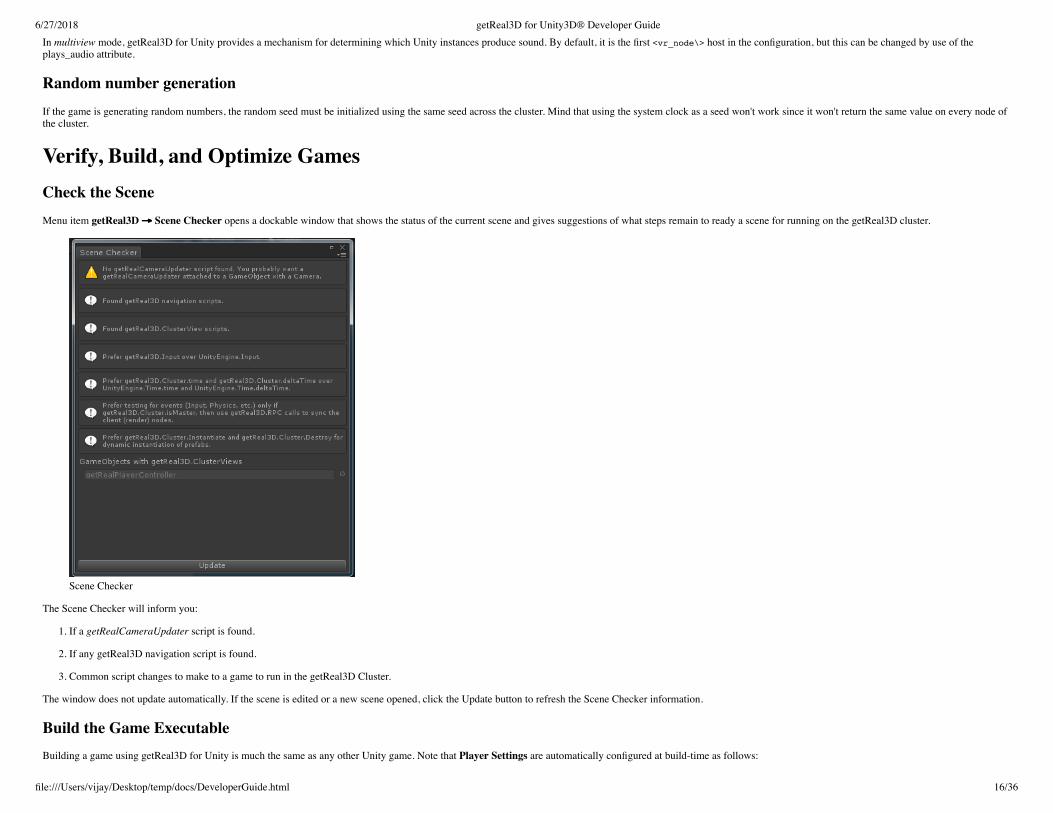
Verify, Build, and Optimize GamesCheck the SceneMenu item getReal3D → Scene Checker opens a dockable window that shows the status of the current scene and gives suggestions of what steps remain to ready a scene for running on the getReal3D cluster.
Scene Checker
The Scene Checker will inform you:
1. If a getRealCameraUpdater script is found.
2. If any getReal3D navigation script is found.
3. Common script changes to make to a game to run in the getReal3D Cluster.
The window does not update automatically. If the scene is edited or a new scene opened, click the Update button to refresh the Scene Checker information.
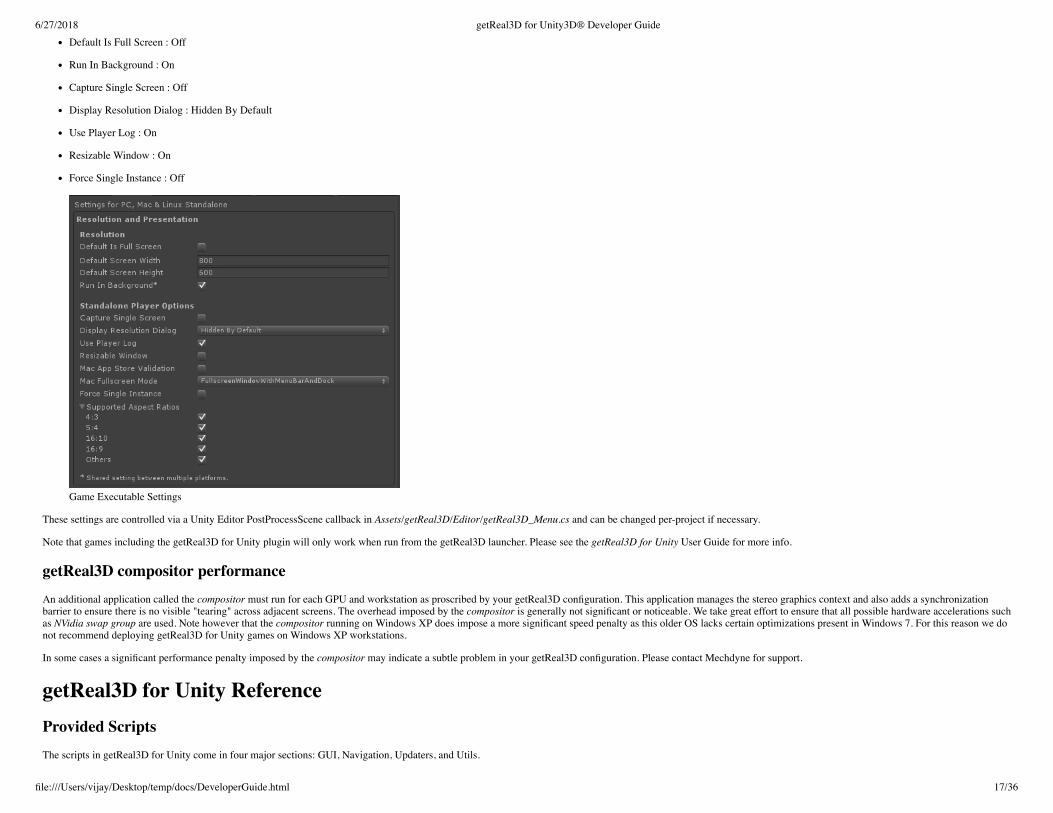
Build the Game ExecutableBuilding a game using getReal3D for Unity is much the same as any other Unity game. Note that Player Settings are automatically configured at build-time as follows:
These settings are controlled via a Unity Editor PostProcessScene callback in Assets/getReal3D/Editor/getReal3D_Menu.cs and can be changed per-project if necessary.
Note that games including the getReal3D for Unity plugin will only work when run from the getReal3D launcher. Please see the getReal3D for Unity User Guide for more info.
getReal3D compositor performanceAn additional application called the compositor must run for each GPU and workstation as proscribed by your getReal3D configuration. This application manages the stereo graphics context and also adds a synchronizationbarrier to ensure there is no visible "tearing" across adjacent screens. The overhead imposed by the compositor is generally not significant or noticeable. We take great effort to ensure that all possible hardware accelerations suchas NVidia swap group are used. Note however that the compositor running on Windows XP does impose a more significant speed penalty as this older OS lacks certain optimizations present in Windows 7. For this reason we donot recommend deploying getReal3D for Unity games on Windows XP workstations.
In some cases a significant performance penalty imposed by the compositor may indicate a subtle problem in your getReal3D configuration. Please contact Mechdyne for support.
getReal3D for Unity ReferenceProvided ScriptsThe scripts in getReal3D for Unity come in four major sections: GUI, Navigation, Updaters, and Utils.
The getRealCameraUpdater script is usually attached to the MainCamera in the game. It positions and orients the camera according to head tracking (if tracking is available and Apply Head Position and Apply Head Rotationare enabled, respectively), and applies the camera projection necessary for the assigned screen geometry (if Apply Camera Projection is enabled).
When a configuration requires multiple cameras (due to the presence of multiple <screen_ref\> elements), getRealCameraUpdater will create any necessary additional cameras, either as a clone of an attached Camera Prefabobject, or as a clone of its own GameObject if the Camera Prefab is empty.
The camera viewport can be fully set by getReal3D (Automatic Viewport Type), can use the User Viewport as a region inside the automatic getReal3D viewport (UserModulated), or can be overridden by the user (UserOverride,but this is rarely desirable). This is especially useful to support multiple tracked cameras per eye.
getReal3D/Scripts/Updaters/getRealHeadUpdater
The getRealHeadUpdater script will update the attached GameObject to represent the position and orientation of the tracked head.
getReal3D/Scripts/Updaters/getRealWandUpdater
The getRealWandUpdater script will update the attached GameObject to represent the position and orientation of the tracked hand/wand. This is useful for providing a reference point for grabbing, pointing, and other userinteractions.
The getRealWalkthruController provides for constrained movement appropriate for most buildings and terrain. It enables the user to use joystick axes to translate forward-and-back and side-to-side along the direction of the handtracker while maintaining contact with the floor or ground (this assumes the building/terrain GameObject has a Collider attached), and return to the last position where the user was touching the floor/ground.
By default, the navigation follows the tracked Wand (e.g. point the wand to your right and push forward on the Forward Axis and you move to your right in the virtual world). This can be changed to follow the tracked Head, oran arbitrary reference Transform. If the Nav Follows variable is set to "Reference" but no Transform is specified, navigation will follow the Transform of the GameObject to which the getRealWalkthruController is attached.
Script Variable PurposeTranslation Speed speed of motion in m/sForward Axis valuator name that controls forward motion
Script Variable PurposeStrafe Axis valuator name that controls sideways motionReset Button button name that controls "reset to ground"Jump Button button name that controls jumpingNav Speed Button button name that controls if User Scale is applied to translation speedNav Follows enumeration selecting what Transform navigation follows: Head, Wand, ReferenceNav Reference Reference to the GameObject Transform that defines the navigation direction
The getRealAimAndGoController script provides for movement that follows the direction of the hand tracker and does not constrain itself to a floor or ground plane. The getRealAimAndGoController script does still check forcollisions and halt motion as appropriate. This navigation may be useful for very large models where more constrained navigation is cumbersome, or for navigation and inspection of non-building, non-terrain models (e.g.manufacturing models, data exploration).
By default, the navigation follows the tracked Wand (e.g. point the wand to your right and push forward on the Forward Axis and you move to your right in the virtual world). This can be changed to follow the tracked Head, oran arbitrary reference Transform. If the Nav Follows variable is set to "Reference" but no Transform is specified, navigation will follow the Transform of the GameObject to which the getRealAimAndGoController is attached.
Script Variable PurposeTranslation Speed speed of motion in m/sForward Axis valuator name that controls forward motionStrafe Axis valuator name that controls sideways motionReset Button button name that controls "reset to ground"Nav Speed Button button name that controls if User Scale is applied to translation speedNav Follows enumeration selecting what Transform navigation follows: Head, Wand, ReferenceNav Reference Reference to the GameObject Transform that defines the navigation direction
The getRealWandDriveController script provides for movement that follows the relative motion the hand tracker. This navigation may be useful for systems where the tracked wand has buttons but no joysticks. When theActivation Button is held, the relative position of the wand (from the initial position where the button was first pressed) drives the motion of navigation.
Script Variable PurposeTranslation Speed Maximum speed of motion in m/sWand Drive Dead Zone Relative position change of less than DeadZone (meters) is ignored.Activation Button The name of the getReal3D.Input button that activates this navigation.Reset Button The Button name that controls "reset to ground"
Script Variable PurposeJump Button The Button name that controls jumping
getReal3D/Scripts/Navigation/getRealJoyLook
getRealJoyLook
The getRealJoyLook script provides for rotational navigation driven by input devices with joystick or thumbstick controls. It enables the user to rotate around the X, Y, or Z axes (configurable, up to 2 axes), to control rotationspeed, and whether rotation is applied in world-space or local-space. Although a single instance of the getRealJoyLook script controls no more than 2 axes of rotation, multiple instances may be attached to a hierarchy ofGameObjects to control and fine-tune full 3-degrees-of-freedom rotations.
Script Variable PurposeRotation Speed speed of motion in degrees/sRotation Follows enumeration selecting the Transform defining frame of the rotation: Head, Wand, ReferenceRotation Follows Reference Reference to the GameObject Transform that defines the rotation frameRotation Around enumeration selecting the Transform at the center of the applied rotation: Head, Wand, ReferenceRotation Around Reference Reference to the GameObject Transform that defines the rotation centerAxes which axes this instance of the script provides rotation aroundFirst Axis valuator name that controls rotation about the first axisSecond Axis valuator name that controls rotation about the second axisReset Button button name that controls "reset to vertical"
getReal3D/Scripts/Navigation/getRealWandLook
The getRealWandLook script provides for rotational navigation driven by the tracked hand. Once the Activation Button is pressed, the user orientation changes as the hand orientation changes (e.g. as the hand rotates left, thenavigation orientation rotates left).
Script Variable PurposeRotation Around enumeration selecting the Transform rotation is around: Head, Wand, ReferenceRotation Reference Reference to the GameObject Transform that defines the rotation centerAxes which axes this instance of the script provides rotation aroundActivation Button button name that activates rotationReset Button button name that controls "reset to vertical"Continuous Drive If enabled, apply the relative orientation difference (current – initial) of the wand continuously. If not enabled, the orientation changes only if the wand orientation changes.Wand Look Dead Zone If the wand's orientation is within DeadZone degrees of its initial, do not apply the difference.Rotation Speed Maximum rotation speed (when Continuous Drive is enabled)
GUIs
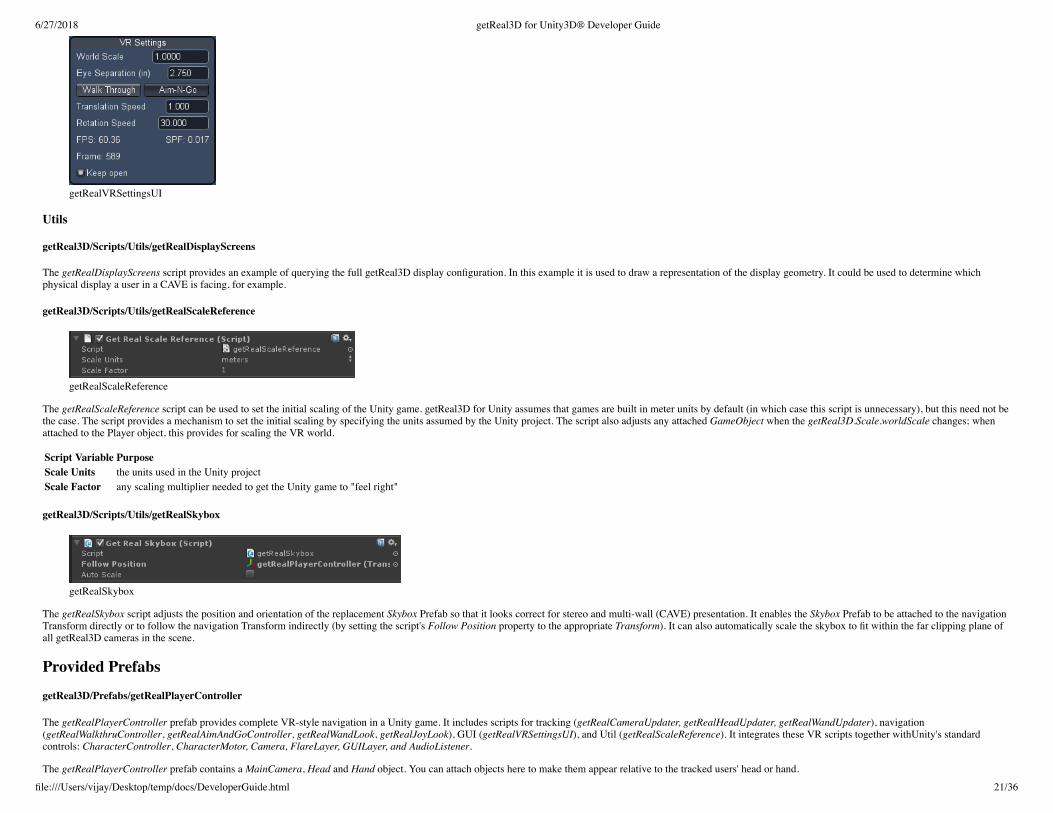
getReal3D/Scripts/GUIs/getRealVRSettingsUI
The getRealVRSettingsUI script provides an example of controlling game behavior from traditional 2D UI. It uses Unity's GUI to control VR and navigation settings, and to display runtime information.
The getRealDisplayScreens script provides an example of querying the full getReal3D display configuration. In this example it is used to draw a representation of the display geometry. It could be used to determine whichphysical display a user in a CAVE is facing, for example.
getReal3D/Scripts/Utils/getRealScaleReference
getRealScaleReference
The getRealScaleReference script can be used to set the initial scaling of the Unity game. getReal3D for Unity assumes that games are built in meter units by default (in which case this script is unnecessary), but this need not bethe case. The script provides a mechanism to set the initial scaling by specifying the units assumed by the Unity project. The script also adjusts any attached GameObject when the getReal3D.Scale.worldScale changes; whenattached to the Player object, this provides for scaling the VR world.
Script Variable PurposeScale Units the units used in the Unity projectScale Factor any scaling multiplier needed to get the Unity game to "feel right"
getReal3D/Scripts/Utils/getRealSkybox
getRealSkybox
The getRealSkybox script adjusts the position and orientation of the replacement Skybox Prefab so that it looks correct for stereo and multi-wall (CAVE) presentation. It enables the Skybox Prefab to be attached to the navigationTransform directly or to follow the navigation Transform indirectly (by setting the script's Follow Position property to the appropriate Transform). It can also automatically scale the skybox to fit within the far clipping plane ofall getReal3D cameras in the scene.
Provided Prefabs
getReal3D/Prefabs/getRealPlayerController
The getRealPlayerController prefab provides complete VR-style navigation in a Unity game. It includes scripts for tracking (getRealCameraUpdater, getRealHeadUpdater, getRealWandUpdater), navigation(getRealWalkthruController, getRealAimAndGoController, getRealWandLook, getRealJoyLook), GUI (getRealVRSettingsUI), and Util (getRealScaleReference). It integrates these VR scripts together withUnity's standardcontrols: CharacterController, CharacterMotor, Camera, FlareLayer, GUILayer, and AudioListener.
The getRealPlayerController prefab contains a MainCamera, Head and Hand object. You can attach objects here to make them appear relative to the tracked users' head or hand.
The WandManager prefab demonstrates three possible wand behaviors. The green wand provides a simple pointer (and a reference for the direction of forward navigation under getRealWalkthruController andgetRealAimAndGoController). The blue wand provides a grabbing interaction. The red wand provides a simple collider interaction. The ChangeWand button selects the active wand, and the WandButton button grabs when theblue grabbing wand is active over an object with a Rigidbody or Collider.
The two Skybox prefabs work with the getRealSkybox script to provide examples of correcting for stereo and multi-wall (CAVE) presentation of skyboxes in Unity.
InputThe getReal3D for Unity plugin provides an input class (getReal3D.Input) that enables reading from Mechdyne's trackd library in your scripts and accessing getReal3D camera information. trackd provides access to thesensors, buttons and valuators available in your VR environment. Note that when running in the editor, the trackd simulator supplies two sensors, eleven buttons, and four valuators for testing.
Since getReal3D version 3.2, it is possible to retrieve the values of the cluster master local keyboard and joysticks. Master keyboard and joystick(s) state can be queried using getReal3D API or simply using the logical inputnames.
The API in getReal3D.Input includes the following properties to access raw tracker and controller data:
Property Meaningsensors List of 6DOF tracking datavaluators List of valuators (axes) from all available controllersbuttons List of buttons from all available controllersheadIndex The index of the head sensor in the sensors list.wandIndex The index of the wand sensor in the sensors list.head The head sensor.wand The wand sensor.cameras List of camera sensors provided in the current Unity instance.
Logical Inputs
The getReal3D.Input class also provides an interface to access tracking system data and shared master inputs by logical name. Buttons, valuators, and sensors have default names which may be overridden in the getReal3D forUnity Configuration File.
The defaults also provide mappings to Unity's axis and button inputs available from UnityEngine.Input. This enables your game to work with normal Unity desktop inputs when trackd is not available.
In addition, the following methods in getReal3D.Input are available to obtain logical input values:
Method Meaning
GetButtonGetButtonUpGetButtonDown
Get the state of a button by name or by its ButtonCode
GetKeyGetKeyDownGetKeyUp
Get the state of a key by its VirtualKeyCode
GetAxisGetAxisRaw Get the state of a valuator (axis) by name or by its AxisCode
Get the state of a sensor by name. Get the state of a camera provided in the current Unity instance.
Logical Inputs configuration
getReal3D for Unity defines logicial input values at three different level, each one overriding the previous configuration in case of conflict:
Plugin default: The default values are defined in the getReal3D plugin itself. They are stored in the Assets/getReal3D/Resources/default_mappings.xml. User shouldn't modify this file since it might be replaced uponplugin update.Game default: Those values are stored in the Assets/Resources/mappings.xml file. They can be edited manually or using the getReal3D Input Editor.Cluster configuration: The getReal3D configuration file also contain mapping definitions. Those ultimately override the game and plugin mappings. See the configuration guide for more information.
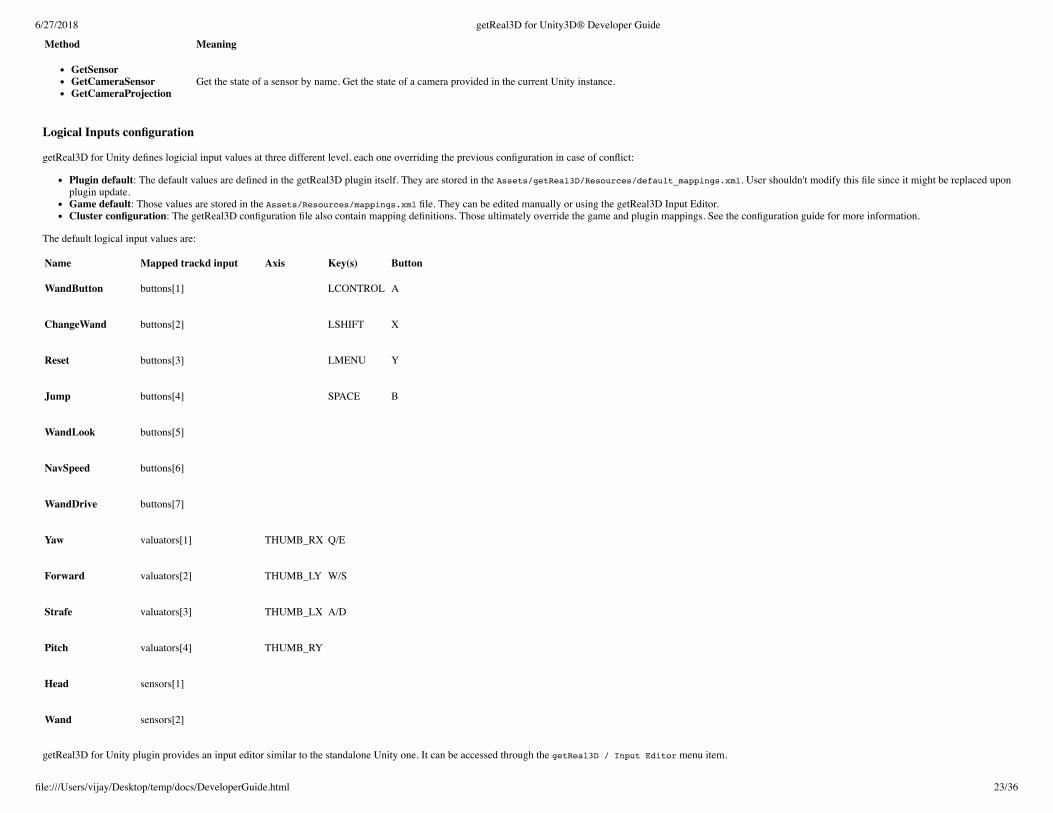
The default logical input values are:
Name Mapped trackd input Axis Key(s) Button
WandButton buttons[1] LCONTROL A
ChangeWand buttons[2] LSHIFT X
Reset buttons[3] LMENU Y
Jump buttons[4] SPACE B
WandLook buttons[5]
NavSpeed buttons[6]
WandDrive buttons[7]
Yaw valuators[1] THUMB_RX Q/E
Forward valuators[2] THUMB_LY W/S
Strafe valuators[3] THUMB_LX A/D
Pitch valuators[4] THUMB_RY
Head sensors[1]
Wand sensors[2]
getReal3D for Unity plugin provides an input editor similar to the standalone Unity one. It can be accessed through the getReal3D / Input Editor menu item.
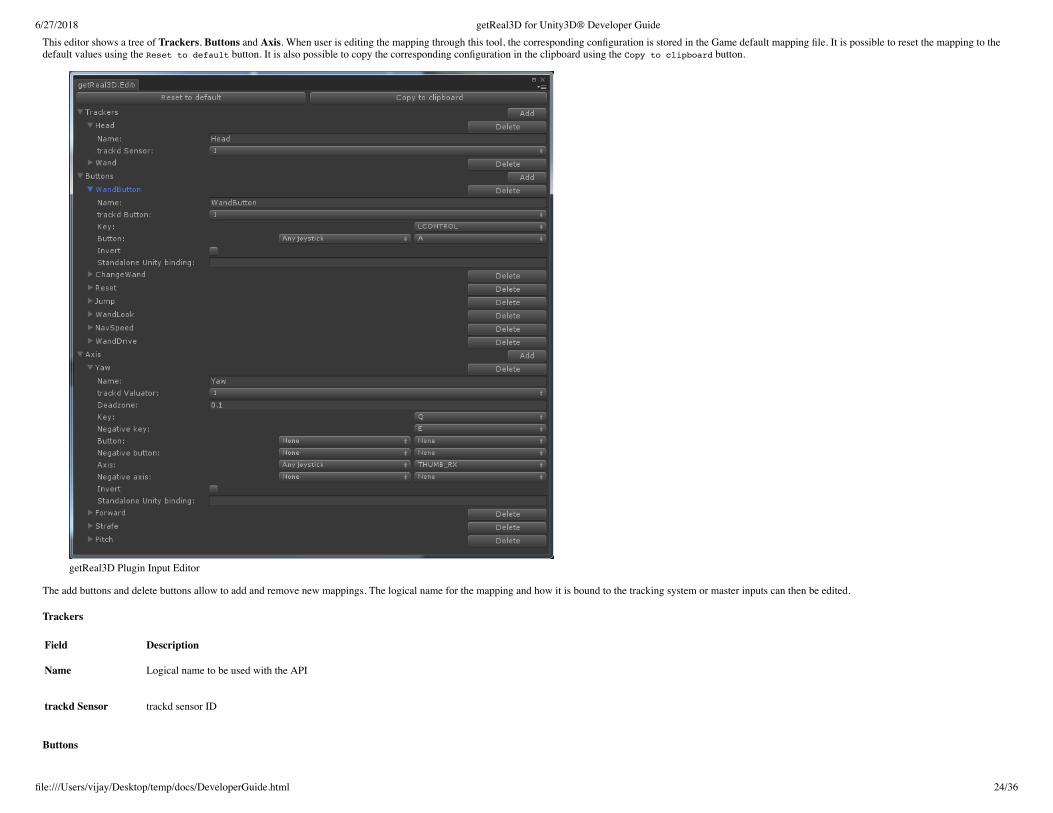
This editor shows a tree of Trackers, Buttons and Axis. When user is editing the mapping through this tool, the corresponding configuration is stored in the Game default mapping file. It is possible to reset the mapping to thedefault values using the Reset to default button. It is also possible to copy the corresponding configuration in the clipboard using the Copy to clipboard button.
getReal3D Plugin Input Editor
The add buttons and delete buttons allow to add and remove new mappings. The logical name for the mapping and how it is bound to the tracking system or master inputs can then be edited.
Button Name Script UseWandButton GrabbingWand Grab an object with the grabbing wandChangeWand WandManager Cycles through available wandsReset getRealWandLook getRealJoyLook getRealWalkThruController getRealAimAndGoController Return navigation orientation to "upright" and reposition to last-known contact with the "ground"Jump getRealWalkThruController Jump while navigatingWandLook getRealWandLook Navigation orientation rotates with wand
Joystick buttons name can be restricted to a specific joystick identifier:
START maps to any joystick.JOYSTICK_START maps to any joystick.JOYSTICK1_START maps to the first joystick only.JOYSTICK2_START maps to the second joystick only.JOYSTICK3_START maps to the third joystick only.JOYSTICK4_START maps to the forth joystick only.
Joystick axis name can be restricted to a specific joystick identifier:
THUMB_LX maps to any joystick.JOYSTICK_THUMB_LX maps to any joystick.JOYSTICK1_THUMB_LX maps to the first joystick only.JOYSTICK2_THUMB_LX maps to the second joystick only.JOYSTICK3_THUMB_LX maps to the third joystick only.JOYSTICK4_THUMB_LX maps to the forth joystick only.
Support InformationFor getReal3D product support issues, please contact Mechdyne Software Support: