GETTING STARTED GUIDE Table of Contents Browsers .................................................................................................................... 2 Creating Your Administration Lists ............................................................................. 3 Importing Your Data......................................................................................................... 3 Entering Your Data Manually ........................................................................................... 6 Importing Your IFTA Fuel Receipts ............................................................................. 8 Importing Your Logo .................................................................................................. 9 Users ........................................................................................................................ 10 Adding Users ................................................................................................................. 10 Setting Permissions ....................................................................................................... 12 Company Preferences .............................................................................................. 14 Account Tab .................................................................................................................. 15 Address Tab .................................................................................................................. 16 Settings Tab .................................................................................................................. 17 Functionality Tab ........................................................................................................... 18 Notes Tab ...................................................................................................................... 19 IFTA Tab........................................................................................................................ 20 QuickBooks Exports ................................................................................................. 21 Customer Invoices ......................................................................................................... 21 Carrier Payables ............................................................................................................ 21 Working With Loads................................................................................................. 22 Changing a Load’s Status.............................................................................................. 22 Duplicating Loads .......................................................................................................... 23 Unlocking Loads ............................................................................................................ 26 Support and Training ............................................................................................... 27 Free Support and Training ............................................................................................. 27 Training Videos .............................................................................................................. 27 Contact Us ..................................................................................................................... 28
Transcript
GETTING STARTED GUIDE Table of Contents Browsers .................................................................................................................... 2
Creating Your Administration Lists ............................................................................. 3
Importing Your Data ......................................................................................................... 3
Entering Your Data Manually ........................................................................................... 6
Importing Your IFTA Fuel Receipts ............................................................................. 8
Importing Your Logo .................................................................................................. 9
Support and Training ............................................................................................... 27
Free Support and Training ............................................................................................. 27
Training Videos .............................................................................................................. 27
Contact Us ..................................................................................................................... 28
Browsers ITS Dispatch works best with Google Chrome or Mozilla Firefox. We do not recommend using Internet Explorer or Safari. The recommended browsers are free and can be downloaded from the following locations: Google Chrome https://www.google.ca/chrome/browser/desktop/ Mozilla Firefox https://www.mozilla.org/en-US/firefox/new/ There are no adjustments required for the default settings for either of these browsers and once downloaded and installed, they are ready to use with ITS Dispatch.
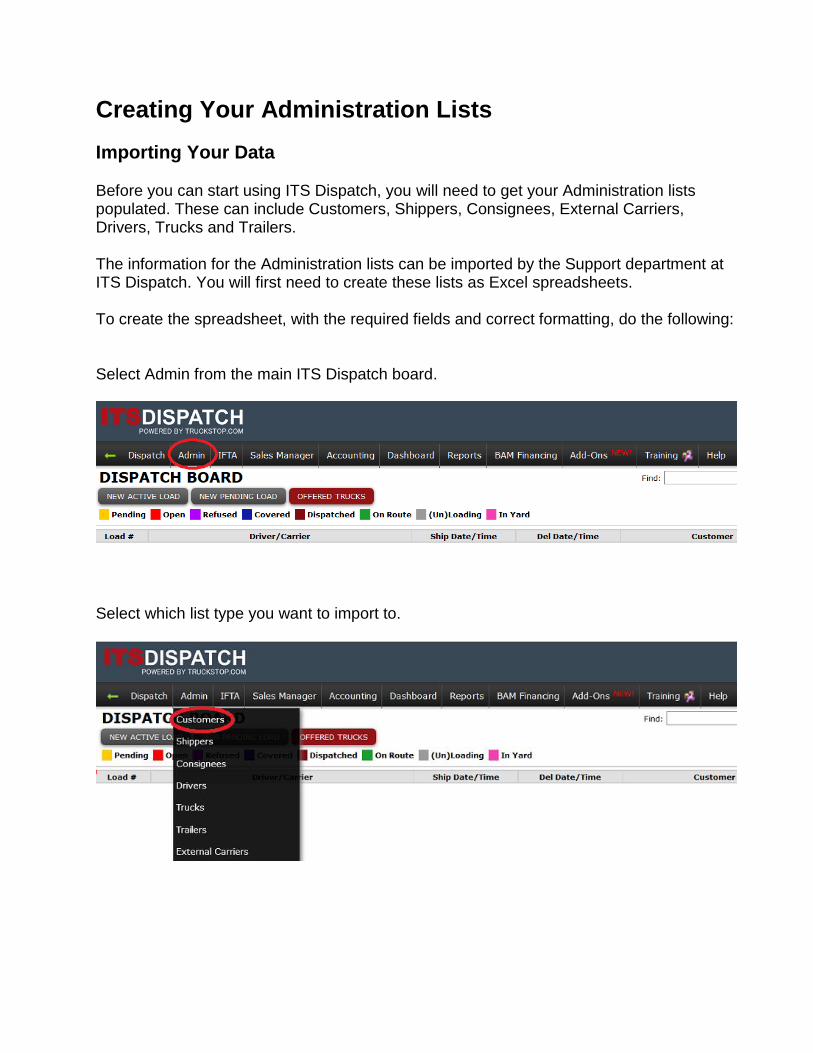
Importing Your Data Before you can start using ITS Dispatch, you will need to get your Administration lists populated. These can include Customers, Shippers, Consignees, External Carriers, Drivers, Trucks and Trailers. The information for the Administration lists can be imported by the Support department at ITS Dispatch. You will first need to create these lists as Excel spreadsheets. To create the spreadsheet, with the required fields and correct formatting, do the following: Select Admin from the main ITS Dispatch board.
Select which list type you want to import to.
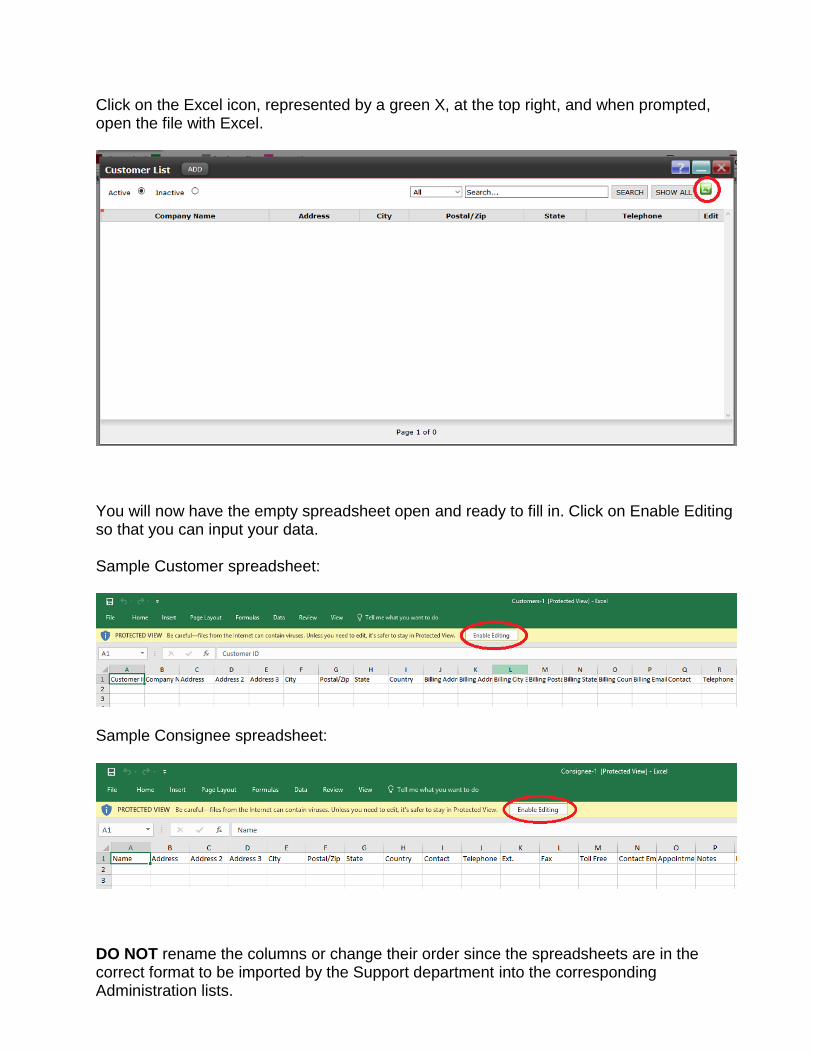
Click on the Excel icon, represented by a green X, at the top right, and when prompted, open the file with Excel.
You will now have the empty spreadsheet open and ready to fill in. Click on Enable Editing so that you can input your data. Sample Customer spreadsheet:
Sample Consignee spreadsheet:
DO NOT rename the columns or change their order since the spreadsheets are in the correct format to be imported by the Support department into the corresponding Administration lists.
NOTE: Each piece of information needs to be in its own column. So make sure that street address is in one column, city in one column, state in one column, zip code in one column, etc. Once you are done entering your information, save it as an Excel spreadsheet with a meaningful name, such as customers list, carriers list, etc. Repeat the above process for all of the lists you wish to import. Once you have all of your lists ready for importing, email them as attachments to [email protected] and include your account number in the Subject. If you have any questions about preparing the information for importing, please email the Support department at [email protected] or call 1-888-338-9656 ext. 2 during our regular business hours of 9:00 to 5:00 EST.
Please allow up to 48 hours for your data to be imported. You will receive a
confirmation email when the process has been completed.
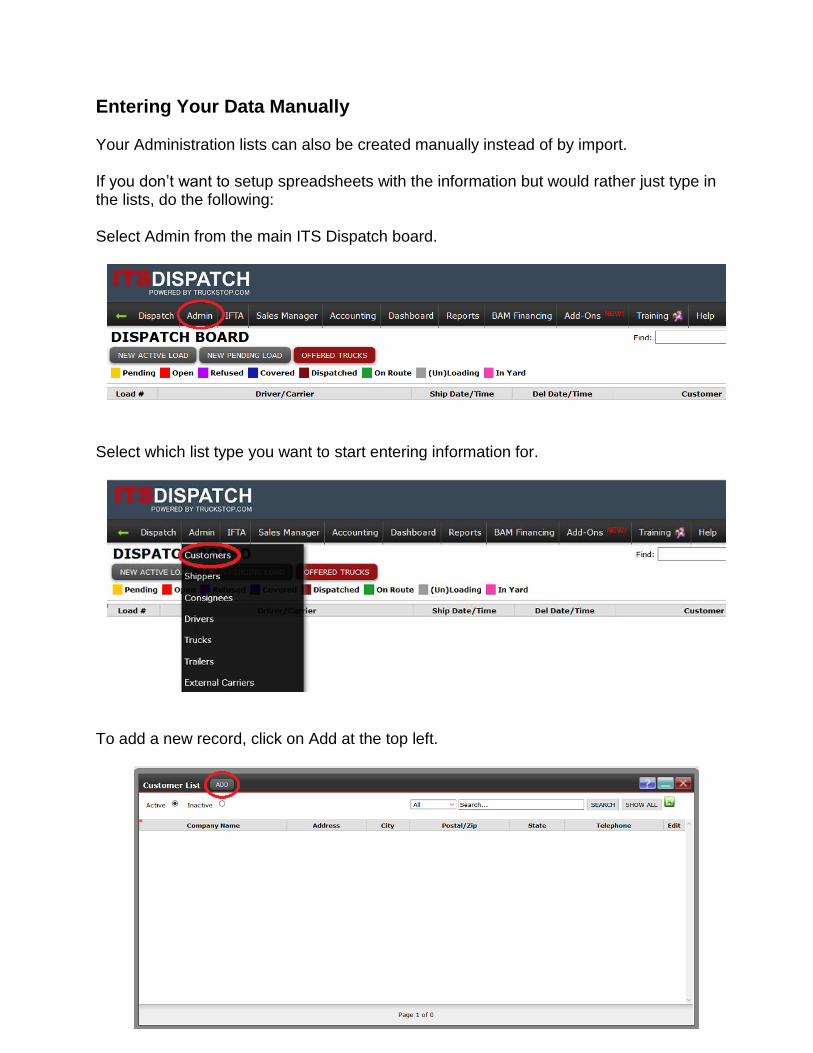
Entering Your Data Manually Your Administration lists can also be created manually instead of by import. If you don’t want to setup spreadsheets with the information but would rather just type in the lists, do the following: Select Admin from the main ITS Dispatch board.
Select which list type you want to start entering information for.
To add a new record, click on Add at the top left.
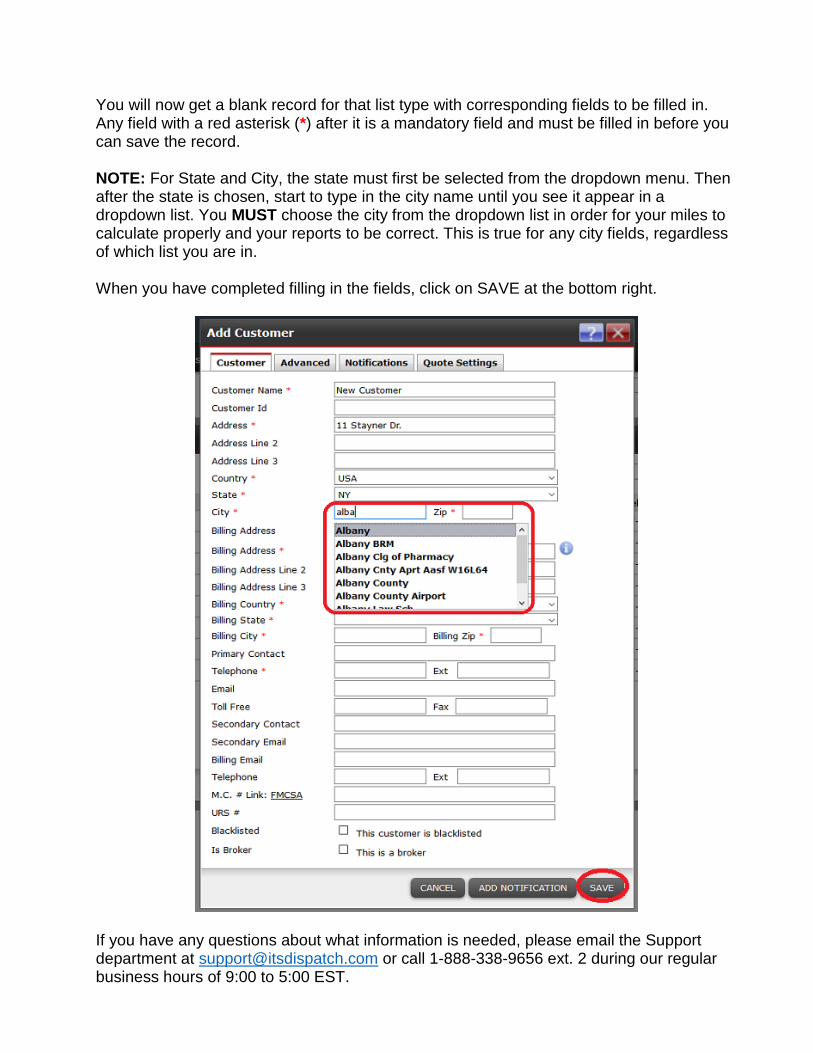
You will now get a blank record for that list type with corresponding fields to be filled in. Any field with a red asterisk (*) after it is a mandatory field and must be filled in before you can save the record. NOTE: For State and City, the state must first be selected from the dropdown menu. Then after the state is chosen, start to type in the city name until you see it appear in a dropdown list. You MUST choose the city from the dropdown list in order for your miles to calculate properly and your reports to be correct. This is true for any city fields, regardless of which list you are in. When you have completed filling in the fields, click on SAVE at the bottom right.
If you have any questions about what information is needed, please email the Support department at [email protected] or call 1-888-338-9656 ext. 2 during our regular business hours of 9:00 to 5:00 EST.
Importing Your IFTA Fuel Receipts Your company’s IFTA Fuel Receipts can be imported by the Support department at ITS Dispatch. You will first need to create these lists as Excel spreadsheets. To create the spreadsheet, with the required fields and correct formatting, you will need to include the following: Truck ID Receipt Date (must be in YYYY-MM-DD format) State where fuel was purchased (must be the 2 character state abbreviation) Volume of fuel purchased Amount spent for the fuel You can also include: Receipt Number Station where fuel was purchased Once you are done entering your information, save it as an Excel spreadsheet with a meaningful name, such as fuel receipts list. NOTE: All fuel receipts for all of your trucks for any one IFTA quarter can be on one list. Just make sure that you include the Truck ID so that the system knows which truck to apply the receipts against. Once you have your fuel receipts list ready for importing, email it as an attachment to [email protected] and include your account number in the Subject. If you have any questions about preparing the information for importing, please email the Support department at [email protected] or call 1-888-338-9656 ext. 2 during our regular business hours of 9:00 to 5:00 EST.
Please allow up to 48 hours for your data to be imported. You will receive a
confirmation email when the process has been completed.
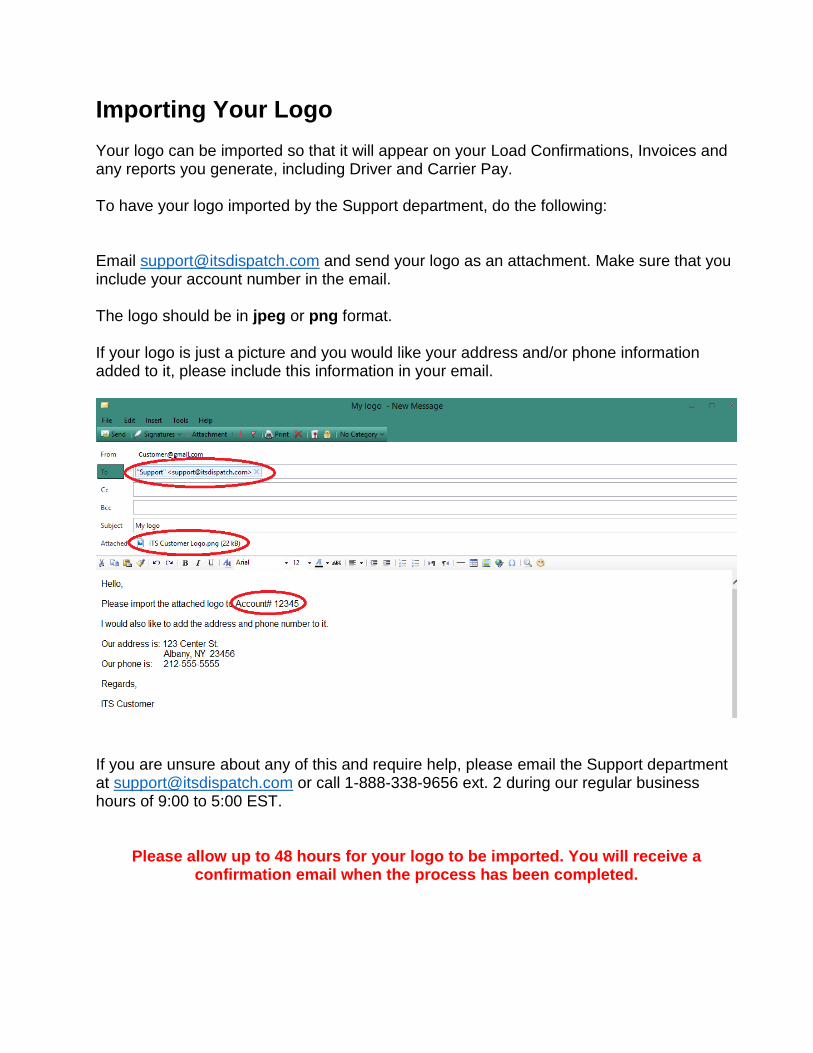
Importing Your Logo Your logo can be imported so that it will appear on your Load Confirmations, Invoices and any reports you generate, including Driver and Carrier Pay. To have your logo imported by the Support department, do the following: Email [email protected] and send your logo as an attachment. Make sure that you include your account number in the email. The logo should be in jpeg or png format. If your logo is just a picture and you would like your address and/or phone information added to it, please include this information in your email.
If you are unsure about any of this and require help, please email the Support department at [email protected] or call 1-888-338-9656 ext. 2 during our regular business hours of 9:00 to 5:00 EST.
Please allow up to 48 hours for your logo to be imported. You will receive a confirmation email when the process has been completed.
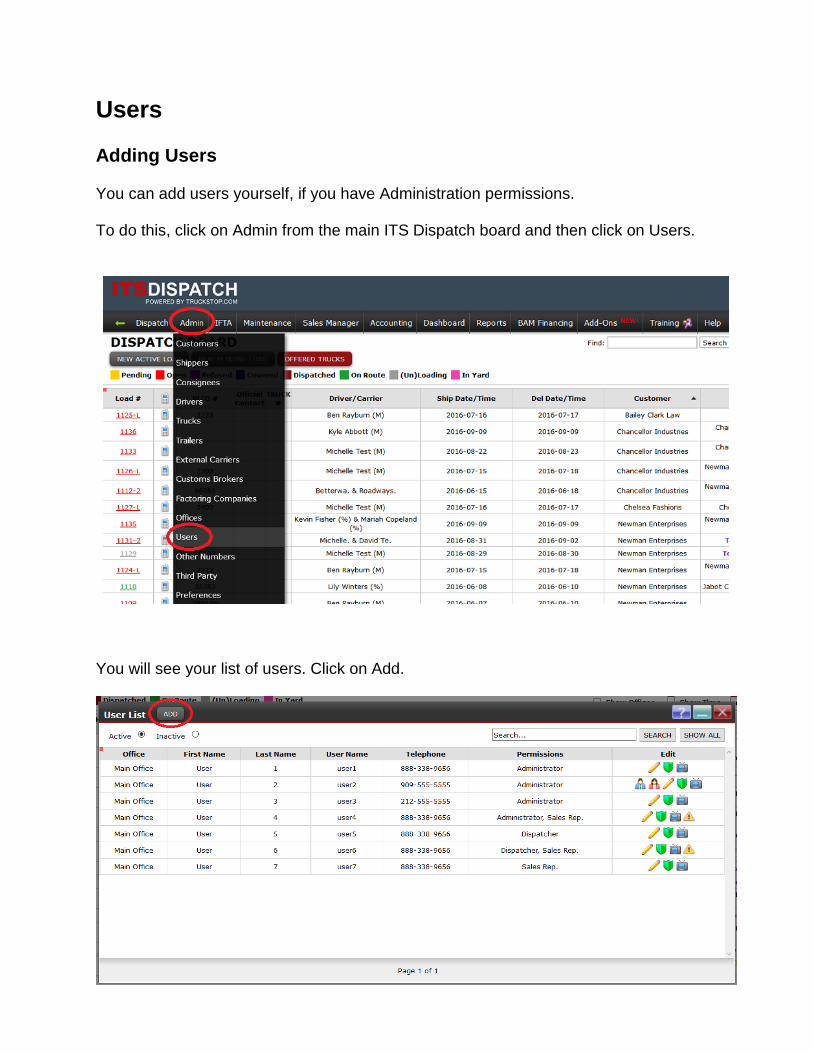
Users Adding Users You can add users yourself, if you have Administration permissions. To do this, click on Admin from the main ITS Dispatch board and then click on Users.
You will see your list of users. Click on Add.
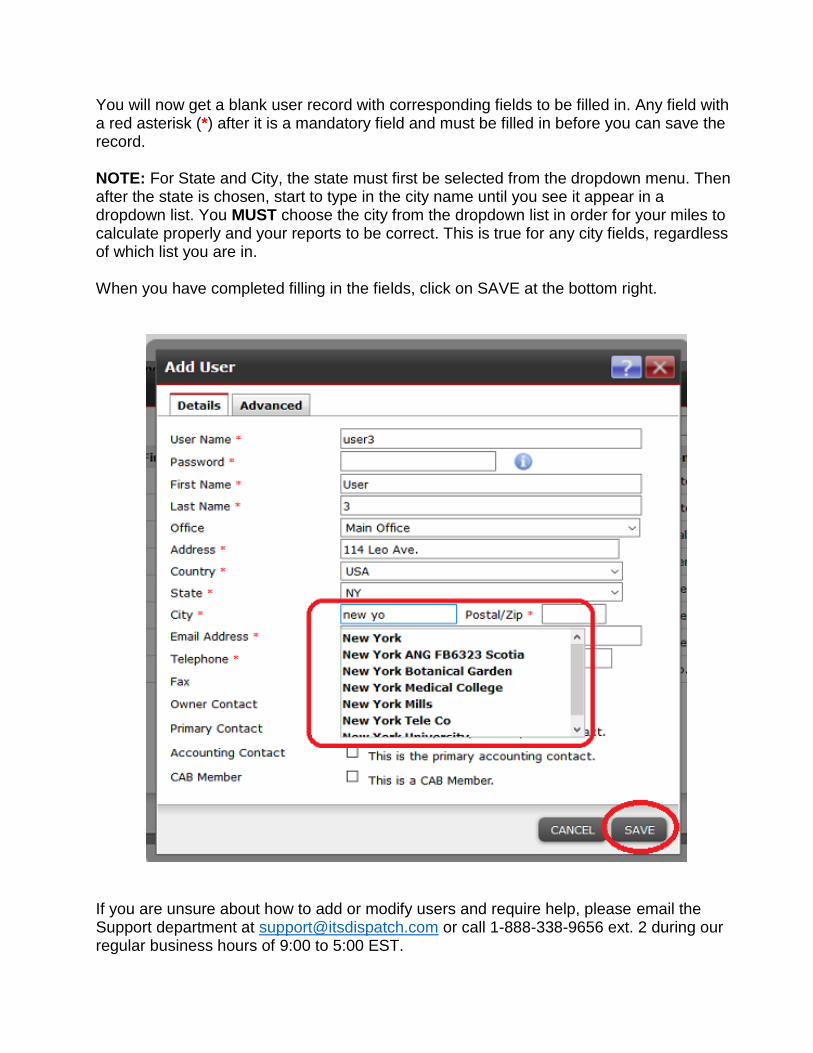
You will now get a blank user record with corresponding fields to be filled in. Any field with a red asterisk (*) after it is a mandatory field and must be filled in before you can save the record. NOTE: For State and City, the state must first be selected from the dropdown menu. Then after the state is chosen, start to type in the city name until you see it appear in a dropdown list. You MUST choose the city from the dropdown list in order for your miles to calculate properly and your reports to be correct. This is true for any city fields, regardless of which list you are in. When you have completed filling in the fields, click on SAVE at the bottom right.
If you are unsure about how to add or modify users and require help, please email the Support department at [email protected] or call 1-888-338-9656 ext. 2 during our regular business hours of 9:00 to 5:00 EST.
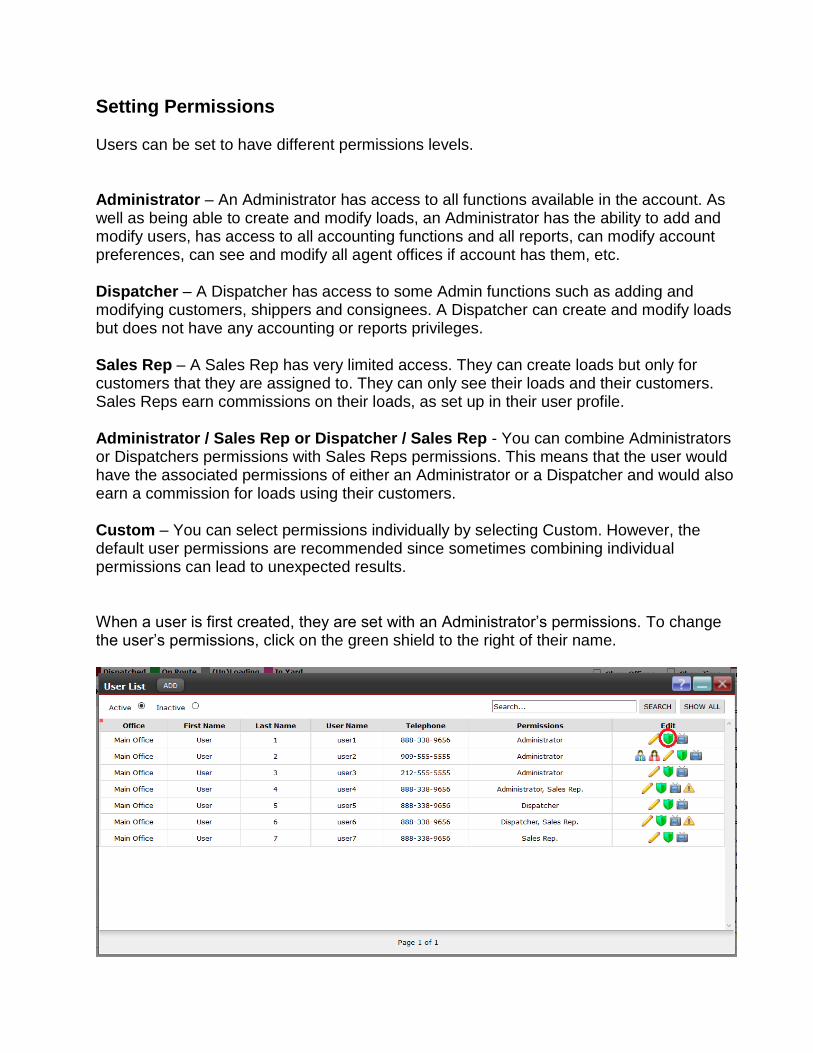
Setting Permissions Users can be set to have different permissions levels. Administrator – An Administrator has access to all functions available in the account. As well as being able to create and modify loads, an Administrator has the ability to add and modify users, has access to all accounting functions and all reports, can modify account preferences, can see and modify all agent offices if account has them, etc. Dispatcher – A Dispatcher has access to some Admin functions such as adding and modifying customers, shippers and consignees. A Dispatcher can create and modify loads but does not have any accounting or reports privileges. Sales Rep – A Sales Rep has very limited access. They can create loads but only for customers that they are assigned to. They can only see their loads and their customers. Sales Reps earn commissions on their loads, as set up in their user profile. Administrator / Sales Rep or Dispatcher / Sales Rep - You can combine Administrators or Dispatchers permissions with Sales Reps permissions. This means that the user would have the associated permissions of either an Administrator or a Dispatcher and would also earn a commission for loads using their customers. Custom – You can select permissions individually by selecting Custom. However, the default user permissions are recommended since sometimes combining individual permissions can lead to unexpected results. When a user is first created, they are set with an Administrator’s permissions. To change the user’s permissions, click on the green shield to the right of their name.
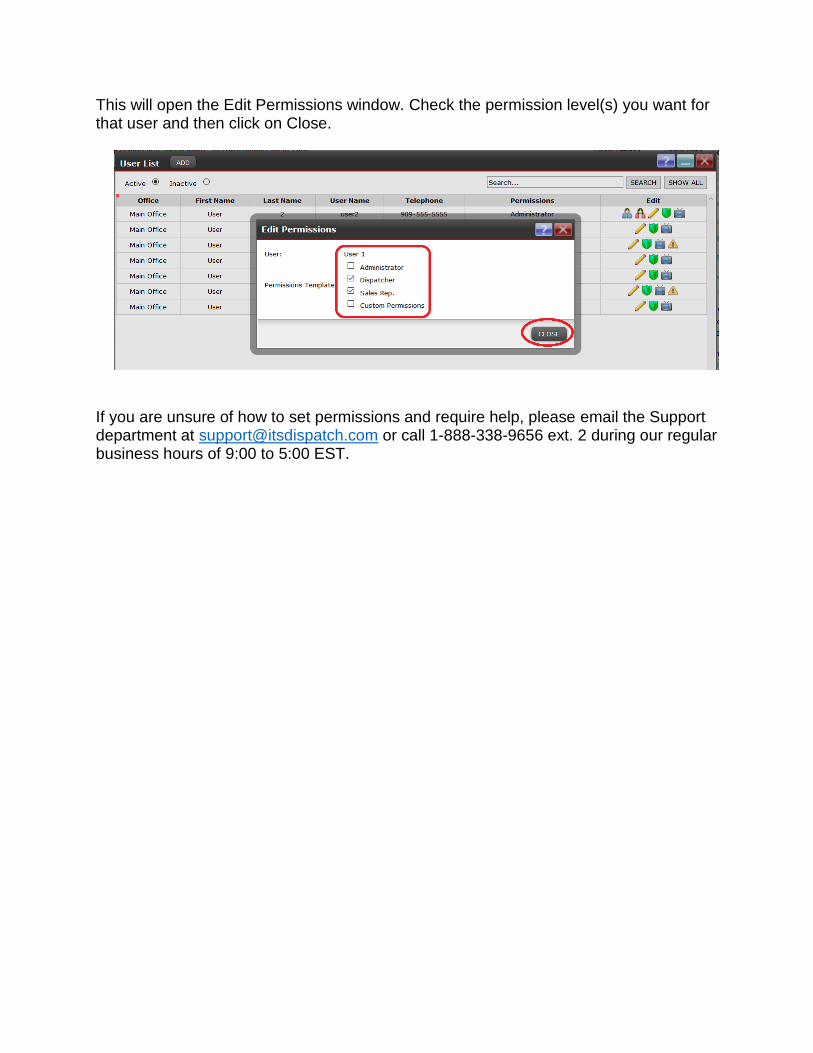
This will open the Edit Permissions window. Check the permission level(s) you want for that user and then click on Close.
If you are unsure of how to set permissions and require help, please email the Support department at [email protected] or call 1-888-338-9656 ext. 2 during our regular business hours of 9:00 to 5:00 EST.
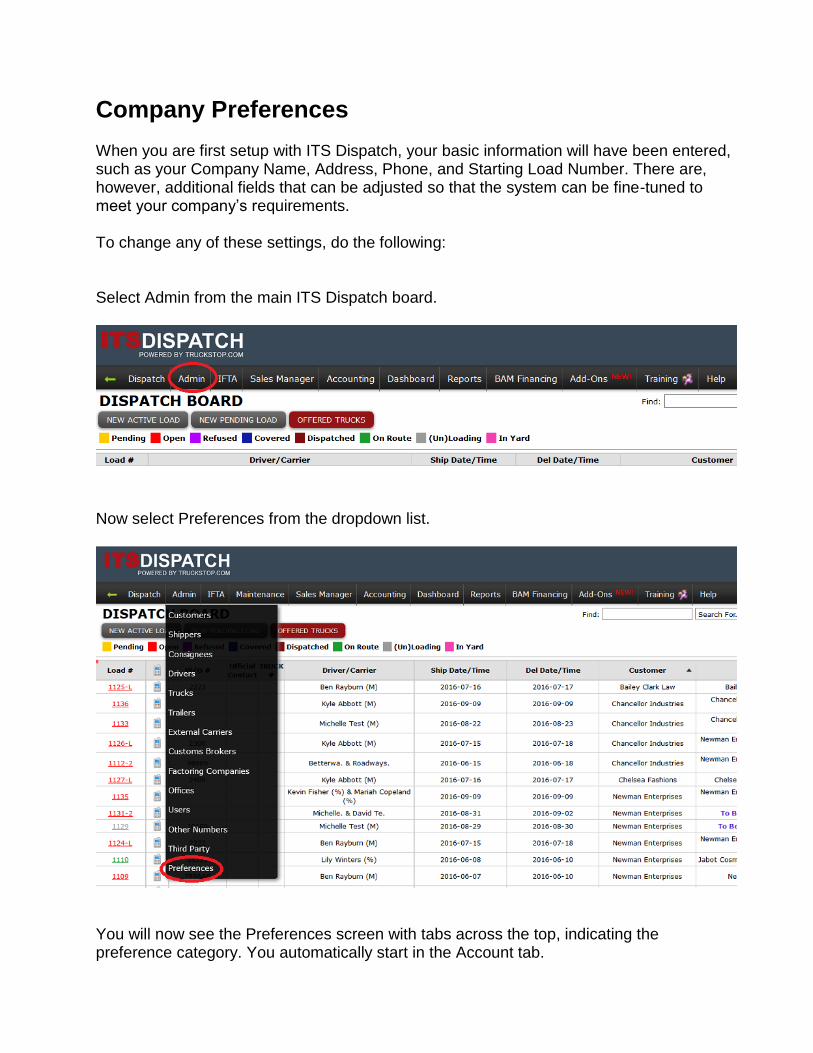
Company Preferences When you are first setup with ITS Dispatch, your basic information will have been entered, such as your Company Name, Address, Phone, and Starting Load Number. There are, however, additional fields that can be adjusted so that the system can be fine-tuned to meet your company’s requirements. To change any of these settings, do the following: Select Admin from the main ITS Dispatch board.
Now select Preferences from the dropdown list.
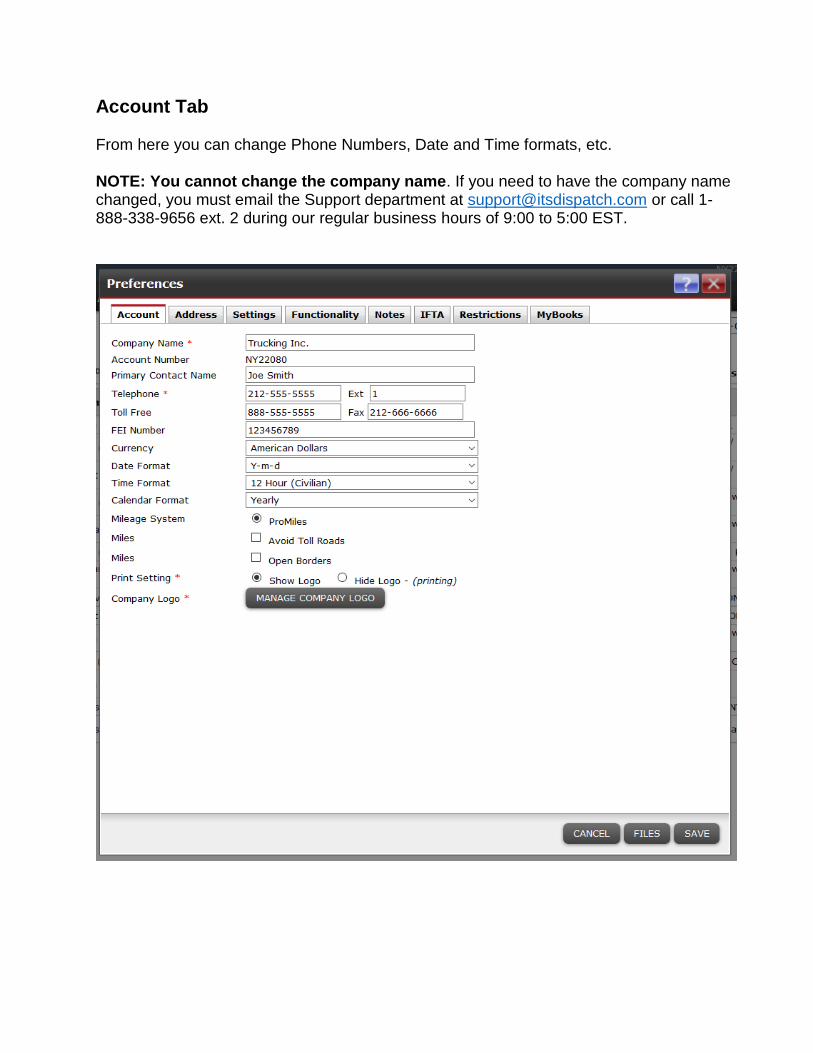
You will now see the Preferences screen with tabs across the top, indicating the preference category. You automatically start in the Account tab.
Account Tab From here you can change Phone Numbers, Date and Time formats, etc. NOTE: You cannot change the company name. If you need to have the company name changed, you must email the Support department at [email protected] or call 1-888-338-9656 ext. 2 during our regular business hours of 9:00 to 5:00 EST.
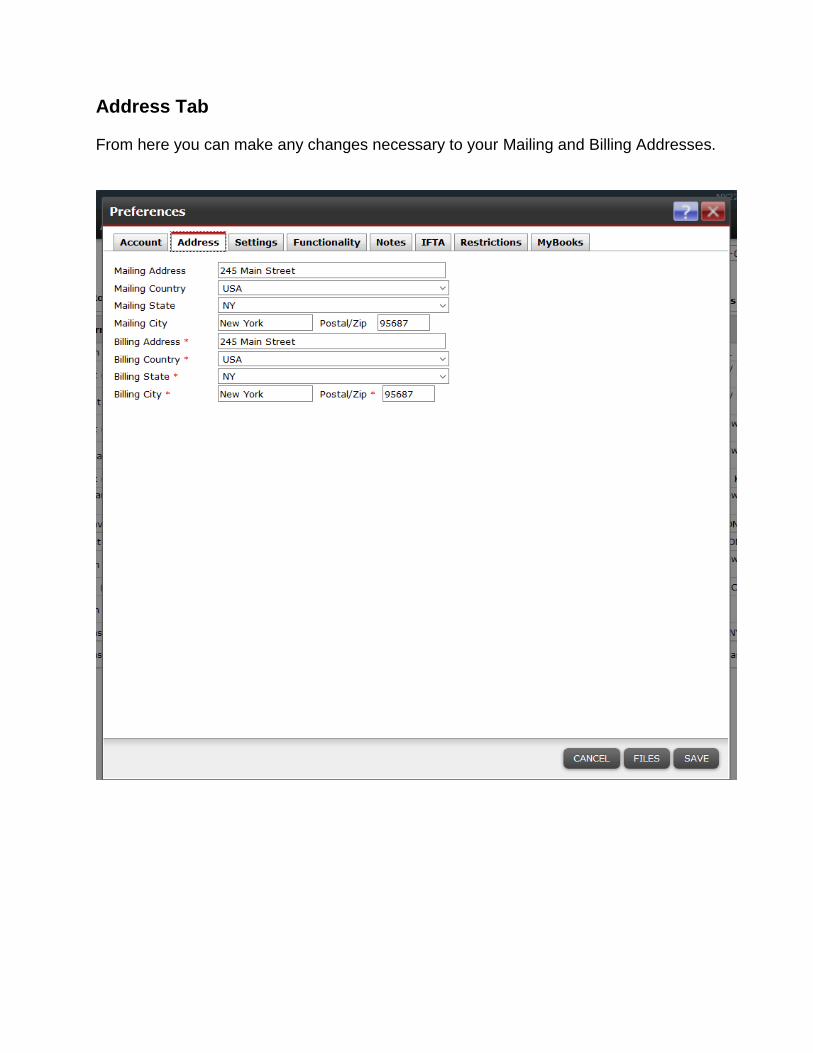
Address Tab From here you can make any changes necessary to your Mailing and Billing Addresses.
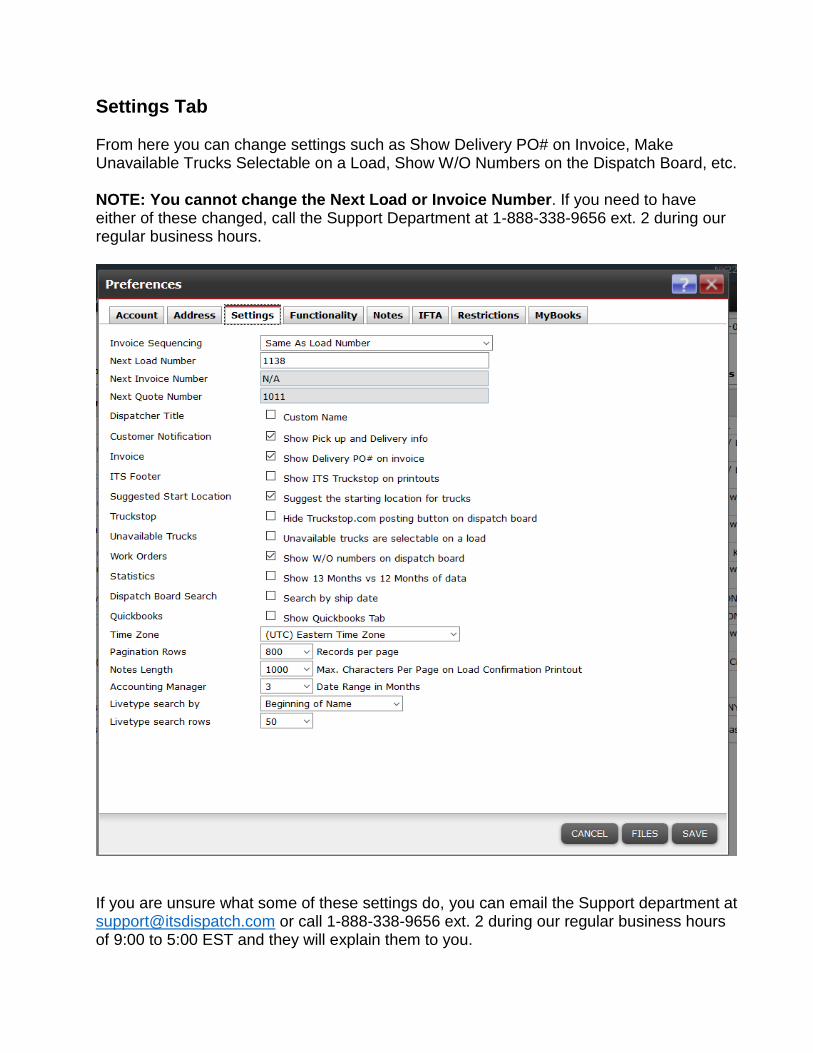
Settings Tab From here you can change settings such as Show Delivery PO# on Invoice, Make Unavailable Trucks Selectable on a Load, Show W/O Numbers on the Dispatch Board, etc. NOTE: You cannot change the Next Load or Invoice Number. If you need to have either of these changed, call the Support Department at 1-888-338-9656 ext. 2 during our regular business hours.
If you are unsure what some of these settings do, you can email the Support department at [email protected] or call 1-888-338-9656 ext. 2 during our regular business hours of 9:00 to 5:00 EST and they will explain them to you.
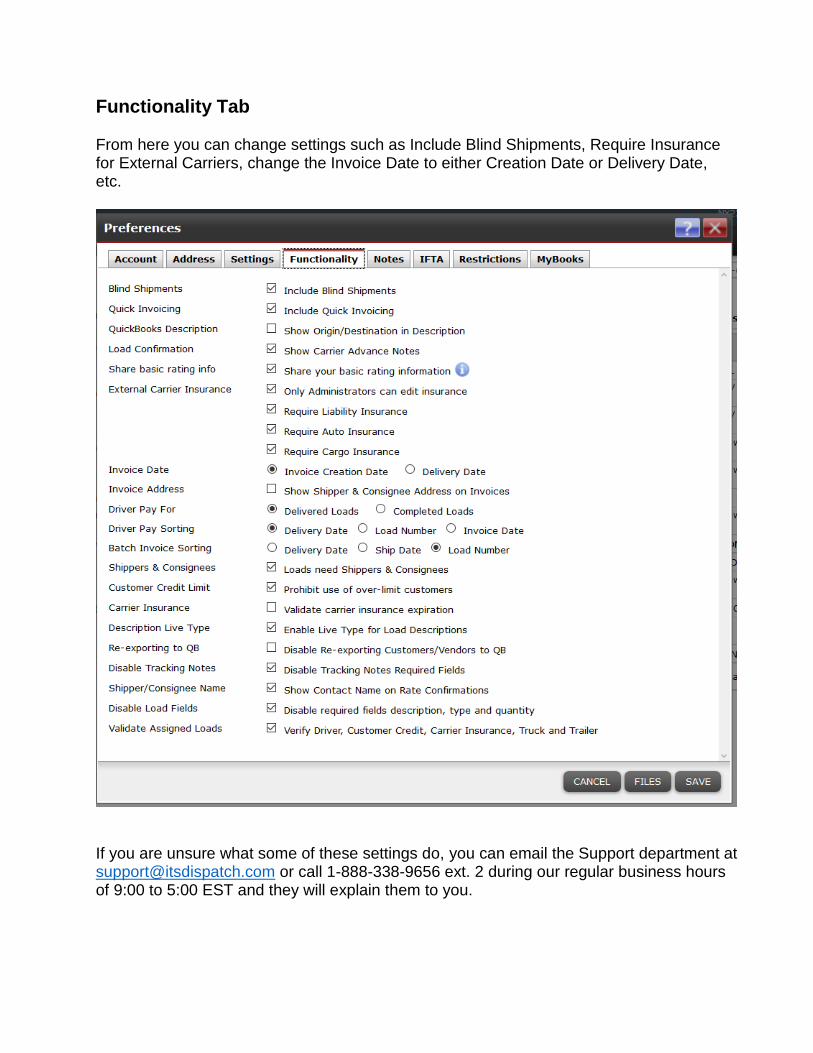
Functionality Tab From here you can change settings such as Include Blind Shipments, Require Insurance for External Carriers, change the Invoice Date to either Creation Date or Delivery Date, etc.
If you are unsure what some of these settings do, you can email the Support department at [email protected] or call 1-888-338-9656 ext. 2 during our regular business hours of 9:00 to 5:00 EST and they will explain them to you.
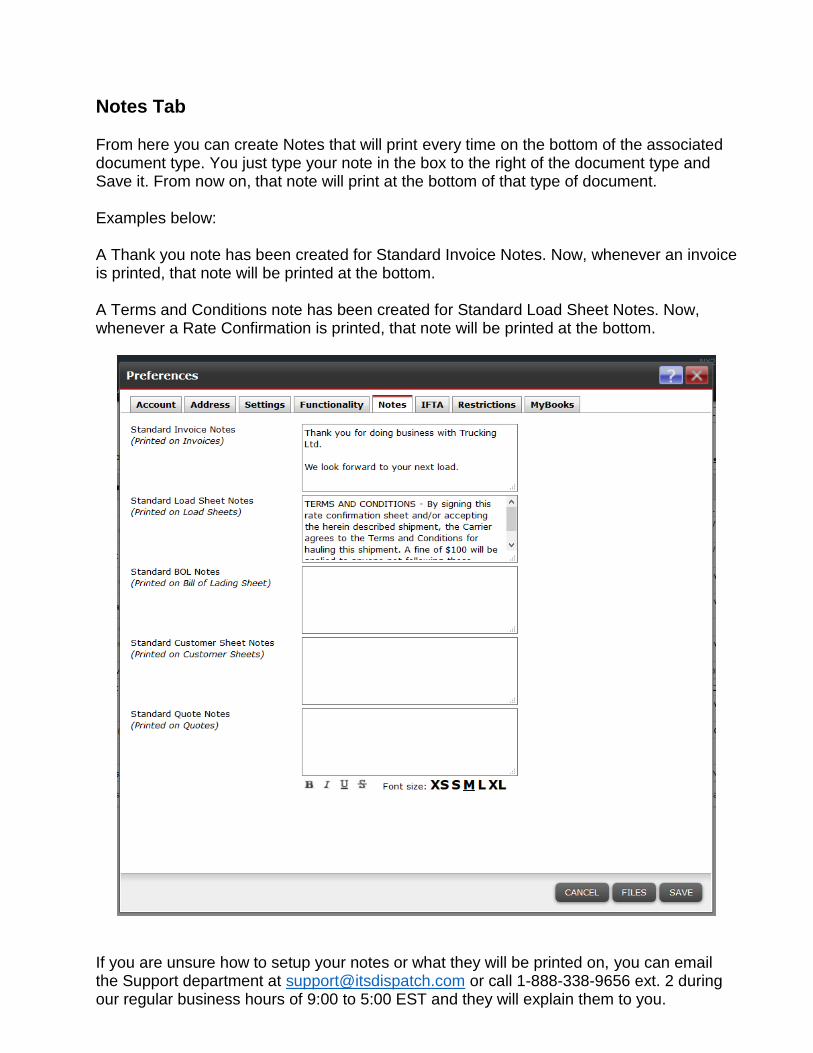
Notes Tab From here you can create Notes that will print every time on the bottom of the associated document type. You just type your note in the box to the right of the document type and Save it. From now on, that note will print at the bottom of that type of document. Examples below: A Thank you note has been created for Standard Invoice Notes. Now, whenever an invoice is printed, that note will be printed at the bottom. A Terms and Conditions note has been created for Standard Load Sheet Notes. Now, whenever a Rate Confirmation is printed, that note will be printed at the bottom.
If you are unsure how to setup your notes or what they will be printed on, you can email the Support department at [email protected] or call 1-888-338-9656 ext. 2 during our regular business hours of 9:00 to 5:00 EST and they will explain them to you.
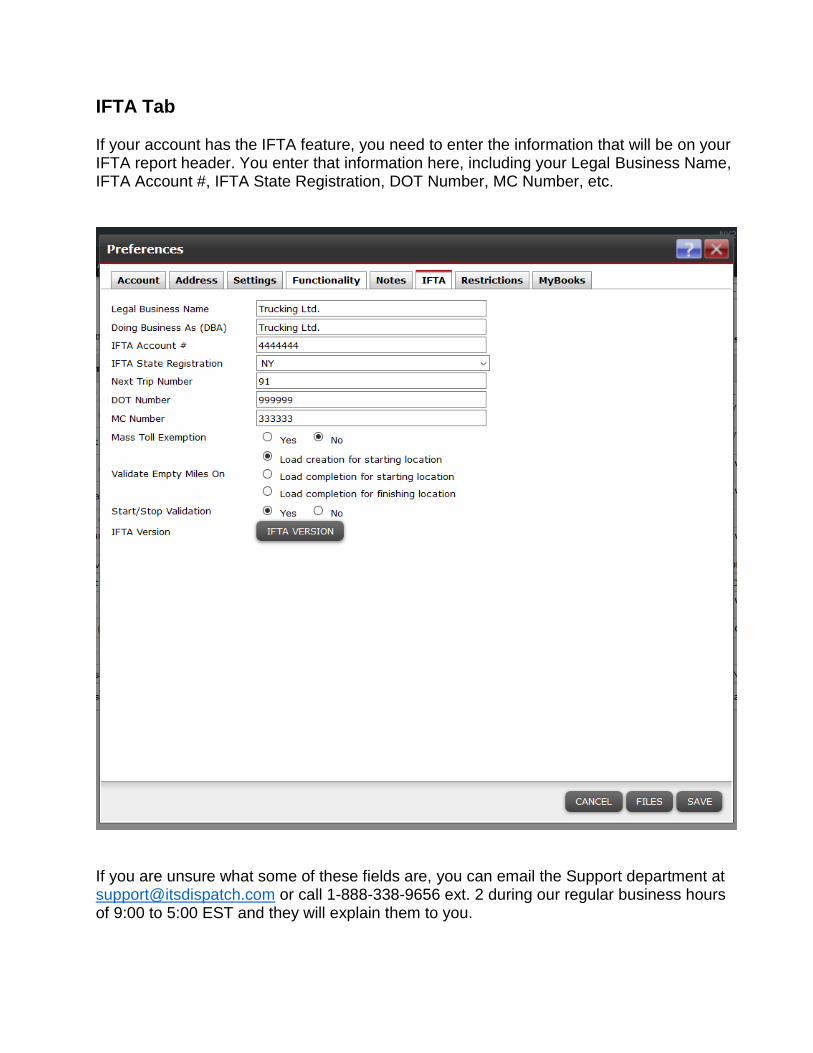
IFTA Tab If your account has the IFTA feature, you need to enter the information that will be on your IFTA report header. You enter that information here, including your Legal Business Name, IFTA Account #, IFTA State Registration, DOT Number, MC Number, etc.
If you are unsure what some of these fields are, you can email the Support department at [email protected] or call 1-888-338-9656 ext. 2 during our regular business hours of 9:00 to 5:00 EST and they will explain them to you.
Customer Invoices ITS Dispatch has the ability to export your customer invoices to a file which can then be imported into QuickBooks. Before this can happen, the Accounting Export must be setup correctly to extract the customer and invoice information from ITS Dispatch. This extraction of data creates an IIF file that you then import into QuickBooks. This setup MUST be done by the Support department. If the setup is not done by the Support department, errors may occur which could seriously compromise the integrity of your QuickBooks accounts. To have your ITS Dispatch account setup to run the Accounting Export, please email the Support department at [email protected] or call 1-888-338-9656 ext. 2 during our regular business hours of 9:00 to 5:00 EST.
Carrier Payables ITS Dispatch has the ability to export your carrier payables to a file which can then be imported into QuickBooks. Before this can happen, the Carrier Pay Export must be setup correctly to extract the carrier and payable information from ITS Dispatch. This extraction of data creates an IIF file that you then import into QuickBooks. This setup MUST be done by the Support department. If the setup is not done by the Support department, errors may occur which could seriously compromise the integrity of your QuickBooks accounts. To have your ITS Dispatch account setup to run the Carrier Pay Export, please email the Support department at [email protected] or call 1-888-338-9656 ext. 2 during our regular business hours of 9:00 to 5:00 EST. NOTE: ITS Dispatch does not have the ability to export driver payables or sales rep payables to QuickBooks.
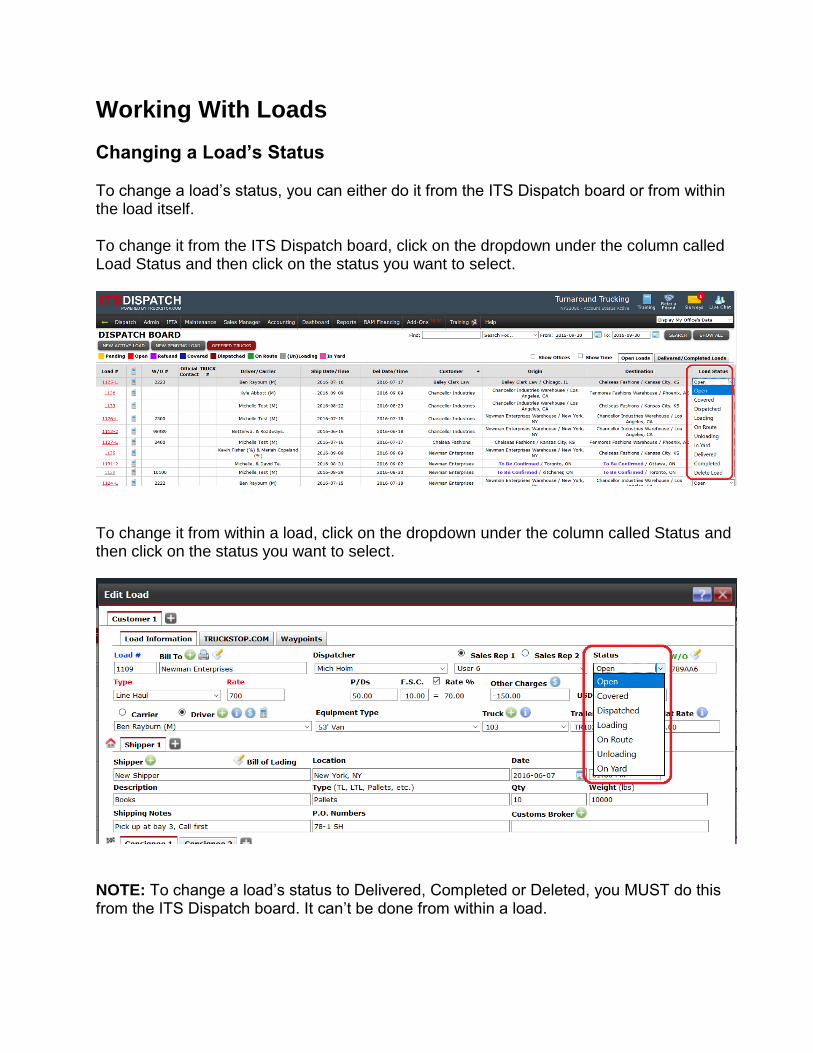
Changing a Load’s Status To change a load’s status, you can either do it from the ITS Dispatch board or from within the load itself. To change it from the ITS Dispatch board, click on the dropdown under the column called Load Status and then click on the status you want to select.
To change it from within a load, click on the dropdown under the column called Status and then click on the status you want to select.
NOTE: To change a load’s status to Delivered, Completed or Deleted, you MUST do this from the ITS Dispatch board. It can’t be done from within a load.
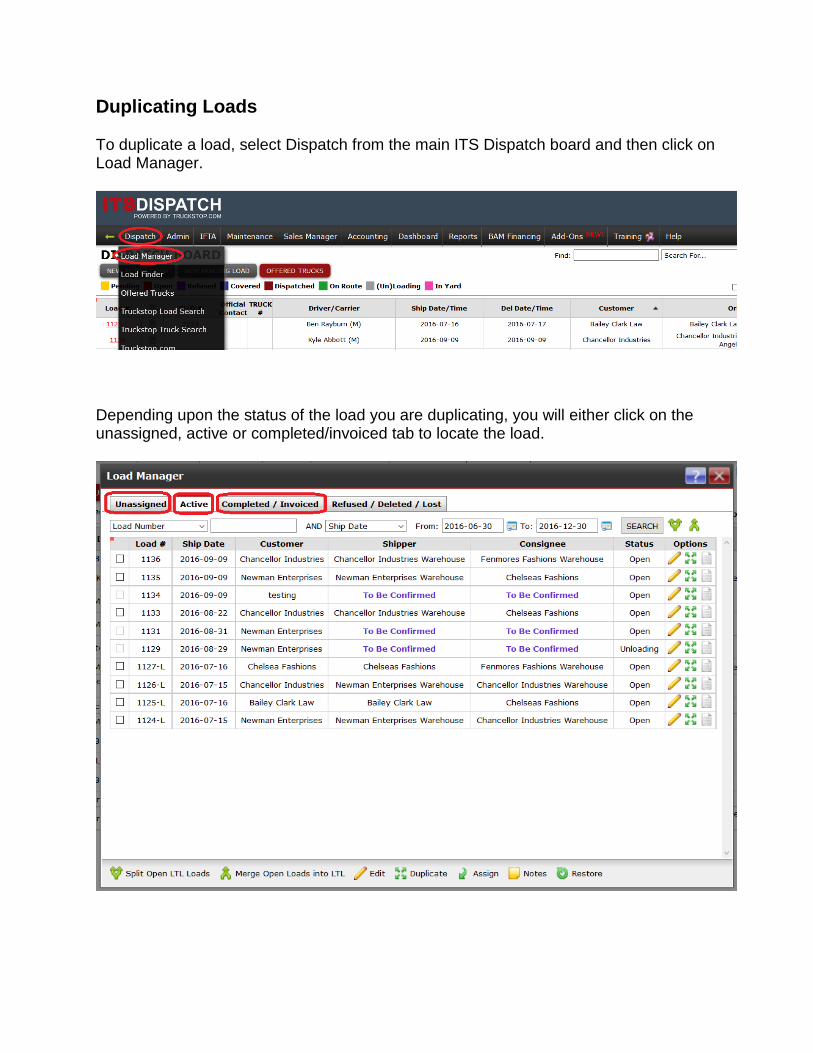
Duplicating Loads To duplicate a load, select Dispatch from the main ITS Dispatch board and then click on Load Manager.
Depending upon the status of the load you are duplicating, you will either click on the unassigned, active or completed/invoiced tab to locate the load.
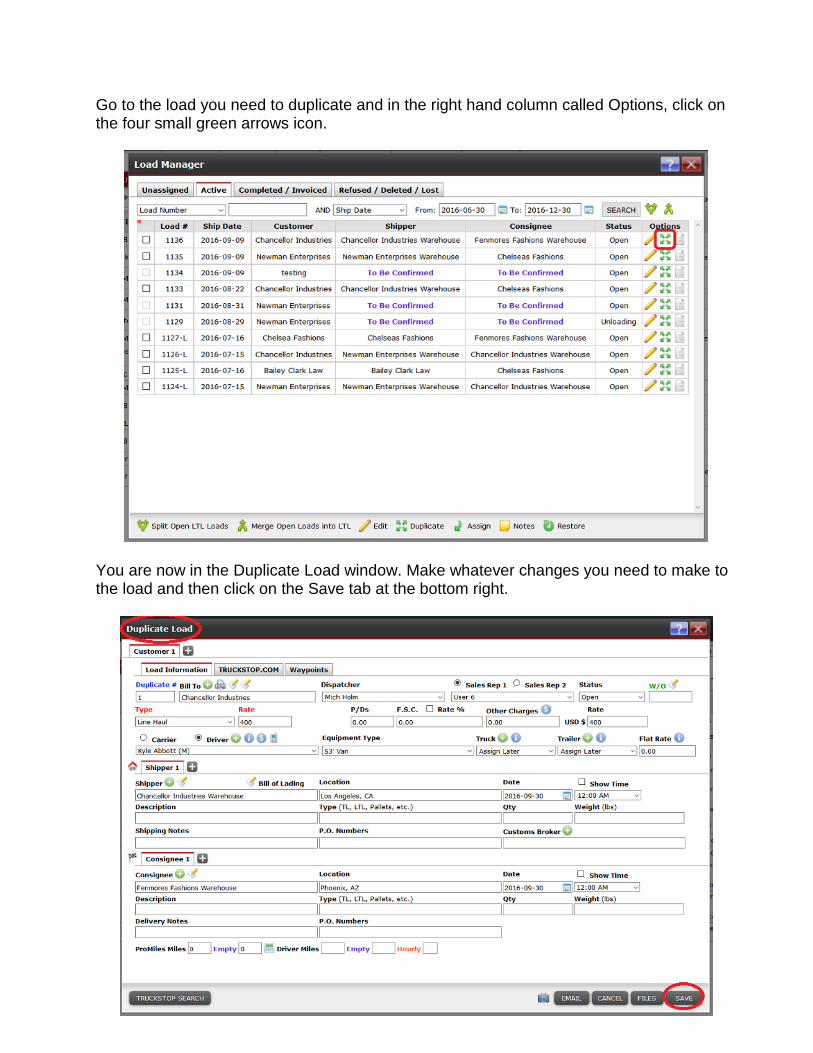
Go to the load you need to duplicate and in the right hand column called Options, click on the four small green arrows icon.
You are now in the Duplicate Load window. Make whatever changes you need to make to the load and then click on the Save tab at the bottom right.
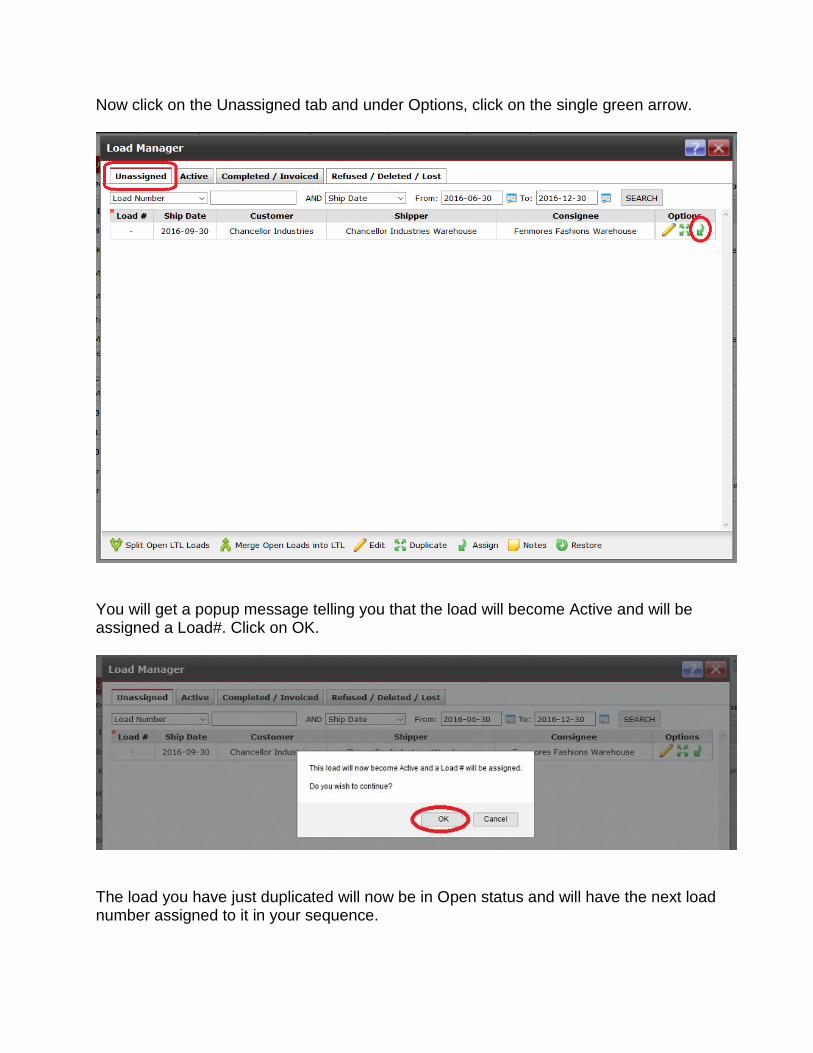
Now click on the Unassigned tab and under Options, click on the single green arrow.
You will get a popup message telling you that the load will become Active and will be assigned a Load#. Click on OK.
The load you have just duplicated will now be in Open status and will have the next load number assigned to it in your sequence.
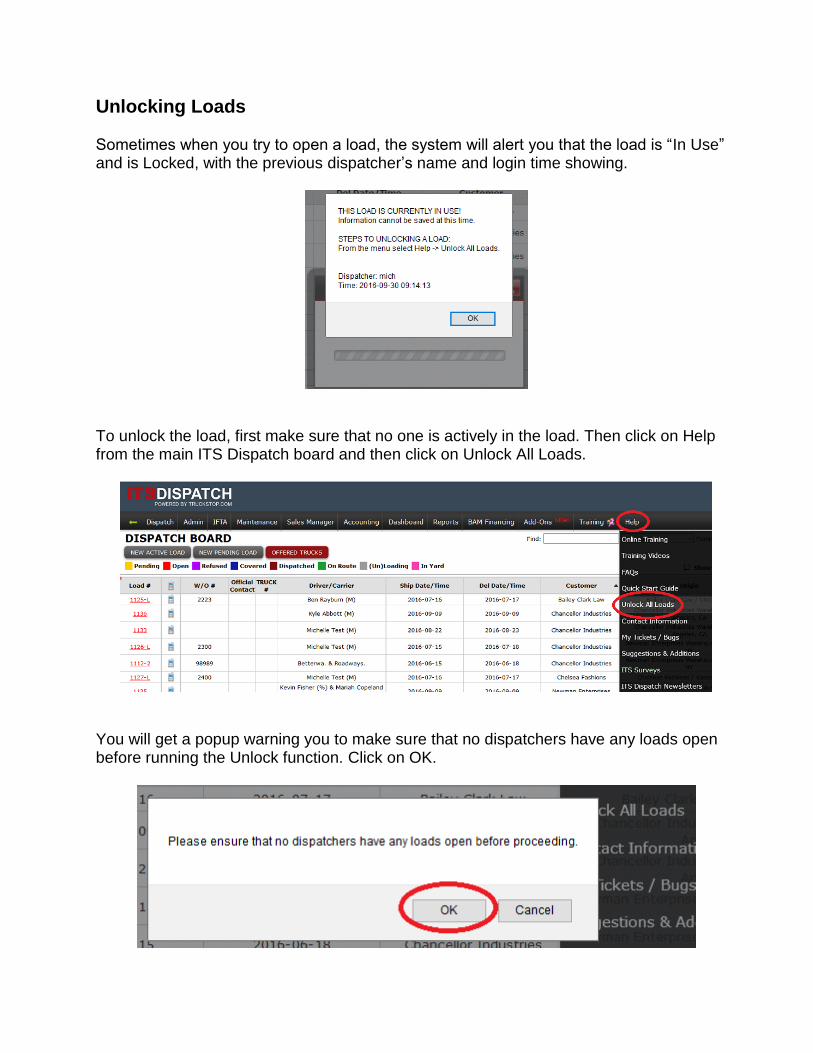
Unlocking Loads Sometimes when you try to open a load, the system will alert you that the load is “In Use” and is Locked, with the previous dispatcher’s name and login time showing.
To unlock the load, first make sure that no one is actively in the load. Then click on Help from the main ITS Dispatch board and then click on Unlock All Loads.
You will get a popup warning you to make sure that no dispatchers have any loads open before running the Unlock function. Click on OK.
Support and Training
Free Support and Training ITS Dispatch provides your company with FREE support and training, for as long as you own an account. If you are a new customer, the Support department will contact you to begin the setup and training process. The Support department will continue to call and train you through the various stages of ITS Dispatch until you feel confident with the system.
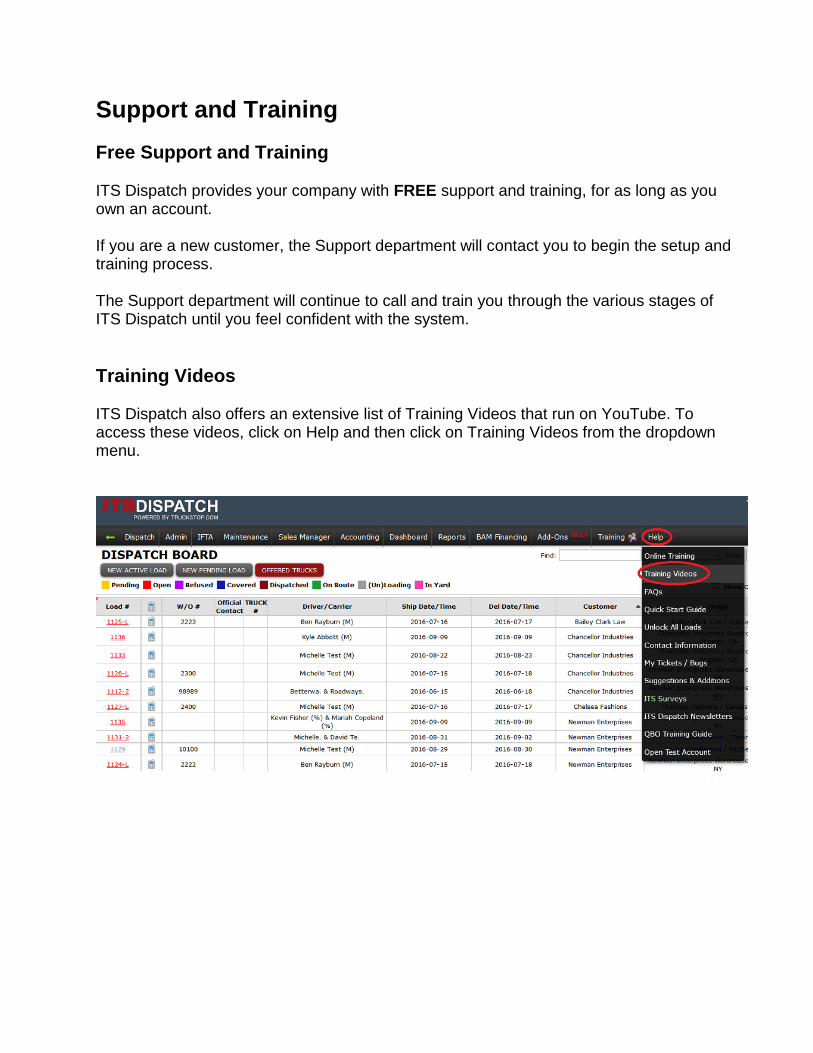
Training Videos ITS Dispatch also offers an extensive list of Training Videos that run on YouTube. To access these videos, click on Help and then click on Training Videos from the dropdown menu.
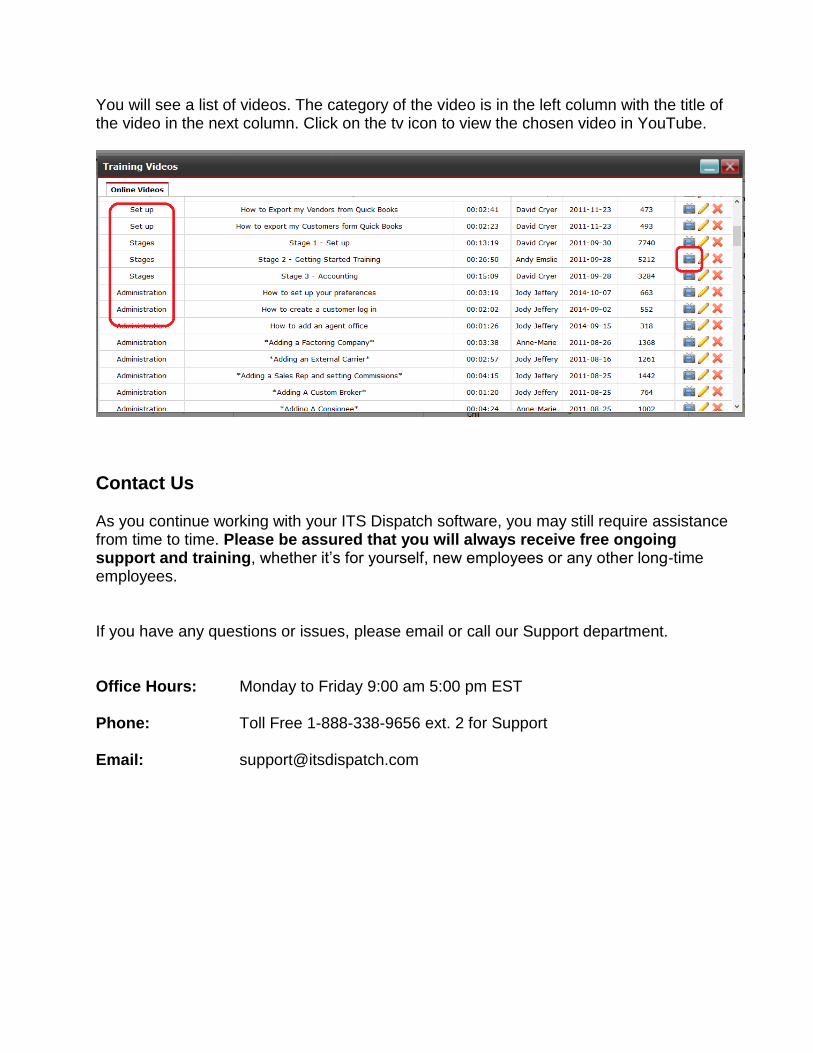
You will see a list of videos. The category of the video is in the left column with the title of the video in the next column. Click on the tv icon to view the chosen video in YouTube.
Contact Us As you continue working with your ITS Dispatch software, you may still require assistance from time to time. Please be assured that you will always receive free ongoing support and training, whether it’s for yourself, new employees or any other long-time employees. If you have any questions or issues, please email or call our Support department. Office Hours: Monday to Friday 9:00 am 5:00 pm EST Phone: Toll Free 1-888-338-9656 ext. 2 for Support Email: [email protected]