Getting Started with 3D in Photoshop 3.1. Workspace and the 3D Panel When creating 3D designs, it is important to understand the complete workflow, as every step is critical in helping one complete and get to the final vision. The fundamental workflow is creating or obtaining the 3D model, adding/editing materials, adding/editing lights, adjusting shadows and other effects, and then finally rendering the scene. Of course, there will be quite a bit of back and forth between rendering your scene and re-adjusting the lights for optimal effects. Further, you can take your 3D layer and composite it with a 2D layer or add traditional 2D effects and touch-ups e one of the key benefits of working with 3D in Photoshop! This chapter will cover the essential things you need to know about working with 3D in Photoshop. Note: For best performance, set your document up to screen resolution (72 ppi). If your final output is print, you can then scale up and re-render. This will optimize performance and speed when editing 3D. CHAPTER 3 | 3D in Photoshop. DOI: 10.1016/B978-0-240-81377-6.10003-1 Copyright Ó 2010 Elsevier Inc. All rights reserved. 29
Transcript
Getting Started with3D in Photoshop
3.1. Workspace and the 3D PanelWhen creating 3D designs, it is important to understand the completeworkflow, as every step is critical in helping one complete and get to the finalvision. The fundamental workflow is creating or obtaining the 3D model,adding/editing materials, adding/editing lights, adjusting shadows and othereffects, and then finally rendering the scene. Of course, there will be quitea bit of back and forth between rendering your scene and re-adjusting thelights for optimal effects. Further, you can take your 3D layer and compositeit with a 2D layer or add traditional 2D effects and touch-upse one of the keybenefits of working with 3D in Photoshop! This chapter will cover theessential things you need to know about working with 3D in Photoshop.
Note: For best performance, set your document up to screen resolution(72 ppi). If your final output is print, you can then scale up and re-render. Thiswill optimize performance and speed when editing 3D.
CHAPTER 3|
3D in Photoshop. DOI: 10.1016/B978-0-240-81377-6.10003-1Copyright � 2010 Elsevier Inc. All rights reserved. 29
To get started, select the 3D workspace from the upper right corner of yourapplication bar (Figure 3.1). This will open the important panels whenworking with 3D that will be referenced throughout the chapter.
With the 3D workspace selected, the panel in front view should be your 3DScene panel (which you can also open from Windows > 3D). This panel hasdifferent views that dynamically update based on what component you haveselected in your scene graph or in your Layers panel. The initial view will havecontrols that allow you to create or open 3D objects. This is described infurther detail in the next section.
If you have a 3D layer selected, the 3D Scene panel has four active buttons, orfilters, on the top of the panel (Figure 3.2). The first button shows you yourscene graph, or scene components (meshes, materials and lights) as well asthe scene properties you can edit. The second button filters out your meshesand lists out all the meshes in your 3D layer, or scene, as well as Meshproperties that you can edit. The third button filters out your materials andlists out all the materials in the scene as well as Material properties that youcan edit. And lastly, the fourth button filters out your lights and lists out allthe lights in your scene as well as the Light properties that you can edit. Eachview of the panel and its associated properties will be discussed further inlater sections.
There are five tools sets on the left that are always available regardless ofwhat view of the Scene panel you are in. These tools are movement tools forobjects, cameras, meshes and lights as well as the Material Drop/Load Tooland the Select Material Tool. How to use these tools will be described in thefollowing sections.
At the bottom of the panel there are three buttons. The first button on theleft allows you to toggle overlays important for navigating around your 3Dlayer, or scene. These overlays are the 3D-Axis, Ground Plane, Lights andSelection. The button in the middle is used to create new lights (it will only beactive with a light selected). The delete icon on the far right will deletewhatever light you have selected in the scene graph.
Note: Overlays are dependant on OpenGL. Be sure that you have this optionon in the Performance section of your Preferences.
FIG 3.1 3D Workspace switcher. Select this workspace to open up necessary panels when working with 3D.
FIG 3.2 3D Scene panel.
|3D in Photoshop
30
3.2. Importing 3DYou can either download models from 3D content providers and open themdirectly in Photoshop or create your own 3D models. There are many 3Dcontent providers that have objects supported by Photoshop. It is recom-mended to work with Collada (dae) files but Photoshop also supports OBJ,KMZ, U3D and 3DS. For more information on format specifics, see AppendixA: File Formats. The easiest way to access these partner websites is byopening up the link found in the 3D menu under the command “Browse 3DContent Online. .” This will bring you to a 3D landing page with useful linksand content.
This book includes a plugin created by 3D Via that allows you to import 3Dobjects directly from their warehouse into Photoshop CS4 or CS5 Extended.You can download this plugin from www.3D-in-Photoshop.com or directlyfrom http://www.3dvia.com/photoshop (Figure 3.3).
3.3. Converting to 3DCreating 3D has never been easier since the introduction of 3D in Photoshop.There are five ways now in Photoshop CS5 Extended to create real 3Dgeometries. You can access the commands to create 3D from the 3Dmenu orstart from the 3D Scene panel Figure 3.4.
3.3.1. 3D Postcard
The easiest way to create 3D is by taking a layer and generating a 3D plane, orpostcard (Figure 3.5). With the Selected Layer(s) set as your Source, choose3D Postcard and Photoshop will create a 3D plane based on the pixels in your
FIG 3.3 3D partner links and download for additional Material presets.
FIG 3.4 3D Scene panel: Panel viewwith 2D layer selected allowing youto create new 3D objects.
Getting Started with 3D in Photoshop|
31
layer. A postcard is also useful if you want to generate a plane to catchreflections, shadows, lighting, effects, etc. You can orient the planeperpendicular to your object and then merge the 3D objects together toa single layer. See Corey Barker's workflow in Chapter 9 for a tutorial on this.
3.3.2. 3D Shape from Preset
You can also take this layer and warp it around any 3D shape, or primitive,that Photoshop ships with. You can create your own 3D shape presets ifyou have a modeling application that exports Collada files. This is a great wayto get started with basic 3D objects (Figure 3.6). See Bert Monroy'sworkflow in Chapter 8 for a tutorial on this.
FIG 3.5 Converting a layer to a postcard.
FIG 3.6 Converting a layer to a cone shape from presets (shown with a wireframe).
|3D in Photoshop
32
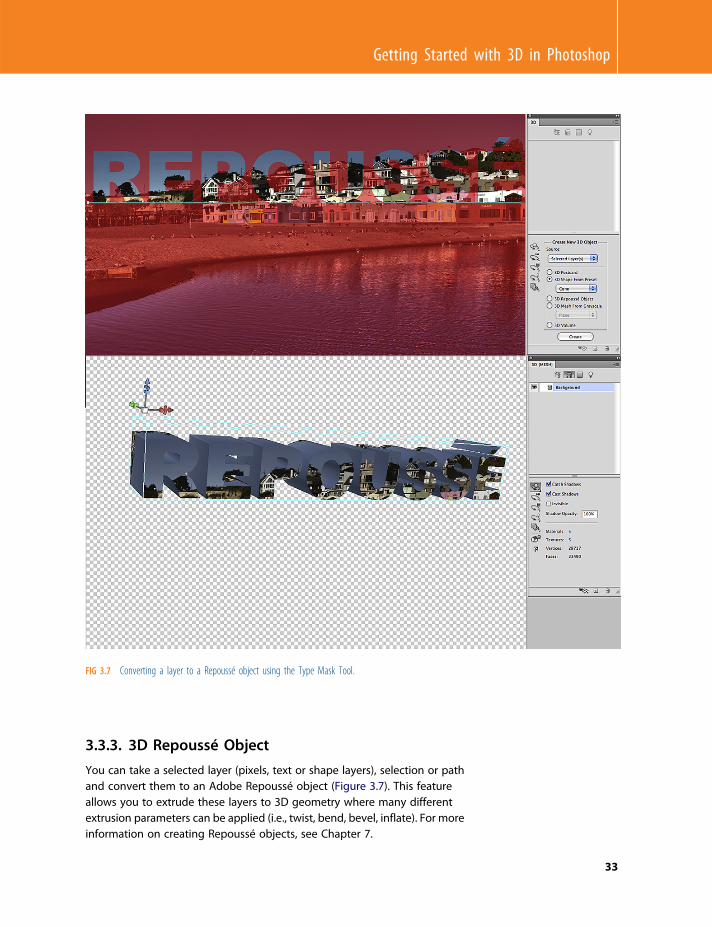
3.3.3. 3D Repoussé Object
You can take a selected layer (pixels, text or shape layers), selection or pathand convert them to an Adobe Repoussé object (Figure 3.7). This featureallows you to extrude these layers to 3D geometry where many differentextrusion parameters can be applied (i.e., twist, bend, bevel, inflate). For moreinformation on creating Repoussé objects, see Chapter 7.
FIG 3.7 Converting a layer to a Repoussé object using the Type Mask Tool.
Getting Started with 3D in Photoshop|
33
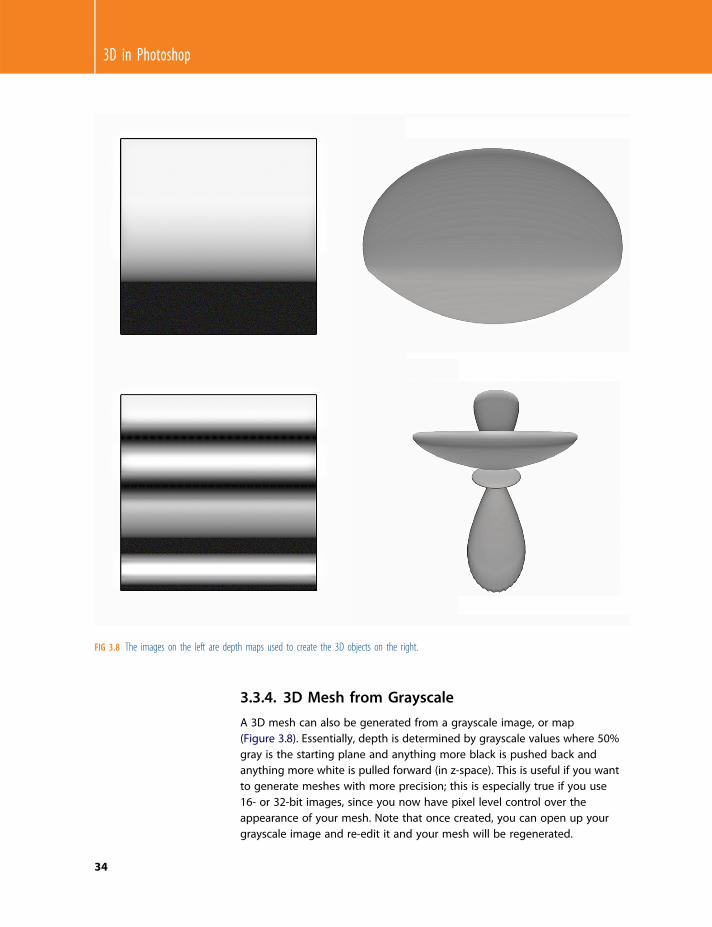
3.3.4. 3D Mesh from Grayscale
A 3D mesh can also be generated from a grayscale image, or map(Figure 3.8). Essentially, depth is determined by grayscale values where 50%gray is the starting plane and anything more black is pushed back andanything more white is pulled forward (in z-space). This is useful if you wantto generate meshes with more precision; this is especially true if you use16- or 32-bit images, since you now have pixel level control over theappearance of your mesh. Note that once created, you can open up yourgrayscale image and re-edit it and your mesh will be regenerated.
FIG 3.8 The images on the left are depth maps used to create the 3D objects on the right.
|3D in Photoshop
34
3.3.5. 3D Volumes
A 3D Volume is generated with two or more layers. The volume is an inter-polation between layers and not real 3D geometry. This means that nomesh isgenerated and you cannot apply many of the 3D capabilities to it. This isprimarily important for medical professionals working with DICOM images orframes where viewing a volume rendering is useful. However, there areinteresting effects you can create by simply taking multiple layers (raster orvector) and interpolating between the pixels to generate a volume (Figure 3.9).
3.4. Navigating 3DThere are many 3D tools in Photoshop to help you manipulate your scenecomponents (objects, meshes, cameras and lights) as well as tools that helpwith selecting and applying materials. The easiest way to manipulate posi-tions of scene components is with the 3D-Axis Tool (Figure 3.10).
FIG 3.9 Image with five layers selected with a volume rendering from those five layers.
Getting Started with 3D in Photoshop|
35
With the 3D-Axis, you can rotate, roll, scale/pan, slide/walk 3D objects,meshes, lights and cameras depending on what tool you have selected in thetoolbar or in the 3D Scene panel. An icon in the upper left of the 3D-Axis willindicate which component you are adjusting and the yellow handle willappear when adjustment that type of movement. You can make a variety ofadjustments (rotate, roll, scale/pan, slide/walk) to the component you’remanipulating without changing tools e simply by interacting with differentparts of the 3D axis.
The 3D-Axis Tool is dependant on OGL. Be sure you have this option on in thePerformance section of your Preferences.
You can also individually select scene component movement tools (i.e.,Object Rotate, Camera Walk) from the toolbar, from the tools in the Scenepanel or from the Options Bar of any 3D tool selected.
All tools can be assigned shortcuts. By default the 3D Object Rotation Toolhas the keystroke K, and the Camera Rotation Tools have the keystroke N. Setcustom shortcuts from Edit > Keyboard Shortcuts.
FIG 3.10 3D-Axis for objects, cameras, meshes and lights e upper left icon indicates component selected andpull on any handle to manipulate the object (i.e. roll, scale, pan, etc.).