Page 1
20/3/2014 GETTING STARTED WITH 8051/AT89C51 USING KEIL uVISION 4 AND PROTEUS
http://hotresistor.blogspot.in/2013/03/getting-started-with-8051at89c51-using.html 1/21
24th March 2013
[http://1.bp.blogspot.com/-
BoElfgzOGQM/UU6xCMbICWI/AAAAAAAAAcU/uZfSNQrs-
pg/s1600/DSCN0884A+SM.jpg]
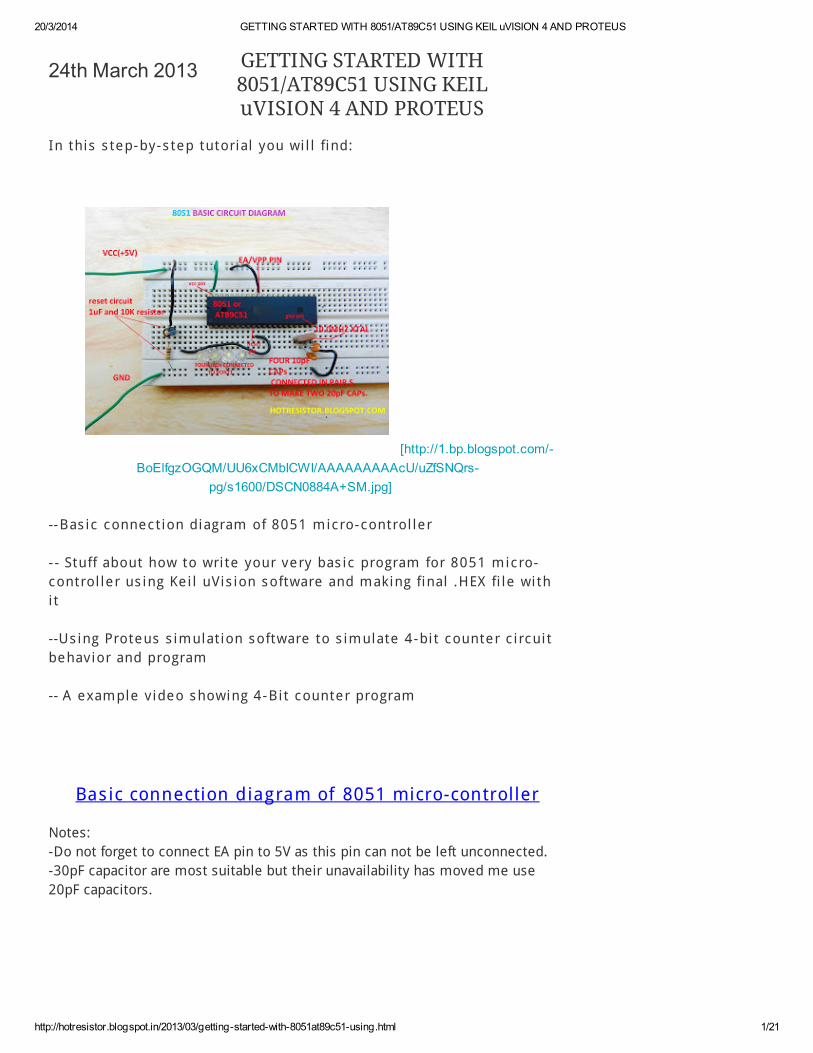
--Bas ic connection diagram of 8051 micro-control ler
- - Stuff about how to write your very bas ic program for 8051 micro-
control ler us ing Ke i l uVis ion s oftware and making final .HEX fi le with
it
--Us ing Proteus s imulation s oftware to s imulate 4-bit counter c ircuit
behavior and program
-- A example v ideo s howing 4-Bit counter program
Notes:
-Do not forget to connect EA pin to 5V as this pin can not be left unconnected.
-30pF capacitor are most suitable but their unavailability has moved me use
20pF capacitors.
GETTING STARTED WITH8051/AT89C51 USING KEILuVISION 4 AND PROTEUS
In this s tep-by-s tep tutorial you wi l l find:
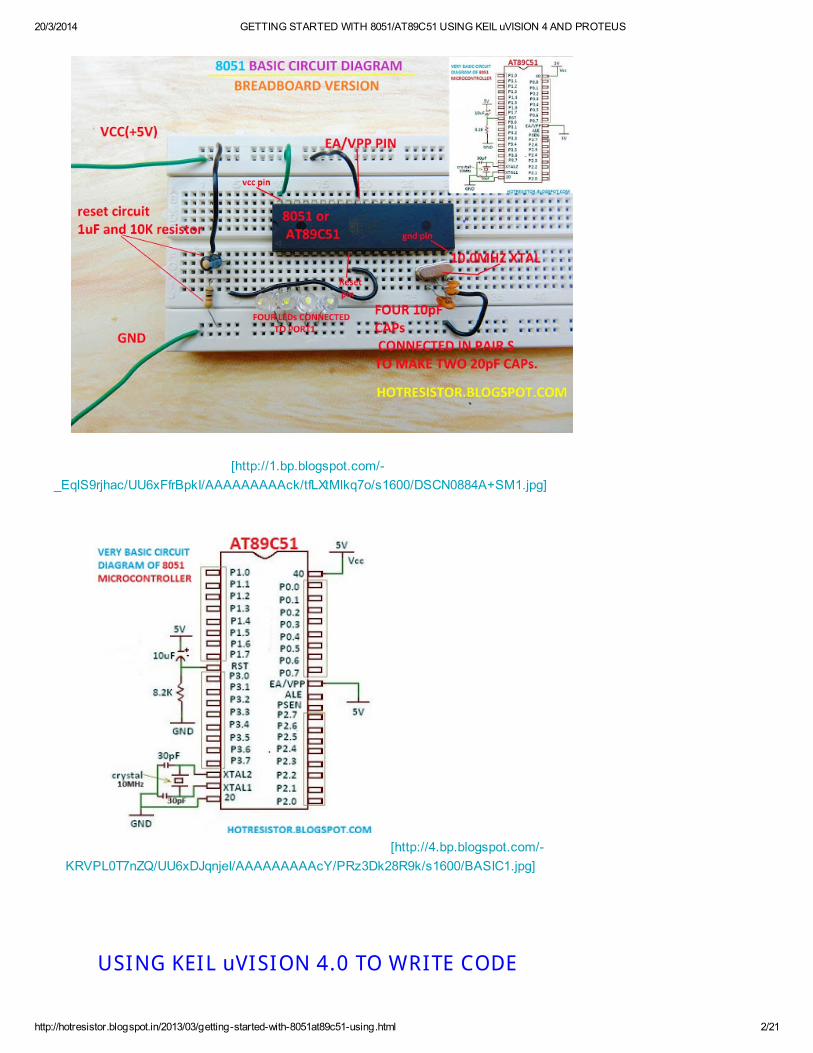
Basic connection diagram of 8051 micro-controller
Page 2
20/3/2014 GETTING STARTED WITH 8051/AT89C51 USING KEIL uVISION 4 AND PROTEUS
http://hotresistor.blogspot.in/2013/03/getting-started-with-8051at89c51-using.html 2/21
[http://1.bp.blogspot.com/-
_EqlS9rjhac/UU6xFfrBpkI/AAAAAAAAAck/tfLXtMlkq7o/s1600/DSCN0884A+SM1.jpg]
[http://4.bp.blogspot.com/-
KRVPL0T7nZQ/UU6xDJqnjeI/AAAAAAAAAcY/PRz3Dk28R9k/s1600/BASIC1.jpg]
USING KEIL uVISION 4.0 TO WRITE CODE
Page 3
20/3/2014 GETTING STARTED WITH 8051/AT89C51 USING KEIL uVISION 4 AND PROTEUS
http://hotresistor.blogspot.in/2013/03/getting-started-with-8051at89c51-using.html 3/21
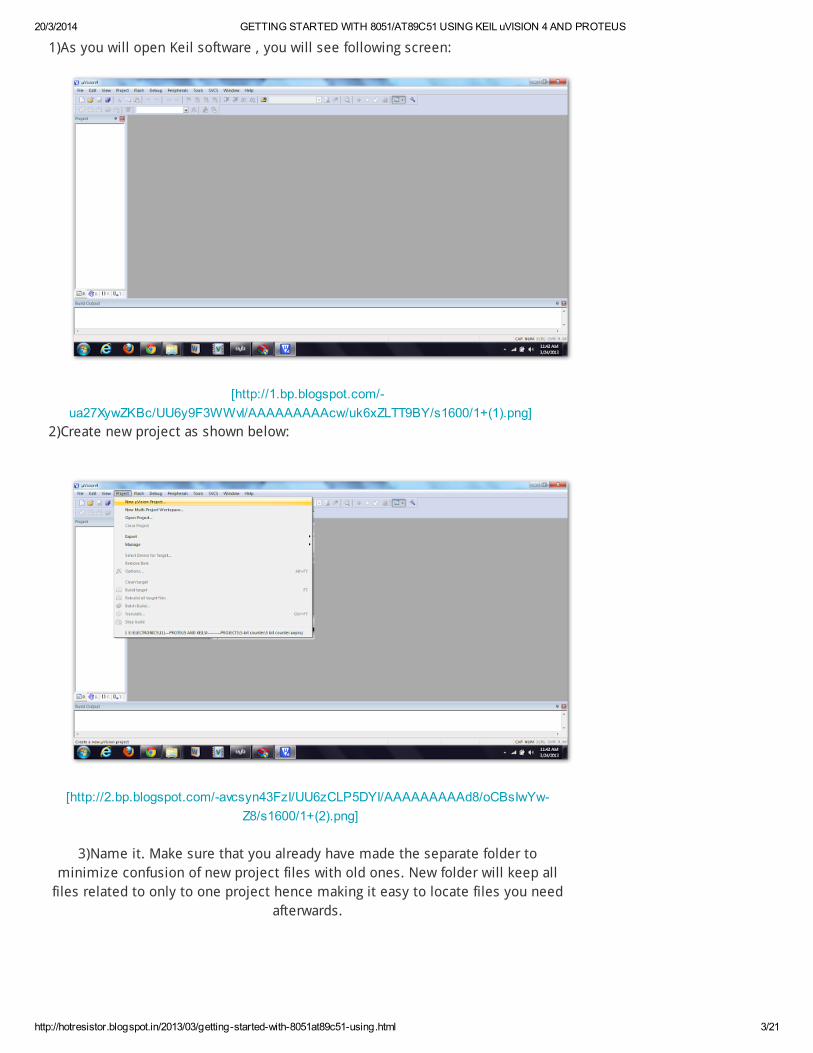
1)As you will open Keil software , you will see following screen:
[http://1.bp.blogspot.com/-
ua27XywZKBc/UU6y9F3WWvI/AAAAAAAAAcw/uk6xZLTT9BY/s1600/1+(1).png]
2)Create new project as shown below:
[http://2.bp.blogspot.com/-avcsyn43FzI/UU6zCLP5DYI/AAAAAAAAAd8/oCBsIwYw-
Z8/s1600/1+(2).png]
3)Name it. Make sure that you already have made the separate folder to
minimize confusion of new project files with old ones. New folder will keep all
files related to only to one project hence making it easy to locate files you need
afterwards.
Page 4
20/3/2014 GETTING STARTED WITH 8051/AT89C51 USING KEIL uVISION 4 AND PROTEUS
http://hotresistor.blogspot.in/2013/03/getting-started-with-8051at89c51-using.html 4/21
[http://3.bp.blogspot.com/-
DSOulXwQW9M/UU6zDVVHgiI/AAAAAAAAAec/4WHOEXpyS50/s1600/1+(3).png]
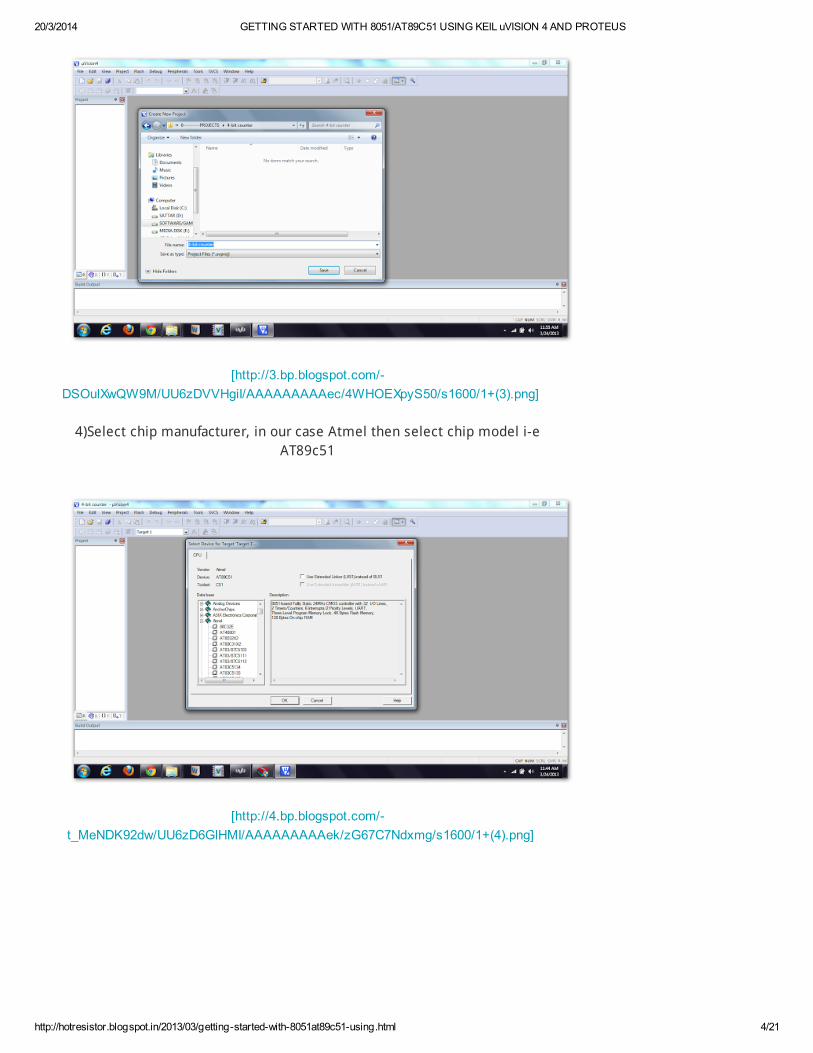
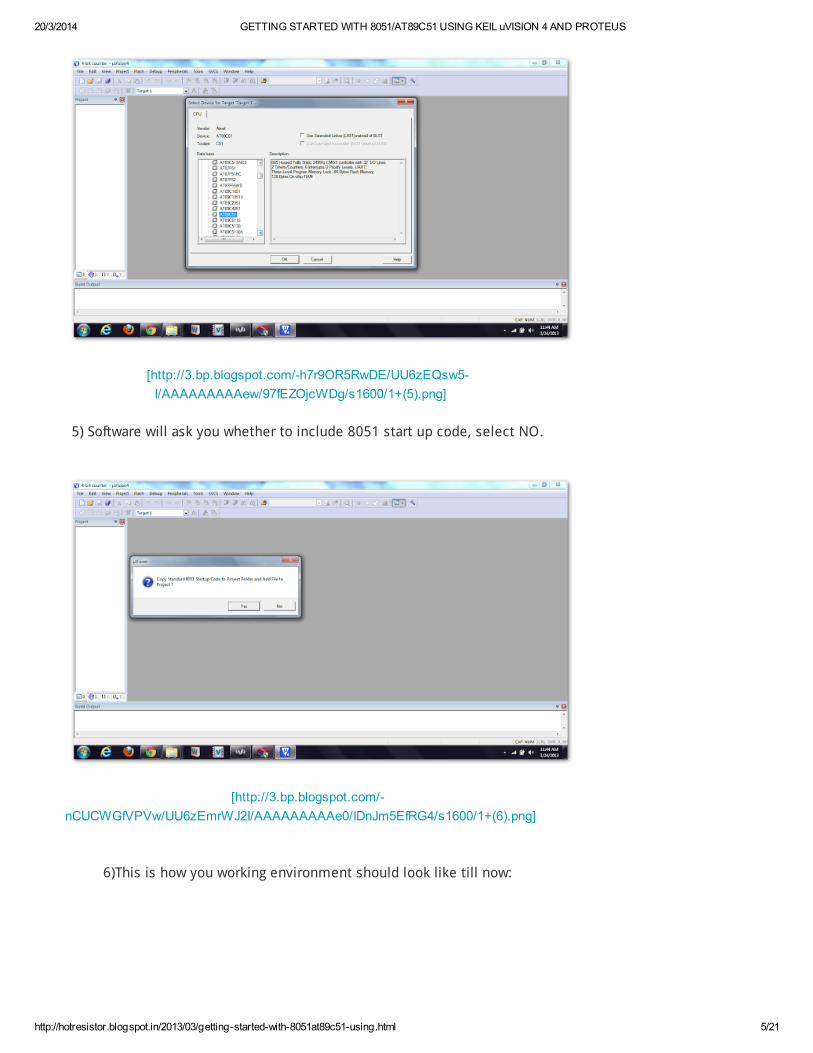
4)Select chip manufacturer, in our case Atmel then select chip model i-e
AT89c51
[http://4.bp.blogspot.com/-
t_MeNDK92dw/UU6zD6GlHMI/AAAAAAAAAek/zG67C7Ndxmg/s1600/1+(4).png]
Page 5
20/3/2014 GETTING STARTED WITH 8051/AT89C51 USING KEIL uVISION 4 AND PROTEUS
http://hotresistor.blogspot.in/2013/03/getting-started-with-8051at89c51-using.html 5/21
[http://3.bp.blogspot.com/-h7r9OR5RwDE/UU6zEQsw5-
I/AAAAAAAAAew/97fEZOjcWDg/s1600/1+(5).png]
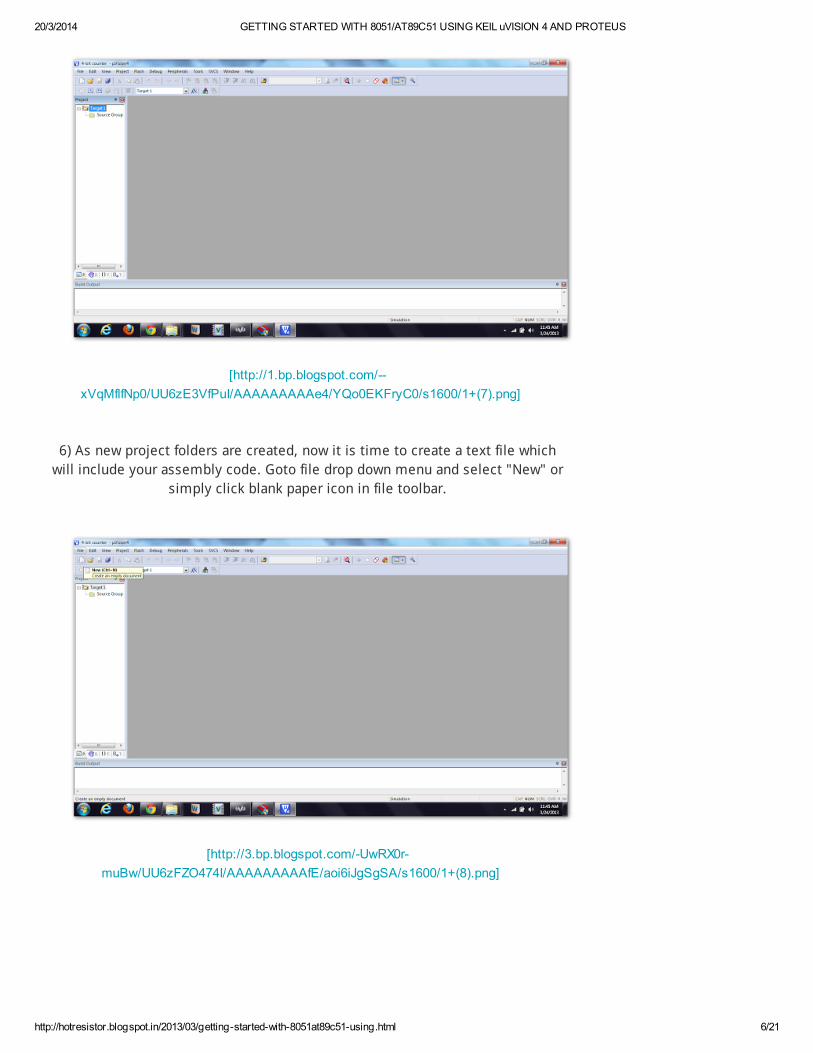
5) Software will ask you whether to include 8051 start up code, select NO.
[http://3.bp.blogspot.com/-
nCUCWGfVPVw/UU6zEmrWJ2I/AAAAAAAAAe0/IDnJm5EfRG4/s1600/1+(6).png]
6)This is how you working environment should look like till now:
Page 6
20/3/2014 GETTING STARTED WITH 8051/AT89C51 USING KEIL uVISION 4 AND PROTEUS
http://hotresistor.blogspot.in/2013/03/getting-started-with-8051at89c51-using.html 6/21
[http://1.bp.blogspot.com/--
xVqMflfNp0/UU6zE3VfPuI/AAAAAAAAAe4/YQo0EKFryC0/s1600/1+(7).png]
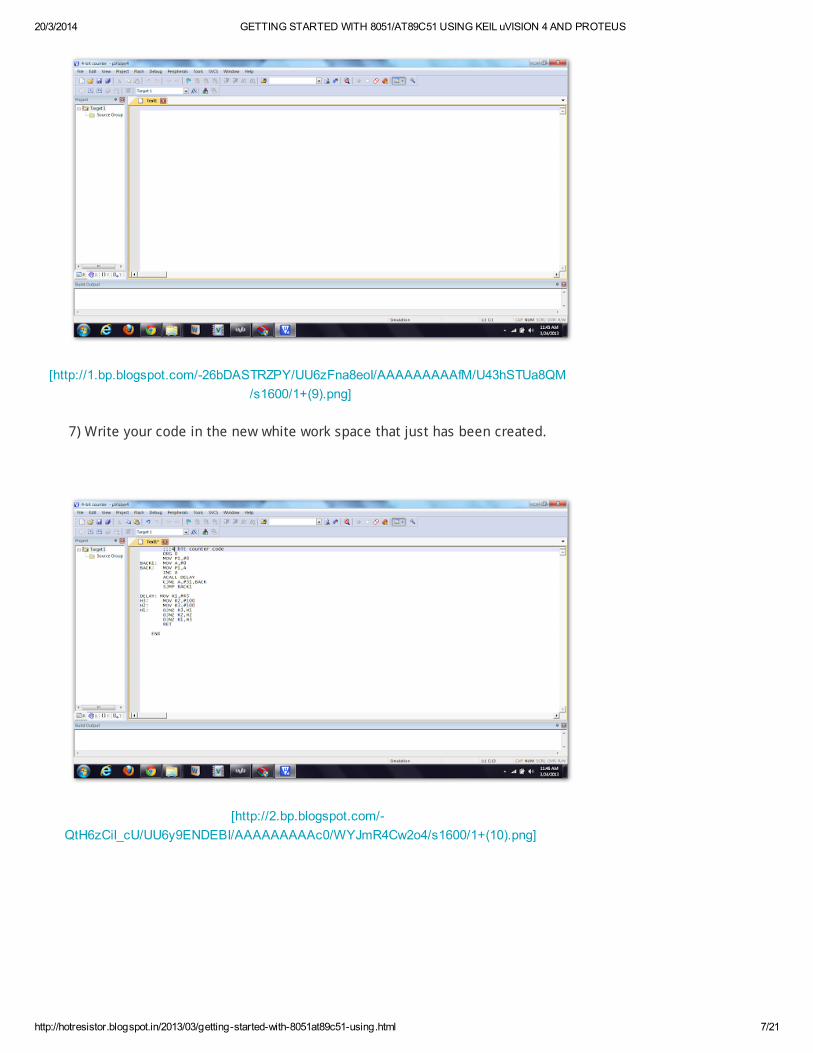
6) As new project folders are created, now it is time to create a text file which
will include your assembly code. Goto file drop down menu and select "New" or
simply click blank paper icon in file toolbar.
[http://3.bp.blogspot.com/-UwRX0r-
muBw/UU6zFZO474I/AAAAAAAAAfE/aoi6iJgSgSA/s1600/1+(8).png]
Page 7
20/3/2014 GETTING STARTED WITH 8051/AT89C51 USING KEIL uVISION 4 AND PROTEUS
http://hotresistor.blogspot.in/2013/03/getting-started-with-8051at89c51-using.html 7/21
[http://1.bp.blogspot.com/-26bDASTRZPY/UU6zFna8eoI/AAAAAAAAAfM/U43hSTUa8QM
/s1600/1+(9).png]
7) Write your code in the new white work space that just has been created.
[http://2.bp.blogspot.com/-
QtH6zCiI_cU/UU6y9ENDEBI/AAAAAAAAAc0/WYJmR4Cw2o4/s1600/1+(10).png]
Page 8
20/3/2014 GETTING STARTED WITH 8051/AT89C51 USING KEIL uVISION 4 AND PROTEUS
http://hotresistor.blogspot.in/2013/03/getting-started-with-8051at89c51-using.html 8/21
[http://1.bp.blogspot.com/-sPZ6vaCWM-
E/UU6y87N7mmI/AAAAAAAAAcs/mh5Dq5uBhGI/s1600/1+(11).png]
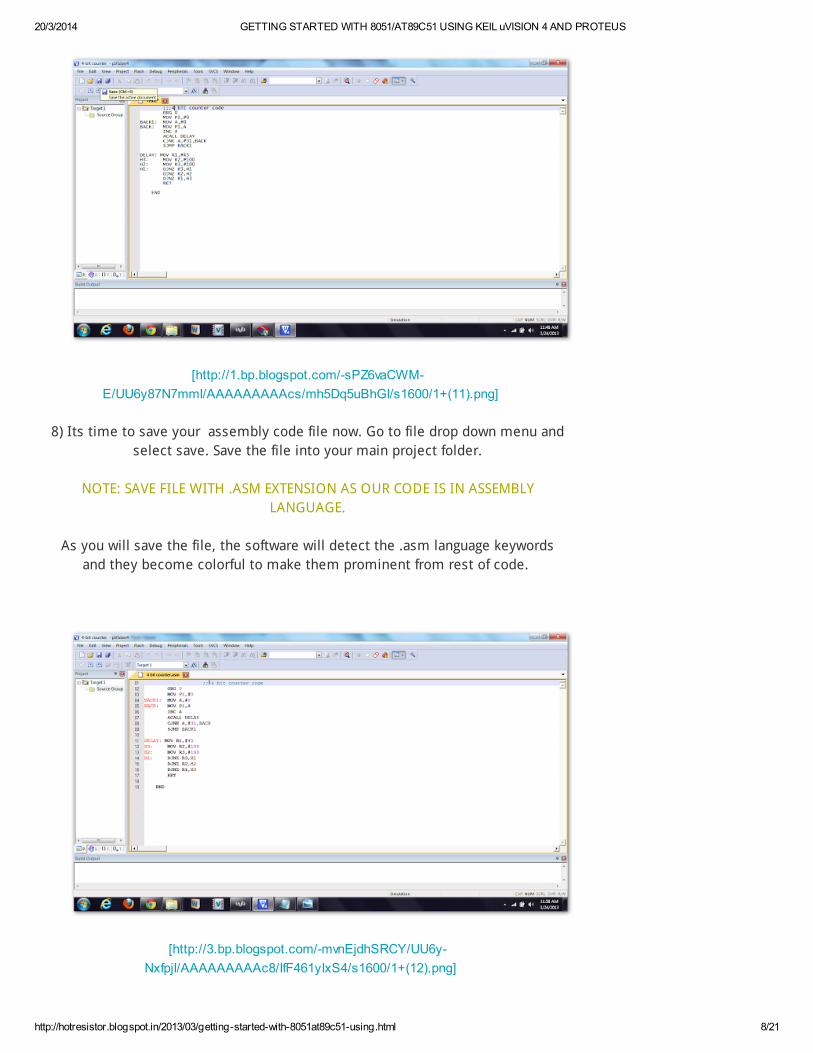
8) Its time to save your assembly code file now. Go to file drop down menu and
select save. Save the file into your main project folder.
NOTE: SAVE FILE WITH .ASM EXTENSION AS OUR CODE IS IN ASSEMBLY
LANGUAGE.
As you will save the file, the software will detect the .asm language keywords
and they become colorful to make them prominent from rest of code.
[http://3.bp.blogspot.com/-mvnEjdhSRCY/UU6y-
NxfpjI/AAAAAAAAAc8/IfF461yIxS4/s1600/1+(12).png]
Page 9
20/3/2014 GETTING STARTED WITH 8051/AT89C51 USING KEIL uVISION 4 AND PROTEUS
http://hotresistor.blogspot.in/2013/03/getting-started-with-8051at89c51-using.html 9/21
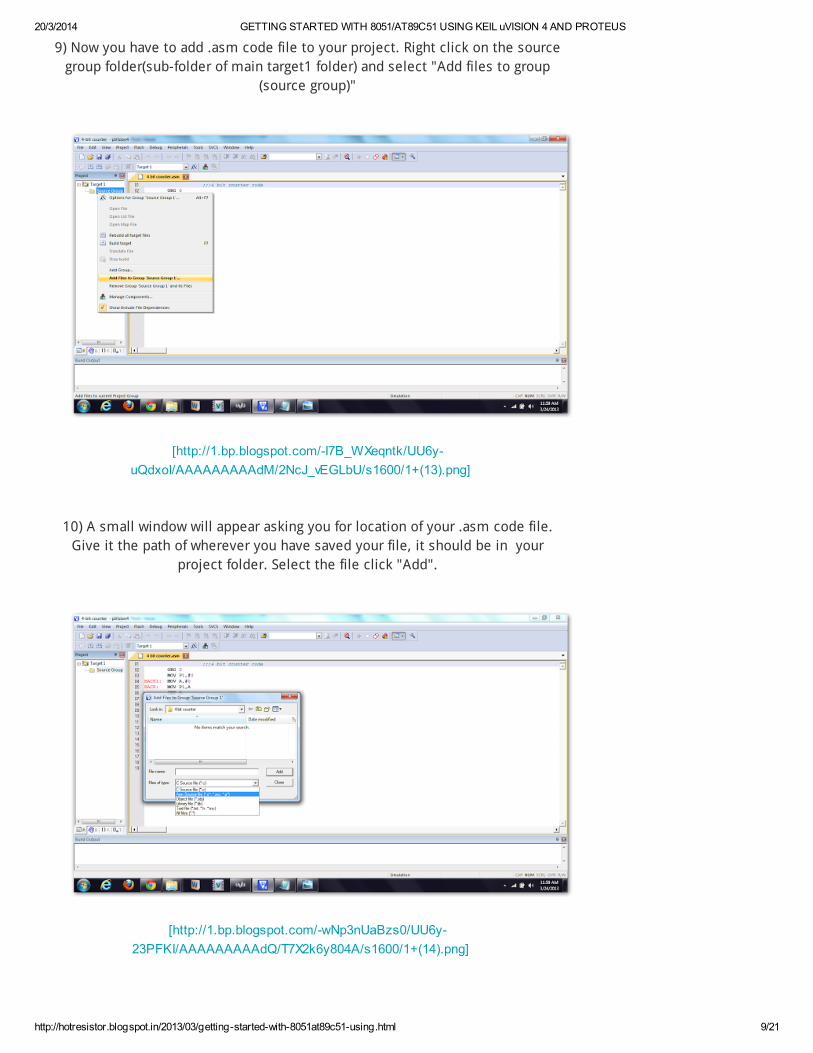
9) Now you have to add .asm code file to your project. Right click on the source
group folder(sub-folder of main target1 folder) and select "Add files to group
(source group)"
[http://1.bp.blogspot.com/-I7B_WXeqntk/UU6y-
uQdxoI/AAAAAAAAAdM/2NcJ_vEGLbU/s1600/1+(13).png]
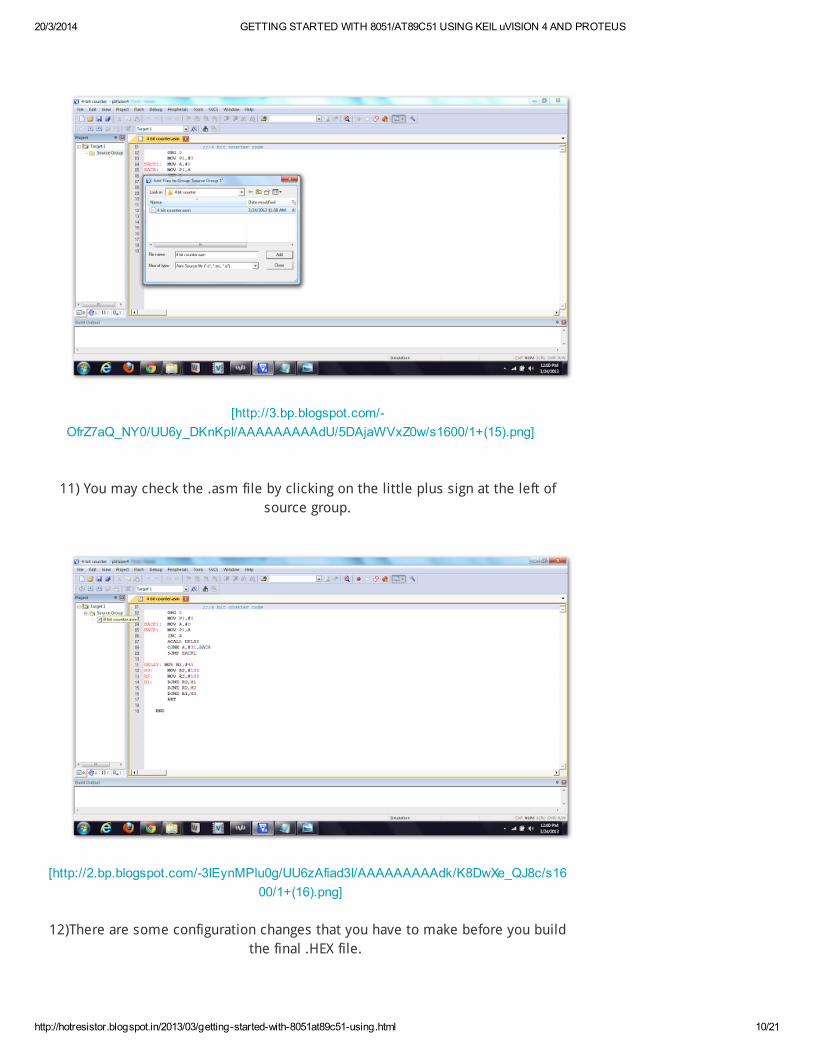
10) A small window will appear asking you for location of your .asm code file.
Give it the path of wherever you have saved your file, it should be in your
project folder. Select the file click "Add".
[http://1.bp.blogspot.com/-wNp3nUaBzs0/UU6y-
23PFKI/AAAAAAAAAdQ/T7X2k6y804A/s1600/1+(14).png]
Page 10
20/3/2014 GETTING STARTED WITH 8051/AT89C51 USING KEIL uVISION 4 AND PROTEUS
http://hotresistor.blogspot.in/2013/03/getting-started-with-8051at89c51-using.html 10/21
[http://3.bp.blogspot.com/-
OfrZ7aQ_NY0/UU6y_DKnKpI/AAAAAAAAAdU/5DAjaWVxZ0w/s1600/1+(15).png]
11) You may check the .asm file by clicking on the little plus sign at the left of
source group.
[http://2.bp.blogspot.com/-3IEynMPlu0g/UU6zAfiad3I/AAAAAAAAAdk/K8DwXe_QJ8c/s16
00/1+(16).png]
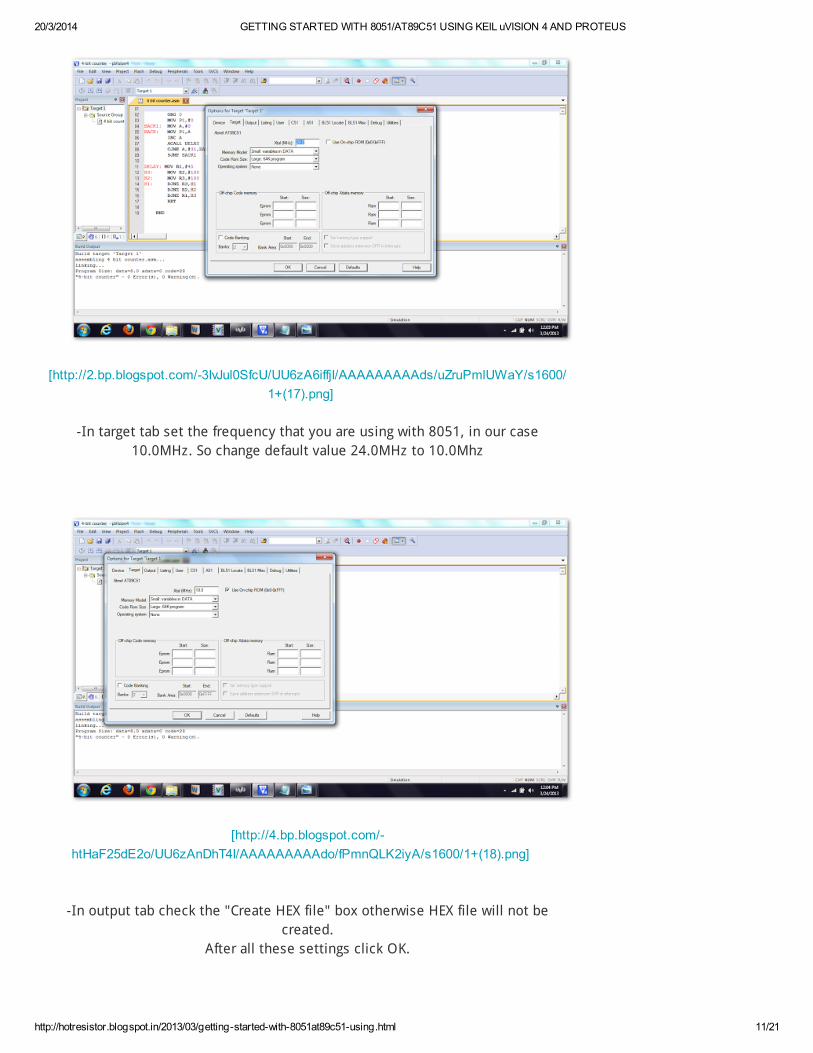
12)There are some configuration changes that you have to make before you build
the final .HEX file.
Page 11
20/3/2014 GETTING STARTED WITH 8051/AT89C51 USING KEIL uVISION 4 AND PROTEUS
http://hotresistor.blogspot.in/2013/03/getting-started-with-8051at89c51-using.html 11/21
[http://2.bp.blogspot.com/-3IvJul0SfcU/UU6zA6iffjI/AAAAAAAAAds/uZruPmlUWaY/s1600/
1+(17).png]
-In target tab set the frequency that you are using with 8051, in our case
10.0MHz. So change default value 24.0MHz to 10.0Mhz
[http://4.bp.blogspot.com/-
htHaF25dE2o/UU6zAnDhT4I/AAAAAAAAAdo/fPmnQLK2iyA/s1600/1+(18).png]
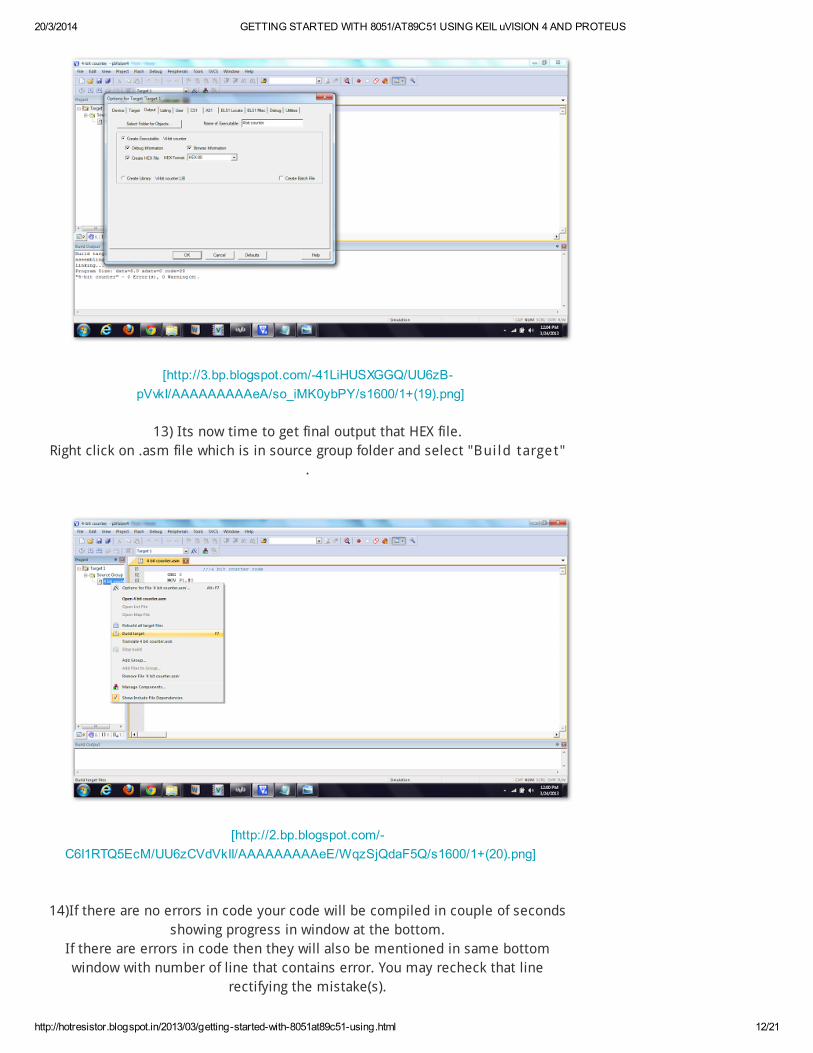
-In output tab check the "Create HEX file" box otherwise HEX file will not be
created.
After all these settings click OK.
Page 12
20/3/2014 GETTING STARTED WITH 8051/AT89C51 USING KEIL uVISION 4 AND PROTEUS
http://hotresistor.blogspot.in/2013/03/getting-started-with-8051at89c51-using.html 12/21
[http://3.bp.blogspot.com/-41LiHUSXGGQ/UU6zB-
pVvkI/AAAAAAAAAeA/so_iMK0ybPY/s1600/1+(19).png]
13) Its now time to get final output that HEX file.
Right click on .asm file which is in source group folder and select "Bui ld target"
.
[http://2.bp.blogspot.com/-
C6I1RTQ5EcM/UU6zCVdVkII/AAAAAAAAAeE/WqzSjQdaF5Q/s1600/1+(20).png]
14)If there are no errors in code your code will be compiled in couple of seconds
showing progress in window at the bottom.
If there are errors in code then they will also be mentioned in same bottom
window with number of line that contains error. You may recheck that line
rectifying the mistake(s).
Page 13
20/3/2014 GETTING STARTED WITH 8051/AT89C51 USING KEIL uVISION 4 AND PROTEUS
http://hotresistor.blogspot.in/2013/03/getting-started-with-8051at89c51-using.html 13/21
[http://1.bp.blogspot.com/-b2ZWrTTG-
UE/UU6zC8TRxYI/AAAAAAAAAeM/igfnAM50jsw/s1600/1+(21).png]
15) After successful compilation of code you can find final HEX file in same
project folder that contains main project file/asm file/other files.
[http://1.bp.blogspot.com/-6w4mj-
N7OmI/UU6zDB7ocaI/AAAAAAAAAeY/7FlhpP3fWk0/s1600/1+(22).png]
Page 14
20/3/2014 GETTING STARTED WITH 8051/AT89C51 USING KEIL uVISION 4 AND PROTEUS
http://hotresistor.blogspot.in/2013/03/getting-started-with-8051at89c51-using.html 14/21
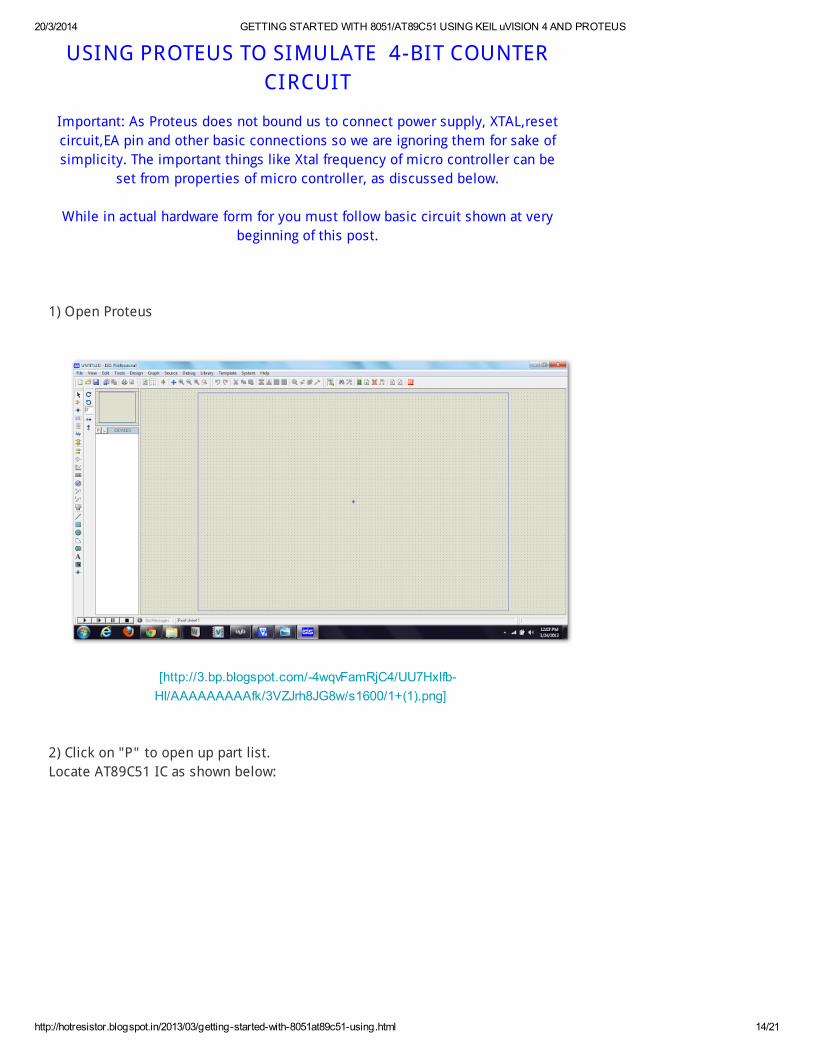
Important: As Proteus does not bound us to connect power supply, XTAL,reset
circuit,EA pin and other basic connections so we are ignoring them for sake of
simplicity. The important things like Xtal frequency of micro controller can be
set from properties of micro controller, as discussed below.
While in actual hardware form for you must follow basic circuit shown at very
beginning of this post.
1) Open Proteus
[http://3.bp.blogspot.com/-4wqvFamRjC4/UU7Hxlfb-
HI/AAAAAAAAAfk/3VZJrh8JG8w/s1600/1+(1).png]
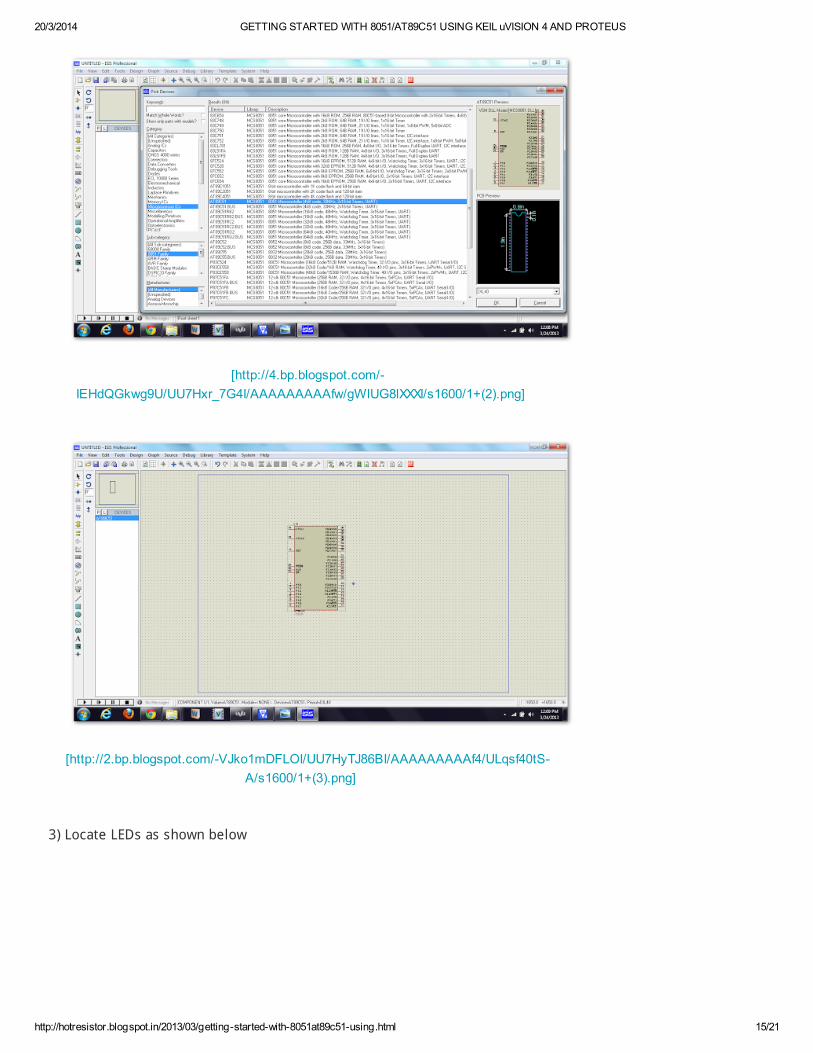
2) Click on "P" to open up part list.
Locate AT89C51 IC as shown below:
USING PROTEUS TO SIMULATE 4-BIT COUNTER
CIRCUIT
Page 15
20/3/2014 GETTING STARTED WITH 8051/AT89C51 USING KEIL uVISION 4 AND PROTEUS
http://hotresistor.blogspot.in/2013/03/getting-started-with-8051at89c51-using.html 15/21
[http://4.bp.blogspot.com/-
IEHdQGkwg9U/UU7Hxr_7G4I/AAAAAAAAAfw/gWlUG8lXXXI/s1600/1+(2).png]
[http://2.bp.blogspot.com/-VJko1mDFLOI/UU7HyTJ86BI/AAAAAAAAAf4/ULqsf40tS-
A/s1600/1+(3).png]
3) Locate LEDs as shown below
Page 16
20/3/2014 GETTING STARTED WITH 8051/AT89C51 USING KEIL uVISION 4 AND PROTEUS
http://hotresistor.blogspot.in/2013/03/getting-started-with-8051at89c51-using.html 16/21
[http://2.bp.blogspot.com/-
M7UQg8phvU8/UU7Hyx5fJvI/AAAAAAAAAgA/xG98W63UJ_c/s1600/1+(4).png]
4) Make connections from 8051 to LEDs
[http://1.bp.blogspot.com/-7YcSN-
kx0JQ/UU7HzYkGDLI/AAAAAAAAAgI/BWoawYNNsSA/s1600/1+(5).png]
5)Locate GND terminal as shown below
Page 17
20/3/2014 GETTING STARTED WITH 8051/AT89C51 USING KEIL uVISION 4 AND PROTEUS
http://hotresistor.blogspot.in/2013/03/getting-started-with-8051at89c51-using.html 17/21
[http://3.bp.blogspot.com/-
_1Wg21Q95g0/UU7HzqWi9VI/AAAAAAAAAgM/CHrb6hUkITw/s1600/1+(6).png]
6) Connect all LEDs to GND
[http://4.bp.blogspot.com/-
V3sZ3XvUELA/UU7H0K5V5nI/AAAAAAAAAgY/7ejHBFMLd2I/s1600/1+(7).png]
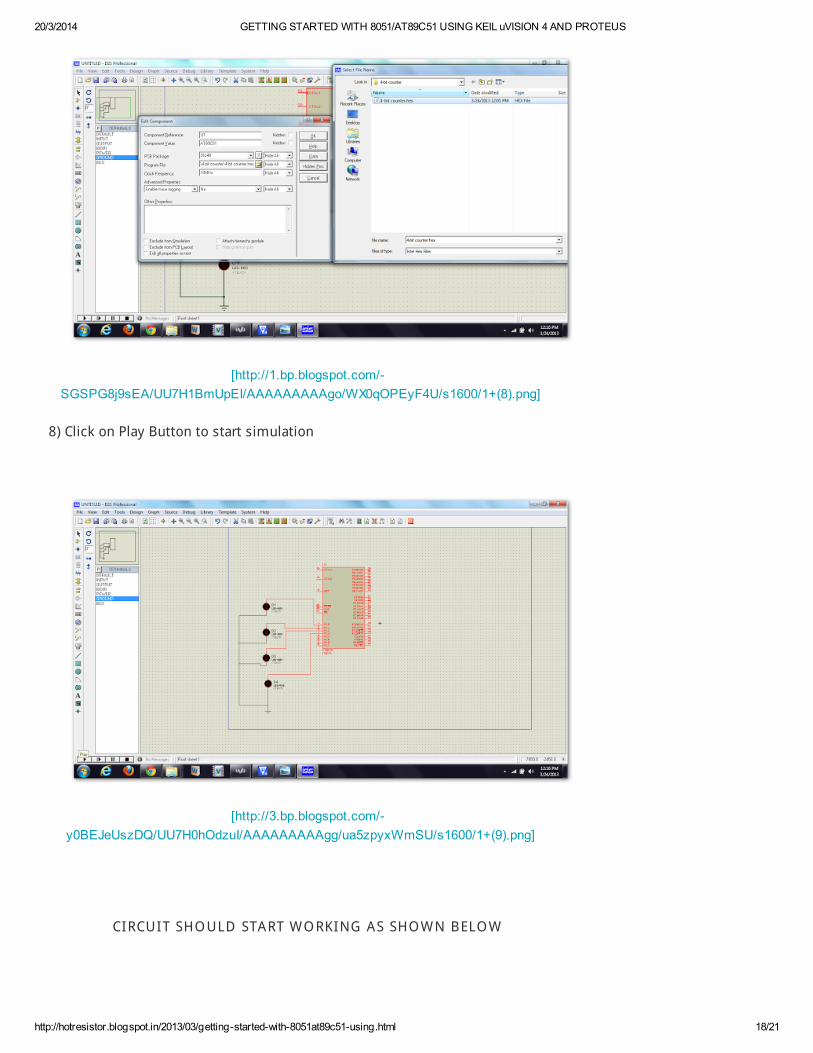
7) Double click on 8051 IC to open up its proerties window.
--- Set the operating frequency i-e 10.0MHz
--- Give controller the desirewd HEX file.
Page 18
20/3/2014 GETTING STARTED WITH 8051/AT89C51 USING KEIL uVISION 4 AND PROTEUS
http://hotresistor.blogspot.in/2013/03/getting-started-with-8051at89c51-using.html 18/21
[http://1.bp.blogspot.com/-
SGSPG8j9sEA/UU7H1BmUpEI/AAAAAAAAAgo/WX0qOPEyF4U/s1600/1+(8).png]
8) Click on Play Button to start simulation
[http://3.bp.blogspot.com/-
y0BEJeUszDQ/UU7H0hOdzuI/AAAAAAAAAgg/ua5zpyxWmSU/s1600/1+(9).png]
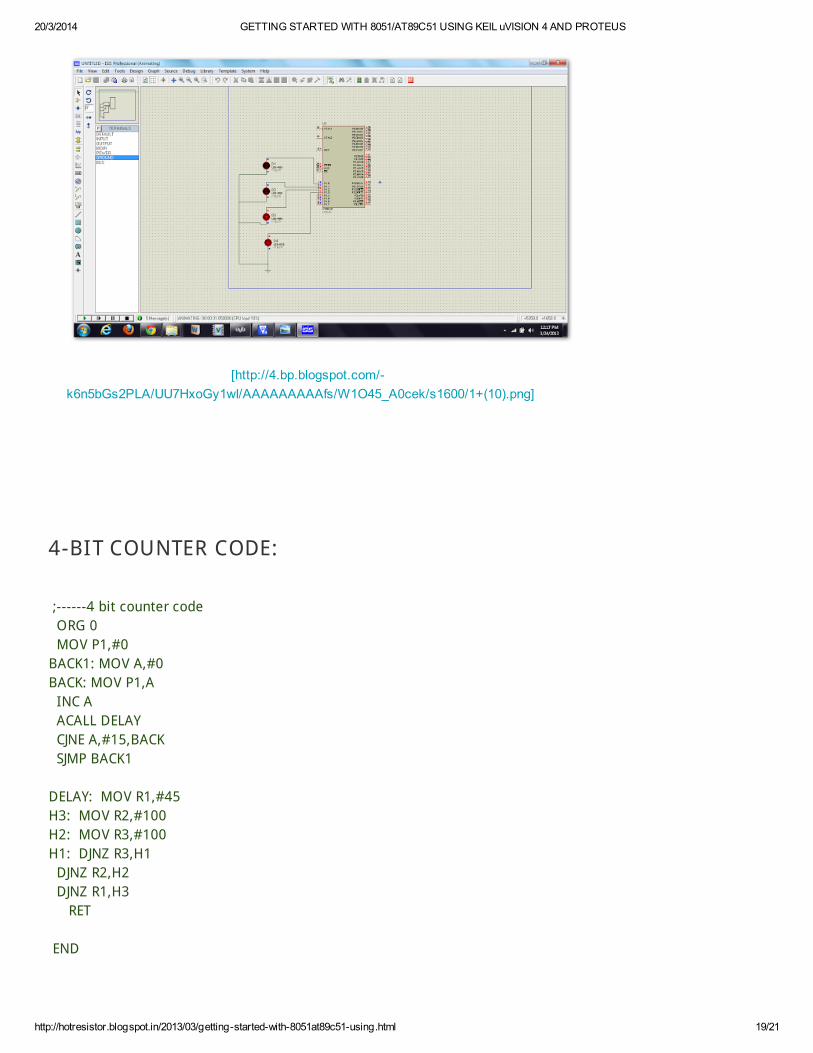
CIRCUIT SHO ULD START W O RKING AS SHO W N BELO W
Page 19
20/3/2014 GETTING STARTED WITH 8051/AT89C51 USING KEIL uVISION 4 AND PROTEUS
http://hotresistor.blogspot.in/2013/03/getting-started-with-8051at89c51-using.html 19/21
[http://4.bp.blogspot.com/-
k6n5bGs2PLA/UU7HxoGy1wI/AAAAAAAAAfs/W1O45_A0cek/s1600/1+(10).png]
;------4 bit counter code
ORG 0
MOV P1,#0
BACK1: MOV A,#0
BACK: MOV P1,A
INC A
ACALL DELAY
CJNE A,#15,BACK
SJMP BACK1
DELAY: MOV R1,#45
H3: MOV R2,#100
H2: MOV R3,#100
H1: DJNZ R3,H1
DJNZ R2,H2
DJNZ R1,H3
RET
END
4-BIT COUNTER CODE:
Page 20
20/3/2014 GETTING STARTED WITH 8051/AT89C51 USING KEIL uVISION 4 AND PROTEUS
http://hotresistor.blogspot.in/2013/03/getting-started-with-8051at89c51-using.html 20/21
Posted 24th March 2013 by Abdul Sattar Noonari
YOUTUBE VIDEO LINK
2 View comments
sajid niaz February 25, 2014 at 8:12 AM
very understandable steps...nice sir
Reply
Abdul Sattar Noonari March 4, 2014 at 9:35 AM
KEIL uVISION DOWNLOADOpen up your torrent client. Go to file>add torrent from urlthen paste following magnetic linkmagnet:?xt=urn:btih:c0cc1b8240c683a5dee956afa70d8b5f249a1c95&dn=Keil%20uVision%204%20C51%20v%209.02a%20Porta...&tr=http%3A%2F%2Ftracker.istole.it%2Fannounce&tr=udp%3A%2F%2Ftracker.publicbt.com%3A80&tr=http%3A%2F%2Finferno.demonoid.ph%3A3389%2Fannounce&tr=http%3A%2F%2Finferno.demonoid.me%3A6969%2Fannounce&tr=http%3A%2F%2Finferno.demonoid.ph%3A3390%2Fannounce&tr=http%3A%2F%2Fmgtracker.org%3A2710%2
Page 21
20/3/2014 GETTING STARTED WITH 8051/AT89C51 USING KEIL uVISION 4 AND PROTEUS
http://hotresistor.blogspot.in/2013/03/getting-started-with-8051at89c51-using.html 21/21
Enter your comment...
Comment as: Google Account
Publish
Preview
Fannounce&tr=http%3A%2F%2Fputo.me%3A6969%2Fannounce&tr=http%3A%2F%2Fnemesis.1337x.org%2Fannounce&tr=http%3A%2F%2Fipv6.tracker.harry.lu%2Fannounce&tr=http%3A%2F%2Finferno.demonoid.me%3A3419%2Fannounce&tr=http%3A%2F%2Finferno.demonoid.me%3A3414%2Fannounce&tr=http%3A%2F%2Finferno.demonoid.me%3A3413%2Fannounce&tr=http%3A%2F%2Finferno.demonoid.me%3A3415%2Fannounce&tr=http%3A%2F%2Finferno.demonoid.me%3A3416%2Fannounce&tr=http%3A%2F%2Finferno.demonoid.me%3A3418%2Fannounce&tr=http%3A%2F%2Finferno.demonoid.me%3A3417%2Fannounce&tr=http%3A%2F%2Fretracker.hotplug.ru%3A2710%2Fannounce&tr=http%3A%2F%2Ftracker.1337x.org%2Fannounce&tr=http%3A%2F%2Ftracker.torrent.to%3A2710%2Fannounce&tr=http%3A%2F%2Ftracker.novalayer.org%3A6969%2Fannounce
Reply