Getting started with NIO Presented by developerWorks, your source for great tutorials ibm.com/developerWorks Table of Contents If you're viewing this document online, you can click any of the topics below to link directly to that section. 1. Before you start ......................................................... 2 2. Input/output: A conceptual overview ................................ 4 3. Channels and buffers .................................................. 6 4. From theory to practice: Reading and writing in NIO............. 8 5. Buffer internals.......................................................... 12 6. More about buffers ..................................................... 21 7. Scattering and gathering .............................................. 26 8. File locking .............................................................. 28 9. Networking and asynchronous I/O .................................. 30 10. Character sets ......................................................... 35 11. Summary and resources ............................................ 38 Getting started with NIO Page 1 of 40
Transcript
Getting started with NIO
Presented by developerWorks, your source for great tutorials
ibm.com/developerWorks
Table of ContentsIf you're viewing this document online, you can click any of the topics below to link directly to that section.
1. Before you start......................................................... 22. Input/output: A conceptual overview ................................ 43. Channels and buffers.................................................. 64. From theory to practice: Reading and writing in NIO............. 85. Buffer internals.......................................................... 126. More about buffers ..................................................... 217. Scattering and gathering .............................................. 268. File locking .............................................................. 289. Networking and asynchronous I/O .................................. 3010. Character sets......................................................... 3511. Summary and resources ............................................ 38
Getting started with NIO Page 1 of 40
Section 1. Before you start
About this tutorial
The new input/output (NIO) library was introduced with JDK 1.4. Picking up whereoriginal I/O leaves off, NIO provides high-speed, block-oriented I/O in standard Javacode. By defining classes to hold data, and by processing that data in blocks, NIOtakes advantage of low-level optimizations in a way that the original I/O package couldnot, without using native code.
In this tutorial, we'll cover almost every aspect of the NIO library, from the high-levelconceptual stuff to under-the-hood programming detail. In addition to learning aboutcrucial I/O elements like buffers and channels, you'll have the opportunity to see howstandard I/O works in the updated library. You'll also learn about things you can only dowith NIO, such as asynchronous I/O and direct buffers.
Throughout the tutorial, we'll work with code samples that illustrate different aspects ofthe NIO library. Almost every code sample is part of an extended Java program, whichyou'll find in Resources on page 38 . As you are working through the exercises, you'reencouraged to download, compile, and run these programs on your own system. Thecode will also come in handy when you're done with the tutorial, providing a startingpoint for your NIO programming efforts.
This tutorial is intended for any programmer who wants to learn more about the JDK1.4 NIO library. To get the most from the discussion you should understand basic Javaprogramming concepts such as classes, inheritance, and using packages. Somefamiliarity with the original I/O library (from the java.io.* package) will also behelpful.
While this tutorial does require a working vocabulary and conceptual understanding ofthe Java language, it does not require a lot of actual programming experience. Inaddition to explaining thoroughly all the concepts relevant to the tutorial, I've kept thecode examples fairly small and simple. The goal is to provide an easy entry point forlearning about NIO, even for those who don't have much Java programmingexperience.
How to run the code
The source code archive (available in Resources on page 38 ) contains all of theprograms used in this tutorial. Each program consists of a single Java file. Each file isidentified by name and easily related to the programming concept it illustrates.
ibm.com/developerWorks Presented by developerWorks, your source for great tutorials
Page 2 of 40 Getting started with NIO
Some of the programs in the tutorial require command-line arguments to run. To run aprogram from the command line, simply go to your nearest command-line prompt.Under Windows, the command-line prompt is the "Command" or "command.com"program. Under UNIX, any shell will do.
You will need to have JDK 1.4 installed and in your path to complete the exercises inthe tutorial. See Resources on page 38 if you need help installing and configuring JDK1.4.
About the author
Greg Travis is a freelance Java programmer and technology writer living in New YorkCity. Greg started his programming career in 1992, spending three years in the world ofhigh-end PC games. In 1995, he joined EarthWeb, where he began developing newtechnologies with the Java programming language. Since 1997, Greg has been aconsultant in a variety of Web technologies, specializing in real-time graphics andsound. His interests include algorithm optimization, programming language design,signal processing (with emphasis on music), and real-time 3D graphics. Other articlesby Greg can be found on his personal Web page. He is also the author of JDK 1.4Tutorial, published by Manning Publications.
For technical questions or comments about the content of this tutorial, contact GregTravis at [email protected] or click Feedback at the top of any panel.
Presented by developerWorks, your source for great tutorials ibm.com/developerWorks
I/O -- or input/output -- refers to the interface between a computer and the rest of theworld, or between a single program and the rest of the computer. It is such a crucialelement of any computer system that the bulk of any I/O is actually built into theoperating system. Individual programs generally have most of their work done for them.
In Java programming, I/O has until recently been carried out using a stream metaphor.All I/O is viewed as the movement of single bytes, one at a time, through an objectcalled a Stream. Stream I/O is used for contacting the outside world. It is also usedinternally, for turning objects into bytes and then back into objects.
NIO has the same role and purpose as original I/O, but it uses a different metaphor --block I/O. As you will learn in this tutorial, block I/O can be a lot more efficient thanstream I/O.
Why NIO?
NIO was created to allow Java programmers to implement high-speed I/O withouthaving to write custom native code. NIO moves the most time-consuming I/O activities(namely, filling and draining buffers) back into the operating system, thus allowing for agreat increase in speed.
Streams versus blocks
The most important distinction between the original I/O library (found in java.io.*)and NIO has to do with how data is packaged and transmitted. As previouslymentioned, original I/O deals with data in streams, whereas NIO deals with data inblocks.
A stream-oriented I/O system deals with data one byte at a time. An input streamproduces one byte of data, and an output stream consumes one byte of data. It is veryeasy to create filters for streamed data. It is also relatively simply to chain several filterstogether so that each one does its part in what amounts to a single, sophisticatedprocessing mechanism. On the flip side, stream-oriented I/O is often rather slow.
A block-oriented I/O system deals with data in blocks. Each operation produces or
ibm.com/developerWorks Presented by developerWorks, your source for great tutorials
Page 4 of 40 Getting started with NIO
consumes a block of data in one step. Processing data by the block can be much fasterthan processing it by the (streamed) byte. But block-oriented I/O lacks some of theelegance and simplicity of stream-oriented I/O.
Integrated I/O
The original I/O package and NIO have been well integrated in JDK 1.4. java.io.*has been reimplemented using NIO as its base, so it can now take advantage of somefeatures of NIO. For example, some of the classes in the java.io.* package containmethods to read and write data in blocks, which leads to faster processing even inmore stream-oriented systems.
It is also possible to use the NIO library to implement standard I/O functions. Forexample, you could easily use block I/O to move data one byte at a time. But as youwill see, NIO also offers many advantages that are not available from the original I/Opackage.
Presented by developerWorks, your source for great tutorials ibm.com/developerWorks
Getting started with NIO Page 5 of 40
Section 3. Channels and buffers
Overview
Channels and Buffers are the central objects in NIO, and are used for just aboutevery I/O operation.
Channels are analogous to streams in the original I/O package. All data that goesanywhere (or comes from anywhere) must pass through a Channel object. A Bufferis essentially a container object. All data that is sent to a channel must first be placed ina buffer; likewise, any data that is read from a channel is read into a buffer.
In this section, you will learn about working with channels and buffers in NIO.
What is a buffer?
A Buffer is an object, which holds some data, that is to be written to or that has justbeen read from. The addition of the Buffer object in NIO marks one of the mostsignificant differences between the new library and original I/O. In stream-oriented I/O,you wrote data directly to, and read data directly from, Stream objects.
In the NIO library, all data is handled with buffers. When data is read, it is read directlyinto a buffer. When data is written, it is written into a buffer. Anytime you access data inNIO, you are pulling it out of the buffer.
A buffer is essentially an array. Generally, it is an array of bytes, but other kinds ofarrays can be used. But a buffer is more than just an array. A buffer provides structuredaccess to data and also keeps track of the system's read/write processes.
Kinds of buffers
The most commonly used kind of buffer is the ByteBuffer. A ByteBuffer allowsget/set operations (that is, the getting and setting of bytes) on its underlying byte array.
ByteBuffer is not the only type of buffer in NIO. In fact, there is a buffer type for eachof the primitive Java types:
• ByteBuffer
ibm.com/developerWorks Presented by developerWorks, your source for great tutorials
Page 6 of 40 Getting started with NIO
• CharBuffer
• ShortBuffer
• IntBuffer
• LongBuffer
• FloatBuffer
• DoubleBuffer
Each of the Buffer classes is an instance of the Buffer interface. With the exceptionof ByteBuffer, each one has the exact same operations, differing only in the type ofdata it deals with. Because ByteBuffer is used for most standard I/O operations ithas all of the shared buffer operations as well as some that are unique.
You may want to take a moment now to run the UseFloatBuffer.java, which contains anexample of typed buffers in action.
What is a channel?
A Channel is an object from which you can read data and to which you can write data.Comparing NIO with original I/O, a channel is like a stream.
As previously mentioned, all data is handled through Buffer objects. You never writea byte directly to a channel; instead you write to a buffer containing one or more bytes.Likewise, you don't read a byte directly from a channel; you read from a channel into abuffer, and then get the bytes from the buffer.
Kinds of channels
Channels differ from streams in that they are bi-directional. Whereas streams only go inone direction (a stream must be a subclass of either InputStream orOutputStream), a Channel can be opened for reading, for writing, or for both.
Because they are bi-directional, channels better reflect the reality of the underlyingoperating system than streams do. In the UNIX model in particular, the underlyingoperating system channels are bi-directional.
Presented by developerWorks, your source for great tutorials ibm.com/developerWorks
Getting started with NIO Page 7 of 40
Section 4. From theory to practice: Reading and writing inNIO
Overview
Reading and writing are the fundamental processes of I/O. Reading from a channel issimple: we simply create a buffer and then ask a channel to read data into it. Writing isalso fairly simply: we create a buffer, fill it with data, and then ask a channel to writefrom it.
In this section, we'll learn a little bit about reading and writing data in Java programs.We'll go over the main components of NIO (buffers, channels, and some relatedmethods) and see how they interact for reading and writing. In the sections that follow,we will look at each of these components and interactions in more detail.
Reading from a file
For our first exercise, we'll read some data from a file. If we were using original I/O, wewould simply create a FileInputStream and read from that. In NIO, however, thingswork a little differently: we first get a Channel object from the FileInputStream,and then use that channel to read the data.
Any time you perform a read operation in an NIO system, you are reading from achannel, but you don't read directly from a channel. Since all data ultimately resides inthe buffer, you read from a channel into a buffer.
So reading from a file involves three steps: (1) getting the Channel fromFileInputStream; (2) creating the Buffer; and (3) reading from the Channel intothe Buffer.
Now, let's see how this works.
Three easy steps
Our first step is to get a channel. We get the channel from the FileInputStream:
FileInputStream fin = new FileInputStream( "readandshow.txt" );FileChannel fc = fin.getChannel();
ibm.com/developerWorks Presented by developerWorks, your source for great tutorials
Page 8 of 40 Getting started with NIO
The next step is to create a buffer:
ByteBuffer buffer = ByteBuffer.allocate( 1024 );
And, finally, we need to read from the channel into the buffer, as shown here:
fc.read( buffer );
You'll notice that we didn't need to tell the channel how much to read into the buffer.Each buffer has a sophisticated internal accounting system that keeps track of howmuch data has been read and how much room there is for more data. We'll talk moreabout the buffer accounting system in Buffer internals on page 12 .
Writing to a file
Writing to a file in NIO is similar to reading from one. We start by getting a channel froma FileOutputStream:
FileOutputStream fout = new FileOutputStream( "writesomebytes.txt" );FileChannel fc = fout.getChannel();
Our next step is to create a buffer and put some data in it -- in this case, the data willbe taken from an array called message which contains the ASCII bytes for the string"Some bytes." (The buffer.flip() and buffer.put() calls will be explained laterin the tutorial.)
ByteBuffer buffer = ByteBuffer.allocate( 1024 );
for (int i=0; i<message.length; ++i) {buffer.put( message[i] );
}buffer.flip();
Our final step is to write to the buffer:
fc.write( buffer );
Notice that once again we did not need to tell the channel how much data we wanted towrite. The buffer's internal accounting system keeps track of how much data it containsand how much is left to be written.
Presented by developerWorks, your source for great tutorials ibm.com/developerWorks
Getting started with NIO Page 9 of 40
Reading and writing together
Next we'll see what happens when we combine reading and writing. We'll base thisexercise on a simple program called CopyFile.java, which copies all the data from onefile to another one. CopyFile.java carries out three basic operations: it first creates aBuffer, then reads data from the source file into this buffer, and then writes the bufferto the destination file. The program repeats -- read, write, read, write -- until the sourcefile is exhausted.
The CopyFile program will let you see how we check the status of an operation, as wellas how we use the clear() and flip() methods to reset the buffer and prepare it tohave newly read data written to another channel.
Running the CopyFile example
Because the buffer tracks its own data, the inner loop of the CopyFile program is verysimple, as shown below:
fcin.read( buffer );fcout.write( buffer );
The first line reads data into the buffer from the input channel, fcin, and the secondline writes the data to the output channel, fcout.
Checking the status
Our next step is to check to see when we're done copying. We're done when there's nomore data, and we can tell this when the read() method returns -1, as shown below:
int r = fcin.read( buffer );
if (r==-1) {break;
}
Resetting the buffer
ibm.com/developerWorks Presented by developerWorks, your source for great tutorials
Page 10 of 40 Getting started with NIO
And, finally, we call the clear() method before we read into a buffer from the inputchannel. Likewise, we call the flip() method before we write a buffer to the outputchannel, as shown below:
buffer.clear();int r = fcin.read( buffer );
if (r==-1) {break;
}
buffer.flip();fcout.write( buffer );
The clear() method resets the buffer, making it ready to have data read into it. Theflip() method prepares the buffer to have the newly-read data written to anotherchannel.
Presented by developerWorks, your source for great tutorials ibm.com/developerWorks
Getting started with NIO Page 11 of 40
Section 5. Buffer internals
Overview
In this section, we'll look at two important components of buffers in NIO: state variablesand accessor methods.
State variables are key to the "internal accounting system" mentioned in the previoussection. With each read/write operation, the buffer's state changes. By recording andtracking those changes, a buffer is able to internally manage its own resources.
When you read data from a channel, the data is placed in a buffer. In some cases, youcan write this buffer directly to another channel, but often, you'll want to look at the dataitself. This is accomplished using the accessor method get(). Likewise, when youwant to put raw data in a buffer, you use the accessor method put().
In this section, you'll learn about state variables and accessor methods in NIO. Eachcomponent will be described, and then you'll have the opportunity to see it in action.While NIO's internal accounting system might seem complicated at first, you'll quicklysee that most of the real work is done for you. The bookkeeping you're probablyaccustomed to coding by hand -- using byte arrays and index variables -- is handledinternally in NIO.
State variables
Three values can be used to specify the state of a buffer at any given moment in time:
• position
• limit
• capacity
Together, these three variables track the state of the buffer and the data it contains.We'll examine each one in detail in the panels that follow, and also see how they fit intoa typical read/write (input/output) process. For the sake of the example, we'll assumethat we are copying data from an input channel to an output channel.
Position
ibm.com/developerWorks Presented by developerWorks, your source for great tutorials
Page 12 of 40 Getting started with NIO
You will recall that a buffer is really just a glorified array. When you read from achannel, you put the data that you read into an underlying array. The positionvariable keeps track of how much data you have written. More precisely, it specifiesinto which array element the next byte will go. Thus, if you've read three bytes from achannel into a buffer, that buffer's position will be set to 3, referring to the fourthelement of the array.
Likewise, when you are writing to a channel, you get the data from a buffer. Theposition value keeps track of how much you have gotten from the buffer. Moreprecisely, it specifies from which array element the next byte will come. Thus, if you'vewritten 5 bytes to a channel from a buffer, that buffer's position will be set to 5,referring to the sixth element of the array.
Limit
The limit variable specifies how much data there is left to get (in the case of writingfrom a buffer into a channel), or how much room there is left to put data into (in thecase of reading from a channel into a buffer).
The position is always less than, or equal to, the limit.
Capacity
The capacity of a buffer specifies the maximum amount of data that can be storedtherein. In effect, it specifies the size of the underlying array -- or, at least, the amountof the underlying array that we are permitted to use.
The limit can never be larger than the capacity.
Observing the variables
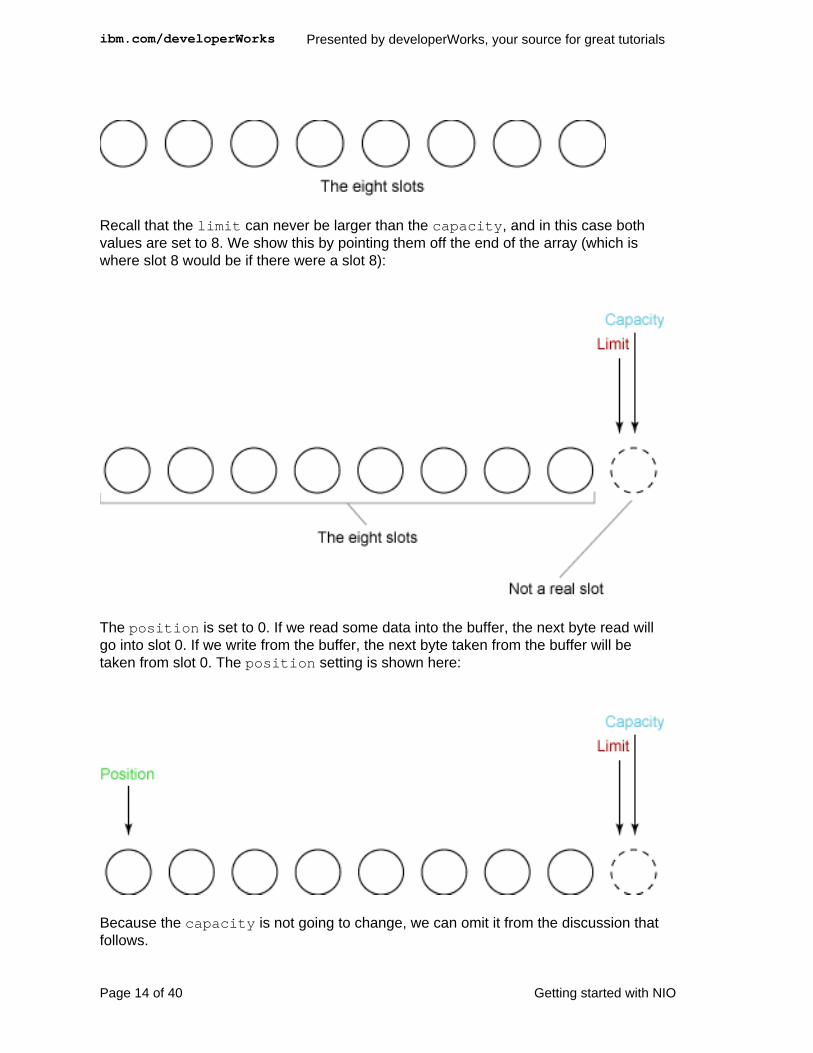
We'll start with a newly created buffer. For the sake of the example, let's assume thatour buffer has a total capacity of eight bytes. The Buffer's state is shown here:
Presented by developerWorks, your source for great tutorials ibm.com/developerWorks
Getting started with NIO Page 13 of 40
Recall that the limit can never be larger than the capacity, and in this case bothvalues are set to 8. We show this by pointing them off the end of the array (which iswhere slot 8 would be if there were a slot 8):
The position is set to 0. If we read some data into the buffer, the next byte read willgo into slot 0. If we write from the buffer, the next byte taken from the buffer will betaken from slot 0. The position setting is shown here:
Because the capacity is not going to change, we can omit it from the discussion thatfollows.
ibm.com/developerWorks Presented by developerWorks, your source for great tutorials
Page 14 of 40 Getting started with NIO
The first read
Now we are ready to begin read/write operations on our newly created buffer. We startby reading some data from our input channel into the buffer. The first read gets threebytes. These are put into the array starting at the position, which was set to 0. Afterthis read, the position is increased to 3, as shown here:
The limit is unchanged.
The second read
For our second read, we read two more bytes from the input channel into our buffer.The two bytes are stored at the location pointed to by position; position is thusincreased by two:
The limit is unchanged.
Presented by developerWorks, your source for great tutorials ibm.com/developerWorks
Getting started with NIO Page 15 of 40
The flip
Now we are ready to write our data to an output channel. Before we can do this, wemust call the flip() method. This method does two crucial things:
1. It sets the limit to the current position.
2. It sets the position to 0.
The figure on the previous panel shows our buffer before the flip. Here is the bufferafter the flip:
We are now ready to begin writing data to a channel from the buffer. The positionhas been set to 0, which means the next byte we get will be the first one. And thelimit has been set to the old position, which means that it just includes all thebytes we read before, and no more.
The first write
In our first write, we take four bytes from the buffer and write them to our outputchannel. This advances the position to 4, and leaves the limit unchanged, asshown here:
ibm.com/developerWorks Presented by developerWorks, your source for great tutorials
Page 16 of 40 Getting started with NIO
The second write
We only have one byte left to write. The limit was set to 5 when we did our flip(),and the position cannot go past the limit. So the last write takes one byte fromour buffer and writes it to the output channel. This advances the position to 5, andleaves the limit unchanged, as shown here:
The clear
Our final step is to call the buffer's clear() method. This method resets the buffer inpreparation for receiving more bytes. Clear does two crucial things:
1. It sets the limit to match the capacity.
2. It sets the position to 0.
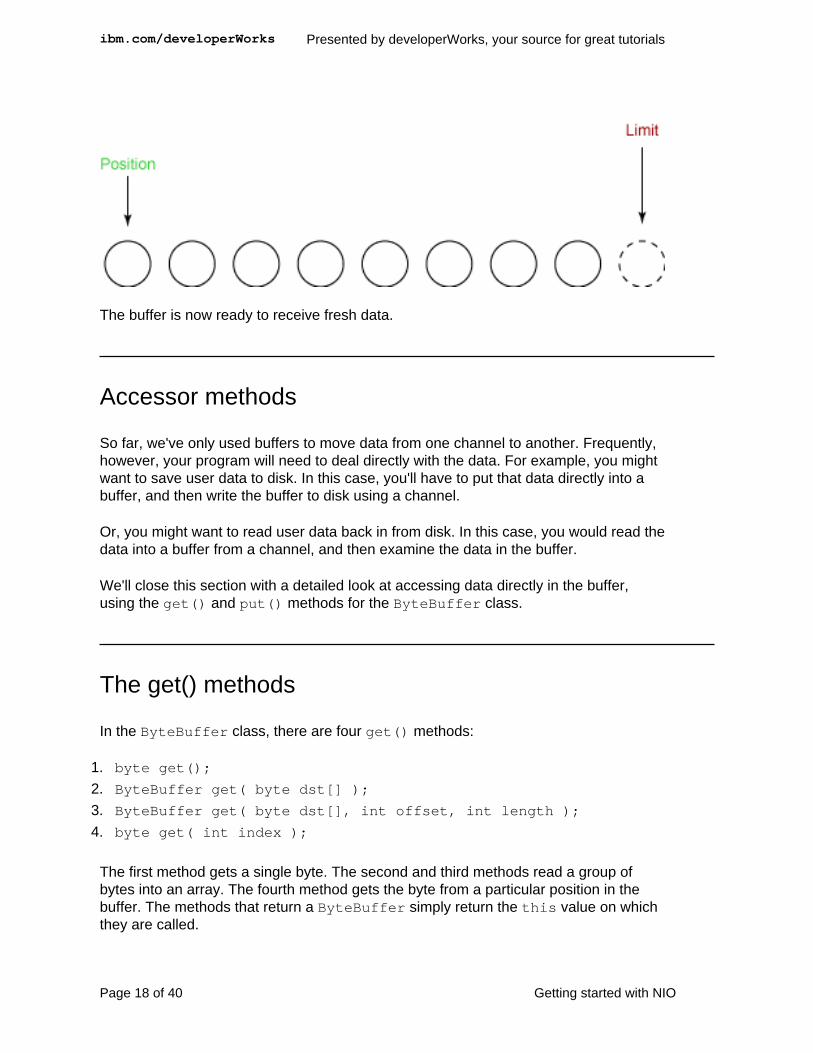
This figure shows the state of the buffer after clear() has been called:
Presented by developerWorks, your source for great tutorials ibm.com/developerWorks
Getting started with NIO Page 17 of 40
The buffer is now ready to receive fresh data.
Accessor methods
So far, we've only used buffers to move data from one channel to another. Frequently,however, your program will need to deal directly with the data. For example, you mightwant to save user data to disk. In this case, you'll have to put that data directly into abuffer, and then write the buffer to disk using a channel.
Or, you might want to read user data back in from disk. In this case, you would read thedata into a buffer from a channel, and then examine the data in the buffer.
We'll close this section with a detailed look at accessing data directly in the buffer,using the get() and put() methods for the ByteBuffer class.
The get() methods
In the ByteBuffer class, there are four get() methods:
1. byte get();
2. ByteBuffer get( byte dst[] );
3. ByteBuffer get( byte dst[], int offset, int length );
4. byte get( int index );
The first method gets a single byte. The second and third methods read a group ofbytes into an array. The fourth method gets the byte from a particular position in thebuffer. The methods that return a ByteBuffer simply return the this value on whichthey are called.
ibm.com/developerWorks Presented by developerWorks, your source for great tutorials
Page 18 of 40 Getting started with NIO
Additionally, we say that the first three get() methods are relative, while the last oneis absolute. Relative means that the limit and position values are respected bythe get() operation -- specifically, the byte is read from the current position, andthe position is incremented after the get. An absolute method, on the other hand,ignores the limit and position values, and does not affect them. In effect, itbypasses the buffer's accounting methods entirely.
The methods shown above correspond to the ByteBuffer class. The other classeshave equivalent get() methods that are identical except that rather than dealing withbytes, they deal with the type appropriate for that buffer class.
The put() methods
In the ByteBuffer class, there are five put() methods:
1. ByteBuffer put( byte b );
2. ByteBuffer put( byte src[] );
3. ByteBuffer put( byte src[], int offset, int length );
4. ByteBuffer put( ByteBuffer src );
5. ByteBuffer put( int index, byte b );
The first method puts a single byte. The second and third methods write a group ofbytes from an array. The fourth method copies data from the given sourceByteBuffer into this ByteBuffer. The fifth method puts the byte into the buffer at aparticular position. The methods that return a ByteBuffer simply return the thisvalue on which they are called.
As with the get() methods, we characterize the put() methods as being relative orabsolute. The first four methods are relative, while the fifth one is absolute.
The methods shown above correspond to the ByteBuffer class. The other classeshave equivalent put() methods that are identical except that rather than dealing withbytes, they deal with the type appropriate for that buffer class.
Typed get() and put() methods
In addition to the get() and put() methods described in the previous panels,ByteBuffer also has extra methods for reading and writing values of different types,as follows:
Presented by developerWorks, your source for great tutorials ibm.com/developerWorks
Getting started with NIO Page 19 of 40
• getByte()
• getChar()
• getShort()
• getInt()
• getLong()
• getFloat()
• getDouble()
• putByte()
• putChar()
• putShort()
• putInt()
• putLong()
• putFloat()
• putDouble()
Each of these methods, in fact, comes in two varieties -- one relative and one absolute.They are useful for reading formatted binary data, such as the header of an image file.
You can see these methods in action in the example program TypesInByteBuffer.java.
The buffer at work: An inner loop
The following inner loop summarizes the process of using a buffer to copy data from aninput channel to an output channel.
while (true) {buffer.clear();int r = fcin.read( buffer );
if (r==-1) {break;
}
buffer.flip();fcout.write( buffer );
}
The read() and write() calls are greatly simplified because the buffer takes care ofmany of the details. The clear() and flip() methods are used to switch the bufferbetween reading and writing.
ibm.com/developerWorks Presented by developerWorks, your source for great tutorials
Page 20 of 40 Getting started with NIO
Section 6. More about buffers
Overview
Thus far, you have learned most of what you need to know about buffers to use themon a day-to-day basis. Our examples haven't strayed much beyond the kind ofstandard read/write procedures you could just as easily implement in original I/O as inNIO.
In this section, we'll get into some of the more complex aspects of working with buffers,such as buffer allocation, wrapping, and slicing. We'll also talk about some of the newfeatures NIO brings to the Java platform. You'll learn how to create different types ofbuffers to meet different goals, such as read-only buffers, which protect data frommodification, and direct buffers, which map directly onto the underlying OS buffers.We'll close the section with an introduction to creating memory-mapped files in NIO.
Buffer allocation and wrapping
Before you can read or write, you must have a buffer. To create a buffer, you mustallocate it. We allocate a buffer using the static method of allocate():
ByteBuffer buffer = ByteBuffer.allocate( 1024 );
The allocate() method allocates an underlying array of the specified size and wrapsit in a buffer object -- in this case a ByteBuffer.
You can also turn an existing array into a buffer, as shown here:
byte array[] = new byte[1024];ByteBuffer buffer = ByteBuffer.wrap( array );
In this case, you've used the wrap() method to wrap a buffer around an array. Youmust be very careful about performing this type of operation. Once you've done it, theunderlying data can be accessed through the buffer as well as directly.
Buffer slicing
The slice() method creates a kind of sub-buffer from an existing buffer. That is, it
Presented by developerWorks, your source for great tutorials ibm.com/developerWorks
Getting started with NIO Page 21 of 40
creates a new buffer that shares its data with a portion of the original buffer.
This is best explained with an example. Let's start by creating a ByteBuffer of length10:
ByteBuffer buffer = ByteBuffer.allocate( 10 );
We fill this buffer with data, putting the number n in slot n:
for (int i=0; i<buffer.capacity(); ++i) {buffer.put( (byte)i );
}
Now we'll slice the buffer to create a sub-buffer that covers slots 3 through 6. In asense, the sub-buffer is like a window onto the original buffer.
You specify the start and end of the window by setting the position and limitvalues, and then call the Buffer's slice() method:
slice is a sub-buffer of buffer. However, slice and buffer share the sameunderlying data array, as we'll see in the next section.
Buffer slicing and data sharing
We've created a sub-buffer of our original buffer, and we know that the two buffers andthe sub-buffers share the same underlying data array. Let's see what this means.
We run through the sub-buffer, and alter each element by multiplying it by 11. Thischanges, for example, a 5 into a 55.
for (int i=0; i<slice.capacity(); ++i) {byte b = slice.get( i );b *= 11;slice.put( i, b );
}
Finally, let's take a look at the contents of the original buffer:
buffer.position( 0 );
ibm.com/developerWorks Presented by developerWorks, your source for great tutorials
Page 22 of 40 Getting started with NIO
buffer.limit( buffer.capacity() );
while (buffer.remaining()>0) {System.out.println( buffer.get() );
}
The result shows that only the elements in the window of the sub-buffer were changed:
$ java SliceBuffer01233445566789
Slice buffers are excellent for facilitating abstraction. You can write your functions toprocess an entire buffer, and if you find you want to apply that process to a sub-buffer,you can just take a slice of the main buffer and pass that to your function. This is easierthan writing your functions to take additional parameters specifying what portion of thebuffer should be acted upon.
Read-only buffers
Read-only buffers are very simple -- you can read them, but you can't write to them.You can turn any regular buffer into a read-only buffer by calling itsasReadOnlyBuffer() method, which returns a new buffer that is identical to the first(and shares data with it), but is read-only.
Read-only buffers are useful for protecting data. When you pass a buffer to a methodof some object, you really have no way of knowing if that method is going to try tomodify the data in the buffer. Creating a read-only buffer guarantees that the bufferwon't be modified.
You cannot convert a read-only buffer to a writable buffer.
Direct and indirect buffers
Another useful kind of ByteBuffer is the direct buffer. A direct buffer is one whosememory is allocated in a special way to increase I/O speed.
Presented by developerWorks, your source for great tutorials ibm.com/developerWorks
Getting started with NIO Page 23 of 40
Actually, the exact definition of a direct buffer is implementation-dependent. Sun'sdocumentation has this to say about direct buffers:
Given a direct byte buffer, the Java virtual machine will make a best effort to performnative I/O operations directly upon it. That is, it will attempt to avoid copying the buffer'scontent to (or from) an intermediate buffer before (or after) each invocation of one ofthe underlying operating system's native I/O operations.You can see direct buffers in action in the example program FastCopyFile.java, whichis a version of CopyFile.java that uses direct buffers for increased speed.
You can also create a direct buffer using memory-mapped files.
Memory-mapped file I/O
Memory-mapped file I/O is a method for reading and writing file data that can be agreat deal faster than regular stream- or channel-based I/O.
Memory-mapped file I/O is accomplished by causing the data in a file to magicallyappear as the contents of a memory array. At first, this sounds like it simply meansreading the entire file into memory, but in fact it does not. In general, only the parts ofthe file that you actually read or write are brought, or mapped, into memory.
Memory-mapping isn't really magical, or all that uncommon. Modern operating systemsgenerally implement filesystems by mapping portions of a file into portions of memory,doing so on demand. The Java memory-mapping system simply provides access tothis facility if it is available in the underlying operating system.
Although they are fairly simple to create, writing to memory-mapped files can bedangerous. By the simple act of changing a single element of an array, you are directlymodifying the file on disk. There is no separation between modifying the data andsaving it to a disk.
Mapping a file into memory
The easiest way to learn about memory mapping is by example. In the example below,we want to map a FileChannel (all or a portion of it) into memory. For this we usethe FileChannel.map() method. The following line of code maps the first 1024bytes of a file into memory:
ibm.com/developerWorks Presented by developerWorks, your source for great tutorials
Page 24 of 40 Getting started with NIO
The map() method returns a MappedByteBuffer, which is a subclass ofByteBuffer. Thus, you can use the newly-mapped buffer as you would any otherByteBuffer, and the operating system will take care of doing the mapping for you, ondemand.
Presented by developerWorks, your source for great tutorials ibm.com/developerWorks
Getting started with NIO Page 25 of 40
Section 7. Scattering and gathering
Overview
Scatter/gather I/O is a method of reading and writing that uses multiple buffers, ratherthan a single buffer, to hold data.
A scattering read is like a regular channel read, except that it reads data into an arrayof buffers rather than a single buffer. Likewise, a gathering write writes data from anarray of buffers rather than a single buffer.
Scatter/gather I/O is useful for dividing a data stream into separate sections, which canhelp implement complicated data formats.
Scatter/gather I/O
Channels can optionally implement two new interfaces: ScatteringByteChanneland GatheringByteChannel. A ScatteringByteChannel is a channel that hastwo additional read methods:
• long read( ByteBuffer[] dsts );
• long read( ByteBuffer[] dsts, int offset, int length );
These long read() methods are rather like the standard read methods, except thatinstead of taking a single buffer they take an array of buffers.
In a scattering read, the channel fills up each buffer in turn. When it fills up one buffer, itstarts filling the next one. In a sense, the array of buffers is treated like one big buffer.
Applications of scatter/gather
Scatter/gather I/O is useful for dividing a piece of data into sections. For example, youmight be writing a networking application that uses message objects, and eachmessage is divided into a fixed-length header and a fixed-length body. You create onebuffer that's just big enough for the header, and another buffer that's just big enough forthe body. When you put these two in an array and read into them using a scatteringread the header and body will be neatly divided between two buffers.
ibm.com/developerWorks Presented by developerWorks, your source for great tutorials
Page 26 of 40 Getting started with NIO
The convenience that we already get from buffers applies to buffer arrays as well.Because each buffer keeps track of how much room it has for more data, the scatteringread will automatically find the first buffer with room in it. After that's filled up, it movesonto the next one.
Gathering writes
A gathering write is like a scattering read, only for writing. It too has methods that takean array of buffers:
• long write( ByteBuffer[] srcs );
• long write( ByteBuffer[] srcs, int offset, int length );
A gathering write is useful for forming a single data stream from a group of separatebuffers. In keeping with the message example described above, you could use agathering write to automatically assemble the components of a network message into asingle data stream for transmission across a network.
You can see scattering reads and gathering writes in action in the example programUseScatterGather.java.
Presented by developerWorks, your source for great tutorials ibm.com/developerWorks
Getting started with NIO Page 27 of 40
Section 8. File locking
Overview
File-locking can be confusing at first. It sounds like it refers to preventing programs orusers from accessing a particular file. In fact, file locks are just like regular Java objectlocks -- they are advisory locks. They don't prevent any kind of data access; instead,they allow different parts of a system to coordinate through the sharing and acquisitionof locks.
You can lock an entire file or a portion of a file. If you acquire an exclusive lock, then noone else can acquire a lock on that same file or portion of a file. If you acquire a sharedlock, then others can acquire shared locks, but not exclusive locks, on that same file orportion of a file. File locking is not always done for the purpose of protecting data. Forexample, you might temporarily lock a file to ensure that a particular write operation ismade atomically, without interference from other programs.
Most operating systems provide filesystem locks, but they don't all do it in the sameway. Some implementations provide shared locks, while others provide only exclusivelocks. And some implementations do, in fact, make a locked portion of a fileinaccessible, although most do not.
In this section, you'll learn how to do a simple file locking procedure in NIO, and we'llalso talk about some of the ways you can ensure your locked files are as portable asthey can be.
Locking a file
To acquire a lock on a portion of a file, you call the lock() method on an openFileChannel. Note that you must open the file for writing if you want to acquire anexclusive lock.
RandomAccessFile raf = new RandomAccessFile( "usefilelocks.txt", "rw" );FileChannel fc = raf.getChannel();FileLock lock = fc.lock( start, end, false );
After you have the lock, you can carry out any sensitive operations that you need to,and then release the lock:
lock.release();
ibm.com/developerWorks Presented by developerWorks, your source for great tutorials
Page 28 of 40 Getting started with NIO
After you have released the lock, any other programs trying to acquire the lock willhave a chance to do so.
The example program for this panel, UseFileLocks.java, is meant to be run in parallelwith itself. This program acquires a lock on a file, holds it for three seconds, and thenreleases it. If you run several instances of this program at the same time, you can seeeach one acquiring the lock in turn.
File locking and portability
File locking can be tricky business, especially given the fact that different operatingsystems implement locks differently. The following guidelines will help you keep yourcode as portable as possible:
• Only use exclusive locks.
• Treat all locks as advisory.
Presented by developerWorks, your source for great tutorials ibm.com/developerWorks
Getting started with NIO Page 29 of 40
Section 9. Networking and asynchronous I/O
Overview
Networking is an excellent foundation for learning about asynchronous I/O, which is ofcourse essential knowledge for anyone doing input/output procedures in the Javalanguage. Networking in NIO isn't much different from any other operation in NIO -- itrelies on channels and buffers, and you acquire the channels from the usualInputStreams and OutputStreams.
In this section we'll start with the fundamentals of asynchronous I/O -- what it is andwhat it is not -- and then move on to a more hands-on, procedural example.
Asynchronous I/O
Asynchronous I/O is a method for reading and writing data without blocking. Normally,when your code makes a read() call, the code blocks until there is data to be read.Likewise, a write() call will block until the data can be written.
Asynchronous I/O calls, on the other hand, do not block. Instead, you register yourinterest in a particular I/O event -- the arrival of readable data, a new socketconnection, and so on -- and the system tells you when such an event occurs.
One of the advantages of asynchronous I/O is that it lets you do I/O from a great manyinputs and outputs at the same time. Synchronous programs often have to resort topolling, or to the creation of many, many threads, to deal with lots of connections. Withasynchronous I/O, you can listen for I/O events on an arbitrary number of channels,without polling and without extra threads.
We'll see asynchronous I/O in action by examining an example program calledMultiPortEcho.java. This program is like the traditional echo server, which takesnetwork connections and echoes back to them any data they might send. However, ithas the added feature that it can listen on multiple ports at the same time, and dealwith connections from all of those ports. And it does it all in a single thread.
Selectors
The explanation in this section corresponds to the implementation of the go() methodin the source code for MultiPortEcho, so take a look at the source for a fuller picture
ibm.com/developerWorks Presented by developerWorks, your source for great tutorials
Page 30 of 40 Getting started with NIO
of what is going on.
The central object in asynchronous I/O is called the Selector. A Selector is whereyou register your interest in various I/O events, and it is the object that tells you whenthose events occur.
So, the first thing we need to do is create a Selector:
Selector selector = Selector.open();
Later on, we will call the register() method on various channel objects, in order toregister our interest in I/O events happening inside those objects. The first argument toregister() is always the Selector.
Opening a ServerSocketChannel
In order to receive connections, we need a ServerSocketChannel. In fact, we needone for each of the ports on which we are going to listen. For each of the ports, weopen a ServerSocketChannel, as shown here:
ServerSocket ss = ssc.socket();InetSocketAddress address = new InetSocketAddress( ports[i] );ss.bind( address );
The first line creates a new ServerSocketChannel and the last three lines bind it tothe given port. The second line sets the ServerSocketChannel to be non-blocking .We must call this method on every socket channel that we're using; otherwiseasynchronous I/O won't work.
Selection keys
Our next step is to register the newly opened ServerSocketChannels with ourSelector. We do this using the ServerSocketChannel.register() method, as shownbelow:
The first argument to register() is always the Selector. The second argument,
Presented by developerWorks, your source for great tutorials ibm.com/developerWorks
Getting started with NIO Page 31 of 40
OP_ACCEPT, here specifies that we want to listen for accept events -- that is, theevents that occur when a new connection is made. This is the only kind of event that isappropriate for a ServerSocketChannel.
Note the return value of the call to register(). A SelectionKey represents thisregistration of this channel with this Selector. When a Selector notifies you of anincoming event, it does this by supplying the SelectionKey that corresponds to thatevent. The SelectionKey can also be used to de-register the channel.
The inner loop
Now that we have registered our interest in some I/O events, we enter the main loop.Just about every program that uses Selectors uses an inner loop much like this one:
int num = selector.select();
Set selectedKeys = selector.selectedKeys();Iterator it = selectedKeys.iterator();
while (it.hasNext()) {SelectionKey key = (SelectionKey)it.next();// ... deal with I/O event ...
}
First, we call the select() method of our Selector. This method blocks until at leastone of the registered events occurs. When one or more events occur, the select()method returns the number of events that occurred.
Next, we call the Selector's selectedKeys() method, which returns a Set of theSelectionKey objects for which events have occurred.
We process the events by iterating through the SelectionKeys and dealing witheach one in turn. For each SelectionKey, you must determine what I/O event hashappened and which I/O objects have been impacted by that event.
Listening for new connections
At this point in the execution of our program, we've only registeredServerSocketChannels, and we have only registered them for "accept" events. Toconfirm this, we call the readyOps() method on our SelectionKey and check tosee what kind of event has occurred:
ibm.com/developerWorks Presented by developerWorks, your source for great tutorials
Page 32 of 40 Getting started with NIO
if ((key.readyOps() & SelectionKey.OP_ACCEPT)== SelectionKey.OP_ACCEPT) {
// Accept the new connection// ...
}
Sure enough, the readOps() method tells us that the event is a new connection.
Accepting a new connection
Because we know there is an incoming connection waiting on this server socket, wecan safely accept it; that is, without fear that the accept() operation will block:
Our next step is to configure the newly-connected SocketChannel to benon-blocking. And because the purpose of accepting this connection is to read datafrom the socket, we must also register the SocketChannel with our Selector, asshown below:
Note that we've registered the SocketChannel for reading rather than accepting newconnections, using the OP_READ argument to register().
Removing the processed SelectionKey
Having processed the SelectionKey, we're almost ready to return to the main loop.But first we must remove the processed SelectionKey from the set of selected keys.If we do not remove the processed key, it will still be present as an activated key in themain set, which would lead us to attempt to process it again. We call the iterator'sremove() method to remove the processed SelectionKey:
it.remove();
Now we're set to return to the main loop and receive incoming data (or an incoming I/Oevent) on one of our sockets.
Presented by developerWorks, your source for great tutorials ibm.com/developerWorks
Getting started with NIO Page 33 of 40
Incoming I/O
When data arrives from one of the sockets, it triggers an I/O event. This causes the callto Selector.select(), in our main loop, to return with an I/O event or events. Thistime, the SelectionKey will be marked as an OP_READ event, as shown below:
} else if ((key.readyOps() & SelectionKey.OP_READ)== SelectionKey.OP_READ) {// Read the dataSocketChannel sc = (SocketChannel)key.channel();// ...
}
As before, we get the channel in which the I/O event occurred and process it. In thiscase, because this is an echo server, we just want to read the data from the socket andsend it right back. See the source code (MultiPortEcho.java) in Resources on page 38 fordetails on this process.
Back to the main loop
Each time we return to the main loop we call the select() method on our Selector,and we get a set of SelectionKeys. Each key represents an I/O event. We processthe events, remove the SelectionKeys from the selected set, and go back to the topof the main loop.
This program is a bit simplistic, since it aims only to demonstrate the techniquesinvolved in asynchronous I/O. In a real application, you would need to deal with closedchannels by removing them from the Selector. And you would probably want to usemore than one thread. This program can get away with a single thread because it'sonly a demo, but in a real-world scenario it might make more sense to create a pool ofthreads for taking care of the time-consuming portions of I/O event processing.
ibm.com/developerWorks Presented by developerWorks, your source for great tutorials
Page 34 of 40 Getting started with NIO
Section 10. Character sets
Overview
According to Sun's documentation, a Charset is "a named mapping betweensequences of sixteen-bit Unicode characters and sequences of bytes." In practice, aCharset lets you read and write character sequences in the most portable waypossible.
The Java language is defined as being based on Unicode. In practice, however, manypeople write programs under the assumption that a single character is represented ondisk, or in a network stream, as a single byte. This assumption works in many cases,but not all, and as computers become more Unicode-friendly, it becomes less trueevery day.
In this section, we'll see how to use Charsets to process textual data in conformancewith modern text formats. The sample program we'll work with here is rather simple;nevertheless, it touches on all the crucial aspects of using Charsets: creating aCharset for a given character encoding, and using that Charset to decode andencode text data.
Encoders/decoders
To read and write text, we are going to use CharsetDecoders andCharsetEncoders, respectively. There's a good reason why these are calledencoders and decoders. A character no longer represents a particular bit-pattern, butrather an entity within a character system. Thus, characters represented by an actualbit pattern must therefore be represented in some particular encoding.
A CharsetDecoder is used to convert the bit-by-bit representation of a string ofcharacters into actual char values. Likewise, a CharsetEncoder is used to convertthe characters back to bits.
In the next panel, we'll take a look at a program that reads and writes data using theseobjects.
The right way to process text
We'll take a look now at the example program, UseCharsets.java. This program is very
Presented by developerWorks, your source for great tutorials ibm.com/developerWorks
Getting started with NIO Page 35 of 40
simple -- it reads some text from one file, and writes it to another file. But it treats thedata as textual data, and reads it into a CharBuffer using a CharsetDecoder.Likewise, it writes the data back out using a CharsetEncoder.
We're going to assume that our characters are stored on disk in the ISO-8859-1(Latin1) character set -- the standard extension of ASCII. Even though we must beprepared for Unicode, we also must realize that different files are stored in differentformats, and ASCII is of course a very common one. In fact, every Java implementationis required to come complete with support for the following character encodings:
• US-ASCII
• ISO-8859-1
• UTF-8
• UTF-16BE
• UTF-16LE
• UTF-16
The sample program
After opening the appropriate files reading the input data into a ByteBuffer calledinputData, our program must create an instance of an ISO-8859-1 (Latin1) characterset:
Charset latin1 = Charset.forName( "ISO-8859-1" );
Then, we create a decoder (for reading) and encoder (for writing):
To decode our byte data into a set of characters, we pass our ByteBuffer to theCharsetDecoder, resulting in a CharBuffer:
CharBuffer cb = decoder.decode( inputData );
If we wanted to process our characters, we could do it at this point in the program. Butwe only want to write it back out unchanged, so there's nothing to do.
To write the data back out, we must convert it back to bytes, using theCharsetEncoder:
ibm.com/developerWorks Presented by developerWorks, your source for great tutorials
Page 36 of 40 Getting started with NIO
ByteBuffer outputData = encoder.encode( cb );
After the conversion is complete we can write the data out to a file.
Presented by developerWorks, your source for great tutorials ibm.com/developerWorks
Getting started with NIO Page 37 of 40
Section 11. Summary and resources
Summary
As you've seen, there are a lot of features in the NIO library. While some of the newfeatures -- file locking and character sets, for example -- provide new capabilities, manyof the features excel in the area of optimization.
At a fundamental level, there's nothing that channels and buffers can do that wecouldn't do using the old stream-oriented classes. But channels and buffers allow forthe possibility of doing the same old operations much faster -- approaching themaximum allowed by the system, in fact.
But one of the greatest strengths of NIO is that it provides a new -- and much needed --structuring metaphor for doing input/output in the Java language. Along with such newconceptual (and realizable) entities as buffers, channels, and asynchronous I/O comesthe opportunity to rethink I/O procedures in your Java programs. In this way, NIObreathes new life into even the most familiar procedures of I/O and gives us theopportunity to do them differently, and better, than we have before.
Resources
• Download nio-src.zip, the complete source for the examples in this tutorial.
• See the SDK Documentation for more information about installing and configuringJDK 1.4.
• Sun's guide to the new I/O APIs provides a thorough introduction to NIO, includingsome minor elements not covered in this tutorial.
• The online API specification describes the classes and methods of NIO, in theautodoc format that you know and love.
• JSR 51 is the Java Community Process document that first specified the newfeatures of NIO. In fact, NIO, as implemented in JDK 1.4, is a subset of the featuresdescribed in this document.
• Want a thorough introduction to stream I/O (including problems, solutions, and theintroduction of NIO)? You couldn't do better than Merlin Hughes's "Turning streamsinside out" (developerWorks, July 2002).
ibm.com/developerWorks Presented by developerWorks, your source for great tutorials
• Of course, you could also just take the tutorial. "Introduction to Java I/O"(developerWorks, April 2000) covers all the basics of Java I/O prior to JDK 1.4.
• John Zukowski has written some good articles about NIO for his Magic with Merlincolumn:• "The ins and outs of Merlin's new I/O buffers" (developerWorks, March 2003) is
another look at buffer basics.
• "Character sets" (developerWorks, October 2002) is all about charsets (especiallyconversion and encoding schemes).
• Get a little deeper into NIO with Aruna Kalagnanam and Balu G's "Merlin bringsnonblocking I/O to the Java platform" (developerWorks, March 2002).
• Greg Travis examines NIO in his book, JDK 1.4 Tutorial (Manning Publications,March 2002).
• You'll find hundreds of articles about every aspect of Java programming in thedeveloperWorks Java technology zone.
Feedback
Please let us know whether this tutorial was helpful to you and how we could make itbetter. We'd also like to hear about other tutorial topics you'd like to see covered.
For questions about the content of this tutorial, contact the author, Greg Travis, [email protected].
Colophon
This tutorial was written entirely in XML, using the developerWorks Toot-O-Matic tutorialgenerator. The open source Toot-O-Matic tool is an XSLT stylesheet and several XSLTextension functions that convert an XML file into a number of HTML pages, a zip file, JPEGheading graphics, and two PDF files. Our ability to generate multiple text and binary formatsfrom a single source file illustrates the power and flexibility of XML. (It also saves ourproduction team a great deal of time and effort.)
You can get the source code for the Toot-O-Matic atwww6.software.ibm.com/dl/devworks/dw-tootomatic-p. The tutorial Building tutorials with theToot-O-Matic demonstrates how to use the Toot-O-Matic to create your own tutorials.
Presented by developerWorks, your source for great tutorials ibm.com/developerWorks
developerWorks also hosts a forum devoted to the Toot-O-Matic; it's available atwww-105.ibm.com/developerworks/xml_df.nsf/AllViewTemplate?OpenForm&RestrictToCategory=11.We'd love to know what you think about the tool.
ibm.com/developerWorks Presented by developerWorks, your source for great tutorials