12
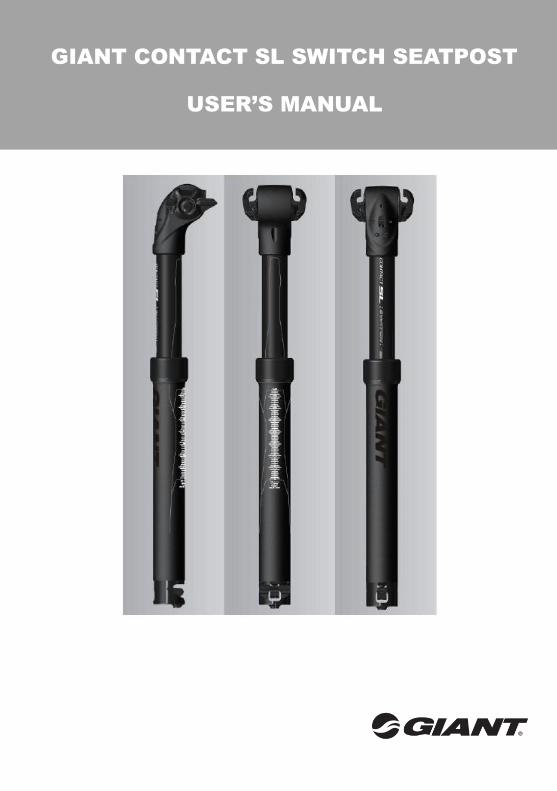
GIANT CONTACT SL SWITCH SEATPOST USER’S MANUAL
| Date post: | 12-Jul-2018 |
| Category: |
Documents |
| Upload: | phungtuong |
| View: | 221 times |
| Download: | 0 times |
GIANT CONTACT SL SWITCH SEATPOST
USER’S MANUAL
1
INTRODUCTION
BILL OF MATERIALS
SPECIFICATIONS & TOOLS
PROCEDURES
DISASSEMBLING & REASSEMBLING CARTRIDGE
INSTALLING SEATPOST ON BIKE
OPERATION OF SEATPOST
GIANT LIMITED WARRANTY
2
INTRODUCTION
Congratulations on the purchase of your new GIANT CONTACT SWITCH
seatpost. This product is designed to help you ride more efficiently in technical
situations and ultimately help you enjoy your rides. When used properly, this
product will provide years of use.
Precaution
Please read the instructions thoroughly before installation and using this
seatpost. Failure to follow the instructions may result in serious injury or death.
1. Adjusting the position of the saddle height during riding can cause the loss
of control.
2. Never ride with a Contact Switch seatpost that is modified, or excessively
worn. Do not modify the Contact Switch seatpost; any modifications will
void the warranty, and could cause invisible damages to the seatpost
and/or the seatpost malfunctions.
3. Loose, over tightened, damaged, or worn parts may cause unexpected
malfunction. Periodically check the seatpost for wear or damage. If there
are any indications of wear, cracks, or dents shown on the seatpost or any
of its parts, stop using the seatpost immediately and find an authorized
GIANT dealer for inspection, repair or replacement of the parts.
4. Please check that all bolts on the Contact Switch seatpost have been
properly fastened within the recommended torque settings before you ride
the bike.
5. Over tightening the seatpost clamp will affect the height-adjustment
functionality of the seatpost, please find the recommended clamping torque
etched on the seatpost clamp or in the bicycle user manual.
3
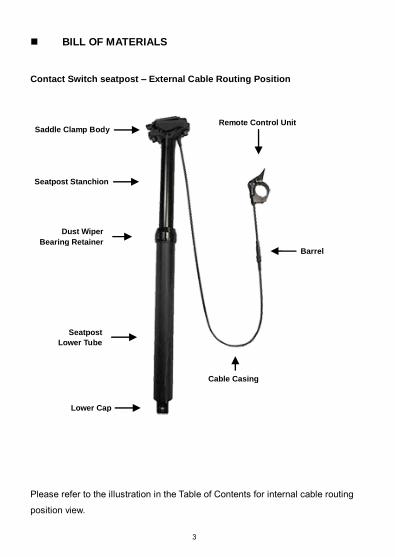
BILL OF MATERIALS
Contact Switch seatpost – External Cable Routing Position
Please refer to the illustration in the Table of Contents for internal cable routing
position view.
Saddle Clamp Body
Seatpost Stanchion
Dust Wiper
Bearing Retainer
Lower Cap
Remote Control Unit
Barrel
Seatpost
Lower Tube
Cable Casing
4
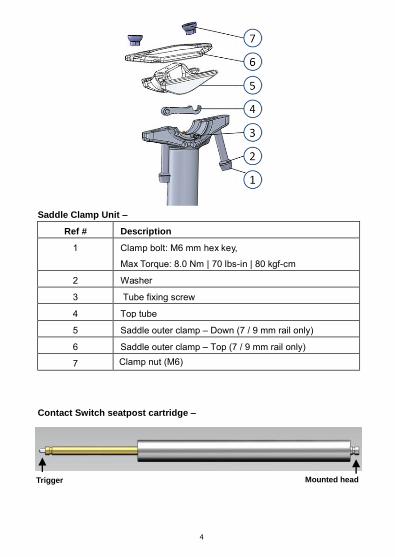
Saddle Clamp Unit –
Ref # Description
1 Clamp bolt: M6 mm hex key,
Max Torque: 8.0 Nm | 70 lbs-in | 80 kgf-cm
2
3 Tube fixing screw
4
5 Saddle outer clamp – Down (7 / 9 mm rail only)
6 Saddle outer clamp – Top (7 / 9 mm rail only)
7 Clamp nut (M6)
Contact Switch seatpost cartridge –
Damper shaft Cartridge body
Trigger Mounted head
Washer
Top tube
5
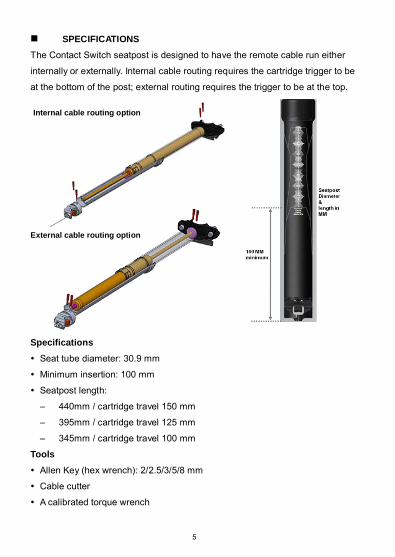
SPECIFICATIONS
The Contact Switch seatpost is designed to have the remote cable run either
internally or externally. Internal cable routing requires the cartridge trigger to be
at the bottom of the post; external routing requires the trigger to be at the top.
Specifications
Seat tube diameter: 30.9 mm
Minimum insertion: 100 mm
Seatpost length:
‒ 440mm / cartridge travel 150 mm
‒ 395mm / cartridge travel 125 mm
‒ 345mm / cartridge travel 100 mm
Tools
Allen Key (hex wrench): 2/2.5/3/5/8 mm
Cable cutter
A calibrated torque wrench
Internal cable routing option
External cable routing option
6
Re
PROCEDURES
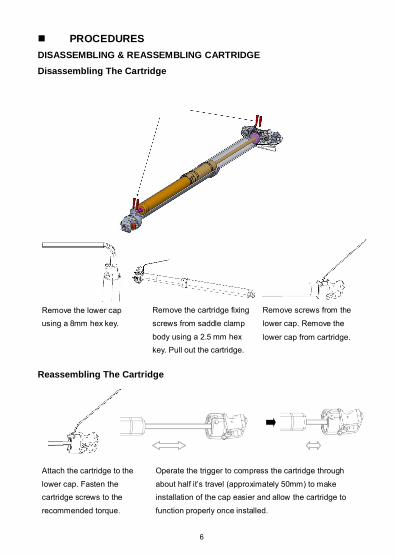
DISASSEMBLING & REASSEMBLING CARTRIDGE
Disassembling The Cartridge
Reassembling The Cartridge
Remove the lower cap using a 8mm hex key.
Remove the cartridge fixing
screws from saddle clamp
body using a 2.5 mm hex key. Pull out the cartridge.
Remove screws from the
lower cap. Remove the
lower cap from cartridge.
Attach the cartridge to the
lower cap. Fasten the cartridge screws to the
recommended torque.
Operate the trigger to compress the cartridge through
about half it’s travel (approximately 50mm) to make installation of the cap easier and allow the cartridge to
function properly once installed.
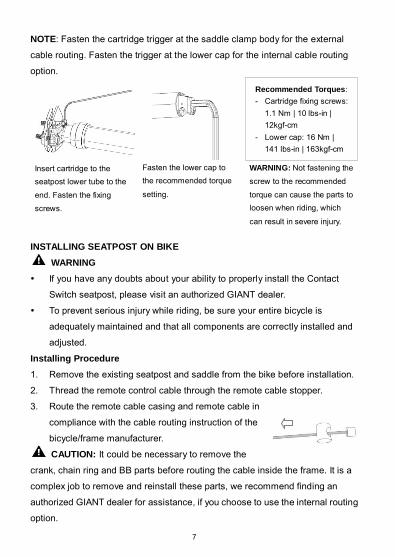
7
Fasten the lower cap to the recommended torque
setting.
NOTE: Fasten the cartridge trigger at the saddle clamp body for the external
cable routing. Fasten the trigger at the lower cap for the internal cable routing
option.
INSTALLING SEATPOST ON BIKE
WARNING
If you have any doubts about your ability to properly install the Contact
Switch seatpost, please visit an authorized GIANT dealer.
To prevent serious injury while riding, be sure your entire bicycle is
adequately maintained and that all components are correctly installed and
adjusted.
Installing Procedure
1. Remove the existing seatpost and saddle from the bike before installation.
2. Thread the remote control cable through the remote cable stopper.
3. Route the remote cable casing and remote cable in
compliance with the cable routing instruction of the
bicycle/frame manufacturer.
CAUTION: It could be necessary to remove the
crank, chain ring and BB parts before routing the cable inside the frame. It is a
complex job to remove and reinstall these parts, we recommend finding an
authorized GIANT dealer for assistance, if you choose to use the internal routing
option.
Insert cartridge to the seatpost lower tube to the
end. Fasten the fixing
screws.
Recommended Torques: - Cartridge fixing screws:
1.1 Nm | 10 lbs-in | 12kgf-cm
- Lower cap: 16 Nm | 141 lbs-in | 163kgf-cm
WARNING: Not fastening the
screw to the recommended
torque can cause the parts to loosen when riding, which
can result in severe injury.
8
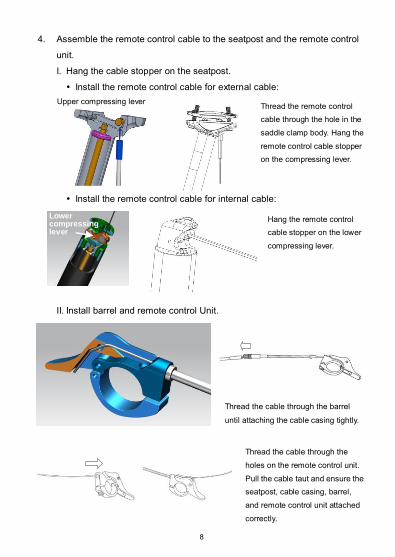
Hang the remote control cable stopper on the lower
compressing lever.
Thread the cable through the barrel
until attaching the cable casing tightly.
Thread the cable through the
holes on the remote control unit.
Pull the cable taut and ensure the seatpost, cable casing, barrel,
and remote control unit attached
correctly.
4. Assemble the remote control cable to the seatpost and the remote control
unit.
I. Hang the cable stopper on the seatpost.
Install the remote control cable for external cable:
Install the remote control cable for internal cable:
II. Install barrel and remote control Unit.
Thread the remote control cable through the hole in the
saddle clamp body. Hang the
remote control cable stopper on the compressing lever.
Lower compressing lever
Upper compressing lever
9
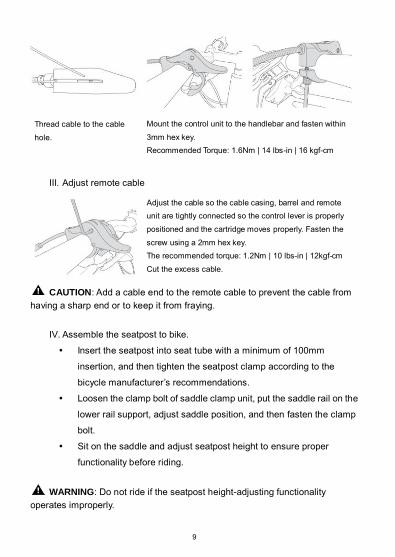
Thread cable to the cable
hole.
Mount the control unit to the handlebar and fasten within
3mm hex key. Recommended Torque: 1.6Nm | 14 lbs-in | 16 kgf-cm
Adjust the cable so the cable casing, barrel and remote unit are tightly connected so the control lever is properly
positioned and the cartridge moves properly. Fasten the
screw using a 2mm hex key. The recommended torque: 1.2Nm | 10 lbs-in | 12kgf-cm
Cut the excess cable.
III. Adjust remote cable
CAUTION: Add a cable end to the remote cable to prevent the cable from
having a sharp end or to keep it from fraying.
IV. Assemble the seatpost to bike.
Insert the seatpost into seat tube with a minimum of 100mm
insertion, and then tighten the seatpost clamp according to the
bicycle manufacturer’s recommendations.
Loosen the clamp bolt of saddle clamp unit, put the saddle rail on the
lower rail support, adjust saddle position, and then fasten the clamp
bolt.
Sit on the saddle and adjust seatpost height to ensure proper
functionality before riding.
WARNING: Do not ride if the seatpost height-adjusting functionality
operates improperly.
10
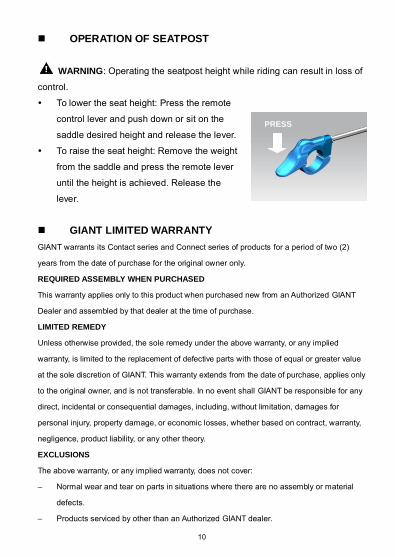
OPERATION OF SEATPOST
WARNING: Operating the seatpost height while riding can result in loss of
control.
To lower the seat height: Press the remote
control lever and push down or sit on the
saddle desired height and release the lever.
To raise the seat height: Remove the weight
from the saddle and press the remote lever
until the height is achieved. Release the
lever.
GIANT LIMITED WARRANTY
GIANT warrants its Contact series and Connect series of products for a period of two (2)
years from the date of purchase for the original owner only.
REQUIRED ASSEMBLY WHEN PURCHASED
This warranty applies only to this product when purchased new from an Authorized GIANT
Dealer and assembled by that dealer at the time of purchase.
LIMITED REMEDY
Unless otherwise provided, the sole remedy under the above warranty, or any implied
warranty, is limited to the replacement of defective parts with those of equal or greater value
at the sole discretion of GIANT. This warranty extends from the date of purchase, applies only
to the original owner, and is not transferable. In no event shall GIANT be responsible for any
direct, incidental or consequential damages, including, without limitation, damages for
personal injury, property damage, or economic losses, whether based on contract, warranty,
negligence, product liability, or any other theory.
EXCLUSIONS
The above warranty, or any implied warranty, does not cover:
‒ Normal wear and tear on parts in situations where there are no assembly or material
defects.
‒ Products serviced by other than an Authorized GIANT dealer.
PRESS
11
‒ Modifications of the product from its original condition.
‒ Use of this product for abnormal, competition and/or commercial activities or for
purposes other than those for which this product was designed.
‒ Damage caused by failing to follow the User’s Manual.
‒ Paint, finish and decal damage resulting from taking part in competitions, jumping,
downhill and/or training for such activities or events or as a result of exposing the
product to, or operating the product in, severe conditions or climates.
‒ Labor charges for part replacement or changeover.
Except as is provided by this warranty and subject to all additional warranties, GIANT and its
employees and agents shall not be liable for any loss or damage whatsoever (including
incidental and consequential loss or damage caused by negligence or default) arising from or
concerning any GIANT product.
GIANT makes no other warranties, express or implied. All implied warranties, including the
warranties of merchantability and fitness for a particular purpose are limited in duration to that
of the express warranties stated above.
Any claim against this warranty must be made through an Authorized GIANT Dealer or
distributor. The purchase receipt or other proof of the date of purchase is required before a
warranty claim may be processed. Claims made outside the country of purchase may be
subject to fees and additional restrictions. Warranty duration and details may differ by country.
This warranty gives you specific legal rights, and you may also have other rights which may
vary from place to place. THIS WARRANTY DOES NOT AFFECT YOUR STATUTORY
RIGHTS.
SERVICE CENTERS
To find a GIANT retailer near you, please visit: www.GIANT-bicycle.com


