GILFORD ® RESPONSE I Spectrophotometer — STANDARD OPERATING PROCEDURE — prepared for: Department of Chemistry and Biochemistry New Mexico State University Las Cruces, NM 88003 last updated June 2003 R.. Cowley
Transcript
GILFORD®
RESPONSE I Spectrophotometer
— STANDARD OPERATING PROCEDURE —
prepared for:Department of Chemistry and BiochemistryNew Mexico State UniversityLas Cruces, NM 88003
last updated June 2003 R.. Cowley
PAGE 1
Table of Contents
I. Introduction............................................................................................................................2
II. System Specs.........................................................................................................................2
III. Safety Warnings and other Considerations............................................................................3
IV. Basic Operation:1. Startup Procedure.......................................................................................................4
2. Running a Spectral Scan.............................................................................................8
3. Setting Up a Calibration Curve..................................................................................12
5. Shutting Down the System........................................................................................14
V. Loading the Cuvettes...........................................................................................................15
Ryan Cowley — June 2003
PAGE 2Ryan Cowley — June 2003
Introduction
The Gilford Response I spectrophotometer < isstill a useful teaching instrument, despite its age(early 1980s). The spectrophotometer hasexcellent optics, utilizing both a quartz–halogenlamp for the visible spectrum and a deteriumlamp for the ultraviolet spectrum. The Responseunit is the large blue instrument presently locatedin CB 325. Currently, the Response unit does nothave a printer, so all data must be hand-tabulateduntil a suitable printer can be found.
System Specs
• The Response Unit uses a quartz-halogen lamp for the visible region (about 400 nm to750 nm), and a deuterium lamp for the ultraviolet region (200 nm to about 400 nm)
• The system is equipped with a six-position, water-heated cuvette holder, which isdesigned for applications that require temperature control. No temperature control unit ispresently equipped, but the holder has the necessary adaptor to accommodate one.
• The wavelength range of the Response is 200 nm to 750 nm.
• Only 10-mm square cuvettes can be used. Round cuvettes will not fit.
• The spectrophotometer comes with a set of two aperture adjustors: 1 mm x 2 mm, and 2mm x 4 mm. Scans can be run with either slit in place or wide open.
• The user can select spectral bandwidths of 0.5nm, 1.0nm, or 4.0nm.
PAGE 3Ryan Cowley — June 2003
Safety Warnings and Other Considerations
DANGERDo not operate Response in an atmosphere containing explosive concentrations of oxygen,hydrogen, or other flammable gases. Components of the instrument include switches, relays, andother electrical parts that may generate sparks.
DANGERThe instrument is designed to be grounded through the power cord for safe operation. To ensurecontinuing safety of operating personnel the instrument must be connected to an electrical outletthat has an effective ground connection.
WARNINGAs with any instrument, use extreme caution not to spill samples! Spilled solutions may result indamage to electrical or optical components. If an accidental spill does occur, promptly clean itup.
WARNINGDo not leave sample cuvettes in the compartment for longer than is needed to take readings,especially samples prone to evaporation or fuming. Vapors may damage operational components.
CAUTIONAlways let the lamp warm up for 15 minutes before the first reading is taken.
CAUTIONAlways hold cuvettes by their frosted sides. Make sure the clear sides are completely free of dustand scratches to ensure accurate light transmission.
CAUTIONIf you are scanning in the UV region, you must use quartz cuvettes. Glass cuvettes and plasticcuvettes are not fully transparent to ultraviolet light.
CAUTIONYour reference sample must contain the same solvent as your samples.
PAGE 4Ryan Cowley — June 2003
Basic Operation
Startup Procedure
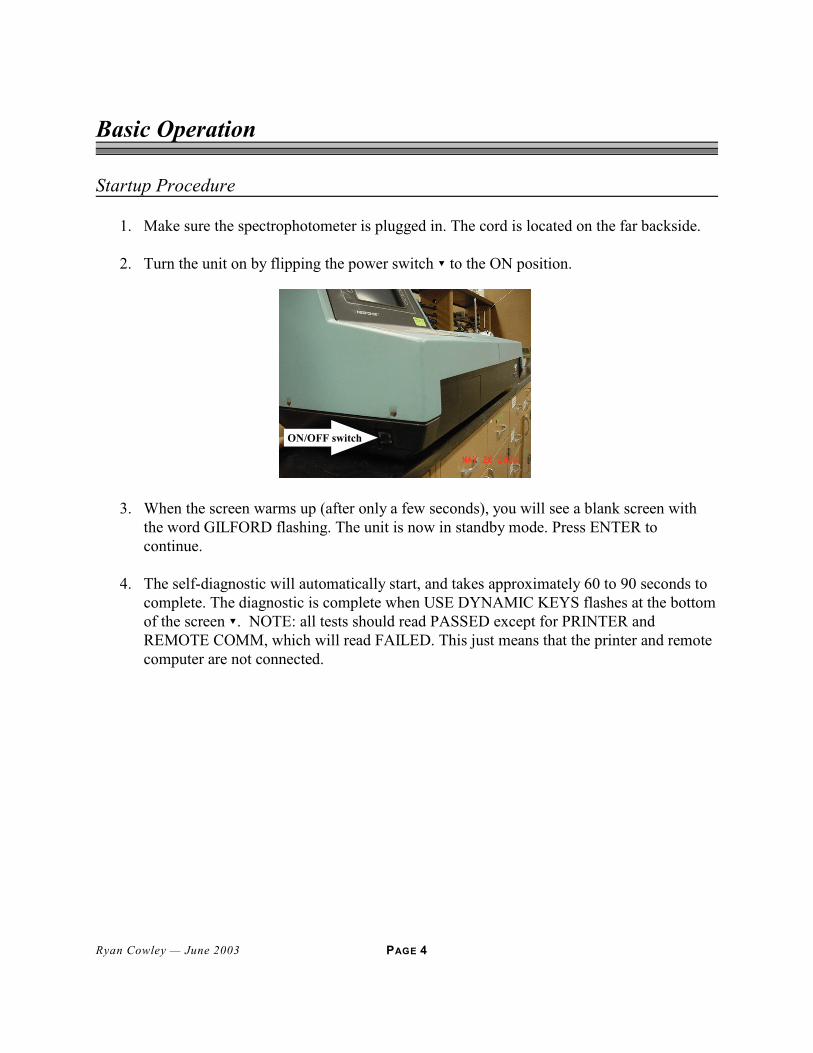
1. Make sure the spectrophotometer is plugged in. The cord is located on the far backside.
2. Turn the unit on by flipping the power switch ? to the ON position.
3. When the screen warms up (after only a few seconds), you will see a blank screen withthe word GILFORD flashing. The unit is now in standby mode. Press ENTER tocontinue.
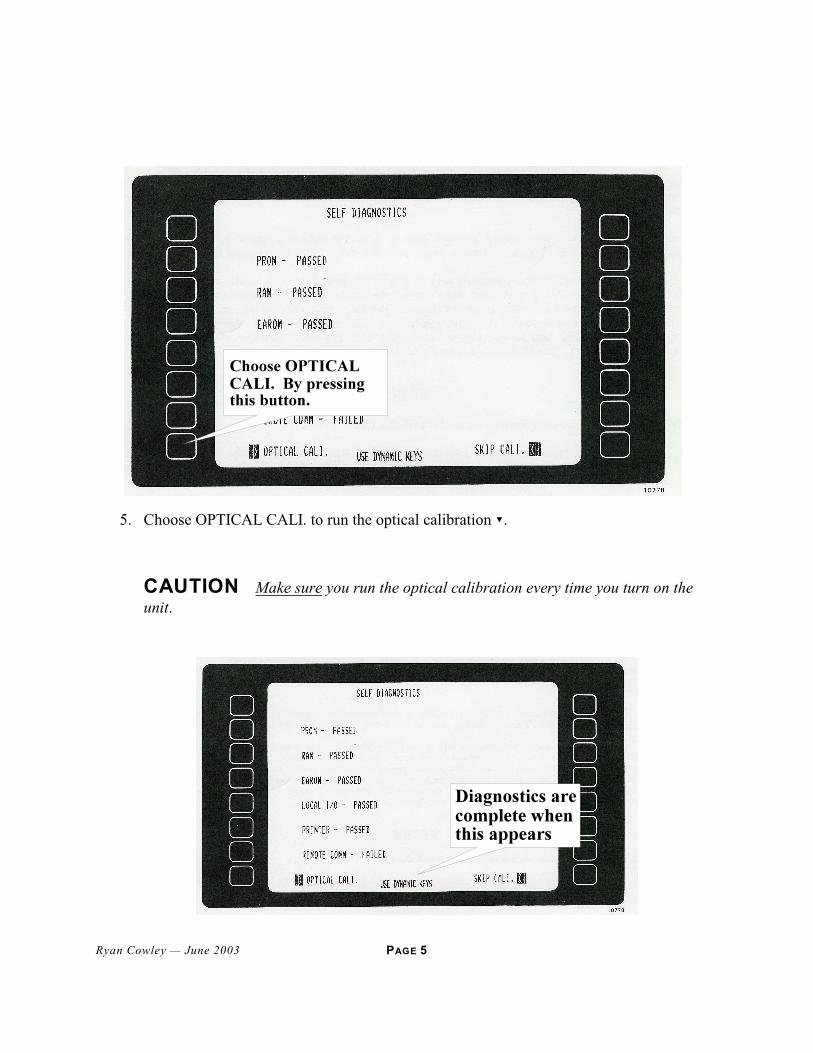
4. The self-diagnostic will automatically start, and takes approximately 60 to 90 seconds tocomplete. The diagnostic is complete when USE DYNAMIC KEYS flashes at the bottomof the screen ?. NOTE: all tests should read PASSED except for PRINTER andREMOTE COMM, which will read FAILED. This just means that the printer and remotecomputer are not connected.
PAGE 5Ryan Cowley — June 2003
5. Choose OPTICAL CALI. to run the optical calibration ?.
CAUTION Make sure you run the optical calibration every time you turn on theunit.
PAGE 6Ryan Cowley — June 2003
6. If the calibration is successful, then the operational guidelines screen is displayed ?.
7. After reading the operating guidelines, press ENTER to continue. The preamble page isnow displayed ?.
PAGE 7Ryan Cowley — June 2003
8. First, select VIS LAMP, UV LAMP or UV AND VIS LAMPS to select the lamps youwill use.
CAUTION It is important to select lamps now so the lamps have adequate time to warmup.
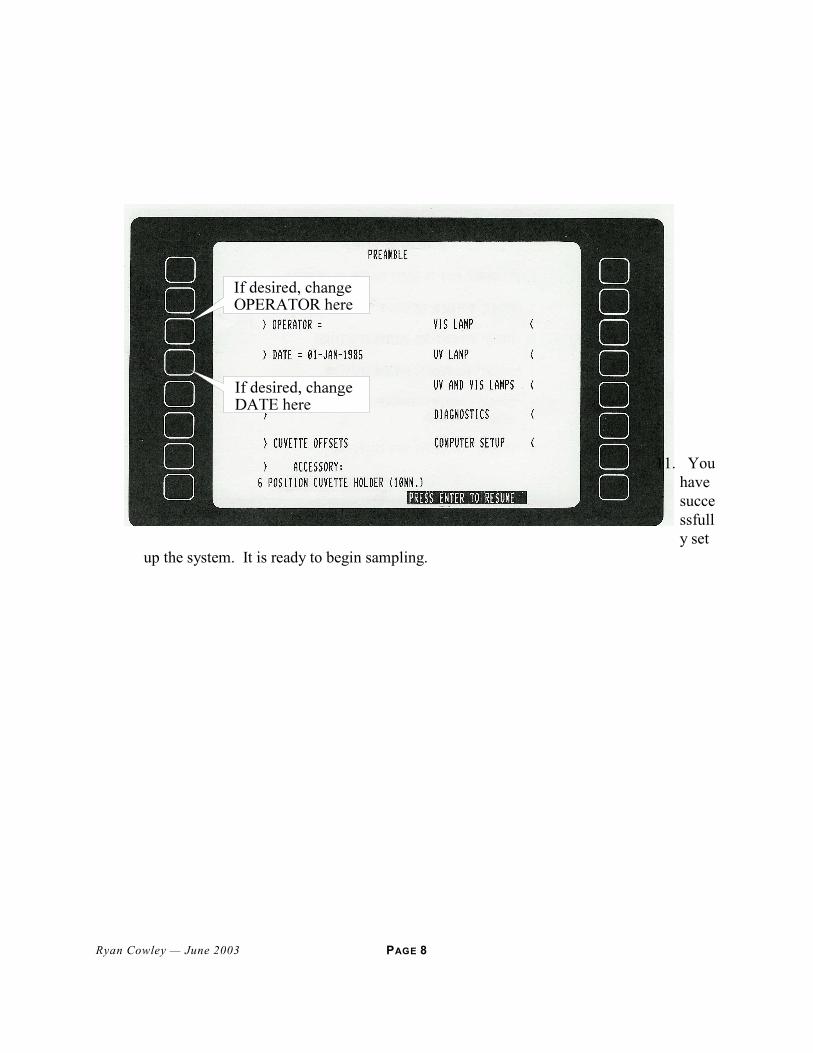
9. If desired, select OPERATOR ? to enter an operator identification number (acceptedvalues are integers 1 to 9999).
10. If desired, select DATE ? to change the date. The system only accepts dates from Jan 1, 1984 to Dec 31, 1999.
PAGE 8Ryan Cowley — June 2003
11. Youhavesuccessfully set
up the system. It is ready to begin sampling.
PAGE 9Ryan Cowley — June 2003
Running a Spectral Scan
1. Press the LIBRARY key ?.
2. Select WAVELENGTH SCAN.
3. Select STARTING WAVELENGTH ?, type in the maximum wavelength you want to scan, and press ENTER.
4. Select ENDING WAVELENGTH ?, type in the minimum wavelength you want to scan, and press ENTER.
PAGE 10Ryan Cowley — June 2003
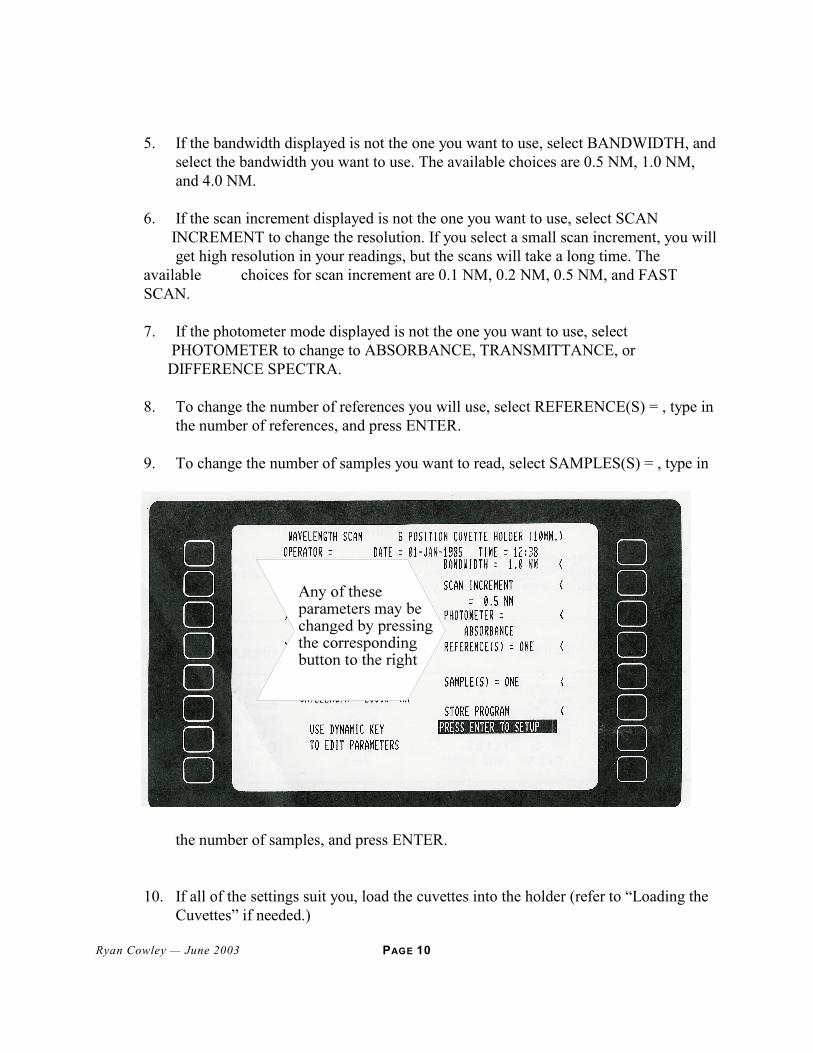
5. If the bandwidth displayed is not the one you want to use, select BANDWIDTH, and select the bandwidth you want to use. The available choices are 0.5 NM, 1.0 NM, and 4.0 NM.
6. If the scan increment displayed is not the one you want to use, select SCAN INCREMENT to change the resolution. If you select a small scan increment, you will get high resolution in your readings, but the scans will take a long time. Theavailable choices for scan increment are 0.1 NM, 0.2 NM, 0.5 NM, and FASTSCAN.
7. If the photometer mode displayed is not the one you want to use, select PHOTOMETER to change to ABSORBANCE, TRANSMITTANCE, or DIFFERENCE SPECTRA.
8. To change the number of references you will use, select REFERENCE(S) = , type in the number of references, and press ENTER.
9. To change the number of samples you want to read, select SAMPLES(S) = , type in
the number of samples, and press ENTER.
10. If all of the settings suit you, load the cuvettes into the holder (refer to “Loading the Cuvettes” if needed.)
PAGE 11Ryan Cowley — June 2003
11. Press ENTER to set up the parameters. This will take 15 – 30 seconds. Note: once you do this, you will be unable to go back and edit any parameters without beginning a completely new scan.
12. When prompted, press ENTER to begin the run.
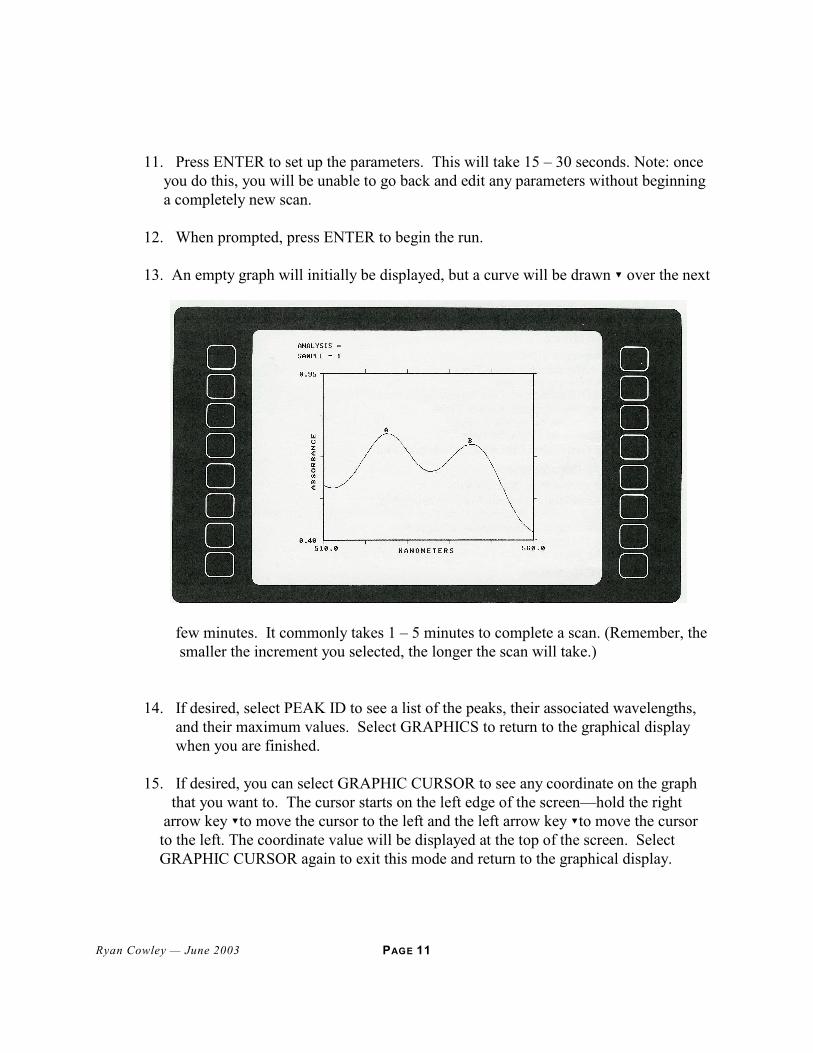
13. An empty graph will initially be displayed, but a curve will be drawn ? over the next
few minutes. It commonly takes 1 – 5 minutes to complete a scan. (Remember, the smaller the increment you selected, the longer the scan will take.)
14. If desired, select PEAK ID to see a list of the peaks, their associated wavelengths, and their maximum values. Select GRAPHICS to return to the graphical display when you are finished.
15. If desired, you can select GRAPHIC CURSOR to see any coordinate on the graph that you want to. The cursor starts on the left edge of the screen—hold the right arrow key ?to move the cursor to the left and the left arrow key ?to move the cursor to the left. The coordinate value will be displayed at the top of the screen. Select GRAPHIC CURSOR again to exit this mode and return to the graphical display.
PAGE 12Ryan Cowley — June 2003
16. If desired, select REFORMAT to change the scale ?. When finished, select RETURN : GRAPHIC to return to the graphical display and apply the reformatting
options you have changed.
17. The spectral scan is complete. You can reformat the graph many times until it suits your needs.
PAGE 13Ryan Cowley — June 2003
Setting up a Calibration Curve
1. Press the LIBRARY key ?.
2. If needed, select NUMBER OF STANDARDS to change the number of standards you will use. NOTE: You must have at least 3 unique standards.
3. If needed, select WAVELENGTH to change the wavelength to scan.
4. If desired, select BANDWIDTH to change the bandwidth you want to use. The available choices are 0.5 NM, 1.0 NM, and 4.0 NM.
5. Load the reference cuvette and the standard cuvettes into the holder (refer to “Loading the Cuvettes” if needed.)
6. Note the position of each standard you insert. You will later be prompted to enter
PAGE 14Ryan Cowley — June 2003
the concentrations of standards in the order you positioned them.
7. If all of the settings suit you, press ENTER to set up the parameters. This will take
15 – 30 seconds.
8. When prompted, press ENTER to begin the scan.
9. You will be prompted for the concentration of each standard, beginning with the second slot from the left and proceeding right. Type the concentration of the corresponding standard when you are prompted for it and press ENTER.
10. When all of the standards have been entered, press ENTER. A calibration curvesuch as the one below will be displayed ?.
11. If you want to determine the concentration of unknown sample(s) based on this calibration, select SAMPLES. Load the samples into the cuvette holder (refer to “Loading the Cuvettes” if needed.) and press ENTER. The concentration of the sample(s) will be displayed. NOTE: If you have empty slots, enter a concentration of “0” when prompted, and ignore the concentration it determines. NOTE: An asterisk ( * ) indicates the calculated absorbance is outside the range of your standards.
12. The calibration curve is complete.
PAGE 15Ryan Cowley — June 2003
Standby Mode
1. If you are going to be away for more than a few minutes, it is a good idea to put the instrument in standby mode. To do this, press the LIBRARY key, and select STANDBY.
2. To exit standby mode, press ENTER. The procedure is now the same as listed in “Startup Procedure”.
Shutting Down the System
1. Make sure the inside compartment is clean and remove any cuvettes. Close the inside compartment lid.
2. Turn the power switch to the OFF position ?.
PAGE 16Ryan Cowley — June 2003
3. Place the tan cover over the screen and keypad.
4. Make sure the general area is clean and free of spills.
PAGE 15Ryan Cowley — June 2003
Loading the Cuvettes
1. Open the inside compartment ?.
2. Remove the cover from the cuvette holder ?.
PAGE 16Ryan Cowley — June 2003
3. The inside compartment will look like this: ?
4. Load the cuvette containing the reference into the first (leftmost) slot ?. Make sure that the clear sides of the cuvette are facing toward the front and back. The reference solution must always be in the first slot.
PAGE 17Ryan Cowley — June 2003
5. Load your sample(s) or standard(s) into the next slot(s) in the same manner. Leave no empty slots between the sample cuvette(s) and the reference ?
6. If desired, insert an aperture adjuster into the slot ?.
7. Replace the cuvette holder cover and close the compartment. Proceed with scans.