Glow bunny Feel free to sell Your finished items. Mass production is - of course - not permitted. Do not copy, alter, share, publish or sell pattern, pictures or images. Copies be made for owner’s personal use only. * * * ATTENTION: Please be aware that I only share my patterns via www.zhaya.de/www.zhaya.eu. If you have downloaded this FREE pattern from anywhere else, please delete it immediately - as there are sites where anonymous hackers upload pattern files containing viruses, allowing them to access your computer and steal your personal and financial details. Materials: When using the suggested materials, it will be about 27 cm tall. • Yarn (DK), with me: DROPS Muskat (this is a mercerized DK cotton yarn) This time I wrote down exactly how much yarn was needed for which piece - of course this can only be an indication, as it also varies here due to personal tension, different yarn or hook size: - Tummy about 80 g - Head about 70 g - Feet about 60 g - Arms about 40 g - Ears about 90 g - Tail about 15 g In total I used a little more than 350 g yarn. Since I wanted to reduce my stock of this yarn, the result was this combination of colors. Normally I would have used a maximum of 2 colors. Which colors and how many different you use is of course up to you :o) • Hook size in suitable size (with me: 2.5 mm and 3.0 mm) • Stuffing • Eyes in suitable size (with me: 15 mm) - You can also crochet or embroider the eyes • LED-Lamp (about 9,5 cm in diameter) - with me: Aukey recharchable Mini RGB Light (Link) ATTENTION! It has to be unconditionally LED, everything else gets hot - fire hazard! If you use a lamp with (not rechargeable) batteries please remove the batteries when the lamp is not used for some days - otherwise it can catch fire! The listed wool and hook sizes are only suggestions. It is, of course, entirely your personal choice, which yarn you use. Please keep in mind that different yarn may result in a bigger or smaller piece. Make sure to adapt your hook size according to your yarn and personal tension. When crocheting Amigurumis you should use a much smaller needle size than indicated on the label or you would use it for other crochet projects so that no holes are made when the piece is stuffed. First published: 22.07.2018
Transcript
Glow bunny
Feel free to sell Your finished items. Mass production is - of course - not permitted. Do not copy, alter, share, publish or sell pattern, pictures or images. Copies be made for owner’s personal use only.
* * * ATTENTION: Please be aware that I only share my patterns via www.zhaya.de/www.zhaya.eu. If you have downloaded this FREE pattern from anywhere else, please delete it immediately - as there are sites where anonymous hackers upload pattern files containing viruses, allowing them to access your computer and steal your personal and financial details.
Materials: When using the suggested materials, it will be about 27 cm tall. • Yarn (DK), with me: DROPS Muskat (this is a mercerized DK cotton yarn)
This time I wrote down exactly how much yarn was needed for which piece - of course this can only be an indication, as it also varies here due to personal tension, different yarn or hook size:
- Tummy about 80 g - Head about 70 g - Feet about 60 g - Arms about 40 g - Ears about 90 g - Tail about 15 g
In total I used a little more than 350 g yarn. Since I wanted to reduce my stock of this yarn, the result was this combination of colors. Normally I would have used a maximum of 2 colors. Which colors and how many different you use is of course up to you :o)
• Hook size in suitable size (with me: 2.5 mm and 3.0 mm) • Stuffing • Eyes in suitable size (with me: 15 mm) - You can also crochet or embroider the
eyes • LED-Lamp (about 9,5 cm in diameter) - with me: Aukey recharchable Mini RGB
Light (Link) ATTENTION! It has to be unconditionally LED, everything else gets hot - fire hazard! If you use a lamp with (not rechargeable) batteries please remove the batteries when the lamp is not used for some days - otherwise it can catch fire!
The listed wool and hook sizes are only suggestions. It is, of course, entirely your personal choice, which yarn you use. Please keep in mind that different yarn may result in a bigger or smaller piece. Make sure to adapt your hook size according to your yarn and personal tension. When crocheting Amigurumis you should use a much smaller needle size than indicated on the label or you would use it for other crochet projects so that no holes are made when the piece is stuffed.
Crochet in continuous rounds (spirals), unless otherwise stated.
For help with invisible color changes, increases and decreases, please visit the „Tipps, Tricks and Tutorials“section on my website www.zhaya.de.
Body: Main color Crochet in rows. At the end of each row, chain 1 and turn. The length of the foundation chain depends on the height of the light. If a very flat lamp is used, the foundation chain must be approx. 5 chains longer than the lamp is high, since the fabric becomes even more narrow, when crocheting and a flat lamp otherwise falls out too easily. With a rather spherical lamp like mine, it is enough if the foundation chain is as long as the lamp is high (see photos), then the lamp sticks out a bit later. My stitch numbers are here only for guideline, this must be adapted if necessary.
1. ch 21, starting in 2nd chain from hook: (loose) slst 20, ch 1, turn Now crochet as many rows with loose slip stitches in the back loops only until the fabric stretches around the lamp, not too loose, not too tight. The slip stitches produce an elastic fabric that can hold the lamp very comfortably later without the lamp falling out, but can still be easily removed for charging.
the yarn tail from the beginning and the working loop should be on the same side, if not, undo one row or crochet 1 row more (depending on whether it is rather tight or very loosely around), it follows a last row, a final row follows, connecting the first and the last row. Now fold the piece so that the working loop is at the back and the first row (with the starting thread) is at the front, insert hook through the first stitch of the front row and pull the working loop through. Furthermore always work through the next front stitch and the back loop of the stitch at the back and crochet 19 more loose slip stitches, do not fasten off. On the inside (which is later turned outwards) there is almost no difference to the other rows ( Picture below middle).
Still not fasten off, crochet along one of the edges in spiral rounds, the pretty side points to you when you rejoin. Crochet a a single crochet at the end of each rib in the loops marked in the picture (top right). I had 48 ribs and 48 stitches in round one. If that is not the case with you, no problem at all. In the following (second) round you take off so many stitches evenly spread that you have a multiple of 6 at the end of this round and in the following rounds always decrease 6 stitches per round until the hole is closed and a kind of "jar" is formed. It looked like this to me: 1. sc 48 along the edge (48) 2. (sc 6, dec) x6 (42) 3. (sc 5, dec) x6 (36) 4. (sc 4, dec) x6 (30) 5. (sc 3, dec) x6 (24) 6. (sc 2, dec) x6 (18) 7. (sc 1, dec) x6 (12) 8. dec x6 (6) Fasten off, close, cut the yarn (just secure the thread and put it on the back - it’s inside later). Now turn the piece so that the nice sides are inside.
First published: 22.07.2018
Now rejoin on the other edge, crochet single crochet along the edge at the end of each rib, the "jar" points backwards. Again, you can easily adapt the number of stitches, this time in the second row by increasing up to a multiple of 12: 1. sc 48 along the egde (48) 2. (sc 3, inc) x12 (60) 3. (sc 4, inc) x12 (72) 4. (sc 5, inc) x12 (84) 5. (sc 6, inc) x12 (96) 6. (sc 7, inc) x12 (108) 7.-24. (18 Rounds) sc in each st around (108) 25. (sc 16, dec) x6 (102) 26. (sc 15, dec) x6 (96) 27. (sc 14, dec) x6 (90) 28. (sc 13, dec) x6 (84) 29. (sc 12, dec) x6 (78) 30. (sc 11, dec) x6 (72) 31. (sc 10, dec) x6 (66) Gently and carefully stuff to the edge (it should now look like the photos on the right). 32. (sc 9, dec) x6 (60) 33. (sc 8, dec) x6 (54) 34. (sc 7, dec) x6 (48) 35. (sc 6, dec) x6 (42) 36. (sc 5, dec) x6 (36) 37. (sc 4, dec) x6 (30) 38. (sc 3, dec) x6 (24) Mostly stuff, when stuffing make sure that the shape of the "jar" at the front is kept - after all, the lamp should be inserted there later. 39. (sc 2, dec) x6 (18) 40. (sc 1, dec) x6 (12) Finish stuffing. 41. dec x6 (6) Fasten off, close, weave in loose ends.
The most tricky one is already finished :o)
Head: Main color Stuff and shape the head while crocheting, do not overstuff. 1. sc 6 in MR (6) 2. inc x6 (12) 3. (sc 1, inc) x6 (18) 4. (sc 2, inc) x6 (24) 5. (sc 3, inc) x6 (30) 6. (sc 4, inc) x6 (36) 7. (sc 5, inc) x6 (42) 8. (sc 6, inc) x6 (48) 9. (sc 7, inc) x6 (54) 10. (sc 8, inc) x6 (60) 11. sc in each st around (60)
First published: 22.07.2018
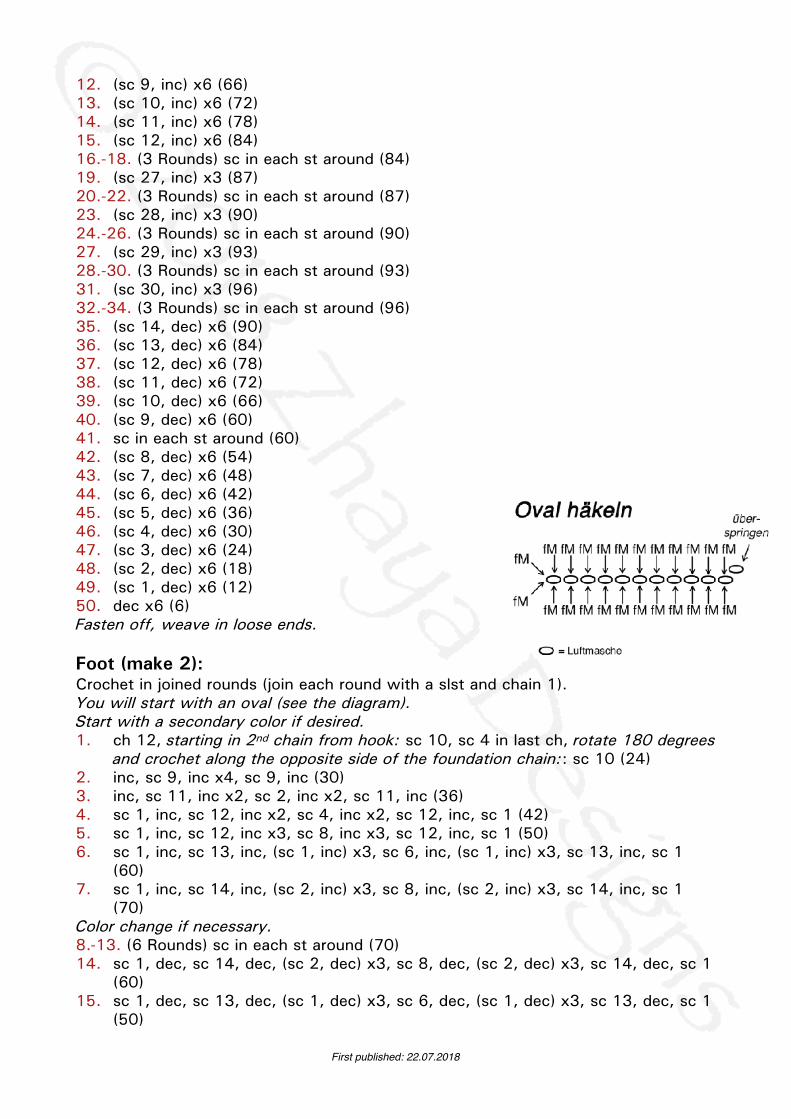
12. (sc 9, inc) x6 (66) 13. (sc 10, inc) x6 (72) 14. (sc 11, inc) x6 (78) 15. (sc 12, inc) x6 (84) 16.-18. (3 Rounds) sc in each st around (84) 19. (sc 27, inc) x3 (87) 20.-22. (3 Rounds) sc in each st around (87) 23. (sc 28, inc) x3 (90) 24.-26. (3 Rounds) sc in each st around (90) 27. (sc 29, inc) x3 (93) 28.-30. (3 Rounds) sc in each st around (93) 31. (sc 30, inc) x3 (96) 32.-34. (3 Rounds) sc in each st around (96) 35. (sc 14, dec) x6 (90) 36. (sc 13, dec) x6 (84) 37. (sc 12, dec) x6 (78) 38. (sc 11, dec) x6 (72) 39. (sc 10, dec) x6 (66) 40. (sc 9, dec) x6 (60) 41. sc in each st around (60) 42. (sc 8, dec) x6 (54) 43. (sc 7, dec) x6 (48) 44. (sc 6, dec) x6 (42) 45. (sc 5, dec) x6 (36) 46. (sc 4, dec) x6 (30) 47. (sc 3, dec) x6 (24) 48. (sc 2, dec) x6 (18) 49. (sc 1, dec) x6 (12) 50. dec x6 (6) Fasten off, weave in loose ends.
Foot (make 2): Crochet in joined rounds (join each round with a slst and chain 1). You will start with an oval (see the diagram). Start with a secondary color if desired. 1. ch 12, starting in 2nd chain from hook: sc 10, sc 4 in last ch, rotate 180 degrees
16. sc 1, dec, sc 12, dec x3, sc 8, dec x3, sc 12, dec, sc 1 (42) 17. sc 1, dec, sc 12, dec x2, sc 4, dec x2, sc 12, dec, sc 1 (36) 18. dec x2, sc 9, dec x2, sc 2, dec x2, sc 9, dec x2 (28) 19. dec x2, sc 7, dec x3, sc 7, dec x2 (21) <- don’t join this round with a slst Fasten off, leave a long tail for closing. Stuff the foot loosely, so that there are no dents in the fabric, so that there are no dents in the fabric, but the stuffing give in slightly at finger pressure. Then close the opening with the thread by stitching the front loops together from the outside of each stitch, put the loops of the last 5 stitches on Your needle one after the other, pull them together, fasten off and weave in all ends.
Now you have to shape the toes using brown yarn (or another contrasting color). It is best to use pins to mark the spots to be pierced. For me it was 3 rounds to the left und to the right of the first/last round and slightly above half of the foot in length.
First published: 22.07.2018
Now thread sturdy yarn in a needle and insert at the first marker through the foot. Run the thread over the foot and insert through at the first spot again, tighten the yarn, repeat 1-2 times. Go to the second marker and repeat the steps. Now You should have 3 toes. Finally go back to the starting point, make 3 knots, weave in all ends.
Leg (make 2): The legs are now crochet in continuous rounds (spirals) again. 1. The first round is crocheted directly into the fabric (I started at the back
between round 14 and 15): sc 24 (if the number is not quite correct, this can be adapted in the next round by increases or decreases, it should be only about 24 and preferably a circle)
2.-13. (12 Rounds) sc in each st around (24) Fasten off, leave a long tail for sewing. Only the lower third of the legs are stuffed, the upper part is not stuffed.
Tail: Secondary color or white 1. sc 6 in MR (6) 2. inc x6 (12) 3. (sc 1, inc) x6 (18) 4. (sc 2, inc) x6 (24) 5. (sc 3, inc) x6 (30) 6. (sc 4, inc) x6 (36) 7. (sc 5, inc) x6 (42) 8.-14. (7 Rounds) sc in each st around (42) 15. (sc 5, dec) x6 (36) 16. (sc 4, dec) x6 (30) Fasten of, don’t close, leave a long tail for sewing. Stuff the tail.
First published: 22.07.2018
Arm (make 2): Main color 1. sc 6 in MR (6) 2. inc x6 (12) 3. (sc 1, inc) x6 (18) 4. (sc 2, inc) x6 (24) 5. (sc 3, inc) x6 (30) 6.-10. (5 Rounds) sc in each st around (30) 11. (sc 8, dec) x3 (27) 12. sc in each st around (27) Shape and stuff, taking care not to overstuff so that you can still shape the paw. 13. (sc 7, dec) x3 (24) 14. sc in each st around (24) 15. (sc 6, dec) x3 (21) 16. sc in each st around (21) 17. (sc 5, dec) x3 (18) 18.-37. (20 Rounds) sc in each st around (18) 38. (sc 4, dec) x3 (15) 39. sc in each st around (15) 40. (sc 3, dec) x3 (12) 41. dec x6 (6) Fasten off, close, leave a long tail for sewing. You can shape the paws, too, the same way as the back paws.
Inner part of the ear (make 2): Secondary color, I used a larger hook this time (3.0 mm) so that the fabric doesn't become so inflexible. Crochet in rows. At the end of each row, chain 1 and turn. 1. ch 2, sc 2 in 2nd chain from hook, ch 1, turn (2) 2. inc x2, ch 1, turn (4) 3.-13. (11 Rows) inc, sc in each st, ch 1, turn You should have 15 stitches now. 14.-53. (40 Rows) sc in each st, ch 1, turn (15) Fasten off, weave in loose ends.
Outer part of the ear (make 2): Main color, I used a larger hook this time, too (3.0 mm) so that the fabric doesn't become so inflexible. Crochet in rows. At the end of each row, chain 1 and turn. 1. ch 2, sc 2 in 2nd chain from hook, ch 1, turn (2) 2. inc x2, ch 1, turn (4) 3.-13. (11 Rows) inc, sc in each st, ch 1, turn You should have 15 stitches now. 14.-53. (40 Rows) sc in each st, ch 1, turn (15) Up to here identical with the inner part. Do not fasten off now, place the outer and inner parts on top of each other (the outer part is at the back, the working loop on the left side) and pull the working loop through the last stitch of the last row. Now crochet both pieces together along the long sides with 1 sc per row, 5 sc in the tip, the upper, short side is not closed, fasten off, leave a long tail for sewing.
First published: 22.07.2018
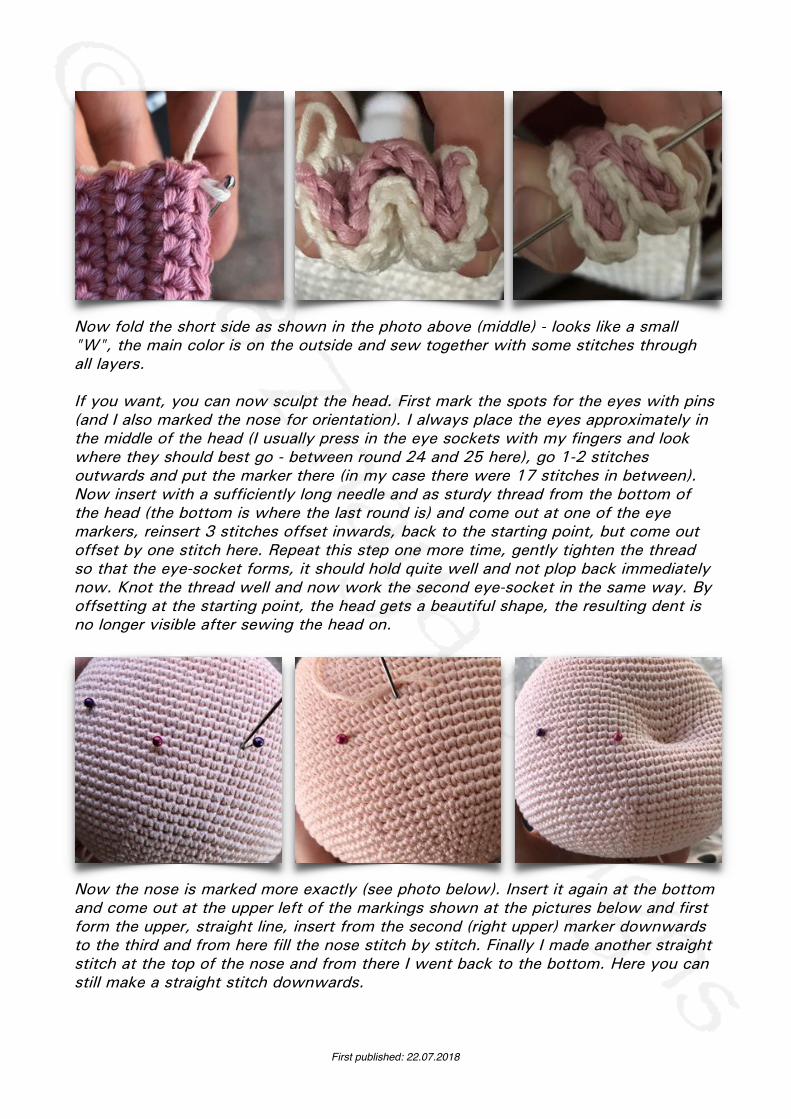
Now fold the short side as shown in the photo above (middle) - looks like a small "W", the main color is on the outside and sew together with some stitches through all layers.
If you want, you can now sculpt the head. First mark the spots for the eyes with pins (and I also marked the nose for orientation). I always place the eyes approximately in the middle of the head (I usually press in the eye sockets with my fingers and look where they should best go - between round 24 and 25 here), go 1-2 stitches outwards and put the marker there (in my case there were 17 stitches in between). Now insert with a sufficiently long needle and as sturdy thread from the bottom of the head (the bottom is where the last round is) and come out at one of the eye markers, reinsert 3 stitches offset inwards, back to the starting point, but come out offset by one stitch here. Repeat this step one more time, gently tighten the thread so that the eye-socket forms, it should hold quite well and not plop back immediately now. Knot the thread well and now work the second eye-socket in the same way. By offsetting at the starting point, the head gets a beautiful shape, the resulting dent is no longer visible after sewing the head on.
Now the nose is marked more exactly (see photo below). Insert it again at the bottom and come out at the upper left of the markings shown at the pictures below and first form the upper, straight line, insert from the second (right upper) marker downwards to the third and from here fill the nose stitch by stitch. Finally I made another straight stitch at the top of the nose and from there I went back to the bottom. Here you can still make a straight stitch downwards.
First published: 22.07.2018
I still have embroidered small eyebrows and an eyelid line with black thread directly over the eyes.
Now all you have to do is sew the head on the body, sew the feet on the bottom of the body (it may also be a bit uneven - as you can see, it's not perfect with me either and it doesn't bother when the bunny sits but rather gives her something "alive"). Sew the tail to the back of the body, make sure that the rabbit does not fall over, the tail keeps it in balance, so that it does not fall backwards. Pin carefully here and then sew on. Now sew the arms left and right directly under the head. That's it - the glow bunny is ready :o)