31
GOLD ® Online Guide for Administrators Section 2: Administration

GOLD® Online
Guide for AdministratorsSection 2: Administration

9
Gettin
g Started
Ad
min
istration
Do
cum
entatio
nC
heckp
oin
tsP
lann
ing
Co
mm
un
ication
Rep
orts
Gettin
g Started
Ad
min
istration
Do
cum
entatio
nC
heckp
oin
tsP
lann
ing
Co
mm
un
ication
Rep
orts
AdministrationGOLD® is organized to give administrators different levels of access according to their roles in their organizations. Administrators may be granted access at the organizational, program, or site level. An organizational level administrator will have access to all of the data for his or her entire organization. A program or site administrator only has access to the data for his or her respective program or site.
The ADMINISTRATION tab is where you set up programs, sites, and classes; add children; add users; and manage license settings.
Note. Depending on your level of access, you may not see the Program or Site links in the first menu option.
Programs, Sites & ClassesThe ADMINISTRATION tab’s drop-down menu gives you access for managing programs, sites, and classes. You also have tools to manage administrators, teachers, and children in the program, site, or class with which you work.
Place your cursor on the ADMINISTRATION tab to view the options.
Steps:
From the ADMINISTRATION tab’s drop-down menu, select Programs, Sites & Classes to get started.

10
Gettin
g Started
Ad
min
istration
Do
cum
entatio
nC
heckp
oin
tsP
lann
ing
Co
mm
un
ication
Rep
orts
Gettin
g Started
Ad
min
istration
Do
cum
entatio
nC
heckp
oin
tsP
lann
ing
Co
mm
un
ication
Rep
orts
Programs
Adding a Program
Note. This option is only available to administrators with organizational level access.
Steps:
From the ADMINISTRATION tab’s drop-down menu, select Programs, Sites & Classes to display the submenu.
Click Programs to display a list of programs in your organization.
Click the Add New Program button.
On the Add Program screen, fill in the required program information.
When you are finished, click SUBMIT.

11
Gettin
g Started
Ad
min
istration
Do
cum
entatio
nC
heckp
oin
tsP
lann
ing
Co
mm
un
ication
Rep
orts
Gettin
g Started
Ad
min
istration
Do
cum
entatio
nC
heckp
oin
tsP
lann
ing
Co
mm
un
ication
Rep
orts
Managing/Editing a Program
Steps:
From the ADMINISTRATION tab’s drop-down menu, select Programs, Sites & Classes to display the submenu.
Click Programs to display a list of programs in your organization.
You can search the list of programs, or you can filter it by entering a program’s name into the “Filter by Program” field and clicking GO. Search results will be displayed below the box in which you typed the program’s name.
Whether you are viewing the full list or you have already filtered the list, click GO to the right of a program’s row to view/edit the program details.
Tip. The Change View button enables you to change the columns that appear on this list. Print, PDF, and Excel® enable you to see the entire list in various formats.
Once you are on the View screen for a selected program, use the Action menu to perform functions such as viewing teachers and children, adding new sites, and viewing reports specific to that program.

12
Gettin
g Started
Ad
min
istration
Do
cum
entatio
nC
heckp
oin
tsP
lann
ing
Co
mm
un
ication
Rep
orts
Gettin
g Started
Ad
min
istration
Do
cum
entatio
nC
heckp
oin
tsP
lann
ing
Co
mm
un
ication
Rep
orts
Sites
Adding a Site
Steps:
From the ADMINISTRATION tab’s drop-down menu, select Programs, Sites & Classes to display the submenu.
Click Sites to display a list of sites in your program or organization.
On the View Sites screen, click the Add New Site button.
Select the Program that the site is to be set up under and click SUBMIT.
On the Add Site screen, fill in the required information.
When you are finished, click SUBMIT.
Managing a Site
There are many more options for administrators at the site level than at any other level of administrative access. If you are an organizational- or program-level administrator, it is important to have administrators assigned at the site level to manage all of the functions and options at that level. (See the “Manage Users” section on page 24 of this guide for help in setting up users’ accounts.)

13
Gettin
g Started
Ad
min
istration
Do
cum
entatio
nC
heckp
oin
tsP
lann
ing
Co
mm
un
ication
Rep
orts
Gettin
g Started
Ad
min
istration
Do
cum
entatio
nC
heckp
oin
tsP
lann
ing
Co
mm
un
ication
Rep
orts
Site Info Action Menu
Accessed from the Site Info screen for a selected site (or the License Settings screen if you are a site-level administrator), the Action menu includes several useful options not found elsewhere in GOLD®. Use this section to learn more about some of these features.
Steps:
From the ADMINISTRATION tab’s drop-down menu, select Programs, Sites & Classes to display the submenu.
Click Sites to display the list of sites within your program or organization.
You can search the list, or you can filter it by entering the site’s name into the “Filter by Site” field and clicking GO.
The results will be displayed below the box in which you typed the site’s name.
Click GO to the right of a site’s row to view/edit the site details.
Click the Action menu to view options.

14
Gettin
g Started
Ad
min
istration
Do
cum
entatio
nC
heckp
oin
tsP
lann
ing
Co
mm
un
ication
Rep
orts
Gettin
g Started
Ad
min
istration
Do
cum
entatio
nC
heckp
oin
tsP
lann
ing
Co
mm
un
ication
Rep
orts
Managing Children (Site Level)
This feature enables you to manage the data for a group of children in one site all at once. You have options to transfer, archive, or delete the data for a group of children.
Steps:
From the ADMINISTRATION tab’s drop-down menu, select Programs, Sites & Classes to display the submenu.
Click Sites to display a list of sites in your program or organization.
You can search the list, or you can filter it by entering the site’s name into the “Filter by Site” field and clicking GO.
Identify the site you are managing.
Click GO to the right of a site’s row to view/edit the site details.
Click the Action menu to view options.
From the Action menu, select Manage Children.
Select the group of children for whom you want to transfer, archive, or delete data. Then click the appropriate orange TRANSFER, ARCHIVE, or DELETE button at the bottom.
Managing Archived Children (Site Level)
Steps:
From the ADMINISTRATION tab’s drop-down menu, select Programs, Sites & Classes to display the submenu.
Click Sites to display a list of sites in your program or organization.
You can search the list, or you can filter it by entering the site’s name into the “Filter by Site” field and clicking GO.
Identify the site you are managing.
Click GO to the right of the site’s row to view/edit the site details.
Click the Action menu to view options.
From the Action menu, select Manage Archived Children.
Select the group of children for whom you want to change the site, reactivate records, or delete records. Then click the appropriate orange CHANGE SITE, REACTIVATE, or DELETE button at the bottom.

15
Gettin
g Started
Ad
min
istration
Do
cum
entatio
nC
heckp
oin
tsP
lann
ing
Co
mm
un
ication
Rep
orts
Gettin
g Started
Ad
min
istration
Do
cum
entatio
nC
heckp
oin
tsP
lann
ing
Co
mm
un
ication
Rep
orts
Managing Deleted Children (Site Level)
Steps:
From the ADMINISTRATION tab’s drop-down menu, select Programs, Sites & Classes to display the submenu.
Click Sites to display a list of sites in your program or organization.
You can search the list, or filter it by entering the site’s name into the “Filter by Site” field and clicking GO.
Identify the site you are managing.
Click GO to the right of the site’s row to view/edit the site details.
Click the Action menu to view options.
From the Action menu, select Manage Deleted Children.
Select the group of children for whom you want to reactivate records, transfer records to archives, or delete records. Then click the appropriate orange REACTIVATE, TRANSFER, or DELETE button at the bottom.

16
Gettin
g Started
Ad
min
istration
Do
cum
entatio
nC
heckp
oin
tsP
lann
ing
Co
mm
un
ication
Rep
orts
Gettin
g Started
Ad
min
istration
Do
cum
entatio
nC
heckp
oin
tsP
lann
ing
Co
mm
un
ication
Rep
orts
Managing Exited Children From IDEA Part B or Part C (Site Level)
Steps:
From the ADMINISTRATION tab’s drop-down menu, select Programs, Sites & Classes to display the submenu.
Click Sites to display a list of sites in your program or organization.
You can search the list or filter by name by entering the site name into the filter field and clicking GO.
Identify the site you are managing.
Click GO to the right of the site’s row to view/edit the site details.
Click the Action menu to view options.
From the Action menu, select Manage Exited Children from IDEA Part B or Part C.
Select the child whose records you want to reactivate. Then click Reactivate.
A pop-up option will ask you to confirm your choice to reactivate this child’s record.
Select OK to reactivate the child’s record or select Cancel to keep the child as exited.

17
Gettin
g Started
Ad
min
istration
Do
cum
entatio
nC
heckp
oin
tsP
lann
ing
Co
mm
un
ication
Rep
orts
Gettin
g Started
Ad
min
istration
Do
cum
entatio
nC
heckp
oin
tsP
lann
ing
Co
mm
un
ication
Rep
orts
Managing Interrater Reliability (Site Level)
Steps:
From the ADMINISTRATION tab’s drop-down menu, select Programs, Sites & Classes to display the submenu.
Click Sites to display a list of sites in your program or organization.
You can search the list, or you can filter by entering the site’s name into the “Filter by Site” field and clicking GO.
Identify the site you are managing.
Click GO at the right of the site’s row to view/edit the site details.
Click the Action menu to view options.
From the Action menu, select Manage Interrater Reliability.
The screen below will appear. It lists all users in your account.
Check the box in the “Add” column to assign the interrater reliability certification process to a user.
Click SAVE.
Each user will receive an e-mail notification that you have assigned the interrater reliability certification process to him or her. The message will include instructions for getting started.
Each user can then access the interrater reliability certification process through the PROFESSIONAL DEVELOPMENT tab on the Dashboard.
Use this screen to monitor/manage each user’s progress throughout the interrater reliability certification process.
Note. You cannot assign more than one test to users at the site level. Use the “Manage Interrater Reliability” feature described in the “Manage Users” section on page 31 of this guide to add additional tests for a single user.

18
Gettin
g Started
Ad
min
istration
Do
cum
entatio
nC
heckp
oin
tsP
lann
ing
Co
mm
un
ication
Rep
orts
Gettin
g Started
Ad
min
istration
Do
cum
entatio
nC
heckp
oin
tsP
lann
ing
Co
mm
un
ication
Rep
orts
Classes
Adding a Class
Steps:
From the ADMINISTRATION tab’s drop-down menu, select Programs, Sites & Classes to display the submenu.
Click Classes to display a list of classes in your program or organization.
On the View Classes screen, click the Add New Class button.
Editing a Class
Steps:
From the ADMINISTRATION tab’s drop-down menu, select Programs, Sites & Classes to display the submenu.
Click Classes to display a list of classes in your program or organization.
On the View Classes screen, click the GO button for the class you need to view/edit.
On the Class Info screen, select Edit to change the information about the class or to add assistant/co-teachers.
Select the Program, Site, and Teacher for which the class is to be set up. Then click SUBMIT.
On the Add New Class screen, fill in the required information for the class.
When you are finished, click ADD.
Tip. For more information about each field on the Add New Class screen, see the “Support” articles on the right-hand side of the screen.

19
Gettin
g Started
Ad
min
istration
Do
cum
entatio
nC
heckp
oin
tsP
lann
ing
Co
mm
un
ication
Rep
orts
Gettin
g Started
Ad
min
istration
Do
cum
entatio
nC
heckp
oin
tsP
lann
ing
Co
mm
un
ication
Rep
orts
OSEP Exit Status Form (Class Level)
Teachers usually complete the “OSEP Exit Status Form,” but you can also do it from your administrator site.
Steps:
From the ADMINISTRATION tab’s drop-down menu, select Programs, Sites & Classes to display the submenu.
Click Classes to display a list of classes in your program or organization.
On the View Classes screen, click the GO button for the class you need to view/edit.
From the Action menu on the Class Info screen, select OSEP Exit Status Form.
Review the status of children in Part B or Part C. Complete checkpoint data in the entry and exit checkpoint periods are required for exiting.
If the child has complete information and is ready to be exited, select Exit.

20
Gettin
g Started
Ad
min
istration
Do
cum
entatio
nC
heckp
oin
tsP
lann
ing
Co
mm
un
ication
Rep
orts
Gettin
g Started
Ad
min
istration
Do
cum
entatio
nC
heckp
oin
tsP
lann
ing
Co
mm
un
ication
Rep
orts
Changing the Primary Teacher
To change the primary teacher for a class, first make sure that an account has already been added for the new primary teacher. (See “Adding User Accounts for Teachers and Administrators” in the “Manage Users” section on page 24 of this guide.)
Steps:
From the ADMINISTRATION tab’s drop-down menu, select Programs, Sites & Classes to display the submenu.
Click Classes to display a list of classes in your program or organization.
On the View Classes screen, click the GO button for the class for which you need to change the primary teacher.
From the Action menu on the Class Info screen, select Change Primary Teacher.
Select the New Primary Teacher from the drop-down list.
Click CHANGE.
Assigning and Changing Assistant/Co-Teachers
First make sure that an account has been added for the assistant/co-teacher. (See “Adding User Accounts for Teachers and Administrators” in the “Manage Users” section on page 24 of this guide.)
Steps:
From the ADMINISTRATION tab’s drop-down menu, select Programs, Sites & Classes to display the submenu.
Click Classes to display a list of classes in your program or organization.
On the View Classes screen, click the GO button for the class for which you need to add/change assistant or co-teachers.
Click the Edit button on the Class Info screen.
Select the new assistant teacher from the drop-down list.
Check the box below the “Assistant Teacher” field if he or she has co-teacher status.
Click UPDATE.
Tip. Co-teachers are given the ability to add and edit checkpoint data. Assistant teachers may add documentation but may only view checkpoint levels without editing or finalizing them.

21
Gettin
g Started
Ad
min
istration
Do
cum
entatio
nC
heckp
oin
tsP
lann
ing
Co
mm
un
ication
Rep
orts
Gettin
g Started
Ad
min
istration
Do
cum
entatio
nC
heckp
oin
tsP
lann
ing
Co
mm
un
ication
Rep
orts
Managing ChildrenThe ADMINISTRATION tab’s Manage Children submenu enables you to add and search for children’s records, manage children’s profile data, and transfer them from class to class.
Steps:
From the ADMINISTRATION tab’s drop- down menu, select Manage Children to display the submenu.
Click Children or Add/Edit Funding Sources to get started.
Adding a Child
Steps:
From the ADMINISTRATION tab’s drop-down menu, select Manage Children to display a submenu.
Click Children.
On the View Children screen, click the Add New Child button.
On the Add Child screen, select a program, site, teacher, and class. Then click SUBMIT.
On the next screen, enter the necessary child data and click ADD.
Tip. A child should only be assessed by using the Spanish language and literacy objectives if the child speaks Spanish AND a teacher in the classroom speaks Spanish well enough to assess the child’s Spanish language and literacy skills.
Tip. On the Add Child screen, use “Support” and “Resources” to find details about each field and how to designate an age or class/grade.
If the child has an IEP or IFSP, click the box near the bottom to display fields for entering the child’s entry date and the entry assessment tool.
22
Gettin
g Started
Ad
min
istration
Do
cum
entatio
nC
heckp
oin
tsP
lann
ing
Co
mm
un
ication
Rep
orts
Gettin
g Started
Ad
min
istration
Do
cum
entatio
nC
heckp
oin
tsP
lann
ing
Co
mm
un
ication
Rep
orts
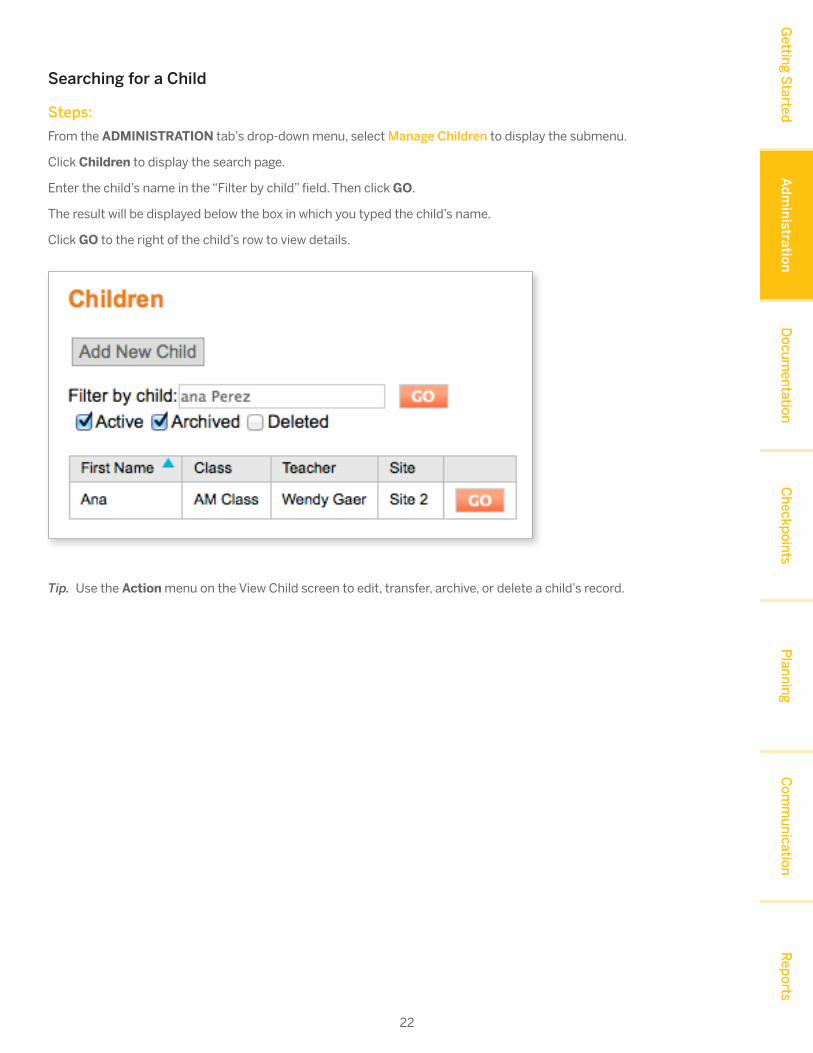
Searching for a Child
Steps:
From the ADMINISTRATION tab’s drop-down menu, select Manage Children to display the submenu.
Click Children to display the search page.
Enter the child’s name in the “Filter by child” field. Then click GO.
The result will be displayed below the box in which you typed the child’s name.
Click GO to the right of the child’s row to view details.
Tip. Use the Action menu on the View Child screen to edit, transfer, archive, or delete a child’s record.

23
Gettin
g Started
Ad
min
istration
Do
cum
entatio
nC
heckp
oin
tsP
lann
ing
Co
mm
un
ication
Rep
orts
Gettin
g Started
Ad
min
istration
Do
cum
entatio
nC
heckp
oin
tsP
lann
ing
Co
mm
un
ication
Rep
orts
Adding/Editing Funding Sources
The “Add/Edit Funding Sources” feature enables you to indicate funding sources for each child in your organization, program, or site by using one screen. This screen also enables you to quickly review and check child funding sources for accuracy.
Steps:
From the ADMINISTRATION tab’s drop-down menu, select Manage Children to display the submenu.
Click Add/Edit Funding Sources. A new screen will display the names of all of the children whose records you may access, and it will show their funding sources.
Use the Change View menu on the top right to filter the data. One option is to show only children “Without funding sources assigned.”
Select a funding source by clicking on the corresponding checkbox.
When you are finished, click UPDATE to save your changes.
Tip. For information about adding funding sources to this screen, refer to “Adding Custom Funding Sources” in the the “License Settings” section of page 37 of this guide.

24
Gettin
g Started
Ad
min
istration
Do
cum
entatio
nC
heckp
oin
tsP
lann
ing
Co
mm
un
ication
Rep
orts
Gettin
g Started
Ad
min
istration
Do
cum
entatio
nC
heckp
oin
tsP
lann
ing
Co
mm
un
ication
Rep
orts
Managing UsersThe Manage Users menu enables you to add users, reset their passwords, manage their profile data, and access the site as the user.
Steps:
From the ADMINISTRATION tab’s drop-down menu, select Manage Users to display the submenu.
Click Teachers & Administrators, Families, or TeamCentral Users to get started.
Adding User Accounts for Teachers and Administrators
Steps:
From the ADMINISTRATION tab’s drop-down menu, select Manage Users to display the submenu.
Click Teachers & Administrators.
On the View Teachers & Administrators screen, click the Add New Teacher or Administrator button.
On the Add Teacher/Administrator screen, enter all required information.
From the drop-down menus, select the program and site for which you want to add user accounts. Click SUBMIT.
First Name and Last Name: Enter the user’s name as you would like it to appear in the system.
E-mail: Enter the e-mail address you would like to use for this account.
Note. It is recommended that each user have a separate e-mail address to which he or she has easy access. All GOLD® communications will be sent to the user at this e-mail address, including messages about forgotten passwords.
Phone: This is not required, but the number is useful when an administrator who does not work directly with the teacher needs contact information.
Username: The username must be different from all other usernames in the GOLD® online system, not just in your program. If the username is already taken, an alert at the top of the page will appear after you click Save: “Username already taken. Please try again.” If it appears, simply edit the username and click Save again.
Tip. Do not enter a password for the user. Users will receive a temporary password by e-mail.

25
Gettin
g Started
Ad
min
istration
Do
cum
entatio
nC
heckp
oin
tsP
lann
ing
Co
mm
un
ication
Rep
orts
Gettin
g Started
Ad
min
istration
Do
cum
entatio
nC
heckp
oin
tsP
lann
ing
Co
mm
un
ication
Rep
orts
Class: You may select either to add the user to an existing class or create a new class for this user.
If you choose Add to an existing Class, a drop-down menu will appear from which you select the class to which you are adding the teacher. After submitting the user information, the next screen will ask you to identify the user as the primary teacher, a co-teacher, or an assistant teacher in that class.
If you choose Create a new Class and submit the user information, the next screen directs you to enter the new class information. The user will be identified as the primary teacher.
Curriculum Types: Depending on your license settings, you may select one or both types: Infants, Toddlers & Twos and/or Preschool, Pre-K, K. This determines the types of classes that the teacher will be able to create.
Identifier: Some programs may have an ID number or similar identifier that they would like to enter for their teachers. It can be entered here.
The form ends with several fields with drop-down choices for providing additional information about the user. Providing the information is optional.
Click Save. Login directions will be sent to the specified e-mail address.

26
Gettin
g Started
Ad
min
istration
Do
cum
entatio
nC
heckp
oin
tsP
lann
ing
Co
mm
un
ication
Rep
orts
Gettin
g Started
Ad
min
istration
Do
cum
entatio
nC
heckp
oin
tsP
lann
ing
Co
mm
un
ication
Rep
orts
Granting Administrative Access to a User
Steps:
From the ADMINISTRATION tab’s drop-down menu, select Manage Users to display the submenu.
Click Teachers & Administrators.
On the View Teachers & Administrators screen, click the Add New Teacher or Administrator button.
Select the appropriate program and site from the drop-down menus. Click SUBMIT.
On the Add Teacher/Administrator screen, click the checkbox captioned “Give this user access to all children within specific Programs or Sites.”
To establish the user’s access level, select an Admin Type.
Select the organization, program, or site to which the user should have administrative access. (Clicking the plus sign [+] expands the section.)
Tip. Refer to the “Support” and “Resources” on the right side of the Add Teacher/Administrator screen to get more information and guidance about granting administrative access.

27
Gettin
g Started
Ad
min
istration
Do
cum
entatio
nC
heckp
oin
tsP
lann
ing
Co
mm
un
ication
Rep
orts
Gettin
g Started
Ad
min
istration
Do
cum
entatio
nC
heckp
oin
tsP
lann
ing
Co
mm
un
ication
Rep
orts
Managing Teachers and Administrators
Steps:
From the ADMINISTRATION tab’s drop-down menu, select Manage Users to display the submenu.
Click Teachers & Administrators to display the search page.
Enter the teacher’s or administrator’s name, e-mail, or username in the filter field. Then click GO.
In the Teachers & Administrators search results, click the arrow next to “Access Site as this User” to see a drop-down list of options.
Tip. To access the list of options, you can also choose View Details from the drop-down list and click GO. Then choose the Action menu on the View Teacher/Administrator screen.
Note. The Delete option will appear in this list only if the user is not associated in GOLD® with children or classes. Before deleting a user, first reassign all children in the teacher’s class to a different teacher. Then delete classes for which the teacher was a primary teacher.

28
Gettin
g Started
Ad
min
istration
Do
cum
entatio
nC
heckp
oin
tsP
lann
ing
Co
mm
un
ication
Rep
orts
Gettin
g Started
Ad
min
istration
Do
cum
entatio
nC
heckp
oin
tsP
lann
ing
Co
mm
un
ication
Rep
orts
Transferring a User
Steps:
From the ADMINISTRATION tab’s drop-down menu, select Manage Users to display the submenu.
Click Teachers & Administrators to display the search page.
Search for the person you wish to transfer. You can do that by using the filter option or by finding the person’s name in the full list.
In the search results, click the drop-down list in the row for the person you wish to transfer.
Select Transfer User and then click GO.
Select the new site.
Click TRANSFER.
Access Site as a User
Steps:
From the ADMINISTRATION tab’s drop-down menu, select Manage Users to display the submenu.
Click Teachers & Administrators to display the search page.
Search for the person whose account you would like to view. You can use the filter option or find the person’s name in the full list.
In the search results, click the drop-down list in the row for the person whose account you would like to view.
Select Access Site as this User and then click GO.
You will then be logged in as that user, so you can see screens exactly as that user sees them. This will help you troubleshoot problems.
To go back to your administrator’s account, look at the top right corner of the screen. Select Change Role and then Back to My Login.
29
Gettin
g Started
Ad
min
istration
Do
cum
entatio
nC
heckp
oin
tsP
lann
ing
Co
mm
un
ication
Rep
orts
Gettin
g Started
Ad
min
istration
Do
cum
entatio
nC
heckp
oin
tsP
lann
ing
Co
mm
un
ication
Rep
orts
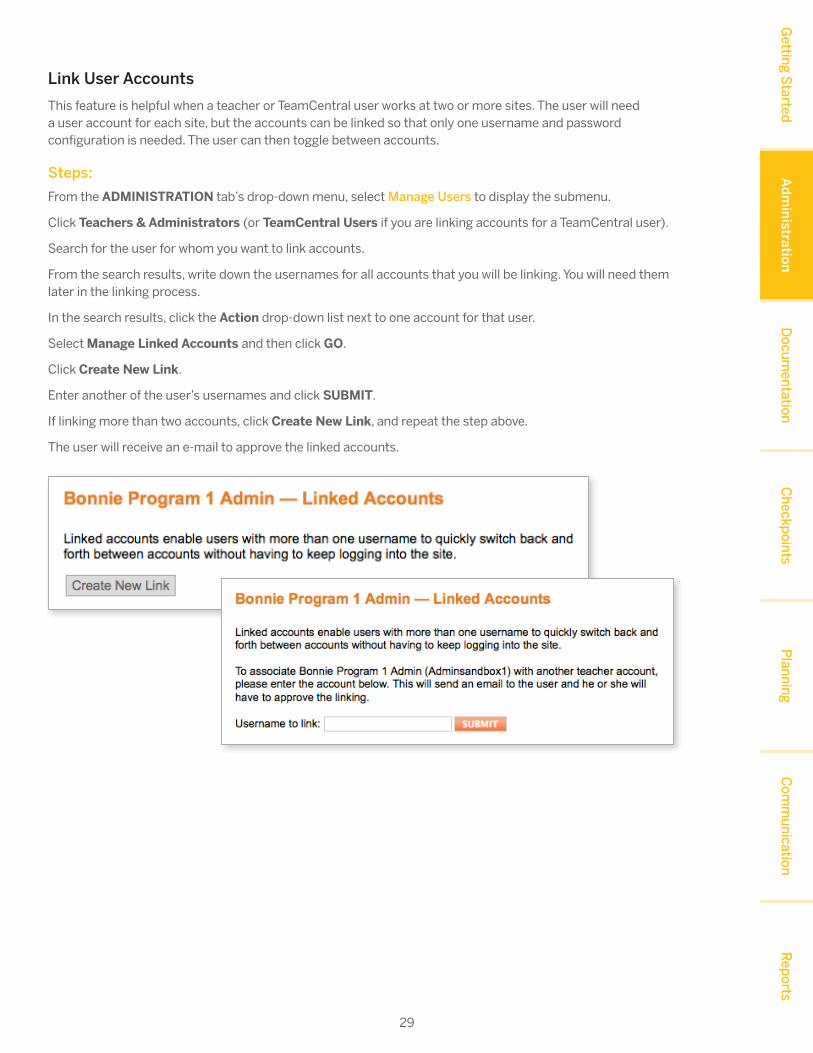
Link User Accounts
This feature is helpful when a teacher or TeamCentral user works at two or more sites. The user will need a user account for each site, but the accounts can be linked so that only one username and password configuration is needed. The user can then toggle between accounts.
Steps:
From the ADMINISTRATION tab’s drop-down menu, select Manage Users to display the submenu.
Click Teachers & Administrators (or TeamCentral Users if you are linking accounts for a TeamCentral user).
Search for the user for whom you want to link accounts.
From the search results, write down the usernames for all accounts that you will be linking. You will need them later in the linking process.
In the search results, click the Action drop-down list next to one account for that user.
Select Manage Linked Accounts and then click GO.
Click Create New Link.
Enter another of the user’s usernames and click SUBMIT.
If linking more than two accounts, click Create New Link, and repeat the step above.
The user will receive an e-mail to approve the linked accounts.

30
Gettin
g Started
Ad
min
istration
Do
cum
entatio
nC
heckp
oin
tsP
lann
ing
Co
mm
un
ication
Rep
orts
Gettin
g Started
Ad
min
istration
Do
cum
entatio
nC
heckp
oin
tsP
lann
ing
Co
mm
un
ication
Rep
orts
Show Login History for a User
Steps:
From the ADMINISTRATION tab’s drop-down menu, select Manage Users to display the submenu.
Click Teachers & Administrators to display the search page.
Search for the person whose history you would like to view. You can use the filter option or find the person’s name in the full list.
In the search results, click the drop-down list in the row for the person whose history you want to view.
Select Show History and then click GO.
Changing/Resetting User Passwords
Steps:
From the ADMINISTRATION tab’s drop-down menu, select Manage Users to display the submenu.
Click Teachers & Administrators to display the search page.
Search for the person for whom you need to reset the password. You can use the filter option or find the name of the person in the full list.
In the search results, click the drop-down list in the row for the person whose password you want to reset.
Select View Details and then click GO.
On the View Teacher/Administrator screen, click the Change Password button.

31
Gettin
g Started
Ad
min
istration
Do
cum
entatio
nC
heckp
oin
tsP
lann
ing
Co
mm
un
ication
Rep
orts
Gettin
g Started
Ad
min
istration
Do
cum
entatio
nC
heckp
oin
tsP
lann
ing
Co
mm
un
ication
Rep
orts
Manage Interrater Reliability Access for a Single User
Steps:
From the ADMINISTRATION tab’s drop-down menu, select Manage Users to display the submenu.
Click Teachers & Administrators to display the search page.
Search for the teacher for whom you want to manage access to the interrater reliability certification process. You can use the filter option or find the name of the teacher in the full list.
In the search results, click the drop-down list in the row for the teacher for whom you want to manage access to the process.
Select View Details and then click GO.
On the View Teacher/Administrator screen, select the Manage Interrater Reliability Access button.
On the Interrater Reliability Access screen, click the Add Interrater Reliability Certification Access button.
To assign the user to an additional interrater reliability test, click the Add Interrater Reliability Certification Access button again.
To remove the user’s access to a test, click the Remove Interrater Reliability Certification Access button.
Tip. You can only remove access before the user has started the test. Once the test is in progress, you cannot remove access. You can also manage interrater reliability access at the site level (see page 17). Refer to the “Support” and “Resources” options on the right side of the Interrater Reliability Access screen to get more information and guidance on the interrater reliability certification process.

32
Gettin
g Started
Ad
min
istration
Do
cum
entatio
nC
heckp
oin
tsP
lann
ing
Co
mm
un
ication
Rep
orts
Gettin
g Started
Ad
min
istration
Do
cum
entatio
nC
heckp
oin
tsP
lann
ing
Co
mm
un
ication
Rep
orts
Managing Families
Teachers invite families to use many features of GOLD®. Administrators will see a list of families who have accepted each teacher’s invitation. Administrators can reset a family member’s password, view login history, disable the account, and access the site as the family member.
Steps:
From the ADMINISTRATION tab’s drop-down menu, select Manage Users to display the submenu.
Click Families to display the list of family site users in your program or site.
Search for a particular family site user by using the filter option at the top of the screen.
To view/edit details of a particular user, click GO to the right of the user’s information.
From the View Family Site User screen, you can reset the user’s password by choosing Change Password. Click the Action button for more options.
Tip. If a family has two or more children in the program, they may use the same family account to view the records of all of their children. The teacher of the second child will use the “Invite Families” feature under the COMMUNICATION tab of the teacher site. Families will have the option of creating a new account or linking the child to an existing account.

33
Gettin
g Started
Ad
min
istration
Do
cum
entatio
nC
heckp
oin
tsP
lann
ing
Co
mm
un
ication
Rep
orts
Gettin
g Started
Ad
min
istration
Do
cum
entatio
nC
heckp
oin
tsP
lann
ing
Co
mm
un
ication
Rep
orts
Managing TeamCentral Users
When an organization uses the optional TeamCentral feature, the child’s teacher invites team members to use GOLD®. Administrators will see a list of team members who have accepted the teacher’s invitation. Administrators can approve or reject a team member’s invitation, reset a team member’s password, view login history, and disable the account.
Steps:
From the ADMINISTRATION tab’s drop-down menu, select Manage Users to display the submenu.
Click TeamCentral Users to display the list of TeamCentral users in your program.
You can search for a particular TeamCentral user by using the filter option at the top of the screen.
To view/edit details of a particular user, click GO to the right of the user’s information.
Tip. Only approved TeamCentral users will appear on the list under TeamCentral Users in the ADMINISTRATION tab. To approve TeamCentral user requests, see the instructions for doing so in the “Communication” section on page 53 of this guide.
Tip. TeamCentral members who work in multiple sites need a user account for each site. The accounts can be linked, so only one username and password configuration is needed. To link TeamCentral member accounts, see the “Link User Accounts” section on page 29 of this guide.
Reset the user’s password by choosing Change Password.
Use the Action menu to manage linked accounts, disable the account, or view the history of this user.
Disassociate a particular child from the TeamCentral member’s caseload.

34
Gettin
g Started
Ad
min
istration
Do
cum
entatio
nC
heckp
oin
tsP
lann
ing
Co
mm
un
ication
Rep
orts
Gettin
g Started
Ad
min
istration
Do
cum
entatio
nC
heckp
oin
tsP
lann
ing
Co
mm
un
ication
Rep
orts
Deleting a Child Association
Administrators can disassociate children from a TeamCentral member’s profile. Once a team member discontinues providing services for a child, you should disassociate that user from the child’s portfolio.
Steps:
From the ADMINISTRATION tab’s drop-down menu, select Manage Users to display the submenu.
Click TeamCentral Users to display the list of TeamCentral users in your program.
Search for the team member for whom you want to delete association with a child.
In the search results, click GO to the right of the user information.
View the list of associated children at the bottom of the View Team Member screen.
Click Disassociate Child.
A pop-up box appears, asking you to confirm the action.
Click OK.
The disassociated child’s name will no longer displayed in the ASSOCIATED CHILDREN list for the team member. The member will no longer have access to the particular child’s profile or other information.

35
Gettin
g Started
Ad
min
istration
Do
cum
entatio
nC
heckp
oin
tsP
lann
ing
Co
mm
un
ication
Rep
orts
Gettin
g Started
Ad
min
istration
Do
cum
entatio
nC
heckp
oin
tsP
lann
ing
Co
mm
un
ication
Rep
orts
License SettingsThe license settings View screen provides you with tools to manage the organization, program, or site for which you are an administrator. You will view different options, depending on your level of access. Not all options are always displayed.
Tip. Don’t forget to click the Action button for more options! The Action menu choices vary according to the license settings for each organization, program, and site.
Steps:
From the ADMINISTRATION tab’s drop-down menu, select License Settings to display the license settings View screen.
Click the Edit button to make changes in the GENERAL INFORMATION section or the license settings View screen.
36
Gettin
g Started
Ad
min
istration
Do
cum
entatio
nC
heckp
oin
tsP
lann
ing
Co
mm
un
ication
Rep
orts
Gettin
g Started
Ad
min
istration
Do
cum
entatio
nC
heckp
oin
tsP
lann
ing
Co
mm
un
ication
Rep
orts
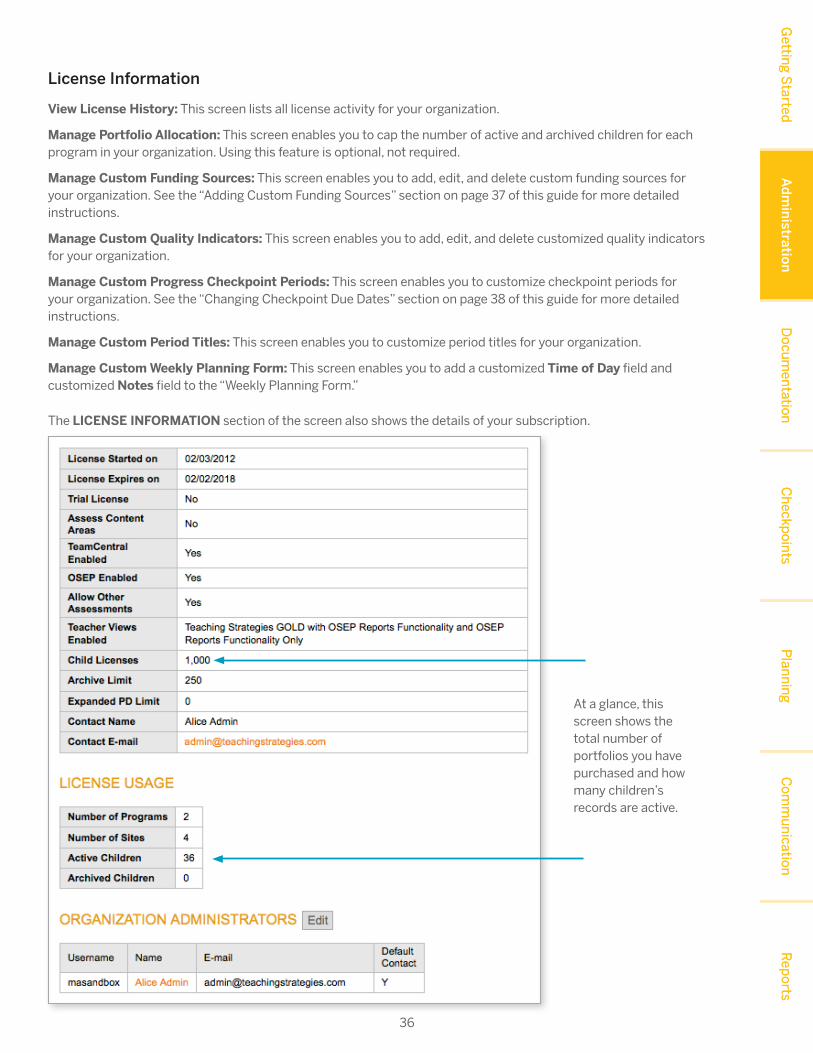
License Information
View License History: This screen lists all license activity for your organization.
Manage Portfolio Allocation: This screen enables you to cap the number of active and archived children for each program in your organization. Using this feature is optional, not required.
Manage Custom Funding Sources: This screen enables you to add, edit, and delete custom funding sources for your organization. See the “Adding Custom Funding Sources” section on page 37 of this guide for more detailed instructions.
Manage Custom Quality Indicators: This screen enables you to add, edit, and delete customized quality indicators for your organization.
Manage Custom Progress Checkpoint Periods: This screen enables you to customize checkpoint periods for your organization. See the “Changing Checkpoint Due Dates” section on page 38 of this guide for more detailed instructions.
Manage Custom Period Titles: This screen enables you to customize period titles for your organization.
Manage Custom Weekly Planning Form: This screen enables you to add a customized Time of Day field and customized Notes field to the “Weekly Planning Form.”
The LICENSE INFORMATION section of the screen also shows the details of your subscription.
At a glance, this screen shows the total number of portfolios you have purchased and how many children’s records are active.

37
Gettin
g Started
Ad
min
istration
Do
cum
entatio
nC
heckp
oin
tsP
lann
ing
Co
mm
un
ication
Rep
orts
Gettin
g Started
Ad
min
istration
Do
cum
entatio
nC
heckp
oin
tsP
lann
ing
Co
mm
un
ication
Rep
orts
Adding Custom Funding Sources
Steps:
From the ADMINISTRATION tab’s drop-down menu, select License Settings.
Under LICENSE INFORMATION on the license settings View screen, click Manage Custom Funding Sources.
View the default and custom funding sources for your organization on the Funding Sources screen.
Click the Add a Custom Funding Source button at the bottom of the screen.
Enter the name of the new funding source and click SUBMIT.

38
Gettin
g Started
Ad
min
istration
Do
cum
entatio
nC
heckp
oin
tsP
lann
ing
Co
mm
un
ication
Rep
orts
Gettin
g Started
Ad
min
istration
Do
cum
entatio
nC
heckp
oin
tsP
lann
ing
Co
mm
un
ication
Rep
orts
Changing Checkpoint Due Dates
Steps:
From the ADMINISTRATION tab’s drop-down menu, select License Settings.
Under LICENSE INFORMATION on the license settings View screen, click Manage Custom Progress Checkpoint Periods.
Tip. To add a fourth checkpoint period, contact us at [email protected]. An added checkpoint period cannot be changed.
Choose the year you want to customize and whether you want to customize the dates for Infants, Toddlers, and Twos; Preschool; or Both.
Enter the Start Date and End Date for each documentation collection period.
Enter the Checkpoint Due Date for each checkpoint period. This is the date by which you expect teachers to have entered and finalized checkpoint levels.
When you have finished, click SUBMIT.
Note. There must not be gaps between checkpoint periods. Most programs set the same date as the End Date and Checkpoint Due Date.


