13
©2016 TOTAL MERCHANT SERVICES. PROPRIETARY AND CONFIDENTIAL SUPPORT CONTENT mPOP SETUP Last updated: July 19, 2016

©2016 TOTAL MERCHANT SERVICES. PROPRIETARY AND CONFIDENTIAL
SUPPORT CONTENT mPOP SETUP
Last updated: July 19, 2016
GROOVV POS Support Content
©2016 TOTAL MERCHANT SERVICES. PROPRIETARY AND CONFIDENTIAL 2
mPOP Setup
What’s Included
• mPOP • Barcode Scanner • Power cable • Mounting bracket with 2 screws • Template • Sample paper roll
Connecting the Power Cable
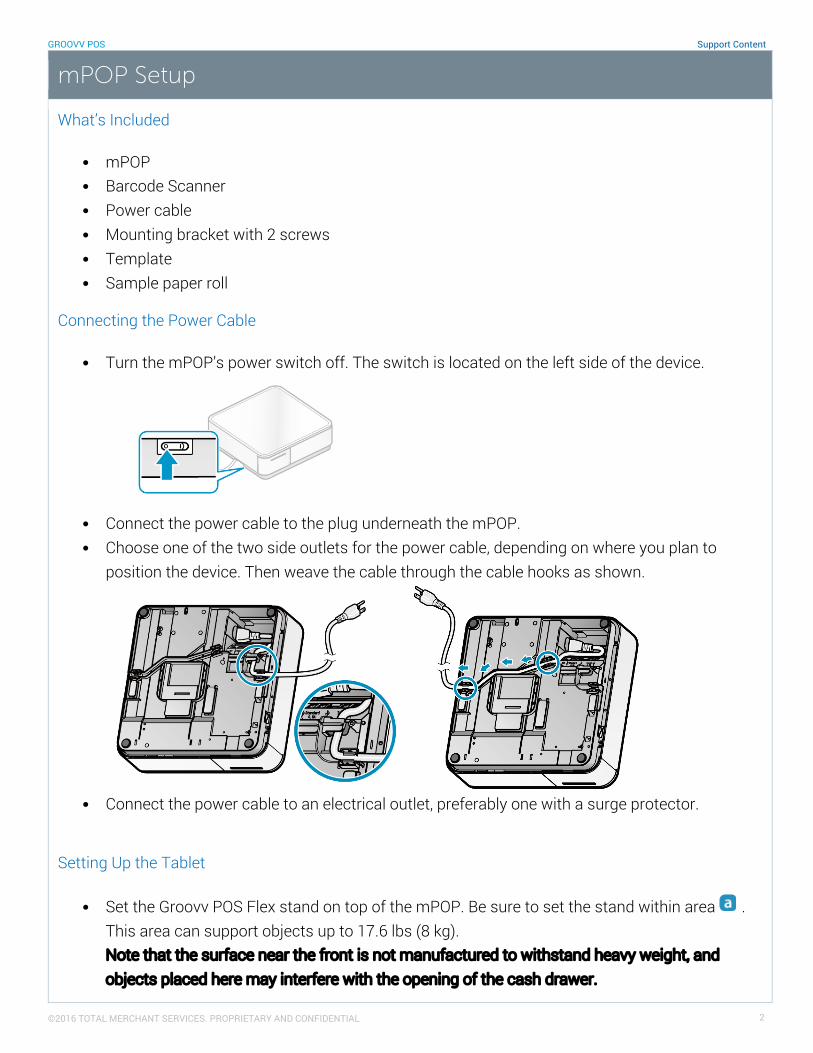
• Turn the mPOP’s power switch off. The switch is located on the left side of the device.
• Connect the power cable to the plug underneath the mPOP. • Choose one of the two side outlets for the power cable, depending on where you plan to
position the device. Then weave the cable through the cable hooks as shown.
• Connect the power cable to an electrical outlet, preferably one with a surge protector.
Setting Up the Tablet
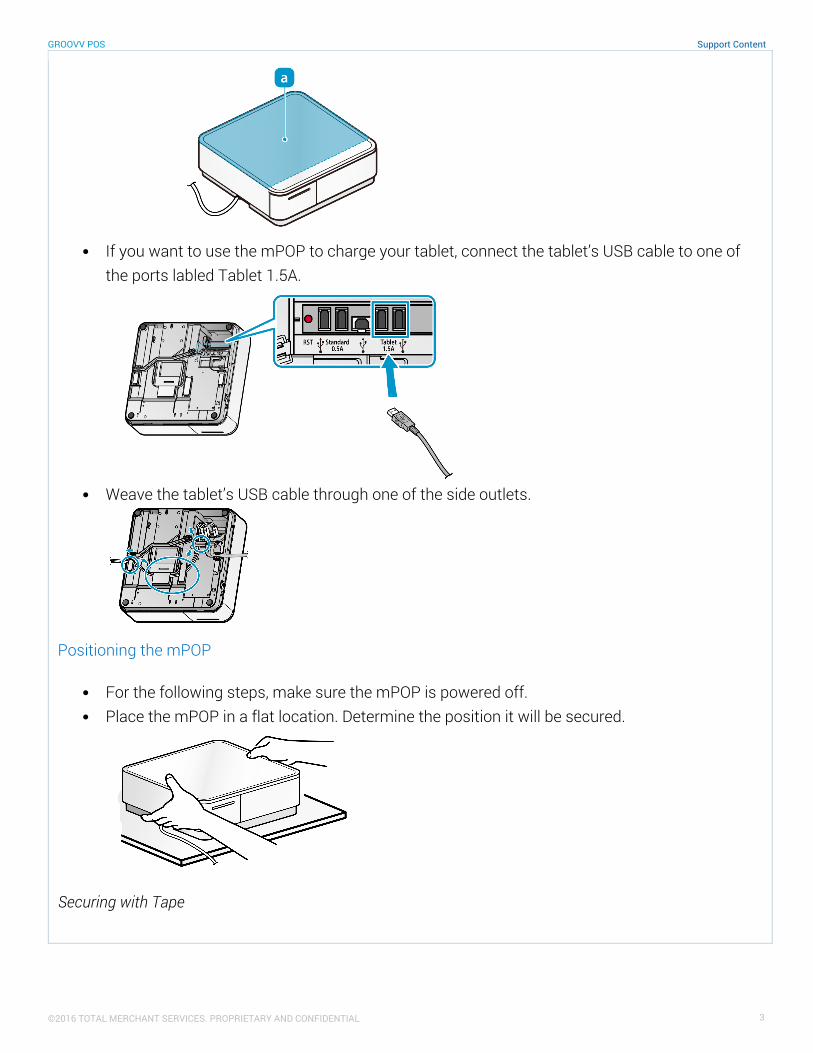
• Set the Groovv POS Flex stand on top of the mPOP. Be sure to set the stand within area . This area can support objects up to 17.6 lbs (8 kg). Note that the surface near the front is not manufactured to withstand heavy weight, and objects placed here may interfere with the opening of the cash drawer.
GROOVV POS Support Content
©2016 TOTAL MERCHANT SERVICES. PROPRIETARY AND CONFIDENTIAL 3
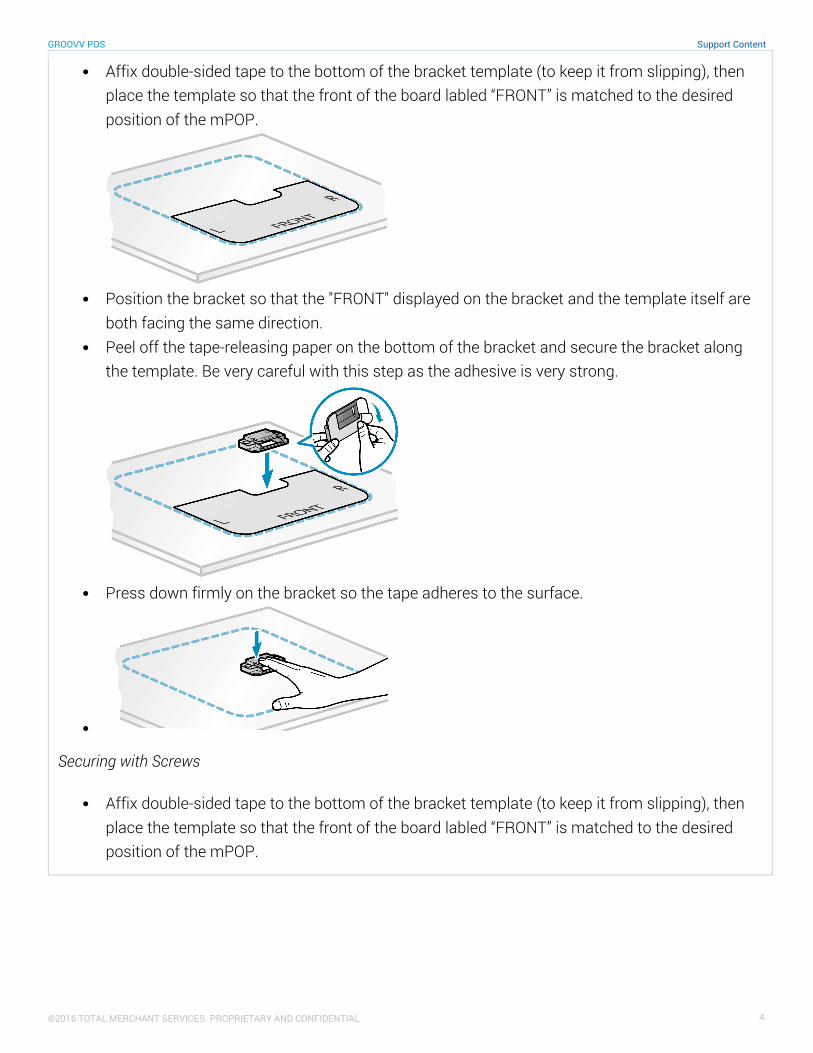
• If you want to use the mPOP to charge your tablet, connect the tablet’s USB cable to one of
the ports labled Tablet 1.5A.
• Weave the tablet’s USB cable through one of the side outlets.
Positioning the mPOP
• For the following steps, make sure the mPOP is powered off. • Place the mPOP in a flat location. Determine the position it will be secured.
Securing with Tape
GROOVV POS Support Content
©2016 TOTAL MERCHANT SERVICES. PROPRIETARY AND CONFIDENTIAL 4
• Affix double-sided tape to the bottom of the bracket template (to keep it from slipping), then place the template so that the front of the board labled “FRONT” is matched to the desired position of the mPOP.
• Position the bracket so that the "FRONT" displayed on the bracket and the template itself are
both facing the same direction. • Peel off the tape-releasing paper on the bottom of the bracket and secure the bracket along
the template. Be very careful with this step as the adhesive is very strong.
• Press down firmly on the bracket so the tape adheres to the surface.
•
Securing with Screws • Affix double-sided tape to the bottom of the bracket template (to keep it from slipping), then
place the template so that the front of the board labled “FRONT” is matched to the desired position of the mPOP.
GROOVV POS Support Content
©2016 TOTAL MERCHANT SERVICES. PROPRIETARY AND CONFIDENTIAL 5
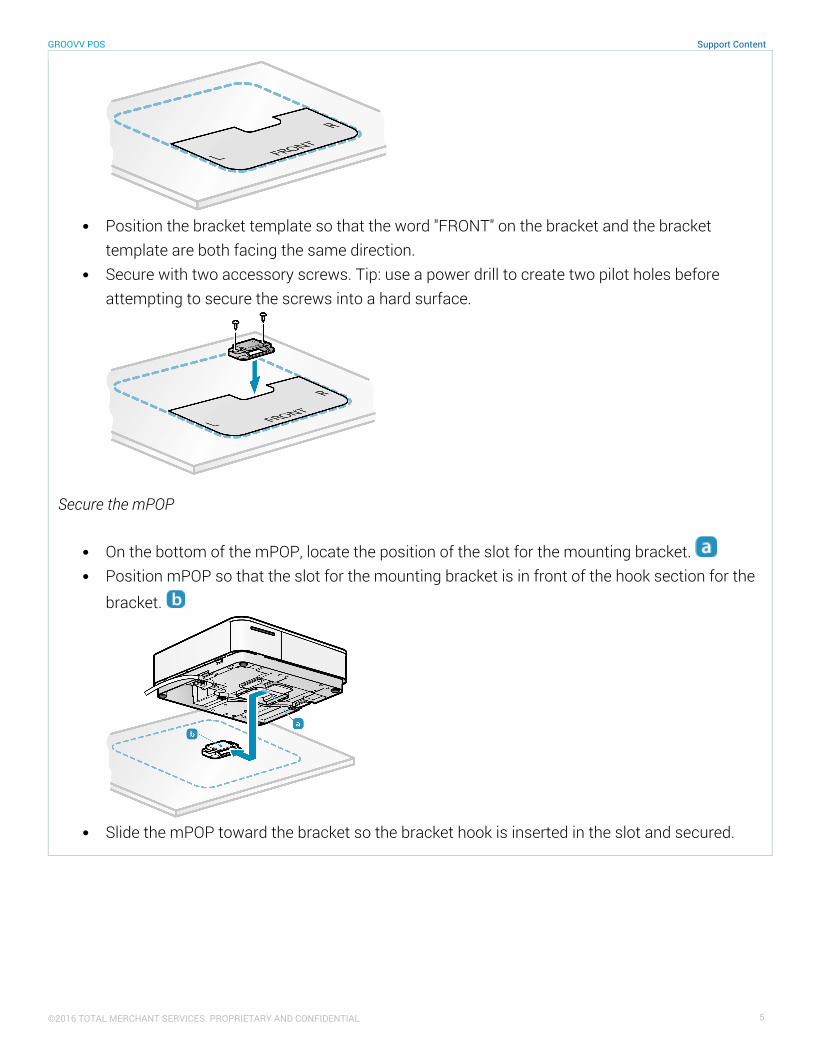
• Position the bracket template so that the word "FRONT" on the bracket and the bracket
template are both facing the same direction. • Secure with two accessory screws. Tip: use a power drill to create two pilot holes before
attempting to secure the screws into a hard surface.
Secure the mPOP
• On the bottom of the mPOP, locate the position of the slot for the mounting bracket. • Position mPOP so that the slot for the mounting bracket is in front of the hook section for the
bracket.
• Slide the mPOP toward the bracket so the bracket hook is inserted in the slot and secured.
GROOVV POS Support Content
©2016 TOTAL MERCHANT SERVICES. PROPRIETARY AND CONFIDENTIAL 6
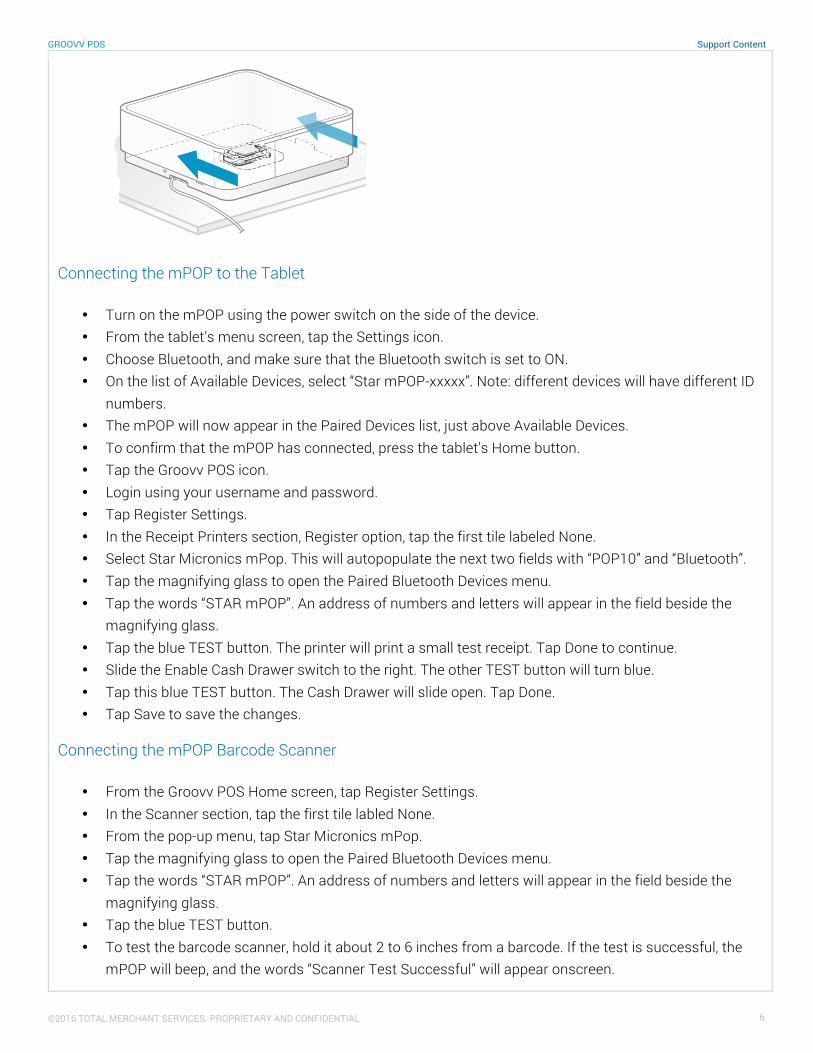
Connecting the mPOP to the Tablet
• Turn on the mPOP using the power switch on the side of the device. • From the tablet’s menu screen, tap the Settings icon. • Choose Bluetooth, and make sure that the Bluetooth switch is set to ON. • On the list of Available Devices, select “Star mPOP-xxxxx”. Note: different devices will have different ID
numbers. • The mPOP will now appear in the Paired Devices list, just above Available Devices. • To confirm that the mPOP has connected, press the tablet’s Home button. • Tap the Groovv POS icon. • Login using your username and password. • Tap Register Settings. • In the Receipt Printers section, Register option, tap the first tile labeled None. • Select Star Micronics mPop. This will autopopulate the next two fields with “POP10” and “Bluetooth”. • Tap the magnifying glass to open the Paired Bluetooth Devices menu. • Tap the words “STAR mPOP”. An address of numbers and letters will appear in the field beside the
magnifying glass. • Tap the blue TEST button. The printer will print a small test receipt. Tap Done to continue. • Slide the Enable Cash Drawer switch to the right. The other TEST button will turn blue. • Tap this blue TEST button. The Cash Drawer will slide open. Tap Done. • Tap Save to save the changes.
Connecting the mPOP Barcode Scanner
• From the Groovv POS Home screen, tap Register Settings. • In the Scanner section, tap the first tile labled None. • From the pop-up menu, tap Star Micronics mPop. • Tap the magnifying glass to open the Paired Bluetooth Devices menu. • Tap the words “STAR mPOP”. An address of numbers and letters will appear in the field beside the
magnifying glass. • Tap the blue TEST button. • To test the barcode scanner, hold it about 2 to 6 inches from a barcode. If the test is successful, the
mPOP will beep, and the words “Scanner Test Successful” will appear onscreen.
GROOVV POS Support Content
©2016 TOTAL MERCHANT SERVICES. PROPRIETARY AND CONFIDENTIAL 7
• Tap Done. • Tap Save to save the changes.
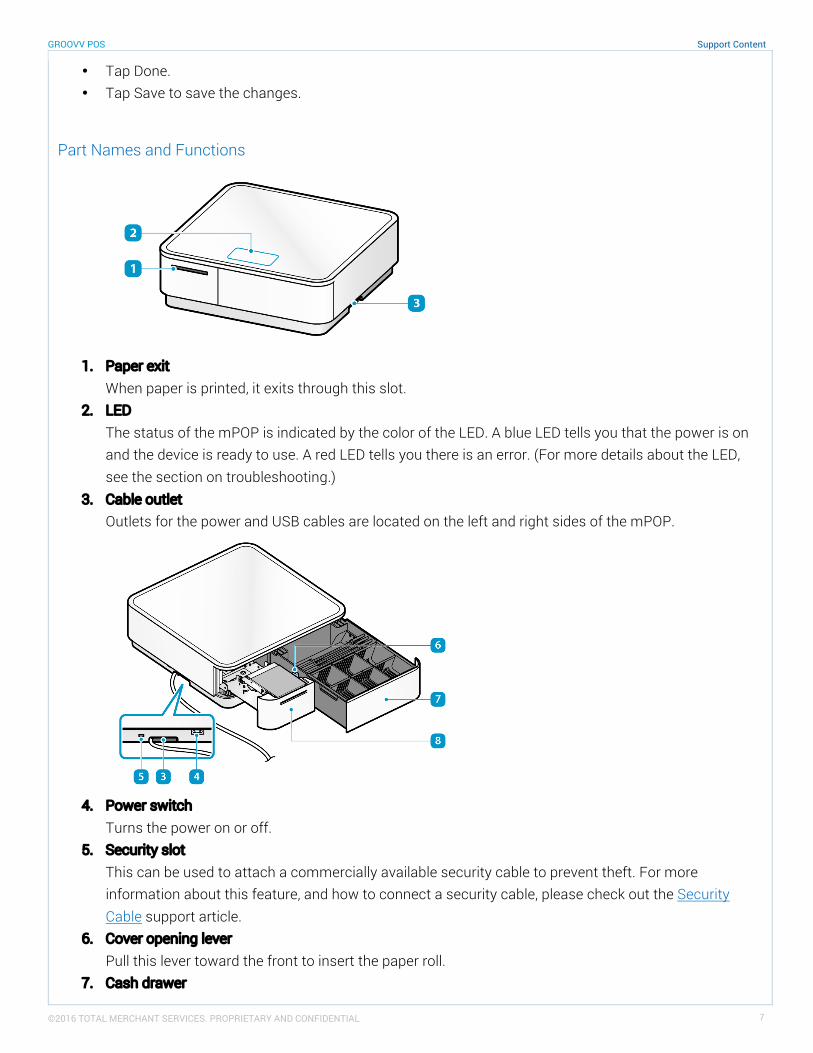
Part Names and Functions
1. Paper exit
When paper is printed, it exits through this slot. 2. LED
The status of the mPOP is indicated by the color of the LED. A blue LED tells you that the power is on and the device is ready to use. A red LED tells you there is an error. (For more details about the LED, see the section on troubleshooting.)
3. Cable outlet Outlets for the power and USB cables are located on the left and right sides of the mPOP.
4. Power switch
Turns the power on or off. 5. Security slot
This can be used to attach a commercially available security cable to prevent theft. For more information about this feature, and how to connect a security cable, please check out the Security Cable support article.
6. Cover opening lever Pull this lever toward the front to insert the paper roll.
7. Cash drawer

GROOVV POS Support Content
©2016 TOTAL MERCHANT SERVICES. PROPRIETARY AND CONFIDENTIAL 8
For storing bills and coins. 8. Printer
For printing receipts. To open, push the front of the printer to unlock it, then pull outward.
9. Multi-function button
Use this button for self-printing. (For more details, see the Self-Printing section below.) 10. Coin tray
For coins. The dividers can be rearranged into different positions. 11. Drawer tray
This can be removed with the bills and coins still in storage. Utility space is found beneath the coin tray.
12. Printer cover Opens when inserting the paper roll.
13. Paper roll holder Sets the paper roll.
14. Bluetooth reset button (RST)

GROOVV POS Support Content
©2016 TOTAL MERCHANT SERVICES. PROPRIETARY AND CONFIDENTIAL 9
Resets the mPOP Bluetooth settings to the factory settings. 15. USB port 0.5A (Standard)
This can be used to charge compatible USB peripherals. 16. USB port
Connects to a PC with a commercially available USB cable. (Not applicable.) 17. USB port 1.5A (Tablet)
This can be used to charge high-power USB peripherals and the tablet. 18. Power socket
Connects the power cable. 19. Power cable hook
This keeps the power cable in one place. 20. Bracket attachment slot
Attaches to the mounting bracket to secure the mPOP. 21. USB cable hook
This helps keep the USB cables organized. 22. Lock release lever
Used to manually open the cash drawer.
Basic Operations
Turn power on
• Make sure that the power cable is properly connected. • Press the power switch on the left side of the mPOP. • Confirm that the Power LED glows blue.
Turn the power off
• Press the power switch on the side of the mPOP. • Confirm that the Power LED is off.
GROOVV POS Support Content
©2016 TOTAL MERCHANT SERVICES. PROPRIETARY AND CONFIDENTIAL 10
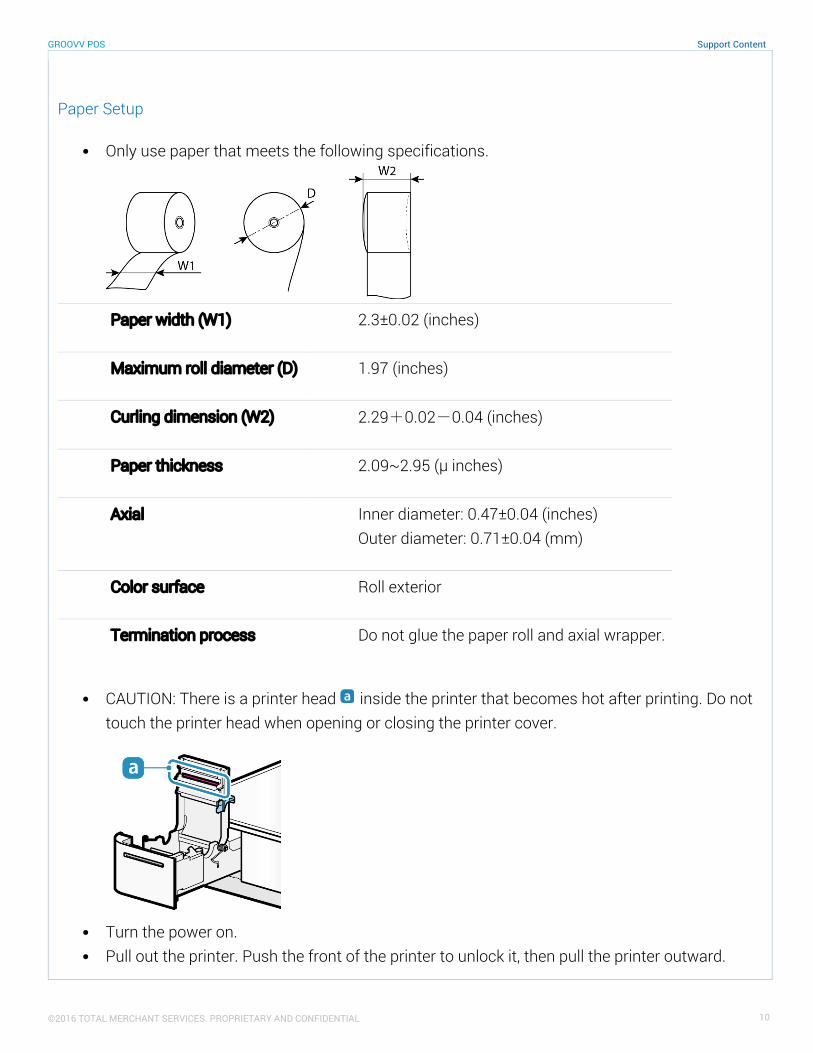
Paper Setup
• Only use paper that meets the following specifications.
Paper width (W1) 2.3±0.02 (inches)
Maximum roll diameter (D) 1.97 (inches)
Curling dimension (W2) 2.29+0.02-0.04 (inches)
Paper thickness 2.09~2.95 (μ inches)
Axial Inner diameter: 0.47±0.04 (inches) Outer diameter: 0.71±0.04 (mm)
Color surface Roll exterior
Termination process Do not glue the paper roll and axial wrapper.
• CAUTION: There is a printer head inside the printer that becomes hot after printing. Do not
touch the printer head when opening or closing the printer cover.
• Turn the power on. • Pull out the printer. Push the front of the printer to unlock it, then pull the printer outward.
GROOVV POS Support Content
©2016 TOTAL MERCHANT SERVICES. PROPRIETARY AND CONFIDENTIAL 11
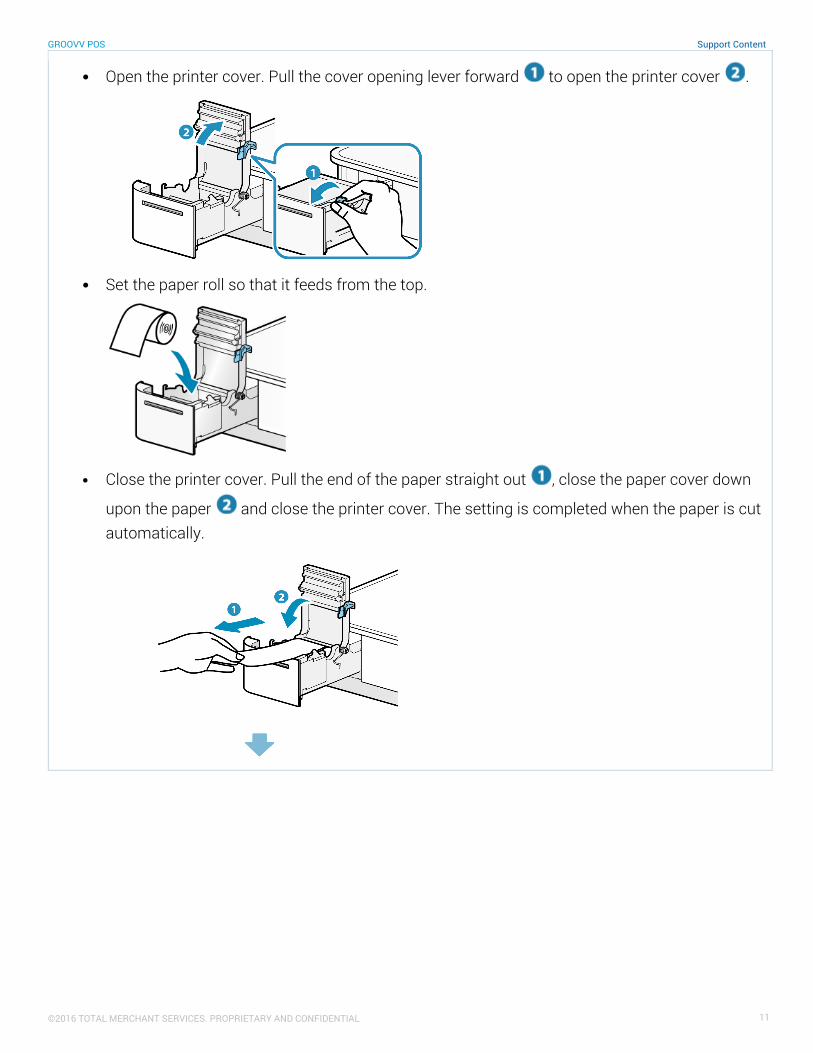
• Open the printer cover. Pull the cover opening lever forward to open the printer cover .
• Set the paper roll so that it feeds from the top.
• Close the printer cover. Pull the end of the paper straight out , close the paper cover down
upon the paper and close the printer cover. The setting is completed when the paper is cut automatically.

GROOVV POS Support Content
©2016 TOTAL MERCHANT SERVICES. PROPRIETARY AND CONFIDENTIAL 12
• Be sure to remove any cut paper to prevent paper jams. • Return the printer to its original position. Push the printer until it locks with a clicking sound.
• Confirm that the LED display glows blue (for standby).
Self-Printing
• The mPOP self-printing function allows you to check basic device information and settings. • To initiate self-printing, turn the power off. • Pull out the printer.
• While pressing the Multi-Function button , turn the power on . • Release the Multi-Function button when self-printing has started.
• Return the printer to its original position.

GROOVV POS Support Content
©2016 TOTAL MERCHANT SERVICES. PROPRIETARY AND CONFIDENTIAL 13
• When self-printing has finished, remove the paper with the printed information, and push the printer inward until it locks with a click.
• Confirm that the LED display glows blue (for standby).


