15
Grandstream IP Phone Configuration Guides Version 1.0 Yeastar Information Technology Co. Ltd.

Grandstream IP Phone Configuration Guides
Version 1.0
Yeastar Information Technology Co. Ltd.

Grandstream IP Phone Configuration Guides
2/15
Table of Contents
FOR GRANDSTREAM GXP SERIES ...................................................................................................... 3
Register with MyPBX ............................................................................. 3 Provisioning for MyPBX .......................................................................... 5
Phone provisioning via PnP mode ........................................................................... 6 Phone provisioning via DHCP mode ........................................................................ 8
FOR GRANDSTREAM HANDYTONE 386 ........................................................................................... 10
How to setup ATA for MyPBX ................................................................ 10
FOR GRANDSTREAM HANDYTONE 486(487), 286(287), ATA ........................................................... 13
How to setup ATA for MyPBX:............................................................... 14

Grandstream IP Phone Configuration Guides
3/15
For Grandstream GXP series Important This guide has been tested for Grandstream phones models GXP280, GXP285, GXP1100, GXP1105, GXP1200, GXP1400, GXP1405, GXP1450, GXP2000, GXP2100, GXP2110, GXP2120, GXP2124, DP710, DP715 with firmware version 1.2.4.3. Be aware that different firmware revisions may have different web interface formats and functionality. The easiest way to set up a Grandstream phone for use with MyPBX is to use the built-in plug and play provisioning functionality inside MyPBX. This will allow the phone to configure itself by retrieving a generated phone configuration file. Alternatively you can configure using DHCP and option. You also can configure manually. For more information, see this configuration guide.
Register with MyPBX
Configuring the Phone to Register with MyPBX 1. Start up the phone and identify its IP Address from the LCD display. For this
example we will assume the IP Address of the phone is 192.168.5.126, and the IP Address of MyPBX is 192.168.5.150
2. Point your browser to the web interface of the phone: http://192.168.5.126. The default password is ‘admin’.
3. We now need to set the phone to register with MyPBX. Go to the ‘Account 1’ page:
Figure 1-1
1) Set the ‘Account Active’ field to ‘yes’ 2) Set the ‘Account Name’ field to a name (for informational purposes
only)

Grandstream IP Phone Configuration Guides
4/15
3) Set the ‘SIP Server’ field to the IP Address of MyPBX 4) Set the ‘SIP User ID’ field to the extension number you want to
associate with this phone 5) Set the ‘Authenticate ID’ field to the extension's number 6) Set the ‘Authenticate Password’ field to the extension's Password 7) Set the ‘Name’ field to the name you would like to be displayed on other
phones when calling out 8) Set the ‘User ID is phone number’ field to ‘yes’ 9) Set the ‘Auth Answer’ field to ‘no’ and the ‘Allow Auth Answer by
Call-Info’ field to ‘yes’ (to allow paging functionality)
Figure 1-2
10) Click the ‘Update’ button at the bottom of the page, and then click the
‘Reboot’ button. Your phone will restart. After rebooting, the phone will retrieve its configuration files and register with MyPBX. This can be verified via the ‘Extension Status’ page of MyPBX Management Console.
Grandstream IP Phone Configuration Guides
5/15
Provisioning for MyPBX
1. Verify Firmware Installed on your Phone Verify the firmware version currently installed on the “Status” page of IP Phone. Go to Grandstream Support Website to download the latest firmware for your phone. 2. Plug phone into the network Plug your Grandstream phone into your LAN. (The Phone must be on the same LAN as that of MyPBX IP PBX). 3. Approve phone and Assign an Extension To do provisioning with Grandstream IP phones, you need to set MyPBX working as the only DHCP server any more.

Grandstream IP Phone Configuration Guides
6/15
Phone provisioning via PnP mode
Note: Grandstream GXP 2100 comes with PnP mode which is on by default. In this case, we test the firm version 1.0.4.9 of GXP 2100 IP phone. Step1. Check MAC address of your Grandstream IP phone on “Status” page.
Figure 1-3
Step2. Reboot IP phone. Step3. Search MAC address you would like configure in “phone provisioning”” Not Configured Phone” page
Figure 1-4

Grandstream IP Phone Configuration Guides
7/15
Step4. In this case, the MAC address of Grandstream IP phone is 000B822B1CD0, Click it to configure.
Figure 1-5 Step5. Fill in the phone detail message on the pop-up windows. Input Name, Call waiting, Line, Extension, Memory Key Settings and so on for the phone.
Figure 1-6
Click “Save” and “Apply Changes”, then reboot IP phone manually. Note: The IP phone will reboot twice to apply the configuration take effect. When done, you can find the account 509 is registered in MyPBX and GrandStream IP Phone.

Grandstream IP Phone Configuration Guides
8/15
Phone provisioning via DHCP mode
Step1. Disable DHCP Server on your local network. E.g. Disable DHCP Server on Linksys Router.
Figure 1-7
Step2. Enable DHCP Server on MyPBX. Login MyPBX web interface, System Settings DHCP Server Enable DHCP Server.
Figure 1-8
Grandstream IP Phone Configuration Guides
9/15
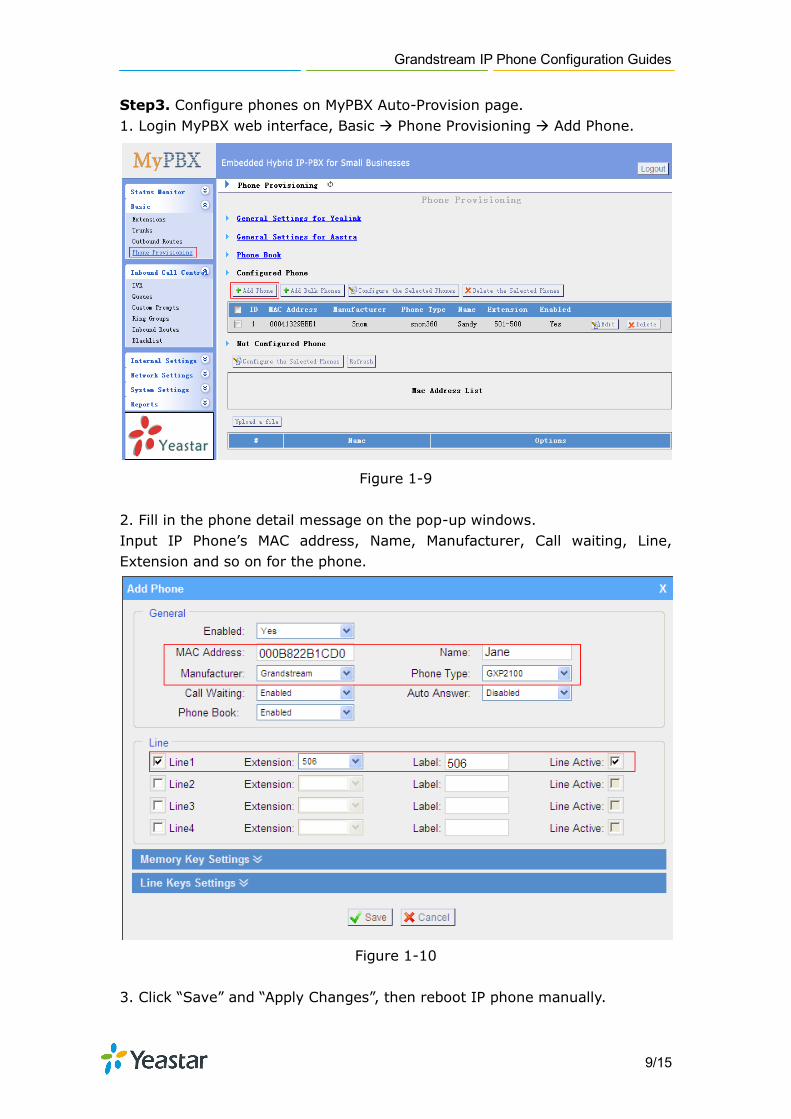
Step3. Configure phones on MyPBX Auto-Provision page. 1. Login MyPBX web interface, Basic Phone Provisioning Add Phone.
Figure 1-9
2. Fill in the phone detail message on the pop-up windows. Input IP Phone’s MAC address, Name, Manufacturer, Call waiting, Line, Extension and so on for the phone.
Figure 1-10
3. Click “Save” and “Apply Changes”, then reboot IP phone manually.

Grandstream IP Phone Configuration Guides
10/15
Note: The IP phone will reboot twice to apply the configuration take effect. When done, you can find the account 506 is registered in MyPBX and GrandStream IP Phone. Remark: The factory default setting of DHCP for IP Phone is “enable”, so you can skip this step to step 5. If the DHCP is disabled, please follow below step to enable it. (e.g.: Grandstream GXP2100 IP Phone). 1. Login IP phone’s web page. Go to “Settings BASIC SETTINGS” page. 2. Enable DHCP.
Figure 1-11
Step4: Done
For GrandStream Handytone 386
How to setup ATA for MyPBX
Follow these steps to set up a GrandStream HandyTone 386 VoIP ATA with
Grandstream IP Phone Configuration Guides
11/15
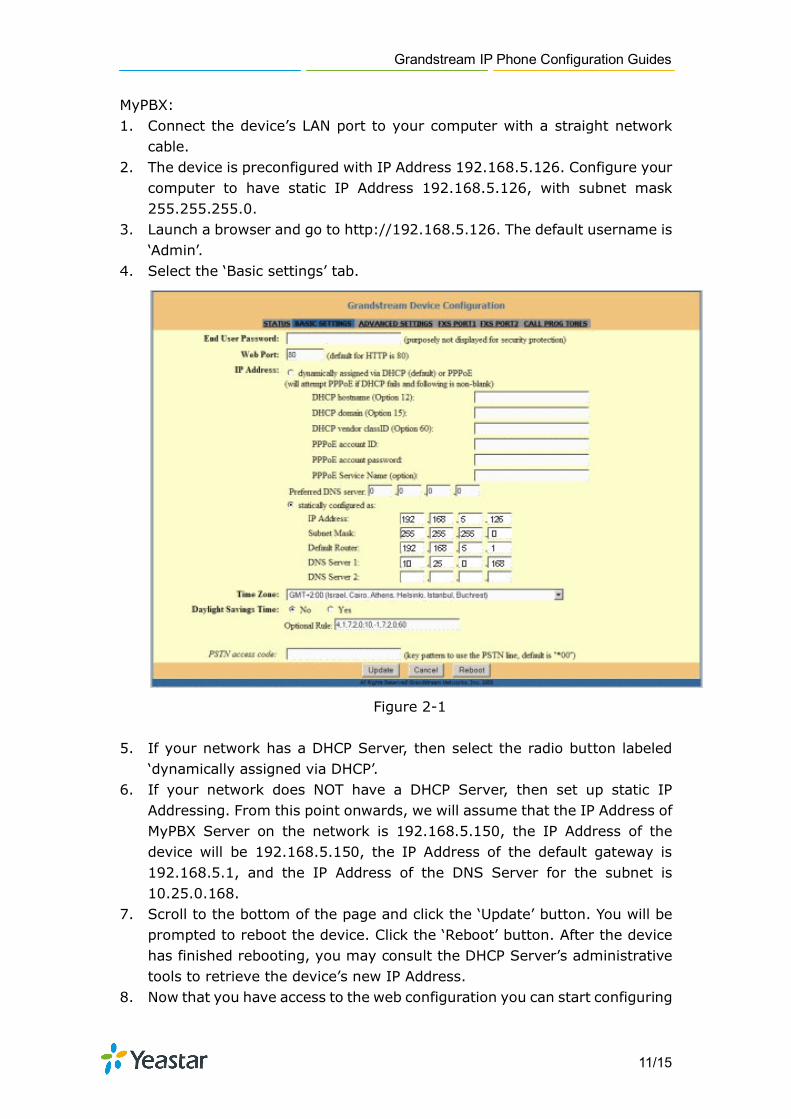
MyPBX: 1. Connect the device’s LAN port to your computer with a straight network
cable. 2. The device is preconfigured with IP Address 192.168.5.126. Configure your
computer to have static IP Address 192.168.5.126, with subnet mask 255.255.255.0.
3. Launch a browser and go to http://192.168.5.126. The default username is ‘Admin’.
4. Select the ‘Basic settings’ tab.
Figure 2-1
5. If your network has a DHCP Server, then select the radio button labeled ‘dynamically assigned via DHCP’.
6. If your network does NOT have a DHCP Server, then set up static IP Addressing. From this point onwards, we will assume that the IP Address of MyPBX Server on the network is 192.168.5.150, the IP Address of the device will be 192.168.5.150, the IP Address of the default gateway is 192.168.5.1, and the IP Address of the DNS Server for the subnet is 10.25.0.168.
7. Scroll to the bottom of the page and click the ‘Update’ button. You will be prompted to reboot the device. Click the ‘Reboot’ button. After the device has finished rebooting, you may consult the DHCP Server’s administrative tools to retrieve the device’s new IP Address.
8. Now that you have access to the web configuration you can start configuring

Grandstream IP Phone Configuration Guides
12/15
it against MyPBX. Launch a browser and point it to device’s new IP Address. 9. Ensure that you have already created the extension in MyPBX. Take note of
the Authentication ID field and the Authentication password that you have entered for the extension connected to the ATA device.
10. Go to ‘FXS PORT 1’ tab.
Figure 2-2
11. Set the ‘SIP Server’ field to the IP Address of the server on which MyPBX is
installed – in this example 192.168.5.150. 12. Set the ‘Outbound Proxy’ field to the same value as in step 11. 13. The ‘SIP User ID’ field should match the ‘Extension Number’ field of the
extension in MyPBX Management Console. 14. The ‘Authenticate ID’ and ‘Authenticate Password’ fields must match the
Authentication ID and Password set for that extension in MyPBX Management Console.
15. The ‘Name’ field is optional. A suitable value would be the name of the user using this phone.
16. Set ‘User ID is phone number’ to ‘Yes’ 17. Set ‘Sip Registration’ to ‘Yes’ 18. Set ‘Unregister on Reboot’ to ‘Yes’ 19. Set the ‘Register Expiration’ field to a suitable value. For testing purposes
you may want to use 60 seconds, but once the configuration is tested a larger value would be more appropriate to limit unnecessary network traffic. A good setting for general use could be 3600 seconds (1 hour).
20. Set ‘Enable Call Features’ to ‘Yes’. This setting enables feature like transfer,
Grandstream IP Phone Configuration Guides
13/15
on hold etc from the analog phone connected to the FXS port of the device. 21. Set the ‘Preferred Vocoder’ to choice 1: PCMU, choice 2: PCMA. The settings
for choices 3 to 6 will not come in use since they will not be used by MyPBX. 22. Set ‘Allow outgoing call without Registration’ to ‘yes’. 23. Scroll to the bottom of the page and click the ‘Update’ button. You will be
prompted to reboot the device. Click the ‘Reboot’ button. 24. Repeat steps 11-24 for the configuring ‘FXS port 2’. 25. After the HandyTone has restarted, switch to MyPBX Management Console,
and click on ‘Line Status’, your new extension connected to the PBX should be listed with a blue status light.
For GrandStream HandyTone 486(487),
286(287), ATA Configuring GrandStream HandyTone 486(487), 286(287), ATA for MyPBX Important This guide has been tested with firmware version 1.1.0.37. Be aware that

Grandstream IP Phone Configuration Guides
14/15
different firmware revisions may have different web interface formats and functionality. This is based on a new ATA OR one that has been reset to factory defaults.
How to setup ATA for MyPBX:
Connect the LAN to the WAN port of the HandyTone 1. Connect an analog phone to the HandyTone phone port. Pick up the headset
and press ‘****’. This will start up a Voice Prompt Menu. Now press ‘02’ to listen to the IP address that was assigned to the device by the DHCP server
2. Enable the wan side Web access, dial ‘****’ and then ‘129’ 3. Launch a browser and go to the IP Address, The default username is ‘admin’,
Select the ‘Advanced Settings 1’ tab.
Figure 3-1
4. Set the ‘SIP Server’ field to the IP Address of the server on which MyPBX is
installed – in this example 192.168.5.150 5. Set the ‘Outbound Proxy’ field to the same value as sip server 6. The ‘SIP User ID’ field should match the ‘Extension Number’ field of the
extension created for this phone in MyPBX Management Console 7. In the ‘Authenticate ID’ and ‘Authenticate Password’ fields must match the
‘extension’ and ‘Password’ set for that extension in MyPBX Management Console
8. The ‘Name’ field is optional. A suitable value would be the name of the user
Grandstream IP Phone Configuration Guides
15/15
using this phone 9. Set the ‘Preferred Vocoder’ to choice 1: PCMU, choice 2: PCMA. The settings
for choices 3 to 7 will not come in use since they will not be used by MyPBX 10. Set ‘payload type’ to 101 for successful registration 11. Set ‘User ID is phone number’ to ‘Yes’ 12. Set ‘Sip Registration’ to ‘Yes’ 13. Set ‘Unregister on Reboot’ to ‘Yes’ 14. Set the ‘Register Expiration’ field to a suitable value. For testing purposes
you may want to use 60 seconds, but once configuration is tested a larger value would be more appropriate to limit unnecessary network traffic. A good setting for general use could be 3600 seconds (1 hour)
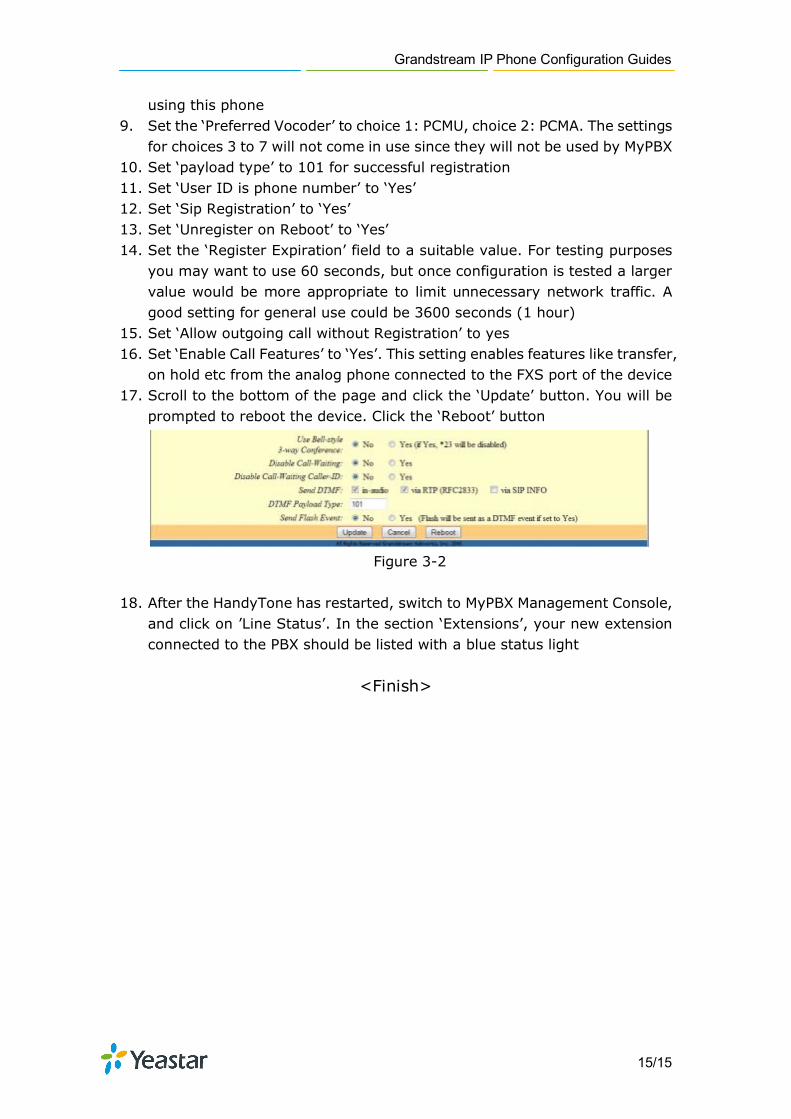
15. Set ‘Allow outgoing call without Registration’ to yes 16. Set ‘Enable Call Features’ to ‘Yes’. This setting enables features like transfer,
on hold etc from the analog phone connected to the FXS port of the device 17. Scroll to the bottom of the page and click the ‘Update’ button. You will be
prompted to reboot the device. Click the ‘Reboot’ button
Figure 3-2
18. After the HandyTone has restarted, switch to MyPBX Management Console,
and click on ’Line Status’. In the section ‘Extensions’, your new extension connected to the PBX should be listed with a blue status light
<Finish>


