24
APPENDIX C ELECTIONS DATA BASE

APPENDIX C
ELECTIONS DATA BASE
Page 2 of 24
The Elections Database
User Guide for Alberta Municipal Users

Page 3 of 24
Contents
1. About the Elections Database ....................................................................................... 4
2. How to Access the Elections Database ......................................................................... 4
3. How to Create a By-election ......................................................................................... 5
3.1 How to Add Candidates to a By-election ................................................................ 7 3.2 How to Print the By-election Candidates List ......................................................... 9 3.3 How to Enter By-election Results ......................................................................... 10 3.4 How to Print the By-election Results List .............................................................. 11
4. How to Create a Summer Village General Election .................................................... 12
4.1 How to Add Candidate(s) to a Summer Village General Election ......................... 14 4.2 How to Print the Summer Village General Election Candidates List .................... 15 4.3 How to Enter Summer Village General Election Results....................................... 16 4.4 How to Print the Summer Village General Election Results List ........................... 17
5. The Alberta Municipal General Election ..................................................................... 18
5.1 How to Add Candidates to a General Election ..................................................... 20 5.2 How to Print the General Election Candidates List ............................................... 21 5.3 How to Enter General Election Results ................................................................. 22 5.4 How to Print the General Election Results List ..................................................... 23
6. Terms that apply to an election: ................................................................................. 24

Elections Database User Guide for Municipalities
Page 4 of 24
1. About the Elections Database
In Alberta, Municipal Elections occur every four years on the third Monday in October. Municipal Affairs is responsible for collecting information related to the General Elections for all municipalities, as well as the on-going Municipal By-elections which occur when a position is vacant. In support of these elections, Municipal Affairs must collect information about candidates that are running for various municipal positions, election results, elected official information, etc. The Elections Database will allow all municipalities to directly report all of their candidates and election results to Municipal Affairs.
2. How to Access the Elections Database To access the Elections Database you must login to the Municipal Affairs Extranet MAConnect. Your Municipality should have a Stakeholder Administrator to request access on your behalf. If you don’t know who your Stakeholder Administrator is, then please contact the MAConnect Administrator at: [email protected]
Once your Stakeholder Administrator completes a User Request on your behalf, you will be sent a temporary password and an access link by email. You will have to click on the link and then follow the instructions to setup your System ID and Password.
Now that you have your MAConnect ID and Password you can proceed to log into MAConnect at: https://www.maconnect.alberta.ca
Once you successfully login to MAConnect you will see a link that will take you to the Elections Database.
The first screen you see will be your Municipality Dashboard. Here are some of the components of the dashboard.
Quick Search Bar – this will appear if you represent more than one Municipality. You can use this function to move from one municipalities dashboard to another.
Municipal Information – if you click on the arrow icon this area will expand and provide constituency information for the municipality (orange shaded area).
Upcoming Elections Tab –provides a list of any current active elections.
Election History Tab –provides a list of past elections. Clicking on the magnifying glass icon will give you a read-only view of that Elections details.
Current Elected Officials –provides a reference list of current Elected Officials.

Elections Database User Guide for Municipalities
Page 5 of 24
Figure 1 - Municipal Dashboard
3. How to Create a By-election
Description: When a municipality has one or more vacant position to fill they may hold a By-election. The municipality creates the By-election in the Elections Database.
Key Dates:
The dates listed below are key to the system and are in order of sequence that they can occur.
1. Nominations Closed (mandatory)
2. Nomination Extension
3. Election Date (mandatory)
4. Official Results Deadline (mandatory)
5. Organizational Meeting
Elections Database User Guide for Municipalities
Page 6 of 24
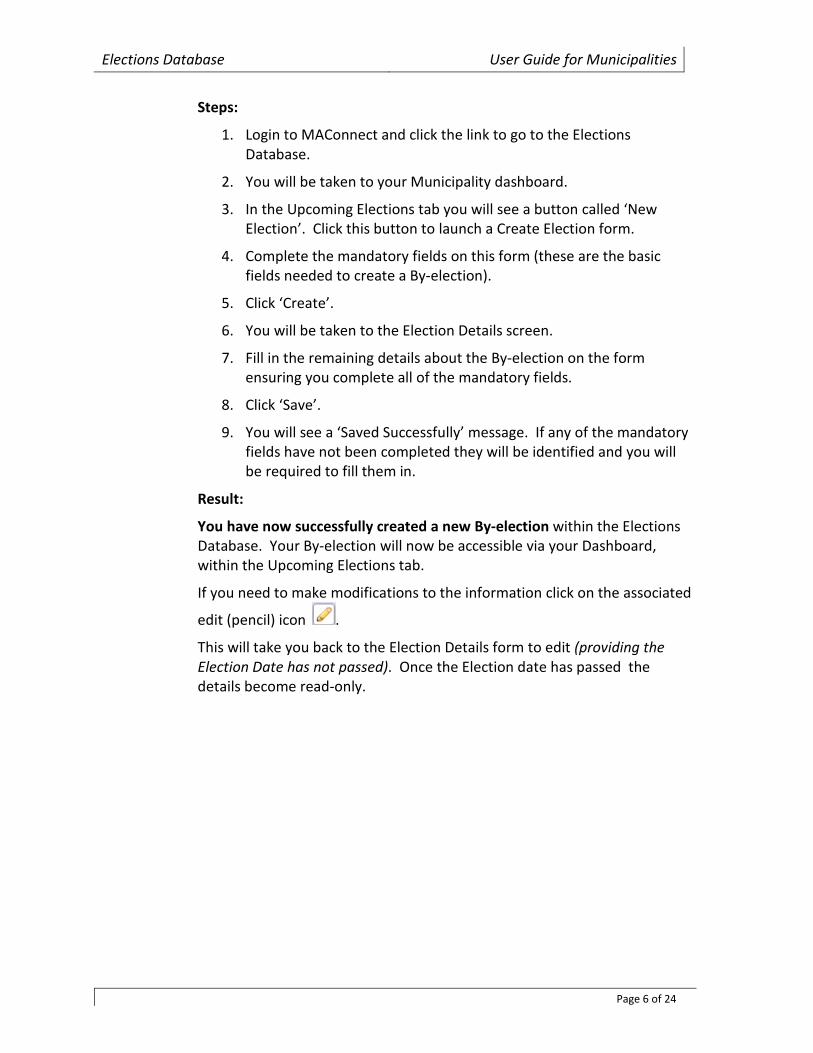
Steps:
1. Login to MAConnect and click the link to go to the Elections Database.
2. You will be taken to your Municipality dashboard.
3. In the Upcoming Elections tab you will see a button called ‘New Election’. Click this button to launch a Create Election form.
4. Complete the mandatory fields on this form (these are the basic fields needed to create a By-election).
5. Click ‘Create’.
6. You will be taken to the Election Details screen.
7. Fill in the remaining details about the By-election on the form ensuring you complete all of the mandatory fields.
8. Click ‘Save’.
9. You will see a ‘Saved Successfully’ message. If any of the mandatory fields have not been completed they will be identified and you will be required to fill them in.
Result:
You have now successfully created a new By-election within the Elections Database. Your By-election will now be accessible via your Dashboard, within the Upcoming Elections tab.
If you need to make modifications to the information click on the associated
edit (pencil) icon .
This will take you back to the Election Details form to edit (providing the Election Date has not passed). Once the Election date has passed the details become read-only.

Elections Database User Guide for Municipalities
Page 7 of 24
Figure 2 - Election Details Screen
3.1 How to Add Candidates to a By-election
Description: Once you have created a By-election for your Municipality then you will need to enter in the By-election Candidate(s).

Elections Database User Guide for Municipalities
Page 8 of 24
Key Information and Dates:
1. You may enter Candidate(s) for up to three days after the Nomination Closed date has passed.
2. A Mayor/Reeve candidate cannot be acclaimed if there is more than one candidate.
3. A Councillor Candidate cannot be acclaimed if there is more than one Councillor Candidate in the ward.
Steps:
1. Login to MAConnect and click the link to go to the Election Database.
2. You will be taken to your Municipality dashboard.
3. On the dashboard you will see the By-election in the data grid within the Upcoming Elections tab. Click on the ‘Edit’ pencil icon.
4. You will be taken to the Election Details tab. Beside this tab is another tab called Candidates.
5. Click on the Candidates tab and you will see there are currently no Candidates for your By-election.
6. To add a Candidate click the ‘Add Candidate’ button. A new row will be added to the form.
7. Fill in the fields in the row. You can add more than one Candidate by using the ‘Add Candidate’ button to add rows and filling in the data.
8. Click ‘Save’ to commit the data to the system.
9. You will see a ‘Saved Successfully’ message or if there are errors the system will highlight the fields that require attention.
Delete a Candidate:
10. If a Candidate has been entered in error, you can delete them by clicking on the ‘delete’ icon on the appropriate row.
11. Click ‘Save’ to commit the changes to the system.
Result:
Your Candidate data has now been saved into the Elections Database. You can go back and edit and modify this information for three days after Nomination Day. Once that date is passed the data will become read-only.
Elections Database User Guide for Municipalities
Page 9 of 24
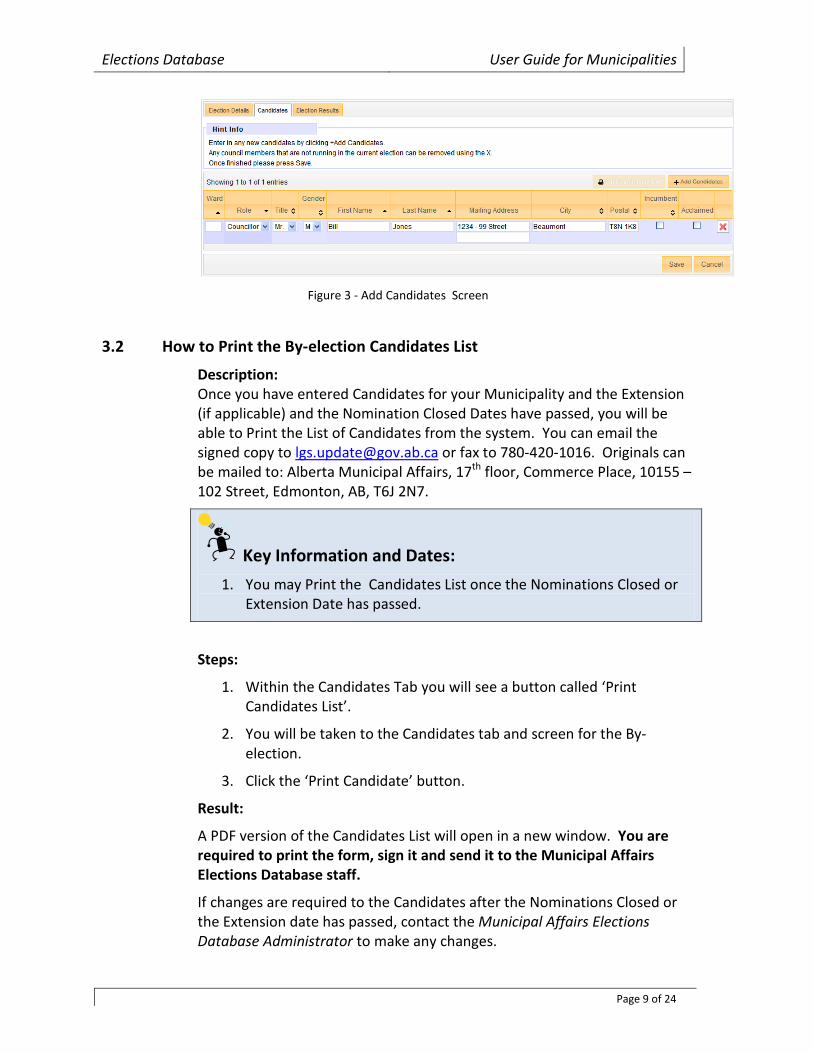
Figure 3 - Add Candidates Screen
3.2 How to Print the By-election Candidates List
Description: Once you have entered Candidates for your Municipality and the Extension (if applicable) and the Nomination Closed Dates have passed, you will be able to Print the List of Candidates from the system. You can email the signed copy to [email protected] or fax to 780-420-1016. Originals can be mailed to: Alberta Municipal Affairs, 17th floor, Commerce Place, 10155 – 102 Street, Edmonton, AB, T6J 2N7.
Key Information and Dates:
1. You may Print the Candidates List once the Nominations Closed or Extension Date has passed.
Steps:
1. Within the Candidates Tab you will see a button called ‘Print Candidates List’.
2. You will be taken to the Candidates tab and screen for the By-election.
3. Click the ‘Print Candidate’ button.
Result:
A PDF version of the Candidates List will open in a new window. You are required to print the form, sign it and send it to the Municipal Affairs Elections Database staff.
If changes are required to the Candidates after the Nominations Closed or the Extension date has passed, contact the Municipal Affairs Elections Database Administrator to make any changes.
Elections Database User Guide for Municipalities
Page 10 of 24
3.3 How to Enter By-election Results
Description: Once you have created your By-election and the Nomination Closed Date has passed, then the Election Results form will be available to enter results.
Key Information and Dates:
1. This form will become read-only after you ‘Save’ and finalize your results.
2. If a candidate is ‘Acclaimed’, the ‘Elected’ checkbox cannot be checked (will be read-only).
3. Number of actual voters cannot be greater than number of eligible voters.
4. Number of votes cannot be greater than number of actual voters.
5. Votes must be filled in for each candidate.
Steps:
1. Login to MAConnect and click the link to go to the Elections Database.
2. You will be taken to your municipalitie’s dashboard.
3. On the dashboard you will see the already created By-election in the data grid within the Upcoming Elections tab. Click on the ‘Edit’ pencil icon.
4. You will be taken to the Election Details tab. Beside this tab is another tab called Election Results.
5. Click on the tab and you will be taken to the Election Results screen for the By-election. The screen will be pre-populated with the Candidates that were previously entered for the election. The system will identify if they are the Incumbent and/or Acclaimed.
6. Enter in the following mandatory information – Number of Eligible Voters, Number of Actual Voters, # of Votes for each Candidate, and if they are elected.
7. Click the ‘Save’ button.

Elections Database User Guide for Municipalities
Page 11 of 24
Result:
The Election Results data will be saved to the database. You can go back and edit and modify this information until you finalize your results. Once that occurs the data will become read-only.
Figure 4 - Add Election Results Screen
3.4 How to Print the By-election Results List
Description: Once you have entered the Election Results for your Municipality you will be able to Print the Election Results from the system. You can email the signed copy to [email protected] or fax to 780-420-1016. Originals can be mailed to: Alberta Municipal Affairs, 17th floor, Commerce Place, 10155 – 102 Street, Edmonton, AB, T6J 2N7.
Key Information and Dates:
1. You may Print the Election Results once you have added your Election result information.
Steps:
1. Within the Election Results Tab you will see a button called ‘Print Results’.
2. Click the ‘Print Results’ button.
Result:
A PDF version of the Election Results will open in a new window. The user can print the form, sign it and send it to the Municipal Affairs Elections Database staff.

Elections Database User Guide for Municipalities
Page 12 of 24
4. How to Create a Summer Village General Election
Description: When a Summer Village holds their General Election they will use the Elections Database to enter information about their election, enter Candidates and election results.
Key Dates:
The dates listed below are key to the system and are in order of sequence that they can occur.
1. Nominations Closed (mandatory)
2. Nomination Extension
3. Election Date (mandatory)
4. Official Results Deadline (mandatory)
5. Organizational Meeting
Steps:
1. Login to MAConnect and click the link to go to the Elections Database.
2. You will be taken to your Summer Village dashboard.
3. In the Upcoming Elections tab you will see a button called ‘New Election’. Click this button to launch a Create Election form.
4. Complete the mandatory fields on this form (these are the basic fields needed to create a Summer Village general election).
5. Click ‘Create’.
6. You will be taken to the Election Details screen.
7. Fill in the remaining details about the election on the form ensuring you complete all of the mandatory fields.
8. Click ‘Save’.
9. You will see a ‘Saved Successfully’ message. If any of the mandatory fields have not been completed they will be identified and you will be required to fill them in.
Elections Database User Guide for Municipalities
Page 13 of 24
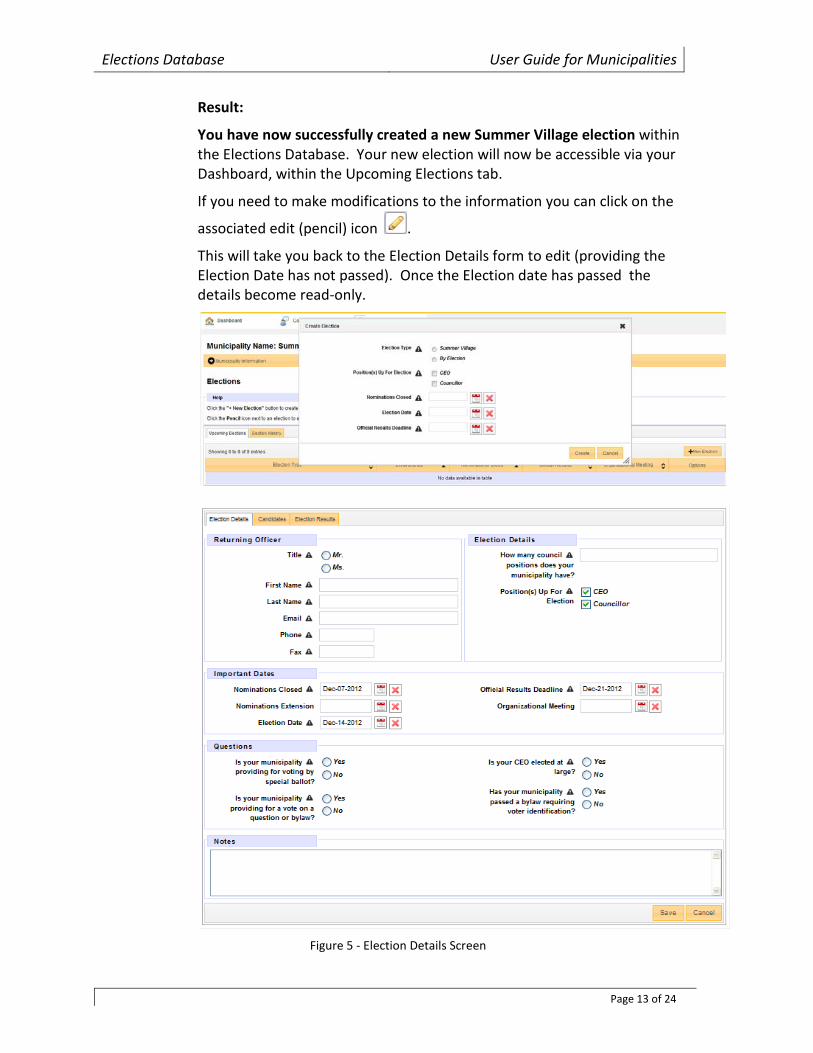
Result:
You have now successfully created a new Summer Village election within the Elections Database. Your new election will now be accessible via your Dashboard, within the Upcoming Elections tab.
If you need to make modifications to the information you can click on the
associated edit (pencil) icon .
This will take you back to the Election Details form to edit (providing the Election Date has not passed). Once the Election date has passed the details become read-only.
Figure 5 - Election Details Screen
Elections Database User Guide for Municipalities
Page 14 of 24
4.1 How to Add Candidate(s) to a Summer Village General Election
Description: Once you have created an election for your Summer Village then you will need to enter in the election Candidate(s).
Key Information and Dates:
1. You may enter Candidates for up to three days after the Nomination Closed date has passed.
2. A CEO candidate cannot be acclaimed if there is more than one CEO Candidate.
3. A Councillor Candidate cannot be acclaimed if there is more than one Councillor Candidate in the ward.
Steps:
1. Login to MAConnect and click the link to go to the Election Database.
2. You will be taken to your Summer Village dashboard.
3. On the dashboard you will see the already created election in the data grid within the Upcoming Elections tab. Click on the ‘Edit’ pencil icon.
4. You will be taken to the Election Details tab. Beside this tab is another tab called Candidates.
5. Click on the Candidates tab and you will see that the list of Candidates is pre-populated with the current incumbents.
6. To add a Candidate click the ‘Add Candidate’ button. A new row will be added to the form.
7. Fill in the fields in the row. You can add more than one Candidate by using the ‘Add Candidate’ button to add rows and filling in the data.
8. Click ‘Save’ to commit the data to the system.
9. You will see a ‘Saved Successfully’ message or if errors the system will highlight the fields that require attention.
Delete a Candidate:
10. If a Candidate has been entered in error, you can delete them by clicking on the ‘delete’ icon on the appropriate row.
11. Click ‘Save’ to commit the changes to the system.

Elections Database User Guide for Municipalities
Page 15 of 24
Result:
Your Candidate data has now been saved into the Elections Database. You can go back and edit and modify this information as long as the three days past the Nomination Date hasn’t occurred. Once that date occurs the data will become read-only.
Figure 6 - Add Candidates Screen
4.2 How to Print the Summer Village General Election Candidates List
Description: Once you have entered Candidates for your Summer Village and the Election and the Nomination Closed Date has passed, you will be able to Print the List of Candidates from the system. You can email the signed copy to [email protected] or fax to 780-420-1016. Originals can be mailed to: Alberta Municipal Affairs, 17th floor, Commerce Place, 10155 – 102 Street, Edmonton, AB, T6J 2N7.
Key Information and Dates:
1. You may Print the Candidates List once the Nominations Closed or Extension Date has passed.
Steps:
1. Within the Candidates Tab you will see a button called ‘Print Candidates List’.
2. You will be taken to the Candidates tab and screen for the election.
3. Click the ‘Print Candidate’ button.
Elections Database User Guide for Municipalities
Page 16 of 24
Result:
A PDF version of the Candidates List will open in a new window. You are required to print the form, sign it and send it to the Municipal Affairs Elections Database staff at [insert email and address here].
If changes are required to the Candidates after the Nomination Closed or Extension date has passed, you will be required to contact the Municipal Affairs Elections Database Administrator to make any changes.
4.3 How to Enter Summer Village General Election Results
Description: Once you have created your election and the Nomination Closed Date has passed, then the Election Results form will be available to enter results.
Key Information and Dates:
1. This form will become read-only after you ‘Save’ and finalize your results.
2. If a candidate is ‘Acclaimed’, the ‘Elected’ checkbox cannot be checked (will be read-only).
3. Number of actual voters cannot be greater than number of eligible voters.
4. Number of votes cannot be greater than number of actual voters.
5. Votes must be filled in for each candidate.
Steps:
1. Login to MAConnect and click the link to go to the Elections Database.
2. You will be taken to your Summer Village dashboard.
3. On the dashboard you will see the already created election in the data grid within the Upcoming Elections tab. Click on the ‘Edit’ pencil icon.
4. You will be taken to the Election Details tab. Beside this tab is another tab called Election Results.
5. Click on the tab and you will be taken to the Election Results screen for the election. The screen will be pre-populated with the Candidates that were previously entered for the election. The system will identify if they are the Incumbent and/or Acclaimed.

Elections Database User Guide for Municipalities
Page 17 of 24
6. Enter in the following mandatory information – Number of Eligible Voters, Number of Actual Voters, # of Votes for each Candidate, and if they are elected.
7. Click the ‘Save’ button.
Result:
The Election Results data will be saved to the database. You can go back and edit and modify this information until you finalize your results. Once that occurs the data will become read-only.
Figure 7 - Add Election Results Screen
4.4 How to Print the Summer Village General Election Results List
Description: Once you have entered the Election Results for your Summer Village you will be able to Print the Election Results from the system. You can email the signed copy to [email protected] or fax to 780-420-1016. Originals can be mailed to: Alberta Municipal Affairs, 17th floor, Commerce Place, 10155 – 102 Street, Edmonton, AB, T6J 2N7.
Key Information and Dates:
1. You may Print the Election Results once you have added your Election result information.
Steps:
1. Within the Election Results Tab you will see a button called ‘Print Results’.
2. Click the ‘Print Results’ button.
Elections Database User Guide for Municipalities
Page 18 of 24
Result:
A PDF version of the Election Results will open in a new window. The user can print the form, sign it and send it to the Municipal Affairs Elections Database staff.
5. The Alberta Municipal General Election Description: Municipal elections in Alberta occur every four years on the third Monday in October. The 2013 municipal election in Alberta takes place on October 21, 2013.
Alberta Municipal Affairs is responsible for setting up the General Elections within the Elections Database. The Ministry will enter in the official General Election date into the system and create the election. It is then the responsibility of each Municipality to provide additional detailed information such as the name of the Returning Officer, number of council positions and answers to other general questions.
Key Dates:
The dates listed below are key to the system and are in order of sequence that they can occur.
1. Nominations Closed (mandatory)
2. Nomination Extension
3. Election Date (mandatory)
4. Official Results Deadline (mandatory)
5. Organizational Meeting
Steps:
1. Login to MAConnect and click the link to go to the Elections Database.
2. You will be taken to your Municipal dashboard.
3. In the Upcoming Elections tab you will see that a General Election has already been created within the system. You now have to provide additional information for this election.
4. Click on the ‘Edit’ pencil icon. You will be taken to your Election Details tab.
Elections Database User Guide for Municipalities
Page 19 of 24
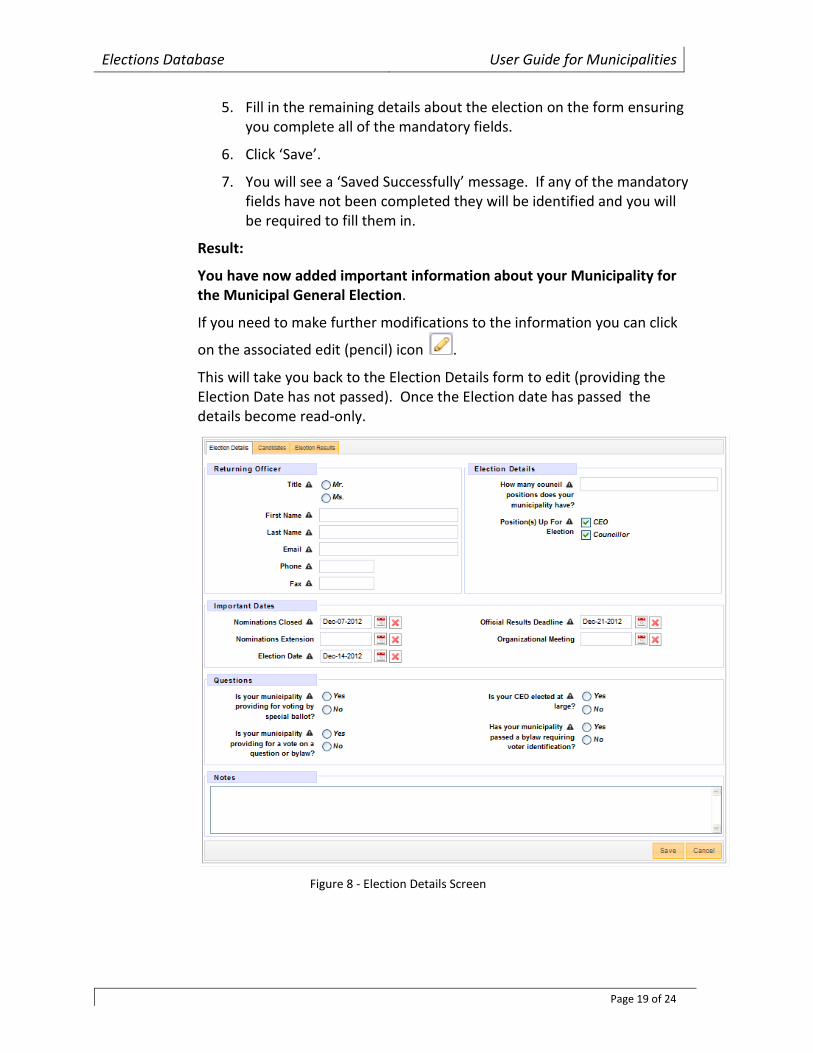
5. Fill in the remaining details about the election on the form ensuring you complete all of the mandatory fields.
6. Click ‘Save’.
7. You will see a ‘Saved Successfully’ message. If any of the mandatory fields have not been completed they will be identified and you will be required to fill them in.
Result:
You have now added important information about your Municipality for the Municipal General Election.
If you need to make further modifications to the information you can click
on the associated edit (pencil) icon .
This will take you back to the Election Details form to edit (providing the Election Date has not passed). Once the Election date has passed the details become read-only.
Figure 8 - Election Details Screen

Elections Database User Guide for Municipalities
Page 20 of 24
5.1 How to Add Candidates to a General Election
Description: Once you have entered additional details for your Municipality then you will need to enter in the election Candidate(s).
Key Information and Dates:
1. You may enter Candidates for up to three days after the Nomination Closed date has passed.
2. A Mayor/Reeve Candidate cannot be acclaimed if there is more than one CEO Candidate.
3. A Councillor Candidate cannot be acclaimed if there is more than one Councillor Candidate in the ward.
Steps:
1. Login to MAConnect and click the link to go to the Election Database.
2. You will be taken to your Municipal dashboard.
3. On the dashboard you will see the already created election in the data grid within the Upcoming Elections tab. Click on the ‘Edit’ pencil icon.
4. You will be taken to the Election Details tab. Beside this tab is another tab called Candidates.
5. Click on the Candidates tab and you will see that the list of Candidates is pre-populated with the current incumbents.
6. To add a Candidate click the ‘Add Candidate’ button. A new row will be added to the form.
7. Fill in the fields in the row. You can add more than one Candidate by using the ‘Add Candidate’ button to add rows and filling in the data.
8. Click ‘Save’ to commit the data to the system.
9. You will see a ‘Saved Successfully’ message or if errors the system will highlight the fields that require attention.
Delete a Candidate:
10. If a Candidate has been entered in error, you can delete them by clicking on the ‘delete’ icon on the appropriate row.
11. Click ‘Save’ to commit the changes to the system.

Elections Database User Guide for Municipalities
Page 21 of 24
Result:
Your Candidate data has now been saved into the Elections Database. You can go back and edit and modify this information as long as the three days past the Nomination Date hasn’t occurred. Once that date occurs the data will become read-only.
Figure 9 - Add Candidates Screen
5.2 How to Print the General Election Candidates List
Description: Once you have entered Candidates for your Municipality and the Election and the Nomination Closed Dates have passed, print the List of Candidates, sign it and either email to [email protected] or fax to 780-420-1016. Originals can be mailed to: Alberta Municipal Affairs, 17th floor, Commerce Place, 10155 – 102 Street, Edmonton, AB, T6J 2N7.
Key Information and Dates:
1. You can Print the Candidates List once the Nominations Closed or Extension Date has passed.
Steps:
1. Within the Candidates Tab you will see a button called ‘Print Candidates List’.
2. You will be taken to the Candidates tab and screen for the election.
3. Click the ‘Print Candidate’ button.
Elections Database User Guide for Municipalities
Page 22 of 24
Result:
A PDF version of the Candidates List will open in a new window. You are required to print the form, sign it and send it to the Municipal Affairs Elections Database staff.
If changes are required to the Candidates after the Nomination Closed or Extension date has passed, you will be required to contact the Municipal Affairs Elections Database Administrator to make any changes.
5.3 How to Enter General Election Results
Description: Once you have created your election and the Nomination Closed Date has passed, then the Election Results form will be available to enter results.
Key Information and Dates:
1. This form will become read-only after you ‘Save’ and finalize your results.
2. If a candidate is ‘Acclaimed’, the ‘Elected’ checkbox cannot be checked (will be read-only).
3. Number of actual voters cannot be greater than number of eligible voters.
4. Number of votes cannot be greater than number of actual voters.
5. Votes must be filled in for each candidate.
Steps:
1. Login to MAConnect and click the link to go to the Elections Database.
2. You will be taken to your Municipal dashboard.
3. On the dashboard you will see the already created election in the data grid within the Upcoming Elections tab. Click on the ‘Edit’ pencil icon.
4. You will be taken to the Election Details tab. Beside this tab is another tab called Election Results.
5. Click on the tab and you will be taken to the Election Results screen for the election. The screen will be pre-populated with the Candidates that were previously entered for the election. The system will identify if they are the Incumbent and/or Acclaimed.
Elections Database User Guide for Municipalities
Page 23 of 24
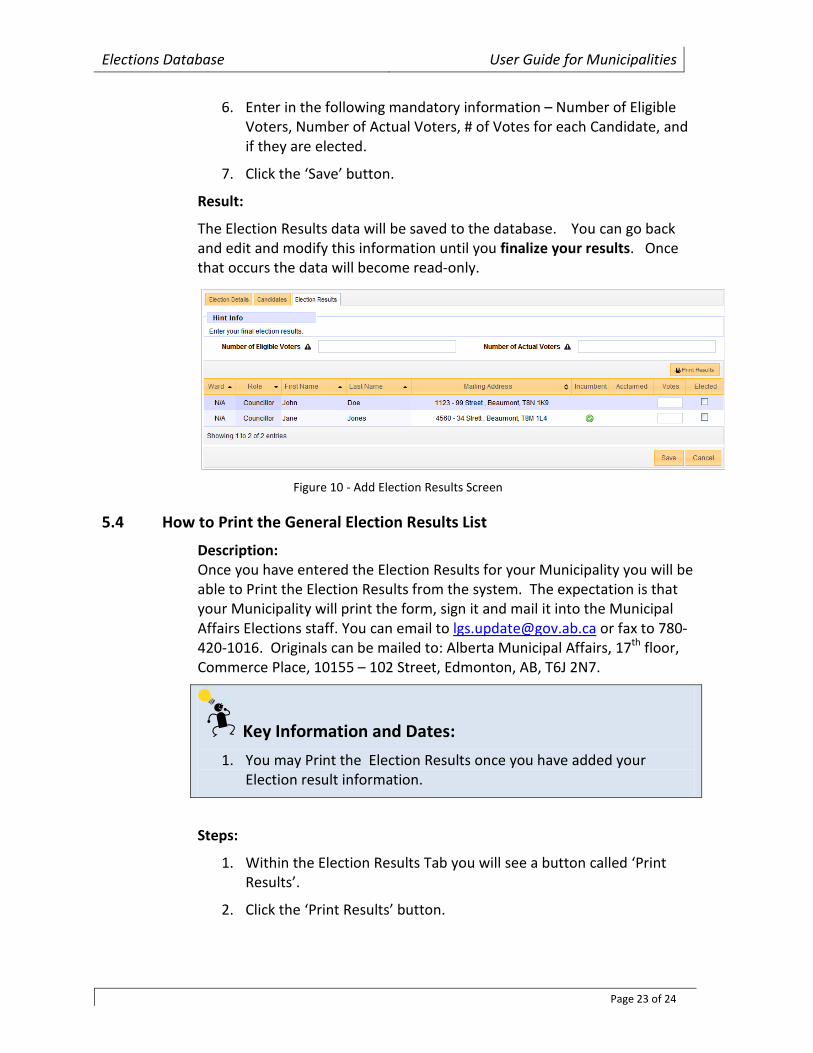
6. Enter in the following mandatory information – Number of Eligible Voters, Number of Actual Voters, # of Votes for each Candidate, and if they are elected.
7. Click the ‘Save’ button.
Result:
The Election Results data will be saved to the database. You can go back and edit and modify this information until you finalize your results. Once that occurs the data will become read-only.
Figure 10 - Add Election Results Screen
5.4 How to Print the General Election Results List
Description: Once you have entered the Election Results for your Municipality you will be able to Print the Election Results from the system. The expectation is that your Municipality will print the form, sign it and mail it into the Municipal Affairs Elections staff. You can email to [email protected] or fax to 780-420-1016. Originals can be mailed to: Alberta Municipal Affairs, 17th floor, Commerce Place, 10155 – 102 Street, Edmonton, AB, T6J 2N7.
Key Information and Dates:
1. You may Print the Election Results once you have added your Election result information.
Steps:
1. Within the Election Results Tab you will see a button called ‘Print Results’.
2. Click the ‘Print Results’ button.

Elections Database User Guide for Municipalities
Page 24 of 24
Result:
A PDF version of the Election Results will open in a new window. The user can print the form, sign it and send it to the Municipal Affairs Elections Database staff.
6. Terms that apply to an election: Candidate:
21(1) A person may be nominated as a candidate in any election under this Act if on nomination day the person
(a) is eligible to vote in that election,
(b) has been a resident of the local jurisdiction and the ward, if any, for the 6 consecutive months immediately preceding nomination day, and
(c) is not otherwise ineligible or disqualified.
Nomination:
27(1) Every nomination of a candidate shall be in the prescribed form and signed by at least 5 electors eligible to vote in that election and resident in the local jurisdiction on the date of signing the nomination, and shall be accompanied with a written acceptance signed in the prescribed form by the person nominated, stating
(a) that the person is eligible to be elected to the office,
(a.1) the name, address and telephone number of the person’s official agent, and
(b) that the person will accept the office if elected, and if required by bylaw, it must be accompanied with a deposit in the required amount.
Incumbant:
An individual who is in current possession of a particular office.
Acclaimed:
An instance of electing or being elected without opposition.
Elected:
95(1) At any general election or by-election the candidate or candidates receiving the highest number of votes shall be declared to be elected and in the event of an equality of votes, section 99 applies.


