For the front axle, the unit bearing (double row angu-lar contact ball bearing) in which the hub and ball bearing are incorporated has been adopted for the front wheel bearing, and the EBJ-ETJ type constant velocity joint for the front driveshaft.There are the following features.• The lightweight front driveshaft and compact
EBJ-ETJ type constant velocity joint have been equipped.
• Due to the use of the output shaft, the right and left driveshafts have been approximately the same in length, reducing noise, vibration, and torque steer.
• The front driveshaft spline diameter on the wheel-side and differential-side has been increased, improving torsional strength.
• The ABS magnetic encoder for wheel speed detection has been integrated into the front wheel bearing, and the protector cover of magnetic encoder for wheel speed detection has been equipped to the driveshaft.
• The lead-free grease has been adopted for the constant velocity joint.
• Hexavalent chromium has been eliminated from the dust cover material and protector cover of magnetic encoder for wheel speed detection.
NOTE: .EBJ (High Efficiency Compact Birfield Joint): the
lighter and smaller constant velocity joint com-pared with the conventional BJ has been achieved by adopting the eight small balls.
ETJ (High Efficiency Compact Tripod Joint): The lighter and smaller constant velocity joint com-pared with the conventional TJ has been installed.
TSB Revision
GENERAL SPECIFICATIONSFRONT AXLE 26-3
CONSTRUCTION DIAGRAM
AC704636
ETJ
EBJ
AC704652
AB
ETJ
<LH>
<RH>
Knuckle
Strut assembly
Front driveshaft (LH)
Front hub
Front driveshaft (RH)
Front wheel bearing
Oil seal
Magneticencoder
Front hub
Magnetic encoderprotection cover
Output shaft
Output shaft
Frontdriveshaftnut
Split pin
GENERAL SPECIFICATIONSM1261000200418
Item SpecificationFront wheel bearing
Type Unit bearing (double-row angular contact ball bearing)
Front driveshaft Joint type Outer High efficiency compact Birfield jointInner High efficiency compact tripod joint
TSB Revision
SERVICE SPECIFICATIONSFRONT AXLE26-4
SERVICE SPECIFICATIONSM1261000301054
Item Standard value LimitWheel bearing end play mm (in) − 0.05 (0.002)
M1261005600251Use these steps to plan your diagnostic strategy. If you follow them carefully, you will be sure that you have exhausted most of the possible ways to find a front axle fault.1. Gather information from the customer.
2. Verify that the condition described by the customer exists.
3. Find the malfunction by following the Symptom Chart.
4. Verify malfunction is eliminated.
SYMPTOM CHARTM1261005700311
Symptom Inspection procedure
Reference page
Driveshaft Noise during wheel rotation 1 P.26-5Noise due to excessive play of wheel in turning direction
2 P.26-6
TSB Revision
FRONT AXLE DIAGNOSISFRONT AXLE 26-5
SYMPTOM PROCEDURES
INSPECTION PROCEDURE 1: Noise during Wheel Rotation
DIAGNOSIS
STEP 1. Check the wheel bearing end play.(1) Remove the caliper assembly and suspend it with a wire.(2) Remove the brake disc from the front hub.
AC703296 AB
(3) Attach a dial gauge as shown in the illustration, and then measure the end play while moving the hub in the axial direction.
Limit: 0.05 mm (0.002 inch)Q: Is the wheel bearing end play within the limit?
YES : Go to step 2.NO : Replace the part, then go to Step 5.
STEP 2. Check the driveshaft and inner shaft for bending.Q: Is the driveshaft and inner shaft bent?
YES : Go to step 3.NO : Replace the part. Then go to Step 5.
STEP 3. Check the center bearing for wear.Q: Is the center bearing worn?
YES : Replace the bearing. Then go to Step 5.NO : Go to step 4.
STEP4. Check the driveshaft assembly for wear or damage.Q: Is the driveshaft assembly worn or damaged?
YES : Replace the driveshaft assembly. Then go to Step 5.NO : There is no action to be taken.
STEP 5. Retest the system.Q: Is the abnormal noise eliminated?
YES : The procedure is complete.NO : Repeat from Step 1.
TSB Revision
SPECIAL TOOLSFRONT AXLE26-6
INSPECTION PROCEDURE 2: Noise Due to Excessive Play of Wheel in Turning Direction
DIAGNOSIS
STEP 1. Check for play in the output shaft and side gear serration, the driveshaft and side gear serration, or the driveshaft and front hub serration.Q: Is the play found?
YES : Replace the part. Then go to Step 2.NO : The procedure is complete.
STEP 2. Retest the system.Q: Is the abnormal noise eliminated?
YES : The procedure is complete.NO : Repeat from Step 1.
SPECIAL TOOLSM1261000601260
Tool Tool number and name
Supersession Application
B990767
MB990767Front hub and flange yoke holder
MB990767-01 Fixing of the hub
MB991618
MB991618Hub bolt remover
General service tool Removal of the hub bolt
MB991897
MB991897 or MB992011 Ball joint remover
MB991113-01, MB990635-01 or General service tool
Ball joint disconnectionNOTE: Steering linkage puller (MB990635 or MB991113)is also used to disconnect knuckle and tie rod end ball joint.
MB990241AD
B
A
MB990241 Axle shaft pullerA: MB990242
Puller shaftB: MB990244
Puller bar
MB990241-01 or General service tool
• Removal of the driveshaft• Removal of hub assembly
MB991354
MB991354Puller body
General service tool
MB991721Slide hammer
− Removal of the output shaft
TSB Revision
ON-VEHICLE SERVICEFRONT AXLE 26-7
A
BC
MB991017
ON-VEHICLE SERVICEWHEEL BEARING END PLAY CHECK
M1261001100373
1. Remove the front caliper assembly and front disk brake, and retain the front caliper assembly with a wire and the like to prevent from falling (Refer to P.26-9).
AC102438
2. Set a dial gauge as shown in the figure. Move the hub in the axial direction and measure the end play.
Limit: 0.05 mm (0.002 inch)3. After checking, install the front brake disk and the front
caliper assembly (Refer to P.26-9).
A: MB991017B: MB990998C: MB991000A, B: Front hub
remover and installer
C: Spacer
MB990998-01 • Provisional holding of the wheel bearing
• Measurement of hub starting torque
• Measurement of wheel bearing end playNOTE: MB991000, which belongs to MB990998, should be used as a spacer.
MB990685Torque wrench
General service tool Measurement of hub starting torque
MB990326
MB990326Preload socket
General service tool
MB991561
MB991561Boot band crimping tool
MB991561 EBJ boot (resin boot) band installation
Tool Tool number and name
Supersession Application
TSB Revision
ON-VEHICLE SERVICEFRONT AXLE26-8
HUB BOLT REPLACEMENTM1261001000558
Required Special Tools:• MB990767: Front Hub and Flange Yoke Holder• MB991618: Hub Bolt Remover
1. Remove the front caliper assembly and front disk brake, and retain the front caliper assembly with a wire and the like to prevent from falling (Refer to P.26-9).
AC302114
MB991618
AB
Hub bolt
2. Use special tool MB991618 to remove the hub bolts.
AC612767AD
MB990767
Plain washer
3. Install the plain washer to the new hub bolt, and install the bolt with a nut while holding the hub with special tool MB990767.
4. Install the front brake disk and the front caliper assembly (Refer to P.26-9).
TSB Revision
FRONT AXLE HUB ASSEMBLYFRONT AXLE 26-9
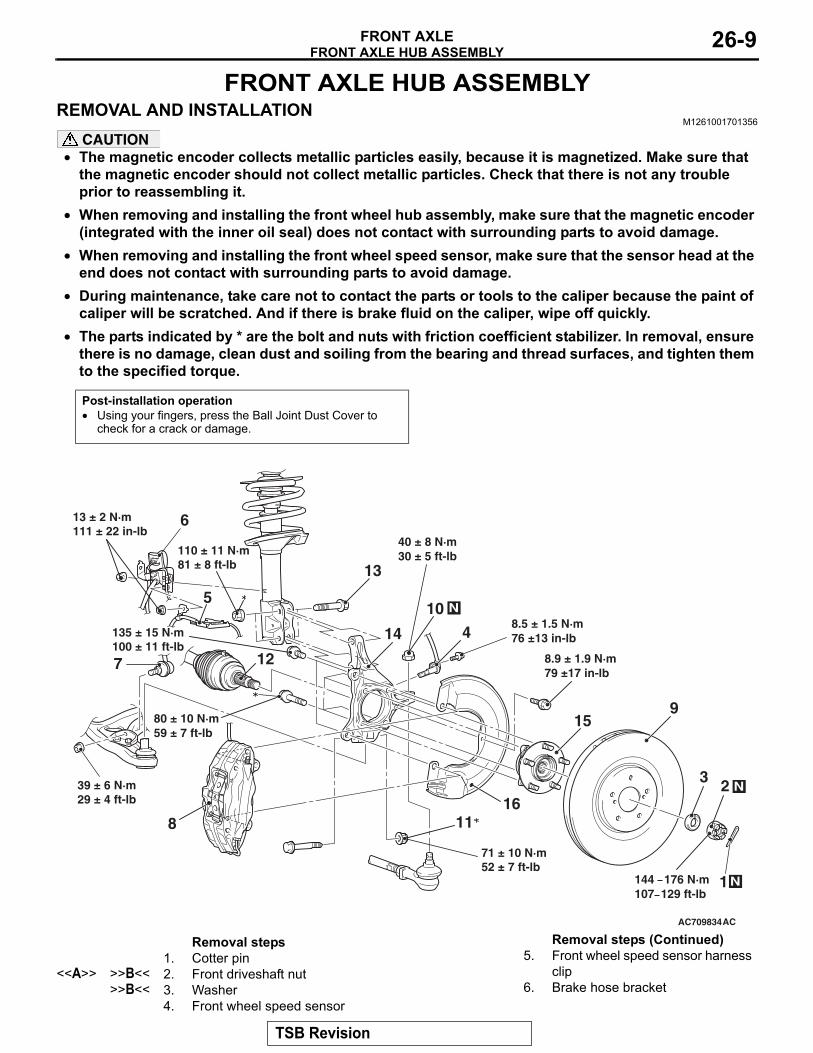
FRONT AXLE HUB ASSEMBLYREMOVAL AND INSTALLATION
M1261001701356
CAUTION• The magnetic encoder collects metallic particles easily, because it is magnetized. Make sure that
the magnetic encoder should not collect metallic particles. Check that there is not any trouble prior to reassembling it.
• When removing and installing the front wheel hub assembly, make sure that the magnetic encoder (integrated with the inner oil seal) does not contact with surrounding parts to avoid damage.
• When removing and installing the front wheel speed sensor, make sure that the sensor head at the end does not contact with surrounding parts to avoid damage.
• During maintenance, take care not to contact the parts or tools to the caliper because the paint of caliper will be scratched. And if there is brake fluid on the caliper, wipe off quickly.
•
Post-installation operation• Using your fingers, press the Ball Joint Dust Cover to
check for a crack or damage.
AC709834
7
1
16
144 176 N·m107 129 ft-lb
80 ± 10 N·m59 ± 7 ft-lb
AC
159
N
8.9 ± 1.9 N·m79 ±17 in-lb
3 2
5
N
4
8
10
11
12
13
8.5 ± 1.5 N·m76 ±13 in-lb
N
71 ± 10 N·m52 ± 7 ft-lb
110 ± 11 N·m81 ± 8 ft-lb
13 ± 2 N·m111 ± 22 in-lb
6
135 ± 15 N·m100 ± 11 ft-lb
39 ± 6 N·m29 ± 4 ft-lb
40 ± 8 N·m30 ± 5 ft-lb
14
The parts indicated by * are the bolt and nuts with friction coefficient stabilizer. In removal, ensure there is no damage, clean dust and soiling from the bearing and thread surfaces, and tighten them to the specified torque.
Removal steps 1. Cotter pin
<<A>> >>B<< 2. Front driveshaft nut>>B<< 3. Washer
4. Front wheel speed sensor
5. Front wheel speed sensor harness clip
6. Brake hose bracket
Removal steps (Continued)
TSB Revision
FRONT AXLE HUB ASSEMBLYFRONT AXLE26-10
Required Special Tools:• MB990242: Puller Shaft• MB990244: Puller Bar
• MB990767: Front Hub and Flange Yoke Holder• MB991354: Puller Body• MB991897 or MB992011: Ball Joint Remover
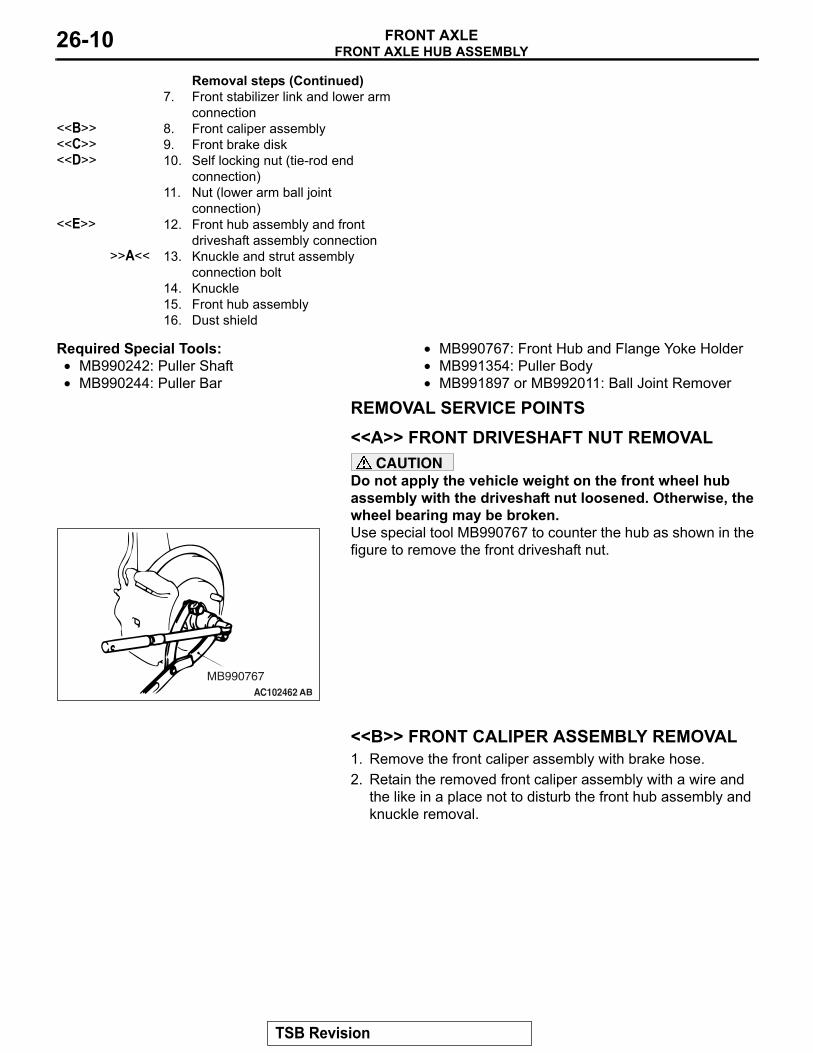
REMOVAL SERVICE POINTS.
<<A>> FRONT DRIVESHAFT NUT REMOVALCAUTION
Do not apply the vehicle weight on the front wheel hub assembly with the driveshaft nut loosened. Otherwise, the wheel bearing may be broken.
AC102462
MB990767AB
Use special tool MB990767 to counter the hub as shown in the figure to remove the front driveshaft nut.
.
<<B>> FRONT CALIPER ASSEMBLY REMOVAL1. Remove the front caliper assembly with brake hose.2. Retain the removed front caliper assembly with a wire and
the like in a place not to disturb the front hub assembly and knuckle removal.
.
7. Front stabilizer link and lower arm connection
<<B>> 8. Front caliper assembly<<C>> 9. Front brake disk<<D>> 10. Self locking nut (tie-rod end
connection)11. Nut (lower arm ball joint
connection)<<E>> 12. Front hub assembly and front
driveshaft assembly connection>>A<< 13. Knuckle and strut assembly
connection bolt14. Knuckle15. Front hub assembly16. Dust shield
Removal steps (Continued)
TSB Revision
FRONT AXLE HUB ASSEMBLYFRONT AXLE 26-11
<<C>> FRONT BRAKE DISK REMOVAL
AC505409AC
Bolts(M8 × 1.25)
If the front brake disk removal is difficult, install bolts (M8 x 1.25) shown in the figure, and tighten them evenly and gradu-ally to remove the front brake disk.
.
<<D>> SELF-LOCKING NUT (TIE-ROD END CONNECTION) REMOVAL
CAUTION• Loosen the self-locking nut (tie-rod end connection)
from the ball joint, but do not remove here. Use the spe-cial tool.
• To prevent the special tool from dropping off, suspend it with a rope.
• If the dust cover is damaged during operation, replace the tie-rod end. (Refer to GROUP 37 − Power Steering Gear and Linkage Disassembly and Reassembly P.37-36.)
AC208247AN
Cord
Bolt
MB991897orMB992011
Nut
Ball joint
1. Install special tool MB991897 or MB992011 as shown in the figure.
AC104739AB
Parallel
Knob
Bolt
Correct
Wrong
2. Turn the bolt and knob to make the special tool jaws parallel, then hand-tighten the bolt. After tightening, check that the jaws are still parallel.NOTE: To adjust the special tool jaws to be parallel, set the orientation of the knob as shown in the figure.
3. Tighten the bolt with a wrench to disconnect the tie rod end..
TSB Revision
FRONT AXLE HUB ASSEMBLYFRONT AXLE26-12
<<E>> FRONT HUB ASSEMBLY AND FRONT DRIVESHAFT ASSEMBLY DISCONNECTION
AC704652AB
Oil seal
Magnetic encoder
Wheel bearing
Hub
CAUTION• The magnetic encoder collects metallic particles easily,
because it is magnetized. Make sure that the magnetic encoder does not collect metallic particles.
•
AC303949
MB990767
MB990242MB991354
MB990244 (Three)
AB
When removing the front driveshaft, make sure that it does not contact with the magnetic encoder (integrated with the inner oil seal) to avoid damage.
If the front driveshaft and front hub are seized, use special tools MB990242 and MB990244, MB991354 and MB990767 to push the front driveshaft assembly out from the front hub.
INSTALLATION SERVICE POINTS.
>>A<< KNUCKLE AND STRUT ASSEMBLY CON-NECTION BOLT INSTALLATION
AC708457AC
Upper boltMark position
Locate the knuckle and strut assembly upper connection bolt�s marking position as shown in the figure and tighten it.
.
TSB Revision
FRONT AXLE HUB ASSEMBLYFRONT AXLE 26-13
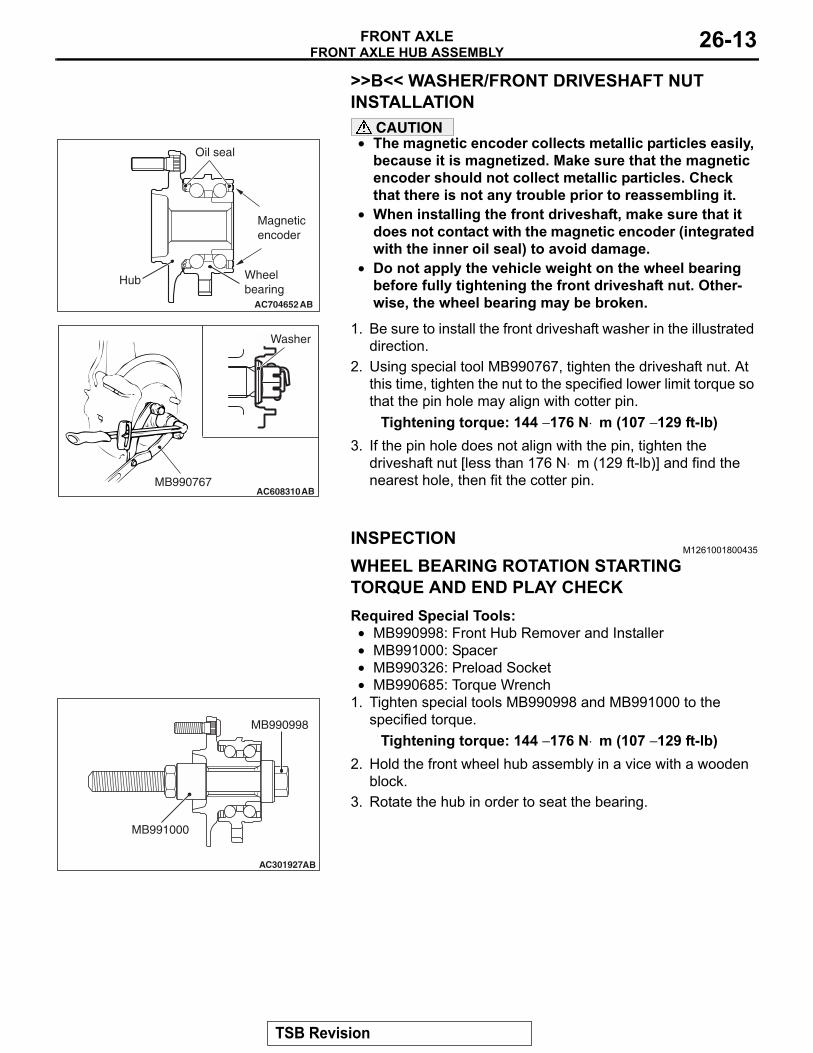
>>B<< WASHER/FRONT DRIVESHAFT NUT INSTALLATION
CAUTION•
AC704652AB
Oil seal
Magnetic encoder
Wheel bearing
Hub
The magnetic encoder collects metallic particles easily, because it is magnetized. Make sure that the magnetic encoder should not collect metallic particles. Check that there is not any trouble prior to reassembling it.
• When installing the front driveshaft, make sure that it does not contact with the magnetic encoder (integrated with the inner oil seal) to avoid damage.
• Do not apply the vehicle weight on the wheel bearing before fully tightening the front driveshaft nut. Other-wise, the wheel bearing may be broken.
AC608310ABMB990767
Washer1. Be sure to install the front driveshaft washer in the illustrated
direction.2. Using special tool MB990767, tighten the driveshaft nut. At
this time, tighten the nut to the specified lower limit torque so that the pin hole may align with cotter pin.
Tightening torque: 144 − 176 N⋅ m (107 − 129 ft-lb)3. If the pin hole does not align with the pin, tighten the
driveshaft nut [less than 176 N⋅ m (129 ft-lb)] and find the nearest hole, then fit the cotter pin.
INSPECTIONM1261001800435
WHEEL BEARING ROTATION STARTING TORQUE AND END PLAY CHECKRequired Special Tools:• MB990998: Front Hub Remover and Installer• MB991000: Spacer• MB990326: Preload Socket•
AC301927AB
MB991000
MB990998
MB990685: Torque Wrench1. Tighten special tools MB990998 and MB991000 to the
2. Hold the front wheel hub assembly in a vice with a wooden block.
3. Rotate the hub in order to seat the bearing.
TSB Revision
FRONT AXLE HUB ASSEMBLYFRONT AXLE26-14
AC206090AC
MB990326 Woodenblock
MB990685Woodenblock
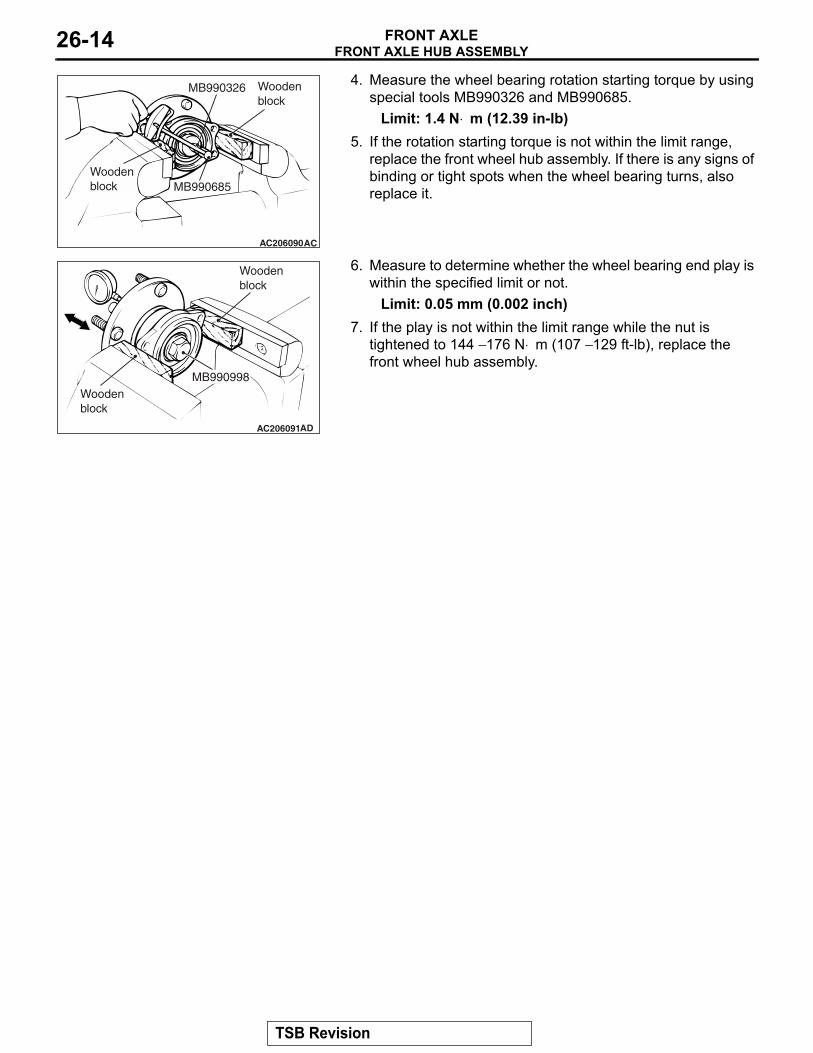
4. Measure the wheel bearing rotation starting torque by using special tools MB990326 and MB990685.
Limit: 1.4 N⋅ m (12.39 in-lb)5. If the rotation starting torque is not within the limit range,
replace the front wheel hub assembly. If there is any signs of binding or tight spots when the wheel bearing turns, also replace it.
AC206091AD
MB990998Wooden block
Wooden block
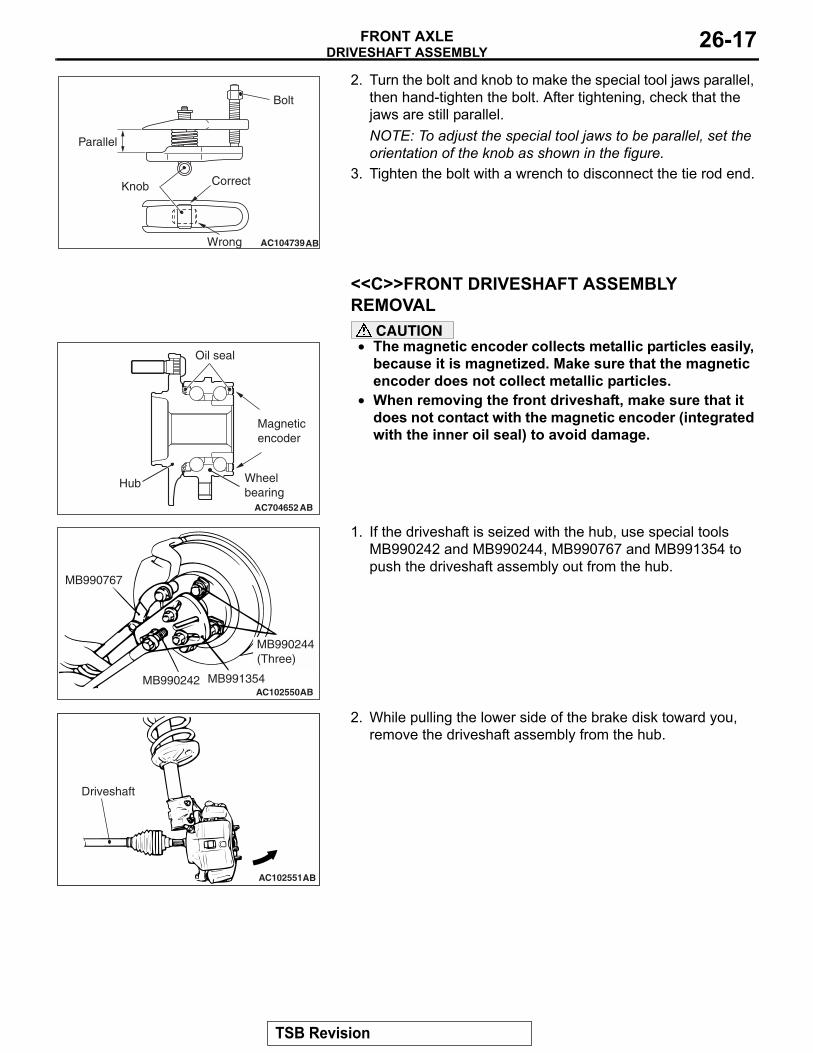
6. Measure to determine whether the wheel bearing end play is within the specified limit or not.
Limit: 0.05 mm (0.002 inch)7. If the play is not within the limit range while the nut is
tightened to 144 − 176 N⋅ m (107 − 129 ft-lb), replace the front wheel hub assembly.
TSB Revision
DRIVESHAFT ASSEMBLYFRONT AXLE 26-15
DRIVESHAFT ASSEMBLYREMOVAL AND INSTALLATION
M1261003501422
CAUTION• The magnetic encoder collects metallic particles easily, because it is magnetized. Make sure that
the magnetic encoder should not collect metallic particles. Check that there is not any trouble prior to reassembling it.
• When removing and installing the front driveshaft assembly, make sure that the magnetic encoder (integrated with the inner oil seal) does not contact with surrounding parts to avoid damage.
• When removing and installing the front wheel speed sensor, make sure that the pole piece at the end does not contact with surrounding parts to avoid damage.
•
Pre-removal operation• Transmission Oil Draining (Refer to GROUP 22A,
The part indicated by*is the nut with friction coefficient stabilizer. In removal, ensure there is no damage, clean dust and soiling from the bearing and thread surfaces, and tighten them to the specified torque.
Removal steps (Continued)
TSB Revision
DRIVESHAFT ASSEMBLYFRONT AXLE26-16
Required Special Tools:• MB990242: Puller Shaft• MB990244: Puller Bar
• MB990767: Front Hub and Flange Yoke Holder• MB991354: Puller Body• MB991897 or MB992011: Ball Joint Remover
REMOVAL SERVICE POINTS.
<<A>> FRONT DRIVESHAFT NUT REMOVALCAUTION
Do not apply the vehicle weight on the front wheel hub assembly with the driveshaft nut loosened. Otherwise, the wheel bearing may be broken.
AC102462
MB990767AB
Use special tool MB990767 to counter the hub as shown in the figure to remove the front driveshaft nut.
.
<<B>> SELF-LOCKING NUT (TIE-ROD END CONNECTION) REMOVAL
CAUTION• Loosen the self-locking nut (tie-rod end connection)
from the ball joint, but do not remove here. Use the spe-cial tool.
• To prevent the special tool from dropping off, suspend it with a rope.
• If the dust cover is damaged during operation, replace the tie-rod end. (Refer to GROUP 37 − Power Steering Gear and Linkage Disassembly and Reassembly P.37-36.)
AC208247AN
Cord
Bolt
MB991897orMB992011
Nut
Ball joint
1. Install special tool MB991897 or MB992011 as shown in the figure.
TSB Revision
DRIVESHAFT ASSEMBLYFRONT AXLE 26-17
AC104739AB
Parallel
Knob
Bolt
Correct
Wrong
2. Turn the bolt and knob to make the special tool jaws parallel, then hand-tighten the bolt. After tightening, check that the jaws are still parallel.NOTE: To adjust the special tool jaws to be parallel, set the orientation of the knob as shown in the figure.
3. Tighten the bolt with a wrench to disconnect the tie rod end.
.
<<C>>FRONT DRIVESHAFT ASSEMBLY REMOVAL
AC704652AB
Oil seal
Magnetic encoder
Wheel bearing
Hub
CAUTION• The magnetic encoder collects metallic particles easily,
because it is magnetized. Make sure that the magnetic encoder does not collect metallic particles.
•
AC102550
MB990767
MB990242 MB991354
MB990244(Three)
AB
When removing the front driveshaft, make sure that it does not contact with the magnetic encoder (integrated with the inner oil seal) to avoid damage.
1. If the driveshaft is seized with the hub, use special tools MB990242 and MB990244, MB990767 and MB991354 to push the driveshaft assembly out from the hub.
AC102551AB
Driveshaft
2. While pulling the lower side of the brake disk toward you, remove the driveshaft assembly from the hub.
TSB Revision
DRIVESHAFT ASSEMBLYFRONT AXLE26-18
CAUTION• Never pull out the front driveshaft assembly from the
EBJ assembly side. Otherwise, the ETJ assembly may be damaged. Always pull out from the ETJ side with a lever.
•
AC102552 AJ
ETJ assembly
Lever
Transaxle
Care must be taken to ensure that the oil seal of the transaxle is not damaged by the spline part of the front driveshaft assembly.
3. Insert a lever between the transaxle case or transfer and front driveshaft assembly, and then pull the front driveshaft assembly out from the transaxle.
AC707591AB
MB991000
MB990998
CAUTIONDo not apply the vehicle weight to the wheel bearing with the front driveshaft assembly removed. If, however, the vehicle weight shall be applied to the bearing (in order to move the vehicle), tighten the following special tools MB991000 and MB990998 to the specified torque 144 − 176 N⋅ m (107 − 129 ft-lb).
.
<<D>>OUTPUT SHAFT ASSEMBLY REMOVALCAUTION
When pulling the output shaft out from the transaxle, be careful that the spline part of the output shaft does not damage the oil seal.
AC102556 AB
MB991721
Output shaftassembly
Use special tool MB991721 to remove the output shaft assem-bly.
The magnetic encoder collects metallic particles easily, because it is magnetized. Make sure that the magnetic encoder should not collect metallic particles. Check that there is not any trouble prior to reassembling it.
• When installing the front driveshaft, make sure that it does not contact with the magnetic encoder (integrated with the inner oil seal) to avoid damage.
• Care must be taken to ensure that the oil seal of the transaxle is not damaged by the spline part of the out-put shaft assembly or front driveshaft assembly.
.
>>B<< WASHER/FRONT DRIVESHAFT NUT INSTALLATION
CAUTIONDo not apply the vehicle weight on the front wheel hub assembly before fully tightening the front driveshaft nut. Otherwise, the wheel bearing may be broken.
AC608310ABMB990767
Washer1. Be sure to install the front driveshaft washer in the illustrated
direction.2. Using special tool MB990767, tighten the driveshaft nut. At
this time, tighten the nut to the specified lower limit torque so that the pin hole may align with cotter pin.
Tightening torque: 144 − 176 N⋅ m (107 − 129 ft-lb)3. If the pin hole does not align with the pin, tighten the
driveshaft nut [less than 176 N⋅ m (129 ft-lb)] and find the nearest hole, then fit the cotter pin.
TSB Revision
DRIVESHAFT ASSEMBLYFRONT AXLE26-20
DISASSEMBLY AND ASSEMBLYM1261003701686
CAUTIONAs for the EBJ assembly, only the EBJ boot can be replaceable, and other parts cannot be disassem-bled.
<<B>> ETJ BOOT REMOVAL1. Wipe off the grease on the shaft spline.2. When reusing the ETJ boot, wrap plastic tape around the
shaft spline to avoid damaging the boot.
ASSEMBLY SERVICE POINTS.
>>A<< ETJ BOOT INSTALLATIONApply a tape to the shaft spline area. Then incorporate the ETJ boot..
TSB Revision
DRIVESHAFT ASSEMBLYFRONT AXLE26-22
>>B<< SPIDER ASSEMBLY/ETJ CASE INSTALLATION
CAUTION• The driveshaft joint use special grease. Do not mix old
and new or different types of grease.• If the spider assembly has been cleaned, take special
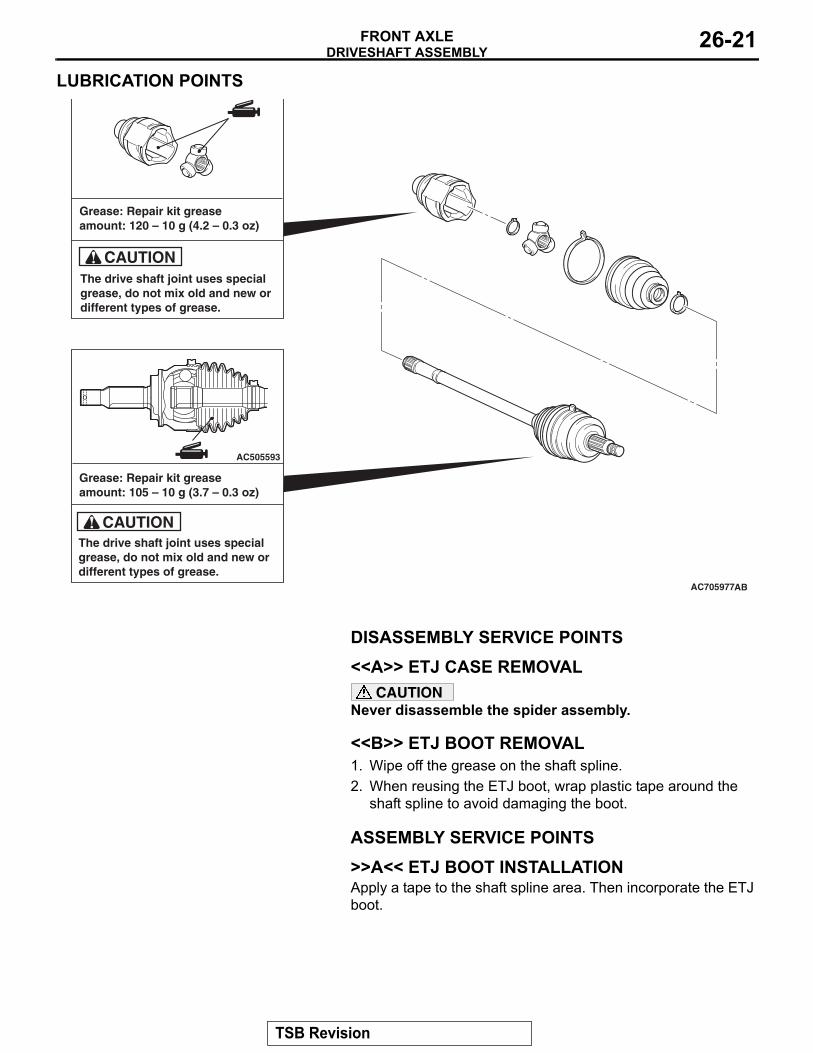
care to apply the specified grease.1. Apply the specified grease furnished in the repair kit to the
spider assembly between the spider axle and the roller.Specified grease: Repair kit grease
AC102654AC
Chamfered side
2. Install the spider assembly to the shaft from the direction of the spline chamfered side.
AC102656 AB
3. After applying the specified grease to the ETJ case, insert the driveshaft and apply grease one more time.
Specified grease: Repair kit greaseAmount to use: 120 ± 10 g (4.2 ± 0.3 ounce)
NOTE: When using the repair kit grease, fill the half of the grease into the joint and the other half into the boot as a guideline, and consume the grease completely.
.
>>C<< ETJ BOOT BAND (SMALL)/ETJ BOOT BAND (LARGE) INSTALLATION
AC102657AB
A
Adjust the distance (A shown in the illustration) between the boot bands to the standard value to adjust the air volume inside the ETJ boot to the specified value, then be sure to tighten the ETJ boot band (large) and ETJ boot band (small).
Standard value (A): 80 ± 3 mm (3.14 ± 0.12 inches)
TSB Revision
DRIVESHAFT ASSEMBLYFRONT AXLE 26-23
EBJ BOOT REPLACEMENTM1261007500197
Required Special Tool:MB991561:Boot Band Crimping Tool
AC505563AB
1. Remove the boot bands (large and small).NOTE: The boot bands cannot be re-used.
2. Remove the EBJ boot.3. Wrap a plastic tape around the shaft spline, and assemble
the boot band and EBJ boot.
AC102659
4. Align the center groove on the EBJ boot small end with the shaft groove.
AC102660
W
MB991561
AB
Stopper
Adjusting bolt
5. Turn the adjusting bolt on special tool MB991561 so that the size of the opening (W) is at the standard value.
Standard value (W): 2.9 mm (0.11 inch)• If it is larger than 2.9 mm (0.11 inch)
Tighten the adjusting bolt.• If it is smaller than 2.9 mm (0.11 inch)
Loosen the adjusting bolt.NOTE: .• The value of W will change by approximately 0.7 mm
(0.03 inch) for each turn of the adjusting bolt.•
AC102661AB
A
B
Boot
Boot band(small)
Projection
The adjusting bolt should not be turned more than once.6. Position the EBJ boot band (small) so that there is even
clearance at either end (A and B).
TSB Revision
DRIVESHAFT ASSEMBLYFRONT AXLE26-24
CAUTION• Secure the driveshaft in an upright position and clamp
part of the boot band to be crimped securely in the jaws of the special tool MB991561.
•
AC606919ABMB991561
Crimp the boot band until special tool MB991561 touches the stopper.
7. Use special tool MB991561 to crimp the boot band (small).
AC606920
C
AF
8. Check that the crimping amount (C) of the boot band is at the standard value.
Standard value (C): 2.4 − 2.8 mm (0.10 − 0.11 inch)If the crimping amount is larger than 2.8 mm (0.11
inch)Readjust the value of (W) in step 5 according to the following formula, and then repeat the operation in step 7.W = 5.5 mm (0.22 inch) − CExample: If C = 2.9 mm (0.11 inch), then W = 2.6 mm (0.10 inch)
If the crimping amount is smaller than 2.4 mm (0.10 inch)Remove the EBJ boot band, readjust the value of (W) in step 5 according to the following formula, and then repeat the operations in steps 6 and 7 using a new EBJ boot band.W = 5.5 mm (0.22 inch) − CExample: If C = 2.3 mm (0.09 inch), then W = 3.2 mm (0.13 inch)
9. Check that the boot band is not sticking out past the place where it has been installed. If the boot band is sticking out, remove it and then repeat steps 6 to 8, using a new boot band.CAUTION
• The driveshaft joint uses special grease. Do not mix old and new or different types of grease.
10.Fill the inside of the boot with the specified amount of the specified grease.
Specified grease: Repair kit greaseAmount to use: 105 ± 10 g (3.7 ± 0.3 ounces)
TSB Revision
DRIVESHAFT ASSEMBLYFRONT AXLE 26-25
AC102664 AB
11.Align the center groove on the EBJ boot big end with the EBJ case groove.
12.Follow the same procedure as in step 5 to adjust the size of the opening (W) on the special tool so that it is at the standard value.
Standard value (W): 3.2 mm (0.13 inch)
AC102665AB
D
EBoot
Projection
Boot band(large)
13.Position the EBJ boot band (large) so that there is even clearance at either end (D and E).
14.Use special tool MB991561 to crimp the EBJ boot band (large) in the same way as in step 7.
AC102666F
AB
15.Check that the crimping amount (F) of the boot band is at the standard value.
Standard value (F): 2.4 − 2.8 mm (0.10 − 0.11 inch)If the crimping amount is larger than 2.8 mm (0.11
inch)Readjust the value of (W) in step 12 according to the following formula, and then repeat the opera-tion in step 14.W = 5.8 mm (0.23 inch) − FExample: If F = 2.9 mm (0.11 inch), then W = 2.9 mm (0.11 inch)
If the crimping amount is smaller than 2.4 mm (0.10 inch)Remove the EBJ boot band, readjust the value of (W) in step 12 according to the following formula, and then repeat the operations in steps 13 and 14 using a new EBJ boot band.W = 5.8 mm (0.23 inch) − FExample: If F = 2.3 mm (0.09 inch), then W = 3.5 mm (0.14 inch)
16.Check that the boot band is not sticking out past the place where it has been installed. If the boot band is sticking out, remove it and then repeat steps 13 to 15, using a new boot band.