38
2009- 2010 Becoming Group“Wise” Using GroupWise 7.0 120 East Smith Ave, Darlington, SC 29532 0

2009-2010
Becoming Group“Wise”Using GroupWise 7.0
1 2 0 E a s t S m i t h A v e , D a r l i n g t o n , S C 2 9 5 3 20
ContentsGroupWise 7.0.............................................................................................................................................3
GroupWise Features................................................................................................................................3
Customizing GroupWise..........................................................................................................................3
Messages.................................................................................................................................................4
QuickViewer............................................................................................................................................4
To Create a Message:..............................................................................................................................5
Sending Options......................................................................................................................................5
Formatting Bulleted and Number Lists....................................................................................................6
Adding a Signature to Items You Send.....................................................................................................6
Spell-Checking Items You Send................................................................................................................6
Delaying Messages..................................................................................................................................7
Replying to a Message:............................................................................................................................8
Forwarding a Message.............................................................................................................................8
Attaching a File........................................................................................................................................8
To Open an Attached file:........................................................................................................................8
Adding an Attachments (Shortcut!).........................................................................................................8
Checking the Status of Sent Messages....................................................................................................9
District E-Mail Out-of-District E-Mail.............................................................................................9
Retracting a Message............................................................................................................................10
Work in Progress Folder:.......................................................................................................................10
The Secrets Behind the Creation of Personal Folders............................................................................10
Sharing Folders......................................................................................................................................11
Filter......................................................................................................................................................12
Using the Find Feature in GroupWise....................................................................................................13
Calendar................................................................................................................................................13
Printing a Calendar................................................................................................................................14
Scheduling an Appointment..................................................................................................................14
Emptying the Trash................................................................................................................................14
Creating a Personal Group.....................................................................................................................16
1
Editing a Group in GroupWise...............................................................................................................16
Archive – File Location and Cleanup......................................................................................................16
GroupWise Notify..................................................................................................................................17
Rules......................................................................................................................................................18
Group Labels..........................................................................................................................................20
Address Books.......................................................................................................................................20
Creating/Deleting Additional Address Books.........................................................................................21
Frequent Contacts – A Blessing or a Curse............................................................................................26
Distribution Lists....................................................................................................................................27
GroupWise Web Access.........................................................................................................................27
Common GroupWise Keystrokes...........................................................................................................28
2
GroupWise 7.0
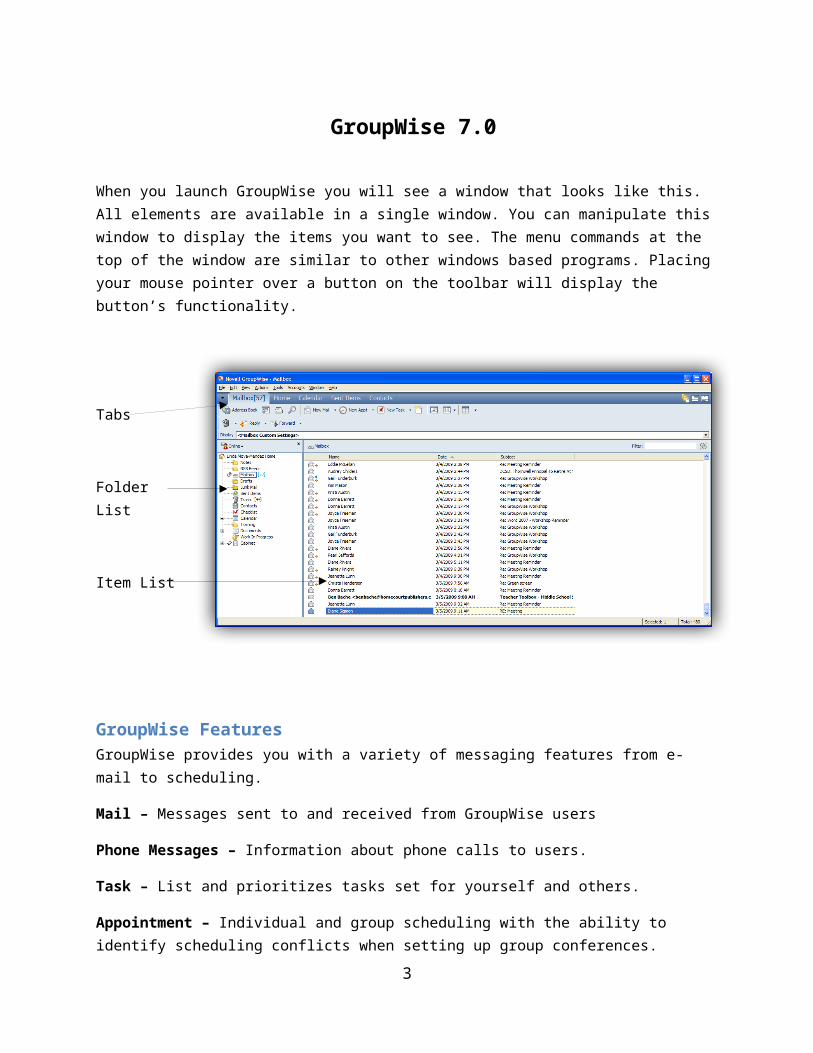
When you launch GroupWise you will see a window that looks like this. All elements are available in a single window. You can manipulate this window to display the items you want to see. The menu commands at the top of the window are similar to other windows based programs. Placing your mouse pointer over a button on the toolbar will display the button’s functionality.
Tabs
Folder List
Item List
GroupWise FeaturesGroupWise provides you with a variety of messaging features from e-mail to scheduling.
Mail – Messages sent to and received from GroupWise users
Phone Messages – Information about phone calls to users.
Task – List and prioritizes tasks set for yourself and others.
Appointment – Individual and group scheduling with the ability to identify scheduling conflicts when setting up group conferences.
Note – Schedule reminders for you and other users.
Customizing GroupWiseIf you do not like the default settings that affect such things as how you open an attachment or a sent message you can customize GroupWise. To do this:
1. Click on Tools.
3
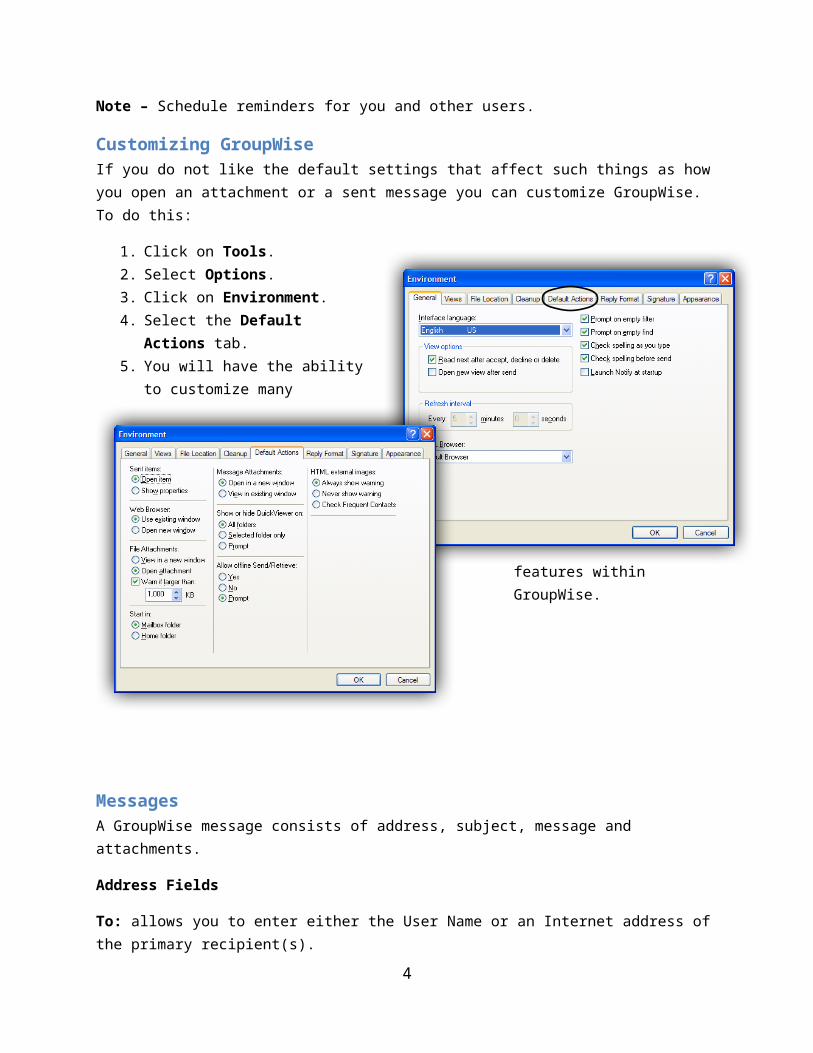
2. Select Options.3. Click on Environment.4. Select the Default Actions tab.5. You will have the ability to customize
many features within GroupWise.
MessagesA GroupWise message consists of address, subject, message and attachments.
Address Fields
To: allows you to enter either the User Name or an Internet address of the primary recipient(s).
From: enables use to enter your User Name (this should automatically appear in the GroupWise message.
CC: (Carbon or Courtesy Copy) allows you to send a copy of your message to other users.
BC: (Blind Copy) allows you to send a copy of your message to other users without the knowledge of the primary or carbon copy recipients.
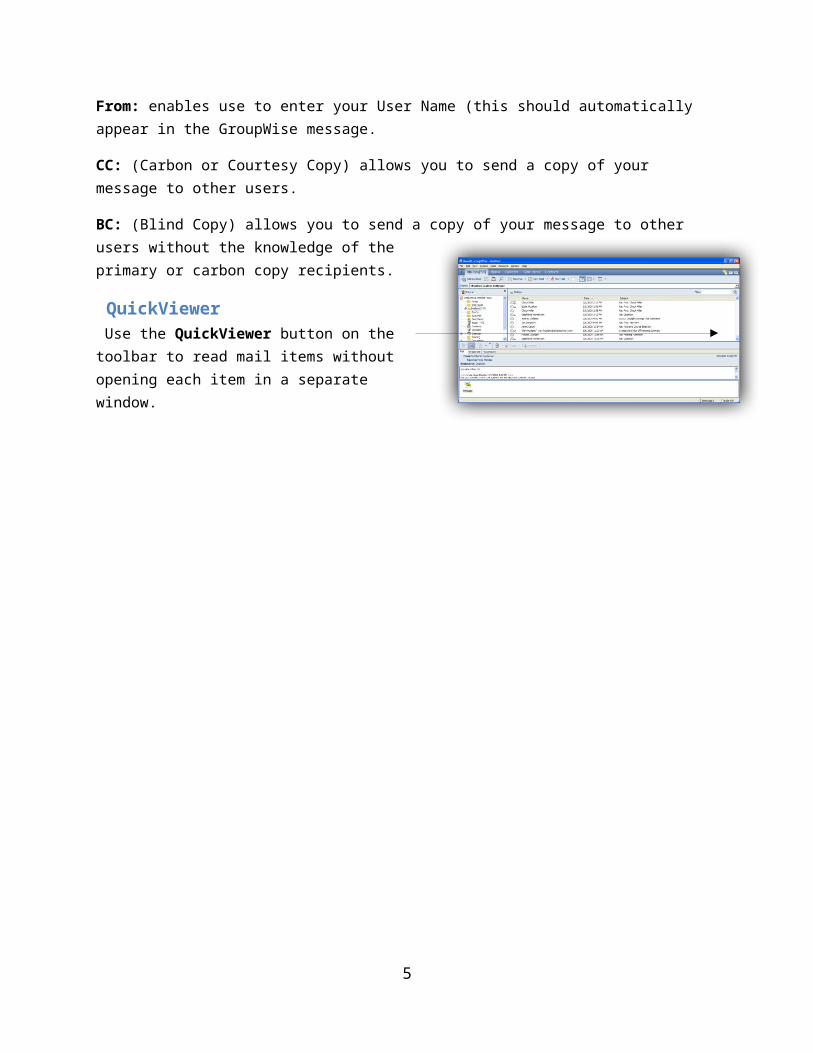
QuickViewer Use the QuickViewer button on the toolbar to read mail items without opening each item in a separate window.
4
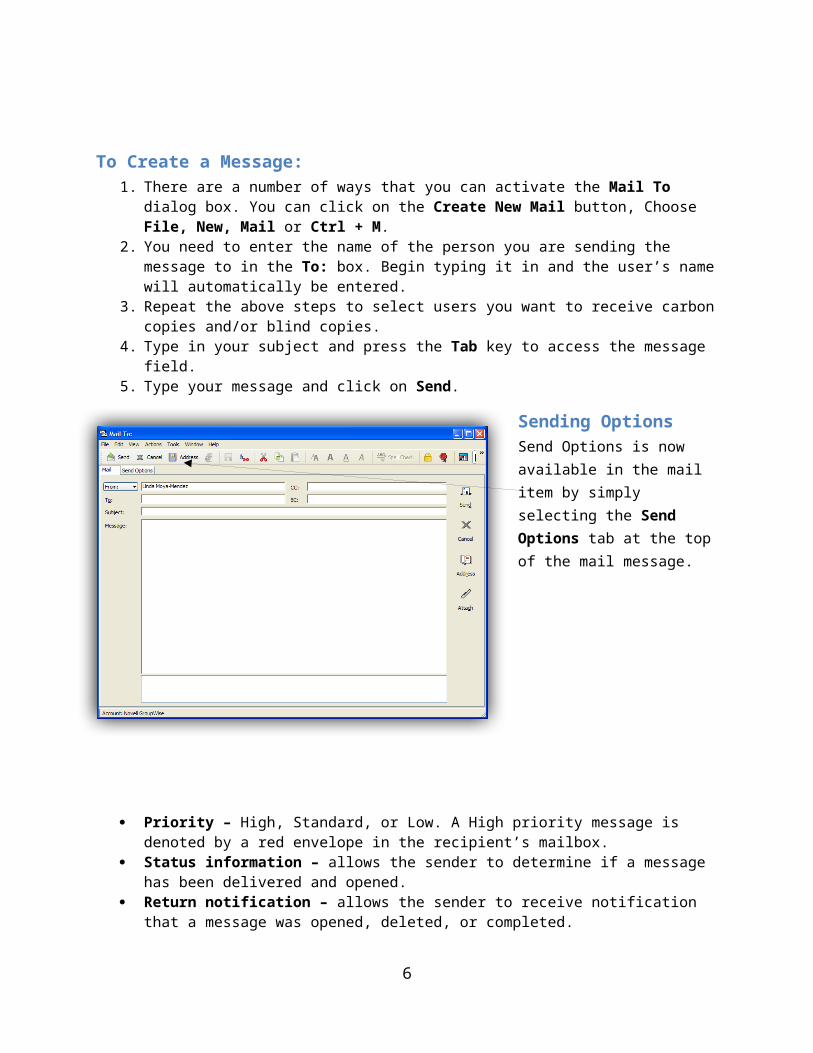
To Create a Message:1. There are a number of ways that you can activate the Mail To dialog box. You can click on the
Create New Mail button, Choose File, New, Mail or Ctrl + M.2. You need to enter the name of the person you are sending the message to in the To: box. Begin
typing it in and the user’s name will automatically be entered.3. Repeat the above steps to select users you want to receive carbon copies and/or blind copies.4. Type in your subject and press the Tab key to access the message field.5. Type your message and click on Send.
Sending OptionsSend Options is now available in the mail item by simply selecting the Send Options tab at the top of the mail message.
Priority – High, Standard, or Low. A High priority message is denoted by a red envelope in the recipient’s mailbox.
Status information – allows the sender to determine if a message has been delivered and opened.
Return notification – allows the sender to receive notification that a message was opened, deleted, or completed.
Reply requested – allows the sender to request a recipient to reply by a certain date. Expiration – allows the sender to delete the message automatically after a certain number of
days providing the message is unopened. Auto-delete – deletes a message from your Sent Items folder once it has been deleted by the
recipient.
5
Formatting Bulleted and Number Lists1. Open a new mail message.2. In the body of the e-mail press Ctrl+Shift+L to insert a bulleted list.3. Press Ctrl+Shift+L again to change it to a numbered list.4. Continue to press Ctrl+Shift+L to select from the six list formats available.5. Type the list item.6. Press Enter to create the next item in the list.7. Press Enter twice after the last list item to turn off the list formatting.
Adding a Signature to Items You SendCreating a Signature
1. Click on Tools.2. Select Options.3. Double-click on Environment.4. Select the Signature tab.5. Select Signature.6. Select New.7. Type a name for the signature.8. Click OK.9. Create your signature.10. Select if you want this signature to be your default signature. You can choose to have it added
automatically or to prompt you before adding. 11. Click OK. (With GroupWise 7.0 you can have multiple signatures available to select to use.)
Spell-Checking Items You SendThere are two ways to spell-check the items you send. Quick Speller checks the spelling as you type, and underlines the words that are spelled wrong. You run Spell Checker separately, either manually or by selecting to have it run when you click Send. Both features check for misspelled words, duplicate words, and irregular capitalization in items that you are creating.
Quick Speller (Also Referred to as Inline Spell Checking or Spell Check as you Type)
When Quick Speller finds a misspelled word, you can replace it with a word Quick Speller suggests or skip the word always for that message. You can also add the word to a user word list.
1. Right-click the misspelled word.2. Click the correctly spelled word OR click Skip Always to skip the word in the rest of the message.
OR Click Add to Word List to add the word to your word list.
6
Spell Checker
When Spell Checker finds a misspelled word, you can replace it with a word Spell Checker suggests, edit the word manually, or skip the word. You can also define an automatic replacement for the word, or add the word to a user word list.
1. Click the Subject or Message box OR select the text to spell-check.2. Click Tools.3. Click Spell Check.4. To specify a user word list to add words to, click the Add To drop-down list and select an option.5. To specify a range of text to check, click the Check drop-down list and select an option.6. When the Spell Checker stops on a word, click any of the available options, or edit the word
manually.7. Click Yes when spell-checking is complete.
Spell-Checking Items Automatically with Spell Checker
You can set it up where GroupWise will automatically spell-check items automatically every time you click Send.
1. Click Tools.2. Click Options.3. Double-click on Environment.4. Click Check Spelling Before Send.5. Click OK.
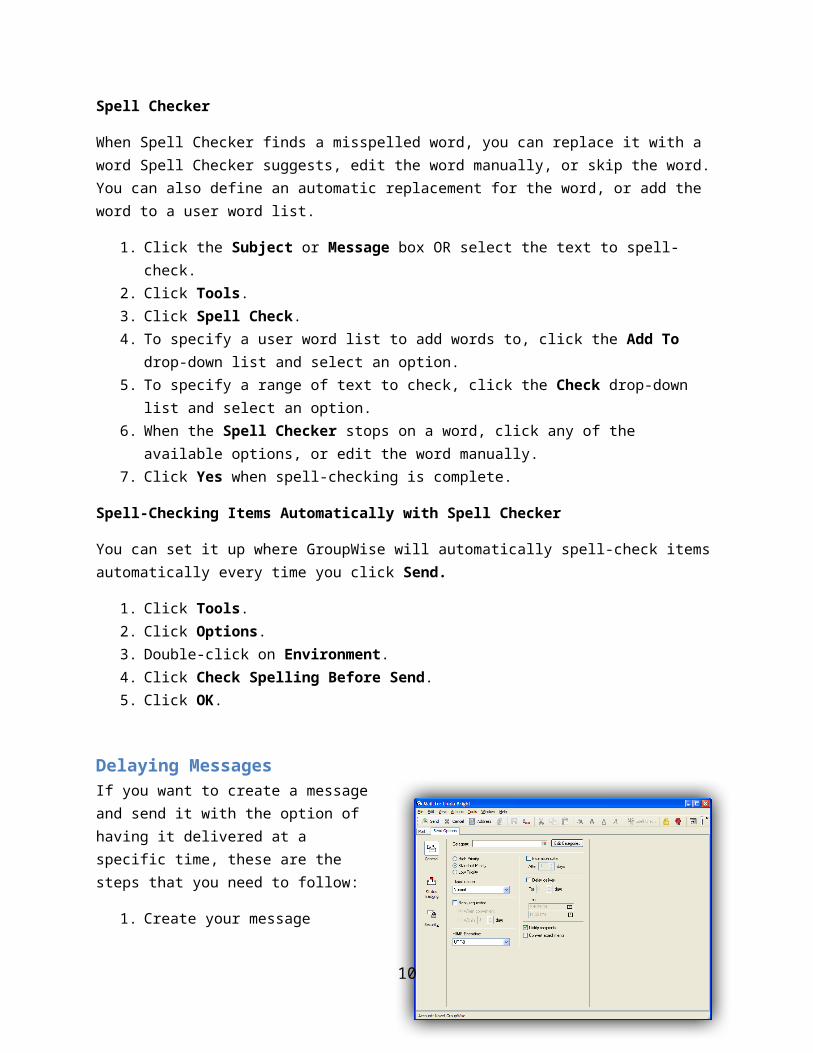
Delaying MessagesIf you want to create a message and send it with the option of having it delivered at a specific time, these are the steps that you need to follow:
1. Create your message2. Prior to sending the message click on
the Send Options tab at the top of the message.
3. Put a check in the box beside Delay Delivery
4. Choose the number of days (You can even choose a specific time of day)
5. Click OK6. Send the message. Its delivery will be pending until the date/time you specified.
7

Replying to a Message:1. Click on the Mailbox folder (if not already open) to view the list of messages.2. Open the message and click on the Reply button3. Select Reply to Sender or Reply to All (replies to the sender and all recipients). You also have
the option to include the message. 4. Click OK.
Type the message and click the Send button.
Forwarding a Message1. Open the message and click on the Forward button to open a new Mail To window.2. Type in the User Name in the To text field.3. Click the Send button.
Attaching a File1. Click on the New Mail button2. Type in the User Name in the To field.3. In the Message field, type in any message you wish
to accompany the attached file.4. Click the Attach button to open the Attach File
dialog box.5. Click the Look in drop down list box to choose the
location of the saved document you are going to attach.
6. Once the document has been located and selected, click OK.
To Open an Attached file:1. Open the message containing the attachment. A message with an attachment will appear in the
bottom half of the mailbox. (If you are viewing your message from the web the attachment will appear in the mailbox with a small paper clip icon.)
2. Double click on the attachment or the paper clip icon (if viewing via the web)
Adding an Attachments (Shortcut!)1. Right click on the attachment icon.2. Select Send to.3. Choose GroupWise Recipient.
8

Checking the Status of Sent Messages
1. Click on the Sent Items folder to display the messages you have sent.
2. Right click on the message to view a hidden menu.
3. Choose Properties.
District E-Mail Out-of-District E-Mail
9
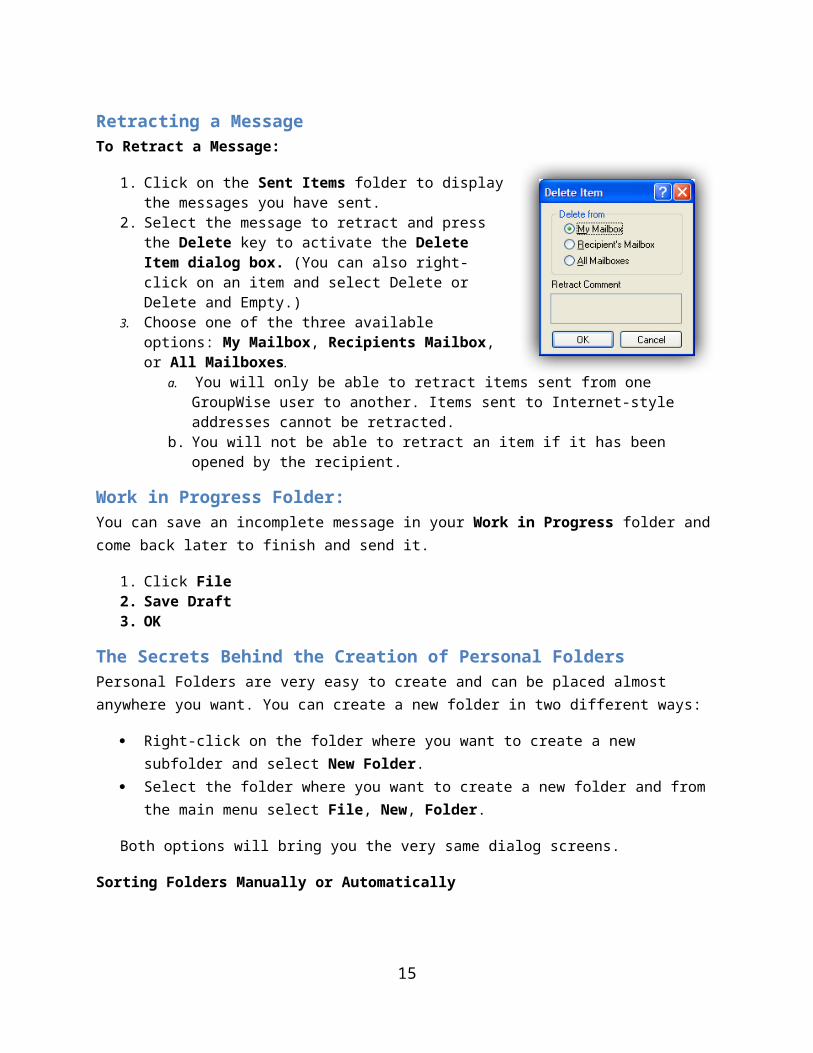
Retracting a MessageTo Retract a Message:
1. Click on the Sent Items folder to display the messages you have sent.
2. Select the message to retract and press the Delete key to activate the Delete Item dialog box. (You can also right-click on an item and select Delete or Delete and Empty.)
3. Choose one of the three available options: My Mailbox, Recipients Mailbox, or All Mailboxes.
a. You will only be able to retract items sent from one GroupWise user to another. Items sent to Internet-style addresses cannot be retracted.
b. You will not be able to retract an item if it has been opened by the recipient.
Work in Progress Folder:You can save an incomplete message in your Work in Progress folder and come back later to finish and send it.
1. Click File2. Save Draft3. OK
The Secrets Behind the Creation of Personal Folders Personal Folders are very easy to create and can be placed almost anywhere you want. You can create a new folder in two different ways:
Right-click on the folder where you want to create a new subfolder and select New Folder. Select the folder where you want to create a new folder and from the main menu select File,
New, Folder.
Both options will bring you the very same dialog screens.
Sorting Folders Manually or Automatically
You can create an unlimited number of folders in GroupWise either by using the menu option, File, New Folder or by right clicking on an existing folder object.
Here’s how you can sort your folders alphabetically:
Right click on any folder with unsorted subfolders. From the menu, select Sort Subfolders to Automatically sort all folders alphabetically. (The
Sort Subfolders option will only be available on folders with unsorted subfolders; otherwise this option is hidden.)
10

As long as all subfolders are sorted, any new subfolder will be inserted in alphabetical order automatically.
Select any folder with subfolders and check if the subfolders are sorted. If not, sort them as described above.
Right-click the parent folder and select New Folder and select a folder type. After clicking Next and entering the folder’s name, you will notice that as you start to type the
name, it will be moved to the correct location. It’s magic!
Moving Messages to Folders:
1. Select the message(s) you wish to move (multiple selection of messages that are not next to each other may be done by holding down the Ctrl key and clicking on the messages. To select messages that are next to each other, hold down the Shift key and click on the first and last message you want to move).
2. Click and drag the selected message(s) to the appropriate folder and release the mouse button.
Deleting Folders and Contents:
1. Select the folder you wish to delete and click the right mouse button.2. In the Delete options box, choose either Items only or Folder and items.3. Click OK.
Sharing FoldersYou may want to share a folder with a co-worker. Follow these steps:
1. Right click on the folder you wish to share.2. Click on Properties3. The Properties Dialog box will appear. Select the Sharing Tab.4. Choose the user you want to give access to your folder from the address book by double-clicking
on their name.5. Click OK.6. You should now see that individuals name in the Share List. Look at the bottom of the box. You
should see the words: Add, Edit, and Delete. You can click beside the words Add, Edit, and/or Delete to assign the access you want to give to that individual.
7. Click OK.8. The person given access will receive an email saying they have been given access to your folder.
They will then be prompted to install that folder.
11

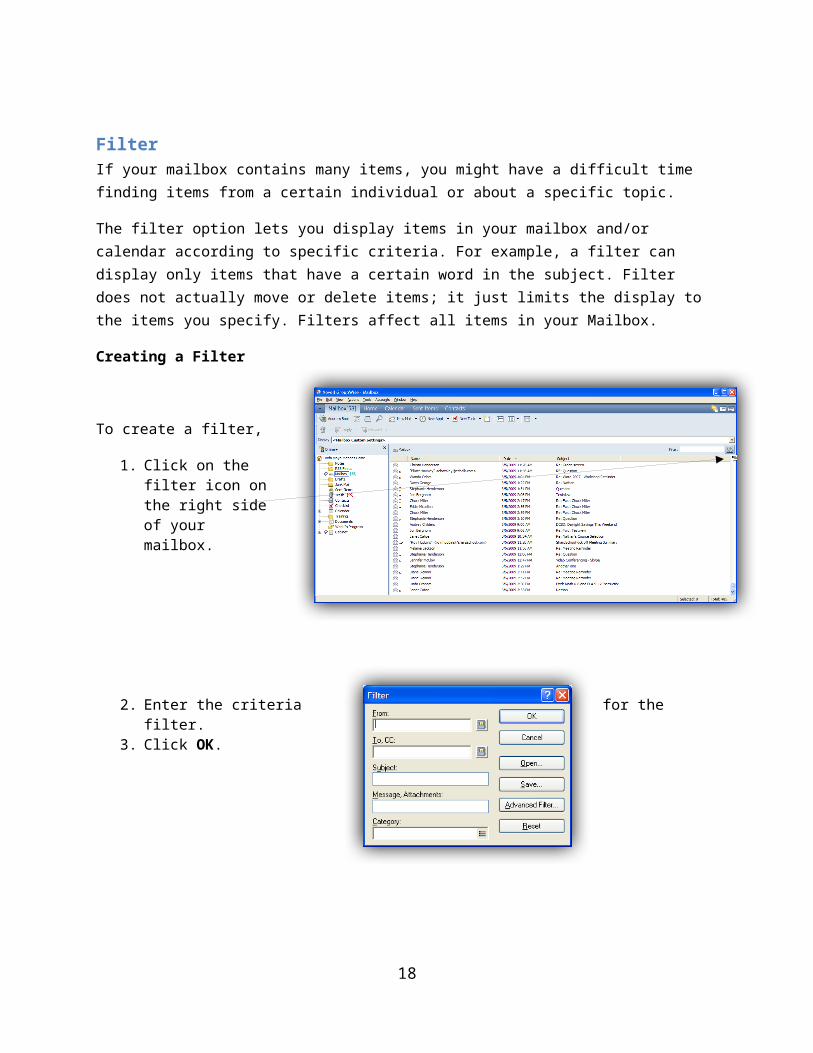
FilterIf your mailbox contains many items, you might have a difficult time finding items from a certain individual or about a specific topic.
The filter option lets you display items in your mailbox and/or calendar according to specific criteria. For example, a filter can display only items that have a certain word in the subject. Filter does not actually move or delete items; it just limits the display to the items you specify. Filters affect all items in your Mailbox.
Creating a Filter
To create a filter,
1. Click on the filter icon on the right side of your mailbox.
2. Enter the criteria for the filter. 3. Click OK.
When the filter is activated, the GroupWise items displayed in the item list match the defined filter. The filter icon changes to yellow when a filter is active.
To Clear a Filter
If you have a filter set, the filter icon is yellow. To clear it, click on the yellow Filter icon and select Clear Filter. Once you clear the filter, all the items reappear.
12

13

Saving a Filter
As you work with filters, you identify items that you filter frequently. You can save a filter to eliminate defining it each time you need to filter your GroupWise items. You can save the filter on the filter menu for quick access. Use the following steps to create a filter and save it to the filter menu.
1. Click on the Filter icon.2. Select Filter.3. Select the filter criteria.4. Save.5. Type a name for the filter and select Put on menu.6. Click OK.7. The filter is now active and displayed in the Filter menu.
Using the Find Feature in GroupWiseYou may need to locate an email from a particular person or dealing with a certain topic. (This will also work to locate email that you have sent to a person or email dealing with a certain topic.)
1. Go to Tools2. Click on Find…3. This dialog box will appear.4. You can choose to search for email To or From an
Author5. You can choose to search for email from Full Text or
Subject.Type either the subject or the author’s name in the appropriate box.
CalendarUsing the calendar, you can view your appointments, tasks, and reminder notes. This information can be displayed by day, week, month, or year.
Select the Calendar folder to open the Calendar view. The Calendar displays tasks, appointments, and notes for specific days.
14
Printing a CalendarYou can print a calendar in GroupWise by selecting File/Print Calendar.
The Print Calendar tabs let you establish the following:
Form: Allows you to specify the form type, size, and orientation. The type and size you select determines the available forms options.
Content: Lets you specify the font, starting date, number of days, and information to be included in the printed materials.
Options: Allows you to specify header, footer, and page printing options.
Scheduling an Appointment The calendar displays appointments you have created. To create an appointment for yourself, complete the following steps:
1. In the Calendar view, double-click the time-slot for the appointment.2. Enter the subject, location, and duration of the appointment.3. Click Post.
Emptying the TrashAll deleted items are stored in the Trash. Items in the Trash can be viewed, opened, or returned to your Mailbox until the Trash is emptied. (Emptying the Trash removes the items in the Trash from the system.)
Emptying the Trash
1. Right - click on the Trash can from the folder list.2. Click Empty Trash.
Deleting an Item from Your Mailbox
1. Select one or more items that you want to delete.2. Press the Delete key.3. If you delete a Sent Item the Delete Item dialog box displays. Select the appropriate Delete from
option, then click OK. (Deleted items are moved to your Trash and remain there until the Trash is emptied.)
15
Undeleting an Item in the Trash
1. Click on the Trash can from the folder list.2. Select the item or items you want to undelete.3. Click Edit.4. Click Undelete. The undeleted item is placed in the folder from which it was originally deleted. If
the folder no longer exists, the item is placed in your Mailbox. You can also restore an item by dragging it from the Trash to any other folder.
16
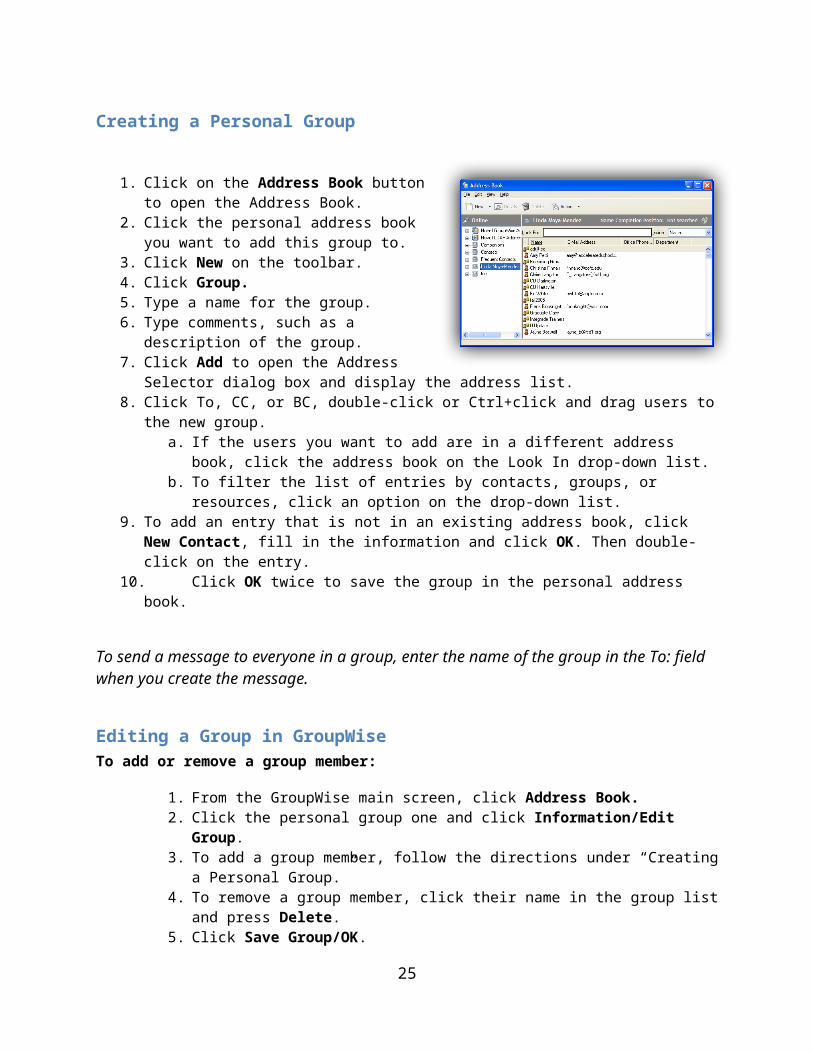
Creating a Personal Group
1. Click on the Address Book button to open the Address Book.
2. Click the personal address book you want to add this group to.
3. Click New on the toolbar.4. Click Group.5. Type a name for the group. 6. Type comments, such as a description of the
group.7. Click Add to open the Address Selector dialog
box and display the address list.8. Click To, CC, or BC, double-click or Ctrl+click and drag users to the new group.
a. If the users you want to add are in a different address book, click the address book on the Look In drop-down list.
b. To filter the list of entries by contacts, groups, or resources, click an option on the drop-down list.
9. To add an entry that is not in an existing address book, click New Contact, fill in the information and click OK. Then double-click on the entry.
10. Click OK twice to save the group in the personal address book.
To send a message to everyone in a group, enter the name of the group in the To: field when you create the message.
Editing a Group in GroupWiseTo add or remove a group member:
1. From the GroupWise main screen, click Address Book.2. Click the personal group one and click Information/Edit Group.3. To add a group member, follow the directions under “Creating a Personal Group.”4. To remove a group member, click their name in the group list and press Delete.5. Click Save Group/OK.
To delete a personal group:
1. From the GroupWise main screen, click Address Book.2. Click the personal group name once and click Remove.3. When GroupWise asks, “Are you sure you want to delete the selected address book item?”
Click Yes.
Archive – File Location and CleanupArchive moves items from your GroupWise mailbox and saves them in a place you specify on your computer’s hard drive. Use archive to save messages you need to keep but don’t want cluttering up your inbox.
17
You can view archived items whenever you need to. You can also un-archive any archived item. When you archive an item you have sent, you will not be able to tract the status of that item.
To archive an item in your mailbox, you must first define the archive directory. When you archive an item, it is placed in the same folder in the archive directory. The folder is automatically created for you.
How to Set Up an Archive Path
1. Click on Tools, then Option.2. Double-click the Environment icon.3. Click the File Location tab.4. Specify the location of your archive directory in the Archive Directory text box. For example,
C:\GWARCHIVE saves the archive on the C: or hard drive of your hard drive of your computer.
5. Click the Cleanup tab.6. To have GroupWise automatically archive all items left in your Mailbox, click the
Autoarchive radio button and specify the number of days.7. Click OK.
GroupWise items can be archived manually or automatically.
How to Manually Archive an Item in Your Mailbox
1. Select the items in your Mailbox, or a folder, you want to archive.2. Press Ctrl-A to select them all.3. Hold down the Ctrl key and click on items to select more than one.4. Hold down the shift key to select a range of items.5. Click Actions, then Archive. The file(s) are no longer displayed in the mailbox or folder. You
can view the file (or retrieve it) from the archive directory.
How to Retrieve Items From an Archive
1. In the Main Window click File, then Open Archive. A check mark appears by Open Archive in this File Menu when the archive is open.
2. All of the folders and items in your archive file are displayed.3. To return to your mailbox, exit the archive by repeating step 1. The check mark is
(You can’t get to an archived item from Web access.)
GroupWise Notify If you want GroupWise to notify you each time you have a new message follow these steps:
1. Click on Tools2. Click on Options3. Chick on Environment4. Click in the box beside Launch Notify at Startup
18
RulesRules can be used to automate several processes, including the following:
Moving messages to the desired folder Replying to messages Deleting messages
Creating a Rule (The Ultimate “Out-the-Office” Rule)
Creating an “Out-Of-Office” rule is a nice courtesy to inform your co-workers that you are not completely available for a certain period of time. You can send an automatic reply to any e-mails received that may say something like, “I’m away for this period of time and will be back in the office at such a time. If you need to speak to someone contact this person at 555-555-5555”.
To create a rule, complete the following steps:
1. Select Tools/Rules. The Rules dialog box appears. This lists all rules created for the mailbox.2. Click New.3. In the Rule Name Line, enter a name. In this
case the rule name will be Out of the Office.4. From the When Event Is drop-down list, select
an event to trigger the rule. Choose New Item. And in the next part select Received. Make sure no other item source is selected.
5. Do not make any selections under Item Types.6. In the If Conditions are (optional) section, on
the left, select the type of messages that this rule should respond to. If you don’t select anything, all items types will be included.
7. The most important part of creating this type of rule is to define proper conditions. Click on the Define Conditions button.
a. If you want to set up the dates during which the rule is in effect – Click Define Conditions, click Delivered in the first drop-down list, click On or After Date in the second drop-down list, then in the date field, select the date you are leaving on vacation. Click the End pop-up list, then click And. On the new line, click Delivered in the first drop-down list, click On or Before Date in the second drop-down list, in the date field, select the date you are returning from vacation. Click OK.
b. If you want to make sure you reply only to items that you sent specifically to you (and not to list servers or newsgroups) – Click Define Conditions. If you have already specified information in this dialog box, click the End pop-up list, then click And. On the new line click To in the first drop-down list, click [ ] Contains in the second drop-down list, then in the next field, type your name as it displays in the To field of a mail message.
8. Under Then Actions Are, click Add Action.9. Click Reply… and then click OK.
19

10. In the Reply dialog box, enter a short and sweet message, preferably identifying a co-worker who will take care of your business while you are away.
11. Click OK to return to the New Rule dialog box.12. Click Save. Verify that the rule has a check mark next to it indicating that it is enabled.13. Click Close.
Creating a Rule so that Messages from an Individual are Delivered to a Pre-Determined Folder
1. Select Tools/Rules. The Rules dialog box appears.2. Click New. 3. In the Rule Name Line, enter a name. In this case name it the name of one of your folders in
folder list of your mailbox.4. From the When Event Is drop-down list, select an event to trigger the rule. Choose New Item.
(Item Received)5. Item Type: Mail.6. Define Conditions7. To: and then (your name)8. Add Actions: Move to Folder (choose a folder from your folder list)9. Save.
Enabling/Disabling a Rule
To enable or disable a rule, do the following:
1. Select Tools/Rules.2. Click the rule you want to enable or disable.
Click Enable or Disable.
Preventing Rule Loops
If you have created and activated your “Out-of-Office” rule it could cause problems that you need to be aware of. If your mailbox sends an automated reply to another person who is also away, and who has set up a similar rule, this other person’s rule will be activated and will send you an “I’m away….” Reply. You mailbox will receive this message, and your “Away” rule will be activated and we now have the perfect “reply loop”. This occurs when tow mailboxes keep sending each other messages until the end of time, if nobody does anything to stop it. Versions 6.5 and 7.0 of GroupWise include some mechanisms to make sure that rules won’t loop. The design of the rule engine will make sure that your “away” message will be sent out only once to each sender, even if you will be away for weeks or months. Although this is a good feature be aware that if someone sends you a message and receives an “away” reply stating that you will be out for 6 weeks on maternity leave and then sends another message a few weeks later, he or she will not get another “away” message again and might be annoyed with you for not answering, forgetting that you are out for an extended period of time.
20

Group LabelsGroupWise 7.0 offers an option which allows you to add Group Labels to your Mailbox view. This option will automatically categorize your mail in categories such as Today, Yesterday, or any other date in the past.
To activate this option
Right-click on the Mailbox folder and click on Properties. Go to the tab called Display. Locate the Show Group Labels checkbox and enable it. Click OK to activate these changes.
This way, it will be easier and more rewarding to keep your Mailbox clean.
TIP: You can also enable or disable the Show Group Labels option by right-clicking on the second or third column of an item. Do not right-click on the first column, because it will offer a lot of other options!
Address BooksThe Address Selector – Your First Point of Contact
Although the full address book has the most features, most people use the Address Selector far more often. It is a simple tool. You might class it an address book “light”, but it includes some nifty little features. To access it:
1. Create any new item.2. Click on the Address button in the item.
Features of the Address Selector
1. The Look in drop down allows you to select the address book you want to search for your contacts.
2. The Look for is actually linked to the Match drop down, where you can select the field, such as the first or last name.
3. The Address List includes a filter icon on the right (the two circles). If you click here, you can filter on Contacts, Groups, Resources, or go back to All Entries again.
4. The columns in the list view can be changed; you can add columns by right-clicking on the column header and you can also easily sort by clicking on the desired column.
5. At the bottom, you will find buttons to add a New Contact or to view or edit the Details.6. If you double-click on a contact in the list, it will be added to the Selected list on the right; either
to the To, the CC, or the BC group, depending on which button above the top of the Selected list is currently active.
21
7. The Remove button will remove an entry from the selected list, but won’t delete it from the address book. (TIP: You can also double-click on any entry in the Selected list to remove it from the list.)
Contacts
The Contacts folder offers another way of looking at the address book data. The Contacts folder is a part of the normal folder list and can be used to select, add, and edit address book entries without opening a new separate window for the full Address Book. This folder has all the important features of any GroupWise folder such as sorting, adding or removing columns. Unfortunately, by default this folder is connected to the Frequent Contacts address book folder. You will see too many addresses that you really don’t want to see and they are cluttering all the more important data. You can change it by following these steps:
1. Select the Contacts folder.2. Right-click to open Properties.3. On the General tab you have the option to connect any other address books to the folder
Contacts.
Features of the Contacts Folder
The Contacts folder is a powerful resource. If you right-click on any of your contacts you will receive a list of options. One of the most powerful features is the History tab. The History tab will present you with a summary of all the mail that you have ever sent to or received from this contact. All incoming and outgoing mail will be there. Even the QuickViewer is available and displays any message body or attachments immediately.
Creating/Deleting Additional Address BooksInteresting Features of the Old Style Address Book
1. You can add as many address book tabs or folders as you like.2. The New button allows you to add new contacts, groups, or resources, but not new address
book folders. You have to go to File>New Book to add another address book folder.3. Auto name completion works by default for only the main address book and Frequent Contacts.
You have to set it up to work for any other address books. To add it to another address book:a. From the address book menu select Fileb. Click on Name Completion Search Order.c. You can add the address book to the Selected Books section and use the Up and Down
buttons to change the order they are searched.
22
You can create additional address books by simply following these steps:
1. Open your address book.2. Click on File.3. Click on New Book.4. Name your book.
To delete address books that you no longer intend to use, follow these steps:
1. With your address book open click on File.2. Choose Delete Book.3. A Delete Address Book dialog box will appear. Choose the name of the address book you wish
to delete from the list. 4. Click OK
You will get a message saying that deleting this address book will delete all the information contained in that book and that it cannot be restored. Make sure that you have selected the correct address book and click Yes.
Frequent Contacts – A Blessing or a Curse By default, your GroupWise client will store every recipient to which you send an e-mail or reply to automatically, to your Frequent Contacts address book. You can even let GroupWise add every sender to your Frequent Contacts, and option we don’t encourage.
Perhaps one of the best benefits of this dialog box, and one you should consider setting up, is the last option: “Delete addresses not referenced within time period”. If you haven’t sent an e-mail to someone in about 6 months, should you not get rid of the address anyway?
23
Distribution Lists You might have used distributions lists which have been defined by your GroupWise administrator in the system address book. You can also create your own distribution lists and store them in any of your existing address books.
But, did you ever see the little plus sign in front of your address book and wondered “what’s that for?”. Well, it won’t be useful if you don’t have any distribution lists defined, but if you create one or more distribution lists and then click on one, you can actually see that the distribution list will be shown below. And if you click on any expanded distribution list in the address book, you will see the members of that list.
GroupWise Web AccessYou can check your GroupWise e-mail from any web browser.
1. Go to the URL http://www.darlington.k12.sc.us in a web browser.2. Click on E-Mail.3. Type in your User Name in the Name box.4. Type your password in the Password box.5. Click the Login button.6. Read your messages by clicking on the links.
If you are unable to access your email via the Web you need to set up a password in GroupWise from your school or office computer.
Your email address:
The email address for DCSD employees in GroupWise is:
Your login name plus @darlington.k12.sc.us
24
Common GroupWise Keystrokes Keystroke Action
F1 Open online helpF2 Search for textF4 Open the selected textF5 Refresh the viewF8 Mark the selected item PrivateF9 Open the Font dialog boxCtrl+A Select all items; select all textCtrl+B Bold textCtrl+C Copy textCtrl+I Italicize textCtrl+L Attach a file to a messageCtrl+M Open a new mail messageCtrl+N Normal textCtrl+O Open the selected messageCtrl+P Open the Print dialog boxCtrl+Q Turn the Quick Viewer on and offCtrl+S Save a draft in the Work in Progress folderCtrl+U Underline textCtrl+V Paste selected textCtrl+Z Undo the last itemCtrl+F1 Open the Spell CheckerCtrl+Shift+L Insert numbered or bulleted list
25

Sources:The GroupWise Powerguide by Erno de Korte
Novell GroupWise 7 - Windows Client User Guide
26


