36
GST e-Filing User Guide

GST e-Filing User Guide

Contents 1. Overview .............................................................................................................. 1
2. EASY .................................................................................................................... 2
2.1 Introduction to EASY....................................................................................... 2
2.2 Flowchart for first time e-Filers........................................................................ 2
2.3 What you will need.......................................................................................... 3
2.4 Hardware / Software Requirements ................................................................ 3
2.5 Steps to authorise staff/third party .................................................................. 4
2.6 Steps to authorise my staff to act for my clients............................................ 10
2.7 Delete record in EASY .................................................................................. 14
3. e-Filing of GST F5 for Your Business ............................................................. 16
3.1 Steps to retrieve GST F5 .............................................................................. 16
3.2 Completing GST F5 ...................................................................................... 20
3.3 Printing acknowledgement page for GST F5 ................................................ 21
4. e-Filing of GST F5 on behalf of Your Client……………………………………...22 4.1 Steps to retrieve GST F5 .............................................................................. 22
4.2 Completing GST F5 ...................................................................................... 27
4.3 Printing acknowledgement page for GST F5 ................................................ 28
5. Request for GST F7 .......................................................................................... 29
5.1 Steps to request for GST F7 ....................................................................... ..29
5.2 Completing GST F7 ...................................................................................... 32
5.3 Printing acknowledgement page for GST F7 ................................................ 33
6. Frequently Ask Questions (FAQ)..................................................................... 34

1
1. Overview
This user guide aims to provide a step-by-step guide to assist taxpayers in
authorising their staff or third party (e.g. tax agent) through e-Services Authorisation
System (“EASY”) and e-Filing their GST returns via myTax Portal. It will also
include steps to request for GST F7 -“Disclosure of Errors on GST Return”.

2. EASY
2.1 Introduction to EASY
e-Services Authorisation System (“EASY”) is an online system that allows
organisations to authorise staff or third parties (e.g. Tax Agent) to access: -
I. IRAS’ e-Services (such as IR21, Corp ECI, GST etc)
II. Other government agencies’ e-Services (JTC, ICA, AGD, SCFD, LTA etc)
You must authorise at least 1 Approver for GST matters in order to e-File your GST
returns.
2.2 Flowchart for first time e-Filers
2

2.3 What you will need
I. Your organization’s tax reference number (e.g. UEN no. 200312345A)
II. Your organization’s e-Services Access Code (issued by IRAS to the business).
If you do not have an Access Code, please retrieve the application form for
the e-Services Access Code, by visiting https://mytax.iras.gov.sg/EASY.
III. Your personal tax reference number (e.g. S1234567A)
IV. Your personal SingPass or IRAS Pin
2.4 Hardware / Software Requirements
I. Minimum Hardware Requirements: Pentium III PC and above with 256 MB
RAM (Macintosh system is not supported) 56kbps modem with connection to
a local ISP.
II. Minimum Software Requirements: Operating system Windows 2000 or
higher Internet Explorer 5.5 or higher / Netscape Navigator 6.2 or higher.
Mozilla Firefox browser is not compatible.
Note: Your browser must be able to execute Java and Java scripts. For more details
on executing Java and Java scripts, please visit
http://www.iras.gov.sg/irasHome/page.aspx?id=4226#A9
It is recommended that you clear your browser's cache, and close all other
applications that are running in your PC to free up memory space.
For instructions on how to clear ‘cache’ (temporary internet files), please visit
http://www.iras.gov.sg/irasHome/page.aspx?id=4226#A11
3

2.5 Steps to authorise staff/third party 2.5 Steps to authorise staff/third party
If you have done the authorisation before, please proceed to Section 3, on steps to
retrieve GST F5. Otherwise, please follow the steps below.
If you have done the authorisation before, please proceed to Section 3, on steps to
retrieve GST F5. Otherwise, please follow the steps below.
Logging in to EASY at https://mytax.iras.gov.sg/EASY Step 1: Select either <SingPass> or <IRAS PIN> NOTE: SingPass is your common password which allows you to transact with the Government online. IRAS PIN is a personal identification number and password issued to individual taxpayers to access IRAS e-Services at myTax Portal and e-Services Authorisation System (EASY).
Step 2.1 (For SingPass Login): <SingPass ID> - Enter your NRIC no. (e.g. S1234567A) <SingPass> - Enter your SingPass password. Click on <Submit>.
4

Step 2.1 (Continue): <My Organisation Reference No.> - Select organisation reference type from the dropdown list. - Enter your organisation tax reference number. <e-Services Access Code> - Enter the e-Services Access Code issued by IRAS. Click on <Log in>. IMPORTANT: Please ensure that you have entered the correct Organisation reference type, Reference Number and e-Services Access Code as specified on your e-Services Access Code mailer. Please note that e-Services Access Code password is case-sensitive.
Step 2.2 (For IRAS PIN Login): <My Tax Reference No.> - Select your personal tax reference type from the dropdown list. - Enter your personal tax reference number. <My IRAS PIN> -Enter your IRAS PIN <My Organisation Reference No.> - Select organisation reference type from the dropdown list. - Enter your organisation tax reference number. <e-Services Access Code>- Enter the e-Services Access Code issued by IRAS. Click on <Log in>.
5

Step 3: - Enter <Access Code> issued by IRAS. Change to a new Access Code of your choice. Click on <Save>. NOTE: You will be prompted to change your Access Code if you are using your Access Code for the 1st time. If you have changed your Access Code before, please proceed to step 5. IMPORTANT: New Access Code is case-sensitive and should be made up of exactly 8-alphanumeric characters (example: 12remPin or Abcd1234).
Step 4: Click on <OK>. IMPORTANT: Do not close the Internet browser before clicking on <OK>.
6

Step 5.1 (To Authorise Staff): - To authorize staff, click on <Staff>.
Step 5.1 (Continue): <Staff Tax Reference No.>- Select your staff’s tax reference type from the dropdown list. - Enter your staff’s tax reference number. <Agency/Ministry> - Select “Inland Revenue Authority of Singapore (IRAS). - Click on <Next>. IMPORTANT: For Staff Tax Reference No., if NRIC is selected, enter a prefix “S” or “T”. If FIN is selected, enter a prefix “F” or “G”.
7
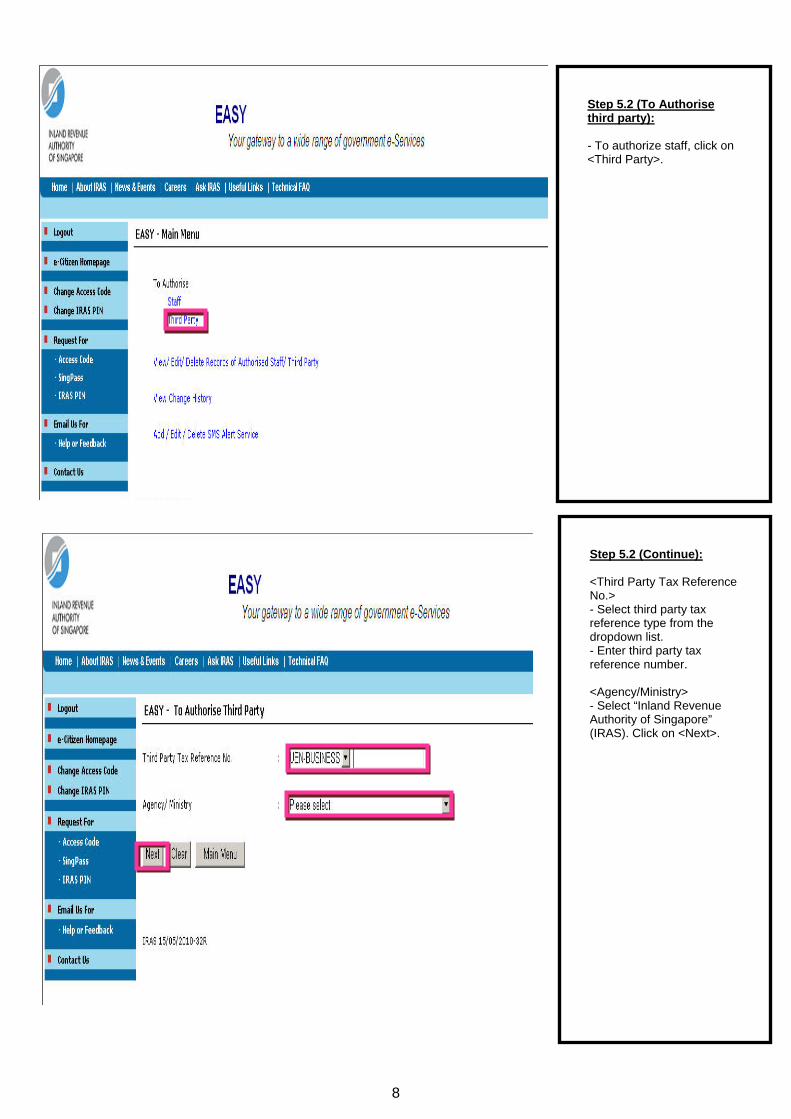
Step 5.2 (To Authorise third party): - To authorize staff, click on <Third Party>.
Step 5.2 (Continue): <Third Party Tax Reference No.> - Select third party tax reference type from the dropdown list. - Enter third party tax reference number. <Agency/Ministry> - Select “Inland Revenue Authority of Singapore” (IRAS). Click on <Next>.
8

Step6: <GST Matters> - Click on <GST matters> checkbox <Effective Date From>
- Click on the calendar icon and select today’s date. <Effective Date To>
- This is optional. You may leave the field blank. If the <Effective Date To> is entered, the authorised staff will not be able to access the e-services (including e-filing) on behalf of the company from that date. <e-Filing of Returns> and <Role>
- Click on <e-Filing of Returns> checkbox to authorise staff for e-filing.
- Select the <Role> as Preparer or Approver.
Please note you can only authorise third party as Approver. <Payment/Refund/Giro/Account Summary> - Click on <Payment/Refund/Giro/Account Summary> checkbox to authorise staff to view the account status (i.e. payable/refundable) and print the statement of account of the company.
IMPORTANT: A Preparer can only prepare the GST return(s). He / She cannot submit the return to IRAS. An Approver can prepare and submit the return. There must be at least 1 Approver.
9
2.6 Steps to authorise my staff to act for my clients
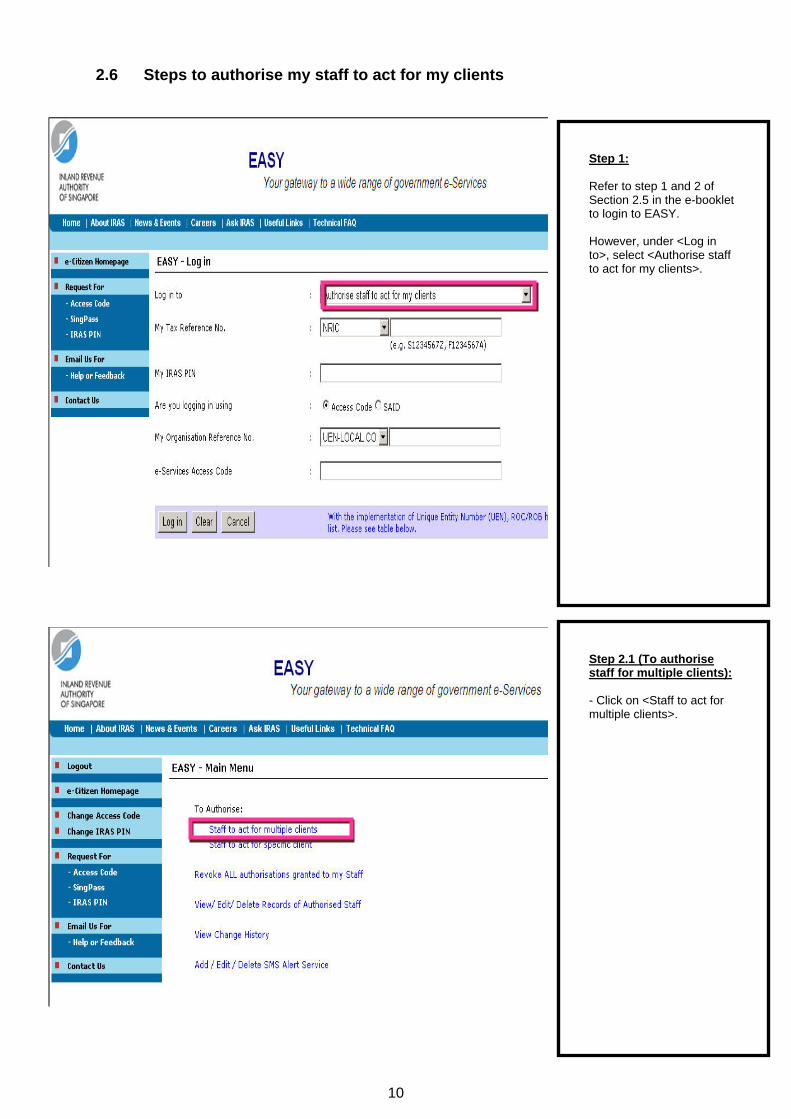
Step 1: Refer to step 1 and 2 of Section 2.5 in the e-booklet to login to EASY. However, under <Log in to>, select <Authorise staff to act for my clients>.
Step 2.1 (To authorise staff for multiple clients): - Click on <Staff to act for multiple clients>.
10

Step 2.1 (Continue): <Staff Tax Reference No.>Select your staff’s tax reference type from the dropdown list. Enter your staff’s tax reference number. <Agency/Ministry> Select “Inland Revenue Authority of Singapore” (IRAS). Click on <Next>. IMPORTANT: For Staff Tax Reference No., if NRIC is selected, enter a prefix “S” or “T”. If FIN is selected, enter a prefix “F” or “G”.
Step 2.1 (Continue): <GST Matters> - Click on <GST matters> checkbox <Role> - Select Preparer or Approver. <Client Tax Reference No.> - Select your client’s tax reference type from the dropdown list. - Enter your client’s tax reference number. Click on <Add>. Please note that a maximum of 10 clients can be added. To remove a client from list, you can click on <Remove> beside the clients’ tax reference number. Once you added the relevant clients for this staff, click on <Save>.
11

Step 2.2 (To authorise staff for specific clients): - Click on <Staff to act for specific client>.
Step 2.2 (Continue): <Client Tax Reference No.> - Select your client’s tax reference type from the dropdown list. - Enter your client’s tax reference number. Click on <Add>. <Staff Tax Reference No.> - Select your staff’s tax reference type from the dropdown list. - Enter your staff’s tax reference number. < Agency/Ministry> - Select “Inland Revenue Authority of Singapore (IRAS). Click on <Next>.
12
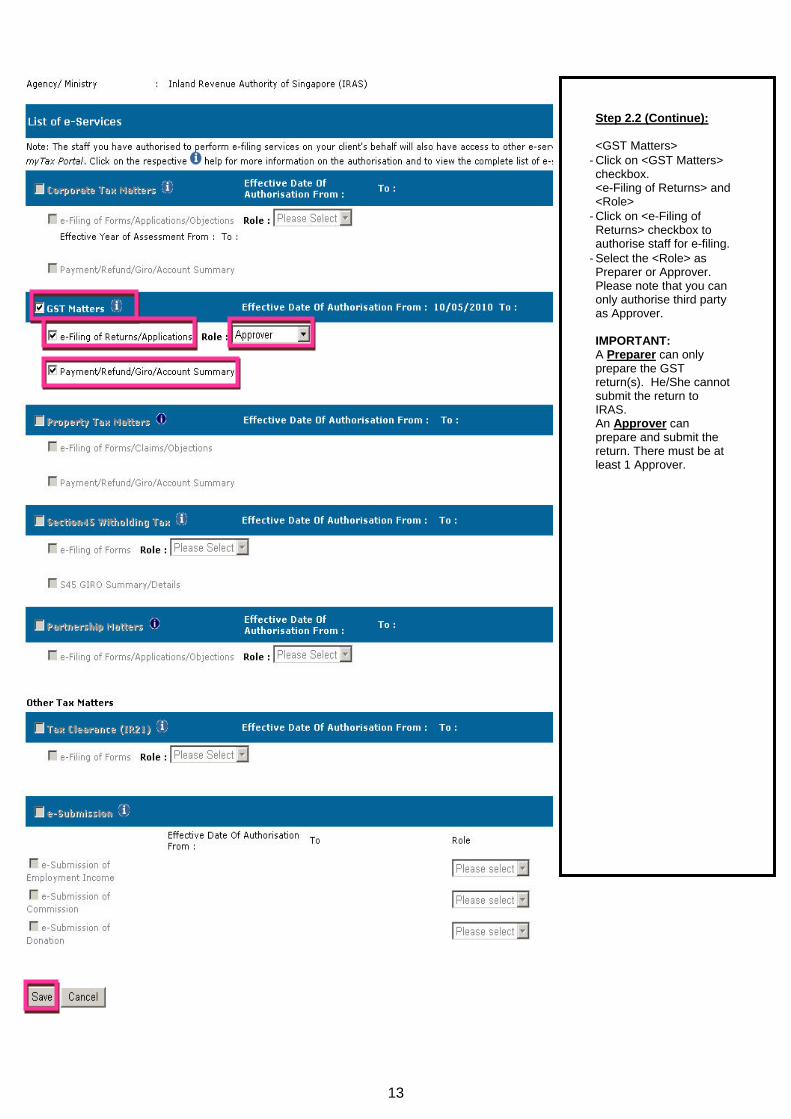
Step 2.2 (Continue): <GST Matters>
- Click on <GST Matters> checkbox. <e-Filing of Returns> and <Role>
- Click on <e-Filing of Returns> checkbox to authorise staff for e-filing.
- Select the <Role> as Preparer or Approver. Please note that you can only authorise third party as Approver. IMPORTANT: A Preparer can only prepare the GST return(s). He/She cannot submit the return to IRAS. An Approver can prepare and submit the return. There must be at least 1 Approver.
13

2.7 Delete record in EASY
Step 1: Click on <View/ Edit/ Delete Records of Authorised Staff/ Third Party> Note: You can use this feature to: - View the authorised staff/ third party filing GST return(s) for the company. - Change the role of a person from Preparer to Approver and vice versa. - Delete the record of an authorised person (e.g.: staff who has left the company).
Step 2: Click on <View All>.
14

Step 3: Click on the checkbox against the record to be deleted. Click on <Delete Record>.
15

3. e-Filing of GST F5 for Your Business 3.1 Steps to retrieve GST F5
Logging in to myTax Portal at - Go to https:// mytax.iras.gov.sg Step 1: - Select I am logging in for <My Organisation’s/Business Tax Matters>.
Step 2.1 (SingPass Login): - Click on <SingPass>. - Enter <SingPass ID> and <SingPass>.
16

Step 2.1 (Continue): Enter <My Organisation Tax Reference Number> Click on <login>.
Step 2.2 (IRAS Pin Login): - Click on <IRAS PIN> - Enter <Tax Reference no> and <IRAS PIN>. - Enter <My Organisation Tax Reference number>.
17
Important: - Please ensure that you have entered the correct organisation type and tax reference number of your business.
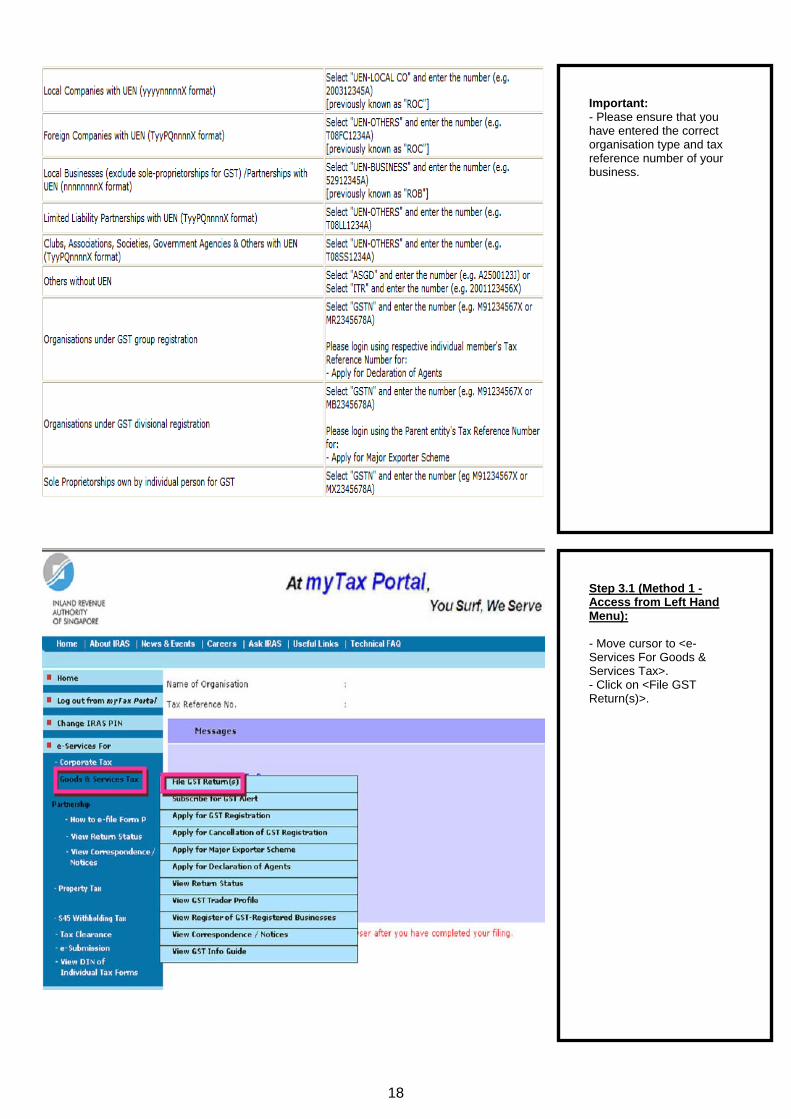
Step 3.1 (Method 1 -Access from Left Hand Menu): - Move cursor to <e-Services For Goods & Services Tax>. - Click on <File GST Return(s)>.
18

Step 3.2 (Method 2 -Access from What I Need To Do): - Click on <What I Need to Do> - Click on <File form/return>.- Click on <File my GST return(s)>.
Step 4: - Click on <GST F5> to retrieve return for the respective accounting period.
19

3.2 Completing GST F5
Step 5.1 (Important checklist when completing GST F5): Do not leave any of the boxes blank. If figure is NIL, enter <0>. Do not put symbols $()/ # etc.Negative figures can be filled with a negative sign. If form is incomplete, the form cannot be submitted. You may refer to the “Checklist of Completing GST Return” here to find out how to complete your GST returns correctly. Step 5.2 (Declaration): - Fill in designation, contact person’s name & contact no - Click on <Submit> - Click <ok> to continue.
20
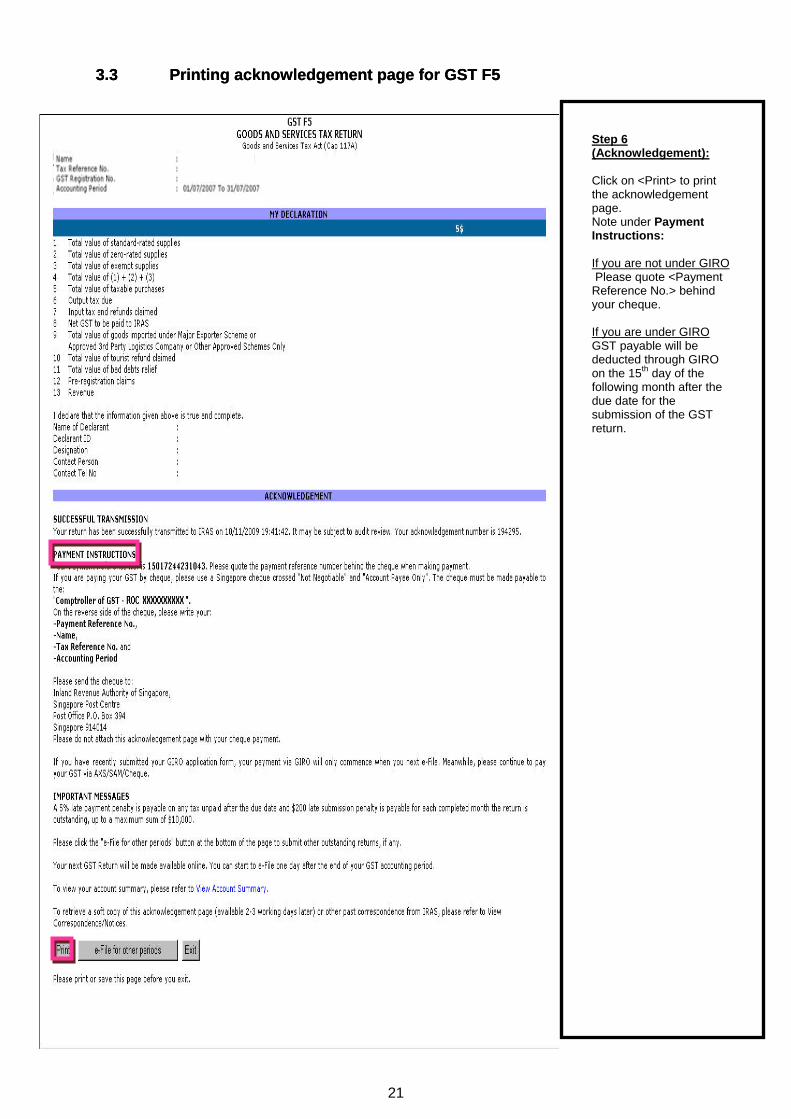
3.3 Printing acknowledgement page for GST F5 3.3 Printing acknowledgement page for GST F5
Step 6 (Acknowledgement): Click on <Print> to print the acknowledgement page. Note under Payment Instructions: If you are not under GIRO Please quote <Payment Reference No.> behind your cheque. If you are under GIRO GST payable will be deducted through GIRO on the 15th day of the following month after the due date for the submission of the GST return.
21
4. e-Filing of GST F5 on behalf of Your Client 4. e-Filing of GST F5 on behalf of Your Client
4.1 Steps to retrieve GST F5 4.1 Steps to retrieve GST F5
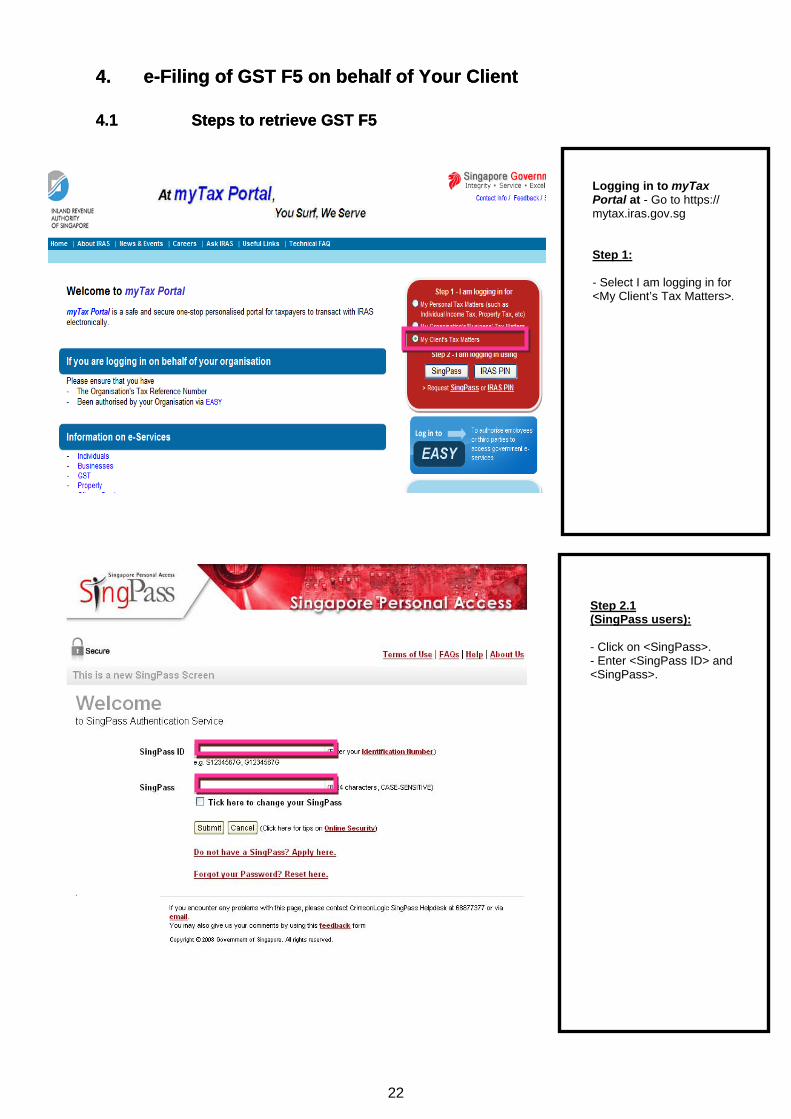
Logging in to myTax Portal at - Go to https:// mytax.iras.gov.sg Step 1: - Select I am logging in for <My Client’s Tax Matters>.
Step 2.1 (SingPass users): - Click on <SingPass>. - Enter <SingPass ID> and <SingPass>.
22

Step 2.1 (Continue): - Enter <My Organisation Tax Reference Number> - Click on <login>.
Step 2.2 (IRAS Pin users): - Click on <IRAS PIN> - Enter <My Tax Reference no> and <IRAS PIN> - Enter <My Organisation Tax Reference number> - Click on <login>.
23

Step 3.1 (Method 1 -Access from Left Hand Menu): - Move cursor to <e-Services For Goods & Services Tax>. - Click on <File GST Return(s)>.
Step 3.1 (continue): - Enter <Tax Reference no>- Click on <Retrieve>
24

Step 3.2 (Method 2 -Access from What I Need To Do): - Click on <What I Need to Do> - Click on <File form/return>. - Click on <File my GST return(s)>.
Step 3.2 (continue): - Enter <Tax Reference no>- Click on <Retrieve>
25

Step 4: - Click on <GST F5> or <GST F7> to e-file.
26

4.2 Completing GST F5
Step 5.1 (Important checklist when completing GST F5): Do not leave any of the boxes blank. If figure is Nil, enter <0>. Do not put symbols $()/# etc. Negative figures can be filled with a negative sign. If form is incomplete, the form cannot be submitted. You may refer to the “Checklist of Completing GST Return” here to find out how to complete your GST returns correctly. Step 5.2 (Declaration): - Fill in designation, contact person’s name & contact no.
- Click on <Submit> - Click <ok> to continue.
27
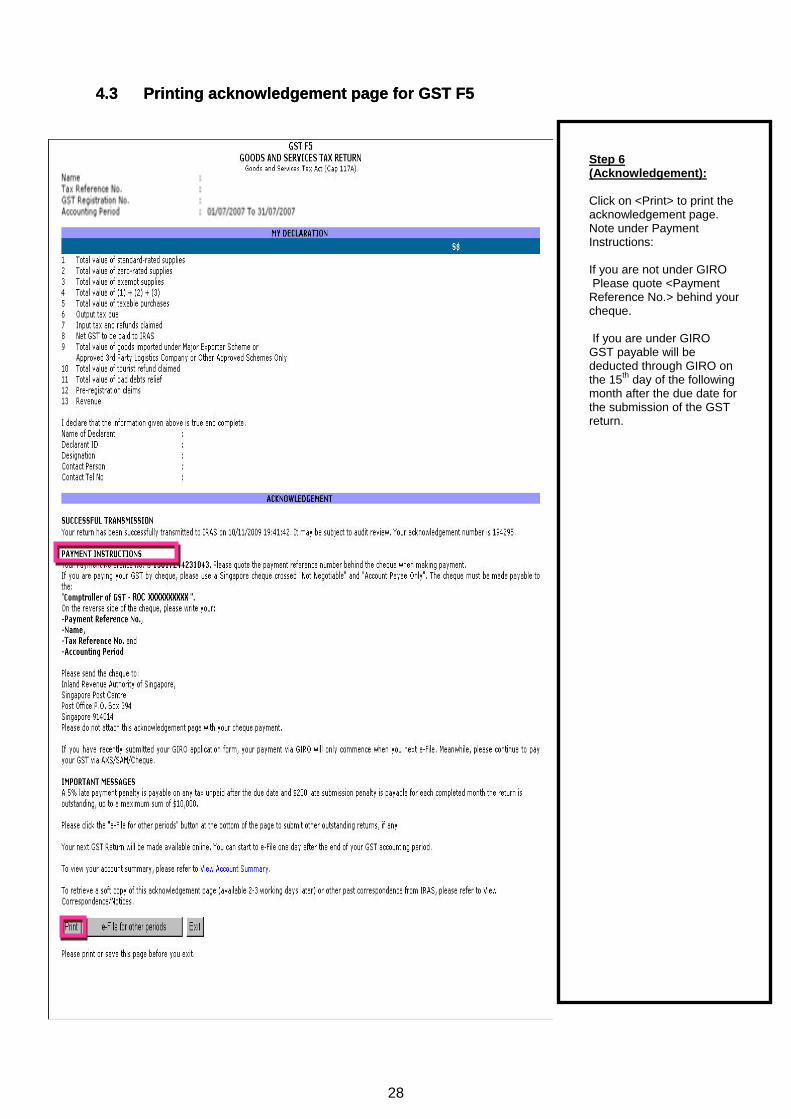
4.3 Printing acknowledgement page for GST F5 4.3 Printing acknowledgement page for GST F5
Step 6 (Acknowledgement): Click on <Print> to print the acknowledgement page. Note under Payment Instructions: If you are not under GIRO Please quote <Payment Reference No.> behind your cheque. If you are under GIRO GST payable will be deducted through GIRO on the 15th day of the following month after the due date for the submission of the GST return.
28

5. Request for GST F7 5.1 Steps to request for GST F7 What is GST F7? If you have made a mistake in your past GST return(s), you can correct the error(s)
by submitting a "Disclosure of Errors on GST Return", i.e. GST F7 return, for the
affected prescribed accounting period(s). GST F7 can be requested via myTax
Portal.
To find out more about GST F7, please access
http://www.iras.gov.sg/irasHome/page04.aspx?id=678.
Step 1: - Move cursor to <e-Service For Goods & Services Tax>.- Click on <File GST Return(s)>.
29

Step 2: - Click on <Request for GST F7>.
Step 3: - Click on <Request for GST F7> - Enter the <Accounting Period From> and <Accounting Period To>. Click on <Continue>. <Accounting Period From>- Enter the start date of the GST F7 in dd/mm/yyyy format. <Accounting Period To> - Enter the end date of the GST F7 in dd/mm/yyyy format.
30

Step 4: - Click on <E-File> to continue with filing the requested GST F7. - Click on <Request for GST F7> to request for GST F7 of other accounting periods. Repeat Step 2 above.
31

5.2 Completing GST F7
Step 5.1 - Important checklist when completing GST F7: It is Compulsory to give a description of errors. Do not leave any of the boxes blank. If figure is Nil, enter <0>. Do not put symbols $()/ # etc.Negative figures can be filled with a negative sign. Step 5.2 - Declaration: Fill in designation, contact person’s name & contact no - Click on <Submit> - Click <ok> to continue.
32
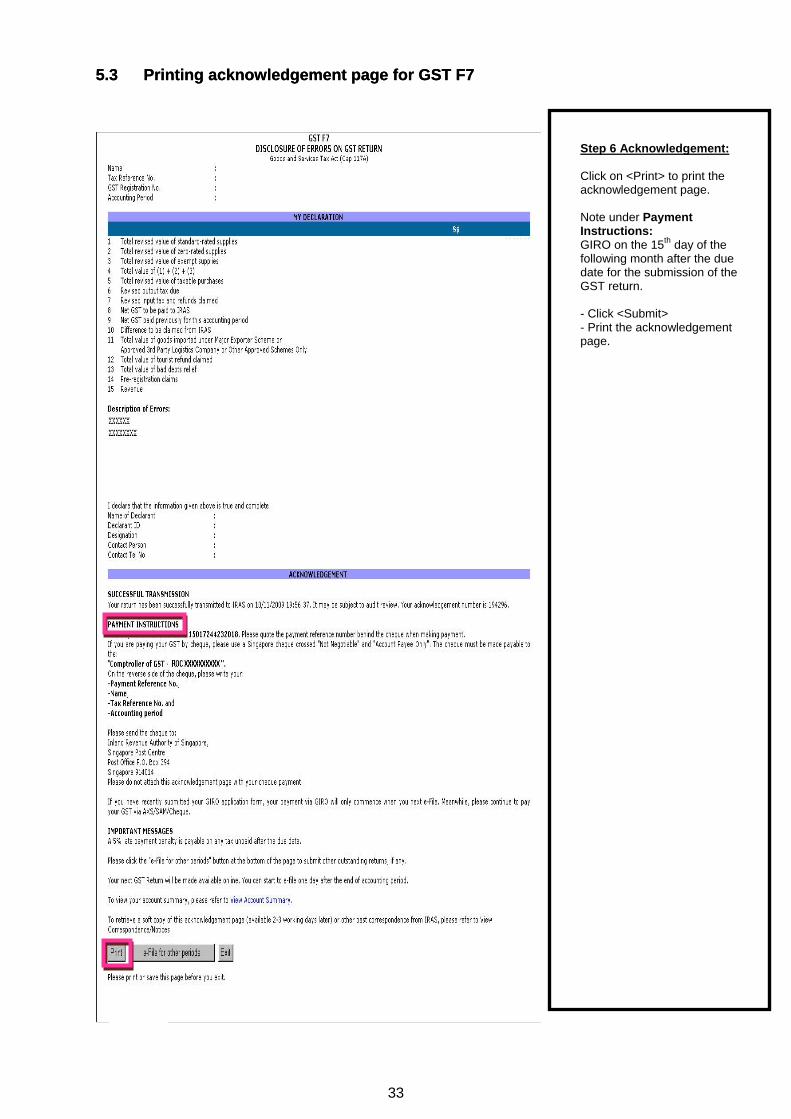
5.3 Printing acknowledgement page for GST F7 5.3 Printing acknowledgement page for GST F7
Step 6 Acknowledgement: Click on <Print> to print the acknowledgement page. Note under Payment Instructions: GIRO on the 15th day of the following month after the due date for the submission of the GST return. - Click <Submit> - Print the acknowledgement page.
33
6. Frequently Ask Questions (FAQ)
For EASY
Please visit the following website for FAQ on EASY.
http://www.iras.gov.sg/irasHome/page.aspx?id=4226#A11
For e-filing of GST returns
Please visit the following website for FAQ on e-filing of GST returns.
http://www.iras.gov.sg/irasHome/uploadedFiles/Quick_Links/e-Services/Goods_and_Services_Tax/faq-filing.doc
34


