Page 1
Page 1 of 25
HDDSURGERY Milutina Milankovića 1E, 11070 Belgrade, Serbia phone +381 11 2683526 www.hddsurgery.com [email protected] Tools for data recovery experts
Tools for data recovery experts
Guide for using HddSurgery™ head change tools:
HDDS Sea 2.5" Slim set
Page 2
Page 2 of 25
HDDSURGERY Milutina Milankovića 1E, 11070 Belgrade, Serbia phone +381 11 2683526 www.hddsurgery.com [email protected] Tools for data recovery experts
Table of contents:
1. Introduction page 3
2. HddSurgery™ Sea 2.5" Slim set head replacement tools page 4
3. Supported models page 5
4. Handling the tools page 6
5. Head replacement process page 7
Step 1 – Preparing the drive page 7
Step 2 - Mounting the tool page 13
Step 3 - Returning the heads page 20
6. Conclusion page 25
Page 3
Page 3 of 25
HDDSURGERY Milutina Milankovića 1E, 11070 Belgrade, Serbia phone +381 11 2683526 www.hddsurgery.com [email protected] Tools for data recovery experts
1. Introduction
This guide is intended as a short course in handling of our tools for professionals in
data recovery. It is assumed that the user is experienced in data recovery and familiar with
"traditional" ways of saving data. This manual should not be taken as a guide for training.
Using these tools without adequate software support is not recommended. It is
recommended to use some of the proven systems for cloning, such as Ace Lab, Salvation Data,
Copy-r and other products.
It is possible to recover data without HddSurgeryTM tools. In many cases, the known
processes of hard drive head replacement are effective and sufficient. The general idea
behind HddSurgeryTM tools was to make sure that the process of replacing damaged hard
drive heads goes with no errors. The use of HddSurgeryTM tools prevents the ferromagnetic
read/write heads to get in any kind of contact with the platter i.e. disk surface or other
read/write heads. Also, with some basic procedures and short training, it is possible to let
junior data recovery technicians handle complex tasks. With the development of these tools,
we are trying to eliminate the element of luck which usually accompanies the process of data
recovery.
Experienced data recovery technicians or engineers can have great success even
without our tools, but they can have absolute security only when using HddSurgeryTM tools.
Non-contact head replacement implies that there is no contact between the heads, or
between heads and platters in the process of dismounting the donor heads and mounting
heads on the patient drive. Traditional techniques of replacing the heads imply contact
between the heads and contact of heads with the platters in data area. These problems
especially come to light on drives that have suffered some form of physical damage.
These tools do not solve the head compatibility problem. They will only assure that
the head replacement goes easily. If you have questions about compatibility, you can send
them to HddSurgeryTM support team on [email protected]
HddSurgeryTM is not responsible for any eventual damage caused by usage of our tools.
HddSurgeryTM is not responsible for the data stored on the patient or donor hard drives.
Page 4
Page 4 of 25
HDDSURGERY Milutina Milankovića 1E, 11070 Belgrade, Serbia phone +381 11 2683526 www.hddsurgery.com [email protected] Tools for data recovery experts
2. HddSurgery™ Sea 2.5" Slim set head replacement tools
HddSurgeryTM HDDS Sea 2.5" Slim set represents a pair of head replacement tools
which can be used to safely and easily replace heads on the Seagate 2.5" slim hard drives with
1-2 platters which “park their read/write heads” on a ramp.
The set contains:
Sea 2.5" Slim 1 This head replacement tool can be used on 2.5” Seagate slim hard drive models which
have 1 platter and with their heads parked on a ramp.
Sea 2.5" Slim 2 This head replacement tool can be used on 2.5” Seagate slim hard drive models which
have 2 platters and with their heads parked on a ramp.
Page 5
Page 5 of 25
HDDSURGERY Milutina Milankovića 1E, 11070 Belgrade, Serbia phone +381 11 2683526 www.hddsurgery.com [email protected] Tools for data recovery experts
3. Supported models
HDDS Sea 2.5" Slim set Supported models
List of Seagate families and models on which process of head replacement could be performed by using the ramp
tools from HDDS Sea 2.5" Slim set.
HDDS Sea 2.5’’ Slim 1 HDDS Sea 2.5’’ Slim 2
Mobile Hdd
ST1000LM035
ST1000LM037
ST1000LM038
Mobile Hdd
ST2000LM007 ST2000LM009 ST2000LM010
BarraCuda
ST2000LM015
Page 6
Page 6 of 25
HDDSURGERY Milutina Milankovića 1E, 11070 Belgrade, Serbia phone +381 11 2683526 www.hddsurgery.com [email protected] Tools for data recovery experts
4. Handling the tools
When not in use, the tools should always be kept in a wooden box delivered with the tools. This way of keeping the tools prevents any possible damage which could appear when not handled properly. While taking the tool out of the box, always hold it for the shank. Never hold the tool in the part where the head lifting snouts are. Due to the sensitivity of hard drive platters to dust and any kind of contamination, be sure to clean the tools before their use. Tools can be cleaned with a piece of cotton wool and alcohol. When cleaning the head lifting snouts, be extremely gentle.
Picture 4.1. HDDS Sea 2.5" Slim set
Page 7
Page 7 of 25
HDDSURGERY Milutina Milankovića 1E, 11070 Belgrade, Serbia phone +381 11 2683526 www.hddsurgery.com [email protected] Tools for data recovery experts
5. Head replacement process on Seagate
slim hard drives
Step 1 – Preparing the drive
Remove all labels from the drive. Carrefully remove the PCB from the drive.
Picture 5.1. Preparing the drive
Page 8
Page 8 of 25
HDDSURGERY Milutina Milankovića 1E, 11070 Belgrade, Serbia phone +381 11 2683526 www.hddsurgery.com [email protected] Tools for data recovery experts
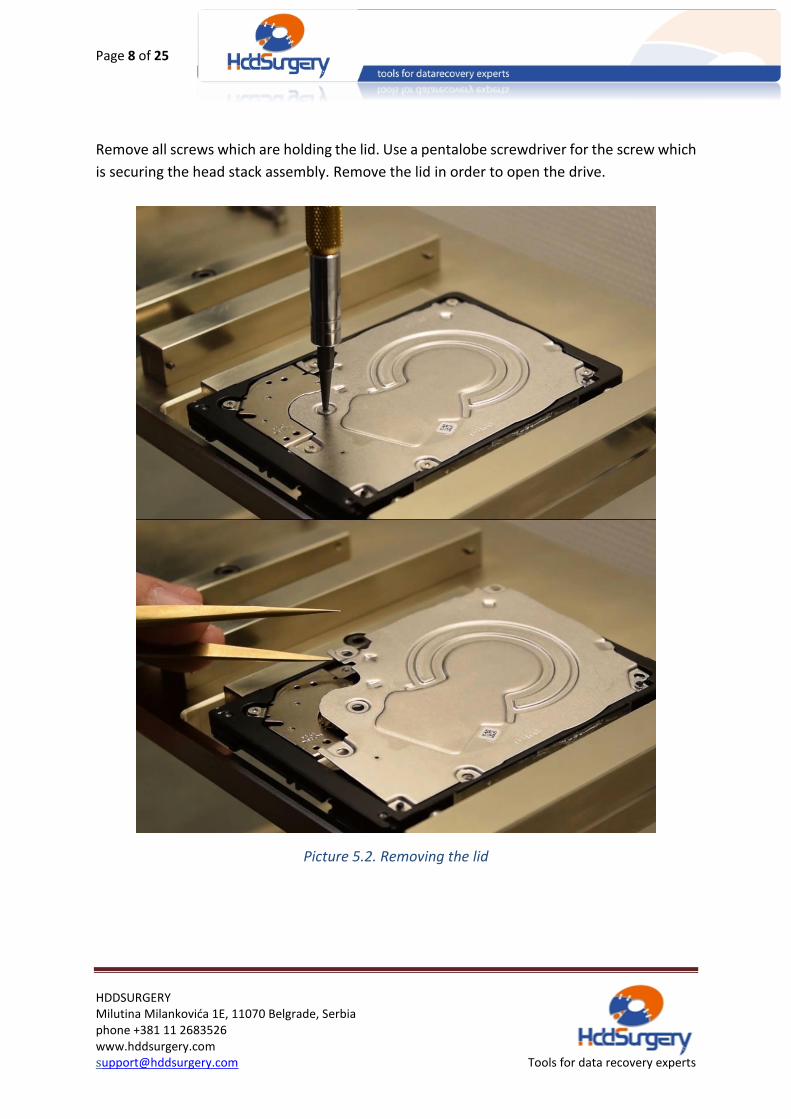
Remove all screws which are holding the lid. Use a pentalobe screwdriver for the screw which
is securing the head stack assembly. Remove the lid in order to open the drive.
Picture 5.2. Removing the lid
Page 9
Page 9 of 25
HDDSURGERY Milutina Milankovića 1E, 11070 Belgrade, Serbia phone +381 11 2683526 www.hddsurgery.com [email protected] Tools for data recovery experts
Remove the screws that are holding the flat cable connector.
Picture 5.3. Removing the flat cable
Page 10
Page 10 of 25
HDDSURGERY Milutina Milankovića 1E, 11070 Belgrade, Serbia phone +381 11 2683526 www.hddsurgery.com [email protected] Tools for data recovery experts
Tighten the head stack assembly with a bolt in order to prevent unwanted movements.
Picture 5.4. Placing a bolt for securing the heads
Page 11
Page 11 of 25
HDDSURGERY Milutina Milankovića 1E, 11070 Belgrade, Serbia phone +381 11 2683526 www.hddsurgery.com [email protected] Tools for data recovery experts
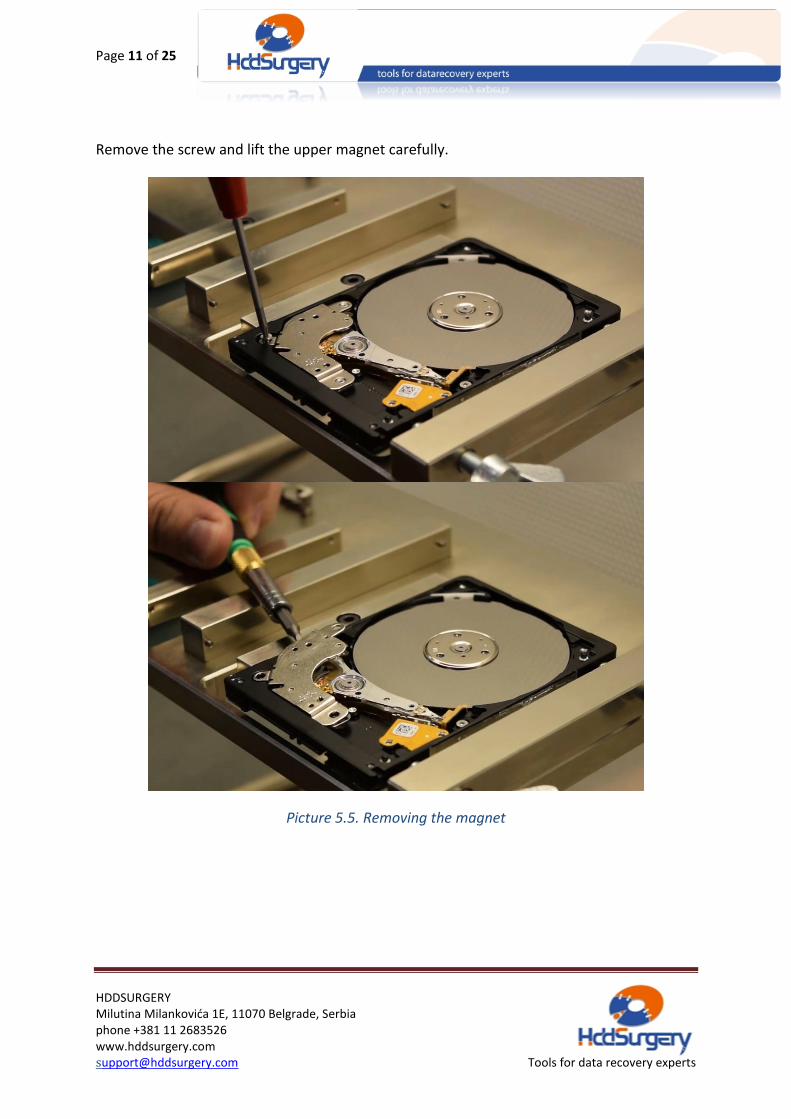
Remove the screw and lift the upper magnet carefully.
Picture 5.5. Removing the magnet
Page 12
Page 12 of 25
HDDSURGERY Milutina Milankovića 1E, 11070 Belgrade, Serbia phone +381 11 2683526 www.hddsurgery.com [email protected] Tools for data recovery experts
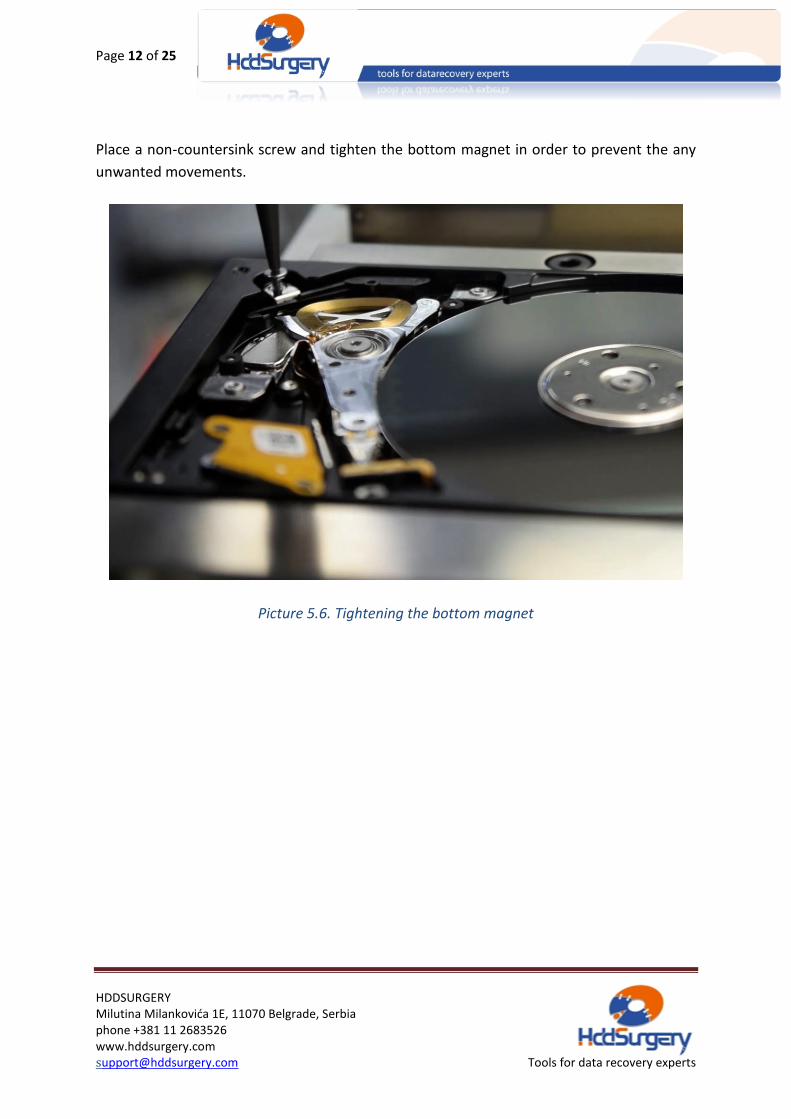
Place a non-countersink screw and tighten the bottom magnet in order to prevent the any
unwanted movements.
Picture 5.6. Tightening the bottom magnet
Page 13
Page 13 of 25
HDDSURGERY Milutina Milankovića 1E, 11070 Belgrade, Serbia phone +381 11 2683526 www.hddsurgery.com [email protected] Tools for data recovery experts
Step 2 – Mounting the tool
Carefully center the axis of the tool over the smaller hole on the head arm. Take care
that the snouts are positioned away from the heads, and push the axis of the tool all the way
down through the hole. Axis of the tool should go easily through this hole.
Picture 5.7. Placing the tool
Push the tool so the snouts go between the heads. These snouts will keep the distance
between the heads and assure that the heads don’t touch each other. You may slightly move
the heads toward the platters while inserting the tool.
ATTENTION! Stop pushing the tool when the heads are lifted! If you continue pushing the
tool, it may damage the heads and sensitive parts (check the right image).
Perform this action with additional precaution as there is a possibility the heads could get
damaged.
Page 14
Page 14 of 25
HDDSURGERY Milutina Milankovića 1E, 11070 Belgrade, Serbia phone +381 11 2683526 www.hddsurgery.com [email protected] Tools for data recovery experts
Be sure that the tool is positioned correctly. Head carriers should be placed between the heads.
When the tool is mounted, gently move the heads over the platters and stop when the ramp is free for dismounting.
Picture 5.8. Moving the heads over the platters
Page 15
Page 15 of 25
HDDSURGERY Milutina Milankovića 1E, 11070 Belgrade, Serbia phone +381 11 2683526 www.hddsurgery.com [email protected] Tools for data recovery experts
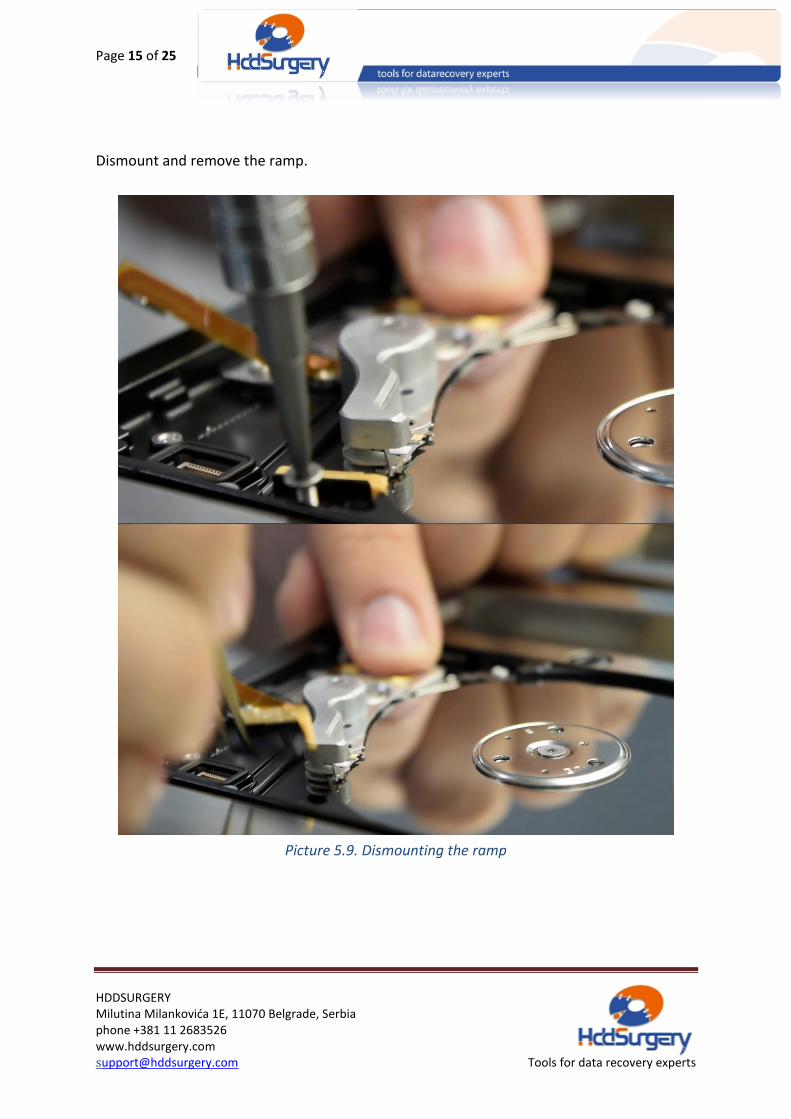
Dismount and remove the ramp.
Picture 5.9. Dismounting the ramp
Page 16
Page 16 of 25
HDDSURGERY Milutina Milankovića 1E, 11070 Belgrade, Serbia phone +381 11 2683526 www.hddsurgery.com [email protected] Tools for data recovery experts
Slide the heads off the platters.
Picture 5.10. Sliding the heads off the platters
Page 17
Page 17 of 25
HDDSURGERY Milutina Milankovića 1E, 11070 Belgrade, Serbia phone +381 11 2683526 www.hddsurgery.com [email protected] Tools for data recovery experts
Unscrew and remove the screw which is holding the head arm connected to the hard drive
casing. While unscrewing this screw, hold the head arm with your other hand to prevent the
heads from going back to the ramp area.
Picture 5.11. Removing the screw
Page 18
Page 18 of 25
HDDSURGERY Milutina Milankovića 1E, 11070 Belgrade, Serbia phone +381 11 2683526 www.hddsurgery.com [email protected] Tools for data recovery experts
To lift the head assembly, tweezers are needed. Use the tweezers to grab the head assembly
through some of the holes on the head arm. Pull the head arm up using the tweezers.
To make sure that the head assembly goes straight up, use one finger to pull the back side of
the head arm (side where the magnetic coil is) simultaneously. Don’t try to dismount the
heads by pulling the tool.
Picture 5.12. Lifting the heads
Page 19
Page 19 of 25
HDDSURGERY Milutina Milankovića 1E, 11070 Belgrade, Serbia phone +381 11 2683526 www.hddsurgery.com [email protected] Tools for data recovery experts
Picture 5.13. Lifting the heads
Page 20
Page 20 of 25
HDDSURGERY Milutina Milankovića 1E, 11070 Belgrade, Serbia phone +381 11 2683526 www.hddsurgery.com [email protected] Tools for data recovery experts
Step 3 – Returning the heads
Place the head stack assembly to its position. Tighten it with a screw in order to
prevent any unwanted movements.
Picture 5.14. Positioning the head stack assembly
Page 21
Page 21 of 25
HDDSURGERY Milutina Milankovića 1E, 11070 Belgrade, Serbia phone +381 11 2683526 www.hddsurgery.com [email protected] Tools for data recovery experts
Place the heads over the platters and mount the ramp. Use one finger to pull the back side of
the head arm (side where the magnetic coil is) simultaneously.
Picture 5.15. Mounting the ramp
Page 22
Page 22 of 25
HDDSURGERY Milutina Milankovića 1E, 11070 Belgrade, Serbia phone +381 11 2683526 www.hddsurgery.com [email protected] Tools for data recovery experts
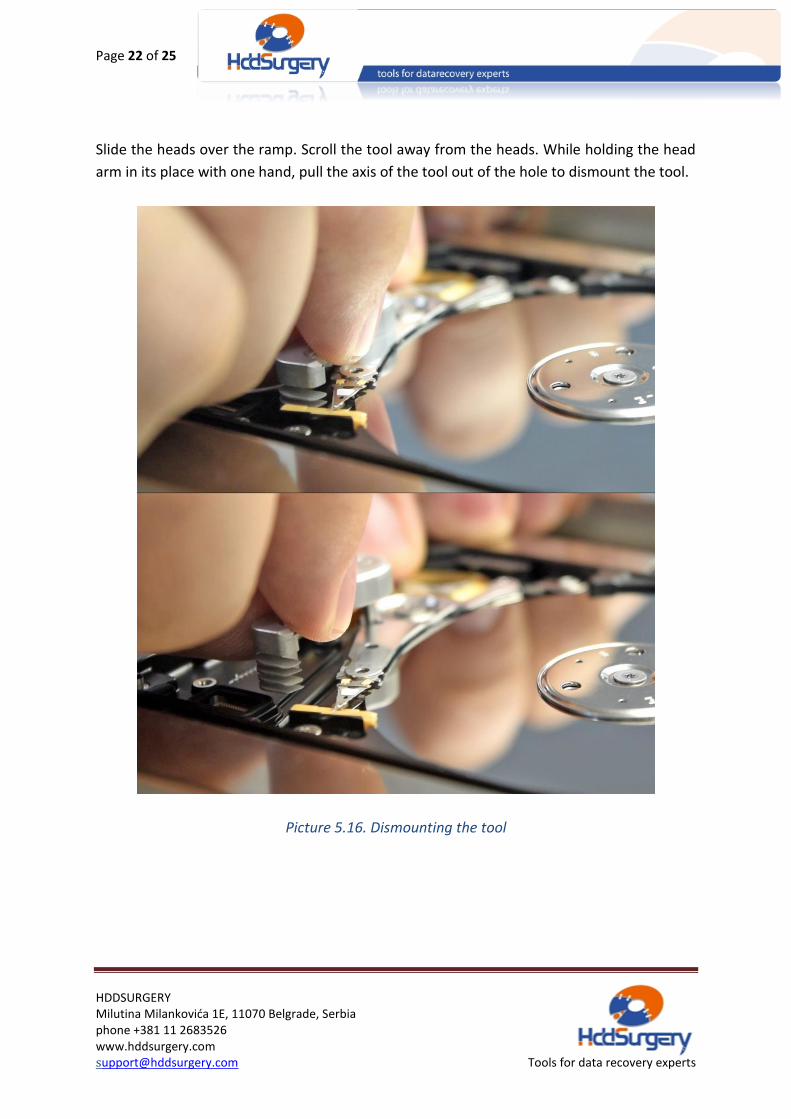
Slide the heads over the ramp. Scroll the tool away from the heads. While holding the head
arm in its place with one hand, pull the axis of the tool out of the hole to dismount the tool.
Picture 5.16. Dismounting the tool
Page 23
Page 23 of 25
HDDSURGERY Milutina Milankovića 1E, 11070 Belgrade, Serbia phone +381 11 2683526 www.hddsurgery.com [email protected] Tools for data recovery experts
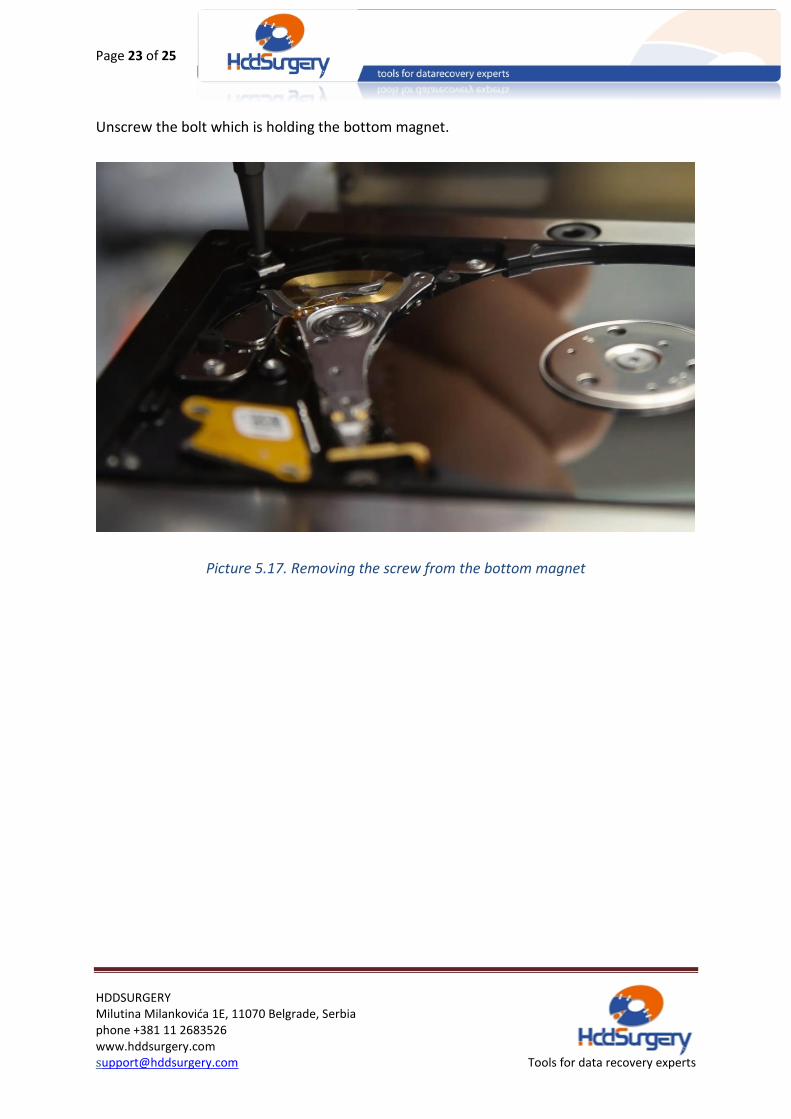
Unscrew the bolt which is holding the bottom magnet.
Picture 5.17. Removing the screw from the bottom magnet
Page 24
Page 24 of 25
HDDSURGERY Milutina Milankovića 1E, 11070 Belgrade, Serbia phone +381 11 2683526 www.hddsurgery.com [email protected] Tools for data recovery experts
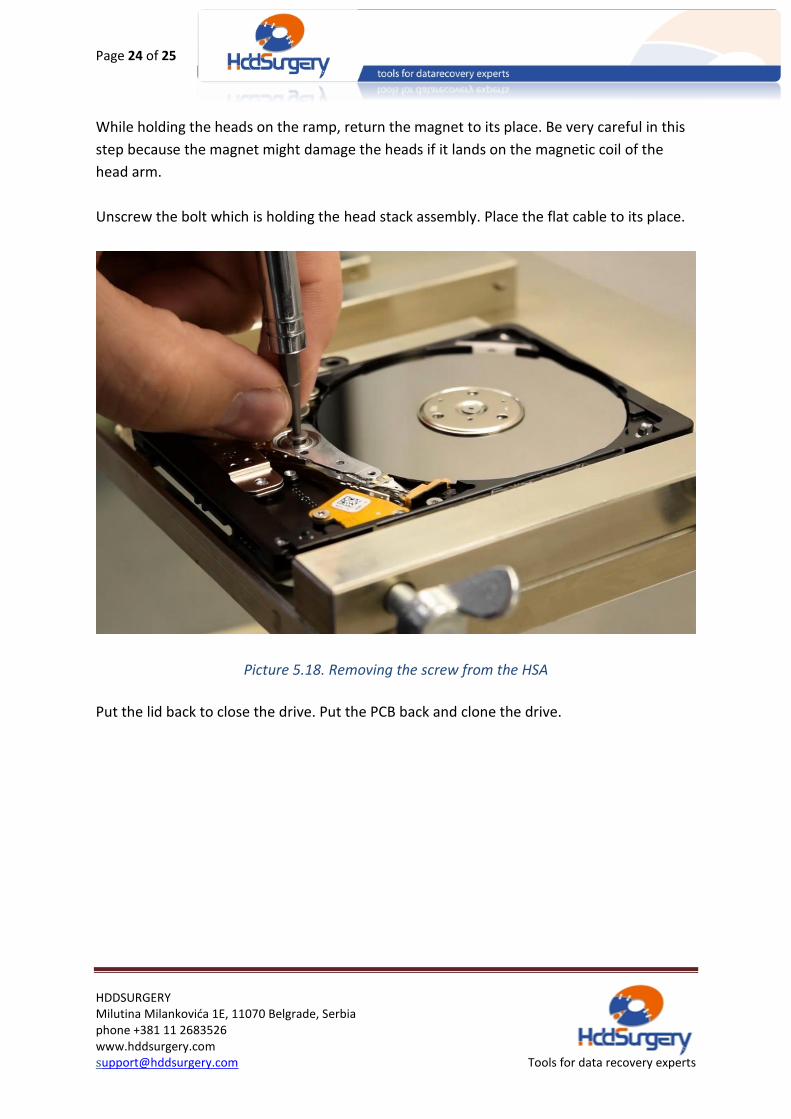
While holding the heads on the ramp, return the magnet to its place. Be very careful in this
step because the magnet might damage the heads if it lands on the magnetic coil of the
head arm.
Unscrew the bolt which is holding the head stack assembly. Place the flat cable to its place.
Picture 5.18. Removing the screw from the HSA
Put the lid back to close the drive. Put the PCB back and clone the drive.
Page 25
Page 25 of 25
HDDSURGERY Milutina Milankovića 1E, 11070 Belgrade, Serbia phone +381 11 2683526 www.hddsurgery.com [email protected] Tools for data recovery experts
6. Conclusion
This guide was written by HDDSurgeryTM team and it is based on our experience
acquired during the process of development, design and testing.
HddSurgeryTM is not responsible for any possible consequential damage, including the
loss or recovery of data or any other damage made by using or working with HddSurgeryTM
tools.
You can find more information about these tools and many other tools used for data
recovery on our website:
http://www.hddsurgery.com/
Also you can watch the videos that show how these tool work on our YouTube channel:
http://www.youtube.com/user/HddSurgery
If you have any doubts or questions regarding use of HDDS Sea 3.5" Ramp 4A, you can contact our
support team any time:
[email protected]