3
GUIDE SHEATH SYSTEM Created to Help Improve Bronchoscopic Diagnosis 3494

GUIDE SHEATH SYSTEMCreated to Help Improve Bronchoscopic Diagnosis
3494
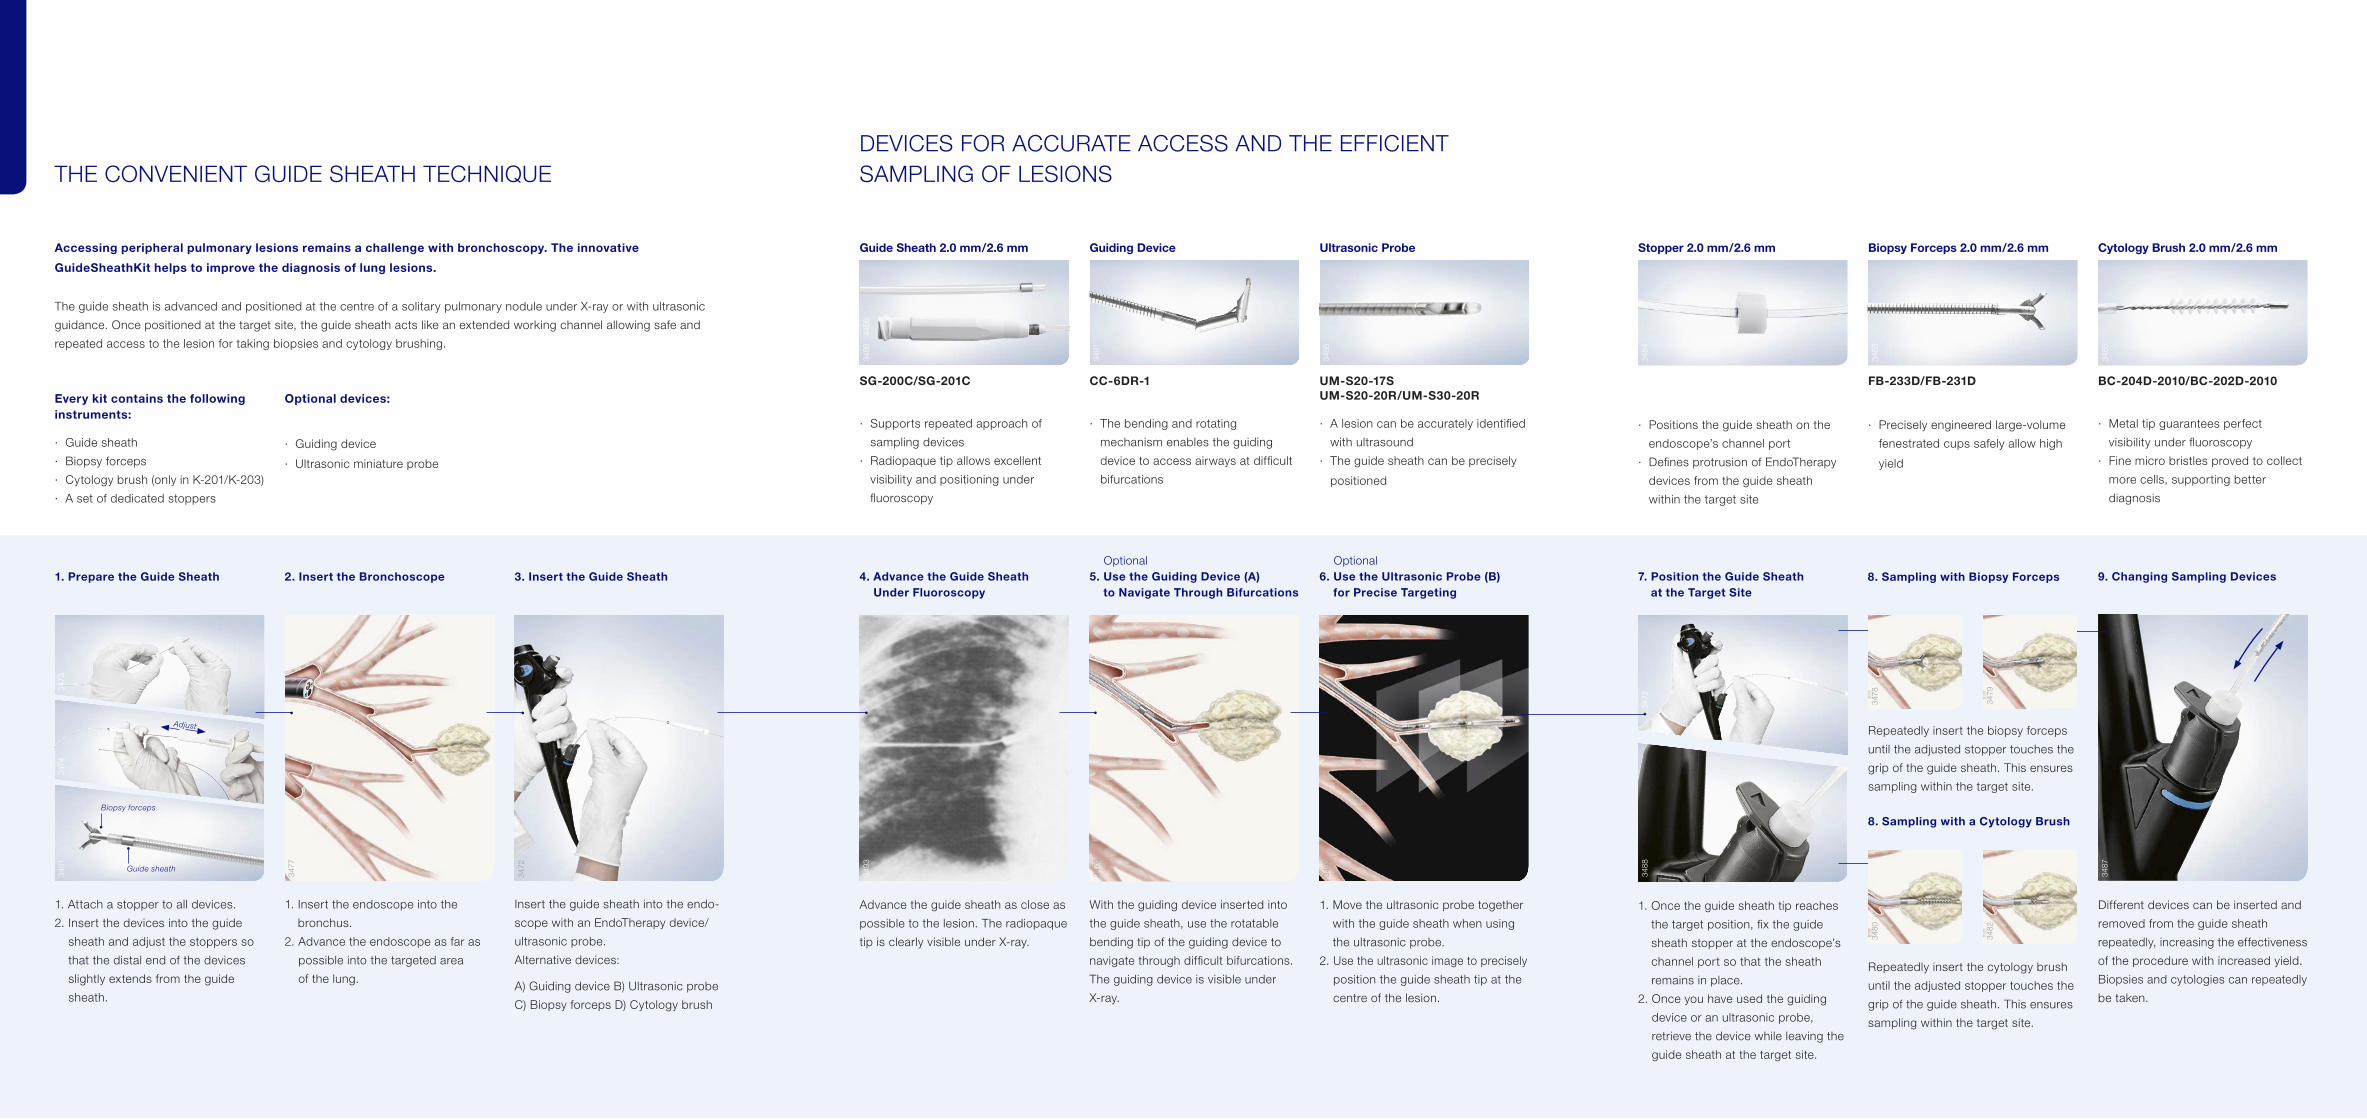
DEVICES FOR ACCURATE ACCESS AND THE EFFICIENT SAMPLING OF LESIONS
Advance the guide sheath as close as
possible to the lesion. The radiopaque
tip is clearly visible under X-ray.
Optional 5. Use the Guiding Device (A)
to Navigate Through Bifurcations
1. Move the ultrasonic probe together
with the guide sheath when using
the ultrasonic probe.
2. Use the ultrasonic image to precisely
position the guide sheath tip at the
centre of the lesion.
With the guiding device inserted into
the guide sheath, use the rotatable
bending tip of the guiding device to
navigate through difficult bifurcations.
The guiding device is visible under
X-ray.
4. Advance the Guide Sheath Under Fluoroscopy
Optional6. Use the Ultrasonic Probe (B)
for Precise Targeting
1. Once the guide sheath tip reaches
the target position, fix the guide
sheath stopper at the endoscope’s
channel port so that the sheath
remains in place.
2. Once you have used the guiding
device or an ultrasonic probe,
retrieve the device while leaving the
guide sheath at the target site.
7. Position the Guide Sheath at the Target Site
8. Sampling with Biopsy Forceps
Guide Sheath 2.0 mm / 2.6 mm Ultrasonic Probe Biopsy Forceps 2.0 mm / 2.6 mm Cytology Brush 2.0 mm / 2.6 mmStopper 2.0 mm / 2.6 mm
SG-200C/SG-201C
· Supports repeated approach of
sampling devices
· Radiopaque tip allows excellent
visibility and positioning under
fluoroscopy
UM-S20-17S UM-S20-20R/UM-S30-20R
· A lesion can be accurately identified
with ultrasound
· The guide sheath can be precisely
positioned
· Positions the guide sheath on the
endoscope’s channel port
· Defines protrusion of EndoTherapy
devices from the guide sheath
within the target site
FB-233D/FB-231D
· Precisely engineered large-volume
fenestrated cups safely allow high
yield
BC-204D-2010/BC-202D-2010
· Metal tip guarantees perfect
visibility under fluoroscopy
· Fine micro bristles proved to collect
more cells, supporting better
diagnosis
Different devices can be inserted and
removed from the guide sheath
repeatedly, increasing the effectiveness
of the procedure with increased yield.
Biopsies and cytologies can repeatedly
be taken.
9. Changing Sampling Devices
Guiding Device
CC-6DR-1
· The bending and rotating
mechanism enables the guiding
device to access airways at difficult
bifurcations
1. Prepare the Guide Sheath
1. Insert the endoscope into the
bronchus.
2. Advance the endoscope as far as
possible into the targeted area
of the lung.
1. Attach a stopper to all devices.
2. Insert the devices into the guide
sheath and adjust the stoppers so
that the distal end of the devices
slightly extends from the guide
sheath.
2. Insert the Bronchoscope 3. Insert the Guide Sheath
Insert the guide sheath into the endo-
scope with an EndoTherapy device/
ultrasonic probe.
Alternative devices:
A) Guiding device B) Ultrasonic probe
C) Biopsy forceps D) Cytology brush
THE CONVENIENT GUIDE SHEATH TECHNIQUE
Accessing peripheral pulmonary lesions remains a challenge with bronchoscopy. The innovative
GuideSheathKit helps to improve the diagnosis of lung lesions.
The guide sheath is advanced and positioned at the centre of a solitary pulmonary nodule under X-ray or with ultrasonic
guidance. Once positioned at the target site, the guide sheath acts like an extended working channel allowing safe and
repeated access to the lesion for taking biopsies and cytology brushing.
Every kit contains the following instruments:
· Guide sheath
· Biopsy forceps
· Cytology brush (only in K-201/K-203)
· A set of dedicated stoppers
Optional devices:
· Guiding device
· Ultrasonic miniature probe
Biopsy forceps
Guide sheath
Adjust
3473
3477
3472
3474
3481
3486
3491
3495
4456
3493
3476
3490
3484
3483
3485
8. Sampling with a Cytology Brush
Repeatedly insert the cytology brush
until the adjusted stopper touches the
grip of the guide sheath. This ensures
sampling within the target site.
Repeatedly insert the biopsy forceps
until the adjusted stopper touches the
grip of the guide sheath. This ensures
sampling within the target site.
3472
3488
3487
3478
3479
3480
3482

GUIDE SHEATH SYSTEM
GuideSheathKit Model Name K-201 K-203
Minimum Channel Diameter 2.0 mm 2.6 mm
Guide Sheath SG-200C SG-201C
Specification Radiopaque distal tip for clear visibility under X-ray
Biopsy Forceps FB-233D FB-231D
Specification Oval, fenestrated cups Oval, fenestrated cups, swinging type
Cytology Brush BC-204D-2010 BC-202D-2010
Specification Brush diameter Ø 2 mm, brush length 10 mm
EndoTherapy (ET) Stopper 3 pcs (white) 2 pcs (grey) + 1 pc. (white)
Ultrasound (US) Stopper 1 pc. (white) 1 pc. (grey)
GuideSheathKit Model Name K-202 K-204
Minimum Channel Diameter 2.0 mm 2.6 mm
Guide Sheath SG-200C SG-201C
Specification Radiopaque distal tip for clear visibility under X-ray
Biopsy Forceps FB-233D FB-231D
Specification Oval, fenestrated cups Oval, fenestrated cups, swinging type
EndoTherapy (ET) Stopper 3 pcs (white) 2 pcs (grey) + 1 pc. (white)
Ultrasound (US) Stopper 1 pc. (white) 1 pc. (grey)
Guiding Device Model Name CC-6DR-1
Minimum Channel Diameter 2.0 mm
Specification Rotatable, bendable tip (double-joint type), reusable
Compatible GuideSheathKit K-201,-202,-203,-204
Ultrasonic Probe Model Name UM-S20-17S UM-S20-20R UM-S30-20R
Minimum Channel Diameter 2.0 mm 2.2 mm 2.2 mm
Scanning Frequency 20 MHz 20 MHz 30 MHz
Compatible GuideSheathKit K-201,-202 (2.0 mm) K-203,-204 (2.6 mm) K-203,-204 (2.6 mm)
EASY AND REPEATED ACCESS TO SOLITARY PULMONARY NODULES
Minimally Invasive
Using the GuideSheathKit for endobronchial sampling in the peripheral area of the lung is a less invasive
technique than percutaneous or surgical sampling methods.
Multiple Sampling for Improved Bronchoscopic Diagnosis
By placing the distal tip of the guide sheath at the target site, physicians can repeatedly take biopsies and
cytology specimens at the same site. Multiple sampling and the combination of different sampling methods
help to increase yield and diagnostic success.
Reliable and Fast Access with Less Radiation
Once the guide sheath is positioned, fast and reliable access to the lesion is possible. There is no further need
to spend additional time relocating the target site under fluoroscopy. By using an ultrasonic probe, the detection
of the centre of the lesion becomes even more precise.
References: Kurimoto N, et al.: Endobronchial ultrasonography using a guide sheath increases the ability to diagnose peripheral pulmonarylesions endoscopically. Chest 2004; 126: 959–965Eberhardt R, et al.: Ultrasound-guided transbronchial biopsy of solitary pulmonary nodules less than 20 mm. ERJ 2009; 34: 1284–1287
Devices to Diagnose Pulmonary Nodules
Optional support devices
E04
2904
9 ·
1.0
00
· 0
8/1
6 ·
PR
· E
D
Specifications, design, and accessories are subject to change without any notice or obligation on the part of the manufacturer.
Postbox 10 49 08, 20034 Hamburg, GermanyWendenstrasse 14–18, 20097 Hamburg, GermanyPhone: +49 40 23773-0, Fax: +49 40 233765www.olympus-europa.com
3492
3492
3491
3496
3496


