140
N a t i o n a l P a rk s & W il d l i fe Guidelines for Vertebrate Surveys in South Australia Using the Biological Survey of South Australia

Natio
nal P
arks & Wildlife
South Australia
Natio
nal P
arks & Wildlife
South Australia
Guidelines for Vertebrate Surveys in South Australia
Using the Biological Survey of South Australia
Guid
elines for Verteb
rate Surveys in South A
ustralia
Using the Biological Survey of South A
ustralia
Cover layout 2/1/01 11:20 AM Page 1
G U I D E L I N E S F O R V E R T E B R A T E S U R V E Y S I N S O U T H A U S T R A L I A
GUIDELINES FOR VERTEBRATE SUR VEYS IN SOUTH AUSTRALIA
USING THE BIOLOGICAL SURVEY OF SOUTH AUSTRALIA
SECTION 1: PRE–SURVEY AND THE SURVEY PROCESS
First edition December 2000
BIOLOGICAL SURVEY AND RESEARCH SECTION
NATIONAL PARKS AND WILDLIFE SA
DEPARTMENT FOR ENVIRONMENT AND HERITAGE


C R E D I T S
Edited by: Helen Owens
Contributions by: Dave Armstrong • Jan Armstrong • Robert Brandle • Peter Canty
Keith Casperson • Steve Donnellan • Adrienne Edwards • Jan Forrest
Lesley Forward • Jeff Foulkes • Gavin Kluske • Lee Heard • Deb Hopton
Philippa Horton • Mark Hutchinson • Bob Inns • Cath Kemper
Malcolm Krieg • Peter Lang • Martine Long • Nick Neagle • Maya Penck
Stuart Pillman • Tony Robinson.
Acknowledgments: This manual is an accumulation of techniques, logistics and ideas which
have been developed over the last 25 years by many dedicated individuals
and volunteers. In particular, thanks goes to Tony Robinson who instigated
the Biological Survey of South Australia in the early 1980s and has been the
driving force ever since. Thanks also to all of the staff of the Biological
Survey and Research Section who have made substantial contributions to
this manual, in particular Dave Armstrong, Lesley Forward and Robert
Brandle, who developed earlier versions of a vertebrate manual which
provided a basis for this publication. Thanks also to the staff of the South
Australian Museum who provided advice on their areas of expertise and to
Peter Canty, Tony Robinson, Steve Doyle, Peter Lang, Dave Armstrong and
Hafiz Stewart for photographic contributions.
Editorial comments have been provided by many people but special thanks
goes to Tim Hudspith for final editorial checks.
ISBN: 0759010129
Section 1
Front Cover Photographs
1 Sturt’s Desert Pea (
Swainsona formosa) - Peter Lang
2 Northern Spiny-tailed Gecko (Strophurus cilliaris) - Peter Canty
3 Diamantina River, North East South Australia - Peter Canty
4 Painted Frog (Neobatrachus pictus) - Tony Robinson
5 Edeowie Station, Flinders Ranges, South Australia - Peter Canty
6 Western Pygmy-possum (Cercartetus concinnus) - Tony Robinson
7 Installing trapline - Dave Armstrong
8 Inland Dotteral (Charadrius australis) - Helen Owens
9 Wilpena Pound, Flinders Ranges, South Australia - Peter Canty
10 Thorny Devil (Moloch horridus) - Peter Lang
11 Wilpena Pound, Flinders Ranges, South Australia - Peter Canty
12 Processing specimens - Steve Doyle
1
2
3
4
8 9
5
11
12
6
10
7

P R E F A C E
This manual is intended to provide consultants, councils, conservation groups and departmental
employees with guidelines for the standard vertebrate survey methodology used in South Australia to
collect data for the Environmental Data Base of South Australia (EDBSA). This survey methodology is
part of the Biological Survey of South Australia (BSSA) and has been developed under the auspices of
the Biological Survey Coordinating Committee (BSCC). It is based on the collection of data which
describes both the physical characteristics of a survey site and the biota. Guidelines for the selection of
survey sites and collection of vegetation and physical data have already been covered in the companion
volume 'Guide to a Native Vegetation Survey' (Heard and Channon 1997).
The methodology is standard throughout South Australia. However, there is some variation between the
size of survey sites and quadrats, and between vertebrate trapping effort in the agricultural and pastoral
regions. These variations are discussed in this manual. It is important to note that the 'Guide to a Native
Vegetation Survey' (Heard and Channon 1997) is based on agricultural region standards only.
This manual is divided into 3 main sections which discuss all aspects of coordinating a vertebrate
biological survey following BSSA methodology. These sections are organised into pre, during and post
survey methodology with additional material provided in the Appendices.
Survey projects which do not have sufficient resources to undertake the specimen vouchering,
validation, data entry and editing required to meet the standards of the BSCC should set different
objectives and contribute to the EDBSA at an alternative level as recommended by the BSCC.
Section 1 v
G U I D E L I N E S F O R V E R T E B R A T E S U R V E Y S I N S O U T H A U S T R A L I A


C O N T E N T S
Section 1: Pre–Survey and the Survey Process
Introduction . . . . . . . . . . . . . . . . . . . . . . . . . . . . . . . . . . . . . . . . . . . . . . . . . . . . . . . . . . . . . . . . . . . . 1
Funding . . . . . . . . . . . . . . . . . . . . . . . . . . . . . . . . . . . . . . . . . . . . . . . . . . . . . . . . . . . . . . . . . . . . . . . . 3
Legislative Requirements . . . . . . . . . . . . . . . . . . . . . . . . . . . . . . . . . . . . . . . . . . . . . . . . . . . . . . . . . . . 3
Licence for Teaching, Research or Experimentation Involving Animals . . . . . . . . . . . . . . . . . . . . 3
Animal Ethics . . . . . . . . . . . . . . . . . . . . . . . . . . . . . . . . . . . . . . . . . . . . . . . . . . . . . . . . . . . . . . . 3
Licence to Possess and Administer Drugs for Euthanasia . . . . . . . . . . . . . . . . . . . . . . . . . . . . . . 4
Scientific Permits . . . . . . . . . . . . . . . . . . . . . . . . . . . . . . . . . . . . . . . . . . . . . . . . . . . . . . . . . . . . 4
Exemptions from Scientific Permits . . . . . . . . . . . . . . . . . . . . . . . . . . . . . . . . . . . . . . . . . . . . . . 5
Forestry SA Lands . . . . . . . . . . . . . . . . . . . . . . . . . . . . . . . . . . . . . . . . . . . . . . . . . . . . . . . . . . . . 5
Aboriginal Heritage . . . . . . . . . . . . . . . . . . . . . . . . . . . . . . . . . . . . . . . . . . . . . . . . . . . . . . . . . . . 6
Aboriginal Lands . . . . . . . . . . . . . . . . . . . . . . . . . . . . . . . . . . . . . . . . . . . . . . . . . . . . . . . . . . . . . 6
Fisheries . . . . . . . . . . . . . . . . . . . . . . . . . . . . . . . . . . . . . . . . . . . . . . . . . . . . . . . . . . . . . . . . . . . 6
State Heritage Areas . . . . . . . . . . . . . . . . . . . . . . . . . . . . . . . . . . . . . . . . . . . . . . . . . . . . . . . . . 6
EPBC Act . . . . . . . . . . . . . . . . . . . . . . . . . . . . . . . . . . . . . . . . . . . . . . . . . . . . . . . . . . . . . . . . . . 6
Quarantine Considerations . . . . . . . . . . . . . . . . . . . . . . . . . . . . . . . . . . . . . . . . . . . . . . . . . . . . . . . . . . 7
Cultural Considerations . . . . . . . . . . . . . . . . . . . . . . . . . . . . . . . . . . . . . . . . . . . . . . . . . . . . . . . . . . . . 8
Consultation with Locals . . . . . . . . . . . . . . . . . . . . . . . . . . . . . . . . . . . . . . . . . . . . . . . . . . . . . . . . . . . 9
Landholders . . . . . . . . . . . . . . . . . . . . . . . . . . . . . . . . . . . . . . . . . . . . . . . . . . . . . . . . . . . . . . . . 9
Others . . . . . . . . . . . . . . . . . . . . . . . . . . . . . . . . . . . . . . . . . . . . . . . . . . . . . . . . . . . . . . . . . . . . 9
Site Selection . . . . . . . . . . . . . . . . . . . . . . . . . . . . . . . . . . . . . . . . . . . . . . . . . . . . . . . . . . . . . . . . . . . 10
Reconnaissance Trips . . . . . . . . . . . . . . . . . . . . . . . . . . . . . . . . . . . . . . . . . . . . . . . . . . . . . . . . . . . . . 10
Confirmation with Landholders . . . . . . . . . . . . . . . . . . . . . . . . . . . . . . . . . . . . . . . . . . . . . . . . . . . . . 10
Field Equipment and Vehicles . . . . . . . . . . . . . . . . . . . . . . . . . . . . . . . . . . . . . . . . . . . . . . . . . . . . . . . 11
Survey Specific Items . . . . . . . . . . . . . . . . . . . . . . . . . . . . . . . . . . . . . . . . . . . . . . . . . . . . . . . . . . . . . 11
Data Sheets . . . . . . . . . . . . . . . . . . . . . . . . . . . . . . . . . . . . . . . . . . . . . . . . . . . . . . . . . . . . . . . 11
Voucher Numbers . . . . . . . . . . . . . . . . . . . . . . . . . . . . . . . . . . . . . . . . . . . . . . . . . . . . . . . . . . . 11
Maps . . . . . . . . . . . . . . . . . . . . . . . . . . . . . . . . . . . . . . . . . . . . . . . . . . . . . . . . . . . . . . . . . . . . . 12
Permanent Photopoint Markers and Disks . . . . . . . . . . . . . . . . . . . . . . . . . . . . . . . . . . . . . . . . . 12
Liaison with Museum Staff . . . . . . . . . . . . . . . . . . . . . . . . . . . . . . . . . . . . . . . . . . . . . . . . . . . . . . . . . . 12
Survey Participants . . . . . . . . . . . . . . . . . . . . . . . . . . . . . . . . . . . . . . . . . . . . . . . . . . . . . . . . . . . . . . . 13
Pre-Survey Meeting . . . . . . . . . . . . . . . . . . . . . . . . . . . . . . . . . . . . . . . . . . . . . . . . . . . . . . . . . . . . . . . 13
Driving and Volunteer Forms . . . . . . . . . . . . . . . . . . . . . . . . . . . . . . . . . . . . . . . . . . . . . . . . . . . 14
Personal Gear . . . . . . . . . . . . . . . . . . . . . . . . . . . . . . . . . . . . . . . . . . . . . . . . . . . . . . . . . . . . . . . 14
Food Shopping . . . . . . . . . . . . . . . . . . . . . . . . . . . . . . . . . . . . . . . . . . . . . . . . . . . . . . . . . . . . . 14
Transport Arrangements . . . . . . . . . . . . . . . . . . . . . . . . . . . . . . . . . . . . . . . . . . . . . . . . . . . . . . . 14
Training Sessions . . . . . . . . . . . . . . . . . . . . . . . . . . . . . . . . . . . . . . . . . . . . . . . . . . . . . . . . . . . . 14
Vehicle Checklist . . . . . . . . . . . . . . . . . . . . . . . . . . . . . . . . . . . . . . . . . . . . . . . . . . . . . . . . . . . . . . . . . 15
Scheduled Radio Calls . . . . . . . . . . . . . . . . . . . . . . . . . . . . . . . . . . . . . . . . . . . . . . . . . . . . . . . . . . . . . 15
Packing . . . . . . . . . . . . . . . . . . . . . . . . . . . . . . . . . . . . . . . . . . . . . . . . . . . . . . . . . . . . . . . . . . . . . . . . 15
Section 1 vii
G U I D E L I N E S F O R V E R T E B R A T E S U R V E Y S I N S O U T H A U S T R A L I A


SECTION 1 LIST OF FIGURES
1 Extent of pastoral and agricultural regions in South Australia . . . . . . . . . . . . . . . . . . . . . . . . . . . 2
Section 1 ix
G U I D E L I N E S F O R V E R T E B R A T E S U R V E Y S I N S O U T H A U S T R A L I A


Section 1. Pre–Survey and the Survey Process
Introduction The Biological Survey of South Australia (BSSA), established under the auspices of the Biological Survey
Coordinating Committee (BSCC), is an ongoing series of systematic surveys conducted across the state.
The BSSA aims to provide a broad baseline inventory of the state's flora and fauna. These surveys, which
began in 1984, are based on recording data from relocatable sites using a repeatable methodology.
In South Australia, site-based (quadrat) surveys are conducted in the pastoral and agricultural regions
(Fig. 1). Vegetation surveys within the pastoral region are undertaken by the Biological Survey and
Research (BSR) Section, Department for Environment and Heritage (DEH). In the agricultural regions
vegetation surveys are undertaken by both the Geographic Analysis and Research (GAR) Unit,
Department for Transport Urban Planning and the Arts (DTUPA), and the BSR Section (DEH). Site based
vertebrate surveys are conducted in the agricultural and pastoral regions by the BSR Section (DEH).
Other flora and fauna surveys undertaken by government agencies include rare and threatened species
monitoring, roadside vegetation, fuel sampling, Heritage Agreement area assessments, vegetation
clearance inspections, grazing impact assessment, post-fire regeneration and re-colonisation, weed
distribution assessment and population monitoring of species considered to be of commercial value or
pest significance.
Site-based surveys, following the Biological Survey methodology, are conducted to collect information
on the presence of fauna and flora species, the relative abundance of species present, the structural
composition of the vegetation, the physical environment, and the presence or absence of disturbances.
Information from these surveys is used by Federal, State and Local Governments in a range of activities
such as environmental impact assessment, conservation and wilderness assessment, regional planning,
fire and weed control, National Forest Inventory, coastal management and revegetation programs. It is
also used by a number of non-government organisations including Landcare groups, research and
academic institutions, and private consultants.
In 1982 the South Australian Government implemented the Environmental Data Base of South Australia
(EDBSA) to store both spatial and textual environmental data in a format which can be easily accessed
and manipulate. This data is held and maintained under joint custodianship by DEH and DTUPA.
Information from the EDBSA is used to assist in the decision making process in areas of planning and
environmental management. The GAR Unit (DTUPA) maintains the spatial component of the EDBSA
which is accessed using the Environmental Systems Research Institute's (ESRI) Geographic Information
System (GIS) Arc/Info software. Biological textual data stored in the EDBSA is maintained by the joint
custodians, BSR Section (DEH) and the GAR Unit (DTUPA), with programming support provided by the
Data Support Unit (DTUPA). Both the GAR Unit and the BSR Section also oversee acquisition of
environmental data for the EDBSA through the BSSA and associated processes. The EDBSA currently has
information for over 16000 vegetation sites, of which approximately 3000 have associated vertebrate
data.
Two committees have been established to assist in the coordination of input of biological data. These
are the BSCC and Biological Survey Users Group. The former deals with policy and planning issues while
the latter oversees the survey methodology, refining and clarifying techniques. Updates of methodology
from the Users Group will be forwarded to councils and consultants when requested. A third group, the
Vegetation Mapping and Analysis Working Group, provides a forum for determining vegetation
mapping standards.
Section 1 1
G U I D E L I N E S F O R V E R T E B R A T E S U R V E Y S I N S O U T H A U S T R A L I A

G U I D E L I N E S F O R V E R T E B R A T E S U R V E Y S I N S O U T H A U S T R A L I A
2 Section 1
0 100 200 km
LEIGH CREEK
HAWKER
WHYALLAKIMBA
CEDUNA
COWELL
Northern Limit of Agricultural Region
MAP 1 EXTENT OF PASTORAL AND AGRICULTURAL REGIONS IN SOUTH AUSTRALIA
PORT LINCOLN
BURRA
BERRI
BORDERTOWN
MOUNT GAMBIER
ADELAIDE
Figure 1. Extent of pastoral and agricultural regions in South Australia.

When planning a survey, existing information from the EDBSA can assist in the design, provide
background and help clarify the specific aims and preferred outcomes of the study. Prior to
commencing a survey, or in the initial stages of project planning, contact should be made with both the
BSR Section (DEH) and the GAR Unit (DTUPA) to discuss what existing data may be helpful and what
services can be offered. A standard series of base maps showing cadastre, landcover, road access,
Heritage Agreement areas, NPWS reserves, previous surveys and infrastructure are available on paper,
mylar or in digital form. Drainage and topography are also available for some areas. New surveys will
also require the allocation of a survey number before field work can proceed. This can be obtained by
contacting the appropriate person in DEH during survey preparation. Following field acquisition, data
from the new surveys and projects should be entered into the EDBSA, thus increasing the level of
statewide information.
FundingThe amount of money required to run a Biological Survey will vary substantially depending on location,
amount of equipment being borrowed and amount of volunteer involvement. The list of 'Potential
Funding Sources' in Heard and Channon (1997) provides a good starting point for obtaining funds.
When applying for funds it is important to remember all the costs involved, including:
• Coordinator wages - pre, during and post-survey, including time to enter and edit data and write a
report.
• Reconnaissance trips.
• Vehicles and fuel.
• Paper, photocopying and printing for data sheets and reports.
• Hire of equipment.
• Charges for accessing existing data and maps.
• Food.
• Unexpected repairs and miscellaneous items and consumables.
• Consultant fees for assistance with identification of voucher material (e.g. hair cross-sections, plant
identifications).
• Additional wages and materials if vegetation mapping is involved.
Legislative Requirements
Licence for Teaching, Research or Experimentation Involving Animals
Under the South Australian 'Prevention of Cruelty to Animals Act, 1985' any organisation or person
conducting research, or an educational project involving animals, must obtain a licence from the
Minister responsible for Animal Welfare. Application forms are available from the Office of Animal
Welfare, DEH (see Appendix 1 for contact details). The purpose of this license is to ensure that the
person or institution has the experience, facilities and scientific skills to conduct research of the general
type proposed. Individuals can work under the license of an organisation with which they are affiliated.
This licence must be obtained before the project commences and requires that the project is approved
by an Animal Ethics Committee. A fee must be paid every two years to maintain the licence.
Animal Ethics
Any project that involves interaction with vertebrates (excluding fish) requires approval from an official
Animal Ethics Committee (AEC). The term 'Official' implies that the committee has been established
under the Prevention of Cruelty to Animals Act and meets the requirements of the National Health and
Medical Research Council 'Australian Code of Practice for the Care and Use of Animals for Scientific
Purposes' (NHMRC 1998). The purpose of this permit is to ensure that the use of the animals is justified,
that as few as statistically possible are used and that those animals which are used suffer as little as
possible and are treated as well as possible. The committee will take into account the expected value of
the knowledge to be gained, the validity of the study and all ethical and animal welfare concerns.
Section 1 3
G U I D E L I N E S F O R V E R T E B R A T E S U R V E Y S I N S O U T H A U S T R A L I A

Approval for vertebrate survey work in South Australia can be given from any registered AEC within
South Australia. DEH, the South Australian Museum and the Royal Zoological Society of South Australia
run a joint AEC, the Wildlife Ethic Committee, specialising in field ecology and survey related research.
This committee has developed guidelines for conducting biological surveys which, if adhered to, will
assist in obtaining approval (Appendix 2). This committee may be used by people outside of these
organisations who do not have access to another committee (see Appendix 1 for contact details).
There are no fees attached to animal ethics approval, but applications should be submitted at least six
weeks prior to the commencement of field work.
Licence to Possess and Administer Drugs for Euthanasia
Collection of animal voucher specimens is generally a fundamental part of carrying out a biological
survey. Voucher specimens will usually need to be euthanased in the field so there must be someone
present licensed to carry and administer the euthanasing drug (recommended substance is Nembutal®).
People employed by DEH, and who have been appropriately trained, are authorised to use the
substance under the departmental licence. If no trained DEH personnel are present alternative
arrangements must be made. Other departments or institutions may be able to provide the personnel
or authorisation to administer the substance. Alternatively arrangements may be made to return the
voucher specimens to the Museum alive (if practical) where they may be euthanased under the Museum
licence. If an institution is carrying out survey work on a regular basis they should apply for a 'Licence to
Possess a Prescription Drug for Administration'. These licenses involve an annual fee and require an
application to the Public and Environmental Health Service (see Appendix 1 for contact details).
Animal ethics applications for projects that require the collection and euthanasia of specimens need to
provide the licence number of the person administering the drug.
Scientific Permits
A permit issued under the scientific permit system, managed by the BSR Section (DEH), meets the
requirements for a number of South Australian Acts in relation to conducting scientific research. The
purpose of the permit is to ensure that the taking of protected flora and fauna for research purposes
does not impact on the broader population or environmental integrity of a habitat. Other authorities
may also require additional approval and these are detailed below (see Appendix 1 for contact details).
Scientific permits are required if the project falls under one or more of the following categories:
• scientific research that involves 'taking' a protected species from the wild (this includes government
and private land). Under the National Parks and Wildlife Act 'take', with reference to an animal, is
defined as any act of hunting, catching, restraining, killing or injuring, and any act of attempting or
assisting to hunt, catch, restrain, kill or injure. Under the Act all native mammals, birds and reptiles
(excluding some species listed in Schedule 10 of that Act) and threatened species of amphibian are
protected throughout the state.
• scientific research carried out in any of the various categories of reserves and elsewhere in the state as
proclaimed under the following Acts of Parliament: the National Parks and Wildlife Act, the
Wilderness Protection Act and the Crown Lands Act. Scientific research inside these reserves includes
observational studies. Remember to include the collection of water, soil, rock, leaf litter, invertebrates
and non-threatened species of amphibian (which do not require a permit outside of a DEH-managed
reserve). Details relating to the collection of plants are provided by Heard and Channon (1997).
4 Section 1
G U I D E L I N E S F O R V E R T E B R A T E S U R V E Y S I N S O U T H A U S T R A L I A
The applicable reserve areas are as follows:
National Parks and Wildlife Act: National Park
Conservation Park
Game Reserve
Recreation Park
Regional Reserve
Wilderness Protection Act: Wilderness Protection Area
Wilderness Protection Zone
Native Vegetation Management Act: Heritage Agreement Area
Crown Lands Act: Conservation Reserve
Under the NPW Act, Government-controlled land is defined as:
• any reserve,
• any other Crown land,
• any land reserved for or dedicated to public purposes,
• any forest reserve.
Government-controlled land includes roadside vegetation, council reserves and land controlled by the
Federal Government.
A DEH scientific permit will be required to 'take' specimens from these areas (in addition the managing
authority of the land may also require a separate permit, e.g. Forestry SA for Forest Reserves, Local
Government approval for roadsides).
Heritage Agreement areas are usually private land and approval from the Native Vegetation Council is
required to conduct research in those areas. Delegation has been provided to the BSR Section (DEH) by
the Native Vegetation Council to issue scientific permits on their behalf. The approval of the landholder
is still required for access to private land.
Exemptions From Scientific Permits
Protected species are those defined in the NPW Act. This currently includes all birds, mammals and
reptiles and two species of threatened frog, Geocrinia laevis (Smooth Frog) and Litoria raniformis
(Golden Bell Frog). Not included (outside of the above reserves) are all other species of frog,
invertebrates and fish. Fish species considered under threat may need a permit from the Department of
Fisheries.
All DEH staff do not require permits if specimens are being collected as part of their official duties. This
includes contract staff who are carrying out DEH-funded projects. If a DEH staff member wishes to
pursue a scientific project in their own time (e.g. graduate/postgraduate studies, setting up a trap-line
whilst on holiday) then they will need a permit.
Forestry SA Lands
Anyone wishing to conduct research or collect specimens from Forestry SA lands must contact Policy
and Community Forestry, Department for Administrative and Information Services. There may be access
restrictions during fire season (see Appendix 1 for contact details).
Section 1 5
G U I D E L I N E S F O R V E R T E B R A T E S U R V E Y S I N S O U T H A U S T R A L I A

Aboriginal Heritage
Anyone wishing to interfere (excavate, collect samples, etc.) with Aboriginal sites must obtain a permit
from the Aboriginal Heritage Section, Division of State Aboriginal Affairs (DTUPA), under the Aboriginal
Heritage Act (see Appendix 1 for contact details).
Aboriginal Lands
Projects planning to work in Aboriginal Lands (e.g. Maralinga Tjarutja, Anangu Pitjantjatjara Lands) must
seek access approval from the appropriate management authority. A Scientific Permit would only be
valid subject to this approval being obtained.
Fisheries
Conducting surveys involving the sampling of native fish for scientific purposes requires a permit from
the Fisheries Division of Primary Industries and Resources SA (see Appendix 1 for contact details).
State Heritage Areas
Permits from the State Heritage Authority are required for excavation, disturbance and removal of
specimens or artefacts from registered places which have been designated to be of geological,
palaeontological or archaeological significance under the Heritage Act, 1993. Permits are required to
'excavate or disturb' any registered place. The main purpose of this requirement is to control the
removal of artefacts (of both Aboriginal and European origin) and fossils. In many cases though,
disturbance of the ground such as pitfall digging may well damage surface and subsurface features even
though not specifically targeting artefacts. Disturbance of rocks at geological and Aboriginal sites, or
structural components of ruins (e.g. in the search for reptiles) may damage or deface significant
features.
Whilst the laws protecting Aboriginal relics apply throughout the state (see section on Aboriginal
Heritage), the laws under the Heritage Act only apply to sites entered in the State Heritage Register.
Heritage Sites on National Parks and Wildlife reserves can be viewed on the Department for Environment
and Heritage website http://www.environment.sa.gov.au/parks/heritage.html. The Heritage South
Australia website is: � http://www .heritage.sa.gov.au. (See Appendix 1 for contact details).
EPBC Act
The Commonwealth Environment Protection and Biodiversity Conservation Act 1999 (EPBC Act) came
into force from 16 July 2000. Under the Act actions likely to have a significant impact on matters of
national environmental significance are subject to a rigorous assessment and approval process. An action
includes a project, development, undertaking, activity, or series of activities. The EPBC Act also applies to
actions likely to have a significant impact on the environment of Commonwealth land (even if taken
outside Commonwealth land).
Matters of national environmental significance include:
• World Heritage properties,
• Ramsar wetlands of international importance,
• listed threatened species and communities,
• migratory species protected under international agreements.
In terms of conducting a biological survey following the guidelines set out in this manual, the EPBC Act
definitions of 'significant impact' will not usually apply. The following quote is an example of an impact
not considered significant (from Environment Australia's website on the EPBC Act):
'an action which causes injury or death to only one or a very small number of a species will not, except in the
case of the most endangered of species, generally lead to a long-term or irreversible decrease in the
population that normal processes, rates of mortality and recruitment could not buffer.'
6 Section 1
G U I D E L I N E S F O R V E R T E B R A T E S U R V E Y S I N S O U T H A U S T R A L I A
The guidelines for determining significant impact should be kept in mind however, and may apply in
some cases when dealing with isolated populations. Be aware that lack of attention to the
hygiene/quarantine procedures outlined in this manual, as an example, may introduce disease or an
invasive species which could have a significant long-term impact. The guidelines for threatened species
and ecological communities are summarised below:
An action has, will have, or is likely to have a significant impact on a threatened species or ecological
community if it does, will, or is likely to:
• lead to a long-term decrease in the size of a population of a species or a long-term adverse affect on
an ecological community, or
• reduce the area of occupancy of a population or extent of a community, or
• fragment an existing population into two or more populations, or an occurrence of the community,
or
• adversely affect habitat critical to the survival of a species or community, or
• disrupt the breeding cycle of a population, or
• modify or destroy abiotic (non-living) factors (such as water, nutrients, or soil) necessary for the
community's survival, or
• modify, destroy, remove, isolate or decrease the availability or quality of habitat to the extent that the
species is likely to decline, or
• result in invasive species, harmful to a threatened species or community, becoming established in a
threatened species' habitat* or in an occurrence of the community*, or
• interferes substantially with the recovery of the species or community.
(* Introducing an invasive species into the habitat may result in that species becoming established. An
invasive species may harm a threatened species or community by direct competition, modification of habitat,
or predation.)
An important population is one that is necessary for a species' long-term survival and recovery. This may
include populations that are:
• key source populations either for breeding or dispersal,
• populations necessary for maintaining genetic diversity, and/or
• populations near the limit of the species' range.
For more information on the Act and nationally recognised threatened species and communities,
visit the Environment Australia website:
http://www.environment.gov
Quarantine ConsiderationsBecause surveys tend to target the most pristine areas of habitat, there is a need to be conscious of the
impact of the survey on those areas. However, to thoroughly search a representative quadrat will usually
mean a high impact on that particular area. This may involve disturbance to potential animal refuge
areas such as the destruction of hollow logs, removal of bark, raking of leaf litter, dismantling rock
outcrops, etc. Keep in mind that the area sampled by the survey quadrat is usually insignificant when
taken in context of the total habitat area. Whilst steps can be taken to minimise these impacts (e.g. by
replacing disturbed material after searching) there is a much less visible and possibly more insidious
threat posed by surveys.
Recent declines in frog populations around the world in both disturbed and in relatively pristine areas
has raised concern about the impact scientists themselves may be having while carrying out research on
populations. Although most amphibian declines can be attributed to factors such as habitat modification
or obvious chemical pollution, this does not explain the dramatic declines occurring in pristine areas.
Section 1 7
G U I D E L I N E S F O R V E R T E B R A T E S U R V E Y S I N S O U T H A U S T R A L I A

There is concern amphibian diseases and parasites may be picked up from one amphibian population
and transferred to many others on scientists' equipment such as collecting nets, holding containers and
boots.
Whilst frogs seem to be particularly sensitive to environmental change, there are other known diseases,
such as cryptosporidiosis which affect reptiles, which can also be readily transferred between
populations if proper attention to hygiene is not taken.
As a precautionary principle, steps must be taken to ensure effective hygiene in order to minimise the
risk of transferring known (and possibly as yet unknown) diseases between populations. This will
generally only apply when moving from one survey area to another widely separated area, or between
surveys. Researchers also need to be alert to the possibility of captured animals, showing any signs of
disease, infecting other animals. The sterilisation or disposal of any collecting and holding gear coming
into contact with diseased animals will help prevent further infection.
Additional information and recommendations for quarantine are provided in Appendix 3. Although
Appendix 3 primarily relates to the transfer of infectious diseases between amphibian populations, it is a
useful guideline for working with any wildlife group. Simple hygiene procedures can alleviate many of
these risks, not only to wildlife, but also to minimise the risk of transferring animal diseases to
researchers as well.
Another major issue with survey techniques is the risk of transferring plant and soil-borne diseases.
Material adhering to tools, traps and other equipment used for establishing traplines poses the greatest
risk. Soil-borne fungal diseases such as phytophthora are serious threats to native vegetation in more
temperate areas and can be easily transferred from one area to another by infected soil clinging to
equipment, vehicles and clothing. For the latest information and recommendations on minimising risk of
spreading soil-borne diseases contact DEH (Appendix 1) or the local NPWS Ranger.
Prior to a survey, particularly in agricultural areas, it is worth contacting the relevant District Councils
and possibly the Animal and Plant Control Commission to determine what significant pest and disease
species may be present in the area and how to avoid breaching any local quarantines or acting as an
unwitting vector. Similarly, if a significant pest species is discovered during a survey, local authorities
should be informed.
Simple procedures such as brushing of soil and seeds from field equipment, clothing and vehicles should
become part of standard practice while in the field. More thorough procedures such as washing
equipment and sterilisation by soaking or spraying with methylated alcohol may be recommended in
high-risk areas. Although some areas of the state are flagged as high risk areas researchers should use
their initiative when assessing the risk of contamination between sites and populations and take the
necessary precautions to minimise risk at all times.
Cultural ConsiderationsAreas proclaimed as Aboriginal Lands or owned by Aboriginal people will require advance entry approval
as outlined under 'Legislative Requirements' (above) and may entail each survey participant seeking and
obtaining an individual entry permit. It is important to keep in mind however, that land outside of these
areas may also include sites of Aboriginal significance or other cultural issues. This is particularly the case
in the arid/semi-arid areas of the state where Aboriginal traditions have been less modified. Many areas
of the state now have formal Aboriginal Consultative Committees which can advise on the likely impact
of surveys on significant sites.
8 Section 1
G U I D E L I N E S F O R V E R T E B R A T E S U R V E Y S I N S O U T H A U S T R A L I A

Examples of how survey techniques can impact on Aboriginal culture include:
• entry of uninitiated people or people of the wrong sex into sacred sites,
• disturbance of significant landscape features such as rock outcrops or trees,
• disturbance of soil in burial grounds, or
• killing and removal of plants and animals sacred to the local Aboriginal group.
It is an offence under the Aboriginal Heritage Act to interfere with and remove material from an
Aboriginal site anywhere throughout South Australia. If an Aboriginal site, object or remains are
discovered during a survey, the site or objects must not be disturbed, and the location should be noted
and the information forwarded to the Minister for State Aboriginal Affairs.
Aboriginal people may wish to become involved in the survey. Aboriginal people can have intimate
ecological knowledge that can benefit a survey and greatly extend the information obtained (this
knowledge should not be exploited and used without permission however, and remains the property of
the Aboriginal custodian). Their level of involvement may be to ensure their cultural sites are not
violated, or they may wish to take a more active role. As with any consultancy, payment for Aboriginal
knowledge and experience to assist in a survey is not unreasonable and should be included in any
survey budget involving Aboriginal lands. A copy of the final report should be provided to any
Aboriginal group involved in the survey.
As an initial approach, the Division of State Aboriginal Affairs can advise on Aboriginal consultative
processes and contacts (see Appendix 1 for contact details).
Consultation with LocalsLandholders
Only after funding has been secured and all permits have been finalised is it appropriate to make
contact with landholder representative groups in the survey region to plan specific details of the actual
survey.
Once the general framework of the survey has been discussed with representative groups it is the
responsibility of the survey coordinator to contact individual landholders with a view to negotiating
access to their properties for establishment of survey sites. At this stage the survey coordinator should
explain the aims and constraints of the survey and seek assistance and cooperation from the landholder
in selection of appropriate sites. Once again, the landholder may wish to become involved in the survey,
to obtain greater understanding of the process or to receive immediate feedback on species
identification. It is always important to encourage their participation.
A more detailed outline of the consultation procedure recommended by the BSCC is provided in
Appendix 4. This has been prepared to specifically target landholder consultation in the pastoral zone
but may also provide useful guidelines for landholder consultation in agricultural areas.
Others
As well as notifying landholders it is important to publicise the survey throughout the local community.
In particular all NPWS rangers, field staff and regional ecologists should be consulted with regards to
any survey work in their area, even if it is not on government land. The general public, particularly in
country areas, will also be interested and it is useful to keep them informed both pre and post-survey
through regular press releases and talks to local field naturalist and Landcare groups. The local public
may also provide feedback on unusual species or interesting sites. Local Aboriginal communities should
also be consulted during all stages of survey work (refer to 'Legislative Requirements' and 'Cultural
Considerations', this section).
Section 1 9
G U I D E L I N E S F O R V E R T E B R A T E S U R V E Y S I N S O U T H A U S T R A L I A

If the survey is in the agricultural region it is a good idea to notify the local police about the use of
firearms, spotlightling and the presence of traps.
Site SelectionThe number and location of sites selected should be based on the distribution of existing sites in the
area and local knowledge as outlined by Heard and Channon (1997). Funding, time and access
constraints will also dictate the number of sites that can be visited. Vertebrate surveys will often be
carried out in conjunction with or following a vegetation survey and may involve revisiting a previously
established site. Due to the equipment and time required to survey a vertebrate site it is usually
necessary to select a subset of the vegetation sites that represent a range of the habitats present in the
area.
The number of sites which can be established and maintained over one week will vary for each survey
depending on personnel and equipment available and distance between sites. As a general guide one
survey group can usually manage six sites in the pastoral region (two trap-lines/site) and 8 sites in the
agricultural region (one trap-line/site). The number of sites that can be surveyed in one period can be
increased by sending out multiple groups. The number of groups will depend on the availability of
personnel and field equipment, but three is the maximum recommended.
Reconnaissance TripsReconnaissance trips prior to any survey will help make things run to plan during the main survey. If a
vertebrate survey is being carried out at existing vegetation sites there may already be good vegetation
maps and 'mud maps' (site location maps) to allow most site selection work to be carried out in the
office. The time elapsed since these sites were surveyed needs to be considered as the vegetation may
have undergone dramatic change (e.g. fire, clearance) and may still need visiting prior to final selection.
If new sites are to be established it is advisable to visit the area prior to the survey (after becoming
familiar with the existing information) to check that all major habitats are being represented and that
travel time between sites is realistic. This will also provide the opportunity to mark the sites, record any
directions required to relocate them, liaise with local landholders and identify suitable accommodation
or camp spots. If permanent photopoints are to be established (see note below), and there is adequate
time available on the reconnaissance trip, the photopoint markers and tags should be installed at each
site (refer to 'Permanent Photopoints' Section 2). This will help field groups relocate sites quickly and
identify the site code. This sort of preparation can save the survey group a lot of time especially on the
first day.
It is also worthwhile taking photopoint photos at the sites so members of the group can familiarise
themselves in advance with the range of habitats they will survey. These photos will also show
conditions at the site at the time of the initial visit and provide a backup in case any photos taken
during the survey are poor quality.
Note: Check with the landholder before installing the standard star droppers as permanent photopoint
markers to see if they foresee any problems. In some locations posts may be a hazard to people
mustering on bikes and on Aboriginal Land they may prefer that the ground is not disturbed. Alternative
markers such as surveyors' pegs or steel plates (contact BSR Section, DEH, for in-ground steel plate
designs) may be agreed upon, or in some cases no permanent markers can be used.
Confirmation with LandholdersOnce the sites and survey dates have been confirmed all landholders and/or managers should be
contacted again to finalise arrangements. Ensure that the survey group can gain access to all gates on
the way to sites and identify any sensitive areas that should be avoided. Landholders and managers
should be kept up-to-date on the arrival and departure dates of groups on their property.
10 Section 1
G U I D E L I N E S F O R V E R T E B R A T E S U R V E Y S I N S O U T H A U S T R A L I A

It is also useful to outline what activities will be taking place and invite them to participate. Check with
landholders to see if it is alright to use firearms. Emphasise that any people using them will be
appropriately trained and licensed. It may also be useful to check what radios and frequencies are used
in the local area in case they are required during the survey.
Field Equipment and VehiclesAvailability of vehicles and field gear is one of the main considerations for setting survey dates so it is
wise to investigate this early in the preparation. When booking vehicles ensure they are adequately
equipped for the survey conditions (e.g. remote area surveys will require 4WD, radios, long range fuel
and water tanks, etc.). Appendix 5 provides a comprehensive checklist of the equipment required to
carry out a vertebrate (and vegetation) survey. The contents of the kits from this list are itemised in
Appendix 6. Some of this equipment is available for hire from DEH when not required by departmental
staff (Appendix 7). Other items need to be arranged through the South Australian Museum (refer to
'Liaison with Museum Staff') or need to be provided by the survey coordinator. Other sources of
trapping equipment may include the South Australian Museum, university departments and some DEH
regional bases. If a survey is being carried out as part of an ongoing project it may be useful to budget
for the purchase of some equipment rather than trying to plan around DEH surveys. Some of the
trapping equipment required is fairly specific and needs to be ordered well in advance. Contact the BSR
Section (DEH) for an up-to-date list of the main supply companies (Appendix 1).
To confirm the booking of any equipment the relevant organisation should be notified of the collection
and return dates as early as possible.
As a general rule, first aid kits, vehicles and recovery equipment are only available to departmental
employees. Other survey specific items such as photopoint tags can be supplied by the BSR Section
(DEH) upon request from the survey coordinator. All consumables, including bait, must be supplied by
the survey coordinator.
Survey Specific ItemsData Sheets
The BSSA has a standard set of data sheets established for the collection of site-based and opportune
data. These data sheets correspond to the EDBSA fields and when filled out correctly make data entry
and editing more efficient. Copies of each of the data sheets required for a vertebrate survey are
available in Microsoft® Word format from the BSR Section (DEH). All data sheets apart from the
physical data sheet are the same for the pastoral and the agricultural zone. Although the physical data
sheet provided by Heard and Channon (1997) can be used throughout the state there is an abbreviated
version used by the BSR Section (DEH), which is more suitable for pastoral zone surveys, especially when
both vegetation and vertebrates are being sampled simultaneously. The vegetation data sheet and the
vegetation voucher list are dealt with by Heard and Channon (1997).
The survey coordinator needs to provide a folder for each group with copies of all the required data
sheets. It is useful to provide the data sheets already hole-punched to allow filing in folders. The folders
should also contain dividers for each site so data sheets can be organised into site groups while in the
field. Some of the data sheets are colour coded in order to help with quick identification. Appendix 8
provides a guide to the number of data sheets required and the standard colours used.
Voucher Numbers
Unique voucher numbers are used to label all vertebrate (and vegetation) specimens collected in the
field so they can be traced back to the correct data sheet. The label and the string used to tie them to
vertebrate specimens must be resistant to formalin and alcohol.
Section 1 11
G U I D E L I N E S F O R V E R T E B R A T E S U R V E Y S I N S O U T H A U S T R A L I A

Dymo tape with linen thread is highly recommended. Rolls of dymo labels should be prepared by the
survey coordinator prior to the survey. It is best to leave the dymo numbers on the roll so they can be
cut off in numbered order as required. Each group will need a set of unique numbers. As a guide one
group surveying six sites may need up to 100 vertebrate labels.
In order to make the number sequence unique the numbers are preceded by the survey number
(allocated by BSR Section, DEH). This means any numbers not used during a survey should be
discarded and left over numbers from a different survey should never be used. Dymo labels should read
as follows:
(Survey number) (space) (number series) e.g. 73 1, 73 2, -----73 100 and so on.
Plant specimens are vouchered using adhesive labels as outlined by Heard and Channon (1997). Each
label should include the survey number (preceded by BS), a hyphen, and the specimen number. Plant
labels generally include the Survey name and survey period as well, e.g.
The BSR Section (DEH) has a Microsoft® Access program that can be used to print plant voucher labels
if required.
Maps
Each survey group will require a set of topographic maps covering their survey area with site locations
marked. In the pastoral zone 1:250 000 is generally adequate while 1:50 000 is more appropriate for
the agricultural zone. These maps can be purchased from major map outlets. Group leaders should
also have access to a general map of the whole area and the recommended route from Adelaide. Aerial
photos and/or mud-maps of the exact site locations are vital and should be put in a folder in the vehicle
where they can be easily accessed on the first day (not packed away in boxes).
Permanent Photopoint Markers and Disks
Survey coordinators will need to supply their own iron star droppers (or equivalent) to install at each
survey site as a permanent photopoint marker (refer 'Permanent Photopoints', Section 2). Photopoint
disks are an aluminium disk, displaying the State Government logo, indented with the site code, which
are tied to the photopoint post (Plate 2, Section 2). New disks and indenting kits are available from the
BSR Section (DEH) upon request. The complete site code should be marked on the disk as follows -
ERA 001 01 (refer to 'Naming Survey Sites', Section 2).
Liaison with Museum Staff
Some of the equipment required to collect specimens must be booked through the South Australian
Museum. Bookings should be made at least two weeks before the equipment is required. Drums of
formalin can be supplied by the vertebrate collection managers in the Biological Science group. Alcohol
vials and jars for the collection of invertebrates can be booked through the senior collection manager in
the Entomology Section. Liquid nitrogen cylinders can be arranged through the Evolutionary Biology
Unit. Contact numbers for the Museum are provided in Appendix 1.
Curators or collection managers of the relevant sections (e.g. Mammals, Reptiles, Birds, etc.) should be
asked to provide advice on which specimens should be collected from the specific survey area. If there
are any taxonomically confusing species in the area they may be able to run a training session with the
relevant experts from each survey group to outline the major taxonomic characteristics.
12 Section 1
G U I D E L I N E S F O R V E R T E B R A T E S U R V E Y S I N S O U T H A U S T R A L I A
BS73-1 BS73-1Sandy Deserts Survey Sandy Deserts Survey1998-2001 1998-2001
They may also recommend variations in the standard number of specimens collected or issue
instructions that differ from the standard procedure. It is useful to make notes on any of the above
hints/instructions and provide a copy to each group for reference in the field.
Survey ParticipantsA standard vertebrate survey group requires a minimum of one ornithologist, one mammalogist and one
herpetologist. It is useful to include one or two other people as general assistants. If the vegetation
survey is being carried out at the same time there will also be two Botanists working with the group.
Most surveys tend to rely strongly on volunteer participation for field work. It is therefore wise to
advertise survey dates well in advance and start recruiting helpers. It is not always possible to fill all of
the positions required for the whole survey period. If this is the case it may be necessary to arrange a
change over group in the middle of the survey after the first set of sites is complete. The use of
volunteers in DEH projects must fall within the guidelines laid out in the 'Public Sector Management Act
Determination No 27'. In particular ‘Volunteers must be adequately protected from unsafe situations in
accordance with the principles and practises as set out in the Occupational Health, Safety and Welfare
Act, 1986.’ They should also be reimbursed for out-of-pocket expenses, including accommodation,
food and travel (for non-departmental surveys make sure it is clear to volunteers what expenses they will
have to cover). A Volunteers Project Commencement Advice Form (Appendix 9) needs to be filled out
for any departmental projects relying on volunteer help. This should be submitted at least one month
before the commencement of the project. All departmental volunteers will also need to complete a
volunteer registration form (refer to 'Driving and Volunteer Forms' this section).
Each group should have at least one member who is familiar with the survey process and comfortable in
taking responsibility for the group and the collection of data (Appendix 10). Other positions in the
group, particularly the specialists, should be filled by the most experienced people available. It is also
very important that as many members as possible have first aid qualifications and four wheel drive
experience (if necessary).
There are many avenues that can be used to recruit field workers. Experienced staff may be available
from relevant government departments, in particular DEH, South Australian Museum and DTUPA.
NPWS rangers and/or local ecologists in the survey area should be invited to join in and can often
provide valuable local knowledge and useful contacts. There are a number of field naturalist groups and
conservation organisations throughout the state with experienced members. Most of these groups
produce regular newsletters where survey details can be advertised. Universities and TAFE colleges also
provide a good source of enthusiastic volunteers. A list of contacts for recruiting volunteers is provided
in Appendix 1. It is always useful to have a few backup people in case of last minute emergencies.
Once survey dates have been finalised and field groups sorted out, all participants should be notified
confirming details and advising of a pre-survey briefing session. Lists of the participants in each group
and their role (including who is group leader) should also be provided along with a brief outline of the
survey methodology (Section 2 of this manual may be photocopied and used for this purpose). The pre-
survey meeting should be held no earlier then two weeks prior to the survey so the finer details are fresh
in everyone's mind.
Pre-Survey MeetingThese meetings can be very beneficial to new volunteers who may have no idea of what is required of
them. Survey coordinators should give a brief overview of the survey procedure and outline the study
area and general location of survey sites. Each group leader should be provided with clear directions of
accommodation/camp spots and site locations (a copy of this should also be provided in each vehicle
for easy access). Group leaders will also need to be briefed on specific instructions such as collection of
keys, contact with landholders and access to facilities.
Section 1 13
G U I D E L I N E S F O R V E R T E B R A T E S U R V E Y S I N S O U T H A U S T R A L I A

Everyone should be made aware of any quarantine and/or cultural issues specific to the survey area
(refer to 'Quarantine Considerations' and 'Cultural Considerations', this section). It is useful to provide all
these details in a handout along with other important information such as selcall/satellite phone
numbers for each group, recommended channels for UHF and VHF radios, and local
landholder/ranger/police radio channels and phone numbers. The meeting is also a good opportunity
to recruit help for packing and to finalise other details as listed below.
Driving and Volunteer Forms
DEH policy requires all non-departmental survey participants to fill out a 'Volunteers Registration Form
and Volunteers Statement re Relevant Skills Form' (Appendix 11). Drivers with little or no 4WD
experience should be shown a training video or handouts and briefed on the basics of winch and radio
operation (this may be carried out at another time prior to the survey). These brief training sessions do
not necessarily mean an inexperienced driver should be allowed to drive unsupervised. Non-
departmental organisations may not have to follow such procedures but should still take responsibility
for checking the skill levels of any volunteers used. It is also necessary for the survey coordinator to be
familiar with any special needs or illnesses and conditions (e.g. epilepsy, diabeties) of the participants
and pass these onto the relevant group leader. The members of each group with first aid training should
be identified and everyone familiarised with the location of first aid kits.
Personal Gear
Participants will need to know what they are expected to bring. This will vary depending on the
resources available to the survey coordinator. Basic items required by DEH survey participants are;
appropriate clothing, raincoat, suitable footware, hat, sleeping gear (tent/swag), water bottle and
personal camera if desired. The group ornithologist is expected to provide their own binoculars and any
one authorised to catch snakes needs to supply their own hoop-bag and 'jigger'. It is useful to advise
people about accommodation facilities. This will prevent them from bringing unnecessary items if room
is scarce (e.g. swag).
Food Shopping
Organising food for several groups can be overwhelming, especially as it needs to be carried out in the
last few days prior to the survey. It is generally a good idea to get one or two members from each
group to shop for their group and organise the food into boxes/fridges. Make sure the people
shopping are aware of vegetarians or special dietary needs amongst their group. A very general guide to
shopping is provided in Appendix 12. If there is access to shops or mid-survey change overs fresh food
may be replenished in the field.
Transport Arrangements
The pre-survey meeting is the best opportunity to finalise pickup and transport arrangements for the
first day and change over groups if necessary. Each group will need to swap addresses and contact
phone numbers and determine the most efficient pickup arrangements. DEH surveys aim to get
everyone to meet at the DEH building so that final packing of perishable food and personal gear can be
done before heading off. If there is a change over group during the survey the people involved will
also need to finalise arrangements. One person (preferably experienced) should be made responsible
for each change over vehicle, as the survey coordinator will most probably be in the field. Change over
meeting points in the field and approximate meeting times should also be finalised.
Training Sessions
Additional training sessions can be organised if considered necessary. New volunteers may benefit from
introductory 4WD training videos. It is also useful (especially for remote area surveys) to run training
sessions on winch and radio operation and basic first aid. If a training session has been recommended
by one of the curators at the South Australian Museum, organise a time for the relevant people to meet.
14 Section 1
G U I D E L I N E S F O R V E R T E B R A T E S U R V E Y S I N S O U T H A U S T R A L I A

Vehicle ChecklistAll departmental vehicles must be checked before being taken into a remote area. It is sensible however,
to carry out basic vehicle checks no matter were the survey is heading. State Fleet cars, or those
borrowed from other sections/organisations, should be checked thoroughly. They will often be missing
some of the basic requirements such as a second spare or a reliable jack. The standard vehicle checklist
is provided in Appendix 13. These should be completed well before the departure date in case any work
needs to be done.
Scheduled Radio CallsIt is DEH policy that scheduled radio calls (scheds) be carried out daily for all remote area travel. Non-
departmental surveys can use the DEH sched system if required, so long as they follow the correct
procedure (they will need a HF radio with one of the departmental frequencies, see below). If the
survey is not in a remote area groups are not obliged to carry out scheds, although the coordinator may
still find it useful to have a scheduled time for radio traffic in case any groups have questions. Remote
area radio scheds are conducted on the HF radios through the DEH Port Augusta base and must be
taken seriously. Trip itineraries and vehicle details (Appendix 14) must be faxed to the Port Augusta
office two days prior to leaving. Sched calls are conducted at 9am and 4pm each weekday by Pt
Augusta base and approximately 10am on weekends and public holidays by CFS Adelaide base. The
base stations will listen out for traffic for approximately 10-20 minutes on frequency 5945 and will then
change to 7956 for long range traffic for another few minutes. It is vital that each vehicle calls in every
day to register their location and assure all is OK (one vehicle may call in for another vehicle if they are
together). Sched calls should be made at least once a day but must be made twice a day during the
summer months. If a call is missed the group must try and selcall the base or drive to a phone and ring.
If three calls are missed (e.g. 9am, 4pm, 9am) and the base cannot contact the vehicle or any of the
emergency contacts provided then search and rescue operations will be activated. The costs associated
with search and rescue may be passed on to the survey coordinator.
Satellite phones may be used to make scheduled calls in remote areas if appropriate arrangements have
been made.
A copy of the trip itinerary and vehicle details (including selcall and/or satellite phone numbers) along
with a list of the survey participants and their associated vehicles should be left at the DEH HF radio base
at the Kensington office. For remote area trips it may also be useful to provide these details to the
nearest police station.
PackingFood shopping and packing vehicles will generally have to take place in the last few days prior to
departure. This will be a lot easier if the field gear and kits for each group have already been sorted out
and organised into piles. Non-perishable shopping can also be done earlier to save some time in the last
few hectic days. It is advisable to organise at least one or two helpers to be present while packing so
they can help lift heavy objects and chase up bits and pieces as required. Another few people doing the
perishable shopping (see Food Shopping section above) will also make things run more smoothly and
give the coordinator time to double check lists and attend to last minute matters. Remember to follow
safe storage and handling practices when packing equipment. In particular;
• do not transport liquid nitrogen or formalin inside passenger compartments,
• do not carry any items in the passenger compartment that are not tied down,
• ensure all firearms are unloaded and out of sight and that vehicles are locked. Do not store
ammunition with the firearm.
Section 1 15
G U I D E L I N E S F O R V E R T E B R A T E S U R V E Y S I N S O U T H A U S T R A L I A

16 Section 1
G U I D E L I N E S F O R V E R T E B R A T E S U R V E Y S I N S O U T H A U S T R A L I A

G U I D E L I N E S F O R V E R T E B R A T E S U R V E Y S I N S O U T H A U S T R A L I A
GUIDELINES FOR VERTEBRATE SUR VEYS IN SOUTH AUSTRALIA
USING THE BIOLOGICAL SURVEY OF SOUTH AUSTRALIA
SECTION 2: SURVEY SITES AND FIELD PROCEDURE
First edition December 2000
BIOLOGICAL SURVEY AND RESEARCH SECTION
NATIONAL PARKS AND WILDLIFE SA
DEPARTMENT FOR ENVIRONMENT AND HERITAGE


G U I D E L I N E S F O R V E R T E B R A T E S U R V E Y S I N S O U T H A U S T R A L I A
Section 2 iii
C O N T E N T S
Section 2: Survey Sites and Field Procedure
Naming Survey sites . . . . . . . . . . . . . . . . . . . . . . . . . . . . . . . . . . . . . . . . . . . . . . . . . . . . . . . . . . . . . . 1
Location Data Sheets and Mud Maps . . . . . . . . . . . . . . . . . . . . . . . . . . . . . . . . . . . . . . . . . . . . . . . . . . 3
Establishing Survey Sites . . . . . . . . . . . . . . . . . . . . . . . . . . . . . . . . . . . . . . . . . . . . . . . . . . . . . . . . . . . . 3
Permanent Photopoints . . . . . . . . . . . . . . . . . . . . . . . . . . . . . . . . . . . . . . . . . . . . . . . . . . . . . . . . 3
Trap-lines . . . . . . . . . . . . . . . . . . . . . . . . . . . . . . . . . . . . . . . . . . . . . . . . . . . . . . . . . . . . . . . . . . 4
Checking Survey Sites . . . . . . . . . . . . . . . . . . . . . . . . . . . . . . . . . . . . . . . . . . . . . . . . . . . . . . . . . . . . . 7
Trapping . . . . . . . . . . . . . . . . . . . . . . . . . . . . . . . . . . . . . . . . . . . . . . . . . . . . . . . . . . . . . . . . . . 7
Observations . . . . . . . . . . . . . . . . . . . . . . . . . . . . . . . . . . . . . . . . . . . . . . . . . . . . . . . . . . . . . . . 8
Other Survey Activities . . . . . . . . . . . . . . . . . . . . . . . . . . . . . . . . . . . . . . . . . . . . . . . . . . . . . . . . . . . . 9
Opportunistic Observations . . . . . . . . . . . . . . . . . . . . . . . . . . . . . . . . . . . . . . . . . . . . . . . . . . . . 9
Batting . . . . . . . . . . . . . . . . . . . . . . . . . . . . . . . . . . . . . . . . . . . . . . . . . . . . . . . . . . . . . . . . . . . . 9
Spotlighting . . . . . . . . . . . . . . . . . . . . . . . . . . . . . . . . . . . . . . . . . . . . . . . . . . . . . . . . . . . . . . . . 10
Shooting . . . . . . . . . . . . . . . . . . . . . . . . . . . . . . . . . . . . . . . . . . . . . . . . . . . . . . . . . . . . . . . . . . 10
Data Sheets . . . . . . . . . . . . . . . . . . . . . . . . . . . . . . . . . . . . . . . . . . . . . . . . . . . . . . . . . . . . . . . . . . . . . 11
General . . . . . . . . . . . . . . . . . . . . . . . . . . . . . . . . . . . . . . . . . . . . . . . . . . . . . . . . . . . . . . . . . . . 11
Physical . . . . . . . . . . . . . . . . . . . . . . . . . . . . . . . . . . . . . . . . . . . . . . . . . . . . . . . . . . . . . . . . . . . 11
Vegetation . . . . . . . . . . . . . . . . . . . . . . . . . . . . . . . . . . . . . . . . . . . . . . . . . . . . . . . . . . . . . . . . . 11
Birds . . . . . . . . . . . . . . . . . . . . . . . . . . . . . . . . . . . . . . . . . . . . . . . . . . . . . . . . . . . . . . . . . . . . . . 11
Mammals and Reptiles . . . . . . . . . . . . . . . . . . . . . . . . . . . . . . . . . . . . . . . . . . . . . . . . . . . . . . . . 12
Amphibians . . . . . . . . . . . . . . . . . . . . . . . . . . . . . . . . . . . . . . . . . . . . . . . . . . . . . . . . . . . . . . . . 22
Invertebrates . . . . . . . . . . . . . . . . . . . . . . . . . . . . . . . . . . . . . . . . . . . . . . . . . . . . . . . . . . . . . . . 22
Opportunistic . . . . . . . . . . . . . . . . . . . . . . . . . . . . . . . . . . . . . . . . . . . . . . . . . . . . . . . . . . . . . . . 22
Trapping Effort . . . . . . . . . . . . . . . . . . . . . . . . . . . . . . . . . . . . . . . . . . . . . . . . . . . . . . . . . . . . . . 22
Weather Observations . . . . . . . . . . . . . . . . . . . . . . . . . . . . . . . . . . . . . . . . . . . . . . . . . . . . . . . . 22
Vertebrate Vouchers . . . . . . . . . . . . . . . . . . . . . . . . . . . . . . . . . . . . . . . . . . . . . . . . . . . . . . . . . . 23
Quadrat Summary . . . . . . . . . . . . . . . . . . . . . . . . . . . . . . . . . . . . . . . . . . . . . . . . . . . . . . . . . . . 23
Storage of Data Sheets . . . . . . . . . . . . . . . . . . . . . . . . . . . . . . . . . . . . . . . . . . . . . . . . . . . . . . . . 23
Collection and Processing of Vertebrate Voucher Specimens . . . . . . . . . . . . . . . . . . . . . . . . . . . . . . . . 23
Specimens Required . . . . . . . . . . . . . . . . . . . . . . . . . . . . . . . . . . . . . . . . . . . . . . . . . . . . . . . . . . 23 4
Field Voucher Numbers . . . . . . . . . . . . . . . . . . . . . . . . . . . . . . . . . . . . . . . . . . . . . . . . . . . . . . . 24
Euthanasia . . . . . . . . . . . . . . . . . . . . . . . . . . . . . . . . . . . . . . . . . . . . . . . . . . . . . . . . . . . . . . . . . 24
Removing Tissues . . . . . . . . . . . . . . . . . . . . . . . . . . . . . . . . . . . . . . . . . . . . . . . . . . . . . . . . . . . . 25
Preserving Specimens . . . . . . . . . . . . . . . . . . . . . . . . . . . . . . . . . . . . . . . . . . . . . . . . . . . . . . . . 26
Use of Formalin . . . . . . . . . . . . . . . . . . . . . . . . . . . . . . . . . . . . . . . . . . . . . . . . . . . . . . . . . . . . . 27
Packing Up Survey Sites . . . . . . . . . . . . . . . . . . . . . . . . . . . . . . . . . . . . . . . . . . . . . . . . . . . . . . . . . . . 28


SECTION 2 LIST OF FIGURES
2 Typical survey region in the pastoral zone showing distribution of sites
with associated camp name. . . . . . . . . . . . . . . . . . . . . . . . . . . . . . . . . . . . . . . . . . . . . . . . . . . . . . 2
3 Site codes for Erabena Track camp. . . . . . . . . . . . . . . . . . . . . . . . . . . . . . . . . . . . . . . . . . . . . . . . . 2
4 Typical survey site in the pastoral zone showing primary and secondary vegetation patches,
vegetation quadrats (shaded) and relative position of trap-lines and photopoints. . . . . . . . . . . . . 3
5 External genitalia of male and female rodents. . . . . . . . . . . . . . . . . . . . . . . . . . . . . . . . . . . . . . . . 21
6 Correct procedure for labelling Eppendorfs. . . . . . . . . . . . . . . . . . . . . . . . . . . . . . . . . . . . . . . . . . . 25
7 Suggested injection/piercing points and final setting positions for frogs, turtles,
lizards and snakes; final fixation should take place with dorsal surface uppermost. . . . . . . . . . . . . 27
SECTION 2 LIST OF PLATES
1 Permanent photopoint posts. . . . . . . . . . . . . . . . . . . . . . . . . . . . . . . . . . . . . . . . . . . . . . . . . . . . . 13
2 Standard photopoint disk attached to star dropper. . . . . . . . . . . . . . . . . . . . . . . . . . . . . . . . . . . . 13
3 Pitfall-line. . . . . . . . . . . . . . . . . . . . . . . . . . . . . . . . . . . . . . . . . . . . . . . . . . . . . . . . . . . . . . . . . . . . 14
4 Poly-plastic sheet (joined with connecting strip) showing flywire bottom
held in place with a rubber band. . . . . . . . . . . . . . . . . . . . . . . . . . . . . . . . . . . . . . . . . . . . . . . . . . 14
5 Pitfall trap showing correct placement of wire across middle of trap. . . . . . . . . . . . . . . . . . . . . . . 14
6 Elliott trap on flat, stable surface shaded by vegetation. . . . . . . . . . . . . . . . . . . . . . . . . . . . . . . . . 15
7 Cage trap with hessian bag around back section. . . . . . . . . . . . . . . . . . . . . . . . . . . . . . . . . . . . . . 15
8 Micro-pitfall trap for invertebrate sampling buried flush with ground.
Note: lid pushed into ground. . . . . . . . . . . . . . . . . . . . . . . . . . . . . . . . . . . . . . . . . . . . . . . . . . . . 15
9 Alcohol jar for collection of invertebrates from large pitfall traps. . . . . . . . . . . . . . . . . . . . . . . . . . 16
10 Hair tubes made of PVC pipe can be pegged into the ground or nailed to a tree. . . . . . . . . . . . . 16
11 Checking an Elliott trap. Note: vertical position of trap. . . . . . . . . . . . . . . . . . . . . . . . . . . . . . . . . 16
12 Removing an animal from an Elliott trap. Note: end with the treadle is at the top. . . . . . . . . . . . 17
13 Harp trap in the fly-way of a creek line. . . . . . . . . . . . . . . . . . . . . . . . . . . . . . . . . . . . . . . . . . . . . 17
14 Harp traps over water. . . . . . . . . . . . . . . . . . . . . . . . . . . . . . . . . . . . . . . . . . . . . . . . . . . . . . . . . . 17
15 Juvenile House Mouse showing female with button teats
(left) (compared to distended teats, Plate 16) and male with abdominal testes (right).
Note: larger distance between anus and genitals in male. . . . . . . . . . . . . . . . . . . . . . . . . . . . . . . 18
16 Female House Mouse with distended teats. Note: well worn suckling rings around teats
compared to almost invisible button teats in Plate 15. . . . . . . . . . . . . . . . . . . . . . . . . . . . . . . . . . 18
17 Field voucher tag with linen thread attached. . . . . . . . . . . . . . . . . . . . . . . . . . . . . . . . . . . . . . . . 18
18 Removing a sample of liver. . . . . . . . . . . . . . . . . . . . . . . . . . . . . . . . . . . . . . . . . . . . . . . . . . . . . . 19
19 Eppendorf tube labelled with voucher number and tissue type. . . . . . . . . . . . . . . . . . . . . . . . . . 19
20 Liquid nitrogen cylinder for preserving tissue samples. . . . . . . . . . . . . . . . . . . . . . . . . . . . . . . . . 19
21 Small mammal showing length of incision. . . . . . . . . . . . . . . . . . . . . . . . . . . . . . . . . . . . . . . . . . 20
22 Formalin drum for transporting preserved specimens. . . . . . . . . . . . . . . . . . . . . . . . . . . . . . . . . . 20
23 Example of preserving tray for reptile and amphibian specimens. . . . . . . . . . . . . . . . . . . . . . . . . 20
Section 2 v
G U I D E L I N E S F O R V E R T E B R A T E S U R V E Y S I N S O U T H A U S T R A L I A


Section 2: Survey Sites and Field Procedure
Naming Survey SitesIn order to standardise site codes across the state the Biological Survey Coordinating Committee (BSCC)
recommends a three-character alpha-numeric code to identify sites. This is defined in Heard and
Channon (1997, pg8) but is repeated below (with a vertebrate survey example) to identify minor
differences involved for vertebrate survey sites (particularly in pastoral areas).
It is important to note that site codes may be duplicated between surveys but never within a survey
(e.g. site code must be used in conjunction with the survey number to make them unique). If sites are
being added to an already established survey, then the Survey data base (EDBSA) must be checked to
identify which site codes have already been used under the relevant survey number.
For example 'ERA/001/01', where:
• 'ERA' are the three initials for Erabena Track along which a group of sites are located in the Sandy
Deserts Survey. This three-letter code is referred to as the camp name (Figure 2). For small-scale
surveys where there may only be one group of sites, the camp name may be based on the survey
name (e.g. Yumbarra C.P. Survey = YUM). With large scale regional surveys it is necessary to have
several camps and more convenient to select multiple camp names based on the local property name
(e.g. Hamilton Station = HAM), a nearby prominent feature (e.g. LOV = Loves Mine Range) or the
mapsheet name (e.g. Penola = PEN).
• '001' is the site number which corresponds to a representative area of vegetation chosen for
sampling. The total area of a site varies according to the size of vegetation communities in the study
region but generally they are 1km x 1km in pastoral regions and 100 metres x 100 metres in
agricultural regions (Figure 3).
• '01' is the patch number which corresponds to each habitat type present within the site. If there is
more than one habitat within a site extra patches will need to be surveyed which should be
numbered '02', 03' and so on. The dominant habitat should always be called '01'. Within each patch
a vegetation quadrat is surveyed which may also be referred to as quadrat '01'. The size of the
quadrat is 30m x 30m in agricultural regions and 100m x 100m in pastoral regions. If the habitat is
linear or unusual in size then the shape of the quadrat may need to be distorted but it should always
remain the same in total area. The permanent photopoint should always be established in patch '01'
inside the vegetation quadrat (refer to 'Permanent Photopoints', this section). Line A of the
vertebrate trap-line should also be established in patch '01', within the vegetation quadrat but out of
view of the photopoint photo (refer to 'Trap-lines', this section). In pastoral regions where an
additional trap-line (Line B) is required it should be established approximately 200 metres away,
outside of the quadrat but it must sample the same habitat and it must be confined within the 1km x
1km site (Figure 4).
Each patch should be numbered sequentially at each site, creating a site code that will be unique within
this survey.
For example:
ERA/001/01 = patch one at site number one at Erabena Track camp on the Sandy Deserts Survey.
ERA/001/02 = patch two at the same site.
ERA/002/01 = patch one at site number two at Erabena Track camp on the Sandy Deserts Survey.
Section 2 1
G U I D E L I N E S F O R V E R T E B R A T E S U R V E Y S I N S O U T H A U S T R A L I A

G U I D E L I N E S F O R V E R T E B R A T E S U R V E Y S I N S O U T H A U S T R A L I A
2 Section 2
Figure 2. Typical survey region in the pastoral zone showing distribution of sites with associated Camp name.
SANDY DESERT SURVEY REGION
KAL = Kallakoopah
PEE = Lake Peera
ERA = Erabena Track
RIG = Rig Road
COL = Colson Track
CAR = Carruthers Hill
TAM = Lake Tamblyn
MUR = Murda Hill
0 50 100 km
Figure 3. Site codes for Erabena Track Camp.
ERA001
ERA007 ERA008
0 25 50 km
ERA002
ERA003
ERA005
ERA006
ERA004
ERA = Erabena Track
100m
100m
50m
200m
1km
1km
Pitfall/Elliott Trapline A
Pitfall/Elliott Trapline B
Photopoint posts
Dominant vegetation type = patch 01
Secondary vegetation type eg. drainage line = patch 02
P
E
E
P
Location Data Sheets and Mud MapsA quadrat locality data sheet should be filled out for each site. This also involves drawing a 'mud map' to
aid in relocation of the photopoint posts during future visits. If multiple patches are present at a site
they should all be marked on the one sheet. The mud map should roughly indicate the driving distance
of the site from a known feature, the location of any patches, the position of the photopoint posts and
the placement of trap-line A and B (e.g. Appendix 15). If a photopoint is not permanently marked, then
it is useful to indicate roughly where and in what direction the site photograph was taken.
Establishing Survey Sites
Permanent Photopoints
Permanent photopoints may have been established during a previous visit or the reconnaissance trip. If
not they will need to be established at sometime during the survey week (preferably not while traps are
being installed). This should be carried out by the Botanists if present or by the group leader if it is a
vertebrate-only survey.
While it is not practical (or necessary) to establish permanent photopoint markers for all patches at a site
it is still useful to take a photo of the habitat. Permanent markers should be established at the primary
patch of all vertebrate trapping sites (unless the landholder has requested otherwise, refer to 'Note' in
'Reconnaissance Trips', Section 1). The standard posts used are 1.35 metre steel droppers although this
is not vital and different types of markers may need to be used under different circumstances. The posts
are erected 10 metres apart in a north-south direction so that the view looking south best represents the
habitat type being sampled (Plate 1). The north-south direction allows photos to be taking throughout
the day without looking into the sun (although this is not always practical). A NPWS photopoint disk
with the appropriate site code indented into it should be attached with wire to the northern star
dropper from which the photo is always taken (Plate 2).
Section 2 3
G U I D E L I N E S F O R V E R T E B R A T E S U R V E Y S I N S O U T H A U S T R A L I A
Figure 4. Typical survey site in the pastoral zone showing primary and secondary vegetation patches, vegetation quadrats (shaded) and relative position of trap-lines and photopoints.

G U I D E L I N E S F O R V E R T E B R A T E S U R V E Y S I N S O U T H A U S T R A L I A
Quadrat photographs should be taken in a standard way using the following guidelines:
• A white board (approx 350mm x 250mm) should be included in the photo to record the site details
and the date. Write the details on the white board with a white board marker as shown below. Make
the writing as large as possible so it fills the white board.
Survey Name
Camp
Quadrat and patch
Date
• The white board is attached (with a rubber band) to a range pole at a height of 1500 mm. The range
pole is then placed (or pushed into the ground) against the southern star dropper.
• Standing at the northern star dropper (or a point 10 metres away if posts are not being established)
photograph the white board and the surrounding vegetation with the camera focused on the white
board. The centre of the view must be at the 1.5m level on the range pole. It is appropriate to place
the top of the white board at this level. This generally means that, at least in open country, the sky
will take up about 1/3 of the view. Use a 50mm lens with a shutter speed of 125th of a second or
60th of a second and an F-stop of 16 or 22 if possible to maximise the depth of field. A film speed of
200 ISO is recommended to improve the light range.
• In windy conditions use the fastest shutter speed possible (e.g. over 250th/sec) or delay the photo
until conditions improve. Do not compromise depth of field. Aperture should be F8 or greater.
• Make sure that you use the camera's light meter effectively. This means taking a light reading
manually from the vegetation - not the vegetation and sky which will result in under-exposure of the
vegetation. If the vegetation is too dark try using a tripod or take another photo later when
conditions are better. Beware of strong winds.
• Take only landscape photos, not portrait (i.e. not with camera held sideways).
• Use this procedure for all patches. Indicate the photopoint direction on your mud map.
Trap-lines
One (agricultural regions) or two (pastoral regions) sets of trap-lines are to be installed at each site
within the dominant habitat type (patch '01'). Each line consists of 1 pit-line, 1 Elliott trap-line, 2 cage-
traps, and 1 micro-pitfall line. The first line (Line A) should be established within the vegetation quadrat
at patch '01' but out of view of the photopoint photo (Figure 4). If a second line is required (Line B) it
will have to fall outside of the vegetation quadrat but must remain in the same habitat and within the
confines of the site (1km x 1km). Line B should be at least 200m from Line A. Trap-lines should be
positioned so they are not easily visible from public access roads.
Trap-lines are maintained over four nights. It can take one and a half to two days to get all the trap-lines
set (depending on number of sites and substrate), which also means that they will be dismantled over
two days. Trap-line installation is a team effort with all hands on deck.
4 Section 2
Flinders
MUL
001 01
25 MAR 99
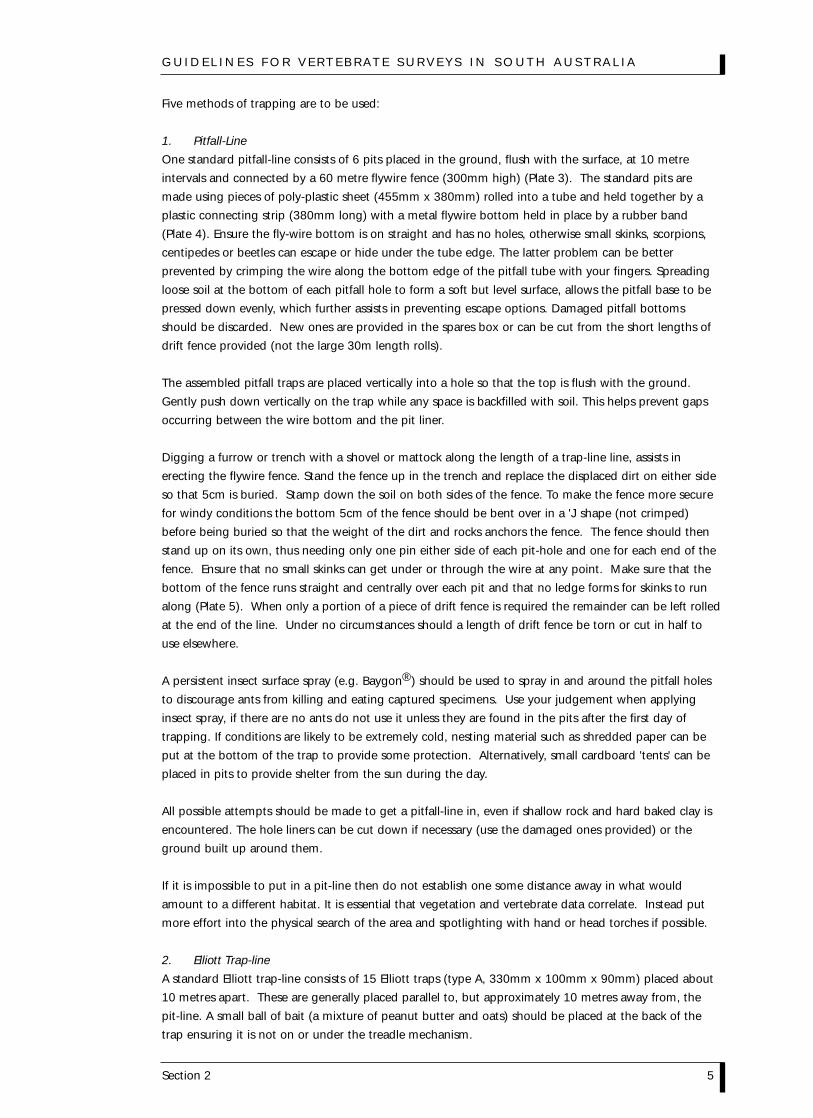
G U I D E L I N E S F O R V E R T E B R A T E S U R V E Y S I N S O U T H A U S T R A L I A
Section 2 5
Five methods of trapping are to be used:
1. Pitfall-Line
One standard pitfall-line consists of 6 pits placed in the ground, flush with the surface, at 10 metre
intervals and connected by a 60 metre flywire fence (300mm high) (Plate 3). The standard pits are
made using pieces of poly-plastic sheet (455mm x 380mm) rolled into a tube and held together by a
plastic connecting strip (380mm long) with a metal flywire bottom held in place by a rubber band
(Plate 4). Ensure the fly-wire bottom is on straight and has no holes, otherwise small skinks, scorpions,
centipedes or beetles can escape or hide under the tube edge. The latter problem can be better
prevented by crimping the wire along the bottom edge of the pitfall tube with your fingers. Spreading
loose soil at the bottom of each pitfall hole to form a soft but level surface, allows the pitfall base to be
pressed down evenly, which further assists in preventing escape options. Damaged pitfall bottoms
should be discarded. New ones are provided in the spares box or can be cut from the short lengths of
drift fence provided (not the large 30m length rolls).
The assembled pitfall traps are placed vertically into a hole so that the top is flush with the ground.
Gently push down vertically on the trap while any space is backfilled with soil. This helps prevent gaps
occurring between the wire bottom and the pit liner.
Digging a furrow or trench with a shovel or mattock along the length of a trap-line line, assists in
erecting the flywire fence. Stand the fence up in the trench and replace the displaced dirt on either side
so that 5cm is buried. Stamp down the soil on both sides of the fence. To make the fence more secure
for windy conditions the bottom 5cm of the fence should be bent over in a 'J' shape (not crimped)
before being buried so that the weight of the dirt and rocks anchors the fence. The fence should then
stand up on its own, thus needing only one pin either side of each pit-hole and one for each end of the
fence. Ensure that no small skinks can get under or through the wire at any point. Make sure that the
bottom of the fence runs straight and centrally over each pit and that no ledge forms for skinks to run
along (Plate 5). When only a portion of a piece of drift fence is required the remainder can be left rolled
at the end of the line. Under no circumstances should a length of drift fence be torn or cut in half to
use elsewhere.
A persistent insect surface spray (e.g. Baygon®) should be used to spray in and around the pitfall holes
to discourage ants from killing and eating captured specimens. Use your judgement when applying
insect spray, if there are no ants do not use it unless they are found in the pits after the first day of
trapping. If conditions are likely to be extremely cold, nesting material such as shredded paper can be
put at the bottom of the trap to provide some protection. Alternatively, small cardboard 'tents' can be
placed in pits to provide shelter from the sun during the day.
All possible attempts should be made to get a pitfall-line in, even if shallow rock and hard baked clay is
encountered. The hole liners can be cut down if necessary (use the damaged ones provided) or the
ground built up around them.
If it is impossible to put in a pit-line then do not establish one some distance away in what would
amount to a different habitat. It is essential that vegetation and vertebrate data correlate. Instead put
more effort into the physical search of the area and spotlighting with hand or head torches if possible.
2. Elliott Trap-line
A standard Elliott trap-line consists of 15 Elliott traps (type A, 330mm x 100mm x 90mm) placed about
10 metres apart. These are generally placed parallel to, but approximately 10 metres away from, the
pit-line. A small ball of bait (a mixture of peanut butter and oats) should be placed at the back of the
trap ensuring it is not on or under the treadle mechanism.
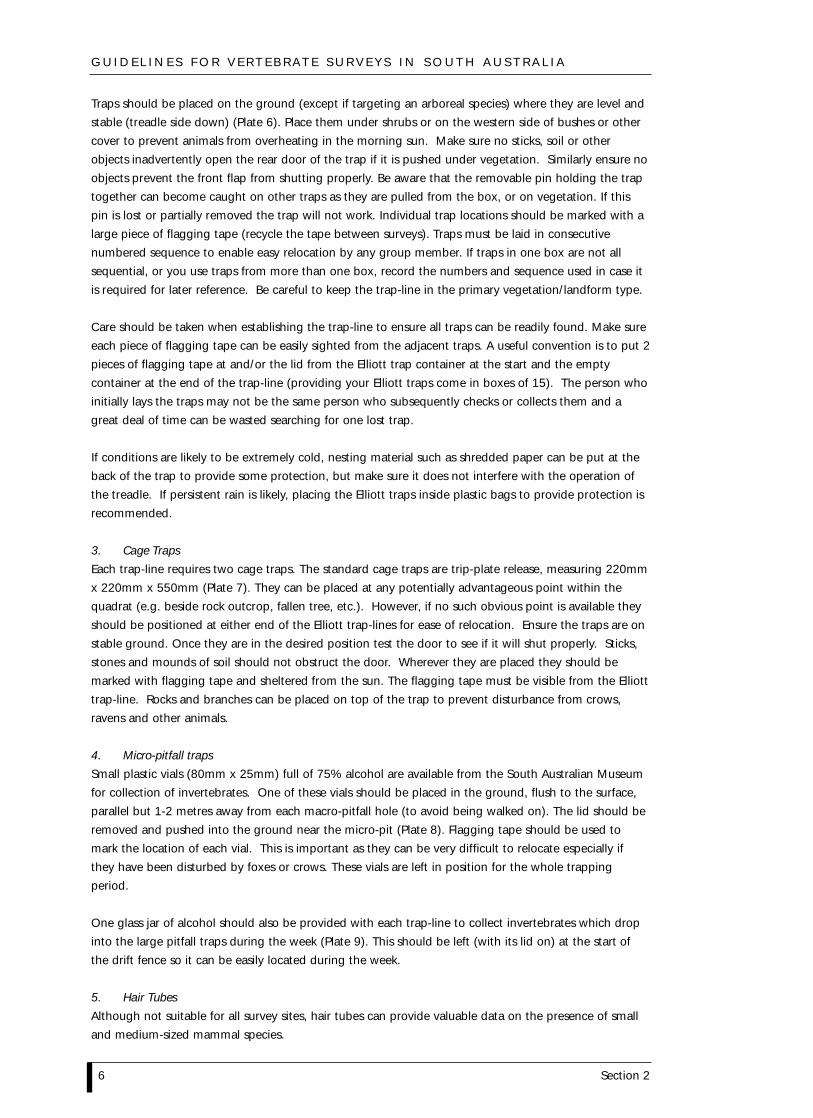
Traps should be placed on the ground (except if targeting an arboreal species) where they are level and
stable (treadle side down) (Plate 6). Place them under shrubs or on the western side of bushes or other
cover to prevent animals from overheating in the morning sun. Make sure no sticks, soil or other
objects inadvertently open the rear door of the trap if it is pushed under vegetation. Similarly ensure no
objects prevent the front flap from shutting properly. Be aware that the removable pin holding the trap
together can become caught on other traps as they are pulled from the box, or on vegetation. If this
pin is lost or partially removed the trap will not work. Individual trap locations should be marked with a
large piece of flagging tape (recycle the tape between surveys). Traps must be laid in consecutive
numbered sequence to enable easy relocation by any group member. If traps in one box are not all
sequential, or you use traps from more than one box, record the numbers and sequence used in case it
is required for later reference. Be careful to keep the trap-line in the primary vegetation/landform type.
Care should be taken when establishing the trap-line to ensure all traps can be readily found. Make sure
each piece of flagging tape can be easily sighted from the adjacent traps. A useful convention is to put 2
pieces of flagging tape at and/or the lid from the Elliott trap container at the start and the empty
container at the end of the trap-line (providing your Elliott traps come in boxes of 15). The person who
initially lays the traps may not be the same person who subsequently checks or collects them and a
great deal of time can be wasted searching for one lost trap.
If conditions are likely to be extremely cold, nesting material such as shredded paper can be put at the
back of the trap to provide some protection, but make sure it does not interfere with the operation of
the treadle. If persistent rain is likely, placing the Elliott traps inside plastic bags to provide protection is
recommended.
3. Cage Traps
Each trap-line requires two cage traps. The standard cage traps are trip-plate release, measuring 220mm
x 220mm x 550mm (Plate 7). They can be placed at any potentially advantageous point within the
quadrat (e.g. beside rock outcrop, fallen tree, etc.). However, if no such obvious point is available they
should be positioned at either end of the Elliott trap-lines for ease of relocation. Ensure the traps are on
stable ground. Once they are in the desired position test the door to see if it will shut properly. Sticks,
stones and mounds of soil should not obstruct the door. Wherever they are placed they should be
marked with flagging tape and sheltered from the sun. The flagging tape must be visible from the Elliott
trap-line. Rocks and branches can be placed on top of the trap to prevent disturbance from crows,
ravens and other animals.
4. Micro-pitfall traps
Small plastic vials (80mm x 25mm) full of 75% alcohol are available from the South Australian Museum
for collection of invertebrates. One of these vials should be placed in the ground, flush to the surface,
parallel but 1-2 metres away from each macro-pitfall hole (to avoid being walked on). The lid should be
removed and pushed into the ground near the micro-pit (Plate 8). Flagging tape should be used to
mark the location of each vial. This is important as they can be very difficult to relocate especially if
they have been disturbed by foxes or crows. These vials are left in position for the whole trapping
period.
One glass jar of alcohol should also be provided with each trap-line to collect invertebrates which drop
into the large pitfall traps during the week (Plate 9). This should be left (with its lid on) at the start of
the drift fence so it can be easily located during the week.
5. Hair Tubes
Although not suitable for all survey sites, hair tubes can provide valuable data on the presence of small
and medium-sized mammal species.
6 Section 2
G U I D E L I N E S F O R V E R T E B R A T E S U R V E Y S I N S O U T H A U S T R A L I A

If hair tubes are considered suitable then four should be used per tap line. The standard tube is a
200mm length of 50mm (diameter) PVC pipe (Plate 10). However, different styles and sizes can be used
depending on the species being targeted. One hair tube should be pegged into the ground, and one
nailed to a tree, at each end of the pitfall-line. The location of all hair tubes should be marked well with
flagging tape. Protective paper is then removed from the double-sided sticky tape located inside each
end of the tube. Bait wrapped in flywire is placed inside the tube and held in position by pushing a nail
or peg through a hole in the tube (this is the same nail or peg used to secure the tube in position).
Checking Survey SitesData are collected at each site by a combination of trapping observations.
Trapping
All trap-lines are left in for four nights and preferably four full days (i.e. pack them up in the order they
were established). During this time they must be checked twice a day in accordance with the Animal
Ethics – Standard Operating Procedure (Appendix 2). The first check should be early in the morning,
before the temperature rises too much or the ants become too active, and the second check late in the
afternoon or early evening. This often means two vehicles are required to go in different directions and
each must therefore contain catching, holding, weighing and recording equipment as well as Baygon®
and extra bait and alcohol. Keep spares of all data sheets in both vehicles. Checking trap-lines is the
responsibility of the mammalogist and herpetologist but in some situations it may be necessary for the
ornithologist or botanist (if present) to check some sites. If this is required all specimens should be
returned to the relevant specialist for confirmation of identification.
Checking trap-lines involves several steps:
1. Record all animals captured in pitfall, Elliott and cage traps on the data sheets (refer to 'Data Sheets'
later in this section). A stick or drift fence pin should be used to check the dirt at the bottom of the
pit for biting insects or small reptiles that may be buried. Any closed Elliott traps should be held
vertically while taking care to slightly open the top door (Plate 11). To remove animals from the trap
put a calico bag firmly around one end, hold the trap upside down so the treadle is at the top (helps
prevent animals getting tangled in the mechanism) push the door open and gently shake the animal
downwards into the bag (Plate 12). A similar technique can be used for cage traps using a larger
calico or hessian bag.
2. If you are confident of the identification and the animal is not required as a voucher specimen record
the necessary details, give it a temporary mark and release it straight away at the site. A 'permanent'
marker pen can be used to draw a bar on the tail as a convenient means of marking small mammals
and reptiles. An additional bar can be added each time the animal is captured. All small mammals
should be placed near holes or cracks or if these aren't available release them into dense cover.
Reptiles can be released in nearby cover.
3. If the animal is required for confirmation of identification or as a voucher specimen, place it in a
calico bag (that has been checked for holes), label the bag (see below) and ensure it is kept in a safe,
cool, place. Small mammals and venomous snakes need to be bagged and placed in a more durable
container. A spare Elliott trap is suitable for small mammals and small snakes and a larger box or
container for larger snakes. Be sure these containers are also kept cool. When handling frogs all
efforts should be made to prevent contamination between populations as viruses are considered the
likely agent responsible for frog declines throughout Australia and the world (refer to 'Quarantine
Considerations', Section1 and Appendix 3). Wash hands with disinfectant between sites and keep
frogs in plastic containers. Containers must be sterilised between use. If calico bags must be used for
frogs they should also be sterilised between use.
Section 2 7
G U I D E L I N E S F O R V E R T E B R A T E S U R V E Y S I N S O U T H A U S T R A L I A
All collection bags and containers must be clearly labelled with a piece of masking tape on the
outside. The label should include species, date, time and site code. Venomous snakes must be clearly
labelled with a sign saying 'DANGER – VENOMOUS SNAKE'. Refer to 'Observations-Reptiles and
Amphibians' later in this section for notes on handling snakes.
4. If there are a lot of ants in a pitfall trap, spray around the trap with surface spray to kill and deter
other ants.
5. If the temperature is extreme Elliott and cage traps should be closed each morning to avoid causing
heat stress to animals captured during the day.
6. As each Elliott and cage trap is checked in the evening it should be reset (if closed that morning) and
checked for bait. As a rule all Elliott and cage traps should be re-baited with fresh bait ready for the
third night of trapping.
7. All invertebrates should be collected from the large pitfall traps and placed in the general collecting
jar provided for each trap-line. Long forceps or plastic tongs can be used to transfer the insects or
rake soil at the bottom of the pit to avoid being bitten.
8. All small insect traps should be checked regularly to see if they require topping up with alcohol.
During hot weather the vials may need to be topped up each day as alcohol evaporates readily. A
squeeze bottle is provided for this purpose.
Observations
In addition to trapping there are standard observations which must be recorded at each site as part of
the total survey effort. Standard observations should be concentrated in the primary patch at each site
(refer to definitions in 'Naming Survey Sites', this section). This ensures they are compatible with
vegetation data which is an essential requirement of survey methodology. Any observations outside of
the primary patch must be entered on data sheets specific to the habitat patch they were observed in
(secondary patches) or on opportunistic data sheets. The location and numbering sequence of
secondary patches needs to be confirmed with the botanists or group leader and clearly defined on
mud maps.
1. Birds
The ornithologist should spend at least one hour during the early morning and one hour in the late
afternoon at each site recording bird species in the area. Effort should be concentrated in the same
habitat type as the primary patch. If records are collected from adjoining patches record them on a
separate site data sheet labelled with the appropriate patch number (you may have to confirm the
patch number later) or alternatively on opportunistic data sheets. Do not tack them on to the end of
the data sheet for the primary patch. On the rare occasions when it is necessarily to collect birds for
voucher specimens, additional time should be spent in each habitat to make up for time lost through
mist-netting and shooting.
2. Reptiles and Amphibians
The herpetologist should spend around two hours during the week at each site physically searching
for reptiles (and amphibians if appropriate). To ensure a proper search is made the herpetologist
should lift rocks and logs, look under bark, dig up burrows and rake leaf litter. These techniques are
unavoidably destructive, but are considered an important part of the survey technique. This search
effort may be split into more than one session to optimise ideal searching conditions. Extra hands and
eyes are often useful for finding and catching reptiles so anyone in the group with spare time should
join in.
8 Section 2
G U I D E L I N E S F O R V E R T E B R A T E S U R V E Y S I N S O U T H A U S T R A L I A

Herpetologists are not required to handle venomous snakes. People should only handle venomous
snakes and other large reptiles if they have been authorised by the survey leader to do so and are
confident about the situation. All handling and transport of venomous snakes must be carried out in
accordance with the OHS&W Policy (Appendix 16).
3. Mammals
The mammalogist should spend 1-2 hours at each site searching for tracks, scats, scratchings,
burrows (excavate if signs of recent activity such as fresh dirt and droppings), skulls, etc. Where there
are small caves or hollow trees, try to locate predator casts (e.g. owl pellets), droppings, sub-fossil
bone material and old Stick-nest Rat nests. Sketch or photograph any unknown tracks. Only people
vaccinated against the Australian Bat Lyssavirus should go into caves likely to be occupied by bats.
Any material which can not be identified at the site should be given a temporary label and taken
back to camp. If the material can not be identified at camp or if it is needed for a voucher specimen
it should be assigned a voucher number (see 'Field Voucher Numbers' later in this section).
4. Invertebrates
Rarely is there the luxury of a specialised invertebrate person as part of the group so everyone should
help with this area. If there are extra people it is useful to assign them the job of maintaining the
alcohol traps and transferring invertebrates from the large pitfall traps to the alcohol jar. Any
additional invertebrates found at the site can be added to the jar but no standard search effort is
required. As a rule collect representatives of all species of invertebrate, but no more than a few of the
common ones. It is not appropriate however to preserve moths or butterflies in alcohol so unless
specialised killing and storage equipment has been provided don't collect these groups.
Other Survey ActivitiesOpportunistic Observations
All sightings of animals outside the designated quadrats should be recorded (e.g. while travelling
between sites). Many species are only recorded for the area from a once-off opportune sighting, so take
the time to stop and record and if necessary collect any opportune species. If some species are
particularly common record a representative sample only (e.g. not every crow every day). Where
groups of kangaroos or emus may be seen each day in the same area only record them once if
considered to be the same group unless extra individuals are noticed. Include road-kills,
interesting/unusual tracks, scats, pellets, skulls and other skeletal material, (specific instructions will be
given later for collection/preservation of certain species). Try to visit any caves in breakaway and
escarpment areas as owl pellets are often the best source of small mammal records over recent times
and caves can contain large amounts of sub-fossil material gathered over thousands of years. Remember,
only people immunised against the Australian Bat Lyssavirus should go into caves likely to be inhabited
by bats. Waterholes, especially if there are none at the sites, are often a good spot to gather new
opportunistic records. These may be the only places that you get records of some species such as
amphibians and waterbirds.
Batting
Due to the recent discovery of the Australian Bat Lyssavirus in the eastern states and the concern by
health authorities as to the health of bat handlers, only people vaccinated with the rabies vaccine are to
handle bats. This must be carried out in accordance with Occupational Health and Safety guidelines
(Appendix 17). Removing bats from mist-nets and harp traps should be carried out by the most
experienced bat handlers to minimise the chance of being bitten. In the event of a bite or scratch from
a bat, wash the area thoroughly with soap and water and contact a medical practitioner immediately.
The bat causing the bite should be euthanased and double bagged in seal-lock bags and refrigerated
(not frozen).
Section 2 9
G U I D E L I N E S F O R V E R T E B R A T E S U R V E Y S I N S O U T H A U S T R A L I A

Unfortunately, bats are not easy to survey on a pre-selected site basis as quite specific requirements are
needed to optimise catching them. This means most batting is usually carried out at opportunistic
locations. The amount of batting conducted will also depend on group workloads (i.e. the number of
specimens that need to be processed at night and spotlighting).
The three main methods used to survey bats are; mist nets, harp traps and bat detectors (Anabat). In
general groups should try and 'bat' for at least three nights each week. However, do not waste time
mist-netting on windy nights as it is usually ineffective. Harp traps or mist nets should be set up at the
designated sites or within 1 km of a site as long as the vegetation is not too significantly different. Harp
traps, and bat detectors (if available), are useful for sites that are a long way from camp but they must
be checked first thing in the morning. If the survey sites have no suitable areas for establishing a net or
trap look for good opportunistic locations. These are usually found in fly-ways formed by tracks or creek
lines or around water (Plate 13 & 14). Guidelines for these three batting techniques are available in
'Australian Bats' (Churchill 1998). Additional notes on the maintenance of batting equipment are
provided in Appendix 18.
Use the mammal data sheets for bat records at survey sites and opportunistic sheets elsewhere.
Remember to include both site and opportunistic batting on the trapping effort data sheet.
Spotlighting
Spotlighting is difficult to formalise on general biological surveys but survey groups are encouraged to
undertake as much as possible, preferably some time at each site. Put in extra effort at sites where rock
has prevented installation of a pitfall-line, and spend time searching with hand-held and head torches.
Try and spend some time travelling between all the sites and to and from camp at night with the car
headlights and hand held spotlights.
Good spotlighting conditions (warm, humid evenings) should not be missed under any circumstances.
All hands (with torches in them) should be on deck! Some nights however, may be totally unsuitable
for spotlighting and should be used for more productive activities.
Nocturnal observations need not be restricted to sightings. Most frogs and some nocturnal birds are
more often heard than seen. Remember to indicate the number of hours spent spotlighting together
with the rough location on the trapping effort data sheet.
Shooting
Shooting is used on some surveys to collect birds and larger mammals (e.g. cats, foxes and rabbits). A
variety of guns may be required depending on the purpose (e.g. a 410 shotgun for birds and smaller
mammals, like cats or rabbits, and a 222 / 243 for larger species). The use of firearms requires training
and experience and they should only be used by an appropriately authorised employee. All landholders
and rangers should be consulted before using firearms on their property. In the agricultural zone, local
police should be notified by the survey coordinator. Do not use firearms when other members of the
survey group are in the vicinity. Avoid collecting birds adjacent to tracks or locations where tourists may
observe your activities. Collection of birds, although only required for a few remote area surveys, is a
sensitive issue and should be carried out with discretion.
10 Section 2
G U I D E L I N E S F O R V E R T E B R A T E S U R V E Y S I N S O U T H A U S T R A L I A

Data SheetsGeneral
Unless otherwise indicated a HB or B pencil must be used for writing on data sheets or labels. Ink will
run when wet and lighter 'H' pencils will not photocopy well. Data for different patches must be
recorded on separate data sheets. It is essential to record the patch code and date at the top of all data
sheets. All times should be recorded in 24 hour format. The codes required to fill out each field are
provided on the data sheets.
The 'Voucher Number' field for each vertebrate sheet should only be filled out if the specimen is
collected (refer to 'Field Voucher Numbers', this section). Likewise the 'Tissue' field is only filled out if
tissue samples are taken from a specimen. 'Museum Number' is provided by the South Australian
Museum once a specimen has been registered and should be left blank while in the field.
Ensure that all species names are recorded in the scientific (Latin) binomial form (i.e. do not use
common names on the final data sheets). If you are unfamiliar with the Latin names (especially birds)
put the common name in comments during the day and enter the scientific name in the correct field in
the evening.
An example of each type of data sheet correctly filled out is provided in Appendix 15.
Physical
One physical data sheet, including site location mud map, should be completed for each patch. There is
an A3 version which should be used for agricultural zone surveys and an A4 version which has been
customised for pastoral zone surveys. The A3 version has some additional fields which are not as
appropriate for sites within pastoral areas. Detailed interpretation of the fields are provided by Heard
and Channon (1997). Notes on the use of GPS units for recording site coordinates are provided in
Appendix 19. Coordinates should be recorded using the Australian Map Grid (AMG). Ensure that the
'Datum' and 'Method' field are recorded for each AMG location.
Vegetation
If the survey covers vegetation as well as vertebrates one vegetation data sheet needs to be completed
for each patch. Detailed interpretation of the vegetation data sheet and an example is provided by
Heard and Channon (1997).
Birds
The majority of bird observation records for each quadrat will be taken by the ornithologist during a
concentrated search at each site. However, daily observations should be made by whichever group
member is checking the trap-lines at the site and any interesting or clearly sighted species should
reported to the ornotholiogist each day. A new data sheet should be used for each patch and each day
that observations are recorded. It is not necessary to fill out a NIL data sheet for days were no bird
observations are recorded. A NIL sheet should be filled out if effort was made to search for birds but
none were recorded (this will indicate search effort).
'Strata' refers to the height the bird was observed at, not the vegetation height. Birds recorded as
'overhead' would be 36/-/19 or 35/-/19, and on the ground 34/-/17.
When recording 'number observed', record only those you feel you haven't previously recorded (i.e. if
flying in opposite direction, in a different tree/area or smaller/larger flock). Use your discretion so
records are not duplicated.
Section 2 11
G U I D E L I N E S F O R V E R T E B R A T E S U R V E Y S I N S O U T H A U S T R A L I A
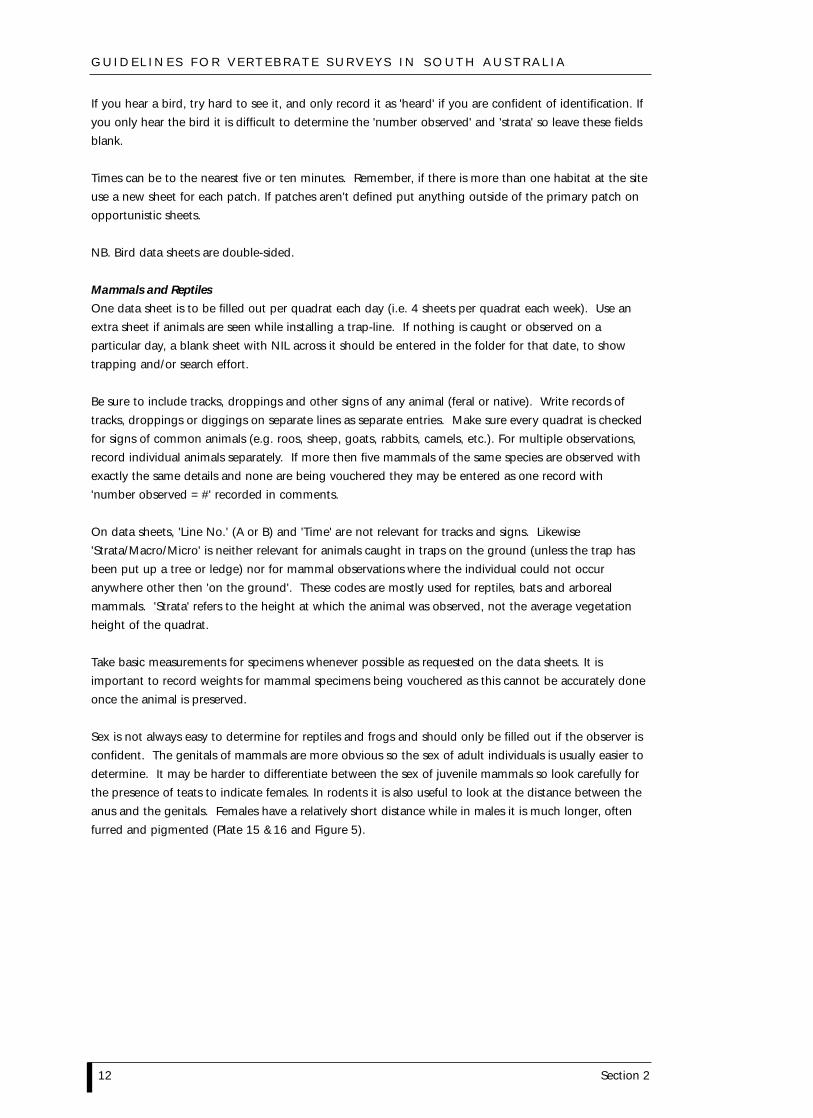
If you hear a bird, try hard to see it, and only record it as 'heard' if you are confident of identification. If
you only hear the bird it is difficult to determine the 'number observed' and 'strata' so leave these fields
blank.
Times can be to the nearest five or ten minutes. Remember, if there is more than one habitat at the site
use a new sheet for each patch. If patches aren't defined put anything outside of the primary patch on
opportunistic sheets.
NB. Bird data sheets are double-sided.
Mammals and Reptiles
One data sheet is to be filled out per quadrat each day (i.e. 4 sheets per quadrat each week). Use an
extra sheet if animals are seen while installing a trap-line. If nothing is caught or observed on a
particular day, a blank sheet with NIL across it should be entered in the folder for that date, to show
trapping and/or search effort.
Be sure to include tracks, droppings and other signs of any animal (feral or native). Write records of
tracks, droppings or diggings on separate lines as separate entries. Make sure every quadrat is checked
for signs of common animals (e.g. roos, sheep, goats, rabbits, camels, etc.). For multiple observations,
record individual animals separately. If more then five mammals of the same species are observed with
exactly the same details and none are being vouchered they may be entered as one record with
'number observed = #' recorded in comments.
On data sheets, 'Line No.' (A or B) and 'Time' are not relevant for tracks and signs. Likewise
'Strata/Macro/Micro' is neither relevant for animals caught in traps on the ground (unless the trap has
been put up a tree or ledge) nor for mammal observations where the individual could not occur
anywhere other then 'on the ground'. These codes are mostly used for reptiles, bats and arboreal
mammals. 'Strata' refers to the height at which the animal was observed, not the average vegetation
height of the quadrat.
Take basic measurements for specimens whenever possible as requested on the data sheets. It is
important to record weights for mammal specimens being vouchered as this cannot be accurately done
once the animal is preserved.
Sex is not always easy to determine for reptiles and frogs and should only be filled out if the observer is
confident. The genitals of mammals are more obvious so the sex of adult individuals is usually easier to
determine. It may be harder to differentiate between the sex of juvenile mammals so look carefully for
the presence of teats to indicate females. In rodents it is also useful to look at the distance between the
anus and the genitals. Females have a relatively short distance while in males it is much longer, often
furred and pigmented (Plate 15 &16 and Figure 5).
12 Section 2
G U I D E L I N E S F O R V E R T E B R A T E S U R V E Y S I N S O U T H A U S T R A L I A

G U I D E L I N E S F O R V E R T E B R A T E S U R V E Y S I N S O U T H A U S T R A L I A
Section 2 13
Plate 1 Permanent photopoint posts.
Plate 2 Standard photopoint disk attached to star dropper.
SECTION 2 COLOUR PLATES
Hel
en O
wen
s
Tony
Rob
inso
n

G U I D E L I N E S F O R V E R T E B R A T E S U R V E Y S I N S O U T H A U S T R A L I A
14 Section 2
Plate 3 Pitfall-line.
Plate 5 Pitfall trap showing correct placement of wire across middle of trap.
Plate 4 Poly-plastic sheet (joined with connecting strip) showing flywire bottom held in place with a rubber band.
Hel
en O
wen
s
Hel
en O
wen
s
Pete
r C
anty
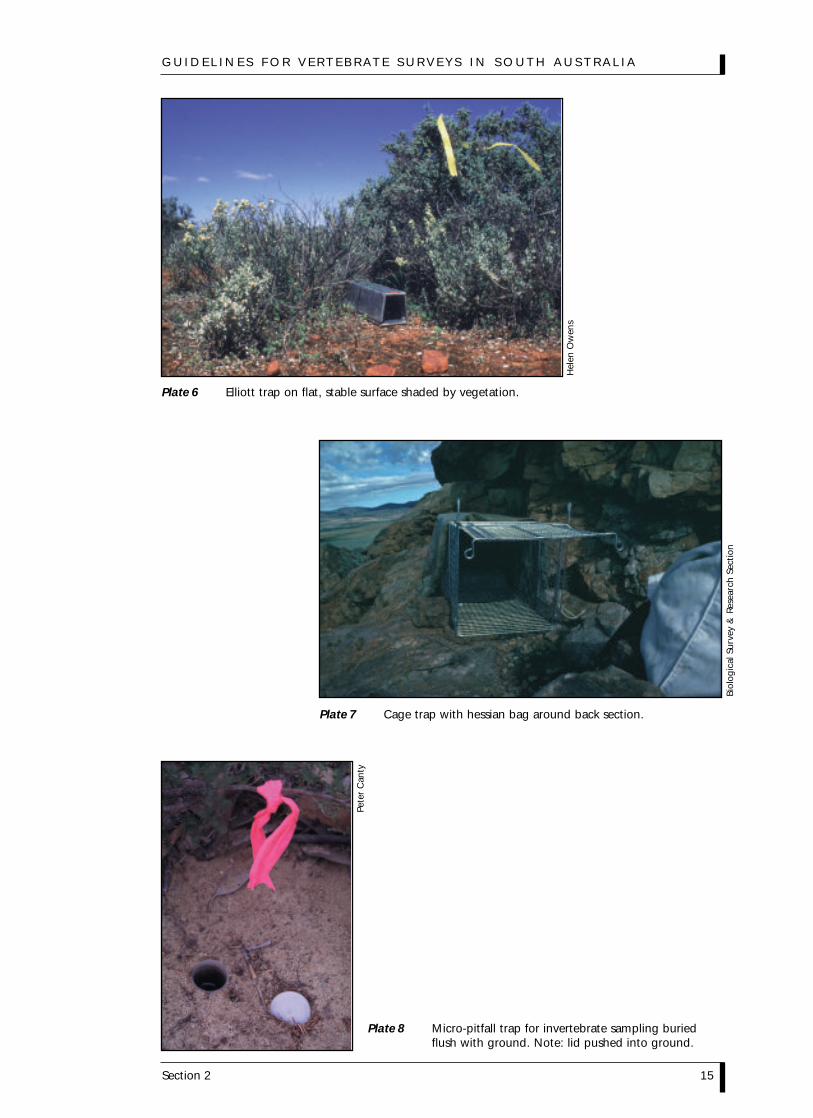
G U I D E L I N E S F O R V E R T E B R A T E S U R V E Y S I N S O U T H A U S T R A L I A
Section 2 15
Plate 6 Elliott trap on flat, stable surface shaded by vegetation.
Plate 7 Cage trap with hessian bag around back section.
Plate 8 Micro-pitfall trap for invertebrate sampling buried flush with ground. Note: lid pushed into ground.
Hel
en O
wen
s
Biol
ogic
al S
urve
y &
Res
earc
h Se
ctio
n
Pete
r C
anty

G U I D E L I N E S F O R V E R T E B R A T E S U R V E Y S I N S O U T H A U S T R A L I A
16 Section 2
Plate 9 Alcohol jar for collection of invertebrates from large pitfall traps.
Plate 10 Hair tubes made of PVC pipe can be pegged into the ground or nailed to a tree.
Plate 11 Checking an Elliott trap. Note: vertical position of trap.
Hel
en O
wen
s
Tony
Rob
inso
nPe
ter
Can
ty

G U I D E L I N E S F O R V E R T E B R A T E S U R V E Y S I N S O U T H A U S T R A L I A
Section 2 17
Plate 12 Removing an animal from an Elliott trap. Note: the end with the treadle is at the top.
Plate 13 Harp trap in the fly-way of a creek line.
Plate 14 Harp traps over water.
Hel
en O
wen
s
Stev
e D
oyle
Haf
iz S
tew
art

G U I D E L I N E S F O R V E R T E B R A T E S U R V E Y S I N S O U T H A U S T R A L I A
18 Section 2
Plate 15 Juvenile House Mouse showing female with button teats (left) (compared to distended teats,Plate 16) and male with abdominal testes (right). Note: larger distance between anus and genitals in male.
Plate 16 Female House Mouse with distended teats. Note: well worn suckling rings around teats compared to almost invisible button teats in Plate 15.
Plate 17 Field voucher tag with linen thread attached.
Hel
en O
wen
s
Hel
en O
wen
s
Tony
Rob
inso
n

G U I D E L I N E S F O R V E R T E B R A T E S U R V E Y S I N S O U T H A U S T R A L I A
Section 2 19
Plate 18 Removing a sample of liver.
Plate 19 Eppendorf tube labelled with voucher number and tissue type.
Hel
en O
wen
s
Tony
Rob
inso
n
Plate 20 Liquid Nitrogen cylinder for preserving tissue samples.
Tony
Rob
inso
n

G U I D E L I N E S F O R V E R T E B R A T E S U R V E Y S I N S O U T H A U S T R A L I A
20 Section 2
Plate 22 Formalin drum for transporting preserved specimens.
Plate 21 Small mammal showing length of incision.
Plate 23 Example of a preserving tray for reptile and amphibian specimens.
Tony
Rob
inso
n
Hel
en O
wen
s
Hel
en O
wen
s

Definitions used for the mammal data sheet are as follows.
Testes - Placentals only
1 Scrotal – scrotal sack obvious, may appear empty or full.
2 Abdominal - scrotum not obvious.
3 Distended – this category is no longer in use. Lumped with scrotal.
Teats
1 Lactating – teats and surrounding mammary tissue swollen. Milk can be squeezed from teat.
2 Distended – easy to see, enlarged.
3 Regressed – this category is no longer in use. Lumped with distended.
4 Button - barely visible.
Pouch - Marsupials only
1 Not developed – no pouch visible, usually just a ring of button teats.
2 Developed - swollen, flaps present, teats enlarged.
Young present – put number of young in brackets (if possible).
Figure 5. External genitalia of male and female rodents.
A An adult male showing penis (b) and enlarged scrotal sack (a) partially obscuring the anus (c). The scrotal sack may appear empty in non-breeding males.
B An immature, no scrotal sack presentC Vulva (e), anus (c), perforate vagina (f) and distended teats (d) on a pregnant female.D Female with imperforate vagina (g)E Female showing position of mammary tissue (h) under the teats.
Section 2 21
G U I D E L I N E S F O R V E R T E B R A T E S U R V E Y S I N S O U T H A U S T R A L I A
Dia
gram
tak
en fr
om (
Nag
orse
n &
Pet
erso
n 19
80)

Amphibians
Fewer of these data sheets are provided as weather conditions will not commonly be conducive to
catching amphibians. Strata/Macro/Micro should be filled out for animals caught outside of traps. If
there are multiple individuals of the same species recorded on the same day and all of the details are the
same, the records may be lumped together and the total recorded in the number observed field. If a
specimen is vouchered it must be recorded as a single record (i.e. with number observed '1'). It is not
necessary to put in a daily NIL return for these data sheets, only fill them out if animals are encountered.
Invertebrates
No data sheets need to be filled out for invertebrates although all jars must have labels put in them. Pre-
printed labels should be provided on sheets which can be cut out and put in the appropriate micro-pits
and site jars when packing up the sites. Alternatively, write the information (survey number, site, date,
and collector) on a small piece of paper with pencil (not ink). If interesting specimens are collected
opportunistically, ensure a label with the appropriate details is put in with the specimen.
Opportunistic
Separate sheets are provided for any opportunistic sightings in the general survey region which fall
outside of the survey sites. There are two types of opportunistic data sheets which may be used. One is
for vertebrates only and allows one observation per location to be recorded. Multiple locations can be
entered per sheet. The other type can be used for vertebrates or plants and allows multiple
observations per location. This type may be provided as a booklet (with codes at the front of the book)
or as an A4 page with 3 locations per page (with codes on the back of the sheet).
Please ensure that all grid references are entered before the end of each week (refer to 'GPS Operation'
Appendix 19). It is best to take a GPS reading at the time of observation. If this is not possible you can
flag the site and return with a GPS if convenient or make notes as to the location and work out the
AMG's that evening on a map. Ensure that the 'Datum' and 'Method' field are recorded each time a
location is recorded.
Although the opportune sheets do not provide fields for specimen details (due to room constraints)
additional details considered important can be written in the comments field or on the line below the
record. In particular, remember to record the weight and sex of mammal specimens being vouchered.
Trapping Effort
Whenever vertebrate data are collected for a site, a trapping effort data sheet should be filled out. One
sheet is required per camp (group of sites) and trap effort is recorded for the primary patch at each site.
If vertebrate effort is spent at other patches they can be listed also. Opportunistic effort should also be
recorded (i.e. bats, spotlighting, etc.). Do not forget to complete this sheet; it is crucial for the data
analysis.
Weather Observations
Whenever vertebrate data are collected for a site, weather conditions for the survey period need to be
recorded. One sheet should be completed at each camp rather than at each site. One individual should
be given the responsibility of setting up thermometers, reading and entering data. One Max/Min
thermometer is put in a sheltered, shady position and one is placed in full sun. These should be checked
and reset once a day (either early morning or late afternoon). Keep thermometers off hot surfaces and
out of direct wind if possible.
22 Section 2
G U I D E L I N E S F O R V E R T E B R A T E S U R V E Y S I N S O U T H A U S T R A L I A

Vertebrate Vouchers
These data sheets provide a cumulative list of all vertebrates collected during the survey. They must be
filled out as specimens are processed, always in ascending numerical order. If any numbered voucher
tags are lost or damaged this should be entered along side the appropriate number on the summary
sheet so the coordinator knows where it is and does not waste time looking for a specimen. The date
field refers to the date the specimen was captured which may vary from the date of processing. The
tissue type taken should be recorded and a note indicating the time since death (if longer than 30
minutes). The appropriate size class should be entered for any specimen euthanased with Nembutal®.
These sheets are of vital importance for DEH and the Museum staff so please be meticulous when filling
them out.
A similar vegetation voucher sheet should be maintained if plant specimens are being collected. Detailed
interpretation of the vegetation voucher sheet and an example is provided by Heard and Channon
(1997).
Quadrat Summary
This data sheet provides a useful summary of the site location information required by the South
Australian Museum. One quadrat summary data sheet should be completed for each group of sites
(each camp). The information can be copied from the physical data sheet.
Storage of Data Sheets
Completed data sheets should be stored in the folder provided under the appropriate site number. As a
general rule (and for ease of data entry and editing) the sheets for each vertebrate group should be
stored together under the site number in the following order; birds, mammals, reptiles and amphibians.
All sheets should be stored in chronological order within their group. A complete set of data sheets
would include site location, physical and vegetation sheets, followed by the vertebrate data sheets in the
order outlined above. Trapping effort, weather observations, voucher sheets, quadrat summary and
opportunistic sheets should go at the front of the folder. It is the responsibility of the group leader to
ensure the data sheets are in order at the end of each week.
Collection and Processing of Vertebrate Voucher SpecimensSpecimens Required
The BSSA requires voucher specimens to be collected to verify the identification of species and provide a
representative sample across the state. These specimens are lodged with the South Australian Museum
and provide a valuable research and taxonomic resource (Appendix 20). In general, voucher specimens
are required to confirm the identification of all mammal, reptile and amphibian species. Birds are much
better known but will still need to be collected in some areas of the state.
It is important to check with the Museum curators prior to a survey to identify any special requirements
for specimen collection in the survey area. As a general rule, collect two specimens (preferably a male
and female) of each species per camp. Although it is rarely necessary to actively collect live bird
specimens, any interesting roadkills or other specimens found dead should be collected. Some
vertebrate species in your survey area may be of special interest and as such require different collecting
guidelines. In some situations more than two specimens may be required or animals may need to be
returned to the Museum alive or prepared in a special way. Alternatively, many of the larger species such
as pythons, echidnas and large goannas may already be well represented in the area and the Museum
may request that only external tissue samples and/or photos are taken rather than the whole specimen.
Once again checking with the curators prior to the survey will identify if there are any such species in
your survey area and what is required.
Section 2 23
G U I D E L I N E S F O R V E R T E B R A T E S U R V E Y S I N S O U T H A U S T R A L I A

If a rare or unexpected species is encountered it is best to keep it alive until the curator or a DEH
representative can be contacted. When there is uncertainty about the identification of similar species,
additional voucher specimens should be collected. This may require collecting one specimen from each
site or habitat type.
Field Voucher Numbers
All specimens and material required as a voucher need to be returned to camp for processing (see
'Euthanasia', this section). The amount of material, especially in the first few days, can build up quickly
and needs to be sorted out each day. Everything must be clearly labelled and all items should be
assigned a field voucher number as soon as possible.
Voucher numbers should be supplied as a roll of pre-punched dymo labels. They should be cut off the
roll as required to ensure they are used in numerical order. Once the number has been cut, pierce a
hole in the end and, using linen thread only, tie first the thread to the tag, (leaving two long ends) then
a knot about 1cm away from the tag (Plate 17). This keeps the tag away from the animal. The label
should be tied to mammals (once dead) above the ankle on the hind leg. On bats, a small hole should
be pierced in the wing membrane and the tag tied around the forearm. Birds should have the tag tied
above the knee joint. On reptiles and amphibians the tag should be tied loosely, but securely, in a
position where it will not slip off. This is generally around the middle for lizards, hind leg for tortoises
and amphibians and around the neck for snakes. Voucher tags should also be attached to bones and
any other dry material that will be sent to the Museum.
Voucher numbers are usually assigned to live specimens as they are processed. Dead material, or
specimens which need to be taken to the Museum alive, can be assigned a field voucher number as
soon as they return to camp (for live reptile and amphibian specimens simply put the tag inside the
bag). Whenever a voucher number is assigned to a specimen it must be recorded on the vertebrate
voucher data sheet (in numerical order). Voucher numbers should be written in the following format;
survey number-sequential voucher number (e.g. 106-39). The number must then be transferred onto
the appropriate data sheet (either site or opportune) along with a record of any tissue samples collected.
It is crucial voucher numbers are used correctly and recorded accurately.
Euthanasia
Live specimens collected as vouchers should be processed as soon as possible. This will minimise stress
on the animal and reduce the chance of the animal dying accidentally. It will also help keep the data in
order and free up calico bags for new specimens. Avoid taking any specimens back alive unless
instructed to do so by the Museum. Roadkills or specimens found dead or injured need to be processed
as soon as possible to maximise the usefulness of tissue samples and minimise decomposition.
Remember to remove old labels from bags once the specimen is processed. Small mammals should not
be kept overnight as they are skilful at escaping and will require food and warmth. Bats are more
tolerant and if necessary can be kept in a bag for a day. Reptiles can be kept in a calico bag for several
days so long as they are kept cool. Amphibians will need to be kept moist and should be processed as
soon as possible to minimise the chance of them dehydrating.
The recommended method for killing specimens is by an overdose of a barbiturate called Nembutal®.
This is a dangerous substance and should be used according to the manufacturers guidelines as set out
in the Material Safety Data Sheet (MSDS). A copy of this is supplied in the processing kit. This must be
administered by appropriately trained and licensed personnel in accordance with the Animal Ethics
Committee Standard Operating Procedure for Euthanasia (Appendix 2). All quantities of Nembutal®
used must be recorded on the vertebrate voucher data sheet and tallied at the end of the survey.
24 Section 2
G U I D E L I N E S F O R V E R T E B R A T E S U R V E Y S I N S O U T H A U S T R A L I A

A copy of the vertebrate data sheet with this information complete must be returned with each
Nembutal® bottle at the end of a trip. The correct dosage for Nembutal® is 1mL per 2kg of body
weight. As an example a House Mouse (~20g) would require about 0.01ml and a Sleepy Lizard (~400g)
would require 0.2ml. Small doses can not be accurately administered with a 1ml syringe and it is
advisable, particularly with small reptiles, to dilute the Nembutal® with water at a ratio of 1:10.
Nembutal® should be injected into the heart region. Most animals will die quickly but reptiles,
especially if they are cold, may take longer. Very small reptiles, that are difficult to inject, can be killed by
putting a drop of neat Nembutal® into the mouth of the animal. This will increase the time taken for
the Nembutal® to take effect. Bats must only be handled by experienced people who have the
appropriate vaccinations (refer to Appendix 17 for safe handling practices).
Removing Tissues
Livers (and occasionally other tissue such as kidney, spleen, muscle and blood) are removed from all
specimens to provide material (uncontaminated by preservative) for genetic analysis. Liver is the
preferred tissue as it is rich in enzymes, although when collecting birds, heart tissue is usually sampled as
well. It is important that the liver is removed and frozen as soon as possible after death to limit the
denaturing of the proteins. If the animal is dead when collected, note the approximate time from death
to tissue removal as this will assist in detecting artefacts in electrophoresis due to post-mortem changes
in proteins. The golden rule is always collect a tissue sample even if the collection conditions are not
ideal as technological changes may allow analysis of degraded samples in the future.
Once the animal is dead the liver (or other tissue) can be removed by making a small incision
immediately below the rib cage (Plate 18). The incision should penetrate the abdominal wall but not
damage the internal organs (or the teat or pouch of mammals). When dealing with birds it may help to
push the feathers apart to reveal the skin prior to making the incision (or wet the feathers). The liver
tissue is usually a deep red colour, although may be quite pale in geckos. Remove a large portion of the
liver and check to see if the gall bladder is still attached. The gall bladder is a small, green (bile)
coloured bladder. If it is present excise it carefully to avoid releasing the bile as excess bile may
denature proteins in the liver sample. Put the liver in an Eppendorf tube, close the lid firmly and seal
with a plastic clip or with masking tape. If the Eppendorf tube has its own attached fastening device, no
additional clip or tape is required. Each Eppendorf must be clearly labelled with the voucher number
and the tissue type (Plate 19). Use a TEXTA® PARCELMATE only for labelling as other markers rub off in
transit. Write this on both sides and ensure the last four digits of the voucher number are on the wide
part of the tube (not on the shoulder) as they can rub off in transport on bumpy tracks (Figure 6). The
Eppendorf should then be transferred to the liquid nitrogen cylinder immediately (Plate 20). Remember
you can not retrieve an Eppendorf from the cylinder so ensure it has the
correct information on it before dropping it in.
Figure 6. Correct procedure for labelling Eppendorfs.
Always write from the tip towards the lip as shown with a fine, black, permanent TEXTA® PARCELMATE
Avoid writing on the shoulder of the tube. Seal the Eppendorf with the lid and clips provided (or the
attached clip or tape).
Section 2 25
G U I D E L I N E S F O R V E R T E B R A T E S U R V E Y S I N S O U T H A U S T R A L I A

All instruments should be washed in water or alcohol between specimens to prevent contamination of
tissue samples. If blood samples are being taken needles and syringes should be discarded after single
use.
Whenever liquid nitrogen is not available and/or fresh tissue is not possible, it is still useful to collect a
sample of liver or other tissue for DNA analysis. The material should be preserved by whatever means
are available in the following order of preference: liquid nitrogen, freezer, alcohol/saline mix or alcohol.
Some material such as hair, spines, skin and scales could also be collected as dry material if the preferred
options were not available.
Care should be taken to avoid burns when using liquid nitrogen. Always close the liquid nitrogen
cylinder immediately after depositing the Eppendorf tubes. Keep the cylinder in a cool spot at all times.
For more detailed instructions on tissue removal and transport refer to Appendix 21. A MSDS outlining
the manufacturer's safety guidelines for liquid nitrogen is supplied in the processing kit.
Preserving Specimens
Formaldehyde solution (10% buffered solution available from SAM) should be used to preserve all intact
mammal, reptile and amphibian specimens (refer to 'Use of Formalin', later in this section). Identifiable
road kills should be preserved in formalin, frozen or dry stored depending on degree of decomposition
and facilities available. Dry skin and skeletal material can be stored in plastic bags or, if fragile, wrapped
in newspaper. Large skulls and bones are generally cleaned on return to the Museum so avoid
preserving these specimens in formalin as this inhibits the maceration process. If a specimen is too fresh
to be stored in a box it is best to freeze it or store it in a drum of water. Scats and pellets, particularly if
fresh, should be stored in a dry container (e.g. paper bag, matchbox) to prevent mould. Tissue and or
silica gel crystals placed in with the specimen are useful to absorb moisture and tissue will also help
protect small fragile material. All 'dry' material should be stored together in a cardboard box.
Before preserving any specimen or material ensure a voucher tag is attached and the number and
details are listed on the appropriate data sheets.
Small mammals are usually preserved by opening the abdominal cavity from the rib cage to the
genitalia (Plate 21) and dropping the specimen into the appropriately labelled formalin drum. Cut
around the pouch of marsupials, not through it. Ensure the incision is large enough to allow formalin to
penetrate throughout the body. Larger mammals like rats and bandicoots need to be injected behind
the head, shoulders, thighs and thorax. Three formalin drums are provided per group; one for
mammals, one for reptiles and a spare for larger specimens, road kills, etc. (Plate 22). The contents of
the drums need to be stirred or shaken occasionally to prevent the specimens from floating above the
surface because of trapped air bubbles. This can also be achieved by holding the specimen under until
all of the air bubbles have escaped. If the specimen floats it may begin to rot and the hair can fall out.
If young are present in the pouch of a marsupial, place the mother and young in a small snaplock
plastic bag punched full of small holes.
Reptiles need to be pierced in several places and/or injected with formalin before being placed in setting
positions in a plastic preserving tray (Plate 23). For most lizards (those < 100mm snout-vent length) the
only area requiring injection is the body cavity. The other areas, indicated in Figure 7, should only be
pierced with a sharp hypodermic needle to allow formalin to penetrate through to the soft tissue of the
legs and tail. If formalin is injected into these areas in small specimens it usually causes distortion.
Larger specimens should be injected at each point, not just pierced. Refer to Figure 7 for suggested
injection/piercing points and preserving positions. If time allows it is useful to invert the hemipenis of
males before setting them (at least one male from each species). This is best done by injecting formalin
at the base of the tail and gently squeezing them out with your fingers (with gloves on).
26 Section 2
G U I D E L I N E S F O R V E R T E B R A T E S U R V E Y S I N S O U T H A U S T R A L I A
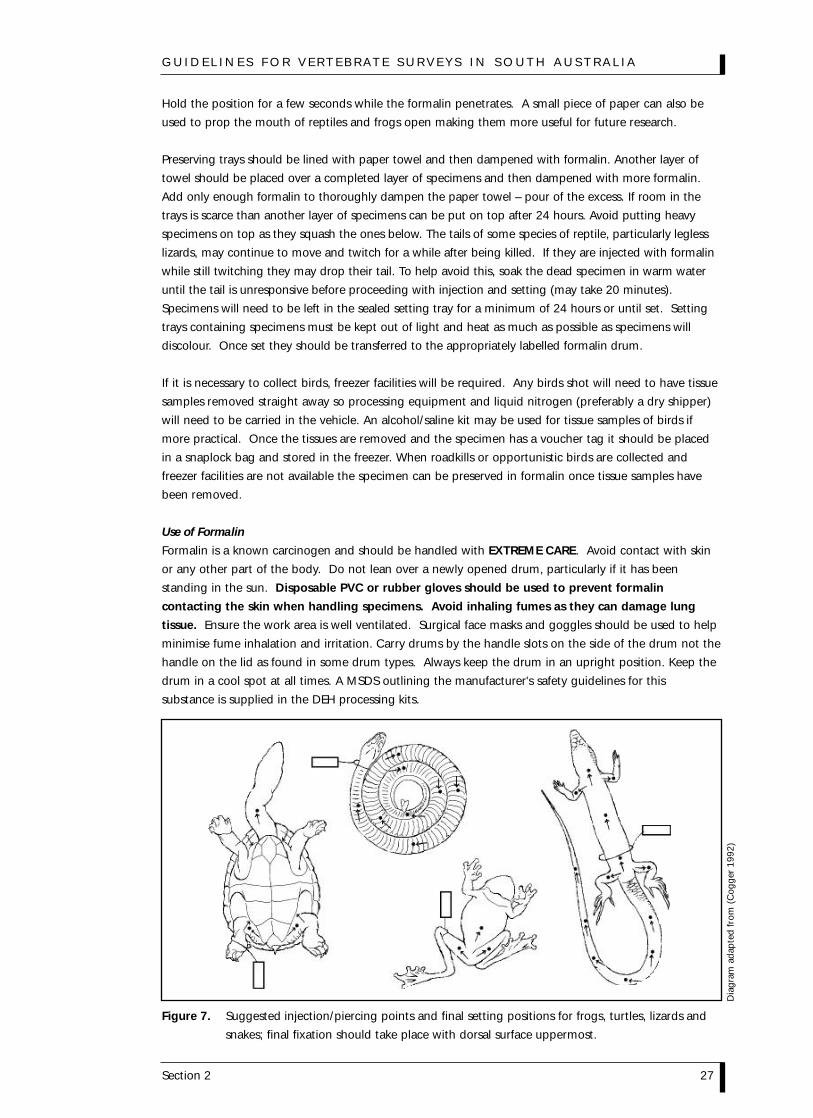
Hold the position for a few seconds while the formalin penetrates. A small piece of paper can also be
used to prop the mouth of reptiles and frogs open making them more useful for future research.
Preserving trays should be lined with paper towel and then dampened with formalin. Another layer of
towel should be placed over a completed layer of specimens and then dampened with more formalin.
Add only enough formalin to thoroughly dampen the paper towel – pour of the excess. If room in the
trays is scarce than another layer of specimens can be put on top after 24 hours. Avoid putting heavy
specimens on top as they squash the ones below. The tails of some species of reptile, particularly legless
lizards, may continue to move and twitch for a while after being killed. If they are injected with formalin
while still twitching they may drop their tail. To help avoid this, soak the dead specimen in warm water
until the tail is unresponsive before proceeding with injection and setting (may take 20 minutes).
Specimens will need to be left in the sealed setting tray for a minimum of 24 hours or until set. Setting
trays containing specimens must be kept out of light and heat as much as possible as specimens will
discolour. Once set they should be transferred to the appropriately labelled formalin drum.
If it is necessary to collect birds, freezer facilities will be required. Any birds shot will need to have tissue
samples removed straight away so processing equipment and liquid nitrogen (preferably a dry shipper)
will need to be carried in the vehicle. An alcohol/saline kit may be used for tissue samples of birds if
more practical. Once the tissues are removed and the specimen has a voucher tag it should be placed
in a snaplock bag and stored in the freezer. When roadkills or opportunistic birds are collected and
freezer facilities are not available the specimen can be preserved in formalin once tissue samples have
been removed.
Use of Formalin
Formalin is a known carcinogen and should be handled with EXTREME CARE. Avoid contact with skin
or any other part of the body. Do not lean over a newly opened drum, particularly if it has been
standing in the sun. Disposable PVC or rubber gloves should be used to prevent formalin
contacting the skin when handling specimens. Avoid inhaling fumes as they can damage lung
tissue. Ensure the work area is well ventilated. Surgical face masks and goggles should be used to help
minimise fume inhalation and irritation. Carry drums by the handle slots on the side of the drum not the
handle on the lid as found in some drum types. Always keep the drum in an upright position. Keep the
drum in a cool spot at all times. A MSDS outlining the manufacturer's safety guidelines for this
substance is supplied in the DEH processing kits.
Figure 7. Suggested injection/piercing points and final setting positions for frogs, turtles, lizards and
snakes; final fixation should take place with dorsal surface uppermost.
Section 2 27
G U I D E L I N E S F O R V E R T E B R A T E S U R V E Y S I N S O U T H A U S T R A L I A
Dia
gram
ada
pted
from
(C
ogge
r 19
92)

Packing Up Survey SitesSites should be packed up after four nights. This is usually done as the traps are checked on the fourth
day.
Several steps are involved in packing up survey sites:
1. Check the traps as outlined in the 'Checking Survey Sites' section.
2. Collect all Elliott and cage traps while they are being checked. This involves emptying out the bait
(thoroughly), untying the flagging tape (collect in a bag for re-use) and putting the Elliotts in the
carry box in numbered order. After collecting a box of Elliotts always double check that you have the
correct number of traps by counting them before putting the lid on. Remove the hessian bag from
the outside of the cage trap and put it inside. If any Elliott or cage traps are damaged (e.g. lost pins,
holes chewed or will not set) mark the box with flagging tape and attach a piece of masking tape
explaining the problem.
3. Collect all drift fence pegs (~20) and bundle together with a rubber band.
4. Roll up the drift fence and put a rubber band around it to prevent unrolling. As the fence is rolled
keep it tight and even. Ensure dirt, seeds and loose material are brushed from the fence to help
minimise the spread of weeds and disease. One 30 metre roll should fit easily inside a cage trap.
Don't force it. If it will not fit re-roll it tighter. Loose rolls can easily be tightened by standing on the
loose end and gently pulling the roll up while holding it in the centre (take care not to tear it).
5. Pull up each pitfall trap. To do this pull each pit up about 1/3 of the way and then retrieve the mesh
bottom and rubber band before removing the pit completely. This will allow you to look for any
small animals that may have worked their way up the outside of the pit. When pulling up the pit
bottom try and keep the dirt in it so it can be carefully checked for small reptiles (e.g. Lerista spp.)
and insects. Put 3 pitfall bottoms in the top of each cage trap and bundle the six pit joiners together
with a rubber band. Refill all holes made.
6. Collect the six micro-pitfalls. Top up the alcohol if required and put the appropriate label in each vial
before putting on the lid. A label also needs to be put in the large glass jar.
7. Collect harp traps, flagging tape and any other material left at the site. Hair tubes may need to be
packed up or may be left out for collecting at a later date. If they are collected make sure they are
labelled with site code and date, and placed in a plastic bag so they do not get contaminated.
Pack up days can be rushed and often people are winding down after one or two weeks away, so it is
important to keep track of all equipment and data. Remember to collect any voucher specimens
required and fill out all nil data sheets. It is also vital that all equipment is checked and counted before
leaving each site. Clearly label any faulty or damaged equipment.
When all equipment is back at camp it should be double-checked before being packed. Any new
voucher specimens should be processed and all data sheets should be tidied up and put into the camp
folder under the appropriate site. Make sure the trap effort and voucher sheets are complete and check
all data sheets for any other glaring admissions. Collect the thermometers and complete the weather
data sheet.
All insect traps should be stored together in a cardboard box. All dry material should be vouchered and
packed in a box. Any specimens that need to be returned to the Museum alive should be allotted
voucher numbers and put in a box (preferably an eski) out of the sun for the return journey.
28 Section 2
G U I D E L I N E S F O R V E R T E B R A T E S U R V E Y S I N S O U T H A U S T R A L I A

G U I D E L I N E S F O R V E R T E B R A T E S U R V E Y S I N S O U T H A U S T R A L I A
Section 2 29
G U I D E L I N E S F O R V E R T E B R A T E S U R V E Y S I N S O U T H A U S T R A L I A
GUIDELINES FOR VERTEBRATE SUR VEYS IN SOUTH AUSTRALIA
USING THE BIOLOGICAL SURVEY OF SOUTH AUSTRALIA
SECTION 3: POST SURVEY REQUIREMENTS
First edition December 2000
BIOLOGICAL SURVEY AND RESEARCH SECTION
NATIONAL PARKS AND WILDLIFE SA
DEPARTMENT FOR ENVIRONMENT AND HERITAGE


G U I D E L I N E S F O R V E R T E B R A T E S U R V E Y S I N S O U T H A U S T R A L I A
Section 3 iii
C O N T E N T S
Section 3: Post-Survey Requirements
Equipment . . . . . . . . . . . . . . . . . . . . . . . . . . . . . . . . . . . . . . . . . . . . . . . . . . . . . . . . . . . . . . . . . . . . . 1
Cleaning and Repairs . . . . . . . . . . . . . . . . . . . . . . . . . . . . . . . . . . . . . . . . . . . . . . . . . . . . . . . . . . 1
Government Vehicles . . . . . . . . . . . . . . . . . . . . . . . . . . . . . . . . . . . . . . . . . . . . . . . . . . . . . . . . . . 1
Lodging and Validation of Specimens . . . . . . . . . . . . . . . . . . . . . . . . . . . . . . . . . . . . . . . . . . . . . . . . . 1
Checking Data and Specimens . . . . . . . . . . . . . . . . . . . . . . . . . . . . . . . . . . . . . . . . . . . . . . . . . . . 1
Lodging Specimens and Tissues . . . . . . . . . . . . . . . . . . . . . . . . . . . . . . . . . . . . . . . . . . . . . . . . . . 2
Specimen Verification . . . . . . . . . . . . . . . . . . . . . . . . . . . . . . . . . . . . . . . . . . . . . . . . . . . . . . . . . . 3
Data Entry and Management . . . . . . . . . . . . . . . . . . . . . . . . . . . . . . . . . . . . . . . . . . . . . . . . . . . . . . . 4
Data Entry . . . . . . . . . . . . . . . . . . . . . . . . . . . . . . . . . . . . . . . . . . . . . . . . . . . . . . . . . . . . . . . . . . 4
Data Validation and Editing . . . . . . . . . . . . . . . . . . . . . . . . . . . . . . . . . . . . . . . . . . . . . . . . . . . . . 5
Lodging Data Sheets and Photopoint Photos . . . . . . . . . . . . . . . . . . . . . . . . . . . . . . . . . . . . . . . . 5
Reports . . . . . . . . . . . . . . . . . . . . . . . . . . . . . . . . . . . . . . . . . . . . . . . . . . . . . . . . . . . . . . . . . . . . . . . . 5
Landholder . . . . . . . . . . . . . . . . . . . . . . . . . . . . . . . . . . . . . . . . . . . . . . . . . . . . . . . . . . . . . . . . . . 5
Survey Participants . . . . . . . . . . . . . . . . . . . . . . . . . . . . . . . . . . . . . . . . . . . . . . . . . . . . . . . . . . . . 5
Animal Ethics . . . . . . . . . . . . . . . . . . . . . . . . . . . . . . . . . . . . . . . . . . . . . . . . . . . . . . . . . . . . . . . . 5
Scientific Permit . . . . . . . . . . . . . . . . . . . . . . . . . . . . . . . . . . . . . . . . . . . . . . . . . . . . . . . . . . . . . . 5
Survey . . . . . . . . . . . . . . . . . . . . . . . . . . . . . . . . . . . . . . . . . . . . . . . . . . . . . . . . . . . . . . . . . . . . . 5


SECTION 3 LIST OF FIGURES
8 Simplified Structure of the Survey and Opportune Data Bases. . . . . . . . . . . . . . . . . . . . . . 4
Section 3 v
G U I D E L I N E S F O R V E R T E B R A T E S U R V E Y S I N S O U T H A U S T R A L I A


Section 3: Post-Survey Requirements
Once the field work is complete it is very easy to assume the worst is over and very tempting to take
some time off. It is very wise however to allow a few days at least following the survey to get things in
order. All equipment, particularly if borrowed, will need to be cleaned and returned ASAP (other people
may be waiting for it) and live specimens and liquid nitrogen cylinders will need to be dealt with within
a day or two of return.
Equipment
Cleaning and Repairs
It is the survey coordinator's responsibility to ensure all equipment is cleaned, repaired and in some sort
of order before returning it to DEH or putting it away. Survey equipment may also need to be sterilised
if it has been used in 'high risk' areas (refer to 'Quarantine Considerations', Section 1). Anything packed
up wet will need to be aired. Broken traps need to be repaired or spare parts may need to be ordered.
Specific instructions for the maintenance of trapping equipment are provided in Appendix 18.
Government Vehicles
Government vehicles should be returned to the DEH building and locked up. If they need to be housed
on private land overnight the driver must get authorisation from a DEH employee and keep the vehicle
locked and preferably undercover. On return to DEH all equipment must be removed from the vehicles
and they must be cleaned inside and out. Ensure all mud is washed from underneath the vehicle to
help minimise the spread of weeds and disease. All government vehicles will have a log book which
must be filled out at the end of the survey. It is the responsibility of the survey coordinator to arrange
for the repair and payment of any tyres or vehicle damage incurred during the survey. Regular services
will be arranged by DEH staff.
Lodging and Validation of SpecimensChecking Data and Specimens
The survey coordinator should check all data sheet folders are in order as soon as possible after
returning from the field. In particular it is important that vertebrate (and vegetation) voucher sheets
have been completed and voucher numbers have been transferred to the appropriate data sheet. Other
things to check include trap effort sheets, common names converted to scientific names and all general
locations converted to AMG's. If any details are incomplete the group leader or relevant specialist
should be contacted while the details are fresh in their mind.
All liquid nitrogen containers should be returned to EBU, South Australian Museum, within a few days of
return, especially if nitrogen levels are low. This may mean the accompanying data is not ready but at
least the tissues can be kept frozen. Similarly, any specimens that have been kept alive for the Museum
should be delivered as soon as possible to minimise stress on the animal. Check that all invertebrate jars
have a label.
It is a good idea for the survey coordinator to retrieve all specimens from the formalin drums (using
appropriate safety equipment) and cross-check the voucher labels with the data sheets. This will identify
any specimens that are missing, incorrectly labelled, or have lost voucher labels and allow the problems
to be sorted out before the specimens are passed onto the Museum. This is particularly important for
surveys involving long-distance travel where voucher labels can become tangled and slip off and surveys
that involve swap over groups where confusion may arise between some specimens.
Specimens can remain in the formalin drums until the data sheets are ready to pass onto the Museum.
Other voucher material such as scats, sub-fossil material and skeletal remains should be put in the
freezer for a minimum of two weeks to kill any insects which may infest Museum collections.
Section 3 1
G U I D E L I N E S F O R V E R T E B R A T E S U R V E Y S I N S O U T H A U S T R A L I A
G U I D E L I N E S F O R V E R T E B R A T E S U R V E Y S I N S O U T H A U S T R A L I A
If they are taken to the Museum without being frozen they must go straight into the Museum freezer
and must be clearly labelled. This should be arranged in conjunction with the relevant curator or
collection manager.
The Museum does not have the resources to store numerous tape recordings of bat calls. These should
be processed by the survey coordinator or an appropriate consultant.
Lodging Specimens and Tissues
All fauna specimens should be lodged with the South Australian Museum for confirmation of
identification and, if worthy, registration. Verification of some specimens may take longer than others
(refer to 'Specimen Verification' Section 3). It is critical that every specimen can easily be linked to the
correct data.
Each section of the Museum has specific data requirements that are necessary for them to register
specimens, however there are a few general fields required by all. The quadrat summary data sheet can
be used to summarise the details of each survey site and any additional significant locations (e.g. mist
net site, rubbish dump). If this is completed the Museum personnel can cross reference full details for
the site codes from the vertebrate voucher sheet.
Fields required by all sections are:
• Survey Name and Field Voucher Number
This provides the link between the specimen and the data sheet. All vertebrate and tissue specimens
will require this. Invertebrates are not individually labelled, instead they will be linked to the relevant
data by the site code or location data written on the label inside each jar.
• Collector and Organisation
If the observers initials or abbreviations are used on the data sheets or invertebrate labels the
Museum will require a list of full names.
• Collection Date
Make sure the date provided is the collection date and not the preservation date.
• Location Data
Latitude and longitude – all AMG references should be converted to latitude and longitude
(conversion program accessible through DEH). Provide latitude and longitude in degrees, minutes
and seconds (not decimal degrees);
Datum – indicate which datum was used to generate the co-ordinates;
Resolution – note that the resolution codes used by DEH do not match those used by the South
Australian Museum so they will need to be converted;
Direction and distance (straight line) from nearest named place – place names must be on a 1:100
000 or 1:250 000 mapsheet or the gazetteer. These fields are updated for each location in the Survey
data base on a weekly basis. Alternatively DEH has a program which provides the nearest named
place, distance and direction for AMG coordinates;
Mapsheet number and name;
Habitat - brief description of dominant vegetation and landform;
Site code - when appropriate;
Special Geographic Unit - include the park name, general name of the region or station (e.g. Pedirka
Desert or Muloorina Station).
A completed copy of the quadrat summary data sheet and the vertebrate voucher data sheets will
provide most of these details and should be provided to each section receiving specimens from a survey.
2 Section 3

Section 3 3
G U I D E L I N E S F O R V E R T E B R A T E S U R V E Y S I N S O U T H A U S T R A L I A
Additional information required by some sections is as follows:
Evolutionary Biology Unit
The data sheets should include which tissues were taken for each specimen and the age of the
tissue before preservation if not fresh (i.e. within 30 minutes of death). The medium the tissue is
stored in, if not frozen, should also be recorded. The specific guidelines issued by EBU for collection
of tissue are provided in Appendix 21.
Mammal Section
The mammal section will require a photocopy of every mammal data sheet (site and opportune)
with a mammal voucher specimen on it. The exact details requested by the mammal section are
provided in Appendix 22.
Invertebrates
The basic information required by the invertebrate section - observer, date and location - should be
written on a label contained in each jar. This information is generally written in brief so a copy of
the quadrat summary data sheet, outlining full site details and any additional location data for
opportune collections, should also be provided. They will also need a list of the observers' full
names. They do not require a copy of the vertebrate voucher data sheet.
If the vegetation was surveyed then all plant presses need to be put into driers and lodged with the
Plant Biodiversity Centre (Herbarium). Use of the Herbarium driers should be arranged prior to the
survey. The Herbarium will also require a copy of the plant voucher data sheets (refer to Heard and
Channon, 1997, for more detailed instructions).
Specimen Verification
When the identification of specimens has been confirmed the Museum will (upon request) supply a list
of correct identifications and registration numbers. This may be returned on the vertebrate voucher
sheet, or can be requested in electronic format, or as a hard copy print out from the Museum data base.
The identifications should be cross-checked with the original site and opportune data sheets and, if
necessary, species names corrected. When the identification of a voucher specimen is corrected by the
Museum, then it is important to reassess the identification of all non-vouchered records from the survey
for that species. If a species is split into two separate species or if there are any other complicating
factors it may not be possible to confirm the identification of the non-vouchered records for the species.
In this case the species may have to be changed to the genus level or whatever taxon is appropriate.
When possible get the relevant field biologist (observer) to help clarify any discrepancies. Museum
registration numbers should also be transferred to the data sheets. Data entry should not proceed for
each vertebrate group until verification is complete however if there are delays in museum verification it
may be necessary to enter the unverified data and correct identifications and add museum registration
numbers at a later date.
Although the Museum will lodge and eventually process collections of sub-fossils, bird of prey pellets,
scats and hair samples it is unlikely they will have the resources to process them within a short time
frame. If identifications of these collections are required more urgently an appropriately trained
consultant will need to be employed.
Invertebrates will be sorted into family groups but it may be many years before they are looked at in any
further detail.

G U I D E L I N E S F O R V E R T E B R A T E S U R V E Y S I N S O U T H A U S T R A L I A
4 Section 3
Data Entry and ManagementData entry should not proceed until all data sheets are complete and verified, otherwise additional time
will be required later, adding or correcting incomplete data.
Data Entry
All survey and opportunistic data, excluding invertebrates, should be entered onto the Survey or
Opportune database (EDBSA). The EDBSA (run on Oracle software) is maintained under joint
custodianships by DEH and DTUPA and all data entry must be carried out under the direction of
Departmental staff. Access to data entry terminals can be arranged through DEH or DTUPA. All users
will be issued with a password and must familiarise themselves with the data entry manual before using
each system. Short-term data base users can use the visitors username and password to gain access for
data entry and editing.
All data recorded on the standard data sheets can be entered onto either the Survey or Opportune data
bases, with the exception of climatic data. There are no provisions for entering invertebrate data at this
stage. Figure 8 shows the structure of the Survey and Opportune data bases. All site related data are
entered on the Survey data base. The first step in entering data into a new survey is to complete the
survey summary information. Some fields in the survey summary set parameters for the patch
information and must be filled out before patch data can be entered. It will also be necessary to update
the observer lookup table with any new observers. Additional information on the use of Oracle and
notes on entering data into each field is available in the Survey Data Base Users Manual which is
available through the BSR Section (DEH) or the GAR Unit (DTUPA).
Opportune data are entered onto the Opportune data base. The survey number can be entered for each
record to maintain a link with the survey.
The time taken to enter survey data will vary depending on the number of records, the state of the data
and the skill of the data entry person. As a general guide allow for 3 sites per day (assuming there is
vegetation and vertebrate data with no secondary patches).
Figure 8. Simplified Structure of the Survey and Opportune Data Bases.
EDBSA
Class Group-enter individual records
-enter voucher details-enter life stages from plant form
Upper Stratum Age Class
Overstorey Assemblage Information
Observers(multiple blocks) Trap Effort
Observers Vouchers
Select Visit-enter visit date
-enter dynamic physical attributes
Select Patch (Site & Patch)-enter location data
-enter non-dynamic physical attributes
Survey Summary
Select Survey Number
SURVEY SYSTEM
Select Class Group
OPPORTUNE SYSTEM

Section 3 5
G U I D E L I N E S F O R V E R T E B R A T E S U R V E Y S I N S O U T H A U S T R A L I A
Data Validation and Editing
All data entered onto the Survey and Opportune data bases needs to be validated and edited to correct data
entry omissions or errors. This should be done once all the data have been entered. Oracle has standard
data validation reports that can be run to produce hard copies for comparison with the data sheets. There
are also standard frequency/count validation reports which can be used to highlight problems.
Lodging Data Sheets and Photopoint Photos
Once voucher specimens have been checked and all the data have been entered and edited, a copy of
the data sheets should be made. One copy (preferably the originals) should be lodged with the BSR
Section (DEH). If the survey was coordinated by the BSR Section (DEH) a copy of the data sheets should
be stored with the GAR Unit (DTUPA).
All photopoint photos must be labelled with survey name and number, site code, photographer and
date and lodged with the BSR Section (DEH).
ReportsDistribution of the survey results is the last important step of any survey. As well as providing a
summary of the data to participants and other authorities involved, it is also important to get the results
out in a useable form so they can be incorporated into environmental planning.
Landholder
If you have surveyed areas on private or lease hold land it is courtesy to provide feedback to the
landholders. The Survey data base has a number of standard reports which allow a complete list of
species (including common name) and physical attributes to be printed out for each site. This
information should be sent to landholders for any sites surveyed on their land. It is also useful to send
them a general summary of all species recorded in the survey region and any significant records. Refer
to 'Landholder Consultation Process', Appendix 4.
Survey Participants
All survey participants should be sent a summary of the species recorded on the survey and information
on any significant records. It is DEH policy to provide a field allowance to any participants who
volunteered their time.
Animal Ethics
All Animal Ethic Committee approvals for vertebrate work will request a yearly summary of animal
captures. The date for submission and a standard form are provided with the approval.
Scientific permit
A copy of specimen collection data, resulting from work carried out under a scientific research permit,
must be forwarded to DEH within two weeks of the permit expiring. A copy of any published reports
relating to the survey must be provided within 28 days of publication or circulation.
Survey
Analysis, interpretation and reporting of biological survey data are generally the responsibility of the
survey coordinator. A relatively standard format (available as a Microsoft® Word file) for presentation of
survey reports has been developed over the last 15 years of the Biological Survey of South Australia. This
may vary where appropriate to meet the requirements of individual surveys.
Survey coordinators are encouraged to incorporate the comments and observations of local land
management groups and landholders in this interpretive process. Refer to 'Landholder Consultation
Process', Appendix 4.
G U I D E L I N E S F O R V E R T E B R A T E S U R V E Y S I N S O U T H A U S T R A L I A
GUIDELINES FOR VERTEBRATE SUR VEYS IN SOUTH AUSTRALIA
USING THE BIOLOGICAL SURVEY OF SOUTH AUSTRALIA
SECTION 4: BIBLIOGRAPHY AND APPENDICES
First edition December 2000
BIOLOGICAL SURVEY AND RESEARCH SECTION
NATIONAL PARKS AND WILDLIFE SA
DEPARTMENT FOR ENVIRONMENT AND HERITAGE


G U I D E L I N E S F O R V E R T E B R A T E S U R V E Y S I N S O U T H A U S T R A L I A
Section 4 iii
C O N T E N T S
Section 4: Bibliography and Appendices
Bibliography . . . . . . . . . . . . . . . . . . . . . . . . . . . . . . . . . . . . . . . . . . . . . . . . . . . . . . . . . . . . . . . . . . . . . 1
Cited . . . . . . . . . . . . . . . . . . . . . . . . . . . . . . . . . . . . . . . . . . . . . . . . . . . . . . . . . . . . . . . . . . . . . . 1
Suggested Reference Material . . . . . . . . . . . . . . . . . . . . . . . . . . . . . . . . . . . . . . . . . . . . . . . . . . . 1
Appendices
1 Contacts . . . . . . . . . . . . . . . . . . . . . . . . . . . . . . . . . . . . . . . . . . . . . . . . . . . . . . . . . . . . . . . . . . 2
2 South Australian Wildlife Animal Ethics Standard Operating Procedure . . . . . . . . . . . . . . . . . . . 3
Collection of Voucher Specimens Associated with Vertebrate Surveys . . . . . . . . . . . . . . . . . . . . 3
Euthanasia –E1 . . . . . . . . . . . . . . . . . . . . . . . . . . . . . . . . . . . . . . . . . . . . . . . . . . . . . . . . . . . . . . 4
Standard Protocol for use of Pitfall Traps . . . . . . . . . . . . . . . . . . . . . . . . . . . . . . . . . . . . . . . . . . 5
3 How to Reduce the Risks of you Transmitting an Infectious Agent Between Frogs and
Between Sites . . . . . . . . . . . . . . . . . . . . . . . . . . . . . . . . . . . . . . . . . . . . . . . . . . . . . . . . . . . . . . 6
4 Biological Survey of South Australia – Landholder Consultation Process . . . . . . . . . . . . . . . . . . 10
5 Equipment Checklist . . . . . . . . . . . . . . . . . . . . . . . . . . . . . . . . . . . . . . . . . . . . . . . . . . . . . . . . . 13
6 Contents of Field Kits Required for a Biological Survey . . . . . . . . . . . . . . . . . . . . . . . . . . . . . . . 14
7 Hire of Field Equipment from Biological Survey and Research Section, DEH. . . . . . . . . . . . . . . . 20
8 Guidelines For Data Sheets Required For A Complete Biological Survey . . . . . . . . . . . . . . . . . . . 21
9 Volunteer Project Commencement Advice Form . . . . . . . . . . . . . . . . . . . . . . . . . . . . . . . . . . . . 22
10 Group Leader Responsibilities . . . . . . . . . . . . . . . . . . . . . . . . . . . . . . . . . . . . . . . . . . . . . . . . . . 25
11 Volunteer Worker’s Registration Form . . . . . . . . . . . . . . . . . . . . . . . . . . . . . . . . . . . . . . . . . . . . 26
12 Guide To Food Shopping For A Biological Survey . . . . . . . . . . . . . . . . . . . . . . . . . . . . . . . . . . . 29
13 Remote Area Travel Vehicle Checklist . . . . . . . . . . . . . . . . . . . . . . . . . . . . . . . . . . . . . . . . . . . . 31
14 Remote Area Travel Form . . . . . . . . . . . . . . . . . . . . . . . . . . . . . . . . . . . . . . . . . . . . . . . . . . . . . 33
15 Example Data Sheets . . . . . . . . . . . . . . . . . . . . . . . . . . . . . . . . . . . . . . . . . . . . . . . . . . . . . . . . 37
16 OHS&W - Local Policy – Kensington Site – No. 5 - Handling Venomous Snakes . . . . . . . . . . . . 50
17 OHS&W – Local Policy - Kensington Site – No. 7 – Handling of Bats . . . . . . . . . . . . . . . . . . . . . 53
18 Maintenance of Biological Survey Field Gear . . . . . . . . . . . . . . . . . . . . . . . . . . . . . . . . . . . . . . . 55
19 GPS Operation . . . . . . . . . . . . . . . . . . . . . . . . . . . . . . . . . . . . . . . . . . . . . . . . . . . . . . . . . . . . . 56
20 Issues relating to the Taking of Voucher Specimens for Biological Survey Work . . . . . . . . . . . . . 57
21 Instructions For Sampling Frozen Tissues From Vertebrates . . . . . . . . . . . . . . . . . . . . . . . . . . . . 60
22 Specific Data Required for Specimens to be Lodged in the
Mammal Collection at the SA Museum . . . . . . . . . . . . . . . . . . . . . . . . . . . . . . . . . . . . . . . . . . . 63

B I B L I O G R A P H Y
CITED
Churchill, S. (1998). ‘Australian Bats’. (Reed New Holland: Sydney).
Cogger, H. G. (1992). ‘Reptiles and Amphibians of Australia’. (Reed Books: Sydney).
Heard, L. and Channon, B. (1997). ‘Guide to a Native Vegetation Survey using Biological Survey of
South Australia’. (Department of Housing and Urban Development: Australia).
Heritage and Biodiversity Occupational Health and Safety Committee (1999). ‘A Quick Reference Guide
to Zoonotic Diseases for field Operatives’: 1st edition Draft. (Government of South Australia: Adelaide).
Nagorsen, D. W. and Peterson, R. L. (1980.) ‘Mammal Collectors Manual’. (The Royal Ontario
Museum: Toronto).
National Health and Medical Research Council (1998). ‘Australian Code of Practice for the care and use
of animals for scientific purposes’: 6th edition 1997. (Commonwealth Department of Health and Family
Services: Canberra).
SUGGESTED REFERENCE MATERIAL
Barker, J., Grigg, G. C. and Tyler, M. J. (1995). ‘A field guide to Australian Frogs’. (Surrey Beatty & Sons:
Sydney).
Churchill, S. (1998). ‘Australian Bats’. (Reed New Holland: Sydney).
Cogger, H. G. (2000). ‘Reptiles and Amphibians of Australia’. (Reed New Holland: Sydney).
Heard, L. and Channon, B. (1997). ‘Guide to a Native Vegetation Survey using Biological Survey of
South Australia’. (Department of Housing and Urban Development: Adelaide).
Note: Heard and Channon (1997) includes additional reference material for vegetation surveys.
Houston, T. F. (1998). ‘Dragon Lizards and Goannas of South Australia’ (2nd edn.,
revised by M. N. Hutchinson). (South Australian Museum: Adelaide).
Reardon, T. B. and Flavel, S. C. (1987). ‘A guide to the Bats of South Australia’. (South Australian
Museum in association with the Field Naturalists’ Society of South Australia (Inc.): Adelaide).
Robinson, A. C., Casperson, K. D. and Hutchinson, M. N. Ed. (2000). ‘A List of the Vertebrates of South
Australia’. (Department for Environment and Heritage: Adelaide).
Simpson, K. and Day, N. (1989). ‘Field Guide to the Birds of Australia’. (Penguin Books: Sydney).
Strahan, R., Ed. (1995.) ‘The Mammals of Australia’. (Reed Books: Sydney).
Triggs, B. (1996). ‘Tracks scats and other traces. A field guide to Australian Mammals’. (Oxford
University Press: Melbourne).
Watts, C .H. S. (1990). ‘A List of the Vertebrates of South Australia’. (Department of Environment and
Planning: Adelaide).
Watts, C. H. S. and H. J. Aslin (1981). ‘The Rodents of Australia’. (Angus & Robertson: Sydney).
Section 4 1
G U I D E L I N E S F O R V E R T E B R A T E S U R V E Y S I N S O U T H A U S T R A L I A

G U I D E L I N E S F O R V E R T E B R A T E S U R V E Y S I N S O U T H A U S T R A L I A
A P P E N D I X 1
CONTACTS
2 Section 4
Organisation Address Phone No.
Survey Background and Protocol
Biological Survey Coordinating Committee, c/o GPO Box 1047, Adelaide, SA, 5001 08 8204 8741Manager, Biological Survey and Research Section, Biodiversity Branch, DEH
Biological Survey and Research Section, GPO Box 1047, Adelaide, SA, 5001 08 8204 8890Biodiversity Branch, DEH
Geographical Analysis and Research Unit, GPO Box 1815, Adelaide, SA, 5001 08 8303 0687Planning SA, DTUPA
Biological Survey Users Group, Geographical GPO Box 1815, Adelaide, SA, 5001 08 8303 0687Analysis and Research Unit, Planning SA, DTUPA
Legislative Requirements
Senior Cultural Heritage Officer, GPO Box 3140, Adelaide, SA, 5001 08 8226 8900Division of State Aboriginal Affairs, DTUPA
Executive Officer (Bob Inns), GPO Box 1047, Adelaide, SA, 5001 08 8204 8880Wildlife Ethics Committee, DEH
Animal Welfare Unit, Resource Protection, DEH GPO Box 1782, Adelaide, SA, 5001 08 8204 8777
Scientific Permit Officer, GPO Box 1047, Adelaide, SA, 5001 08 8204 8776Biological Survey and Research Section, DEH
Manager, Policy and Community Forestry, GPO Box 2284, Adelaide, SA, 5001 08 8303 9900Forestry SA, DAIS
Fisheries Licensing, Department of Fisheries, PIRSA GPO Box 1625, Adelaide, SA, 5001 08 8226 2311
Pharmaceutical Services Branch, PO Box 6, Rundle Mall, 08 8226 7166Public and Environmental Health Service, Adelaide, SA, 5000Dept. Human Services
Principal Heritage Officer, GPO Box 1047, Adelaide, SA, 5001 08 8204 9247Heritage South Australia
Field Equipment and Data
Biological Survey Section, Biodiversity Branch, DEH GPO Box 1047, Adelaide, SA, 5001 08 8204 8890
Curators or Collection Managers, North Terrace, Adelaide, SA, 5001 08 8207 7422Natural Science Building, South Australia Museum
Evolutionary Biology Unit, South Australian Museum North Terrace, Adelaide, SA, 5001 08 8207 7453
Plant Biodiversity Centre, DEH GPO Box 1047, Adelaide, SA, 5001 08 8222 9307
Volunteers
Biological Society of SA C/o Department of Environmental Biology, N/aUniversity of Adelaide, Adelaide, SA, 5005
FNSSA - Mammal Club C/o SA Museum, North Terrace, N/aAdelaide, SA, 5000
Nature Conservation Society of SA C/o Conservation Centre, 08 8223 6301120 Wakefield Street, Adelaide, SA, 5000
SA Herpetology Group C/o SA Museum, North Terrace, N/aAdelaide, SA, 5000
SA Ornithological Association C/o SA Museum, North Terrace, N/aAdelaide, SA, 5000
Section 4 3
G U I D E L I N E S F O R V E R T E B R A T E S U R V E Y S I N S O U T H A U S T R A L I A
A P P E N D I X 2
SOUTH AUSTRALIAN WILDLIFE ANIMAL ETHICS COMMITTEE - Standard Operating Procedure (SOP)
COLLECTION OF VOUCHER SPECIMENS ASSOCIATED WITH VERTEBRATE SURVEYS
‘Best practice’ for biological survey work is to validate species distribution records with voucher
specimens lodged in major natural history collections for future verification and revision.
However, there are accepted cases where collection of specimens need not apply. For example, most
(not all) bird distributions are now routinely based on visual records only, justified by the high level of
taxonomic discrimination reached in avian taxonomy and the wide availability of expertise in bird
identification and habits which constitute effective means of verification of most observations. For
limited numbers of taxa in other vertebrate groups or for particular geographic areas, it may also be that
some species can be identified as not requiring collection.
Advice on species likely to fall within these criteria and recommended number of specimens is to be
obtained from the appropriate specialist (e.g. from the South Australian Museum, or the Biological
Survey and Research section of the Department for Environment and Heritage before commencing a
survey).
If such advice is not available then two voucher specimens (one male, one female - including those with
pouch young) should be collected to authenticate the record.
In any case, no more then five specimens from the local (within an area of continuous habitat)
population are to be collected unless advised by the South Australian Museum.
Survey leaders and/or members of the survey should have experience in, or have consulted with, South
Australian Museum staff regarding proper procedures for collection and preservation of animal
specimens, prior to any survey.
If specimens of animal species listed as endangered, vulnerable or rare under the
National Parks and
Wildlife Act (SA) 1972 are captured, advice should be sought where practical from the Museum or DEH
prior to release or euthanasia (procedure for this euthanasia to be discussed with the appropriate
Museum curator or the Biological Survey and Research Section, DEH before commencing field work).

G U I D E L I N E S F O R V E R T E B R A T E S U R V E Y S I N S O U T H A U S T R A L I A
SOUTH AUSTRALIAN WILDLIFE ANIMAL ETHICS COMMITTEE - Standard Operating Procedure (SOP)
EUTHANASIA - E1
The euthanasia of any animal must be achieved in the shortest time possible, with a minimum of
distress. Intravenous, intracardiac or intrahepatic injection of specially formulated euthanasia solutions
offer almost instantaneous death.
Unfortunately these routes are not always available, either due to animal size/cooperation or operator
experience. Where intravenous, intracardiac or intrahepatic administration is not used suitable
alternatives must be considered. The highly irritant and consequently painful reactions that euthanasia
solutions create when given other then directly into the venous system necessitate the use of alternate
drugs. Any person involved in euthanasing animals must be fully familiar with the anatomical aspects
associated with the particular species with which they are dealing. All operators need to have sufficient
familiarity with the doses of the drugs with which they are dealing, and an ability to accurately estimate
body weights to ensure suitable doses are administered.
Euthanasia solutions are not selective in their actions and operators carry a public health responsibility to
ensure the correct use and safe storage of all material in their possession. Suitable log books should be
maintained to monitor drug usage.
The euthanasia of reptiles is not to be done via freezing. A review of scientific literature has failed to
provide adequate evidence that reptiles become insensitive to pain during the cooling/freezing process.
Acceptable methods of euthanasia involve the overdose of pentobarbitone solutions, or similar. Where
non-vascular routes are used, a non irritant solution needs to be used. General anaesthesia or
dissociative anaesthetic agents may be used prior to freezing.
Intravenous Injections:
In most animals the most accessible veins are the jugular vein or brachial vein. Some species may have
useable tail veins. It is up to the operator to be suitably familiar and experienced with an animals
anatomy to enable them to routinely find and enter a vein with an appropriate needle.
Intracardiac Injections:
It is up to the operator to be suitably familiar and experienced with an animals anatomy to enable them
to routinely find and enter the heart with an appropriately sized needle.
Intrahepatic Injections:
It is up to the operator to be suitably familiar and experienced with an animals anatomy to enable them
to routinely find and enter the liver with an appropriate needle.
Intraperitoneal Injections:
It is not appropriate to use Lethabarb® or the equivalent solutions directly into the abdomen due to
their irritant nature. Where this route is to be used non irritant solutions are more humane. Nembutal®
is a non irritant solution used for anaesthesia and is the most suitable drug for use via intraperitoneal
administration. All effort should be made to avoid injection directly into the intestine as this slows the
absorption and subsequent effect of the drug.
4 Section 4

Section 4 5
G U I D E L I N E S F O R V E R T E B R A T E S U R V E Y S I N S O U T H A U S T R A L I A
Intrathoracic Injections:
This is not a suitable route for euthanasia and should be used as a last resort. Non irritant solutions are
the only suitable drugs, with Nembutal® being the drug of choice. Fluids of any nature given into lung
tissue are likely to cause the animal distress as anoxia and drowning will be involved.
Subcutaneous/Intramuscular Injections:
Low or non irritant solutions are suitable for this route. Slow absorption make this route unacceptable
except where no alternative exists. Darting an animal from distance or a particularly large or difficult to
handle animal may justify this route.
Inhalation:
With some smaller species, especially birds, inhalation of anaesthetic drugs or the use of carbon dioxide
may be appropriate. Ether and Chloroform are both irritant and not considered appropriate. Their
volatile nature makes them unsafe. Carbon dioxide used in a sealed environment is suitable for animals
up to 300 gms.
Exsanguination:
This method is only suitable with an animal that has been anaesthetised.
SOUTH AUSTRALIAN WILDLIFE ANIMAL ETHICS COMMITTEE - Standard Operating Procedure (SOP)
STANDARD PROTOCOL FOR USE OF PITFALL TRAPS
• No use of wet pitfall traps for vertebrates, i.e. with formalin/picric acid preservatives
• Pitfalls to be visited at least twice a day around sunset and within 1.5 hours of sunrise.
• During hot or wet weather more frequent visits should be made or a method of protecting captures
from the weather used.
• Use a low toxicity insecticide spray to kill ants if there are many in the vertebrate pitfall.
• All pitfalls to be removed – or made inoperable at the end of the trapping period.

A P P E N D I X 3
HOW TO REDUCE THE RISKS OF YOU TRANSMITTING AN INFECTIOUS AGENT BETWEENFROGS AND BETWEEN SITES
Rick Speare1, Lee Berger1 and Harry Hines 2
1School of Public Health and Tropical Medicine, James Cook University, Townsville, Australia, 4811
2 Department of Environment, Moggill, Queensland, Australia
copied from web page http://www.jcu.edu.au/school/phtm/PHTM/frogs/prevent.htm updated 14/6/98
1. PROBLEM1. Infectious agents pathogenic to frogs are present in the environment (e.g. fungi, viruses).
2. We do not want agents transmitted by humans from an infected frog population to an
uninfected frog population.
3. People working in infected streams need to ensure they do not contribute to declines by
transmitting possible agents between frogs within a population.
This information sheet therefore aims to tell you what measures you can take to reduce the chances of a
researcher working in an area with ill frogs transmitting organisms to a new area or increasing rates of
transmission within a population.
2. BASIS FOR THE RECOMMENDATIONSThe recommendations are based on the following assumptions:
1. Micro-organisms are durable and can survive in a range of environments;
2. Micro-organisms are present in water as well as in infected frogs;
3. Procedures that reduce the infectivity of durable viruses such as parvoviruses will inactivate these
agents.
Remember that with most infectious agents the number of infectious particles in the initial dose
(inoculating dose) frequently determines the outcome in terms of disease. Low numbers of organisms
may result in no disease or mild disease; high numbers of organisms may result in rapid onset of severe
disease. So although the measures may not kill all particles of the agent or prevent frogs coming into
contact with the agent, if the measures reduce the number of particles of the agent that enters a frog,
outcomes may be much improved.
Remember also that the procedures followed in any disease control are done on a cost-benefit basis. For
the cost of the control procedures what will be the benefit? For example, control procedures in an
infected stream may have little impact and so expensive control procedures may not be justified.
However, preventing an agent from getting from an infected to an uninfected stream, may be
absolutely critical, and expensive and tedious control procedures may be justified. We recommend that
this protocol be implemented for any studies on frog species considered endangered.
The following procedures do not guarantee against spread of disease, but greatly minimise the risk.
6 Section 4
G U I D E L I N E S F O R V E R T E B R A T E S U R V E Y S I N S O U T H A U S T R A L I A

3. RECOMMENDATIONS
3.1 REDUCING RISK OF TRANSMISSION BETWEEN FROGS WITHIN INFECTED STREAMS
If infected frogs are in a stream, how could an agent be spread and would any activities be able to
reduce this? We recommend that these procedures are used in all frog research programs, as it is often
difficult to know whether infected frogs are present.
Frogging Activities Could Potentially Affect Spread
In water: no effect.
By handling infected frogs first and then handling uninfected frogs increase dose of agent.
Toe clipping infected frogs then clipping uninfected frog with agent inoculated into cut stumps of toes
of uninfected frogs.
PIT tagging agent inoculated into body.
3.1.1 To decrease possibility of transmission from handling infected frogs
On arrival clean hands using hospital grade antiseptic solutions such as 4% chlorhexidine and rinse
thoroughly. There are two methods of handling frogs that if used correctly will ensure agents are not
transmitted between frogs.
Either:
• Use disposable vinyl gloves (e.g. Surgigloves), changing gloves after handling each animal, or
• Capture and handle frogs using new plastic bags for each animal.
In both cases the frogs do not come in contact with the frogger's skin or clothing. At times frogs prove
difficult to catch and handle, or try to escape. In such instances where the frogger's skin or clothing
comes in contact with the frog then these should be cleaned using an antiseptic solution before
handling any other frogs.
Ensure that used gloves and bags do not come in contact with clean gloves or bags. When work is
completed at a stream dispose of the bags or gloves and disinfect any clothing or equipment that came
in contact with them. Clean hands with hospital grade disinfectant.
3.1.2 To decrease possibility of transmission from toe clipping or PIT tagging
Toe clipping is used to collect genetic material and/or to individually identify animals or cohorts in mark-
recapture studies. Toe clipping has been associated with inflammation and local infection in many
studies and there is some evidence that it may decrease longevity. If individual identification is necessary
then consider alternative means of identification (e.g. pattern recognition).
If toe clipping is used, decrease the risk of transfer between frogs by ensuring every frog has a cutting
instrument free of the agent, either:
1. Disposable sterile instruments,
2. Instruments sterilised previously and used once, or
3. Instruments resterilised in the field and reused.
A possible strategy for using disposable instruments is to use a 15G or 11G scalpel blade to cut off toes
and a compound to stop blood flow. A scalpel blade will be difficult to use unless the toe is fixed against
a reasonably solid surface. However, a small piece of card may be adequate for this, and could be
disposed of after every frog.
Section 4 7
G U I D E L I N E S F O R V E R T E B R A T E S U R V E Y S I N S O U T H A U S T R A L I A

All cutting instruments could be sterilized before field trips by autoclaving or other standard procedures.
This could be done if the researchers know approximately how many frogs will be marked and they take
sufficient sterilized instruments.
Resterilised instruments: if biologists had several sets of instruments, after use on one frog, the
instruments could be cleaned, placed in a sterilising solution for the necessary period of time, and
reused. Possible options:
1. Immersion in 70% methanol for 30 min, or
2. Dipped in 100% methanol and then flamed, or
3. Immersion in 1% glutaraldehyde for 15 minutes, or
4. Immersion in boiling water for 10 minutes.
Note that for options 1 and 3, the instruments should be rinsed well in water.
Most of the options are difficult to implement in the field. Take care not to let frogs contact the
disinfectants. Do not contaminate streams.
PIT tags are supplied in sterile needles. However other instruments used in the implanting procedure
(e.g. forceps) should be sterile prior to use on each animal (see above).
Assuming the water is contaminated, open wounds left by toe clipping or PIT tagging may increase risks
of transmission by allowing easier access of the agent. Sealing the toe or PIT tag hole by rapid artificial
means would decrease these risks. It is not feasible to hold frogs in sterile conditions until the wounds
heal. However the use of a cyanoacrylate compound such will seal the wound until it heals naturally.
Christy (1996) reports using PIT tags after swabbing with 0.1% iodine and then sealing with medical
grade cyanoacrylate. Captive Limnodynastes peronii and and free-ranging Litoria aurea showed no ill-
effects.
3.2 REDUCING RISKS OF SPREAD TO NEW AREAS
Always go from uninfected streams to those suspected to be infected, not the reverse. It is much more
important that these procedures are used for long distance movements by froggers than for short
moves. Adjacent streams in the same major catchment are likely to have similar agents present, but the
possibility of introducing new agents is greatly increased by moving between major catchments or over
much longer distances
Spread on people:
• Clean hands using a hospital grade antiseptic solution such as 4% Chlorhexidine and rinse
thoroughly.
• Use plastic bags or disposable gloves as outlined above.
Spread on clothes:
• Change clothes, bag and wash.
• Boots and other equipment or clothing exposed to water that will be used at other sites (e.g.
sleeves of raincoat, dip nets). Clean off all mud and debris at infected site. Scrub with a
commercially available disinfectant for parvovirus (e.g. Oxykil, Parvocide), according to the
recommended instructions provided with the disinfectant. Use disinfectants at least 200m away
from water.
Spread by vehicles:
• If froggers have introduced mud and or water into a vehicle then scrub floor and pedals with
disinfectant as above.
• If the vehicle has been used for creek crossings then hose it down concentrating on the wheels
and undercarriage, before arriving at a new site.
8 Section 4
G U I D E L I N E S F O R V E R T E B R A T E S U R V E Y S I N S O U T H A U S T R A L I A

Spread on translocated frogs:
• Adult frogs, their eggs or tadpoles should not be moved over large distances.
• Consider not returning captive held frogs or tadpoles to the wild, particularly if they have been in
contact with other captive frogs or tadpoles. This applies especially to species that are restricted
to specialised or geographically confined habitats (e.g. montane species). If frogs are being
returned to the wild, examination for disease by specialists should be considered prior to return.
LITERATURE CITEDChristy, M.T. (1996). The efficacy of using Passive Integrated Transponder (PIT) tags without anaesthetic
in free-living frogs. Australian Zoologist 30, 139-142
Section 4 9
G U I D E L I N E S F O R V E R T E B R A T E S U R V E Y S I N S O U T H A U S T R A L I A

A P P E N D I X 4
BIOLOGICAL SURVEY OF SOUTH AUSTRALIA- LANDHOLDER CONSULTATION PROCESS
BACKGROUND
The Biological Survey of South Australia is State Government Policy. It is managed by the Biological
Survey and Research Section of the Department for Environment and Heritage but is coordinated by a
Biological Survey Coordinating Committee chaired by the Manager, Biological Survey and Research
(BSR) and with representatives of the following Government Departments with an involvement in the
survey:
Biodiversity Branch
Department for Environment and Heritage
Biodiversity Monitoring and Evaluation (BME)
Department for Environment and Heritage
Plant Biodiversity Centre
Department for Environment and Heritage
South Australian Museum
Department of Transport, Urban Planning and the Arts
Geographic Analysis and Research Unit
Department of Transport, Urban Planning and the Arts
Sustainable Resources Unit, Planning SA,
Primary Industries and Resources, South Australia
Coast and Marine Section
Environment Protection Authority
Department for Environment and Heritage
Marine Environment and Conservation Program
South Australia Research and Development Institute
The Biological Survey of South Australia involves standard site-based vegetation and vertebrate surveys
and the production of vegetation maps at several scales detailed below and appropriate to the particular
survey area.
Agricultural Lands 1:50 000
Sheep Pastoral Lands 1:100 000
Cattle Pastoral Lands and Aboriginal Lands 1:250 000
FUNDING
As in the past future funding for the Biological Survey of South Australia will come from a variety of
sources. Although the fundamental structure of data gathering by the survey remains standardised, it is
the right of particular funding agencies to specify particular analysis and/or reporting procedures.
10 Section 4
G U I D E L I N E S F O R V E R T E B R A T E S U R V E Y S I N S O U T H A U S T R A L I A

CONSULTATION WITH LANDHOLDERS
Only after funding has been secured is it appropriate to make contact with landholder representative
groups in the survey region to plan specific details of the actual survey and this role is the primary
responsibility of the Biological Survey Coordinator.
Once the general framework of the survey has been discussed with representative groups it is the
responsibility of the Biological Survey Coordinator to contact individual landholders with a view to
negotiating access to their properties for establishment of sample sites. At this stage the Biological
Survey Coordinator will explain the aims and constraints of the survey and seek assistance and
cooperation from the landholder in selection of appropriate sites.
Landholders are encouraged to take part in some or all of the fieldwork on their properties.
ANALYSIS AND REPORTING
The analysis, interpretation and vegetation mapping associated with a particular biological survey is the
overall responsibility of the Biological Survey Coordinator but landholders are encouraged to contribute
their biological observations to this process because of their ability to observe biological changes and
rare events which can be very valuable in this interpretive process.
Biological Surveys will initially be reported using a relatively standard format developed over the first 15
years of the Biological Survey of South Australia but varying where appropriate to meet the
requirements of individual surveys.
Any conservation recommendations made public in a biological survey report will be discussed with
appropriate landholders and, before publication, this section of the report will be distributed to all
potentially affected landholders for their further input.
SPECIFIC APPROACHES IN THE PASTORAL ZONE
Field Survey
Pre–survey – dialogue with BME – re existing data, site selection, mapping, local knowledge – basically
to allow sharing of resources and, where practicable, shared survey sites.
Meeting with Soil Conservation Board (SCB) – SCB can invite extras as they see fit.
Individual lessee contact – Biological Survey Coordinator +/-BME officer depending on availability and
schedules.
Survey results/outcomes
• General findings summarised and reported to lessees and SCB – summary chapters from standard
reports may not always be appropriate although these chapters should be provided as well so the
actual wording of the report can be seen.
• Important areas/species draft summary to SCB and effected lessees.
• Lessees effected by designation of important areas/species visited by BME officer +/-Biological Survey
Coordinator- explain why – discuss draft, areas for wildlife conservation, current management,
current and future issues – report outcomes of lessee discussions to SCB.
• Where new/unusual species are to be publicised in the media aim for joint media release with lessee.
Section 4 11
G U I D E L I N E S F O R V E R T E B R A T E S U R V E Y S I N S O U T H A U S T R A L I A

Additional research after biological survey
Aim for joint approach in all facets – i.e. DEH (and/or other research proponent, e.g.
Universities)/SCB/lessees – planning, funding, data collection, reporting and publicity.
On ground management following biological survey and/or additional research
• BME, in consultation with Biological Survey, negotiate with lessees where grazing management is
identified as a significant wildlife management issue. Where a biological survey pre-dates a pastoral
assessment these will be ideally identified in the Assessment Report and negotiations will take place in
the follow up phase. Where a biological survey follows the initial assessment process Pastoral
Secretariat officers will negotiate management in follow-up inspections. This could be with individual
lessees, or groups of stations or a whole district (SCB).
• In the years following the biological survey, BME officers will arrange wildlife management field
days/seminars, perhaps annually, involving SCB, BME, BSR, Biodiversity Conservation Programs (BCP),
Northern Region. DEH will also develop info sheets, videos, etc. promoting a positive approach to
habitat/species management.
• DEH will formalise intra-branch dialogue through the establishment of a Rangelands Wildlife
Management Committee, (including BME, BSR, BCP, Northern Region) initially to meet twice yearly
or as needed.
12 Section 4
G U I D E L I N E S F O R V E R T E B R A T E S U R V E Y S I N S O U T H A U S T R A L I A

A P P E N D I X 5
EQUIPMENT CHECKLIST
COMPLETE BIOLOGICAL SURVEY, 6 PEOPLE, 1 WEEK, 6 SITES (Line A and B)
Items in Italics are only required if vegetation is being surveyed.
Items in bold must be increased for additional weeks.
* refer to itemised list for each kit in Appendix 6.
2 Vehicles Pitliners (~100)
*2 Tool boxes *Pitfall equipment box
*2 Recovery kits -drift fence pegs (~250)
2 St. John first aid kits -pitfall joiners (~100)
2 General first aid kits *Cooking gear box
2 Burns kits *Cutlery box
1 Flying Doctors kit (remote areas only) *Lighting equipment box
1 Trailer *Field kit
3 Cargo nets *Processing kit
Ropes/Octopus straps -vertebrate voucher
1 Chescold fridge & gas/electrical fittings numbers(~100)
1 Engel fridge & electrical fittings *Book box
Generator (optional) -data sheets
2 Gas cylinders -plant voucher
24 Cage traps & mesh numbers (~400)
180 Elliott traps 1 20lt Bait bucket (1/2 full of bait)
3 Crowbars 2 Bait carry buckets
3 Long-handled shovels Aerial photos
1 Mattock Maps
2 Army Shovels Site maps
1 Large marquee (12’by 12’) 2 Boxes newspaper
1 Large groundsheet (12’ by 12’) 2 Boxes cardboard
Bag of tent poles/pegs 4 Presses & belts
2 Tables 3 Formalin containers
6 Chairs 1 Liquid Nitrogen cylinder
Camp stretchers (optional) Harp trap (incl. Spares kit)
Min. of 2 x diesel jerry cans 4 Mist net poles and pegs
1 Jerry unleaded petrol (for lamp/generator) Bat detector (incl. batteries &tapes)
Spare tarps 72 Micropit vials & alcohol
Min. of 2 washing basins 15 Large alcohol jars
Backpack spotlight 5 litres alcohol & squeeze bottle
Hand held radios (optional) 1 Camera & film & tripod.
Extra water (depending on situation) Star droppers (for site set up)
2 Water coolers for vehicles Photopoint tags (for site set up)
Food boxes Metal number stamps (for site set up)
At least 1 GPS & batteries Photographic Range pole
Personal insect repellent Sledge hammer
Toilet paper Alcohol/saline kit (one/vehicle)
Sun block cream
Section 4 13
G U I D E L I N E S F O R V E R T E B R A T E S U R V E Y S I N S O U T H A U S T R A L I A

A P P E N D I X 6
CONTENTS OF FIELD KITS REQUIRED FOR A BIOLOGICAL SURVEY
14 Section 4
G U I D E L I N E S F O R V E R T E B R A T E S U R V E Y S I N S O U T H A U S T R A L I A
DEPARTMENT FOR ENVIRONMENT AND HERITAGE
BIOLOGICAL SURVEY & RESEARCH SECTION
FIELD KIT
2 Compasses Surveyors tape measure
2 White boards 2 White board marker pens
Masking tape (thick & thin) Gaffer tape
2 Dissecting boards 2 Preserving trays
2 Max/Min thermometers 2 Pairs of secateurs
Hand rake 2 Trowels
Builders twine 2 Mist nets & ropes
Specimen bags: 5 large, 20 med., 80 small Plastic bags & envelopes
Large rubber gloves (for formalin) Paper towels
Pliers Pencils inc. omnichrom, pens, textas
Roll of wire Ruler, scissors, gluestick
Inclinometer Erasers, pencil sharpeners
6 Pocket notebooks Stapler & staples
6 Clipboards Hole punch
Spare Eppendorf tubes Dymo tape gun & tape
DEPARTMENT FOR ENVIRONMENT AND HERITAGE
BIOLOGICAL SURVEY & RESEARCH SECTION
PROCESSING KIT
2 PARCELMATE markers for Eppendorfs Callipers
Masking tape (thick & thin) Tape measure (3m)
Linen thread (for voucher tags) Scales (50g,100g,200g,1kg,2kg,5kg.)
Voucher tags (+ spare Dymo tape) Stanley knife, glue
Nembutal® & notebook Ruler, pencils, eraser, pencil sharpener
Eppendorf tubes & clips Paper towel
Needles (10@25g +26g ,2 @ea other size) Hand lens
Syringes (2@20ml,10@1ml,5@2ml,5@5ml) Long forceps
Used sharps container Plastic tongs
Instrument cleaning jars (2) Gas lighter (disposable)
Surgical gloves (for dissections) MSDS for all dangerous substances
Dissecting kit (2 scalpel handles & blades;3 fine & 1 blunt scissors; blunt & fine probe;
2 fine,1 curved &1 blunt forceps; mounted needles)
Material Safety Data Sheet (MSDS) – formalin, liquid nitrogen and Nembutal®.

Section 4 15
G U I D E L I N E S F O R V E R T E B R A T E S U R V E Y S I N S O U T H A U S T R A L I A
DEPARTMENT FOR ENVIRONMENT AND HERITAGE
BIOLOGICAL SURVEY & RESEARCH SECTION
PITFALL EQUIPMENT
120 Pitfall joiners 400 Metal pegs
20 Spare pitfall bottoms Approx. 100m spare drift net mesh
2 Army shovels 2 Rolls flagging tape
Approx. 200 large rubber bands Extra alcohol (Museum)
3 Cans surface spray 200 Invertebrate vials (Museum)
Jemmy bar 35 Large invertebrate jars (Museum)
6 Pairs work gloves Squeeze bottle for alcohol (Museum)
DEPARTMENT FOR ENVIRONMENT AND HERITAGE
BIOLOGICAL SURVEY & RESEARCH SECTION
BOOKS
• Field Guide to Australian Frogs (Barker) • Flora of South Australia (Jessop)
• Dragon Lizards & Goannas of S.A. • A list of Vascular Plants of Australia
(Houston, revised by Hutchinson) (Jessop)
• Mammals of Australia (Strahan) • Plants of Western N.S.W.(Cunningham)
• Vertebrates of S. A. (Robinson et al 2000) • A Key to Australian Grasses (Simon)
• Vertebrates of S. A. (Watts 1990) • Acacias of South Australia (Whibley & Symon)
• Bats of S. A. (Reardon & Flavel) • Guide to a Native Vegetation Survey
• Field Guide to Birds of Australia (Heard & Channon)
(Simpson & Day) • South Aust. Swainsona (Thompson)
• Reptiles & Amphibians of Australia (Cogger) • Threatened Plant Species Management
• Field Guide to the Small Land Mammals in the Arid Pastoral Zone of S.A. (Davies)
of the N.T. (Cole & Woinarski, draft) • Customised Flora & Fauna Survey Notes
• Tracks, Scats & Other Traces (Triggs) • Folder for Completed Data Sheets
• Folder of Blank Data Sheets • Additional keys & Curators Instructions
& Plant Voucher Nos.

16 Section 4
G U I D E L I N E S F O R V E R T E B R A T E S U R V E Y S I N S O U T H A U S T R A L I A
DEPARTMENT FOR ENVIRONMENT AND HERITAGE
BIOLOGICAL SURVEY & RESEARCH SECTION
LIGHTING EQUIPMENT
2 generator lights Spotlight/battery connector
Gas light Spotlight
2 Fluoro lights 2 Torches
6 Head torches Spare mantles, spare bulbs
Matches 10 / 4.5 volt batteries
40 / AA batteries 8 / D cell batteries
Cigarette lighter extension cord Circuit tester
6 / C batteries 2 / 9 volt batteries
DEPARTMENT FOR ENVIRONMENT AND HERITAGE
BIOLOGICAL SURVEY & RESEARCH SECTION
TOOL BOX
Small sledge hammer 2 Adjustable crescent wrenches, inc.12”
Hammer Truck tyre gauge (glove box)
Metric set ring spanners(6) Multigrip pliers
Metric set open-end spanners(6) Needle-nosed pliers
Precision screwdrivers Locking vice grip pliers
Set of screwdrivers (inc. Phillips head) Conventional pliers
2 / D shackles for trailer Can aerostart
Insulating tape Can WD40
Gaffer tape Tin plastibond
Wire brush Tube auto silastic
Rat-tail & flat file Metric socket set
Hex key set Set fuses
Hack saw & spare blades Hand saw
Tow bar ball Coping saw
Bottle ‘Barsleak’ Hole punch
Crimping tool set Chisel

Section 4 17
G U I D E L I N E S F O R V E R T E B R A T E S U R V E Y S I N S O U T H A U S T R A L I A
DEPARTMENT FOR ENVIRONMENT AND HERITAGE
BIOLOGICAL SURVEY & RESEARCH SECTION
RECOVERY EQUIPMENT HILUX
Winch control (+ one in glove box) Tube repair kit inc. valve tool
Wire Compressor (if not fitted) & hose
2 Wooden jack bases Mechanical tyre pump
Snatchem strap & Snatch block Bead breaker
Tow rope/winch extension & tree guard Wheel nut spanner
2 x 4 Tonne D shackles 2 Tyre levers
Battery jumper leads Spare wheel nuts & studs
Spare fan belt 2 Spare tubes
Spare airconditioner belts Rubber mallet
Fuel funnel & extension Bolt cutters
Spare hose clamps 2 Spare radiator hoses
2 Spare tyres (separate) Brake fluid
Air bag (separate) Oil (separate)
Power steering fluid
Instructions -tyre repair & changing
-winch & snatchem strap use

18 Section 4
G U I D E L I N E S F O R V E R T E B R A T E S U R V E Y S I N S O U T H A U S T R A L I A
DEPARTMENT FOR ENVIRONMENT AND HERITAGE
BIOLOGICAL SURVEY & RESEARCH SECTION
RECOVERY EQUIPMENT OKA
Recovery Box (in rear)
10 tonne Snatchem rope & Snatch block 2 Tyre levers
2 x Tow rope/winch extension Bead breaker
3 x 8 Tonne D shackles Rubber mallet
Mechanical tyre pump Bolt cutters
Battery jumper leads 2 Spare tubes
Brake fluid Power steering fluid
Fuel funnel & extension
Spares Kit (army box in rear)
Tube repair kit inc. valve tool Spare fuses -blade & tube
Spare fan belt Spare airconditioner belt
Radiator hose -top & bottom Radiator/engine hose- upper & lower
Spare hose clamps Spare globes – large and small
Inside Tub (under back seat)
Winch control Compressor hose
Siphon tube water & fuel Extension cord (15 amp plug)
Other (scattered)
2 Wooden jack bases 2 Spare tyres
Wire Oil
2 x Jacks and lever Tool roll (inc. wheel nut spanner)

Section 4 19
G U I D E L I N E S F O R V E R T E B R A T E S U R V E Y S I N S O U T H A U S T R A L I A
DEPARTMENT FOR ENVIRONMENT AND HERITAGE
BIOLOGICAL SURVEY & RESEARCH SECTION
CUTLERY BOX
Small cutting board Egg flip
8 Plates 2 Wooden spoons
8 Bowls Slotted spoon
8 Cups Serving spoon
Tea strainer Oven mitt
Gas lighter Scourers & sponges
3 Large sharp knives Matches
Small paring knife Pegs
2 Potato peelers Antibacterial handwash
2 Can openers 4 Teatowels
10 Knives 10 Forks
10 Spoons 10 Teaspoons
Grater
DEPARTMENT FOR ENVIRONMENT AND HERITAGE
BIOLOGICAL SURVEY & RESEARCH SECTION
COOKING GEAR
Wok Single burner gas stove & fittings
Large camp oven Gas stove wind shelter
Small camp oven Detergent & soap
Cutting board Disinfectant
Large mixing bowl Aluminium foil
Small mixing bowl Colander
Large billy Paper towels
Small billy Matches
Toast rack Pair tongs
Methylated spirits LP gas stove & fittings (seperate)
A P P E N D I X 7
HIRE OF FIELD EQUIPMENT FROM BIOLOGICAL SURVEY AND RESEARCH SECTION, DEH.
PRICE LIST
Item $ per wk
1 trapline (i.e. 15 Elliotts, 6 pits, 2 cage traps, fence mesh, pins) 20
installation tools (i.e. 2 crowbars, 3 spades, mattock, rake 3-pronged hoe) 20
processing kit (no Nembutal®) 25
harp trap (only available to those vaccinated against rabies) 20
field kit (i.e. calico bags, plastic bags, folders, range poles, etc.) 50
2 hand held spotlights 20
• i.e. surveying 6 quadrats in the pastoral zone will cost 375
Individual Items $ per wk
Elliott Traps (box of 15) 5
e.g. 33 cents/trap/week
Cage Traps 2
Note:
All breakages and consumables must be replaced in addition to hire charge.
Equipment will not be loaned out without proof of animal ethics approval and a scientific permit.
20 Section 4
G U I D E L I N E S F O R V E R T E B R A T E S U R V E Y S I N S O U T H A U S T R A L I A
A P P E N D I X 8
GUIDELINES FOR DATA SHEETS REQUIRED FOR A COMPLETE BIOLOGICAL SURVEY
The number of sheets is based on the standard required by one group surveying six sites over a one
week period. The per/site number is also provided so adjustments can be made for a different number
of sites.
Per Group
Vertebrate Voucher (A4, white, double sided) 3
Vegetation Voucher (A4, white, double sided) 10
Per Camp
Weather (A4, white, single sided) 1
Opportune (A4, white, double sided 20
or opportune books) one per car
Trap Effort (A4, white, single sided) 1
Quadrat Summary (A4, white, single sided) 1
One Site Six Sites
Per Site
Site Location/Physical (A4, white, double sided) 1 6
Vegetation (A3, green, double sided) 1 6
Bird (A4, yellow, double sided) 4 24
Mammal (A4, pink, double sided) 5 30
Reptile (A4, blue, double sided) 5 30
Amphibian (A4, orange, double sided) 2 12
Section 4 21
G U I D E L I N E S F O R V E R T E B R A T E S U R V E Y S I N S O U T H A U S T R A L I A

A P P E N D I X 9
VOLUNTEER PROJECT COMMENCEMENT ADVICE FORM
22 Section 4
G U I D E L I N E S F O R V E R T E B R A T E S U R V E Y S I N S O U T H A U S T R A L I A

DEPARTMENT FOR ENVIRONMENT AND HERITAGE
NATIONAL PARKS AND WILDLIFE, SOUTH AUSTRALIA
VOLUNTEER PROJECT COMMENCEMENT ADVICE FORM
(TO BE SUBMITTED AT LEAST ONE MONTH BEFORE COMMENCEMENT OF PROJECT)
TO: MANAGER, COMMUNITY LIAISON UNIT, N.P.W.S.A.
THROUGH:
FROM: _________________________________________ DATE: __________________
PLEASE NOTE THAT IT IS MY INTENTION TO COMMENCE A VOLUNTEER PROJECT, A DESCRIPTION
BEING AS FOLLOWS:-
______________________________________________________________________________________
______________________________________________________________________________________
______________________________________________________________________________________
______________________________________________________________________________________
PROJECT DETAILS:
• Location of project: ______________________________________________________________
• Name of volunteer group: ________________________________________________________
• Commencement date: ____________________________
• Finishing date: ____________________________or Ongoing?___________________________
• Name of group leader:____________________________________________________________
• Telephone number:______________________________________________________________
• Anticipated number of volunteers:__________________________________________________
• Proposed number of hours: _______________________________________________________
VOLUNTEER REQUIRED TO OPERATE PLANT/EQUIPMENT/DRIVE MOTOR VEHICLE:
Specify what plant/equipment to be used: (Please
✓ boxes)
• Consultation with relevant District Ranger/Manager ❐
• Volunteer holding appropriate licence (sighted) ❐
• Volunteer assessed by qualified operator ❐
• Volunteer understands N.P.W. standard work practices ❐

VOLUNTEER REQUIRED TO USE PESTICIDES (Please ✓ boxes).
YES ❐ NO ❐
• Consultation with relevant District Ranger/Manager ❐
• Project supervised/assessed by N.P.W. accredited person ❐
• Volunteers understand N.P.W. standard work practices ❐
• Material Safety Data Sheets supplied ❐
• Protective clothing supplied ❐
REGIONAL EMPLOYEES’ CONSULTATIVE MEASURES
Regional Employees consulted YES ❐ NO ❐ (Please ✓ boxes)
• P.S.A. Delegate consulted: ________________________________________________________
Signature of Delegate: ____________________________________________________________
• L.H.M.U. Delegate consulted: _____________________________________________________
Signature of Delegate: ____________________________________________________________
• Where no Delegate is registered, members consulted: ________________________________
Signature of Delegate: ____________________________________________________________
OTHER COMMENTS OR STAFF CONCERNS:
______________________________________________________________________________________
______________________________________________________________________________________
_________________________________________ ___________________________________________
MANAGER DATE
DISTRICT RANGER/MANAGER USE ONLY
Estimated Use of Staff Time:_____________________hours
COMMUNITY LIAISON USE ONLY
No. of Volunteers: Type of project/s: *No. of Visits: *No. of Workdays: *
Ongoing: YES/NO PROJECT NO.sUnions.p12-13.pjs

A P P E N D I X 1 0
GROUP LEADER RESPONSIBILITIES
Although it is necessary for one person to oversee the groups activities they should not be the ones
doing all the work. All participants should use their initiative and share the work load.
-Determine food menu and arrange food shopping.
-Handle cash and receipts throughout the trip.
-Ensure all equipment has been checked including vehicles and radios.
-Oversee packing of all equipment.
-List all DEH equipment taken and record in the Equipment Booking Register.
-Become familiar with travel route and sites etc.
-Inform volunteers of first aid box locality and to use small general kit if possible.
-Check all participants are familiar with use of vehicles, radios and other survey equipment (e.g.GPS).
-Make sure radio schedules are met.
-Make sure fuel and water supplies are maintained during survey period.
-Carry out basic vehicle checks throughout the survey period.
-Provide a general plan (each evening) for the days activities.
-Ensure all data sheets are filled out daily.
-Ensure site photos and site description/location data sheets are completed.
-Ensure all data sheets are completed and filed away in the correct location.
-Ensure environmental readings are recorded.
-Ensure all specimens are labelled correctly.
-Ensure voucher lists are kept up-to-date.
-If St. John or Flying Doctor kits are opened, ensure a list is enclosed of supplies used.
-Inform volunteers to report all damage or loss of equipment.
-Check all head torches are returned at the end of the trip.
-On return fill out vehicle log book.
-Unpack vehicles.
-Report any vehicle or trailer problems.
-Check all equipment and list all damages and losses in the equipment booking register.
-Clean out fridge with detergent and disinfectant.
-Clean vehicles.
-Top up all alcohol specimen jars.
-Ensure the Nembutal® usage has been tallied on the vertebrate voucher sheets.
-Pass on all specimens and data sheets to survey coordinator.
-Encourage other group members to help with unpacking etc. or make alternative arrangements.
Section 4 25
G U I D E L I N E S F O R V E R T E B R A T E S U R V E Y S I N S O U T H A U S T R A L I A

A P P E N D I X 1 1
VOLUNTEERS WORKER’S REGISTRATION FORM
26 Section 4
G U I D E L I N E S F O R V E R T E B R A T E S U R V E Y S I N S O U T H A U S T R A L I A
VOLUNTEER WORKER’S REGISTRATION FORM
AN AGREEMENT between . . . . . . . . . . . . . . . . . . . . . . . . . . . . . . . . . . . . . . . . . . . . . . . . . . . . . . . . . . (the Volunteer)
of . . . . . . . . . . . . . . . . . . . . . . . . . . . . . . . . . . . . . . . . . . . . . . . . . . . . . . . . . . . . . . . . . . . . . . . . . . . . . . . . . . . . . . . . . (address)
AND . . . . . . . . . . . . . . . . . . . . . . . . . . . . . . . . . . . . . Project Coordinator . . . . . . . . . . . . . . . . . . . . . . . . . . . . . . . . . . . .
for the Biodiversity Branch of the Department for Environment and Heritage, PO Box 1047, Adelaide SA
5001 with respect to undertaking of voluntary work
1. This Agreement to undertake voluntary work on behalf of the Department for Environment and
Heritage is accepted in accordance with the conditions listed in the Commissioner for Public
Employment’s Circular No.62 - Volunteers in Government Agencies - Guidelines (see copy
attached).
2. In addition to the above, the Volunteer may only drive a Government vehicle under specified
conditions if a signed statement of driving ability (particularly 4WD experience) and his/her licence
number has been submitted and approved by the Program Manager (please complete and sign the
attached Driver’s Statement)
SIGNED:
. . . . . . . . . . . . . . . . . . . . . . . . . . . . . . . . . . . . . . . . . . . . . . . . . . . . . . . . . . . . . . . . . . . . . . . . . . . . . . . . . .
Departmental Representative Volunteer Parent/Guardian if under 18 years
Date: . . . . . . . . . . . . . . . . . . Date: . . . . . . . . . . . . . . . . . . Date: . . . . . . . . . . . . . . . . . .

VOLUNTEER WORKER’S STATEMENT
RE RELEVANT SKILLS
I, . . . . . . . . . . . . . . . . . . . . . . . . . . . . . . . . . . . . . . . . . . . . . . (Volunteer) of . . . . . . . . . . . . . . . . . . . . . . . . . . . . . . . . . . . . .
. . . . . . . . . . . . . . . . . . . . . . . . . . . . . . . . . . . . . . . . . . . (address) Driver’s licence type and no. . . . . . . . . . . . . . . . . . . .
have been driving for . . . . . . . . . . . . . . years. I have/have not 4WD experience.
Please itemise below extent of relevant 4WD experience and certificates held.
. . . . . . . . . . . . . . . . . . . . . . . . . . . . . . . . . . . . . . . . . . . . . . . . . . . . . . . . . . . . . . . . . . . . . . . . . . . . . . . . . . . . . . . . . . . . . . . . . . . . . .
. . . . . . . . . . . . . . . . . . . . . . . . . . . . . . . . . . . . . . . . . . . . . . . . . . . . . . . . . . . . . . . . . . . . . . . . . . . . . . . . . . . . . . . . . . . . . . . . . . . . . .
. . . . . . . . . . . . . . . . . . . . . . . . . . . . . . . . . . . . . . . . . . . . . . . . . . . . . . . . . . . . . . . . . . . . . . . . . . . . . . . . . . . . . . . . . . . . . . . . . . . . . .
. . . . . . . . . . . . . . . . . . . . . . . . . . . . . . . . . . . . . . . . . . . . . . . . . . . . . . . . . . . . . . . . . . . . . . . . . . . . . . . . . . . . . . . . . . . . . . . . . . . . . .
For field safety, please indicate experience in the following areas. If none, state ‘none’:
First Aid Training (state certificate level and currency) . . . . . . . . . . . . . . . . . . . . . . . . . . . . . . . . . . . . . . . . . . . . . . . . .
HF Radio experience (able to operate without supervision) . . . . . . . . . . . . . . . . . . . . . . . . . . . . . . . . . . . . . . . . . . . .
Winch training (or extensive experience) . . . . . . . . . . . . . . . . . . . . . . . . . . . . . . . . . . . . . . . . . . . . . . . . . . . . . . . . . . . . .
Experience with using specialist jacks (e.g. high lift, air bags) . . . . . . . . . . . . . . . . . . . . . . . . . . . . . . . . . . . . . . . . . .
Signed: . . . . . . . . . . . . . . . . . . . . . . . . . . . . . . . . . . . . . . . . . . . . . Dated . . . . . . . . . . . . . . . . . . . . . . . . . . . .
PROJECT COORDINATOR’S RECOMMENDATION
The Volunteer is considered competent to drive :
Government 2WD ❐ supervised ❐ unsupervised ❐
Government 4WD ❐ supervised ❐ unsupervised ❐
Signed: . . . . . . . . . . . . . . . . . . . . . . . . . . . . . . . . . . . . . . . . . . . . . Dated . . . . . . . . . . . . . . . . . . . . . . . . . . . .
Project Coordinator
APPROVED:
Signed: .. . . . . . . . . . . . . . . . . . . . . . . . . . . . . . . . . . . . . . . . . . . . . . . . . Dated . . . . . . . . . . . . . . . . . . . . . . . .
Deputy Director NP&WSA Conservation
A P P E N D I X 1 2
GUIDE TO FOOD SHOPPING FOR A BIOLOGICAL SURVEY
Calculate how many meals are required by the number of people . Work out roughly what you will
have in each meal so you buy the right amount of pasta and rice as well as other ingredients. It doesn’t
hurt to have extra of these for emergencies. Also estimate what will be eaten for lunch and breakfast.
BASIC ITEMS
*rice - one 500g pkt for 4 people for one meal
*pasta - as above (assorted types)
*bread - one loaf/person/week (more if people don't eat breakfast cereal), maybe only for first week as
bread can go mouldy in warm weather (volkorn bread lasts for as long as you don't eat it). Buy
plenty of dry cracker biscuits for backup (i.e. a box per day plus a couple of extras)
*wheatbix, muesli, etc. - one kilo for 1 person for two weeks
*flavour sauces or sachets - one jar per meal. (e.g. Pataks curry pastes or pasta sauces; makes cooking
quick and easy plus plenty of variety).
*margarine - 1kg per 6 people per week
*jam
*honey
*vegemite
*cheese - 100g per person per day; assorted types
*small goods - metwurst, salami, pepperoni, etc. 1kg for trip
*tinned fish - 1 per lunch
*tinned tuna - 4 tins for use in meals
*bacon for main meals - sealed 250g packets; 1 per meal (requiring bacon)
*plain flour - 1 kg
*long life UHT milk- 1L per day plus extra
*instant coffee - 200g jar
*tea - 50 bags plus 1 pkt leaves
*sugar - 1 kg
*staminade
FRESH FOODS
*Diced steak/mince/chicken (optional) - ~200gm/person/meal. Get butcher to vacuum seal individual
packets, freeze and place in bottom of fridge. Should then last for two weeks
*carrots - 20-30 for trip (more if vegetarians present) don't leave in plastic; wrap in newspaper (this
applies to all vegies not kept in the fridge).
*capsicums - 1-2 per day, usually best eaten in first week
*potatoes - 1 per person per meal
*zuchinis - as above
*sweet potatoes – 1 or 2 per week (depending on size)
*butternut pumpkins – 1 per week
*cabbage - 1 whole
*lettuce - half per day for lunches; best in first week
*tomatoes - two per day; buy some hard
*mushrooms - keep in fridge and use in first week
*cucumbers - 1 per day; best in first week
*avocados - 1 per day or as desired
Section 4 29
G U I D E L I N E S F O R V E R T E B R A T E S U R V E Y S I N S O U T H A U S T R A L I A

*onions - enough for two per meal
*oranges - 1 per person per day
*apples - as above
STORABLE FOODS - suggestions only
*tinned mushrooms
*tinned beans - various assortments for main meals or salads
*tinned corn
*nuts and dried fruit
*snack foods: BBQ shapes, corn chips, etc. several boxes
*dips – 3 per week
*lollies - mints
*sweet biscuits - several packets
*chocolate - 1 block per day
*fruit cake - 1 per week
*Packet cheese cake mix - 1 per week
*cuppa soups - enough for 40 cups
*tabasco sauce, chilli sauce
*spices; salt pepper herbs etc.
*soy sauce
*cordial - 3 litres
*pickled onions
*tinned fruit
*muesli bars
*milo - 1 tin
*minced garlic - 1 jar
*minced ginger - 1 jar
*sultanas - 1 kg
NON-FOOD ITEMS
*cheap tea towels
*matches and a butane firelighter
*headache tablets
*dishwashing liquid
*antibacterial hand wash
*aerogard/rid insect repellent lotion
*sunscreen
*toilet paper (available from store for DEH projects)
*tissues (available from store for DEH projects)
30 Section 4
G U I D E L I N E S F O R V E R T E B R A T E S U R V E Y S I N S O U T H A U S T R A L I A

APPENDIX 13
REMOTE AREA TRAVEL VEHICLE CHECKLIST
Section 4 31
G U I D E L I N E S F O R V E R T E B R A T E S U R V E Y S I N S O U T H A U S T R A L I A

VIS
UA
L C
HEC
K� ❐
Engi
ne c
ompo
nent
s fo
r fa
ults
& lo
ose
part
s� ❐
Brak
e flu
id� ❐
Coo
lant
� ❐Fu
el T
ank
1� ❐
Fuel
Tan
k 2
� ❐Ba
tter
y flu
id (
1&2)
� ❐En
gine
oil
� ❐N
ext
Serv
ice
Due
..
....
....
....
....
...
km� ❐
Odo
met
er r
eadi
ng .
....
....
....
....
....
km
Tyre
sPr
essu
reC
ond
itio
n� ❐
Fron
t rig
ht..
....
....
....
....
....
...
� ❐Fr
ont
left
....
....
....
....
....
....
.� ❐
Rear
left
....
....
....
....
....
....
.� ❐
Rear
rig
ht..
....
....
....
....
....
...
� ❐1s
t Sp
are
....
....
....
....
....
....
.� ❐
2nd
Spar
e..
....
....
....
....
....
...
RA
DIO
CH
ECK
� ❐H
F Ra
dio
secu
re &
ope
ratio
nal
� ❐A
eria
ls &
fitt
ings
sec
ure
� ❐Te
st c
all t
o� ❐
Sign
al s
tren
gth
& c
larit
y� ❐
Selc
all t
est
� ❐VH
F Ra
dio
secu
re &
ope
ratio
nal
� ❐Te
st c
all t
o� ❐
Sign
al s
tren
gth
& c
larit
y� ❐
Sign
al s
tren
gth
& c
larit
y� ❐
Cop
y ra
dio
proc
edur
es/s
elca
ll nu
mbe
rs
GEN
ERA
L EQ
UIP
MEN
T &
SPA
RES
� ❐Fi
rst
aid
kit
chec
ked.
� ❐W
ater
tan
k fu
ll &
che
cked
for
leak
s� ❐
Knap
sack
(to
pre
vent
fire
s in
long
gra
ss)
� ❐Ve
hicl
e fr
idge
sec
ure
& w
orki
ng� ❐
Spar
e pa
rts
chec
ked
& p
acke
d
GEN
ERA
L EQ
UIP
MEN
T &
SPA
RES
� ❐C
ompr
essi
on/p
ump
chec
ked
& p
acke
d� ❐
Cra
ne o
pera
tiona
l slin
gs p
acke
d� ❐
Air
cond
ition
er w
orki
ng� ❐
Gen
erat
or w
orki
ng� ❐
Gen
erat
or f
uel p
acke
d� ❐
Gen
erat
or 1
2 vo
lt ba
tter
y� ❐
Cha
rge
lead
OK
and
pack
ed� ❐
Map
s, c
ompa
ss &
rul
er p
acke
d� ❐
Spar
e fu
el &
oil
pack
ed
REC
OV
ERY
EQ
UIP
MEN
T C
HEC
K� ❐
Win
ch d
isen
gage
d &
fre
es c
able
� ❐W
inch
eng
ages
& p
ower
s ca
ble
in a
nd o
ut� ❐
Hi L
ift ja
ck o
r ai
r ba
g� ❐
Shov
el, a
xe, m
atch
es� ❐
Win
ch s
ling/
tree
pro
tect
or� ❐
Jack
bas
e pa
cked
(Ti
mbe
r)� ❐
Snat
chem
str
ap c
heck
ed &
pac
ked
� ❐W
inch
con
trol
pac
ked
� ❐Sn
atch
/blo
ck p
acke
d� ❐
Tow
cab
les
� ❐2
x ja
cks
D s
hack
les
pack
ed� ❐
Win
ch c
able
sou
nd &
sec
ure
EMER
GEN
CY
MA
INTE
NA
NC
E TO
OLS
� ❐Se
t of
met
ric s
pann
ers
� ❐Se
t of
met
ric s
ocke
ts� ❐
Larg
e &
sm
all f
lat
blad
e sc
rew
driv
ers
� ❐La
rge
& s
mal
l Phi
lip’s
scr
ew d
river
� ❐Pl
iers
(co
nven
tiona
l & n
eedl
e no
se)
� ❐Fu
nnel
s (o
il an
d fu
el)
� ❐Sp
anne
rs� ❐
Two
Schr
ader
too
ls� ❐
Jum
ping
lead
s� ❐
Tyre
rep
air
equi
pmen
t� ❐
Spar
e fu
el f
ilter
� ❐Sp
are
fuse
s, e
lect
rical
wire
� ❐Ty
re le
vers
� ❐Su
pply
of
engi
ne o
il
SUPP
LY L
IST
CH
ECK
� ❐Fo
od fo
r ..
....
....
....
days
pac
ked
� ❐C
ooki
ng u
tens
ils� ❐
Drin
king
wat
er (
othe
r th
an t
ank)
..
....
....
..lit
res
pack
ed� ❐
Swag
(s)
� ❐Ta
rps,
Ten
ts� ❐
Hat
, sun
glas
ses
� ❐Su
nscr
een
& in
sect
rep
ella
nt
VEH
ICLE
DET
AIL
S
VEH
ICLE
REG
. NO
: ...
....
....
....
....
....
....
....
....
.
VEH
ICLE
FLE
ET ID
: ...
....
....
....
....
....
....
....
....
.
VEH
ICLE
CA
LL S
IGN
: ...
....
....
....
....
....
....
....
...
TYPE
OF
VEH
ICLE
...
....
....
....
....
....
....
....
....
..
SELC
ALL
NO
. ..
....
....
....
....
....
....
....
....
....
...
VEH
ICLE
PRE
PARE
D B
Y ..
....
....
....
....
....
....
....
...
SIG
NED
...
....
....
....
....
....
....
....
....
....
....
....
DAT
E ..
....
....
....
....
....
PRE-
TRA
VEL
CH
ECK
LIST
(Do
not
Fax
with
RAT
For
m t
o Ra
dio
Base
– P
t. A
ugus
ta)

A P P E N D I X 1 4
REMOTE AREA TRAVEL FORM
G U I D E L I N E S F O R V E R T E B R A T E S U R V E Y S I N S O U T H A U S T R A L I A
Section 4 33

REMOTE AREA TRAVEL
TO: Department for Environment & Heritage
PORT AUGUSTA
Tel: (08) 8648 5345
Fax: (08) 8648 5301
Duty Officer Mobile: 0408 378 284
Name . . . . . . . . . . . . . . . . . . . . . . . . . . . . . . . . . . . . . . . . . . Location . . . . . . . . . . . . . . . . . . . . . . . . . . . . . . . . . . . . . .
Telephone No . . . . . . . . . . . . . . . . . . . . . . . . . . . . . . . . . Fax No . . . . . . . . . . . . . . . . . . . . . . . . . . . . . . . . . . . . . . . .
Organisation . . . . . . . . . . . . . . . . . . . . . . . . . . . . . . . . . Branch . . . . . . . . . . . . . . . . . . . . . . . . . . . . . . . . . . . . . . . .
Request Date . . . . . . . . . . . . . . . . . . . . . . . . . . . . . . . . . Supervisor’s Name . . . . . . . . . . . . . . . . . . . . . . . . . . .
Supervisor’s Signature . . . . . . . . . . . . . . . . . . . . . . . . . . . . . . . . .
TRIP DETAILS:
. . . . . . . . . . . . . . . . . . . . . . . . . . . . . . . . . . . . . . . . . . . . . . . . . . . . . . . . . . . . . . . . . . . . . . . . . . . . . . . . . . . . . . . . . . . . . . . . . . . . . .
. . . . . . . . . . . . . . . . . . . . . . . . . . . . . . . . . . . . . . . . . . . . . . . . . . . . . . . . . . . . . . . . . . . . . . . . . . . . . . . . . . . . . . . . . . . . . . . . . . . . . .
. . . . . . . . . . . . . . . . . . . . . . . . . . . . . . . . . . . . . . . . . . . . . . . . . . . . . . . . . . . . . . . . . . . . . . . . . . . . . . . . . . . . . . . . . . . . . . . . . . . . . .
. . . . . . . . . . . . . . . . . . . . . . . . . . . . . . . . . . . . . . . . . . . . . . . . . . . . . . . . . . . . . . . . . . . . . . . . . . . . . . . . . . . . . . . . . . . . . . . . . . . . . .
. . . . . . . . . . . . . . . . . . . . . . . . . . . . . . . . . . . . . . . . . . . . . . . . . . . . . . . . . . . . . . . . . . . . . . . . . . . . . . . . . . . . . . . . . . . . . . . . . . . . . .
TRAVELLERSSurnames Given Names
1 . . . . . . . . . . . . . . . . . . . . . . . . . . . . . . . . . . . . . . . . . . . . . . . . . . . . . . . . . . . . . . . . . . . . . . . . . . . . . . . . . . . . . . . . . . . .
2 . . . . . . . . . . . . . . . . . . . . . . . . . . . . . . . . . . . . . . . . . . . . . . . . . . . . . . . . . . . . . . . . . . . . . . . . . . . . . . . . . . . . . . . . . . . .
3 . . . . . . . . . . . . . . . . . . . . . . . . . . . . . . . . . . . . . . . . . . . . . . . . . . . . . . . . . . . . . . . . . . . . . . . . . . . . . . . . . . . . . . . . . . . .
4 . . . . . . . . . . . . . . . . . . . . . . . . . . . . . . . . . . . . . . . . . . . . . . . . . . . . . . . . . . . . . . . . . . . . . . . . . . . . . . . . . . . . . . . . . . . .
5 . . . . . . . . . . . . . . . . . . . . . . . . . . . . . . . . . . . . . . . . . . . . . . . . . . . . . . . . . . . . . . . . . . . . . . . . . . . . . . . . . . . . . . . . . . . .
6 . . . . . . . . . . . . . . . . . . . . . . . . . . . . . . . . . . . . . . . . . . . . . . . . . . . . . . . . . . . . . . . . . . . . . . . . . . . . . . . . . . . . . . . . . . . .
TRAVEL VEHICLE – (Attach separate sheet with same details for any additional vehicles)
Model: . . . . . . . . . . . . . . . . . . . . . . . . . . . . . . . . . . . . . . . Colour: . . . . . . . . . . . . . . . . . . . . . . . . . . . . . . . .
Type: . . . . . . . . . . . . . . . . . . . . . . . . . . . . . . . . . . . . . . . . . Call Sign: . . . . . . . . . . . . . . . . . . . . . . . . . . . . . .
Selcall No: . . . . . . . . . . . . . . . . . . . . . . . . . . . . . . . . . . .
Radio connected to GPS? ❐ Yes❐ No

REMOTE AREA TRAVEL SCHEDULE – To be completed by travel group
Day Date Proposed Location Nominated Preferred Schedule Any
Schedule Frequency checked Comments
3372 and
5945 recorded
7956
1
2
3
4
5
6
7
8
9
10
11
12
13
14
EMERGENCY CONTACT: (In priority order – attach separate sheet if additional contacts required)
1. Organisation Contact Ph Fax
Name: A/H
2. Name: Ph Fax
A/H
3. Name: Ph Fax
A/H
4. Name: Ph Fax
A/H

REMOTE AREA TRAVEL SCHEDULE
ADDITIONAL DETAILS (including additional call signs, selcall numbers, etc.)
. . . . . . . . . . . . . . . . . . . . . . . . . . . . . . . . . . . . . . . . . . . . . . . . . . . . . . . . . . . . . . . . . . . . . . . . . . . . . . . . .
. . . . . . . . . . . . . . . . . . . . . . . . . . . . . . . . . . . . . . . . . . . . . . . . . . . . . . . . . . . . . . . . . . . . . . . . . . . . . . . . .
. . . . . . . . . . . . . . . . . . . . . . . . . . . . . . . . . . . . . . . . . . . . . . . . . . . . . . . . . . . . . . . . . . . . . . . . . . . . . . . . .
. . . . . . . . . . . . . . . . . . . . . . . . . . . . . . . . . . . . . . . . . . . . . . . . . . . . . . . . . . . . . . . . . . . . . . . . . . . . . . . . .
. . . . . . . . . . . . . . . . . . . . . . . . . . . . . . . . . . . . . . . . . . . . . . . . . . . . . . . . . . . . . . . . . . . . . . . . . . . . . . . . .
. . . . . . . . . . . . . . . . . . . . . . . . . . . . . . . . . . . . . . . . . . . . . . . . . . . . . . . . . . . . . . . . . . . . . . . . . . . . . . . . .
PROVIDE A MAP OR COPY, IF AVAILABLE, OR PREPARE DETAILED SKETCHPLAN USING THIS GRID.

A P P E N D I X 1 5
EXAMPLE DATA SHEETS
Section 4 37
G U I D E L I N E S F O R V E R T E B R A T E S U R V E Y S I N S O U T H A U S T R A L I A

38 Section 4
G U I D E L I N E S F O R V E R T E B R A T E S U R V E Y S I N S O U T H A U S T R A L I A
EXAMPLE
Section 4 39
G U I D E L I N E S F O R V E R T E B R A T E S U R V E Y S I N S O U T H A U S T R A L I A
EXAMPLE

40 Section 4
G U I D E L I N E S F O R V E R T E B R A T E S U R V E Y S I N S O U T H A U S T R A L I A
EXAMPLE
Section 4 41
G U I D E L I N E S F O R V E R T E B R A T E S U R V E Y S I N S O U T H A U S T R A L I A
EXAMPLE

42 Section 4
G U I D E L I N E S F O R V E R T E B R A T E S U R V E Y S I N S O U T H A U S T R A L I A
EXAMPLE
Section 4 43
G U I D E L I N E S F O R V E R T E B R A T E S U R V E Y S I N S O U T H A U S T R A L I A
EXAMPLE

44 Section 4
G U I D E L I N E S F O R V E R T E B R A T E S U R V E Y S I N S O U T H A U S T R A L I A
EXAMPLE
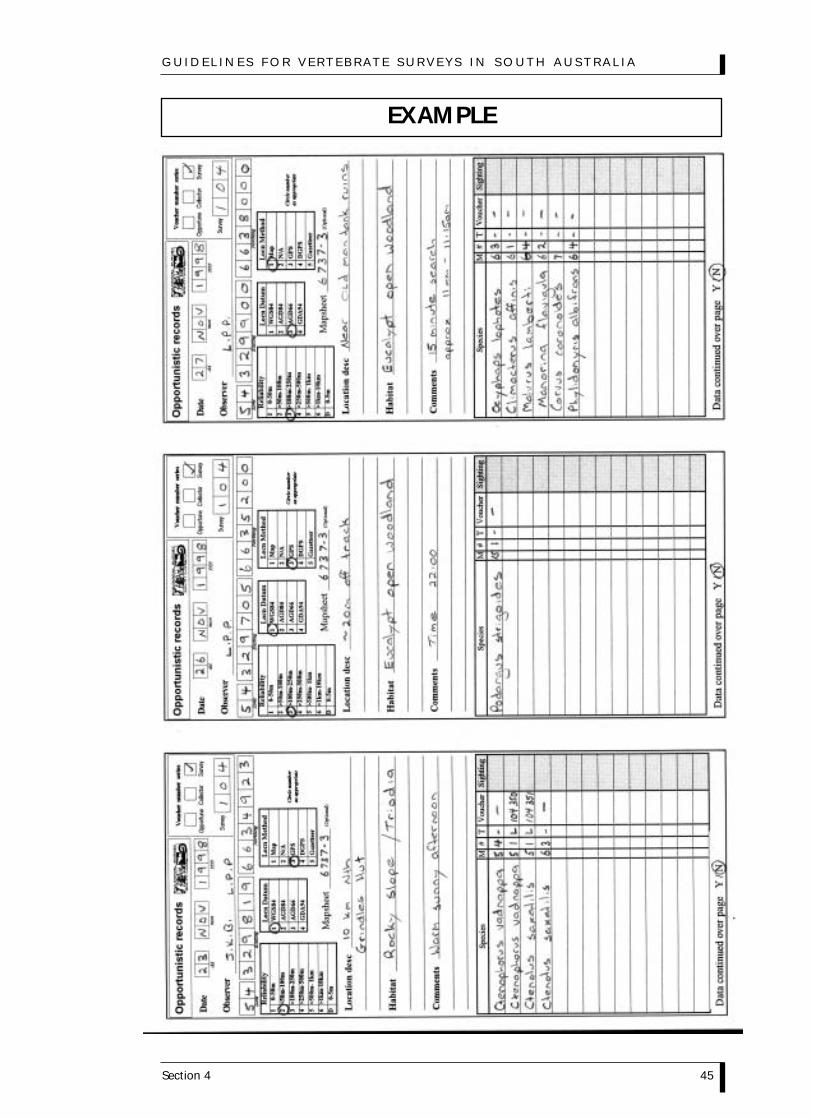
Section 4 45
G U I D E L I N E S F O R V E R T E B R A T E S U R V E Y S I N S O U T H A U S T R A L I A
EXAMPLE

46 Section 4
G U I D E L I N E S F O R V E R T E B R A T E S U R V E Y S I N S O U T H A U S T R A L I A
EXAMPLE

Section 4 47
G U I D E L I N E S F O R V E R T E B R A T E S U R V E Y S I N S O U T H A U S T R A L I A
EXAMPLE

48 Section 4
G U I D E L I N E S F O R V E R T E B R A T E S U R V E Y S I N S O U T H A U S T R A L I A
EXAMPLE

Section 4 49
G U I D E L I N E S F O R V E R T E B R A T E S U R V E Y S I N S O U T H A U S T R A L I A
EXAMPLE

A P P E N D I X 1 6
OHS&W – LOCAL POLICY – KENSINGTON SITE - NO. 5HANDLING VENOMOUS SNAKES
INTRODUCTIONAustralia has many species of venomous animals including 80 terrestrial snakes (34 in South Australia).
Of that number 22 are considered potentially dangerous in Australia (14 species in South Australia).
Venom is generally harmless if ingested but toxic when it comes in contact with the underlying tissue
normally protected by the skin. Venomous animals have to break the skin with body-spines, stings or
teeth (includes fangs in spiders and centipedes). Officers should be aware that other species of reptiles
can be dangerous e.g., monitors and pythons
Failure to maintain strict security and safety procedures in relation to these animals can lead to accidents
which may be fatal, or produce serious long-term illness and/or monetary cost.
STAFF QUALIFICATIONSNo one is authorised to handle venomous snakes unless they:-
• Have a demonstrated understanding of snake posturing and natural behaviour.
• Have a demonstrated ability to correctly identify all Australian snakes, venomous and non-venomous.
• Either demonstrate a degree of competence in the handling of non-venomous snakes including the
use of a snake hook or equivalent safe handling equipment or have attended ìan approved snake
awareness courseî. Current snake awareness courses available are those delivered by Geoff Coombe,
Ian Renton, Peter Mirtschin, Dr Julian White and Ted Mertens.
First aid training
No one is authorised to handle venomous snakes unless they:-
Possess a current first aid certificate, or
Have undertaken a specific course concerning snakebite prevention and first aid, or
Have a demonstrated ability to perform appropriate first aid following envenomation.
FIELDWORK:
Equipment and personnel clothing
• Those people who are qualified are expected to have the appropriate equipment with them in any
situation where a venomous snake is handled.
• The appropriate tool for the job varies and may include hoop bags, jigger/head press, snake hook,
leather thong or rope noose, grab stick, grasping tongs and clear tubes.
• All personnel handling venomous snakes should wear non-restrictive clothing and wear footwear that
fully encloses the feet.
• All personnel handling venomous snakes should carry first aid equipment e.g. 2 broad crepe
bandages, sling wooden/plastic splint.
General
• Venomous snakes, including potentially dangerous snakes, may only be handled when two persons
are present, one of which must meet the above staff qualifications. Both persons must be aware of
emergency first aid procedures.
• If a venomous snake is in a pitfall trap leave the animal in the trap until a qualified snake handler is
available to remove it. If you are not sure as to the identity of a snake do not attempt to handle it.
50 Section 4
G U I D E L I N E S F O R V E R T E B R A T E S U R V E Y S I N S O U T H A U S T R A L I A

• If the identity of the snake is certain and a specimen has already been collected, some long sticks can
be put into the pit to enable the snake to climb out during the day (make sure the sticks are removed
before nightfall).
• Do not involve ‘unskilled’ persons directly in activities with venomous snakes.
• Observe the convention of being able to summon aid quickly.
• Venomous snakes kept in bags for scientific purposes must be clearly labelled (see paragraph on
transporting).
• Do not handle venomous snakes after alcohol has been consumed or medicines/drugs taken.
Emergency plan
Prior to undertaking a field trip which involves the collection or handling of venomous reptiles the team
leader is required to prepare an emergency plan and advise all officers involved in the field trip details of
the plan. The plan is to take into account:
• An outline of what to do if a person is bitten – e.g. apply broad form bandage, keep limb as still as
possible, medical care.
• Availability of two way radio/mobile telephone/satellite telephone.
• Details of the nearest hospital, Royal Flying Doctor.
• Ensure that another experienced person is within earshot during snake collection.
TRANSPORTING VENOMOUS SNAKES
Animal welfare considerations
• Never leave snakes or their containers in direct sunlight. To avoid death from desiccation in warm
weather, wet bags regularly.
• Keep venomous snakes separate from other reptiles.
Security
• Place the snake in an appropriate bag or container that prevent the escape of the snake.
• Always double tie calico bags and double bag the snake.
• Clearly label the bag/container with the number and species (common and scientific name) of snake
inside. The label must clearly indicate that the snake is venomous e.g. ‘DANGER – VENOMOUS
SNAKE’.
• Snake bags must be checked (stitching, ties, etc.) prior to use. Bags containing venomous snakes are
to be handled with extreme care. Where possible they are to be kept inside a more solid container
(e.g. box).
• If the snake has to be moved on public transport, double bag the snake and place in a secure locked
receptacle.
SEIZURE AND SURRENDER OF SNAKE
NP&W SA Wardens may be required to seize a venomous snake from a member of the public. Similarly,
members of the public may surrender a snake to an officer. Officers are not to handle venomous snakes
unless they meet the staff qualifications listed above.
If seizing from a permit holder then it is OK for a non-qualified officer to have permit holder (specialist
endorsed for venomous snakes) bag the snake and tie up the calico bag. Non qualified officers should
not attempt to bag venomous snakes and should call for assistance if the permit holder is not willing to
bag the snake.
A non-qualified officer can transport snakes as long as they comply with the transport requirements.
Section 4 51
G U I D E L I N E S F O R V E R T E B R A T E S U R V E Y S I N S O U T H A U S T R A L I A
If receiving a snake from another officer, check with consigning officer that all snakes have been
correctly and competently identified. If there is any doubt about the species concerned it is to be
treated as if it was a dangerous species and steps taken to identify it by a trained competent person as
soon as possible.
All venomous snakes seized or surrendered are to be transported to the Monarto Fauna Complex. The
disposal of any snake to any other person or organisation requires prior written approval from the
Manager, Compliance.
PUBLIC DISPLAYS OF VENOMOUS CREATURES BY STAFF
Kensington staff are not to display venomous creatures to groups or individuals or handle venomous
creatures while they are on public display.
GENERAL
Officers with the following medical conditions are to avoid handling venomous snakes
• Known allergy to horses, sheep or horse/sheep blood product,
• Known allergy to snake venoms,
• Existing heart, kidney disease,
• Epilepsy,
• Major psychiatric illness.
• Do not involve ‘unskilled’ persons directly in activities with venomous snakes.
VENOMOUS SNAKE BITES
Appropriate first aid and basic life support is to be applied to the victim –(DR(ABC) & a compression
bandage and splint).
Keep patient at rest, reassured and under constant observation.
Arrange transport to the patient. Transport the patient to a medical facility, preferably by ambulance.
Relevant forms in the OHS&W manual need to be completed (e.g. a near miss/incident report) for all
bites.
Approved: Kensington Site Safety Committee Date: 22/12/97
Reviewed: Peter Alexander Date: 18/08/99
Reviewed: Peter Alexander Date: 11/05/00
52 Section 4
G U I D E L I N E S F O R V E R T E B R A T E S U R V E Y S I N S O U T H A U S T R A L I A
A P P E N D I X 1 7
OHS&W - LOCAL POLICY - KENSINGTON SITE - NO 7HANDLING OF BATS
BACKGROUND
A new Lyssa virus has been identified during 1996 in two species of bat in Australia. The two species are
the Black flying fox (Pteropus alecto) and Little Red flying fox (Pteropus scapulatus). In November 1996, a
woman in Queensland developed encephalitis, probably due to the virus, after being bitten and
scratched by bats.
The genus Lyssavirus falls within the family Rhabdoviridae. There were six genotypes recognised within
the genus. These include the classic rabies virus, Lagos bat virus, Mokola virus, Duvenhage virus and the
two European bat Lyssaviruses.
Rabies does not occur in Australia.
Non-rabies Lyssaviruses usually do not spread among terrestrial animals and human infections are rare.
The newly identified Lyssavirus is currently only known to infect fruit bats (flying foxes) and humans.
Insectivorous bats are known to carry other Lyssaviruses overseas and therefore cannot be discounted as
a potential risk, at this stage.
Rabies virus and other Lyssaviruses are usually transmitted to humans via bites or scratches which
provide direct access of the virus in saliva to exposed tissue and nerve endings. This means that most
people would not be exposed to Lyssavirus through casual contact with bats.
RECOMMENDATIONS:
Field Staff
Before handling a bat give some thought to whether you really do need to handle the animal. There
may be some alternatives such as simply covering a sick or injured animal.
It is recommended that field staff required to handle any species of bats, both dead and alive, take care
to avoid scratches and bites. Avoid contact with blood and saliva of bats. Sick bats present the greatest
risk (aggression is one of the clinical signs presented by bats infected by Lyssavirus).
It is recommended that staff catching and restraining live bats should wear
a full face mask or goggles or protective glasses.
elbow length leather welders gloves or puncture proof gloves.
Iegs, feet and arms must be covered with a long sleeved shirt, long trousers, or overalls or a thicker
material.
Exercise caution to avoid scratches, bites or contamination of unhealed cuts or abraded skin in yourself
and in any assistants. Abrasions and cuts on any exposed part of the body should be covered.
Section 4 53
G U I D E L I N E S F O R V E R T E B R A T E S U R V E Y S I N S O U T H A U S T R A L I A

Pre-Exposure Vaccination
Pre-exposure vaccination should be recommended to those occupationally or recreationally exposed to
bats, where there is a risk of being bitten or scratched, for example:
Bat carers
Wildlife Officers
Managers of display or research colonies
You should see your doctor about the need for vaccination if you are in one of these groups.
Persons Bitten Or Scratched By Bats
The wound should be scrubbed thoroughly as soon as possible with soap and water. Proper cleansing
of the wound is the single most effective measure for reducing the transmission.
If saliva is suspected of having entered the eye, the eye must be washed at least five times.
The person must then contact a medical practitioner.
Where possible, the bat should be kept (refrigerated but not frozen) for further investigation by the
State veterinary laboratory.
Staff must complete a near miss/incident report as per the OHS manual.
For further information contact the Communicable Disease Control Branch, SA Health Dept, Phone 08
8226 6352.
APPROVED: Kensington Site Safety Committee Date: 25/02/99
Reviewed: Date:
54 Section 4
G U I D E L I N E S F O R V E R T E B R A T E S U R V E Y S I N S O U T H A U S T R A L I A

A P P E N D I X 1 8
MAINTENANCE OF BIOLOGICAL SURVEY FIELD GEAR
PITFALLS
The wire mesh provided for pitfall fence lines should not be cut for any reason. If there is excess mesh at
the end of a line leave it rolled up and secure it with pins, do not cut it to use on another line. Spare
mesh off-cuts are provided in the pitfall box to use for new pitfall bottoms if required. Fences should be
rolled up neatly, removing as much vegetation and mud as possible. A pitfall line will consist of two
30m rolls. One 30m roll is placed in each of the cage traps at the site. The rolls should be tight enough
to drop into the cage traps without needing to force them in. Loose rolls can be tightened by standing
squarely on one end, holding the roll in the centre with both hands and pulling firmly (taking care not
to tear the mesh). A rubber band should always be placed around the roll to stop it unwinding while in
the cage trap. Three mesh pit-bottoms should be rolled loosely together, held together with a rubber
band and placed on top of the pit fence in the cage trap. Pitfall joiners should be placed in bundles of 6
and pins in bundles of 20 and placed back in the pitfall box. Pitfall liners should be brushed off and
placed back in the container provided.
ELLIOTT TRAPS
Empty any old bait, dirt and scats out of Elliott traps as they are packed up in the field. Ensure they are
packed back into boxes in numerical order. If any traps are damaged or missing then label the box
accordingly. After the survey Elliott traps should be washed by removing pins and leaving to soak for a
few hours. Some may require scrubbing before being rinsed and laid out to dry. Put traps back together
when dry and replace, in numerical order, in appropriately numbered boxes.
MIST NETS/POLES
Be careful not to drop nets on the ground or brush against any bushes, they tear easily and are also
difficult to disentangle from sticks and other vegetable matter. It is also wise to remove watches and
jewellery before handling mist nets and avoid wearing shirts with buttons. When checking the nets for
bats remove any beetles as quickly as possible as they can cause damage to the net. Always furl nets
when not in use as any birds flying into them will die if not removed quickly. Nets may be left up
overnight, but only if they are furled tightly. Refold nets carefully removing all vegetable matter. Even a
small leaf can tangle a net if left in. Thread the top loop at one end through the others and knot before
folding. Hold the net taut and of the ground while folding. Place the net into a calico bag one fold at a
time (each fold should be about 30cm long). Tie the loops as per the other end. Note any major
damage on the bag. Clean the poles.
HARP TRAPS
Any broken or loose lines should be rethreaded using the repair kit provided. All strings should be of the
same tension. Canvas bags should be completely dry before putting back into the container. If they are
not, the trap must be unpacked immediately on return and left to dry, as they will rot very quickly if left
in the tube. Clean dirt off poles and dry them, then spray with WD40 to keep poles moving freely. Wrap
‘harp’ inside the canvas bag with the legs, ensuring that no metal poles come into contact with the
strings (i.e. use the bag to protect the strings and the harp). Abrasion caused by travelling will severe
the strings if they are not protected in this manner. Tie together with one of the ropes. Slip this package
into the tube along with the long square-section supports. Put in the hip sections and then fit ropes and
repair kit around the spaces remaining (this may take a bit of juggling). Screw on the lid. Harp traps
should be checked again after returning from a survey to ensure no damage has occurred on the trip
back.
Report any damage or loss of equipment to the survey coordinator or DEH technical officer.
Section 4 55
G U I D E L I N E S F O R V E R T E B R A T E S U R V E Y S I N S O U T H A U S T R A L I A
A P P E N D I X 1 9
GPS OPERATIONAll locations recorded on DEH data sheets should be collected using Australian Map Grid (AMG)
coordinates, rather than longitude and latitude. The AMG coordinates (also referred to as UTM) can be
electronically converted to alternative outputs if required at a later date.
The datum used to determine all coordinates must be recorded with the location data. DEH prefer (and
unless specified otherwise will assume) that all coordinates are recorded using the WGS84 datum mode.
Most brands of GPS currently in use will default to this mode and it is the closest match (~10m
variation) to the new GDA94 datum which is now the standard required for all DEH projects.
Note: Coordinates recorded using a different datum can vary 100-200m. If coordinates are recorded
using WGS84 and then plotted on a topographic map (most topographic maps currently in use are
based on the AGD66 datum and some on AGD84) a difference of up to 200m will be noted between
the location and the plotted coordinates.
GPS accuracy is determined by a number of factors including the brand and model of the GPS, satellite
configuration and local variables such as vegetation cover, hills and other obstructions. Since early
2000, GPS accuracy has improved considerably to within 20m.
The Garmin GPS models are the most commonly used by DEH. There are a number of models available
and all users need to refer to the individual instruction manuals for specific instructions. An example of
the procedure for changing between datum and coordinates on a GARMIN II PLUS is provided below.
GARMIN II PLUS
• Turn the unit on by pressing the on/off light bulb button.
• The satellite screen will be displayed showing the number and strength of satellites. Once the unit
has acquired enough satellites it will switch to the coordinate screen.
• The unit has five main display pages which you can scroll through by pushing the PAGE button. The
basic information available on each page is
• Satellite – number and strength
• Position – coordinates, altitude, speed, direction
• Map - tracks your movement
• Navigation – steering guidance if destination has been selected
• Menu - access to change settings and waypoint and route management
• To change the coordinate mode (i.e.: longitude/latitude to AMG) or datum mode (i.e.: WGS84 to
AGD66);
• Push PAGE until you get to ‘Menu’ page
• Use the rocker keypad to move to ‘System Menu’
• Push ENTER
• Use the rocker keypad to move to ‘Navigation’.
• Push ENTER
• Use the rocker keypad to move to ‘Position’ to change coordinates or ‘Datum’ to change the datum
mode.
• Push ENTER
• In ‘Position Mode’ select ‘UTM/UPS’ for AMG or ‘hddd’mm’ss.s’’ for Latitude/Longitude (decimal
seconds)
• Use rocker keypad to scroll through options and push ENTER to save
• Push the QUIT button at any time to go back a screen
• Turn the unit off by holding the on/off button down for 3 seconds
56 Section 4
G U I D E L I N E S F O R V E R T E B R A T E S U R V E Y S I N S O U T H A U S T R A L I A

Section 4 57
G U I D E L I N E S F O R V E R T E B R A T E S U R V E Y S I N S O U T H A U S T R A L I A
A P P E N D I X 2 0
ISSUES RELATING TO THE TAKING OF VOUCHER SPECIMENS FOR BIOLOGICAL SURVEYWORK
The term ‘biological survey’ or ‘fauna survey’ is used with varying levels of stringency. Biological survey
work is a crucial source of data on which conservation management and much other biological work
depends. The findings must be as reliable as they can be, and if possible, independently verifiable. This
necessity is what influences much of the policy and practices outlined below.
1. Collection policies of the SA Museum and Biological Survey
The S.A. Museum and the S.A. Department for Environment and Heritage have developed a policy
related to the collection of specimens during biological survey work, and this underpins activities
sponsored by the Biological Survey of South Australia. It recognises several facts regarding the
knowledge of our fauna.
One is that the fauna is not yet fully described – we still do not have confidence that all of the things we
call ‘species’ are truly species (genetically distinct groups of organisms that don’t normally interbreed
with neighbouring groups), and we know little about the genetic variation within these species. The
only group for which the current understanding is thought to approach a satisfactory state is birds.
Other terrestrial vertebrate groups, small mammals, reptiles and amphibians, are still poorly understood
in this regard. So survey work aims to collect a basic representation of regional species diversity for
current and future study of genetic variation and speciation. Merely collecting genetic data is
insufficient – future descriptions of new species or revisions of existing species will also need descriptions
of the species’ external and sometimes internal anatomy.
Second is the fact that particular survey trips are windows in time. For one four-day period, animals are
observed, collected or released and recorded. The animals are recorded under the taxonomic
knowledge available at that time. As time goes by, old observations lose their usefulness unless a
process of verification can be employed. The existence of representative specimens collected at the time
provides that verification. Without the specimens, the observations recorded rapidly become mere
hearsay. For people involved in day to day information flow regarding the distribution and identification
of our fauna, there is no substitute for being able to check a specimen. If we are to make management
decisions based on certain knowledge of what lives where, then specimens are the source of that
certainty.
Thirdly, expertise on our fauna is very limited. While a few species are well known and easily identified
by most observers, there are many for which the converse is true. Very few people are sufficiently expert
to confidently identify all members of a particular group. A specimen that can be placed in a collection
for later study by an expert will ensure that the most reliable identifications are made. In addition, some
species distinctions have to be made using microscopic or internal characteristics, a task not easily
undertaken under field conditions. Everyone, experts included, makes mistakes. Hasty field examination
by even the best workers can produce identification errors which are only uncovered later when time is
available to properly examine specimens collected.
Fourthly, for various reasons, most areas of South Australia have had some specimens collected in the
past, so for any given survey, there is always some pre-existing knowledge of distributions. In addition
there will also be cases where particular species are known to be problematic. For example a group of
species may be especially difficult to identify, or a supposed ‘species’ may be suspected of including
several as yet unknown species. This knowledge guides decisions on which specimens should be taken.

Putting these considerations together, our normal policy prior to a survey is to examine existing records
before deciding on the species to be collected as voucher specimens. From this it is decided that certain
species will not be collected (usually on the grounds that we currently have adequate records), that a
majority will be collected at a minimum rate necessary for a permanent record (typically a maximum of
two specimens per site), and that a few species will have a higher level of collection (up to five per site
in difficult cases).
2. Policy reviews
This overall policy is constantly fine-tuned as new surveys are planned, the desire being always to
minimise the number of specimens without sacrificing reliability. The Wildlife Animal Ethics Committee
oversees the collection of vertebrate specimens during surveys. This committee includes not just wildlife
biologists, but two vets, a member of the RSPCA and representatives from non-scientific backgrounds
with a concern for animal welfare in general.
At present, the Wildlife Animal Ethics Committee recognises that fauna survey activities such as live
trapping, handling and uncovering of refuge sites are stressful and threaten the lives of animals. Trapped
animals can die through mishaps or stress. Hand searching always involves some disturbance, damage
or destruction of refuge sites. Therefore, if survey work is to be done, an ethical approach requires that
data should be properly gathered and be of the best quality. This effectively means that surveys that do
not collect voucher specimens are operating at a relatively trivial level, as the data that they gather will
be ephemeral and unlikely to be as useful as guides to planning. An application that offers to survey and
not collect will have little merit scientifically and is therefore an imposition on the fauna without the
redeeming feature of reliable data.
3. Are volunteer organisations obliged to adhere to these policies?
Other organisations interested in field work on wildlife, like the Field Naturalists’ Society, the Nature
Conservation Society, and others, that wish to carry out biological survey work would need to adhere to
this policy of collecting a minimum number of representative specimens if their efforts are to be of
maximum value.
Persons involved in field work on wildlife are generally enthusiastic and single-minded in their
fascination with and appreciation of the animals they study. Killing animals for specimens is therefore a
stressful and distasteful task. Short-term unease has to be balanced against the long-term certainty that
specimens will provide. Surveyors need to ensure that maximum value is attached to each animal taken
and so that the survey will be maximally beneficial in terms of producing reliable, enduring knowledge.
4. Inform participants
The Biological Survey of SA (BSSA) informs participants of all the activities that will be undertaken in
surveys it runs. This is a requirement of the Occupational Health and Safety code and is good practice
anyway. Not everyone might agree on the necessity for collection, but at least the explanation should
establish that collections are made on sound principles. Those who were uncomfortable with the idea
would then be able to decide if they wished to be involved. However, understanding of the policy and
practise presented above is integral to the decisions on which specimens to retain or release that will be
made during a survey. It is not a requirement for other groups involved in Biological Survey work, but it
would surely be in everyone’s interest to ensure that the case for collecting is clearly explained.
Prepared by
Mark Hutchinson
(Curator of Reptiles and Amphibians, South Australian Museum)
58 Section 4
G U I D E L I N E S F O R V E R T E B R A T E S U R V E Y S I N S O U T H A U S T R A L I A
Section 4 59
G U I D E L I N E S F O R V E R T E B R A T E S U R V E Y S I N S O U T H A U S T R A L I A
Suggested Reading
Green, D. G. (1992). Ecology and conservation: the role of biological collections. Australian Biologist 5,
48-56.
Keto, A. I. (1992). Collections and conservation: a case study. Australian Biologist 5, 57-67.
Laubitz, D. R., Shih, C. T. and Sutherland, I. (1983). Why should a museum maintain a large collection?
Syllogeus 44, 169-171.
Meester, J. (1990). The importance of retailing voucher specimens. Transvaal Museum Special
Publication 1, 123-127.
Pettitt, C. (1991). Putting ‘bloody mice’ to good use. Museums Journal August, 25-28
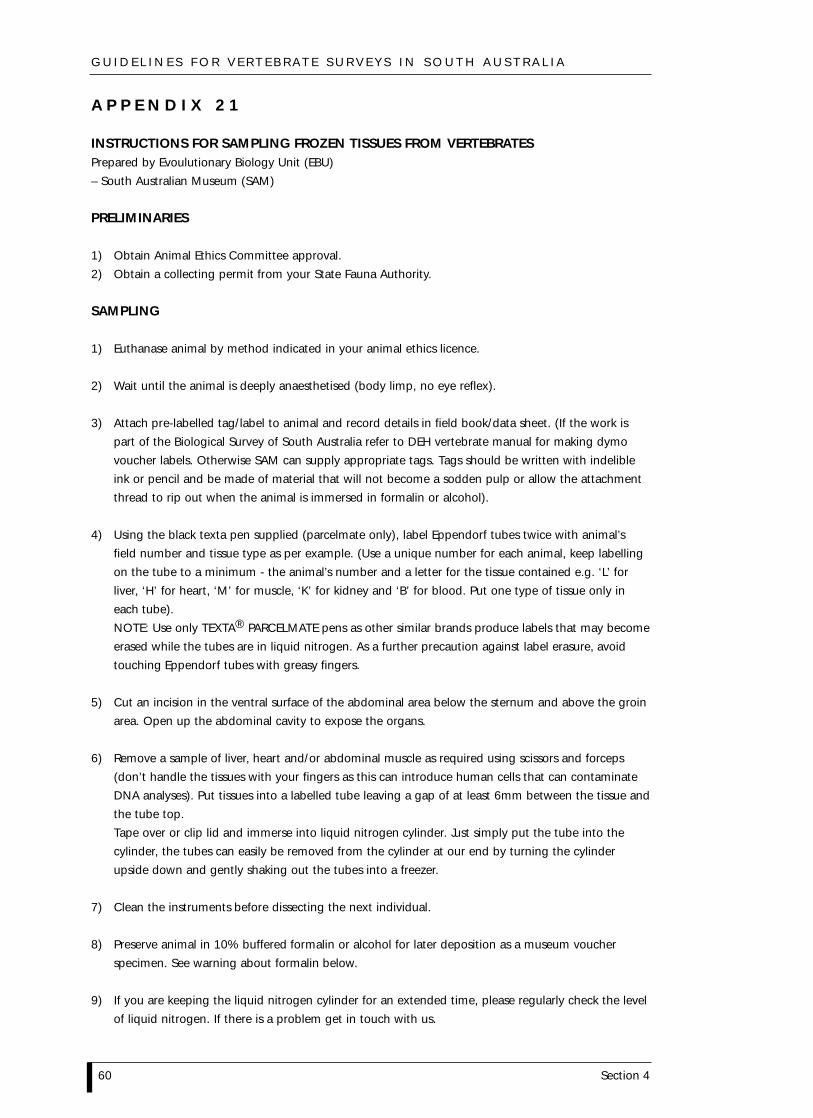
A P P E N D I X 2 1
INSTRUCTIONS FOR SAMPLING FROZEN TISSUES FROM VERTEBRATESPrepared by Evoulutionary Biology Unit (EBU)
– South Australian Museum (SAM)
PRELIMINARIES
1) Obtain Animal Ethics Committee approval.
2) Obtain a collecting permit from your State Fauna Authority.
SAMPLING
1) Euthanase animal by method indicated in your animal ethics licence.
2) Wait until the animal is deeply anaesthetised (body limp, no eye reflex).
3) Attach pre-labelled tag/label to animal and record details in field book/data sheet. (If the work is
part of the Biological Survey of South Australia refer to DEH vertebrate manual for making dymo
voucher labels. Otherwise SAM can supply appropriate tags. Tags should be written with indelible
ink or pencil and be made of material that will not become a sodden pulp or allow the attachment
thread to rip out when the animal is immersed in formalin or alcohol).
4) Using the black texta pen supplied (parcelmate only), label Eppendorf tubes twice with animal’s
field number and tissue type as per example. (Use a unique number for each animal, keep labelling
on the tube to a minimum - the animal’s number and a letter for the tissue contained e.g. ‘L’ for
liver, ‘H’ for heart, ‘M’ for muscle, ‘K’ for kidney and ‘B’ for blood. Put one type of tissue only in
each tube).
NOTE: Use only TEXTA® PARCELMATE pens as other similar brands produce labels that may become
erased while the tubes are in liquid nitrogen. As a further precaution against label erasure, avoid
touching Eppendorf tubes with greasy fingers.
5) Cut an incision in the ventral surface of the abdominal area below the sternum and above the groin
area. Open up the abdominal cavity to expose the organs.
6) Remove a sample of liver, heart and/or abdominal muscle as required using scissors and forceps
(don’t handle the tissues with your fingers as this can introduce human cells that can contaminate
DNA analyses). Put tissues into a labelled tube leaving a gap of at least 6mm between the tissue and
the tube top.
Tape over or clip lid and immerse into liquid nitrogen cylinder. Just simply put the tube into the
cylinder, the tubes can easily be removed from the cylinder at our end by turning the cylinder
upside down and gently shaking out the tubes into a freezer.
7) Clean the instruments before dissecting the next individual.
8) Preserve animal in 10% buffered formalin or alcohol for later deposition as a museum voucher
specimen. See warning about formalin below.
9) If you are keeping the liquid nitrogen cylinder for an extended time, please regularly check the level
of liquid nitrogen. If there is a problem get in touch with us.
60 Section 4
G U I D E L I N E S F O R V E R T E B R A T E S U R V E Y S I N S O U T H A U S T R A L I A

Section 4 61
G U I D E L I N E S F O R V E R T E B R A T E S U R V E Y S I N S O U T H A U S T R A L I A
DO’S AND DON’TS
DON’T:
- put tissue tubes into plastic bags or stockings before putting into liquid nitrogen cylinder - EBU can’t
remove the samples at their end of the operation and the bags fracture in liquid nitrogen.
- put whole animals into the cylinder as they can disintegrate once they are frozen and the cylinder is
agitated during transport.
- put tubes whose length is greater than the diameter of the cylinder neck into the cylinder.
- tie the tubes to pieces of string and suspend from the cylinder lid - the strings twist in transport and
each tube has to be individually cut away while still in the cylinder - no easy feat given the diameter
and length of the cylinder neck.
- put tubes into cylinder without taping or clipping lid as they explode when removed from the
cylinder and brought down to -80˚C.
- dissect and process animals in the sun - animals and tissues in tubes overheat very quickly - this can
compromise results that can be obtained in the lab.
DO:
- process the animal as soon as possible after it is anaesthetised.
- if animal has been dead for some time, still take tissue samples but record in the field notes how long
you estimate it was dead before the tissues were sampled. This will assist in interpreting potentially
anomalous results in the lab.
WARNINGS
Nembutal®
- Nembutal® (a barbituate) is a restricted substance and lethal if accidentally injected or swallowed, so
treat it with extreme care.
Formalin
- Protect your eyes and hands while you are preserving animals as formalin can cause skin and eye
damage.
- Preserve animals in a well-ventilated area to minimise inhalation of formalin fumes.
Liquid Nitrogen
- Secure the cylinder in your vehicle so it won’t become a projectile during an accident.
- Secure the lid of the cylinder during transport so that the contents won’t be released accidentally.
- Provide adequate ventilation if the cylinder is used or kept in a confined space.
- Don’t allow your skin to come into contact with liquid nitrogen.
- Don’t look into the cylinder when adding tubes, or moving the cylinder as the liquid nitrogen can
shoot up the neck into your eyes causing permanent eye damage.
- Don’t drop the cylinder or treat it roughly.

RETURN OF SAMPLES TO EBU VIA COMMERCIAL TRANSPORT
1) Obtain and fill out IATA dangerous goods forms (available from airline shipping offices) as per
accompanying example.
- 2 originals + photocopy for air transport
- 1 original + 2 photocopies for road transport
EBU can supply forms if you don’t have any available.
2) Label cylinder according to accompanying instruction.
3) Dispatch cylinder by air (Ansett Air Freight) or road (Kwikasair).
4) - Address shipping docket to:
Tissue Collection Manager, EBU
South Australian Museum
North Terrace, Adelaide
South Australia 5000
- Tick or cross ‘bill to receiver’.
- For air transport tick ‘Next day economy’ box - (don’t tick ‘Overnight First Class’ as it costs a
fortune).
- Our Ansett Air Freight account number is ‘S000712’ our Kwikasair account number is ‘Z361900’.
- For road transport, tick ‘Routine 160’ box on the Kwikasair form.
5) Record consignment note number and phone this through to EBU along with shipping details - day
of dispatch, transport mode and company.
If you can’t get anybody on the phone, than leave a message with the Division of Natural Science
receptionist on 82077 422 or fax these details on 82077 222.
6) Send voucher specimens either to EBU or to your State’s Museum. Once fixed the specimens need
to be drained free of liquid, then wrapped in moistened cotton wool and sealed in 2 plastic bags
one inside the other. Pack specimens so that they won’t be crushed. Don’t send the specimens in
free formalin or alcohol as this is illegal and can earn you a hefty fine and/or jail sentence.
7) Send specimen collection details with the liquid nitrogen cylinder if possible.
EBU require:
field number
collection location
tissues taken
date of collection
Contact numbers for EBU staff:
Malcolm Krieg 08 8207 7453
Mark Adams 08 8207 7305
Steve Donnellan 08 8207 7479
Jan Birrell 08 8207 7462
Terry Reardon 08 8207 7460
Reception 08 8207 7422
62 Section 4
G U I D E L I N E S F O R V E R T E B R A T E S U R V E Y S I N S O U T H A U S T R A L I A

Section 4 63
G U I D E L I N E S F O R V E R T E B R A T E S U R V E Y S I N S O U T H A U S T R A L I A
A P P E N D I X 2 2
SPECIFIC DATA REQUIRED FOR SPECIMENS TO BE LODGED IN THE MAMMALCOLLECTION AT THE SA MUSEUM
Voucher Numbers
• if more than one specimen is collected then attach a unique number to each specimen and cross
reference to data sheet.
Voucher List
• for large surveys, a running list of voucher numbers, species, tissue taken, date, site, nearest named
place and reserve name is required.
Data Sheets
• DEH sheets.
• Use SAM mammal data sheets for small collections if no DEH sheet available.
Animal Data
• weight (if possible);
• sex;
• relative age (i.e.: juvenile, adult);
• presence of young;
• if tissue collected for genetics;
• identification;
• type of specimen (e.g. skull, intact animal, owl pellets etc.);
• type of preservation (e.g. frozen, methylated spirits, formalin).
Collection Data
• name and organisation of collector(s);
• method of collection;
• date collected;
• date died (if different from above).
Location Data
• direction and distance (straight line) from nearest named place on 1:100 000 or 1:250 000 map;
• latitude and longitude (grid reference are not preferred but if they are used, the full data, including
map number and name must be supplied); please give latitude and longitude in degrees, minutes
and seconds;
• very brief description of dominant vegetation and landform;
• site number.


