18 Hacking Windows XP I n this chapter you’ll find the answers to the following questions: • Is it possible to back up or recover Windows XP passwords? • I want to make my password hard to guess. What are some guidelines? • I can’t remember the Administrator password for my computer. Can I change it? • What programs are available to help me recover lost passwords? • My computer won’t boot. Are there any special programs that will let me boot the computer to access files or fix the computer? • I’m interested in seeing what information is stored on my computer. Are there any tools that will show me that information? • Is it possible to see what traffic is coming and going through my network? • I’ve lost my CD key and need to reinstall Windows XP. How do I recover the key? • Is it possible to change the CD key in an existing Windows XP installation? If you’ve turned to this chapter in hopes of learning how to be a hacker, you’ll have to look elsewhere. However, there are several issues that can crop up when using any computer system, and being able to work around the operating system can save the day. In this chapter I explore some of the most common problems you might face and how to use built-in capabilities or third-party tools to work around those problems. For example, there are a couple of techniques you can use either to recover a lost administrator password or to essentially clear out the password and start fresh. These techniques can help you regain full access to the system. This chapter also covers other topics that will help you work around problems with the operating system and troubleshoot network problems. This chapter isn’t intended for network administrators, most of whom have an even bigger arsenal of weapons to lay siege to any computer problem. Nor is this chapter targeted at users who work in a large enterprise—doing some of the things in this chapter could well get you fired! Instead, this chapter is geared toward individual users and people who need to manage computers for others in a small network. TIP TIP Don’t go surfing the Internet looking for hacking or cracking sites. Invariably, you will run into one that will infect your system or pull a nasty trick like disabling Internet Explorer. If you disregard my advice, make sure you have several restore points available from which to restore your system. 411 CHAPTER Presented by:
Transcript
18Hacking Windows XP
In this chapter you’ll fi nd the answers to the following questions:
• Is it possible to back up or recover Windows XP passwords?
• I want to make my password hard to guess. What are some guidelines?
• I can’t remember the Administrator password for my computer. Can I change it?
• What programs are available to help me recover lost passwords?
• My computer won’t boot. Are there any special programs that will let me boot the computer to access fi les or fi x the computer?
• I’m interested in seeing what information is stored on my computer. Are there any tools that will show me that information?
• Is it possible to see what traffi c is coming and going through my network?
• I’ve lost my CD key and need to reinstall Windows XP. How do I recover the key?
• Is it possible to change the CD key in an existing Windows XP installation?
If you’ve turned to this chapter in hopes of learning how to be a hacker, you’ll have to look elsewhere. However, there are several issues that can crop up when using any computer system, and being able to work around the operating system can save the day.
In this chapter I explore some of the most common problems you might face and how to use built-in capabilities or third-party tools to work around those problems. For example, there are a couple of techniques you can use either to recover a lost administrator password or to essentially clear out the password and start fresh. These techniques can help you regain full access to the system. This chapter also covers other topics that will help you work around problems with the operating system and troubleshoot network problems.
This chapter isn’t intended for network administrators, most of whom have an even bigger arsenal of weapons to lay siege to any computer problem. Nor is this chapter targeted at users who work in a large enterprise—doing some of the things in this chapter could well get you fi red! Instead, this chapter is geared toward individual users and people who need to manage computers for others in a small network.
TIP TIP Don’t go surfi ng the Internet looking for hacking or cracking sites. Invariably, you will run into one that will infect your system or pull a nasty trick like disabling Internet Explorer. If you disregard my advice, make sure you have several restore points available from which to restore your system.
411
CHAPTER
Presented by:
detwilerb
Text Box
Reproduced from the book Windows XP Answers from the Experts. Copyrightã 2005, The McGraw-Hill Companies, Inc.. Reproduced by permission of The McGraw-Hill Companies, Two Penn Plaza, NY, NY 10121-2298. Written permission from The McGraw-Hill Companies, Inc. is required for all other uses.
412 P a r t I I : C u s t o m i z i n g , C o n t r o l l i n g , a n d U s i n g W i n d o w s
Backing Up and Recovering Windows XP PasswordsIf you never connect your computer to the Internet and no one else ever has physical access to it, passwords can be an annoyance. But the minute those two situations reverse, having a password is your fi rst line of defense in securing your data and system. Having a good password is even more important.
For example, for best security your password should not include personal information, any part of your user name, or easily guessed words. What’s more, the password should include a mix of letters, numbers, and special characters to make it impossible to guess and not susceptible to a brute-force password attack in which an automated system repeatedly attempts to crack the password.
Here are some tips for creating a good password:
• Use a mix of characters and case Use letters, numbers, and special characters such as ! and #. Example: MyPass2W0rd!9
• Don’t use any real words Many brute-force applications rely on the fact that many people use words they can remember as their passwords. Example: pe845jd#65!
• Use a mnemonic to help you remember the password Remember Every Good Boy Does Fine for the lines on the treble cleft in music class? Come up with your own mnemonic and throw in some special characters. Example: Joe eats 2 bananas with 7 grapes, or je2bw7g!
Why am I explaining how to create a good password in a section about backing up and restoring passwords? If you take my advice, your passwords will be much harder to remember, particularly if you don’t use them often. For example, you might need the administrator password for your computer only once or twice a month to install some new software. Even if you use a mnemonic, there’s a chance you’ll forget the password. So, you should back up your passwords so that you can recover them if needed.
You could tape a sheet of paper with your passwords on it under your desk, but Windows XP offers a more technically advanced method—a password reset disk. This method requires that you have previously created a password backup disk.
Creating a Password Reset Diskette for a Workgroup ComputerHere’s how to create the backup disk for a computer in a workgroup (not a domain member):
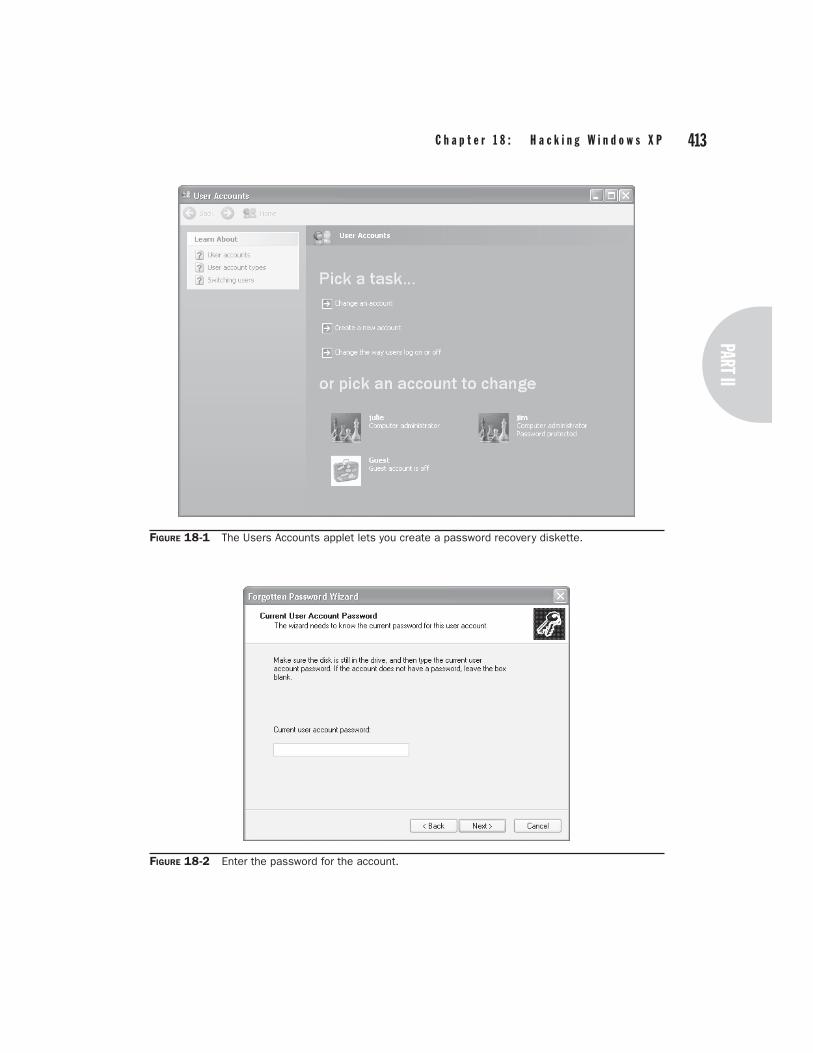
1. Open the Users Accounts applet from the Control Panel (Figure 18-1).
2. If you logged on with an account that is a member of the Administrators group, click the account for which you want to create a password recovery disk. If you are logged on with a limited account, your account is selected automatically.
3. In the Related Tasks area of the left pane, click Prevent A Forgotten Password to start the Forgotten Password Wizard.
4. Click Next, insert a blank, formatted disk in drive A, and click Next.
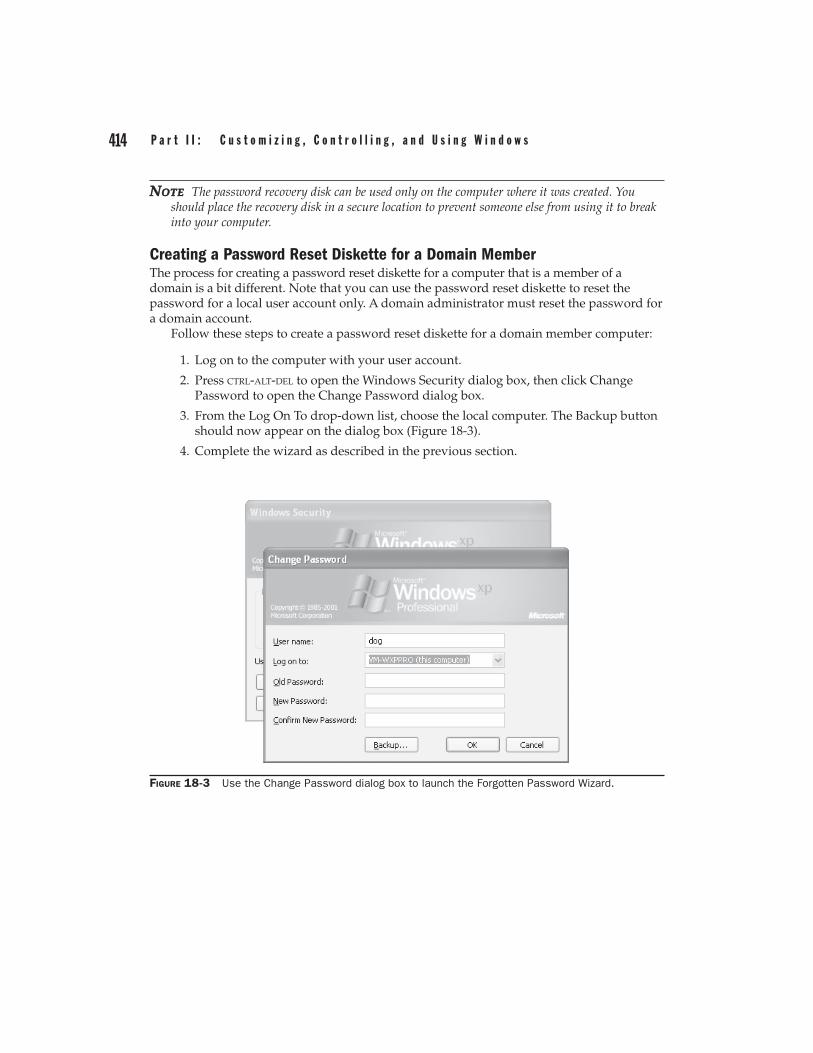
5. When prompted (Figure 18-2), enter the current account password and click Next.
6. Click Next when the wizard indicates it has created the disk, then click Finish.
7. Label the diskette with the account name and store the diskette in a safe place.
PART II
C h a p t e r 1 8 : H a c k i n g W i n d o w s X P 413
FIGURE 18-1 The Users Accounts applet lets you create a password recovery diskette.
FIGURE 18-2 Enter the password for the account.
414 P a r t I I : C u s t o m i z i n g , C o n t r o l l i n g , a n d U s i n g W i n d o w s
NOTE NOTE The password recovery disk can be used only on the computer where it was created. You should place the recovery disk in a secure location to prevent someone else from using it to break into your computer.
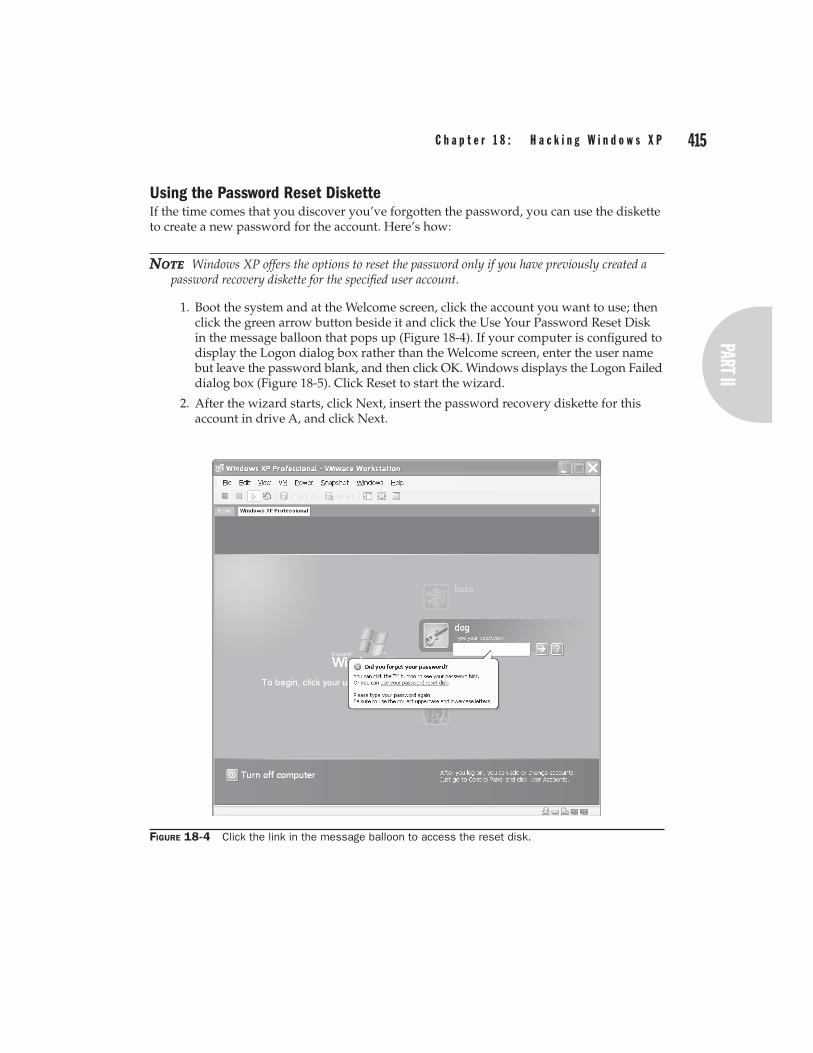
Creating a Password Reset Diskette for a Domain MemberThe process for creating a password reset diskette for a computer that is a member of a domain is a bit different. Note that you can use the password reset diskette to reset the password for a local user account only. A domain administrator must reset the password for a domain account.
Follow these steps to create a password reset diskette for a domain member computer:
1. Log on to the computer with your user account.
2. Press CTRL-ALT-DEL to open the Windows Security dialog box, then click Change Password to open the Change Password dialog box.
3. From the Log On To drop-down list, choose the local computer. The Backup button should now appear on the dialog box (Figure 18-3).
4. Complete the wizard as described in the previous section.
FIGURE 18-3 Use the Change Password dialog box to launch the Forgotten Password Wizard.
PART II
C h a p t e r 1 8 : H a c k i n g W i n d o w s X P 415
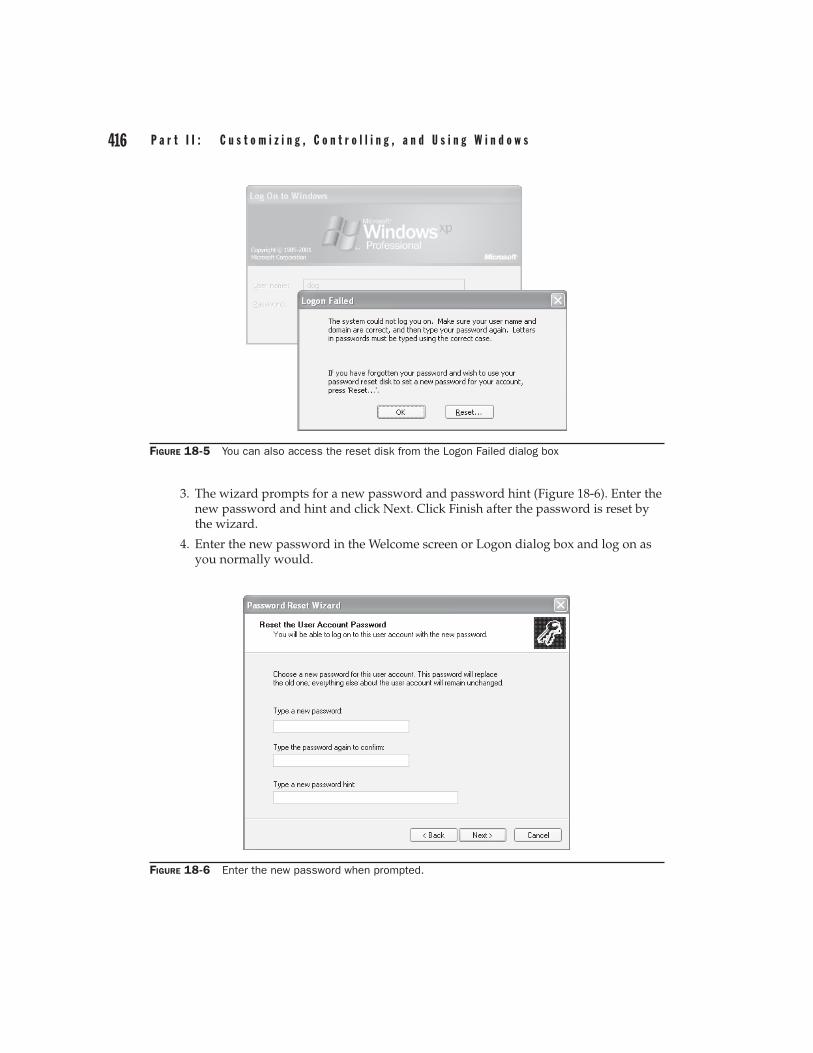
Using the Password Reset DisketteIf the time comes that you discover you’ve forgotten the password, you can use the diskette to create a new password for the account. Here’s how:
NOTE NOTE Windows XP offers the options to reset the password only if you have previously created a password recovery diskette for the specifi ed user account.
1. Boot the system and at the Welcome screen, click the account you want to use; then click the green arrow button beside it and click the Use Your Password Reset Disk in the message balloon that pops up (Figure 18-4). If your computer is confi gured to display the Logon dialog box rather than the Welcome screen, enter the user name but leave the password blank, and then click OK. Windows displays the Logon Failed dialog box (Figure 18-5). Click Reset to start the wizard.
2. After the wizard starts, click Next, insert the password recovery diskette for this account in drive A, and click Next.
FIGURE 18-4 Click the link in the message balloon to access the reset disk.
416 P a r t I I : C u s t o m i z i n g , C o n t r o l l i n g , a n d U s i n g W i n d o w s
3. The wizard prompts for a new password and password hint (Figure 18-6). Enter the new password and hint and click Next. Click Finish after the password is reset by the wizard.
4. Enter the new password in the Welcome screen or Logon dialog box and log on as you normally would.
FIGURE 18-5 You can also access the reset disk from the Logon Failed dialog box
FIGURE 18-6 Enter the new password when prompted.
PART II
C h a p t e r 1 8 : H a c k i n g W i n d o w s X P 417
Recovering from a Lost Administrator PasswordIf you have the password for any account on the computer with administrator privileges, you can reset the password for any other account through the Local Users and Groups console or Users Accounts applet in the Control Panel. If you lose the Administrator account password, however, you won’t be able to reset any password except your own. You also won’t be able to reconfi gure the system or perform other system-wide tasks.
There are a couple of methods you can use if you need to recover a lost Administrator password. The method you use depends on the computer’s confi guration. Here is a summary of the methods, requirements, and consequences:
• Delete the SAM registry hive fi le This method deletes all accounts and blanks the Administrator account password. Although accounts are deleted, user profi les and their corresponding documents are not lost. However, you might have to reassociate the profi le directory with the user account after re-creating the account. This method also requires access to the fi le system so that you can delete the SAM fi le.
• Use a third-party recovery tool There are a handful of recovery tools available for recovering passwords and failed systems. One I like is ERD Commander, from http://www.winternals.com.
Delete the SAM Registry Hive FileThis method is a bit drastic because it deletes all accounts on the system. However, applications and other settings are unaffected, and user profi le folders and documents are retained. After you create new local accounts, you can reassociate the new accounts with their old profi les. Before you take this approach, however, check the next section for a list of third-party alternatives that don’t delete the SAM and therefore don’t delete the accounts from the system.
TIP TIP The SAM fi le is the portion of the registry that stores user accounts.
If you choose to go the route of deleting the SAM, you’ll need to gain access to the %systemroot%\System32\Confi g folder, which is where the registry hive fi les are located. Using one of the methods described in the preceding section, navigate to the %systemroot%\System32\Confi g folder and rename the SAM fi le:
C:\Windows\System32\Confi g>rename sam sam.old
Then, reboot the system. The Administrator account will now have a blank password.
Useful Third-Party Password Recovery ToolsLots of tools are available for various recovery tasks, including resetting the Administrator account password. The following list summarizes some of these tools and indicates whether they are freeware, shareware, or commercial software:
• Winternals ERD Commander This is one of my favorite recovery tools. It boots even unbootable systems from a CD and gives you the capability to reset the Administrator password, recover lost fi les, recover Windows XP restore points, and perform many other tasks. http://www.winternals.com. Commercial software.
418 P a r t I I : C u s t o m i z i n g , C o n t r o l l i n g , a n d U s i n g W i n d o w s
• Offl ine NT Password and Registry Editor This tool, developed by Petter Nordahl-Hagen, includes a bootable CD image and the capability to reset the Administrator password for the local computer without deleting any accounts. http://home.eunet.no/<126>pnordahl/ntpasswd. Freeware.
• EBCD This is a bootable CD developed by Mikhail Kupchik that enables you to boot XP (and other) systems and perform a variety of tasks, including resetting any account password without knowing the old password. http://ebcd.pcministry.com. Freeware.
• Austrumi Another bootable Linux-based CD, this tool fi ts on a business-size CD, which means you can carry it in your wallet! It enables you to reset the Administrator password and perform other recovery tasks. http://sourceforge.net/projects/austrumi.Freeware.
• Windows XP / 2000 / NT Key This bootable CD enables you to reset passwords on 2003, XP, 2000, and NT systems. http://www.lostpassword.com/windows-xp-2000-nt.htm. Commercial software.
• NTAccess This tool can be used from a set of boot diskettes or bootable CD to reset the Administrator password. The tool also displays the current name of the Administrator account if it has been renamed. http://www.mirider.com/ntaccess.html. Commercial software.
Recovering Other Passwords and Booting Dead SystemsAccount passwords are not the only passwords you’ll fi nd on a Windows XP computer, nor are they the only ones you’re likely to forget. These include passwords for Outlook Express, FTP sites in Internet Explorer or other FTP applications, passwords for Web sites, and others. Windows and applications generally display these passwords as asterisks. There are several utilities that essentially “peek behind” the asterisks to show you the real password, but one of the most popular is iOpus Password Recovery XP. This inexpensive tool reveals the password hidden behind asterisks in dialog boxes and works for Windows and any application that stores the password in the displayed dialog box (including Internet Explorer, CuteFTP,
Changing Profi le LocationIf the computer contained user accounts before you deleted the SAM fi le, you’ll need to recreate the accounts. If the accounts do take on the old user profi le location, you can reassociate the old profi le folder with the new account. Open the Registry Editor and expand the branch HKEY_LOCAL_MACHINE\ Software\ Microsoft\ Windows NT\ CurrentVersion\ Profi leList. This branch includes settings that specify the location of the profi les directory as well as the location of the All Users and Default User profi les. You can change the settings to change the location, if needed.
Under the Profi leList key you’ll fi nd additional keys that defi ne each user’s profi le. You can click the key to view and change the profi le settings. For example, change the Profi leImagePath setting if you need to point Windows 2000 to a different profi le for the selected user.
PART II
C h a p t e r 1 8 : H a c k i n g W i n d o w s X P 419
and many others). See http://www.iopus.com/password_recovery.htm for details.There are lots of tools available that enable you to boot dead Windows XP systems, recover fi les, reset passwords, and perform other recovery tasks. One of the more popular solutions is Knoppix, a bootable Linux CD that gives you an amazing array of tools to manage fi les, sniff the network, recover fi les, and perform other tasks. You’ll fi nd information about Knoppix and a download at http://www.knoppix.com. See the section “Sniffi ng the Network with Knoppix and EtherApe” later in this chapter for more details.
Sniffi ng the NetworkThere is a lot of information fl oating across your network. The capability to monitor network traffi c can be a real lifesaver sometimes, whether you’re trying to determine if a computer on your network is spitting out excessive packets or you want to know what sites your computer is trying to access on the Internet on its own (a sure sign of adware infection).
Using the Network MonitorThe Windows XP CD includes a Support\Tools folder that contains several useful tools for Windows XP. One of these is Netcap.exe, a client-side capture tool that enables you to capture network packets for viewing with Network Monitor. However, Network Monitor is not included with Windows XP. Instead, you need to turn to Windows 2000 Server or Windows Server 2003 for Network Monitor. You can, however, capture the data with Netcap.exe and view it on the server.
NOTE NOTE I won’t go into detail about Netcap.exe here because you need Windows 2000 Server or Windows Server 2003 (or SMS) with the GUI-based Network Monitor application to view the captured packets. Instead, I include this section so that you’ll know that a capture driver for Network Monitor is available with Windows XP.
You can install the support tools by running Setup.exe from the \Support\Tools folder, but if Netcap.exe is all you want, just copy it from the cabinet fi le to your system. Insert the Windows XP CD, open a command console, use CD to change to the \Support\Tools folder on the CD, and then issue the following command, replacing <dest> with the path to the folder where you want to store Netcap.exe:
The fi rst time you run Netcap.exe, it installs itself on all network interfaces automatically. Rather than explore the command syntax or parameters for Netcap here, however, I’ll point you instead to the online help. Just use the command netcap /? at a console prompt to view syntax and parameters.
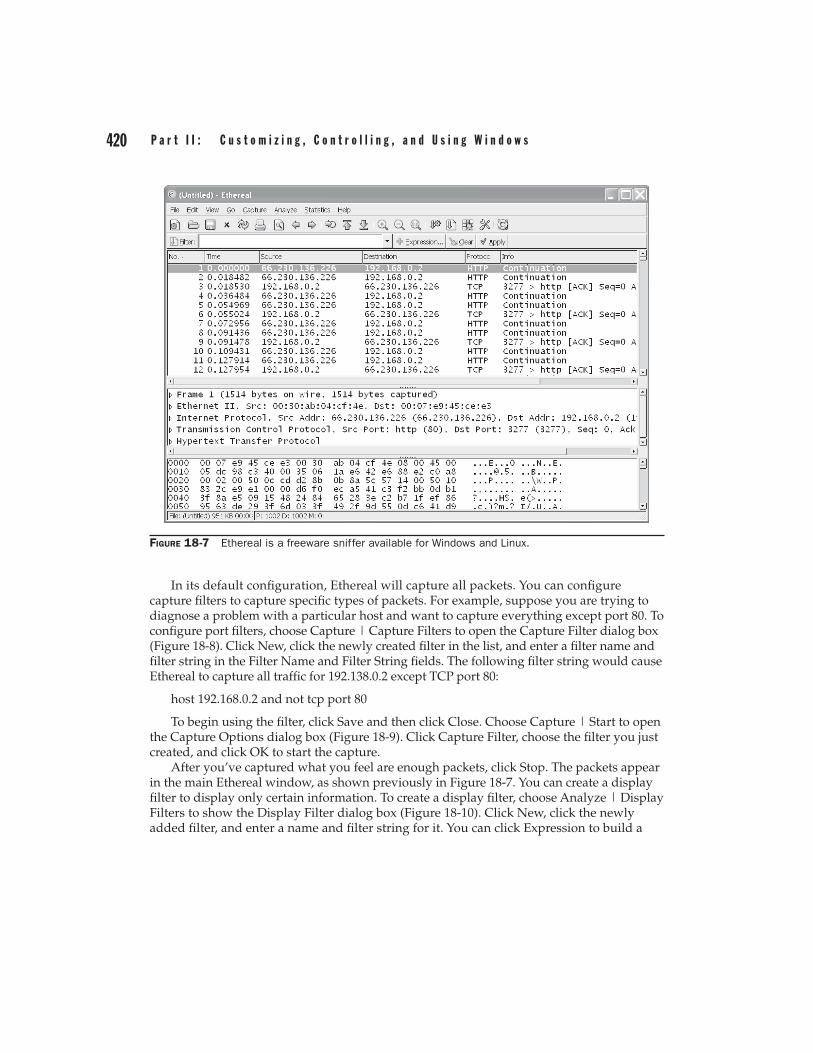
Sniffi ng the Network with EtherealIf you’re interested in a Windows-based sniffer application, consider Ethereal (Figure 18-7), available for Linux and Windows at http://www.ethereal.com. Ethereal is a free application, and the 32-bit Windows version runs on Windows 98 or later.
420 P a r t I I : C u s t o m i z i n g , C o n t r o l l i n g , a n d U s i n g W i n d o w s
In its default confi guration, Ethereal will capture all packets. You can confi gure capture fi lters to capture specifi c types of packets. For example, suppose you are trying to diagnose a problem with a particular host and want to capture everything except port 80. To confi gure port fi lters, choose Capture | Capture Filters to open the Capture Filter dialog box (Figure 18-8). Click New, click the newly created fi lter in the list, and enter a fi lter name and fi lter string in the Filter Name and Filter String fi elds. The following fi lter string would cause Ethereal to capture all traffi c for 192.138.0.2 except TCP port 80:
host 192.168.0.2 and not tcp port 80
To begin using the fi lter, click Save and then click Close. Choose Capture | Start to open the Capture Options dialog box (Figure 18-9). Click Capture Filter, choose the fi lter you just created, and click OK to start the capture.
After you’ve captured what you feel are enough packets, click Stop. The packets appear in the main Ethereal window, as shown previously in Figure 18-7. You can create a display fi lter to display only certain information. To create a display fi lter, choose Analyze | Display Filters to show the Display Filter dialog box (Figure 18-10). Click New, click the newly added fi lter, and enter a name and fi lter string for it. You can click Expression to build a
FIGURE 18-7 Ethereal is a freeware sniffer available for Windows and Linux.
PART II
C h a p t e r 1 8 : H a c k i n g W i n d o w s X P 421
fi lter expression with the Filter Expression dialog box (Figure 18-11). If the fi lter is correct, the Filter String fi eld in the Display Filter dialog box will appear in green. If the string is incorrect, the fi eld displays red. When you have the fi lter string you need, click Apply to apply it and then click Close.
FIGURE 18-8 Create fi lters with the Capture Filter dialog box.
FIGURE 18-9 Use the Capture Options dialog box to set options for capturing packets.
422 P a r t I I : C u s t o m i z i n g , C o n t r o l l i n g , a n d U s i n g W i n d o w s
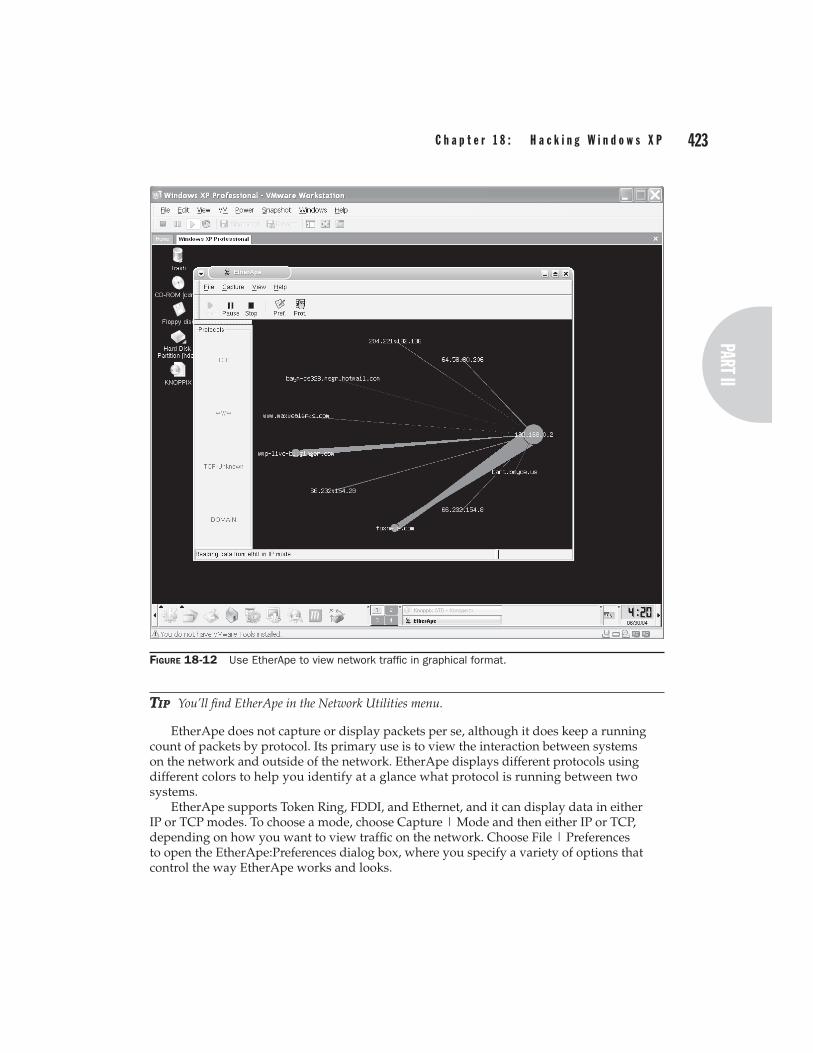
Sniffi ng the Network with Knoppix and EtherApeAnother useful tool is EtherApe, which is included in the Knoppix distribution. Unlike Ethereal, EtherApe provides a graphical view of network traffi c (Figure 18-12). EtherApe can be very useful for identifying at a glance what external sites are being hit, seeing where traffi c is coming from on the network, and viewing traffi c for other reasons. The main benefi t is that it is easy to set up and use.
FIGURE 18-10 Use the Display Filters dialog box to create a fi lter for displaying captured packets.
FIGURE 18-11 Create a fi lter expression with the Filter Expression dialog box.
PART II
C h a p t e r 1 8 : H a c k i n g W i n d o w s X P 423
TIP TIP You’ll fi nd EtherApe in the Network Utilities menu.
EtherApe does not capture or display packets per se, although it does keep a running count of packets by protocol. Its primary use is to view the interaction between systems on the network and outside of the network. EtherApe displays different protocols using different colors to help you identify at a glance what protocol is running between two systems.
EtherApe supports Token Ring, FDDI, and Ethernet, and it can display data in either IP or TCP modes. To choose a mode, choose Capture | Mode and then either IP or TCP, depending on how you want to view traffi c on the network. Choose File | Preferences to open the EtherApe:Preferences dialog box, where you specify a variety of options that control the way EtherApe works and looks.
FIGURE 18-12 Use EtherApe to view network traffi c in graphical format.
424 P a r t I I : C u s t o m i z i n g , C o n t r o l l i n g , a n d U s i n g W i n d o w s
Other Network Sniffi ng ToolsThere are many other network sniffers in addition to the ones I’ve already mentioned. For example, if you’re looking for packet capture capabilities and Ethereal doesn’t suit you, check out EtherDetect, from http://www.etherdetect.com. The program offers some great features for fi ltering the capture as well as the display. If you’re looking for something a little sneakier, check out Give Me Too, at http://www.spyarsenal.com/network-sniffer. Give Me Too is mainly targeted at users who need to determine what others are doing on the network for common protocols such as HTTP, POP3, SMTP, and others. Another good candidate is Softperfect Network Protocol Analyzer, available from http://www.softperfect.com.
TIP TIP To fi nd other sniffer applications, run a search at your favorite search site using the keyphrase “network sniffer software.”
Sniffi ng for PasswordsI include this section not because I think you should sniff the network for other users’ passwords, but because I occasionally fi nd it necessary to sniff the network to recover passwords for e-mail accounts, services, Internet sites, and so on that I can’t obtain using other methods.
One of the most useful tools of this kind in my opinion is Cain and Abel, available from http://www.oxid.it/cain.html. Without doing any sniffi ng, the program can pull an amazing amount of information out of your system, from e-mail passwords to accounts, passwords, and other information you have entered in Internet Explorer with AutoComplete. Figure 18-13 shows the program with the Protected Storage information extracted. The actual sites, users’ names, and passwords are blurred for privacy.
Cain and Abel is actually two sets of applications. Cain provides the GUI and related features, including sniffi ng, password cracking, SID scanning, and much more. Abel is a Windows service that you can install locally or on a remote computer. Abel provides a remote console on the target machine and can dump user hashes from the remote SAM (Security Account Manager). It includes other features such as the LSA Secrets dumper, the Route Table Manager, and the TCP/UDP Table Viewer.
Cain and Abel is a fairly complex application, and detailing all of its inner workings is beyond the scope of this chapter. Many users will fi nd Cain and Abel useful simply for pulling information from your existing password and Internet Explorer caches on a computer. To do so, run Cain, click the Protected Storage tab, and then click the plus sign icon on the toolbar to dump the information.
Recovering and Changing Your CD KeyWhen you install Windows XP, you must enter a CD key, which either is listed on a label on the back of your CD case or appears on your Certifi cate of Authenticity. Windows Product Activation (WPA) uses the CD key and your hardware’s signature to create a unique installation identifi er that is used to activate the product. Sometimes it can be necessary to recover the CD key from an existing Windows XP installation or even change the key assigned to the computer. This section explains how to accomplish both tasks.
PART II
C h a p t e r 1 8 : H a c k i n g W i n d o w s X P 425
TIP TIP Windows XP obtained under an open license does not require activation.
Recovering Your CD KeyJust the other day, I realized I had lost the case for one of my Windows XP CDs. In some previous Windows versions, you could recover the CD key easily enough because it was stored as plain text in the registry. Windows XP doesn’t store the CD key in that way, however. There began a quest to fi nd a way to retrieve the CD key from my Windows XP installation. Assuming (correctly) that Microsoft’s tech support staff would not be able to tell me how to extract the information from my registry, I searched the Internet for a magical tool that would grab the key for me. I found it at http://www.magicaljellybean.com.
Keyfi nder is a simple application that not only extracts your CD key from Windows 9x, Windows Me, Windows NT 4, Windows 2000, Windows XP, and Windows Server 2003. You can also use Keyfi nder to change the CD key on all of these platforms except NT, 2000, and 2003.
FIGURE 18-13 Cain and Abel, without doing any sniffi ng, can display an amazing amount of information from your own computer.
426 P a r t I I : C u s t o m i z i n g , C o n t r o l l i n g , a n d U s i n g W i n d o w s
TIP TIP Keyfi nder also can recover the CD key for Offi ce 97 and Offi ce XP. The release version (it is currently beta as I write this) will add several new features, including support for Offi ce 2003 and the capability to change the user information stored for your installation of Windows XP. The new version also makes it possible to retrieve the CD key from a remote computer.
Viewing the CD key with Keyfi nder is easy. When you start the program, it searches for and displays the key as shown in Figure 18-14. You can copy the key to the Clipboard, save it to a text fi le, or print it through the File menu.
Changing Your Windows XP CD KeyWhy would you need to change your CD key if you made the installation using a legal copy of Windows XP? The main reason is to insert a CD key for an image that was copied to several computers from the same source. For example, if you need to roll out Windows XP to 25 computers, you might install them all from the same image, which would give them all the same CD key. Each computer would then need to be tweaked to get its own CD key.
To change the key with Keyfi nder, open Keyfi nder on the computer and choose Options | Change Windows Key. Enter the new key in the Change Microsoft Windows XP Key dialog box and click Change.
TIP TIP Microsoft offers its own method for changing the CD key on an existing Windows XP installation. See http://support.microsoft.com/default.aspx?scid=kb;en-us;Q328874 to learn how to use Windows Product Activation to change the key.
FIGURE 18-14 Keyfi nder will extract the CD key from your local Windows XP installation.
detwilerb
Text Box
Reproduced from the book Windows XP Answers from the Experts. Copyrightã 2005, The McGraw-Hill Companies, Inc.. Reproduced by permission of The McGraw-Hill Companies, Two Penn Plaza, NY, NY 10121-2298. Written permission from The McGraw-Hill Companies, Inc. is required for all other uses.


![The golden age of hacking - Högskolan Dalarnausers.du.se/~hjo/cs/dt1058/presentation/pdf/EHP_12...• Rxbot - “Analysis of RXBOT” thesis – [server]\malware\bots, source code](https://static.documents.pub/doc/80x56/5b08e7007f8b9a51508c8a77/the-golden-age-of-hacking-hgskolan-hjocsdt1058presentationpdfehp12.jpg)


