13
CAR RADIO HAMBURG 100 Operating and Installation Instructions

CAR RADIOHAMBURG 100
Operating and Installation Instructions
CAUTIONS
1
PLACING THE DEVICE IN OPERATIONCaution!Vehicle screwsEnsure vehicle screws are removed beforeinstallation. (See "Installation” instructions).
Road SafetyAlways observe the following notes for road safety:•
•
•
General Safety Notes:Observe the following for protection against injuries:•
•
•
Car radio must be used in a way that compliments safety of the user when driving the vehicle. It is recommended for the user to at an appropriate location when operating the car radio. While driving, user is not recommended to use applications that can be prone to distraction e.g. streaming to videos, entering destination etc.
User is recommended to proceed with proposed driving routes only if it does not violate any tra�c regulations. Local tra�c signs and regulations always prevail over the routes proposed.
User is advised to keep the volume of the car radio to a moderate level for the protection of the ears and to increase the ability to hear any emergency warning signals (e.g. police and ambulance sirens). Do not increase the car radio volume while the car radio is muted as it is not audible. The car radio volume can be too loud when the car radio is unmuted.
This car radio is intended for installation and operation in a vehicle with 12V vehicle system outage, hence the radio unit must be installed in a DIN slot. Observe the output limits of the car radio. Do not dismantle or modify the car radio. Installation and repairs, if necessary, should be performed by a specialist. We are not liable for any loss or damage caused or resulting from unauthorized disassembly or modi�cation to the product.
This car radio’s core components may result to damage when the car is driven on bumpy roads for a prolonged period of time or if it is used to play non-standard or severely damaged discs.
Please do not operate the car radio under extreme temperature conditions (extremely high temperature or extremely low temperature); make sure that temperature within the car ranges from -20°C to 80°C before you connect the car radio to the power supply
•
•
•
•
This manual may be updated from time to time without any notice.
Road Safety
In no event shall Blaupunkt be liable for any direct, indirect, punitive, incidental, special consequential damages to property or life and whatsoever arising out of or connected with the use or misuse of our products.
USA & CANADA: This product is not intended for sale in the United States and Canada. If purchased in the U.S. or Canada, this product is purchased on as-is basis. No warranty, whether expressed or implied is provided in the U.S. or Canada.
Scope of Delivery•••••••
For abnormalities, please refer to the “Troubleshoot-ing” section. If the problem cannot be resolved, please press the Reset button to recover its factory settings. Otherwise, please contact respective installer/seller directly for help.
As SD/USB �le formats, codecs, bitrate, resolution and other parameters available in the market are not all the same, there is no guarantee that this car radio can play all media �le formats.
Di�erent cars may have di�erent con�gurations. It is normal that some CAN-Bus functions cannot be enabled because it is not supported by the user’s car or this car radio.
Solvents, cleaning and scouring agents as well as dashboard spray and plastics care products may contain materials which can damage the surface and screen of the car radio. Use only dry or slightly moistened cloth to clean the car radio surface and screen.
1 Car radio1 Operating & installation instructions1 Remote control (incl. battery)1 Connecting cable chamber A1 Connecting cable chamber B1 Support frame2 Removal key

Turn knob left or right to increase/decrease volume.Radio mode ; Press to select BAS-TRE-BAL- FAD-EQ-LOUD-LOC-STEREO, turn knob to adjust.
BAS : BassTRE : TrebleBAL : BalanceFAD : FaderEQ (Equalizer) : Flat/Pop/Rock/ClassicLOUD LOC : Turn knob for LOC ON to reduce the receiving sensitivity when searching stations in Local mode, therefore only strong signal stations will be received. LOC OFF will allow device to receive weak signal stations.STEREO : Turn knob to switch between Stereo or Mono.
Radio mode : Press to change radio band (18FM) or press & hold to preset button 1~6 with auto memory stations. USB/SD mode : Press to search �le according to NUM/FILE/DIR. Use button 1~6, 7 (MODE/CLOCK), 8 (I<<), 9 (>>I), to key in the number and wait for the device to load the song.
Press to mute/unmute sound output.Press & hold to power on/o�.
5
67
8 9
10
11
12
13
14
Radio mode : Press to auto seek down orpress & hold for manual seek down. USB/SD mode : Press to return to previous song or press & hold to Fast Rewind.NUM/FILE/DIR song selection : V/W/X/8
Press to switch between media RADIO-PHONE -DISC-USB-CARD-AUXINPress & hold for clock setting (Use 7 or 19 to adjust)NUM/FILE/DIR song selection : S/T/U/7
Radio mode : Press & hold to preset stationUSB/SD mode : Pause/PlayNUM/FILE/DIR song selection : A/B/C/1
Radio mode : Press & hold to preset stationUSB/SD mode : Introduction, play the �rst 10 seconds of each tracksNUM/FILE/DIR song selection : D/E/F/2
Radio mode : Press & hold to preset stationUSB/SD mode : Repeat 1 / Repeat AllNUM/FILE/DIR song selection : G/H/I/3
CD SlotInsert disc with the printed side up. EJECTI<<•
•
•IR SENSORAUX-IN Connect the device and the media storage (eg: Mobile phone, MP3 player) with a 3.5mm jack.RESETReset the device to default setting.MOD/CLK•
•
•1/>II•••2/INT ••
•3/RPT•••
1
23
4
1 3 5 8 92 4 6 7
1110
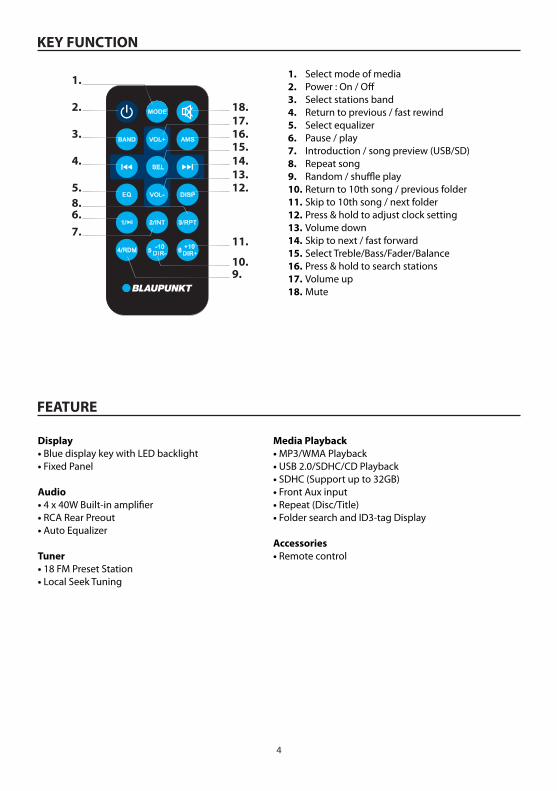
KEY FUNCTION
VOLUME/MODE•
•
-------
-
USBBND/AMS•
•
Power/MUTE• •
2
Press anybutton toturn on the device

Radio mode : Press & hold to preset stationUSB/SD mode : Random On/O� (Shu�e Play)NUM/FILE/DIR song selection : J/K/L/4
Radio mode : Press & hold to preset stationUSB/SD mode : Press to skip to previous 10th track or press & hold to return to previous folderNUM/FILE/DIR song selection : M/N/O/5
Radio mode : Press & hold to preset stationUSB/SD mode : Press to skip to next 10th song or press & hold to skip to next folderNUM/FILE/DIR song selection : P/Q/R/6
Radio mode : Press for auto seek up or press & hold for manual seek upUSB/SD mode : Press to skip to next song or press & hold to Fast ForwardNUM/FILE/DIR song selection : Y/Z/(SPACE)/9
15
16
17
18
19
13 1512 14 16 17 18 19
KEY FUNCTION
4/RDM•••5/-10••
•6/+10••
•>>I•
•
•SD SLOT
3
Press anybutton toturn on the device
Insert SDHC this way
KEY FUNCTION
FEATURE
1.2.3.4.5.6.7.8.9.10.11.12.13.14.15.16.17.18.
Select mode of mediaPower : On / O�Select stations bandReturn to previous / fast rewindSelect equalizerPause / playIntroduction / song preview (USB/SD)Repeat songRandom / shu�e playReturn to 10th song / previous folderSkip to 10th song / next folderPress & hold to adjust clock settingVolume downSkip to next / fast forwardSelect Treble/Bass/Fader/BalancePress & hold to search stations Volume upMute
1.
2.
3.
4.
5.8.6.7.
10.9.
11.
12.13.14.15.16.17.18.
Media Playback• MP3/WMA Playback• USB 2.0/SDHC/CD Playback• SDHC (Support up to 32GB)• Front Aux input• Repeat (Disc/Title)• Folder search and ID3-tag Display
Accessories• Remote control
Display• Blue display key with LED backlight• Fixed Panel
Audio• 4 x 40W Built-in ampli�er• RCA Rear Preout• Auto Equalizer
Tuner• 18 FM Preset Station• Local Seek Tuning
4
RADIO•••••••
CD/USB/SDHCThis device support CDs (CDDA) and CD-R/RWs with audio, MP3 or WMA �les as well as MP3 or WMA �les on USB and SDHC. Device will automatically play �les when CD/USB/S-DHC is inserted.Press 12 to switch between media.Note : Use only CDs with Compact-Disc logo.Blaupunkt cannot guarantee the �awless function of copy-protected CDs and all blanks, USB and SDHC available in the market.
CD player • ••USB• • • • • SDHC • • • •
Note : Ensure all media stop playing before removing CD/USB/SDHC
OPERATION
5
FMPresets : 18 FMLocal seek tuningFrequency range : FM/87.5MHZ-108.0MHZUsable sensitivity : FM/15 DB Usable sensitivity : 35dBSignal-to-noise ratio : 25dB
MP3/WMA2 ChannelsFolder search & ID3-tag
USB 2.0Maximum current supply :1AFile system : FAT12,FAT16,FAT32MP3/WMA decoding format : MP3/MP2/WMAFolder search & ID3-tag
Support up to 32GB SDHCFile system : FAT12,FAT16,FAT32MP3/WMA decoding format : MP3/MP2/WMAFolder search & ID3-tag

Voltage SupplyOperating voltage : 10.5 - 14.4V
Current ConsumptionIn operation : <10A10sec. after switch O� : <3.5mA
Ampli�erOutput power : 4 x 24W at 14.4V at 4 ohmsMax output power : 4 x 40W
TunerWavebands in Europe/Asia/ThailandFM : 87.5 - 108MHz
CD Frequency range : 20 - 20kHz
Pre-amp out4 Channels : 4V
Input sensitivity Front AUX-IN : 300mV/10 ohms
Dimension & weightWxHxD : 178 x 50 x 160mmWeight : approx. 1.26kg
GENERAL
6
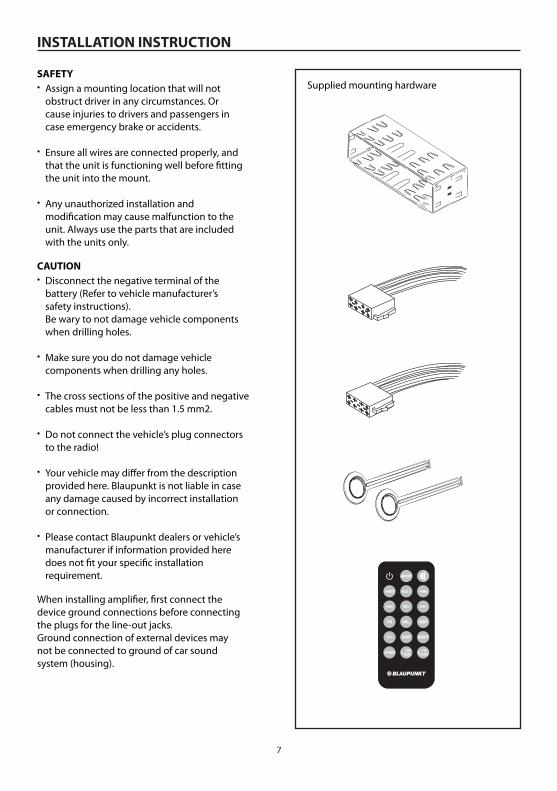
INSTALLATION INSTRUCTION
SAFETY•
•
•
CAUTION•
•
•
•
•
•
When installing ampli�er, �rst connect thedevice ground connections before connectingthe plugs for the line-out jacks.Ground connection of external devices maynot be connected to ground of car soundsystem (housing).
Assign a mounting location that will notobstruct driver in any circumstances. Orcause injuries to drivers and passengers incase emergency brake or accidents.
Ensure all wires are connected properly, andthat the unit is functioning well before �ttingthe unit into the mount.
Any unauthorized installation andmodi�cation may cause malfunction to theunit. Always use the parts that are includedwith the units only.
Disconnect the negative terminal of thebattery (Refer to vehicle manufacturer’ssafety instructions).Be wary to not damage vehicle componentswhen drilling holes.
Make sure you do not damage vehiclecomponents when drilling any holes.
The cross sections of the positive and negativecables must not be less than 1.5 mm2.
Do not connect the vehicle’s plug connectorsto the radio!
Your vehicle may di�er from the description provided here. Blaupunkt is not liable in case any damage caused by incorrect installationor connection.
Please contact Blaupunkt dealers or vehicle’smanufacturer if information provided heredoes not �t your speci�c installationrequirement.
Supplied mounting hardware
7
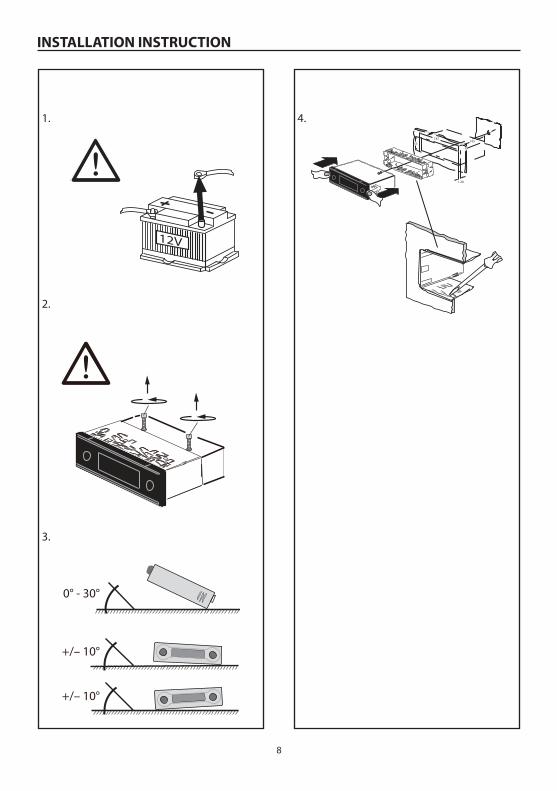
INSTALLATION INSTRUCTION
1.
2.
3.
4.
8
53
182165
1-20
12V
0° - 30°
+/– 10°
+/– 10°

DISMANTLE INSTRUCTION
4.1.
2.
3.
9
2.

WIRING DIAGRAM
10
•
•
•
•
•
This unit is desgined for 12V DC negative ground operation system only.Before installating the unit, ensure vehicle is connected to 12V negative ground electrical system
The negative battery terminal must be disconnected before making connections.This will help to prevent device from being damaged by short-circuit.
Ensure to connect the colour coded leads correctly according to the diagram.Incorrect connections may cause unit to malfunction and may damage vehicle’s electrical system.
Ensure to connect the speaker (-) leads to the speaker (-) terminal.Do not connect the left and right channel speaker cables to each other or the vehicle.
Do not block vents or radiator panels. Ensure good ventilation to prevent overheating.
*
A B1 NC 1 Speaker out RR_2 Telephone Mute 2 Speaker out RR-3 NC 3 Speaker out RF+4 Permanent +12V 4 Speaker out RF-5 Auto Antenna* 5 Speaker out LF+6 Illumination 6 Speaker out LF-7 KI.15/Ignition 7 Speaker out LR+8 Ground 8 Speaker out LR-
Switched power supply +12 V / max. 150 mA
1 3 5
2 48
7
6
12V
Relais
+12V
+12V
KI.15 +12V
Telephone Mute
4 ohms
4 ohms
4 ohms
4 ohms
Subject to change.
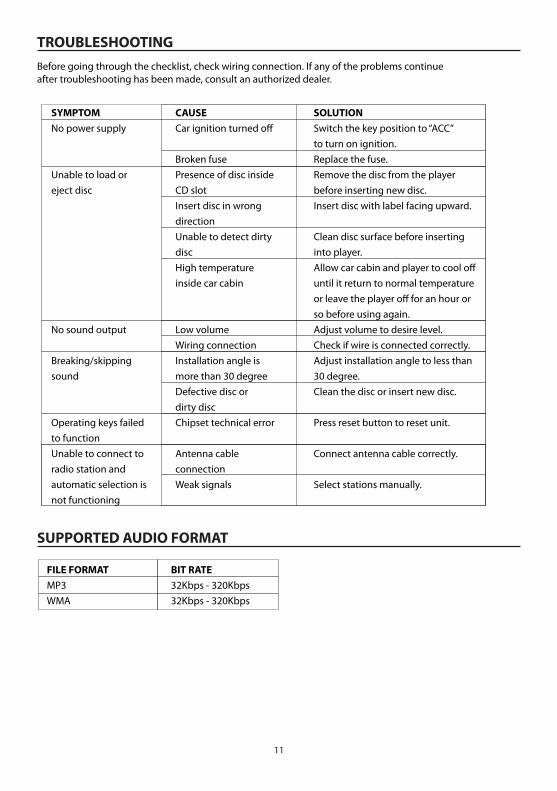
TROUBLESHOOTING
SUPPORTED AUDIO FORMAT
11
Before going through the checklist, check wiring connection. If any of the problems continueafter troubleshooting has been made, consult an authorized dealer.
SYMPTOMNo power supply
Unable to load oreject disc
No sound output
Breaking/skipping sound
Operating keys failedto functionUnable to connect toradio station andautomatic selection isnot functioning
CAUSECar ignition turned o�
Broken fusePresence of disc insideCD slotInsert disc in wrongdirectionUnable to detect dirtydiscHigh temperatureinside car cabin
Low volumeWiring connectionInstallation angle ismore than 30 degreeDefective disc ordirty discChipset technical error
Antenna cable connectionWeak signals
SOLUTIONSwitch the key position to “ACC”to turn on ignition.Replace the fuse.Remove the disc from the playerbefore inserting new disc.Insert disc with label facing upward.
Clean disc surface before insertinginto player.Allow car cabin and player to cool o�until it return to normal temperatureor leave the player o� for an hour orso before using again.Adjust volume to desire level.Check if wire is connected correctly.Adjust installation angle to less than30 degree.Clean the disc or insert new disc.
Press reset button to reset unit.
Connect antenna cable correctly.
Select stations manually.
FILE FORMATMP3WMA
BIT RATE32Kbps - 320Kbps32Kbps - 320Kbps

Designed and engineered by Blaupunkt


