25
SEPA Message Validation Tool Handbook Version 1.0
SEPA Message Validation Tool Handbook
Version 1.0
Page 2 of 25
Glossary Abbreviation Explanation
B2B Business to Business BIC Business Identifier Code (ISO 9362) CVF Credit Validation File DNF Debit Notification File DVF Debit Validation File End-to-End ID Identification number of a SEPA transaction File Physical file with file header
HTTPS HyperText Transfer Protocol Secure A communications protocol in the World Wide Web, used to transfer data without any risk of interception.
NAK Negative Acknowledgement Proxy Communication interface in a network PSP Payment Service Provider SCC SEPA Card Clearing SCT SEPA Credit Transfer SDD SEPA Direct Debit SEPA Single Euro Payments Area
SEPA file
A physical file featuring a file header (file) in line with the file structure as defined by the RPS SEPA-Clearer and composed of logical files (bulks) containing individual SEPA transactions.
SMV SEPA Message Validator ZIP Format used for compressed files.
Page 3 of 25
Contents
GLOSSARY .................................................................................................................... 2
1 INTRODUCTION ................................................................................................... 4
2 BASIC POINTS REGARDING USE OF THE TOOL........................................................ 4
2.1 SYSTEM REQUIREMENTS ...................................................................................... 4 2.1.1 OPERATING SYSTEM AND INTERNET BROWSER ...............................................................5 2.1.2 ZIP PROGRAMME .........................................................................................................5 2.1.3 PROXY ........................................................................................................................5
2.2 FILE SPECIFICATIONS ........................................................................................... 5 2.3 SECURITY ASPECTS ............................................................................................. 5
3 STEP-BY-STEP PROCEDURE ................................................................................ 6
4 USER ADMINISTRATION AND ROLES...................................................................... 6
4.1 USER ROLE ......................................................................................................... 6 4.2 ADMINISTRATOR ROLE ......................................................................................... 7 4.3 CREATING, MODIFYING AND DELETING USERS ........................................................ 8
5 REGISTERING, LOGGING IN AND LOGGING OUT .................................................... 10
5.1 REGISTERING .................................................................................................... 10 5.2 LOGGING IN AND LOGGING OUT .......................................................................... 12 5.3 HAVE YOU FORGOTTEN YOUR PASSWORD / DO YOU NEED TO CHANGE YOUR USER
DATA? .............................................................................................................. 13
6 USING THE APPLICATION ................................................................................... 14
6.1 OVERVIEW ........................................................................................................ 14 6.2 STEP BY STEP VALIDATION PROCEDURE .............................................................. 15 6.3 GENERATING NEW SEPA FILES AND R TRANSACTIONS ........................................ 16 6.4 REPORTING AND DOWNLOADING ........................................................................ 18
7 MISCELLANEOUS ............................................................................................. 19
7.1 AVAILABILITY .................................................................................................... 19 7.2 CONTACT PERSONS ........................................................................................... 19
ANNEX 1 ..................................................................................................................... 20
ANNEX 2 ..................................................................................................................... 22
Page 4 of 25
1 Introduction The Deutsche Bundesbank provides direct participants in its RPS SEPA-Clearer with access to the SEPA message validation tool (SMV tool) designed to facilitate their test activities.
The Bundesbank only allows direct participants or their technical service providers to make use of this designated tool.
This handbook explains how the SMV tool is to be used, providing an overview of the masks that have to be deployed and the various functions offered by the tool.
Using the SMV tool, SEPA files can be validated against the schema applied by the Bundesbank's RPS SEPA-Clearer.
The programme also supports participants in their test activities by enabling the creation of (test) SEPA files which can then be applied in their own test system. Section 6.3 outlines the various functions available for this purpose.
Scattered throughout this handbook, use is made of the following symbols
2 Basic points regarding use of the tool The SMV tool generates validation reports for SEPA files as well as new SEPA files based on the contents of individual transactions that are uploaded to the tool within a given SEPA file. Upon completing the online registration procedure, the user is able to send SEPA files using an upload function and to retrieve SEPA files generated by the SMV tool by means of a download function.
2.1 System requirements The application is accessible via the internet which means that no specialised software or updates are required in order to use it. All you need in order to enter data and conduct tests is a permament internet connection and an internet browser.
Note: Used to draw attention to additional information and points.
Attention: Used to draw attention to important information and warnings.
Attention: The system is not meant to be used for making stress tests. For this reason, it is only possible to upload files comprising no more than 50 individual transactions in each file.
Page 5 of 25
2.1.1 Operating system and internet browser Thanks to the central access capability via an internet browser, the tool can be used regardless of the operating system in place.
As a rule, the following browsers are suitable for use
• Internet Explorer • Mozilla Firefox • Google Chrome
Depending on the browser being used, the exact manner in which the tool is presented may vary. However, this does not lead to any functional problems within the tool.
2.1.2 ZIP programme The SEPA files that are to be validated can be uploaded to the SMV tool either uncompressed or compressed into a zip file.
SEPA files generated by the SMV tool are made available as retrievable zip files.
2.1.3 Proxy To ensure optimal use of the tool, make sure that the proxy you are using actually gives you access to the application. If you encounter any problems, contact your IT support team.
2.2 File specifications The SMV tool supports the SDD B2B, SDD CORE, SCT and SCC schema files used by the Bundesbank's RPS SEPA-Clearer. In each case, the current version and its successor (once published) are available.
Annex 1 gives an overview of the various transaction types supported by the SMV tool.
2.3 Security aspects All entered data are securely transmitted in decrypted mode via the HTTPS internet protocol. To provide additional security, access to the user's personal realm is protected by a user ID and a password. To prevent unauthorised access, such data should not be disclosed to third parties.
Attention: You should not use the browser's own navigation bar as this can result in loss of data.
Note: Communication between the internet browser and the SMV tool is achieved using the HTTPS protocol, by means of Port 443/TCP.
Page 6 of 25
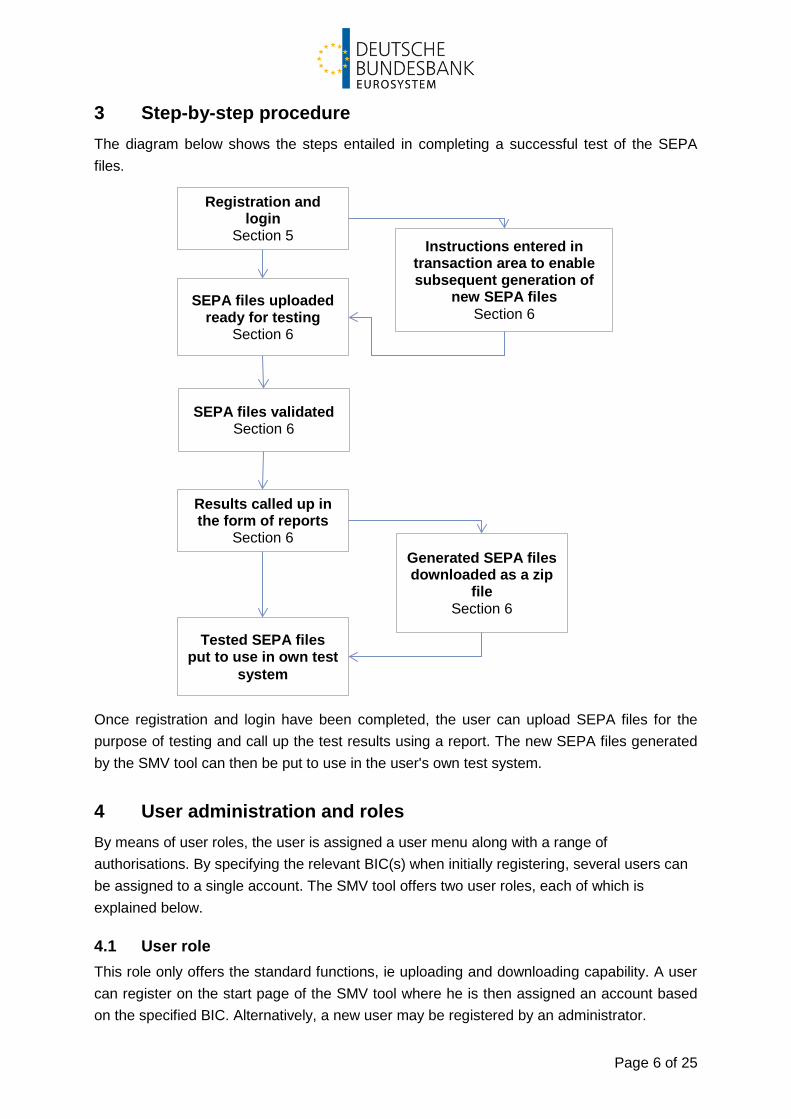
3 Step-by-step procedure The diagram below shows the steps entailed in completing a successful test of the SEPA files.
Once registration and login have been completed, the user can upload SEPA files for the purpose of testing and call up the test results using a report. The new SEPA files generated by the SMV tool can then be put to use in the user's own test system.
4 User administration and roles By means of user roles, the user is assigned a user menu along with a range of authorisations. By specifying the relevant BIC(s) when initially registering, several users can be assigned to a single account. The SMV tool offers two user roles, each of which is explained below.
4.1 User role This role only offers the standard functions, ie uploading and downloading capability. A user can register on the start page of the SMV tool where he is then assigned an account based on the specified BIC. Alternatively, a new user may be registered by an administrator.
Registration and login
Section 5
SEPA files uploaded ready for testing
Section 6
SEPA files validated Section 6
Results called up in the form of reports
Section 6 Generated SEPA files downloaded as a zip
file Section 6
Tested SEPA files put to use in own test
system
Instructions entered in transaction area to enable subsequent generation of
new SEPA files Section 6

Page 7 of 25
4.2 Administrator role In addition to having user rights, administrators are also able to administer the users of their own account. To this end, when in administrator mode, the user interface displays a further tab marked "Users"
Persons wishing to act as an administrator first need to register as a user, after which their role is switched by the Bundesbank to that of an administrator ("Admin"). They can then see a list of all the other users who share their account, register new users and delete existing ones.
Figure 1User interface of an administrator
Following successful registration, the participant is required to contact the test centre by means of an e-mail which can be used to specify all those persons who are to exercise the role of administrator. The participant is then able to independently register additional users, as outlined in section 4.3.

Page 8 of 25
4.3 Creating, modifying and deleting users New users are registered under the tab marked "Users".
Figure 2 User interface under the "Users" tab
The interface shows the names of all members sharing a given account (as per the specified BIC) as well as the roles assigned to them.
One click on the button "New user" opens a dialogue box. The administrator can use this input screen to register new users for his account. A single click on the "Save" button adds the name of any such new user to the overview list.
Figure 3 Adding a new user
Page 9 of 25
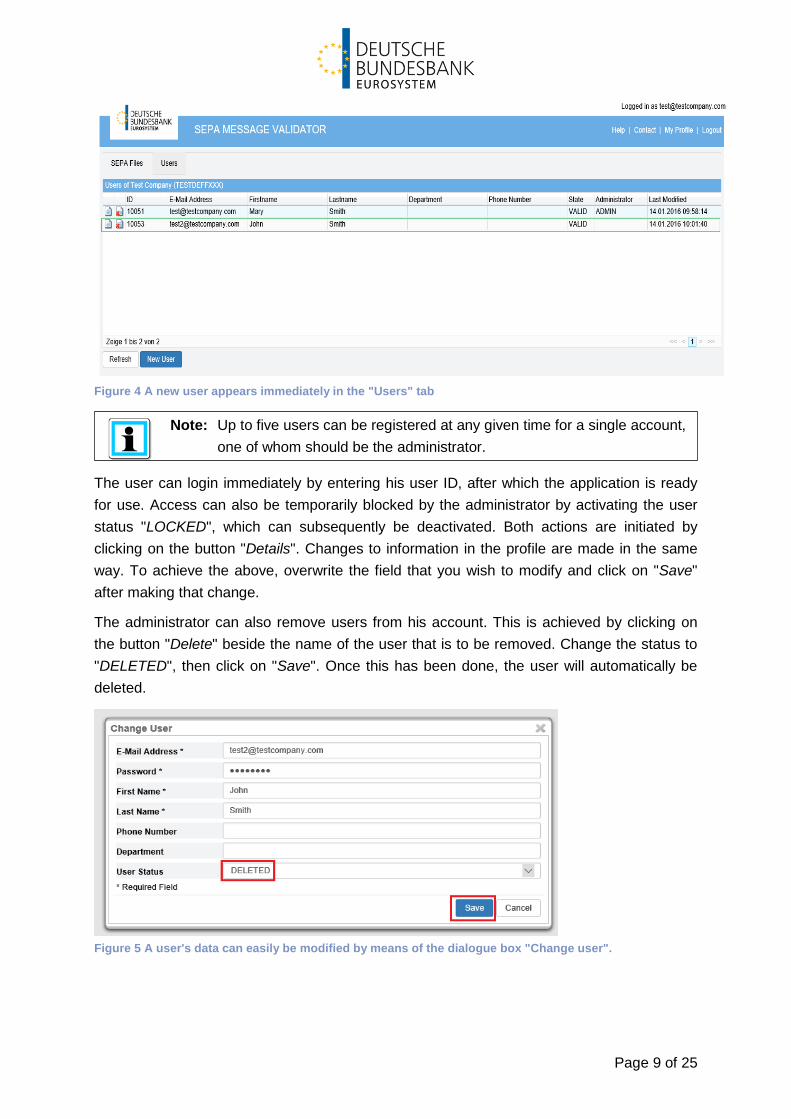
Figure 4 A new user appears immediately in the "Users" tab
The user can login immediately by entering his user ID, after which the application is ready for use. Access can also be temporarily blocked by the administrator by activating the user status "LOCKED", which can subsequently be deactivated. Both actions are initiated by clicking on the button "Details". Changes to information in the profile are made in the same way. To achieve the above, overwrite the field that you wish to modify and click on "Save" after making that change.
The administrator can also remove users from his account. This is achieved by clicking on the button "Delete" beside the name of the user that is to be removed. Change the status to "DELETED", then click on "Save". Once this has been done, the user will automatically be deleted.
Figure 5 A user's data can easily be modified by means of the dialogue box "Change user".
Note: Up to five users can be registered at any given time for a single account, one of whom should be the administrator.
Page 10 of 25
5 Registering, logging in and logging out
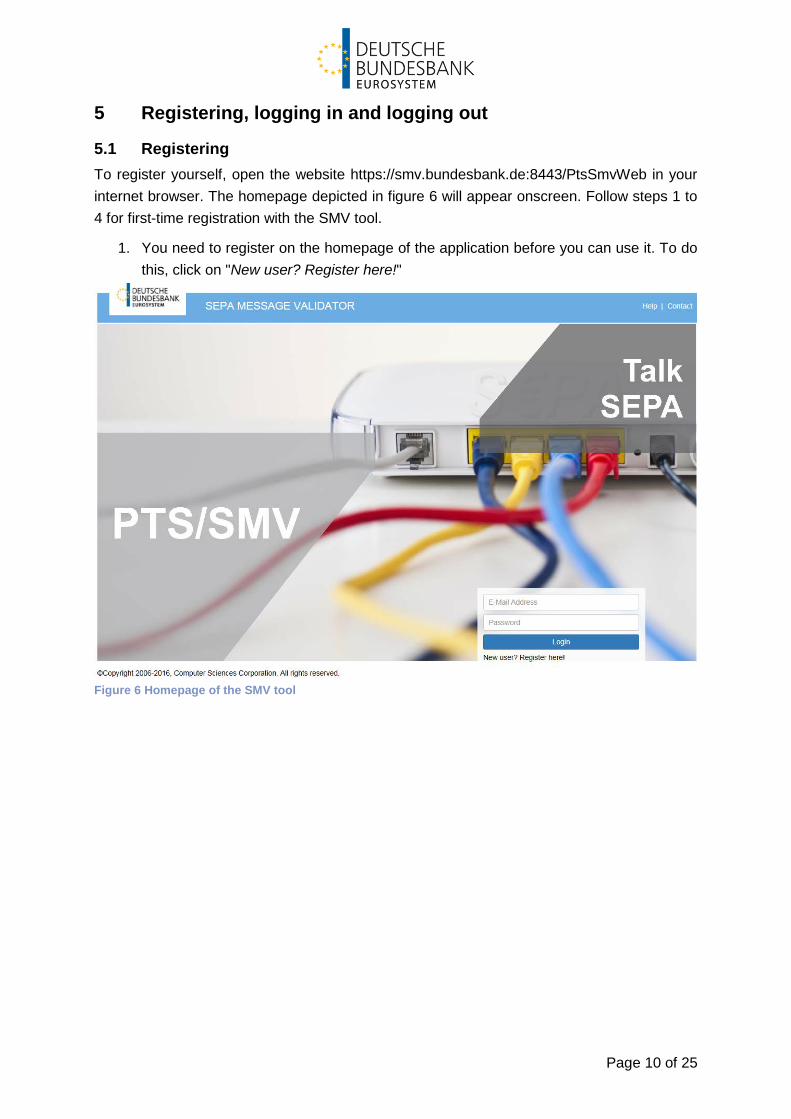
5.1 Registering To register yourself, open the website https://smv.bundesbank.de:8443/PtsSmvWeb in your internet browser. The homepage depicted in figure 6 will appear onscreen. Follow steps 1 to 4 for first-time registration with the SMV tool.
1. You need to register on the homepage of the application before you can use it. To do this, click on "New user? Register here!"
Figure 6 Homepage of the SMV tool
Page 11 of 25
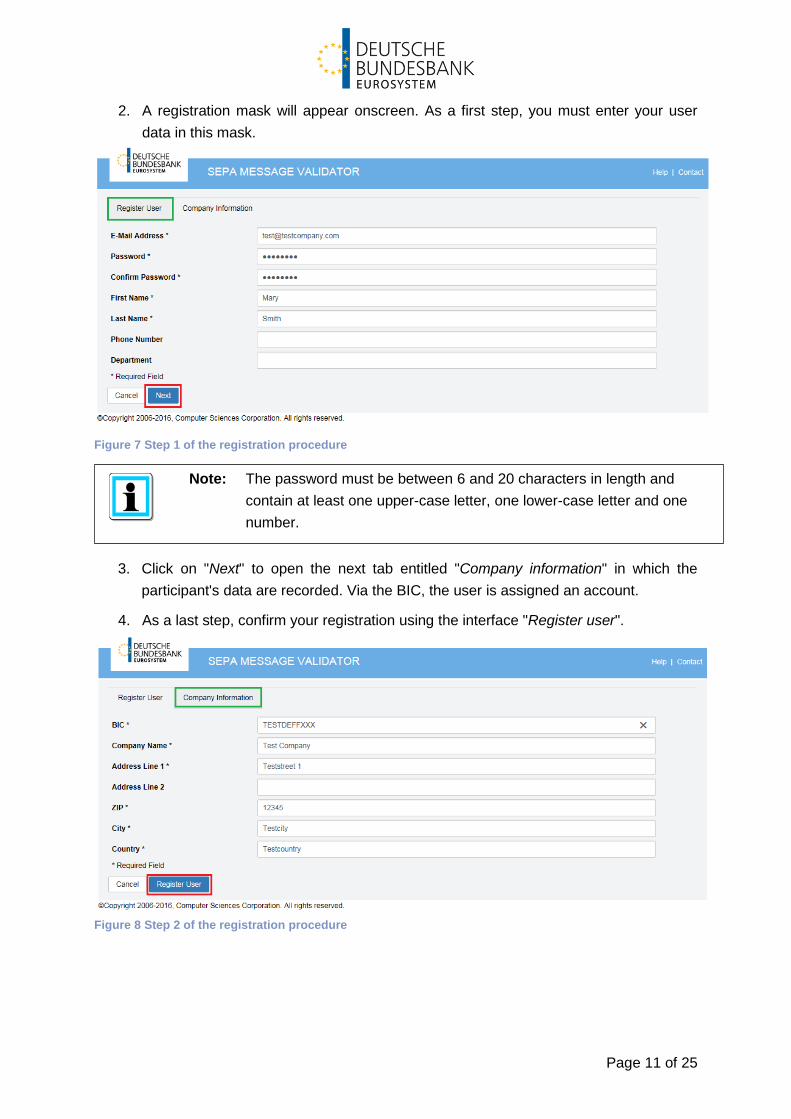
2. A registration mask will appear onscreen. As a first step, you must enter your user data in this mask.
Figure 7 Step 1 of the registration procedure
3. Click on "Next" to open the next tab entitled "Company information" in which the participant's data are recorded. Via the BIC, the user is assigned an account.
4. As a last step, confirm your registration using the interface "Register user".
Figure 8 Step 2 of the registration procedure
Note: The password must be between 6 and 20 characters in length and contain at least one upper-case letter, one lower-case letter and one number.

Page 12 of 25
5. Once you have successfully registered, send an e-mail to the test centre at testzentrum@bundesbank to have the application activated. Once your account has been activated you will receive a notification confirming that you are now able to use the tool. This feature is designed to protect against improper and unauthorised use. Use is restricted to direct participants in the Bundesbank's RPS SEPA-Clearer and their technical service providers. As soon as the Bundesbank has activated your account you can login on the homepage using your previously specified user data. Click on "Return to login" to reach the homepage.
Figure 9 Confirming a successful registration
5.2 Logging in and logging out Provided you have already registered and your account has been duly activated, you can login on the homepage using your e-mail address and your personal password. Once you have done this you will be able to upload and validate SEPA files.
To exit the programme, log out, after which you can close the internet browser.
The next time you log in the user interface will look exactly the same as when you last logged out. All SEPA files that you have uploaded but not yet deleted will remain visible in the list and can be used again, even after logging out.
Attention: Following registration, you will not be sent an e-mail confirmation. Moreover, you cannot login to use the SMV tool using the previously specified user data until the Bundesbank has activated your account.
Page 13 of 25
5.3 Have you forgotten your password / Do you need to change your user data?
There is always the chance that a password will be forgotten or that it needs to be changed for security reasons.
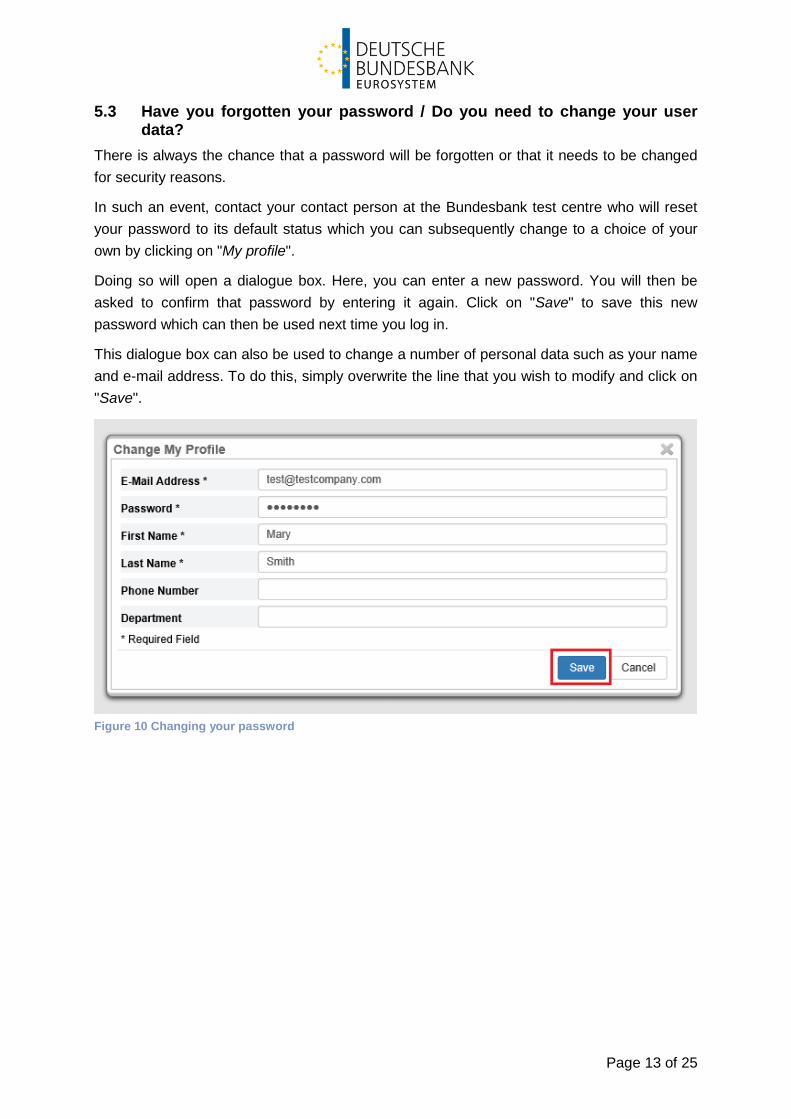
In such an event, contact your contact person at the Bundesbank test centre who will reset your password to its default status which you can subsequently change to a choice of your own by clicking on "My profile".
Doing so will open a dialogue box. Here, you can enter a new password. You will then be asked to confirm that password by entering it again. Click on "Save" to save this new password which can then be used next time you log in.
This dialogue box can also be used to change a number of personal data such as your name and e-mail address. To do this, simply overwrite the line that you wish to modify and click on "Save".
Figure 10 Changing your password
Page 14 of 25
6 Using the application
6.1 Overview
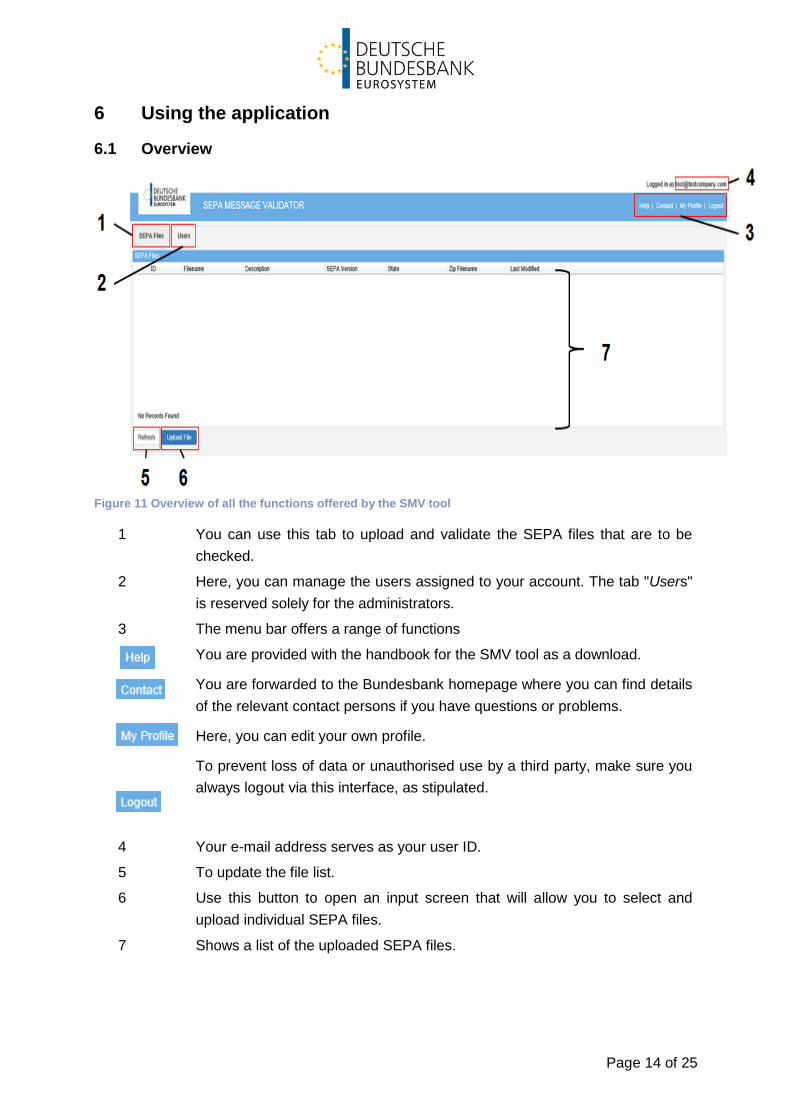
Figure 11 Overview of all the functions offered by the SMV tool
1 You can use this tab to upload and validate the SEPA files that are to be checked.
2 Here, you can manage the users assigned to your account. The tab "Users" is reserved solely for the administrators.
3 The menu bar offers a range of functions
You are provided with the handbook for the SMV tool as a download.
You are forwarded to the Bundesbank homepage where you can find details of the relevant contact persons if you have questions or problems.
Here, you can edit your own profile.
To prevent loss of data or unauthorised use by a third party, make sure you always logout via this interface, as stipulated.
4 Your e-mail address serves as your user ID.
5 To update the file list.
6 Use this button to open an input screen that will allow you to select and upload individual SEPA files.
7 Shows a list of the uploaded SEPA files.
Page 15 of 25
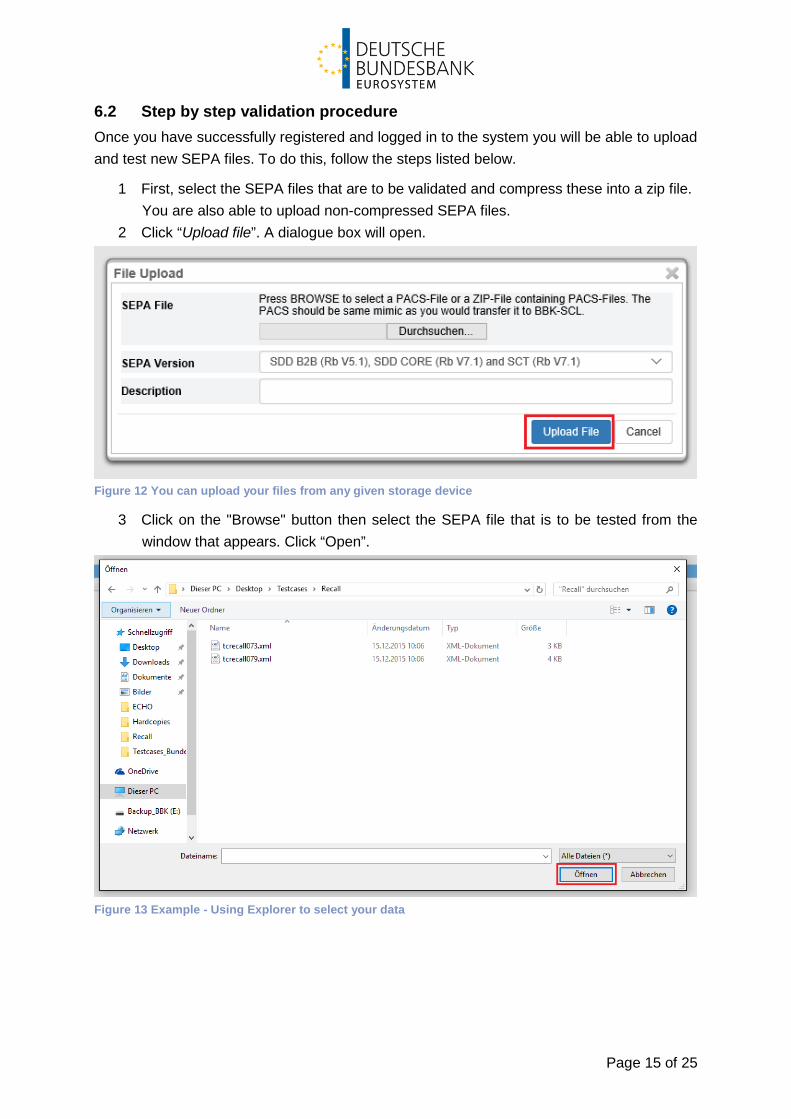
6.2 Step by step validation procedure Once you have successfully registered and logged in to the system you will be able to upload and test new SEPA files. To do this, follow the steps listed below.
1 First, select the SEPA files that are to be validated and compress these into a zip file. You are also able to upload non-compressed SEPA files.
2 Click “Upload file”. A dialogue box will open.
Figure 12 You can upload your files from any given storage device
3 Click on the "Browse" button then select the SEPA file that is to be tested from the window that appears. Click “Open”.
Figure 13 Example - Using Explorer to select your data

Page 16 of 25
4 The SEPA file path is recorded in the preceding dialogue box. You can now select the desired SEPA version from the drop-down list. To simplify identification or to record comments you can make use of the field "Description". Once you have completed all the fields, click on "Upload file".
5 This will cause the SEPA file to be uploaded and displayed in the file list. Overview of the various status notifications that are possible. Imported The SEPA file was uploaded but no test has been conducted
yet.
Validated The validation procedure has been completed. The detailed view indicates any errors the file may contain.
Results available Use was made of SMV tool functions (eg ECHO) included in the individual transactions. The generated SEPA files are available. Any errors that may have occurred are flagged.
6.3 Generating new SEPA files and R transactions Aside from enabling the schematic validation of uploaded SEPA files, the SMV tool may also be used to create new SEPA files with a view to the operator using these for test purposes within his own test system.
New SEPA files are generated by entering commands in the field "End-to-end ID" at the individual transaction level. As a rule, during testing operations this field is used for entering test case numbers. Such a test case number can be entered in addition to the command.
To allow the generation of new SEPA files, any individual transactions controlled by commands specified in the end-to-end IDs must likewise be processed in line with steps 1 to 4 as outlined above.
Note: It can take a fair amount of time to process all the uploaded SEPA files. To update the status, press the refresh button.
Attention: The SMV tool is used solely to test the schema validity. Any further checks performed by the RPS SEPA-Clearer are only included in tests with the RPS SEPA-Clearer's test environment.
Page 17 of 25
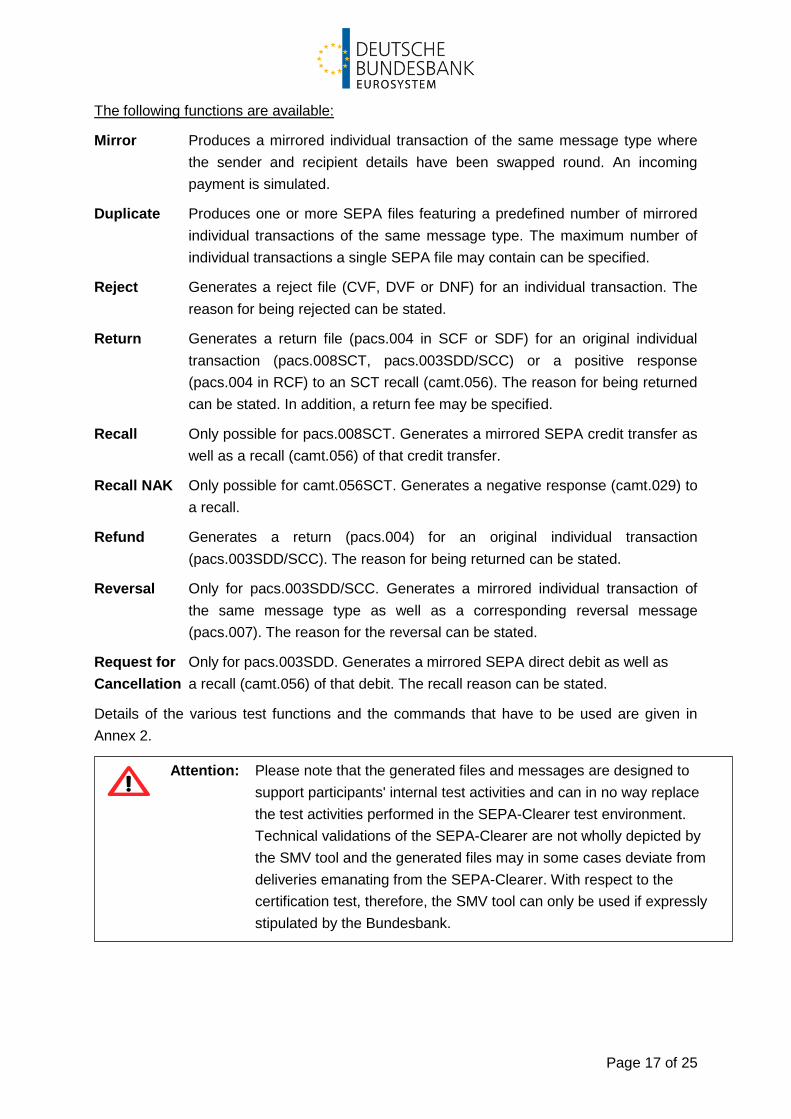
The following functions are available:
Mirror Produces a mirrored individual transaction of the same message type where the sender and recipient details have been swapped round. An incoming payment is simulated.
Duplicate Produces one or more SEPA files featuring a predefined number of mirrored individual transactions of the same message type. The maximum number of individual transactions a single SEPA file may contain can be specified.
Reject Generates a reject file (CVF, DVF or DNF) for an individual transaction. The reason for being rejected can be stated.
Return Generates a return file (pacs.004 in SCF or SDF) for an original individual transaction (pacs.008SCT, pacs.003SDD/SCC) or a positive response (pacs.004 in RCF) to an SCT recall (camt.056). The reason for being returned can be stated. In addition, a return fee may be specified.
Recall Only possible for pacs.008SCT. Generates a mirrored SEPA credit transfer as well as a recall (camt.056) of that credit transfer.
Recall NAK Only possible for camt.056SCT. Generates a negative response (camt.029) to a recall.
Refund Generates a return (pacs.004) for an original individual transaction (pacs.003SDD/SCC). The reason for being returned can be stated.
Reversal Only for pacs.003SDD/SCC. Generates a mirrored individual transaction of the same message type as well as a corresponding reversal message (pacs.007). The reason for the reversal can be stated.
Request for Only for pacs.003SDD. Generates a mirrored SEPA direct debit as well as Cancellation a recall (camt.056) of that debit. The recall reason can be stated.
Details of the various test functions and the commands that have to be used are given in Annex 2.
Attention: Please note that the generated files and messages are designed to support participants' internal test activities and can in no way replace the test activities performed in the SEPA-Clearer test environment. Technical validations of the SEPA-Clearer are not wholly depicted by the SMV tool and the generated files may in some cases deviate from deliveries emanating from the SEPA-Clearer. With respect to the certification test, therefore, the SMV tool can only be used if expressly stipulated by the Bundesbank.
Page 18 of 25
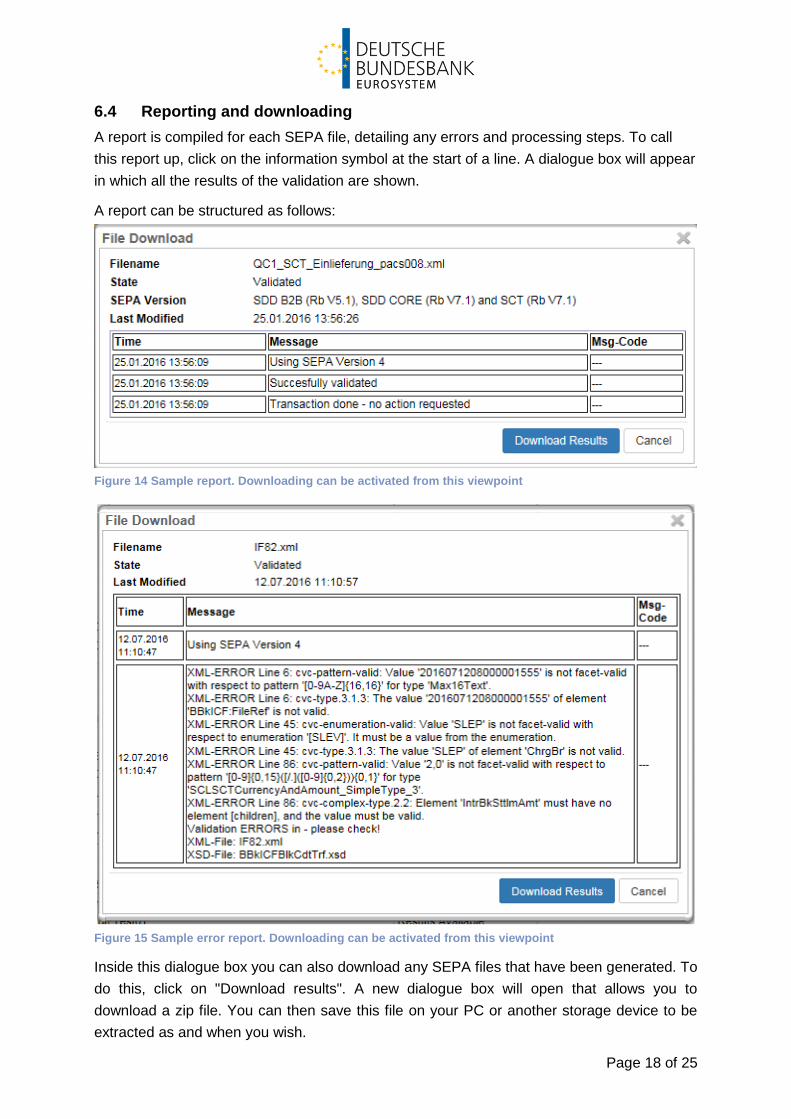
6.4 Reporting and downloading A report is compiled for each SEPA file, detailing any errors and processing steps. To call this report up, click on the information symbol at the start of a line. A dialogue box will appear in which all the results of the validation are shown.
A report can be structured as follows:
Figure 14 Sample report. Downloading can be activated from this viewpoint
Figure 15 Sample error report. Downloading can be activated from this viewpoint
Inside this dialogue box you can also download any SEPA files that have been generated. To do this, click on "Download results". A new dialogue box will open that allows you to download a zip file. You can then save this file on your PC or another storage device to be extracted as and when you wish.
Page 19 of 25
7 Miscellaneous
7.1 Availability The SMV tool is available for use on working days between 8.00 and 16.00.
7.2 Contact persons If you have any questions or problems, please contact our team at the Bundesbank's Customer Test Centre.
Deutsche Bundesbank Kundentestzentrum Z 421 Postfach 10 11 48 40002 Düsseldorf, Germany Tel: +49 211 874 2343 E-mail: [email protected]

Page 20 of 25
Annex 1 Transaction type
PACS types for SEPA credit transfers pacs.008 SEPA credit transfer, original message
pacs.004 Return credit transfer Return after settlement or a positive response to a camt.056 message from the debtor bank requesting the return of a SEPA credit transfer from the creditor bank via the SCL.
camt.056 Payment cancellation request Request by the debtor bank to recall a specific SEPA credit transfer
camt.029 Resolution of investigation Negative response to a payment cancellation request
pacs.002SCL Clearer reject Direct rejection of the file submitted by the Bundesbank's SEPA-Clearer following the detection of a technical or functional error.
PACS types for SEPA direct debits pacs.003 SEPA direct debit, original message
pacs.002 Reject/refusal Rejection/refusal prior to settlement by the debtor bank to the creditor bank via the SCL.
pacs.004 Return/refund Return after settlement by the payer's PSP via the SCL
camt.056 Payment cancellation request Message from the payee's PSP requesting the cancellation prior to settlement of a SEPA direct debit that has already been delivered.
pacs.007 Reversal Reimbursement of the countervalue of the direct debit by the payee's PSP
pacs.002SCL Clearer reject Direct rejection by the Bundesbank's SEPA-Clearer of the file submitted following the detection of a technical or functional error.
Page 21 of 25
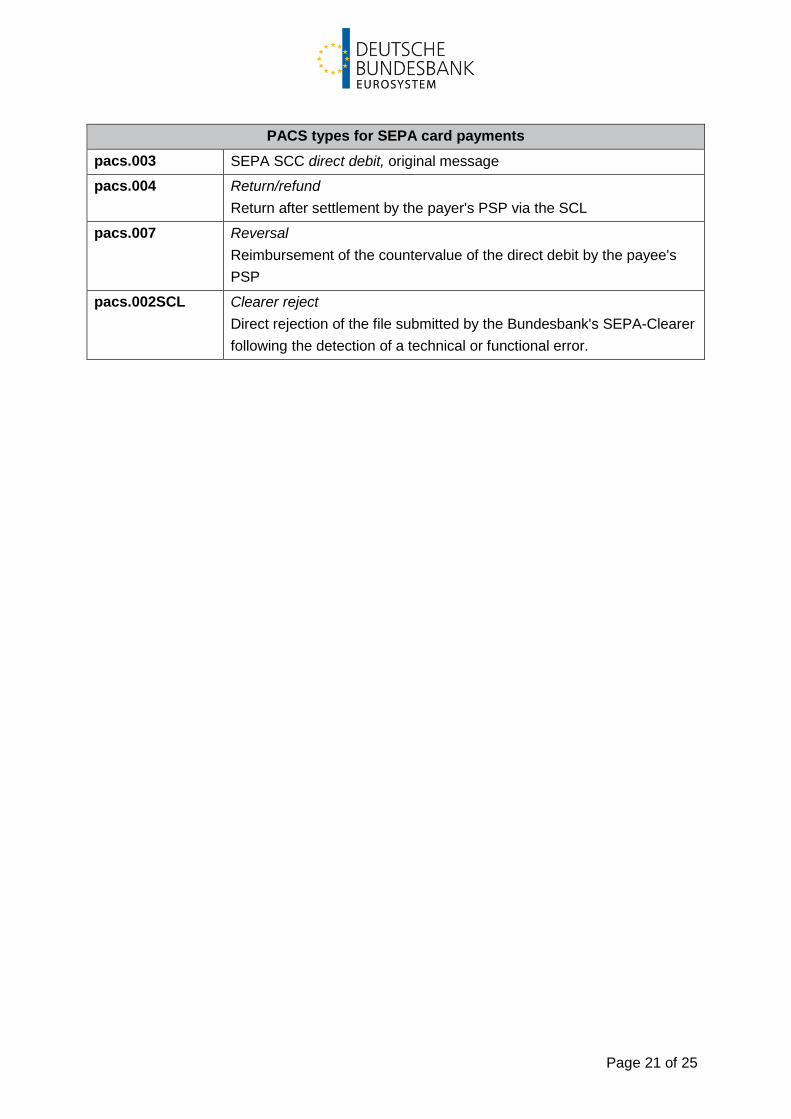
PACS types for SEPA card payments pacs.003 SEPA SCC direct debit, original message
pacs.004 Return/refund Return after settlement by the payer's PSP via the SCL
pacs.007 Reversal Reimbursement of the countervalue of the direct debit by the payee's PSP
pacs.002SCL Clearer reject Direct rejection of the file submitted by the Bundesbank's SEPA-Clearer following the detection of a technical or functional error.

Annex 2 SMV tool function Command Option (mandatory/optional) Examples Mirror (SCT, SDD, SCC) Creating incoming mirrored individual transactions of the same message type.
ECHO
None 1. In its tag EndToEndId, the incoming individual
transaction has a valid random value. 2. The recipient and sender information are
reversed.
-E2E (o) 1. In its tag EndToEndId, the incoming individual
transaction has a predefined valid value. 2. The recipient and sender information are
reversed.
Original content EndToEndID ECHO:NOTPROVIDED Result CLE-7628677975
Original content EndToEndID ECHO-E2E:TESTCASE231 Result TESTCASE231
Duplicate (SCT, SDD, SCC) Creating one or more incoming mirrored individual transactions of the same type. The number of generated SEPA files as well as the maximum number of individual transactions that may be contained in a single file can be freely determined.
ECHO -N:x (o) 1. In its tag EndToEndId, the incoming individual
transaction has a valid random value. 2. The recipient and sender information are
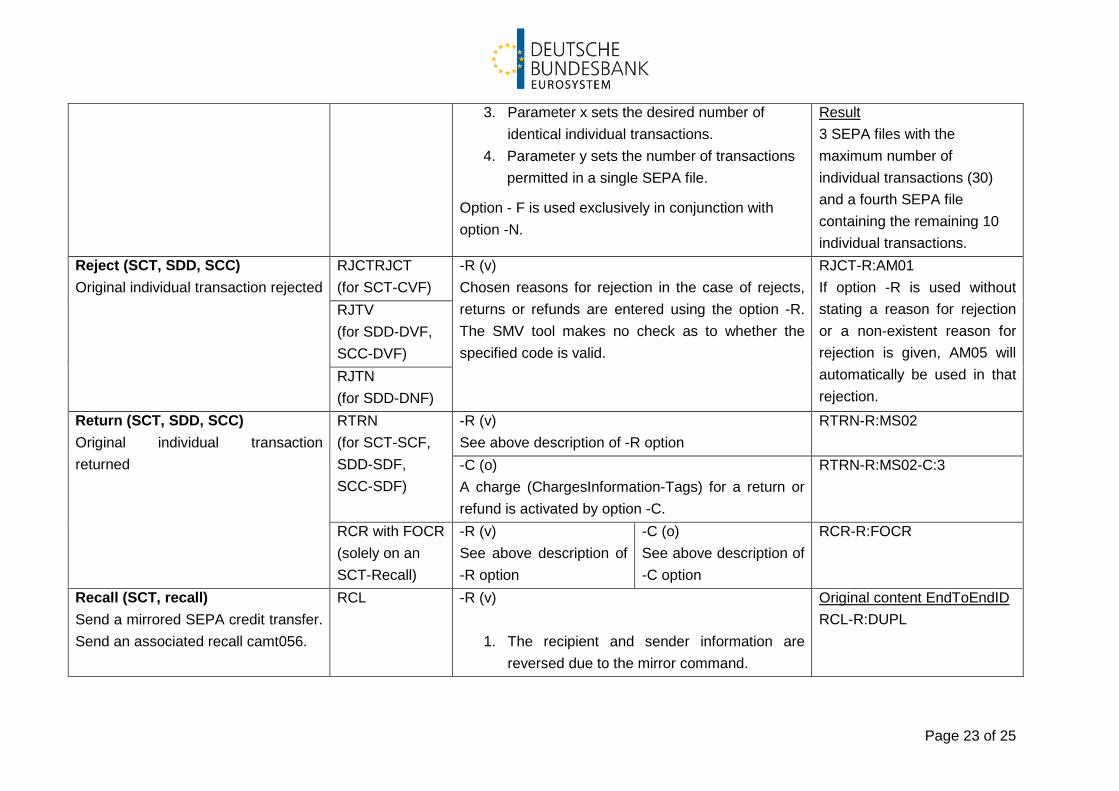
reversed due to the mirror command. 3. Parameter x sets the desired number of
identical individual transactions.
Original content EndToEndID ECHO-N:100 Result A SEPA file containing 100 individual transactions Original content EndToEndID ECHO-N:100-F:30
-N:x-F:y (o) 1. In its tag EndToEndId, the incoming individual
transaction has a valid random value. 2. The recipient and sender information are
reversed due to the mirror command.
Page 23 of 25
3. Parameter x sets the desired number of identical individual transactions.
4. Parameter y sets the number of transactions permitted in a single SEPA file.
Option - F is used exclusively in conjunction with option -N.
Result 3 SEPA files with the maximum number of individual transactions (30) and a fourth SEPA file containing the remaining 10 individual transactions.
Reject (SCT, SDD, SCC) Original individual transaction rejected
RJCTRJCT (for SCT-CVF)
-R (v) Chosen reasons for rejection in the case of rejects, returns or refunds are entered using the option -R. The SMV tool makes no check as to whether the specified code is valid.
RJCT-R:AM01 If option -R is used without stating a reason for rejection or a non-existent reason for rejection is given, AM05 will automatically be used in that rejection.
RJTV (for SDD-DVF, SCC-DVF) RJTN (for SDD-DNF)
Return (SCT, SDD, SCC) Original individual transaction returned
RTRN (for SCT-SCF, SDD-SDF, SCC-SDF)
-R (v) See above description of -R option
RTRN-R:MS02
-C (o) A charge (ChargesInformation-Tags) for a return or refund is activated by option -C.
RTRN-R:MS02-C:3
RCR with FOCR (solely on an SCT-Recall)
-R (v) See above description of -R option
-C (o) See above description of -C option
RCR-R:FOCR
Recall (SCT, recall) Send a mirrored SEPA credit transfer. Send an associated recall camt056.
RCL -R (v)
1. The recipient and sender information are reversed due to the mirror command.
Original content EndToEndID RCL-R:DUPL

Page 24 of 25
Send a NAK message (camt.029) in response to a recall (camt.056) (irrespective of command RCL)
2. A recall (camt056) is generated in response to a mirrored individual transaction.
RCN -R (v) Generating a NAK message RCN-R:AC04
Refund (SDD, SCC) An R-transaction is generated, based on the original individual transaction. The procedure is comparable to that used for a return.
RFND -R (v) RFND-R:MD06 -C (o) Aside from the charges mentioned above, a €5 general compensation fee is charged as well.
RFND-R:DISP-C:5
Reversal (SDD) The individual transaction is mirrored; in addition, a corresponding reversal is generated. The reason for reversal is added in the command.
RVSL -R (v) RVSL-R:MS02 If no R parameter is stipulated, the return code AM05 is automatically set.
Request for cancellation (SDD) As with a reversal, the original individual transaction is mirrored and a cancellation request is generated as well.
RQFC -R (v) RQFC-R:DUPL
List of figures
Figure 1User interface of an administrator .............................................................................................................................................................. 7 Figure 2 User interface under the "Users" tab ......................................................................................................................................................... 8 Figure 3 Adding a new user .................................................................................................................................................................................... 8 Figure 4 A new user appears immediately in the "Users" tab .................................................................................................................................. 9 Figure 5 A user's data can easily be modified by means of the dialogue box "Change user". ................................................................................. 9 Figure 6 Homepage of the SMV tool ..................................................................................................................................................................... 10 Figure 7 Step 1 of the registration procedure ........................................................................................................................................................ 11 Figure 8 Step 2 of the registration procedure ........................................................................................................................................................ 11 Figure 9 Confirming a successful registration ........................................................................................................................................................ 12 Figure 10 Changing your password ...................................................................................................................................................................... 13 Figure 11 Overview of all the functions offered by the SMV tool ............................................................................................................................ 14 Figure 12 You can upload your files from any given storage device ...................................................................................................................... 15 Figure 13 Example - Using Explorer to select your data ........................................................................................................................................ 15 Figure 14 Sample report. Downloading can be activated from this viewpoint ........................................................................................................ 18 Figure 15 Sample error report. Downloading can be activated from this viewpoint ................................................................................................ 18


