(Sounding Alarm tone even in Manner mode (P.9-36 - 9-37)
9-6
Calendar & Tasks
[ One Entry
1 In task list, select task S B
2 Delete S %
3 This Task S % S Yes S %
[ All Completed Tasks
1 In task list, B
2 Delete S %
3 All Comp. Tasks S % S Yes S %
Deleting Tasks
Han
dy E
xtras
9
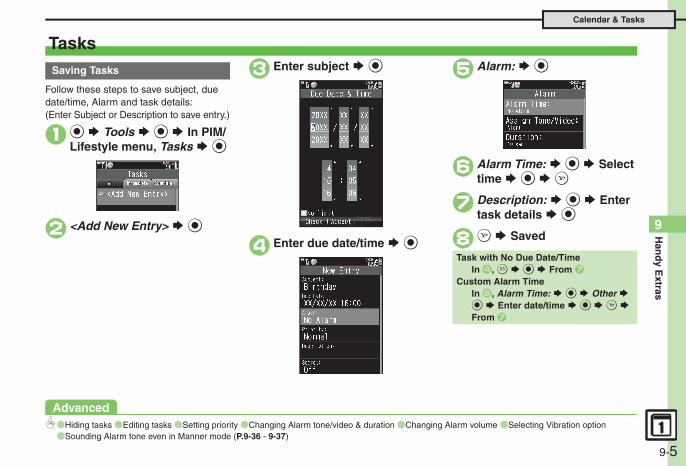
Alarm activates; sounds/vibrates by related settings.
1% S Tools S % S In PIM/Lifestyle menu, Tasks S %
Task List
. Use f to open completed or uncompleted task list.
2 Select task S %
3" S Standby returns
At Alarm Time
Stopping Alarm to Return to Standby. While Alarm sounds/vibrates, press %, " or $.
Stopping Alarm to Open Task. While Alarm sounds/vibrates, press a key
other than %, " or $.When Another Function is Active. Alarm may not activate until handset
returns to Standby.Incoming Calls. Active Alarm stops for incoming calls.
Information window opens after handset returns to Standby.
Opening Tasks
Accessing Secret EntriesAfter 1, B S Unlock Temporarily S % S Enter Handset Code S %
Marking Tasks as CompletedAfter 1, select task S A
Advanced0(Searching tasks (Sorting tasks by priority (Checking memory status (Deleting all tasks (P.9-37)
Alarms
Alarm Volume: S %
Adjust level S %
Duration: S %
Select time S %. For custom Duration, select Other.
A S Saved. For more settings, repeat 2 - c.
" S Alarm setting ends
Han
dy E
xtras
9
9-7
Activating Alarm Once or DailyIn 4, Once or Every Day (All) S % S From 6
Selecting/Canceling All DaysIn 5, B S Check All or Uncheck All S %
Excluding HolidaysIn 5, select day S % (N/P) S Complete selection S Except Holidays S % S A S From 6
Time (Sounding Alarm tone even in Manner
Follow these steps to set Alarm to sound at a specific time on a specific day of the week:(Set Snooze--Alarm repeats at set interval--Alarm Volume and Duration.)
1% S Tools S % S In PIM/Lifestyle menu, Alarms S %
Alarm List
2 --:-- S % S Enter hour (24-hour format) S Enter minutes S %
3 Repeat: S %
4 Selected Days S %
5 Select day S % (N/P) S Complete selection S A
6 Snooze: S %
7 Select interval S %. For custom intervals, select Other.
89abcd
Using AlarmsSetting Alarm
Advanced0(Editing entries (Saving entry name (Changing Alarm tone/video (Setting handset to vibrate at Alarm
mode (Activating Alarm based on World Clock time (P.9-38)
Alarms
9-8
[ One Entry
1 In Alarm list, select entry S B
2 Reset Alarm S %
3 Yes S %
[ All Entries
1 In Alarm list, select entry S B
2 Clear All S %
3 Enter Handset Code S % S Yes S %
Deleting Alarm
Han
dy E
xtras
9
Alarm activates; sounds/vibrates by related settings.
Alarm repeats at the set interval.Other Alarms do not activate while handset is Snoozing.
1 In Alarm list, select entry S B
2 Switch Off S %. Reactivate entry to use the same
settings.
At Alarm Time
Stopping Alarm. Press a key.When Another Function is Active. Alarm may not activate until handset
returns to Standby.Incoming Calls. Active Alarm stops for incoming calls.
Information window opens after handset returns to Standby.
When Snooze is Set
Canceling SnoozeWhile Snoozing, % S Yes S %
. Snooze is automatically canceled after a period of time.
Canceling Alarm
Reactivating EntryIn 2, Switch On S %
Wakeup TV
Activating TV Once or DailyIn 4, Once or Every Day (All) S % S From 6
Selecting/Canceling All DaysIn 5, B S Check All or Uncheck All S %
Excluding HolidaysIn 5, select day S % (N/P) S Complete selection S Except Holidays S % S A S From 6
Canceling Alarm. Alarm activates at Wakeup TV time. To
Han
dy E
xtras
9
9-9
cancel Alarm, follow these steps:[Wakeup TV Menu] Alarm On/Off: S % S Off S % S From 8
Adjusting Alarm Volume[Wakeup TV Menu] Alarm Volume: S % S Adjust level S % S From 8
Follow these steps to activate TV at a specific time on a specific day of the week:. Complete TV Area Setup beforehand.. TV may not activate in poor signal conditions.
1% S Tools S % S In PIM/Lifestyle menu, Wakeup TV S %
Wakeup TV List
2 --:-- S % S Enter hour (24-hour format) S Enter minutes S %
Wakeup TV Menu
3 Repeat: S %
4 Selected Days S %
5 Select day S % (N/P) S Complete selection S A
6 Channel: S %
7 Select channel S %
8A S Saved. For more settings, repeat 2 - 8.
9" S Wakeup TV setting ends
Using Wakeup TVSetting Wakeup TV
Advanced0(Editing entries (Changing Alarm tone/video (Sounding Alarm tone even in Manner mode (P.9-38)
Wakeup TV
9-1
Han
dy E
xtras
9
0
TV activates after Alarm. 1 In Wakeup TV list, select entry S B
2Wakeup TV Off S %. Reactivate entry to use the same
settings.
[ One Entry
1 In Wakeup TV list, select entry S B
2 Reset Alarm S %
3 Yes S %
[ All Entries
1 In Wakeup TV list, select entry S B
2 Clear All S %
3 Enter Handset Code S % S Yes S %
At Wakeup TV Time
Stopping Alarm Instantly. While Alarm sounds/vibrates, press a key.When Another Function is Active. TV may not activate depending on the
function.After TV is On for a Period of Time. Confirmation appears. Choose Yes and
press % to exit TV.
Canceling Wakeup TV
Reactivating EntryIn 2, Wakeup TV On S %
Deleting Wakeup TV
Relaxation Time
Set Key Illumi S %
Key Pattern S %
Select pattern S % S A
" S Standby returns
Han
dy E
xtras
9
9-11
Disabling Key IlluminationIn 3, Set Key Illumi S % S Switch On/Off S % S Off S % S A
Play preset animations or downloaded Flash® files with music and illumination.Set playback time, volume and illumination pattern as needed.
1% S Tools S % S In PIM/Lifestyle menu, Relaxation Time S %
2 Select type S %. Animation appears.. For Flash®, select a file and press %., Key LEDs do not illuminate for
soundless Flash® files.
Follow these steps to set playback time, volume and Key Illumination pattern:
1% S Tools S % S In PIM/Lifestyle menu, Relaxation Time S %
2 Settings S %
3 Playback Time S %
4 Select time S %. For custom playback time, select Other.
5 Volume S %
6 Adjust level S %
7
89a
Playing Animation with Music & IlluminationSetting Relaxation Time
9-1
Calculator
s (P.9-38)
Han
dy E
xtras
9
2
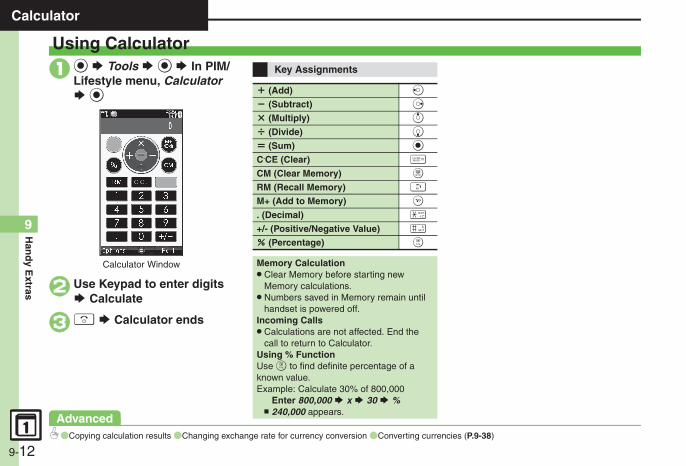
1% S Tools S % S In PIM/Lifestyle menu, Calculator S %
Calculator Window
2 Use Keypad to enter digits S Calculate
3" S Calculator ends
Using CalculatorKey Assignments
+ (Add) c
- (Subtract) d
× (Multiply) a
÷ (Divide) b
= (Sum) %
C.CE (Clear) $
CM (Clear Memory) &
RM (Recall Memory) !
M+ (Add to Memory) A
. (Decimal) (
+/- (Positive/Negative Value) #
% (Percentage) '
Memory Calculation. Clear Memory before starting new
Memory calculations.. Numbers saved in Memory remain until
handset is powered off.Incoming Calls. Calculations are not affected. End the
call to return to Calculator.Using % FunctionUse ' to find definite percentage of a known value.Example: Calculate 30% of 800,000
1% S Tools S % S In PIM/Lifestyle menu, Expenses Memo S %
2 Totals S %
Expenses Memo List
3" S Standby returns
[
1
23[
123
Adding ExpensesEntering Expenses
Saving under Custom CategoryIn 3, Other S % S Enter name S %
Checking Entries
Saving Entries to Notepad[Expenses Memo List] B S Save to Notepad S %
, All expense details are saved as a single entry.
Advanced0(Changing Category of saved entry (Changing amount (Renaming Categories (P.9-39)
9-1
Osaifu-Keitai®
Important Osaifu-Keitai® Usage Note. SoftBank Mobile is not liable for damages
resulting from accidental loss/alteration of IC Card data/settings.
When Placed Over Sensor. If recognition is slow, move handset
around slightly.. Handset may respond automatically for
some services.
ications from Balance Info list (P.9-39)
Han
dy E
xtras
9
4
Osaifu-Keitai® describes IC Card-equipped handsets that support e-money or credit functions/services. Osaifu-Keitai® encompasses a range of IC Card-based services on FeliCa-compatible SoftBank handsets. 936SH supports Osaifu-Keitai®. To use e-money, e-ticketing and reward points, etc., hold handset over a compatible reader/writer at shops, restaurants, and other retail outlets, etc.
Before using Osaifu-Keitai®, activate Lifestyle-Appli, complete registration, customize settings and charge accounts.
Follow these steps to conduct a transaction: Example: Making an electronic payment. Lifestyle-Appli activation is not necessary.. Transactions are possible even when handset
power is off (if battery is adequately charged).. Calls/Internet transmissions do not affect
transactions.
1 Place m logo over reader/writer S Confirm scan results
. Align handset parallel to reader/writer.
Osaifu-Keitai® (Japanese)
Basics
Starting Lifestyle-Appli% S Tools S % S In PIM/Lifestyle menu, Osaifu-Keitai S % S Lifestyle-Appli S % S Select application S %
Lifestyle-Appli Precautions. Contact Osaifu-Keitai® service providers
for Lifestyle-Appli registration and usage details.
. Keep service passwords/customer service contact information, etc. in a separate place.
Using Osaifu-Keitai®
Place this part over reader/writer
Advanced0(Enabling to view e-money balances (Moving applications up/down Balance Info list (Removing appl
Han
dy E
xtras
9
9-15
Osaifu-Keitai®
IC Card Lock notice recipient (Changing
Restrict access to/prevent unauthorized use of Osaifu-Keitai® on handset.
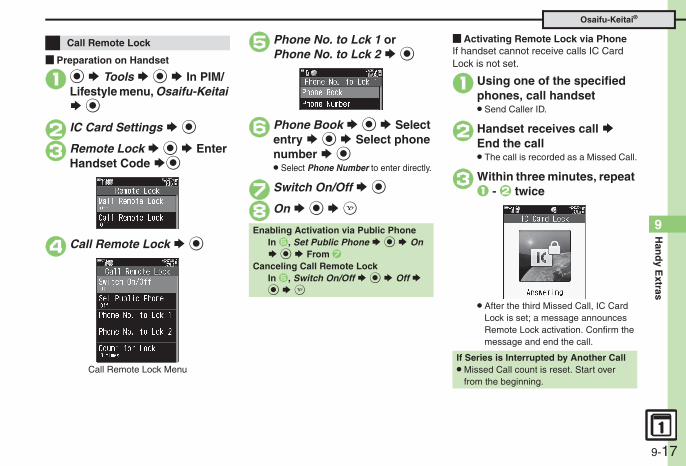
1% S Tools S % S In PIM/Lifestyle menu, Osaifu-Keitai S %
2 IC Card Settings S %
IC Card Settings Menu
3 IC Card Lock S % S On S %
4 Enter Handset Code S % S Yes S %
Locking IC CardIC Card Lock
Canceling IC Card LockIn 3, IC Card Lock S % S Off S % S Enter Handset Code S %
Advanced0(Customizing handset response to reader/writer commands (Opening IC Card properties (Changing
When Receive Timing is Not Immediately. Press " or $ during wait time to
cancel Simulated Call activation.. Simulated Call activation is canceled by
incoming calls, Alarms, etc. during wait time.
40)
Han
dy E
xtras
9
8
Handset rings to emulate an incoming call.. Save name and phone number to show as
Caller ID.. Ringer may be muted by handset settings.
To override Silent setting, see P.9-40.
1% S Tools S % S In PIM/Lifestyle menu, Simulated Call S %
Simulated Call Menu
2 Switch On/Off S % S On S %
3 Set Caller S %
4 Name: S % S Enter name S %
5 Phone Number: S % S Enter phone number S % S A
6 Assign Tone S % S Select tone/file S %
7A S PIM/Lifestyle menu returns
Faking Incoming Calls
Setting Simulated Call
When Name and Phone Number are Unset. Handset rings with Caller ID "Withheld."Canceling Simulated Call
[Simulated Call Menu] Switch On/Off S % S Off S % S A
Setting Wait Time[Simulated Call Menu] Receive Timing S % S Select time S % S A
Advanced0(Starting via Simulated Call menu (Clearing caller information (Overriding Silent volume setting (P.9-
Stopwatch
H
and
y Extras
9
9-19
Stopwatch stops when battery runs low.
1% S Tools S % S f Clocks/Gauges S Stopwatch S %
Stopwatch Window
2% S Stopwatch starts
3% S Stopwatch stops. Press % to resume.
4" S Yes S % S Stopwatch ends. Records are deleted when
Stopwatch ends.
Using StopwatchRecording Lap Times
While Stopwatch is running, BSaving Records to Notepad
After 3, B S Save to Notepad S %Resetting Records
After 3, A S From 2Incoming Calls. Stopwatch is not affected by incoming
calls. End the call to return.
9-2
Countdown Timer
Tone sounds.
When Set Time Elapses
Stopping Tone Instantly. Press % or a Side Key. (Tone stops
automatically after a period of time.)When Timer Time Elapsed during a Call. Tone sounds after the call.
Han
dy E
xtras
9
0
1% S Tools S % S f Clocks/Gauges S Countdown Timer S %
Timer Entry Window
2 Enter minutes S Enter seconds S %
Countdown Timer Window
. Press B to change time.
3% S Countdown starts. Press % to stop/resume countdown.
4 Set time elapses S Tone sounds
5" S Yes S % S Countdown Timer ends
Using Countdown Timer
Using Timer RecordsAfter 1, B S Select record S % S % S From 3
Resetting Countdown TimerStop countdown and B
Incoming Calls. Countdown is not affected by incoming
calls. End the call to return.
World Clock
% S Settings S % S In Phone menu, Display S %
Standby Display S %
Opening World Clock in Standby
Han
dy E
xtras
9
9-21
Clock/Calendar S %
World Clock (L), etc. S %
" S Standby returns
1% S Tools S % S f Clocks/Gauges S World Clock S %
2%
Set Time Zone Window
3f Select area S %
4" S World Clock ends 1
2
345
Opening World Clock
Local Time Zone
World Time Zone
Advancing One Hour (Daylight Saving)[Set Time Zone Window] A
, To cancel, press A.Adding Custom Time Zone
[Set Time Zone Window] B S Enter city name S % S + or - S d S Enter time difference S %
9-2
Hour Minder
Hour Minder activates; sounds/vibrates by related settings.
1 In Hour Minder menu, Switch On/Off S % S Off S % S A
At Hour Minder Time
Stopping Tone Instantly. Press a key.When Another Function is Active. Hour Minder does not activate.Incoming Calls. Active Hour Minder stops for incoming calls.
Canceling Hour Minder
Minder tone even in Manner mode (Activating
Han
dy E
xtras
9
2
Follow these steps to activate the hourly time signal at selected hours:
1% S Tools S % S f Clocks/Gauges S Hour Minder S %
Hour Minder Menu
2 Switch On/Off S % S On S %
3 Select Time S %
4 Select hour S % (N/P) S Complete selection S A
5A S Saved
6" S Hour Minder setting ends
Using Hour MinderSetting Hour Minder
Adjusting Hour Minder VolumeIn 2, Advanced S % S Volume: S % S Adjust level S % S A S From 5
Changing Hour Minder DurationIn 2, Advanced S % S Duration: S % S Select time S % S A S From 5
, For custom Duration, select Other.Selecting/Canceling All Hours
In 4, B S Check All or Uncheck All S %
Advanced0(Changing Hour Minder tone/video (Setting handset to vibrate at Hour Minder Time (Sounding Hour
Hour Minder based on World Clock time (P.9-40)
Pedometer
Height S % S Enter height S %
Weight S % S Enter weight S %
Pace S % S Yes or No S %. Choose Yes to enter pace
automatically based on height.
Enter pace S % S A
Han
dy E
xtras
9
9-23
In Pedometer menu, Switch On/Off S %
On S %
Editing Body Information[Body Info Menu] Select item S % S Enter value S % S A
, For Pace, automatic calculation confirmation appears (when height is entered).
Activating Pedometer
Canceling PedometerIn 2, Off S %
. Count based on a pace of approximately 100 steps per minute over even terrain.
. Accuracy may be affected by course, terrain, walking style, etc.
. Avoid holding the handset; use a body worn case or a strap, or place handset inside a pocket or bag., Avoid sudden/erratic movements.
. Steps are not counted in the following cases:, While handset is off, For the first few steps, While handset vibrates
. Handset use may affect accuracy.
. Use Pedometer only as a rough guide.
Weight and pace entry required to view full Pedometer data.
1% S Tools S % S f Clocks/Gauges S Pedometer S %
Pedometer Menu
2 Settings S % S Body Info. S %
3 Enter Handset Code S %
Body Info Menu
4
5
6
7
1
2
Using PedometerGetting Started
Adjusting Counter Sensitivity% S Tools S % S f Clocks/Gauges S Pedometer S % S Settings S % S Step Sensitivity S % S Select option S %
, Select Low when steps seem overcounted; select High when they seem undercounted.
Saving Body Information
9-2
Pedometer
1 In Pedometer menu, Settings S % S Target S %
2 Target Settings S %
3 Select item S % S Enter value/time S %. Other target settings may
consequently change.
Editing Targets[Pedometer Menu] Settings S % S Target S % S Target Settings S % S Select item S B S Enter value/time S %
When Target is Achieved. A tone sounds and Information window
opens. (Select Goal Achievement and press % to open Pedometer Calendar.) Follow these steps to mute achievement tone:
[Pedometer Menu] Settings S % S Target S % S Goal Announce S % S Off S %
About Exercise (Ex). Ex and MET indicate amount and
intensity of physical activity, respectively. Ex for walking is calculated by multiplying 3 METs by walking duration (hour).
g accumulated data (Customizing achievement
Han
dy E
xtras
9
4
When Pedometer is active, today's step count appears in Standby.
1 In Pedometer menu, Today's Walking S %
2%
Steps Window
. Press A to toggle daily/weekly view.
. Press ( to open previous day/week, or # to open next day/week.
3 Select time/date S %. Hourly/daily step counts appear.
4" S Standby returns
Information window opens, etc. when target is achieved for these items:
Pedometer Indicator
Viewing Step Count Records
Resetting Today's Step CountIn 2, B S Reset Day's Data S % S Yes S %
Resetting Log[Steps Window] B S Walk Data Reset S % S Enter Handset Code S % S Yes S %
, Today's data is also reset.
Setting Targets
Steps Walking Time
Exercise Calories
Distance Fat burned
Advanced0(Changing Pedometer indicator (Using Pedometer Calendar (Checking accumulated data (Resettin
notice (P.9-40 - 9-41)
Document Viewer
Key Assignments
View Whole Page %
Scroll g
View Upper Left 1
Toggle Full Screen View On/Off
2
View Upper Right 3
Zoom Out 4/F
Continuous Zoom Out4 (Long) F (Long)
Han
dy E
xtras
9
9-25
View Center 5
Zoom In 6/E
Continuous Zoom In 6 (Long)
View Lower Left 7
Jump to Page 8
View Lower Right 9
Open Help 0
Next Page #
Previous Page (
Fit Width !
Rotate 90 Degrees A
Supported File Formats:
. Some files may not appear correctly.
. Download files via the Internet.
. When transferring files from PCs, save to corresponding Memory Card folder (P.15-24).
1% S Tools S % S f Doc./Rec. S Document Viewer S %
2 Select file S %
Opening PC Documents
PDF (.pdf)
Microsoft® Excel® (.xls)
Microsoft® Word (.doc)
Microsoft® PowerPoint® (.ppt)
Zooming In/Out with Loupe (Magnifier)In open file, & (Long) S Specify portion S B S Zoom Out or Zoom In S %
9-2
Notepad
[ One Entry
1 In Notepad list, select entry S B
2 Delete Item S % S Yes S %
[ Selected Entries
1 In Notepad list, select entry S B S Setting/Manage S %
2 Multiple Selection S % S Select entry S % (N/P) S Complete selection S B
3 Delete S % S Yes S %
[ All Entries
1 In Notepad list, select entry S B S Setting/Manage S %
2 Delete All S % S Enter Handset Code S % S Yes S %
[Notepad List] A, Press to toggle sort options (Modified,
Created, Category and Accessed).Inserting Notepad Text during Text Entry
[Text Entry Window] B S Notepad S % S Call Notepad S % S Select entry S %
Opening Notepad
Advanced0(Editing Notepad (Searching text within all entries (Inserting Notepad text into message text (Send
(Importing text files (Checking memory status (Opening properties (P.9-41)
ASCII Art
In ASCII Art list, select entry S B S Delete S %
Yes S %
Deleting Entries
Han
dy E
xtras
9
9-27
1 In message text entry window, B S Call ASCII Art S %
2 Select entry S %
1% S Tools S % S f Doc./Rec. S ASCII Art S %
ASCII Art List
2 Select entry S % S Edit S %
1
2
Using ASCII ArtInserting ASCII Art
Previewing ASCII ArtIn 2, select entry S B
, Press % to insert ASCII Art.
Editing Entries
Opening EntriesIn 2, select entry S B S View S %
Adding New EntriesIn 2, <Empty> S % S Create ASCII Art S %
9-2
Voice Recorder
1 In recording window, B S Ring Songs·Tones S %
2 Select file S %
Playback
Playing Files via Data Folder% S Data Folder S % S Ring Songs·Tones S % S Select file S %
Playback Operations
Adjust Volume e
Pause/Resume %
Stop $
Han
dy E
xtras
9
8
. Recording stops if battery runs low while recording.
. Record conversations during calls via Record Caller Voice.
1% S Tools S % S f Doc./Rec. S Voice Recorder S %
Recording Window
2% S Recording starts
3% S Recording stops
. For Extended Voice, recording is saved automatically.
4 Save S %
Recording/Playing VoiceRecording
Play Before SavingIn 4, Playback S % S Playback starts S $ S Playback stops
Starting OverIn 4, $ S From 2
Advanced0(Saving longer recordings (Sending Voice files via S! Mail (Switching storage media (P.9-41 - 9-42)
Scan Barcode
Tone sounds S Scan results appear
Split Data. After scanning, confirmation appears.
Follow onscreen prompt(s).
Han
dy E
xtras
9
9-29
. Scan results do not appear until all split data is scanned.
Starting OverAfter 5, A S Yes S % S From 3
Key Assignments in Scan Window
Toggle Focus Mode 3
Switch to Photo Camera 7
Focus Lock !
Mobile Light On/Off #
Adjust Brightness f
Open Help 0
sults (Saving to Notepad (Saving linked info images & melodies (Copying text (And more
Scan UPC/JAN (1D barcodes) or QR Codes (2D barcodes).. Membership file or password may be
required when scanning barcodes.. Some barcodes may not be scanned.
1% S Tools S % S f Doc./Rec. S Barcode/Scan S %
2 Scan Barcode S %
3 Frame barcode in center of Display
Scan Window
. Use Focus Adjustment Bar as a guide (better focus in darker blue).
. If focus is poor, press A to switch to Shutter mode.
4% S Scan starts. If recognition takes time, slowly
adjust the distance between handset and barcode.
. Press A to stop scan.
5Scanning Barcodes
FocusAdjustment Bar
Advanced0(Scanning during text entry (Scanning continuously (Reading saved barcode images (Saving scan re
to Phone Book (Opening saved scan results (Using linked info (Using images as Wallpaper (Savingon P.9-42 - 9-43)
9-3
Create QR Code
From Phone Book EntriesIn 3, Phone Book S % S Select entry S % S 5
From My DetailsIn 3, My Details S % S B S 5
From Entered TextIn 3, Text Input S % S Enter text S % S 5
Switching Storage MediaIn 5, B S Save to S % S Phone or Memory Card S % S %
Attaching to S! MailIn 5, B S Send As Message S % S Complete message S A
Incoming Calls. QR Code creation is not affected by
incoming calls. End the call to return.
Han
dy E
xtras
9
0
Create QR Codes from these items on handset:
Large items are divided into multiple QR Codes.
Follow these steps to create QR Codes from Data Folder files:
1% S Tools S % S f Doc./Rec. S Barcode/Scan S %
2 Create QR Code S %
3 Data Folder S %
4 Select folder S % S Select file or entry S %. QR Code is created.
5%. QR Code is saved to Data Folder
(Pictures).
Creating QR Codes
Phone Book My Details
Text Input Ring Songs·Tones
Pictures Notepad
Procedure
Scan Card
If Text Exceeds Phone Book Entry Item Character Limit. Confirmation appears. Follow these
steps to delete overage:Yes S %
Switching Storage MediaAfter 5, B S Save to S % S Select storage media S % S %
Saving Scanned Image as Phone Book Picture
After 5, B S Add Image S % S On S % S 6
Han
dy E
xtras
9
9-31
Starting OverAfter 5, A S Yes S % S From 3
Key Assignments in Scan Window
Toggle Focus Mode 3
Switch to Photo Camera 7
Focus Lock !
Mobile Light On/Off #
Adjust Brightness f
Open Help 0
Scan business cards and save names, addresses, etc. to Phone Book.. English business cards may not be
scanned correctly.. Some cards may not be scanned.
1% S Tools S % S f Doc./Rec. S Barcode/Scan S %
2 Scan Card S %
3 Frame card on Display
Scan Window
4%. Press A to stop scan.
5% S Scan results appear
6% S A. New Phone Book entry is saved.
Scanning Business Cards
Advanced0(Saving to Notepad (Pasting to message text (Copying text (P.9-44)
9-3
Scan Text
6%
7B S Notepad S %
Correcting Text TypeAfter 5, B S Change Mode S % S Select type S % S From 6
Editing Scanned TextAfter 5, B S Select/Edit S % S Select character S Select alternative from list or edit directly S From 6
Starting OverIn 6, A S Yes S % S From 3
Key Assignments in Scan Window
Toggle Focus Mode 3
Switch to Photo Camera 7
Focus Lock !
Mobile Light On/Off #
Adjust Brightness f
Open Help 0
fo to Phone Book (Opening saved scan results
Han
dy E
xtras
9
2
Scan text and save it to Notepad, etc.Available Modes:
. To toggle mode, press A in scan window.
. Some text cannot be scanned.
1% S Tools S % S f Doc./Rec. S Barcode/Scan S %
2 Scan Text S %. To change mode, press A in scan
window.
3 Frame text in center of Display
Scan Window
4% S Scan starts. Press A to stop scan.
5 Select line S % S Scan results appear
Scanning Text
FullCapture text in full screen and scan a selected line
LineCapture a few lines of text and scan a selected line
Advanced0(Scanning and pasting during text entry (Scanning more text (Saving scan results (Saving linked in
(Using linked info (Pasting to message text (Copying text (P.9-44 - 9-45)
Kanji Grabber
Key Assignments in Scan Window
Toggle 2x Magnification On/Off A
Toggle Focus Mode 3
Switch to Photo Camera 7
Focus Lock !
Mobile Light On/Off #
Adjust Brightness f
Open Help 0
Han
dy E
xtras
9
9-33
Scan a word of up to ten kanji and look it up in dictionaries.Some text cannot be scanned.
1% S Tools S % S f Doc./Rec. S Barcode/Scan S %
2 Kanji Grabber S %
3 Frame kanji in Loupe
Scan Window
4%. Scan results (kanji) appear.
5%
6 Select dictionary S % S Search S %
7 Select word, etc. S %. Definition/translation window opens.
Using Kanji Grabber
Starting OverIn 5, A S From 3
Loupe
Advanced0(Scanning and pasting during text entry (P.9-45)
9-3
Additional Functions
% S Tools S % S In PIM/Lifestyle nu, Calendar S % S B S Calendar ttings S % S Set Holiday S % S f vate S See below
ding Holidaysmpty> S % S Enter name S % S Enter te S % S Select frequency S % S A
iting Added Holidayslect holiday S B S Edit S % S Name: S S Enter name S % S Date: S % S Enter te S % S Select frequency S % S A
S Tools S % S In PIM/Lifestyle menu, lendar S % S B S Calendar Settings S S Set Holiday S % S f Private or Public Select holiday S % (N/P)
Han
dy E
xtras
9
4
[ View Settings
Calendar
Changing default view
% S Tools S % S In PIM/Lifestyle menu, Calendar S % S B S Calendar Settings S % S Default View S % S Select type S %
Jumping to specified date
% S Tools S % S In PIM/Lifestyle menu, Calendar S % S 8 S Enter date S %
Changing date color
7% S Tools S % S In PIM/Lifestyle menu, Calendar S % S See below
By Days of the WeekB S Calendar Settings S % S Set Color S % S By Week S % S Select day S % S Select color S %
By DateSelect date S 4 S Select color S %. Not available in 6Month View.
Resetting "By Date" ColorsB S Calendar Settings S % S Set Color S % S Reset Color S % S Select option S % S Yes S %
Selecting task view option
% S Tools S % S In PIM/Lifestyle menu, Calendar S % S B S Calendar Settings S % S Tasks View S % S Select option S %
Adding stamps (Month/3Month View)
% S Tools S % S In PIM/Lifestyle menu, Calendar S % S Select date S 2 S Select stamp S %
Hiding schedules
% S Tools S % S In PIM/Lifestyle menu, Calendar S % S Select date S % S Select entry S % S % S Secret: S % S On S % S A
Saving additional holidays
7meSePri
Ad<Eda
EdSe%da
Removing/restoring holidays
%Ca%S
Han
dy E
xtras
9
9-35
Additional Functions
% S Tools S % S In PIM/Lifestyle u, Calendar S % S Select date S % S ct entry S % S % S S! Friend'sStatus: S Link Setting: S % S Linked S % S
below
ilabilitywer Status: S % S Edit S A S A S At Category first.
mentment: S % S Enter text S % S A S At Category first.
Tools S % S In PIM/Lifestyle menu, ndar S % S Select date S % S Select y S % S % S Select item S % S Edit in same manner as saving schedules S A
% S Tools S % S In PIM/Lifestyle u, Calendar S % S Select date S % S ct entry S % S % S Alarm: S % S See w
m Tone/Videoign Tone/Video: S % S Select folder S
Select tone/file S % S A S Alect start point if required.
ationation: S % S Select time S % S A S A
Tools S % S In PIM/Lifestyle menu, ndar S % S B S Alarm Settings S % larm Volume: S % S Adjust level S %
Tools S % S In PIM/Lifestyle menu, ndar S % S B S Alarm Settings S % ibration: S % S Select option S %
[ Saving/Editing Schedules
Setting Category/Location
7% S Tools S % S In PIM/Lifestyle menu, Calendar S % S Select date S % S Select entry S % S % S See below
CategoryCategory: S % S Select Category S % S A
LocationLocation: S % S Enter location S % S A
Creating Categories
7% S Tools S % S In PIM/Lifestyle menu, Calendar S % S B S Calendar Settings S % S Set Category S % S See below
Renaming CategoriesSelect Category S % S Edit Category Name S % S Enter name S %
Changing IconsSelect Category S % S Change Icon S % S Select Pictogram S %
ResettingB S Reset Settings S % S Enter Handset Code S % S Yes S %
Saving repetitive schedules
% S Tools S % S In PIM/Lifestyle menu, Calendar S % S Select date S % S Select entry S % S % S Repeat: S % S Select frequency S % S Enter repeat time S % S A. Repeat time is not available for Every Year.
Saving S! Friend's Status information
7menSeleS %See
AvaAns. Se
ComCom. Se
Editing entries
% SCaleentrthe
Changing Alarm tone/video & duration
7menSelebelo
AlarAss% S. Se
DurDur
Changing Alarm volume
% SCaleS A
Selecting Vibration option
% SCaleS V
Additional Functions
9-3
s
% S Tools S % S In PIM/Lifestyle nu, Calendar S % S See below
thin One Monthlect date S B S Delete S % S All This nth S % S Yes S %
to the End of Previous Monthlect date S B S Delete S % S Up to Last nth S % S Yes S %
S Tools S % S In PIM/Lifestyle menu, lendar S % S B S Delete S % S All is 6Months S % S Yes S %
S Tools S % S In PIM/Lifestyle menu, ks S % S Select task S B S Edit S %
Secret: S % S On S % S A
S Tools S % S In PIM/Lifestyle menu, ks S % S Select task S B S Edit S %
Select item S % S Edit in the same nner as saving tasks S A
S Tools S % S In PIM/Lifestyle menu, ks S % S Select task S B S Edit S %
Priority: S % S Select priority S % S A
Han
dy E
xtras
9
6
[ Managing Schedules
[ Task List
[ Saving/Editing Task
Sounding Alarm tone even in Manner mode
% S Tools S % S In PIM/Lifestyle menu, Calendar S % S B S Alarm Settings S % S For Manner Mode: S % S Ring S % S Yes S %
Searching entries
7% S Tools S % S In PIM/Lifestyle menu, Calendar S % S See below
By Part of Subject6 S Enter text S %
By Category9 S Select Category S %
Checking memory status
% S Tools S % S In PIM/Lifestyle menu, Calendar S % S Select date S B S Memory Status S %
Deleting all entries
% S Tools S % S In PIM/Lifestyle menu, Calendar S % S B S Delete S % S All Appointments S % S Enter Handset Code S % S Yes S %
Deleting entries by specifying week (Week View)
7% S Tools S % S In PIM/Lifestyle menu, Calendar S % S See below
Within One WeekSelect date S B S Delete S % S All This Week S % S Yes S %
Up to the End of Previous WeekSelect date S B S Delete S % S Up to Last Week S % S Yes S %
Deleting entries by specifying month (Month/3Month View)
7me
WiSeMo
UpSeMo
Deleting entries in six months (6Month View)
%CaTh
Tasks
Hiding tasks%TasS
Editing tasks
%TasS ma
Setting priority%TasS
Han
dy E
xtras
9
9-37
Additional Functions
% S Tools S % S In PIM/Lifestyle u, Tasks S % S B S Find S % S See w
art of Subjectubject S % S Enter text S %
ue Dateue Date S % S Enter date S %
Tools S % S In PIM/Lifestyle menu, ks S % S B S Sort S % S Priority S %
Tools S % S In PIM/Lifestyle menu, ks S % S B S Memory Status S %
Tools S % S In PIM/Lifestyle menu, ks S % S B S Delete S % S All Tasks
S Enter Handset Code S % S Yes S %
[ Managing Tasks
Changing Alarm tone/video & duration
7% S Tools S % S In PIM/Lifestyle menu, Tasks S % S Select task S B S Edit S % S Alarm: S % S See below
Alarm Tone/VideoAssign Tone/Video: S % S Select folder S % S Select tone/file S % S A S A. Select start point if required.
DurationDuration: S % S Select time S % S A S A
Changing Alarm volume
% S Tools S % S In PIM/Lifestyle menu, Tasks S % S B S Alarm Settings S % S Alarm Volume: S % S Adjust level S %
Selecting Vibration option
% S Tools S % S In PIM/Lifestyle menu, Tasks S % S B S Alarm Settings S % S Vibration: S % S Select option S %
Sounding Alarm tone even in Manner mode
% S Tools S % S In PIM/Lifestyle menu, Tasks S % S B S Alarm Settings S % S For Manner Mode: S % S Ring S % S Yes S %
Searching tasks
7menbelo
By PBy S
By DBy D
Sorting tasks by priority
% STas
Checking memory status
% STas
Deleting all tasks% STasS %
Additional Functions
9-3
S Tools S % S In PIM/Lifestyle menu, keup TV S % S Select entry S % S lect item S % S Edit in the same manner saving entries S A
% S Tools S % S In PIM/Lifestyle nu, Wakeup TV S % S Select entry S % Assign Tone/Video: S % S See below
ing Preset Tone or Data Folder Filelect folder S % S Select tone/file S % S Aelect start point if required.
ing Customized Screen Tone/Videostomized Screen S % S A
S Tools S % S In PIM/Lifestyle menu, keup TV S % S For Manner Mode S % S g S % S Yes S %
ile result appears, B S Copy S %
S Tools S % S In PIM/Lifestyle menu, lculator S % S B S Money Converter S S Exchange Rate S % S Domestic or reign S % S Enter rate S %
S Tools S % S In PIM/Lifestyle menu, lculator S % S Enter amount of money S S Money Converter S % S To Domestic To Foreign S %et Exchange Rate first.
Han
dy E
xtras
9
8
Alarms
Editing entries
% S Tools S % S In PIM/Lifestyle menu, Alarms S % S Select entry S % S Select item S % S Edit in the same manner as saving entries S A
Saving entry name% S Tools S % S In PIM/Lifestyle menu, Alarms S % S Select entry S % S Subject: S % S Enter name S % S A
Changing Alarm tone/video
7% S Tools S % S In PIM/Lifestyle menu, Alarms S % S Select entry S % S Assign Tone/Video: S % S See below
Using Preset Tone or Data Folder FileSelect folder S % S Select tone/file S % S A. Select start point if required.
Using Customized Screen Tone/VideoCustomized Screen S % S A
Setting handset to vibrate at Alarm Time
% S Tools S % S In PIM/Lifestyle menu, Alarms S % S Select entry S % S Vibration: S % S On or Link to Sound S % S A. Select Link to Sound to allow compatible SMAF
files to control vibration.
Sounding Alarm tone even in Manner mode
% S Tools S % S In PIM/Lifestyle menu, Alarms S % S Settings S % S For Manner Mode S % S Ring S % S Yes S %
Activating Alarm based on World Clock time
% S Tools S % S In PIM/Lifestyle menu, Alarms S % S Settings S % S Link to World Clk S % S On S %
Wakeup TV
Editing entries
%WaSeas
Changing Alarm tone/video
7meS
UsSe. S
UsCu
Sounding Alarm tone even in Manner mode
%WaRin
Calculator
Copying calculation results
Wh
Changing exchange rate for currency conversion
%Ca%Fo
Converting currencies
%CaBor . S
Han
dy E
xtras
9
9-39
Additional Functions
Tools S % S In PIM/Lifestyle menu, ifu-Keitai S % S IC Card Settings S %
nterface Settings S % S Enter Handset e S % S Select item S % S Off S %
Tools S % S In PIM/Lifestyle menu, ifu-Keitai S % S IC Card Settings S %
C Card Status S %
% S Tools S % S In PIM/Lifestyle u, Osaifu-Keitai S % S IC Card Settings S Remote Lock S % S Enter Handset
e S % S Mail Remote Lock S % S ice Settings S % S Send Notice S % S below
nging Recipientet Recipient S % S Set Recipient S % elect method S % S Select/enter ber/address S % S $ S A
mit step of pressing $ when selecting Phone ok as setting method.
bling NoticeS % S $ S A
Tools S % S In PIM/Lifestyle menu, ifu-Keitai S % S IC Card Settings S % S ote Lock S % S Enter Handset Code S Call Remote Lock S % S Count for Lock S Enter Missed Call count S % S A
Tools S % S In PIM/Lifestyle menu, ifu-Keitai S % S IC Card Settings S % et to Default S % S Enter Handset Code S Yes S %
Expenses Memo
Changing Category of saved entry
% S Tools S % S In PIM/Lifestyle menu, Expenses Memo S % S Totals S % S Select entry S % S Select Category S %
Changing amount
% S Tools S % S In PIM/Lifestyle menu, Expenses Memo S % S Totals S % S Select entry S B S Change Amount S % S Edit S %
Renaming Categories
% S Tools S % S In PIM/Lifestyle menu, Expenses Memo S % S Edit Category S % S Select Category S % S Enter name S %
Osaifu-Keitai®
Enabling to view e-money balances
% S Tools S % S In PIM/Lifestyle menu, Osaifu-Keitai S % S IC Card Settings S % S Balance Info S % S Enter Handset Code S % S <Empty> S % S S! Appli or Lifestyle-Appli S % S Select application S %. For use with compatible Lifestyle-Applications.. Start Lifestyle-Appli once before adding it to Balance
Info list.
Moving applications up/down Balance Info list
% S Tools S % S In PIM/Lifestyle menu, Osaifu-Keitai S % S IC Card Settings S % S Balance Info S % S Enter Handset Code S % S Select application S B S Move S % S Select target location S %
Removing applications from Balance Info list
% S Tools S % S In PIM/Lifestyle menu, Osaifu-Keitai S % S IC Card Settings S % S Balance Info S % S Enter Handset Code S % S Select application S B S Delete S %
Customizing handset response to reader/writer commands
% SOsaS ICod
Opening IC Card properties
% SOsaS I
Changing IC Card Lock notice recipient
7menS %CodNotSee
ChaTo SS Snum. O
Bo
DisaOff
Changing required Missed Call count for Call Remote Lock
% SOsaRem% SS %
Restoring default Osaifu-Keitai® settings
% SOsaS SS %
Additional Functions
9-4
S Tools S % S f Clocks/Gauges S ur Minder S % S Advanced S % S For nner Mode: S % S Ring S % S Yes S % A S A
S Tools S % S f Clocks/Gauges S ur Minder S % S Advanced S % S Link World Clk: S % S On S % S A S A
S Settings S % S In Phone menu, Display % S Standby Display S % S Pedometer % S Select item S %
S Tools S % S f Clocks/Gauges S dometer S % S Pedometer Calendar S % Select date S %egree of achievement appears.ress ( or # to view previous or next month.
S Tools S % S f Clocks/Gauges S dometer S % S Accumulated Data S %hange in body information is reflected in the data.
S Tools S % S f Clocks/Gauges S dometer S % S Accumulated Data S % S S Reset Walk Data S % S Enter Handset de S % S Yes S %verages are also reset.
Han
dy E
xtras
9
0
Simulated Call
Starting via Simulated Call menu
% S Tools S % S In PIM/Lifestyle menu, Simulated Call S % S Receive Simulated Call S % S Yes S %. Simulated Call starts immediately regardless of
Receive Timing setting.. Settings remain even after starting Simulated Call
during setup.
Clearing caller information
% S Tools S % S In PIM/Lifestyle menu, Simulated Call S % S Set Caller S % S B S Yes S % S A S A
Overriding Silent volume setting
% S Tools S % S In PIM/Lifestyle menu, Simulated Call S % S For Silent Mode S % S Ring S % S Yes S % S A
Hour Minder
Changing Hour Minder tone/video
% S Tools S % S f Clocks/Gauges S Hour Minder S % S Advanced S % S Assign Tone/Video: S % S Select folder S % S Select tone/file S % S A S A. Select start point if required.
Setting handset to vibrate at Hour Minder Time
% S Tools S % S f Clocks/Gauges S Hour Minder S % S Advanced S % S Vibration: S % S On or Link to Sound S % S A S A. Select Link to Sound to allow compatible SMAF
files to control vibration.
Sounding Hour Minder tone even in Manner mode
%HoMaS
Activating Hour Minder based on World Clock time
%Hoto
Pedometer
Changing Pedometer indicator
%S S
Using Pedometer Calendar
%PeS . D. P
Checking accumulated data
%Pe. C
Resetting accumulated data
%PeBCo. A
Han
dy E
xtras
9
9-41
Additional Functions
Tools S % S f Doc./Rec. S Notepad S Select entry S B S Send S % S
Message S % S Complete message S A
Tools S % S f Doc./Rec. S Notepad S Select entry S B S Setting/Manage S Create Text File S % S Enter name S Save here S %
Tools S % S f Doc./Rec. S Notepad S Select entry S B S Setting/Manage S Import Text File S % S Select file S %
Tools S % S f Doc./Rec. S Notepad S Select entry S B S Setting/Manage S Memory Status S %
Tools S % S f Doc./Rec. S Notepad S Select entry S B S Details S %
Tools S % S f Doc./Rec. S Voice order S % S B S Record Time S % S nded Voice S % S % S Recording ts S % S Recording endssert Memory Card to record in Extended Voice ode. (Recording is saved automatically.)
Tools S % S f Doc./Rec. S Voice order S % S % S Recording starts S % ecording ends S Save and Send S % S plete message S A
ailable in For Message mode.
Customizing achievement notice
7% S Tools S % S f Clocks/Gauges S Pedometer S % S Settings S % S Target S % S Goal Announce S % S On S % S See below
Changing ToneGoal Sound S % S Select pattern S %
Changing Tone VolumeGoal Volume S % S Adjust level S %
Selecting Vibration OptionVibration S % S Select option S %
Changing DurationDuration S % S Select time S %. For custom Duration, select Other and press %.
Notepad
Editing Notepad
7% S Tools S % S f Doc./Rec. S Notepad S % S Select entry S B S See below
Editing TextEdit Text S % S Edit S %
Changing CategoryChange Category S % S Select Category S %
Searching text within all entries
% S Tools S % S f Doc./Rec. S Notepad S % S Select entry S B S Search S % S Enter text S %
Inserting Notepad text into message text
% S Tools S % S f Doc./Rec. S Notepad S % S Select entry S B S Send S % S As Message Text S % S S! Mail or SMS S % S Complete message S A. S! Mail Composition window opens automatically
depending on character count.
Sending entries via S! Mail
% SS %Via
Creating text files
% SS %S %S %
Importing text files% S% S% S
Checking memory status
% SS %S %
Opening properties% SS %
Voice Recorder
Saving longer recordings
% SRecExtestar. In
m
Sending Voice files via S! Mail
% SRecS RCom. Av
Additional Functions
9-4
S Tools S % S f Doc./Rec. S Barcode/an S % S Scan Barcode S % S Frame rcode in center of Display S % S B S tepad S %
S Tools S % S f Doc./Rec. S Barcode/an S % S Scan Barcode S % S Frame rcode in center of Display S % S Select mber or mail address S B S Save to .Book S % S As New Entry S % S mplete other fields S Ao add to an existing entry, select As New Detail.hen MEMORY: appears in scan results, press %
o enter the items underlined with a dotted line utomatically in Phone Book entry window.
S Tools S % S f Doc./Rec. S Barcode/an S % S Scanned Results S % S Select S %elect a file and press B to rename files, open roperties or delete files.ome files may not open.
% S Tools S % S f Doc./Rec. S rcode/Scan S % S Scan Barcode S % S me barcode in center of Display S % S
e below
ling Numberslect phone number S % S !
nding Messageslect mail address S % S Complete ssage S Ahen MAILTO: appears in scan results, press % to
nter the items underlined with a dotted line utomatically in Composition window.
cessing Internet Siteslect URL S %
Han
dy E
xtras
9
2
Switching storage media
% S Tools S % S f Doc./Rec. S Voice Recorder S % S B S Save Recording to S % S Select option S %. Available in For Message mode.. Set to Ask Each Time to select media after every
recording.
Scan Barcode
Scanning during text entry
7In a text entry window, B S Scan S % S Scan Code S % S Frame barcode in center of Display S % S See below
Pasting All Scan Results%
Pasting a Part of Scan ResultsB S Select first character S % S Highlight text range S %
Scanning continuously
% S Tools S % S f Doc./Rec. S Barcode/Scan S % S Scan Barcode S % S B S Continuous Scan S % S On S % S Frame barcode in center of Display S %. Choose Yes to continue scanning or No and press %
to view scan results.
Reading saved barcode images
% S Tools S % S f Doc./Rec. S Barcode/Scan S % S Open Barcode S % S Select file S %
Saving scan results
% S Tools S % S f Doc./Rec. S Barcode/Scan S % S Scan Barcode S % S Frame barcode in center of Display S % S B S Save S %
Saving to Notepad
%ScbaNo
Saving linked info to Phone Book
%ScbanuPhCo. T. W
ta
Opening saved scan results
%Scfile. S
p. S
Using linked info
7BaFraSe
DiaSe
SeSeme. W
ea
AcSe
Han
dy E
xtras
9
9-43
Additional Functions
% S Tools S % S f Doc./Rec. S code/Scan S % S Scan Barcode S % S
e barcode in center of Display S % S B end Message S % S See below
ext S! Mail or SMS S % S Complete
sage S AMail Composition window opens automatically pending on character count.
cted Text Select first character S % S Highlight
range S % S S! Mail or SMS S % S plete message S AMail Composition window opens automatically pending on character count.
% S Tools S % S f Doc./Rec. S code/Scan S % S Scan Barcode S % S
e barcode in center of Display S % S below
t Copy S % S Select first character S %
ighlight text range S %
ber, Address or URLct number, mail address or URL S B S y Telephone, Copy Address or Copy URL
Using images as Wallpaper
% S Tools S % S f Doc./Rec. S Barcode/Scan S % S Scan Barcode S % S Frame barcode in center of Display S % S Select image S B S Set as Wallpaper S % S %. For images smaller or larger than Display, Wallpaper
Display options appear; follow onscreen prompts.
Saving images & melodies
% S Tools S % S f Doc./Rec. S Barcode/Scan S % S Scan Barcode S % S Frame barcode in center of Display S % S Select file S B S To Data Folder S %
Opening or playing files
% S Tools S % S f Doc./Rec. S Barcode/Scan S % S Scan Barcode S % S Frame barcode in center of Display S % S Select file S %
Using images for System Graphics
% S Tools S % S f Doc./Rec. S Barcode/Scan S % S Scan Barcode S % S Frame barcode in center of Display S % S Select image S B S As System S % S Select item S % S Specify image area S %. Some images may be usable without specifying
image area.
Pasting to message text
7BarFramS S
All T% Smes. S!
de
SeleB StextCom. S!
de
Copying text
7BarFramSee
TexB SS H
NumSeleCopS %
Additional Functions
9-4
a text entry window, B S Scan S % S an Text S % S Frame text in center of play S % S Select line S % S %
S Tools S % S f Doc./Rec. S Barcode/an S % S Scan Text S % S Frame text in ter of Display S % S Select line S % S
S B S Continue Part or Scan More S %elect Continue Part to enter additional text or can More to enter text after a line break.
S Tools S % S f Doc./Rec. S Barcode/an S % S Scan Text S % S Frame text in ter of Display S % S Select line S % S
S B S Save S %
S Tools S % S f Doc./Rec. S Barcode/an S % S Scan Text S % S Frame text in ter of Display S % S Select line S % S
S Select number or mail address S B S ve to Ph.Book S % S As New Entry S % Complete other fields S Ao add to an existing entry, select As New Detail.
S Tools S % S f Doc./Rec. S Barcode/an S % S Scanned Results S % S Select S %elect a file and press B to rename files, open roperties or delete files.ome files may not open.
Han
dy E
xtras
9
4
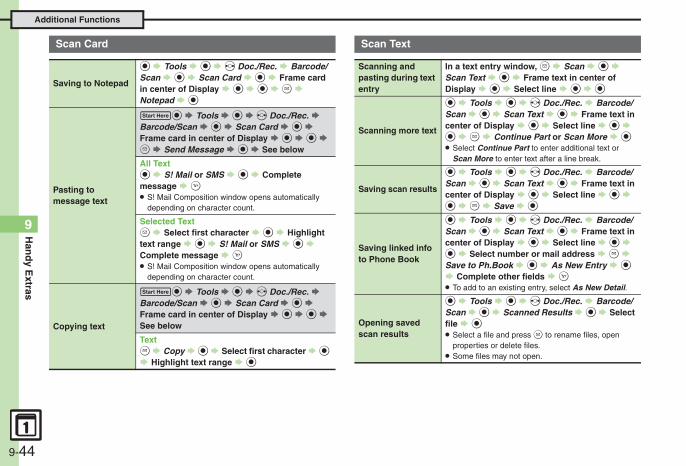
Scan Card
Saving to Notepad
% S Tools S % S f Doc./Rec. S Barcode/Scan S % S Scan Card S % S Frame card in center of Display S % S % S B S Notepad S %
Pasting to message text
7% S Tools S % S f Doc./Rec. S Barcode/Scan S % S Scan Card S % S Frame card in center of Display S % S % S B S Send Message S % S See below
All Text% S S! Mail or SMS S % S Complete message S A. S! Mail Composition window opens automatically
depending on character count.
Selected TextB S Select first character S % S Highlight text range S % S S! Mail or SMS S % S Complete message S A. S! Mail Composition window opens automatically
depending on character count.
Copying text
7% S Tools S % S f Doc./Rec. S Barcode/Scan S % S Scan Card S % S Frame card in center of Display S % S % S See below
TextB S Copy S % S Select first character S % S Highlight text range S %
Scan Text
Scanning and pasting during text entry
In ScDis
Scanning more text
%Sccen%. S
S
Saving scan results
%Sccen%
Saving linked info to Phone Book
%Sccen%SaS . T
Opening saved scan results
%Scfile. S
p. S
Han
dy E
xtras
9
9-45
Additional Functions
% S Tools S % S f Doc./Rec. S code/Scan S % S Scan Text S % S
e text in center of Display S % S Select S % S % S See below
t Copy S % S Select first character S %
ighlight text range S %
ber, Address or URLct number, mail address or URL S B S y Telephone, Copy Address or Copy URL
text entry window, B S Scan S % S ji Grabber S % S Frame kanji in Loupe S
Scan results appear S %
Using linked info
7% S Tools S % S f Doc./Rec. S Barcode/Scan S % S Scan Text S % S Frame text in center of Display S % S Select line S % S % S See below
Dialing NumbersSelect phone number S % S !
Sending MessagesSelect mail address S % S Complete message S A
Accessing Internet SitesSelect URL S %
Pasting to message text
7% S Tools S % S f Doc./Rec. S Barcode/Scan S % S Scan Text S % S Frame text in center of Display S % S Select line S % S % S B S Send Message S % S See below
All Text% S S! Mail or SMS S % S Complete message S A. S! Mail Composition window opens automatically
depending on character count.
Selected TextB S Select first character S % S Highlight text range S % S S! Mail or SMS S % S Complete message S A. S! Mail Composition window opens automatically
depending on character count.
Copying text
7BarFramline
TexB SS H
NumSeleCopS %
Kanji Grabber
Scanning and pasting during text entry
In aKan% S
Han
dy E
xtras
9
9-46
Troubleshooting
Cannot read barcodes during text entry
. Scanning is not available during calls or when mobile camera is active.
Cannot read barcode images in Data Folder automatically
. When scan fails, follow onscreen instructions and select next barcode image manually.
Cannot scan business cards properly
. Scan fails if business card is printed in light-colored text on a dark background, handwritten or printed in casual/decorative fonts, decorated with a background pattern, or designed with both vertical and horizontal text.
. Scan may fail if business card is printed in light-colored text on a light background, printed in italics or extremely small fonts, decorated with a logo or logo-like text, printed on a glossy paper or other material, or dirty/folded.
Cannot scan text properly
. Scanning over 35 characters at one time may yield poor results.
. Adjust to frame text in [ ]. Letters at the ends may be distorted.
Osaifu-Keitai®
3 Cannot use Osaifu-Keitai® (S! FeliCa)
. Battery may be low. Charge battery or install a charged battery.
3 Recognition via reader/writer takes time
. Check m logo area. Foreign articles can block/hamper recognition.
3 Call Remote Lock does not activate even after specified number of Missed Calls
. Missed Call count is reset by calls from other numbers. If series is interrupted, start over from the beginning.
. When Call Forwarding is active, Missed Calls may not be recorded.
Wakeup TV
3 TV does not activate with specified channel
. If Wakeup TV Time arrives while TV is active, channel does not switch to the specified one.
Voice Recorder
3 Cannot record properly
. If incompatible microphone is connected, recording may fail.
3 Noise/skipping occurs
. Avoid shocks to handset while recording; may cause noise or skipping.
3 Recording takes time to start
. Recording window may take longer to open as more Voice files are saved on Memory Card.
Scanning Barcode/Card/Text
3 Cannot read barcodes properly
. Scan may fail if barcode is dirty or unclear.
. Scan may fail if barcode is scanned under inadequate light.
. Scan may fail if multiple barcodes are captured at one time.