224
HB-0845-06

HB-0845-06

h2000 User Manual
2 HB-0845-06
The information contained in this document is subject to change without prior notice. B&G Ltd. shall not be liable for errors contained herein or for incidental or consequential damages in connection with the furnishing, performance, or use of this document.
© 2005 B&G Ltd. All rights reserved. No part of this work covered by the copyright hereon may be reproduced or otherwise copied without prior permission from B&G Ltd. B&G Ltd. Premier Way Abbey Park Romsey SO51 9DH England
Tel: +44 1794 518448 Fax: +44 1794 518077 www.BandG.com Email: [email protected]

HB-0845-06 3
LIABILITY AND SAFETY WARNINGS Brookes and Gatehouse Limited accept no responsibility for the use and/or operation of this equipment. It is the user’s responsibility to ensure that under all circumstances the equipment is used for the purposes for which it has been designed.
Warning: Electrical Hazard This equipment uses high voltage electrical power. Contact with high voltages may result in injury and/or loss of life.
Warning: Calibration The safe operation of this equipment is dependent on accurate and correct calibration. Incorrect calibration of this equipment may lead to false and inaccurate navigational readings placing the yacht into danger.
Warning: Navigation Hazard The h2000 system is an Electronic Navigation aid and is designed to assist in the navigation of your yacht. It is not designed to totally replace conventional navigation procedures and precautions and all necessary precautions should be taken to ensure that the yacht is not placed into danger.
Caution: Electrical Supply This equipment is designed for use with a power supply source of 12V dc. The application of any other power supply may result in permanent damage to the equipment.
Caution: Cleaning The use of alcohol or solvent-based cleaners will damage this equipment and any warranty in force will be invalidated.
Caution: Display Installation Displays installed into locations manufactured from conductive materials (e.g. Steel, Carbon Fibre etc.) should be insulated from the structure to prevent damage to the casings as a result of the effects of electrolysis.

h2000 User Manual
4 HB-0845-06
ABOUT THIS MANUAL Conventions
Instructions in this manual describe the controls and calibration of your h2000 system. You can also use the controls on the RemoteVision if they have the same or similar names as those found in this manual.
The icon shown on the right is used in this manual.
Icon Meaning
Indicates that the function is for Hercules 2000 systems only.
HB-0845-06 5
Table of Contents
CHAPTER 1: INTRODUCTION..............................................13
1.1 SYSTEM DESCRIPTION .............................................13
1.2 PROCESSORS............................................................13 1.2.1 h2000 Main Processor ............................................................................. 13 1.2.2 Expansion Processor................................................................................ 15 1.2.3 Performance Processor ............................................................................ 15 1.2.4 Halcyon Gyro Processor.......................................................................... 16
1.3 SENSORS..................................................................17 1.3.1 Masthead Unit ......................................................................................... 17 1.3.2 Ultrasonic Speed Sensor.......................................................................... 17 1.3.3 Paddle-Wheel Speed Sensor.................................................................... 17 1.3.4 Halcyon 2000 Compass ........................................................................... 17 1.3.5 Halcyon Gyro Stabilised Compass .......................................................... 18 1.3.6 Depth Sensor ........................................................................................... 18
1.4 DISPLAYS.................................................................19 1.4.1 Full Function Display (FFD) ................................................................... 19 1.4.2 RemoteVision .......................................................................................... 19 1.4.3 20/20 Display........................................................................................... 20 1.4.4 40/40 Display........................................................................................... 20 1.4.5 Analogue Indicators................................................................................. 20 1.4.6 Halcyon Display ...................................................................................... 20
1.5 CALIBRATION ..........................................................20
1.6 DAMPING .................................................................21
1.7 MENU STRUCTURE....................................................22
CHAPTER 2: OPERATING INFORMATION ............................29
2.1 INTRODUCTION .......................................................29
2.2 THE KEYS .................................................................29 2.2.1 Keylock.................................................................................................... 29 2.2.2 Power/Light Key ..................................................................................... 30 2.2.3 Page Key.................................................................................................. 30 2.2.4 Scroll Keys .............................................................................................. 31 2.2.5 Enter Key................................................................................................. 31 2.2.6 Speed/Depth (SPD/DEP) Key ................................................................. 33 2.2.7 Wind (WIND) Key ................................................................................. 33 2.2.8 Navigation (NAV) Key ........................................................................... 33
2.3 EXAMPLES OF OPERATION .......................................34 2.3.1 Function Selection ................................................................................... 34

h2000 User Manual
6 HB-0845-06
2.3.2 Page Display Configuration .................................................................... 35 2.3.3 NAV Key Configuration ......................................................................... 36 2.3.4 Damping Adjustment - Boat Speed......................................................... 36
2.4 EXAMPLES OF CALIBRATION ....................................37 2.4.1 Manual Calibration Adjustment - Boat Speed......................................... 37 2.4.2 Calibration Adjustment - Depth .............................................................. 38 2.4.3 Calibration Adjustment - Wind Angle .................................................... 38
2.5 ALARMS....................................................................39 2.5.1 Alarm Control.......................................................................................... 39 2.5.2 Alarm Types ............................................................................................ 39 2.5.3 Set Lo Alarm - Depth .............................................................................. 40 2.5.4 Switch Alarms On/Off............................................................................. 41 2.5.5 Disable Alarms ........................................................................................ 41 2.5.6 Selective Alarm Display.......................................................................... 42
2.6 TRIP FUNCTIONS .....................................................42 2.6.1 Race Timer .............................................................................................. 43 2.6.2 Rolling 5 Timer ....................................................................................... 44 2.6.3 Timer Alarm Sounder.............................................................................. 44 2.6.4 Reset Trip Log......................................................................................... 44
2.7 LIGHTING CONTROL.................................................45 2.7.1 Select Local Lighting Control ................................................................. 45 2.7.2 System Lighting Control ......................................................................... 45
2.8 OPERATION DESCRIPTION.......................................46
2.9 OPERATING FUNCTIONS ..........................................46 2.9.1 Aft Depth ................................................................................................. 46 2.9.2 Air Temperature ...................................................................................... 47 2.9.3 Apparent Wind Angle.............................................................................. 47 2.9.4 Apparent Wind Speed.............................................................................. 48 2.9.5 Average Speed......................................................................................... 49 2.9.6 Barometric Pressure................................................................................. 49 2.9.7 Barometric Pressure Trend ...................................................................... 50 2.9.8 Battery Voltage........................................................................................ 50 2.9.9 Bearing to Waypoint................................................................................ 51 2.9.10 Bearing Waypoint to Waypoint .......................................................... 51 2.9.11 Boat Speed .......................................................................................... 51 2.9.12 Course ................................................................................................. 52 2.9.13 Course Over Ground........................................................................... 53 2.9.14 Cross Track Error................................................................................ 53 2.9.15 Course to Steer.................................................................................... 54 2.9.16 Dead Reckoning.................................................................................. 54 2.9.17 Depth................................................................................................... 56 2.9.18 Distance to Waypoint.......................................................................... 57 2.9.19 Fore/Aft Trim...................................................................................... 57
HB-0845-06 7
2.9.20 Heading............................................................................................... 57 2.9.21 Heading on Opposite Tack ................................................................. 58 2.9.22 Head Lift Trend .................................................................................. 58 2.9.23 Heel Angle .......................................................................................... 59 2.9.24 Leeway................................................................................................ 59 2.9.25 Layline Distance ................................................................................. 60 2.9.26 Local Time of Day.............................................................................. 60 2.9.27 Loadcell .............................................................................................. 61 2.9.28 Mast Angle.......................................................................................... 61 2.9.29 Measured Wind Angle ........................................................................ 62 2.9.30 Measured Wind Speed ........................................................................ 62 2.9.31 Next Leg Wind Information ............................................................... 63 2.9.32 Next Leg Polar Boat Speed................................................................. 64 2.9.33 Off Course........................................................................................... 64 2.9.34 Optimum Wind Angle ........................................................................ 65 2.9.35 Polar Boat Speed................................................................................. 65 2.9.36 PULSE2 .............................................................................................. 66 2.9.37 Reaching Performance ........................................................................ 66 2.9.38 Rudder Angle ...................................................................................... 67 2.9.39 Sea Temperature ................................................................................. 67 2.9.40 Speed Over Ground ............................................................................ 68 2.9.41 Stored Log........................................................................................... 68 2.9.42 Tacking Performance.......................................................................... 68 2.9.43 Target Boat Speed............................................................................... 70 2.9.44 Target True Wind Angle..................................................................... 71 2.9.45 Tide Set and Rate ................................................................................ 72 2.9.46 Timer................................................................................................... 73 2.9.47 Time to Layline................................................................................... 73 2.9.48 Time to Waypoint ............................................................................... 74 2.9.49 Trip Log .............................................................................................. 74 2.9.50 True Wind Angle ................................................................................ 75 2.9.51 True Wind Direction ........................................................................... 76 2.9.52 True Wind Speed ................................................................................ 77 2.9.53 VMG to Waypoint (VMC) ................................................................. 78 2.9.54 VMG ................................................................................................... 79 2.9.55 Wind Angle to the Mast...................................................................... 80
CHAPTER 3: CALIBRATION.................................................82
3.1 INTRODUCTION .......................................................82
3.2 BOAT SPEED/LOG CALIBRATION..............................83 3.2.1 Principle of Log Calibration .................................................................... 83 3.2.2 Preparation for Log Calibration............................................................... 84 3.2.3 Calibration Runs ...................................................................................... 84 3.2.4 Log AUTO CAL Facility ........................................................................ 84 3.2.5 Log AUTO CAL Procedure .................................................................... 85

h2000 User Manual
8 HB-0845-06
3.2.6 Manual Calibration .................................................................................. 87 3.2.7 Speed Calibration Referenced to a Known Value ................................... 88 3.2.8 Boat Speed Units (Knots, MPH, KPH) ................................................... 88 3.2.9 Tack Source Speed Calibration Setting ................................................... 90 3.2.10 Boat Speed Offset Calibration ............................................................ 91 3.2.11 Speed Linearity Correction ................................................................. 91 3.2.12 Substituting Speed Over Ground for Boat Speed ............................... 92 3.2.13 Pulse2 Boat Speed Input ..................................................................... 93
3.3 MEASURED WIND SPEED AND ANGLE .......................94 3.3.1 Principles of Wind Speed/Angle Calibration .......................................... 94 3.3.2 Measured Wind Angle (MWA) Calibration............................................ 96 3.3.3 Measured Wind Speed............................................................................. 97
3.4 TRUE WIND CORRECTION ........................................98 3.4.1 True Wind Direction................................................................................ 98 3.4.2 True Wind Speed................................................................................... 102
3.5 COMPASS CALIBRATION ........................................103 3.5.1 Principles of Compass Calibration ........................................................ 103 3.5.2 Heading Source Selection...................................................................... 104 3.5.3 Halcyon 2000 Compass Calibration Procedure..................................... 105 3.5.4 Halcyon Gyro Stabilised Compass Calibration Procedure.................... 106 3.5.5 Halcyon Gyro Processor Setup.............................................................. 108 3.5.6 Halcyon Gyro Processor NMEA output setup ...................................... 108
3.6 HEEL ANGLE/LEEWAY CALIBRATION......................109 3.6.1 Heel Angle............................................................................................. 109 3.6.2 Leeway .................................................................................................. 110 3.6.3 Heel and Trim angle from Halcyon Gyro Compass .............................. 112
3.7 DEPTH....................................................................112
3.8 AFT DEPTH .............................................................113
3.9 BATTERY VOLTS .....................................................114
3.10 SEA TEMPERATURE.................................................114 3.10.1 Sea Temperature Offset Calibration ................................................. 115
3.11 TIMER ....................................................................115
CHAPTER 4: INSTALLATION INFORMATION .....................117
4.1 INTRODUCTION .....................................................117
CHAPTER 5: OPTIONS ......................................................139
5.1 SYSTEM EXPANSION ..............................................139
5.2 SENSORS................................................................139 5.2.1 Heel Angle Sensor ................................................................................. 139 5.2.2 Mast Rotation Sensor ............................................................................ 139

HB-0845-06 9
5.2.3 Trim Angle Sensor ................................................................................ 140 5.2.4 Barometric Pressure Sensor................................................................... 140 5.2.5 Rudder Angle Sensor............................................................................. 140 5.2.6 Sea Temperature Sensor ........................................................................ 140 5.2.7 Air Temperature Sensor......................................................................... 140 5.2.8 Load Cells.............................................................................................. 140 5.2.9 Sensor Input Configuration ................................................................... 141
5.3 DISPLAYS...............................................................142 5.3.1 Halcyon Display .................................................................................... 142 5.3.2 Analogue Indicators............................................................................... 142 5.3.3 Analogue Indicator Configuration......................................................... 143 5.3.4 Meter Scaling......................................................................................... 144
5.4 REMOTEVISION......................................................145 5.4.1 The Display ........................................................................................... 145
5.5 20/20 DISPLAY......................................................146 5.5.1 The Display ........................................................................................... 146 5.5.2 Display Configuration ........................................................................... 146 5.5.3 Function Selection - Remote Pushbutton .............................................. 147 5.5.4 Function Selection - FFD ...................................................................... 147 5.5.5 Re-configuring 20/20 Display ............................................................... 148
5.6 40/40 DISPLAY......................................................150 5.6.1 The Display ........................................................................................... 150 5.6.2 Display Configuration ........................................................................... 150 5.6.3 Function Selection - Remote Push-Button ............................................ 151 5.6.4 Function Selection - FFD ...................................................................... 151 5.6.5 Re-configuring the 40/40 Display ......................................................... 152
5.7 GRAVITY SWITCH...................................................153
5.8 AUDIBLE ALARM.....................................................153
5.9 NMEA INTERFACE...................................................153 5.9.1 Displaying NMEA Functions ................................................................ 155 5.9.2 Selection of Equipment ......................................................................... 156
5.10 Main Processor NMEA Interfacing ..........................157 5.10.1 Main Processor NMEA Input Summary........................................... 157 5.10.2 Main Processor Proprietary NMEA Input Summary........................ 158 5.10.3 Main Processor NMEA Input Prioritisation ..................................... 159
5.11 NMEA FFD Interfacing ............................................160 5.11.1 NMEA FFD Input Summary ............................................................ 160 5.11.2 NMEA FFD Proprietary Input Summary ......................................... 161 5.11.3 - NMEA FFD Output Summary ....................................................... 162
5.12 Performance Processor NMEA Interfacing ..............163 5.12.1 Performance Processor Input Summary ........................................... 163

h2000 User Manual
10 HB-0845-06
5.12.2 Performance Processor Output Summary......................................... 164
5.13 Halcyon Gyro Processor NMEA Interfacing .............165 5.13.1 Halcyon Gyro Processor Input Summary ......................................... 165 5.13.2 Halcyon Gyro Processor Output Summary ...................................... 165
5.14 Performance Processor NMEA Input and Output Configuration...................................................................166
5.14.1 Changing NMEA/RS232 Configuration........................................... 166 5.14.2 Fast HDM Output Option ................................................................. 167 5.14.3 True/Magnetic Reference Selection.................................................. 167 5.14.4 Handling of NMEA Alarm Conditions............................................. 168 5.14.5 NMEA-based Data on the B&G Network ........................................ 169
5.15 RS232 INTERFACING..............................................169 5.15.1 RS232C Input and Output Configuration ......................................... 170 5.15.2 Changing NMEA/RS232 Configuration........................................... 170 5.15.3 Command Syntax.............................................................................. 171 5.15.4 Channel Numbers ............................................................................. 172 5.15.5 Automatic Output Enable/Disable .................................................... 175 5.15.6 Automatic Output Start/Stop ............................................................ 175 5.15.7 Input Remote Channel Data and Text............................................... 176 5.15.8 Automatic Output of Basic Data....................................................... 176 5.15.9 Immediate Output of Basic Data....................................................... 177 5.15.10 Immediate Output of Channel or Remote Data ................................ 177 5.15.11 Output Latitude and Longitude......................................................... 178 5.15.12 Assign Remote Channels .................................................................. 179 5.15.13 Trip Control ...................................................................................... 179 5.15.14 Polar Table Manipulation ................................................................. 182 5.15.15 Output Polar Table Value ................................................................. 182 5.15.16 Input Polar Table Value .................................................................... 184 5.15.17 Output Polar Table Type and Rating ................................................ 185 5.15.18 Input Polar Table Type and Rating................................................... 185 5.15.19 Input Polar Table Wind Speed.......................................................... 186 5.15.20 Output Apparent Wind Correction Table Values ............................. 186 5.15.21 Input Apparent Wind Correction Table Value.................................. 189 5.15.22 Output Apparent Wind Correction Status......................................... 190 5.15.23 Enable/Disable Apparent Wind Correction ...................................... 190 5.15.24 Input Calibration Value .................................................................... 190 5.15.25 Output Calibration Value.................................................................. 191 5.15.26 Input Damping Value........................................................................ 191 5.15.27 Output Damping Value ..................................................................... 191 5.15.28 Input Hercules Channel Text ............................................................ 192 5.15.29 Output Text Immediately.................................................................. 192 5.15.30 Output Alarm .................................................................................... 192 5.15.31 h2000 General Purpose Input Value ................................................. 194 5.15.32 General Purpose Output Value ......................................................... 194

HB-0845-06 11
5.15.33 NMEA Sentence Output Rate Selection ........................................... 195 5.15.34 Displaying the Software Version Number........................................ 196 5.15.35 RS232 Error Messages...................................................................... 196 5.15.36 RS232 Command Summary ............................................................. 201 5.15.37 True Wind Correction ....................................................................... 202 5.15.38 Output True Wind Correction Table Values..................................... 202 5.15.39 Input True Wind Correction Table Values ....................................... 202
5.16 EXPANSION PROCESSOR........................................203 5.16.1 The Expansion Processor.................................................................. 203 5.16.2 Linear Function Settings ................................................................... 204 5.16.3 Calibrating a Linear Channel ............................................................ 205 5.16.4 Expansion Processor Wiring............................................................. 206
CHAPTER 6: DIAGNOSTIC DATA .......................................208
6.1 FFD DIAGNOSTICS .................................................208 6.1.1 Diagnostic Function Selection............................................................... 208 6.1.2 RES-SYS ............................................................................................... 209 6.1.3 Versions ................................................................................................. 210
6.2 h2000 MAIN PROCESSOR .......................................211 6.2.1 Mast Head Unit...................................................................................... 211
6.3 DEPTH SOUNDER....................................................211 6.3.1 Yacht Stationary .................................................................................... 212 6.3.2 Yacht Moving........................................................................................ 213 6.3.3 Consistently Shows Shallow Depth....................................................... 214 6.3.4 Random Deep Depths............................................................................ 215
6.4 PERFORMANCE UNIT ..............................................216
6.5 ERROR MESSAGES ..................................................216
6.6 HALCYON 2000 COMPASS.......................................217 6.6.1 Shows Heading and CAL Flashing ....................................................... 217 6.6.2 Heading Shows Err................................................................................ 217 6.6.3 Heading or COMP CAL Shows PHS.................................................... 218 6.6.4 Two Headings Flashing Alternately ...................................................... 218 6.6.5 True Wind Direction, Tide Set or DR Course Not Functioning Correctly 218
6.7 ROUTINE MAINTENANCE........................................219 6.7.1 Through-hull housings........................................................................... 219 6.7.2 Boat speed sensor (paddlewheel type)................................................... 219 6.7.3 Boat speed sensor (ultrasonic type) ....................................................... 219 6.7.4 Desiccators ............................................................................................ 220
6.8 WINTER STORAGE/LAYING UP...............................220 6.8.1 Masthead unit ........................................................................................ 220 6.8.2 Boat speed sensors................................................................................. 221

h2000 User Manual
12 HB-0845-06

HB-0845-06 13
CHAPTER 1: INTRODUCTION
1.1 SYSTEM DESCRIPTION At the heart of every h2000 System is the main processor. Dependent upon your system choice, this will either be the Hydra Processor for Hydra 2000 Systems, or the Hercules Processor for Hercules 2000 systems.
The main processor integrates raw data from sensors and makes them available on a choice of displays anywhere in the yacht. The modular design allows you to progress from a standard system, adding new units as required. This manual describes the standard system and then describes how the system can be expanded.
The system is connected together by the Fastnet high-speed communications network, which handles all the data that travels between devices; the Main Processor, Full Function Displays (FFDs), 20/20s, 40/40s and Halcyon Displays. These, combined with the wind speed and angle, compass heading, boat speed and depth sensors make up the standard system.
1.2 PROCESSORS
1.2.1 h2000 Main Processor
The h2000 Main Processor is responsible for monitoring the data from the sensors, including sensors of both the standard system and the expansion options that may be added. The sensors can provide the following functions:
Boat Speed Depth Measured Wind Angle Measured Wind Speed Compass Heading
h2000 User Manual
14 HB-0845-06
Sea Temperature Air Temperature Battery Voltage Heel Angle Trim Angle Mast Rotation Barometric Pressure Rigging Loads Foil positions
From this information the h2000 Main Processor then calculates the following:
Apparent Wind Speed Apparent Wind Angle True Wind Speed True Wind Angle True Wind Direction Average Boat Speed Velocity Made Good (VMG) Upwind/Downwind Resettable Log Stored Log Race Timer Heading on Opposite Tack Leeway Heading Corrected for Leeway (Course) Dead Reckoning Course and Distance Pressure Trend
This information, once calculated, is distributed from the Main Processor Unit to the displays via the network.
In addition, the h2000 Main Processor provides four outputs for analogue indicators. A variety of different analogues can be connected to each of these outputs. The Main Processor also incorporates a battery-backed memory that stores all the calibration, damping and alarm settings whilst the power is OFF; these settings are adjustable from any FFD or the RemoteVision wireless handheld.
HB-0845-06 15
1.2.2 Expansion Processor
The Expansion Processor allows a further four analogue indicators and a number of additional sensors to be added to the system. Further details are given in Chapter 5 - Options.
1.2.3 Performance Processor
The Performance Processor adds two components to the system: a polar table to store your yacht's performance data, and additional interfacing facilities to enable communications between the h2000 and other electronic devices.
The polar tables can be adjusted to suit each individual yacht. Once configured, a range of new functions becomes available to assist with improved sailing of the boat. Functions provided by the Performance Processor are:
Tacking Performance Reaching Performance Target Boat Speed Target True Wind Angle Optimum Wind Angle Next Leg Wind Predictions Tidal Set and Drift (Not polar related)
The functions listed here are explained in detail in Chapter 2 - Operating Information. The interfaces provided are to both the NMEA and RS232C standards. This allows two-way communication with almost any type of electronic equipment, for instance, position fixers and laptop computers.
Full details on interfacing are given in Chapter 5 - Options

h2000 User Manual
16 HB-0845-06
1.2.4 Halcyon Gyro Processor
The Halcyon Gyro Processor is an interface between the Halcyon Gyro Stabilised Compass and the B&G Fastnet Network. It also outputs NMEA heading information at a rate of 10Hz for use with other marine instruments and AD10 for use with Radar.
The Halcyon Gyro Processor accepts NMEA data from your position fixer for magnetic variation information to allow display and output of True referenced heading.
The Halcyon Gyro Processor can also be used as an interface to either output NMEA heading and AD10 from a B&G system compass, or to accept NMEA heading information from an external compass for use on the h2000 system.
Full details are given in Chapter 3 – Calibration.

HB-0845-06 17
1.3 SENSORS
1.3.1 Masthead Unit
The Masthead Unit measures the wind speed and angle at the masthead. A choice of units is available; Four sizes of Vertical Masthead Unit, including some available in ‘Ocean Specification’ for special applications. A standard 450mm (17.5”) horizontal unit is also available.
1.3.2 Ultrasonic Speed Sensor
The Ultrasonic Speed Sensor provides highly accurate and stable boat speed measurement. The Ultrasonic Speed Sensor has no moving parts and requires minimal maintenance. The transducer can be fitted flush with the hull, creating zero drag, and can be painted, or anti-fouled over. The Ultrasonic Speed Sensor processes the sensor signals for use by the h2000 Main Processor, which then generates the boat speed and log functions.
1.3.3 Paddle-Wheel Speed Sensor
The Paddle-Wheel Speed Sensor is designed primarily for cruising yachts and consists of a paddle-wheel which protrudes through the hull via a housing. To enable regular cleaning of the paddle-wheel, the housing is provided with a flap valve which closes automatically when the unit is pulled back into the yacht.
1.3.4 Halcyon 2000 Compass
The Halcyon 2000 Compass is a high performance electronic fluxgate compass for use on both sailing and power craft. It is designed to connect to h2000 systems through the B&G Fastnet Network.

h2000 User Manual
18 HB-0845-06
The Halcyon 2000 Compass has the ability to ‘learn’ the magnetic effect of the vessel on the compass and automatically apply deviation correction.
1.3.5 Halcyon Gyro Stabilised Compass
The Halcyon Gyro Stabilised Compass (HGSC) is a high performance, solid-state compass that provides the best available heading information through the use of rate gyros to correct for the motion of your yacht. It also provides high accuracy Heel and Trim data. It interfaces to h2000 systems via the Halcyon Gyro Processor that transmits this information to the B&G Fastnet Network.
The HGSC is an easily calibrated compass that ‘learns’ the magnetic effects of your vessel on the compass and automatically applies the deviation correction.
1.3.6 Depth Sensor
This can either be a removable through hull unit, or moulded in-hull for reduced drag. The depth datum is fully adjustable and can be set to either the waterline, the bottom of the keel or from the transducer.
The foregoing sensors combined with the two processor units provide an integrated set of tactical and performance data. Additional sensors provide either single inputs, or improve the accuracy of other functions on the system and are described in Chapter 5 - Options.

HB-0845-06 19
1.4 DISPLAYS
1.4.1 Full Function Display (FFD)
This is the standard system display; all h2000 systems must contain at least one FFD. Additional FFDs and other display types, as described in the following paragraphs, are options with which the system can be expanded and made even more powerful to the user.
The FFDs name provides an indication that this is more than simply a display. The FFD is a terminal for the whole system, allowing you to control everything from the functions displayed (and those functions displayed at the 20/20s and 40/40s) to the calibration of the system.
The FFD simultaneously displays two functions with accompanying descriptive text. Any system function can be called up on any FFD; as many FFDs as you require can be placed on the system - all with full control of the h2000. Chapter 2 - Operating Information describes operation of the FFD to control the system.
1.4.2 RemoteVision
The RemoteVision is a wireless link to your h2000 system, as well as a pilot controller, all in the palm of your hand. The lightweight, palm sized unit is linked to the h2000 and pilot control through a small wireless port and secure wireless connection, which is suitable for use on both small and large vessels.
RemoteVision offers you full wireless access to the h2000 instrument system as well as the h2000 pilot systems and enables you to do everything you can with the regular Full Function Display and Pilot displays.
Chapter 5 – Options describes more information concerning the RemoteVision. Complete operating details can be found in the RemoteVision user manual.

h2000 User Manual
20 HB-0845-06
1.4.3 20/20 Display
The 20/20 display is a lightweight, large digit, liquid crystal display that can be configured from any FFD or RemoteVision to display any system function. A Remote Button is also available for scrolling through pre-configured functions quickly.
The 20/20’s operation is described in Chapter 5 - Options.
1.4.4 40/40 Display
The 40/40 display is a lightweight, extra-large digit, liquid crystal display that can be configured from any FFD or RemoteVision to display any system function. A Remote Button is also available for scrolling through pre-configured functions quickly.
The 40/40’s operation is described in Chapter 5 - Options.
1.4.5 Analogue Indicators
There are a wide range of analogue indicators available; refer to Chapter 5 - Options for details.
1.4.6 Halcyon Display
This is a tactical compass display and is described in Chapter 5 - Options.
1.5 CALIBRATION It cannot be over stressed at this stage the importance of calibrating the system properly, in both the initial stages of the installation and operation, and throughout the life of the system.

HB-0845-06 21
h2000 calibration is an ongoing process and is something you must be aware of each time you go sailing. This is particularly relevant of the true wind calibration, where constant refining will pay huge dividends in accuracy. To this end the process has been simplified as far as possible, so that all you require for accurate instrument data is some background knowledge together with a few simple techniques. Refer to Chapter 3 - Calibration.
1.6 DAMPING Another important facility that you need to be constantly aware of is the damping available on certain functions. This allows you to filter signal noise on the function when in unstable or rough conditions. The damping works by applying a filter over a time period; the more you increase this time period, the smoother the data readings will be, but the longer it will take to see the effect of any change. Similarly the lower the time period the greater the jumps you will see in the numbers, but the response to any change will be faster.
Dynamic Damping adjusts your system to deliver the most accurate and real-time information, i.e. when on a beat, it is essential that the wind angle information is accurate but steady with most ‘noise filtered out, however, when tacking, data needs to be more real-time. With Dynamic Damping, the damping value applied will reduce to almost zero during conditions when the data is changing rapidly.
The Damping value is set (in seconds) to a steady state value, the Dynamic Damping is set to a value between 0 (off) and 10 (maximum), the higher the value, the more sensitive the function is to rates of change, and the faster the damping value is lowered. This allows the effects of the change to be more readily seen on the instruments. As the rate of change of the function reduces, so the damping value is allowed to rise to the preset Damping Value to ensure signal noise is filtered out of the data.

h2000 User Manual
22 HB-0845-06
Damping should not be confused with the update rate which is the number of times per second that the function value is sent to the display. The update rate is fixed for all the functions.
1.7 MENU STRUCTURE The central concept to the operation of the system is the menu structure of the functions, and once this is grasped, operation very quickly becomes familiar. The idea of structured layers of menus is seen everywhere in modern software, and regular computer users should have a head start.
The principle is that at any one level there is a set of choices that you can scroll through until you find the one you want. Having found the correct menu entry, it is then selected by pressing the Enter key - the FFD then displays the first choice in the next level of menu down. Here you once again scroll through the available options until you find and select your choice. In many cases this is as far as you will need to go, i.e. to choose a function for display. To complete some actions such as entering a calibration value, switching on an alarm, and so on, it may be necessary to go to another menu level.
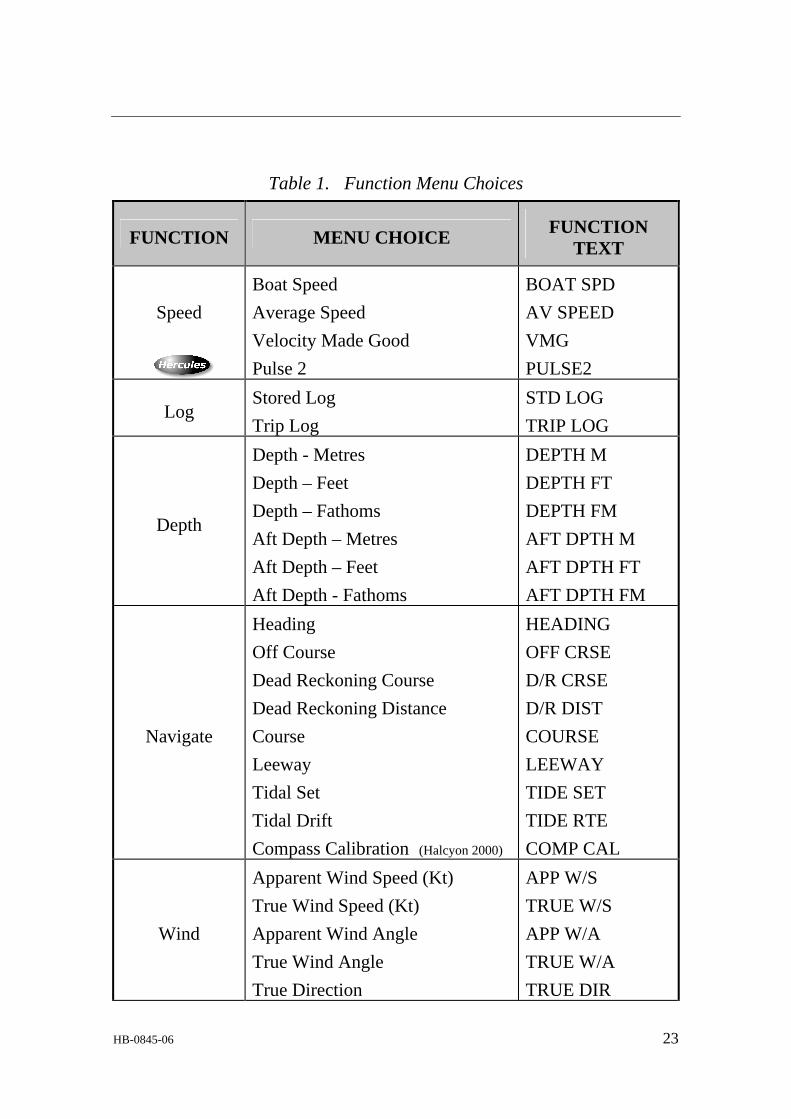
The options available for each Function Menu Choice are listed in Table 1 - Function Menu Choices. Operational Menu Choices together with the applicable Function Menu are listed in Table 2 - Operational Menu Choices.
Note
The functions available to the user are dependent on the range of sensors fitted to the system.
Details of the sensors required for each function are fully explained in Chapter 3 - Operating Information.
HB-0845-06 23
Table 1. Function Menu Choices
FUNCTION MENU CHOICE FUNCTION TEXT
Speed
Boat Speed Average Speed Velocity Made Good Pulse 2
BOAT SPD AV SPEED VMG PULSE2
Log Stored Log Trip Log
STD LOG TRIP LOG
Depth
Depth - Metres Depth – Feet Depth – Fathoms Aft Depth – Metres Aft Depth – Feet Aft Depth - Fathoms
DEPTH M DEPTH FT DEPTH FM AFT DPTH M AFT DPTH FT AFT DPTH FM
Navigate
Heading Off Course Dead Reckoning Course Dead Reckoning Distance Course Leeway Tidal Set Tidal Drift Compass Calibration (Halcyon 2000)
HEADING OFF CRSE D/R CRSE D/R DIST COURSE LEEWAY TIDE SET TIDE RTE COMP CAL
Wind
Apparent Wind Speed (Kt) True Wind Speed (Kt) Apparent Wind Angle True Wind Angle True Direction
APP W/S TRUE W/S APP W/A TRUE W/A TRUE DIR
h2000 User Manual
24 HB-0845-06
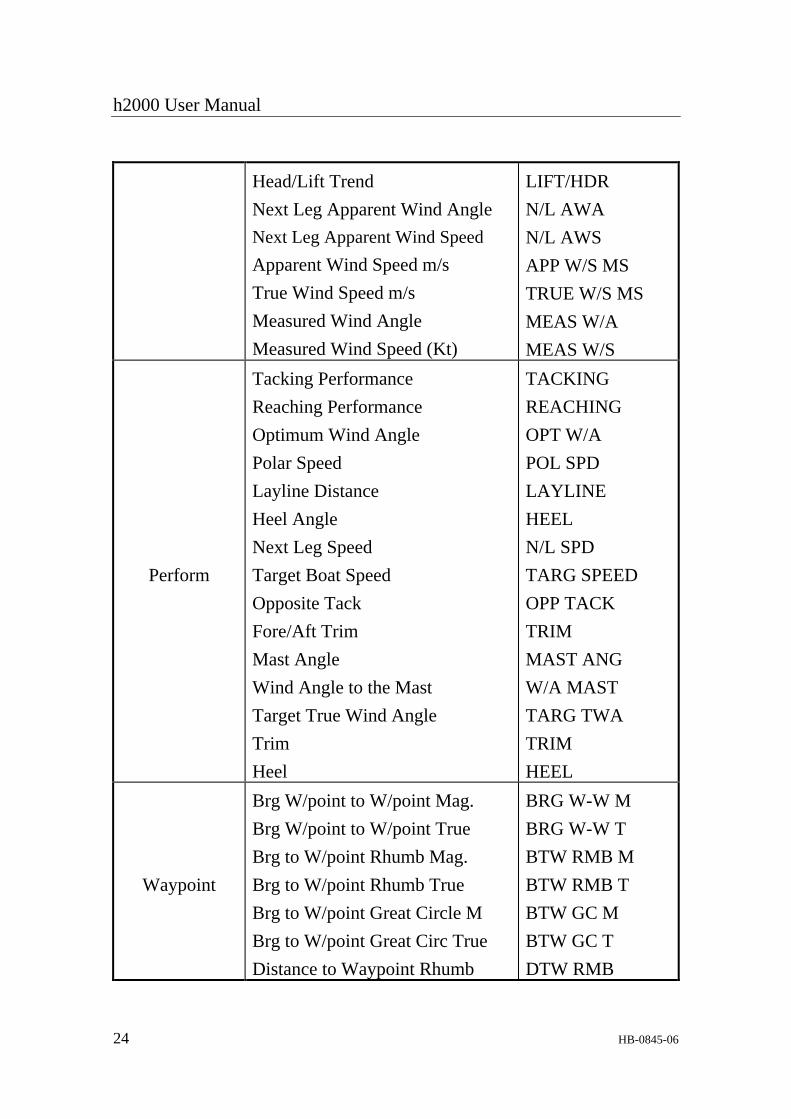
Head/Lift Trend Next Leg Apparent Wind Angle Next Leg Apparent Wind Speed Apparent Wind Speed m/s True Wind Speed m/s Measured Wind Angle Measured Wind Speed (Kt)
LIFT/HDR N/L AWA N/L AWS APP W/S MS TRUE W/S MS MEAS W/A MEAS W/S
Perform
Tacking Performance Reaching Performance Optimum Wind Angle Polar Speed Layline Distance Heel Angle Next Leg Speed Target Boat Speed Opposite Tack Fore/Aft Trim Mast Angle Wind Angle to the Mast Target True Wind Angle Trim Heel
TACKING REACHING OPT W/A POL SPD LAYLINE HEEL N/L SPD TARG SPEED OPP TACK TRIM MAST ANG W/A MAST TARG TWA TRIM HEEL
Waypoint
Brg W/point to W/point Mag. Brg W/point to W/point True Brg to W/point Rhumb Mag. Brg to W/point Rhumb True Brg to W/point Great Circle M Brg to W/point Great Circ True Distance to Waypoint Rhumb
BRG W-W M BRG W-W T BTW RMB M BTW RMB T BTW GC M BTW GC T DTW RMB

HB-0845-06 25
Distance to W/point Great Circ Course Over Ground Mag Course Over Ground True Speed Over Ground VMG to Waypoint Estimated Time of Arr. to WPT Cross Track Error
DTW GC CRSE O/G M CRSE O/G T SPD O/G VMG WPT ETA WPT CROSS TR
Motor Battery Voltage VOLTS
Temperature
Sea Temperature Degrees °C Sea Temperature Degrees °F Air Temperature Degrees °C Air Temperature Degrees °F
SEA TEMP °C SEA TEMP °F AIR TEMP °C AIR TEMP °F
Time Timer Rolling 5 Timer
TIMER MS ROLLING 5 MS
Miscellaneous
Linear 1 Linear 2 Linear 3 Linear 4 Barometric Pressure Barometric Pressure Trend Rudder Angle Halcyon Base Station
LINEAR 1 LINEAR 2 LINEAR 3 LINEAR 4 BAROMETR PR TREND RUDDER HALCYON BASE STN
Loadcell Loadcells User defined External Remote 0 to 9 REMOTE 0 TO 9

h2000 User Manual
26 HB-0845-06
Table 2. - Operational Menu Choices
OPERATION SELECTED FUNCTION(S) OPERATIONAL CHOICE
Log Control Trip Log D/R Course D/R Distance
RESET RUN FREEZE
Timer Control Timer
SET START STOP SYNC
Barometric Pressure Trend
Control PR Trend PERIOD
RESET
Next Leg Control N/L AWA N/L AWS
LEG BEAR TIDE ON
Alarm Control
BOAT SPD APP W/S DEPTH VOLTS SEA TEMP AIR TEMP TRUE W/S
ALL OFF HI ALARM HI ON HI OFF LO ALARM LO ON LO OFF
Sector Alarm Control
HEADING APP W/A TRUE W/A
ALL OFF SECTOR SECT ON SECT OFF
Damping Control
BOAT SPD APP W/A APP W/S HEADING TRUE W/A TRUE W/S TRUE DIR HEEL TRIM TIDE
Damping Value

HB-0845-06 27
Dynamic Damping
BOAT SPD APP W/A APP W/S HEADING TRUE W/A TRUE W/S TRUE DIR
Damping Value
Calibrate Log (AUTO CAL)
BOAT SPD STD LOG
SINGLE PORT CAL STBD CAL CAL DIST STRT RUN STOP RUN END CAL
Calibrate Log (MANL CAL)
BOAT SPD STD LOG
SINGLE PORT CAL STBD CAL
Calibrate Log (REF CAL) BOAT SPD Reference CAL
Calibrate Temp SEA TEMP °C SEA TEMP °F OFFSET C
Calibrate Datum DEPTH DATUM (+/-) Calibrate
Measured W/A MEAS W/A MHU ANGL
Calibrate Measured W/S MEAS W/S MHU CAL
MHU OFFS
Calibrate Wind TRUE W/A TRUE W/S CORRECTN
All Other Calibrate Functions
Selected Function
CAL VAL 1 CAL VAL 2 CAL VAL 3 CAL VAL 4

h2000 User Manual
28 HB-0845-06

HB-0845-06 29
CHAPTER 2: OPERATING INFORMATION
2.1 INTRODUCTION The h2000 System is operated by using the keys on the Full Function Display (FFD).
Hercules 2000
Page Key
Scroll Up
Scroll Down
Power/Light
Figure 1 - Full Function Display
2.2 THE KEYS
2.2.1 Keylock
To prevent accidental changing of the data displayed, or to any critical calibration values, two keylock features are available on the FFDs.
1. Press the Enter and Lights keys simultaneously once. All keys except the Page key are locked.
2. Press the Enter and Lights keys simultaneously once more. All keys are locked.
3. Press the Enter and Lights keys simultaneously a third time. All keys are unlocked.
h2000 User Manual
30 HB-0845-06
2.2.2 Power/Light Key
This key controls the application of power to the system and the level of illumination at all displays.
One short press of this key applies power to the h2000 System and the display is activated to show the last page used on the previous operation. A second short press of the key provides full background illumination on all system displays. Further short presses of the key decrease the illumination in three stages from full brightness to OFF. The next press of the key enables full illumination. This operation at any one h2000 Display invokes the same sequence on all h2000 Displays connected to the system. However, display lighting can be localised so that the level is adjustable for individual displays.
To switch the system OFF press and hold down the key for two seconds. After this time lapse, the message POWER OFF appears in the upper text, release the key and after a further two seconds the system switches OFF.
2.2.3 Page Key
Operation of this single key enables the user to quickly access eight functions of the h2000 System, by selecting any one of the four pre-set page displays (2 functions per page) with a simple key press. This key also allows the operator to prematurely terminate any other function, such as calibration, and return to the normal page display.
Default Pages: • True Wind Angle/Opposite Tack • True Wind Direction/Timer • VMG to Waypoint/Cross Track Error • Course Over Ground/Speed Over Ground
Notes
1. If you are lost in the system, press the Page Key to immediately return to the top level display.

HB-0845-06 31
2. The initial four pages can be reconfigured using the remaining keys and the menu system as described in Paragraph 2.3.2.
3. Successive presses of the Page Key displays each page in rotation.
4. Holding down the Page Key for 2 seconds initiates control of 20/20 Displays (refer to Chapter 5 - Options).
2.2.4 Scroll Keys
Two scroll keys are provided: Scroll Up and Scroll Down. The scroll keys have two functions:
To scroll through the menu choices. To increase or decrease numerical values, such as calibration values.
When the Scroll Up Key is first pressed, the large digits in the upper display are no longer displayed and the name of the current menu flashes in the upper text. If the key is held down, then the upper text will scroll through some of the menu choices. If, when you are scrolling up, the required menu choice is passed, then the Scroll Down Key will allow you to reverse back to the required choice. When the required menu choice is found, the text will flash until selected by pressing the Enter Key.
2.2.5 Enter Key
The principle use of the Enter Key is to invoke selections chosen from the menu by the scroll keys. As a general rule, when any menu choice is flashing, pressing the Enter Key will select that choice.

h2000 User Manual
32 HB-0845-06
The Enter Key is also used to enter data. When the value that needs changing is displayed on the screen, it is altered by pressing the Enter Key, which starts the value flashing, then using the Scroll Up or Scroll Down Keys for change to the required value. Press the Enter Key again to complete the operation.
The use of the Enter Key differs depending on whether you want to select a Function Menu Choice or an Operation Menu Choice.
Function Menu Choice If a Function Menu Choice is selected from the system menu using the Scroll Up Key, the new function will appear in the upper display when the Enter Key is pressed. Operation Menu Choice If an Operation Menu Choice is selected from the system menu using the Scroll Up Key, the new operation will appear on the upper display when the Enter Key is pressed. Therefore, to select a different FUNCTION in the upper display the Scroll Up Key must be used. To perform an operation (such as changing a calibration value) on the function in the upper display the Scroll Down Key must be used.
The two additional uses of the Enter Key are as follows:
Accept and Reset Alarms When an alarm sounds (if the audible alarm is fitted) or flashes at the FFD, two presses of the Enter Key stops the warning and resets the alarm.

HB-0845-06 33
Expand Function Displays When displaying the LOG , TIMER, LATITUDE and LONGITUDE functions the Enter Key can be used to expand the display. Normally the Log function displays nautical miles to two decimal places, i.e. 99.99nm (maximum). One press of the Enter Key expands the display to 0099nm, giving a maximum available display of 9999nm if required. Similarly the TIMER function normally displays a minutes and seconds reading. Expansion by the Enter Key displays hours and minutes instead.
2.2.6 Speed/Depth (SPD/DEP) Key
Pressing the SPD/DEP Key will select the Speed/Depth Display. After selection of the Speed/Depth functions, successive operations of the SPD/DEP Key will display the following information in a fixed order:
Boat Speed/Depth Boat Speed/Speed Over Ground Boat Speed/Apparent Wind Angle Boat speed/True Wind Speed
2.2.7 Wind (WIND) Key
Pressing the Wind Key will select the Wind Display. After selection of the Wind Display, successive operations of the Wind Key will display the following information in a fixed order:
Apparent Wind Speed/Apparent Wind Angle True Wind Speed/True Wind Angle True Wind Speed/True Wind Direction Velocity Made Good/True Wind Angle
2.2.8 Navigation (NAV) Key
Pressing the NAV Key will select the Navigation Display. After selection of the Navigation Display, successive operation of the NAV Key will display the following information in a fixed order:

h2000 User Manual
34 HB-0845-06
Heading/Course Over Ground Heading/Boat Speed Distance to Waypoint/Bearing to Waypoint Tide Set/Tide Rate
Note
The NAV key may be configured to show waypoint information in either Great Circle or Rhumb modes. Refer to Para 2.3.3 for further details.
2.3 EXAMPLES OF OPERATION The general principle of operating the h2000 will be made clear by the following examples of function and page selection, damping and calibration adjustment.
2.3.1 Function Selection
Our first example will be to select another function for one of the pages. The new function is Stored Log and since we want to place this function in the bottom display we will be using the Scroll Down Key.
1. Press the SPD/DEP Key until the display is showing BOAT SPD in the upper display and DEPTH in the lower display.
2. Press Scroll Down, the lower text now shows DEPTH flashing, the upper display is not affected.
3. Press Scroll Down until the lower text shows LOG flashing, the upper display is not affected.
4. Press Enter, the lower text now shows STD LOG flashing, the upper display not affected.
5. Press Enter again, the lower display now shows required function, the upper display is not affected.
HB-0845-06 35
We are now able to view this function; press the Page Key, the configured pages will return and Stored Log will no longer be displayed. If you wish to keep Stored Log on a page, then you can configure the page.
2.3.2 Page Display Configuration
The Page Key allows the user to configure four pages per FFD depending on the required use at that position.
To store the setting in Paragraph 2.3.1 as a permanent new page, proceed as follows:
1. Press Scroll Up or Scroll Down and scroll text to CNFG DSP.
Note
Scroll Up or Scroll Down can be used because we are configuring the whole page, both upper and lower displays.
2. Press Enter, PAGE is shown in the appropriate display.
3. Press Enter, the digital display is blanked and the two functions selected are displayed in the text.
Note
At this point, either of the two functions may be changed if required using the Scroll Up or Scroll Down Keys.
4. Press Enter to accept the new page configuration and restore the digital display.
You will be able to set up each FFD on the boat for the people in the immediate vicinity, each crew member being able to develop their own pages for the information that is most needed on the FFD. All page displays are held in the display memory, independent of the power supply.

h2000 User Manual
36 HB-0845-06
2.3.3 NAV Key Configuration
Our second example is configuring the NAV key. The NAV key allows the user to select either Rhumb Line or Great Circle navigation information to be displayed. To select the required mode, proceed as follows:
1. Press the Page Key once. 2. Press Scroll Up until the upper display shows
CNFG DSP flashing. 3. Press Enter, the upper text now shows PAGE
flashing. 4. Press Scroll Up to select either NAV MODE GC
(Great Circle) or NAV MODE RH (Rhumb). 5. Press Enter to select your desired choice. The
display will stop flashing.
2.3.4 Damping Adjustment - Boat Speed
Our third example is the entry of a Damping Value. We want to damp Boat Speed which is in the upper display we therefore use the Scroll Down Key.
1. On the upper display select BOAT SPD. 2. When BOAT SPD is shown in the upper display,
press and hold Scroll Down to select DAMPING which flashes in the lower text.
3. Press Enter and the current damping value is displayed on the lower display.
4. Press Scroll Down to toggle between DAMPING and DYN DAMP.
5. Press Enter and DAMPING (or DYN DAMP) value flashes.
6. Press Scroll Up or Scroll Down to increase/decrease the damping value as required.
7. Press Enter to accept new value.

HB-0845-06 37
8. Press Page to return to normal display. Damping control for any of the other functions that can be damped is completed in a similar manner.
2.4 EXAMPLES OF CALIBRATION The method of calibration for your h2000 System should be made clear by following the examples of calibration. The calibration process is described in detail in Chapter 3 - Calibration.
2.4.1 Manual Calibration Adjustment - Boat Speed
1. Select BOAT SPD. 2. If BOAT SPD is in the upper display, press and
hold the Scroll Down Key to select CALIBRATE from the menu.
3. Press Enter then press Scroll Down and the display shows MANL CAL, which is the choice that we require.
4. Press Enter and the display shows SINGLE. Notes
SINGLE is the choice required if a single speed sensor is fitted.
If two paddle-wheels are fitted, the Scroll Up or Scroll Down Keys should be used to select PORT CAL or STBD CAL, as required.
5. Press Enter to reveal the current calibration value in Hertz/knot.
6. To adjust the calibration value, press Enter and the value flashes.
7. Use Scroll Up or Scroll Down to change the calibration value as required to the new calibration value.

h2000 User Manual
38 HB-0845-06
8. Press Enter to store the new value into the system.
9. Press Page to return to full display.
2.4.2 Calibration Adjustment - Depth
1. Select DEPTH. 2. When DEPTH is shown in the upper display,
press and hold the Scroll Down Key to select CALBRATE from the menu.
Note
Scroll Down is used because we are using an Operation Menu Choice relating to the function on the upper display. If DEPTH is in the lower display then Scroll Up must be used.
3. Select Enter and the display shows DATUM which flashes.
4. Press Enter again, DATUM stops flashing and the current datum value is displayed.
5. Press Enter and the DATUM value flashes. 6. Use Scroll Up or Scroll Down to select the new
DATUM value. Note
If DATUM is referenced to the water line, the value is positive. If DATUM is referenced to the keel, the value is negative and this is indicated by a minus sign.
7. Press Enter to store the new DATUM value into the system.
8. Press Page to return to full display.
2.4.3 Calibration Adjustment - Wind Angle
1. Select MEAS W/A.
HB-0845-06 39
2. If MEAS W/A is shown on the lower display press Scroll Up and scroll to CALBRATE which flashes. If MEAS W/A is on upper display, press Scroll Down and scroll to CALBRATE.
3. Press Enter twice and the current alignment value is shown.
4. Press Enter, MHU ANGL flashes, use Scroll Up or Scroll Down to select the new value.
5. Press Enter to accept the new value. 6. Press Page to return to the normal display.
2.5 ALARMS
2.5.1 Alarm Control
When a pre-set alarm parameter is reached, e.g. the depth reducing, the system raises an alarm automatically. In an alarm condition, the lower display changes to highlight the cause of the alarm, which flashes on and off continuously until Enter is pressed twice; at which point all the FFDs except the one on which Enter was pressed, return to normal. The audible alarm, if fitted, is also silenced by this key operation. After this, the lower display continues to monitor the alarm condition.
The alarm is still active and, if the alarm parameter is again exceeded, the alarm will flash/sound as necessary. The displayed alarm function remains on the lower display until Page is pressed.
2.5.2 Alarm Types
The system incorporates the following types of alarm: HI ALARM - This is generated if the value of a function exceeds a pre-set level. LO ALARM - This is generated if the value of a function drops below a pre-set level.
h2000 User Manual
40 HB-0845-06
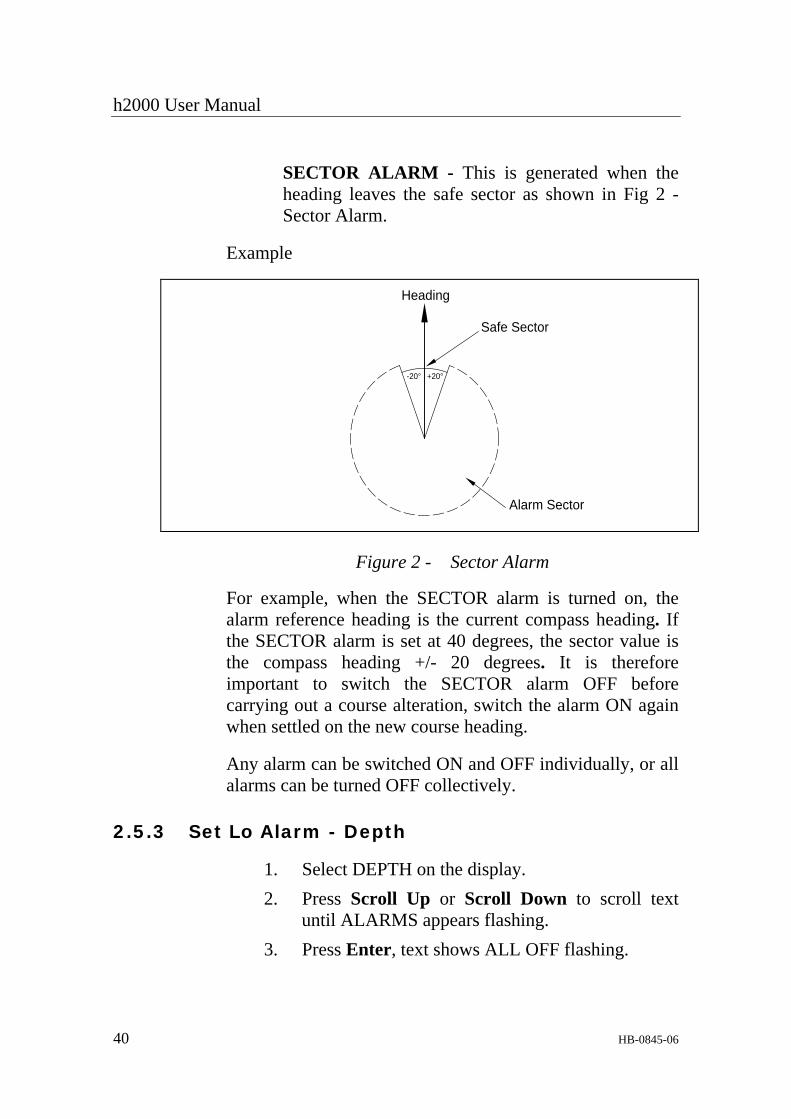
SECTOR ALARM - This is generated when the heading leaves the safe sector as shown in Fig 2 - Sector Alarm.
Example
-20° +20°
Heading
Safe Sector
Alarm Sector
Figure 2 - Sector Alarm
For example, when the SECTOR alarm is turned on, the alarm reference heading is the current compass heading. If the SECTOR alarm is set at 40 degrees, the sector value is the compass heading +/- 20 degrees. It is therefore important to switch the SECTOR alarm OFF before carrying out a course alteration, switch the alarm ON again when settled on the new course heading.
Any alarm can be switched ON and OFF individually, or all alarms can be turned OFF collectively.
2.5.3 Set Lo Alarm - Depth
1. Select DEPTH on the display. 2. Press Scroll Up or Scroll Down to scroll text
until ALARMS appears flashing. 3. Press Enter, text shows ALL OFF flashing.

HB-0845-06 41
4. Press Scroll Up until upper text shows LO ALARM flashing.
5. Press Enter, the display shows current LO ALARM value.
6. To change the LO value press Enter, the value flashes.
7. Press Scroll Up or Scroll Down to increase or decrease the value as required. Press Enter to accept the new value and switch the alarm ON.
8. Press Page to return to full display. To access the HI ALARM, press Scroll Up until HI ALARM appears and press Enter to reveal current HI ALARM value. To change the value, use the same procedure as used to change the LO ALARM value.
2.5.4 Switch Alarms On/Off
To switch an alarm OFF (HI, LO or SECTOR) press Scroll Up until the required item (e.g. HI OFF) appears in the text and press Enter.
To switch an alarm ON press Scroll Up until the required item (e.g. LO ON) appears in the text and press Enter.
2.5.5 Disable Alarms
1. Select any function with an alarm facility, e.g. DEPTH.
2. If the function is in the upper display, press Scroll Down to ALARMS, or if the function is on the lower display use the Scroll Up Key. Then press Enter and ALL OFF appears flashing.
3. Press Enter again, all alarms are switched OFF and the normal page display will be restored.

h2000 User Manual
42 HB-0845-06
WARNING All alarms in the system will remain OFF until the values are reset or the individual alarms are turned on again.
2.5.6 Selective Alarm Display
When an alarm condition arises all FFDs in the system flash the alarm function on the bottom half of their displays.
Individual FFDs can be set to ignore alarm messages.
The procedure for Selective Alarm Display is as follows:
1. Press the Page key. 2. Scroll up to CNFG DSP, then press Enter. 3. Scroll up to SHOW ALM, then press Enter. 4. Scroll to NO, then press Enter. 5. Press the Page key to return to normal view.
This display is now set to ignore any alarm function.
2.6 TRIP FUNCTIONS The h2000 provides three trip functions: Timer (count-up and count-down), Trip Log and Dead Reckoning. The functions can be reset and restarted as required, e.g. for keeping a separate log of elapsed time and distance run for a given passage.
When any trip function is started, all other trip functions which have been reset start simultaneously, except when the timer countdown is started. Under this condition, the other functions start, again if previously reset, when the countdown reaches zero. This is designed for the beginning of races, so that you have DR, log and timer running without pressing buttons during the intense moments of the start itself.
When a trip function is on the display, the two right hand characters show the status of the display.

HB-0845-06 43
The letters MS (Minutes/Seconds) and NM (Nautical Miles) indicate that the function is running.
The letters RE denote RESET, where the function is zeroed and waiting to be started.
The letters FR denote FROZEN, where the displayed value is frozen, but the function is still counting in the background.
2.6.1 Race Timer
1. With TIMER MS shown on one half of the display, press the Scroll key adjacent to the opposite half of the display to display the CONTROL menu. Press Enter to activate the SET/START/STOP/SYNC loop function.
2. Scroll to SET and press Enter. The SET time flashes. Using the UP/DOWN arrow keys, alter the time (to a maximum of 120 minutes), press Enter to confirm the time selected. This automatically activates the START page.
3. When START is selected, the current SET time is transferred to the timer and it starts counting down.
4. The other half of the display shows SYNC. Pressing Enter will cause the timer value to be reset to the nearest whole minute, pressing the UP/DOWN scroll arrow continues the cycle.
5. When the timer reaches zero, the counter starts counting upwards. Selecting START in this condition resets the counter to the SET value and starts counting down again.
When STOP is selected, the timer stops at whatever value is currently displayed.

h2000 User Manual
44 HB-0845-06
2.6.2 Rolling 5 Timer
As an alternative to the main settable timer, a ‘rolling 5’ is provided. This simply cycles from 5:00 minutes to zero then starts again counting down from 4:59, until stopped. The same START, STOP and SYNC functions as used in the settable timer are available in the CONTROL menu.
2.6.3 Timer Alarm Sounder
When the timer is counting down, the Audible Alarm (optional, fitted to the h2000 Main Processor) will sound every 10 minutes until the counter reaches 10 minutes to go, the alarm sounder will then sound briefly at the following intervals:
5:00, 4:00, 3:00, 2:00, 1:00, 0:30, 0:15, 0:10, 0:05 and 0:00.
2.6.4 Reset Trip Log
1. Select TRIP LOG on the upper display. 2. Press Scroll Down once, the lower display shows
CONTROL flashing. 3. Press Enter, and then press Scroll Down
repeatedly until the display shows RESET flashing.
4. Press Enter and the display shows the TRIP LOG reset and RUN in the lower menu flashing.
5. Press Enter again and the display now shows the TRIP LOG running.
6. Press Page to resume normal operation. Each time you reset the TRIP LOG, the AVERAGE SPEED resets and begins its calculation again. The control facility for the Dead Reckoning functions work in the same manner. The bearing and distance are linked, so that when one is started, both start.

HB-0845-06 45
2.7 LIGHTING CONTROL The level of illumination at system displays is controlled by the Power Lights Key. Use of this key normally controls all the h2000 displays simultaneously. However, the level of illumination on a single FFD can be controlled individually under the menu choice - LIGHTING →→→→ LOCAL.
2.7.1 Select Local Lighting Control
1. Press and hold Scroll Up or Scroll Down until LIGHTING appears in the text.
2. Press Enter and use Scroll Up or Scroll Down until LOCAL appears in the text.
3. Press Enter again and the original page display appears. The FFD is now in local mode.
The Power Lights Key now controls this display only. This will enable you to use very low lighting at the chart table down below, whilst retaining the brightness up on deck.
2.7.2 System Lighting Control
1. Select LIGHTING. 2. Press Enter and use Scroll Up or Scroll Down to
select SYSTEM. 3. Press Enter again, the original page display
appears and the lighting has returned to system control.
The Performance Unit has an input that allows the display lighting to be controlled externally. This can be used to switch the h2000 lighting ON and OFF.
The lighting brightness is still controlled by successive short presses of the lower right hand key on an FFD in the normal way. Displays which have their lighting control set to LOCAL will not be affected by the lighting control input.

h2000 User Manual
46 HB-0845-06
2.8 OPERATION DESCRIPTION The rest of this Manual contains some detailed examples. To describe further operations, we will use the following shorthand.
Each successive selected menu choice will be in capitals, separated by a →→→→ symbol. For instance, the example given in Paragraph 2.4.1 to manually calibrate the log would look like this:
SPEED →→→→ BOAT SPD, CALBRATE →→→→ MANL CAL →→→→ SINGLE
Menu choices in PLAIN capitals are the selection of the required Function. Menu choices in BOLD are the selection of the relevant Operation and are completed by using the other half of the display.
2.9 OPERATING FUNCTIONS We have seen how the h2000 System is built up and how the key and menu system operates. Here we will describe each of the functions in greater detail, to see not only the information they provide, but also some of the ways they can be employed on the boat.
2.9.1 Aft Depth
Menu heading: DEPTH Function text: AFT DEPTH Update rate: 1Hz Units: Metres, feet, and fathoms Notes
1. Aft Depth available when valid NMEA depth information received on Main Processor NMEA input.
2. Depth offset calibration available. 3. Low alarm available.

HB-0845-06 47
4. Function text can be renamed to other pre-defined choices.
Aft Depth is useful when it is important to monitor the depth from an auxiliary depth transducer. For example, it is possible to install an NMEA depth transducer at the stern of the yacht, which then allows you to monitor depth readings when manoeuvring stern to, into a berth.
Refer to Chapter 3 – Calibration for details on setting the depth datum and renaming the function text.
2.9.2 Air Temperature
Menu heading: TEMP Function text: AIR TEMP Update rate: 1Hz Units: Degrees Centigrade, Fahrenheit Notes
1. Requires Air Temperature sensor. 2. Audible high/low alarm available.
A useful addition to the meteorological data.
2.9.3 Apparent Wind Angle
Menu heading: WIND Function text: APP W/A Update Rate: 2Hz, Hydra Update rate: 4Hz, Hercules Units: Degrees Notes
1. Variable damping 0-99 seconds. 2. Dynamic damping available. 3. Analogue indicators available. 4. Audible, sector alarm available. 5. Corrected for Heel and Trim angles (requires
sensors).

h2000 User Manual
48 HB-0845-06
Used in calculated functions such as True Wind Speed and Angle.
There is a special analogue indicator called Magnified Wind which only shows the 0-50º upwind/downwind sector of apparent wind angle in a magnified form. Analogues are described in Chapter 5 - Options.
2.9.4 Apparent Wind Speed
Menu heading: WIND Function text: APP W/S Update rate: 2Hz, Hydra Update rate: 4Hz, Hercules Units: Knots, metres per second Notes
1. Variable damping 0-99 seconds. 2. Dynamic damping available. 3. High/low alarm available. 4. Analogue indicator available. 5. Programmable meter scaling. 6. Corrected for Heel and Trim angles (requires
sensors) The apparent wind speed is simply the speed of the wind blowing across the deck, and is derived from the same components as the apparent wind angle. Used in calculated functions such as True Wind Angle and Speed, also important in its own right since many sail selection decisions are based on the apparent wind speed.

HB-0845-06 49
2.9.5 Average Speed
Menu heading: SPEED Function text: AV SPEED Update rate: 1Hz Units: Knots Average speed is a trip function that averages your speed through the water over the period for which the Trip Log has been running, i.e.
Trip Log
Trip Time
2.9.6 Barometric Pressure
Menu heading: MISC Function text: BAROMETR Update rate: 1Hz Units: Millibars Notes
1. Requires pressure sensor. 2. Offset calibration.
A must for the offshore sailor, giving not only the instantaneous value but also the all important trend (see below) towards higher or lower pressure that helps position you in a weather system and so predict the next change. There is a calibration if you wish to check your pressure reading against another barometer. CAL VAL1 should be set to the current correct barometric pressure and is found under:
MISC → BAROMETER, CALIBRATE →→→→ CAL VAL1

h2000 User Manual
50 HB-0845-06
2.9.7 Barometric Pressure Trend
Menu heading: MISC Function text: PR TREND Update rate: 1Hz Units: Millibars This shows the change in pressure over a period of time that can be set at any value up to 24 hours. The period change facility can be found as a control option in the Operation Menu:
MISC →→→→ PRTREND, CONTROL →→→→ PERIOD
A reset facility at the same menu level is also provided. This is selected using the following sequence:
MISC →→→→ PRTREND, CONTROL →→→→ RESET
This resets the data collected to zero. This is useful when the instruments are first switched ON after a prolonged break, because if you switch the instruments OFF on Sunday night, and ON again the following Friday, the Pressure Trend will have data from the previous weekend that you will need to reset.
2.9.8 Battery Voltage
Menu heading: MOTOR Function text: VOLTS Update rate: 1Hz Units: Volts Notes
1. High/low alarm available. 2. Calibration facility.
Measures the voltage that the batteries supply to the system, especially useful for monitoring the supply offshore enabling you to optimise your engine running time.

HB-0845-06 51
To calibrate against another voltmeter, measure the supply voltage and then enter this actual voltage into:
MOTOR →→→→ VOLTS, CALBRATE →→→→ CAL VAL1
2.9.9 Bearing to Waypoint
Menu heading: WAYPOINT Function text: BTW RMB or BTW GC Update rate: Provided by the position fixer Units: ºM or ºT Notes
1. Requires interfaced position fixing system. 2. Rhumb Line or Great Circle
Once the position fixer is connected and sending information, the information gathered automatically appears in the menu and becomes available for display.
2.9.10 Bearing Waypoint to Waypoint
Menu heading: WAYPOINT Function text: BRG W-W Update rate: Provided by the position fixer Units: ºM or ºT Note
Requires interfaced position fixing system. This is the bearing from the active waypoint to the next waypoint on the active route.
2.9.11 Boat Speed
Menu heading: SPEED Function text: BOAT SPD Update rate: 4Hz Units: Knots, MPH or KPH Notes
1. Automatic calibration facilities.

h2000 User Manual
52 HB-0845-06
2. Boat speed offset correction to minimise tack-to-tack errors.
3. Variable damping 0-99 seconds. 4. Dynamic damping available. 5. Acceleration, deceleration indicator. 6. Analogue indicators available. 7. Programmable meter scaling. 8. High/low alarm available.
Boat Speed is probably the most fundamental piece of information on the h2000 and is used in many of the calculations of higher functions: true wind angle/speed/direction, VMG, the log and trip functions. Boat Speed is also the primary performance measure that the boat is sailed to. Accurate calibration of Boat Speed is therefore fundamental to the performance of the system.
It is also important to be aware of the effect you can have over the readout via the damping facility. Damping set for twenty knots of breeze will not be as satisfactory in two knots - you must be prepared to alter the damping regularly, remembering that the calmer the conditions are, the lower the damping required.
2.9.12 Course
Menu heading: NAVIGATE Function text: COURSE Update rate: 1Hz Units: ºM or ºT Note
Requires heel sensor.
This incorporates Leeway into heading and is sometimes called Course Made Good. Leeway can only be calculated if you have the heel sensor fitted, but Course is the preferred function for most navigational purposes and should be used when possible.

HB-0845-06 53
2.9.13 Course Over Ground
Menu heading: WAYPOINT Function text: CRSE O/G Update rate: Provided by the position fixer Units: ºM or ºT Note
Requires interfaced position fixing system.
Once the position fixer is connected and sending information, the information gathered automatically appears in the menu and becomes available for display. This is your actual track over the ground and is invaluable to the Navigator for helping deal with tidal areas.
2.9.14 Cross Track Error
Menu heading: WAYPOINT Function text: CROSS TR Update rate: Provided by the position fixer Units: Nautical miles Notes
1. Requires interfaced position fixing system. 2. Analogue indicator available.
This is also sent direct from the position fixing system and is necessary for keeping the yacht tracking directly in to the target. Cross Track Error indicates how far you are from the direct (Rhumb Line or Great Circle) as a perpendicular distance and allows you to correct even the slightest deviation. Although this may not be the objective, on long, tidally affected legs you will plan to be swept first one way and then the other. The Cross Track Error is useful for monitoring your tidally corrected course to see if you have the right offset, and that you are not being swept too far one way.

h2000 User Manual
54 HB-0845-06
2.9.15 Course to Steer
Menu heading: WAYPOINT Function Text: CTS Update rate: Provided by the Position Fixer Units: ºM or ºT Note
Requires NMEA 0183 interfaced position fixing system. APB sentence.
2.9.16 Dead Reckoning
Menu heading: NAVIGATE Function text: D/R CRSE or D/R DIST Update rate: 1Hz Units: ºM or ºT, nautical miles Notes
1. Course and distance. 2. Corrected for leeway if heel sensor fitted. 3. Can be independently reset as a trip function.
Formerly the mainstay of all offshore navigation, now with such widespread use of electronic position fixing equipment it is more often used as an essential back up.
It can be particularly effective as an indicator of the net course steered on long offshore legs. Calculated from a base point, which is set when you start the function running, (see Para 2.3.3 for details of control) both the course as a bearing from the start point, and its distance in nautical miles, can be displayed as separate functions. If the heel angle sensor is fitted then the Course calculation will include leeway correction.
In the worst case, a Man Overboard (MOB) situation, immediately resetting the Dead Reckoning (DR) will bring the vessel back to the MOB position. DR is the course and distance over the water and not over the land as would be given by a position fixer.

HB-0845-06 55
Course Made Good
Actual Course Sailed
Distance Made Good
Course Reads 213°Distance Reads 17.8 Miles
Tide Vector
Starting Point
Needles
N
MagneticNorth
Lymington
Isle of Wight
Hercules 2000
D/R CRSE °MD/R CRSE °M
D/R DIST NM
Figure 3 - Course Made Good

h2000 User Manual
56 HB-0845-06
2.9.17 Depth
Menu heading: DEPTH Function text: DEPTH Update rate: 1Hz Units: Metres, feet and fathoms Notes
1. Shallow alarm available, range 0-99.9m 2. Deep alarm available. 3. Analogue indicator available, 0-200 m or 0-100
ft/fm Depth calculation is one of the most important functions required for essential navigational and safety. On a network, rather than as a separate unit, Depth can be accessed from any display on the boat. A datum adjustment allows the base point to be moved to give either depth under the keel from the waterline or depth from the transducer.
Depth sounder performance is dependent on transducer type and installation, boat speed, electrical noise, sea state, sea bed conditions, air and plankton in the water. There will always be times when a reliable measurement of depth is not possible; in such cases, for instance, following in the wake of another boat, the display shows four floating bars to indicate a signal problem.
The accuracy of the measurement is dependent on the velocity of sound and the amount the sound penetrates the sea bottom. Changes in the velocity of sound are not normally significant, however, errors up to one foot can result from sound penetration into very soft mud.
HB-0845-06 57
2.9.18 Distance to Waypoint
Menu heading: WAYPOINT Function text: DTW RMB or DTW GC Update rate: Provided by the position fixer Units: Nautical miles Notes
1. Rhumb Line or Great Circle. Once the position fixer is connected and sending the information it automatically appears in the menu, and becomes available for display.
2.9.19 Fore/Aft Trim
Menu heading: PERFORM Function text: TRIM Update rate: 1Hz Units: Degrees Notes
1. Adjustable for vertical sensor alignment. 2. Requires Halcyon Gyro Stabilised Compass
system or a Trim Angle (clinometer) sensor. 3. Variable damping 0 - 99 seconds.
Fore and Aft Trim angle (along with Heel Angle) is used by the h2000 Main Processor to correct Apparent Wind Angle.
2.9.20 Heading
Menu heading: NAVIGATE Function text: HEADING Update rate: 2Hz Units: ºM or ºT Notes
1. Adjustable damping, 0-99 seconds. 2. Dynamic Damping available 3. Audible, sector alarm available.

h2000 User Manual
58 HB-0845-06
4. Sensor alignment calibration. 5. Moving card analogue meter available.
This is your compass heading, derived directly from the Halcyon Gyro Stabilised Compass, Halcyon 2000 Compass or valid NMEA heading input which allows calculation of true wind direction, dead reckoning and other course related navigation functions.
Heading fulfils a very important tactical role, and it does this best when connected to the Halcyon Display. This permanently shows heading in a digital form and has a segmented bar graph display to show off course.
2.9.21 Heading on Opposite Tack
Menu heading: PERFORM Function text: OPP TACK Update rate: 1Hz Units: ºM or ºT This informs you of the heading you would be sailing on the opposite tack, and can therefore be used in conjunction with a hand-bearing compass to confirm that you are on the layline. This is calculated from the true wind angle and compass heading.
2.9.22 Head Lift Trend
Menu heading: WIND Function text: LIFT/HDR Update rate: 1Hz Units: Degrees Notes
1. Requires Halcyon Display. 2. Analogue indicator available. 3. Can be reset on any FFD via the following:
WIND →→→→ LIFT/HDR, CONTROL →→→→ RESET

HB-0845-06 59
This function can also be displayed on an FFD, 20/20 or an analogue indicator.
2.9.23 Heel Angle
Menu heading: PERFORM Function text: HEEL Update rate: 1Hz Units: Degrees Notes
1. Adjustable for vertical sensor alignment. 2. Requires Halcyon Gyro Stabilised Compass
system or a Heel Angle (clinometer) sensor. 3. Variable damping 0 - 99 seconds.
Heel angle (along with Fore and Aft Trim angle) is used by the h2000 Main Processor to correct Wind data, and is a useful option that improves the accuracy of some of the calculated functions. Heel can be used to give an indication of the wind pressure when abnormal shear or gradient is affecting the true wind speed. It can also be checked when going upwind to ensure that the boat is not sailed over the optimum heel angle.
2.9.24 Leeway
Menu heading: NAVIGATE Function text: LEEWAY Update rate: 1Hz Units: Degrees Notes
1. Requires clinometer for heel. 2. Calibration for leeway factor, see Chapter 3 -
Calibration.

h2000 User Manual
60 HB-0845-06
Leeway is the angle between the boat’s heading and course through the water. The difference is caused by the sideways slip that the boat has when going upwind. For the h2000 to be able to measure this it needs to know the heel angle, and hence a sensor must be fitted. Leeway is of great importance in the calculation of Dead Reckoning, since the 3º to 4º of leeway can considerably affect the dead reckoned position.
2.9.25 Layline Distance
Menu heading: PERFORM Function text: LAYLINE Update rate: Provided by position fixer Units: Nautical miles Note
Requires NMEA 0183 interfaced position-fixing system transmitting the ZDL sentence.
If tacking upwind or downwind to a waypoint, some position fixing systems will provide layline information based on a pre-defined tacking angle (usually adjustable). This function displays the distance off both left and right-hand laylines by alternating the display between the two. An L or R is shown in the right hand digits to signify Left or Right laylines respectively. This function can be particularly useful when nearing a waypoint. When the value reaches zero, it is time to tack or gybe for the mark. The calculation should be corrected for any tidal offset.
2.9.26 Local Time of Day
Menu heading: TIME Function text: LOC TIME HR Update rate: Provided by the position fixer Units: Hours, minutes, seconds Notes
1. Requires NMEA 0183 interfaced position-fixing system transmitting the ZLZ sentence.
HB-0845-06 61
2. Check that the Local Time Offset is entered on the position fixer correctly.
The function normally shows the Local Time of Day in hours and minutes as given by the position fixer. To reveal minutes and seconds press the Enter Key once. A further press of the Enter Key returns the display to hours and minutes.
2.9.27 Loadcell
Menu heading: LOADCELL Function text: User selected in hardware Update rate: 1Hz Units: Tonnes, Klb Notes
1. Requires Digital Amplifier. 2. Calibration available.
System for accurate measurement of load on rigging pins that are in shear. Refer to Loadcell manual for more information.
2.9.28 Mast Angle
Menu heading: PERFORM Function text: MAST ANG Update rate: 1Hz Units: Degrees Notes
1. Requires mast rotation sensor. 2. Offset calibration available.
Required for yachts with rotating masts, such as multi-hulls, who have the mast rotation sensor fitted. This function displays the angle between the mast and the centreline of the yacht, i.e. the angle it is twisted off the centreline.
h2000 User Manual
62 HB-0845-06
2.9.29 Measured Wind Angle
Menu heading: WIND Function text: MEAS W/A Update rate: 4Hz Units: Degrees Notes
1. Alignment calibration. The Measured Wind Angle is the angle measured by the Masthead Unit sensor and corrected by alignment calibration. Measured Wind is not used whilst sailing, but is a useful function for checking the operation of Wind instruments before additional corrections are applied to the data.
2.9.30 Measured Wind Speed
Menu heading: WIND Function text: MEAS W/S Update rate: 4Hz Units: Knots Notes
1. Anemometer calibration. 2. Offset Correction.
The Measured Wind Speed is the angle measured by the Masthead Unit sensor and corrected by alignment calibration. Measured Wind is not used whilst sailing, but is a useful function for checking the operation of Wind instruments before additional corrections are applied to the data.
HB-0845-06 63
2.9.31 Next Leg Wind Information
Menu heading: WIND Function text: N/L AWA or N/L AWS Update rate: 1Hz Units: Knots and degrees Notes
1. Apparent wind speed and angle. 2. Corrected for tide if required. 3. Requires a Performance Processor.
Next Leg information is a prediction of the conditions of apparent wind speed and angle that you will meet on the next leg, and is calculated from the current true wind speed and direction, and a bearing that you enter for the next leg course. From this the true wind angle on the next leg is calculated, and using the polar tables the corresponding boat speed is given, and hence the apparent wind speed and angle.
Should the leg be upwind or downwind, rather than free, the h2000 calculates on the basis of the true wind angle for the optimum VMG on the advantaged tack; this is indicated by the position of the small bar at the top or bottom of the digits. The tide calculated by the h2000 can be applied to the calculation if required.
The Next Leg Bearing is entered as a CONTROL option under N/L AWA, found by:
WIND → N/L AWA, CONTROL →→→→ LEG BEAR
At the same menu level is the tidal option where entering a 1 applies tide to the calculation, and entering a zero removes tide from the calculation, found by:
WIND→N/L AWA, CONTROL →→→→ TIDE ON
The tide is calculated by the Performance Processor when a position fixing system is connected, see Para 2.9.40.
h2000 User Manual
64 HB-0845-06
2.9.32 Next Leg Polar Boat Speed
Menu heading: PERFORM Function text: N/L SPD KT Update rate: 1Hz Units Knots Notes
1. Requires a Performance Processor. This is the predicted target speed for immediately after rounding the next mark of the course. This function is linked to the Next Leg Apparent Wind Function and thus relies on the Next Leg Bearing being entered correctly. Since the bearing is known, the Next Leg True Wind Angle can be calculated based on the current True Wind Direction. The Next Leg Target Speed is then found from the polar tables based on the current True Wind Speed and the Next Leg True Wind Angle. If the next leg is upwind or downwind, the next leg speed is based on the optimum true wind angle upwind, or downwind, at the current true wind speed.
2.9.33 Off Course
Menu heading: NAVIGATE Function text: OFF CRSE Update rate: 1Hz Units: ºM Notes
1. Requires Halcyon Display. 2. Analogue indicator available. 3. Can be reset via FFD:
NAVIGATE →→→→ OFFCRSE, CONTROL →→→→ RESET
This can also be displayed on any FFD or 20/20.

HB-0845-06 65
2.9.34 Optimum Wind Angle
Menu heading: PERFORM Function text: OPT W/A Update rate: 1Hz Units: Degrees Note
1. Requires Performance Processor. For every target boat speed there is an angle at which that speed will be achieved (the Target Wind Angle). The optimum wind angle is the difference between this angle and that at which you are presently sailing, so keeping the optimum wind angle at zero achieves the angle for Target Boat Speed.
Sometimes, particularly downwind, it is easier to try to sail to a wind angle rather than to the target boat speed. The accuracy of this function will depend on how accurate the polar tables are for your boat.
2.9.35 Polar Boat Speed
Menu heading: PERFORM Function text: POL SPD KT Update rate: 1Hz Units: Knots Note
1. Requires Performance Processor. This is the predicted maximum achievable boat speed for the current wind conditions. Unlike Target Boat Speed, which only applies whilst sailing at the optimum wind angle upwind or downwind, Polar Boat Speed applies at all wind angles. It is useful when sailing on a free leg. The helmsman and trimmers can use this figure as the target to achieve maximum performance independent of any changes in the wind speed.

h2000 User Manual
66 HB-0845-06
2.9.36 PULSE2
Menu heading: SPEED Function text: PULSE2 Update rate: 4Hz Units: Knots Notes
1. Requires secondary paddlewheel sensor.
The PULSE2 function is a secondary boat speed input connected to the main processor. This sensor is in addition to the primary boat speed sensor.
Refer to Chapter 3 – Calibration, for more information about renaming the function text.
2.9.37 Reaching Performance
Menu heading: PERFORM Function text: REACHING Update rate: 1Hz Units: % (PC) Note
1. Requires Performance Processor. Reaching performance compares the actual boat speed with the value given in the polar table for the current true wind speed and true wind angle (the Polar Speed) and displays the result as a percentage; this will keep helmsman and trimmers alert, particularly at night. Because it accounts for changes in windspeed, it is a better indication of performance gains and losses than just boat speed.

HB-0845-06 67
2.9.38 Rudder Angle
Menu heading: MISC Function text: RUDDER Update rate: 1Hz Units: Degrees Notes
1. Requires rudder angle sensor. 2. Offset calibration available. 3. Analogue available.
Can be helpful for indicating how the boat is balanced.
2.9.39 Sea Temperature
Menu heading: TEMP Function text: SEA TEMP Update rate: 1Hz Units: ºC or ºF Notes
1. Requires temperature sensor. 2. High/low alarm available. 3. Offset calibration available under Cal Val 2.
This is most useful in races such as the Newport-Bermuda, where the ocean currents are critical to the tactics. Changes in sea temperature are good indications of ocean current. Sea temperature can be useful in other ways too; water flowing out of rivers differs in temperature quite markedly to the sea, and this can assist in choosing a favourable current.
h2000 User Manual
68 HB-0845-06
2.9.40 Speed Over Ground
Menu heading: WAYPOINT Function text: SPD O/G Update rate: Provided by the position fixer Units: Knots Note
1. Requires interface to position fixing system. This also comes direct from the position fixing system, and is available, provided it is sent, as soon as the position fixer is connected. Comparing the speed over the ground to the speed attained through the water is a key tactical tool, particularly so in strong tidal waters and at night.
2.9.41 Stored Log
Menu heading: LOG Function text: STD LOG Update rate: 1Hz Units: Nautical miles The Stored Log runs continually, and is always available as an accumulative total of the boat miles.
To expand the display, the Enter Key should be pressed, this will allow the log to display up to a maximum of 9999 nautical miles.
2.9.42 Tacking Performance
Menu heading: PERFORM Function text: TACKING Update rate: 1Hz Units: % (PC) Note
1. Requires Performance Processor.

HB-0845-06 69
The h2000 calculates the optimum VMG from the polar table for the wind speed and then compares this to the VMG actually being achieved, displaying the result as the tacking performance percentage. The same problems of time lag exist here as they do with VMG, this is discussed in the section on VMG.
0˚10˚20˚
30˚
40˚
50˚
60˚
70˚
80˚
90˚
100˚
110˚
120˚
130˚
140˚
150˚
160˚170˚ 180˚ 170˚
160˚
150˚
140˚
130˚
120˚
110˚100˚
90˚80˚
70˚
60˚
50˚
40˚
30˚
20˚10˚10
8
6
4
2
3
5
7
9 KtsBoat Speed
Target BoatSpeed Downwind
Target BoatSpeed Upwind
Optimum True WindAngle Upwind
Optimum True WindAngle Downwind
Maximum VMGUpwind
Maximum VMGDownwind
True Wind AnglePort Tack
True Wind AngleStarboard Tack
Figure 4 - Polar Performance Curve
The advantage of tacking performance over VMG is that it takes into account changes in windspeed. You should also be aware of the potential inaccuracies caused by your polar table being incorrect.

h2000 User Manual
70 HB-0845-06
Tacking Performance has a CALBRATE option that allows you to choose a type of polar table that equates to your type of yacht. In the next Paragraph, Target Boat Speed, we discuss polar tables in general and the implications of this choice.
2.9.43 Target Boat Speed
Menu heading: PERFORM Function text: TARG SPD Update rate: 1Hz Units: Knots Notes
1. At Target True Wind Angle. 2. Requires a Performance Processor.
This is the boat speed at which the optimum VMG will be achieved, and can be measured from the polar table or obtained by careful analysis of both VMG and boat speed while you are sailing.
The Polar Table describes the performance of the boat in all conditions of True Wind Speed and Angle. The Boat Speed is plotted radially against the True Wind Angle for each True Wind Speed in turn. The result is a diagram as shown in Figure 4 - Polar Performance Curve, which shows the boat speed plotted for just one value of true wind speed.
Polar tables can be derived either by theoretical predictions, the IMS certificate for instance, or by analysing the boat's actual performance. You may well use one of these techniques to obtain your polar table, however, if you do not, then the h2000 has one polar table already stored in its memory. A copy of this polar table is shown in Table 3 on page 87.
The polar table is located within the h2000 system under the following:
PERFORM → TACKING, CALBRATE →→→→ CAL VAL1 (TAB TYPE)

HB-0845-06 71
It can then be scaled to your rating using the RATING Menu choice, which is at the same level, and found by:
PERFORM → TACKING, CALBRATE →→→→ CAL VAL2 (RATING)
These values are entered in the normal manner.
Once you have understood and developed the polar table it will improve all the performance functions: reaching and tacking performance, optimum wind angle and target boat speed, as well as the predictions of next leg.
We can see from Figure 4 how the target boat speed is obtained from the polar tables. It is the point at which a perpendicular drawn to the 0 degree true wind angle first touches the curve, hence optimising speed in a windward direction. The boat speed on the curve at this point becomes the target boat speed for that wind speed, and the true wind angle at that point becomes the optimum wind angle. The two combined give the optimum VMG and so allow us to calculate tacking performance.
2.9.44 Target True Wind Angle
Menu heading: PERFORM Function text: TARG TWA Update rate: 1Hz Units: Degrees Notes
1. Derived from Polar Table. 2. Requires Performance Processor.
The True Wind Angle at which the optimum VMG will be achieved according to the Polar Table.

h2000 User Manual
72 HB-0845-06
2.9.45 Tide Set and Rate
Menu heading: NAVIGATE Function text: TIDE SET or TIDE RTE Update rate: 1Hz Units: ºM or ºT, knots Notes
1. Damping 0-99 minutes. 2. Calibration: Magnetic variation.
Some position fixers output the current local magnetic variation on the NMEA 0183 port using either HVD, HVM, RMA or RMC sentences. As a result, CAL VAL1 on the TIDE SET function will be automatically set to the correct variation.
Your position fixer will either supply true or magnetic bearing to the h2000. If it supplies true bearing then you must enter the magnetic variation into the h2000. It is found in the menu under:
NAVIGATE → TIDE SET, CALBRATE →→→→ CAL VAL 1 (MAG VAR)
Note
1. If your position fixer sends magnetic bearing, check that the variation is correctly entered.
The calculation involves comparing the course and speed over the ground, from the position fixing system, to the course and speed of the boat through the water, from the dead reckoning. Any differences are due to the tidal set and drift, and can be displayed as such. To make this accurate the dead reckoning requires the leeway input which in turn, requires the clinometer to measure heel angle.

HB-0845-06 73
The damping on this function is adjustable and can be important. In rapidly changing tidal situations you need to lower the damping down as far as possible to be able to see the changes quickly. Conversely, in a steady tide or current the longer the period over which the calculation is averaged, the more accurate the results will be.
The lag in the position fixer's ability to adjust to rapid changes in direction, such as when tacking, should also be borne in mind when considering the results of this function. Frequent tacking produces figures that are unreliable and should be treated with caution.
2.9.46 Timer
Menu heading: TIME Function text: TIMER Update rate: 1Hz Units: Hours, Minutes, Seconds Note
1. Can be reset independently of other trip functions Used for both the start and to record elapsed time. The timer will act as either a stopwatch or a countdown.
The Enter key will toggle the display between minutes/seconds and hours/minutes. Paragraph 2.6.1 describes control of the timer.
2.9.47 Time to Layline
Menu heading: TIME Function text: TIME L/L Update rate: Provide by the position fixer Units: Hours, minutes, seconds Note
1. Requires NMEA 0183 interfaced position-fixing system transmitting the ZDL sentence.
h2000 User Manual
74 HB-0845-06
This function is linked to Layline Distance. The information displayed shows the time to go before reaching the appropriate layline. A value of zero indicates time to tack or gybe.
2.9.48 Time to Waypoint
Menu heading: WAYPOINT Function text: ETA WPT Update rate: Provided by the position fixer Units: Hours, minutes Note
1. Also gives ETA. Requires interfaced position fixing system.
This is calculated directly by the position fixer, and is based on your speed over the ground towards the mark, which is assumed to be constant.
2.9.49 Trip Log
Menu heading: LOG Function text: TRIP LOG Update rate: 1Hz Units: Nautical miles Note
1. Can be reset independently of other trip functions. This is the log for recording individual trip distances, it displays the distance travelled from the time the function was started in nautical miles. It must be remembered that this is the distance sailed through the water, not over the ground. It also forms part of the calculation for Average Speed. A particularly useful feature is that when reset prior to the start of the race, the Timer counts down to zero, the Trip Log (and any other trip functions that have been reset) start automatically.

HB-0845-06 75
The Trip Log display can be expanded to display 9999nm by pressing Enter. See Para 2.6.4 for details of trip function control.
2.9.50 True Wind Angle
Menu heading: WIND Function text: TRUE W/A Update rate: 2Hz, Hydra Update rate: 4Hz, Hercules Units: Degrees Notes
1. Relative to the boat’s heading. 2. Corrected for masthead and other errors via the
look-up table. 3. Variable damping 0-99 seconds. 4. Dynamic damping available.
The true wind is calculated from the vector triangle shown in Figure 5 – True Wind Angle. This uses the Apparent Wind Speed, Apparent Wind Angle and the Boat Speed in the calculation. The results are then corrected by the true wind correction tables, which are discussed in Chapter 3 - Calibration.
Note
1. The true wind is the wind relative to the water, not the land. The true wind is not the same as the ground wind, unless there is zero tide.
The True Wind Angle is the angle between the boat's heading and the true wind.
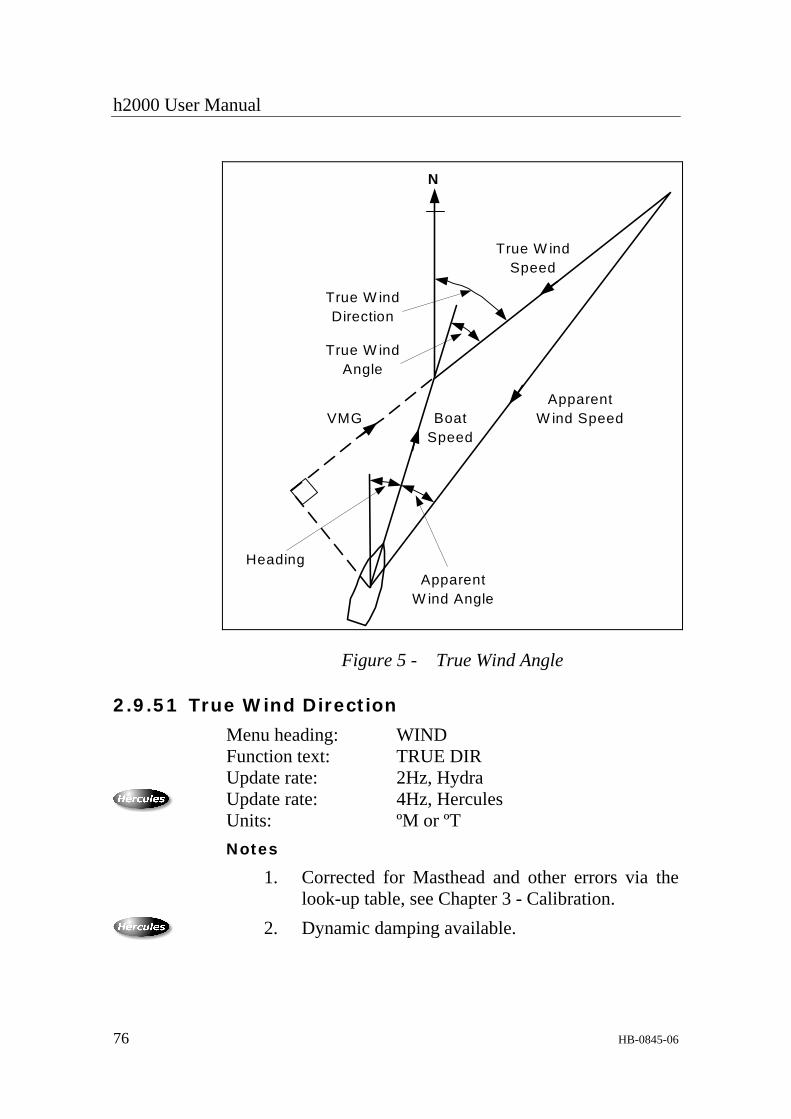
h2000 User Manual
76 HB-0845-06
N
True W indDirection
True W indAngle
ApparentW ind SpeedVMG Boat
Speed
ApparentW ind Angle
Heading
True W indSpeed
Figure 5 - True Wind Angle
2.9.51 True Wind Direction
Menu heading: WIND Function text: TRUE DIR Update rate: 2Hz, Hydra Update rate: 4Hz, Hercules Units: ºM or ºT Notes
1. Corrected for Masthead and other errors via the look-up table, see Chapter 3 - Calibration.
2. Dynamic damping available.

HB-0845-06 77
This is the Tactician's greatest ally in the search for the right wind shifts. It shows the compass direction that the wind is coming from regardless of the boat's heading. It is calculated from the true wind angle and heading, and is corrected for calibration errors by the true wind look-up table. It is very important to understand the function of this, in order to have an accurate true wind direction. It is fully explained in Chapter 3 - Calibration.
2.9.52 True Wind Speed
Menu heading: WIND Function text: TRUE W/S Update rate: 2Hz, Hydra Update rate: 4Hz, Hercules Units: Knots, metres per second Notes
1. Corrected for masthead and other errors via the look-up table, see Chapter 3 - Calibration.
2. Variable damping 0-99 seconds. 3. Dynamic damping available.
When the boat is sailing downwind, the air passing over the mast is accelerated, and in the past this has tended to make the true wind speed over-read. The h2000 has introduced a calibration for this that will allow you to correct out the error; it is explained in Para 3.4.
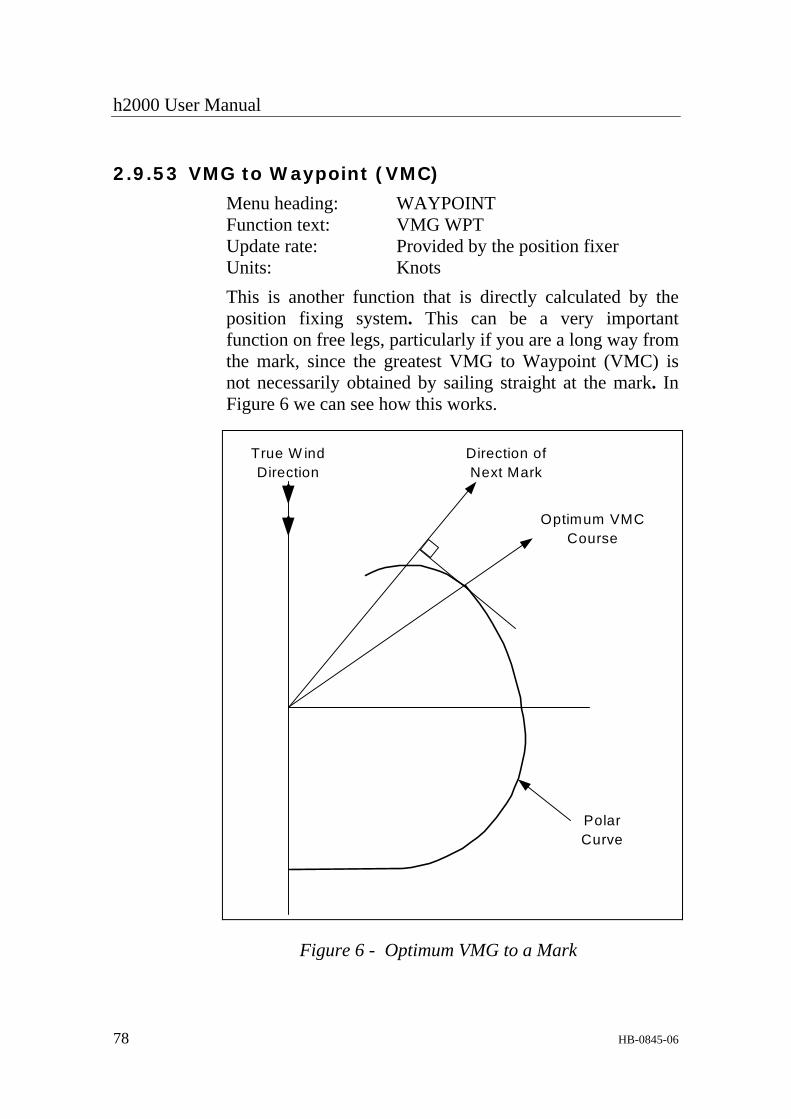
h2000 User Manual
78 HB-0845-06
2.9.53 VMG to Waypoint (VMC)
Menu heading: WAYPOINT Function text: VMG WPT Update rate: Provided by the position fixer Units: Knots This is another function that is directly calculated by the position fixing system. This can be a very important function on free legs, particularly if you are a long way from the mark, since the greatest VMG to Waypoint (VMC) is not necessarily obtained by sailing straight at the mark. In Figure 6 we can see how this works.
True W indDirection
Direction ofNext Mark
Optimum VMCCourse
PolarCurve
Figure 6 - Optimum VMG to a Mark
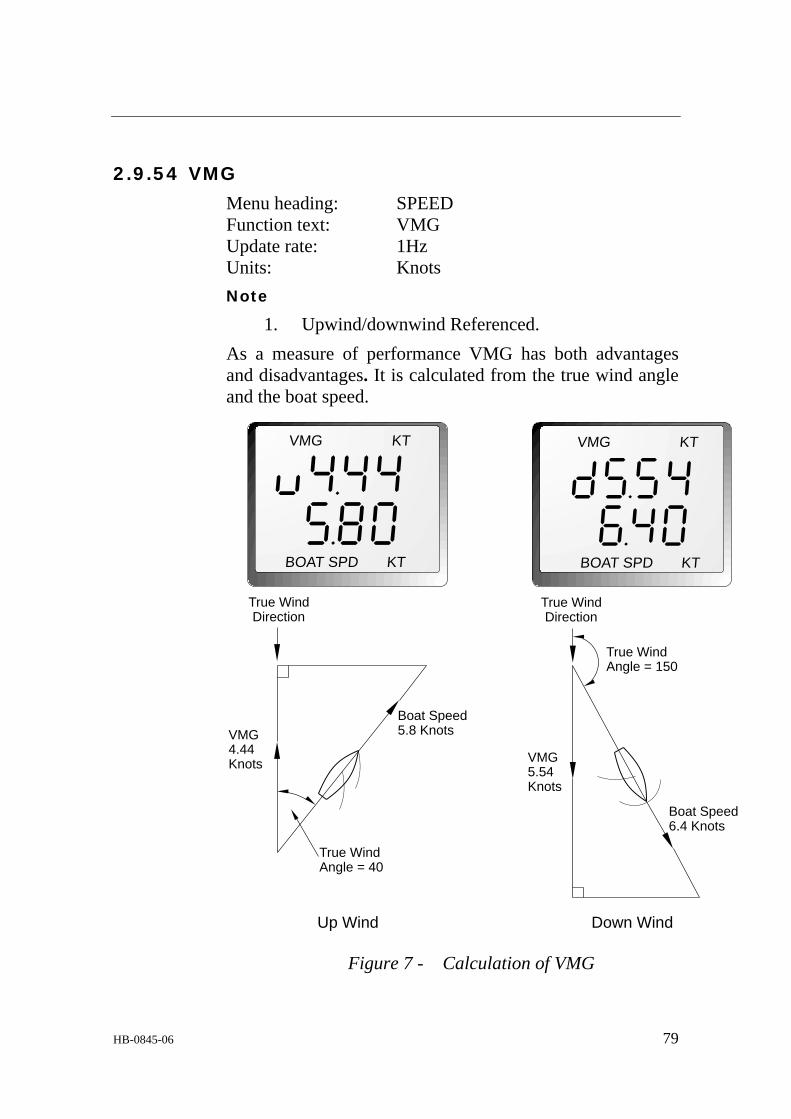
HB-0845-06 79
2.9.54 VMG
Menu heading: SPEED Function text: VMG Update rate: 1Hz Units: Knots Note
1. Upwind/downwind Referenced. As a measure of performance VMG has both advantages and disadvantages. It is calculated from the true wind angle and the boat speed.
True WindDirection
VMG5.54Knots
Boat Speed6.4 Knots
True WindAngle = 150
VMG KT
BOAT SPD KT
Down Wind
VMG4.44Knots
Boat Speed5.8 Knots
True WindAngle = 40
True WindDirection
Up Wind
VMG KT
BOAT SPD KT
Figure 7 - Calculation of VMG

h2000 User Manual
80 HB-0845-06
VMG can measure the performance upwind and downwind much more effectively than boat speed, since it takes into account how close the boat is sailing to the wind. However, it is not possible for the helmsman to sail to it directly because of the momentum of the boat. As the boat sails closer to the wind, the VMG will initially rise because the boat will hold its speed due to the energy contained in its momentum. VMG increases, and the helmsman, seeing this, would be encouraged to sail even closer to the wind thus increasing the VMG still further. Ultimately the boat will be head to wind and stop dead. VMG will then drop.
Because of this, the technique has been developed of analysing the boat’s performance to find out at which speed the greatest VMG occurs.
Once this is known the helmsman steers to this target boat speed knowing that this is optimising their upwind or downwind performance.
Whilst VMG is an important part of sailing technique, it should be checked by someone other than the helmsman. This person should develop a feel for the boat speeds when the greatest VMG is attained and then communicate these to the helmsman.
2.9.55 Wind Angle to the Mast
Menu heading: PERFORM Function text: W/A MAST Update rate: 1Hz Units: Degrees Note
1. Requires mast rotation sensor When the mast rotation sensor is fitted, this measures the apparent wind angle to the mast's centreline, thus giving the actual attack angle of the entry of the sail to the wind.
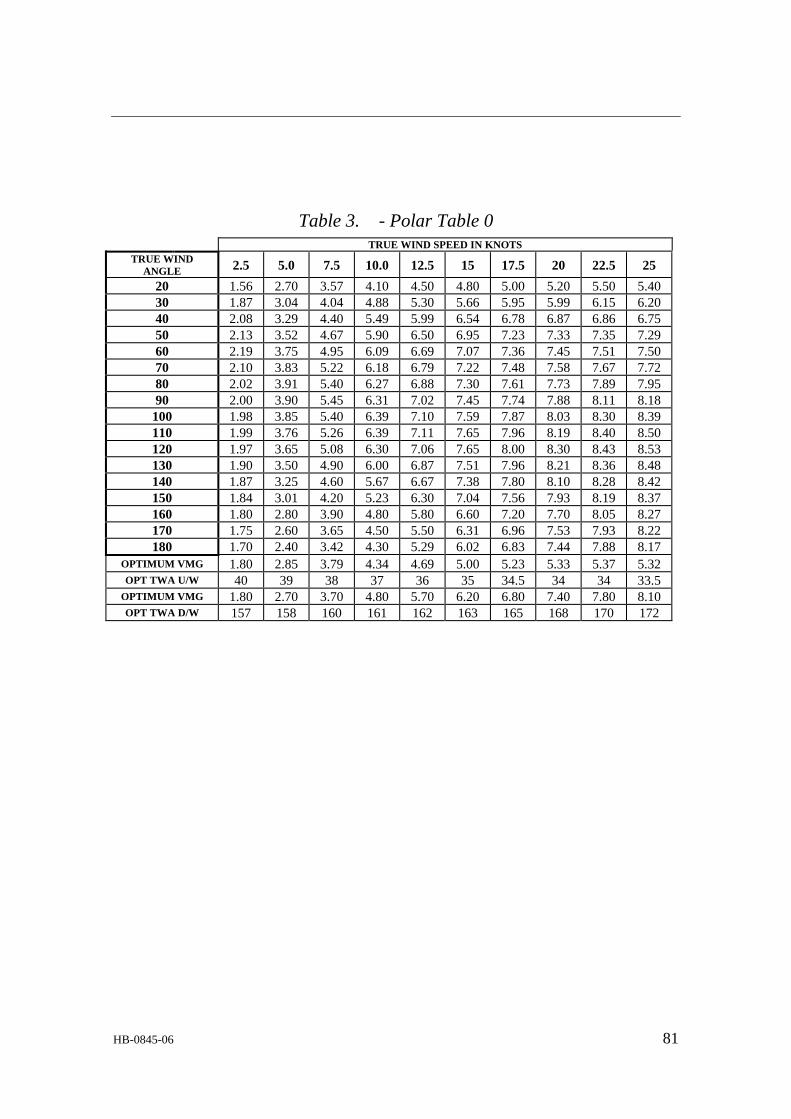
HB-0845-06 81
Table 3. - Polar Table 0 TRUE WIND SPEED IN KNOTS TRUE WIND
ANGLE 2.5 5.0 7.5 10.0 12.5 15 17.5 20 22.5 25 20 1.56 2.70 3.57 4.10 4.50 4.80 5.00 5.20 5.50 5.40 30 1.87 3.04 4.04 4.88 5.30 5.66 5.95 5.99 6.15 6.20 40 2.08 3.29 4.40 5.49 5.99 6.54 6.78 6.87 6.86 6.75 50 2.13 3.52 4.67 5.90 6.50 6.95 7.23 7.33 7.35 7.29 60 2.19 3.75 4.95 6.09 6.69 7.07 7.36 7.45 7.51 7.50 70 2.10 3.83 5.22 6.18 6.79 7.22 7.48 7.58 7.67 7.72 80 2.02 3.91 5.40 6.27 6.88 7.30 7.61 7.73 7.89 7.95 90 2.00 3.90 5.45 6.31 7.02 7.45 7.74 7.88 8.11 8.18 100 1.98 3.85 5.40 6.39 7.10 7.59 7.87 8.03 8.30 8.39 110 1.99 3.76 5.26 6.39 7.11 7.65 7.96 8.19 8.40 8.50 120 1.97 3.65 5.08 6.30 7.06 7.65 8.00 8.30 8.43 8.53 130 1.90 3.50 4.90 6.00 6.87 7.51 7.96 8.21 8.36 8.48 140 1.87 3.25 4.60 5.67 6.67 7.38 7.80 8.10 8.28 8.42 150 1.84 3.01 4.20 5.23 6.30 7.04 7.56 7.93 8.19 8.37 160 1.80 2.80 3.90 4.80 5.80 6.60 7.20 7.70 8.05 8.27 170 1.75 2.60 3.65 4.50 5.50 6.31 6.96 7.53 7.93 8.22 180 1.70 2.40 3.42 4.30 5.29 6.02 6.83 7.44 7.88 8.17
OPTIMUM VMG 1.80 2.85 3.79 4.34 4.69 5.00 5.23 5.33 5.37 5.32 OPT TWA U/W 40 39 38 37 36 35 34.5 34 34 33.5
OPTIMUM VMG 1.80 2.70 3.70 4.80 5.70 6.20 6.80 7.40 7.80 8.10 OPT TWA D/W 157 158 160 161 162 163 165 168 170 172
h2000 User Manual
82 HB-0845-06
CHAPTER 3: CALIBRATION
3.1 INTRODUCTION WARNING Every care must be taken when undertaking any
Calibration Procedure to ensure that the h2000 System is calibrated accurately and correctly. Incorrect calibration could lead to incorrect navigational information placing the yacht into danger. Calibration of an integrated instrument system is probably one of the most misunderstood processes in the world of yacht racing. Rather in the way that fast sails badly trimmed will add little or nothing to the boat’s performance, good instruments badly calibrated, will also achieve very little. In the same way that just a few trimmers guard their skills in a mystique amounting to a black art, the navigators who really understand and can get the maximum from their electronic partners, have tended to hide what is, like sail trim, a highly logical understandable process in a veil of mystifying jargon. This part of the manual hopes to remove some of that mystique and break the calibration process down into a series of simple steps, which, when carefully undertaken in the right order, will consistently produce good results.
There are four sensor inputs to your system that are fundamental to its integrated approach - Boat Speed, Compass Heading, Measured Wind Angle and Measured Wind Speed.

HB-0845-06 83
Without these basic inputs you cannot have the more important values of true wind speed and direction and velocity made good, which are calculated from them. As an absolute minimum your system should measure these four parameters. There are many really useful additional values that the h2000 allows you to measure, but they are not essential to the system's primary function. Nevertheless, these will need to be calibrated as well, but we shall deal with them separately, after we have the main system up and running.
On any yacht after the launch, the calibration of the sensors should have the same priority as making sure that the sails fit. It is crucial to keep a full record of the process. Appendix 1 contains calibration tables for this purpose.
3.2 BOAT SPEED/LOG CALIBRATION
3.2.1 Principle of Log Calibration
To calibrate the log we must work out the number of revolutions of a paddle-wheel, or sonic pulses per second that correspond to each knot of boat speed. The boat speed/log calibration value is always shown as Hertz per knot (Hz/Kt)
The h2000 allows for calibration of separate port and starboard sensors, as well as a single unit.
There are occasions when you will need to calibrate each tack separately e.g. for dual or single sensor installations, due to the placement of the units off the centre line. If you have a single unit which you have calibrated automatically, as we are about to explain, and it shows differences between one tack and the other, then the solution lies in using the manual method of entering percentage offset values into the Boat Speed correction table.
h2000 User Manual
84 HB-0845-06
In the case of multiple speed sensors the h2000 will always use the calibration value for the selected sensor; this is determined by the system based on user choice of heel, wind angle or a combination of the two.
3.2.2 Preparation for Log Calibration
Before calibrating the log you should ensure that the underwater unit is correctly aligned as follows:
Sonic Speed: Check that the unit is operating correctly. Ultrasonic Speed: The notch on the transducer is located in the cut-out in the housing. Paddle-Wheel: The moulded arrows on top of the unit must be pointing forward along the fore and aft line of the hull. The unit must also be totally free of any weed or other fouling.
3.2.3 Calibration Runs
Consecutive runs, under power at a constant speed, should be made along the given course. To eliminate the effect of tidal conditions, it is advisable to perform at least two runs, preferably three, along the measured course. There are three available options for calibrating the log, Automatically (AUTO CAL), Manually (MANL CAL) or to a Reference speed (REF CAL).
3.2.4 Log AUTO CAL Facility
This facility enables the user to calibrate the yacht's log accurately and simply. Calculations are performed by the h2000 computer. Referring to Figure 8, A and B are the markers for each run and X is the actual distance for each run as ascertained from the chart.

HB-0845-06 85
Cal DistXStart Run 1
"Enter"
Stop Run 2"Enter"
"Scroll Up"or
"Scroll Down"
Start Run 3"Enter"
Stop Run 1"Enter"
Start Run 2"Enter"
"Scroll Up"or
"Scroll Down"
End Cal"Enter"
A B
Figure 8 - Calibration Runs
The user is required to enter the distance X in nautical miles (CAL DIST) and then, as the yacht passes marks A and B on each run, to instruct the system to start (STRT RUN) and stop (STOP RUN) and finally to end calibration (END CAL) after the last run is completed.
Note
The calibration process can be cancelled at any time during the operation by pressing the Page Key, if the operator is not satisfied with the calibration runs underway, e.g., hampered by another vessel, or wash etc.
3.2.5 Log AUTO CAL Procedure
1. Select BOAT SPD on the upper display. 2. Press and hold Scroll Down to select
CALBRATE.

h2000 User Manual
86 HB-0845-06
3. Press Enter, the display shows the current Boat Speed on the upper display with AUTO CAL flashing below.
4. Press Enter, the display shows the current Boat Speed with SINGLE flashing.
5. Press Enter twice and display shows the default setting for the actual calibration distance for each run along the given course.
6. Press Enter, the value for CAL DIST will flash. The Scroll Up and Scroll Down Keys can now be used to select the appropriate measured distance (X). Press Enter to accept the new distance. The system is now ready to start the first calibration run.
7. Press Scroll Up and STRT RUN appears, flashing.
8. When crossing the first transit mark of the run, press Enter, the display now shows the current Boat Speed with STOP RUN flashing.
9. When crossing the transit mark at the end of the run press Enter, the display shows the current Boat Speed with END CAL flashing.
10. Press Scroll Down to select STRT RUN again and repeat steps (8) and (9).
11. If only two runs are required, press Enter to end calibration. The lower display will now show the new calibration value which has automatically been calculated by the Main Processor. This should be recorded in the chart provided (Appendix 1).
12. If a third run is required, press Scroll Down to STRT RUN then repeat from step (8).

HB-0845-06 87
Note
• “Err” is displayed if the system encountered a problem during the calibration run. For example, if the calibration run distance was too short.
The log is now calibrated and the new calibration value is stored permanently in the Main Processor memory.
3.2.6 Manual Calibration
The calibration values can be adjusted directly as follows:
1. Select BOAT SPD in the upper display. 2. Press and hold the Scroll Down Key to select
CALIBRATE from the menu. 3. Press Enter then press Scroll Down and the
display shows MANL CAL, which is the choice that we require.
4. Press Enter and the display shows SINGLE. Notes
• SINGLE is the choice required if a single paddle-wheel or sonic speed is fitted.
• If two paddle-wheels are fitted it is possible to access the individual port and starboard calibration values: use the Scroll Up or Scroll Down keys to select PORT CAL or STBD CAL, as required. The Port and Starboard calibration values refer to the sensor, i.e. port calibration = port sensor (not “port tack”).
5. Press Enter to reveal the current calibration value in Hertz/knot.
6. To adjust the calibration value, press Enter and the value flashes.
7. Use Scroll Up or Scroll Down to change the calibration value as required to the new calibration value.

h2000 User Manual
88 HB-0845-06
8. Press Enter to store the new value into the system.
9. Press Page to return to full display.
3.2.7 Speed Calibration Referenced to a Known Value
To calibrate the Boat Speed by reference to a known value, e.g. another boat with an accurately calibrated log, proceed as follows:
1. Select BOAT SPD KT on upper half of FFD display:
2. Press Scroll Down until the lower text shows CALBRATE flashing.
3. Press Enter, the lower text now shows AUTO CAL flashing.
4. Press Scroll Down until the lower text shows REF CAL flashing.
5. Press Enter, the lower text now shows REF CAL along with the current value of Boat Speed.
6. Press Enter, the lower text now shows the REF CAL value flashing and by use of the Scroll Up/Down the reference speed may be adjusted to the new value.
7. Press Enter, the new speed value is accepted and the upper display will show the re-calibrated Boat Speed.
3.2.8 Boat Speed Units (Knots, MPH, KPH)
To configure the required boat speed units proceed as follows:
1. Press Scroll Up until the upper text shows LOG flashing.
HB-0845-06 89
2. Press Enter, the upper text now shows STD LOG flashing.
3. Press Scroll Up until the upper text shows TRIP LOG flashing.
4. Press Enter, the upper text shows TRIP LOG and the current value.
5. Press Scroll Down until the lower text shows CALBRATE flashing.
6. Press Enter, the lower text now shows CAL VAL 1 flashing.
7. Press Scroll Down repeatedly and the lower text will cycle through CAL1, VAL 1, CAL VAL 2, and CAL VAL 3.
When CAL VAL 1 is displayed: 8. Press Enter, the lower text shows SPD KTS. When CAL VAL 2 is displayed: 9. Press Enter, the lower text shows SPD MPH. When CAL VAL 3 is displayed: 10. Press Enter, the lower text shows SPD KPH. For whichever selection is made: 11. Press Enter, the lower text now shows SPD KTS,
SPD MPH, or SPD KPH with the current boat speed value in its original units.
12. Press Enter, the current boat speed value, in its original units, will flash.
13. Press Enter, the current boat speed will be converted to and displayed in the newly selected units.

h2000 User Manual
90 HB-0845-06
3.2.9 Tack Source Speed Calibration Setting
The Tack Source setting allows you to define how the h2000 determines which tack it is presently sailing on, and therefore decide which is the most appropriate boat speed sensor and calibration value (port or starboard) to use.
The port and starboard boat speed calibration values can be automatically switched from either the apparent wind angle or heel angle if a suitably installed sensor is connected to the system. The tack source function can also be used to force the system to select either Port Tack or Starboard Tack when calibrating boat speed and thus help you to eliminate tack-to-tack boat speed differences.
The Force Tack options are used to ensure that only one sensor input is measured during calibration.
Tack Source calibration is done by entering the corresponding number under:
WIND → TRUE DIR, CALBRATE →→→→ CAL VAL 3 CAL VAL 3
Setting Description
0
Tack source uses heel as preference upwind and Measured Wind Angle as preferred source downwind.
1 Heel is always the preferred source.
2 Measured Wind Angle is always the preferred source (Default setting).
3 Force tack to starboard (uses port sensor input)
4 Force tack to port (uses starboard sensor input)

HB-0845-06 91
3.2.10 Boat Speed Offset Calibration
If a difference in boat speed is indicated from tack to tack, it is possible to calibrate out the error using an offset table.
It is necessary to first calibrate the boat speed using one of the methods described previously, it is then important to establish which tack is providing the correct boat speed, set the other tack to be the “correction tack” under TACK OFF.
1. Select BOAT SPD on an FFD. 2. Press Enter, then scroll to select CALIBRATE. 3. Scroll to CORRECTN, press Enter. 4. Select TACK OFF, press Enter 5. Set to PORT or STBD. 6. Press Enter to confirm, then scroll up to HEEL. 7. Set the current value for the heel angle. 8. Scroll up to OFFSET PC and enter the percentage
error on this (inaccurate) tack. The entered percentage offset is applied for angles greater than, and equal to the entered heel angle, and is interpolated to 0% at 0 degrees of heel.
3.2.11 Speed Linearity Correction
After the Tack correction is applied it is possible to apply both Heel Angle and Linearity corrections to the boat speed data.
The Linearity correction table is provided due to the characteristics of different speed sensors, a paddlewheel sensor (for example) is inherently non-linear so at high boat speeds due to their mechanical nature, they are likely to over-read and require correction. An Ultrasonic sensor is linear in its response and does not require significant correction.
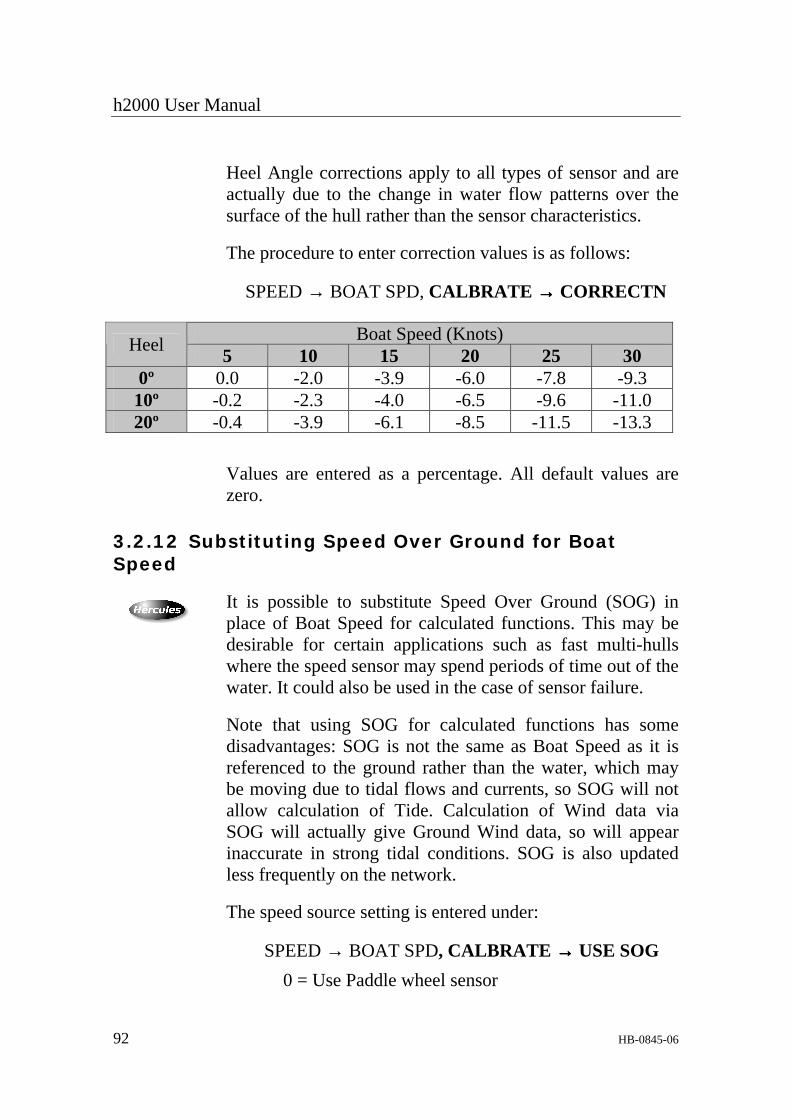
h2000 User Manual
92 HB-0845-06
Heel Angle corrections apply to all types of sensor and are actually due to the change in water flow patterns over the surface of the hull rather than the sensor characteristics.
The procedure to enter correction values is as follows:
SPEED → BOAT SPD, CALBRATE →→→→ CORRECTN
Boat Speed (Knots) Heel 5 10 15 20 25 30 0º 0.0 -2.0 -3.9 -6.0 -7.8 -9.3
10º -0.2 -2.3 -4.0 -6.5 -9.6 -11.0 20º -0.4 -3.9 -6.1 -8.5 -11.5 -13.3
Values are entered as a percentage. All default values are zero.
3.2.12 Substituting Speed Over Ground for Boat Speed
It is possible to substitute Speed Over Ground (SOG) in place of Boat Speed for calculated functions. This may be desirable for certain applications such as fast multi-hulls where the speed sensor may spend periods of time out of the water. It could also be used in the case of sensor failure.
Note that using SOG for calculated functions has some disadvantages: SOG is not the same as Boat Speed as it is referenced to the ground rather than the water, which may be moving due to tidal flows and currents, so SOG will not allow calculation of Tide. Calculation of Wind data via SOG will actually give Ground Wind data, so will appear inaccurate in strong tidal conditions. SOG is also updated less frequently on the network.
The speed source setting is entered under:
SPEED → BOAT SPD, CALBRATE →→→→ USE SOG 0 = Use Paddle wheel sensor

HB-0845-06 93
1 = Use Speed Over Ground
3.2.13 Pulse2 Boat Speed Input
The h2000 is able to display boat speed readings from a secondary boat speed sensor connected to the main processor. The function PULSE2 can be renamed by selecting one of the pre-defined functions. This is done by entering the corresponding number under:
SPEED → PULSE2, CALBRATE →→→→ CAL VAL 1
CAL VAL 1 Setting
Function Text Shown
Notes
0 PULSE2 Default setting. The display will show the input in Hz if present.
1 STBD BS
The secondary boat speed sensor is declared as STBD under the SPEED menu. The primary boat speed sensor is declared as PORT in the SPEED menu.
2 PORT BS
The secondary boat speed sensor is declared as PORT under the SPEED menu. The primary boat speed sensor is declared as STBD in the SPEED menu.
3 BOAT SPD The primary boat speed sensor is completely replaced by the secondary boat speed sensor.
Additionally, it is possible to configure the h2000 to use an external speed source and disable the boat speed sensor inputs connected to the main processor. This is done by entering the corresponding number under:
SPEED → PULSE2, CALBRATE →→→→ CAL VAL 2
h2000 User Manual
94 HB-0845-06
CAL VAL 2
Setting Description
0
Default setting. Uses the boat speed sensor(s) connected to the main processor.
1
Uses an external boat speed source. For example, a paddlewheel sensor connected to a pilot computer or NMEA boat speed decoded by the main processor.
3.3 MEASURED WIND SPEED AND ANGLE
3.3.1 Principles of Wind Speed/Angle Calibration
One of the greatest problems for an instrument system to overcome, which has not yet been conquered, is wind shear and wind gradient. These two effects are at the root of some apparent instrument inaccuracies. The effects themselves are relatively straightforward and are due to the simple fact that as moving air comes into contact with the ground it slows and changes direction.
The slowing creates the effect called wind gradient. The change in direction creates wind shear. Both shear and the wind gradient depend on the amount of mixing of the wind at ground level and the wind aloft; if the wind is well mixed both effects are minimised. The best example of this is the sea breeze, which starts off almost completely unmixed. Differences of direction of 40-50 degrees between the wind at the mast head and the wind at the water are not uncommon in an early sea-breeze, but as the day goes on and the sea-breeze strengthens this will disappear.

HB-0845-06 95
This creates a problem for the two things we are about to try to calibrate, measured wind speed and measured wind angle. It is easy to see how shear can affect the measured wind angle; no sooner have you set it up than the shear changes and everything is out again.
This can lead to a circular situation if one is not careful, and the best solution is to do your calibration on a day when the shear is minimal, and thereafter leave it as an indicator of the wind angle at the masthead, always remembering that this is not necessarily the wind angle that you are sailing at.
How do you know the shear is minimal? If you are finding it easier to get speed on one tack than the other for no obvious reasons, then there is likely to be shear. A good look at the general weather conditions is also helpful. Do not calibrate in building sea breezes.
Wind gradient is the biggest culprit for getting true wind speeds accused of gross inaccuracy. The problem is that most people use the wind speed as a measure of the pressure, which it is not. It is a measure of the wind speed at the top of the mast, and that is all. If it is 12 knots at the top of the mast and only 4 at the water, then the breeze will feel a lot softer, and provide less power for the rig than if the breeze is twelve knots all the way down to the water.
There are other signs that can help get a feel for the pressure on the rig. One of the most important of these is the heel angle; it is no bad thing to have an idea of how much heel you normally have in any given windspeed. Target boat speeds can also provide valuable information as to the wind gradient. The target is read from a polar table which only knows about one average wind condition, it does not know if the wind has a strong gradient or none at all. So next time you are having trouble reaching the target speeds, think about the wind gradient and whether or not it is a soft or heavy breeze, and use the input to help sail the boat. The information from the instruments is generally useful - it just needs rather more interpreting than it sometimes gets.

h2000 User Manual
96 HB-0845-06
This is why we recommend that the last thing you touch is the Measured Wind Speed. It is calibrated in the factory where wind tunnel calibrated units are available, and apparent inaccuracies are 99% attributable to effects such as wind gradient, rather than to a basic calibration problem.
3.3.2 Measured Wind Angle (MWA) Calibration
To discover the MWA alignment error we can employ one of two techniques. The first is simply to go head to wind and read the value of the Measured Wind Angle. If it reads anything other than 0, you have an error. If the error is greater than 0 (up to 180 degrees), you should subtract the error from 0 and enter this as the calibration value. So if when you go head to wind the measured wind angle reads 4 degrees, then you should enter -4 as the calibration value. If it is less than 0 then the opposite applies.
The second method involves a sailing trial as shown in Figure 9 - Masthead Unit Alignment.
1. Whilst monitoring MEAS W/A on a display, sail upwind at the optimum close-hauled angle.
2. When conditions are steady, write down the mean MEAS W/A reading.
3. Tack the vessel and sail at the optimum close-hauled position as before.
4. When conditions are again steady, write down the mean MEAS W/A reading.
5. Repeat steps (1) to (4) inclusive at least two or three times to obtain an average MEAS W/A for each tack.
6. Half the difference between the two Measured W/A’s needs to be applied to the MHU OFFSET. If STBD is greater than PORT, then subtract half the difference.
WIND → MEAS W/A, CALBRATE →→→→ MHU ANGL

HB-0845-06 97
Full details are given in Examples of Calibration contained in Chapter 2 - Operating Information.
Wind
Stbd TackSails sheetedclose hauled
Port TackSails sheetedclose hauled.exactly the sameas stbd tack
Difference = 6˚MHU error 6˚/2 = 3˚ (CAL value)
if Port Tack is low subtract 003˚if Stbd Tack is low add 003˚
33˚ 27˚
Figure 9 - Masthead Unit Alignment
3.3.3 Measured Wind Speed
As previously stated you are strongly discouraged from changing the measured wind speed calibration. However, should you need to do it, then the changes are made in the system menu under:
WIND → MEAS W/S, CALBRATE →→→→ MHU CAL
and
WIND → MEAS W/S, CALBRATE →→→→ MHU OFFS
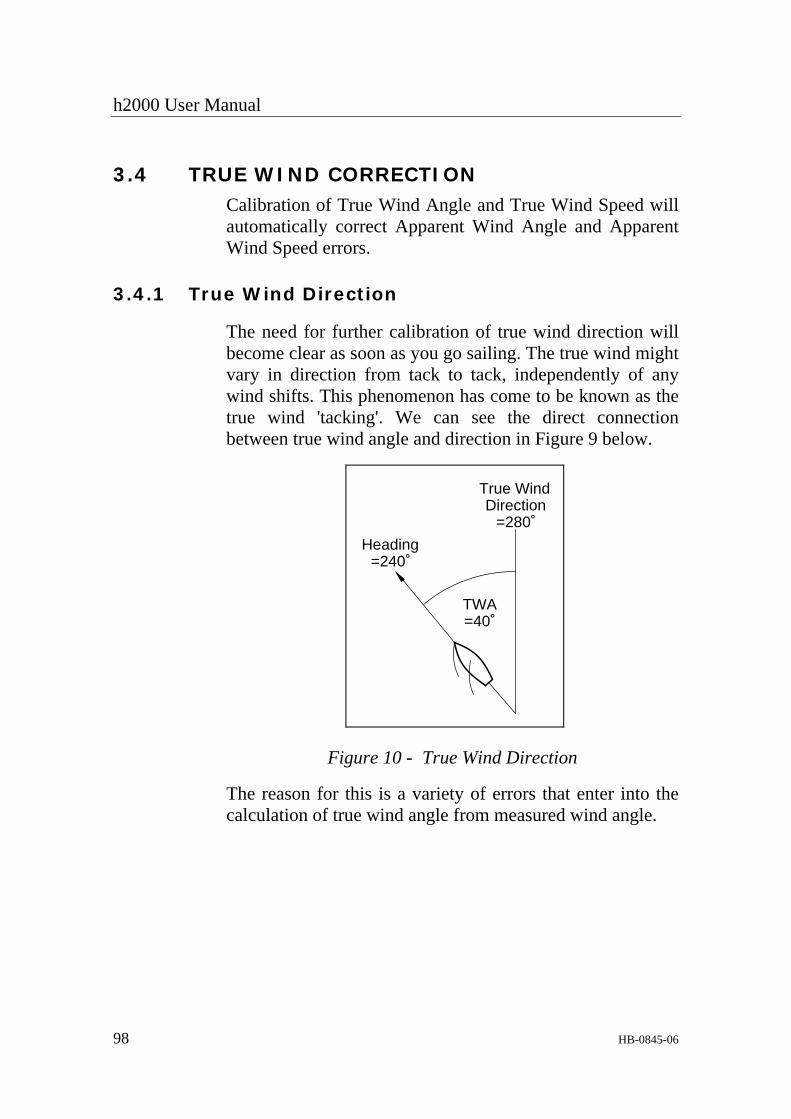
h2000 User Manual
98 HB-0845-06
3.4 TRUE WIND CORRECTION Calibration of True Wind Angle and True Wind Speed will automatically correct Apparent Wind Angle and Apparent Wind Speed errors.
3.4.1 True Wind Direction
The need for further calibration of true wind direction will become clear as soon as you go sailing. The true wind might vary in direction from tack to tack, independently of any wind shifts. This phenomenon has come to be known as the true wind 'tacking'. We can see the direct connection between true wind angle and direction in Figure 9 below.
True WindDirection
=280˚
Heading=240˚
TWA=40˚
Figure 10 - True Wind Direction
The reason for this is a variety of errors that enter into the calculation of true wind angle from measured wind angle.
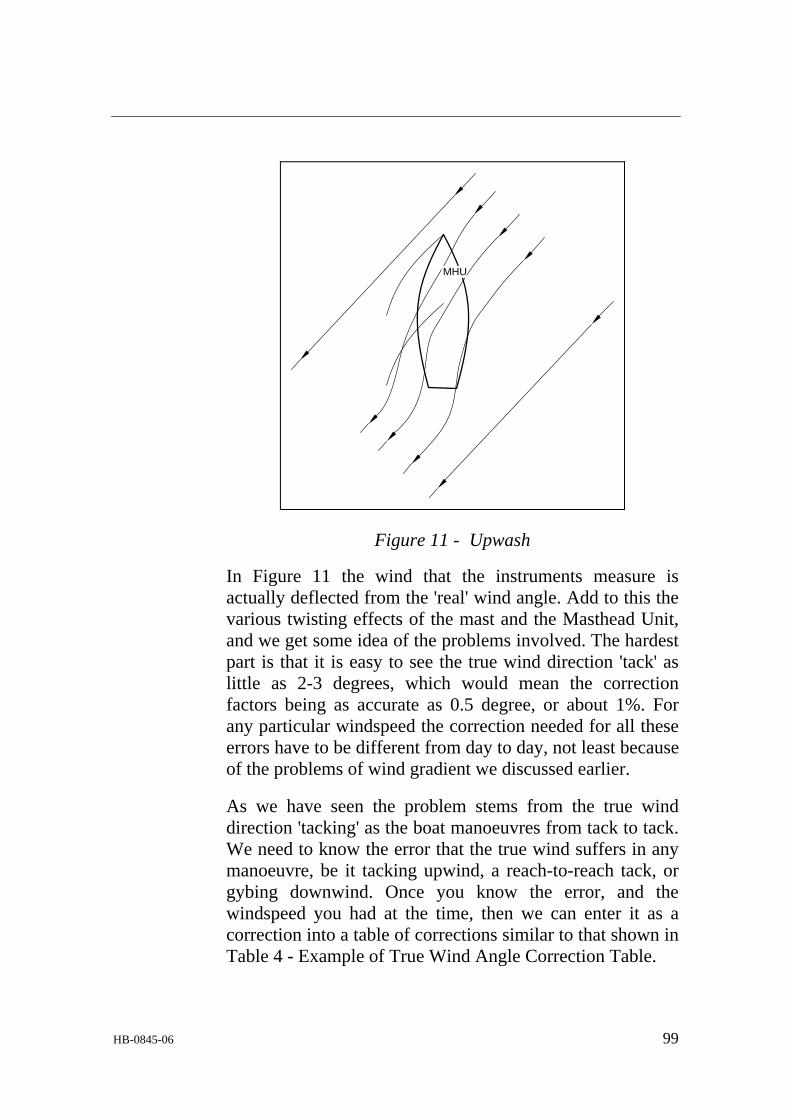
HB-0845-06 99
MHU
Figure 11 - Upwash
In Figure 11 the wind that the instruments measure is actually deflected from the 'real' wind angle. Add to this the various twisting effects of the mast and the Masthead Unit, and we get some idea of the problems involved. The hardest part is that it is easy to see the true wind direction 'tack' as little as 2-3 degrees, which would mean the correction factors being as accurate as 0.5 degree, or about 1%. For any particular windspeed the correction needed for all these errors have to be different from day to day, not least because of the problems of wind gradient we discussed earlier.
As we have seen the problem stems from the true wind direction 'tacking' as the boat manoeuvres from tack to tack. We need to know the error that the true wind suffers in any manoeuvre, be it tacking upwind, a reach-to-reach tack, or gybing downwind. Once you know the error, and the windspeed you had at the time, then we can enter it as a correction into a table of corrections similar to that shown in Table 4 - Example of True Wind Angle Correction Table.
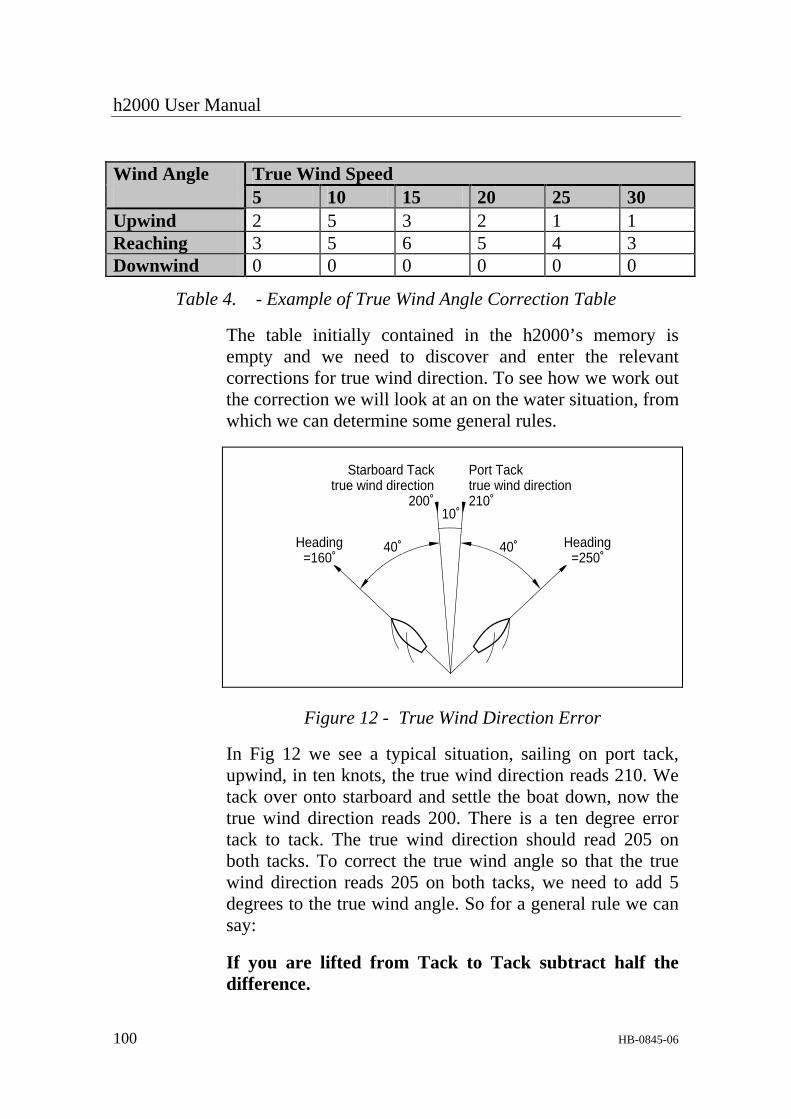
h2000 User Manual
100 HB-0845-06
Wind Angle True Wind Speed 5 10 15 20 25 30 Upwind 2 5 3 2 1 1 Reaching 3 5 6 5 4 3 Downwind 0 0 0 0 0 0
Table 4. - Example of True Wind Angle Correction Table
The table initially contained in the h2000’s memory is empty and we need to discover and enter the relevant corrections for true wind direction. To see how we work out the correction we will look at an on the water situation, from which we can determine some general rules.
10˚
Heading=160˚
40˚ Heading=250˚
40˚
Starboard Tacktrue wind direction
200˚
Port Tacktrue wind direction210˚
Figure 12 - True Wind Direction Error
In Fig 12 we see a typical situation, sailing on port tack, upwind, in ten knots, the true wind direction reads 210. We tack over onto starboard and settle the boat down, now the true wind direction reads 200. There is a ten degree error tack to tack. The true wind direction should read 205 on both tacks. To correct the true wind angle so that the true wind direction reads 205 on both tacks, we need to add 5 degrees to the true wind angle. So for a general rule we can say:
If you are lifted from Tack to Tack subtract half the difference.

HB-0845-06 101
And the converse will apply:
If headed from Tack to Tack add half the difference.
All we need to do now is tell the h2000 the correction value at each of the points in the table. The true wind correction facility, is found in the menu under:
WIND → TRUE W/A, CALBRATE →→→→ CORRECTION
This then allows you to scroll through all the correction values in the table (using Scroll Up or Scroll Down) until you find the one where you wish to enter a correction, in our example above we would be looking for "upwind, 10 knots". Once you have scrolled through to this, a press of the Enter Key will allow you to enter the required number of degrees correction (i.e. +5) using the Scroll Up and Scroll Down Keys to increase/decrease the value accordingly. A final press of the Enter Key stores this to the h2000.
In the early stages of calibration when the table is nearly empty, it is important to enter the same value of correction to the windspeeds either side of the one you are using. This is to avoid the true wind direction jumping in value when the wind speed drops or increases outside the range you are correcting.
As your table gets closer to being finished you will be able to make individual changes, because the other corrections will be accurate enough to avoid any strange "step" changes as the true wind speed varies. For this reason it is very important to enter all these corrections into a Calibration Chart (see Appendix 1). This way you will notice any big gaps in the correction table where you have entered no values at all.
Initially you may require to do some sailing trials, and it is advisable to get into a pre-start routine of carrying out each of the tacking manoeuvres before the start of a race, correcting any problems as they arise.
h2000 User Manual
102 HB-0845-06
Finally, the most important thing is to record all these entries in the Calibration Charts provided in Appendix 1.
3.4.2 True Wind Speed
The True Wind Speed suffers from another, mainly aerodynamic, problem, where it tends to over-read downwind because of acceleration of the airflow over the top of the mast. It is possible to correct for this by applying a downwind correction to the true wind speed. This correction is applied at 165 degrees in a Hydra system, or at the user set angle in a *Hercules system, and linearly interpolated to zero correction at 90 degrees true wind angle. The routine here is to bear away quickly from close-hauled to your usual downwind True Wind Angle and watch the increase in true wind speed. Then the difference is entered as the negative correction. The table will look similar to the one shown in Table 5 - True Wind Speed Correction.
Wind Angle True Wind Speed 5 10 15 20 25 30 Correction (kt) 0 0 0 0 0 0 Correction angle* 165 165 165 165 165 165
Table 5. - Example of True Wind Speed Correction Table
The corrections are found in the menu under:
WIND → TRUE W/S, CALBRATE →→→→ CORRECTION
They are entered in the same way as the true wind direction corrections. It is crucial to keep a full record of the process.
HB-0845-06 103
3.5 COMPASS CALIBRATION
3.5.1 Principles of Compass Calibration
B&G's Autoswing compasses contain software that allows them to record the magnetic fields in the yacht that are causing the deviation errors. It calculates the corrections every time the boat completes a 360° turn, provided the following conditions are met:
a. The 360° turn - Halcyon 2000 & Halcyon Gyro Stabilised Compass is completed in the same direction.
b. The rate of change of heading does not exceed 3°/s; i.e. the turn should take about 3 minutes to complete.
c. The rate of change of heading must not fall below 0.2 of a degree per second during the 360° turn, i.e. the turn must not take longer than 12 minutes.
d. The rate of change in heading is constant. e. The compass is installed in a location a safe
distance from magnetic interference such as iron keels, engines, loudspeakers etc. Consideration should also be given to electrical cables which may carry high currents (e.g. navigation lights).
f. The compass is installed in a location as close to the centreline of the boat as possible. Avoid areas such as the fore peak and the sides of the hull where the effects of pitch and roll are at their greatest.
g. On steel hulled vessels, the compass will need to be installed above decks away from the effects of the hull.

h2000 User Manual
104 HB-0845-06
3.5.2 Heading Source Selection
The h2000 System can accept heading data from a variety of different sources. These different sources are known as Nodes and allow the system to identify which heading devices are connected to the system. The list below shows the various sources of heading available with its respective address node:
Device Node Main Processor (NMEA input) 5 Performance Processor (NMEA input) 9 Halcyon Processor (“Halcyon Gyro” input) 15 Halcyon Processor (NMEA input) 15 Halcyon 2000 Compass 16 PLC Pilot (internal compass) 17 ACP Pilot (direct “Halcyon Gyro” input) 18 NMEA Input to NMEA FFD 96, 97…
Enter the required heading node by following the procedure below:
a. Press the Scroll Up key until NAVIGATE is shown in the text, flashing.
b. Press Enter. c. Press the Scroll Up key again until the display
shows COURSE flashing. d. Press Enter. COURSE will now stop flashing. e. Press Scroll Down until the display shows
CALBRATE. f. Press Enter 3 times. The display now shows
HDG NODE and will display a value which flashes.
g. Use the Scroll Up and Scroll Down keys to change the value to the required setting.
h. Press Enter. i. Switch the system off, and then back on again to
complete the calibration process.
HB-0845-06 105
Notes
• Hydra Pilots, Hercules Pilots, HS Pilots and Halcyon FFDs will also require the Heading Node to be set to your desired choice. Refer to the relevant user manual for further information.
• 20/20 displays will require Heading to be re-selected following Heading node selection. Simply re-select this function. Refer to Para 5.4.5 for more information.
3.5.3 Halcyon 2000 Compass Calibration Procedure
1. Check for any magnetic devices placed near the compass, especially ones that are out of their normal places.
2. On a calm day select a stretch of open water with little traffic (so you will not have to take avoiding action which would affect the calibration). The flatter the water and the less the wind the easier it will be to meet the conditions for calibration.
3. Check for and avoid sailing close to any large steel structures nearby, that may cause additional, erratic deviations.
4. Scroll to the NAVIGATE menu and select COMP CAL on the top half of the display. The display shows OFF.
5. Press Scroll Down until the lower text shows CALBRATE flashing.
6. Press the Enter key twice to display START and a default setting of ‘0’.
7. Press the Enter key once and the ‘0’ starts to flash. Use the Scroll Up key to change the value to ‘1’.
8. Press the Enter key. The display now shows 000°.
9. At a speed not exceeding five knots, turn the boat through 360° at a rate not greater than 2-3° per

h2000 User Manual
106 HB-0845-06
second. The display will show the amount of turn completed so far. Continue to turn the boat until the display shows PASS or FAIL. If FAIL is displayed the compass calibration should be re-started.
10. Eliminate any constant error in heading. These are normally checked for by using shore-based transits, once the error is known it can be eliminated by entering the value into the Hercules under:
NAVIGATE →→→→ HEADING, CALBRATE →→→→ CAL VAL1
For example, the compass was reading 320 degrees and it should read 316, then the value to enter would be -4.
Notes
• The compass calibration swing may be aborted at any time. To do this, press the Enter key once. Next, using the Scroll Down key change the value from ‘1’ to ‘0’, and then press Enter to store. The display will now show OFF.
• The first time the system is switched on, or after a system reset, the Heading will alternate with CAL. This is to indicate to the user that the compass must be calibrated. This will disappear after the compass has been calibrated.
3.5.4 Halcyon Gyro Stabilised Compass Calibration Procedure
1. Check for any magnetic devices placed near the compass, especially ones that are out of their normal places.
2. On a calm day select a stretch of open water with little traffic (so you will not have to take avoiding action which would ruin the calibration). The flatter the water and the less the wind the easier it will be to meet the conditions for calibration.
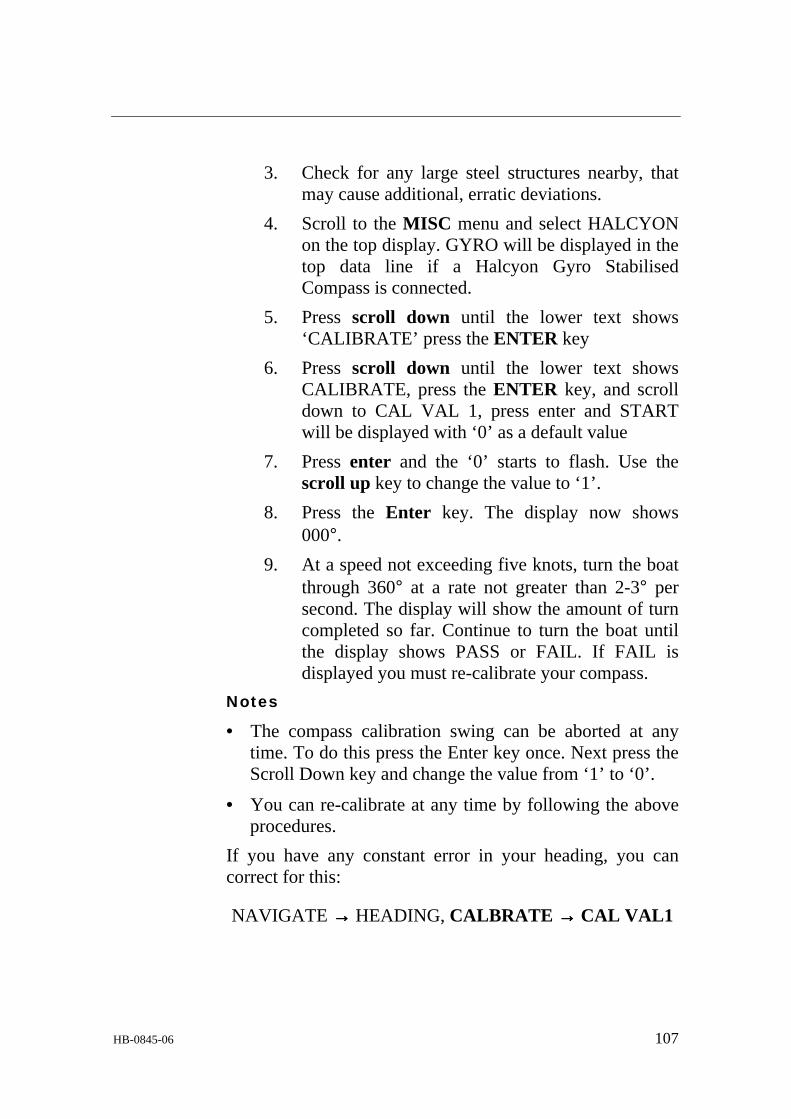
HB-0845-06 107
3. Check for any large steel structures nearby, that may cause additional, erratic deviations.
4. Scroll to the MISC menu and select HALCYON on the top display. GYRO will be displayed in the top data line if a Halcyon Gyro Stabilised Compass is connected.
5. Press scroll down until the lower text shows ‘CALIBRATE’ press the ENTER key
6. Press scroll down until the lower text shows CALIBRATE, press the ENTER key, and scroll down to CAL VAL 1, press enter and START will be displayed with ‘0’ as a default value
7. Press enter and the ‘0’ starts to flash. Use the scroll up key to change the value to ‘1’.
8. Press the Enter key. The display now shows 000°.
9. At a speed not exceeding five knots, turn the boat through 360° at a rate not greater than 2-3° per second. The display will show the amount of turn completed so far. Continue to turn the boat until the display shows PASS or FAIL. If FAIL is displayed you must re-calibrate your compass.
Notes
• The compass calibration swing can be aborted at any time. To do this press the Enter key once. Next press the Scroll Down key and change the value from ‘1’ to ‘0’.
• You can re-calibrate at any time by following the above procedures.
If you have any constant error in your heading, you can correct for this:
NAVIGATE →→→→ HEADING, CALBRATE →→→→ CAL VAL1

h2000 User Manual
108 HB-0845-06
Enter the value to offset your heading e.g. if your heading displays 100° and it should read 97°, then the value to enter would be –3.
3.5.5 Halcyon Gyro Processor Setup
Data under the MISC > HALCYON function describes the current mode of the Halcyon Gyro Processor, and are as follows: OFF
No heading detected from either a Halcyon Gyro Stabilised Compass sensor or a B&G system compass
GYRO
Receiving data from Halcyon Gyro Stabilised Compass or NMEA input to Halcyon Gyro Processor
SYS
Receiving data from a B&G system compass or NMEA input to NMEA FFD or performance processor
PASS
Calibration swing is complete
FAIL
Calibration swing failed and the compass needs to be re-calibrated
xxxº Number of degrees turned during calibration swing, indicates calibration swing in progress
3.5.6 Halcyon Gyro Processor NMEA output setup
NMEA sentence output settings determine what sentences are output with respect to which heading source is available.
MISC → HALCYON, CALBRATE →→→→ CAL VAL 2 (NMEA MDE)
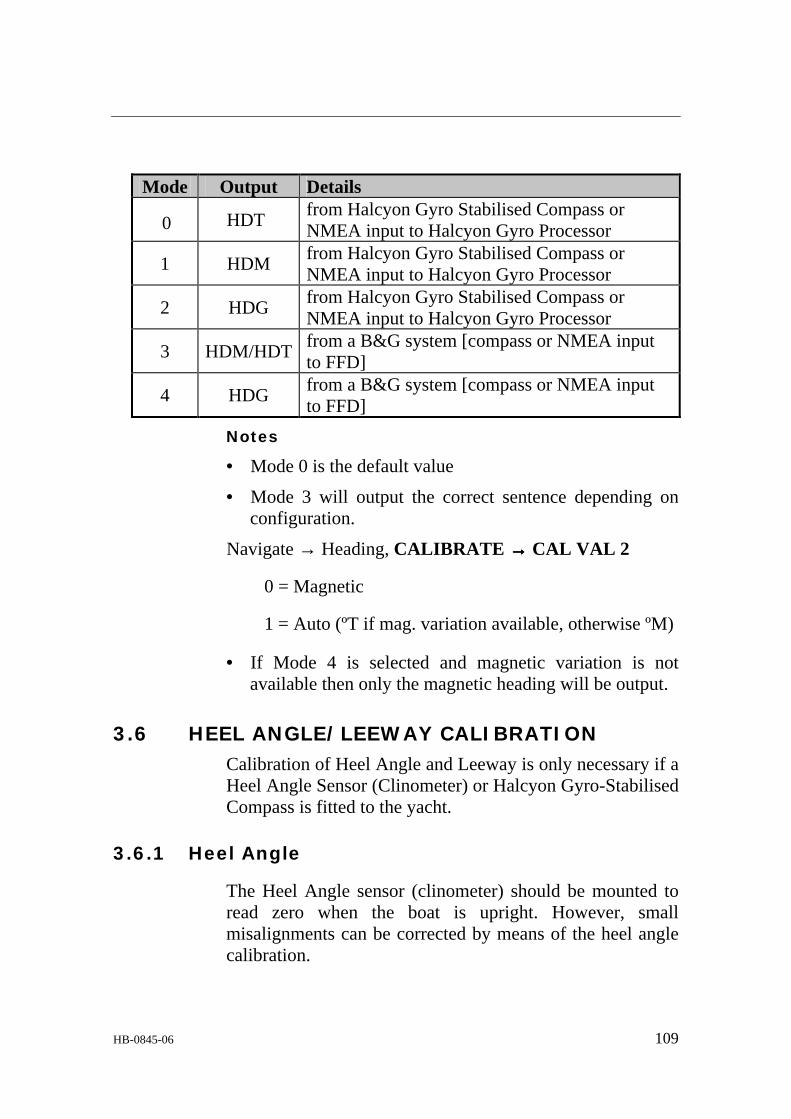
HB-0845-06 109
Mode Output Details
0 HDT from Halcyon Gyro Stabilised Compass or NMEA input to Halcyon Gyro Processor
1 HDM from Halcyon Gyro Stabilised Compass or NMEA input to Halcyon Gyro Processor
2 HDG from Halcyon Gyro Stabilised Compass or NMEA input to Halcyon Gyro Processor
3 HDM/HDT from a B&G system [compass or NMEA input to FFD]
4 HDG from a B&G system [compass or NMEA input to FFD]
Notes
• Mode 0 is the default value
• Mode 3 will output the correct sentence depending on configuration.
Navigate → Heading, CALIBRATE →→→→ CAL VAL 2
0 = Magnetic
1 = Auto (ºT if mag. variation available, otherwise ºM)
• If Mode 4 is selected and magnetic variation is not available then only the magnetic heading will be output.
3.6 HEEL ANGLE/LEEWAY CALIBRATION Calibration of Heel Angle and Leeway is only necessary if a Heel Angle Sensor (Clinometer) or Halcyon Gyro-Stabilised Compass is fitted to the yacht.
3.6.1 Heel Angle
The Heel Angle sensor (clinometer) should be mounted to read zero when the boat is upright. However, small misalignments can be corrected by means of the heel angle calibration.

h2000 User Manual
110 HB-0845-06
On a calm day with the boat lying at slack warps in the dock, head to wind, all the gear stowed in its normal place, and anyone onboard standing on the centreline the heel angle should be recorded, under these conditions it should be zero, any error can be taken out by the heel angle calibration, by adding or subtracting the error from the existing calibration.
Heel angle calibration is to be found in the system menu under:
PERFORM → HEEL, CALBRATE →→→→ CAL VAL1
3.6.2 Leeway
Calibrating leeway is a notoriously difficult thing to do; it may be easier, and as accurate, to consult the yachts designer who may have a theoretical value for leeway coefficient, as it is to try to measure it. Should that not be possible then we can calculate the Leeway coefficient from the following formula: L = K x H Bs x Bs where, Bs = Boat Speed K = Leeway Coefficient H = Heel Angle L = Leeway Angle K then is the constant that needs to be entered, and to establish a value for leeway coefficient we need to measure the leeway angle at a particular heel angle and boat speed shown in Fig 13 below.

HB-0845-06 111
Heading - 180˚
HeadingCourse Markers
Leeway Angle
Back Bearing
Figure 13 - Leeway Angle Measurement
The idea is to sail on a steady course and drop markers* over the stern at regular intervals, the angle between them and the centreline of the yacht is measured with a hand-bearing compass, and hence leeway angle is measured. Whilst this is happening the boat speed and heel angle should be noted at intervals and an average calculated. These values can then be used to calculate the leeway coefficient from the following expression.
K = L x Bs x Bs H
Obviously the flatter the water and the steadier the breeze the more likely this is to be successful, but even in perfect conditions it is difficult, to say the least. Once you have the leeway coefficient 'K' then it is entered into the system under:
NAVIGATE → LEEWAY, CALBRATE →→→→ CAL VAL1
*please collect your markers after calibration!

h2000 User Manual
112 HB-0845-06
3.6.3 Heel and Trim angle from Halcyon Gyro Compass
The heel and trim information from the Halcyon Gyro Stabilised Compass is displayed in the PERFORM menu.
The H symbol will be placed on left indicating heel to port and on the right for heel to starboard. The display will always be shown to 1 decimal point
The U symbol on the left indicates that the bow is up, while a d will be shown indicating bow down. The display will always be shown to 1 decimal point
Both heel and trim have an offset calibration to allow for any constant errors, adding or subtracting from CAL VAL 1 will correct this.
PERFORM → HEEL, CALIBRATE →→→→ CAL VAL 1
If you have heel and trim sensors connected to your system as well as a Halcyon Gyro Stabilised Compass then the Heel and Trim from the Compass will be used by default. If you wish to use your external sensors then set CAL VAL 2 to ‘0’.
PERFORM → HEEL, CALIBRATE →→→→ CAL VAL 2
3.7 DEPTH A typical transducer installation is through the hull at a suitable position between the water line and the bottom of the keel. A DATUM (offset value) can be set, such that the depth display refers to either the water line or the keel line.

HB-0845-06 113
Add for Waterline
Subtract for Keel
Transducer
Figure 14 - Depth Datum
The datum is entered under:
DEPTH → DEPTH, CALBRATE →→→→ DATUM
3.8 AFT DEPTH The h2000 has the facility to display NMEA depth data from an auxiliary depth source. Any NMEA depth information input into the NMEA port on the h2000 Main Processor is displayed on the system as Aft Depth.
A depth datum offset is available for the AFT DEPTH function. The datum is entered under:
DEPTH → AFT DPTH, CALBRATE →→→→ CAL VAL 1
Additionally, it is possible to re-name the function AFT DEPTH by selecting one of the pre-defined function names. This is done by entering the corresponding number under:
DEPTH → AFT DPTH, CALBRATE →→→→ CAL VAL 2

h2000 User Manual
114 HB-0845-06
CAL VAL 2 Setting
Function Text Shown
0 AFT DPTH 1 FWD DPTH 2 MID DPTH 3 PORT DEP 4 STBD DEP 5 DEPTH 2
3.9 BATTERY VOLTS The h2000 monitors the yacht's battery supply and can be shown on any display, giving a reading in volts. This is calibrated by the manufacturer and should not require adjustment except in exceptional circumstances or after a system reset. If it is necessary to calibrate this function a suitable voltmeter is required. The calibration value is found in the menu under:
MOTOR → VOLTS, CALBRATE → CAL VAL1
Using the independent voltmeter, measure the battery supply at terminals 18 (+) and 17 (-) at the Computer Unit connection block.
Alter CAL VAL1 to match the value from the voltmeter.
3.10 SEA TEMPERATURE If a suitable temperature sensor is fitted, the h2000 will monitor the current sea temperature.
The paddle-wheel has a sensor incorporated within it, in this case no further action is required.
If the sensor is a totally independent fitting (B&G part no. 224-00-065) then it is necessary to change the sensor selection value.
This value is found in:

HB-0845-06 115
TEMP → SEA TEMP, CALBRATE →→→→ CAL VAL1 (SENSORS)
The default selection value is 1, for the independent sensor we need to change to 2.
3.10.1 Sea Temperature Offset Calibration
To calibrate SEA TEMP proceed as follows:
1. Select SEA TEMP on upper half on FFD display 2. Press Scroll Down until the lower text shows
CALBRATE flashing 3. Press Enter, the lower text now shows CAL VAL
1 flashing 4. Press Scroll Down, the lower text now shows
CAL VAL 2 flashing 5. Press Enter, the lower text now shows OFFSET 6. Press Enter, the lower text now shows OFFSET
flashing and by use of Scroll Up/Down the reference temperature may be entered.
7. Press Enter, the offset value is accepted and the upper display will show the adjusted measured temperature.
This calibration can be carried out on either SEA TEMP ºC or SEA TEMP ºF
The offset value is automatically converted so that both degrees C and F are adjusted correctly.
3.11 TIMER The Timer uses a stable quartz crystal to provide an accurate time base when calibrated. The calibration is set when the unit is manufactured and should not normally require further adjustment. If adjustment is necessary the calibration can be found as follows:

h2000 User Manual
116 HB-0845-06
TIME → TIMER, CALBRATE →→→→ CAL VAL1
The Calibration value is the number of seconds correction required a day. If the timer is gaining then the number of seconds it is gaining a day should be subtracted from the current calibration value. If the timer is losing time the number of seconds lost a day should be added to the current calibration value.

HB-0845-06 117
CHAPTER 4: INSTALLATION INFORMATION
4.1 INTRODUCTION This part of the manual contains information relating to the interconnection of the units that make up the h2000 system. It is provided to enable a qualified technician to fault find or undertake the installation of additional units and thereby increase the number of functions available.
The information provided consists of drawing sheets showing equipment options and the interconnections between them.
Also on the installation sheets are details of cables, cable colours, instructions for installation and notes to assist the technician.
The installation sheets following are:
1. h2000 System Example Reference 2. Power Supply, Fastnet Network and Alarm 3. Network Terminator Installation 4. Standard Full Function Display 5. Analogue Meters 6. Depth Transducer and Paddlewheel Sensor 7. Ultrasonic Speed Sensor Unit 8. Pulse 2 Input (Secondary boat speed input) 9. Depth Transducer, Sonic Speed and Sea
Temperature 10. Change Over Switch Wiring 11. 213 Masthead Unit 12. Halcyon 2000 Compass 13. Multiple Linear Sensor Inputs

h2000 User Manual
118 HB-0845-06
14. Clinometer and Barometric Pressure Sensor 15. Main Processor NMEA Input 16. NMEA Full Function Display 17. Performance Processor 18. Halcyon Gyro Processor with Halcyon Gyro
Stabilised Compass 19. Halcyon Gyro Processor with NMEA Gyro input 20. Halcyon Gyro Processor as output interface
Notes
• All screens should be connected under the metal clamp bar located on Processor cases.
• Cables should not to be run near Depth cables or other cables where interference may result.

HB-0845-06 119

h2000 User Manual
120 HB-0845-06
+
+ -
12
13
14
15
17
18
ALARM
ALARM
NETWORK DATA -
NETWORK DATA +
SUPPLY GROUND
12V DC SUPPLY
BLUE
BROWN
GREEN
WHITE
BLACK
RED
LINK
ALARM UNIT, NETWORK AND POWER SUPPLYINSTALLATION SHEET
Alarm Unit130-00-045(rear view)
MAIN PROCESSORTERMINALS
BATTERYSUPPLY12V DC
1A FUSE
ALARM TERMINALS INTERNALLYCONNECTED TO NORMALLY OPEN
0.5A RELAY CONTACT
SATNAV LOG PULSES200 PER NAUTICAL MILE
OPEN COLLECTOR, ACTIVE LOW
17
18
19 BATTERY SENSE
BLUE
BROWN
3m CABLE 135-0A-096
20
21SATNAV PULSE OUTPUT
GROUND
BROWN
BLUE
GROUND
+12V DC SUPPLY
NETWORK TERMINATOR
FITTED WITHIN
NETWORK TERMINATORFITTED WITHIN
20/20 DISPLAY
FULL FUNCTION DISPLAYHALCYON DISPLAY
TERMINAL FUNCTION CABLE & WIRE COLOUR
ALARM UNIT
SYSTEM NETWORK
POWER SUPPLY
3m CABLE 135-0A-096
10m CABLE 135-0A-130
3m CABLE 135-0A-096
SATNAV PULSES
NOTE:TERMINATORS MUST BE FITTEDACROSS THE GREEN AND WHITEWIRES AT EACH END OF THE NETWORK(ONLY TWO REQUIRED PER SYSTEM)
Halcyon Hercules 2000
1918171615141312 20 21
DEP
20/20
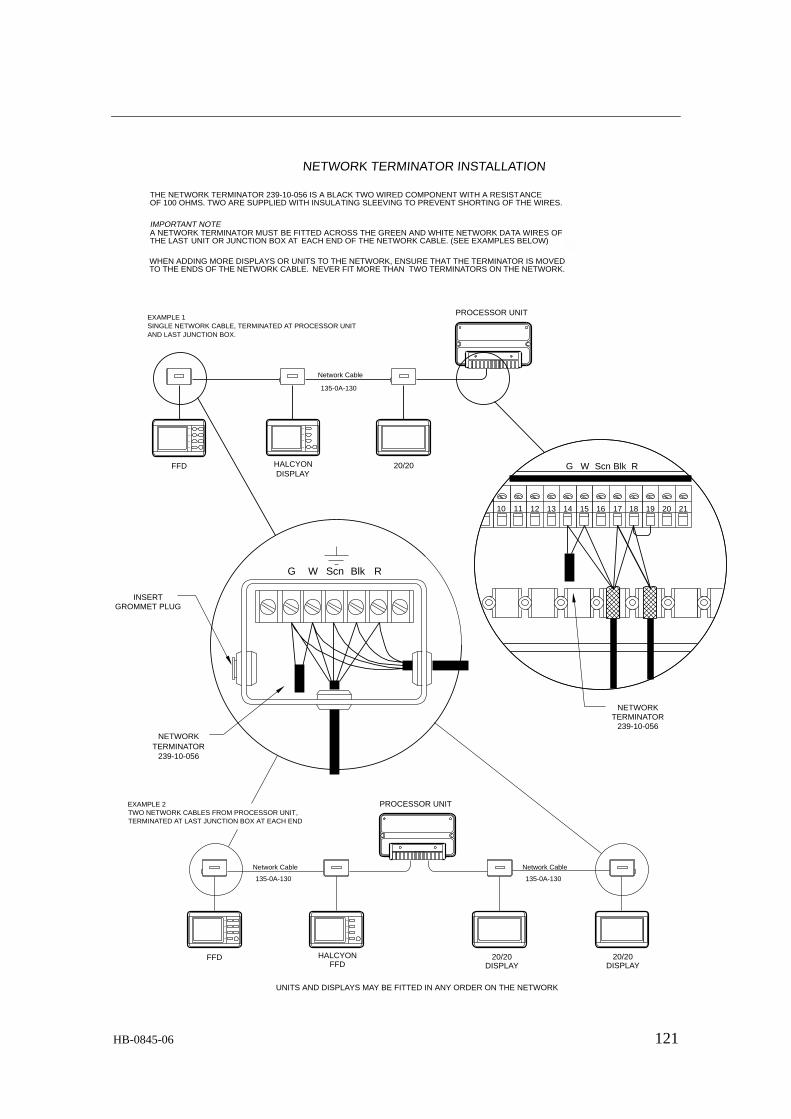
HB-0845-06 121
20/20DISPLAY
20/20DISPLAY
135-0A-130
Network Cable
PROCESSOR UNIT
HALCYONFFD
FFD
Network Cable
135-0A-130
PROCESSOR UNIT
20/20DISPLAY
HALCYONFFD
135-0A-130
Network Cable
THE NETWORK TERMINATOR 239-10-056 IS A BLACK TWO WIRED COMPONENT WITH A RESISTANCEOF 100 OHMS. TWO ARE SUPPLIED WITH INSULATING SLEEVING TO PREVENT SHORTING OF THE WIRES.
A NETWORK TERMINATOR MUST BE FITTED ACROSS THE GREEN AND WHITE NETWORK DATA WIRES OFTHE LAST UNIT OR JUNCTION BOX AT EACH END OF THE NETWORK CABLE. (SEE EXAMPLES BELOW)
WHEN ADDING MORE DISPLAYS OR UNITS TO THE NETWORK, ENSURE THAT THE TERMINATOR IS MOVEDTO THE ENDS OF THE NETWORK CABLE. NEVER FIT MORE THAN TWO TERMINATORS ON THE NETWORK.
UNITS AND DISPLAYS MAY BE FITTED IN ANY ORDER ON THE NETWORK
SINGLE NETWORK CABLE, TERMINATED AT PROCESSOR UNITAND LAST JUNCTION BOX.
TWO NETWORK CABLES FROM PROCESSOR UNIT,TERMINATED AT LAST JUNCTION BOX AT EACH END
TERMINATOR239-10-056
239-10-056TERMINATOR
NETWORK
INSERTGROMMET PLUG
EXAMPLE 1
EXAMPLE 2
RBlkScnWG
RBlkScnWG
10 11 12 13 14 15 16 17 18 19 20 21
NETWORK TERMINATOR INSTALLATION
IMPORTANT NOTE
NETWORK
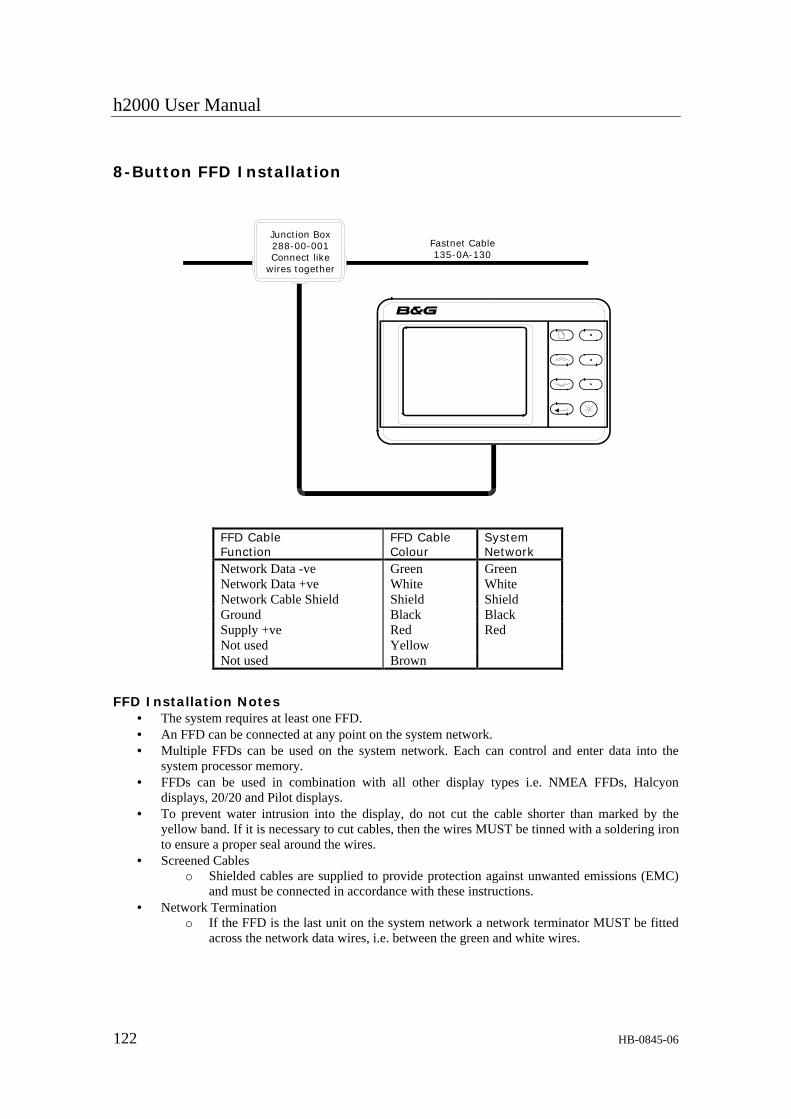
h2000 User Manual
122 HB-0845-06
8-Button FFD Installation
Junction Box288-00-001Connect like
wires together
Fastnet Cable135-0A-130
FFD Cable Function
FFD Cable Colour
System Network
Network Data -ve Green Green Network Data +ve White White Network Cable Shield Shield Shield Ground Black Black Supply +ve Red Red Not used Yellow Not used Brown
FFD Installation Notes • The system requires at least one FFD. • An FFD can be connected at any point on the system network. • Multiple FFDs can be used on the system network. Each can control and enter data into the
system processor memory. • FFDs can be used in combination with all other display types i.e. NMEA FFDs, Halcyon
displays, 20/20 and Pilot displays. • To prevent water intrusion into the display, do not cut the cable shorter than marked by the
yellow band. If it is necessary to cut cables, then the wires MUST be tinned with a soldering iron to ensure a proper seal around the wires.
• Screened Cables o Shielded cables are supplied to provide protection against unwanted emissions (EMC)
and must be connected in accordance with these instructions. • Network Termination
o If the FFD is the last unit on the system network a network terminator MUST be fitted across the network data wires, i.e. between the green and white wires.

HB-0845-06 123
6
2 2 2
"Return to Zero" meters must have terminals 4 and 5 linked; i.e. Boat Speed, Wind Speed, Depth,Rudder Angle and Heel Angle.
Meters are shown in Factory set configuration. To reconfigure refer to section 5 of the Manual.
1 2 3 4
5 6 7 8 9 10 11
1234
5678
91011
METER 1 SINCOS WIND ANGLE
METER 2 SINCOS
METER 3 SINCOS
METER 4 SINCOS
METER LIGHTING 12VMETER COMMONMETER GROUND
WIND ANGLE
DEPTHDEPTH
BOAT SPEEDBOAT SPEEDWIND SPEEDWIND SPEED
GREENBLUEREDVIOLET
REDVIOLETGREENBLUE
YELLOWORANGEBLACK
METER 1WIND ANGLE215-HL-016
METER 2DEPTH
215-HL-025
METER 3BOAT SPEED215-HL-019
METER 4WIND SPEED215-HL-022
COM
SIN
COS
GND
LIGHTING COS
SIN
COMGND
GREENYELLOW
BLACK
BLUE
ORANGEVIO
LETRED
GREEN
BLUE
ORANGEVIOLET
BLACKYELLOW
RED
GNDCOM
SIN
COSLIGHTING
GND
COS
SIN
COM
MAIN PROCESSORTERMINALS
ORANGE ORANGE
2 x2 x2 x
TERMINAL FUNCTION CABLE & WIRE COLOUR
METERS 1 & 2
METERS 3 & 4
ALL METERS COMMON
19m CABLE 135-0A-095PART OF
19m CABLE 135-0A-095
ANALOGUE METERS
ELECTRICAL INSTALLATION SHEET
3 4
2
1
5
3 4
61
5
3 4
61
5
3 4
61
5
135-0A-095135-0A-095
PART OF
LINK
LINK
LINK

h2000 User Manual
124 HB-0845-06
Depth TransducerSEN-DEPTH-H
Paddle/Sea Temp. SensorSEN-SPEED-H
363534333231302928
MAIN PROCESSORUNIT
FOLD BACK SCREENAROUND CABLE AND SECURE
UNDER METAL CLAMP
CUT OFF BLUE WIRE
DEPTH AND PADDLEELECTRICAL INSTALLATION SHEET
NO CONNECTION
DEPTH -DEPTH +
PADDLE INPUT
GROUNDSEA TEMP./PADDLE SUPPLYSEA TEMP. INPUT
2930
3132333435
BLACKBLUE
GREEN
RED AND WHITEYELLOW
BLACK
FUNCTION CABLE WIRE COLOURTERMINAL
DEPTH TRANSDUCER
PADDLE/SEA TEMP. SENSOR
16m CABLE ATTACHED
16m CABLE ATTACHED
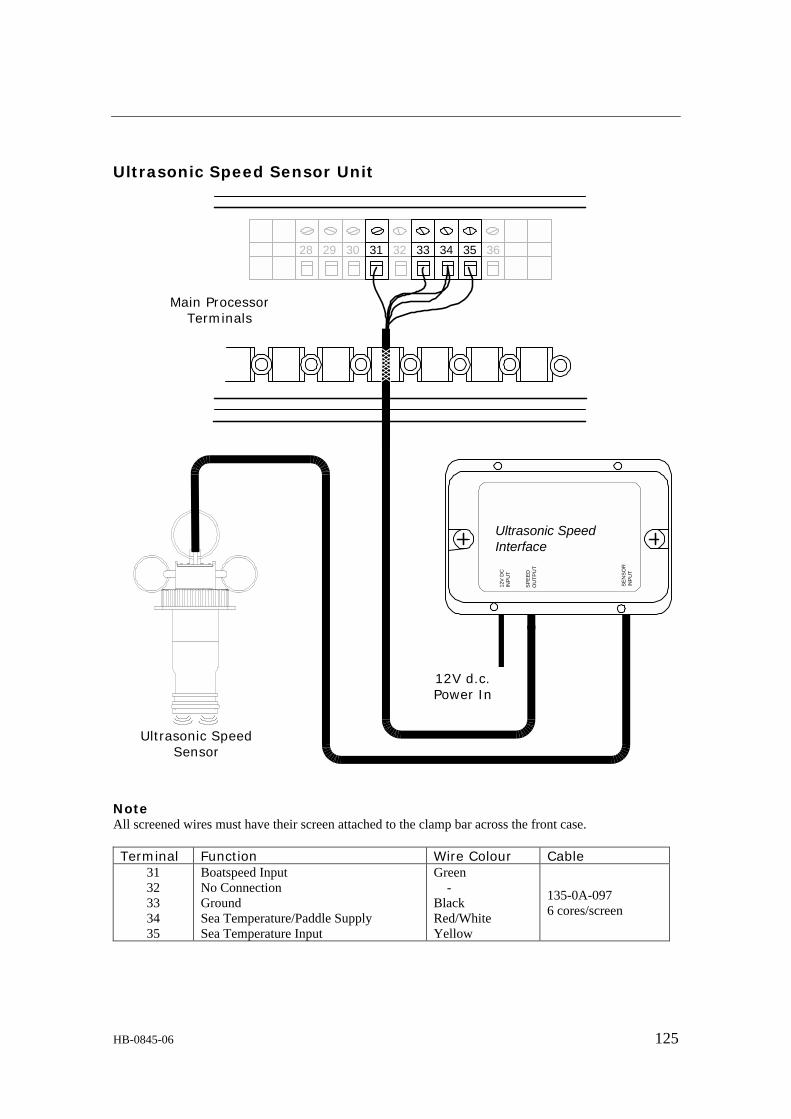
HB-0845-06 125
Ultrasonic Speed Sensor Unit
28 29 30 31 32 33 34 35 36
Main ProcessorTerminals
12V d.c.Power In
Ultrasonic SpeedInterface
Ultrasonic SpeedSensor
SEN
SO
RIN
PUT
SPE
ED
OU
TPU
T
12V
DC
INPU
T
Note All screened wires must have their screen attached to the clamp bar across the front case. Terminal Function Wire Colour Cable
31 32 33 34 35
Boatspeed Input No Connection Ground Sea Temperature/Paddle Supply Sea Temperature Input
Green - Black Red/White Yellow
135-0A-097 6 cores/screen

h2000 User Manual
126 HB-0845-06
Pulse 2 Input (Secondary boat speed input)
33 34 36
Cut back and insulateunused wires
Fold back screen aroundcable and secure under
metal clamp bar
Main ProcessorUnit
Terminal Function Wire Colour 33 34 35 36
Ground (0V) Paddlewheel Supply (5V) No connection Pulse 2 Input
Black Red Green
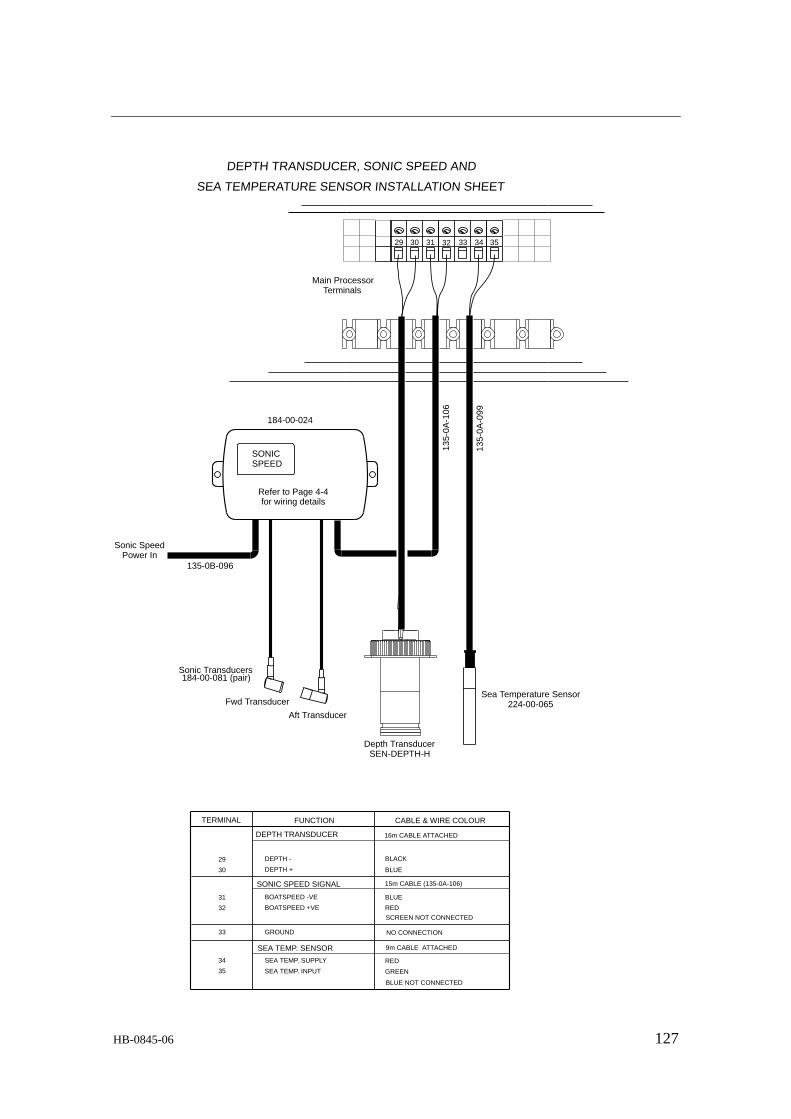
HB-0845-06 127
DEPTH TRANSDUCER
SONIC SPEED SIGNAL 15m CABLE (135-0A-106)
SEA TEMP. SENSOR 9m CABLE ATTACHED
DEPTH -
DEPTH +
BOATSPEED -VE
BOATSPEED +VE
GROUND
SEA TEMP. SUPPLY
SEA TEMP. INPUT
29
30
31
32
33
34
35
BLACK
BLUE
BLUE
RED
RED
GREEN
NO CONNECTION
SCREEN NOT CONNECTED
BLUE NOT CONNECTED
FUNCTION CABLE & WIRE COLOURTERMINAL
16m CABLE ATTACHED
Sonic Transducers184-00-081 (pair)
Fwd Transducer
Aft Transducer
35343332313029
Sea Temperature Sensor224-00-065
Main ProcessorTerminals
Sonic SpeedPower In
135-
0A-1
06
135-
0A-0
99
135-0B-096
DEPTH TRANSDUCER, SONIC SPEED AND
SEA TEMPERATURE SENSOR INSTALLATION SHEET
Depth TransducerSEN-DEPTH-H
SONICSPEED
184-00-024
Refer to Page 4-4for wiring details
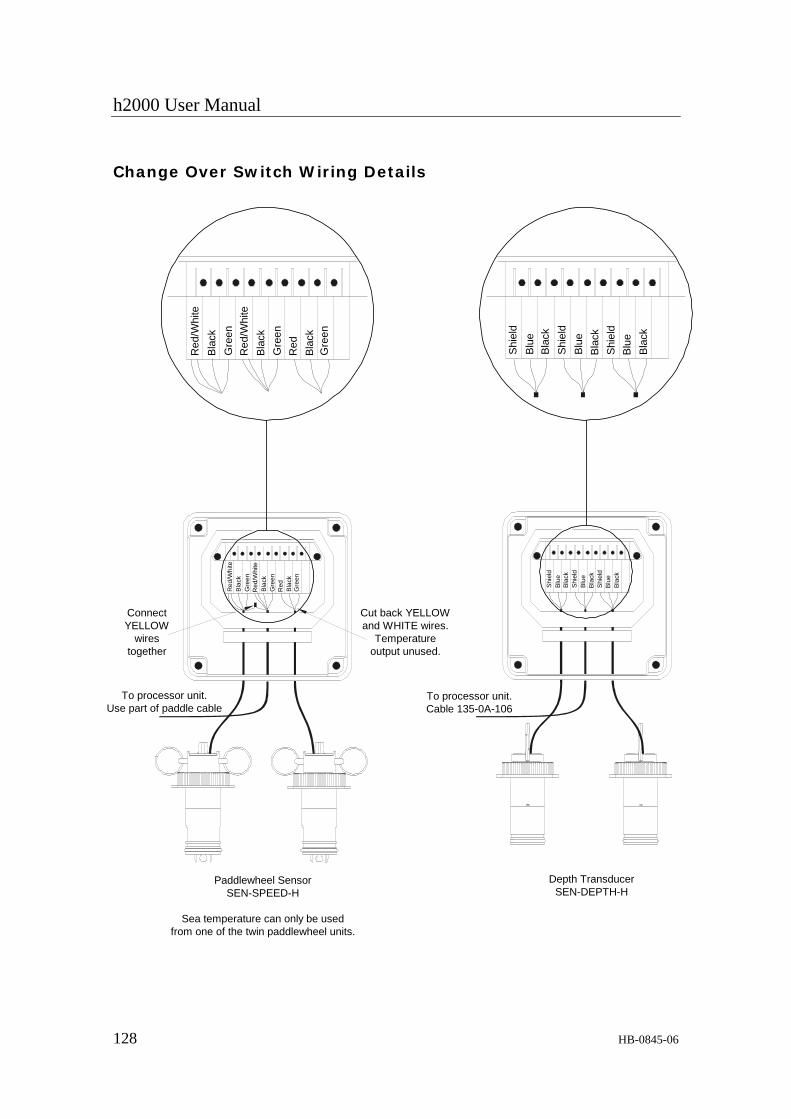
h2000 User Manual
128 HB-0845-06
Change Over Switch Wiring Details
Paddlewheel SensorSEN-SPEED-H
Sea temperature can only be usedfrom one of the twin paddlewheel units.
To processor unit.Use part of paddle cable
Cut back YELLOWand WHITE wires.
Temperatureoutput unused.
ConnectYELLOW
wirestogether
Red
/Whi
te
Red
/Whi
te
Blac
kG
reen
Blac
kG
reen
Red
Blac
kG
reen
Depth TransducerSEN-DEPTH-H
To processor unit.Cable 135-0A-106
Shie
ldBl
ueBl
ack
Shie
ldBl
ueBl
ack
Shie
ldBl
ueBl
ack
Shie
ldBl
ueBl
ack
Shie
ldBl
ueBl
ack
Shie
ldBl
ueBl
ack
Red
/Whi
te
Red
/Whi
te
Blac
kG
reen
Blac
kG
reen
Red
Blac
kG
reen
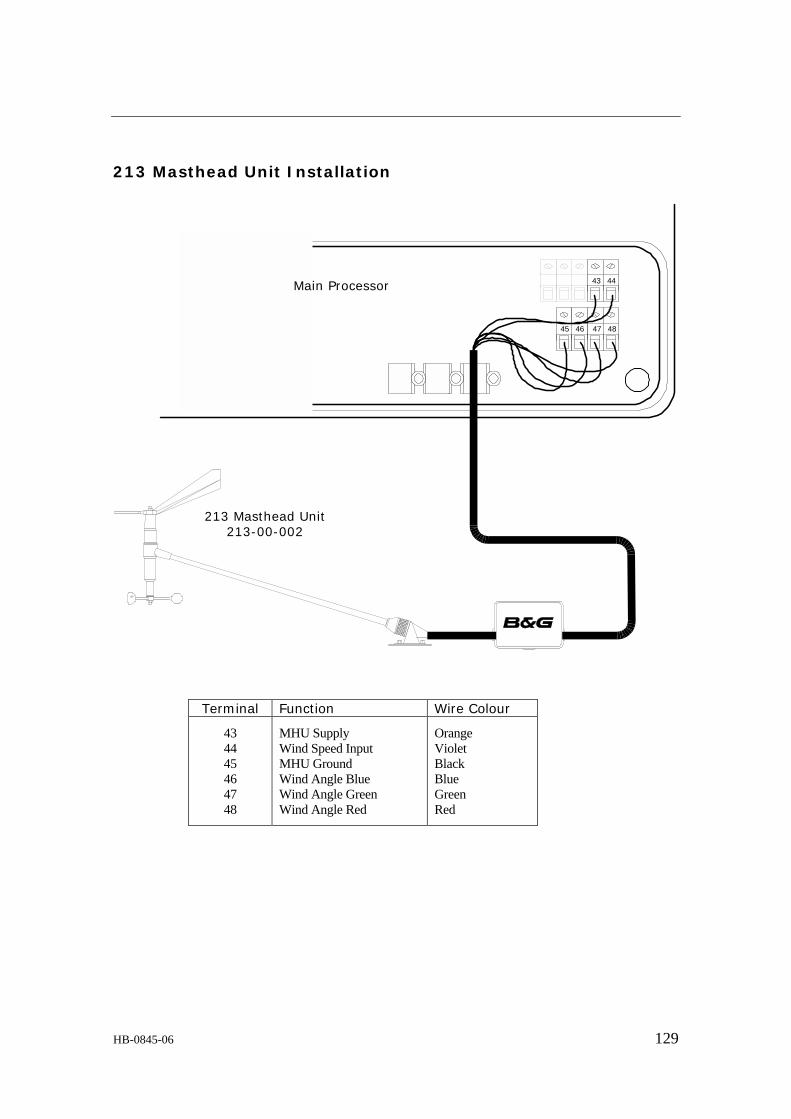
HB-0845-06 129
213 Masthead Unit Installation
213 Masthead Unit213-00-002
43 44
45 46 47 48
Main Processor
Terminal Function Wire Colour
43 44 45 46 47 48
MHU Supply Wind Speed Input MHU Ground Wind Angle Blue Wind Angle Green Wind Angle Red
Orange Violet Black Blue Green Red

h2000 User Manual
130 HB-0845-06
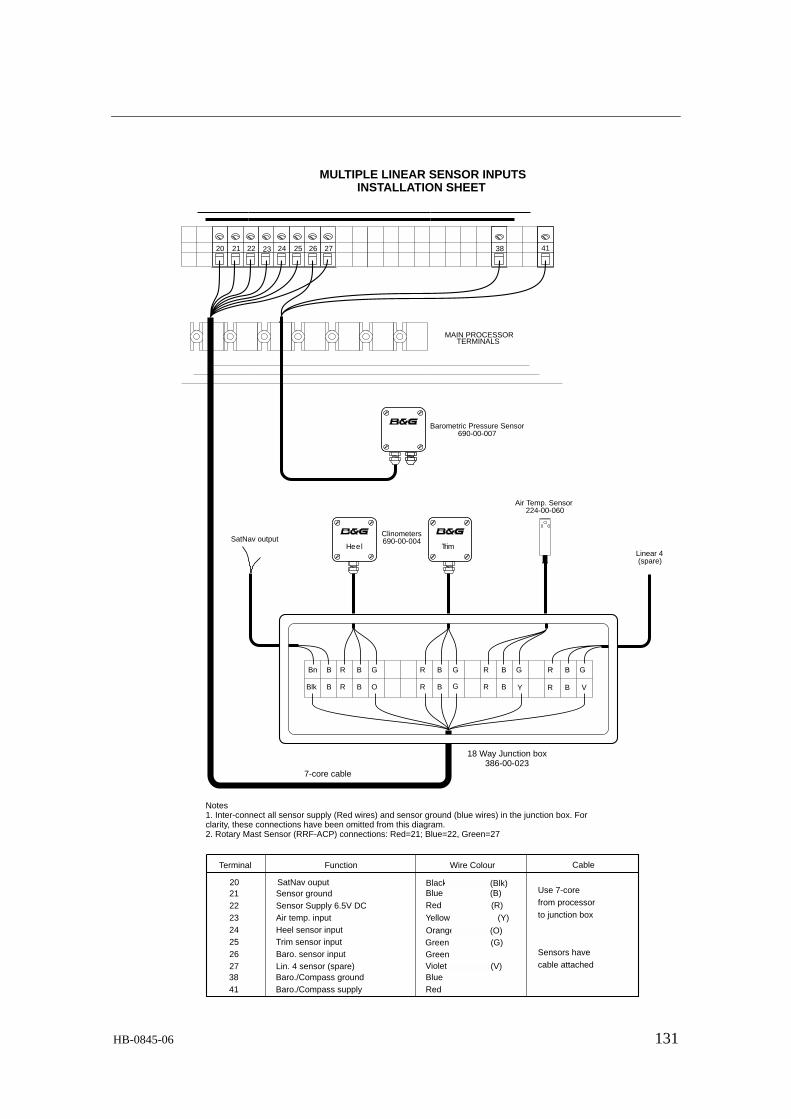
HB-0845-06 131
Green (G)
Terminal Function Wire Colour
21222324252627
Sensor groundSensor Supply 6.5V DCAir temp. inputHeel sensor inputTrim sensor inputBaro. sensor inputLin. 4 sensor (spare)
Blue (B)Red (R)
Green
3841
Baro./Compass groundBaro./Compass supply
BlueRed
MULTIPLE LINEAR SENSOR INPUTSINSTALLATION SHEET
41382726252423222120
Black
Orange
Violet
R G R G R GR GBBn B B B B
R B GBlk O Y VB R B R R BB
Air Temp. Sensor224-00-060
Linear 4(spare)
SatNav outputHeel Trim
Clinometers690-00-004
Barometric Pressure Sensor690-00-007
18 Way Junction box386-00-023
7-core cable
20 SatNav ouput
Yellow (Y)
Cable
Use 7-corefrom processorto junction box
Sensors havecable attached
(Blk)
(O)
(V)
MAIN PROCESSORTERMINALS
Notes1. Inter-connect all sensor supply (Red wires) and sensor ground (blue wires) in the junction box. Forclarity, these connections have been omitted from this diagram.2. Rotary Mast Sensor (RRF-ACP) connections: Red=21; Blue=22, Green=27

h2000 User Manual
132 HB-0845-06
CLINOMETER(HEEL)
690-00-004
BAROMETRICPRESSURE
SENSOR690-00-007
21
22
23
24
25
26
27
GROUND
SENSOR SUPPLY 6.5V DC
AIR TEMP. INPUT
LINEAR 1 INPUT (HEEL)
LINEAR 2 INPUT (TRIM)
LINEAR 3 INPUT (BARO)
LINEAR 4 INPUT (SPARE)
BLUE
RED
GREEN
GREEN
38
41
BARO. SENSOR GROUND
BARO. SENSOR SUPPLY
BLUE
RED
Ensure the boat is level and steady, a sheltered berth isrequired for best results.
For HEEL angle sensor select a transverse vertical bulkhead.
For TRIM angle sensor select a longitudinal vertical bulkhead.
For correct indication of port or starboard heel angle,mount the unit so that the top surface is horizontal andlevel, with the lid of the unit (labelled) facing aft.
Heel angle calibration should be carried out to ensureaccuracy. Refer to Manual, Section 4.
Mount the unit on a suitable vertical bulkhead, in a drylocation, protected from the direct influences of theelements ie. rain, salt spray and extremes of temperature.
Do not mount the sensor in a sealed compartment.
MAIN PROCESSORTERMINALS
20 21 22 23 24 25 26 27 38 41
TERMINAL FUNCTION CABLE & WIRE COLOUR
CLINOMETER INSTALLATION
BAROMETRIC PRESSURE SENSOR INSTALLATION
CLINOMETER SENSOR
PRESSURE SENSOR
CABLE ATTACHED
CABLE ATTACHED
CLINOMETER AND BAROMETRIC PRESSURESENSOR INSTALLATION SHEET

HB-0845-06 133
Main Processor NMEA Input
NMEA DataInput
40 42
Main ProcessorTerminals
NMEA signal flow:
Terminal Function 40 42
NMEA Input + NMEA Input -

h2000 User Manual
134 HB-0845-06
8-Button NMEA FFD Installation
Junction Box386-00-023
Fastnet Cable135-0A-130
Fastnet Cable135-0A-130
NMEAInput
NMEAOutput
Red
(+
)
Blu
e (-
)
Shie
ld
Red
(+
)
Blu
e (-
)NMEA signal flow
NMEA FFD Cable
Function FFD
Cable NMEA Input
NMEA Output (v1.5)
NMEA Output (v2.x)
Network Data -ve Green Network Data +ve White Network Cable Shield Shield Shield Shield Ground Black Blue Supply +ve Red NMEA Input (+) Brown Red NMEA Input (-) Blue Blue NMEA Output (+) Violet Red Red NMEA Output v2.xx (-) Yellow Blue
INSTALLATION NOTES
• An NMEA FFD can be connected at any point on the system network. Typically an NMEA FFD is mounted close to the NMEA device, e.g. at the chart table next to the GPS, thus minimising the NMEA cable routes.
• NMEA FFDs can be used in combination with all other display types, i.e. standard FFDs, Halcyon displays, 20/20 and Pilot displays.
• To prevent water intrusion into the display, do not cut the cable shorter than marked by the yellow band. If it is necessary to cut cables, then the wires MUST be tinned with a soldering iron to ensure a proper seal around the wires.
SCREENED CABLES • Shielded NMEA cables are supplied to provide protection against unwanted emissions (EMC) and must
be connected in accordance with these instructions. • NMEA cable shields must be connected at the TRANSMITTING end. • The NMEA output cable shield should be connected to the other cable shields in the junction box
supplied.
NETWORK TERMINATION • If the NMEA FFD is the last unit on the system network a network terminator MUST be fitted across the
network data wires, i.e. between the green and white wires. Only two network terminators are required per system.
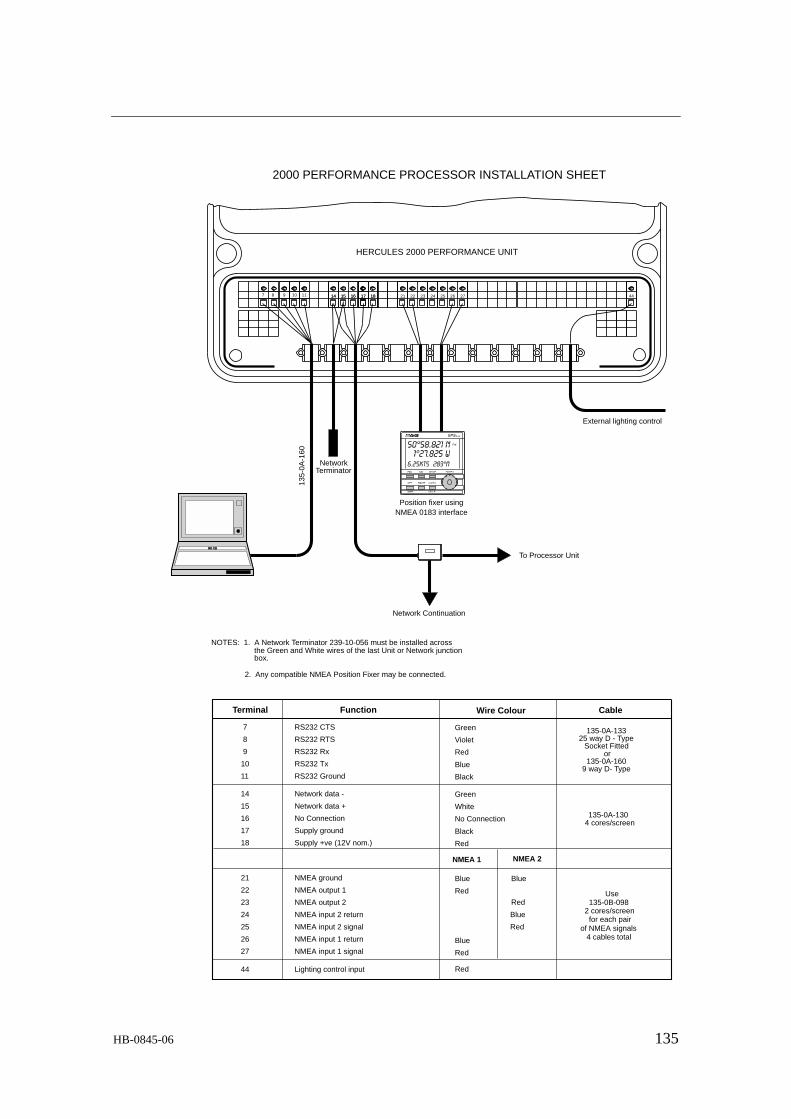
HB-0845-06 135
External lighting control
Terminal Function Wire Colour
14
15
16
17
18
21
22
23
24
25
26
27
44
Network data -
Network data +
No Connection
Supply ground
Supply +ve (12V nom.)
NMEA ground
NMEA output 1
NMEA output 2
NMEA input 2 return
NMEA input 2 signal
NMEA input 1 return
NMEA input 1 signal
Lighting control input
Black
Red
Blue
Red
Blue
Red
Green
White
No Connection
Red
Cable
135-0A-1304 cores/screen
135-0B-0982 cores/screen
To Processor Unit
Network Continuation
2000 PERFORMANCE PROCESSOR INSTALLATION SHEET
Position fixer usingNMEA 0183 interface
NetworkTerminator
NOTES: 1. A Network Terminator 239-10-056 must be installed acrossthe Green and White wires of the last Unit or Network junctionbox.
NMEA 1 NMEA 2
Blue
Blue
Red
Red
Use
for each pairof NMEA signals
4 cables total
2. Any compatible NMEA Position Fixer may be connected.
1110987 44272625242322211817161514 181716151413
5-0A
-160
HERCULES 2000 PERFORMANCE UNIT
7
8
9
10
11
RS232 CTS
RS232 RTS
RS232 Rx
RS232 Tx
RS232 Ground
Blue
Black
Green
Violet
Red
135-0A-13325 way D - Type
Socket Fittedor
135-0A-1609 way D- Type
RD CD
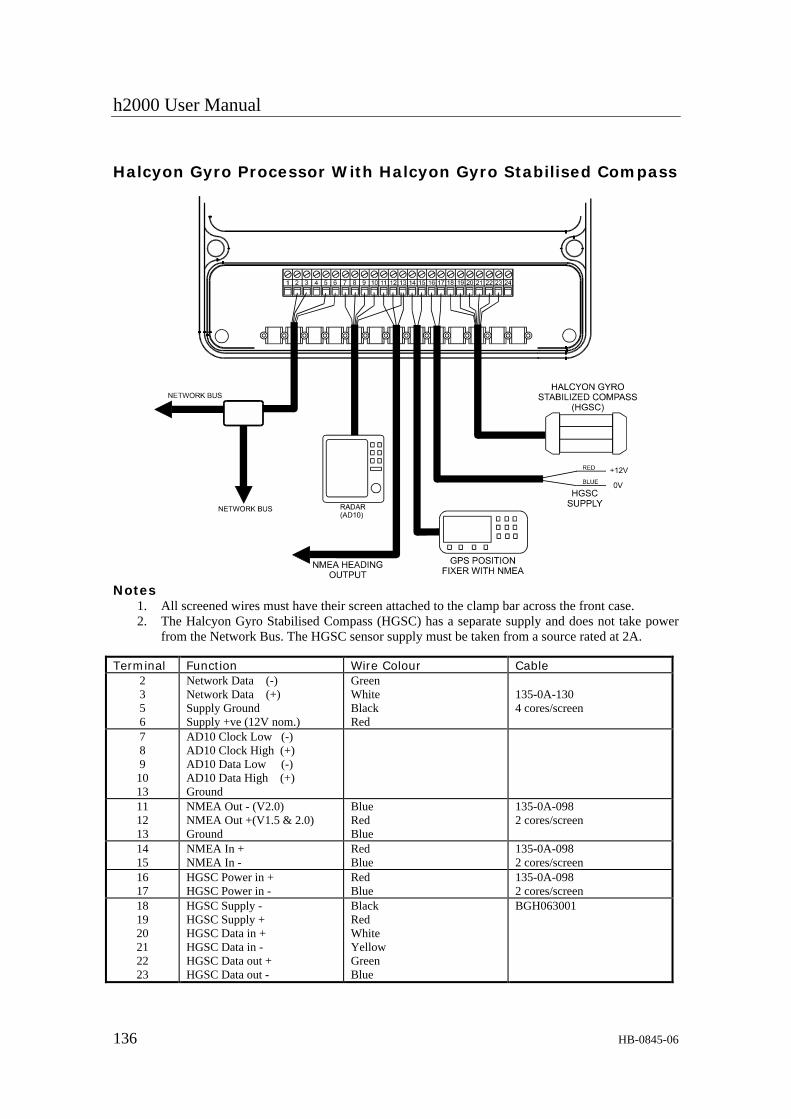
h2000 User Manual
136 HB-0845-06
Halcyon Gyro Processor With Halcyon Gyro Stabilised Compass
Notes
1. All screened wires must have their screen attached to the clamp bar across the front case. 2. The Halcyon Gyro Stabilised Compass (HGSC) has a separate supply and does not take power
from the Network Bus. The HGSC sensor supply must be taken from a source rated at 2A. Terminal Function Wire Colour Cable
2 3 5 6
Network Data (-) Network Data (+) Supply Ground Supply +ve (12V nom.)
Green White Black Red
135-0A-130 4 cores/screen
7 8 9 10 13
AD10 Clock Low (-) AD10 Clock High (+) AD10 Data Low (-) AD10 Data High (+) Ground
11 12 13
NMEA Out - (V2.0) NMEA Out +(V1.5 & 2.0) Ground
Blue Red Blue
135-0A-098 2 cores/screen
14 15
NMEA In + NMEA In -
Red Blue
135-0A-098 2 cores/screen
16 17
HGSC Power in + HGSC Power in -
Red Blue
135-0A-098 2 cores/screen
18 19 20 21 22 23
HGSC Supply - HGSC Supply + HGSC Data in + HGSC Data in - HGSC Data out + HGSC Data out -
Black Red White Yellow Green Blue
BGH063001

HB-0845-06 137
Halcyon Gyro Processor With NMEA Gyro Input
Note
1. All screened wires must have their screen attached to the clamp bar across the front case. Terminal Function Wire Colour Cable
2 3 5 6
Network Data (-) Network Data (+) Supply Ground Supply +ve (12V nom.)
Green White Black Red
135-0A-130 4 cores/screen
7 8 9
10 13
AD10 Clock Low (-) AD10 Clock High (+) AD10 Data Low (-) AD10 Data High (+) Ground
11 12 13
NMEA Out - (V2.0) NMEA Out +(V1.5 & 2.0) Ground
Blue Red Blue
135-0A-098 2 cores/screen
14 15
NMEA In + NMEA In -
Red Blue
135-0A-098 2 cores/screen
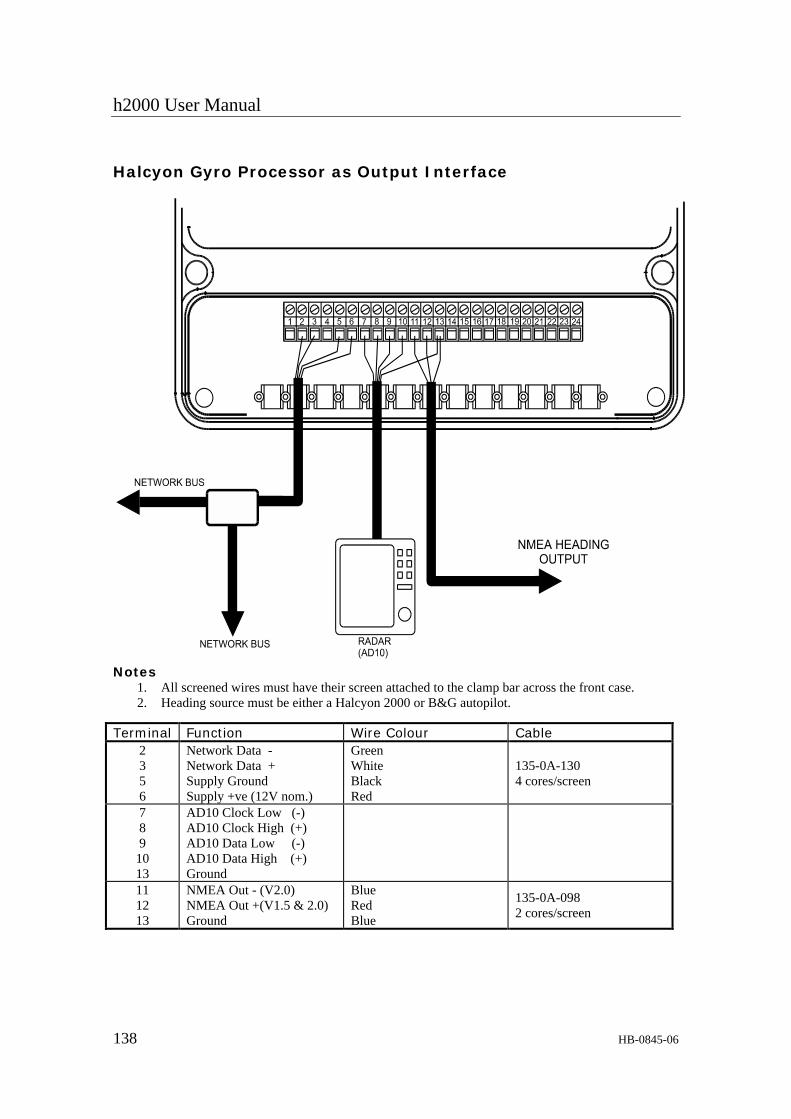
h2000 User Manual
138 HB-0845-06
Halcyon Gyro Processor as Output Interface
Notes 1. All screened wires must have their screen attached to the clamp bar across the front case. 2. Heading source must be either a Halcyon 2000 or B&G autopilot.
Terminal Function Wire Colour Cable 2 3 5 6
Network Data - Network Data + Supply Ground Supply +ve (12V nom.)
Green White Black Red
135-0A-130 4 cores/screen
7 8 9
10 13
AD10 Clock Low (-) AD10 Clock High (+) AD10 Data Low (-) AD10 Data High (+) Ground
11 12 13
NMEA Out - (V2.0) NMEA Out +(V1.5 & 2.0) Ground
Blue Red Blue
135-0A-098 2 cores/screen

HB-0845-06 139
CHAPTER 5: OPTIONS
5.1 SYSTEM EXPANSION The h2000 System may be expanded to provide a wider range of facilities and features by the addition of further displays, sensors, and interfaces. These Options are described in the following Paragraphs 5.2 - SENSORS.
Further sensors can be added to improve the accuracy of the data already available and to supply new information.
5.2 SENSORS
5.2.1 Heel Angle Sensor
The addition of heel to the system provides display of Heel Angle and increases the accuracy of the following functions:
Apparent Wind Angle Apparent Wind Speed True Wind Angle True Wind Speed True Wind Direction Course Dead Reckoning Tidal Set and Drift
5.2.2 Mast Rotation Sensor
This is essential if your mast rotates, otherwise the wind data will become inaccurate as the mast rotates away from the centreline. The addition of this unit gives two new functions, the Wind Angle to the Mast (W/A MAST) and Mast Angle (MAST ANG).
h2000 User Manual
140 HB-0845-06
5.2.3 Trim Angle Sensor
Provides display of Trim Angle and increases the accuracy of the following functions:
Apparent Wind Angle Apparent Wind Speed True Wind Angle True Wind Speed True Wind Direction
5.2.4 Barometric Pressure Sensor
Measures the atmospheric pressure, allowing the Main Processor to record atmospheric pressure changes over varying periods of time.
5.2.5 Rudder Angle Sensor
The addition of a Rudder Angle can be very useful, indicating how the boat is balanced.
5.2.6 Sea Temperature Sensor
Measures the seawater temperature.
5.2.7 Air Temperature Sensor
Measures the air temperature.
5.2.8 Load Cells
Up to 12 B&G loadcells can be added to the h2000 system via the Fastnet databus (refer to the B&G Loadcell Installation/Calibration Manual). If desired, loadcells may be connected as non-networked devices and wired directly to the linear inputs of the h2000 Main Processor. These loadcells should provide a linear output voltage in the range of 0 to 6.5 volts.

HB-0845-06 141
5.2.9 Sensor Input Configuration
Additional sensors can be added to the system connecting to one of the four linear inputs on the main processor. Linear channels 5 to 16 are available with the addition of an Expansion Processor. These can be configured to take different sensors. If you connect the sensor to the linear input that B&G have anticipated then you need take no action beyond the connection itself, since the default linear input configuration will be the right one. The default settings for the four inputs are as follows:
Linear 1 = Heel Angle (4) Linear 2 = Trim Angle (5) Linear 3 = Barometric Pressure (6) Linear 4 = 0 to 1000 format (1)
Should you wish to connect one of the other sensors, then you will have to reconfigure the input linear channel that you are connecting it to. This is done by following the menu path:
MISC →→→→ LINEAR X, CALBRATE →→→→ CAL VAL1
The number you enter to CAL VAL1 should correspond to the sensor you are connecting as follows:
-2 = Normal Linear output to 2 decimal places -1 = Normal Linear output to 1 decimal place 0 = Normal Linear output 0-1000 1 = Normal Linear output 0-1000 2 = Normal Linear output 0-1000 3 = Rotating Mast Correction (output Mast Angle
and Wind Angle to Mast) 4 = Heel Angle 5 = Trim Angle 6 = Barometric Pressure and Pressure Trend 7 = Rudder Angle

h2000 User Manual
142 HB-0845-06
Note
Do not select the same number on more than one linear input, otherwise the selection will be ignored (no function can be connected to more than one input except the Normal Linear input which is not limited).
5.3 DISPLAYS Further displays and controllers can be added to the system. These include additional FFDs, the RemoteVision, the 20/20 or 40/40 Display (see Para 5.4 and 5.5), the Halcyon Display, and all the different types of analogue indicators.
5.3.1 Halcyon Display
The Halcyon display is a digital display dedicated to compass heading. It incorporates a graphic analogue indicator which shows clearly whether you are higher or lower than the set heading. This can be used in two ways:
a. As an off course indicator which many people find easier to steer to than either a conventional card compass or numerical display.
b. As a tactical race compass - showing whether you are headed or lifted.
You can fit as many of these displays as you require.
Two analogue indicators are available specifically for these functions (Off Course and Trend), see below.
5.3.2 Analogue Indicators
Up to four analogue indicators can be added to the basic system. If more are required then an Expansion Unit can be used allowing another four analogue indicators onto the system. The four indicators can be selected from the following list:

HB-0845-06 143
Boatspeed Depth Windspeed Apparent Wind Angle Magnified Wind Angle Compass Heading Cross Track Error Trend* Rudder Heel Off Course* True Wind Angle
Note
• Items marked with * are only available with the Halcyon Display.
5.3.3 Analogue Indicator Configuration
If meters other than the defaults are chosen then it is necessary to reconfigure the meter drive outputs from the Computer Unit. This is done from any FFD as follows:
1. Power up the system with the Enter Key pressed, DIAGNOST appears.
2. Press Scroll Up, CNFG SYS appears, press Enter to select this option, now press Enter again to select the METERS option.
3. With OPTIONS flashing, press Enter, METER 1 appears, the Scroll Up Key is now used to scroll through the meter drives (Refer to the installation sheet to determine the meter options and their respective meter drives).
4. With the appropriate meter drive flashing in the top display, press Enter to reveal the current option assigned to that meter. Pressing Scroll Up at this stage, and then Enter again, will reveal the METER 2 option. Repeating this process will reveal the METER 3 and METER 4 options as required.
5. With the meter number and option on display, press Enter, the lower text will flash. Use Scroll Down to scroll through the options until the appropriate one (e.g. DEPTH) is shown. Pressing

h2000 User Manual
144 HB-0845-06
Enter will select that option, and the meter drive will be configured to drive a DEPTH meter.
6. Press Page to return to normal operation. Note
It is possible to configure more than one meter drive to the same meter option (e.g. BOAT SPD on METER 1 and METER 2).
5.3.4 Meter Scaling
Meter scaling can also be varied for boat speed and wind speed. For example, if a 25 knot full scale Boatspeed Meter is required, this can be done as follows:
1. Follow steps (1) and (2) as detailed in Para 5.3.3. 2. With OPTIONS flashing, press Scroll Up to
reveal SCALING, press Enter, BOAT SPD will appear. A further press of Enter will reveal the current maximum meter scale value for the Boatspeed Meter.
3. To change this (e.g. to 25 knots) press Enter and then Scroll Up to increase the number to 25.0. A final press of Enter will then enter the new maximum scale. The Boatspeed Meter will read between 0 and 25 knots.
4. Press Page to return to normal operation.
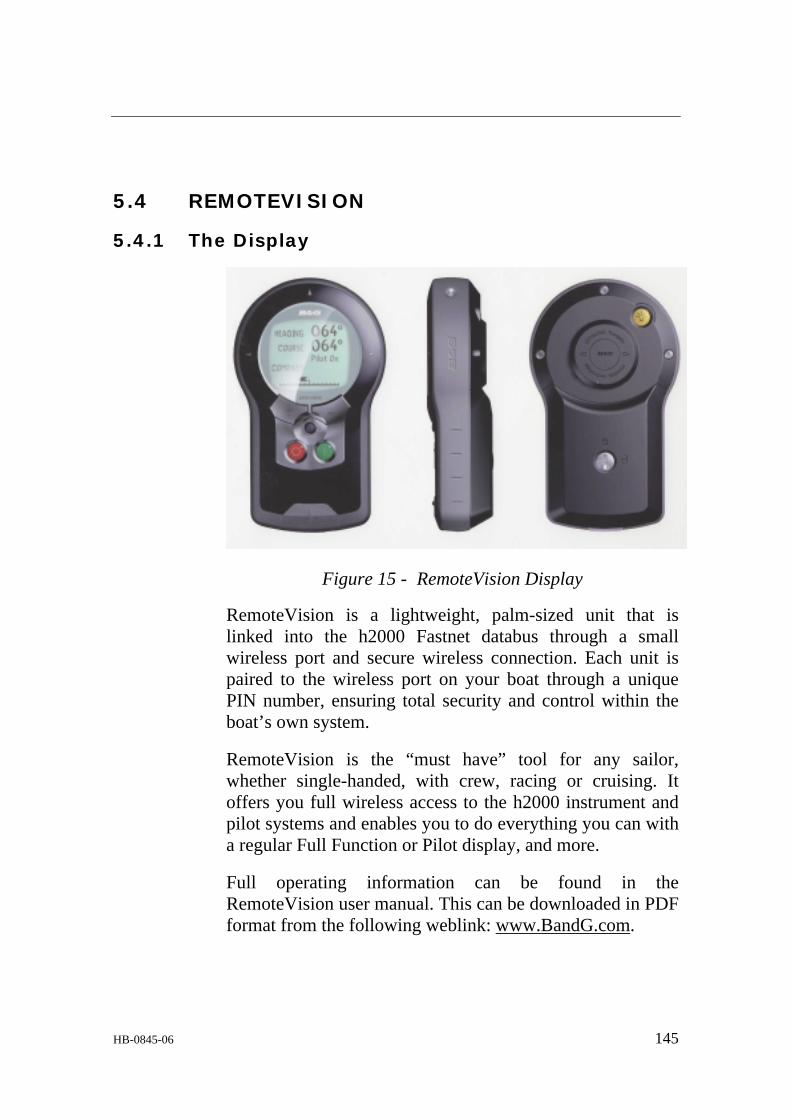
HB-0845-06 145
5.4 REMOTEVISION
5.4.1 The Display
Figure 15 - RemoteVision Display
RemoteVision is a lightweight, palm-sized unit that is linked into the h2000 Fastnet databus through a small wireless port and secure wireless connection. Each unit is paired to the wireless port on your boat through a unique PIN number, ensuring total security and control within the boat’s own system.
RemoteVision is the “must have” tool for any sailor, whether single-handed, with crew, racing or cruising. It offers you full wireless access to the h2000 instrument and pilot systems and enables you to do everything you can with a regular Full Function or Pilot display, and more.
Full operating information can be found in the RemoteVision user manual. This can be downloaded in PDF format from the following weblink: www.BandG.com.

h2000 User Manual
146 HB-0845-06
5.5 20/20 DISPLAY
5.5.1 The Display
The 20/20 is a fully programmable, single function, large digit, display which may be installed anywhere in the yacht.
Figure 16 - 20/20 Display
5.5.2 Display Configuration
The 20/20 may be configured to display any function available on your h2000 System. It is however provided with 14 pre-set functions which may be selected by use of a Remote Button connected to the display or via any FFD on the system.
The pre-set functions are as follows: Boatspeed Depth m Depth ft Apparent Wind Speed Apparent wind Angle True Wind Speed True Wind Angle Velocity Made Good Compass heading Timer Count Up/Down Bearing to Waypoint* Course Over Ground* Speed Over Ground* True Wind Direction
HB-0845-06 147
Note
• Functions marked with an * are NMEA Functions and are available only when a suitable Position Fixer is interfaced with the system.
5.5.3 Function Selection - Remote Pushbutton
If a Remote Button is connected to a 20/20 Display any one of the 14 pre-set functions may be selected by pressing and holding down the associated Button. The Display will then cycle through the functions. When the required function is displayed, release the Button.
If the Button is held down too long and the required function is missed, press and hold down the Button again. The Display will then cycle though the functions in reverse order. When the required function is displayed, release the Button.
5.5.4 Function Selection - FFD
An alternative to using a dedicated Remote Pushbutton, is to control the 20/20 using any one of the standard FFDs on the system. Any 20/20 can be controlled from any FFD.
To change the function displayed on a 20/20 using a standard FFD, proceed as follows:
1. At the FFD, press and hold down the Page Key for approximately 3 seconds. The FFD display will change to show the function displayed on the 20/20 together with the display number. The selected 20/20 display will start to flash.
2. (2) Using the Scroll Down Key cycle through the 20/20 numbers and select the required Display Number, the selected 20/20 will flash.
3. Using the Scroll Up Key cycle through the 14 pre-set functions until the required function is displayed on the FFD. Release the Scroll Up Key.

h2000 User Manual
148 HB-0845-06
4. If the function is missed, press and hold down the Scroll Up Key and the functions will cycle through in reverse order. Release the Scroll Up Key when the required function is displayed.
5. Press the Page Key. The FFD will now return to normal operation and the 20/20 will display the selected function.
5.5.5 Re-configuring 20/20 Display
In addition to the 14 pre-set functions, any one of the 20/20 Displays may be re-configured to show any other function available to the system. This feature allows any 20/20 to be set-up to show the information most useful to the user at that station in the yacht.
The procedure for re-configuring a 20/20 function is as follows:
1. At the FFD, press and hold down the Page Key for at least 3 seconds. The FFD will change to show the function displayed on the 20/20 together with the display number.
2. Using the Scroll Down Key, cycle through the 20/20 numbers and select the one required.
3. Using the Scroll Up Key select the function you wish to change.
4. Press the Enter Key and the function currently being displayed on the 20/20 will commence to flash.
5. Press and hold down the Scroll Up Key and cycle through the normal FFD Menu until the required function choice is displayed (e.g. NAVIGATE).
6. Press and hold down the Scroll Down Key until the required operational choice is displayed (e.g. COURSE).
7. Press the Enter Key to accept the selection.

HB-0845-06 149
8. Press the Page Key and the FFD will return to normal operation and the 20/20 displays the newly configured page.
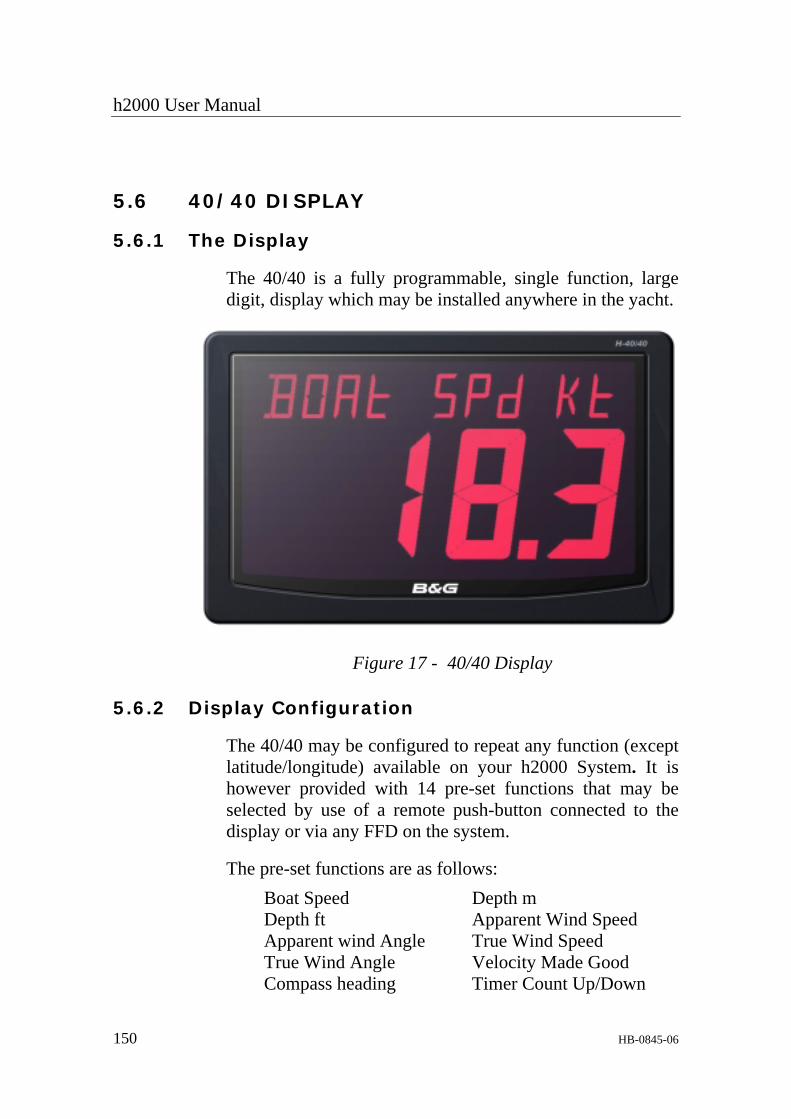
h2000 User Manual
150 HB-0845-06
5.6 40/40 DISPLAY
5.6.1 The Display
The 40/40 is a fully programmable, single function, large digit, display which may be installed anywhere in the yacht.
Figure 17 - 40/40 Display
5.6.2 Display Configuration
The 40/40 may be configured to repeat any function (except latitude/longitude) available on your h2000 System. It is however provided with 14 pre-set functions that may be selected by use of a remote push-button connected to the display or via any FFD on the system.
The pre-set functions are as follows: Boat Speed Depth m Depth ft Apparent Wind Speed Apparent wind Angle True Wind Speed True Wind Angle Velocity Made Good Compass heading Timer Count Up/Down

HB-0845-06 151
Bearing to Waypoint* Course Over Ground* Speed Over Ground* True Wind Direction
Note
• Functions marked with an * are NMEA Functions and are available only when a suitable Position Fixer is interfaced with the system.
5.6.3 Function Selection - Remote Push-Button
If a remote push-button is connected to a 40/40 display any one of the 14 pre-set functions may be selected by pressing and holding down the associated button. The display will then cycle through the functions. When the required function is displayed, release the button.
If the button is held down too long and the required function is missed, press and hold down the button again. The display will then cycle through the functions in reverse order. When the required function is displayed, release the button.
5.6.4 Function Selection - FFD
An alternative to using a dedicated remote push-button, is to control the 40/40 using any one of the standard FFDs on the system. Any 40/40 can be controlled from any FFD.
To change the function shown on a 40/40 using an FFD, proceed as follows:
1. At the FFD, press and hold down the Page Key for at least 3 seconds. The FFD display will change to show the function displayed on the 40/40 together with the display number. The selected display will start to flash.
2. Using the Scroll Down Key cycle through the 40/40 numbers and select the required display number.

h2000 User Manual
152 HB-0845-06
3. Using the Scroll Up Key cycle through the 14 pre-set functions until the required function is displayed on the FFD. Release the Scroll Up Key.
4. If the function is missed, press and hold down the Scroll Up Key and the functions will cycle through in reverse order. Release the Scroll Up Key when the required function is displayed.
5. Press the Page Key. The FFD will now return to normal operation and the 40/40 will display the selected function.
5.6.5 Re-configuring the 40/40 Display
In addition to the 14 pre-set functions, any 40/40 pre-set function may be re-configured to show any other function available to the system. This feature allows any 40/40 to be set-up to show the information most useful to the user at that station in the yacht.
The procedure for re-configuring a 40/40 function is as follows:
1. At the FFD, press and hold down the Page Key for at least 3 seconds. The FFD will change to show the function displayed on the 40/40 together with the display number.
2. Using the Scroll Down Key, cycle through each 40/40 display in turn (display flashes) and stop at your desired choice.
3. Using the Scroll Up Key select the function you wish to change.
4. Press the Enter Key and the function currently being displayed on the 40/40 will start to flash.
5. Press and hold the Scroll Up Key and cycle through the normal FFD Menu until the required function choice is displayed (e.g. NAVIGATE).
HB-0845-06 153
6. Press and hold the Scroll Down Key until the required operational choice is displayed (e.g. COURSE).
7. Press the Enter Key to accept the selection. 8. Press the Page Key and the FFD will resume
normal operation and the 40/40 displays the newly configured page.
5.7 GRAVITY SWITCH In installations where two speed sensors or depth transducers are fitted a gravity change over switch can be fitted to automatically select the leeward sensor. A switch on the outside of the unit over rides the automatic selection if required, for example when calibrating the individual speed sensors.
On a Hercules system it is not necessary to use a gravity switch for a second speed sensor as two sensor inputs are available using the Pulse 2 function.
5.8 AUDIBLE ALARM The main processor contains a relay switch for an external audible alarm.
Note
• The current drive capacity of any alarm connected to the system must not exceed 0.5 Amps.
5.9 NMEA INTERFACE Several methods are available for interfacing NMEA data to the h2000 system:
� The Main Processor has a NMEA input which can accept data from GPS, Heading and/or Depth sources.

h2000 User Manual
154 HB-0845-06
� A NMEA Full Function Display (FFD) can be used to interface NMEA 0183 data to an h2000 system.
� The Performance Processor can also be used as an interface for NMEA 0183 data to the h2000 System. The Performance Processor has two NMEA inputs and outputs, (one of which is disabled if the RS232C interface is required).
In the case of multiple NMEA inputs and outputs it should not be assumed that data input to one device will be available for output from any other device. For example, inputting Latitude and Longitude to the NMEA FFD will not ensure that it is output from the performance unit.
Note
• If the Performance Processor is installed on the system it should be used as the primary NMEA input device.

HB-0845-06 155
5.9.1 Displaying NMEA Functions
Depending on the device connected to the NMEA interface the following functions may be displayed by the Hercules System: Bearing to waypoint, true, rhumb. (BTW RMB T) Bearing to waypoint, magnetic, rhumb. (BTW RMB M) Bearing to waypoint, true, great circle. (BTW GC T) Bearing to waypoint, mag., great circle. (BTW GC M) Bearing from waypoint to waypoint, true. (BRG W/W T) Bearing from waypoint to waypoint, mag. (BRG W/W M) Distance to waypoint, rhumb line, Nm. (DTW RMB NM) Distance to waypoint, great circle, Nm. (DTW GC NM) Distance to layline, Nm. (LAYLINE NM) Course over ground, true. (CRSE O/G T) Course over ground, magnetic. (CRSE O/G M) Speed over ground in knots. (SPD O/G KT) Velocity made good to waypoint in knots. (VMG WPT KT) Time to waypoint. (TTG WPT MS) Time to Layline (TTG L/L MS) Cross track error Nautical miles. (CROSS TR NM) Local time. (LOC TIME MS) Universal Coordinated Time (UTC TIME MS)
In addition there are also a number of functions that can be input through the NMEA interface that duplicate other h2000 functions. Details of all the input functions are given in Paragraphs 5.10 – 5.13.
The NMEA functions may be called up to display in the same manner as any h2000 function, see Chapter 2 - Operating Information. Most of the NMEA functions are to be found in the WAYPOINT Menu, but the time functions (LOC TIME and UTC TIME) are in the TIME Menu. Only those functions that are received by the h2000 System will appear in the display menu and it may be necessary to wait a while after the NMEA device has been switched on before the menu is complete. If no data is received for a selected function after 15 seconds then the display will show OFF.

h2000 User Manual
156 HB-0845-06
5.9.2 Selection of Equipment
When planning the purchasing of equipment to interface to the h2000 System, it is most important to check that it is NMEA 0183 compatible and the required data is transmitted or received by it.
The 0183 standard defines data sentences which are identified by three letter mnemonics. Paragraphs 5.10 – 5.13 list the sentences and their mnemonics that are input and output by the h2000 NMEA interface.
Note
• If you have any doubt about your equipment compatibility then please consult your dealer.
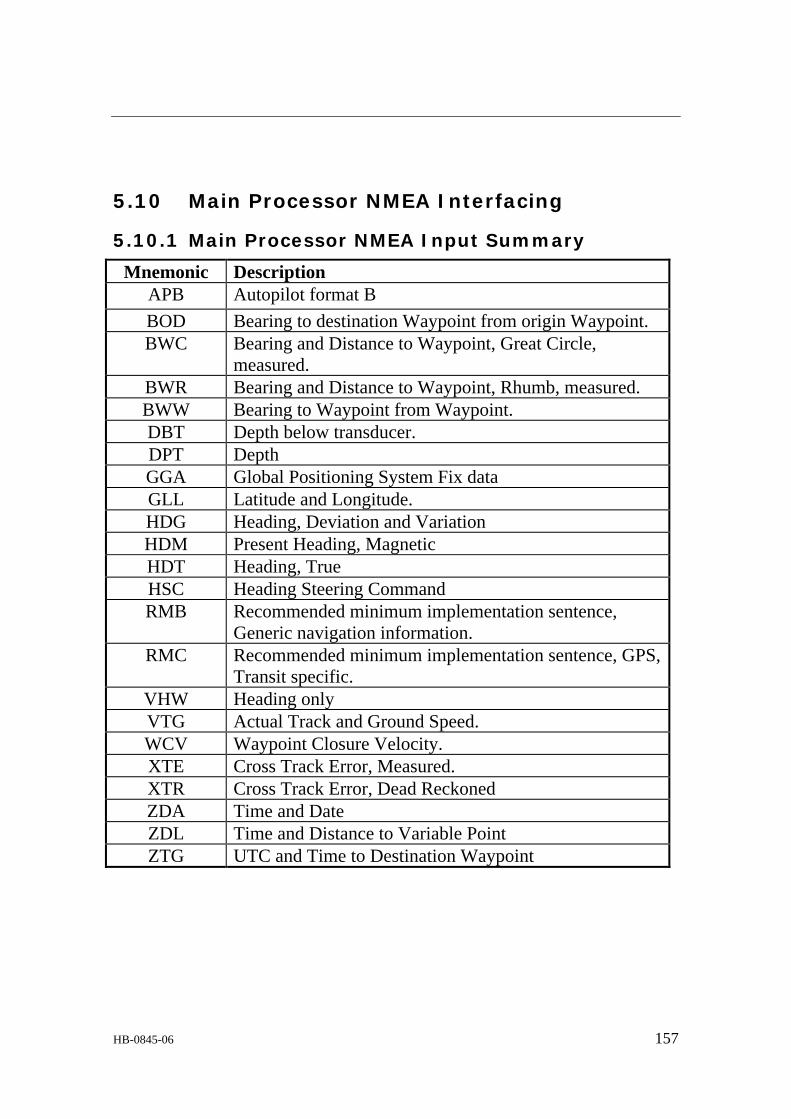
HB-0845-06 157
5.10 Main Processor NMEA Interfacing
5.10.1 Main Processor NMEA Input Summary
Mnemonic Description APB Autopilot format B BOD Bearing to destination Waypoint from origin Waypoint. BWC Bearing and Distance to Waypoint, Great Circle,
measured. BWR Bearing and Distance to Waypoint, Rhumb, measured. BWW Bearing to Waypoint from Waypoint. DBT Depth below transducer. DPT Depth GGA Global Positioning System Fix data GLL Latitude and Longitude. HDG Heading, Deviation and Variation HDM Present Heading, Magnetic HDT Heading, True HSC Heading Steering Command RMB Recommended minimum implementation sentence,
Generic navigation information. RMC Recommended minimum implementation sentence, GPS,
Transit specific. VHW Heading only VTG Actual Track and Ground Speed. WCV Waypoint Closure Velocity. XTE Cross Track Error, Measured. XTR Cross Track Error, Dead Reckoned ZDA Time and Date ZDL Time and Distance to Variable Point ZTG UTC and Time to Destination Waypoint

h2000 User Manual
158 HB-0845-06
5.10.2 Main Processor Proprietary NMEA Input Summary
Mnemonic Description $PBGTTBS Polar Speed knots $PBGTLAY Distance to Layline (Nm)
Time to Layline (hhmmss) $PBGTVMG VMG upwind (polar)
Upwind heading for best VMG (polar) Downwind heading for best VMG (polar)
$PBGTSTR Distance to Start Line (metres) Time to Start Line (hhmmss)

HB-0845-06 159
5.10.3 Main Processor NMEA Input Prioritisation
The following table shows the order in which the h2000 Main Processor prioritises incoming NMEA data. Function Main Processor Bearing to Waypoint RMB BWR Bearing to Waypoint GC ºM BWC, APB Bearing to Waypoint GC ºT RMB, BWC, APB Bearing Waypoint - Waypoint BOD, BWW COG ºM VTG COG ºT RMC, VTG Cross Track Error RMB, XTE, XTR CTS APB, HSC Depth B&G, DBT, DPT Distance to Layline ZDL Distance to Waypoint RMB BWR Distance to Waypoint GC RMB, BWC Heading ºM B&G, HDG, HDM, VHW Heading ºT B&G, HDG, HDT, VHW Latitude/Longitude RMC, GLL, GGA Layline Distance ZDL Magnetic Variation RMC Speed Over Ground RMC, VTG Time (UTC) RMC, ZDA, ZTG Time (Local) ZDA Time to Layline ZDL Time to Waypoint ZTG VMG Waypoint RMB, WCV

h2000 User Manual
160 HB-0845-06
5.11 NMEA FFD Interfacing
5.11.1 NMEA FFD Input Summary
Mnemonic Description APB Autopilot format B BOD Bearing to destination Waypoint from origin Waypoint. BWC Bearing and Distance to Waypoint, Great Circle,
measured. BWR Bearing and Distance to Waypoint, Rhumb, measured. BWW Bearing to Waypoint from Waypoint. DBT Depth below transducer. GGA Global Positioning System Fix data GLL Latitude and Longitude. HDG Heading, Deviation and Variation HDM Present Heading, Magnetic HDT Heading, True HSC Heading Steering Command HVD Magnetic Variation – Derived HVM Magnetic Variation Manually Set MTA Air Temperature, Celsius MTW Water Temperature, Celsius MWD Surface Wind Direction and Velocity MWV Wind Speed and Angle RMB Recommended minimum implementation sentence,
Generic navigation information. RMC Recommended minimum implementation sentence, GPS,
Transit specific. VHW Heading and Water Speed VLW Log mileage, water referenced VMG Velocity Made Good VPW Velocity Parallel to True Wind, Device Measured VTG Actual Track and Ground Speed. VWR Wind Relative Bearing and Velocity VWT Wind True Bearing and Velocity WCV Waypoint Closure Velocity.

HB-0845-06 161
WDC Next Waypoint Distance, Great Circle. WDR Next Waypoint Distance, Rhumb. XTE Cross Track Error, Measured. XTR Cross Track Error, Dead Reckoned. ZDA Time and Date ZDL* Time and Distance to Layline. ZLZ Local Time Zone. ZTG Time to Waypoint.
*Non-standard NMEA sentence. Note
• The h2000 system will not necessarily extract data from every NMEA field. This avoids the same information being repeated twice on the system.
5.11.2 NMEA FFD Proprietary Input Summary
Mnemonic Description $PBGTTBS Polar Speed knots $PBGTLAY Distance to Layline (Nm)
Time to Layline (hhmmss) $PBGTVMG VMG upwind (polar)
Upwind heading for best VMG (polar) Downwind heading for best VMG (polar)
$PBGTSTR Distance to Start Line (metres) Time to Start Line (hhmmss)

h2000 User Manual
162 HB-0845-06
5.11.3 - NMEA FFD Output Summary
Mnemonic Description
DBT Depth Below Transducer GLL Latitude and Longitude HDM Present Heading, Magnetic HSC Heading Steering Command HDT Heading, True MTA Air Temperature, Celsius MTW Water Temperature, Celsius MWD Surface Wind Direction and Velocity MWV Wind Speed and Angle VHW Heading and Water Speed VLW Log Mileage, Water Referenced VPW Velocity Parallel to True Wind, Device Measured VTG Actual Track and Ground Speed VWR Wind Relative Bearing and Velocity VWT Wind True Bearing and Velocity XTE Cross Track Error, Measured
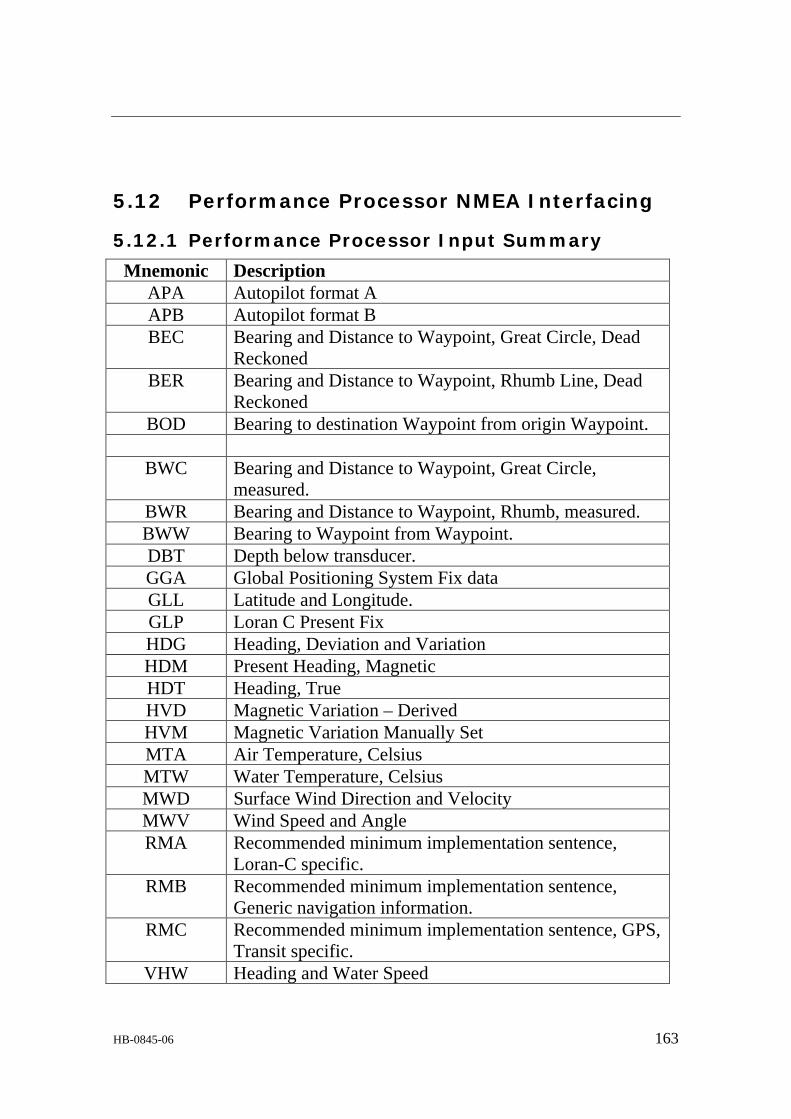
HB-0845-06 163
5.12 Performance Processor NMEA Interfacing
5.12.1 Performance Processor Input Summary
Mnemonic Description APA Autopilot format A APB Autopilot format B BEC Bearing and Distance to Waypoint, Great Circle, Dead
Reckoned BER Bearing and Distance to Waypoint, Rhumb Line, Dead
Reckoned BOD Bearing to destination Waypoint from origin Waypoint.
BWC Bearing and Distance to Waypoint, Great Circle,
measured. BWR Bearing and Distance to Waypoint, Rhumb, measured. BWW Bearing to Waypoint from Waypoint. DBT Depth below transducer. GGA Global Positioning System Fix data GLL Latitude and Longitude. GLP Loran C Present Fix HDG Heading, Deviation and Variation HDM Present Heading, Magnetic HDT Heading, True HVD Magnetic Variation – Derived HVM Magnetic Variation Manually Set MTA Air Temperature, Celsius MTW Water Temperature, Celsius MWD Surface Wind Direction and Velocity MWV Wind Speed and Angle RMA Recommended minimum implementation sentence,
Loran-C specific. RMB Recommended minimum implementation sentence,
Generic navigation information. RMC Recommended minimum implementation sentence, GPS,
Transit specific. VHW Heading and Water Speed

h2000 User Manual
164 HB-0845-06
VLW Log mileage, water referenced VPW Velocity Parallel to True Wind, Device Measured VTG Actual Track and Ground Speed. VWR Wind Relative Bearing and Velocity VWT Wind True Bearing and Velocity
WBD* Bearing and Distance to Waypoint WCV Waypoint Closure Velocity. WDC Next Waypoint Distance, Great Circle. WDR Next Waypoint Distance, Rhumb. XTE Cross Track Error, Measured. XTR Cross Track Error, Dead Reckoned. ZDA Time and Date ZDL* Time and Distance to Layline. ZLZ Local Time Zone. ZTG Time to Waypoint.
*Non-standard NMEA sentence.
5.12.2 Performance Processor Output Summary
Mnemonic Description DBT Depth Below Transducer GLL Latitude and Longitude HDM Present Heading, Magnetic HDT Heading, True MTA Air Temperature, Celsius MTW Water Temperature, Celsius MWD Surface Wind Direction and Velocity MWV Wind Speed and Angle VHW Heading and Water Speed VLW Log Mileage, Water Referenced VPW Velocity Parallel to True Wind, Device Measured VTG Actual Track and Ground Speed VWR Wind Relative Bearing and Velocity VWT Wind True Bearing and Velocity XTE Cross Track Error, Measured
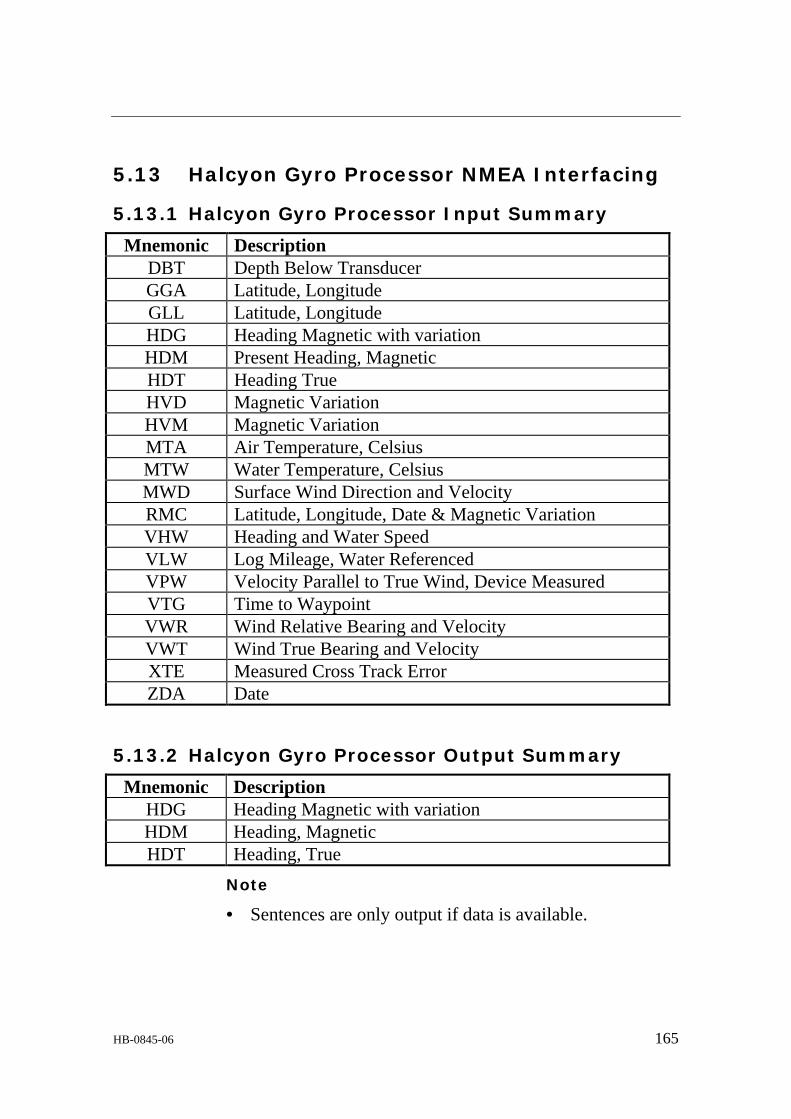
HB-0845-06 165
5.13 Halcyon Gyro Processor NMEA Interfacing
5.13.1 Halcyon Gyro Processor Input Summary
Mnemonic Description DBT Depth Below Transducer GGA Latitude, Longitude GLL Latitude, Longitude HDG Heading Magnetic with variation HDM Present Heading, Magnetic HDT Heading True HVD Magnetic Variation HVM Magnetic Variation MTA Air Temperature, Celsius MTW Water Temperature, Celsius MWD Surface Wind Direction and Velocity RMC Latitude, Longitude, Date & Magnetic Variation VHW Heading and Water Speed VLW Log Mileage, Water Referenced VPW Velocity Parallel to True Wind, Device Measured VTG Time to Waypoint VWR Wind Relative Bearing and Velocity VWT Wind True Bearing and Velocity XTE Measured Cross Track Error ZDA Date
5.13.2 Halcyon Gyro Processor Output Summary
Mnemonic Description HDG Heading Magnetic with variation HDM Heading, Magnetic HDT Heading, True
Note
• Sentences are only output if data is available.

h2000 User Manual
166 HB-0845-06
5.14 Performance Processor NMEA Input and Output Configuration
The Performance Processor has two NMEA inputs and two NMEA outputs. However if the RS232 interface is required then only one NMEA input and output can be used. The inputs are optically isolated, as required by the standard, so there is no direct electrical connection between the talker device and the Hercules System. The input requirement is half the minimum drive capacity of a standard NMEA output.
The two outputs are identical and are capable of driving at least two NMEA inputs each (four in total). If data is available then NMEA information is output once a second.
5.14.1 Changing NMEA/RS232 Configuration
Changing the NMEA/RS232 configuration is carried out by adjusting the calibration on Cross Track Error as follows:
1. Select Cross Track Error on the display. If a page has not already been set up to display cross track error, then it can be found by cycling through the options in the WAYPOINT Menu.
2. Using the Scroll Up and Scroll Down Keys scroll to "CALBRATE" on the other half of the display. Press Enter twice to show the current configuration number (NMEA MDE).
3. Press Enter, the configuration number flashes. 4. Use the Scroll Up and Scroll Down Keys to
change the number as follows:
Mode Input 1 Output 1 Input 2 Output 2 0 183 183 RS232 RS232 1 183 183 - 183 4 - 183 183 183
The default setting is 0 for RS232 capability.

HB-0845-06 167
5. Press Enter to accept the new configuration.
5.14.2 Fast HDM Output Option
The two NMEA ports may be configured independently to output HDM sentences ten times a second for the benefit of other NMEA instruments that may require a rapid heading update. To set this up, proceed as follows:
1. Select the MISC Menu and cycle through the options to find NMEAPORT 1 or NMEAPORT 2 as appropriate.
2. Using the Scroll Up and Scroll Down keys scroll to CALBRATE on the other half of the display. Press Enter twice to show the current HDM output rate (HDM RATE HZ).
3. Press Enter, the output rate flashes. 4. Use the Scroll Up and Scroll Down keys to adjust
the output rate: the only rates that are valid are 1 (for output once a second) and 10 (for output ten times a second).
5. Press Enter to accept the new output rate. When fast HDM output has been selected on a given NMEA port HDM will be the only sentence output on that port.
5.14.3 True/Magnetic Reference Selection
When an NMEA heading source is used to drive the B&G network the heading data may be referenced to either true North or magnetic North. In some cases the heading source will output both types of data, and it is necessary for the user to select the desired reference. To do this, proceed as follows:
1. On the NAVIGATE Menu, select HEADING. 2. Using the Scroll Up and Scroll Down keys scroll
to CALBRATE on the other half of the display.

h2000 User Manual
168 HB-0845-06
Press Enter twice to select CAL VAL 1 (TRUE/MAG). The current selection is shown as 0 for magnetic, 1 for true.
3. Press Enter, the TRUE/MAG selection flashes. 4. Use the Scroll Up and Scroll Down keys to adjust
the 0/1 selection. 5. Press Enter to accept the new reference.
If on pressing Enter in step (2) the display shows anything other than TRUE/MAG it means that there is another heading source on the network. To eliminate the other source, go to the COURSE function (also on the NAVIGATE Menu) and select CAL VAL 1 (HDG NODE). Ensure that this is set to the node number of the Performance Unit, and then restart the instrument system. The unwanted heading source will no longer appear in the NAVIGATE menu.
When the heading reference is changed the text for the HEADING function will automatically be set to show °T or °M as appropriate. A similar change will also be made to other functions that are heading dependent, namely COURSE, TWD, REQD CRSE, DR CRSE and TIDE SET.
A similar procedure may be used to select the reference for CTS (Course To Steer), which is derived from the Heading-to-steer to destination waypoint field in the APB sentence. As with HEADING, the text for CTS is updated automatically when the reference is changed.
5.14.4 Handling of NMEA Alarm Conditions
Several NMEA sentences contain fields that indicate the validity of the data. For example, GLL, RMA, RMB and RMC contain a data valid or navigation receiver warning flag, and GGA contains a quality indicator.

HB-0845-06 169
When input sentences containing these indicators are decoded by the Performance Unit the status of the indicators is checked. If an invalid status is found then all the data in that sentence is marked as invalid when stored internally.
When output sentences are being constructed the validity of the data for each field is checked, and if any field is found to be invalid the invalid indicator is set in the output sentence.
If no valid data has been received for a period of 15 seconds the corresponding B&G function will display ‘OFF’.
5.14.5 NMEA-based Data on the B&G Network
Data derived from NMEA sources is normally transmitted on the B&G network once a second. However, in the case of heading, if the incoming data is being rapidly updated the network data will be sent at up to four times a second. This allows improved performance to be obtained from the h2000 autopilot, if fitted.
5.15 RS232 INTERFACING The RS232C is an internationally used electrical standard for communications between computers of all different makes and sizes. It is widely used in personal computers to allow the transfer of files and other information between PC’s or from PC’s to printers. Using the RS232C interface on the h2000 allows you to send data to an on-board PC running B&G’s Deckman Software. This can be used, for example, to update your polar tables.
The RS232C differs from the NMEA standard in that it only provides the electrical specifications and not the data format standard. Your external device will have to be programmed to send and receive the information according to the format of the B&G data. The remainder of this section is dedicated to the commands and data sentences understood by the h2000 with its RS232C port.

h2000 User Manual
170 HB-0845-06
5.15.1 RS232C Input and Output Configuration
The Hercules Performance Unit has two serial input output channels, one is used just for NMEA and the other can be configured for NMEA or RS232C.
5.15.2 Changing NMEA/RS232 Configuration
Adjusting two calibration values (CAL VALs) on the Cross Track Error function changes the NMEA/RS232 configuration. The first of these determines if RS232C can be used and the second determines the RS232C baud rate and format.
To configure the Performance Unit for RS232C, NMEA MDE must be set to 0 (default). NMEA MDE can be found as follows:
WAYPOINT → CROSS TR, CALBRATE →→→→ CAL VAL1 (NMEA MDE)
Full details of the meaning of other values of NMEA MDE are given in the NMEA interfacing Para 5.14.1
To adjust the RS232C baud rate and format select BAUD RTE as follows:
WAYPOINT → CROSS TR, CALBRATE → CAL VAL2 (BAUD RTE)
The units digit is the Baud Rate as follows: 1 = 300 Baud 2 = 600 Baud 3 = 1200 Baud 4 = 2400 Baud 5 = 4800 Baud 6 = 9600 Baud 7 = 19200 Baud
The tenths digit controls the format for input as well as output as given in Table 6. The default setting is 6.2 (9600 Baud, 7 data bits, RTS/CTS). All data has at least 1 stop bit.

HB-0845-06 171
Table 6. RS232 Format INPUT OUTPUT
0 8 data bits (bit 7 ignored) no parity, RTS handshake
7 data bits, even parity, CTS Handshake
1 8 data bits (bit 7 ignored) no parity, RTS handshake
7 data bits, odd parity, CTS handshake
2 7 data bits, even parity RTS handshake
7 data bits, even parity, CTS handshake
3 7 data bits, odd parity RTS handshake
7 data bits, odd parity, CTS handshake
4 8 data bits (bit 7 ignored) no parity, RTS handshake
7 data bits, even parity, no handshake (CTS ignored)
5 8 data bits (bit 7 ignored) no parity, RTS handshake
7 data bits, odd parity, no handshake (CTS ignored)
6 7 data bits, even parity RTS handshake
7 data bits, even parity, no handshake (CTS ignored)
7 7 data bits, odd parity RTS handshake
7 data bits, odd parity, no handshake (CTS ignored)
5.15.3 Command Syntax
Commands are input as a string of ASCII characters starting with a # character and a two-character command mnemonic followed by data fields separated by commas. The command is terminated and execution initiated by a carriage return (CR).
A command line may not contain more than 88 characters including the start # and the terminating carriage return (CR). Data parameters may be omitted provided that if a following parameter is needed the separating commas are included.
For example:
####IR,0,,NO DATA,(CR)

h2000 User Manual
172 HB-0845-06
Would just input the text "NO DATA" to display on remote 0.
Characters received after the terminating (CR) of a command line and before the # of the next command will be ignored. This allows comment lines to be inserted between commands if required.
5.15.4 Channel Numbers
To maintain compatibility with previous Hercules Systems it has been necessary to allocate the functions that were available in 290/390 channel numbers (see Tables 7 and 8) and in the case of NMEA or remote functions have a means of changing the allocations. This is done by setting CAL VAL3 for the function to the required channel number or using the ####RC,nn,cc(CR) command.
Table 7. Channel Numbers for 290/390 Functions
Channel Function Output Rate Hz Format
00 heel angle 1 H0.00 or 0.00H 01 Boatspeed 4 ,0.00 or 20.00 02 stored log 0.25 00.00 03 heading, true 2 359 04 reset log 0.25 00.00 05 heading, magnetic 2 359 06 dead reckoning 0.25 00.00 or 359 07 battery volts 0.5 12.00 08 depth feet 0.5 99.9' or 999' 09 optimum wind angle 0.5 -00 or 00 10 apparent windspeed 1 A 0.0 or A99.9 11 depth metres 0.5 30.2d or 304d 12 True windspeed 1 T 0.0 or T00.0 13 apparent wind angle 2 -179 or 00- 14 True wind angle 1 =179 or 179= 15 true wind direction 1 359. 16 reaching performance 0.5 P000

HB-0845-06 173
17 tacking performance 0.5 t000 18 linear 4 1 0 to 1000 19 velocity made good 1 U4.63 or D4.63 20 linear 2 1 0 or 1000 21 target boat speed 0.5 t0.00 or 10.00 22 - 1 - 23 Leeway 0.5 L 0.0 or L10.0 24 - 1 - 25 Course 0.5 C000 26 linear 3 1 0 to 1000 27 sea temperature 0.25 -9.9C or 49.9 C 28 Linear 1 1 0 to 1000 29 - 1 - 30 Timer 1 00.00 31 - 1 -
An output rate of 0.25Hz means one reading every 4 seconds.
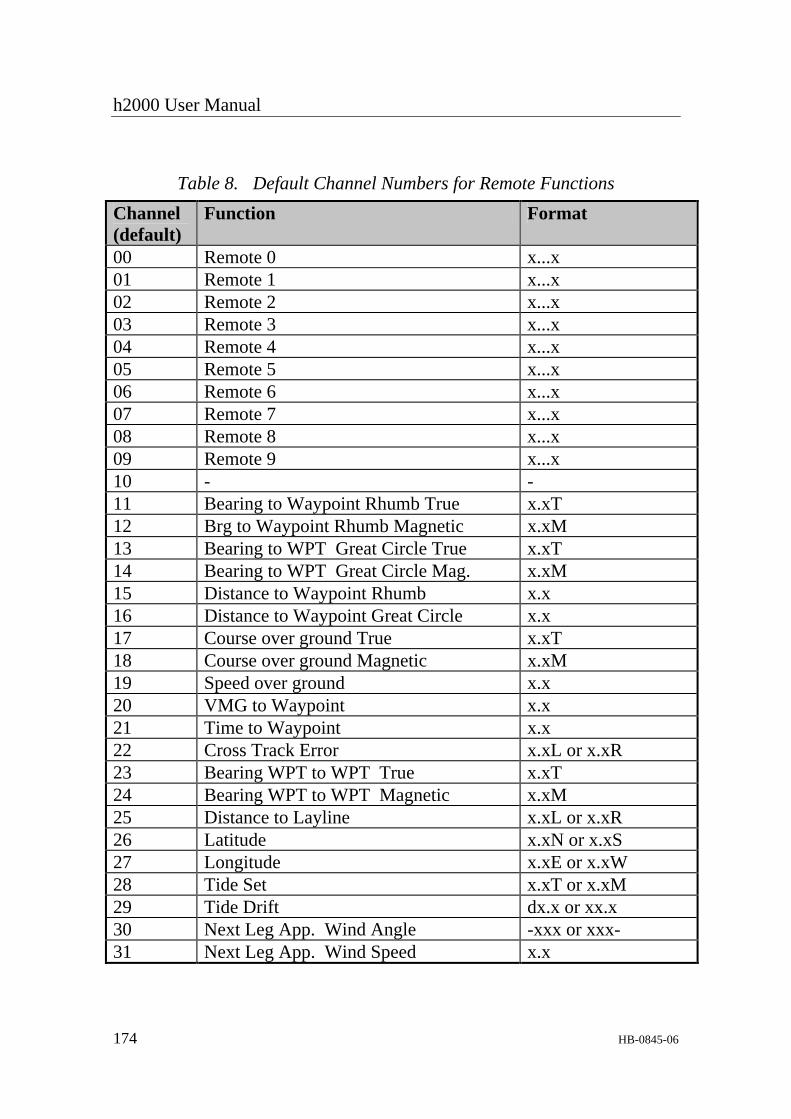
h2000 User Manual
174 HB-0845-06
Table 8. Default Channel Numbers for Remote Functions Channel (default)
Function Format
00 Remote 0 x...x 01 Remote 1 x...x 02 Remote 2 x...x 03 Remote 3 x...x 04 Remote 4 x...x 05 Remote 5 x...x 06 Remote 6 x...x 07 Remote 7 x...x 08 Remote 8 x...x 09 Remote 9 x...x 10 - - 11 Bearing to Waypoint Rhumb True x.xT 12 Brg to Waypoint Rhumb Magnetic x.xM 13 Bearing to WPT Great Circle True x.xT 14 Bearing to WPT Great Circle Mag. x.xM 15 Distance to Waypoint Rhumb x.x 16 Distance to Waypoint Great Circle x.x 17 Course over ground True x.xT 18 Course over ground Magnetic x.xM 19 Speed over ground x.x 20 VMG to Waypoint x.x 21 Time to Waypoint x.x 22 Cross Track Error x.xL or x.xR 23 Bearing WPT to WPT True x.xT 24 Bearing WPT to WPT Magnetic x.xM 25 Distance to Layline x.xL or x.xR 26 Latitude x.xN or x.xS 27 Longitude x.xE or x.xW 28 Tide Set x.xT or x.xM 29 Tide Drift dx.x or xx.x 30 Next Leg App. Wind Angle -xxx or xxx- 31 Next Leg App. Wind Speed x.x
HB-0845-06 175
5.15.5 Automatic Output Enable/Disable
####OE,nn,s,h(CR) nn = 00 to 31 channel number s = 0 for automatic output of channel disabled s = 1 for automatic output of channel enabled h = H indicates reference to Hercules channel h = R indicates reference to NMEA or Remote channel. The data output rate depends on the channel number, as shown in Table 7.
5.15.6 Automatic Output Start/Stop
####OS,s(CR) s = 0 to stop all RS232 automatic output. s = 1 to start all RS232 automatic output which has been enabled. When an automatic start command is executed, all Hercules and remote channels that have been enabled using the ####OE command will be output regularly.
Data for Hercules functions is output as follows:- nn,x...x(CR) nn = channel number (00 to 31). x...x = ASCII data.
Data for NMEA or Remote channels is output as follows:- rnn,x...x(CR) nn = Remote channel number (00 to 31). x...x = ASCII data.
Examples:

h2000 User Manual
176 HB-0845-06
00,19.8H(CR) Heel angle 01, 8.35(CR) Boatspeed r00,1234(CR) r01,45.88(CR)
If no data is available for a selected channel the text ‘OFF’ will be substituted.
5.15.7 Input Remote Channel Data and Text
####IR,nn,a...a,c...c,d...d(CR) nn = Remote channel number (00 to 31). This must be allocated to the REMOTE 0 - 9 function by adjusting its CAL VAL3 or using the #RC,nn,cc(CR) command.
EXTERNAL → REMOTE 0, CALBRATE →→→→CAL VAL3(CHAN NO) or
using the ####RC,nn,cc(CR) command. a...a = Remote channel data which will be output on the FFD or 20/20CD digits. c...c = Text to be displayed on the FFD or 20/20CD. Up to 16 characters may be sent but only 10 are used. d...d = Page Text, ignored (was used in 290 & 390 Systems)
If only data is to be input the command may be terminated with a (CR) after the data parameter as follows:
####IR,nn,a...a(CR)
Note
• This command has no effect on remote channels currently assigned to NMEA functions.
5.15.8 Automatic Output of Basic Data
Basic data consists of the values obtained from the boat speed, wind speed, wind angle and heading sensors without damping or calibration.
####OB,s(CR)

HB-0845-06 177
s = 0 for automatic output disabled s = 1 for automatic output enabled at 2Hz s = 2 for automatic output enabled at 4Hz Sets or resets automatic output flag for basic raw data. Automatic output is started using the #OS,1(CR) command. Basic data is then output every half second as follows: B,w...w,x...x,y...y,z...z(CR) www.w = Boatspeed in Hz uncalibrated, 5 characters xxx.x = Apparent Windspeed in Hz uncalibrated, 5 characters. yyy.y = Apparent Wind Angle in degrees no offset, 5 characters zzz.z = Heading in degrees after application of offset, 5 characters If #OS,2(CR) is used basic data will be output every quarter of a second.
5.15.9 Immediate Output of Basic Data
####OB(CR)
This command stops all automatic output of other data and outputs basic data immediately. Data is output using the same format as automatic output of basic data.
Note
• After automatic data has been stopped by this command it can be restarted using the ####OS,1(CR) command.
5.15.10 Immediate Output of Channel or Remote Data
####OI,nn,s(CR)

h2000 User Manual
178 HB-0845-06
nn = channel number 00 to 31. For NMEA and Remote 0 to 9 functions channel numbers must be allocated by setting CAL VAL3 on those functions or using the #RC,nn,cc(CR) command. Table 7 gives the channel numbers for other functions. s = 0 (or H) for Hercules data output s = 1 (or R) for NMEA or Remote data output This command stops all other automatic output, and outputs as follows: Inn,xxxxx(CR) - Hercules data requested Rnn,xxxxx(CR) - if remote data requested nn = channel number xxxx = data (see Tables 7 and 8 for examples). Note
If Hercules data is required, s may be omitted and the command will be:
####OI,nn(CR)
If remote data is required, the command will be:
####OI,nn,1(CR)
Note
After automatic output has been stopped by an output immediate command it can be re-started using the #OS,1(CR) command.
Examples I00,H19.8 Heel angle channel 00 I01,21.35 Boatspeed channel 01 I10,A9.9 Apparent wind speed channel 10 I14,179= True wind angle channel 14
5.15.11 Output Latitude and Longitude
####OL(CR)
Stops all other automatic output and outputs the last value for latitude and longitude received via NMEA as follows:

HB-0845-06 179
L,ddmm.hhh,n,dddmm.hhh,e(CR) latitude longitude dd = degrees mm = minutes hhh = hundredths of minutes n = n for north or s for south e = e for east or w for west
####OL,s(CR) s = 0 for automatic output of lat. and long. disabled. s = 1 for automatic output of lat. and long. enabled.
Automatic output must be started using the ####OS,1(CR) command.
5.15.12 Assign Remote Channels
####RC,nn,cc(CR) nn = 00 to 31 Remote channel number cc = Item number, see Table 8
5.15.13 Trip Control
####TC,t,l,d(CR) t = 0,-5,-10,-15 to start Timer Countdown = 1 to leave Timer running or unfreeze = 2 to freeze Timer l = 0 to reset Trip Log to zero = 1 to start Trip Log or leave running = 2 to freeze Trip Log d = 0 to reset Dead Reckoning to zero = 1 to start Dead Reckoning or leave running = 2 to freeze Dead Reckoning
####TC(CR) Stops automatic output and returns the current states as follows:
S,t,l,d,(CR)

h2000 User Manual
180 HB-0845-06
Table 9. Item Numbers for Remote Functions Number Remote Function
01 Bearing to Waypoint True Rhumb 02 Bearing to Waypoint Magnetic Rhumb 03 Bearing to Waypoint True Great Circle 04 Bearing to Waypoint Magnetic Great Circle 05 Distance to Waypoint Rhumb 06 Distance to Waypoint Great Circle 07 Course Over Ground True 08 Course Over Ground Magnetic 09 Speed Over Ground 10 VMG to Waypoint 11 Time to Waypoint 12 Cross Track Error 13 Bearing Waypoint to Waypoint, True 14 Bearing Waypoint to Waypoint, Magnetic 15 Distance to Layline, Nautical Miles 16 Latitude 17 Longitude 18 Tide Set, Magnetic 19 Tide Drift 20 Next leg Apparent Wind Angle 21 Next leg Apparent Wind Speed 22 Remote 0 23 Remote 1 24 Remote 2 25 Remote 3 26 Remote 4 27 Remote 5 28 Remote 6 29 Remote 7 30 Remote 8 31 Remote 9

HB-0845-06 181
Table 10. Polar Table Example
TWS (KNOTS)
TWA 4.0 6.0 8.0 10.0 12.0 14.0 16.0 18.0 20.0 22.0
02 20 1.56 2.70 3.57 4.10 4.50 4.80 5.00 5.20 5.50 5.40
03 30 1.87 3.04 4.04 4.88 5.30 5.66 5.95 5.99 6.15 6.20
04 40 2.08 3.29 4.40 5.49 5.99 6.54 6.78 6.87 6.86 6.75
05 50 2.13 3.52 4.67 5.90 6.50 6.95 7.23 7.33 7.35 7.29
06 60 2.19 3.75 4.95 6.09 6.69 7.07 7.36 7.45 7.51 7.50
07 70 2.10 3.83 5.22 6.18 6.79 7.22 7.48 7.58 7.67 7.72
08 80 2.02 3.91 5.40 6.27 6.88 7.30 7.61 7.73 7.89 7.95
09 90 2.00 3.90 5.45 6.31 7.02 7.45 7.74 7.88 8.11 8.18
10 100 1.98 3.85 5.40 6.39 7.10 7.59 7.87 8.03 8.30 8.39
11 110 1.99 3.76 5.26 6.39 7.11 7.65 7.96 8.19 8.40 8.50
12 120 1.97 3.65 5.08 6.30 7.06 7.65 8.00 8.30 8.43 8.53
13 130 1.90 3.50 4.90 6.00 6.87 7.51 7.96 8.21 8.36 8.48
14 140 1.87 3.25 4.60 5.67 6.67 7.38 7.80 8.10 8.28 8.42
15 150 1.84 3.01 4.20 5.23 6.30 7.04 7.56 7.93 8.19 8.37
16 160 1.80 2.80 3.90 4.80 5.80 6.60 7.20 7.70 8.05 8.27
17 170 1.75 2.60 3.65 4.50 5.50 6.31 6.96 7.53 7.93 8.22
18 180 1.70 2.40 3.42 4.30 5.29 6.02 6.83 7.44 7.88 8.17
19 OPT VMG UPWIND 1.80 2.85 3.79 4.34 4.69 5.00 5.23 5.33 5.37 5.32
20 OPT TWA UPWIND 40 39 38 37 36 35 34.5 34 34 33.5
21 OPT VMG DOWNWIND 1.80 2.70 3.70 4.80 5.80 6.20 6.80 7.40 7.80 8.10
22 OPT TWA DOWNWIND 157 158 160 161 162 163 165 168 170 172

h2000 User Manual
182 HB-0845-06
5.15.14 Polar Table Manipulation
A special set of RS232 commands are available for the manipulation of polar performance data. Using these commands it is possible to read and adjust individual elements of the polar table or scale the whole polar table.
An example of the polar table format is shown in Table 10. The syntax and function of each command is as described in the following Paragraphs.
5.15.15 Output Polar Table Value
####PO,s,nn(CR) s = single digit number between 0 and 9 which represents a column in the Polar Table (see Table 10). Each column of the table has a true wind angle associated with it. nn = two digit value between 02 and 22 which represents a rw in the Polar Table. Rows 02 to 18 represent true wind angles from 20 to 180 degrees in increments of 10 degrees. Row 19 represents the optimum upwind VMG. Row 20 represents the true wind angle associated with 19. Row 21 represents the optimum downwind VMG. Row 22 represents the true wind angle associated with 21. Issuing this command will cause the following message to be output:
P,xx.x,yy.yy(CR)
where:
xx.x = three digit value representing true wind speed associated with row 's' of polar table
yy.yy = boat speed in knots if 'nn' = 02-18
HB-0845-06 183
optimum upwind VMG in knots if 'nn' = 19 true wind angle associated with above if 'nn' = 20 optimum downwind VMG in knots if 'nn' = 21 true wind angle associated with above if 'nn' = 22 Example:
The command ####PO,3,08(CR) will cause the message: P , 10.0 , 07.25 (CR) to be output. | | true boat wind speed speed
Likewise command ####PO,4,20(CR) will cause the message: P , 12.0 , 042 (CR) to be output. | | true true wind wind speed angle The command may also be used to output a complete row, or the entire table, by omitting one or more parameters. For example, the command:
#PO,3(CR)
will cause the whole of row 3 to be output in the format:
PR,r,cc,uu.u,cc,vv.vv,...cc,vv.vv,cc,ww.ww,cc,xxx,cc,yy.yy,cc,zzz
h2000 User Manual
184 HB-0845-06
where r is the row number (0..9) cc is the column number (01..22) uu.u is the true wind speed set for this row vv.vv is the boat speed ww.ww is the optimum upwind vmg xxx is the true wind angle for upwind vmg yy.yy is the optimum downwind vmg zzz is the true wind angle for downwind vmg Because output lines can only be a maximum of 80 characters it takes several lines to output a complete row. Each line begins with
PR,r,cc....
to indicate which row and column follows.
In a similar way, the command:
#PO(CR)
outputs the entire table, row by row, in the above format.
5.15.16 Input Polar Table Value
####PI,s,nn,yy.yy(CR) s = 0 - 9 (as in previous command) nn = 02 - 22 (as in previous command) This command permits any single element of the polar table to be changed.
Example:
The command ####PI,7,05,07.45(CR)
Will cause the polar table element corresponding to a wind speed of 20 knots and a true wind angle of 50 degrees to be changed from 7.40 Knots to 7.45 Knots.
Likewise command ####PI,0,22,150(CR)
HB-0845-06 185
Will cause the true wind angle associated with the optimum down wind VMG in a true wind speed of 4.0 knots to be changed from 130 degrees to 150 degrees.
5.15.17 Output Polar Table Type and Rating
The command ####PR(CR)
Will cause the current polar table type and its associated rating to be output in the following format:
W,s,xx.xx(CR) s = single digit 0, 1, 2 or 3 representing the polar table type currently being used. xx.xx = Four digit number between 16.50 and 99.99 representing the IOR rating. This rating value is used when the entire polar table is scaled.
5.15.18 Input Polar Table Type and Rating
The command ####PR,s,xx.xx(CR)
This command selects a polar table from the three available in the Performance Unit and then scales it for a new rating value.
s = Polar table type (0, 1 or 2) to be selected. All adjustments to the previously selected polar table will be lost. If the 's' parameter is omitted then the currently selected polar table will be adjusted to the new rating value.
xx.xx = four digit number between 16.50 and 99.99 Representing the IOR rating. When a new rating is entered using this command, all the elements (apart from optimum angles) will be scaled in the following way:
New value = old value x
Each of the three polar tables stored within the Performance Unit has its own associated default rating value:

h2000 User Manual
186 HB-0845-06
TYPE NO. RATING Masthead rig 0 26.20 IOR rated feet Fractional rig 1 22.50 IOR rated feet ULDB 2 29.50 IOR rated feet
5.15.19 Input Polar Table Wind Speed
####PW,s,xx.x(CR)
This command permits values in the wind speed column of the currently selected Polar Table to be altered. s = single digit value 0 to 9 representing a row in the Polar Table (see Table 10) xx.x = wind speed in knots of 00.0 to 99.9 Notes
• It is important that the wind speeds in the polar table lie in ascending order, i.e. s = 0 corresponds to the smallest wind speed value, s = 9 corresponds to the largest wind speed value. If, by using the ####PW command, the wind speed values become disordered then 'Err 5' will be displayed on Reaching and Tacking performance.
• Duplicate non-zero values for wind speed must not exist in the wind speed column of the polar table. If duplicate values are introduced using the PW command then 'Err 6' will be displayed on Reaching and Tacking performance.
• If less than ten Wind Speeds are required, the first values must be set to zero.
5.15.20 Output Apparent Wind Correction Table Values
The h2000 contains two tables that can be used to correct the measured apparent wind values which are to be used in further calculations. These do not affect the values of apparent wind speed or apparent wind angle displayed. Table 11 is an example of the apparent wind speed correction table and Table 12 is an example of the apparent wind angle table.

HB-0845-06 187
####TO,s,nn(CR) s = 1 to 6 row number for 5,10,15,20,25 and 30 knots Apparent Windspeed respectively. nn = 01 to 24 column number. Columns 01 to 12 are for 20, 25, 30, 35, 40, 60, 80, 100, 120, 140, 160 and 180 degrees Apparent Wind Angle respectively and contain apparent wind speed correction values. Columns 13 to 24 for 20, 25, 30, 35, 40, 60, 80, 100, 120, 140, 160 and 180 degrees Apparent Wind Angle respectively and contain apparent wind angle correction values.
The command stops all automatic output and returns: U,s,nn,y...y(CR) if nn = 01 to 12 yy.yy or -yy.yy = Windspeed correction value in knots if nn = 13 to 24 yyy.y or -yyy.y = Wind Angle correction value in degrees.
The command may also be used to output a complete row, or the entire wind correction table by omitting one or more parameters. For example:
#TO,3(CR)
outputs the whole of row 3 in the format:
UR,r,cc,-ww.ww,...cc,-xxx.x,...cc,-yyy.y,...cc,zz.zz
where r is the row number (1..6) cc is the column number (01..28) ww.ww is the apparent wind speed correction xxx.x is the apparent wind angle correction yyy.y is the true wind angle correction zz.zz is the true wind speed correction In general, these values can be either positive or negative. Negative values will be preceded by a minus sign.
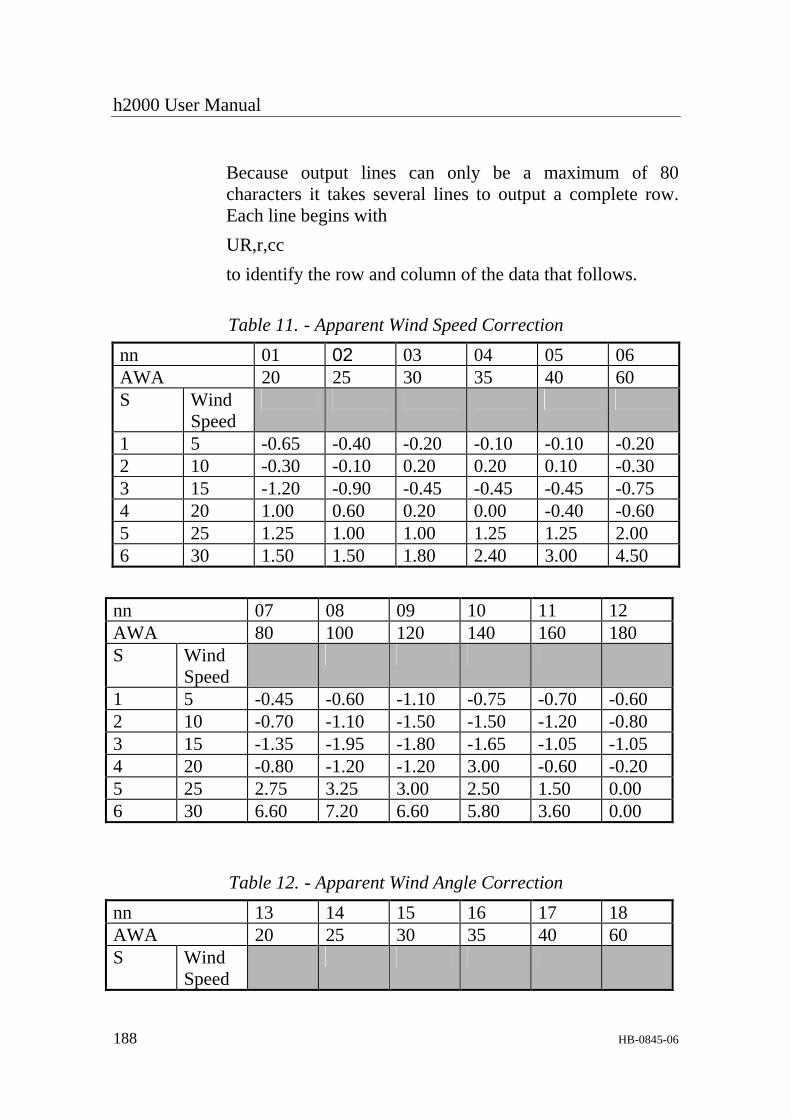
h2000 User Manual
188 HB-0845-06
Because output lines can only be a maximum of 80 characters it takes several lines to output a complete row. Each line begins with UR,r,cc to identify the row and column of the data that follows.
Table 11. - Apparent Wind Speed Correction nn 01 02 03 04 05 06 AWA 20 25 30 35 40 60 S Wind
Speed
1 5 -0.65 -0.40 -0.20 -0.10 -0.10 -0.20 2 10 -0.30 -0.10 0.20 0.20 0.10 -0.30 3 15 -1.20 -0.90 -0.45 -0.45 -0.45 -0.75 4 20 1.00 0.60 0.20 0.00 -0.40 -0.60 5 25 1.25 1.00 1.00 1.25 1.25 2.00 6 30 1.50 1.50 1.80 2.40 3.00 4.50
nn 07 08 09 10 11 12 AWA 80 100 120 140 160 180 S Wind
Speed
1 5 -0.45 -0.60 -1.10 -0.75 -0.70 -0.60 2 10 -0.70 -1.10 -1.50 -1.50 -1.20 -0.80 3 15 -1.35 -1.95 -1.80 -1.65 -1.05 -1.05 4 20 -0.80 -1.20 -1.20 3.00 -0.60 -0.20 5 25 2.75 3.25 3.00 2.50 1.50 0.00 6 30 6.60 7.20 6.60 5.80 3.60 0.00
Table 12. - Apparent Wind Angle Correction nn 13 14 15 16 17 18 AWA 20 25 30 35 40 60 S Wind
Speed
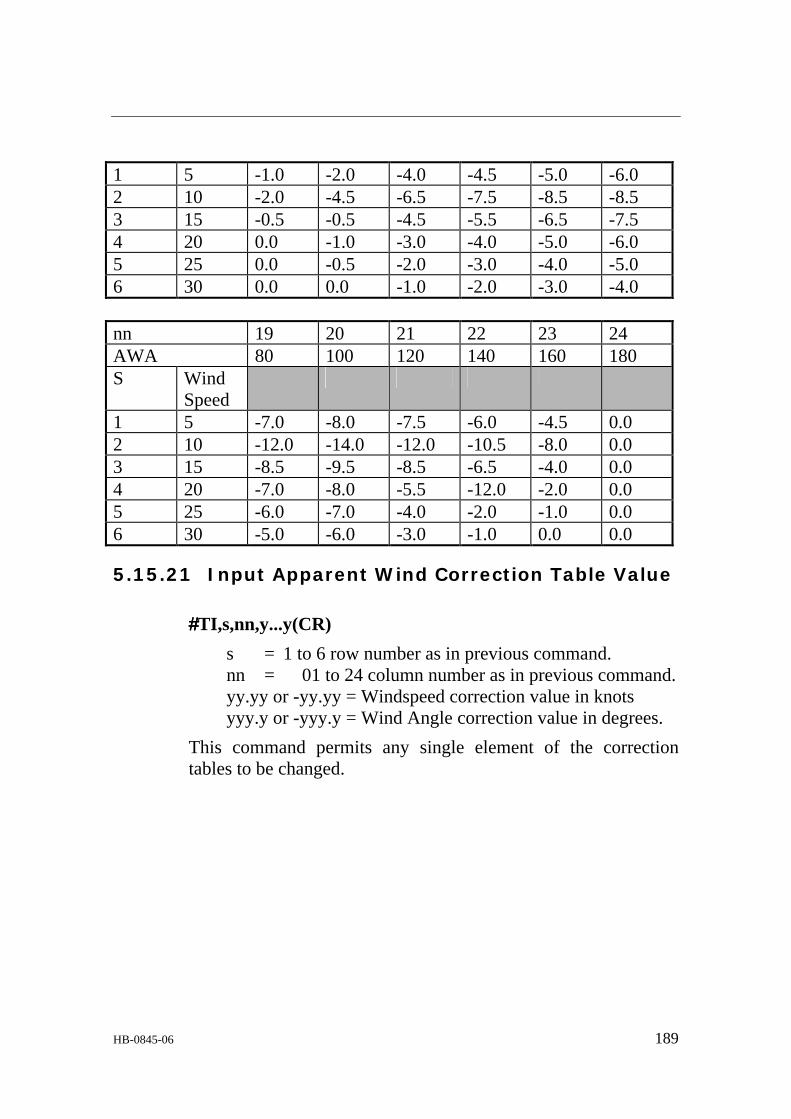
HB-0845-06 189
1 5 -1.0 -2.0 -4.0 -4.5 -5.0 -6.0 2 10 -2.0 -4.5 -6.5 -7.5 -8.5 -8.5 3 15 -0.5 -0.5 -4.5 -5.5 -6.5 -7.5 4 20 0.0 -1.0 -3.0 -4.0 -5.0 -6.0 5 25 0.0 -0.5 -2.0 -3.0 -4.0 -5.0 6 30 0.0 0.0 -1.0 -2.0 -3.0 -4.0
nn 19 20 21 22 23 24 AWA 80 100 120 140 160 180 S Wind
Speed
1 5 -7.0 -8.0 -7.5 -6.0 -4.5 0.0 2 10 -12.0 -14.0 -12.0 -10.5 -8.0 0.0 3 15 -8.5 -9.5 -8.5 -6.5 -4.0 0.0 4 20 -7.0 -8.0 -5.5 -12.0 -2.0 0.0 5 25 -6.0 -7.0 -4.0 -2.0 -1.0 0.0 6 30 -5.0 -6.0 -3.0 -1.0 0.0 0.0
5.15.21 Input Apparent Wind Correction Table Value
####TI,s,nn,y...y(CR) s = 1 to 6 row number as in previous command. nn = 01 to 24 column number as in previous command. yy.yy or -yy.yy = Windspeed correction value in knots yyy.y or -yyy.y = Wind Angle correction value in degrees.
This command permits any single element of the correction tables to be changed.

h2000 User Manual
190 HB-0845-06
5.15.22 Output Apparent Wind Correction Status
####OC,15(CR)
This command will stop automatic output and reply with: C,15,s(CR) s = 0 for no corrections being applied to apparent wind values. 1 for corrections being applied to apparent wind values for use in further calculations.
5.15.23 Enable/Disable Apparent Wind Correction
####IC,15,s(CR) s = 0 for no correction to be applied to apparent wind values. 1 for correction to be applied to apparent wind values used in further calculations.
5.15.24 Input Calibration Value
####IC,n,x...x(CR) n = calibration number x....x = calibration value
N Calibration Type Data Format Max Value 1 Boatspeed (port) x.xx 9.99 2 Boatspeed (stbd) x.xx 9.99 3 Windspeed Hz/kt x.xx 9.99 4 MHU Angle xxx.x 359.9 5 Leeway xx.x 99.9 6 True Wind Correction ignored 7 Zero Correction Angle ignored 8 Max Mast Twist ignored 9 Max Twist Angle ignored
10 Windspeed offset x.xx 9.99 11 Depth datum m xx.x 99.9 12 Depth datum ft xx.x 99.9

HB-0845-06 191
13 Depth datum fm xx.x 99.9 14 Compass offset xxx.x 359.9 15 Apparent wind correction x 2 16 Magnetic Variation xxx.x 359.9 17 Next Leg Bearing xxx.x 359.9 18 Tide On N/L Select x 1
5.15.25 Output Calibration Value
####OC,n(CR) n = calibration number as above This command stops all automatic output and returns C,n,x...x(CR)
5.15.26 Input Damping Value
####ID,n,xx(CR) n = damping number 1 Boatspeed Damping 2 Heading Damping 3 Apparent Windspeed Damping 4 Apparent Wind Angle Damping 5 True wind speed damping 6 True wind angle damping 7 Tide Damping in minutes xx = damping value in seconds (minutes if tide) 0 to 99.
5.15.27 Output Damping Value
####OD,n(CR) n = damping number as in previous command. This command stops all automatic output and returns
h2000 User Manual
192 HB-0845-06
D,n,xx(CR) xx = damping value 0 to 99
5.15.28 Input Hercules Channel Text
####IT,nn,c...c,d...d(CR) nn = 00 to 31 - Hercules Channel Number (see Table 7) c...c = channel text, up to 16 characters (only 10 displayed) d...d = Page Text, ignored by h2000.
5.15.29 Output Text Immediately
####OT,nn,h(CR) nn = 00 to 31 channel number h = H for Hercules channel (see Tables 7 and 8) R for NMEA or Remote channel. Note
• Remote channel numbers must be allocated by adjusting CAL VAL3 for the required function or using the ####RC,nn,cc(CR) command.
This command stops all automatic output and outputs text as follows (page text is returned as spaces) HT,nn,c...c, (CR) if Hercules channel text requested RT,nn,c...c, (CR) if Remote Text requested.
5.15.30 Output Alarm
####OA,nn(CR) nn = alarm number, see Table 13 This command stops all automatic output, and returns Ann,xxxx,s(CR) nn = Alarm Number xxxx = Alarm Value s = 0 for alarm OFF s = 1 for alarm ON and not active s = 3 for alarm ON and active

HB-0845-06 193
Table 13. - Alarm Numbers Alarm No. Description
01 Boatspeed High Alarm 02 Boatspeed Low Alarm 03 Heading Clockwise Alarm (calculated from Alarm
Value and Sector Width) 04 Heading Anti-Clockwise Alarm (calculated from
Alarm Value and Sector Width) 05 Apparent Wind Speed High Alarm 06 Apparent Wind Speed Low Alarm 07 Apparent Wind Angle Clockwise (calculated from
Alarm Value and Sector Width) 08 Apparent Wind Angle Anti-Clockwise (calculated
from Alarm Value and Sector Width) 09 Battery Volts High Alarm 10 Battery Volts Low Alarm 11 Depth Feet High Alarm 12 Depth Feet Low Alarm 13 Depth Fathoms High Alarm 14 Depth Fathoms Low Alarm 15 Depth Metres High Alarm 16 Depth Metres Low Alarm 17 Sea Temperature Centigrade High Alarm 18 Sea Temperature Centigrade Low Alarm 19 Sea Temperature Fahrenheit High Alarm 20 Sea Temperature Fahrenheit Low Alarm 21 Air Temperature Centigrade High Alarm 22 Air Temperature Centigrade Low Alarm 23 Air Temperature Fahrenheit High Alarm 24 Air Temperature Fahrenheit Low Alarm

h2000 User Manual
194 HB-0845-06
5.15.31 h2000 General Purpose Input Value
####IV,nnn,mmm,fff,xx.xx,tttttttttt(CR) nnn = node number to which value is to be sent 1 - Depth Board 5 to 8 - Wind Boards 9 to 12 - RS232 or NMEA Board 255 - Broadcast to all Boards mmm = message type to be used 211 - Calibration Value 1 212 - Calibration Value 2 213 - Calibration Value 3 214 - Calibration Value 4 206 - Damping Value 34 - High Alarm Value 33 - Low Alarm Value 32 - Sector Alarm Value 1 - Data Value 2 - New text for an existing function fff = function number see Table 14 xx.xx = Value value to be sent, or node number of function fff if mmm=2 tttttttttt = function text displayed on FFD, 20/20 or 40/40 This is a general purpose command for inputting values to other nodes.
5.15.32 General Purpose Output Value
####OV,nnn,mmm,fff,(CR)
HB-0845-06 195
nnn = number of node from which value is to be obtained. 1 - Depth Board 5 to 8 - Wind Board 9 to 12 - RS232 or NMEA Board 13 to 16 - Expansion Boards 17 to 18 - Pilot Boards 255 - Broadcast to all Boards mmm = message type to be used 211 - Calibration Value 1 212 - Calibration Value 2 213 - Calibration Value 3 214 - Calibration Value 4 206 - Damping Value 34 - High Alarm Value 33 - Low Alarm Value 32 - Sector Alarm Value 1 - Data Value fff = function number of value to be sent
This is a general purpose command for getting values from any node (including the Performance Unit itself) and replies with the value as follows: Vnnn,mmm,fff,xx.xx(CR) xx.xx = value
5.15.33 NMEA Sentence Output Rate Selection
#NS,p,fff,r(CR)
can be used to set the output rate of a specified NMEA sentence, where: p is the NMEA port number, 1 or 2 fff is the three-character NMEA sentence formatter r is the desired output rate in Hz
Example:
h2000 User Manual
196 HB-0845-06
#NS,1,HDM,10(CR)
sets the output rate of HDM on port 1 to ten times a second.
At present the only sentence formatter that is recognised is HDM, and the output rates can only be 0, 1, or 10. An output rate of 0 turns HDM off.
5.15.34 Displaying the Software Version Number
#RV,nn(CR)
causes the software version number of node nn to be output in the format: RV,nn,vv(CR)
where nn is the node number vv is the version number (in hexadecimal)
Example:
#RV,9(CR)
gives RV,9,75(CR) if version 7.5 software is fitted to the Performance Unit.
Not all Hercules units respond to version number requests, so some nodes will return version 00.
5.15.35 RS232 Error Messages
If a command is incorrectly entered or has a parameter out of range then an error message of the following form will be output on RS232:

HB-0845-06 197
*ERROR nn: <text>(CR) nn = error number <text> = a text message describing the error The error numbers are as follows: 01 = Invalid command mnemonic 02 = Command line too long, > than 80 characters 03 = Invalid command syntax, missing parameter 04 = Invalid parameter 05 = Parity error 06 = Channel Number out of range
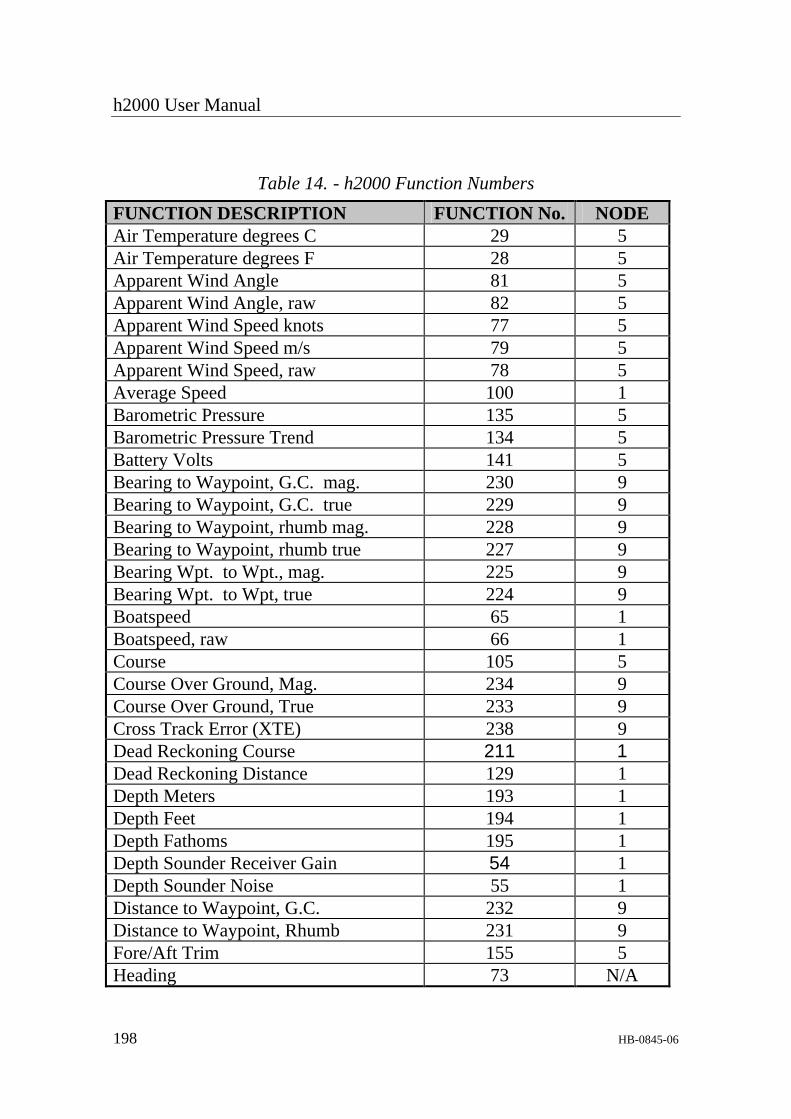
h2000 User Manual
198 HB-0845-06
Table 14. - h2000 Function Numbers FUNCTION DESCRIPTION FUNCTION No. NODE Air Temperature degrees C 29 5 Air Temperature degrees F 28 5 Apparent Wind Angle 81 5 Apparent Wind Angle, raw 82 5 Apparent Wind Speed knots 77 5 Apparent Wind Speed m/s 79 5 Apparent Wind Speed, raw 78 5 Average Speed 100 1 Barometric Pressure 135 5 Barometric Pressure Trend 134 5 Battery Volts 141 5 Bearing to Waypoint, G.C. mag. 230 9 Bearing to Waypoint, G.C. true 229 9 Bearing to Waypoint, rhumb mag. 228 9 Bearing to Waypoint, rhumb true 227 9 Bearing Wpt. to Wpt., mag. 225 9 Bearing Wpt. to Wpt, true 224 9 Boatspeed 65 1 Boatspeed, raw 66 1 Course 105 5 Course Over Ground, Mag. 234 9 Course Over Ground, True 233 9 Cross Track Error (XTE) 238 9 Dead Reckoning Course 211 1 Dead Reckoning Distance 129 1 Depth Meters 193 1 Depth Feet 194 1 Depth Fathoms 195 1 Depth Sounder Receiver Gain 54 1 Depth Sounder Noise 55 1 Distance to Waypoint, G.C. 232 9 Distance to Waypoint, Rhumb 231 9 Fore/Aft Trim 155 5 Heading 73 N/A
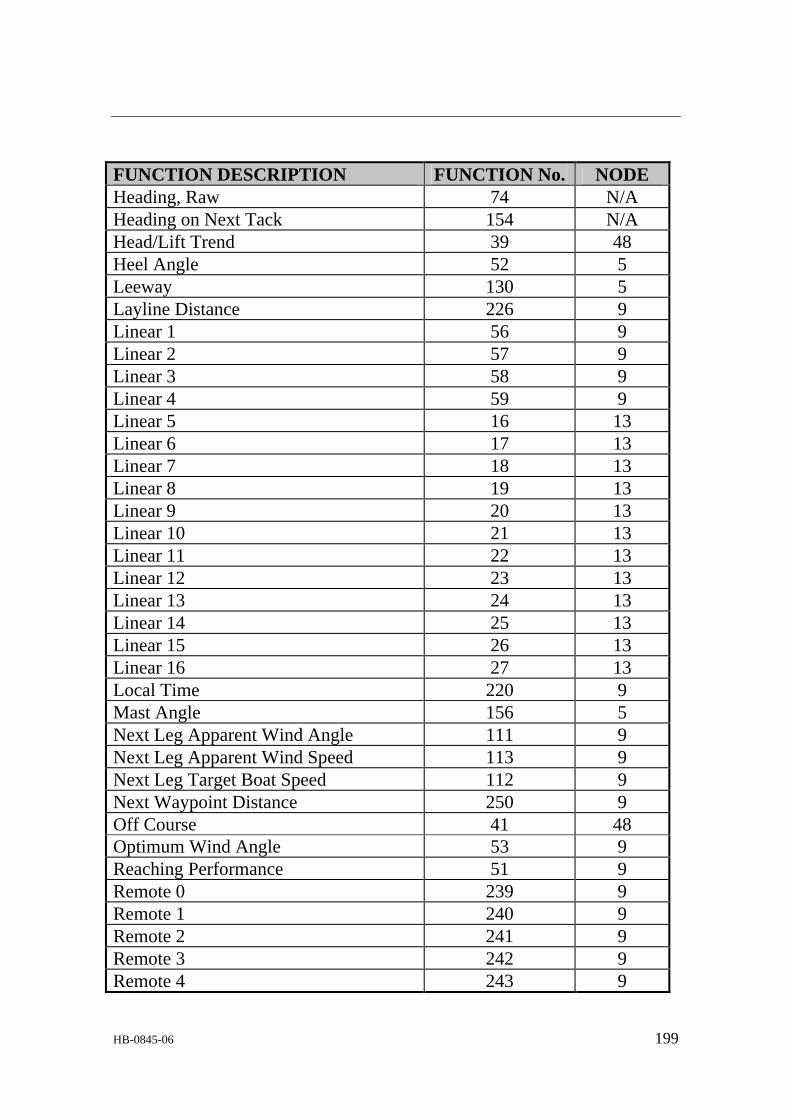
HB-0845-06 199
FUNCTION DESCRIPTION FUNCTION No. NODE Heading, Raw 74 N/A Heading on Next Tack 154 N/A Head/Lift Trend 39 48 Heel Angle 52 5 Leeway 130 5 Layline Distance 226 9 Linear 1 56 9 Linear 2 57 9 Linear 3 58 9 Linear 4 59 9 Linear 5 16 13 Linear 6 17 13 Linear 7 18 13 Linear 8 19 13 Linear 9 20 13 Linear 10 21 13 Linear 11 22 13 Linear 12 23 13 Linear 13 24 13 Linear 14 25 13 Linear 15 26 13 Linear 16 27 13 Local Time 220 9 Mast Angle 156 5 Next Leg Apparent Wind Angle 111 9 Next Leg Apparent Wind Speed 113 9 Next Leg Target Boat Speed 112 9 Next Waypoint Distance 250 9 Off Course 41 48 Optimum Wind Angle 53 9 Reaching Performance 51 9 Remote 0 239 9 Remote 1 240 9 Remote 2 241 9 Remote 3 242 9 Remote 4 243 9

h2000 User Manual
200 HB-0845-06
FUNCTION DESCRIPTION FUNCTION No. NODE Remote 5 244 9 Remote 6 245 9 Remote 7 246 9 Remote 8 247 9 Remote 9 248 9 Rudder Angle 11 5 Sea Temperature degrees °C 31 1 Sea Temperature degrees °F 30 1 Speed Over Ground 235 9 Stored Log 205 1 Tacking Performance 50 9 Target Boatspeed 125 9 Target TWA 83 9 Tidal Set 132 9 Tidal Drift 131 9 Timer 117 5 Time to Layline 251 9 Time to Waypoint 237 9 Trip Log 207 1 True Wind Angle 89 5 True Wind Direction 109 5 True Wind Speed, knots 85 5 True Wind Speed, m/s 86 5 VMG to Waypoint (VMC) 236 9 Velocity Made Good 127 5 Wind Angle to the Mast 157 5

HB-0845-06 201
5.15.36 RS232 Command Summary
#IC,n,x..x Input calibration value #ID,n,XX Input damping value #IR,nn,a...a,c...c Input remote channel data and text #IT,nn,c....c Input text for Hercules channel #IV,nnn,mmm,fff,xx.xx,t...t Input Value #NI,s,a... Send network or NMEA message #NO,s,a... Output from network or NMEA #NS,p,fff,r NMEA output rate selection #OA,nn Output alarm #OB Output Basic Data Immediately #OB,s Automatic output of basic data
enable/disable #OC,n Output calibration #OD,n Output damping value #OE,nn,s,h Automatic output enable /disable #OI,nn,s Output data immediately #OL Output Latitude and Longitude #OS,s Start/stop automatic output #OT,nn,h(R) Output text immediately #OV,nnn,mmm,fff Output value #PI,s,nn,xx.xx Polar input #PO,s,nn Polar output #PR Output table selection and rating #PR,s,xx.xx Input table selection and rating #PW,s,xx.x Enter polar windspeed #RC,nn,cc Assign remote channel #RM,ssss,ffff Display performance unit memory #RV,nn Display software version number #TC,t,l,d Trip Control #TC Output trip status #TO,s,nn Output wind correction #TI,s,nn,y...y Input wind correction

h2000 User Manual
202 HB-0845-06
5.15.37 True Wind Correction
There are two tables that are used to correct the values of true wind angle and true wind speed before output to the display or use in calculation of true wind direction. These are the values that can be adjusted via the FFD when calibrating true wind angle and speed and are explained in Chapter 3 - Calibration
5.15.38 Output True Wind Correction Table Values
####TO,s,nn(CR) s = 1 to 6 row number for 5,10,15,20,25 and 30 knots true wind speed respectively. nn = 25 to 28 column number. Columns 25 to 27 contain the true wind angle correction values for Upwind, Reaching and Downwind sectors respectively. Column 28 contains true wind speed correction values for 180 degrees down wind. The wind speed correction values are interpolated to 0 at 90 degrees. The command stops all automatic output and returns: U,s,nn,y...y(CR) if nn = 25 to 27
yyy.y or -yyy.y = True wind angle correction value degrees.
if nn = 28 yy.yy or -yy.yy = True wind speed correction
value in knots.
5.15.39 Input True Wind Correction Table Values
####TI,s,nn,y...y(CR) s = 1 to 6 row number as in previous command.
nn = 25 to 28 column number as in previous command.
yy.yy or - yy.yy = True wind speed correction value in knots

HB-0845-06 203
yyy.y or - yyy.y = True wind angle correction value in degrees.
Table 15. - True Wind Angle Correction Table Wind Angle True Wind Speed 5 10 15 20 25 30 Correction °°°° Correction Angle
Table 16. - True Wind Speed Correction Table Wind Angle True Wind Speed 5 10 15 20 25 30 Upwind Reaching Downwind
5.16 EXPANSION PROCESSOR
5.16.1 The Expansion Processor
The Expansion Unit can be connected to the h2000 System via the Fastnet to drive four extra analogues (meters 5,6,7 and 8), and provide extra analogue inputs.

h2000 User Manual
204 HB-0845-06
A new menu automatically appears on all FFDs called EXPAND when an Expansion Processor is added to the system. Up to twelve linear functions may be displayed numbered LINEAR 5 to LINEAR 16. Initially only LINEAR 5 is shown. A linear function by default shows a number between 0, representing 0 volts on its input and 1000 representing 6.5 volts on its input. The voltage change is assumed to be linear in relationship. Hence an external sensor, for example a load cell giving a linear change in voltage as the load increases, may be connected to a linear input.
LINEAR 5 has four calibration values, other linear functions have three calibration values found by selecting CALBRATE on the appropriate linear function.
5.16.2 Linear Function Settings
Altering calibration value 1 (CAL VAL 1) allows the correct input sensor to be selected. The different inputs available are shown below:
1 or 2 normal linear input 0 to 1000 3 rotating mast correction for apparent wind angle 4 heel angle input 5 trim angle input 6 barometric pressure 7 rudder angle 8 air temperature
The default factory setting for a linear input on the Expansion Processor is 1 (0-1000 format).
Note
• Do not set different linear inputs to the same function (except type 1 for normal linear input) or the calibration value will be ignored. This ensures that no function uses no more than one analogue input. However, any one of the Linear 1 to 4 inputs from the main processor may be

HB-0845-06 205
set to the same function as any one of the Linear 5 to 16 inputs.
Calibration value 2 (CAL VAL 2) displays MIN VAL with a number that can be adjusted between -999 and 9999. This is the number to be displayed for a 0V input. The default setting is 0.
Calibration value 3 (CAL VAL 3) displays MAX VAL with a number that can be adjusted between -999 and 9999. This is the number to be displayed for 6.5V input. The default setting is 1000.
5.16.3 Calibrating a Linear Channel
Adjusting the MIN and MAX values allows the displayed value to be scaled to the appropriate range for the sensor attached. Taking a load cell for example, if the zero load output is 0V, MIN VAL=000 and if maximum load is 650 KgF at 6.5V then MAX VAL=650.
Calibration value 4 is only available on Linear 5 and this displays a value between 05 and 16. This setting determines the number of linear inputs that are available. For example, changing this value to 10 would display a maximum of 10 linear inputs. The default value is 05.
Damping is adjustable between 00 and 99 seconds. The default setting is 01.
Notes
• When calibration value 1 is changed to select a desired input sensor, the linear value is no longer updated and a constant value is displayed until the page key is pressed.
• Extra functions selected, and then removed, remain in the display menu but with no data shown until the system is switched off and then back on again.

h2000 User Manual
206 HB-0845-06
• Linear functions will always be shown if selected by CAL VAL 4 on linear 5. They will show no data if the CAL VAL 1 is set to 1 or 2.
5.16.4 Expansion Processor Wiring
The Expansion Processor is connected to the system Fastnet for power and data requirements.
TERMINAL FUNCTION WIRE COLOUR
1 Meter 5 SIN Green 2 Meter 5 COS Blue 3 Meter 6 SIN Red 4 Meter 6 COS Violet 5 Meter 7 SIN Red 6 Meter 7 COS Violet 7 Meter 8 SIN Green 8 Meter 8 COS Blue 9 Meter Lighting Yellow
10 Meter Common Orange 11 Meter Ground Black 12 N/C 13 N/C 14 Network Data -ve Green 15 Network Data +ve White 16 Network Screen Screen 17 Battery Supply Ground Black 18 Battery Supply 12V Red 19 Battery Volts Sense Link to 18 20 N/C 21 Ground Blue 22 Sensor Supply +6.5V Red 23 Linear 5 Input Green 24 Linear 6 Input Green 25 Linear 7 Input Green 26 Linear 8 Input Green 27 Linear 9 Input Green 28 N/C

HB-0845-06 207
TERMINAL FUNCTION WIRE COLOUR 29 N/C 30 N/C 31 N/C 32 N/C 33 N/C 34 N/C 35 N/C 36 N/C 37 Linear 10 Input Green 38 N/C 39 Linear 11 Input Green 40 Linear 12 Input Green 41 +12V Switched Supply Red 42 Linear 13 Input Green 43 +6.5V Sensor Supply Red 44 RPM Input Green 45 Ground Blue 46 Linear 14 Input Green 47 Linear 15 Input Green 48 Linear 16 Input Green
h2000 User Manual
208 HB-0845-06
CHAPTER 6: DIAGNOSTIC DATA
6.1 FFD DIAGNOSTICS The FFD contains a number of diagnostic functions. These allow the FFDs own keys, display and memory to be tested and also perform some checks on other parts of the system via the network. One of the more useful of these tests enables the user to determine the software version numbers of the processor units in the system. This information is often useful when contacting service agents.
6.1.1 Diagnostic Function Selection
To use the diagnostic functions they must be selected on the required FFD when the system is switched ON as follows:
1. When switching ON the system press Enter and hold until DIAGNOST appears on the upper text in an otherwise blank display.
2. Press Enter and the first test option appears which is KEYTEST.
3. The required test can then be selected using the Scroll Up and Scroll Down Keys (see below for details of the tests).
4. Press Enter to start the test. 5. On completion of each test, press Scroll Up or
Scroll Down to scroll to the next test. Press Enter to start the test.
6. To return the display back to normal operation press the Page Key.
7. Provided that the power is not switched off or a system reset performed, the diagnostics can be re-entered by holding Enter down and pressing the On/Off Lights Key.

HB-0845-06 209
The options in the DIAGNOSTICS Menu are described in the following paragraphs, 6.1.2 to 6.1.3.
6.1.2 RES-SYS
Caution Do not use this option during normal operation as all calibration values will be lost
This allows individual units or the entire system to be reset. The network node address of the unit to be reset is selected using the Scroll Up and Scroll Down Keys and then Enter pressed. The node allocations are as follows:
Individual Addresses Node Address Function 01H Depth 05H Wind 09H Performance 0DH Expansion 10H Halcyon 2000 Compass 11H to 12H (Typ. 12H) Auto-Pilot 20H to 2FH FFDs 30H to 3FH Halcyon FFDs 40H to 4FH 20/20’s 50H to 5FH Pilot FFDs 60H to 6FH NMEA FFDs 112H to 127H Loadcell Amplifiers 128H Tank Level Sensor
h2000 User Manual
210 HB-0845-06
Collective Addresses FAH All 20/20s FBH All Halcyon FFDs FCH All Pilot FFDs FDH All Processor Nodes FEH All FFDs FFH Entire System
Notes
• When the system is reset, all calibration, damping and alarm values will be set back to default settings, all log values and trip functions will be reset to zero. All display units will reset to their default page settings. After a delay of about 20 seconds the system should be switched OFF and then back ON twice to complete the reset procedure.
• If the Depth board is reset, the FILTER PC setting for boat speed calibration will need to be reset to 10% as follows:
SPEED → BOAT SPD, CALBRATE →→→→ CORRCTN →→→→ FILTER PC
6.1.3 Versions
This option allows the user to obtain the software version numbers for the FFD (DISPLAY), Depth Board (DEPTH), Wind Board (WIND), Expansion Unit (EXP UNIT) and Pilot, if fitted. With 'VERSIONS' flashing on the display, press Enter. Then use the Scroll Up Key to select the device whose version number is required and press Enter to display the software checksum of that device, in the bottom display. The last two digits of the checksum are the software version number.

HB-0845-06 211
6.2 h2000 MAIN PROCESSOR The main processor contains two circuit boards: the wind board and the depth board. The depth board is responsible for boat speed, sea temperature and depth measurement. The wind board is the main computer responsible for wind functions and also drives the analogue meters. It has special inputs for the mast head unit, Halcyon compass, air temperature, battery voltage and four linear inputs which can be connected to a variety of other sensors, see Chapter 4 - Installation Information.
6.2.1 Mast Head Unit
If there appears to be a problem with wind speed or wind angle first check the cable connections at the main processor and at the mast base junction box. The easiest way to test the mast head unit cable is by substituting a spare cable. If the cable is damaged in the mast the cause of the damage should be ascertained and the mast re-rigged or new conduit installed before replacing the cable. The mast head unit should always be removed before the mast is un-stepped to avoid damage. It should be stored in its original packing box with the vane and cups removed.
Note
• The mast head unit's bearings should not be oiled as they are of a sealed pre-lubricated type and additional oil may cause chemical breakdown of the existing lubricant.
6.3 DEPTH SOUNDER Fault finding on the depth sounder is often difficult as depth sounder performance is dependent on many factors: transducer type and installation, boat speed, electrical noise, sea state, sea bed conditions, air and plankton in the water. Indications of problems with the depth sounder normally manifest themselves in one of three ways: display shows four floating bars:
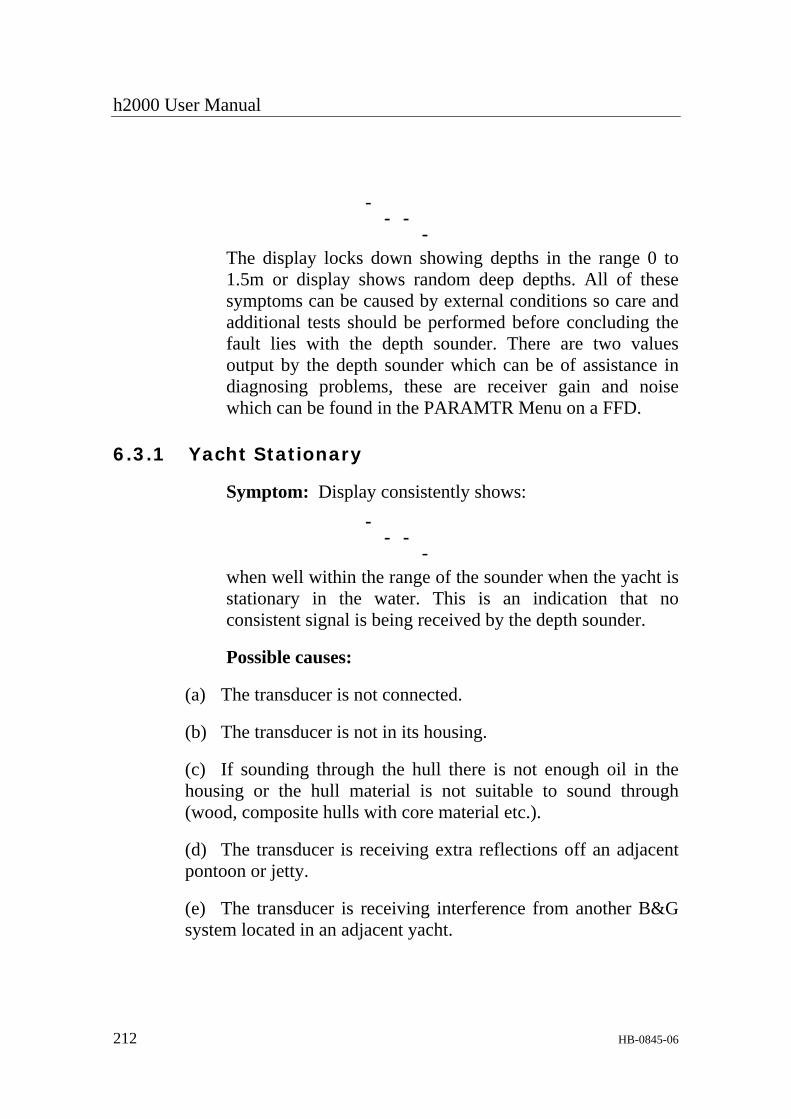
h2000 User Manual
212 HB-0845-06
-
- --
The display locks down showing depths in the range 0 to 1.5m or display shows random deep depths. All of these symptoms can be caused by external conditions so care and additional tests should be performed before concluding the fault lies with the depth sounder. There are two values output by the depth sounder which can be of assistance in diagnosing problems, these are receiver gain and noise which can be found in the PARAMTR Menu on a FFD.
6.3.1 Yacht Stationary
Symptom: Display consistently shows: -
- --
when well within the range of the sounder when the yacht is stationary in the water. This is an indication that no consistent signal is being received by the depth sounder.
Possible causes:
(a) The transducer is not connected.
(b) The transducer is not in its housing.
(c) If sounding through the hull there is not enough oil in the housing or the hull material is not suitable to sound through (wood, composite hulls with core material etc.).
(d) The transducer is receiving extra reflections off an adjacent pontoon or jetty.
(e) The transducer is receiving interference from another B&G system located in an adjacent yacht.
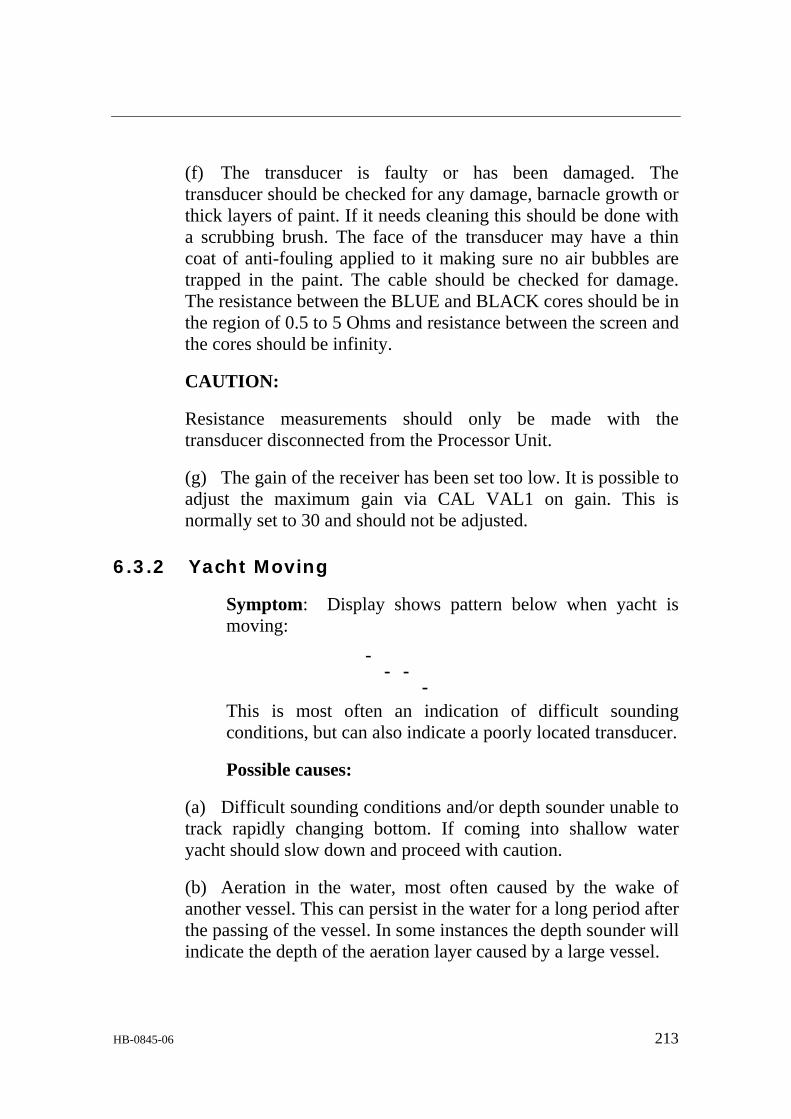
HB-0845-06 213
(f) The transducer is faulty or has been damaged. The transducer should be checked for any damage, barnacle growth or thick layers of paint. If it needs cleaning this should be done with a scrubbing brush. The face of the transducer may have a thin coat of anti-fouling applied to it making sure no air bubbles are trapped in the paint. The cable should be checked for damage. The resistance between the BLUE and BLACK cores should be in the region of 0.5 to 5 Ohms and resistance between the screen and the cores should be infinity.
CAUTION:
Resistance measurements should only be made with the transducer disconnected from the Processor Unit.
(g) The gain of the receiver has been set too low. It is possible to adjust the maximum gain via CAL VAL1 on gain. This is normally set to 30 and should not be adjusted.
6.3.2 Yacht Moving
Symptom: Display shows pattern below when yacht is moving:
-- -
-This is most often an indication of difficult sounding conditions, but can also indicate a poorly located transducer.
Possible causes:
(a) Difficult sounding conditions and/or depth sounder unable to track rapidly changing bottom. If coming into shallow water yacht should slow down and proceed with caution.
(b) Aeration in the water, most often caused by the wake of another vessel. This can persist in the water for a long period after the passing of the vessel. In some instances the depth sounder will indicate the depth of the aeration layer caused by a large vessel.

h2000 User Manual
214 HB-0845-06
(c) Poorly located transducer. Determine what conditions cause the problem by doing some manoeuvring trials in an area which has a relatively uniform depth, a solid bottom and is clear of the wake from other boats.
First determine the maximum speed at which reliable soundings can be made when travelling in a straight line. Then repeat the tests when turning to port and starboard. If better results can be obtained when turning it is possible that there is something in front of the transducer causing aeration. This may be a hull fitting like a water outlet in which case the transducer or the hull fitting should be moved. If there seems little difference whether turning or not, the position of the transducer should be reviewed. It may be coming out of the water at high speed or in rough water. It is impossible to give specific instructions on where to re-site the transducer as it is so dependent on the design of boat; however generally better results will be obtained nearer the centre line of the boat. If there is only a problem when heeled, consider fitting two transducers with a changeover switch.
6.3.3 Consistently Shows Shallow Depth
Symptom: Display consistently shows a shallow depth between 0m and about 1.5m.
Possible causes:
a. Faulty transducer. Transducer rings for too long after the transmit pulse is sent and the ringing is interpreted as a shallow return by the depth sounder. On a deep keeled yacht it may be possible to overcome this problem by increasing the minimum depth to just less than the draft of the yacht. The minimum depth is adjusted by changing CAL VAL1 on NOISE.
PARAMTR→NOISE, CALBRATE→CAL VAL1 (MIN DPTH M)
The default setting for minimum depth is 0.7 metres.
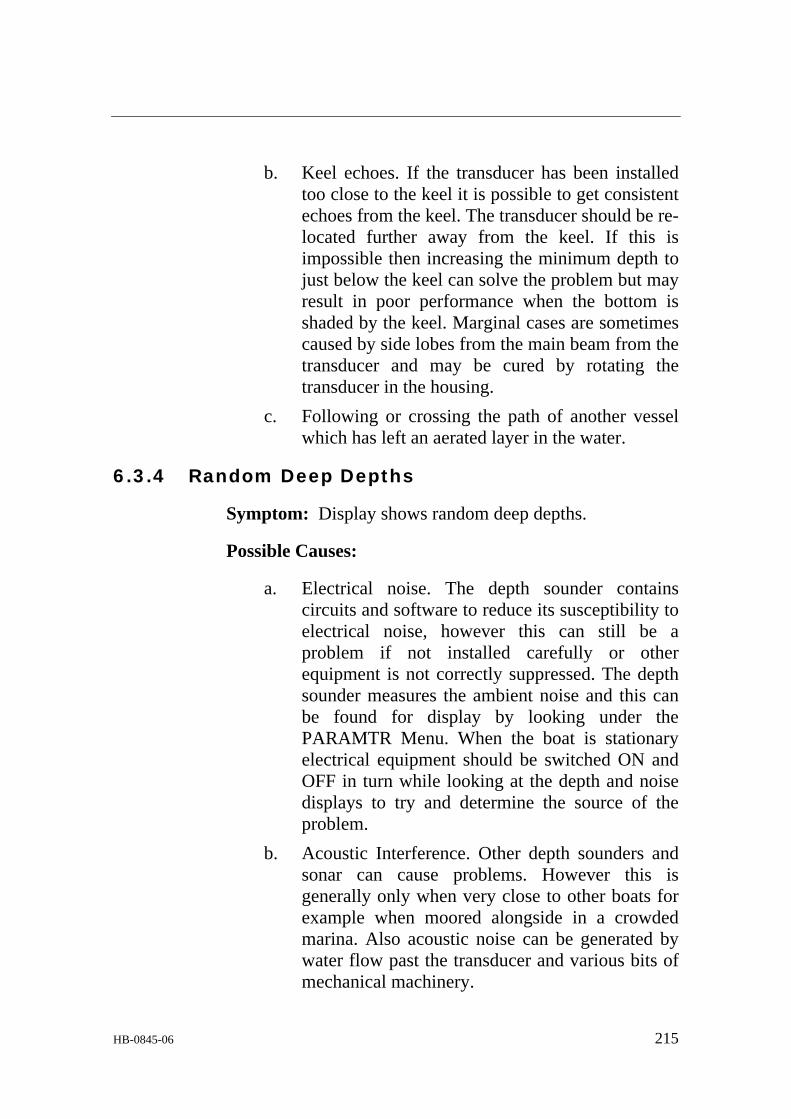
HB-0845-06 215
b. Keel echoes. If the transducer has been installed too close to the keel it is possible to get consistent echoes from the keel. The transducer should be re-located further away from the keel. If this is impossible then increasing the minimum depth to just below the keel can solve the problem but may result in poor performance when the bottom is shaded by the keel. Marginal cases are sometimes caused by side lobes from the main beam from the transducer and may be cured by rotating the transducer in the housing.
c. Following or crossing the path of another vessel which has left an aerated layer in the water.
6.3.4 Random Deep Depths
Symptom: Display shows random deep depths.
Possible Causes:
a. Electrical noise. The depth sounder contains circuits and software to reduce its susceptibility to electrical noise, however this can still be a problem if not installed carefully or other equipment is not correctly suppressed. The depth sounder measures the ambient noise and this can be found for display by looking under the PARAMTR Menu. When the boat is stationary electrical equipment should be switched ON and OFF in turn while looking at the depth and noise displays to try and determine the source of the problem.
b. Acoustic Interference. Other depth sounders and sonar can cause problems. However this is generally only when very close to other boats for example when moored alongside in a crowded marina. Also acoustic noise can be generated by water flow past the transducer and various bits of mechanical machinery.

h2000 User Manual
216 HB-0845-06
c. Mid-water echoes. When outside the range of the depth sounder it is possible that random depths are displayed due to mid-water echoes from shoals of fish or aeration layers.
6.4 PERFORMANCE UNIT The Performance Unit contains the NMEA and RS232 interfaces and also calculates the performance related functions.
6.5 ERROR MESSAGES Following is a list of error messages output on the displays:
Er01 Error detected reading the analogue to digital converter on the depth sounder board. This can be an indication of a fault on the board or that the sea water temperature or the compass signals are outside their normal range. Try disconnecting the sensors in turn.
Er02 Error detected when writing to the analogue to digital converter on the depth sounder board. This can indicate the same problems as Er01.
Err.3 Syntax or parity error on received NMEA data.
Err.4 Checksum error on received NMEA 0183 data.
Err.5 Polar table wind speed values are disordered, see Chapter 2 - Operating Information.
Err.6 There are duplicate non-zero wind speed values in the Polar Table, Chapter 2 - Operating Information.
HB-0845-06 217
CAL Alternating with a function value indicates that it has yet to be calibrated. This will happen after a system reset or if the internal battery is exhausted.
NO SPACE FFD memory full, too many functions have been declared.
NOT FND New function declared without text, can occur temporarily at start-up or after changing a system setting (e.g. True/Magnetic reference).
6.6 HALCYON 2000 COMPASS
6.6.1 Shows Heading and CAL Flashing
Symptom: Display flashes a Heading and CAL
Possible Causes:
a. The memory in the Halcyon 2000 is empty or has been corrupted. This may be due to a System Reset being performed or the first time the compass has been installed and not yet been calibrated. Perform a calibration swing to restore normal operation.
b. After a calibration swing the result is always FAIL. There is a source of magnetic deviation near to the Halcyon 2000 compass. Try re-positioning the compass and perform the calibration.
6.6.2 Heading Shows Err
Possible Causes:
a. The signal from the fluxgate sensor is too big or too small. Try re-positioning the compass. If still showing Err set NAVIGATE→COMP CAL, CALBRATE→→→→CAL VAL 2 (RES CAL) to 1.

h2000 User Manual
218 HB-0845-06
This will reset the compass. All previous calibrations will be lost.
6.6.3 Heading or COMP CAL Shows PHS
Possible Causes:
a. The compass is in the middle of resetting, the display should show heading and CAL flashing after 20 seconds. A calibration swing will be required.
6.6.4 Two Headings Flashing Alternately
Symptom: Pilot or Halcyon Displays shows 2 headings flashing alternately
Possible Causes:
a. The Pilot has not been set to use the Halcyon 2000 as its heading source. See using Halcyon 2000 with a B&G ACP Pilot. If the Halcyon 2000 is not to be the source of heading then it must be unplugged from the system.
6.6.5 True Wind Direction, Tide Set or DR Course Not Functioning Correctly
a. The Main Processor has not been configured to use the Halcyon 2000 as the main heading source. Set the following to 16:
NAVIGATE→COURSE, CALBRATE→→→→CAL VAL 1 (HDG NODE)

HB-0845-06 219
6.7 ROUTINE MAINTENANCE
6.7.1 Through-hull housings
Keep the screw threads of through-hull housings well greased with silicone or water pump grease. Ensure that the outer surfaces of the housing are properly coated with anti-fouling paint.
6.7.2 Boat speed sensor (paddlewheel type)
Use a stiff brush to remove marine growth that may cause the paddlewheel to freeze, and then clean the surfaces with a very weak solution of household detergent. If fouling is very severe, push the paddlewheel axle out by using a small drift, and then very gently, wet sand the surface with a fine grade wet/dry paper.
Inspect the o-rings on both the sensor and the blanking plug and replace if necessary, and then lubricate with silicone lubricant or petroleum jelly (Vaseline®).
6.7.3 Boat speed sensor (ultrasonic type)
Aquatic growth can accumulate rapidly on the transducer surface reducing performance. Clean the surface with a soft cloth and a very weak solution of household detergent. If fouling is severe, use a stiff brush or a putty knife. Take care not to cause scratches on the transducer face. Wet sanding using fine grade wet/dry paper is permissible to remove stubborn deposits.
Surfaces exposed to salt water must be coated with antifouling paint. Use only water-based antifouling paint. Solvent-based paints must not be used. Solvent-based paints contain ‘ketones’ which may attack the plastic surfaces and damage the sensor. Re-apply the antifouling paint every six months or at the start of each boating season.

h2000 User Manual
220 HB-0845-06
6.7.4 Desiccators
Should any display window show signs of moisture having penetrated the seals e.g. misting of the glass or condensation, the instrument should be removed and returned to your national distributor for drying.
6.8 WINTER STORAGE/LAYING UP
6.8.1 Masthead unit
Storage of the masthead unit when the yacht is laid up afloat will increase the life of the transmitters. It should always be removed from masthead before the mast is unstepped. It should be stored in its packing box with the vane and cups removed. The exposed socket and connector threads at the top of the mast should be smeared with silicone grease such as MS4 (Midland Silicones Ltd), and then protected with the plastic cap supplied with it.
The contacts in the masthead unit connector should be inspected for cleanliness and sprayed with a water inhibitor such as WD40. The outer casing of the connector should also be smeared with silicone grease.
The masthead unit must never be oiled. The bearings are of the sealed pre-lubricated type and any additional oil may cause chemical breakdown of the existing lubricant. Any scratch marks or corrosion on masthead unit spar should be rubbed clean with a soft cloth and lightly smeared with silicone grease. This should not be necessary if care is taken when hoisting or lowering the masthead unit, to protect it from collision against the rigging.
If the mast is un-stepped, care must be taken to ensure that the cable is not cut through, but disconnected at the junction box below decks. The bare ends of the cable should be smeared with silicone grease.

HB-0845-06 221
6.8.2 Boat speed sensors
Remove paddlewheel unit(s) from housing(s) and lubricate the sealing rings and threads. Place the sealing cap on the housing. Perform the maintenance instructions given Routine Maintenance section for paddlewheel type sensors.

h2000 User Manual Appendix 1 – Calibration Data
HB-0845-06 A1-1
A2 h2000 CALIBRATION DATA A2.1 System Configuration Record
Default Setting User Setting HEADING NODE 16 (HALCYON 2000)
HALCYON MODE 0
1 WIND ANG
2 DEPTH
3 BOAT SPD
4 WIND SPD
5 HEADING
6 MAG WIND
7 OFF CRSE
ANALOGUES
8 XTE
1 4 (HEEL)
2 5 (TRIM)
3 6 (BAROMETER)
LINEARS 4 1 (0-1000 TYPE)
NMEA MODE 0
BAUD RATE 6.2
SEA TEMP TYPE 1

h2000 User Manual Appendix 1 – Calibration Record
HB-0845-06 A1-2
A2.2 Basic Calibration Record
FUNCTION CALIBRATION VALUE MEAS W/A OFFSET
Hz/Kt 1.04 (default) MEAS W/S
OFFSET 1.04 (default) APP W/A OFFSET
Hz/Kt 1.04 (default) APP W/S
OFFSET 1.04 (default) STBD Hz/Kt
BOAT SPD PORT H/Kt
HEADING OFFSET DEPTH DATUM HEEL OFFSET TRIM OFFSET
LEEWAY COEFFICIENT MAST ANGLE OFFSET
RUDDER OFFSET A2.3 True Wind Speed Correction Table
TRUE WIND SPEED 5 10 15 20 25 30
CORRECTION º CORR. ANGLE
A2.4 True Wind Angle Correction Table
TRUE WIND SPEED WIND ANGLE 5 10 15 20 25 30 UPWIND
REACHING DOWNWIND
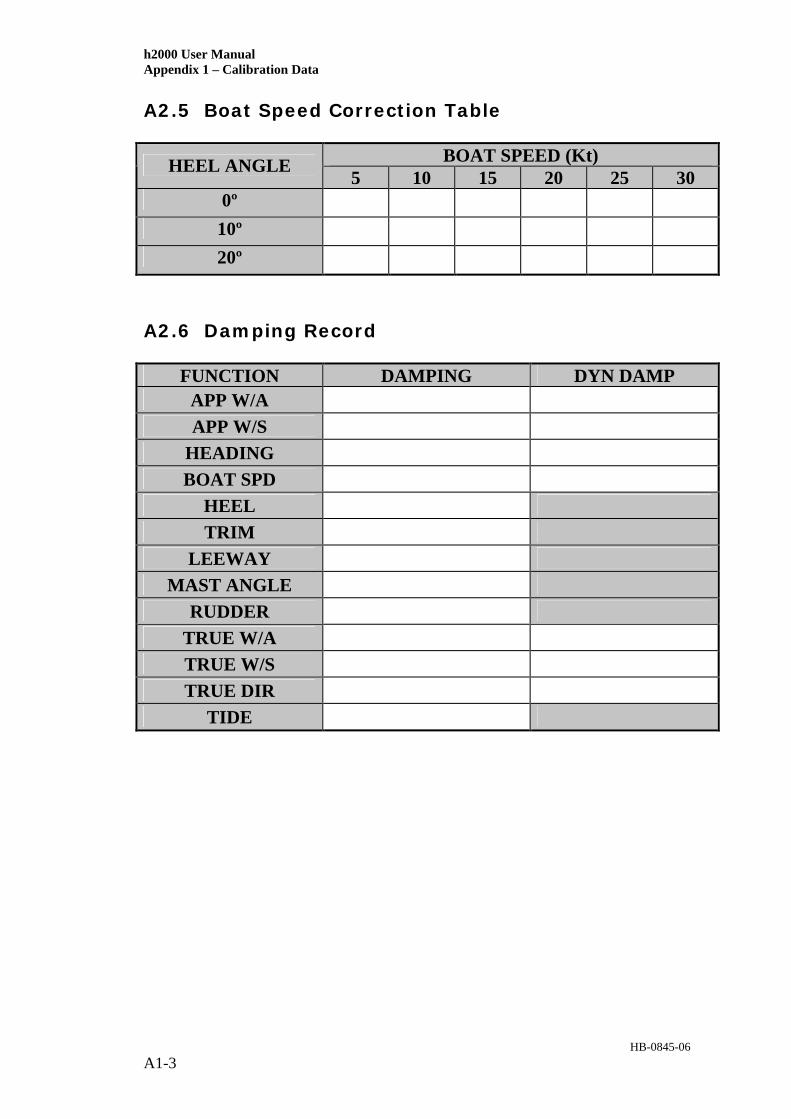
h2000 User Manual Appendix 1 – Calibration Data
HB-0845-06 A1-3
A2.5 Boat Speed Correction Table
BOAT SPEED (Kt) HEEL ANGLE 5 10 15 20 25 30 0º
10º 20º
A2.6 Damping Record
FUNCTION DAMPING DYN DAMP APP W/A APP W/S
HEADING BOAT SPD
HEEL TRIM
LEEWAY MAST ANGLE
RUDDER TRUE W/A TRUE W/S TRUE DIR
TIDE


