4. CHAPTER 1: The history of computers ....................................................................... 3
4.1. IT concepts ............................................................................................................................................. 3 4.2. History of computers .............................................................................................................................. 4
8.1. Number systems .................................................................................................................................... 8 8.2. Working with signed numbers .............................................................................................................. 16 8.3. Character set encoding ASCII and EBCDIC ........................................................................................ 17
13. CHAPTER 5: Types of Computer Instruction Set Architecture .............................. 26
13.1. RISC versus CISC processors ........................................................................................................... 26
14. CHAPTER 6:Ms Word ................................................................................................ 27
14.1. Introduction to Ms Word ..................................................................................................................... 27 74.1. Creating Resume and Cover letter ..................................................................................................... 48
75. CHAPTER 7: Ms Excel ............................................................................................... 48
75.1. Introduction to Ms Excel ..................................................................................................................... 48 75.2. Excel and Financial Analysis .............................................................................................................. 59
76. CHAPTER 8: Networking and Interent ..................................................................... 59
76.1. Introduction to Internet ....................................................................................................................... 59
77. Data Security .............................................................................................................. 65
77.1. Data Security ...................................................................................................................................... 65
some set of instructions (programs) so as to produce some output information. Components of a computer system A computer system comprises of two primary components - Hardware and software. Hardware refers to the computer physical parts which are further divided into input devices, the central processing unit (CPU), output devices, and storage devices. Software on the other hand is categorized into systems software and application software. System software are programs that are required by the computer in order to make it be ready for its functions. They include operating systems and utility programs. Operating systems are programs that are used to support basic computer operations from the time it is powered on until it is shut down. It functions as the platform on which a computer user runs all their user specific programs. Utility programs are variety of programs that can be added to a computer so as to extend functionality of the computer by creating additional functions not necessarily primary to the operating system but give enhanced user environment and some housekeeping functions. For example anti-virus, CD writing software, video player, calculator, etc. Applications software refer to a variety of programs for user specific tasks. The choice of an application program depends on the type of user and what one wants to do. For example accounting packages, architectural programs, word processing programs, etc. Assignment: Identify FIVE application programs that can used in a large wholesale business. Types of computers Computers can be categorized as follows; - Analog vs digital: An analog computer is a form of computer that uses the continuously-changeable aspects of physical phenomena such as electrical, mechanical, or hydraulic quantities to model the problem being solved. In contrast, digital computers represent varying quantities of measurement using discrete values of two digits 0,1 called binary digits. Digital computers are the proper meaning of a computer today. - Dedicated (special purpose) vs general purpose computer: A dedicated computer is a computing device that is designed by the manufacturer to carry out only one function. It refers to a number of intelligent devices that have some microprocessor to automate them. For example, electronic fuel pump, ATM machine, electronic washing machine, digital television, etc. General purpose computers on the other are computers that can be modified to perform any functions by loading the necessary software. Business application computers are general purpose and therefore can be programmed with variety of user applications.
4.2. History of computers
The history of computers can be traced back to almost 2000 years ago, with the advent of abacus, a
wooden rack holding two horizontal wires with beads strung on them. Numbers are represented
using the position of beads on the rack. Fast and simple calculations can be carried out by
appropriately placing the beads.
ICS2101 COMPUTER ORGANIZATION, user 5
In 1620, an English mathematician by the name William Oughtred invented the slide rule – a
calculating device based on the principle of logarithms. It consisted of two graduated scales devised
in such a manner that suitable alignment of one scale against the other, made it possible to perform
additions, compute products etc. just by inspection.
Blaise Pascal, a French mathematician, is usually credited for building the first digital computer in
1642. He invented the mechanical calculating machine. Numbers were entered in this machine by
dialing a series of numbered wheels. Another series of toothed wheels transferred the movements to
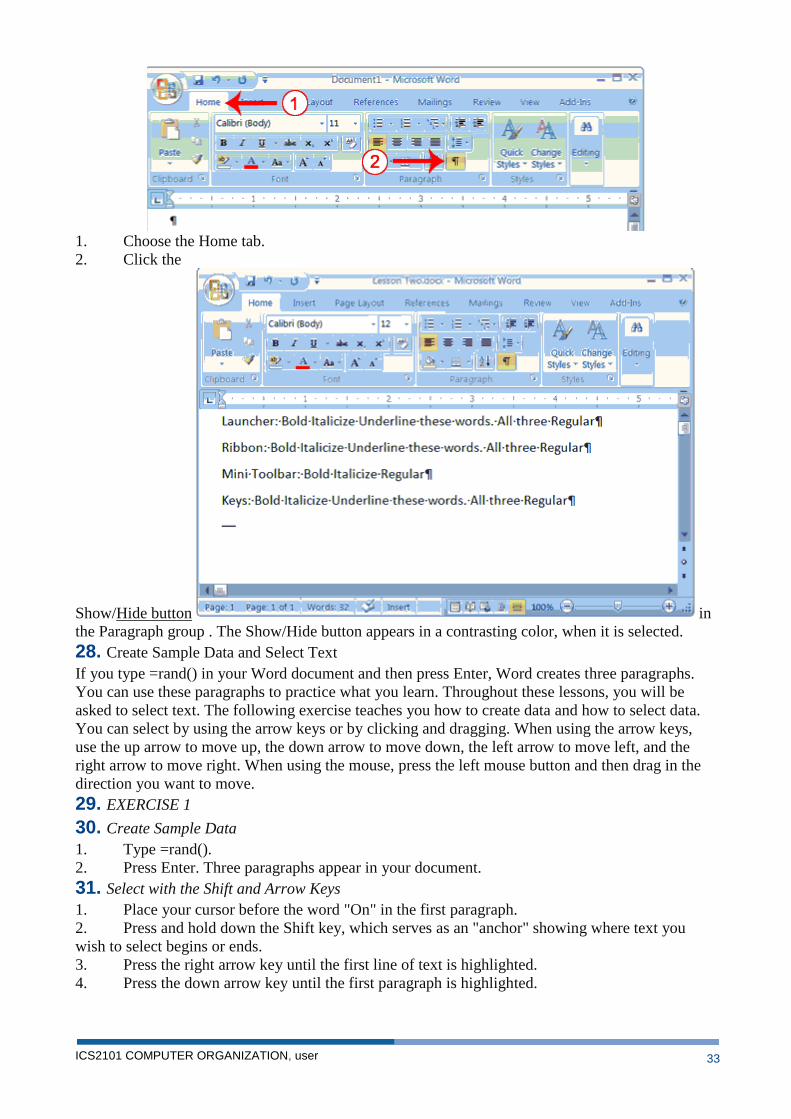
a dial, which showed the results.
In 1671, Gottfried von Leibnitz, a German mathematician, invented a calculating machine which
was able to add and perform multiplications. He invented a special stepped gear mechanism for
introducing the addend digits, which is still being used.
The prototypes made by Pascal and Leibnitz were not used in many places. It was only about a
century later that Thomas of Colmar created the first successful mechanical calculator which could
add, subtract, multiply, and divide. A lot of improved desktop calculators by various inventors
followed, such that by 1890 a range of improvements like accumulation of partial results, storage of
past results, and printing of results were not uncommon.
5. 1.3.1 The First Computer
Charles Babbage, a professor of mathematics at Cambridge University, England, realized that
many long calculations usually consisted of a series of actions that were constantly repeated and
hence could possibly be automated. By 1822, he designed an automatic calculating machine that he
called the ‘Difference Engine’. It was intended to be steam powered and fully automatic (including
printing of result tables), commanded by a fixed instruction program. In short, he developed a
prototype of a computer which was 100 years ahead of time and is, therefore, considered as the
father of modern day computers.
A step towards automated computing was the development of punched cards which were first
successfully used by Herman Hollerith, who worked in the US Census Bureau in 1890. He along
with James Powers developed devices that could read information that had been punched into
cards, without any human help. This resulted in reduced reading errors, increased workflow and
availability of unlimited memory (punched cards could be used as easily accessible memory of
unlimited size).
These advantages were seen by various commercial companies and soon led to the development of
improved punch-card using computers by companies like International Business Machines (IBM)
and Remington.
6. 1.3.2 Some Well Known Early Computers
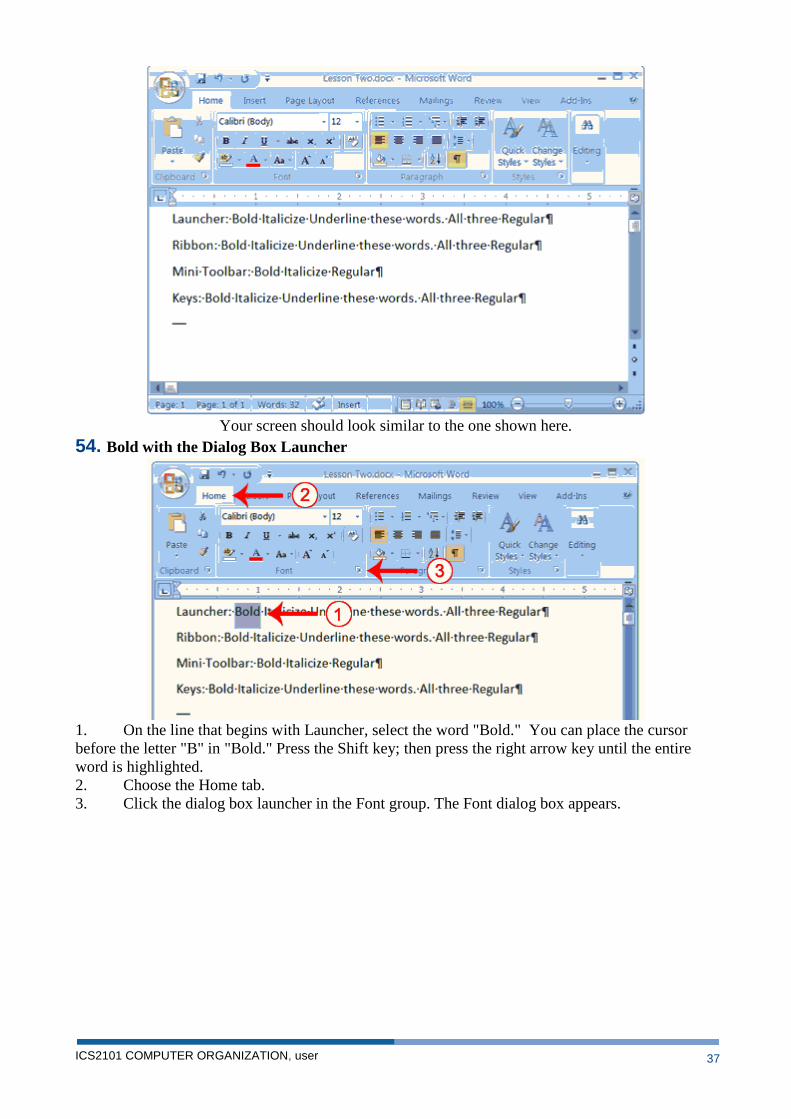
Mark I
After World War II there was a need felt for advanced calculations. By that time, many
reliable mechanical desk calculators had been developed. Howard A. Aiken of Harvard
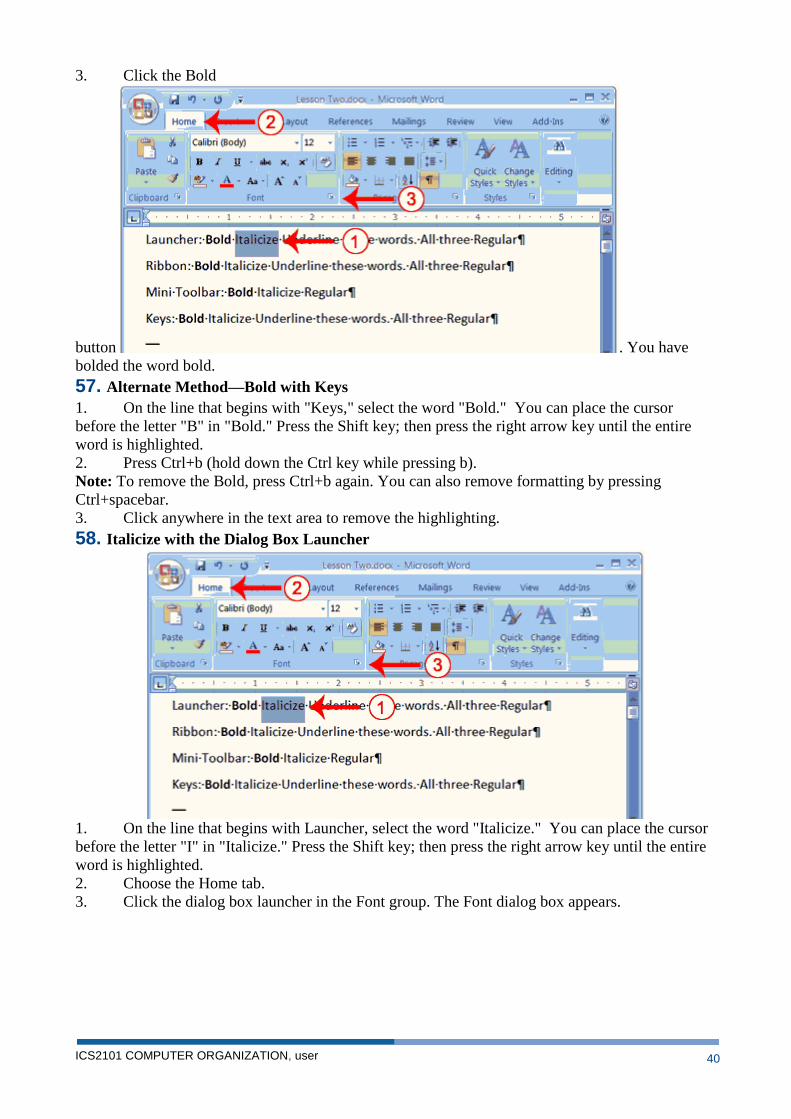
University, while working on his doctorate in physics, in the year 1937, designed a machine
that could automatically perform a sequence of arithmetic operations. He completed this in
1944 and named it Mark I. This machine performed a multiplication and division at an
average of about four and eleven seconds respectively. The results were printed at a rate of
one result per five seconds.
ENIAC
The World War II also produced a large need for computer capacity especially for the
ICS2101 COMPUTER ORGANIZATION, user 6
military. New weapons were made for which trajectory tables and other essential data were
needed. In 1942, Professors
John P. Eckert and John W. Mauchly at the Moore School of Engineering of the University
of Pennsylvania, USA, decoded to build a high speed computer to do the job. This was called
the Electronic Numeric Integrator and Calculator (ENIAC).
It used 18,000 vacuum tubes, about 1,800 square feet of floor space, and consumed about
180,000 watts of electrical power. It had punched cards I/O and its programs were wired on
boards.
ENIAC is accepted as the first successful high-speed electronic digital computer and was used
from 1946 to 1955.
EDVAC
Fascinated by the success of ENIAC, John Von Neumann, a mathematician, undertook an
abstract study of computation in 1945. In this he aimed to show that a computer should be
able to execute any kind of computation by means of a proper programmed control. His ideas,
referred to as ‘stored program technique’, became essential for future generations of high-
speed digital computers and were universally accepted. The basic idea behind the stored
program concept was that data as well as instructions can be stored in the computer’s memory
to enable automatic flow of operations.
Between 1947 and 1950, the More School personnel and the Ballistics Research Laboratory
of the US army built a computer named Electronic Discrete Variable Automatic Computer
(EDVAC), which was based on Von Neumann’s concept of stored program.
UNIVAC
The Universal Automatic Computer (UNIVAC), developed in 1951, was the first digital
computer to be produced and was installed in the Census Bureau.
The first-generation stored-program computers needed a lot of maintenance, reached 70% to
80% reliability of operations and were used for almost 10 years. EDVAC and UNIVAC fell
into this group of computers and were the first commercially available computers.
7. 1.3.3 Computer Generations
‘Generation’ in computer terminology is a ‘step’ ahead in technology. As you go through the
history of evolution of computers, you will find that the earliest computers were big in size,
consumed a lot of power and heated up quickly, due to which it had to be shut down, frequently to
be cooled. They were very expensive in terms of development and maintenance.
As technology improved, computers became compact, faster and more powerful. From a user’s
perspective, they become user friendly and more affordable. This has largely contributed towards
the popularity that computers have gained these days.
The term ‘generation’ was earlier used only to distinguish between varying hardware technologies
but was later extended to include both hardware and software. A comparison of generations is made
below.
First Generation Computers (1940 to 1956)
The first generation of computers was characterized by vacuum tubes in the circuitry and
magnetic drums for memory.
These computers were enormous in size, used great deal of electricity and were expensive to
operate. They also had limited storage capacity.
ICS2101 COMPUTER ORGANIZATION, user 7
First generation computers relied on machine language (binary-coded program) to perform
operations and could solve only one problem at a time. Punched cards and paper tapes were
used to input data and instructions, and output was displayed on printouts.
Early computers like ENIAC, EDVAC and UNIVAC can all be classified as first generation
computers.
Second Generation Computers (1956 to 1963)
In the early 1950s, the discoveries of Transistor and Magnetic core memory changed the
image of computers – from unreliable to highly reliable machines with increased capability,
and higher storage capacity.
The transistor was far superior to the vacuum tube, allowing computers to become smaller in
size, cheaper, reliable and more energy efficient. Though transistor still generated a great deal
of heat, it was a substantial improvement over the vacuum tube.
Second generation of computers was also characterized by allowing programmers to specify
instructions in symbolic (or assembly) language rather than cryptic binary machine language.
High level programming languages like COmmon Business Oriented Language (COBOL)
and FORmula TRANslation (FORTRAN) were also being developed at this time.
Due to the increase in the cost of expanding programming, these machines were expensive to
purchase and operate. Such computers were, therefore, mostly found in large computer
centres or government/private laboratories with many programmers and support professionals.
Third Generation Computers (1964 to 1971)
The development of Integrated Circuit by Jack Kilby, an engineer with Texas Instruments,
in 1958, was the hallmark of the third generation of computers. Punched cards and printouts
gave way to devices like keyboards and monitors making it easier for the user to interact with
the computer. Computer manufacturers could provide a range of accessories like the cathode
ray tube display devices, page printers, consoles etc.
Existence of an operating system allowed the device to run various applications at one time
with the central program monitoring the memory.
For the first time, computers were being widely used in business for areas like :
Accounting
Payroll
Billing
Tracking Inventory, etc.
Third generation computers were substantially smaller and cheaper than their predecessors.
Fourth Generation Computers (1971 to present)
The trend in 1970s was to move from single-purpose but powerful computers towards cheaper
computer systems that could support a large range of applications.
ICS2101 COMPUTER ORGANIZATION, user 8
A new revolution in computer hardware came about which could shrink the computer logic
circuitry and its components using the Large Scale Integration (LSI) technology. Hundreds of
components could now fit onto a single chip!
In the 1980s, Very Large Scale Integration (VLSI) squeezed hundreds of thousands of
components onto a single chip. This shrinking trend continued and led to the introduction of
personal computers (PCs) – programmable machines that are small enough and inexpensive
so that these can be purchased and used by individuals. Companies like Apple Computers and
IBM introduced very successful PCs.
The IC technology was not only used to construct the processor, but also for the construction
of memory. The first memory chip was constructed in 1970 and could hold 256 bits.
Fifth Generation Computers (the Road Ahead)
The fifth generation of computers characterized by artificial intelligence is in the process of
development. The goal here is to develop devices that are capable of learning and responding to
natural language input. This generation of computers is using new technologies in very large scale
integration, along with new programming languages and will be capable of amazing feats, in the
area of artificial intelligence, such as voice recognition.
8. CHAPTER 2: Computer Arithmetic
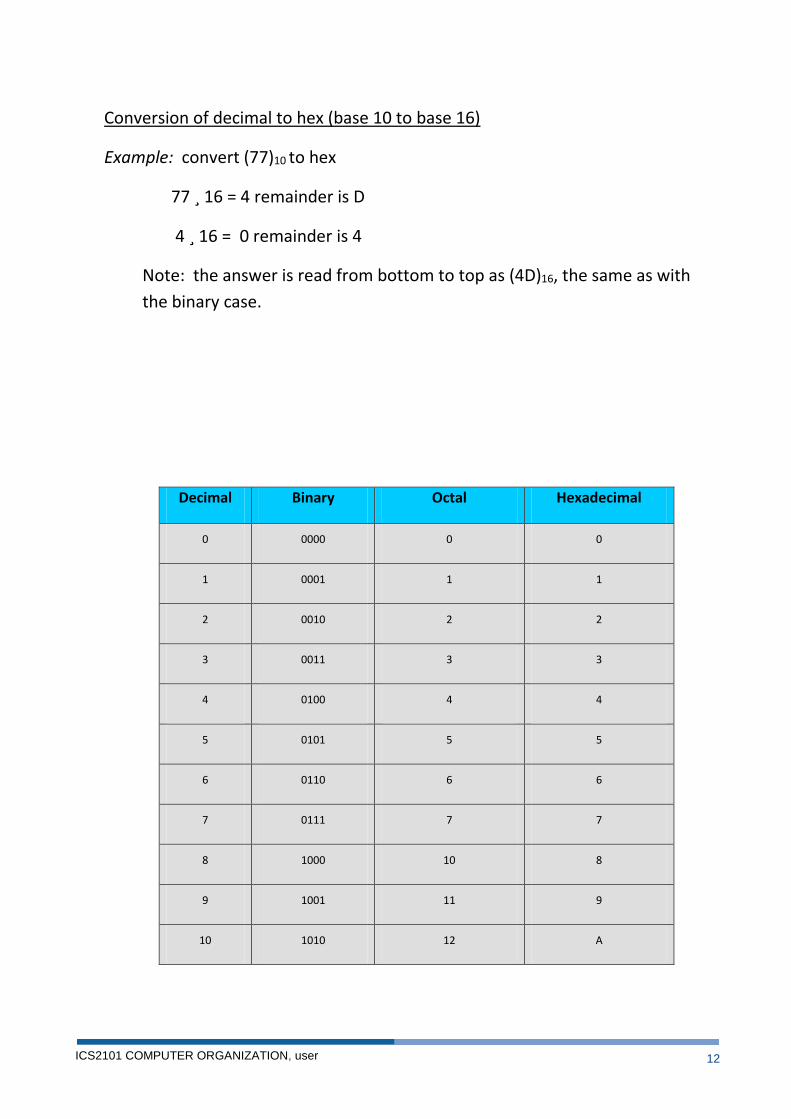
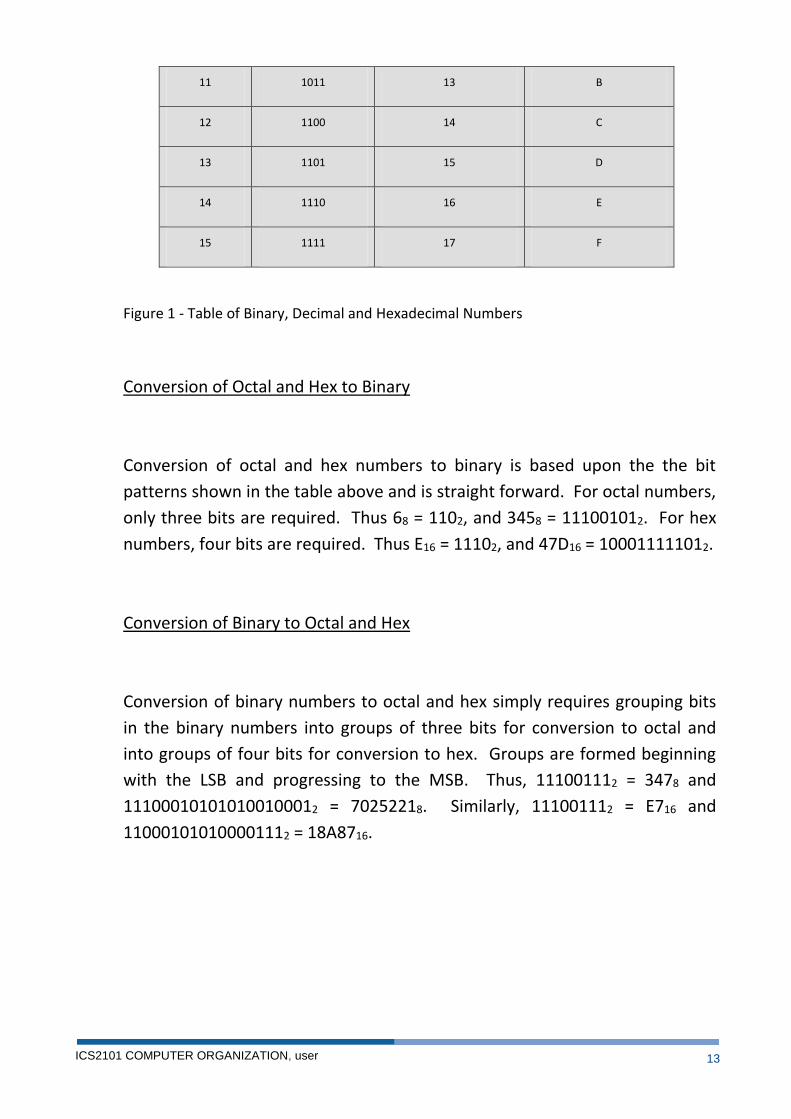
8.1. Number systems
Data Representation inside a computer
All data stored in a computer is coded into binary digits. However, computer data coding can also
use a number of other data coding systems including octal and hexadecimal. Below is some
examples to illustrate the arithmetic conversions and operations of these number systems
Note: This problem in decimal is 20 – 9 = 11 which is the answer we get in binary.
8.2. Working with signed numbers
Representation of negative numbers (2’s complement)
The 2’s complement of a binary number is defined as the value obtained by subtracting the number
from a large power of two (specifically, from 2N for an N-bit 2’s complement). The 2’s complement
of the number then behaves like the negative of the original number in most arithmetic, and it can
coexist with positive number in a natural way. A 2’s complement negative number binary
representation can be found for an n-bit number by applying the following simple equation:
N*=2n - N
For example, to represent -3 as a 4-bit 2’s complement number, one can apply the above equation
or simply take the positive binary representation, complement the bits, and add 1.
-3 = 24 – 1 = 16 – 3 = 13 = 11012
3 = 00112 – 3 = 11002 + 12 = 11012
Arithmetic overflow
Since n-bit binary numbers are of fixed length, there are only a fixed set of numbers that can be
represented; therefore, it is possible to perform arithmetic on two n-bit binary numbers and get a
condition known as overflow. An overflow occurs when an arithmetic operation of two words of
ICS2101 COMPUTER ORGANIZATION, user 17
length n-bits sum to a result that requires more than n-bits to correctly represent. This is true for
both unsigned and signed binary numbers.
For example, adding the following two 4-bit unsigned numbers will result in an overflow:
8 + 8 = 16 10002 + 10002 = 1 00002 = 0 ≠ 16
For example, adding the following two 4-bit signed numbers will result in an overflow:
-8 + -8 = -16 10002 + 10002 = 1 00002 = 0 ≠ -16
There are few simple statements to remember for 2’s complement numbers in order to know if an
overflowhas occurred for a signed number:
1) If adding two negative signed numbers results in a positive number, an overflow has
occurred.
2) If adding two positive signed numbers results in a negative number, an overflow has
occurred.
3) For two n-bit signed numbers, it is impossible to get and overflow when adding a positive
number and a negative number, or subtracting a positive number from another positive number.
4) If subtracting two numbers, take 2’s complement of the subtrahend (number being
subtracted) and perform addition using rules 1) – 3) above.
8.3. Character set encoding ASCII and EBCDIC
Character set encoding systems
A character is a digit, an alphabet or a symbol that can be stored and manipulated by a computer.
They 0,1,2...9, A,B,C,...Z, a,b,c, .... Z, ,.:;'"[]{}|\, etc. The American Standard Code for Information
Interchange and the Extended Binary Coded Decimal Interchange Code are two character
encoding schemes; which are more commonly known by their respective acronyms, ASCII and
EBCDIC. The main difference between the two is the number of bits that they use to represent
each character. EBCDIC uses 8 bits per character while the original ASCII standard only used 7, due
to concerns that using 8 bits for characters that can be represented with 7 is much less efficient.
The main consequence of that difference is the number of characters that can be accommodated
with each one. EBCDIC can accommodate up to 28 characters for a total of 256 while the 27 of
ASCII has a maximum of 128 characters.
Although EBCDIC was very popular, due largely to the popularity of IBM machines at the time, it
had several problems that irritated programmers. The first one is how it arranges the letters of the
alphabet. In ASCII, all the letters are in consecutive order. Capital letters are grouped together
ICS2101 COMPUTER ORGANIZATION, user 18
while small letters also have their own group. In EBCDIC, the letters are grouped 9 at a time. This
non-intuitive layout comes from the EBCDIC’s punch card origins and is quite difficult for
programmers to deal with.
IBM’s hold of the EBCDIC coding has led to many problems when it comes to updates. ASCII and
EBCDIC later had updates to increase the number of characters that they can accommodate. ASCII
pages had some code points replaced while maintaining most of the other code points. With
EBCDIC, the different versions are highly incompatible with each other.
As the encoding needs of computer outgrew both ASCII and EBCDIC, other standard emerged. The
most recent is Unicode, which incorporated ASCII. The first 128 characters of Unicode are from
ASCII. This lets Unicode open ASCII files without any problems. On the other hand, the EBCDIC
encoding is not compatible with Unicode and EBCDIC encoded files would only appear as
gibberish.
Summary:
Therefore, EBCDIC uses 8 bits while ASCII uses 7 bits.
9. CHAPTER 3: Computer Hardware
9.1. Basic Computer Elements - Hardware & Software
9.2. Hardware Components
Modern computers are electronic and digital in contrast to analog computers which would be electromechanical measuring devices. The actual physical components -- wires, transistors, and circuits -- is called hardware; the instructions and data are called software The electrical, electronic, mechanical and magnetic components that make up the computer
system are together termed as ‘hardware’.These include components that are responsible for
user input, display and mathematical processing. The CPU, disk drives, internal chips and
wiring, modem, peripheral devices like the monitor, keyboard, mouse, printer, speakers etc.
are together termed as computer hardware.
Computer hardware cannot perform any manipulation or calculation without being instructed
as to what to do and how to do it. Programs (or instructions) are required to tell the computer
what to do. The generic term for computer programs is ‘software’. Software comes in two
main types – system software and application programs
9.2.1. Input
Input Unit
Data and instructions must be entered into the computer system for processing, and
results obtained from computations must be displayed or recorded for the user. The
input device serves the purpose of receiving data and instructions in a form that can be
understood by the computer.
10.
1. Manual Input Devices for Human Input are the most common devices.
a. Keyboard – most common input device, like a typewriter with additional function keys and cursor movement keys; ergonomic keyboards are now available; users should be very careful to use proper hand and wrist movements to avoid carpel tunnel syndrome.
b. Mouse – point-and-click device that lets the user move the device to move the cursor on the screen, point and click to make a choice, and point and drag objects in a graphical user interface environment (GUI).
c. Trackball – similar to a mouse, but the device doesn’t move, a round ball rotates to move the cursor; found on notebook/laptop computers (in addition to touchpads where a finger is moved on a pad to move the cursor).
d. Stylus – a rubberized pen device on PDAs to allow the user to touch options or write on a sensitive screen.
e. Microphone – used for voice recognition input; important to have a strong and clear signal.
2. Input Devices for Source Data Automation (direct data entry- DDE) improve the speed and accuracy of data input by capturing the data at the time of the transaction.
a. Magnetic recognition – includes magnetic ink character recognition (MICR), magnetic cards, and smart cards; used in the banking industry since the 1950s; used today on cards similar to credit cards, smart cards are enhanced with a microprocessor on the card to allow data to be stored.
b. Touch-sensitive screens – allow a person to point with finger and touch certain parts of the screen; sensors make it an interactive device.
c. Optical recognition- scans the data for input; includes optical mark recognition (OMR), which is the simplest scanning technology, when a pencil mark is made in a predetermined grid; bar code, which is what the UPC code is on products; and optical character recognition (OCR) to recognized letters, numbers, or special characters.
d. Voice input-converts the human voice to digital impulses so the computer can process the data; takes a lot of practice for the computer to understand your voice accurately.
e. Visual input-pattern recognition systems that require a camera to be a computer’s eye.
ICS2101 COMPUTER ORGANIZATION, user 20
10.1.1. Output
Output Unit
The processed data, stored in the memory of the computer is sent to the output unit,
which then converts it into a form that can be understood by the user. The output is
usually produced in one of the two ways – on the display device, or on paper (hard
copy). 1. Output Media include paper, display, and voice.
a. Paper output – used often so people can readily use the information; referred to as a hard copy.
b. Display output – on a screen; must be saved on a secondary storage device to be permanent; includes microfilm and microfiche; often referred to as a soft copy.
c. Voice response system – sound chips embedded in the hardware; includes beeps and verbal responses to the user; prevalent in computer business applications; more advanced systems use speech synthesizers to convert data into speech.
11. 2. Output Devices
a. Monitors – vary in their quality; flat-panel monitors utilize newer technology.
Evaluate the viewable size of a monitor relative to the actual size.
The resolution includes pixels (short for picture element) and dot pitch (distance between centers of adjacent pixels); the lower the dot pitch, the greater number of pixels in the display and the higher the resolution.
Flat-panel monitors use LCD (tiny transistors to reflect light through the liquid crystal to produce high resolution output) and plasma technology (tiny light bulbs to ignite the phosphor to produce high-resolution output with little trailing edge blur).
b. Printers – chosen based on print quality, speed, and cost.
Impact printers are noisy, slow, and low-quality for graphics. When used for multi-part forms, dot matrix is most common; inexpensive.
Non-impact printers include ink jet types that use fast-drying ink sprayed in droplets to form the characters; relatively low cost and offer many features to make them popular in office environments.
Non-impact printers also include laser printers, which use intense low-power light beam capable of carrying millions of characters; very high-resolution for text and graphics, very fast; capable of duplexing and using different paper sizes; costs coming down, making them more attractive in the office.
c. Plotters-used for large drawings; drum and table plotters move the paper past a stylus bi-directionally; use roll-feed paper up to 4 feet wide and 50 feet long; popular in engineering, drafting and graphic arts.
d. Speakers-used with a voice-response system; can be an additional peripheral or built-in.
11.1.1. Storage
Main Memory
ICS2101 COMPUTER ORGANIZATION, user 21
The main memory holds data and instructions after input, till they are needed. It
also holds the processed results that are awaiting output.
Secondary Storage
Also termed as ‘auxiliary’ or ‘backup’ storage, it is typically used as a supplement to main
storage. It is much cheaper than the main storage and stores large amount of data and
instructions permanently. Hardware devices like magnetic tapes and disks fall under
this category. 1. Secondary Storage – nonvolatile, long-term; data is not lost when the power is turned off; auxiliary to primary storage and is outside the processor unit; most common types:
a. Hard disk – fixed disk (non-removable) and external (removable) hard disks; today range in size from 20 GB to 1000 GB.
b. Magnetic disk – common for microcomputers; removable from disk drive, data transported from place to place; size varies with disk density and quality; protect disk to keep data safe, a disk with a bad sector cannot be used any longer. USB flash drive is an external, portable storage drive that can be carried in your pocket; can hold 250 MB of data.
c. Optical disc – uses laser beam of light to store and read data instead of magnetic processes, burns microscopic pits onto the disk tracks as data are stored; shelf life of 30 years. Includes CD-ROM (read-only, holds approximately 650 MB of data), CD-R (recordable CD, can write to one time and then read only), CD-RW (rewritable CD, can store, access, and reuse discs the same as a magnetic disk; rewritable nearly a million times without a decline in accuracy), DVD (digital video disk provides high resolution, true color, and no flicker output; can be read only, recordable, or rewritable like CDs).
d. RAID – redundant arrays of independent disks; combine 10-100 small hard disks drives into a single unit, specialized microcontroller coordinates the hard drives’ microprocessors so it appears as a single drive.
e. Magnetic tapes – first form of secondary storage to be widely used; sequential access only, storage capacity greater than 200 MB, transfer rate of 50,000-400,000 bps; popular backup medium.
f. Storage area network – a high-speed fiber channel local area network dedicated to storage that interconnects different storage devices; expensive and difficult to manage; enterprise-wide infrastructure provides rapid sharing and access to the organization’s stored data.
11.1.2. Central Processing Unit
Central Processing Unit
The CPU is also responsible for controlling the operations of various units of the
computer system.
Arithmetic Logic Unit (ALU)
All calculations and comparisons, based on the instructions provided, are carried
out within the ALU. It performs arithmetic functions like addition, subtraction,
multiplication, division and also logical operations like greater than, less than and
equal to.
Control
ICS2101 COMPUTER ORGANIZATION, user 22
The function of the control unit is to execute the instructions of a program, one by
one, in the desired sequence. It interprets each instruction and then prompts its
execution by one of the units like input, output, ALU, storage.
For example, a comparison of two numbers (a logical operation) to be performed
by the ALU may require loading the two numbers into the main memory which is a
function performed by the control unit. It will then pass on the execution of the
‘compare’ function to the ALU.
12. CHAPTER 4: Computer Software
Computer software, or just software, is any set of machine-readable instructions (most often in the form of a computer program) that directs a computer's processor to perform specific operations. Software is divided into two basic categories; - System Software, and - Applications software
12.1. System Software
System software consists of the programs that control the operations of a computer and its devices. The two types of system software are operating systems and utility programs. An operating system (OS) is a set of programs containing instructions that coordinate all the activities among computer hardware devices. A utility program performs a specific task, usually related to managing a computer, its devices, or its programs. They include; Desktop enhancers – Change the desktop look and organization, allowing users to create and switch between multiple desktops. File conversion – Converts from one file format to another so that a file can be used by another application. Internet organizers – Helps in the management and use of favorite Web sites, searching the Web and reporting on site changes. Antivirus programs – Prevent, detect, and remove computer viruses.
12.1.1. Operating Systems
Most operating systems perform similar functions that include managing programs, managing memory, scheduling jobs, configuring devices, accessing the Web, monitoring performance, providing housekeeping services, and administering security. Managing programs directly affects your productivity. A single user/single tasking operating system allows only one user to run one program at a time. A multitasking operating system allows a single user to work on two or more applications that reside in memory at the same time. A multi-user operating system enables two or more users to run a program simultaneously. A multiprocessing operating system can support two or more CPUs running programs at the same time. Managing memory involves assigning items to an area of memory while they are being processed. The purpose of memory management is to optimize use of random access memory (RAM). With virtual memory (VM), the operating system optimizes memory by allocating a portion of a storage medium, usually the hard disk, to function as additional RAM. Scheduling jobs (operations the processor manages) involves determining the order in which jobs are processed.
ICS2101 COMPUTER ORGANIZATION, user 23
Spooling increases efficiency by placing print jobs in a buffer (an area of memory or storage where data resides while waiting to be transferred) until the printer is ready, freeing the processor for other tasks. Configuring devices establishes communication with each device in the computer. A device driver is a small program that tells the operating system how to communicate with a device. Accessing the Web may entail including a Web browser and e-mail program in the operating system. Monitoring performance helps to identify and solve system problems. A performance monitor is a program that assesses and reports information about various system resources and devices. Providing housekeeping services entails performing storage and file management functions. A file manager performs such functions as formatting and copying disks; listing the files on a storage medium; checking the amount of used and unused space on a storage medium; organizing, copying, deleting, moving, and sorting files; and creating shortcuts (icons on the desktop that run a program when clicked). Administering security involves establishing user accounts on a network. Each account typically requires a user name and a password to log on, or access, the network. Q: Discuss the functions of an operating system Know the difference between stand-alone operating systems and network operating systems A stand-alone operating system is a complete operating system that works on a desktop or notebook computer. A network operating system (also called network OS or NOS) is an operating system that supports a network. A network is a collection of computers and devices connected together via communications media and devices such as cables, telephone lines, and modems. In some networks, the server is the computer that controls access to the hardware and software on a network and provides a centralized storage area. The other computers on the network, called clients, rely on the server(s) for resources. Identify various stand-alone operating systems Stand-alone operating systems include DOS, Windows 3.x, Windows 95, Windows NT Workstation, Windows 98, Windows 2000 Professional, Windows Millennium Edition, Windows XP Home Edition, Windows XP Professional Edition, Mac OS, OS/2 Warp Client, UNIX, and Linux. UNIX and Linux also function as network operating systems. DOS (Disk Operating System) refers to several single user, command-line and menu-driven operating systems developed in the early 1980s for personal computers. Windows 3.x refers to early operating environments that, although not operating systems, provided a graphical user interface to work in combination with DOS and simplify its use. Windows 95 is a true multitasking operating system – not an operating environment – with an improved graphical interface. Windows NT Workstation is a client operating system that can connect to a Windows NT Server. Developed as an upgrade to Windows 95, the Windows 98 operating system is easier to use and more integrated with the Internet. Windows 98 includes Microsoft Internet Explorer, a popular Web browser, Windows Explorer, a file
ICS2101 COMPUTER ORGANIZATION, user 24
manager, and an Active Desktop™ that works similarly to Web links. Windows 2000 Professional is a complete, reliable multitasking client operating system for business desktop and business notebook computers. Windows Millennium Edition is an operating system that has features specifically for the home user. Windows XP is Microsoft’s fastest, most reliable Windows operating system, providing quicker startup, better performance, and a new, simplified visual look. Windows XP Home Edition is an upgrade to Windows Millennium Edition, while Windows XP Professional Edition is an upgrade to Windows 2000 Professional. The Mac OS, the latest version of the Macintosh operating system (the first commercially successful graphical user interface), is a multitasking operating system available only on Apple computers. OS/2 Warp Client is IBM’s GUI multitasking client operating system that supports networking, Java, the Internet, and speech recognition. Identify various network operating systems Network operating systems include NetWare, Windows NT Server, Windows 2000 Server, Windows .NET Server, OS/2 Warp Server for E-business, UNIX, Linux, and Solaris™. Novell’s NetWare is a widely used network operating system designed for client/server networks. Windows NT Server is the operating system used by servers in the Windows NT client/server network environment. The Windows 2000 Server family consists of three products: Windows 2000 Server (for the typical business network), Windows 2000 Advanced Server (for e-commerce applications), and Windows 2000 Database server (for demanding, large-scale applications). Windows .NET Server is an upgrade to Windows 2000 Server. The Windows .NET Server family includes four products: Windows .NET Standard Server (for the typical small- to medium-sized business network), Windows .NET Enterprise Server (for medium- to large-sized businesses, including those with e-commerce applications), Windows .NET Datacenter (for business with huge volumes of transactions and large-scale databases), and Windows .NET Web Server (for Web server and Web hosting businesses). OS/2 Warp Server for E-business is IBM’s network operating system designed for all sizes of business. UNIX is a multitasking, command-line operating system implemented on many different types of computers. Because it is both a stand-alone operating system and a network operating system, some call UNIX a multipurpose operating system. Linux is a popular, free, multitasking UNIX-type operating system. Solaris™, a version of UNIX developed by Sun Microsystems, is a network operating system designed for e-commerce applications.
12.1.2. Utilities
Define the Term Utility Software and discuss the purpose of the following utilities: file viewer, file compression, diagnostic, uninstaller, disk scanner, disk defragmenter, backup, and screen saver, anti-virus, CD writing software, games, movie player ,etc. Most operating systems include several utility programs that perform specific tasks related to managing a computer, its devices, or its programs. A file viewer is a utility that allows you to display and copy the contents of a file. A file compression utility shrinks the size of a file. A diagnostic utility compiles technical information about a computer’s hardware and certain system software programs and then prepares a report outlining any identified problems. An uninstaller is a utility that removes an application, as well as any associated
ICS2101 COMPUTER ORGANIZATION, user 25
entries in the system files. A disk scanner is a utility that (1) detects and corrects both physical and logical problems on a hard disk, and (2) searches for and removes unnecessary files. A disk defragmenter is a utility that reorganizes files and unused space on a computer’s hard disk so data can be accessed more quickly and programs can run faster. A backup utility copies, or backs up, selected files or an entire hard drive onto another disk or tape. A screen saver is a utility that causes the monitor’s screen to display a moving image on a blank screen if no keyboard activity occurs for a specified period.
12.2. Application Programs
Application software consists of programs designed to perform specific tasks for users. Application software can be used as a productivity/business tool; to assist with graphics and multimedia projects; to support home, personal, and educational activities; and to facilitate communications. Specific application software products, called software packages, are available from software vendors. Although application software also is available as shareware, freeware, and public-domain software, these usually have fewer capabilities than retail software packages. People use productivity software to become more effective and efficient while performing daily activities. Word processing software allows users to create and manipulate documents that contain text and graphics. With word processing software, you can insert clip art into a document; change margins; find and replace text; use a spelling checker to check spelling; place a header and footer at the top and the bottom of a page; and vary font (character design), font size (character scale), and font style (character appearance). With spreadsheet software, data is organized in rows and columns, which collectively are called a worksheet. The intersection of a row and column, called a cell, can contain a label (text), a value (number), or a formula or function that performs calculations on the data and displays the result. Database software allows you to create and manage a database. A database is a collection of data organized to allow access, retrieval, and use of that data. A query is used to retrieve data according to specified criteria, which are restrictions the data must meet. Presentation graphics software is used to create presentations that communicate ideas, messages, and other information to a group through a slide show. You can use a clip gallery to enhance your presentation with clip art images, pictures, video clips, and audio clips. A personal information manager (PIM) is software that includes an appointment calendar to schedule activities, an address book to maintain names and addresses, and a notepad to record ideas, reminders, and important information. A software suite is a collection of individual applications sold as a single package. Project management software allows you to plan, schedule, track, and analyze the progress of a project. Accounting software helps companies record and report their financial transactions.
ICS2101 COMPUTER ORGANIZATION, user 26
Power users often use software that allows them to work with graphics and multimedia. Computer-aided design (CAD) software assists in creating engineering, architectural, and scientific designs. Desktop publishing (DTP) software is used to design and produce sophisticated documents. DTP is developed specifically to support page layout, which is the process of arranging text and graphics in a document. Paint software is used to draw graphical images with various on-screen tools. Image editing software provides the capability to modify existing images. Video editing software and audio editing software can be used to modify video and audio segments. Multimedia authoring software is used to create electronic interactive presentations that can include text, images, video, audio, and animation. Web page authoring software is designed to create Web pages and to organize, manage, and maintain Web sites. Many software applications are designed specifically for use at home or for personal or educational use. Integrated software combines several productivity software applications that share a similar interface and common features into a single package. Personal finance software is an accounting program that helps pay bills, balance a checkbook, track income and expenses, follow investments, and evaluate financial plans. Legal software assists in the creation of legal documents and provides legal advice. Tax preparation software guides users through the process of filing federal taxes. Personal DTP software helps develop conventional documents by asking questions, presenting predefined layouts, and supplying standard text. Photo-editing software is used to edit digital photographs. A clip art/image gallery is a collection of clip art and photographs that can be used in all types of documents. Home design/landscaping software assists with planning or remodeling. Educational software teaches a particular skill and exists for about any subject. Reference software provides valuable and thorough information for all individuals. Entertainment software includes interactive games, videos, and other programs designed to support a hobby or provide amusement.
13. CHAPTER 5: Types of Computer Instruction Set Architecture
An instruction set, or instruction set architecture (ISA), is the part of the computer architecture related to programming, including the native data types, instructions, registers, addressing modes, memory architecture, interrupt and exception handling, and external I/O. An ISA includes a specification of the set of opcodes (machine language), and the native commands implemented by a particular processor.
13.1. RISC versus CISC processors
Classification of instruction sets There are two basic types of instruction sets architectures of processors; complex instruction set computer (CISC) and reduced instruction set computer (RISC).
CISC
CISC is an instruction set design where each instruction in a CISC instruction set is meant to
perform a series of operations inside the processor. This reduces the number of instructions required to
ICS2101 COMPUTER ORGANIZATION, user 27
implement a given program, and allows the programmer to learn a small but flexible set of instructions.The philosophy behind it is that hardware is always faster than software, therefore one should make a powerful instruction set, which provides programmers with assembly instructions to do a lot with short programs. Intel and AMD processors normally use CISC instruction set design.
RISC
RISC chips evolved around the mid-1980 as a reaction at CISC chips. The philosophy behind it is that fewer, simpler and faster instructions would be better, than the large, complex and slower CISC instructions. However, more instructions are needed to accomplish a task.
An other advantage of RISC is that - in theory - because of the more simple instructions, RISC chips require fewer transistors, which makes them easier to design and cheaper to produce. Finally, it's easier to write powerful optimised compilers, since fewer instructions exist.
RISC vs CISC
There is still considerable controversy among experts about which architecture is better. Some say that RISC is cheaper and faster and therefor the architecture of the future.
Others note that by making the hardware simpler, RISC puts a greater burden on the software. Software needs to become more complex. Software developers need to write more lines for the same tasks.
Therefore they argue that RISC is not the architecture of the future, since conventional CISC chips are becoming faster and cheaper anyway.
RISC has now existed more than 10 years and hasn't been able to kick CISC out of the market and at least 75% today's PCs, workstations and servers processors are based on the CISC architecture. Most of them the x86 standard (Intel, AMD, etc.), but even in the mainframe territory CISC is dominant via the IBM/390 chip. Looks like CISC is here to stay …
Is RISC than really not better? The answer isn't quite that simple. RISC and CISC architectures are becoming more and more alike. Many of today's RISC chips support just as many instructions as yesterday's CISC chips. The PowerPC 601, for example, supports more instructions than the Pentium. Yet the 601 is considered a RISC chip, while the Pentium is definitely CISC. Further more today's CISC chips use many techniques formerly associated with RISC chips.
So simply said: RISC and CISC are growing to each other.
14. CHAPTER 6:Ms Word
14.1. Introduction to Ms Word
15. Microsoft Word Training- Lesson 1: Getting Familiar with Microsoft Word 2007 for Windows
16. Microsoft Word Training
This Microsoft Word training is free and online. After completing this training you will be
proficient in Microsoft Word.
Lesson 1: Getting Familiar with Microsoft Word 2007 for Windows
ICS2101 COMPUTER ORGANIZATION, user 28
Microsoft Word is a word processing software package. You can use it to type letters, reports, and
other documents. This tutorial teaches Microsoft Word 2007 basics. Although this tutorial was
created for the computer novice, because Microsoft Word 2007 is so different from previous
versions of Microsoft Word, even experienced users may find it useful
This lesson will introduce you to the Word window. You use this window to interact with Word. To
begin this lesson, open Microsoft Word 2007. The Microsoft Word window appears and your
screen looks similar to the one shown here.
Note: Your screen will probably not look exactly like the screen shown. In Word 2007, how a
window displays depends on the size of your window, the size of your monitor, and the resolution
to which your monitor is set. Resolution determines how much information your computer monitor
can display. If you use a low resolution, less information fits on your screen, but the size of your
text and images are larger. If you use a high resolution, more information fits on your screen, but
the size of the text and images are smaller. Also, Word 2007, Windows Vista, and Windows XP
have settings that allow you to change the color and style of your windows.
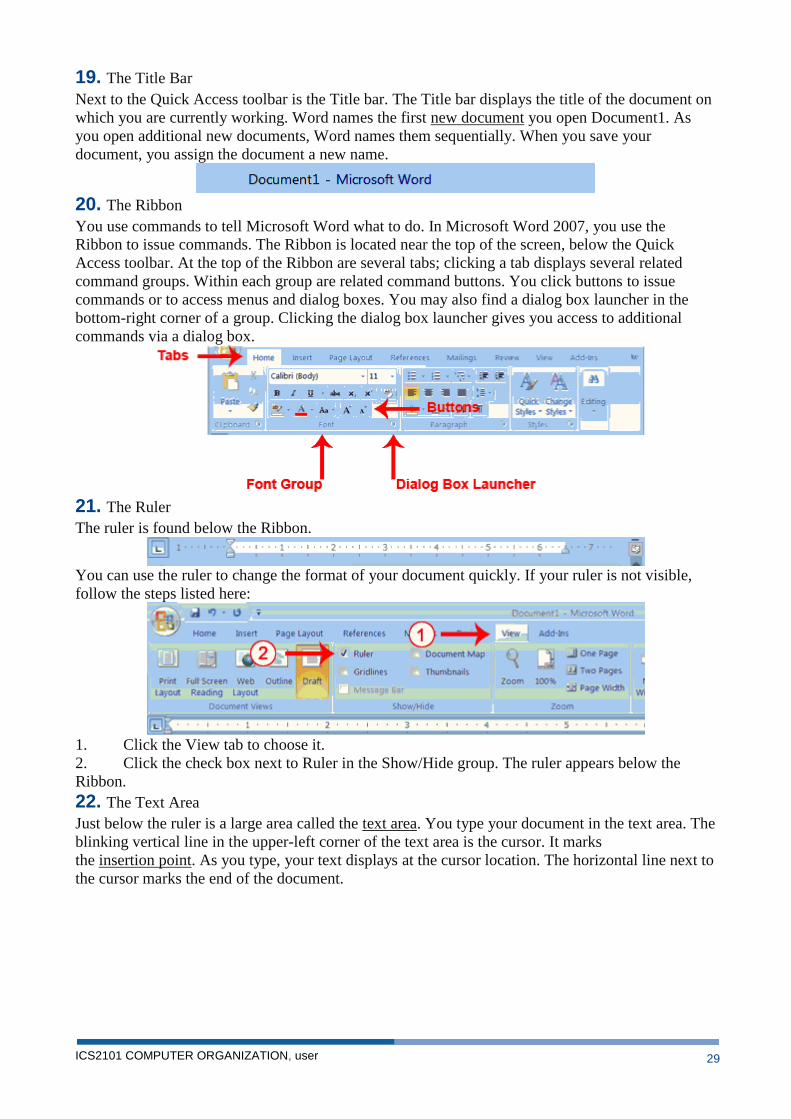
17. The Microsoft Office Button
In the upper-left corner of the Word 2007 window is the Microsoft Office button. When you click
the button, a menu appears. You can use the menu to create a new file, open an existing file, save a
file, and perform many other tasks.
18. The Quick Access Toolbar
Next to the Microsoft Office button is the Quick Access toolbar. The Quick Access toolbar provides
you with access to commands you frequently use. By default Save, Undo, and Redo appear on the
Quick Access toolbar. You can use Save to save your file, Undo to rollback an action you have
taken, and Redo to reapply an action you have rolled back.