HD-D10/D20/D30 Series Asynchronous operate manual 1 / 16 The rights subject to Shenzhen Huidu Technology Co.,Lted Chapter1 Summary HDPlayer Software we promoting for Full Color door head display. It can remote display by long distance, play high definition video, picture and text etc. It is Asynchronous model system. The system include two main parts: HD-D10/D20/D30and software. The core part it is controller HD-D10/D20/D30, it is responsible for setting up parameter and sending program. It play program Asynchronous. The controller connected the display, it is responsible for receiving data and sending the date and showing program on the display 1. Hardware structure Part Name Part No Function Full color controller HD-D10/D20/D30 Asynchronous controller and store program Software HDPlayer Screen set、create program、send program Accessories -- Hub、network cable、u disk 2. Controller working system 1) Cluster management Note: The Network cable made by 568B 2) Direct management Note: The Network cable made by 568B
Transcript
HD-D10/D20/D30 Series Asynchronous operate manual
1 / 16
The rights subject to Shenzhen Huidu Technology Co.,Lted
Chapter1 Summary
HDPlayer Software we promoting for Full Color door head display. It can remotedisplay by long distance, play high definition video, picture and text etc. It isAsynchronous model system. The system include two main parts:HD-D10/D20/D30and software.
The core part it is controller HD-D10/D20/D30, it is responsible for setting upparameter and sending program. It play program Asynchronous.
The controller connected the display, it is responsible for receiving data and sendingthe date and showing program on the display
1. Hardware structure
Part Name Part No Function
Full color controller HD-D10/D20/D30 Asynchronous controller and store
program
Software HDPlayer Screen set、create program、send
program
Accessories -- Hub、network cable、u disk
2. Controller working system
1) Cluster management
Note: The Network cable made by 568B
2) Direct management
Note: The Network cable made by 568B
HD-D10/D20/D30 Series Asynchronous operate manual
2 / 16
The rights subject to Shenzhen Huidu Technology Co.,Lted
Chapter 2 Adjust the display procedureWhen first time use Sending controller HD-D10/D20/D30, it need use Network cableconnect the display. When found the controller ID automatically, then set up thedisplay parameter. Show as below
HD-A60X Series Asynchronous-Synchronous operate manual
3 / 16
The rights subject to Shenzhen Huidu Technology Co.,Lted
Chapter 3 Hardware connect1. The Controller HD-D10/D20/D30 connect Hub
Using the HUB connected with HD-D3, like HUB08 etc
2. Network connected◆Direct to the pc by the network cable
Also can connect with Router, then via Router connected PC
◆Network cable use the 568B
The 2 network port can be change of Receiving card
4. The power charger◆The power charger voltage it is 4V-5.5V
when power on, the “POWER” is bright, “RUN” and “DISPLAY” is flicker.
HD-A60X Series Asynchronous-Synchronous operate manual
4 / 16
The rights subject to Shenzhen Huidu Technology Co.,Lted
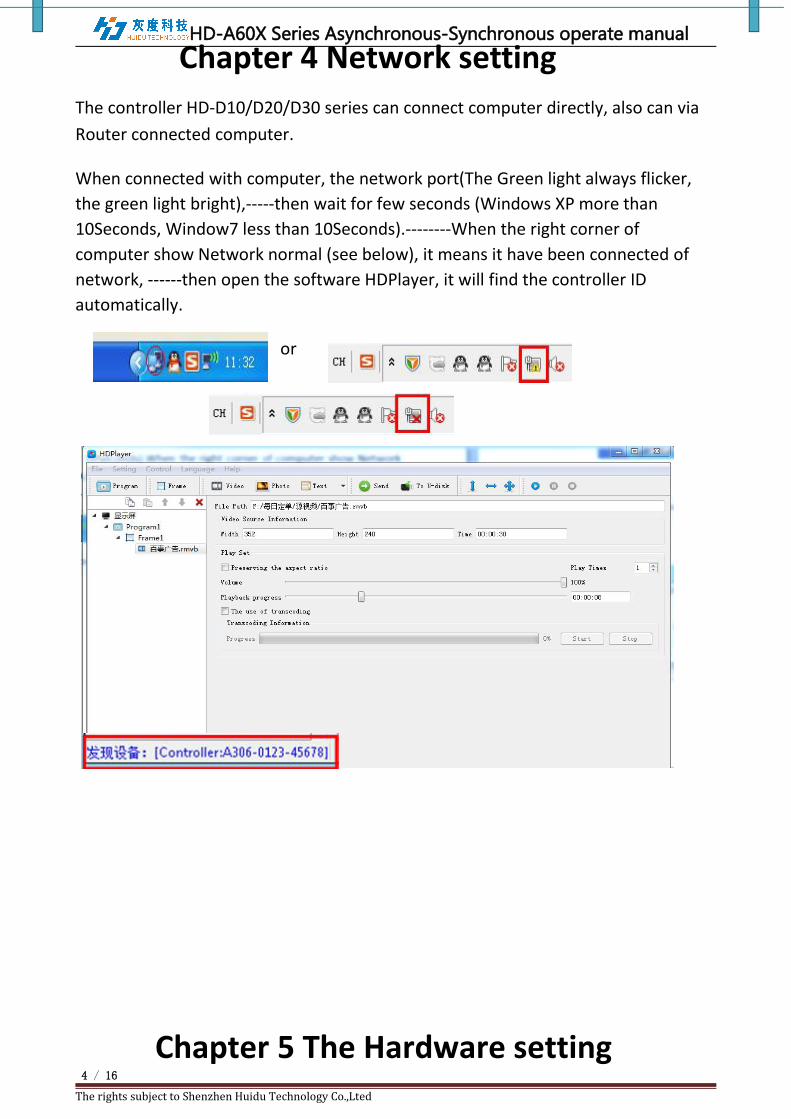
Chapter 4 Network settingThe controller HD-D10/D20/D30 series can connect computer directly, also can viaRouter connected computer.
When connected with computer, the network port(The Green light always flicker,the green light bright),-----then wait for few seconds (Windows XP more than10Seconds, Window7 less than 10Seconds).--------When the right corner ofcomputer show Network normal (see below), it means it have been connected ofnetwork, ------then open the software HDPlayer, it will find the controller IDautomatically.
or
Chapter 5 The Hardware setting
HD-A60X Series Asynchronous-Synchronous operate manual
5 / 16
The rights subject to Shenzhen Huidu Technology Co.,Lted
First time using this controller HD-D10/D20/D30series, it need Smart setting at first.
1). Click Smart setting, then into basic information.
2) Click Next, then into Data Polarity setting
3) Click Next , then into Data Polarity setting
One led module pixel of width
Click A, what is the display status ofdisplayClick B, what is the display status ofdisplayResult: A is Black or B is black
HD-A60X Series Asynchronous-Synchronous operate manual
6 / 16
The rights subject to Shenzhen Huidu Technology Co.,Lted
4) Click Next, then into Color channel setting.
5) Click Next, then into Line controlled by One RGB Data
6) Click Next, then it into display scan types
Click A, what is the display colorClick B what is the display colorClick C, what is the display colorClick D, what is the display color
How many lines lighting in displayThis step for scan type
Click A, what is the display status ofdisplayClick B, what is the display status ofdisplayResult: A is Brighter than B
Or B is Brighter than A
HD-A60X Series Asynchronous-Synchronous operate manual
7 / 16
The rights subject to Shenzhen Huidu Technology Co.,Lted
Like this led module from right corner of first module
(First flicker led from 16th lines of first light)
User can use key ←→ to move
7) The last step, Into Alignment description
The last step display showing
How many lines lighting in displayThis step for scan type (the ways:16/1=16, so it is 16 scan )
According to the Top Right corner of thefirst led display module, the bright lightflicker (in the first led module), then clickthis place on the Alignment description
HD-A60X Series Asynchronous-Synchronous operate manual
8 / 16
The rights subject to Shenzhen Huidu Technology Co.,Lted
4. Basic parameter
1) Refresh rate: The more highly refresh rate, the led display play more fluently. If lower
Than 100MHZ, the showing photo shake clearly. The Refresh rate calculate by computer, no needwrite by hand.
1) Refresh acceleration: It according to Refresh rate and add it by proportional.
For example, the fresh rate 120, the acceleration it is 2; if change to 4,the fresh rate 240MHZ.
2) Gray Level
The Gray Level is used to represent the color richness. More higher more better. Gray level256、512、1024、2048、4096、8192、16384、32768、65536 etc. Usually set 4096 or 8092
The gray level is inversely proportional to the longest width of led displayThe gray level is proportional to luminance efficiency
3) Brightness level : Usually Low light, normal and high light.
5) Frequency: It means the shift frequency of the scan program. Its range 3.125MHz-31.25MHz.it is better to set the frequency lower than 25MHz.Because most LED screen driver ICs is lowerthan 25MHz.
If Alignment successfully, it show likethis and saved file.(Next time if havesame led display, do not need set again,just click Setting –Hardware setting–Import, importing this .doo file
HD-A60X Series Asynchronous-Synchronous operate manual
9 / 16
The rights subject to Shenzhen Huidu Technology Co.,Lted
4) Priority Mode
◆Brightness Priority: Protecting the brightness lost less, then do refresh acceleration, usually used
for outdoor display require high brightness.
◆Refresh Priority: In this mode, it will sacrifice about20% brightness efficiency. It can update
Frequency clearly. Usually used for indoor display.
◆Gray level Priority : If for lower brightness requirement, it can select this mode. Usually used for
indoor led display.
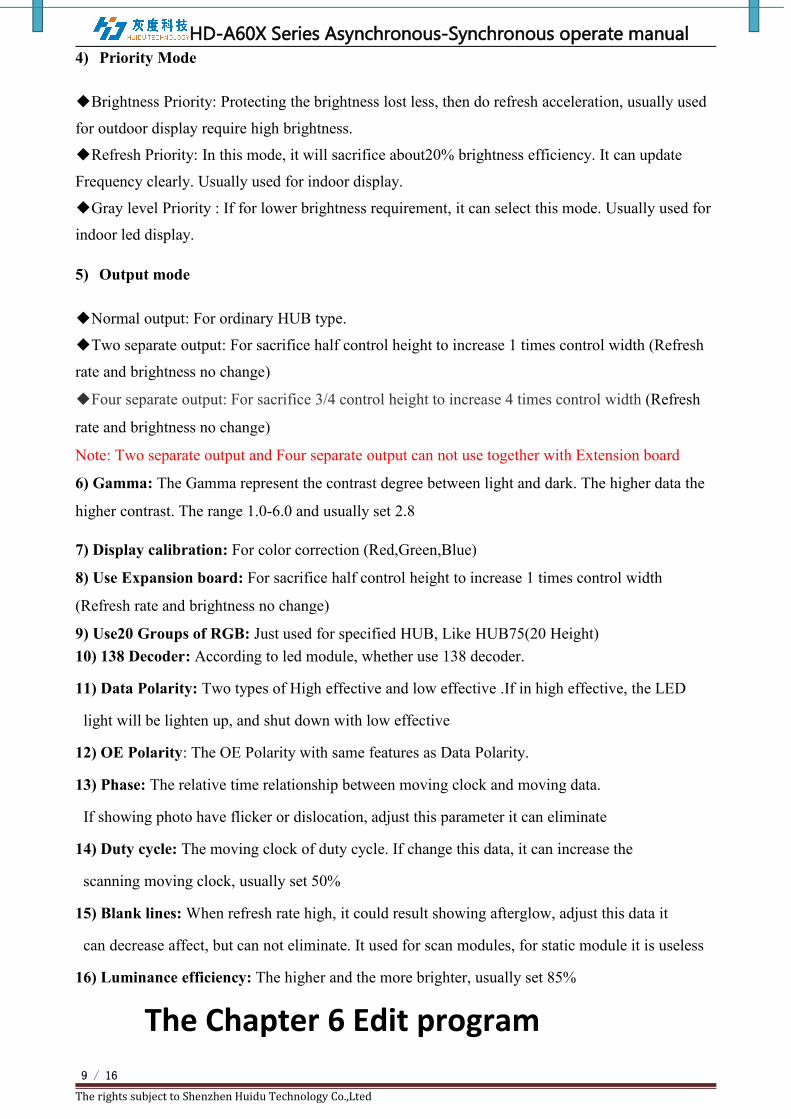
5) Output mode
◆Normal output: For ordinary HUB type.
◆Two separate output: For sacrifice half control height to increase 1 times control width (Refresh
rate and brightness no change)
◆Four separate output: For sacrifice 3/4 control height to increase 4 times control width (Refresh
rate and brightness no change)
Note: Two separate output and Four separate output can not use together with Extension board
6) Gamma: The Gamma represent the contrast degree between light and dark. The higher data the
higher contrast. The range 1.0-6.0 and usually set 2.8
7) Display calibration: For color correction (Red,Green,Blue)
8) Use Expansion board: For sacrifice half control height to increase 1 times control width
(Refresh rate and brightness no change)
9) Use20 Groups of RGB: Just used for specified HUB, Like HUB75(20 Height)10) 138 Decoder: According to led module, whether use 138 decoder.
11) Data Polarity: Two types of High effective and low effective .If in high effective, the LED
light will be lighten up, and shut down with low effective
12) OE Polarity: The OE Polarity with same features as Data Polarity.
13) Phase: The relative time relationship between moving clock and moving data.
If showing photo have flicker or dislocation, adjust this parameter it can eliminate
14) Duty cycle: The moving clock of duty cycle. If change this data, it can increase the
scanning moving clock, usually set 50%
15) Blank lines:When refresh rate high, it could result showing afterglow, adjust this data it
can decrease affect, but can not eliminate. It used for scan modules, for static module it is useless
16) Luminance efficiency: The higher and the more brighter, usually set 85%
The Chapter 6 Edit program
HD-A60X Series Asynchronous-Synchronous operate manual
10 / 16
The rights subject to Shenzhen Huidu Technology Co.,Lted
The software interface have 2 parts: Play window and edit program window
For Program window: Click File-New(screen)-Program-Frame-add video, photo etc
1. Software interface.
1) Play window (the program showing in the display) : User show programvideo, Pictures, Text, etcin the display2) Edit program window: Menu ,Tool ,Structure and attribute
Edit program window
2. Screen structure
◆Screen: In first sequence. Decide the play contents in display. Each Screen relationship it is equal.In screen, it can add more Programs
◆Program: In second sequence, and playingBy sequence◆Frame: In Third sequence, and it can addmore frame in one program◆Play content: Last sequence. It can addProVideo, Picture,Text,Etc
3. Set up New screen
Ways: Click File-New or use Ctrl+NIt can add more Screens in the structure;if delete the screen, just right- click
Tool
Attribute
Play window
gramFrame Play
contentScreen
HD-A60X Series Asynchronous-Synchronous operate manual
11 / 16
The rights subject to Shenzhen Huidu Technology Co.,Lted
1) Set Play Window
Ways: Click Setting –screen setting (The width and Height it is led display size)
2) Screen attribute: Set screen play time and all controller connected
3) Add program
Ways: Click file –screen -Program (First it need set up Screen file first )
◆If delete program, click red“X” or right–click program
HD-A60X Series Asynchronous-Synchronous operate manual
12 / 16
The rights subject to Shenzhen Huidu Technology Co.,Lted
◆For program, when right –Click, it can rename, delete, add program, add frame, copy.
◆For use frame(different meaning), it can add screen boarder effects
◆For program attribute, user can add play mode and play time, background music, Effects
It can set more background music.
3) Add Frame
Ways: File –Screen-Program-Frame (It need add Program first).In one program, it
can add more frame
◆If delete Frame, click red“X” or right–click Frame
◆For Frame, when right –Click, it can rename, delete, add program, add frame, copy
◆For change Frame size, can use below ways
① Set up X and Y coordinate
② In Play window, moving the mouse to adjust
③ In the Tool, using
HD-A60X Series Asynchronous-Synchronous operate manual
13 / 16
The rights subject to Shenzhen Huidu Technology Co.,Lted
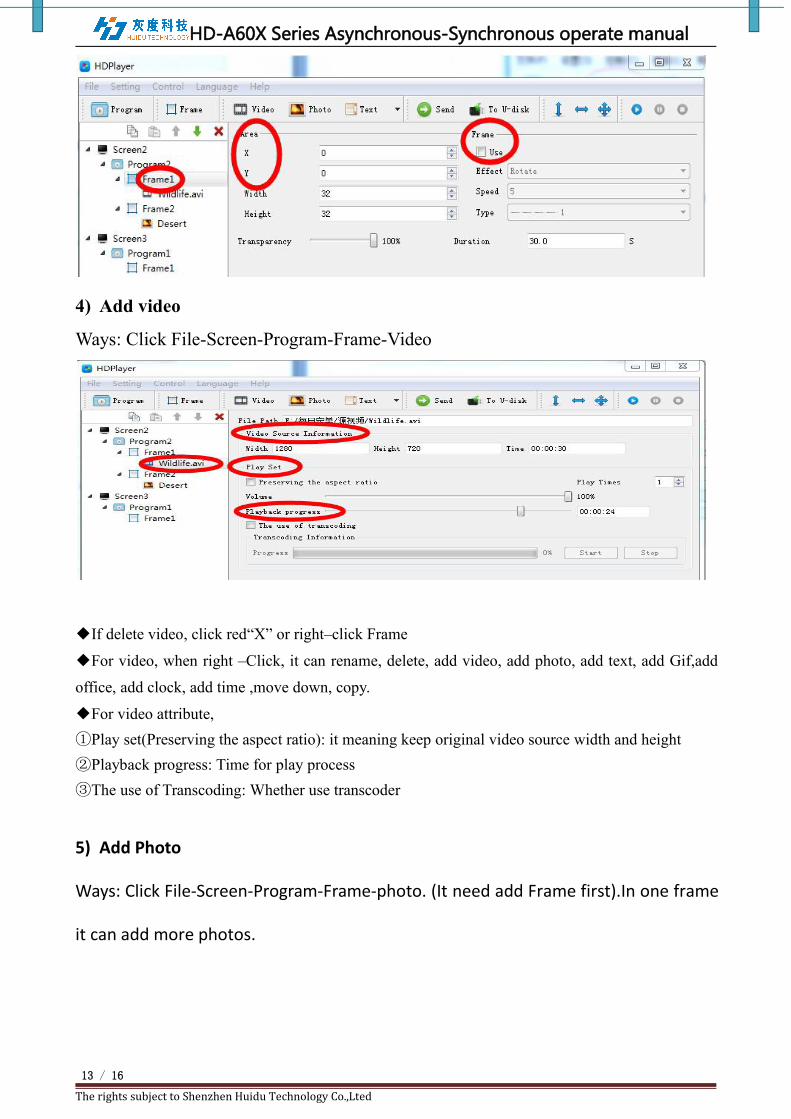
4) Add video
Ways: Click File-Screen-Program-Frame-Video
◆If delete video, click red“X” or right–click Frame
◆For video, when right –Click, it can rename, delete, add video, add photo, add text, add Gif,add
office, add clock, add time ,move down, copy.
◆For video attribute,①Play set(Preserving the aspect ratio): it meaning keep original video source width and height②Playback progress: Time for play process③The use of Transcoding: Whether use transcoder
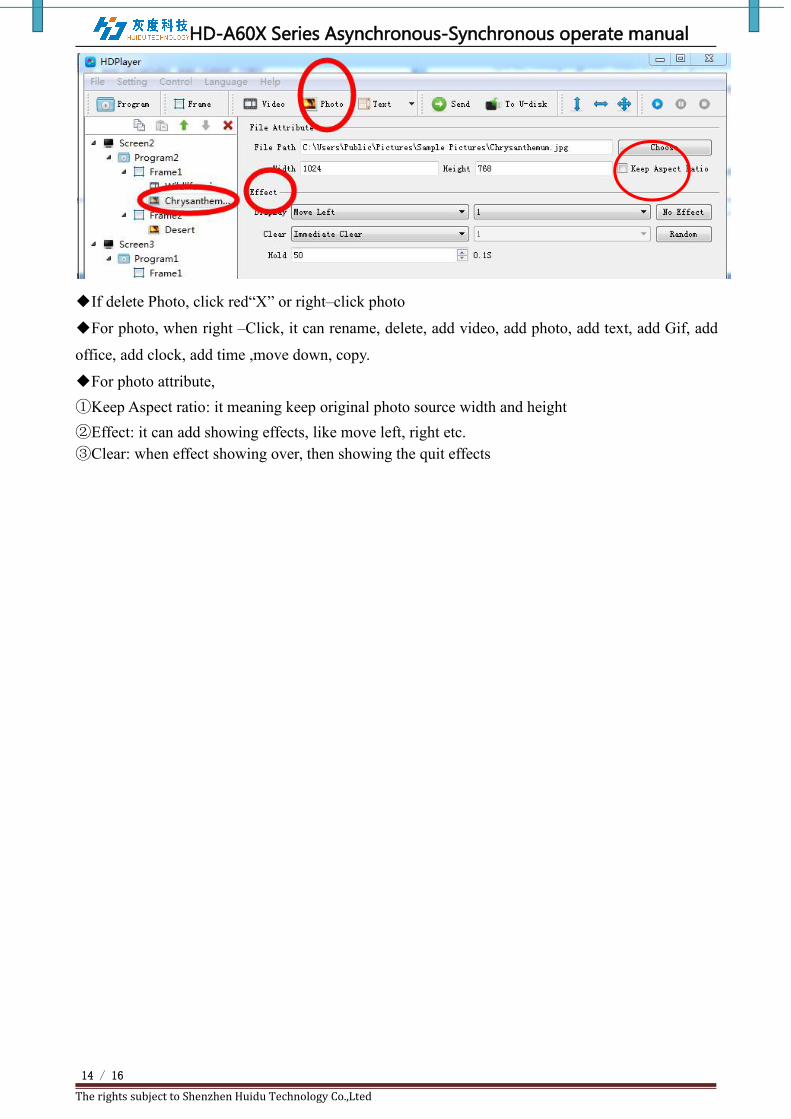
5) Add Photo
Ways: Click File-Screen-Program-Frame-photo. (It need add Frame first).In one frame
it can add more photos.
HD-A60X Series Asynchronous-Synchronous operate manual
14 / 16
The rights subject to Shenzhen Huidu Technology Co.,Lted
◆If delete Photo, click red“X” or right–click photo
◆For photo, when right –Click, it can rename, delete, add video, add photo, add text, add Gif, add
office, add clock, add time ,move down, copy.
◆For photo attribute,①Keep Aspect ratio: it meaning keep original photo source width and height②Effect: it can add showing effects, like move left, right etc.③Clear: when effect showing over, then showing the quit effects
HD-A60X Series Asynchronous-Synchronous operate manual
15 / 16
The rights subject to Shenzhen Huidu Technology Co.,Lted
Chapter 7 Program updateAfter below steps, we finished to edit the program, and send the program to display.
The controller HD-D10/D20/D30 series support 2 types to send program (one bynetwork , another by U-disk), also it support U-disk to expand memory limitless.
1 .Program by Sending and Cluster sending
1) When just one led display and one HD-D3 sending card, just click” Send” to
send program. Ways: Click Send.
2)When one screen file related to more sending cards, the screen file can send
to all controller( it meaning cluster sending)
When more screen files related to one sending card, the last screen file program canbe instead before sending program.
Ways: Click Control –Cluster sending or Click Send.
1. Program by U-disk to update(Copy)
Ways: When the U-disk insert to computer, click Control-Exporting to U-disk or ClickTo U-disk. Select Copy.
HD-A60X Series Asynchronous-Synchronous operate manual
16 / 16
The rights subject to Shenzhen Huidu Technology Co.,Lted
1 When Export the file by U-disk, then insert the U-disk to sending controller HD-A60X series,
the controller will copy the U-disk program to the itself of Flash IC, the led display will show the
process
②After Copy finished, then pull out the U-disk, and the display showing the new program
2 The sending controller HD-A60X series support more than 5m extension lines
2. U-Disk expand memory Limitless by PlayWays: When the U-disk insert to computer, click Control-Exporting to U-disk or ClickTo U-disk. Select Play.
①When Export the file by U-disk, then insert the U-disk to sending controller HD-A60X series, the
controller play the U-disk program( no need restart, plug and play). Using this wayIt can expand
memory limitless.
②When sending program by network, it is sending to U-disk(it meaning can limitless expand
according to your U-disk size)
3 The sending controller HD-A60X series support more than 5m extension lines