38
ZAAPTV HD409N User’s Guide How to use this HD409N set-top box
| Date post: | 30-Nov-2015 |
| Category: |
Documents |
| Upload: | chadiresidency |
| View: | 15 times |
| Download: | 1 times |

ZAAPTV HD409N
User’s Guide How to use this HD409N set-top box

HD409N-User’s Guide
2/ 38
IMPORTANT SAFETY INSTRUCTIONS Read and follow these instructions. Heed all warnings. Do not use this apparatus near water. Clean only with dry cloth. Do not block any ventilation openings. Install in accordance with the manufacturer’s instructions. Protect the power cord from being walked on or pinched particularly at plugs, convenience receptacles, and the
point where they exit from the apparatus. Unplug this apparatus during lightning storms or when unused for long periods of time. Refer all servicing to qualified service personnel. Servicing is required when the apparatus has been damaged in
any way, such as the power-supply cord or plug is damaged, liquid has been spilled or objects have fallen into the apparatus, the apparatus has been exposed to rain or moisture, does not operate normally, or has been dropped.
In ambient temperatures of no more than 27º C (80º F), the normal operating temperature for HD409N is between 50º C (122º F) to 60º C (140º F).
IMPORTANT SAFETY CONSIDERATIONS The HD409N set-top box requires careful handling to avoid potential damage to its internal parts. Be sure to follow these requirements during transportation and installation. The plug is the main disconnect device. It shall remain readily accessible and operable. The apparatus shall not be exposed to dripping or splashing and no objects filled with liquids, such as vases, shall be placed on the apparatus.
HD409N-User’s Guide
3/ 38
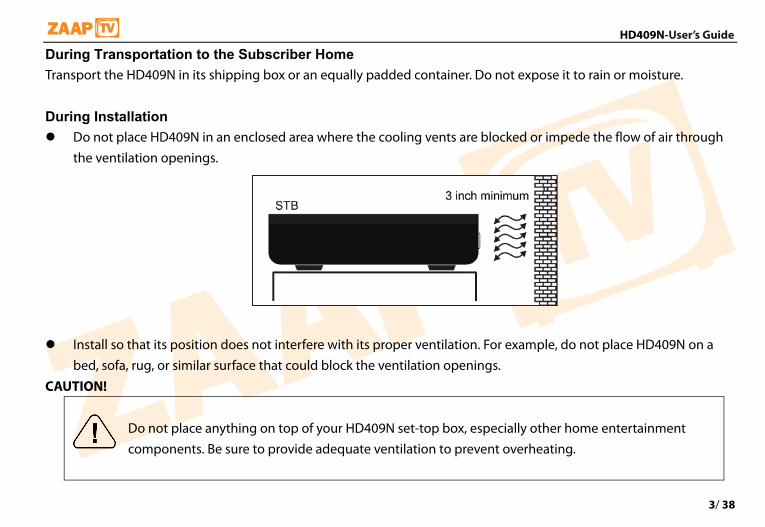
During Transportation to the Subscriber Home Transport the HD409N in its shipping box or an equally padded container. Do not expose it to rain or moisture.
During Installation Do not place HD409N in an enclosed area where the cooling vents are blocked or impede the flow of air through
the ventilation openings.
Install so that its position does not interfere with its proper ventilation. For example, do not place HD409N on a
bed, sofa, rug, or similar surface that could block the ventilation openings.
CAUTION! Do not place anything on top of your HD409N set-top box, especially other home entertainment components. Be sure to provide adequate ventilation to prevent overheating.

HD409N-User’s Guide
4/ 38
Install HD409N on a hard flat surface not prone to vibration or impact and not on top of another electronic device Do not install near any heat sources such as radiators, heat registers, stoves, or other apparatus (including
amplifiers) that produce heat. Installation of HD409N near consumer electronics devices, such as stereo receiver/amplifiers and televisions, is
permitted as long as the air surrounding HD409N does not exceed 40º C (104º F). Do not install HD409N in an area where condensation occurs. To prevent the temporary loss of guide data and cause a temporarily non-responding HD409N, do not plug the AC
power cord into a switched power outlet.

HD409N-User’s Guide
5/ 38
FCC COMPLIANCE Note: This equipment has been tested and found to comply with the limits for a Class B digital device, pursuant to part 15 of the FCC Rules. These
limits are designed to provide reasonable protection against harmful interference in a residential installation. This equipment uses and can
radiate radio frequency energy and, if not installed and used in accordance with the instructions, may cause harmful interference to radio
communications. However, there is no guarantee that interference will not occur in a particular installation. If this equipment does cause harmful
interference to radio or television reception, which can be determined by turning the equipment off and on, the user is encouraged to try to correct
the interference by one or more of the following measures:
Reorient or relocate the receiving antenna. Increase the separation between the equipment and set-top box. Connect the equipment into an outlet on a circuit different from that to which the set-top box is connected. Consult the dealer or an experienced radio/TV technician for help.
Caution: Changes or modifications not expressly approved by ZAAPTV for compliance could void the user’s authority to operate the equipment.
This device complies with part 15 of the FCC Rules. Operation is subject to the following two conditions: (1) This device may not cause harmful interference, and (2) this device must accept any interference received, including interference that may cause undesired operation.
FCC Radiation Exposure Statement The antennas used for this transmitter must be installed to provide a separation distance of at least 20 cm from all persons and must be co-located for operating in conjunction with any other antenna or transmitter.

HD409N-User’s Guide
6/ 38
CARING FOR THE ENVIRONMENT BY RECYCLING When you see this symbol on a ZAAPTV product, do not dispose of the product with residential or commercial waste.
Recycling your ZAAPTV Equipment Please do not dispose of this product with your residential or commercial waste. Some countries or regions, such as the European Union, have set up systems to collect and recycle electrical and electronic waste items. Contact your local authorities for information about practices established for your region.

HD409N-User’s Guide
7/ 38
© 2012 ZAAPTV N.V. All rights reserved. No part of this publication may be reproduced in any form or by any means or used to make any derivative work
(such as translation, transformation, or adaptation) without written permission from ZAAPTV, Inc.
ZAAPTV and its logo are registered trademark. HDMI, the HDMI Logo and High-Definition Multimedia Interface are trademarks or registered trademarks of
JDMI Licensing LLC. All other product or service names are the property of their respective owners. All rights reserved.
ZAAPTV reserves the right to revise this publication and to make changes in content from time to time without obligation on the part of ZAAPTV to provide
notification of such revision or change. ZAAPTV provides this guide without warranty of any kind, implied or expressed, including, but not limited to, the
implied warranties of merchantability and fitness for a particular purpose. ZAAPTV may make improvements or changes in the product(s) described in this
manual at any time.

HD409N-User’s Guide
8/ 38
CONTENTS
1. INTRODUCTION ................................................................................................................................................................................................... 9Front Panel ......................................................................................................................................................................................................... 11Rear Panel ........................................................................................................................................................................................................... 12
2. OPERATION ........................................................................................................................................................................................................ 13Turning Power On and Off ........................................................................................................................................................................... 13Changing Channels ........................................................................................................................................................................................ 13Adjusting the Volume .................................................................................................................................................................................... 13Interactive Programming Guide ................................................................................................................................................................ 14Video Output Format Option ...................................................................................................................................................................... 14
3. CONNECTING YOUR HD409N SET TOP BOX TO YOUR HOME .......................................................................................................... 154. HOW TO MANUALLYCONFIGURE THE HD409N SET-TOP BOX ......................................................................................................... 205. TROUBLESHOOTING ....................................................................................................................................................................................... 36

HD409N-User’s Guide
9/ 38
1. INTRODUCTION
We congratulate you on receiving this HD409N Series High-Definition All-Digital set-top box, one of the most compact and advanced interactive digital IPTV set-top boxes available today. ZAAPTV has combined the extraordinary features of IPTV — the interactive programming guides, almost endless programming options, Video on Demand (VOD), the incredible sound and picture quality of High-Definition TV (HDTV), and so much more. This set-top box comes with an “Entertainment Package” that enables a direct digital connection to consumer audio and video devices through HDMI™ interfaces. The HDMI interface and provides 7.1 channels and beyond enhanced-quality audio and video. It comes with a T-connector just in case your TV set doesn’t support High-Definition TV. It’s also equipped with a built-in WiFi module (optional), so that you can seamlessly connect it to your home network and/or Internet without the need of a network cable (although it is included in the package). This User’s Guide introduces you to the basic features, outlines important safeguards, and provides several options for integrating this component into your current home entertainment system. Please take a few minutes to read through this User’s Guide to help you maximize the most of your home entertainment experience: the configuration diagrams, on-screen menu description and a troubleshooting section. To determine which features of digital IPTV service are provided in your service area, please check with your IPTV operator. They will be happy to provide instructions for some of these optional services.

HD409N-User’s Guide
10/ 38
Features
Fast 1620 DMIPS MIPS Architecture CPU 512 MB of 1600 MHz DDR3 256 MB NAND Flash USB support for mass storage playback, keyboard, and mouse Video format support: MPEG-1 MPEG-2 MP@HL, MPEG-4.2 ASP, MPEG 4.10 AVC (H.264 & H.263), MP & HP TO LEVEL
4.1, VC-1 AP@L3, WMV9, SD & HD, DIVX, AVI, AVS, XVID. Audio format support: MPEG-1 LAYER 1,2. MP3, WMA, WMA PRO, AAC LC, AA LC+SBR L2, AAC+L2, AAC+L4, AAC
5.1. Support many display modes: PAL, NTSC, 720p, 1080i, Full HD 1080p.* Support aspect ratios: 4:3 and 16:9 letterbox, zoom, and full screen mode. HDMI 1.4, T-connector (for Component & Composite), Digital Audio (S/PDIF), Audio L/R, Ethernet, USB. 1080p 24/30 video decode & output support Support optional 802.11n 150 Mb/s WiFi
*Some televisions may not support all video formats listed above
HD409N-User’s Guide
11/ 38
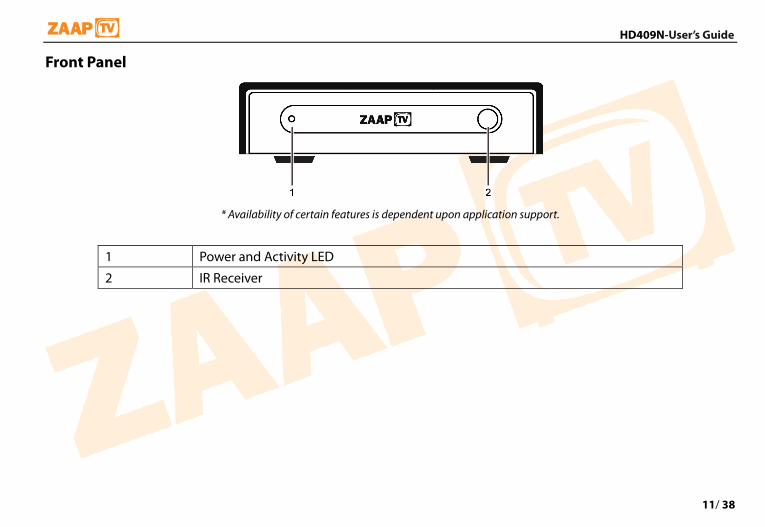
Front Panel
* Availability of certain features is dependent upon application support.
1 Power and Activity LED
2 IR Receiver

HD409N-User’s Guide
12/ 38
Rear Panel
* Availability of certain features is dependent upon application support.
1 T-CONNECTOR
2 OPTICAL SPDIF
3 HDMI 1.4
4 USB 2.0
5 ETHERNET/RJ-45
6 IR Dongle
7 POWER
HD409N-User’s Guide
13/ 38
2. OPERATION
Turning Power On and Off
Plug in the supplied power adapter to the electrical outlet and to the back of HD409N set-top box or use a remote control to turn it on or off (standby). When using the remote control, pressing the POWER button once will put HD409N set-top box on a standby mode while pressing and holding the same button for approximately 3 seconds will turn it off.
Changing Channels
You can change channels in three ways: Press CHANNEL + or – on the remote control to step through the channel selection. Enter the number of the channel you wish to view using the number keys on the remote control. Select the channel in the Interactive Program Guide.
Adjusting the Volume
Press VOLUME + or – on the remote control to adjust the volume. When you adjust the volume, the volume scale is displayed on the screen. Press MUTE on the remote control to toggle the sound on and off. For best audio quality when using the analog L/R (var.) volume controlled audio outputs, use the remote control to set the HD409N set-top to approximately three quarters of the maximum volume level and then adjust the audio levels on external devices such as your TV or A/V receiver. When using the analog L/R (fixed) audio outputs or any of the digital audio outputs (HDMI, optical or coaxial digital audio) adjust the audio levels on your external device such as your TV or A/V receiver. You may

HD409N-User’s Guide
14/ 38
also be able to program your remote to control the volume of your TV or A/V receiver directly (refer to the remote control instruction manual).
Interactive Programming Guide
The Interactive Programming Guide displays information about TV programs and enables you to access features such as Parental Control or Pay-Per-View. Interactive program guides may vary with each service provider.
Video Output Format Option
HD409N set-top box allows you to quickly change the video output format used by the Composite Video, Component Video (YPbPr) and HDMI outputs. The HD409N set-top box is capable of providing the following video formats on the YPbPr and HDMI video outputs: High Definition 1080i (1920 x 1080 pixels) High Definition 720p (1280 x 720 pixels) Enhanced Definition 480p (720 x 480 pixels) Standard Definition 480i (720 x 480 pixels) The HD409N set-top box is also capable of passing through High-Definition 1080p 24/30 (1920 x 1080 pixels)
source content over the HDMI video output.
HD409N allows you to select a video output format that is compatible with a connected display device. This option provides an easy method for selecting an output format that is compatible with your television.

HD409N-User’s Guide
15/ 38
3. CONNECTING YOUR HD409N SET TOP BOX TO YOUR HOME
Instructions and diagrams are included for the following connections: High-Definition Television (HDTV) Standard-Definition TV (SDTV) WiFi Router Before you move or change components on your entertainment system, review the following: Disconnect power from your equipment before connecting or changing connections. For information on
connecting to an HDTV, see the Video Connection Options page.

HD409N-User’s Guide
16/ 38
HDMI provide video and audio, so no separate audio connections are required if you plan to use your TV’s speakers as the
primary audio source.
Component video (YPbPr) — HDTV and SDTV
The YPbPr connectors on your HD409N set-top box provide HDTV and SDTV component video. Note:
Component video does not provide audio. A separate audio connection must be made.
Composite video — SDTV
If a Component input is not available on your TV, use the composite video (video) connection. Note:
Composite video does not provide audio. A separate audio connection must be made.
HDMI If your TV has an HDMI input, this is for both audio and video if you are using the TV speakers. Connect the provided HDMI
cable to the TV and to the HDMI connector on your HD409N set-top box.

HD409N-User’s Guide
17/ 38
Connecting HD409N with HDMI connector
Please see the setup diagram below: Please follow the instructions below:
1. Make sure you’re connected to the Internet without any
problem (either with a router or a modem).
2. Plug in the power adapter of the HD409N set-top box
to the nearby power outlet.
3a. Connect the network cable from the set-top box to the
router.
3b. Alternatively you can also connect the set-top box
wirelessly to your wireless router. This option is only available
if your HD409N set-top box has a wireless module in it and
you have a working wireless router. You can setup the
wireless connection later in the Settings page.
4. Connect the HDMI cable with the small connector head
to the set-top box while the big connector head to your TV.

HD409N-User’s Guide
18/ 38
Connecting HD409N with Composite video connector
Please see the setup diagram below: Please follow the instructions below:
1. Make sure you’re connected to the Internet without any
problem (either with a router or a modem).
2. Plug in the power adapter of the HD409N set-top box
to the nearby power outlet.
3a. Connect the network cable from the set-top box to the
router.
3b. Alternatively you can also connect the set-top box
wirelessly to your wireless router. This option is only available
if your HD409N set-top box has a wireless module in it and
you have a working wireless router. You can setup the
wireless connection later in the Settings page.
4. Connect the HDMI cable with the small connector head
to the set-top box while the big connector head to your TV.

HD409N-User’s Guide
19/ 38
Connecting HD409N with Component video connector
Please see the setup diagram below: Please follow the instructions below:
1. Make sure you’re connected to the Internet without any
problem (either with a router or a modem).
2. Plug in the power adapter of the HD409N set-top box
to the nearby power outlet.
3a. Connect the network cable from the set-top box to the
router.
3b. Alternatively you can also connect the set-top box
wirelessly to your wireless router. This option is only available
if your HD409N set-top box has a wireless module in it and
you have a working wireless router. You can setup the
wireless connection later in the Settings page.
4. Connect the HDMI cable with the small connector head
to the set-top box while the big connector head to your TV.

HD409N-User’s Guide
20/ 38
4. HOW TO MANUALLYCONFIGURE THE HD409N SET-TOP BOX
On the Main Menu page, use the remote control buttons
to navigate and select Settings tab. Press Enter on the remote control to enter the Settings
page.

HD409N-User’s Guide
21/ 38
On the Settings page, use the remote control buttons to navigate up and down selection. Select General tab and press right arrow button to enter the page. At any point of the operation if you wish to go back to the left side menu selection, you can either press the left arrow button or the Back button on the remote control.
On the Language tab, press right arrow button to go to
the system language page.

HD409N-User’s Guide
22/ 38
There are 3 different languages supported by HD409N:
English, Russian, and German. Use the remote control to
navigate up and down selecting your desired language. Once
you have made a selection, press Enter on the remote control. It
will automatically change the system language to the language
of your selection. On the Settings page, use the remote control buttons to
navigate to Location tab, and press right arrow button to enter.

HD409N-User’s Guide
23/ 38
On the Location page, select your location and press Enter.
HD409N will then set itself to the location of your selection. On the Settings page, use the remote control buttons to
navigate to Skins tab, and press right arrow button on the
remote control to select it.

HD409N-User’s Guide
24/ 38
There are 5 different skins you can choose from. Use the
remote control buttons to navigate up and down to select your
desired skin for your HD409N. Once you have made your selection, press Enter on the
remote control to change the system skin to the one that you
choose.

HD409N-User’s Guide
25/ 38
On the Settings page, use the remote control buttons to
navigate up and down to select Network tab, and press right
arrow button on the remote control.
If you want to connect the HD409N to your home network
by means of a network cable, then select LAN (Local Area
Network) tab and press Enter.

HD409N-User’s Guide
26/ 38
Select Static tab and press right arrow button only if you
have the necessary information about your network and want
to manually configure the network connection of HD409N into
your home network.
Press any numeric button on the remote control, and it
will bring up the soft keyboard onto the screen. If you want to
cancel at this point, press the Back button on the remote
control to go back. Once you have entered all the necessary
information, press Enter on the soft keyboard or select OK and
press Enter on the remote control to finish setting the Static IP
address.

HD409N-User’s Guide
27/ 38
On the Network settings page, use the navigation buttons
on the remote control to move up and down to select between
tabs.
Select DHCP if you don’t want or need to manually
configure the IP address for your HD409N. Press right arrow
button to select it.
HD409N-User’s Guide
28/ 38
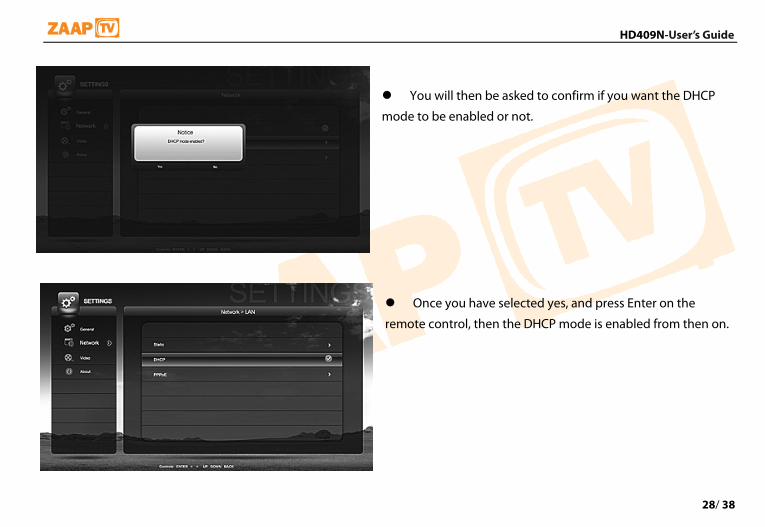
You will then be asked to confirm if you want the DHCP
mode to be enabled or not.
Once you have selected yes, and press Enter on the
remote control, then the DHCP mode is enabled from then on.

HD409N-User’s Guide
29/ 38
On the Network settings page, use the navigation buttons
on the remote control to move up and down to select between
tabs. Select PPPoE and press right arrow button on the remote
control to enter. Press any numeric button on the remote control to bring
up the soft keyboard. Enter all the necessary information and
press Enter on the soft keyboard or select OK and press Enter
on the remote control when you finish.

HD409N-User’s Guide
30/ 38
Please wait while HD409N is trying to establish the
network connection for you. When it has successfully established the connection you
will see the check mark next to the PPPoE tab.

HD409N-User’s Guide
31/ 38
If you want to connect HD409N to your home network by
means of wireless connection, then on the Network page select
WIFI and press the right arrow button on the remote control to
enter the WIFI page. HD409N then will display a list of all the available wireless
connections nearby that it can find for you to select.

HD409N-User’s Guide
32/ 38
Once you have made your selection, and press Enter on
the remote control you will then be asked for the password.
Here you can press any numeric button on the remote control
to bring up the soft keyboard for ease of entering information
into the required field. Once you have finished entering, press
Enter on the soft keyboard. When the wireless connection has been fully established,
you will see a check mark on the wireless connection of your
own choosing.

HD409N-User’s Guide
33/ 38
The next time you enter the Network page you will see
that you’re connected to your home network by WiFi when you
see the check mark next to the WIFI tab. On the Settings page, use the navigation buttons on the
remote control to select Video, and press right arrow button to
enter the display mode page.
HD409N-User’s Guide
34/ 38
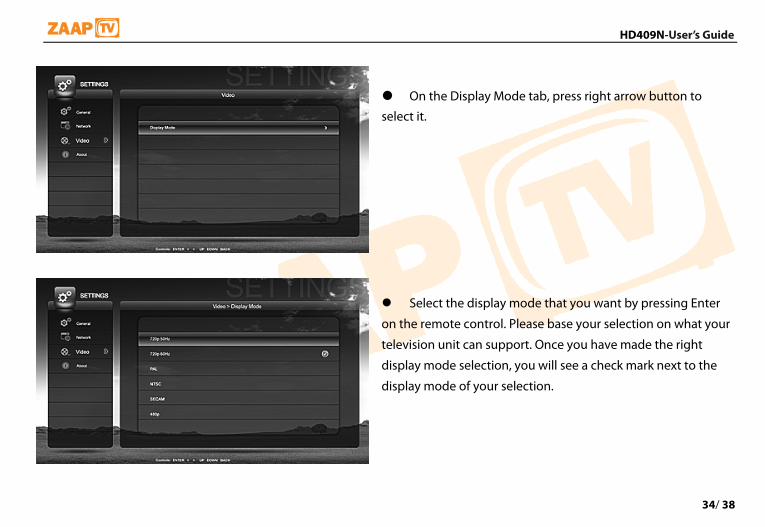
On the Display Mode tab, press right arrow button to
select it. Select the display mode that you want by pressing Enter
on the remote control. Please base your selection on what your
television unit can support. Once you have made the right
display mode selection, you will see a check mark next to the
display mode of your selection.

HD409N-User’s Guide
35/ 38
On the Settings page, use the navigation buttons on the
remote control and select About tab and press right arrow
button to know more information about your HD409N. You
might need to provide this information to your service provider
or for some customer assistance.

HD409N-User’s Guide
36/ 38
5. TROUBLESHOOTING
Before calling your service provider, review this troubleshooting guide. This information is to help you quickly solve a problem. If your problem still exists, contact your service provider.
Problem Possible Solution The HD409N set-top box will not power on
The HD409N set-top box may have received a software update and may not power on while the new software is being installed. Try again in a few minutes. Verify that the AC power cord of the external power supply is connected to the HD409N
set-top box and an AC outlet. Unplug the HD409N set-top box from the AC outlet, plug it back in.
If the HD409N set-top box is connected to a switched outlet on another unit, verify that that unit is powered on. Unplug the power cord from the HD409N set-top box AC outlet, plug it back it in. It is recommended to use an unswitched outlet, if possible.

HD409N-User’s Guide
37/ 38
The remote control does not work
Verify that there are batteries in the remote control, and that they’ve been inserted with the correct polarities. Verify that there are no obstructions between the remote control and the HD409N set-top box. Also check to see if there’s any plastic cover on the front panel of HD409N. If so, please remove it as it might affect the remote control reception. Aim the remote control directly at the HD409N set-top box front panel, not the TV or VCR. The angle between the remote control and the HD409N set-top box may be too large. Stand in front of the HD409N set-top box and not too far to either side. Press and release operation keys one at a time, firmly and deliberately. Check the batteries in the remote control. Install new batteries if needed.
There is no audio when viewing channels
Verify that the mute button on the HD409N set-top box or the remote control has not been pressed. Press mute on the remote control to restore sound. If the HD409N set-top box audio output is connected to the TV, verify that the mute
button on the TV has not been pressed. If the HD409N set-top box audio output is connected to a home theater receiver, verify
that the receiver is set to the appropriate input source and the mute button on the receiver has not been pressed.
Verify that you have the correct cables for the audio connections. Verify that the audio cables are firmly connected between the HD409N set-top box and
the audio play back device (TV, receiver, etc.).

HD409N-User’s Guide
38/ 38
No part of this document may be reproduced or transmitted in any form or by any means, electronic or mechanical, for any purpose, without the express
written permission of ZAAPTV. Under the law, reproducing includes translating into another language or format.