Everlasting summer Also in this issue ... • Flower power • Crafts and DIY projects aplenty It’s all about caring for and improving your home Stencilling, stamping and fabric Make a handy screen, stop your cat painting for an everlasting summer from scratching the furniture and more March 2010
Home-Dzine It’s all about caring for and improving your home March 2010 Everlasting summer online Also in this issue ... • Flower power • Crafts and DIY projects aplenty Stencilling, stamping and fabric Make a handy screen, stop your cat painting for an everlasting summer from scratching the furniture and more
Transcript
Home-DzineIt’s all about caring for and improving your home
March 2010
Everlasting summer
online
Also in this issue ...• Flower power • Crafts and DIY projects aplenty Stencilling, stamping and fabric Make a handy screen, stop your cat painting for an everlasting summer from scratching the furniture and more
WIN a Dremel Series 300 MultiToolAll you have to do is book an EASY-DIY Workshop for yourself and 2 friends and we’ll automatically enter you into the draw to own your very own Dremel Series 300 MultiTool, valued at over R1000!
CLICK HERE TO VISIT THE EASY-DIY WEBSITE
Features & Benefits* New and unique design - Improved ergonomics and increased comfort* Comfort switches - More comfortable when handling and better control* Variable speed 10.000–33.000 RPM - To match speed to the project at hand* Second attachment interface - To attach DREMELite* On-board wrench storage - To have the wrench always at hand* Integrated hang hook - For hanging the tool while working with the Flexible
Shaft* Soft grip - For reduced vibration and a better grip* 125W motor - Optimal performance
Contents* Dremel 300 Series* 55 high quality Dremel accessories in Mini Accessory Case* Dremel high quality Flexible Shaft* Convenient and elegant storage case* Inspiring Welcome Poster
Home-Dzine Online is written and compiled by Janice Anderssen. All projects in this issue, or any other issue, remain the property of Home-Dzine and Janice Anderssen, or the respective copyright holders, and may not be copied or reproduced in any manner whatsoever without written permission.
Image and content credits:meredith publishing - good homes - family handyman - sunset publishing - popular mechanic - house & home - georgia pacific- expert village - channel4 - pottery barn - flikr - nkba - resene - mitre10 - lowes and any others.
Do it!
Thank you to all the DIY Divas who have attended our EASY DIY workshops to date. The response has been overwhelming and great fun has been had by all. If you haven’t yet booked to attend a workshop - you’re missing out on learning valuable skills and discovering how easy it is to ‘Do It Yourself’
You can sign up for our new DIY DIVA workshops and start making your own furniture and home decor accessories.
We’ve got some BIG brand prizes up for grabs to be value of over R50,000. All you have to do is attend a workshop and we’ll automatically enter you into the year-end draw.
Add flower power to yourhome’s decor with these floral-inspired ideas.
Flowers are a sure way to brighten up any home’s decor. Bright and colourful or soft and neutral, flowers add instant cheer. Butfresh-cut arrangements aren’t your only option for adding flower powerto your home. Floral designs abound in home accessories. So we’ve rounded up some flower-themedideas that don’t need watering and will brighten your home year-round!
flower powerABOVE: Floral designs in a bedroom infuse the room with a fresh, calming atmosphere - just as long as you don’t overdo it!
If you’re handy with a sewing machine, select your own floral printsand sew up a duvet and pillow cases for your bed.
3
Decoratesty
leatho
me -
janice
ande
rssen
- ide
as
LEFT: Decorate the border of a tablecloth with a selection of beautiful doilies.
If the doily is in a good condition but is slightly discoloured you can always tea stain it. This will give it an attractive antique look.
Place the doilies at random at each end of the tablecloth to form a border at the hem line. Some can overlap each other. We used three uneven rows of doilies to create our border, with the bottom row draping over the hem to create a lace frill. When you are happy with the effect, hand-stitch them in place using neat, small stitches. [ideas magazine]
BELOW: Wall stickers and stencils continue to be a trendy way to dress up a plain wall to create an instant feature.
View the February issue of Home-Dzine Online for stencils to add your own wall art designs.
BELOW LEFT: Dainty, funky, chic, playful, modern and lots more. Poms add warmth and light to any room. They give a punch to parties. They are divine at weddings. Outside, hanging from trees, they are simply lovely.
You can order your Poms online from www.Etsy.com. The kit Includes 2 small Poms, 3 medium Poms and 2 large Poms tied with green cloth wire sections. Also included is a guide for easy unfurling and 3 metres of monofilamentfor hanging. All papers are folded and edge cut by hand in various patterns for a textured look.
Click here for PDF instructions to make your own fabric pom poms.
LEFT: Colourful, fun and touchy-feely. Use felt to transform a plain fleece cushion into akaleidoscope of colour.
So easy: Make your cushions as large - or as small - as you want. Cut out square piece of fleece - very affordable fromyour local fabric store - and arrange cut out felt flowerpetals in various colours.
You sew - or glue - the felt petals onto the fleece. Add more decoration by using various embroidery threads to finish off the pattern.
DecorateGet creating with felt and embellish a plain cushion with this rose beauty.
You will need:Small plateFeltTailor’s chalk or white chalkRotary pinking cutterCutting matNeedle and thread
Here’s how:1. Using a plate as a template, trace a circle on
a felt piece with tailor’s chalk.
2. From the outside edge, draw a 5cm-wide spiral into the centre of the circle.
3. On a cutting mat, cut along the line with a rotary pinking cutter.
4. To start your flower, fold the circular centre ofthe spiral up and over. Secure the base with several hand-sewn stitches in a matching thread.
5. Complete approximately 6-8 centimetres of running stitch along the spiral. Holding the thread, gather your fabric and secure it to the flower centre. Continue stitching,gathering, and securing until you have a rose. Finish with a simple whip stitch, and trim off the leftover felt.
6. Repeat Steps 1 through 5 to construct a second, smaller rose from your trimmed leftover felt. Secure the felt roses to the pillow.
7. For the stem and leaves, hand-stitch small wood beads to your pillow fabric.
DIY Tip: Save time - and your fingers- by hot-gluing a strand of fun beads to the pillow. A simple running stitch of embroidery flossor pearl cotton is a great alternative to beads.
7
Decorate
gloriousagapanthus
8
Don’t consider yourself an artist? No sweat! We just stamped tons of small flowers in a mix of colours until theygrew into enormous blossoms. Then, we secured the green-dyed twin sheet to a homemade wood frame like an artist’s stretched canvas.
How to make your own canvasThe trick to stretching the sheet square and taut is in the order you attach the sides. Staple the top edge to the top of the frame first, alwaysworking from the middle out. Stretch it to the bottom of the frame next, then do the sides last.
You will need:Thin foamSmall timber offcutsScissors or craft knifeAcrylic craft paintPaintbrushSprayable adhesive
Here’s how:1. Draw your desired shape and cut out with
scissors or a sharp craft knife (on a cutting mat).
2. Apply sprayable adhesive to the back of your shape and mount this onto the timber block.
3. Use a paintbrush to dab paint onto the stamp. Put the paint on thick in some areas, barely any in others, to create the texture and dimension we got—a chic Italian impasto look!
4. Wipe clean the stamp when you want to apply different colours.
5. Continue this process, applying various flowerand leaf shapes until your design is complete.
6. Once the paint is completely dry, stretch the fabric to create your canvas.
bette
r hom
es an
d gar
dens
mag
azine
Crafts
9
bette
r hom
es an
d gar
dens
mag
azine
zing withzinnias
Crafts
10
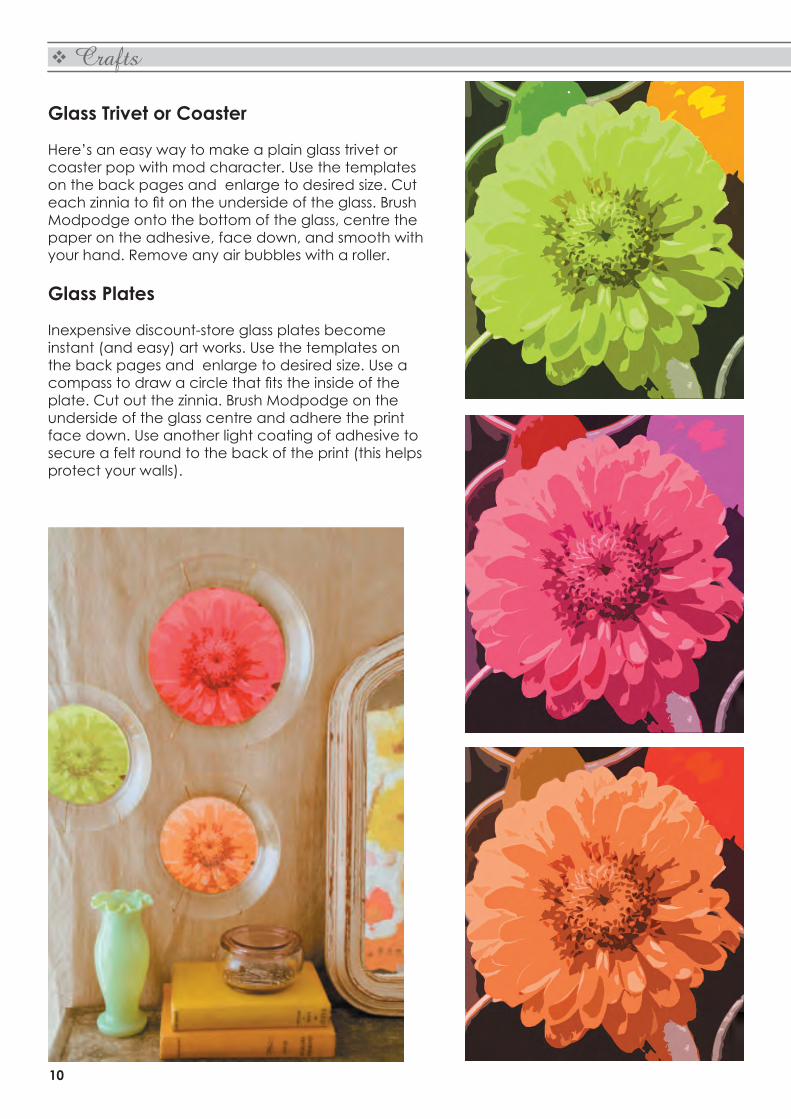
Glass Trivet or Coaster
Here’s an easy way to make a plain glass trivet or coaster pop with mod character. Use the templates on the back pages and enlarge to desired size. Cut each zinnia to fit on the underside of the glass. BrushModpodge onto the bottom of the glass, centre the paper on the adhesive, face down, and smooth with your hand. Remove any air bubbles with a roller.
Glass Plates
Inexpensive discount-store glass plates become instant (and easy) art works. Use the templates on the back pages and enlarge to desired size. Use a compass to draw a circle that fits the inside of theplate. Cut out the zinnia. Brush Modpodge on the underside of the glass centre and adhere the print face down. Use another light coating of adhesive to secure a felt round to the back of the print (this helps protect your walls).
creative
Crafts
11
Designer cushionsTape preshrunk fabric to a plastic cutting board. Use fabrics paint or an acrylic paint with textile medium added (both available at crafts stores). Apply the paint in several thin coats to work it into the fibres.Heat set if required. Your piece can be laundered with mild detergent after 10-14 days.
creativecushions
Crafts
12
Crafts
roll-oncolourDouble rolling is an easy and fun way to add a textured effect to
walls.
Although you can’t buy double-rollers here in South Africa, there
is an easy way to make your own.
Two shades of gold, consistently double-rolled onto a wall, play
off one another in this room, catching light in varying ways.
13
CraftsFor years, professional painters haveproduced richly mottled surfaces by rolling on and blending two colours of paint at the same time.
Now any home decorator can add a textured effect to walls. The best part about this project is that if you simply cannot be bothered to faff about with rags and cloths, double-rolling is an effective way to create the look without all the fuss.
You will need:Paint roller*Craft knifePaint traySilicone sealerPaint pad or sea sponge
Here’s how:1. The best roller to use for this project is a
*cotton or sheepskin roller. Synthetic rollers tend to make quite a bit of mess and can end up spoiling the paint job with loose fibres.
2. Use a sharp craft knife to lightly score a channel around the centre of the paint roller - to a width of approximately 10mm.
3. Once you have scored you can angle the craft knife to scrape off the material in the channel to leave you with two separate parts - or a double-roller.
4. You will also need to section off the paint tray so that you can add two different colours of paint. To do this simply run silicone sealer down the centre line of the paint tray. You will need to do this twice to build up a reasonably high strip - letting each layer dry completely before adding the next layer.
Painting the wall1. Pour one colour of Prominent Paints sheen or
satin paint into one side of a double tray. Pour the second colour into the other. Be careful not to dribble paint into the opposite side. Load the double paint roller with both paints, rolling at the top of the tray to remove excess paint.
14
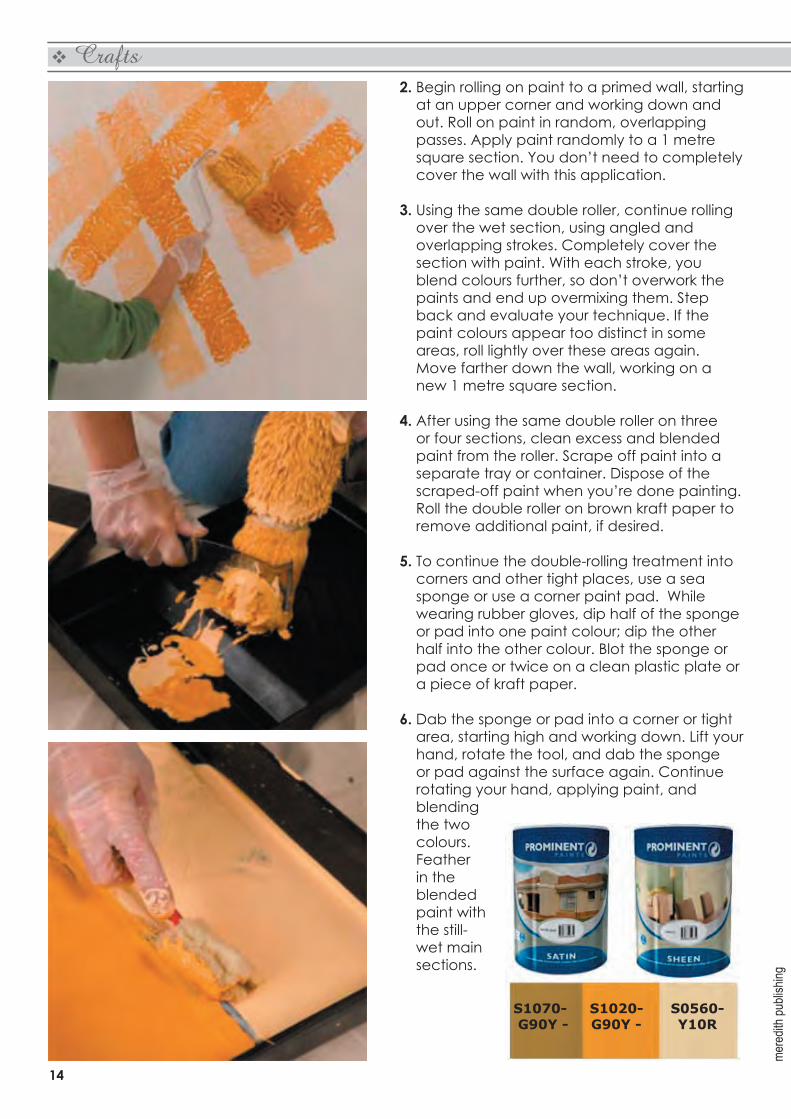
Crafts2. Begin rolling on paint to a primed wall, starting
at an upper corner and working down and out. Roll on paint in random, overlapping passes. Apply paint randomly to a 1 metre square section. You don’t need to completely cover the wall with this application.
3. Using the same double roller, continue rolling over the wet section, using angled and overlapping strokes. Completely cover the section with paint. With each stroke, you blend colours further, so don’t overwork the paints and end up overmixing them. Step back and evaluate your technique. If the paint colours appear too distinct in some areas, roll lightly over these areas again. Move farther down the wall, working on a new 1 metre square section.
4. After using the same double roller on three or four sections, clean excess and blended paint from the roller. Scrape off paint into a separate tray or container. Dispose of the scraped-off paint when you’re done painting. Roll the double roller on brown kraft paper to remove additional paint, if desired.
5. To continue the double-rolling treatment into corners and other tight places, use a sea sponge or use a corner paint pad. While wearing rubber gloves, dip half of the sponge or pad into one paint colour; dip the other half into the other colour. Blot the sponge or pad once or twice on a clean plastic plate or a piece of kraft paper.
6. Dab the sponge or pad into a corner or tight area, starting high and working down. Lift your hand, rotate the tool, and dab the sponge or pad against the surface again. Continue rotating your hand, applying paint, and blending the two colours. Feather in the blended paint with the still-wet main sections.
LEFT: An ordinary louvred panel is given new purpose as a magazine and book rack.
We are all looking for ways to reduce our carbon footprint, and recycling what we already have in our home, is a novel way to start a hobby for profit, or tomake items to decorate your home.
RIGHT: An unusual
lampshade made by recycling
mere
dith p
ublis
hing
using yourimaginationEach and every day I am amazed at how DIY and craft enthusiasts are coming up with ideas for new and exciting recycling projects.
Christiaan of Furniture Trends has quite a few innovative ideas for home decor accessories, many of which transform old furniture or look for ways to make use of everyday items to create something new and unique.
RIGHT: These candle holders are made using gum poles with a centre hole sawn
out to create candle holders.
16
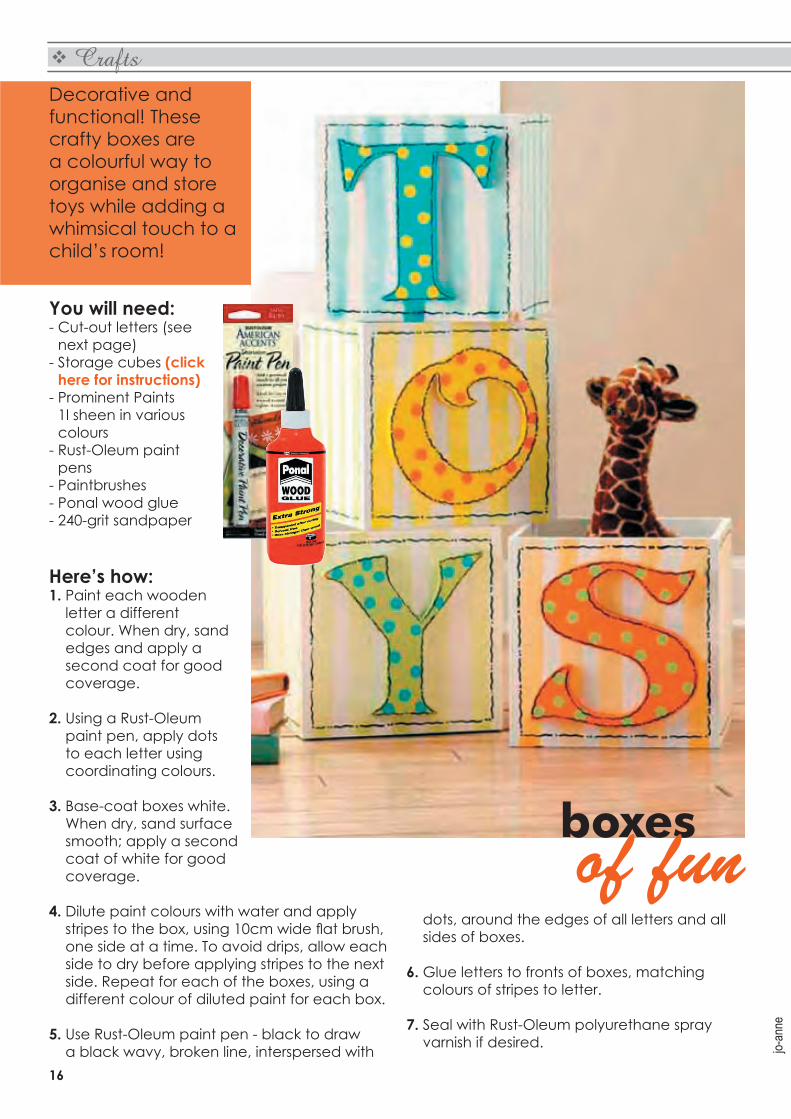
boxesof fun
Decorative and functional! These crafty boxes are a colourful way to organise and store toys while adding a whimsical touch to a child’s room!
letter a different colour. When dry, sand edges and apply a second coat for good coverage.
2. Using a Rust-Oleum paint pen, apply dots to each letter using coordinating colours.
3. Base-coat boxes white. When dry, sand surface smooth; apply a second coat of white for good coverage.
4. Dilute paint colours with water and apply stripes to the box, using 10cm wide flat brush,one side at a time. To avoid drips, allow each side to dry before applying stripes to the next side. Repeat for each of the boxes, using a different colour of diluted paint for each box.
5. Use Rust-Oleum paint pen - black to draw a black wavy, broken line, interspersed with
dots, around the edges of all letters and all sides of boxes.
6. Glue letters to fronts of boxes, matching colours of stripes to letter.
7. Seal with Rust-Oleum polyurethane spray varnish if desired.
Few decorative paintingtechniques offer more graphicimpact than stencilling and a simple stencilled border applied near the ceiling line gives any room greater architectural appeal. And you can use up any leftover paints from the ‘Boxes of Fun’.
Here’s how:1. Plan where you want the stencil. If you’re
applying a continuous border design, select a starting point for your design. Use a spirit level and pencil to lightly mark dashes at a consistent height around the room.
2. Draw your design and cut out with a crafts knife. Place the stencil facedown on a rag or piece of newspaper. Spray a thin coat of repositionable spray adhesive onto the back. You can also use masking tape around the edges rather than spray adhesive. Press the sticky side of the stencil onto the wall.
3. Decide how many paint colours you want and prepare a tray with the selected colours. Add a few drops of scumble glaze to each colour to blend colours.
4. Dip the stencil brush into the first colour andtap the brush onto a piece of newspaper to remove excess paint and ensure even application.
5. Dab the stencil brush onto the stencil with a steady, circular motion, perpendicular to the wall. For a softer look, dab the paint heaviest around the edge of the stencil. Work paint toward the centre of the area, blending as you go. Fill in all areas of the stencil where the first colour appears.
6. Clean and load the stencil brush with the second colour of paint and apply in the same way. Continue for any additional colours.
7. As soon as you’re done applying paint, remove the stencil from the wall. Wipe off paint with a clean, damp cloth. Reposition the clean stencil next to the completed design. If any paint seeps under the film whilestencilling use a small artist’s brush to touch up with the basecoat.
Make your own stencilsYou can transform most any simple image into a stencil. Place a photocopy of the image under a sheet of clear film (overheadtransparencies work great) and trace the edges of the image with a fine-tip permanentmarker. Cut out the shapes of your design with a crafts knife, working on a cutting mat. Label the front of your design.
Crafts
18
A Breath of fresh air for Decorex Durban & KSA Kitchen & Bathroom Faire 2010
This year’s show brings you inspired solutions, the latest in home trends, beautiful kitchens and bathrooms and fantastic prizes.
Plascon’s Colour Inspiration: Hear the beat of the drum. Feel the blaze of the sun. Revel in the richness of Plascon’s 2010 Colour Palette which will reveal a celebration of Africa and unfolds a bounty of colour as diversified andinspired as the Mother continent.
Quintessential Design in Kitchens & Bathrooms: From magnificent marble toquintessential quartz, beautiful bath tubs, amazing appliances and stunning stoves – explore and find the it-factor that turnsyour kitchen into the heart of your home and your bathrooms into a haven of luxurious indulgence.
Conversations on Architecture: Exclusive to Decorex and KSA Kitchen & Bathroom Faire 2010, KZN’s architects, décor and interior design fraternity are invited to this annual trade highlight with must-attend status which sheds light on the shape of the built future. Join an illustrious cast of international and local speakers who share their vision, debate new directions and share ideas.
Pure InspirationDecorex and KSA Kitchen & Bathroom Faire provides a preview into the latest décor trends set within a variety of roomscapes.
iid Room Pavilion: Featuring a selection of gorgeous rooms created by iid decorators [South African Institute of Design Professionals]. Visitors will get their visual fix of the latestin fine pieces and décor arrangements. Thisleading talent will apply this year’s theme of a ‘breath of fresh air’ to their design approach promising a pavilion that is a veritable feast of the sense featuring fabulous and new decorology.
Finishing Touches: Define and finesse withthe finest finishes. From floors and doors to windows and walls bring your home to life in spectacular fashion by integrating flawlessfinishing touches that refine, uplift and define.
Great goodie bags, including the official showjournal on arrival, style on a shoestring, expert advice and the chance to win fantastic prizes.
Café Chic: Fall in love with food at Decorex and KSA Kitchen & Bathroom Faire’s eateries which also offer breathing spaces and meeting places for business and social chats in exquisite settings. Discover the DStv and Love Chocolate Lounges for more than just a taste of the finerthings in life.
District Delicious: A foodies’ fantasy come true - featuring a delectable blend of gourmet food, wine and cheffy have-to-haves, this all new pavilion promises to be a feast of all things fabulous and foodie! Enthusiasts can also enjoy the District Delicious Theatre featuring the country’s top culinary talent from the SA Chefs Association and fantastic live demo’s on table settings, wine tasting and interesting food related topics.
19th – 22nd March 2010
Show times: 10:00 – 20:00 19 – 21 March 2010
10:00 – 18:00 22 March 2010International Convention Centre
Durban [ICC]
Ticket prices: Opening special Friday 19 March – R35 From 20 – 22 March
With food prices soaring and energy costs rising through the roof, it’s time for an energy-saving tune up for your refrigerator and freezer.
Keeping food fresh - while conserving energy - can bring a helpful boost to the strained food budget.
Try these tips to minimise energy use and save money on groceries:
• Fill the freezer, but give the fridge some air
The freezer works most efficiently whenpacked as full as possible. Need to fillin some space? Tuck extra ice for cold drinks or cold-packs for summer picnics into any empty space in the freezer.
A black-out bonus: Full freezers keep food frozen longer if a power outage occurs.
The refrigerator is a different animal; it needs air circulation to keep food at an even temperature. Packing a refrigerator too tightly means some foods become too cold - and may even freeze - while others aren’t kept cold enough for proper storage. Let the refrigerator breathe to keep food fresh longer.
•Match foods to the right microclimate
Since hot air rises and cold air sinks - and because every refrigerator has its own unique weather pattern of chilly breezes - be sure to assign foods to the right neighbourhood inside the refrigerator.
keep yourcool
orga
nised
home
21
EcoA cold spot near the cold-air inlet makes a good home for meat or poultry, but will freeze and spoil a head of lettuce.
Keep produce cool, condiments cold and proteins downright chilly for longest food life.
Track temperatures. Too-cold temperatures waste energy, while too-warm temps lead to premature food spoilage.
Be sure to pay attention when the seasons change; a temperature setting that works well for the winter months may need to be adjusted during hotter weather.
•Test the door seal
Leaky door seals are a main culprit for energy loss in both refrigerator and freezer. Improperly-sealed doors let cold air escape, making the unit work harder and cutting food quality.
To check the door seals, close the refrigerator or freezer door on a piece of paper. A well-sealed door will hold tight to the paper; if the paper falls out, or can be slid around easily, it’s time to clean or replace the door gasket.
• Clean condenser coils
Condenser coils do the heavy lifting of creating cold air, but they can’t radiate heat properly if their surface is coated with dust or grime.
Use a vacuum cleaner extension wand to clean the condenser coils behind or beneath the refrigerator. Clean coils cost less to operate, and because they work more quickly to chill the air, keeping them clean will extend the useful life of your appliance. For those of you who don’t know where the condenser coils are - look at the back of the fridge!
•Find it fast with a freezer inventory
Rummaging through a packed freezer in search of a packet of minced beef can waste a lot of power.
Keep visits to the freezer short, sweet and energy-efficient with a printablefreezer inventory form. It’ll track what you have and let you find your frozenassets in record time - and let the freezer keep its cool for best energy savings.
Is it time to replace your fridge?Thanks to recent improvements in insulation and compressors, today’s refrigerators use much less energy than older models. With an ENERGY STAR qualified refrigerator, you can maximizeyour energy and dollar savings without sacrificing the features you want.
orga
nised
home
22
MakeoverNow you can make your DIY window décor ideas come to life with the innovative new ‘Envision’ room viewer on Decorland’s recently revamped website. With this inspiring new application, Decorland has given home decorating new meaning, allowing you to effortlessly and safely experiment and design perfect window décor solutions.
Simply enter the unique room viewer and, at the click of a mouse, choose the room you plan to redecorate – bedroom, kitchen or living room. Then, ‘personalise’ that room by changing the colour of the walls and linen and adjusting the floor finishes to match yourown. After that, you can try out various colour schemes, weigh up different finishes and,most importantly, browse through Decorland’s extensive range of window finishes - fromwooden and aluminium blinds to curtain rods and accessories. Finally, select one you like and drag and drop it in place.
With Decorland’s new website, you can also download the latest catalogue or access helpful DIY window décor tips and advice. To make your shopping experience
easier, the new store finder utility locates yournearest outlet. You can even print out the handy shopping list or fill in the online form forfurther information or a quotation.
roomswith views
Decorland products are exclusively available at Game stores country wide. For further information, contact Decorland on 0800 002 635 or log on to www.decorland.co.za
• Measure in millimetres as this will give you the most accurate result
• Use a metal tape measure
• Measure each window individually, as size vari-ations are common
• For recess fitting, measure within the recess inat least two places for the width and the drop in case the window isn’t perfectly square
• Record the smallest of the measurements as the final window recess size
• Record your measurements in width x drop and double check all figures
• Check for any obstructions that may interfere with the blind fitting into the recess. i.e. bur-glar bars and window handles
• For recess fitting make sure you measure thedepth of your window recess to ensure that the blind will fit
• For wall face mountings, measure the total area you would like covered by your blind
• Do not make any deductions, this will be done in-store for you
INSTALLATION INSTRUCTIONSDoing it yourself is not that difficult, justmake sure you have the necessary tools and follow the easy installation instructions inside every product pack.
YOU WILL NEEDTape Measure, Pencil, Spirit Level, Drill, 6mm Masonry Bit, Screwdriver or Drill/Driver
24
Do it Yourself
toilet humourMy ‘original’ artwork on display at the recent Homemakers Expo. Few could believe that it was actually designed using cut off pieces of toilet rolls!
I saved all my toilet roll cardboard holders and cut them into thin loops about 3cm wide using a sharp pair of scissors.
These loops were then glued onto a piece of canvas that was made using the instructions in the craft section. I used clear adhesive to glue them on.
Once dry, the artwork was sprayed with Rust-Oleum stone spray and then given splashes of colour with Rust-Oleum Painters Touch.
25
Do it Yourself
You will need:22mm pine cut to blocks 300 x 300180-grit sanding paperCraft knifeCarpet offcuts or carpet tilesContact adhesiveNo More Nails mounting tape (red - 50kg)Woodoc 10 and stain concentrateSpirit levelPencil
Here’s how:1. Have the pine cut to size at your nearest
Builders Warehouse or Builders Express.
2. Sand the blocks with 180-grit sandpaper for a smooth finish and wipe with a clean cloth.
3. Use a sharp craft knife to cut the carpet offcuts or carpet tiles into 250 x 250mm squares. If you don’t have a cutting board, use a piece of scrap timber to protect your work surface.
4. Use a pencil and ruler to mark a 250 x 250mm square onto the pine blocks.
5. Apply contact adhesive to the marked square and to the back of the carpet offcut
Stop your kitty-cat from scratching your furniture or carpets by making this scratching block.
You can easily position the scratching blocks on walls in your lounge, bedroom or other rooms with No More Nails mounting tape.
furniturepurr-fect
or tile. Leave for approximately 15 minutes until it feels dry to the touch.
6. Affix the carpet offcut or carpet tile ontothe marked square and press down hard around all edges to make sure it is securely fixed. Leave this to dry over night.
7. Use Woodoc 10 - clear or with added stain concentrate - to seal the blocks.
8. Apply No More Nails mounting tape to the back of each block, approximately 10mm in from the edge and around the entire block. You can also put a couple of strips in the centre for additional support.
9. Use a spirit level and pencil to mark the wall where you want to position the scratching blocks.
10. Remove the backing strip from the tape and press firmly onto thewall, make sure that it is level with your marked guide.
Use this decorative screen to display your favourite
photos, or conceal an ugly area in a room.
27
Do it YourselfThis oak (or pine) screen tucks away mess and displays photos. It stands at 1300mm and is designed to hide a fireplace in summer. To use it as aroom divider, you’ll have to make it higher than the measurements suggested here.
MAKING DOWEL JOINTSEach joint is assembled with two 8mm dowels. Dowel joints look simple but need to be accurately aligned. Dowelling jigs make theprocess simple. The trick is to ensure you’re always working from the same
face. For a cheaper option than a jig, use dowel centres. They have a sharp centrepoint, making it easier to identify the drilling position on the connecting piece.
Insert a dowel centre into one hole and carefully align the adjoining piece to mark the hole position.
Use a wood bit, which has a centre point for more precise drilling.
You will need:Oak or pine cut to size as per diagramsClamps8mm dowelsDowel centresPonal wood glueDrill/driver and 8mm wood bit[4] brass butt-hinges with screwsMulti or orbital sander180-grit sanding pads
Here’s how:1. Make the outer frames Clamp the four outer
frame stiles together with the face edges up. Ensure the ends are flush. Mark out therail positions (see Diagram 1). Square the lines across all four edges. Mark the rail positions with a cross to avoid confusion.
2. Clamp eight longer rails together and mark out the centre position for the 42mm mullions on both edges of the intermediate rails and one edge only of the top and bottom rails. Repeat for the other outer frame rails.
3. Mark out the positions of the dowels in the end of the rails and mullions. Use a marking gauge to mark the centre, then position two dowels, each 10mm in from each edge. Drill the holes to a depth of 21mm.
4. Lay out two stiles on a flat area, insert the dowel centres into the rail holes. Align the rails with the marked positions on the stiles and firmly press the pieces together to markthe hole positions.
5. Label each joint with a corresponding number, and repeat for all rails and mullions. Drill the dowel holes into the edge of the stiles and rails to 21mm deep on a drill press or by hand.
6. Mark out the centre frame, as in Diagram 2, ensuring all joints are clearly labelled with corresponding numbers or letters. This will help prevent confusion and save time during the glue-up.
7. Mark out a 255 x 42mm taper on the inside edges of the stiles. This may be cut out with a jigsaw or handsaw. (Make sure you cut on the waste side of the line.) Sand with 180-grit sandpaper.
DIAGRAMS CAN BE FOUND ON BACK PAGE
28
DIY Tips
• Label all the joints as soon as you’ve marked out the dowel positions.
• Make sure all the pieces are flat on the benchduring marking-out.
• When drilling rails, don’t be tempted to go all the way through. Mark both sides and drill toward the centre from each side.
• Sand all the internal edges before gluing up.
• Use Ponal wood glue, which is easily painted and sanded.
• Gluing early in the morning, or in colder weather, buys more time for assembly.
• Don’t be heavy-handed with the glue, as it will squeeze out and make a mess.
Get everything you need at your local Builders
Warehouse or Builders Express
8. Apply Ponal wood glue to the holes in edges of the stiles, then drive home the 8mm dowels. Apply some glue to the ends of the mullions and attach to the rails. Clamp securely.
9. Apply glue to the dowel holes in the ends of the rails and assemble to the stiles. (You may need to tap them with a dead blow hammer.) Clamp the entire frame securely and set aside to dry. Assemble the remaining two frames using the same steps.
10. Sand the frames, ensuring all joints are flushand sharp edges removed. Attach two 65mm brass butt hinges to the adjoining frames. The hinges should be arranged in opposing directions to allow folding.
11. If the screen will be used for photos, cut a rebate into the back off each opening. Set up a *router with a rebating bit to a depth of 6mm.
Each photo is held in place by a piece of 3mm MDF (supawood) backing board secured with picture framing tape.
* If you don’t own a router, stick your photos or fabric onto a clear piece of thin plastic or card.
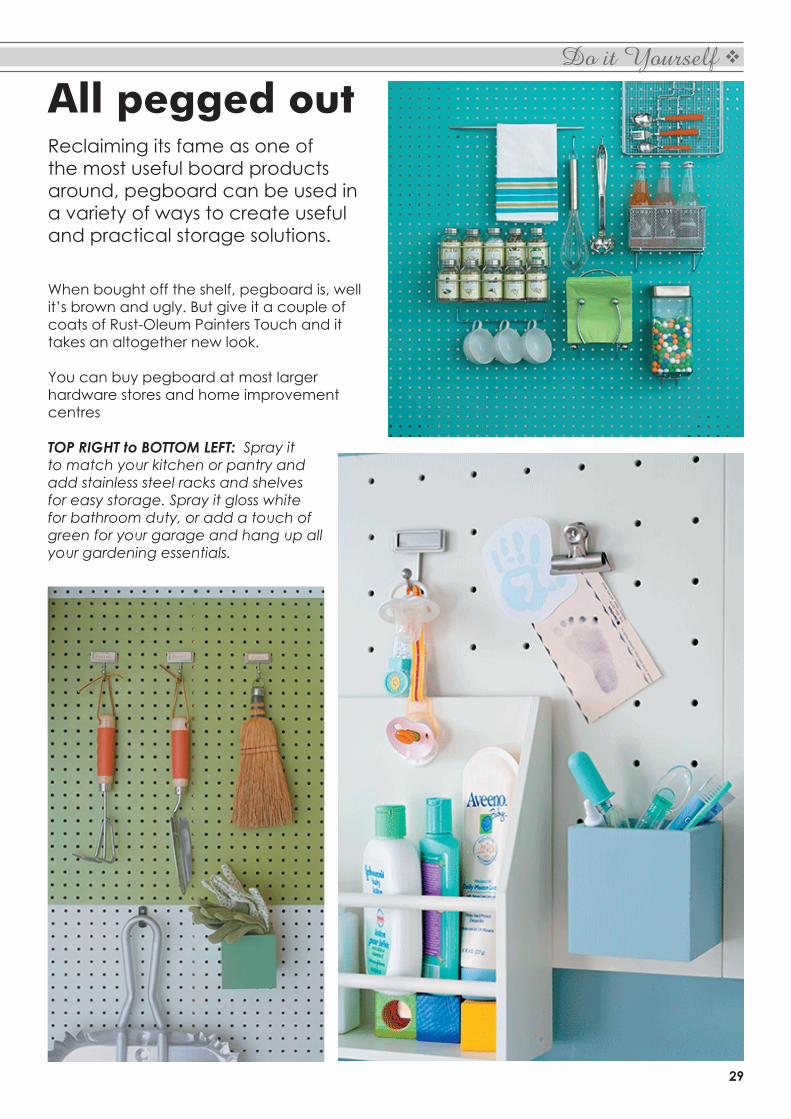
All pegged outReclaiming its fame as one of the most useful board products around, pegboard can be used in a variety of ways to create useful and practical storage solutions.
When bought off the shelf, pegboard is, well it’s brown and ugly. But give it a couple of coats of Rust-Oleum Painters Touch and it takes an altogether new look.
You can buy pegboard at most larger hardware stores and home improvement centres
TOP RIGHT to BOTTOM LEFT: Spray it to match your kitchen or pantry and add stainless steel racks and shelves for easy storage. Spray it gloss white for bathroom duty, or add a touch of green for your garage and hang up all your gardening essentials.


![Disclosures Mar10[1] Basel 3](https://static.documents.pub/doc/80x56/577d365d1a28ab3a6b92e0f6/disclosures-mar101-basel-3.jpg)


![Iraq Overview Mar10[1]](https://static.documents.pub/doc/80x56/577d38d31a28ab3a6b9890ca/iraq-overview-mar101.jpg)


