61
1 E HDR-TRI Hard Disk Recorder Option User’s Guide

1E
HDR-TRIHard Disk Recorder Option
User’s Guide

Table of Contents
Table of Contents1. Introduction . . . . . . . . . . . . . . . . . . . . . . . . . . . . . . . . . . . . . . . . . . . . . . 1
Features of the HDR-TRI . . . . . . . . . . . . . . . . . . . . . . . . . . . . . . . . . . . . 1About hard disk recording . . . . . . . . . . . . . . . . . . . . . . . . . . . . . . . . . . . 1About hard disks . . . . . . . . . . . . . . . . . . . . . . . . . . . . . . . . . . . . . . . . . . . 2About sound and audio events . . . . . . . . . . . . . . . . . . . . . . . . . . . . . . . 2
2. Operation . . . . . . . . . . . . . . . . . . . . . . . . . . . . . . . . . . . . . . . . . . . . . . . . 3Settings for recording . . . . . . . . . . . . . . . . . . . . . . . . . . . . . . . . . . . . . . . 3
Hard disk connections and settings . . . . . . . . . . . . . . . . . . . . . . . . . . . . 3Formatting a hard disk . . . . . . . . . . . . . . . . . . . . . . . . . . . . . . . . . . . . . 4Types of SCSI devices that can be connected and their ID settings . . . 5Connections for recording. . . . . . . . . . . . . . . . . . . . . . . . . . . . . . . . . . . 6Song settings . . . . . . . . . . . . . . . . . . . . . . . . . . . . . . . . . . . . . . . . . . . . . 7Checking the external input . . . . . . . . . . . . . . . . . . . . . . . . . . . . . . . . . 8
Recording . . . . . . . . . . . . . . . . . . . . . . . . . . . . . . . . . . . . . . . . . . . . . . . . 10Recording an audio track . . . . . . . . . . . . . . . . . . . . . . . . . . . . . . . . . . 10Recording a guitar in stereo on tracks 3 and 4 while listening to audio tracks 1 and 2 . . . . . . . . . . . . . . . . . . . . . . . . . . . . . . . . . . . . . . . . . . . 11The Compare function. . . . . . . . . . . . . . . . . . . . . . . . . . . . . . . . . . . . . 11
Playback . . . . . . . . . . . . . . . . . . . . . . . . . . . . . . . . . . . . . . . . . . . . . . . . . 12Playing back the track(s) you recorded . . . . . . . . . . . . . . . . . . . . . . . . 12Adjusting the pan or volume balance of the tracks . . . . . . . . . . . . . . . 12Recording mixer events. . . . . . . . . . . . . . . . . . . . . . . . . . . . . . . . . . . . 13
Re-recording . . . . . . . . . . . . . . . . . . . . . . . . . . . . . . . . . . . . . . . . . . . . . . 14Using the rehearsal function . . . . . . . . . . . . . . . . . . . . . . . . . . . . . . . . 14Using auto punch-in recording to edit. . . . . . . . . . . . . . . . . . . . . . . . . 14
Editing . . . . . . . . . . . . . . . . . . . . . . . . . . . . . . . . . . . . . . . . . . . . . . . . . . . 15Creating repetitions of the same phrase . . . . . . . . . . . . . . . . . . . . . . . 15Track bouncing (“ping-pong” recording) . . . . . . . . . . . . . . . . . . . . . . 15Bouncing MIDI tracks and audio tracks together . . . . . . . . . . . . . . . . 16Applying master effects . . . . . . . . . . . . . . . . . . . . . . . . . . . . . . . . . . . 16
Creating a song in conjunction with the MIDI sequencer . . . . . . . . 17Saving/loading recorded data. . . . . . . . . . . . . . . . . . . . . . . . . . . . . . . 19
Saving song data to a hard disk. . . . . . . . . . . . . . . . . . . . . . . . . . . . . . 19Loading data from a hard disk . . . . . . . . . . . . . . . . . . . . . . . . . . . . . . 19
Using a recorded sound more than once in the same .SNG file . . . 20Creating different arrangements using the same vocal . . . . . . . . . . . . 20Using the same sound more than once . . . . . . . . . . . . . . . . . . . . . . . . 20
3. Parameters . . . . . . . . . . . . . . . . . . . . . . . . . . . . . . . . . . . . . . . . . . . . . . 21Sequencer P1. . . . . . . . . . . . . . . . . . . . . . . . . . . . . . . . . . . . . . . . . . . . . . 21
1–5: Audio Track Rec . . . . . . . . . . . . . . . . . . . . . . . . . . . . . . . . . . . . . 211–6: Mix Audio Track 1–4 . . . . . . . . . . . . . . . . . . . . . . . . . . . . . . . . . 261–7: Preference . . . . . . . . . . . . . . . . . . . . . . . . . . . . . . . . . . . . . . . . . . 29
Sequencer P2. . . . . . . . . . . . . . . . . . . . . . . . . . . . . . . . . . . . . . . . . . . . . . 302–5: Audio Track parameter (Audio Track 1–4) . . . . . . . . . . . . . . . . 30
Sequencer P5. . . . . . . . . . . . . . . . . . . . . . . . . . . . . . . . . . . . . . . . . . . . . . 315–3: Audio Track Edit. . . . . . . . . . . . . . . . . . . . . . . . . . . . . . . . . . . . . 31
i

Table of Contents
5–4: Audio Track Name . . . . . . . . . . . . . . . . . . . . . . . . . . . . . . . . . . . 44Disk P1. . . . . . . . . . . . . . . . . . . . . . . . . . . . . . . . . . . . . . . . . . . . . . . . . . . 46
1–1: Load . . . . . . . . . . . . . . . . . . . . . . . . . . . . . . . . . . . . . . . . . . . . . . 461–3: Utility . . . . . . . . . . . . . . . . . . . . . . . . . . . . . . . . . . . . . . . . . . . . . 471–4: Audio Utility . . . . . . . . . . . . . . . . . . . . . . . . . . . . . . . . . . . . . . . . 50
4. Appendix . . . . . . . . . . . . . . . . . . . . . . . . . . . . . . . . . . . . . . . . . . . . . . . 55Block diagram . . . . . . . . . . . . . . . . . . . . . . . . . . . . . . . . . . . . . . . . . . . . 55Messages . . . . . . . . . . . . . . . . . . . . . . . . . . . . . . . . . . . . . . . . . . . . . . . . . 56Troubleshooting. . . . . . . . . . . . . . . . . . . . . . . . . . . . . . . . . . . . . . . . . . . 56Specifications . . . . . . . . . . . . . . . . . . . . . . . . . . . . . . . . . . . . . . . . . . . . . 57
ii

Features of the HDR-TRI
Intr
oduc
tion
Ope
ratio
nPa
ram
eter
sA
ppen
dix
Intr
oduc
tion
Ope
ratio
nPa
ram
eter
sA
ppen
dix
1. IntroductionThank you for purchasing the HDR-TRI hard disk recorder option. In order to enjoy long and trouble-free use, please read this manual carefully.
In this manual, tracks recorded by the hard disk recorder are referred to as “audio tracks.” In contrast, tracks of the sequencer discussed in the Parameter Guide and Basic Guide are referred to in this manual as “MIDI tracks.”
This manual explains the functions which are newly added when the HDR-TRI hard disk recorder option is installed. For the parameters whose functions remain unchanged, refer to your Parameter Guide, Basic Guide, and Effect Guide.
Features of the HDR-TRI• 4-channel hard disk recorder• 16-bit linear PCM recording• A 540 Mbyte hard disk allows approximately 47 minutes of stereo recording• Up to 7 SCSI disks can be connected• Instantaneous cueing• Rehearsal function• Manual or Auto Punch In/Out recording is supported• Editing operations such as Copy, Move, Erase, Delete, Insert, and Edit Undo• Backup to DAT via the S/P DIF OUT connector• Digital EQ• Two master effect sends
About hard disk recordingRealtime recording to an audio track can be performed using Overwrite Record-ing, Auto Punch-In Recording, or Manual Punch-In Recording. Unlike when recording to a MIDI track, Overwrite Recording overwrites only the measures that were recorded.
As when recording to a MIDI track, recording to an audio track creates “events” (audio events) which can be edited in detail using the Audio Event Edit func-tions. Since individual audio events can be edited, you can edit (move, delete, copy, etc.) even small segments of sound such as orchestra hits.In addition, the mixer allows you to adjust the pan, volume, etc. for each audio track, and to record these changes so that they will be faithfully reproduced when the data is played back.
1

About hard disks
About hard disks
About sound and audio eventsWhen audio recording is performed, sound is recorded directly into the sound partition of the hard disk. At the same time, event data (audio events) pertaining to that sound is recorded into the audio track that is currently selected. (The sound data itself does not exist in the audio track.) Audio events contain data that specifies the name of the sound that they use, and data that specifies the portion of the sound that will be played back.When a song is played back and an audio event is encountered, the appropriate sound will be played back from the hard disk. This means that playback is not possible unless the sound itself as well as the audio event that uses that sound are both present.Be aware that audio events can be erased using the event edit commands, and can also be erased by accident by turning the power off before they have been saved to the hard disk. Furthermore, if just the sound is left, it will not be possi-ble to re-use that sound in an audio track. If you allow these unusable sounds to accumulate in your hard disk, they will simply occupy disk space to no pur-pose, so we recommend that you execute the “Delete Unused Sound” command (☞ page 53 of this manual) to make the best use of your hard disk.
When a hard disk connected to the TRINITY is formatted, it is divided into two partitions: a filer area and a sound area. The filer partition is used to save .SNG files and .PCG files, and also includes an area used to manage these files. The sound partition is used to record sound.When you specify the size of the filer partition in the Format dialog box before executing the Format command, the disk will be formatted with the remaining space allotted to the sound partition (☞ page 48 of this manual). In order to mod-ify the partitioning, you must either execute Format once again, or execute the Wipe command.
Hard Disk
Filer partition .SNG files .PCG files etc.
Sound partition
Recordedsounds
2
Settings for recording
Intr
oduc
tion
Ope
ratio
nPa
ram
eter
sA
ppen
dix
2. Operation
Settings for recordingThis section explains how to make the necessary settings for hard disk record-ing. Be sure to make these settings before performing hard disk recording.
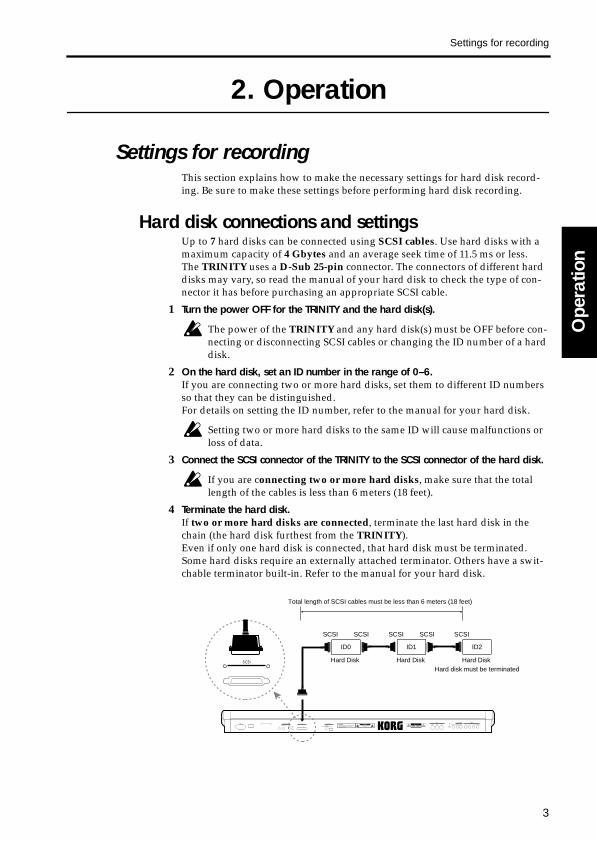
Hard disk connections and settingsUp to 7 hard disks can be connected using SCSI cables. Use hard disks with a maximum capacity of 4 Gbytes and an average seek time of 11.5 ms or less.The TRINITY uses a D-Sub 25-pin connector. The connectors of different hard disks may vary, so read the manual of your hard disk to check the type of con-nector it has before purchasing an appropriate SCSI cable.
1 Turn the power OFF for the TRINITY and the hard disk(s).
The power of the TRINITY and any hard disk(s) must be OFF before con-necting or disconnecting SCSI cables or changing the ID number of a hard disk.
2 On the hard disk, set an ID number in the range of 0–6.If you are connecting two or more hard disks, set them to different ID numbers so that they can be distinguished.For details on setting the ID number, refer to the manual for your hard disk.
Setting two or more hard disks to the same ID will cause malfunctions or loss of data.
3 Connect the SCSI connector of the TRINITY to the SCSI connector of the hard disk.
If you are connecting two or more hard disks, make sure that the total length of the cables is less than 6 meters (18 feet).
4 Terminate the hard disk.If two or more hard disks are connected, terminate the last hard disk in the chain (the hard disk furthest from the TRINITY).Even if only one hard disk is connected, that hard disk must be terminated.Some hard disks require an externally attached terminator. Others have a swit-chable terminator built-in. Refer to the manual for your hard disk.
Hard Disk
SCSI
Hard Disk Hard Disk
ID2ID1ID0
SCSI SCSI SCSI SCSI
Hard disk must be terminated
Total length of SCSI cables must be less than 6 meters (18 feet)
3

Settings for recording
5 Turn on the power of the hard disk(s), and then turn on the power of the TRINITY.When turning on the power, turn on devices in sequence from the hard disk → TRINITY.When turning off the power, turn off devices in sequence from the TRINITY → hard disk.
Never turn off the power while the hard disk is being accessed (e.g., while the LED indicator of the hard disk is lit).
Formatting a hard diskIf the hard disk is being used by the TRINITY series for the first time, the hard disk must first be formatted to establish a filer partition and a sound partition.
When formatting is executed, all data that was previously on that hard disk will be erased. Before formatting a disk, make sure that it does not contain data you wish to keep.
The only way to modify the size of the filer partition or the volume label is to execute formatting once again or to execute the Wipe command.
1 In Disk mode P1 tab 3 page (Utility), use the drive select field to select the hard disk that you wish to format.
When using Drive Select to select a hard disk, the ID numbers of hard disks that have not been formatted will appear as Unformatted, and the ID numbers of hard disks that are not connected will appear as None. Even if a hard disk has been formatted by a personal computer, etc., it will be shown as Unformatted, and such a hard disk must be formatted as well.
2 Choose the page menu command “Format,” and the following dialog box will appear.
3 Assign a volume label (up to 11 characters).When formatting is executed, this volume label will be displayed in the drive select area.
4 Specify the size (0–540 Mbyte) of the filer partition.When formatting is executed, the remaining space on the disk will become the sound partition.
Drive select
345
4

Settings for recording
Intr
oduc
tion
Ope
ratio
nPa
ram
eter
sA
ppen
dix
If you are using only a single hard disk to perform hard disk recording, you must specify a filer partition larger than 0 in order to create an area where .SNG files and .PCG files etc. can be saved. If you are using two or more hard disks, a filer partition must be created on at least one of the disks.
5 Press the OK button to execute formatting.Formatting a hard disk will require a certain amount of time depending on the size of the hard disk. (e.g., formatting a 540 Mbyte hard disk requires approxi-mately 5 minutes.)
After formatting has been executed, pressing the [COMPARE] key will not restore the original state of the disk.
Do not install a hard disk that was formatted on the TRINITY series into another computer. Korg cannot guarantee the operation of such a disk.
Types of SCSI devices that can be connected and their ID settings
SCSI devices other than hard disks can also be connected, including removable media such as magneto-optical disks (MO).Hard disks can be set freely to any ID number 0–6, but a removable media device can be used only when its ID number is set to 6.If you have connected only one removable media device, and no other device is connected, that removable media can be used to load and save .SNG files.However if one or more hard disks are also connected in addition to the remov-able media device, the hard disk(s) will be able to record sound and load/save .SNG files, but the removable media device will not be able to record sounds nor load/save .SNG files. The removable media device will be usable only for oper-ations such as “Copy with Sound” (☞ page 52 of this manual) or “Copy” (☞ page 47 of this manual).
5

Settings for recording
Connections for recordingBe sure that the power is turned OFF for all devices before you make connec-tions.
Sources that are input to the ANALOG IN 1 jack will be recorded on audio track 1 or 3. Sources that are input to the ANALOG IN 2 jack will be recorded on audio track 2 or 4.Sources that are input to the S/P DIF IN connector will be recorded with the left channel on audio track 1 or 3, and the right channel on audio track 2 or 4. Use a commercially available video cable to make connections.
When turning on the power, turn on each device in sequence from the con-nected devices → TRINITY.When turning off the power, turn off each device in sequence from the TRINITY → connected devices.
Never turn off the power while the hard disk is being accessed (e.g., while the LED indicator of the hard disk is lit).
Powered monitor speakers etc.
When using a mic to record, connect it via a mixer.
Effect deviceINPUTOUTPUT
SCSI
Hard Disk
S/P DIF OUT DAT
Headphones
Mixer
INPUTOUTPUT
When recording a guitar that has active pickups, you can connect it directly. However a passive guitar (i.e., without a built-in preamp) should first be passed through an effect device.
INPUT
Connect a digital recording device (DAT etc.) whose sampling frequency is 48 kHz.
6

Settings for recording
Intr
oduc
tion
Ope
ratio
nPa
ram
eter
sA
ppen
dix
Song settings1 Access the Sequencer mode P1 tab 5 page (ATrkRec).
2 In the Song field, select a new song and assign a song name.The display will ask “Are You Sure?” Press the OK button.
3 In the Track field, select the audio track(s) that you wish to record.Select AT1–AT4 for monaural recording, or AT1&2 or AT3&4 for stereo record-ing. Make sure that the audio track(s) selected here appear in the Audio Track Display.
4 If you wish to hear the metronome while you record, set the Metronome setting to On or Rec (to sound only during recording), and adjust the tab 7 page (Preference) Metronome settings Precount, Output, and Level.With a metronome Output setting of L, L+R, or R, the metronome sound will be output from the headphone jack and from output jacks 1/L/MONO and 2/R. With a metronome Output setting of Send 1, Send 1+2, or Send 2, the metro-nome sound will be output from output jacks 3 and 4.
5 In the Take field, specify the take name.
6 If you want to differentiate sounds by a number added to the end of the take name, check the Take No. box.
7 If two or more hard disks are connected, execute the Page Menu Command “Rec HD Select” and select the hard disk that will be used for recording.If only one hard disk is connected there is no need to execute this command.
2
1
4
5
6
3 7
7

Settings for recording
Checking the external inputBefore you begin, go to “Song settings” (☞ page 7 of this manual) and select an audio track (AT1 for this example).
1 Access the Sequencer mode P1 tab 5 page (ATrkRec).
2 Select the Input Select item.If you are recording from an analog device such as a guitar connected to the ANALOG IN 1 or 2 jack, select Analog.Input from the ANALOG IN 1 jack will be recorded on audio track 1 or 3.Input from the ANALOG IN 2 jack will be recorded on audio track 2 or 4.If you are recording from a digital device such as a DAT connected to the S/P DIF connector, select Digital. In this case, make sure that the Global mode P2 System Clock setting is set to S/P DIF. If you are recording from a digital device, proceed to step 6 .If a digital signal containing a copy inhibit flag is input, the display will indicate Copy Inhibit. The HDR-TRI is able to record a digital signal which contains the SCMS (Serial Copy Management System) flag. However it will be recorded as digital audio data without the SCMS flag.
When digitally recording from copyrighted audio material such as a com-mercial DAT tape, you must be sure to obtain permission. Otherwise, you must use non-copyrighted material. Korg will take no responsibility for the consequences of any copyright violation which you may commit.
Input from the S/P DIF connector will be recorded with the left channel of the source on audio track 1 or 3, and the right channel on audio track 2 or 4.
It is not possible to record a sampler or CD with a sampling frequency other than 48 kHz via the S/P DIF connector. If you wish to record from such a sampler or CD, use the ANALOG 1 or 2 jacks.
16 4
2
3
8
Settings for recording
Intr
oduc
tion
Ope
ratio
nPa
ram
eter
sA
ppen
dix
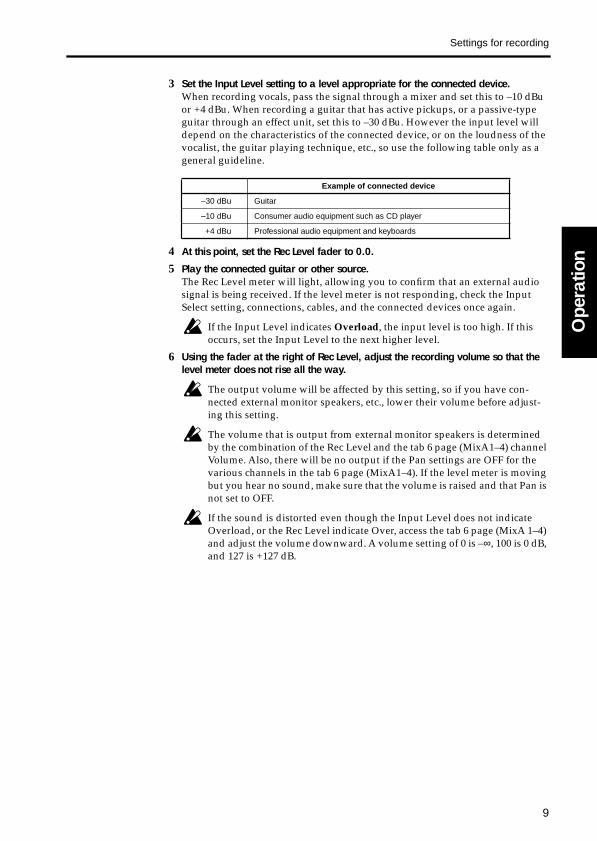
3 Set the Input Level setting to a level appropriate for the connected device.When recording vocals, pass the signal through a mixer and set this to –10 dBu or +4 dBu. When recording a guitar that has active pickups, or a passive-type guitar through an effect unit, set this to –30 dBu. However the input level will depend on the characteristics of the connected device, or on the loudness of the vocalist, the guitar playing technique, etc., so use the following table only as a general guideline.
4 At this point, set the Rec Level fader to 0.0.
5 Play the connected guitar or other source.The Rec Level meter will light, allowing you to confirm that an external audio signal is being received. If the level meter is not responding, check the Input Select setting, connections, cables, and the connected devices once again.
If the Input Level indicates Overload, the input level is too high. If this occurs, set the Input Level to the next higher level.
6 Using the fader at the right of Rec Level, adjust the recording volume so that the level meter does not rise all the way.
The output volume will be affected by this setting, so if you have con-nected external monitor speakers, etc., lower their volume before adjust-ing this setting.
The volume that is output from external monitor speakers is determined by the combination of the Rec Level and the tab 6 page (MixA1–4) channel Volume. Also, there will be no output if the Pan settings are OFF for the various channels in the tab 6 page (MixA1–4). If the level meter is moving but you hear no sound, make sure that the volume is raised and that Pan is not set to OFF.
If the sound is distorted even though the Input Level does not indicate Overload, or the Rec Level indicate Over, access the tab 6 page (MixA 1–4) and adjust the volume downward. A volume setting of 0 is –∞, 100 is 0 dB, and 127 is +127 dB.
Example of connected device
–30 dBu Guitar
–10 dBu Consumer audio equipment such as CD player
+4 dBu Professional audio equipment and keyboards
9

Recording
Recording
Recording an audio trackWhen recording an audio track, it is not possible to select Rec as the Tempo Mode. If you wish to record tempo changes on the Master track, select a MIDI track or MIXER REC in “1-4d: Track.” Even when the Tempo Mode is manual, do not modify the Tempo setting during recording.
1 Perform the procedure “Settings for recording” (☞ page 3–10 of this manual).
2 Access the Sequencer mode P1 tab 7 page (Preference).
3 In the Recording Setup item, select the recording method.If you are recording for the first time, select Overwrite.
4 Press the [REC/WRITE] key.In 1 or 2 seconds you will enter record-ready mode, and the [START/STOP] key LED will blink.
5 Press the [START/STOP] key.Recording will begin.
6 To end recording, press the [START/STOP] key.
If you play the keyboard while an audio track is selected in “1–5: Track,” the settings (MIDI channel, Program, Track Status etc.) of the last-selected MIDI track will be used.
2
3
10

Recording
Intr
oduc
tion
Ope
ratio
nPa
ram
eter
sA
ppen
dix
Recording a guitar in stereo on tracks 3 and 4 while listening to audio tracks 1 and 2
1 Use the procedure of “Recording an audio track” to record onto audio tracks 1 and 2.
2 Connect your guitar to a stereo-output effect device.
3 Connect the stereo-output effect device to the ANALOG IN 1 and 2 jacks.
Checking the external input4 In the Track setting, select AT3&4.
The input to the ANALOG IN 1 jack will be recorded onto audio track 3, and the input to the ANALOG IN 2 jack will be recorded onto audio track 4.
5 In the Input Select setting, select Analog.
6 In the Input Level setting, select –30 dBu.
7 Play your guitar, and adjust the Rec Level so that the level meter does not rise all the way.If the Input Level indicates Overload, the input level is too great. If this occurs, select the next higher setting for Input Level.
8 Press the [RESET] key to return to the beginning of the song. Press the [REC/WRITE] key and then (after making sure that the [START/STOP] key LED is blinking) press the [START/STOP] key.Recording will begin. While listening to audio tracks 1 and 2, play your guitar and record it on audio tracks 3 and 4.
9 To stop recording, press the [START/STOP] key.
The Compare functionIf you press the [COMPARE] key, the TRINITY will return to the state it was in before recording began (this is referred to as the Compare function). Press the [COMPARE] key once again, and the recorded data will reappear.
7
4
5
6
11

Playback
Playback
Playing back the track(s) you recorded1 Press the [RESET] key to return to the beginning of the song.
2 Press the [START/STOP] key.The audio that was recorded will be played back.
Adjusting the pan or volume balance of the tracksYou can adjust the pan and volume of each track so that the recorded tracks are played back in an appropriate balance. You can also use the equalizer to adjust the tone of each track.
1 Access the Sequencer mode P1 tab 6 page (MixA1–4).
2 Set the Mix Audio Track Mode to MANUAL for the audio tracks that have already been recorded.
3 Press the [RESET] key to return to the beginning of the song, and press the [START/STOP] key.Playback will begin.
4 Use the Pan/Volume settings to adjust the pan and volume of each track, and use EQ to adjust the tone.
5 When you are finished, press the [START/STOP] key.
1
4
2
12

Playback
Intr
oduc
tion
Ope
ratio
nPa
ram
eter
sA
ppen
dix
Recording mixer eventsYou can record pan, volume and equalizer settings as mixer events on the audio track. The audio track will be played back according to the Pan/Volume, EQ, and Send 1/2 settings that were recorded.
1 Use the procedure “Recording an audio track” to record an audio track.
2 Access the Sequencer mode P1 tab 7 page (Preference).
3 In Recording Setup, specify the recording method for mixer events.When recording mixer events, select Overwrite.Alternatively, you may use Auto Punch-In or Manual Punch-In to specify the measures of the area in which recording will take place.
4 Access the tab 6 page (MixA1–4).
5 For the Track selection, select MIXER REC.
6 For the audio track on which you want to record mixer events, set the Mix Audio Track Mode to WRITE.
For audio tracks on which you do not want to record mixer events, set the Mix Audio Track Mode to READ or MANUAL.
7 Press the [RESET] key to return to the beginning of the songpress the [REC/WRITE] key and then (after making sure that the [START/STOP] key, LED is blinking) press the [START/STOP] key.Recording will start.
8 While listening to the song, adjust EQ, Send 1/2, and Pan/Volume for the audio track on which you want to record mixer events.If you execute the page menu command “Volume Pairing,” adjusting the vol-ume of one channel in a stereo pair will simultaneously adjust the volume of the other channel.
9 When you are finished, press the [START/STOP] key.
4
5
8
6
13

Re-recording
Re-recordingThis section explains the procedure for re-recording part of a previously-recorded audio track.If you wish to re-record the entire track, select Overwrite, and record using the procedure “Recording an audio track.”
Using the rehearsal function1 Access the Sequencer mode P1 tab 7 page (Preference).
2 In the Track setting, select the audio track that you wish to edit.
3 For Recording Setup, select Auto Punch In.
4 Specify the area of measures that you wish to edit.
5 Access the tab 5 page (ATrkRec).
6 Check the Rehearsal check box.
7 Output sound from the instrument, etc. that you are recording, and adjust the Input Level and Rec Level.
8 Check the Monitor Mode check box to set Auto Input ON.When Auto Input is ON, you will be able to monitor the external input between the punch-in and punch-out points, and at other times you will be able to moni-tor the previously-recorded sound. For example if you have set punch-in at 005 (measure 5) and punch-out at 008 (measure 8), you will be monitoring the previ-ously-recorded sound for the first four measures, and will monitor the external input sound during measures 5 through 8.
9 Press the [REC/WRITE] key and then (after making sure that the [START/STOP] key LED is blinking) press the [START/STOP] key.Simulated recording will start (nothing will actually be recorded). Between the punch-in and punch-out points, you can practice the phrase that you intend to record.
0 When you are finished, press the [START/STOP] key.
Using auto punch-in recording to edit1 Access the Sequencer mode P1 tab 7 page (Preference).
2 In the Track setting, select the audio track that you wish to edit.
3 For Recording Setup, select Auto Punch In.
4 Specify the area of measures that you wish to edit.
5 Access the tab 5 page (ATrkRec).
6 Un-check the Rehearsal check box.If you wish to rehearse the punch-in, check the box.
7 Output sound from the instrument, etc. that you are recording, and adjust the Input Level and Rec Level.
8 Press the [REC/WRITE] key and then (after making sure that the [START/STOP] key LED is blinking) press the [START/STOP] key.Recording will start. Play between the punch-in and punch-out points to re-record the desired phrase.When auto punch in recording is performed with Auto Input ON, approxi-mately 0.5 seconds will be required from when the Punch Out point is reached until the track playback sound can once again be monitored. (The audio for this
14
Editing
Intr
oduc
tion
Ope
ratio
nPa
ram
eter
sA
ppen
dix
portion of track has not been lost.)
9 When you are finished, press the [START/STOP] key.
Editing
Creating repetitions of the same phrase1 Record using the procedure “Recording an audio track.”
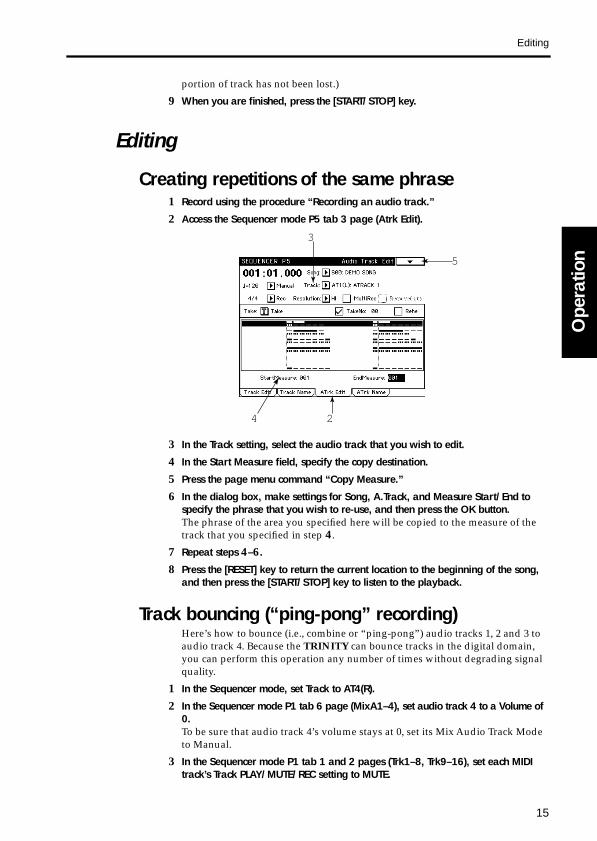
2 Access the Sequencer mode P5 tab 3 page (Atrk Edit).
3 In the Track setting, select the audio track that you wish to edit.
4 In the Start Measure field, specify the copy destination.
5 Press the page menu command “Copy Measure.”
6 In the dialog box, make settings for Song, A.Track, and Measure Start/End to specify the phrase that you wish to re-use, and then press the OK button.The phrase of the area you specified here will be copied to the measure of the track that you specified in step 4 .
7 Repeat steps 4–6 .
8 Press the [RESET] key to return the current location to the beginning of the song, and then press the [START/STOP] key to listen to the playback.
Track bouncing (“ping-pong” recording)Here’s how to bounce (i.e., combine or “ping-pong”) audio tracks 1, 2 and 3 to audio track 4. Because the TRINITY can bounce tracks in the digital domain, you can perform this operation any number of times without degrading signal quality.
1 In the Sequencer mode, set Track to AT4(R).
2 In the Sequencer mode P1 tab 6 page (MixA1–4), set audio track 4 to a Volume of 0.To be sure that audio track 4’s volume stays at 0, set its Mix Audio Track Mode to Manual.
3 In the Sequencer mode P1 tab 1 and 2 pages (Trk1–8, Trk9–16), set each MIDI track’s Track PLAY/MUTE/REC setting to MUTE.
2
5
3
4
15

Editing
This way, only the audio tracks will be bounced. If you want to bounce the MIDI tracks’ audio as well, see “Bouncing MIDI tracks and audio tracks together” below.
4 Make the appropriate Volume, Panning, EQ and Send 1/2 settings for audio tracks 1, 2 and 3.Since you will be mixing these three tracks down to a single track, you will not be able to change their mix at a later time. Be sure you are satisfied with the settings you make at this point.
5 Set Pan to R127 for audio tracks 1–3.The playback from audio tracks 1–3 will be output from the right channel of the S/P DIF jack. This is necessary because audio tracks 2 and 4 record signals from the right channel (you selected audio track 4 as the recording track in the previ-ous step). Audio tracks 1 and 3 record signals from the left channel. If you had chosen to bounce to audio track 1 or 3, you would need to set Pan to L000 for this step.
6 Connect the S/P DIF OUT connector to the S/P DIF IN connector.Use a commercially available video cable to make connections.
7 Set the Global mode P2 System Clock setting to Internal.
8 Set the P1 tab 5 page (ATrkRec) Input setting to Digital.
9 Press the [RESET] key to return to the beginning of the song, press the [REC/WRITE] key and then (after making sure that the [START/STOP] key LED is blinking) press the [START/STOP] key.Recording from audio tracks 1, 2, and 3 to audio track 4 will begin.
0 Disconnect the video cable from the S/P DIF OUT and IN connectors.
If the mixer volume is raised when the S/P DIF connectors are connected, oscillation may occur. For this reason, the S/P DIF OUT and IN connectors should not be connected to each other except while bouncing tracks.
Bouncing MIDI tracks and audio tracks togetherThe TRINITY also lets you bounce MIDI tracks and audio tracks together, down to audio tracks. Bouncing tracks in this way allows you to conserve MIDI tracks and polyphony. For example, you can bounce MIDI tracks 1–16 plus audio tracks 1 and 2 to audio tracks 3 and 4, preserving the stereo mix you have cre-ated.
The procedure is basically the same as outlined in the previous section (ignore steps 3 and 5). Make the appropriate Volume, Panning, EQ and Send 1/2 set-tings for audio tracks 1 and 2 and the MIDI tracks (you can also set the MIDI tracks’ insert effects). In step 2 , set the Volume of audio tracks 3 and 4 to 0. In step 1 , set Track to AT3&4.
Applying master effects1 Access the Sequencer mode P1 tab 6 page (MixA1–4).
2 Use Send 1/2 to adjust the send levels (the amount of signal sent to the master effects) for each track.Send 1 is the input to the modulation-type master effect (effect 1).Send 2 is the input to the reverb-type master effect (effect 2).With a setting of 064, the send level to the master effect will be 50 percent.
3 Access the P8 tab 1 page (Master FX).To use a master effect, select the effect and turn it ON, and raise the return 1 and
16

Creating a song in conjunction with the MIDI sequencer
Intr
oduc
tion
Ope
ratio
nPa
ram
eter
sA
ppen
dix
2 levels.If you check the check box located at the left of the display, the right side output of effect 1 will be sent to effect 2, and effects 1 and 2 will be mixed. Refer to the Parameter Guide for details on the P8 tab 1 page (Master FX), and to the Effect Guide for an explanation of the settings of the master effects.
Creating a song in conjunction with the MIDI sequencer
This section explains how to record a vocal on audio track 1 to the accompani-ment of the MIDI sequencer.
Recording the vocal1 Access the Sequencer mode P1 tab 5 page (ATrkRec).
2 In the Song field, select the song that will provide the accompaniment.
3 For the Track setting, select the desired audio track (AT1 in this example).Make sure that the Audio Track Display shows the selected audio track.
4 If you wish to hear the metronome as you record, set Metronome to On or Rec (to hear it only during recording), and make Metronome settings for Precount, Out-put, and Level in the tab 7 page (Preference).With a metronome Output setting of L, L+R, or R, the metronome sound will be output from the headphone jack and from output jacks 1/L/MONO and 2/R. With a metronome Output setting of Send 1, Send 1+2, or Send 2, the metro-nome sound will be output from output jacks 3 and 4.
5 In the Take field, assign a take name.
6 If you want a number to be added at the end of the take name to distinguish takes, check the Take No. box.
Checking the external input7 Access the Sequencer mode P1 tab 5 page (ATrkRec).
8 Set the Input Select to Analog.
9 For the Input Level, select a level appropriate for the device that is connected (–10 dBu) for this example, and sing into the mic while you adjust the Rec Level so that the meter does not go all the way.If the Input Level indicates Overload, the input level is too high. If this occurs,
2
1
3
4
5
6
17

Creating a song in conjunction with the MIDI sequencer
set Input Level to the next higher setting.
Recording0 Press the [RESET] key to return to the beginning of the song, press the [REC/WRITE]
key and then (after making sure that the [START/STOP] key LED is blinking) press the [START/STOP] key.Recording will start. Sing into the mic while listening to the accompaniment of the MIDI sequencer.
A When you finish recording, press the [START/STOP] key.
Adjusting the balance and equalizer for the monitor outputHere’s how to adjust the pan, volume and EQ of the vocal that was recorded on the audio track. To make adjustments for the MIDI sequencer, use the tab 3 or 4 page (Mix 1–8 or Mix 9–16).
B Access the tab 6 page (MixA1–4).
C Set the Mix Audio Track Mode to MANUAL for the channel that you wish to adjust (channel 1 in this example).
D Press the [RESET] key to return to the beginning of the song, and then press the [START/STOP] key.The song with vocals will begin playing back.
E Use Pan/Volume to adjust the pan and volume of channel 1 to create an appropri-ate balance of sound in the monitor output. Use EQ to adjust the tone.A Pan setting of C064 will produce the impression of singing from center stage.
Using effect processingIf you wish to apply effects to give spaciousness to the vocal, use the Send parameters and the “Master Effects” of P8 to make settings for the effect types and the amount of the effects.
F With the recorded song playing back, set Send to about 64.
G Access the P8 page.Select the effects in the tab 1 (Master FX) page (make detailed effect settings in the tab 2 and tab 3 pages as necessary), and raise the Return parameters to adjust the mix with the original sound.To adjust the depth of the effects, use the master effect parameters to make set-tings for each effect, and use the P1 Send and P8 Return parameters to adjust the sends and returns.
Recording mixer eventsHere’s how to record pan, volume, send, and equalizer mixer events.
H Access the Sequencer mode P1 tab 5 page (MixA1–4).For the Track item, select MIXER REC.
I Set the Mix Audio Track Mode to WRITE for the channel that you wish to record (channel 1 for this example).
J Press the [RESET] key to return to the beginning of the song, press the [REC/WRITE] key and then (after making sure that the [START/STOP] key LED is blinking) press the [START/STOP] key.The song will playback.
K Adjust the Pan/Volume, Send, and EQ of the channel whose Mix Audio Track Mode was set to WRITE (channel 1 for this example).Your adjustments will be recorded as mixer events.
18

Saving/loading recorded data
Intr
oduc
tion
Ope
ratio
nPa
ram
eter
sA
ppen
dix
L When you are finished, press the [START/STOP] key.When playing back the song, set the Mix Audio Track Mode to READ for chan-nel 1. Playback will be controlled according to the mixer events that were recorded.
Saving/loading recorded data
Saving song data to a hard disk1 Access the Disk mode tab 2 page (Save).
2 In the Drive Select box, select the hard disk on which you want to save the data.As necessary, use the Open button and the Up button to move through the directory hierarchy, and select the saving destination.
Song data that includes an audio track(s) cannot be saved to a floppy disk.
3 Execute the page menu command “Save Song.”
Loading data from a hard disk1 Access the Disk mode tab 1 page (Load).
1
2
3
1
2
3
4
19

Using a recorded sound more than once in the same .SNG file
2 In the Drive Select box, select the hard disk that contains the data you wish to load.
3 In the directory window, specify the data that you wish to load.As necessary, use the Open or Up buttons to move through the directory hierar-chy, and specify the data to be loaded.
4 Execute the page menu command “Load Selected.”The dialog box that appears when Load Selected is executed will depend on the type of data that is being loaded. Follow the instructions given in the dialog box that appears. For details on the various dialog boxes and the procedure, refer to the explanations for the page menu commands in “1–1: Load” of Disk mode in the Parameter Guide.
Using a recorded sound more than once in the same .SNG file
Creating different arrangements using the same vocal
After selecting a new song in Song mode, select the “Copy from Song” function from the page menu of Sequencer mode P1 to copy the song containing the data you wish to use to a new song. Then re-record the MIDI tracks, etc. to create a new accompaniment.
Using the same sound more than onceHere is a useful way to use a recorded sound effect more than once.For example, suppose that you are using song 19 as a “library song” that con-tains various sound effects recorded at different locations.To use a sound from this “library song,” use the P5 tab 3 page (ATrkEdit) page menu command “Copy Measure” to copy sounds to the desired location in the song that you are creating. If you need to make fine adjustments to the location of the sound, use the P5 tab 3 page (ATrkEdit) page menu command “Audio Event Edit.”If you use the “Copy Measure” command to copy all sounds recorded in other songs to a “library song,” these sounds will be ready for immediate use if they are ever needed later; you will not have to re-record them.Collecting sounds in a “library song” in this way also provides a backup of the sounds.
In the “Copy Measure” dialog box, specify the Start Measure and End Measure of the copy source, and execute the copy command. At the copy destination, the number of measures specified in the dialog box will be overwritten. For example if measures 1–4 were specified as the copy source, the four measures 1–4 will be overwritten at the copy destination. However if “Copy Measure” is executed between songs that have a differ-ent Tempo setting, the playback time will differ even if the number of measures is identical, meaning that the copied data may not fit into the specified number of measures, or that a gap may occur at the end of the measures.
20

Sequencer P1
Intr
oduc
tion
Ope
ratio
nPa
ram
eter
sA
ppen
dix
3. Parameters
This manual explains the functions which are newly added when the HDR-TRI hard disk recorder option is installed. For the parameters whose func-tions remain unchanged, refer to your Parameter Guide, Basic Guide, and Effect Guide.
Sequencer P1
1–5: Audio Track RecHere you can make basic settings for recording onto the audio tracks. Since real-time recording is done according to the recording method selected in “1–7: Pref-erence,” make settings for those parameters as well. Detailed editing after recording (non-realtime editing) can be performed in “5–3: Audio Track Edit.”
1–5c: Tempo/Tempo Mode
Tempo ModeWith a setting of Manual, the tempo data in the master track will be ignored, and playback will play at the Tempo setting.
Never modify the Tempo setting while recording an audio track, since this will prevent proper recording.
With a setting of Auto, the tempo during playback will change according to the tempo data in the master track.It is not possible to select Rec in this mode. If you wish to record tempo changes to the master track, go to “1–5d: Track” and select a MIDI track or MIXER REC.
1–5D
1–5d
1–5c
1–5e
1–5f
1–5g
1–5h
1–5i
1–5j
1–5k
1–5l
1–5m
Page Menu
21

Sequencer P1
1–5d: Track [T01...16, MTR, AT1(L), AT2(R), AT3(L), AT4(R), AT1&2, AT3&4, MIXER REC]
Select the track that you wish to record.When the HDR-TRI is installed, you will be able to select audio tracks AT1(L), AT2(R), AT3(L), AT4(R), AT1&2 or AT3&4, and MIXER REC in addition to the MIDI tracks T01–16 and the MTR (Master Track) that were previously available.
When T01–16 are selected, you can record onto the selected MIDI track. Basic settings for recording a MIDI track and settings that determine how the notes will be sounded and output are made in “1–1: Track Play/Rec”–“1–4: Mixer (Track 9–16),” and the recording method is selected in “1–7: Preference.”
When a MIDI track is selected, playing the keyboard and operating the control-lers will cause the internal tone generator to sound with the settings (program and level, etc.) of the MIDI track that you select here (if the Track Status is INT or BOTH). In addition, other MIDI tracks with the same MIDI channel will also sound (if the Track Status is INT or BOTH). Furthermore, messages will be transmitted on the MIDI channels specified for those MIDI tracks (if the Track Status is EXT or BOTH).
If you play the keyboard while an audio track is selected in “1–5: Track,” the set-tings (MIDI channel, Program, Track Status etc.) of the last-selected MIDI track will be used.
When realtime recording a single track, the musical data will be recorded onto the MIDI track you select here.
When realtime recording multiple tracks, you can specify in “1–1i: PLAY/MUTE/REC” whether recording will occur for each MIDI track.
Select MTR when using “5–1: Track Edit” to edit the master track.
If AT1–AT3&4 is selected, you can record onto the selected audio track(s). When AT1&2 or AT3&4 are selected, you can record a stereo pair of audio tracks. The audio track(s) selected here will also appear in the “1–5l: Rec Audio Track Name Display.”Here you can make basic settings for recording the audio track(s), set the output level and EQ settings, etc. in “1–6: Mix Audio Track 1–4,” and select the record-ing method in “1–7: Preference.”Select MIXER REC when you wish to record mixer events using “1–6: Mix Audio Track 1–4.”
The audio track name displayed here is set in “5–4: Audio Track Name,” and the MIDI track name is set in “5–2: Track Name.” However if AT1&2 or AT3&4 are selected, the audio track name will not be displayed.This parameter is displayed in all pages “1–1: Track Play/Rec” through “1–7: Preference,” and can be modified from any page.
1–5e: Meter/Metronome/Resolution/Multi Rec/Remove Data
Multi RecIf this is checked, multi-track recording mode will be used, but the audio tracks cannot be recorded.If this is un-checked, single-track recording mode will be used. Un-check this when you wish to record audio tracks.
22

Sequencer P1
Intr
oduc
tion
Ope
ratio
nPa
ram
eter
sA
ppen
dix
1–5f: Take
Specify the name of the “take” that you are about to record.Press the text edit button, and the rename page will appear. (☞ Basic Guide page 6). Up to 13 characters can be used here.If you wish to append a number at the end of the take name to manage your takes, check “1–5g: Take Number.” When you stop recording, the number will be automatically incremented, and added to the take name (for the next record-ing).
If you re-assign the take name here, the incremented number will begin from 00. Also, if in “1–5g: Take Number” you change the number to a value other than 00, the count-up will begin from that number.If you wish to change the sound name that was recorded, use the “Trimming an audio event” command (☞ page 39 of this manual) that appears when you press the Trim button in “5–3J: Audio Event Edit.”
1–5g: Take Number
If this is checked, the number shown at right will be automatically added to the take name (up to 13 characters) that was assigned in “1–5f: Take.”This number will be incremented each time you record using the same take name.If you re-assign the take name in “1–6f: Take,” the incremented number will begin from 00. Also, if you change the number to a value other than 00, the count-up will begin from that number.
If this is un-checked, an incremented number will not be added to the take name of the sound that you are about to record.
1–5h: Rehearsal
If this is checked, recording operations will be simulated (recording will not actually take place). Monitoring during rehearsal will depend on the selection in “1–5m: Monitor Mode Select.” When Auto Input is ON, you will be able to monitor the external input between the punch-in and punch-out points, and at other times you will be able to monitor the previously-recorded sound. For example if you have set punch-in at 005 (measure 5) and punch-out at 008 (measure 8), you will be mon-itoring the previously-recorded sound for the first four measures, and will mon-itor the external input sound during measures 5 through 8.
1–5i: Input Select [Analog, Digital]
Select either Analog or Digital as appropriate for the signal that is being input.When Digital is selected, please input a digital signal at a sampling frequency of
When you begin recording, a sound will be created and a name assigned to it. The sound name will consist of the take name you specify here plus the incrementing number. When recording in stereo, an L or R will be added. The sound name will be displayed during the event edit or sound trim opera-tions performed in “5–3J: Audio Event Edit.”
Sound name = first 13 characters of Take name + 2 digit number + 1 character L/R
Take name(for stereo)
23

Sequencer P1
48 kHz.If a digital signal containing a copy inhibit flag is input, the display will indicate Copy Inhibit. The HDR-TRI is able to record a digital signal which contains the SCMS (Serial Copy Management System) flag. However it will be recorded as digital audio data without the SCMS flag.When a signal with a sampling frequency of 48 kHz is being input, the display will indicate 48 kHz. For other sampling frequencies, the display will indicate FsError, and recording will not be performed correctly.Also, when recording digitally, you must set the Global mode System Clock set-ting of “1–1d: MIDI Clock/System Clock” to S/P DIF so that the TRINITY will use the S/P DIF clock of the external device.
When recording from a CD or a sampler whose sampling frequency is other than 48 kHz, use the ANALOG IN 1 or 2 jacks and select Analog for this set-ting.
1–5j: Input Level [+4 dBu, –10 dBu, –30 dBu]
This controls the gain amp that adjusts the level of the analog input.If the input level is higher than this Input Level and the input is distorted (clip-ping), the display will indicate Overload.This parameter will be available when Analog is selected in “1–5i: Input Select.”When recording vocals, route the signal through a mixer and set this to either–10 dBu or +4 dBu. Set this to –30 dBu when recording a guitar that has active pickups, or when recording a guitar that has passive pickups routed through an effect device. However input levels will depend on the characteristics of the equipment that is connected, on the loudness of the vocalist, and on playing technique, etc., so use the following table merely as a guideline.
1–5k: Rec Level [–∞...+18 dB]
Adjust the level for recording.Adjust the fader so that the level meter does not rise all the way.
The output volume will be affected by this setting, so if you have connected external monitor speakers, etc., lower their volume before adjusting this set-ting.
If an audio track is not selected in “1–5d: Track,” there will be no output from the monitor even if the level meters are up.
1–5l: Audio Track Name Display
This indicates the audio track selected in “1–5d: Track.”If T01...T16, MTR, or MIXER REC is selected in “1–5d: Track,” this will be dis-played as OFF. It will likewise be displayed as OFF during multi-track recording of MIDI tracks.
Example of connected device
–30 dBu Guitar
–10 dBu Consumer audio equipment such as CD player
+4 dBu Professional audio equipment and keyboards
24

Sequencer P1
Intr
oduc
tion
Ope
ratio
nPa
ram
eter
sA
ppen
dix
1–5m: Monitor Mode Select
This selects Auto Input ON/OFF.Audio tracks that are selected in “1-5d: Track” will be monitored differently than audio tracks that are not selected. (Refer to the table below.)If this is checked, Auto Input will be ON. During auto/manual punch in record-ing, monitoring will be switched automatically for the audio tracks selected in the Track page: the external input will be monitored during the measures being recorded, and the track playback will be monitored before and after these mea-sures.For audio tracks which are not selected in the Track page, the track playback will always be monitored.If this is not checked, Auto Input will be OFF. Audio tracks selected in the Track page will always monitor the external input.For audio tracks which are not selected in the Track page, the track playback will always be monitored.
Audio track monitoring (Line: external input, Track: track playback)
* When auto punch in recording is performed with Auto Input ON, approxi-mately 0.5 seconds will be required from when the Punch Out point is reached until the track playback sound can once again be monitored. (It is not the case that the track audio in this portion has been lost.)
Page Menu Command
1–5D: Rec HD SelectSelect the hard disk on which recording will take place.The amount of time available for recording (Free Time) will also be displayed here. Since the amount of recorded sound will gradually increase, we recom-mend that you periodically use the Disk mode command “1–4F: Delete Unused Sound” to organize the sound and maintain the Free Time space.
Auto Input Stopped PlayingDuring
Overwrite Rec
During Punch Rec
...In In...Out Out...
Audio track(s) selected by Track
ON Line Track Line Track Line Track*
OFF Line Line Line Line Line Line
Audio tracks not selected by Track
ON Track Track Track Track Track Track
OFF Track Track Track Track Track Track
1 When you select Rec HD Select, the dialog box at right will appear.
2 Select the hard disk for recording: ID0–ID6.Keep in mind the amount of Free Time as you select a hard disk.
3 To execute Rec HD Select, press the OK but-ton. To cancel without executing, press the Cancel button.
25

Sequencer P1
1–6: Mix Audio Track 1–4Here you can make basic settings for recording audio tracks, and make mixer event settings for each track. Mixer events are recorded according to the record-ing method selected in “1–7: Preference,” so you will need to set those parame-ters as well. Editing of mixer events can be performed in “5–3: Audio Track Edit.”For details on the basic settings for recording an audio track, refer to “1–5: Audio Track Rec.”
1–6f: EQ (Equalizer)
This adjusts the tone of the audio signal that is output from the 1/L/MONO and 2/R output jacks (and the S/P DIF output).Depending on the selection in “1–6j: Mix Audio Track Mode,” it may not be pos-sible to modify this parameter. Refer also to “1–6j: Mix Audio Track Mode.”
H (High EQ) [–15...0...+15]Adjusts the level of the high frequency range (Fc= 10 kHz) of the audio track playback.
L (Low EQ) [–15...0...+15]Adjusts the level of the low frequency range (Fc= 100 Hz) of the audio track playback.
1–6g: Send1/Send2 [0...127]
Adjusts the send levels to the master effects (left is Send 1, right is Send 2).Depending on the selection in “1–6j: Mix Audio Track Mode,” it may not be pos-sible to modify this parameter. Refer also to “1–6j: Mix Audio Track Mode.”
1–6h: Pan (Panpot) [OFF, L000...C064...R127]
Specifies the panning to the 1/L/MONO and 2/R output jacks (and the S/P DIF output).With a setting of OFF, there will be no output to the 1/L/MONO and 2/R out-put jacks (or the S/P DIF output).Depending on the selection in “1–6j: Mix Audio Track Mode,” it may not be pos-sible to modify this parameter. Refer also to “1–6j: Mix Audio Track Mode.”
1–6D
1–6E
1–6f
1–6g
1–6h
1–6i
1–6j
Page Menu
Information for theselected audio track
26

Sequencer P1
Intr
oduc
tion
Ope
ratio
nPa
ram
eter
sA
ppen
dix
1–6i: Volume [0...100...127]
Adjusts the volume of each audio track.A setting of 0 is –∞, 100 is 0 dB, and 127 is +12 dB.Depending on the selection in “1–6j: Mix Audio Track Mode,” it may not be pos-sible to modify this parameter. Refer also to “1–6j: Mix Audio Track Mode.”
1–6j: Mix Audio Track Mode [MANUAL/READ/MUTE/SOLO/WRITE]
When a track is played back with a setting of MANUAL, the mixer events that were recorded will be ignored, and EQ, Send, Pan, and Volume will be set man-ually.
When a track is played back with a setting of READ, the mixer events that were recorded will be played back. Even if you adjust EQ, Send, Pan, or Volume dur-ing playback, the setting will change to the setting of a mixer event when the location of that mixer event is reached. (If there are no mixer events, the param-eters can be set in the same way as for MANUAL.)
When a track is played back with a setting of MUTE, the muted audio track will not be heard.
When a track is played back with a setting of SOLO, all other audio tracks will be set to MUTE, and you will hear only the sound of the selected audio track. Audio tracks which are set to SOLO will be played back according to the mixer events which were recorded. At this time, even if you adjust EQ, Send, Pan, or Volume during playback, the setting will change to the setting of a mixer event when the location of that mixer event is reached.Two or more audio tracks can be set to SOLO, but the modes which can subse-quently be selected for each audio track will differ as follows, depending on whether only one, or two or more audio tracks were set to SOLO.
When SOLO is selected for one audio track
If the SOLOED audio track is switched to a different mode, audio tracks which are MUTED will switch to the same mode as was selected for the previously SOLOED audio track.For example if the SOLOED audio track is switched to MANUAL, the MUTED tracks will also be switched to MANUAL. Similarly, if the SOLOED audio track is switched to WRITE, the MUTED tracks will also be switched to WRITE.
So be careful not to accidentally record over existing tracks.
When SOLO is selected for two or more audio tracks
Select WRITE to record mixer events. In order to record mixer events, select Mixer Rec as the Track setting, and select WRITE here. Then begin recording (simultaneously press the [REC] key and the [PLAY] key). The various audio track parameters that were set in this tab page will be recorded as mixer events in the range of measures specified by Recording Setup in “1–7: Preference.” Dur-
Selectable modes
SOLO tracks MANUAL, READ, MUTE, SOLO, WRITE
MUTE tracks SOLO, MUTE
Selectable modes
SOLO tracks SOLO, MUTE
MUTE tracks SOLO, MUTE
27
Sequencer P1
ing recording, you can adjust EQ, Send, Pan, and Volume and the changes you make will be recorded. By changing this setting to READ and then playing back the song, EQ, Send, Pan, and Volume settings will change according to the mixer events that were recorded.Mixer events can also be edited individually in “5–3B: Automation Edit.”
WRITE can be selected only if MIXER REC has been selected in “1–5d: Track.”
If after using WRITE you change from MIXER REC to another track, the Mix Audio Track Mode of the audio track that was written will automatically change to READ.
Page Menu Command
1–6D: Rec HD SelectThis selects the hard disk on which recording will take place.The Free Time (recordable time) will also be displayed.For the procedure, refer to “1–5D: Rec HD Select.”
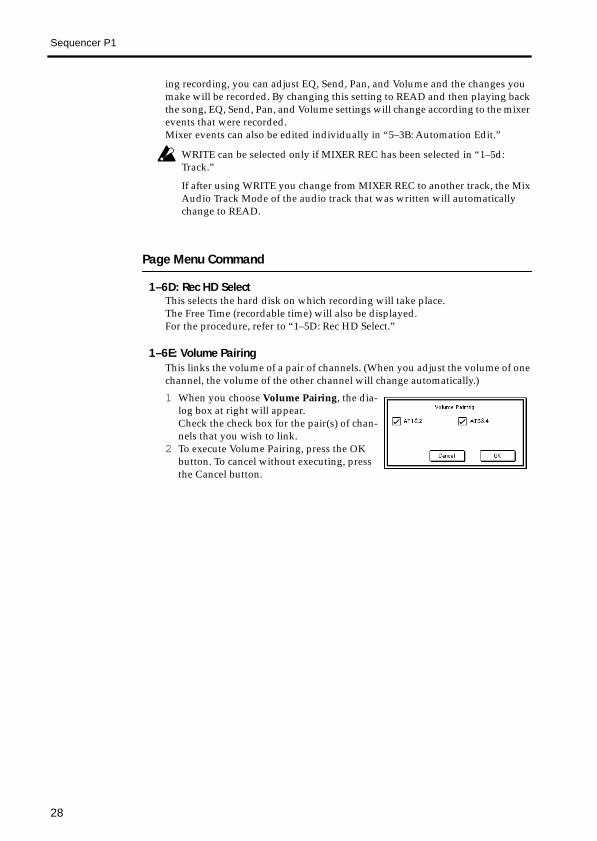
1–6E: Volume PairingThis links the volume of a pair of channels. (When you adjust the volume of one channel, the volume of the other channel will change automatically.)
1 When you choose Volume Pairing, the dia-log box at right will appear.Check the check box for the pair(s) of chan-nels that you wish to link.
2 To execute Volume Pairing, press the OK button. To cancel without executing, press the Cancel button.
28

Sequencer P1
Intr
oduc
tion
Ope
ratio
nPa
ram
eter
sA
ppen
dix
1–7: PreferenceHere you can make overall settings for the entire song, recording settings for MIDI tracks, audio tracks, and mixer events, and settings for playback.
1–7h: Recording Setup
Use the radio buttons to select the realtime recording method.
When you record using Overwrite, the new data will be recorded over (i.e., will replace) the previously recorded data.When Overwrite recording a MIDI track, the musical data that was previously recorded in measures later than the measure at which recording began will be erased. However this is not the case for audio tracks; the previously recorded data will be overwritten only in the measures which are actually re-recorded, and the previously recorded data in subsequent measures will remain.
When you record using Overdub, newly recorded audio tracks will be overwrit-ten over the previously recorded data, just as with Overwrite recording. How-ever when mixer events are recorded, they will be added to the previously existing data.Recording is not possible when Loop is selected.
As when recording MIDI tracks, you will first use Overwrite to record the data. If you wish to use realtime recording to modify previously recorded data, use Auto/Manual Punch In. To modify individual events (for example to insert part of an orchestra hit), you can use the editing commands of “5–3J: Audio Event Edit” to trim (☞ page 39 of this manual), move, or copy the data.
1–7h
Page Menu
29
Sequencer P2
Sequencer P2
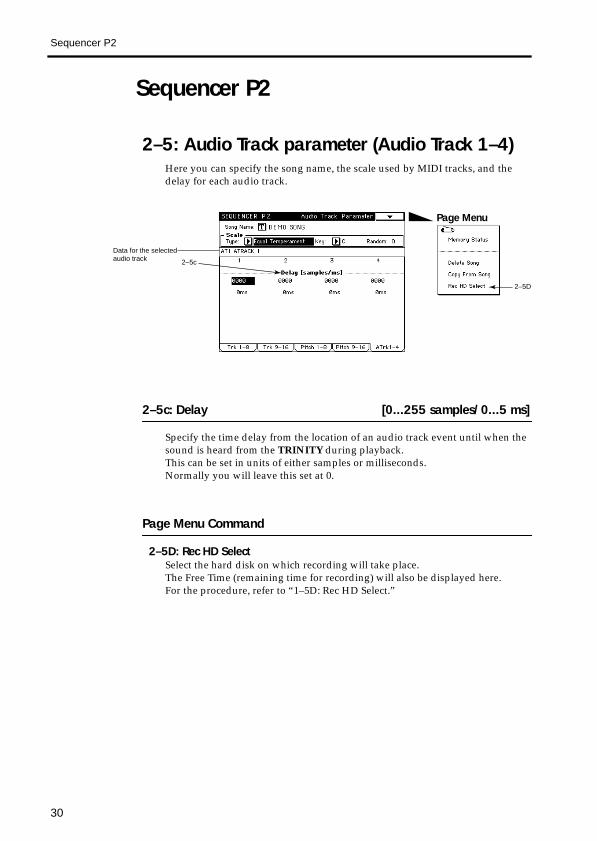
2–5: Audio Track parameter (Audio Track 1–4)Here you can specify the song name, the scale used by MIDI tracks, and the delay for each audio track.
2–5c: Delay [0...255 samples/0...5 ms]
Specify the time delay from the location of an audio track event until when the sound is heard from the TRINITY during playback.This can be set in units of either samples or milliseconds.Normally you will leave this set at 0.
Page Menu Command
2–5D: Rec HD SelectSelect the hard disk on which recording will take place.The Free Time (remaining time for recording) will also be displayed here.For the procedure, refer to “1–5D: Rec HD Select.”
2–5D
2–5c
Page Menu
Data for the selected audio track
30

Sequencer P5
Intr
oduc
tion
Ope
ratio
nPa
ram
eter
sA
ppen
dix
Sequencer P5
5–3: Audio Track EditHere you can edit audio events and mixer events of a previously-recorded audio track.
5–3d: Track [T01...16, MTR, AT1(L), AT2(R), AT3(L), AT4(R), AT1&2, AT3&4, MIXER REC]
Select the track that you wish to edit (or the copy destination track).When the hard disk recorder option is installed, you will be able to select audio tracks AT1(L), AT2(R), AT3(L), AT4(R), AT1&2 or AT3&4, and MIXER REC, in addition to the MIDI tracks T01–16 and the MTR (Master Track) which were previously available.
If you wish to edit audio events or mixer events, select AT1(L), AT2(R), AT3(L), AT4(R), AT1&2, or AT3&4.
Since this tab page is for editing audio tracks, it will not be possible to edit T01–16 or MTR even if you select them. To edit MIDI tracks or the master track, use “5–1: Track Edit.”Conversely, it is not possible to use “5–1: Track Edit” or “5–2: Track Name” to display or edit audio tracks.Select MIXER REC when you wish to use “1–6: Mix Audio Track 1–4” to record mixer events. After making your selection here, move to “1–6: Mix Audio Track 1–4” and record.
5–3i: Start Measure/End Measure
Specifies the range of measures in the audio track that will be edited.
Start Measure [1...999]Specifies the first measure.
End Measure [1...999]Specifies the last measure.
5–3F
5–3G
5–3H
5–3I
5–3J
5–3B
5–3C
5–3D
5–3E
5–3d
Audio Track1
Master Track
5–3i
Page Menu
Upper line: audio events @ @ Lower line: mixer events @ @ No events
Audio data display(selected track is highlighted)
31

Sequencer P5
Page Menu Command
5–3B: Automation EditHere you can edit individual mixer events that were previously recorded. To perform event editing on audio tracks, use “5–3J: Audio Event Edit.”
Event editing of audio tracks is performed using “5–3J: Audio Event Edit.” (Even if the Audio box is checked, audio events will only be displayed here, and cannot be edited.)
4 To move to the Automation Edit dialog box, press the OK button. To return to the previous display, press the Cancel button.When you press the OK button, a dialog box like the following will appear.
a: Specify measures or locations, etc. by selecting an index number, by using the scroll bar, or by directly pressing an event.
b: You can move through the events by changing the measure or location val-ues.
1 In the tab 3 page, select an audio track that contains the mixer events you wish to edit, and specify the Start Measure.
2 When you choose Automation Edit, the dialog box at right will appear.
3 The Set Event Filter check boxes in the Automation Edit dialog box allow you to select the type(s) of data which will be edited.You can select Audio (Audio Event), EQ, Send 1/2, Pan, and Volume data. Data types whose check box is checked will appear in the Automation Edit dialog box.If you set the Track setting to AT1&2 or AT3&4 in the tab 3 page, you can select which track in the pair to edit.
Index number
A: Insert button
B: Delete button
C: Copy button
D: Audition start/stop button
b: Location in measure
b: Measure
Audio event end location(display only)(measure, beat, clock)
Value of event
c: Type of event
Execute button
a: Index
a: Scroll bar
32

Sequencer P5
Intr
oduc
tion
Ope
ratio
nPa
ram
eter
sA
ppen
dix
c: The following table shows the types of events and the possible values for each type.
5 Press the appropriate button to make the desired edits as follows.When you have finished editing mixer events and wish to return to the tab page, press the Done button.
A: Insert buttonInserting a mixer eventSelect a mixer event located where you wish to insert a new event, and press the Insert button. A new mixer event will be inserted at the location of the selected mixer event.
Moving a mixer eventSelect the mixer event that you wish to move, and press the Delete button. Then press the Insert button at the desired new location, and that mixer event will be inserted.
B: Delete buttonDeleting a mixer eventSelect the mixer event that you wish to delete, and press the Delete button.The mixer event will be deleted.
C: Copy buttonCopying a mixer eventSelect the mixer event that you wish to copy, and press the Copy button. Then press the Insert button at the desired new location, and that mixer event will be inserted.
D: Audition Start/Stop buttonStarting/stopping auditionWhen an audio event is highlighted, you can press the Audio Start/Stop button to playback that audio event. During playback, you can press the button once again to stop playback.
Sound name (ex. Take01L) (display only) (Audio event)
E:001.00.000...999.15.191 (display only) (end of audio event: measure, beat, clock)
HiEQG: –15…+15(gain)
LoEQG: –15…+15(gain)
Send1V: 0…127(value)
Send2V: 0…127(value)
PanV: 0…127(value)
VolumeV: 0…127(value)
33
Sequencer P5
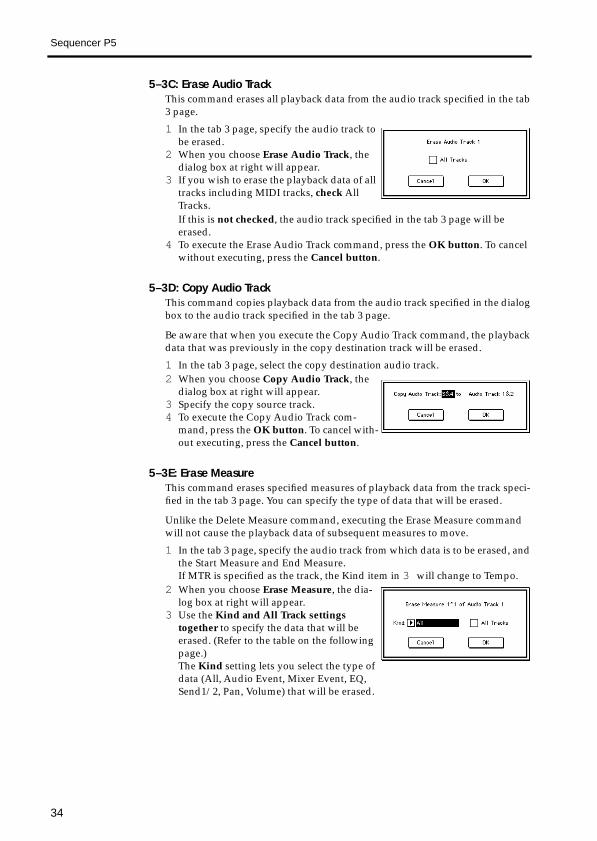
5–3C: Erase Audio TrackThis command erases all playback data from the audio track specified in the tab 3 page.
5–3D: Copy Audio TrackThis command copies playback data from the audio track specified in the dialog box to the audio track specified in the tab 3 page.
Be aware that when you execute the Copy Audio Track command, the playback data that was previously in the copy destination track will be erased.
5–3E: Erase MeasureThis command erases specified measures of playback data from the track speci-fied in the tab 3 page. You can specify the type of data that will be erased.
Unlike the Delete Measure command, executing the Erase Measure command will not cause the playback data of subsequent measures to move.
1 In the tab 3 page, specify the audio track to be erased.
2 When you choose Erase Audio Track, the dialog box at right will appear.
3 If you wish to erase the playback data of all tracks including MIDI tracks, check All Tracks.If this is not checked, the audio track specified in the tab 3 page will be erased.
4 To execute the Erase Audio Track command, press the OK button. To cancel without executing, press the Cancel button.
1 In the tab 3 page, select the copy destination audio track.2 When you choose Copy Audio Track, the
dialog box at right will appear.3 Specify the copy source track.4 To execute the Copy Audio Track com-
mand, press the OK button. To cancel with-out executing, press the Cancel button.
1 In the tab 3 page, specify the audio track from which data is to be erased, and the Start Measure and End Measure.If MTR is specified as the track, the Kind item in 3 will change to Tempo.
2 When you choose Erase Measure, the dia-log box at right will appear.
3 Use the Kind and All Track settings together to specify the data that will be erased. (Refer to the table on the following page.)The Kind setting lets you select the type of data (All, Audio Event, Mixer Event, EQ, Send1/2, Pan, Volume) that will be erased.
34

Sequencer P5
Intr
oduc
tion
Ope
ratio
nPa
ram
eter
sA
ppen
dix
4 To execute the Erase Measure command, press the OK button. To cancel without executing, press the Cancel button.
Be aware that if this command is executed with “All” selected for Kind and the All Tracks box checked, any control data in MIDI tracks which spans the boundary of the erased and non-erased sections will be erased only in the specified area. Also, erasing measures through which a note is held (i.e., measures falling within the duration of a note) will cause that note data to be erased from subsequent measures as well.
5–3F: Delete MeasureThis command deletes specified measures of playback data from the track spec-ified in the tab 3 page.
Unlike the Erase Measure command, executing the Delete Measure command will cause the playback data of subsequent measures to move toward the begin-ning of the song to fill the gap.
KindAll Tracks
Checked Un-checked
AllMIDI tracks, master track, audio events and mixer events of the audio tracks
Audio events and mixer events of the selected audio track
Audio Event Audio events of audio tracks 1–4 Audio events of the selected audio track
Mixer Event All mixer events of audio tracks 1–4All mixer events of the selected audio track
EQ Equalizer events of audio tracks 1–4Equalizer events of the selected audio track
Send 1/2 Send 1/2 events of audio tracks 1–4Send 1/2 events of the selected audio track
Pan Panpot events of audio tracks 1–4Panpot events of the selected audio track
Volume Volume events of audio tracks 1–4Volume events of the selected audio track
1 In the tab 3 page, specify the audio track from which measures are to be deleted, and the Start Measure and End Measure.
2 When you choose Delete Measure, the dia-log box at right will appear.
3 If you wish to delete measures from all tracks including the MIDI tracks, check the All Tracks box.If this box is not checked, measures will be deleted from the audio track specified in the tab 3 page.
4 To execute the Delete Measure command, press the OK button. To cancel without executing, press the Cancel button
21 543
1 4 52 3
No data
Example: If measures 2–3 are erased, measures 2–3 will be blank.
Before Erase
After Erase
35

Sequencer P5
If this command is executed with the All Tracks box checked in step 3 , the playback data in the measures specified in the tab page will be deleted from all tracks including the MIDI tracks and master tracks, and the time signa-ture and tempo will also slide forward according to the number of measures deleted.
Be aware that when this command is executed, any control data in MIDI tracks which spans the boundary of the deleted and non-deleted sections will be deleted only in the specified area. Also, deleting measures through which a note is held (i.e., measures falling within the duration of a note) will cause that note data to be deleted from subsequent measures as well.
5–3G: Insert MeasureThis command inserts the number of measures specified in the dialog box into the track specified in the tab 3 page. When the Insert Measure command is exe-cuted, the measures will be inserted at the location specified for the Start Mea-sure. Playback data located after the inserted measures will slide toward the end of the song to make room.
1 In the tab 3 page, specify the audio track into which measures will be inserted, and the Start Measure.
2 When you choose Insert Measure, the dia-log box at right will appear.
3 If you wish to insert measures into all tracks including the MIDI tracks, check the All Tracks box. Playback data located after the inserted measures will play in the same way as before.If this box is not checked, measures will be inserted into the audio track selected in the tab 3 page.The playback data located after the insertion point will slide toward the end of the song to make room, but be aware that the time signature and tempo will not move.
1 2 3 4 5 6
21
7 8
543
Example: When measures 3–5 are deleted, measures 6–8 are moved forward.
Before Delete
After Delete
Track 2 2 (3/4)1 (4/4) 3 (3/4)
Track 1 2 (3/4)1 (4/4) 3 (3/4) 4 (4/4) 5 (4/4)
1 (4/4) 3 (3/4) 5 (4/4)2 (3/4) 4 (4/4)Track 2
1 (4/4) 3 (3/4) 5 (4/4)2 (3/4) 4 (4/4)Track 1Before Delete
After Delete
Example: When measures 2 and 3 (3/4 time) of track 2 are deleted, the measures that were at 4 and 5 are moved forward, and their time signature will change to 3/4.
36
Sequencer P5
Intr
oduc
tion
Ope
ratio
nPa
ram
eter
sA
ppen
dix
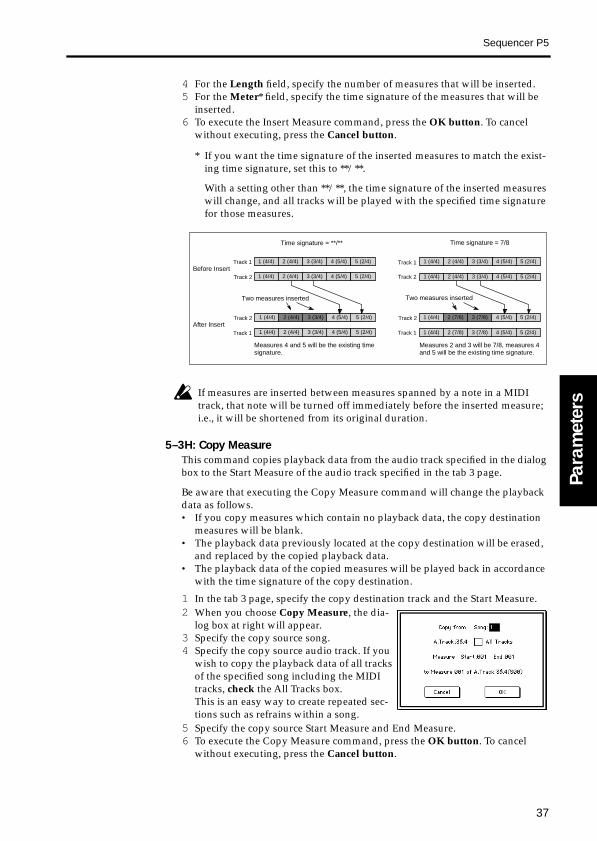
* If you want the time signature of the inserted measures to match the exist-ing time signature, set this to **/**.
With a setting other than **/**, the time signature of the inserted measures will change, and all tracks will be played with the specified time signature for those measures.
If measures are inserted between measures spanned by a note in a MIDI track, that note will be turned off immediately before the inserted measure; i.e., it will be shortened from its original duration.
5–3H: Copy MeasureThis command copies playback data from the audio track specified in the dialog box to the Start Measure of the audio track specified in the tab 3 page.
Be aware that executing the Copy Measure command will change the playback data as follows.• If you copy measures which contain no playback data, the copy destination
measures will be blank.• The playback data previously located at the copy destination will be erased,
and replaced by the copied playback data.• The playback data of the copied measures will be played back in accordance
with the time signature of the copy destination.
4 For the Length field, specify the number of measures that will be inserted.5 For the Meter* field, specify the time signature of the measures that will be
inserted.6 To execute the Insert Measure command, press the OK button. To cancel
without executing, press the Cancel button.
1 In the tab 3 page, specify the copy destination track and the Start Measure.2 When you choose Copy Measure, the dia-
log box at right will appear.3 Specify the copy source song.4 Specify the copy source audio track. If you
wish to copy the playback data of all tracks of the specified song including the MIDI tracks, check the All Tracks box.This is an easy way to create repeated sec-tions such as refrains within a song.
5 Specify the copy source Start Measure and End Measure.6 To execute the Copy Measure command, press the OK button. To cancel
without executing, press the Cancel button.
Time signature = **/**
Track 2 5 (2/4)4 (5/4)1 (4/4) 2 (7/8) 3 (7/8)
1 (4/4) 2 (4/4) 4 (5/4) 5 (2/4)3 (3/4)
1 (4/4) 2 (4/4) 4 (5/4) 5 (2/4)3 (3/4)
1 (4/4) 2 (7/8) 4 (5/4) 5 (2/4)3 (7/8)
Track 2
5 (2/4)4 (5/4)Track 2 1 (4/4) 2 (4/4)
1 (4/4) 2 (4/4) 4 (5/4) 5 (2/4)3 (3/4)
3 (3/4)
1 (4/4) 2 (4/4) 4 (5/4) 5 (2/4)3 (3/4)
1 (4/4) 2 (4/4) 4 (5/4) 5 (2/4)3 (3/4)Track 1
Track 1 Track 1
Track 2
Track 1
Time signature = 7/8
Before Insert
After Insert
Two measures inserted Two measures inserted
Measures 4 and 5 will be the existing time signature.
Measures 2 and 3 will be 7/8, measures 4 and 5 will be the existing time signature.
37
Sequencer P5
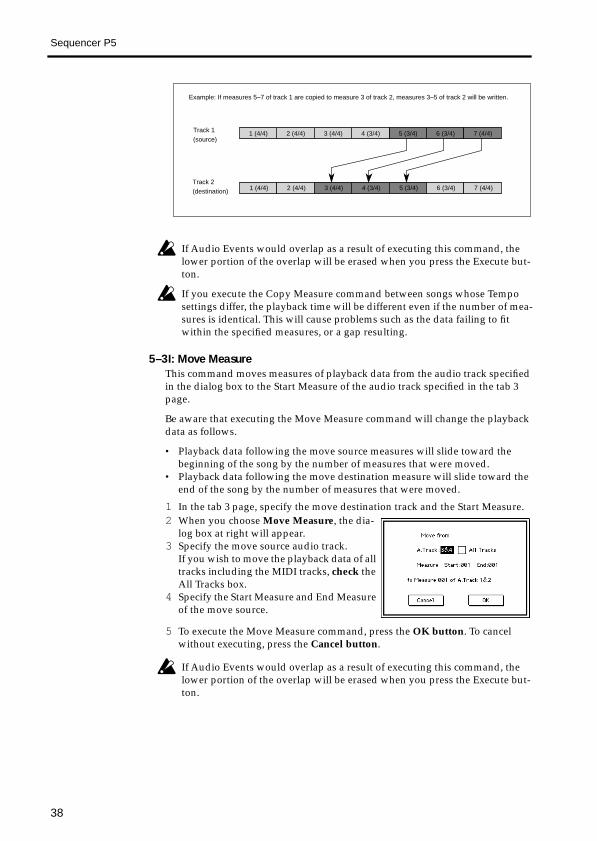
If Audio Events would overlap as a result of executing this command, the lower portion of the overlap will be erased when you press the Execute but-ton.
If you execute the Copy Measure command between songs whose Tempo settings differ, the playback time will be different even if the number of mea-sures is identical. This will cause problems such as the data failing to fit within the specified measures, or a gap resulting.
5–3I: Move MeasureThis command moves measures of playback data from the audio track specified in the dialog box to the Start Measure of the audio track specified in the tab 3 page.
Be aware that executing the Move Measure command will change the playback data as follows.
• Playback data following the move source measures will slide toward the beginning of the song by the number of measures that were moved.
• Playback data following the move destination measure will slide toward the end of the song by the number of measures that were moved.
If Audio Events would overlap as a result of executing this command, the lower portion of the overlap will be erased when you press the Execute but-ton.
1 In the tab 3 page, specify the move destination track and the Start Measure.2 When you choose Move Measure, the dia-
log box at right will appear.3 Specify the move source audio track.
If you wish to move the playback data of all tracks including the MIDI tracks, check the All Tracks box.
4 Specify the Start Measure and End Measure of the move source.
5 To execute the Move Measure command, press the OK button. To cancel without executing, press the Cancel button.
Track 1(source)
2 (4/4)1 (4/4) 5 (3/4)4 (3/4)3 (4/4)
Track 2(destination)
6 (3/4) 7 (4/4)
Example: If measures 5–7 of track 1 are copied to measure 3 of track 2, measures 3–5 of track 2 will be written.
2 (4/4)1 (4/4) 5 (3/4)4 (3/4)3 (4/4) 6 (3/4) 7 (4/4)
38

Sequencer P5
Intr
oduc
tion
Ope
ratio
nPa
ram
eter
sA
ppen
dix
5–3J: Audio Event EditThis command lets you perform event editing of audio events (events in the audio tracks), and trim the sound used by an audio event (i.e., adjust the loca-tion or the area where the sound will be heard, in steps of one sample).If you wish to modify the sound name after recording, you can do so in the Trim dialog box.
1 In the tab 3 page, select the track that contains the audio event you wish to edit, and specify the Start Measure.
2 When you choose Audio Event Edit, the following dialog box (Audio Event Edit) will appear.
a: To select the audio event that you wish to edit, select an index, use the scroll bar, or directly press the desired event.At this time, you can press the Audition Start/Stop button once to play-back the event, allowing you to hear the contents. During playback, press the button once again to stop.
b: You can move the event by modifying the measure or location values. When moving an event in this way by modifying its location values, you are not limited to movement within the current measure (unlike Event Edit for a MIDI track).
c: Adjust the volume for each audio event. The value will be 127 immedi-ately after recording.
3 Press the appropriate button to perform the desired operations explained below: “Trim audio event,” “Insert audio event,” “Delete audio event,” “Copy audio event,” or “Audition start/stop.”When you are finished with event editing, press the Done button to return to the tab page.
A: Trim buttonTrimming an audio eventThe Trim operation lets you specify in units of a sample the portion of a recorded sound that will be played back, allowing you to adjust the timing of the sound or to remove unwanted space.Since the trim source sound is kept unchanged from its original recorded state, you can later restore the sound to its original condition even if you shorten it excessively by mistake. Executing the Trim operation simply changes the loca-tion where the sound begins to playback, and the location of the sound event
B: Insert button
A: Trim button
C: Delete button
D: Copy button E: Audition start/stop button
Location in measure b:(beat, clock)
b: Measure
Ending location of audio event (measure, beat, clock)
Execute button
Sound name of audio event
a: Index
a: Scroll bar
c: Volume
39

Sequencer P5
within the song is not affected.Here you can also modify the sound name that was recorded.
Select the audio event that you wish to trim, and press the Trim button. You will enter Trim mode, and the following dialog box will appear.
Audition buttons
When you press the All Play/Stop button once, the audio event will playback from start to end, allowing you to check the result of your trim setting. During playback you can press the button once again to stop. This button can also be used to stop playback that was initiated by the three audition buttons at left.
To execute the Trim operation, press the Done button. To return to the previous tab page, press the Cancel button. If you press the Cancel button, your edits will be canceled, and you will return from this dialog box to the Audio Event Edit dialog box. However a sound name that you have edited here will not be canceled.
a: Audio TrackThis displays the selected track (the track selected when you entered Trim mode).
b: Location/Sound nameThis displays the location in the track of the audio event being trimmed, and the name of the sound used by that event. You can use the text edit button to edit the sound name.
c: Audition Parameters• Speed [x1, x7/8, x6/8, x5/8, x4/8] lets you specify the playback speed. By
adjusting the playback speed you can find the appropriate trim points more accurately.
• If the Repeat box is checked, pressing an audition button will cause the audio event to be played back repeatedly. To stop playback, press the All Play/Stop button.
Play To Point buttonPlayback from approximately 2 seconds before the edit point until the edit point and then stop.
Play Through Point buttonPlayback approximately 4 seconds surrounding the edit point and then stop.
Play From Point buttonPlayback from the edit point for approximately 2 seconds and then stop.
Play Through Point button
Play To Point button
Audition buttons
Play From Point button All Play/Stop button
Cancel button
a
b
c
d
Execute button
40

Sequencer P5
Intr
oduc
tion
Ope
ratio
nPa
ram
eter
sA
ppen
dix
d: Trim ParametersHere you can specify the various points for trimming (refer to the diagrams below).• Sample Start and Sample End (min:sec.sample) specify the range of the
recorded audio event that will actually be played back.• Sample Start is the location where the audio event will begin playing back.
This is indicated as the time from the beginning of the sound.• Sample End is the location where the audio event will stop playing back.
This is indicated as the time from the beginning of the sound.When Sample Start or Sample End are selected (i.e., when the parameters are highlighted, you can use an audition button to playback the audio event and press the [Enter] key at the appropriate moment to input that location as the Sample Start or Sample End value (the “grab” function).
• Duration (min:sec:msec) indicates the length of the audio event that will be played back (the distance between Sample Start and Sample End). This is only displayed, and cannot be edited.
• If the Stereo Edit box is checked, selecting an audio event in one audio track of a stereo-recorded pair will cause the Trim operation to be applied to the other audio event as well.
If you perform the Trim operation on only one of a stereo pair of tracks, phase discrepancies may occur. We recommend that you check the Stereo Edit box when trimming stereo data.
If the selected audio event is monaural, it will not be possible to check the Stereo Edit box.
• Edit Step (1, 100, 10000 samples) determines the detail (the units) with which the VALUE dial or the [▲]/[▼] keys will adjust the Sample Start or Sample End values.
Executing the trim operationSuppose that you are trimming an audio event located at the beginning of mea-sure 5 and consisting of the phrases; “The weather is very nice today.” “Yes, it is.”
If you want “very nice today” to playback at the beginning of measure 5, set Sample Start before “very” and Sample End after “nice today.”
Executing these settings will cause the audio event to playback from the speci-fied Sample Start location, and “very nice today” will playback at the beginning of measure 5.
If you once again adjust the trim duration to include “The weather is” and “Yes, it is,” the entire audio event will be played back as originally.
Audio event that is played back
The weather is very nice today. Yes, it is.Before trimming
005.01.000
Sample Start
Duration
The weather is very nice today. Yes, it is.Trim parameter settings
Sample End
Audio event that is played back
The weather is very nice today. Yes, it is.After trimming
005.01.000
41

Sequencer P5
B: Insert buttonInserting an audio eventSelect the audio event that you wish to insert, and press the Copy button. Next, select an audio event and press the Insert button to insert the previously copied event at the End Time location of the selected audio event (refer to the diagrams below).
Audio events can be inserted into locations in which other events do not exist. (They cannot be inserted where other events exist.)
If the interval between audio events 1 and 3 is longer than audio event 2 , audio event 2 can be inserted as it is.
If the interval between audio events 1 and 3 is shorter than audio event 2 , audio event 2 can be inserted, but it will be played only up to the Start Time of audio event 3 .Although event 2 will be played only for a limited duration in this case, it will once again play in its entirety if it is moved to an unoccupied location of suffi-cient length.
Moving an audio eventTo move an inserted audio event, use “b: Location” to adjust the Start Time. This can be set anywhere between the End Time of the preceding audio event and the Start Time of the following audio event. If you wish to move an audio event past another audio event, select the audio event that you wish to move and press the Delete button. Then press the Insert button at the desired new location to insert that audio event.
C: Delete buttonDeleting an audio eventSelect the audio event that you wish to delete, and press the Delete button.The audio event will be deleted.
D: Copy buttonCopying an audio eventSelect the audio event that you wish to copy, and press the Copy button. Then use the Insert button to insert the audio event that you copied.
1
2
3
1 3
2
Insert
1 3
1 3
Insert2
4
4
42

Sequencer P5
Intr
oduc
tion
Ope
ratio
nPa
ram
eter
sA
ppen
dix
E: Audition Start/Stop buttonStart/stop auditionWhen an audio event is highlighted, you can press the Audition Start/Stop but-ton once to playback that audio event. Pressing the button once again during playback will stop the playback.
43

Sequencer P5
5–4: Audio Track NameHere you can assign a name to each audio track.
5–4j: Audio Track Name
Use the text edit button to assign a name to the audio track.The audio track name is displayed in the various tab pages of Sequencer mode P1, P2, and P5.
Page Menu Command
5–4B: Automation EditThis command lets you edit individual mixer events that were recorded. Event editing of an audio track can be done using “5–3J: Audio Event Edit.”
For details on the procedure, refer to “5–3B: Automation Edit.”
5–4C: Erase Audio TrackThis command erases all playback data from the audio track selected in the tab 3 page.
For details on the procedure, refer to “5–3C: Erase Audio Track.”
5–4D: Copy Audio TrackThis command copies playback data from the audio track selected in the dialog box to the audio track specified in the tab 3 page.
Be aware that when you execute the Copy Audio Track command, all playback data that previously existed in the copy destination track will be erased.
For details on the procedure, refer to “5–3D: Copy Audio Track.”
5–4E: Erase MeasureThis command erases specified measures of playback data from the track selected in the tab 3 page.You can specify the type(s) of data that will be erased.
Unlike the Delete Measure command, executing the Erase Measure command will not cause playback data following the erased area to be moved toward the beginning of the song.
5–4F
5–4G
5–4H
5–4I
5–4J
5–4B
5–4C
5–4D
5–4E5–4j
Page Menu
44

Sequencer P5
Intr
oduc
tion
Ope
ratio
nPa
ram
eter
sA
ppen
dix
For details on the procedure, refer to “5–3E: Erase Measure.”
5–4F: Delete MeasureThis command deletes specified measures of playback data from the track selected in the tab 3 page.Unlike the Erase Measure command, executing the Delete Measure command will cause playback data following the deleted area to be moved forward toward the beginning of the song.
For details on the procedure, refer to “5–3F: Delete Measure.”
5–4G: Insert MeasureThis command inserts the number of measures specified in the dialog box into the track specified in the tab 3 page. When the Insert Measure command is exe-cuted, the measures will be inserted at the location specified by the Start Mea-sure. The playback data following the inserted location will be moved backward toward the end of the song.
For details on the procedure, refer to “5–3G: Insert Measure.”
5–4H: Copy MeasureThis command copies specified measures of playback data from the audio track selected in the dialog box to the Start Measure of the audio track selected in the tab 3 page.
Be aware that the playback data will change as follows when the Copy Measure command is executed.• If measures which contain no playback data are copied, the copy destination
measures will be blank.• Any playback data existing at the copy destination will be erased, and
replaced by the copied playback data.• The playback data that is copied will be played back according to the time
signature of the copy destination.
For details on the procedure, refer to “5–3H: Copy Measure.”
5–4I: Move MeasureThis command moves playback data of the audio track selected in the dialog box to the Start Measure location of the audio track specified in the tab 3 page, in steps of a measure.
Be aware that the playback data will change as follows when the Move Measure command is executed.• Playback data located after the move source measures will be shifted forward
by the number of measures that were moved.• Playback data located after the move destination measure will be shifted
backward by the number of measures that were moved.
For details on the procedure, refer to “5–3I: Move Measure.”
5–4J: Audio Event EditThis command lets you perform event editing of audio events (events in an audio track), and trim the sound that is used by an audio event (make sample-unit adjustments in the location or portion of a sound that will be played back).You can use the Trim dialog box to modify the sound name after recording.
For details on the procedure, refer to “5–3J: Audio Event.”
45
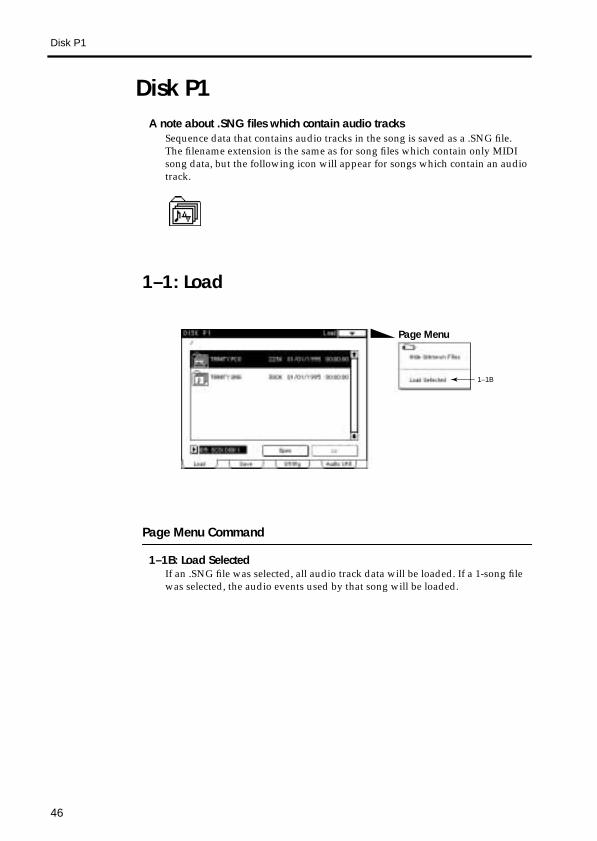
Disk P1
Disk P1A note about .SNG files which contain audio tracks
Sequence data that contains audio tracks in the song is saved as a .SNG file.The filename extension is the same as for song files which contain only MIDI song data, but the following icon will appear for songs which contain an audio track.
1–1: Load
Page Menu Command
1–1B: Load SelectedIf an .SNG file was selected, all audio track data will be loaded. If a 1-song file was selected, the audio events used by that song will be loaded.
1–1B
Page Menu
46

Disk P1
Intr
oduc
tion
Ope
ratio
nPa
ram
eter
sA
ppen
dix
1–3: UtilityHere you can perform various operations on the selected file or disk drive. Use Drive Select or the directory window to select a disk drive or file, and then choose a command from the page menu.
Page Menu Command
1–3B: RenameModifies the name of the selected file or directory. However it is not possible to modify the name of a .SNG file containing a song that includes an audio track. (Refer to the top of page 46 for the icon.) Also, the Rename command is avail-able only when a DOS file or DOS directory is selected.
1–3C: CopyCopies the selected file.
If the drive selected by Drive Select is removable media (such as a floppy disk or a removable hard disk, etc.), it will not be possible to copy between different media on the same drive.
1 In the tab 3 page, select the file you wish to copy.
2 When you choose Copy, the dialog box at right will appear.
3 Use Drive Select to select the copy destination disk, and use the Open or Up buttons to select the copy destination directory.
4 If you wish to change the filename, use the text edit box to change the name.
5 To execute the copy command, press the Copy button. To cancel without copying, press the Cancel button.
1–3B
1–3C
1–3G
1–3H
Page Menu
47
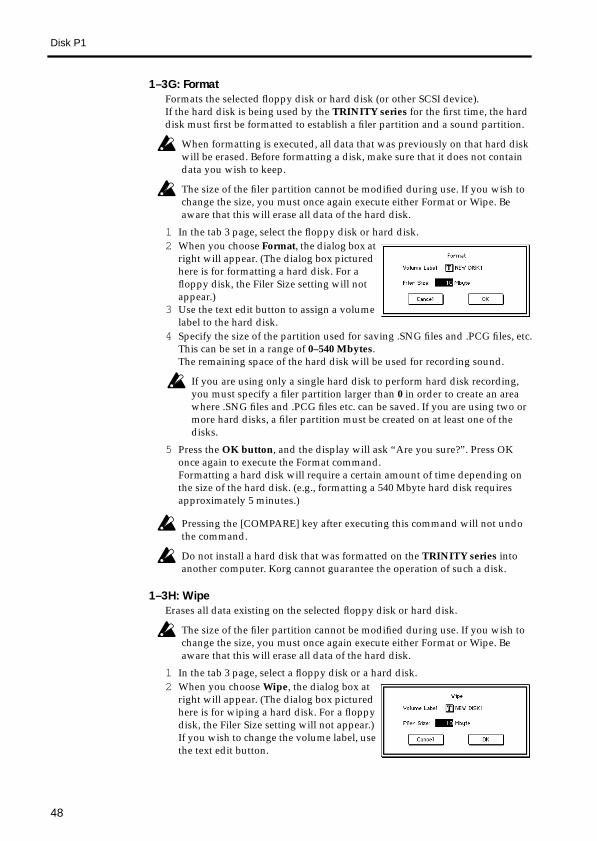
Disk P1
1–3G: FormatFormats the selected floppy disk or hard disk (or other SCSI device).If the hard disk is being used by the TRINITY series for the first time, the hard disk must first be formatted to establish a filer partition and a sound partition.
When formatting is executed, all data that was previously on that hard disk will be erased. Before formatting a disk, make sure that it does not contain data you wish to keep.
The size of the filer partition cannot be modified during use. If you wish to change the size, you must once again execute either Format or Wipe. Be aware that this will erase all data of the hard disk.
Pressing the [COMPARE] key after executing this command will not undo the command.
Do not install a hard disk that was formatted on the TRINITY series into another computer. Korg cannot guarantee the operation of such a disk.
1–3H: WipeErases all data existing on the selected floppy disk or hard disk.
The size of the filer partition cannot be modified during use. If you wish to change the size, you must once again execute either Format or Wipe. Be aware that this will erase all data of the hard disk.
1 In the tab 3 page, select the floppy disk or hard disk.2 When you choose Format, the dialog box at
right will appear. (The dialog box pictured here is for formatting a hard disk. For a floppy disk, the Filer Size setting will not appear.)
3 Use the text edit button to assign a volume label to the hard disk.
4 Specify the size of the partition used for saving .SNG files and .PCG files, etc.This can be set in a range of 0–540 Mbytes.The remaining space of the hard disk will be used for recording sound.
If you are using only a single hard disk to perform hard disk recording, you must specify a filer partition larger than 0 in order to create an area where .SNG files and .PCG files etc. can be saved. If you are using two or more hard disks, a filer partition must be created on at least one of the disks.
5 Press the OK button, and the display will ask “Are you sure?”. Press OK once again to execute the Format command.Formatting a hard disk will require a certain amount of time depending on the size of the hard disk. (e.g., formatting a 540 Mbyte hard disk requires approximately 5 minutes.)
1 In the tab 3 page, select a floppy disk or a hard disk.2 When you choose Wipe, the dialog box at
right will appear. (The dialog box pictured here is for wiping a hard disk. For a floppy disk, the Filer Size setting will not appear.)If you wish to change the volume label, use the text edit button.
48

Disk P1
Intr
oduc
tion
Ope
ratio
nPa
ram
eter
sA
ppen
dix
Pressing the [COMPARE] key after executing this command will not undo the command.
3 Specify the size of the partition that will be used for saving .SNG files and .PCG files, etc. The remaining area of the hard disk will be used for recording sound.This can be set in a range of 0–540 Mbytes.
4 Press the OK button, and the display will ask “Are you sure?”. Press OK once again to execute the Wipe command.
49

Disk P1
1–4: Audio UtilityHere you can perform operations such as backing up data from hard disk to a DAT tape, or restoring backed up data from a DAT tape to a hard disk.
Page Menu Command
1–4B: Backup to DATThis command backs up one selected .SNG file to DAT tape.When one .SNG file is backed up, all .PCG files of the same name existing in the current directory will be backed up together.
Connect the S/P DIF OUT connector located on the rear panel of the TRINITY to the DIGITAL IN (coaxial) connector of your DAT recorder.
1 In the tab 4 page, select a .SNG file.2 When you choose Backup to DAT, the dia-
log box at right will appear.3 The Backup Time will be displayed. Insert a
DAT tape of sufficient length into your DAT recorder.
1–4B
1–4C
1–4D
1–4E
1–4F
Page Menu
Connections for backup
Your DAT recorder
TRINITY
S/P DIF OUTDIGITAL IN(Coaxial)
50

Disk P1
Intr
oduc
tion
Ope
ratio
nPa
ram
eter
sA
ppen
dix
If audio devices are connected to your DAT recorder, make settings so that the sound from the DAT is not output to speakers or headphones. Speakers or headphones may be damaged if this precaution is not taken.
7 When the backup is finished, the display will indicate Complete. When this display appears, stop your DAT recorder.
If you press the Cancel button during backup in an attempt to create a par-tial backup, the backed-up data will be incomplete, and even if this data is restored it will be unusable.
1–4C: Restore from DATThis command restores backed-up data from DAT tapes to the hard disk(s).
Connect the S/P DIF IN connector located on the rear panel of the TRINITY to the DIGITAL OUT (coaxial) connector of your DAT recorder.
4 Press the OK button, and the dialog box at right will appear.
5 Start recording on your DAT recorder.6 Press the OK button in the dialog box. The
data will begin to be output, and backup will begin.Within approximately 10 seconds, the level meter on your DAT recorder will begin to move.
1 Load the tape containing the backup data into your DAT recorder.
2 When you choose Restore from DAT, the dialog box at right will appear.
3 Playback your DAT recorder.4 When the header of the DAT tape has been
read, the dialog box at right will appear. Stop your DAT recorder within 30 seconds. (Do not rewind the DAT tape.)
If you do not stop the DAT recorder within 30 seconds, restore cannot be performed correctly.
Connections for restoring
Your DAT recorder
TRINITY
S/P DIF INDIGITAL OUT(Coaxial)
51

Disk P1
1–4D: Copy with Sound
1–4E: Disp Used Sound List
5 Press the OK button. The dialog box at right will appear.Specify the directory into which the file will be restored.
6 The dialog box of step 2 will reap-pear. Start the DAT recorder, and restoring will begin.
7 When the restoration operation is completed, the display will indicate Completed. When this display appears, stop your DAT recorder.
This command copies the selected .SNG file with the sounds it uses to another hard disk. If at this time a .PCG file with the same name exists in the current directory, it will also be copied.However if a hard disk and removable media (fixed at ID6) are both connected, and you select a hard disk of ID0–5 as the copy source, the copy destination will be the removable media of ID6. If you select the removable media of ID6 as the copy source, you will able to select a hard disk of ID0–5 as the copy destination.1 In the tab 4 page, select the copy
source /SNG file.2 When you choose Copy with
Sound, the dialog box at right will appear.
3 Select the hard disk and directory of the copy destination, and press the Copy button.
This command displays the sounds used by the selected .SNG file.1 Select a .SNG file.2 When you choose Disp Used Sound
List, the dialog box at right will appear.
3 Press the OK button.
52

Disk P1
Intr
oduc
tion
Ope
ratio
nPa
ram
eter
sA
ppen
dix
1–4F: Delete Unused SoundThis command deletes sounds which are not used by any .SNG file from all hard disks.
After this command has been executed, it is not possible to use the [COM-PARE] key to bring back the deleted data.
53

Disk P1
54
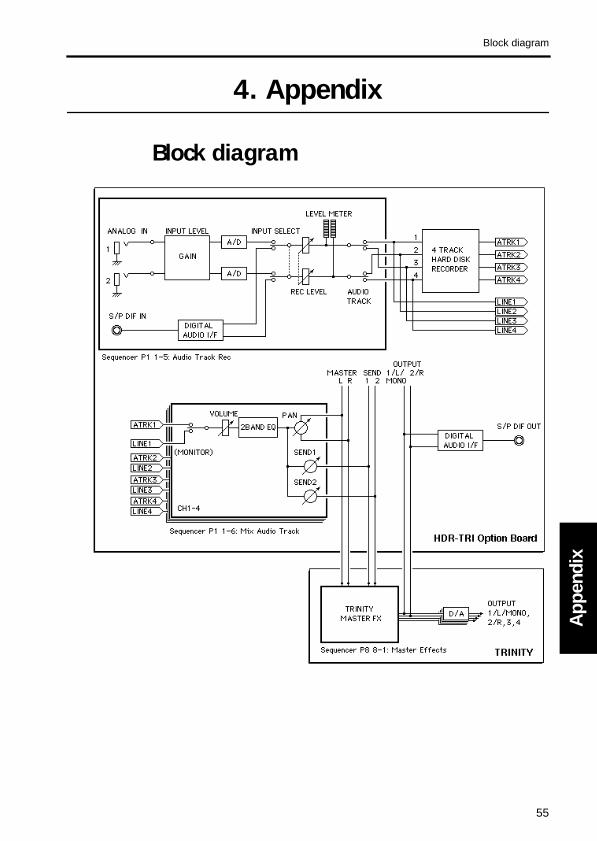
Block diagram
Intr
oduc
tion
Ope
ratio
nPa
ram
eter
sA
ppen
dix
4. Appendix
Block diagram
55

Messages
MessagesWhen the HDR-TRI is installed, the following messages will be added.
Disk not formatted
Error in wiping medium
Memory full. Audio track can’t play to the end.
No unused sounds found
Troubleshooting
Meaning: The disk for which Wipe was attempted is not formatted.Action: Use the Format command of the TRINITY to format the disk.
Meaning: Disk wipe could not be performed.Action: The disk is damaged. Use a different disk.
Meaning: The master track's memory has been used up, so the audio track can-not be played back to the end.
Action: Increase the available memory of the master track by deleting tempo changes etc. from the master track.
Meaning: When you executed the Disk mode command Delete Unused Sound, no unused sounds were found.
Problem: An asterisk “ ” appears to the right of the page menu button (as shown in the graphic at the right), and problems such as a flickering LCD and a drop in volume occur.If you continue using the unit under these circumstances, functions may stop working properly. Take the following actions immediately.
Cause: The clock is not being detected correctly. The cable connected to the S/P DIF IN connector may not be plugged in, a frequency other than 48 kHz may be transmitting to the S/P DIF IN connector or for a sim-ilarly related reason. Also, if the DI–TRI is installed, the clock may not be correctly detected because the BNC cable may not be plugged in, etc.
Action: First, confirm that the connected cable is working. Then, input the correct clock [48 kHz (±5 Hz) to both the S/P DIF IN connector and the WORD CLOCK IN connector], and set the Global mode P1 (Glo-bal Setup) parameter System Clock to “Internal.” Before continuing to use the unit, make sure that normal operation has resumed and that the asterisk “ ” is no longer displayed next to the page menu button. If these steps do not restore normal operation, turn the power off and back on. You must first back up the Sequencer memory since all data will be lost when the power is turned off.
Problem: Sound is distorted.Cause 1: If the Sequencer mode P1 tab 5 page (Audio Track Rec) settings for
Input Level and/or Rec Level are excessively high (and the display indicates Overload and/or Over), the input will be overloaded and distorted sound will be recorded.
56

Specifications
Intr
oduc
tion
Ope
ratio
nPa
ram
eter
sA
ppen
dix
SpecificationsINPUT/OUTPUT connectors: SCSI connector, ANALOG IN 1/2 connectors, S/P DIF IN/OUT connectorsSampling frequency: 48 kHzRecording time: when using a 540 Mbyte hard disk, approximately 94 minutes of monaural recording, approximately 47 minutes of stereo recording (approxi-mately 5 Mbytes per minute of monaural recording)Tracks recorded simultaneously: 2Tracks played back simultaneously: 4Digital mixer specifications
Volume: 0—127 (100=unity)High EQ: –15—+15 (0=unity)Low EQ: –15— +15 (0=unity)Send 1: 0—127 (send to Master Effect 1)Send 2: 0—127 (send to Master Effect 2)Pan: L000—C064—R127, OFF
Analog audio input gain structure
S/N ratio (A-weighted): better than 90 dBMeasured at OUTPUT 1 and 2 for a 1 kHz sine wave input, Rec Level=0.0, AT1: Pan=L000, Volume=100, AT2: Pan=R127, Volume=100, AT3/4: MUTE
Action: Lower the Input Level and/or Rec Level settings so that the Over-load and/or Over displays do not appear.
Cause 2: Even if the Input Level and Rec Level settings are appropriate, dis-torted sound will be output from the monitor if the P1 tab 6 page (Mix Audio Track 1–4) Volume setting is too high. (However the sound that is recorded is not distorted.)
Action: Adjust the volume downward. A volume setting of 0 is -infinity, 100 is 0 dB, and 127 is +127 dB.
Cause 3: In situations other than the above, the output from the monitor will be distorted if Pan is set to C064 during stereo recording.
Action: During stereo recording, set Pan to L000 and R127.
Problem: Sound is not output from the monitor even though the level meters are up.
Cause 1: There is a problem with the settings of the TRINITY itself or with the connections.
Action: Raise the TRINITY’s volume, or check the monitor connections.Cause 2: An audio track is not selected in Track.Action: Select an audio track.Cause 3: Even if an audio track is selected, the tab 6 page (Mix A1–4) Volume
setting is 0, or Pan is OFF.Action: Adjust the Volume and Pan settings.
Input Level setting Typical input level Max input level Typical gain
–30 dBu –30 dBu –20 dBu +20 dB
–10 dBu –10 dBu 0 dBu 0 dB
+4 dBu +4 dBu +14 dBu –14 dB
57

Hard Disk Recording Demo Songs: Hard Disk Recording Demo Songs consist of TRINITY seqneuce data and Audio Data.
1. Godzilla Wants my Trinitywritten by John Lehmkuhl, Nick Forcillo and Steve Hunt©1996 Real–Kuhl MusicSteve Hunt – VocalsNick Forcillo – GuitarsCaroline Lehmkuhl – Female radio announcerJohn Lehmkuhl – voice of Male radio announcer & Godzilla. All production on Trinity including sequenc-ing & playing.
2. WhatCha'GonnaDo?written by John Lehmkuhlraps composed by Aaron Bray, Jason Floyd, Jahmad Rollins, Edwin Hamilton, Jason Smith, Ryan Young©1996 Real-Kuhl MusicAaron Bray, Jason Floyd, Jahmad Rollins, Edwin Hamilton, Jason Smith, Ryan Young – Raps John Leh-mkuhl – All production on Trinity including sequencing & playing.
3. Holy Trinitywritten by John Lehmkuhl and Kathy Talbott©1996 Real–Kuhl MusicKathy Talbott – VocalJohn Lehmkuhl – All production on Trinity including sequencing & playing.
4. Paddy Wackwritten by John Lehmkuhl©1996 Real–Kuhl MusicMindi Abair – Alto SaxophoneCharles Moore – Mute TrumpetTy Stevens – Electric GuitarsJohn Lehmkuhl – All production on Trinity including sequencing & playing.
* John Lehmkuhl / Real-Kuhl Music can be contacted at “[email protected]” for questions/comment.** Above Demo song data are not attached to this product. *** LIMITATION: These HD Demos are for demonstration purposes only in the Trinity Workstation DRS. Unauothorized duplication,
rebroadcast or any other use of the music and/or PCM audio data is strictly prohibited and would constitute a violation of all applicable laws.
58


