Health System MobileIron Installation for Android Devices THE FOLLOWING INSTRUCTIONS AND SCREEN CAPTURES WERE TAKEN FROM A NEXUS 7 AND ANDROID 4.4.2. EXACT STEPS AND IMAGES WILL VARY BY MODEL, VENDOR AND OPERATING SYSTEM Access the Google Play Store Once in the store search for MobileIron and install the Mobile@Work app. Once the app opens tap Get Started Next type in our server address where the app asks for an email or server address. mdm.healthsystem.virginia.edu The app will now ask for your username and password. Add your typical Health System credentials here and tap Next.
Transcript
Health System MobileIron Installation for Android Devices
THE FOLLOWING INSTRUCTIONS AND SCREEN CAPTURES WERE TAKEN FROM A NEXUS 7 AND ANDROID 4.4.2. EXACT STEPS AND IMAGES WILL VARY BY MODEL, VENDOR AND OPERATING SYSTEM
Access the Google Play Store
Once in the store search for MobileIron and install the Mobile@Work app.
Once the app opens tap Get Started
Next type in our server address where the app asks for an email or server address.
mdm.healthsystem.virginia.edu
The app will now ask for your username and password. Add your typical Health System credentials here and tap Next.
Confirm device administration approval for the modifications needed by tapping Activate.
Tap Configure to setup security passcodes.
Select PIN to setup your four digit device unlock code. This code will be required to unlock the screen each time you access the device in line with the Health System security policies.
Choose and add that PIN code and re-enter a second time to confirm. Tap OK to continue.
ENCRYPTION Android devices are required to be encrypted. This involves a software update to your device. The device
will be restarted and all data on the device will then be under an encrypted and protected layer. This process can only be reversed by restoring the device to its default factory condition.
In order to perform the encryption it may be required that the device be plugged into a power source. Minimum battery level requirements vary by device manufacture.
Tap Configure to begin the encryption process.
After reading the encryption disclaimer and ensuring your battery level and power source meet the requirements tap Encrypt tablet. Tablet applies to the device used for this instruction set and will vary based on individual device type.
Enter your PIN to confirm your desire to continue. After a final encryption disclaimer once again tap Encrypt tablet
The encryption process can take up to an hour or longer. Once it completes and you are back on the home screen open the MobileIron app to continue the setup.
To begin the Secure Apps setup tap Continue
Now tap Begin
Tap Next
At this point you may have to approve of “apps obtained from unknown sources”. If you see this popup tap Settings.
On the Security settings page place a checkmark in the box on the right side of Unknown sources.
Tap OKTap the return button to go back and continue adding the MobileIron Secure Apps applications. Alternatively open the MobileIron app from the homescreen.
At this step MobileIron should remind you that there are still items to install. Tap Continue to install those items.
Secure Apps Manager
Secure Apps Manager is the container that will hold the Health System apps that you add to your device. This will allow Health System security policies to remove those apps and data for compliance reasons while not interfering with the rest of your device.
Tap Next to continue…
…then Install to begin.
Accept Google’s security policy.
After the install confirmation tap Open
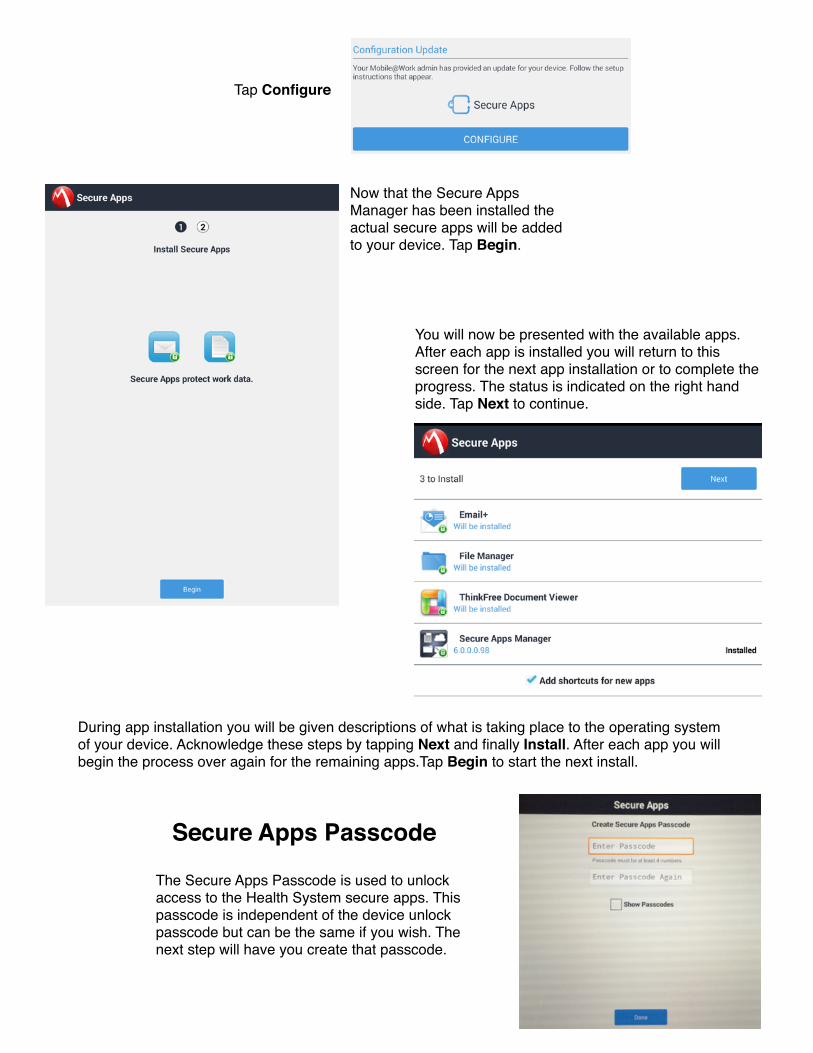
Now that the Secure Apps Manager has been installed the actual secure apps will be added to your device. Tap Begin.
You will now be presented with the available apps. After each app is installed you will return to this screen for the next app installation or to complete the progress. The status is indicated on the right hand side. Tap Next to continue.
During app installation you will be given descriptions of what is taking place to the operating system of your device. Acknowledge these steps by tapping Next and finally Install. After each app you will begin the process over again for the remaining apps.Tap Begin to start the next install.
Secure Apps Passcode
The Secure Apps Passcode is used to unlock access to the Health System secure apps. This passcode is independent of the device unlock passcode but can be the same if you wish. The next step will have you create that passcode.
Tap Configure
During this step you will also enter your Health System email password to finish setting up and begin syncing your email, contacts and calendar.
One installation and configuration has been completed you can use the Email+ app from your device home screen.