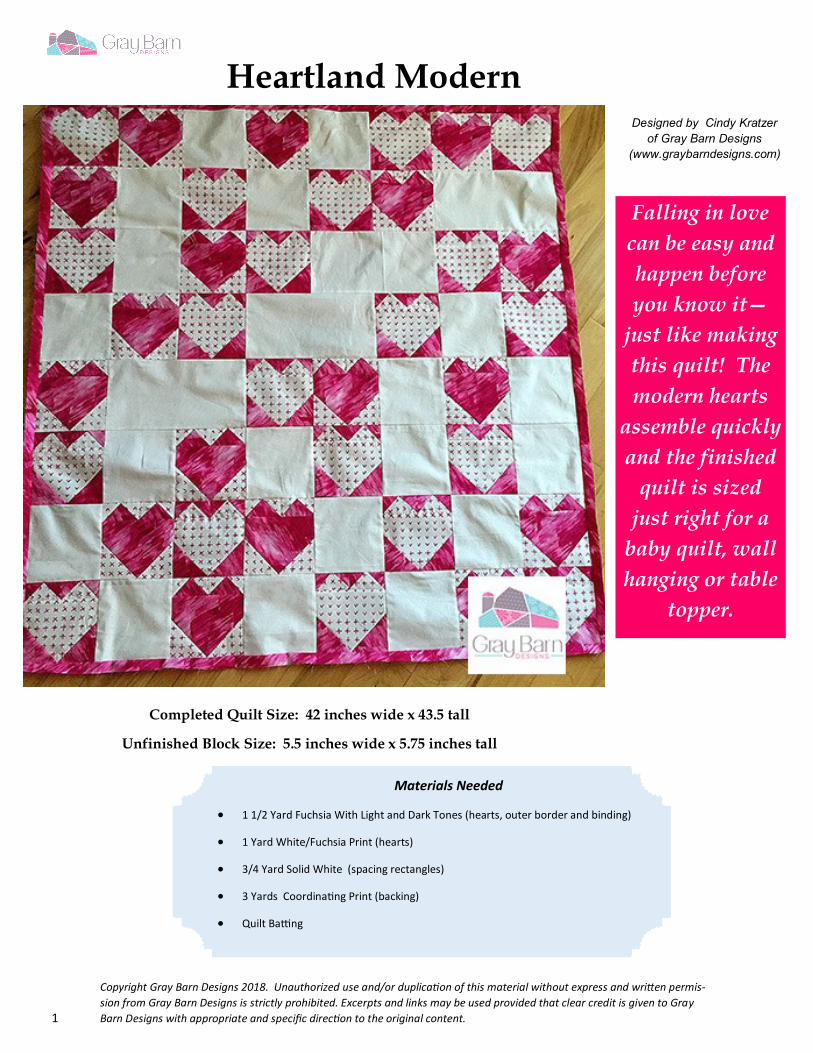
1 Heartland Modern Designed by Cindy Kratzer of Gray Barn Designs (www.graybarndesigns.com) Gray Barn Designs Copyright Gray Barn Designs 2018. Unauthorized use and/or duplicaon of this material without express and wrien permis- sion from Gray Barn Designs is strictly prohibited. Excerpts and links may be used provided that clear credit is given to Gray Barn Designs with appropriate and specific direcon to the original content. Falling in love can be easy and happen before you know it— just like making this quilt! The modern hearts assemble quickly and the finished quilt is sized just right for a baby quilt, wall hanging or table topper. Completed Quilt Size: 42 inches wide x 43.5 tall Unfinished Block Size: 5.5 inches wide x 5.75 inches tall Materials Needed 1 1/2 Yard Fuchsia With Light and Dark Tones (hearts, outer border and binding) 1 Yard White/Fuchsia Print (hearts) 3/4 Yard Solid White (spacing rectangles) 3 Yards Coordinang Print (backing) Quilt Bang
Transcript
1
Heartland Modern Designed by Cindy Kratzer
of Gray Barn Designs
(www.graybarndesigns.com)
Gray Barn Designs
Copyright Gray Barn Designs 2018. Unauthorized use and/or duplication of this material without express and written permis-
sion from Gray Barn Designs is strictly prohibited. Excerpts and links may be used provided that clear credit is given to Gray
Barn Designs with appropriate and specific direction to the original content.
Falling in love
can be easy and
happen before
you know it—
just like making
this quilt! The
modern hearts
assemble quickly
and the finished
quilt is sized
just right for a
baby quilt, wall
hanging or table
topper.
Completed Quilt Size: 42 inches wide x 43.5 tall
Unfinished Block Size: 5.5 inches wide x 5.75 inches tall
Materials Needed
1 1/2 Yard Fuchsia With Light and Dark Tones (hearts, outer border and binding)
1 Yard White/Fuchsia Print (hearts)
3/4 Yard Solid White (spacing rectangles)
3 Yards Coordinating Print (backing)
Quilt Batting
2
Heartland Modern
Gray Barn Designs
Copyright Gray Barn Designs 2018. Unauthorized use and/or duplication of this material without express and written permis-
sion from Gray Barn Designs is strictly prohibited. Excerpts and links may be used provided that clear credit is given to Gray
Barn Designs with appropriate and specific direction to the original content.
Cutting Instructions
Fuchsia Light/Dark Tone Fabric
(17) 5.5 inch wide x 4.5 inch tall rectangles
(34) 3 x 1.75 inch rectangles
(80) 1.75 x 1.75 inch squares
(40) 3 x 3 inch squares
(2) 1 x 42 inch strips (left/right outer border)
(2) 1 x 42 inch strips (top/bottom outer border)
(5) 2.5 inch x width of fabric strips for binding
White/Fuchsia Print
(20) 5.5 inch wide x 4.5 inch tall rectangles
(40) 3 x 1.75 inch rectangles
(68) 1.75 x 1.75 inch squares
(34) 3 x 3 inch squares
White Solid
(19) 5.5 inch wide x 5.75 inch tall rectangles
(4) 10 inch wide x 5.75 inch tall rectangles
Once all fabrics have been cut as listed above, sort them into piles according to the lists below. This is a real
time saver and the hearts will assemble in no time flat!
Total White/Fuchsia Print Hearts Needed = 20
(20) 5.5 x 4.5 inch rectangles (white/fuchsia print)
(40) 3 x 1.75 inch rectangles (white/fuchsia print)
(80) 1.75 x 1.75 inch squares (fuchsia light/dark)
(40) 3 x 3 inch squares (fuchsia light/dark)
Total Fuchsia Light/Dark Tone Hearts Needed = 17
(17) 5.5 x 4.5 inch rectangles (fuchsia light/dark)
(34) 3 x 1.75 inch rectangles (fuchsia light/dark)
(68) 1.75 x 1.75 inch squares (white/fuchsia print)
(34) 3 x 3 inch squares (white/fuchsia print)
Quilting Math
1/4 inch = .25 inch
1/2 inch = .5 inch
3/4 inch = .75 inch
“ is the symbol for inch
Gray Barn Design Notes
All seams are 1/4 inch , unless otherwise
noted in instructions
Assume width of fabric = 44 inches
Press seams as indicated
Sew seams with right sides together
3
Copyright Gray Barn Designs 2018. Unauthorized use and/or duplication of this material without express and written permis-
sion from Gray Barn Designs is strictly prohibited. Excerpts and links may be used provided that clear credit is given to Gray
Barn Designs with appropriate and specific direction to the original content.
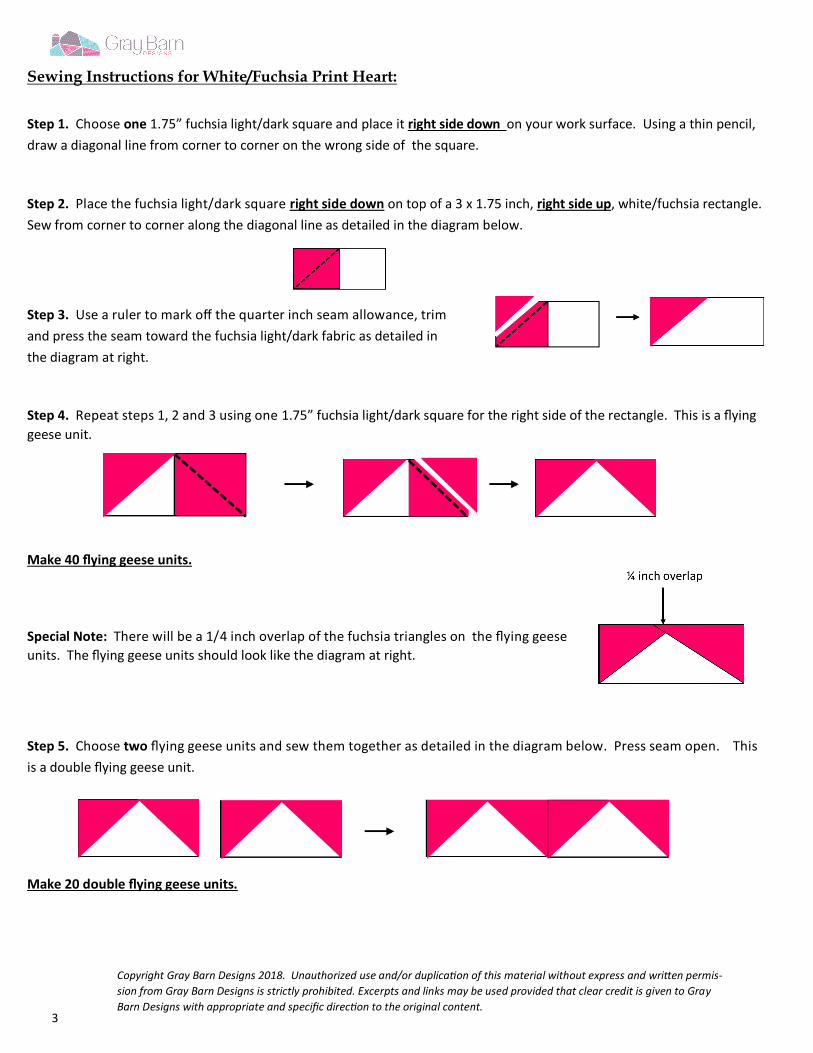
Sewing Instructions for White/Fuchsia Print Heart:
Step 1. Choose one 1.75” fuchsia light/dark square and place it right side down on your work surface. Using a thin pencil,
draw a diagonal line from corner to corner on the wrong side of the square.
Step 2. Place the fuchsia light/dark square right side down on top of a 3 x 1.75 inch, right side up, white/fuchsia rectangle.
Sew from corner to corner along the diagonal line as detailed in the diagram below.
Step 3. Use a ruler to mark off the quarter inch seam allowance, trim
and press the seam toward the fuchsia light/dark fabric as detailed in
the diagram at right.
Step 4. Repeat steps 1, 2 and 3 using one 1.75” fuchsia light/dark square for the right side of the rectangle. This is a flying
geese unit.
Make 40 flying geese units.
Special Note: There will be a 1/4 inch overlap of the fuchsia triangles on the flying geese
units. The flying geese units should look like the diagram at right.
Step 5. Choose two flying geese units and sew them together as detailed in the diagram below. Press seam open. This
is a double flying geese unit.
Make 20 double flying geese units.
4
Copyright Gray Barn Designs 2018. Unauthorized use and/or duplication of this material without express and written permis-
sion from Gray Barn Designs is strictly prohibited. Excerpts and links may be used provided that clear credit is given to Gray
Barn Designs with appropriate and specific direction to the original content.
Sewing Instructions for White/Fuchsia Print Heart (cont’d)
Step 6. Choose two 3 inch fuchsia light/dark squares and place them right side down on your work surface. Using a
thin pencil, draw a diagonal line from corner to corner on the wrong side of each square.
Step 7. Place one fuchsia light/dark square right side down on top of the 5.5 x 4.5 inch, right
side up, white/fuchsia rectangle. Sew from corner to corner along the diagonal line as
detailed in the diagram at right.
Step 8. Use a ruler to mark off the quarter inch seam allowance, trim and press the seam toward the fuchsia light/dark
as detailed in the diagram below.
Step 9. Repeat steps 6, 7 and 8 using one 3 inch fuchsia light/dark square for the right side of the rectangle as detailed
below. Note fuchsia light/dark triangle seams will overlap by 1/4 inch.
Step 10. Sew a double flying geese unit created in Step 5 to a heart unit created in Step 9 as detailed in the diagram below.
Make 20 white/fuchsia print hearts. Each heart should measure 5.5 inches wide x 5.75 inches tall.
5
Copyright Gray Barn Designs 2018. Unauthorized use and/or duplication of this material without express and written permis-
sion from Gray Barn Designs is strictly prohibited. Excerpts and links may be used provided that clear credit is given to Gray
Barn Designs with appropriate and specific direction to the original content.
Sewing Instructions for Fuchsia Light/Dark Heart:
Step 1. Choose one 1.75 inch white/fuchsia print square and place it right side down on your work surface. Using a thin
pencil, draw a diagonal line from corner to corner on the wrong side of the square.
Step 2. Place the white/fuchsia print square right side down on top of a 3 x 1.75 inch, right side up, fuchsia light/dark
rectangle. Sew from corner to corner along the diagonal line as detailed in the diagram below.
Step 3. Use a ruler to mark off the quarter inch seam allowance, trim and press
the seam toward the white/fuchsia print fabric as detailed in the diagram at right.
Step 4. Repeat steps 1, 2 and 3 using one 1.75 inch white/fuchsia print square for the right side of the rectangle. This is a
flying geese unit.
Make 34 flying geese units.
Special Note: There will be a 1/4 inch overlap of the fuchsia triangles on the flying geese units.
The flying geese units should look like the diagram at right.
Step 5. Choose two flying geese units and sew them together as detailed in the diagram below. Press seam open. This is
a double flying geese unit.
Make 17 double flying geese units.
6
Copyright Gray Barn Designs 2018. Unauthorized use and/or duplication of this material without express and written permis-
sion from Gray Barn Designs is strictly prohibited. Excerpts and links may be used provided that clear credit is given to Gray
Barn Designs with appropriate and specific direction to the original content.
Sewing Instructions for Fuchsia Light/Dark Heart (cont’d)
Step 6. Choose two 3 inch white/fuchsia print squares and place them right side down on your work surface. Using a
thin pencil, draw a diagonal line from corner to corner on the wrong side of each square.
Step 7. Place one white/fuchsia print square right side down on top of the 5.5 x 4.5 inch,
right side up, fuchsia light/dark rectangle. Sew from corner to corner along the diagonal
line as detailed in the diagram at right.
Step 8. Use a ruler to mark off the quarter inch seam allowance, trim and press the seam toward the white/fuchsia
print as detailed in the diagram below.
Step 9. Repeat steps 6, 7 and 8 using one 3 inch white/fuchsia print square for the right side of the rectangle as
detailed below. Note white/fuchsia print triangle seams will overlap by 1/4 inch.
Step 10. Sew a double flying geese unit created in Step 5 to a heart unit created in Step 9 as detailed in the diagram below.
Make 17 fuchsia light/dark hearts. Each heart should measure 5.5 inches wide x 5.75 inches high.
7
Copyright Gray Barn Designs 2018. Unauthorized use and/or duplication of this material without express and written permis-
sion from Gray Barn Designs is strictly prohibited. Excerpts and links may be used provided that clear credit is given to Gray
Barn Designs with appropriate and specific direction to the original content.
Sew the Rows Together
Step 1. Lay out your hearts and rectangles in rows according to the diagram below. Sew all the blocks together in Row
1 and press seams open. Sew all the blocks together in Row 2, then Row 3, 4, 5, 6, 7, and 8, pressing all seams open.
Step 2: Sew all rows together and press seams open.
Step 3: Add left and right borders as detailed in
the diagram at right. Press seams toward borders.
Step 4: Add top and bottom borders as detailed in
the diagram at right. Press seams toward borders.
Step 5: Layer the backing fabric, batting and quilt
top and quilt using your favorite technique.
Step 6: Sew the 2.5 inch binding strips together
and attach to the quilt using your favorite binding
technique.
Step 7: Celebrate making a beautiful quilt!
Like free quilt patterns? Follow us at www.graybarndesigns.com