12/23/13, 7:18 PM Heckler & Koch G3 Build - Calguns.net Page 1 of 75 http://www.calguns.net/calgunforum/showthread.php?t=274354 #1 Home My iTrader Donate to CGF Donate to CGSSA Sponsors CGN Google Search CA Semiauto Ban(AW)ID Flowchart CA Rifle Ban Interactive Chart CA Handgun Ban ID Flowchart CA Shotgun Ban ID Flowchart OLL Assembly Guide Calguns.net > INTERESTS AND ACTIVITIES > Gunsmithing & How To Heckler & Koch G3 Build Welcome, kcstott . You last visited: 12-23-2013 at 5:46 PM Private Messages : Unread 0, Total 2947. BECOME A CGN/CGSSA CONTRIBUTOR! User CP FAQ Members List Calendar Chat New Posts Search Quick Links Log Out Gunsmithing & How To Pro, Amateur & WECSOG and Tutorials, Guides & OLL Build Instructions Page 1 of 3 1 23> Thread Tools Search this Thread Rating: Display Modes 02-27-2010, 4:43 AM fredieusa Member Join Date: Mar 2008 Location: Contra Costa County Posts: 416 iTrader: 57 / 100% Heckler & Koch G3 Build Heckler & Koch G3 Build Fixing/Building/Putting together your own guns can/may cause serious harm, up-to and including death! That is a good reason why professional/qualified gunsmiths exist, make use of them. Do know your laws, many that may apply to you may not be mentioned here. Some images used here for illustration (with permission from the rightful owner) are NFA regulated items under current laws, they require special permits and licensing and may be completely prohibited in your State. This thread of mine is for pure educational purposes. It is not my intention in any way to get you to follow. All images used from the Wikipedia and Photobucket are used under their Proprietary Rights in Content policy . Images that are proprietary are being used by first obtaining written Permission from the rightful owner. This material may not be copied, edited, reproduced or distributed without prior permission from the original owner. By mentioning any commercial vendors or by using their material does not benefit me in anyways. Prerequisite: For people familiar with the HK family. Armorer level knowledge is not covered here i.e. stripping a Bolt- Head, or disassembling a Trigger Pack. You will need good mechanical skills, tools and pertaining knowledge i.e. we will not be covering how to weld. I have no experience with a CETME, below thread may or may not apply to them. There are many other documented HK builds (semi-complete in most cases) on various boards, at the very end I will post some links to them. If you wish to get into further/deeper detail you can search archives on HKPro forum or Special Topics
Page 1 of 75http://www.calguns.net/calgunforum/showthread.php?t=274354
#1
Home My iTrader Donate to CGF Donate to CGSSA Sponsors CGN Google Search
CA Semiauto Ban(AW)ID Flowchart CA Rifle Ban Interactive Chart CA Handgun Ban ID Flowchart CA Shotgun Ban ID Flowchart OLL Assembly Guide
Calguns.net > INTERESTS AND ACTIVITIES > Gunsmithing & How To Heckler & Koch G3 Build
Welcome, kcstott.You last visited: 12-23-2013 at 5:46 PM Private Messages: Unread 0, Total 2947.BECOME A CGN/CGSSA CONTRIBUTOR!
User CP FAQ Members List Calendar Chat New Posts Search Quick Links Log Out
Gunsmithing & How To Pro, Amateur & WECSOG and Tutorials, Guides & OLL Build Instructions
Page 1 of 3 1 2 3 >
Thread Tools Search this Thread Rating: Display Modes
02-27-2010, 4:43 AM
fredieusa Member
Join Date: Mar 2008Location: Contra Costa CountyPosts: 416iTrader: 57 / 100%
Heckler & Koch G3 Build
Heckler & Koch G3 Build
Fixing/Building/Putting together your own guns can/may cause serious harm, up-to and including death! That is a good reason whyprofessional/qualified gunsmiths exist, make use of them. Do know your laws, many that may apply to you may not be mentioned here.Some images used here for illustration (with permission from the rightful owner) are NFA regulated items under current laws, theyrequire special permits and licensing and may be completely prohibited in your State. This thread of mine is for pure educationalpurposes. It is not my intention in any way to get you to follow.
All images used from the Wikipedia and Photobucket are used under their Proprietary Rights in Content policy . Images that areproprietary are being used by first obtaining written Permission from the rightful owner. This material may not be copied, edited,reproduced or distributed without prior permission from the original owner. By mentioning any commercial vendors or by using theirmaterial does not benefit me in anyways.
Prerequisite: For people familiar with the HK family. Armorer level knowledge is not covered here i.e. stripping a Bolt-Head, or disassembling a Trigger Pack. You will need good mechanical skills, tools and pertaining knowledge i.e. we willnot be covering how to weld. I have no experience with a CETME, below thread may or may not apply to them.
There are many other documented HK builds (semi-complete in most cases) on various boards, at the very end I will post some links tothem. If you wish to get into further/deeper detail you can search archives on HKPro forum or Special Topics
Page 2 of 75http://www.calguns.net/calgunforum/showthread.php?t=274354
Principal behind building a 91 (G3), 93 (HK33), 94 (HK MP-5) or the SP-89 (PDW) TYPE OF SEMI AUTO GUN is basically the same. If youcan do one, you can do the others or anything in between with a little chopping and welding, i.e. the 51 or 53. Even guns like PSG-1,MSG-90, H&K 11, H&K 21 and H&K 23 can be built (if you can find parts). Although I am building a (Calif. Legal) Semi-Auto G3 copy, Iwill be making small reference to the 5.56 and the 9mm guns.
Page 4 of 75http://www.calguns.net/calgunforum/showthread.php?t=274354
and screw but is not necessary. Here is the Road Map. Most of the pictures are AFTER the description and run left to right, top to bottom.I can only post limited number of pics in each post, so bear with me.
1.0.0.0 Kit-1.1.0.0 Front End-1.2.0.0 Trigger Group-1.3.0.0 Butt Stock Assembly-1.4.0.0 Small Parts-1.5.0.0 Other Parts needed – Essential. -1.6.0.0 Other Parts needed - Optional.-1.7.0.0 §922(r) Parts Count and List of Suppliers
2.0.0.0 Preparing the Kit and Parts-2.1.0.0 Checking Head-Space-2.2.0.0 Marking Front Sight Post and Bolt Guide Tube / Cocking Tube-2.3.0.0 Demilling the Trunion from the receiver stub -2.4.0.0 Demilling the Bolt Guide Tube / Cocking Tube-2.5.0.0 Salvaging Rear Sight Base (RSB)-2.6.0.0 Salvaging Reinforcement Plate for rear push-pins (and stock pin sleeves)-2.7.0.0 Salvaging Paddle Mag Release
3.0.0.0 Parts Conversion to Semi-Auto -3.1.0.0 Eliminating Select Fire parts.-3.2.0.0 Trigger pack housing / body cutting and welding. -3.3.0.0 New pin location for Sear Spring.--3.3.1.0 Bending of the Spring.-3.4.0.0 Internal Trigger Stop Pin. --3.4.1.0 New Pin location.--3.4.2.0 Drilling for the new pin.--3.4.3.0 Installing the new Stop Pin and securing with a weld.-3.5.0.0 Hammer Work-3.6.0.0 Trigger Work-3.7.0.0 Converting the Trigger pack housing / Clipping and Pinning. --3.7.1.0 Making a Semi-Auto Shelf --3.7.2.0 Fitting the Semi-Auto Shelf. --3.7.3.0 Welding the Semi-Auto Shelf.--3.7.4.0 Clipping off the ears / Cutting off the tabs – Grinding the Tabs.--3.7.5.0 Installing Push-Pin bits-3.8.0.0 Bolt Carrier
4.0.0.0 Receiver Building and Completion---4.0.0.1 Complete Receivers---4.0.0.2 Flats-4.1.0.0 Bending the Flat.--4.1.1.0 Squaring the rails--4.1.2.0 Forming / bending the flat-4.2.0.0 Welding the Receiver--4.2.1.0 Conforming the receiver to specification. ---4.2.1.1 Receiver Rails---4.2.1.2 Lower Opening---4.2.1.3 Trigger Housing fit---4.2.1.4 Magazine Well---4.2.1.5 Stock / Back Plate Mounting --4.2.2.0 Magazine Catch--4.2.3.0 Welding the Semi-Auto Wedge (Shelf). --4.2.4.0 Welding rear Push-Pin support and sleeves.-4.3.0.0 Welding / Installing the Trunion (barrel), Charging Tube and Rear Sight ---4.3.0.1 Preparing the Trunion---4.3.0.2 Preparing Charging Tube---4.3.0.3 Preparing Rear Sight---4.3.0.4 Setting up the Boresighter--4.3.1.0 Drilling Barrel Retaining Pin Holes and Chamfer Receiver Edge--4.3.2.0 Mocking-up Trunion and Charging Tube in Receiver---4.3.2.1 Boresighting---4.3.2.2 Fixing Canted/Misaligned Barrels---4.3.2.3 Trunion and the Rails---4.3.2.4 Rear Sight--4.3.3.0 Welding the Rear Sight Base--4.3.4.0 Welding Trunion---4.3.4.1 Drilling Holes for Barrel Retaining Pin --4.3.5.0 Welding Charging Tube
Page 5 of 75http://www.calguns.net/calgunforum/showthread.php?t=274354
#3
6.0.0.0 Issues. -6.1.0.0 Bolt Carrier-6.2.0.0 Rails and Trunion-6.3.0.0 Hand Guard Fit--6.3.1.0 Correcting Charging Tube location
7.0.0.0 Refinishing of Metal
8.0.0.0 Refinishing of Wood
9.0.0.0 Range Report and Notes__________________★
Last edited by fredieusa; 03-07-2010 at 2:04 PM..
02-28-2010, 11:29 PM
fredieusa Member
Join Date: Mar 2008Location: Contra Costa CountyPosts: 416iTrader: 57 / 100%
1.0.0.0 The KitAll kits are well built. Depending on the origin, basic accessories included and the condition, you can expect to pay anywhere from $300-$700. Other factory accessories like the scope mounts ($250 - $650) are most likely going to be extra. Receivers and other materialsrequired for building are also extra.
Parts can be readily interchanged between all the G3 variants. Unlike the German WW2 stuff, or even builds such as AK from demilledkits, the serial number is not stamped all over the place, this alone saves some headache.
Your kit should have four basic identifiable parts. Front end, trigger group, butt stock assembly and small parts bag.
Notes on Furniture: Furniture usually refers to the Hand-Guard, Pistol Grip and Butt Stock. All furniture is interchangeable if you havean original type sheet metal receiver. Cast Aluminum receivers use the older slim Hand-Guard, wide can be used after heavymodifications. Usually all three items should match in color, but is you use the wood Hand-Guard and Butt-Stock, a black pistol grip goesjust fine.
Page 6 of 75http://www.calguns.net/calgunforum/showthread.php?t=274354
These Schematics http://www.robertrtg.com/g3schematic.html may help in identifying parts. Make note that theseschematics are of a G3 Rifle, your parts should match.
Page 7 of 75http://www.calguns.net/calgunforum/showthread.php?t=274354
These schematics are from a H&K 91 Semi Auto Rifle. Visible difference is in the receiver (behind the mag well) and the FireControl parts with their housing.
Page 8 of 75http://www.calguns.net/calgunforum/showthread.php?t=274354
#4
__________________★
Last edited by fredieusa; 03-12-2010 at 9:03 PM..
02-28-2010, 11:30 PM
fredieusa Member
Join Date: Mar 2008Location: Contra Costa CountyPosts: 416iTrader: 57 / 100%
1.1.0.0 Front End
Muzzle Device
Barrel: It is pressed into the Trunion and is retained there by a cross pin.
Front Sight Post a.k.a Tripple Tee: A dust cover made of Aluminum or Steel goes in the middle. It has a spring loaded indent that isused to secure the cover to the Post. The indent locks into a hole when pushed into the Post
Page 9 of 75http://www.calguns.net/calgunforum/showthread.php?t=274354
Trunion
Hand-Guard (Forearm): The older styles are narrow (slim) as pictured kit above. They were made of wood or plastic (black andgreen). The Newer Style usually refers to the wide forearm made of plastic. They usually come in Black, Green and even Beige (Earth).All wide Hand-Guards have a slot for bi-pod mount at the front end, and a leaf spring lock for the bi-pod on the underside. Most qualitywide forearms also have a hook on rear left side meant for use with three point sling. Cheaper ones do not have the heat shield linerinside.
Bolt Guide Tube / Cocking Tube: Bolt carrier rides in this. Although the carrier does not travel all the way till the Front Sight Post, itdoes travel to almost the charging handle resting position.
Dents deep enough on the tube will obstruct the action by blocking the free movement of the carrier, and cause malfunction. You can fixthe dents easily or get a replacement. They are easily available.
Page 10 of 75http://www.calguns.net/calgunforum/showthread.php?t=274354
#5
Bolt Carrie Group complete.
Bolt Carrier, Bolt Head, Locking Piece, Firing Pin and Spring: Bear in mind that not all locking piece are the same. They bearidentifying numbers and vary at the angle at which they taper.
__________________★
02-28-2010, 11:30 PM
fredieusa Member
Join Date: Mar 2008Location: Contra Costa CountyPosts: 416iTrader: 57 / 100%
Page 12 of 75http://www.calguns.net/calgunforum/showthread.php?t=274354
Grip Frame and selector.
Sear Pack - Skeleton Box Housing, Hammer, Hammer Shank, Spring and Pivoting Pin. Sear Catch, Sear Spring (ElbowSpring), and Trip Lever, Spacer, Roller and Pivoting Pin. Trigger, Sear, Trigger Spring and Pivot Pin.
Pistol Grip: All are made up of plastic and come in three colors, Black, Green and Beige (Earth).They are secured to the metal Trigger Housing Frame with a lock washer and a screw.
The newer Trigger Housing Frame is a single unit, molded in plastic as one piece incorporating the Pistol Grip. They come in blackand are lighter in weight than the older version.
Page 13 of 75http://www.calguns.net/calgunforum/showthread.php?t=274354
#6
__________________★
02-28-2010, 11:31 PM
fredieusa Member
Join Date: Mar 2008Location: Contra Costa CountyPosts: 416iTrader: 57 / 100%
1.3.0.0 Butt Stock Assembly
Fixed stock is made of wood or plastic. The plastic come in the same three colors, Black, Green and Beige (Earth). Some after-marketplastic ones do not have the sling loop anchor slot or the holes for back plate (butt plate cover) retainer. There are a lot of stylesavailable now, including telescopic (M4 type) ones.
Page 14 of 75http://www.calguns.net/calgunforum/showthread.php?t=274354
Collapsible or Telescopic. These are very sold and have a lesser known older style. The older style was all metal and had a slightcontour along the shoulder. The newer style has a rubber cushion attached and is bowed at the end.
Side Folding. Not as popular, I have no personal experience with this. BTW Choate is an OEM.
Page 16 of 75http://www.calguns.net/calgunforum/showthread.php?t=274354
#8
__________________★
02-28-2010, 11:32 PM
fredieusa Member
Join Date: Mar 2008Location: Contra Costa CountyPosts: 416iTrader: 57 / 100%
1.5.0.0 Other Parts needed – Essential.
These parts are a MUST. If you did not get them with your kit, you will need to buy them or make your own.
Receiver / Flat
Here you have two choices. You can buy a complete receiver and skip right over to demilling in the next section or get yourself a flat,which will need to be formed, welded, and parts attached /welded to it.
Complete PTR Receiver: These PTR receivers are a piece of art! The closest thing I have seen to the original. Down to the very lastdetail that matters. Semi shelf installed. Rear sight base installed. Rails are square. Stampings are nice and sharp, and most importantlyit has the rear receiver reinforced that houses the two bushings. I highly recommend it.
Sorry, did not have time to e-mail PTR to get permission for using their photo.
Page 17 of 75http://www.calguns.net/calgunforum/showthread.php?t=274354
#9
Shelf for Semi-Auto Receiver. This part, when welded to the rear of the magazine well, prevents the Select Fire Trigger housing fromattaching.
Rear Sight Base. You can either buy a new one or extract one from a demilled receiver.
http://www.robertrtg.com/receiverflat.html
__________________★
Last edited by fredieusa; 03-06-2010 at 9:25 PM..
02-28-2010, 11:32 PM
fredieusa Member
Join Date: Mar 2008Location: Contra Costa CountyPosts: 416iTrader: 57 / 100%
1.6.0.0 Other Parts needed - Optional. These are not essential to complete a functioning rifle, but they may saveyou time and effort. Also I am including some items (or description of) which I find are important to reinforce the structural integrity, justlike the original HK.
Page 18 of 75http://www.calguns.net/calgunforum/showthread.php?t=274354
Sear Pack already converted to Semi Auto. For whatever reason if you choose not to convert your own.
Trigger Housing already Clipped, Pinned and shelf welded. For whatever reason you wish not to convert your own as explained in section 3.0.0.0-Parts Conversion to Semi-Auto
Shelf for Semi Auto Trigger Housing. Looks similar to the Shelf for the receiver, But not the same thing.
Bushings (2) for rear butt stock push pins. Maybe not commonly used, but I highly recommend it.
Reinforcing Shelf for rear receiver push pin bushingsThis sheet metal piece is welded (and spot welded on the sides) to the receiver, then bushings are inserted and welded. Installing thisreinforces the lower rear of the receiver and makes it rigid and strong. All factory guns have this installed.
I am reclaiming this from a demilled receiver stub as shown in section 2.6.0.0. Because it is a demilled item, instillation will be different.(Shown in the middle below).
Blackwing on MilitaryFirearms.com offers these also. Here.
Paddle Magazine release I will be installing a Paddle Mag-Release, Here is a very desirable upgrade. The anti rattle lever, it improves magazine fit (feeling) andrattle.http://www.hkparts.net/shop/pc/viewP...6&idcategory=0
Page 19 of 75http://www.calguns.net/calgunforum/showthread.php?t=274354
#10
Bushings for sear spring
These bushings / washers will fill in the gap created by the elimination of the sear catch (full auto part).
PIC needed__________________★
Last edited by fredieusa; 03-06-2010 at 9:11 PM..
02-28-2010, 11:33 PM
fredieusa Member
Join Date: Mar 2008Location: Contra Costa CountyPosts: 416iTrader: 57 / 100%
1.7.0.0 §922(r) Parts Count and List of Suppliers http://www.922r.com/
I am building a rifle here, so §922(r) applies. If it were a pistol build, it would not have applied.HK91 type build involves 17 parts, that means I am required to use at least 7 US Made parts (10 foreign parts areallowed). As you can see below, I have plenty of choices (ones listed in color Purple ) of domestically made parts to choose from.
Here is a partial list of vendors that offer parts [also §922(r) compliant US Made-parts]. Although I have not dealt with all on the list,most are upstanding. In addition to the list below, you can also try auction sites, various boards and classifieds likehttp://www.hkpro.com and http://www.sturmgewehr.com
Join Date: Mar 2008Location: Contra Costa CountyPosts: 416iTrader: 57 / 100%
2.0.0.0 Preparing the Kit and PartsAs we disassemble and demill the kit, keep an eye out for excessively worn parts that may be critical to the safety and functioning ofyour gun.
2.1.0.0 Checking Head-Space .3 to .4
We check headspace now. The HK delayed Roller lock action do not require a Head-Spacing Gauge, instead we will use a feeler Gauge.Factory sets head space between 0.3mm and 0.4mm. Safe working limit is between .2mm and .5mm. If I can get a gauge in therebetween .2mm and .5mm it will be safe. If it is between .3mm and .4mm, that will be ideal.
To check the headspace I lock the bolt carrier group into the Trunion. It needs to seat all the way and lock-up. The head space ismeasured by gauging / measuring the space between the carrier and the bolt head.
In the extend position the bolt group is unlocked. When the bolt head is seated all the way, it is locked. Now we insert our feeler gaugeand check headspace. This one here comes in at .203mm / .008”. Almost on the line towards the lower limit, but I will live with this.Depending on how much I shoot it, it may become necessary to visit this again. More the gun/parts wear out, less the head-space gets.
Page 22 of 75http://www.calguns.net/calgunforum/showthread.php?t=274354
Correcting Head Space
Using a different size of Rollers or replacing your Locking Piece will correct your Head-Space.Here is what rollers come in. You determine if you your have less or excessive head space, then choose your parts accordingly. If youincrease your roller size by +2, your Head-Space (Gap) will increase by .02mm. here are some threads on the subject.
Page 23 of 75http://www.calguns.net/calgunforum/showthread.php?t=274354
#12
★
Last edited by fredieusa; 03-14-2010 at 8:43 PM..
02-28-2010, 11:33 PM
fredieusa Member
Join Date: Mar 2008Location: Contra Costa CountyPosts: 416iTrader: 57 / 100%
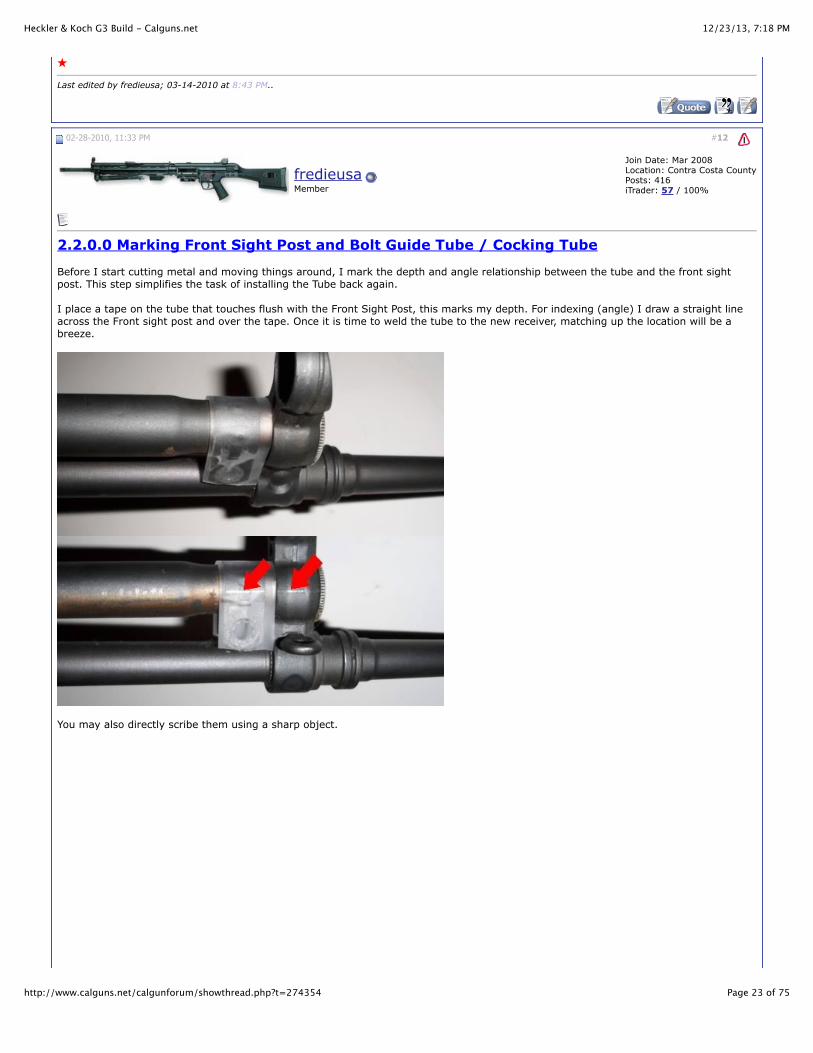
2.2.0.0 Marking Front Sight Post and Bolt Guide Tube / Cocking Tube
Before I start cutting metal and moving things around, I mark the depth and angle relationship between the tube and the front sightpost. This step simplifies the task of installing the Tube back again.
I place a tape on the tube that touches flush with the Front Sight Post, this marks my depth. For indexing (angle) I draw a straight lineacross the Front sight post and over the tape. Once it is time to weld the tube to the new receiver, matching up the location will be abreeze.
You may also directly scribe them using a sharp object.
Page 24 of 75http://www.calguns.net/calgunforum/showthread.php?t=274354
#13
__________________★
02-28-2010, 11:33 PM
fredieusa Member
Join Date: Mar 2008Location: Contra Costa CountyPosts: 416iTrader: 57 / 100%
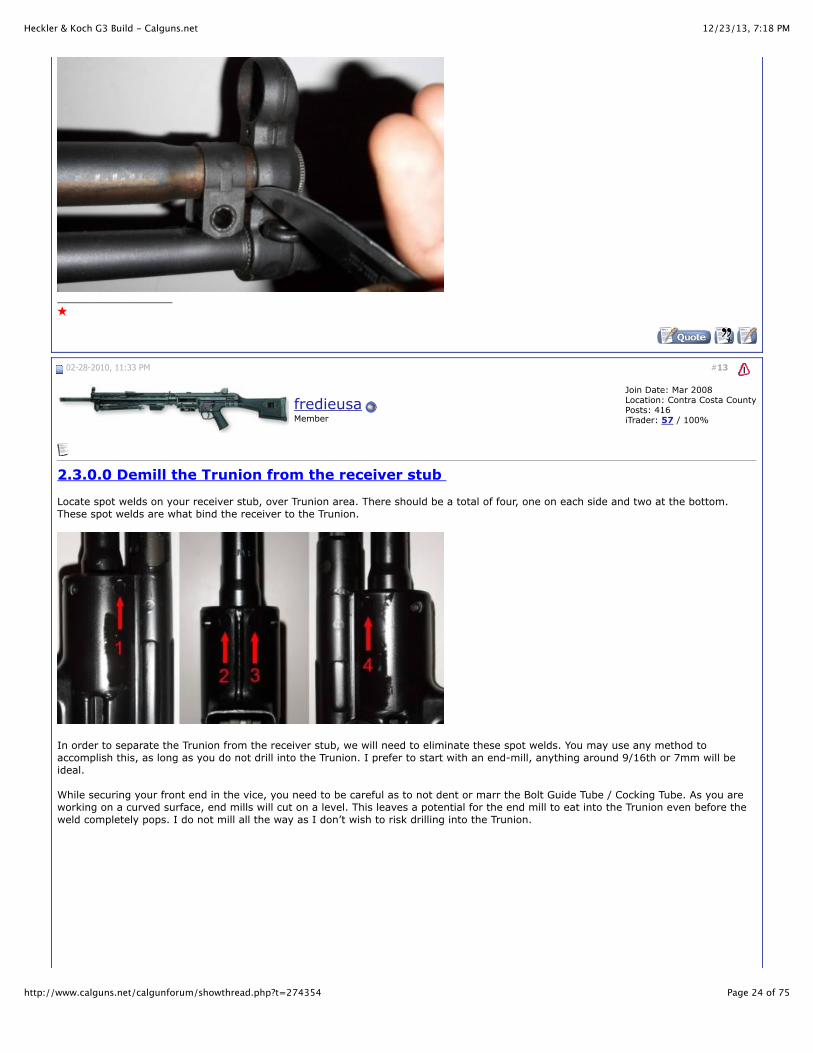
2.3.0.0 Demill the Trunion from the receiver stub
Locate spot welds on your receiver stub, over Trunion area. There should be a total of four, one on each side and two at the bottom.These spot welds are what bind the receiver to the Trunion.
In order to separate the Trunion from the receiver stub, we will need to eliminate these spot welds. You may use any method toaccomplish this, as long as you do not drill into the Trunion. I prefer to start with an end-mill, anything around 9/16th or 7mm will beideal.
While securing your front end in the vice, you need to be careful as to not dent or marr the Bolt Guide Tube / Cocking Tube. As you areworking on a curved surface, end mills will cut on a level. This leaves a potential for the end mill to eat into the Trunion even before theweld completely pops. I do not mill all the way as I don’t wish to risk drilling into the Trunion.
Page 25 of 75http://www.calguns.net/calgunforum/showthread.php?t=274354
With most of the spot weld milled, now use a hack saw or a dremel to cut along the bottom of the receiver and through the magazinewell. Once the cut is complete, use a chisel to open up the gap and start to peel away. As you peel the receiver away, any material stillholding the spot welds will pop.
Damaging the Bolt Guide Tube / Cocking Tube in this process is common because you will be swinging hammers and chisels to peel offthe receiver stub off the Trunion, while the Tube is still connected. Saving the tube is not hard, just remain aware where the tube is whenworking.
Page 26 of 75http://www.calguns.net/calgunforum/showthread.php?t=274354
Secure one of the ears of the mag well into a vice, that will hold it in place while you hammer away using a chisel. The receiver is alsowelded to the Trunion at the rails, they give fairly easy. Continue to pop the last two spot welds on the Trunion till it is free. Now that wehave the Barrel (barrel, Trunion & FSB) and Bolt Guide Tube / Cocking Tube separate, store the barrel away as it will not be needed tillthe receiver is complete and ready in Section 4.3.0.0
Page 28 of 75http://www.calguns.net/calgunforum/showthread.php?t=274354
2.4.0.0 Demilling the Bolt Guide Tube / Cocking Tube
Should your Tube get damaged or dented where you are unable to fix, there are replacements available. You can also buy new ones,which will save you time and effort, nothing beats that. Your kit is expensive, so is everything H&K. Don’t wait for a visualdisappointment in the end trying to save a few bucks. Here is ours, no dings or dents fortunately. I worked very carefully to make sure ofthat. Notice I still have my tape up front.
Next I take off the receiver stub from the tube while retaining the (whole) extension. This original extension has a beautiful bevel job,moreover the bolt in normal battery does not travel far enough (rearwards) to clear the extension. Should these measurements bedecreased, the bolt carrier will have a rougher ride.
Start with milling out or grind off two spot welds, one on each side. Mill most of the way and peel the rest off, just like the Trunion. I willalso place a shallow cut along the border of the tube and the receiver. The cut is placed just behind the weld away from the tube. Oncethe cuts are made, again (just like the trunion) I will tightly secure one of the receiver’s mag well ears in a vice and try peeling it off. Thetube extension is thin, so I have to be careful as to not squash it.
Page 29 of 75http://www.calguns.net/calgunforum/showthread.php?t=274354
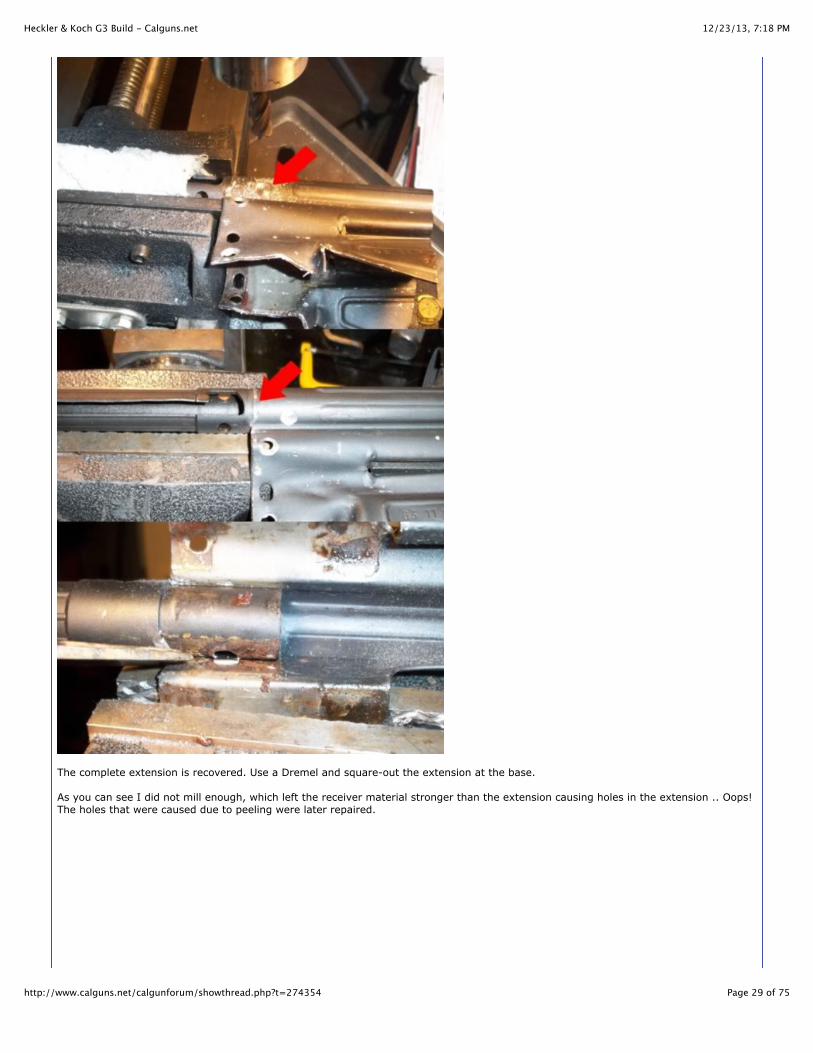
The complete extension is recovered. Use a Dremel and square-out the extension at the base.
As you can see I did not mill enough, which left the receiver material stronger than the extension causing holes in the extension .. Oops!The holes that were caused due to peeling were later repaired.
Page 30 of 75http://www.calguns.net/calgunforum/showthread.php?t=274354
#15
THERE IS AN ALTERNATE METHOD. Cut off the excess receiver portion that enveloped the Trunion. Leave the receiver stubaround the extension tube. Using a belt sander, eliminate the receiver stub. This saves you the milling for the spot weldsand no peeling off. I don’t use this method because I find hard to achieve uniformity while belt-sanding around acylindrical object.__________________★
02-28-2010, 11:34 PM
fredieusa Member
Join Date: Mar 2008Location: Contra Costa CountyPosts: 416iTrader: 57 / 100%
2.5.0.0 Salvaging Rear Sight Base (RSB)
Most folks buy a new one. You can reclaim one if you have a receiver rear end (or buy the demilled section from RobertRTG). Use aDremel and cut through the receiver along the edges of the Sight Base.
Page 31 of 75http://www.calguns.net/calgunforum/showthread.php?t=274354
Once the RSB is free, grind off the receiver stub on the rear and match it to the rear of the RSB. Then start grinding at the lower edges.When you start to come close to .26”, the RSB will start to separate from the receiver stub attached to it because you have ground offthe weld.
Page 32 of 75http://www.calguns.net/calgunforum/showthread.php?t=274354
Cut towards the front end on both sides straight down, this frees up any welds on the sides. For the front end, you can see where themetal is welded on the underside. Use a Dremel to clean the area around the weld cutting into the receiver. While doing this, do not cutinto the Sight Base. Give a few light taps with a punch and the receiver stub will comes loose. Dress up the recovered Sight Base but nottoo much, fitting will be done when it is time to weld RSB on to the new receiver.
Update 3/6/2010 : These are offered new by member Blackwing on MilitaryFirearms.com HERE.
Most builders do not pay attention to the reinforcement plate and some not even to the stock pins. I have not seen a factory HK withoutthis, therefore I will include this. However this is totally optional.
There are a few ways these parts can be salvaged from a demilled receiver, but it is a tedious task. Sleeves are freely available, for thereinforcing plate you can cut a sheet metal to size and then fold/form it yourself.
Slit the top of the receiver. Then bend each side, you can now spread and open the receiver stub. Each side has three spot welds, millthe material off these spot welds almost down to the thin inner plate.
Page 34 of 75http://www.calguns.net/calgunforum/showthread.php?t=274354
#17
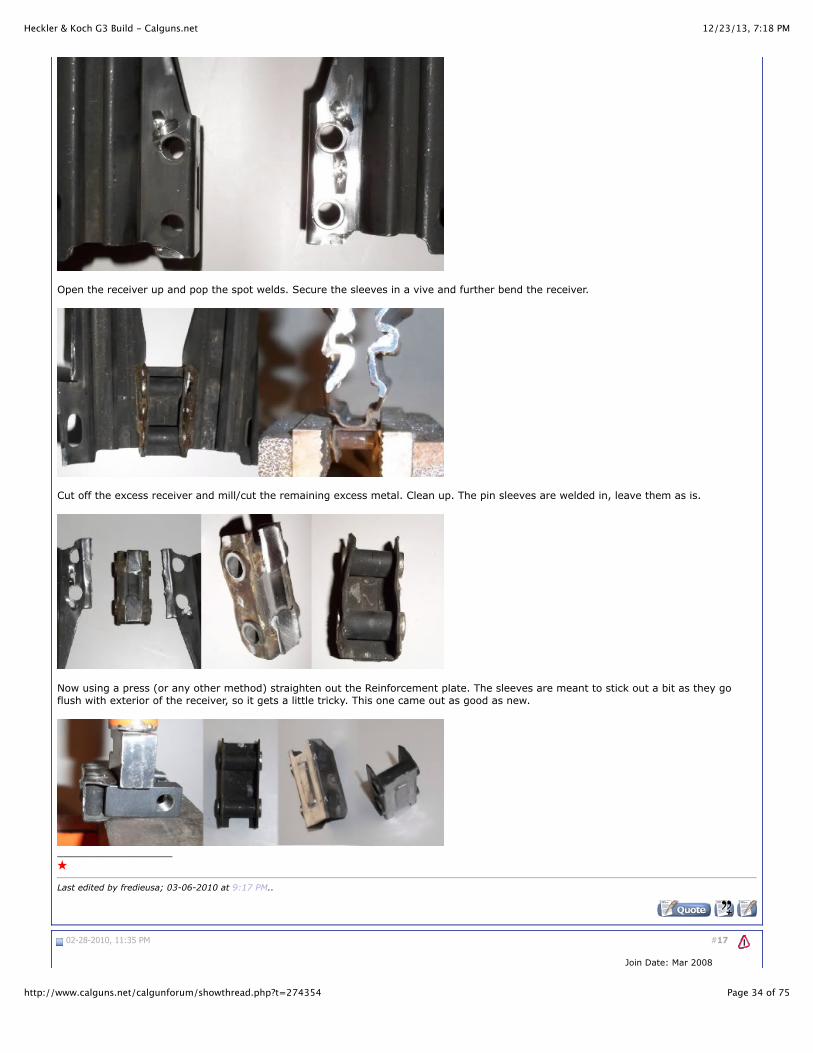
Open the receiver up and pop the spot welds. Secure the sleeves in a vive and further bend the receiver.
Cut off the excess receiver and mill/cut the remaining excess metal. Clean up. The pin sleeves are welded in, leave them as is.
Now using a press (or any other method) straighten out the Reinforcement plate. The sleeves are meant to stick out a bit as they goflush with exterior of the receiver, so it gets a little tricky. This one came out as good as new.
Page 35 of 75http://www.calguns.net/calgunforum/showthread.php?t=274354
fredieusa Member
Location: Contra Costa CountyPosts: 416iTrader: 57 / 100%
2.7.0.0 Salvaging Paddle Mag Release.
Most likely the Paddle Mag release you have with your kit is the old style. At this point, you can choose to upgrade to the newer AntiRattle Mag Release. You can use the same one for the 91 and 93, however the 94 (9mm) ones are different.
Cut along the rear of the Mag well, right on top of the structural welding. This will part the Mag well and you will need to pry it off till itcomes free.
Page 36 of 75http://www.calguns.net/calgunforum/showthread.php?t=274354
#18
★
02-28-2010, 11:35 PM
fredieusa Member
Join Date: Mar 2008Location: Contra Costa CountyPosts: 416iTrader: 57 / 100%
3.0.0.0 Parts Conversion to Semi-AutoUPDATE on Semi-Conversion Jan-2010: I ran across this latest list issued by the BATFE- Technology Branch, that certifies an imported HKas a Semi-Auto. These new featured added or modified are far beyond what original factory Semi-Auto HK’s came with. All Semi-Autofeatures listed in this thread maybe something that is now required, I just don’t know. Build documented here was completed prior to theexistence of this new list. http://hkpro.com/forum/showpost.php?...0&postcount=29
Below mentioned conversion is what was very much acceptable and very effective. Should you have questions and wish to explore moreon this topic, please start a new thread here or on HKPRO.com. Shooting off letters to ATF for clarification leads to more confusion, morequestions and still new rulings. This new letter linked above is a direct result of someone questioning some designs and features the newimported HK hold! Another example of outcome from writing letters to ATF is the broader expansion of §922(r), previously (for stateswhere it is allowed) NFA items were exempt and now the ruling is reversed to incorporate ALL firearms, so lay-off on them letters.
Although I am going through this process of conversion for documentation purpose, I will NOT use the original Sear, Hammer and theTrigger. For compliance with §922(r), these (along with some other parts) will be replaced with US Made ones.
I am doing all modifications for semi-auto conversions that are possible. Most people do not do all that I am demonstrating here. AGIVideo does not limit the trigger travel by installing a new pin, but place a weld on the exterior housing that limits the swing of theselector itself. Few builds do not perform the Hammer notch modification, yet some do not bother with the lower trigger step thatengages the sear. Many like to leave their bolt carrier as-is and not cut the notch for the clearance of the trip lever.
Page 37 of 75http://www.calguns.net/calgunforum/showthread.php?t=274354
#19
__________________★
02-28-2010, 11:35 PM
fredieusa Member
Join Date: Mar 2008Location: Contra Costa CountyPosts: 416iTrader: 57 / 100%
3.1.0.0 Eliminating Select Fire parts.
These parts will not be used, they should be disposed off.Sear Catch and the Trip Lever are two parts whose only purpose is to facilitate select-fire capability, they need to go.
Page 38 of 75http://www.calguns.net/calgunforum/showthread.php?t=274354
#20
__________________★
02-28-2010, 11:36 PM
fredieusa Member
Join Date: Mar 2008Location: Contra Costa CountyPosts: 416iTrader: 57 / 100%
3.2.0.0 Trigger pack housing / body cutting and welding.
I cut the housing and thereby eliminate the location (pivot hole) where the Sear Catch and spring pivot. This modification will also allowthe modified housing to fit only in a semi-auto grip frame. My method is not the simplest, fastest or the easiest; however it is the sameas the original factory. The easiest (and still 100% functional) would be to simple cut out the scribed portion and move on to the nextstep.
Scribe lines along the top and rear of the pivot holes on both sides. Keep lines completely vertical and horizontal in relation to thehousing, so the cuts are neat and in proportion. Make cuts on both sides of the housing and fold them out. Bend at the front as shown; itis important that the front corner created gets a square shape. If it is not square enough, it will not fit into the outer grip frame. I makeuse of a press to form the edge.
Page 40 of 75http://www.calguns.net/calgunforum/showthread.php?t=274354
Now I cut off the excess ears. Smooth and bevel for welding. As I was too lazy to set up TIG, I use a jeweler’s torch with no filler. It gotthe job done just fine. Quality of the job solely depends upon an individual’s skill with the tool.
Page 42 of 75http://www.calguns.net/calgunforum/showthread.php?t=274354
#21
__________________★
02-28-2010, 11:36 PM
fredieusa Member
Join Date: Mar 2008Location: Contra Costa CountyPosts: 416iTrader: 57 / 100%
3.3.0.0 New pin location for Sear Spring.
Determining the hole location is important as it will determine the clearance for hammer and how effectively the sear spring works.Having drilled to some measurements offered by companies and individuals on the net, I find it easier to stick with the location that thefactory semi-autos have. However, you will need to bend the sear reset spring just like the factory semi-autos (covered in the next step
Page 43 of 75http://www.calguns.net/calgunforum/showthread.php?t=274354
below) so the spring itself does not touch the sear, only the roller should come in contact. The bow-toe bending is not required, but canbe included (added to) if your initial bending does not accomplish required results.
Vertical reference line (in Blue) is in the center of the pillar as shown.Horizontal Line is 6mm parallel to the bottom edge.The hole is drilled with a 5mm drill bit and then reamed.
3.3.1.0 Bending of the Spring.
Bend at the base where the spring coils around the pin. After a successful modification, only the roller should contact the sear thought itsmovement.
Page 45 of 75http://www.calguns.net/calgunforum/showthread.php?t=274354
#22
★
02-28-2010, 11:37 PM
fredieusa Member
Join Date: Mar 2008Location: Contra Costa CountyPosts: 416iTrader: 57 / 100%
3.4.0.0 Internal Trigger Stop Pin.
This procedure is done to limit the movement of the trigger or decrease the length of the trigger pull by only 2.5mm (roughly 0.1”). Thiscan be done by two ways.
First Method: Moving (or installing new) pins inside the pack that will result in decreased distance between the two. Or simply place abead with a welder just below the upper limit pin and adjust as needed using a file.
Second method: Welding an extension on the trigger surface (shown below in pic) itself that will limit the travel upwards.
Page 46 of 75http://www.calguns.net/calgunforum/showthread.php?t=274354
#23
I limit the trigger travel by installing a new pin and eliminating the old one. The old one can be left as is, but it serves no purpose.__________________★
02-28-2010, 11:37 PM
fredieusa Member
Join Date: Mar 2008Location: Contra Costa CountyPosts: 416iTrader: 57 / 100%
3.4.1.0 New Pin location.
Factory HK Stop Pins are installed 1” from the bottom (or about 0.52” from the top) of the housing and .84” from the rear. The diameterof the pin itself is 5mm. For our conversion, locating this exactly is not feasible (as-is) as it will require drilling over the circumference ofthe existing pin. So first I cut off the old upper limit pin flush with a Dremel (knocking it out can dent or disfigure the housing). Whilemeasuring for dimensions, bear in mind that the rear edge is curved so place a flat surface along the rear to accurately locate the spot.
Page 47 of 75http://www.calguns.net/calgunforum/showthread.php?t=274354
#24
#25
02-28-2010, 11:37 PM
fredieusa Member
Join Date: Mar 2008Location: Contra Costa CountyPosts: 416iTrader: 57 / 100%
3.4.2.0 Drilling for the new pin.
The pin should come from the same drill used for the drilling as it will be a good fit. You can also use anything in between 3/16”–13/64”,they will all suffice. It is very unlikely the Sear will not release the Hammer because the pull is not enough. Should that situation arise,that can be easily fixed by filing on Trigger arm that contacts the Trigger Stop Pin, being installed here. The old Stop can be cut off, as Ihave done below. Most builders leave the first pin as is, which is fine too.
__________________★
02-28-2010, 11:37 PM
fredieusa Member
Join Date: Mar 2008Location: Contra Costa CountyPosts: 416iTrader: 57 / 100%
3.4.3.0 Installing the new Stop Pin and securing with a weld.
I started to weld with the drill inside. Once the base was welded, I cut off the excess drill on the outside and cleaned off the rest. Here itis after a little dressing.
Notes: Many semi-auto conversion kits on the market come with directions that call for a 1/8” (3.18mm) diameter pin to be installed.They locate the hole where the diameter is located just outside of the existing pin. That is fine too, in-fact it is less work.
Page 48 of 75http://www.calguns.net/calgunforum/showthread.php?t=274354
#26
__________________★
02-28-2010, 11:38 PM
fredieusa Member
Join Date: Mar 2008Location: Contra Costa CountyPosts: 416iTrader: 57 / 100%
3.5.0.0 Hammer Work.
Eliminate the first notch / step as shown . This will eliminate the capacity of the sear to catch there. Factory Hk’s also have this done totheir hammers.
Page 50 of 75http://www.calguns.net/calgunforum/showthread.php?t=274354
#27
#28
__________________★
02-28-2010, 11:38 PM
fredieusa Member
Join Date: Mar 2008Location: Contra Costa CountyPosts: 416iTrader: 57 / 100%
3.6.0.0 Trigger Work.
Grind out the lower step on the trigger as indicated with the arrow. I do this by cutting or milling straight down using a mill. It can alsobe done with a Dremel. This step ensures that the sear rests on the trigger in Semi-Auto mode only.
Note: The semi-auto notch should not be recessed in anyway. Under normal operation, we only have about 1mm of the trigger makecontact with the sear!
__________________★
02-28-2010, 11:38 PM
fredieusa Member
Join Date: Mar 2008Location: Contra Costa CountyPosts: 416iTrader: 57 / 100%
3.7.0.0 Converting the Trigger pack housing / Clipping and Pinning.
Most people simply crop the ears off as shown. This takes away the ability of a semi-auto housing (with the ears cut off) to be able tomount on a full-auto receiver due to the lack of holes for the pivoting pin. Below is an example of what a simple clipping jobaccomplished and how it fit. Further on in the chapter I will be doing the shelf also.
Page 52 of 75http://www.calguns.net/calgunforum/showthread.php?t=274354
#29
automatic. This relatively new process is called “Clipping and Pinning”, in addition to installing/welding the shelf that rests on theReceiver’s Semi-Auto wedge. Few posts down i also do this for kicks.
__________________★
Last edited by fredieusa; 01-06-2013 at 12:54 PM..
02-28-2010, 11:39 PM
fredieusa Member
Join Date: Mar 2008Location: Contra Costa CountyPosts: 416iTrader: 57 / 100%
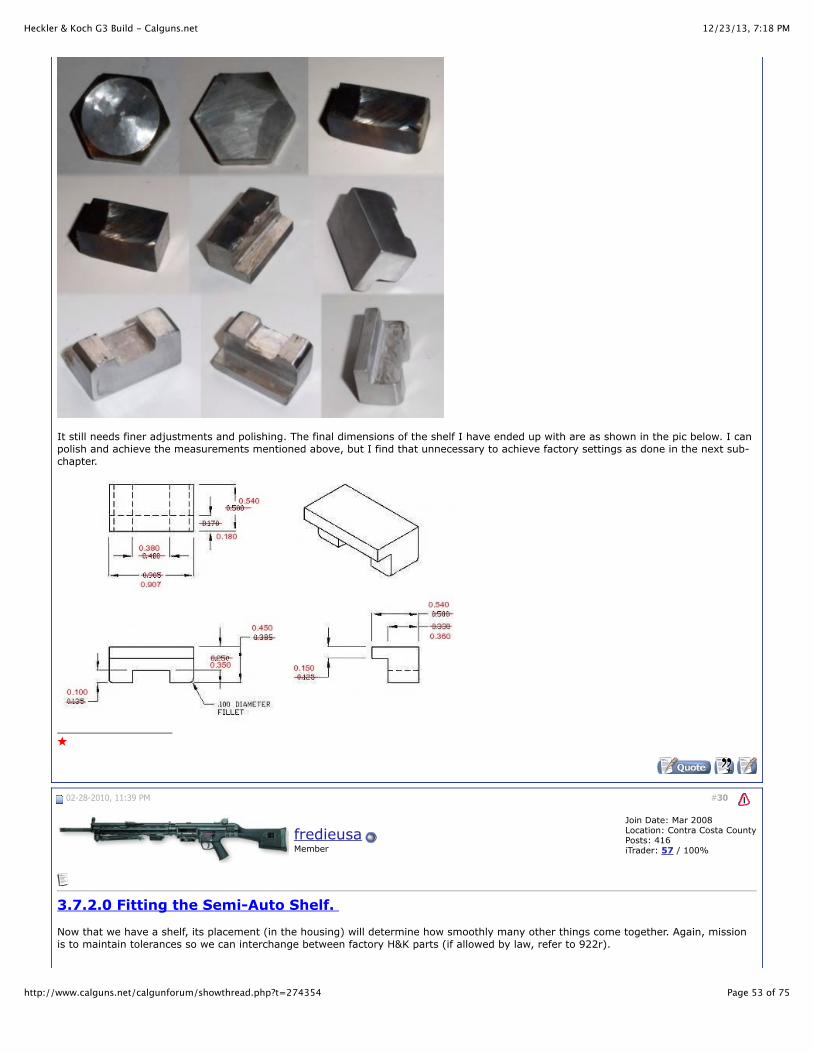
3.7.1.0 Making a Semi-Auto Shelf for instillation on the housing. I was unable to find a shelf commercially, so I had tomake one. A good shelf will block a G3 unmodified pack from being seated, yet engage the receiver wedge snugly eliminating any wobbleor sloppy fit for the grip frame. My method was very labor intensive, given the availability of tools and material. There are easier ways,just bear in mind the goals we are trying to accomplish.
I worked on a chunk of bolt head that was severed while making a mandrill for another project. Shaping and grinding skills areelementary so I will not write a thesis on this. Not bad for only using the grinder and a Dremel.
Page 53 of 75http://www.calguns.net/calgunforum/showthread.php?t=274354
#30
It still needs finer adjustments and polishing. The final dimensions of the shelf I have ended up with are as shown in the pic below. I canpolish and achieve the measurements mentioned above, but I find that unnecessary to achieve factory settings as done in the next sub-chapter.
__________________★
02-28-2010, 11:39 PM
fredieusa Member
Join Date: Mar 2008Location: Contra Costa CountyPosts: 416iTrader: 57 / 100%
3.7.2.0 Fitting the Semi-Auto Shelf.
Now that we have a shelf, its placement (in the housing) will determine how smoothly many other things come together. Again, missionis to maintain tolerances so we can interchange between factory H&K parts (if allowed by law, refer to 922r).
Page 54 of 75http://www.calguns.net/calgunforum/showthread.php?t=274354
#31
Here are some pictures from a factory H&K for reference for the steps below. As you can see, the factory shelf is a two piece item. Alsothe factory have relieved the housing’s lower edge back to the trigger guard tab.
Page 55 of 75http://www.calguns.net/calgunforum/showthread.php?t=274354
fredieusa Member
Location: Contra Costa CountyPosts: 416iTrader: 57 / 100%
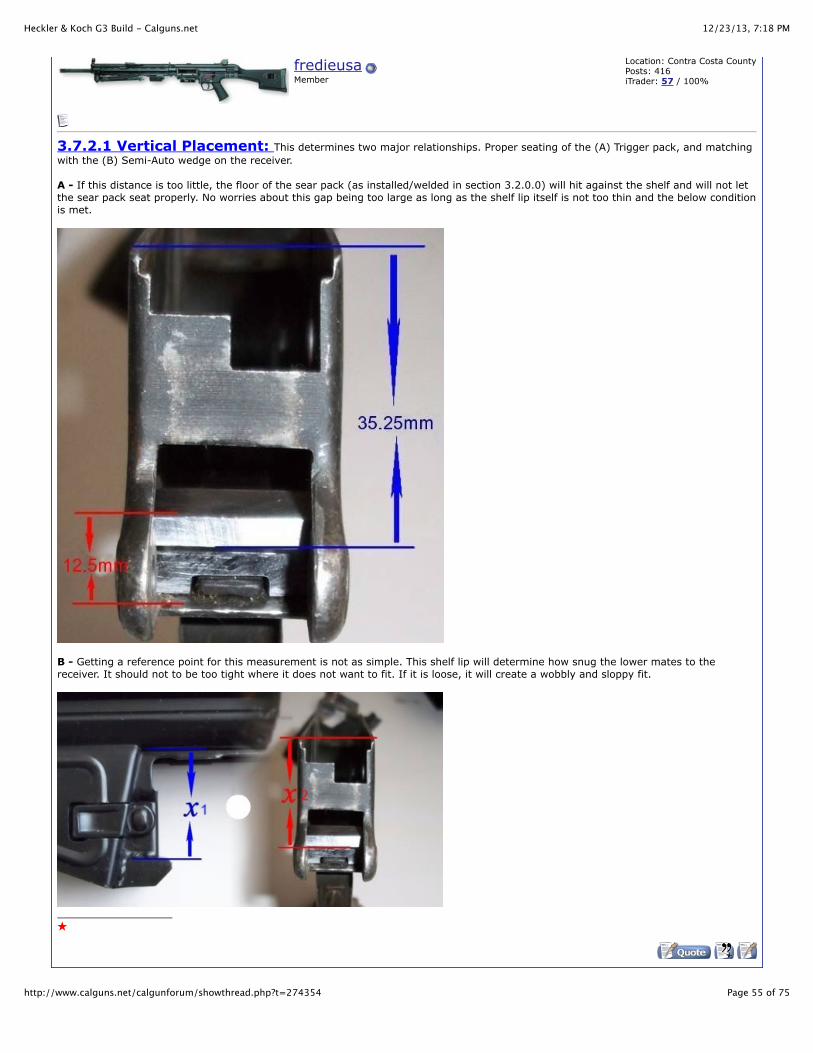
3.7.2.1 Vertical Placement: This determines two major relationships. Proper seating of the (A) Trigger pack, and matchingwith the (B) Semi-Auto wedge on the receiver.
A - If this distance is too little, the floor of the sear pack (as installed/welded in section 3.2.0.0) will hit against the shelf and will not letthe sear pack seat properly. No worries about this gap being too large as long as the shelf lip itself is not too thin and the below conditionis met.
B - Getting a reference point for this measurement is not as simple. This shelf lip will determine how snug the lower mates to thereceiver. It should not to be too tight where it does not want to fit. If it is loose, it will create a wobbly and sloppy fit.
Page 56 of 75http://www.calguns.net/calgunforum/showthread.php?t=274354
#32 02-28-2010, 11:39 PM
fredieusa Member
Join Date: Mar 2008Location: Contra Costa CountyPosts: 416iTrader: 57 / 100%
3.7.2.2 Horizontal Placement: Best is to line it up with the front wall of the housing suing a guide on the outside.
If this is placed too far back, it will not engage the wedge on the receiver or risk slipping off. Also you do not want it to touch (interferewith) the sear pack housing or the spring (as installed in section 3.3.0.0).
If the shelf is installed too far forward, it will create an unwanted gap between the trigger housing body and the receiver. Among otherthings (like hammer not making even/flush contact with the firing pin), it will lead to issues lining up holes for the rear stock push pins.
Page 58 of 75http://www.calguns.net/calgunforum/showthread.php?t=274354
fredieusa Member
Posts: 416iTrader: 57 / 100%
3.7.3.0 Welding the Semi-Auto Shelf.
H&K spot welded theirs on. Spot welds can be placed using a spot welder or simply welding the two locations and then cleaning it off willalso work.
This is how the factory one looks.
Because of the shelf placement measurements in the previous section, I know where to drill in-order to get the solid sides of the shelf. Todouble check I scribe the inside Notice that the Trigger Guard slot falls dead in the center. Given the height of the shelf, I scribe on theoutside, placing the housing against a level surface (curved edges are poor reference points). Now I have the top limit and the centerline for my hole.
I locate the drill spot by dropping 5mm below the top limit line and punch it. I drilled 4.5 mm holes, this size is really a personalpreference. H&K spot welds are about the same size. I clean the front half thoroughly with degreaser as oil runs towards the heat ruiningthe weld. Then buff out the park / paint from all four sides around the holes for a solid weld.
Page 60 of 75http://www.calguns.net/calgunforum/showthread.php?t=274354
#34
#35
02-28-2010, 11:41 PM
fredieusa Member
Join Date: Mar 2008Location: Contra Costa CountyPosts: 416iTrader: 57 / 100%
3.7.4.0 Clipping off the ears / Cutting off the tabs – Grinding the Tabs.
Cutting ears/tabs off. I do not cut the ears off because I went for the original type look, which gives the appearance that the push-pin ispresent. Reduction is done in section 4.2.3.0, when the semi-auto wedge is welded to the receiver.
__________________★
Last edited by fredieusa; 03-01-2010 at 4:34 PM..
02-28-2010, 11:41 PM
fredieusa Member
Join Date: Mar 2008Location: Contra Costa CountyPosts: 416iTrader: 57 / 100%
3.7.5.0 Installing Push-Pin bits.
This procedure is purely cosmetic, giving the appearance of the push pin being present. To prevent accidental release of the pin (not thatit matters here lol), it is preferred that they be installed from the right to the left (It also depends on a personal preference, dependingwhich hand the shooter shoots).
First I cut the Push-Pin head. Insert it all the way, scribe and cut when fully seated.
Page 61 of 75http://www.calguns.net/calgunforum/showthread.php?t=274354
Now hold other end with wire lock held touching against the tab, scribe and cut. As the cut is made shorter than the point where thespring wire is anchored – it will come loose. I set the wire back in the pin piece and wedge in a nail to hold it in place. The nail will alsoact as filler so I can melt it and spread the material around, this will also secure the spring wire piece.
I can now either weld them or use an epoxy (after refinishing the housing), to secure the push-pin tabs to the housing. I choose to go with welding. Epoxies are also very good and durable, it just so happens that my welder is all setup and ready to go. Placewelds along the inside, grind to an even smooth finish.
Page 62 of 75http://www.calguns.net/calgunforum/showthread.php?t=274354
Here the wire spring end is welded.
After a little buffing here it is with some slag still attached. Because I don’t want to scratch it or marr it, I will media/sand blast the restof the slag off before parking.
Page 64 of 75http://www.calguns.net/calgunforum/showthread.php?t=274354
#36
#37
02-28-2010, 11:41 PM
fredieusa Member
Join Date: Mar 2008Location: Contra Costa CountyPosts: 416iTrader: 57 / 100%
3.8.0.0 Bolt Carrier.
This step is not completed by all builders. Regardless of this fact, I cover it. I have no idea if this procedure is required or even coveredunder any new guide lines. Please check on HKPRO.com boards or elsewhere on this. Again, don’t go shooting off letters to BATFEtechnology branch.
The rear of a Select Fire bolt carrier is complete, which facilitates the actuation of the Auto Trip Lever located on the right side wheninstalled for operation. The trip Lever is already discarded from our sear pack as covered under section 3.1.0.0
The slot can easily be made with a Dremel. If you have a knee mill, there is nothing like it. The slot is 5mm wide and 6.5mm deep.
Before.
After.
__________________★
02-28-2010, 11:42 PM
fredieusa Member
Join Date: Mar 2008Location: Contra Costa CountyPosts: 416iTrader: 57 / 100%
Page 65 of 75http://www.calguns.net/calgunforum/showthread.php?t=274354
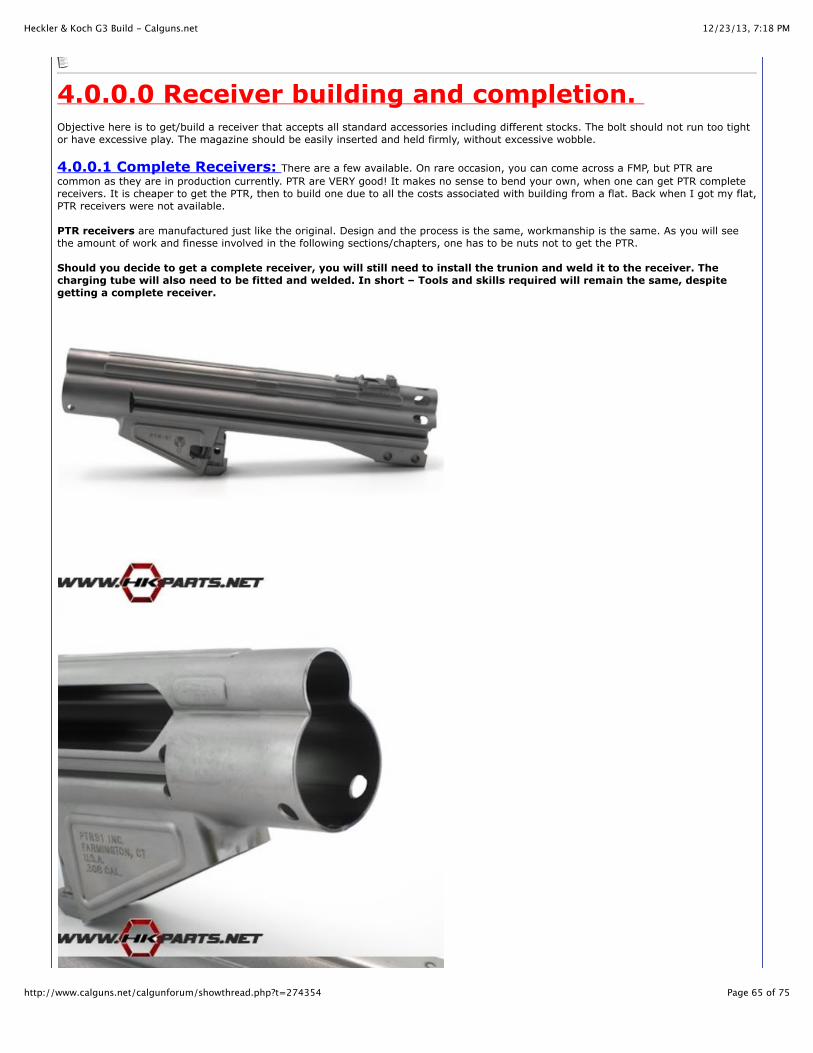
4.0.0.0 Receiver building and completion. Objective here is to get/build a receiver that accepts all standard accessories including different stocks. The bolt should not run too tightor have excessive play. The magazine should be easily inserted and held firmly, without excessive wobble.
4.0.0.1 Complete Receivers: There are a few available. On rare occasion, you can come across a FMP, but PTR arecommon as they are in production currently. PTR are VERY good! It makes no sense to bend your own, when one can get PTR completereceivers. It is cheaper to get the PTR, then to build one due to all the costs associated with building from a flat. Back when I got my flat,PTR receivers were not available.
PTR receivers are manufactured just like the original. Design and the process is the same, workmanship is the same. As you will seethe amount of work and finesse involved in the following sections/chapters, one has to be nuts not to get the PTR.
Should you decide to get a complete receiver, you will still need to install the trunion and weld it to the receiver. Thecharging tube will also need to be fitted and welded. In short – Tools and skills required will remain the same, despitegetting a complete receiver.
Page 66 of 75http://www.calguns.net/calgunforum/showthread.php?t=274354
Cast Aluminum receivers are nice, but they do not readily allow acceptance of all standard parts. Aluminum receivers do work welland are just as durable, it depends on how they are assembled.
Myths: Aluminum receivers develop a play at the trunion.
Fact: Correctly assembled Aluminum receiver stays strong; the fit should be tight enough that a press should be required to push thebarrel in. If the fit (@ trunion and barrel) is loose enough where you can push the barrel in by simply using a mallet (as shown in the AGIvideo) you are asking for trouble! If the fit is not correct to begin with (or the builder relies on epoxy or thread lock for a snug fit), howcan one expect the receiver to last?
Page 67 of 75http://www.calguns.net/calgunforum/showthread.php?t=274354
#38
The retaining pins (installed on either side on Aluminum receivers) should also have a tight fit that requires a press. When installing a4mm pin measure it. Also measure the drill bit that will be used for drilling the hole. Just because the drill bit if from a fancy companydoes not mean it is in specification.
I have a Springfield made clone in an Aluminum receiver, it is just as strong as any company HK out there.__________________★
02-28-2010, 11:42 PM
fredieusa Member
Join Date: Mar 2008Location: Contra Costa CountyPosts: 416iTrader: 57 / 100%
4.0.0.2 Flats: Apparently all seem to work, despite where you get them. More appropriately; you can get all of them to workdepending on your skill and understanding of the HK design.
Bending jigs: Knowing what needs to be accomplish is important as that will determine the process for bending/folding the flat. I havenoticed folks (on the net) bend flats while holding them with a pipe, secured to a table using only adjustable pliers and clamps. On theother hand I have seen exquisite, Cadillac jigs custom made for the job.
The jig I use below is very solid, simple (to the point) and adequate to get the job done. It can be used with 9mm, .223 and the .308flats. It has a lot of mandrills and rods to bend and adjust the receiver to correct some issues that may arise. I paid extra and got the railsquaring set-up also. This set-up cost me about $500.00 including shipping and insurance.
You can order these jigs DIRECTLY from the Original Source - Bob Nicholls, e-mail address is [email protected] is a nice guy and here to stay. Deal with confidence.
Page 68 of 75http://www.calguns.net/calgunforum/showthread.php?t=274354
Addition : 06-23-2011 below..New Jig on the market..
.
Guys just an FYI...
I saw this on GB and was in contact with the person manufacturing them.. I am NOT in the market for one but this product seemscutting edge. No need for a press and such. i think it offers the best control of the flat being bent and provides for much fineradjustments that may be needed. I have have built a few in all calibers and i think this is the finest one out there yet!
Page 71 of 75http://www.calguns.net/calgunforum/showthread.php?t=274354
#39
__________________★
Last edited by fredieusa; 06-23-2011 at 10:21 PM..
02-28-2010, 11:42 PM
fredieusa Member
Join Date: Mar 2008Location: Contra Costa CountyPosts: 416iTrader: 57 / 100%
4.1.0.0 Bending the Flat.
4.1.1.0 Squaring the rails
After some experience, I find squaring the rails before bending is ideal. It is a straight forward process where I can apply adequate forceprecisely where I need; this leaves all stampings crisp receiver alone without flattening them out or placing stress on areas that are notassociated with rails. There are exceptions where using a mandrill after welding may be necessary. That is covered in section 4.2.1.0.
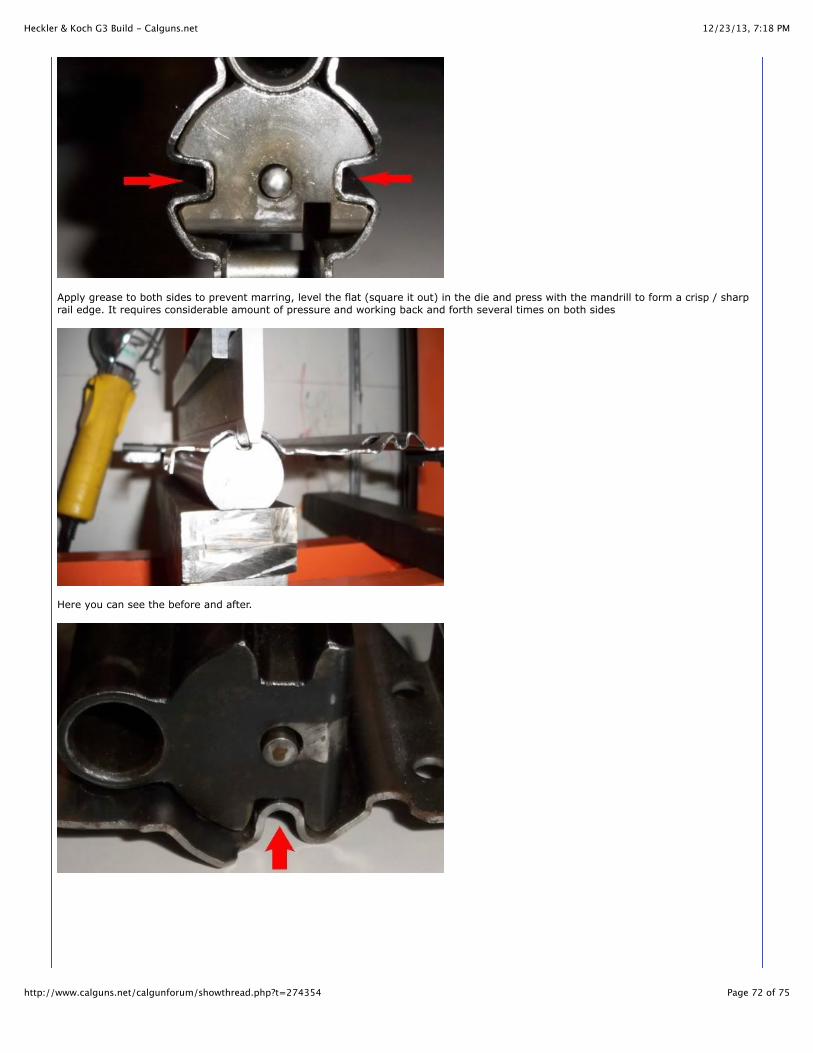
The bolt carrier runs on rails formed / pressed into the flat. On most flats the rails come rounded, whereas on the original design theyare sharp. Proper formed rails (to the original specification) will allow the bolt to function properly and also allow you to install the A3telescoping stock. Here is a picture of a factory receiver, as you can see the corners are sharp.
Page 72 of 75http://www.calguns.net/calgunforum/showthread.php?t=274354
Apply grease to both sides to prevent marring, level the flat (square it out) in the die and press with the mandrill to form a crisp / sharprail edge. It requires considerable amount of pressure and working back and forth several times on both sides
Page 73 of 75http://www.calguns.net/calgunforum/showthread.php?t=274354
#40
Squaring rails will straighten the main bulge in the flat, this is bad as it will result in the rails being too close after the receiver is bentand welded. Apply even force on either side when the flat is in the rail squaring jig till you get the same semi-circle form before youstarted.
NOTES: Squaring the rails is not required to get the bolt to work or the rifle to fire. Front of the rails (where rails meet the trunion) canbe filed to match up with the trunion so the dolt head rollers can smoothly lock up in the trunion. More on this later in section 4.3.2.3and 6.2.0.0.__________________★
02-28-2010, 11:43 PM
fredieusa Member
Join Date: Mar 2008Location: Contra Costa CountyPosts: 416iTrader: 57 / 100%
4.1.2.0 Forming / Bending the flat
The flat is held square between the base of the jig and the mandrill by guide pins at both ends. It is vital that the flat is evenly placed inthe jig. I measure (to the last fraction of a millimeter to make certain the flat is even. If the flat is not even, it will be lop sided resultingin a canted receiver (the mother of all many very serious issues).
Once the flat is bent a little, I check my measurements again to make certain that the flat is still even. It is not uncommon for a flat toslip and start to slide on one side (this will happen if your mandrill is not centered).
Go slow and press at different locations by moving the ram. It does not take that much force to bend, however it does require goodtechnique. As simple as it looks, it must not be rushed. There is nothing you can do if you end up with a warped receiver.
Page 75 of 75http://www.calguns.net/calgunforum/showthread.php?t=274354
Show your signature
If the receiver does go wrong (Canted or warped) at the end of this process, just start with a new one rather than trying to fix the error.G3 flats are complicated and will lead to newer issues in the process of trying to fix errors.__________________★
Page 1 of 3 1 2 3 >
Quick Reply
Message:
Options
Quote message in reply?
Old Thread WarningThis Thread is more than 1174 days old. It is very likely that it does not need any further discussionand thus bumping it serves no purpose.If you still feel it is necessary to make a new reply, you can still do so though.
I am aware that this Thread is rather old but I still want to make a reply.
Post Quick Reply Go Advanced
« Previous Thread | Next Thread »
Posting Rules
You may post new threadsYou may post repliesYou may post attachmentsYou may edit your posts
BB code is OnSmilies are On[IMG] code is OnHTML code is Off
Forum RulesForum Jump
Gunsmithing & How To Go
All times are GMT -8. The time now is 7:18 PM.
-- CalGuns 1.0 Advertise on Calguns.net - Contact Us - Calguns.net - Archive - Top