26
Start-Up Screen Merlin™ Patient Care System Help Manual

Start-Up Screen Merlin™ Patient Care System
Help Manual

Unless otherwise noted, ™ indicates that the name is a trademark of, or licensed to, St. Jude Medical or one of its subsidiaries. ST. JUDE MEDICAL and the nine-squares symbol are trademarks and service marks of St. Jude Medical, Inc. and its related
companies. © 2014 St. Jude Medical, Inc. All Rights Reserved.

i
Contents Start-Up Screen ....................................................................................................................................................... 1
Supported Devices ................................................................................................................................................................ 1 Start-Up Screen .................................................................................................................................................................... 5 ? Button ................................................................................................................................................................................ 6 RF Telemetry Status Icon ...................................................................................................................................................... 6 Wired & Wireless Connection Icons ........................................................................................................................................ 7 Tools .................................................................................................................................................................................... 7 Session Records ................................................................................................................................................................... 8 MerlinConduct™ Settings ...................................................................................................................................................... 8 PDFs .................................................................................................................................................................................. 10 Preferences ........................................................................................................................................................................ 11 Print Screen ........................................................................................................................................................................ 12 Export Screen ..................................................................................................................................................................... 12 Export Data ......................................................................................................................................................................... 12 Rhythm Display................................................................................................................................................................... 12 Waveform Control ................................................................................................................................................................ 13 Adjust Display ..................................................................................................................................................................... 13 ECG Configuration ............................................................................................................................................................... 13 Freeze Capture ................................................................................................................................................................... 13 Print Menu Settings ............................................................................................................................................................. 13 Technical Support ............................................................................................................................................................... 13
Error and Informational Messages .......................................................................................................................... 15 No PSA Wand Communication or Merlin™ PSA is not Functioning ........................................................................................ 15 No PSA Detected ................................................................................................................................................................ 15 Help ................................................................................................................................................................................... 15 Problem with Media Device ................................................................................................................................................. 15 No Media Detected ............................................................................................................................................................. 15 Media Invalid or Not Present ................................................................................................................................................ 15 Sustained Interruption ......................................................................................................................................................... 15 Older Device ....................................................................................................................................................................... 15 Device Not Supported ......................................................................................................................................................... 16 Telemetry Interruption ......................................................................................................................................................... 16 Invalid Parameters Detected ................................................................................................................................................ 16 On-Screen Keyboard ........................................................................................................................................................... 16 Emergency VVI Programming Interrupted ............................................................................................................................. 16 Backup VVI Procedure Interrupted ....................................................................................................................................... 16 Help Not Provided ............................................................................................................................................................... 16 Requires Connection to Computer ........................................................................................................................................ 16 BVVI Session Must Be Ended .............................................................................................................................................. 17 Unable to Restore Original Parameters ................................................................................................................................. 17
Index ..................................................................................................................................................................... 19


1
Start-Up Screen Contents:
Supported Devices (page 1) Start-Up Screen (page 5) ? Button (page 6) RF Telemetry Status Icon (page 6) Tools (page 7) Preferences (page 11) Print Screen (page 12) Export Screen (page 12) Export Data (page 12) Rhythm Display (page 12) Waveform Control (page 13) Adjust Display (page 13) ECG Configuration (page 13) Freeze Capture (page 13) Print Menu Settings (page 13) Technical Support (page 13)
Supported Devices The devices listed in the tables below are supported by the Merlin™ Patient Care System equipped with Model 3330 Software.1 The table also indicates whether the programmer's telemetry wand should be used with the magnet installed or removed. If you attempt to interrogate a device not listed here, the programmer cannot identify the device.
NOTE
If you do not know the implanted device's model name or number, interrogate the device without the magnet.
Table 1. Bradycardia devices supported by the Merlin PCS
Device Model Number Magnet MerlinConduct™ Feature Capability
MerlinReflect™ Feature Capability
Accent™ DR PM2112 Remove Yes Yes
Accent™ DR RF PM2212 Remove Yes Yes
Accent MRI™ PM1124, PM1224, PM2124, PM2224
Remove Yes Yes
Accent™ SR PM1110 Remove Yes Yes
Accent™ SR RF PM1210 Remove Yes Yes
Accent™ ST PM1122, PM1222, PM2122, PM2222
Remove Yes Yes
Accent™ ST MRI PM1126, PM1226, PM2126, PM2226
Remove Yes Yes
AddVent™ 2060 Install No No
Affinity™ DC 5230, 5231 Remove No No
Affinity™ DR 5330, 5331 Remove No No
Affinity™ SR 5130, 5131 Remove No No
Affinity™ VDR 5430 Remove No No
Allure™ PM3120 Remove Yes Yes
Allure Quadra™ PM3140 Remove Yes Yes
Allure™ RF PM3222 Remove Yes Yes
Allure Quadra™ RF PM3242 Remove Yes Yes
Anthem™ PM3112 Remove Yes Yes
Anthem™ RF PM3212 Remove Yes Yes
Assurity™ PM1240, PM2240 Remove Yes Yes
Assurity™ + PM1260, PM2260 Remove Yes Yes
Assurity MRI™ PM1272, PM2272 Remove Yes Yes
Endurity™ PM1160, PM 1162, PM2160, PM2162
Remove Yes Yes
1 Not all device models are available in all countries.

2
Table 1. Bradycardia devices supported by the Merlin PCS
Device Model Number Magnet MerlinConduct™ Feature Capability
MerlinReflect™ Feature Capability
Endurity™ Core PM1152, PM2152, PM1140, PM2140
Remove Yes Yes
Endurity MRI™ PM1172, PM2172 Remove Yes Yes
Entity™ DC 5226 Remove No No
Entity™ DR 5326 Remove No No
Frontier™ 5508, 5510 Remove No No
Frontier™ II 5586, 5596 Remove No No
Identity™ ADx DC 5286 Remove No Yes
Identity™ ADx DR 5380 Remove No Yes
Identity™ ADx SR 5180 Remove No Yes
Identity™ ADx VDR 5480 Remove No Yes
Identity™ ADx XL DR 5386 Remove No Yes
Identity™ DR 5370 Remove No Yes
Identity™ SR 5172 Remove No Yes
Identity™ XL DR 5376 Remove No Yes
Integrity™ ADx DR 5360 Remove No Yes
Integrity™ ADx SR 5160 Remove No Yes
Integrity™ ADx XL DR 5366 Remove No Yes
Integrity™ AFx DR 5346 Remove No Yes
Integrity™ SR 5142 Remove No Yes
Integrity™ µ DR 5336 Remove No No
Integrity™ µ SR 5136 Remove No No
Microny™ SR+ 2425 Remove No No
Microny™ II SR+ 2525 Remove No No
Microny™ K SR 2535 Remove No No
Nanostim™ S1DLCP Remove No No
Paragon™ 2010, 2011, 2012 Install No No
Paragon™ II 2016 Install No No
Paragon™ III 2304, 2305, 2314, 2315 Install No No
Phoenix™2 2005, 2008, 2009 Install No No
Phoenix™ III 2204, 2205 Install No No
Polarity™ 2091 Install No No
Quadra Allure MP™ PM3160 Remove Yes Yes
Quadra Allure MP™ RF PM3262 Remove Yes Yes
Regency™ SC 2406, 2407 Remove No No
Regency™ SCX 2408 Remove No No
Regency™ SC+ 2402 Remove No No
Regency™ SR 2404, 2405 Remove No No
Regency™ SR+ 2400 Remove No No
Solus™ 2002, 2003 Install No No
Solus™ II 2006, 2007 Install No No
Sustain™ XL DC PM2134 Remove No Yes
Sustain™ XL DR PM2136 Remove No Yes
Sustain™ XL SC PM1134 Remove No Yes
Sustain™ XL SR PM1136 Remove No Yes
Synchrony™ 2020 Install No No

3
Table 1. Bradycardia devices supported by the Merlin PCS
Device Model Number Magnet MerlinConduct™ Feature Capability
MerlinReflect™ Feature Capability
Synchrony™ II 2022, 2023 Install No No
Synchrony™ III 2028, 2029 Install No No
Trilogy™ DC 2308 Install No No
Trilogy™ DC+ 2318 Install No No
Trilogy™ DR 2350 Install No No
Trilogy™ DR+ 2360, 2364 Install No No
Trilogy™ DR+/DAO 2364 Install No No
Trilogy™ SR 2250 Install No No
Trilogy™ SR+ 2260, 2264 Install No No
Verity™ ADx XL DC 5256 Remove No Yes
Verity™ ADx XL DR 5356 Remove No Yes
Verity™ ADx XL DR M/S 5357 Remove No Yes
Verity™ ADx XL SC 5056 Remove No Yes
Verity™ ADx XL SR 5156 Remove No Yes
Verity™ ADx XL SR M/S 5157 Remove No Yes
Verity™ ADx XL VDR 5456, 5456i Remove No Yes
Victory™ DR 5810 Remove No Yes
Victory™ SR 5610 Remove No Yes
Victory™ XL DR 5816 Remove No Yes
Zephyr™ DR 5820 Remove No Yes
Zephyr™ SR 5620 Remove No Yes
Zephyr™ XL DR 5826 Remove No Yes
Zephyr™ XL SR 5626 Remove No Yes
Table 2. Tachycardia devices supported by the Merlin PCS
Device Model Number Magnet MerlinConduct™ Feature Capability
MerlinReflect™ Feature Capability
AnalyST™ DR CD2217-30, CD2217-36 Remove Yes Yes
AnalyST™ VR CD1217-30, CD1217-36 Remove Yes Yes
AnalyST Accel™ DR CD2219-30, CD2219-36, CD2219-36Q
Remove Yes Yes
AnalyST Accel™ VR CD 2219-30, CD1219-36, CD1219-36Q
Remove Yes Yes
Atlas™ DR V-240, V-242 Remove No Yes
Atlas™ VR V-199 Remove No Yes
Atlas™+ DR V-243 Remove No Yes
Atlas™+ HF V-340, V-343 Remove No Yes
Atlas™+ VR V-193, V-193C Remove No Yes
Atlas™ II DR V-265 Remove No Yes
Atlas™ II HF V-365 Remove No Yes
Atlas™ II VR V-168 Remove No Yes
Atlas™ II+ DR V-268 Remove No Yes
Atlas™ II+ HF V-366, V-367 Remove No Yes
Auricle™ 3107-36P Remove No Yes
Convert™ V-191 Remove No Yes
Convert™+ V-195 Remove No Yes

4
Table 2. Tachycardia devices supported by the Merlin PCS
Device Model Number Magnet MerlinConduct™ Feature Capability
MerlinReflect™ Feature Capability
Current™ DR 2107-30, 2107-36, CD2207-36Q Remove Yes Yes
Current™ DR RF 2207-30, 2207-36 Remove Yes Yes
Current Accel™ DR CD2215-30, CD2215-36, CD2215-36Q
Remove Yes Yes
Current™+ DR CD2211-36, CD2211-36Q Remove Yes Yes
Current™ VR 1107-30, 1107-36, CD1207-36Q Remove Yes Yes
Current™ VR RF 1207-30, 1207-36 Remove Yes Yes
Current Accel™ VR CD1215-30, CD1215-36, CD1215-36Q
Remove Yes Yes
Current™+ VR CD1211-36, CD1211-36Q Remove Yes Yes
Ellipse™ DR CD2277-36, CD2277-36Q, CD2279-36, CD2279-36Q, CD2311-36, CD2311-36Q, CD2377-36, CD2377-36C, CD2377-36Q, CD2377-36QC
Remove Yes Yes
Ellipse™ VR CD1277-36, CD1277-36Q, CD1279-36, CD1279-36Q, CD1311-36, CD1311-36Q, CD1377-36, CD1377-36C, CD1377-36Q, CD1377-36QC
Remove Yes Yes
Epic™ DR V-233, V-235 Remove No Yes
Epic™ HF V-337,V-338 Remove No Yes
Epic™ VR V-197 Remove No Yes
Epic™+ DR V-236, V-239 Remove No Yes
Epic™+ HF V-350 Remove No Yes
Epic™+ VR V-196 Remove No Yes
Epic™ II DR V-255 Remove No Yes
Epic™ II HF V-355 Remove No Yes
Epic™ II VR V-158 Remove No Yes
Epic™ II+ DR V-258 Remove No Yes
Epic™ II+ HF V-356, V-357 Remove No Yes
Fortify™ DR CD2233-40, CD2233-40Q, CD2234-40, CD2234-40Q
Remove Yes Yes
Fortify™ VR CD1233-40, CD1233-40Q, CD1234-40, CD1234-40Q
Remove Yes Yes
Fortify Assura™ DR CD2257-40, CD2257-40Q, CD2259-40, CD2259-40Q, CD2261-40, CD2261-40Q, CD2359-40, CD2359-40C, CD2359-40Q, CD2359-40QC
Remove Yes Yes
Fortify Assura™ VR CD1257-40, CD1257-40Q, CD1259-40, CD1259-40Q, CD1261-40, CD1261-40Q, CD1359-40, CD1359-40C, CD1359-40Q, CD1359-40QC
Remove Yes Yes
Fortify™ ST DR CD2235-40, CD2235-40Q Remove Yes Yes
Fortify™ ST VR CD1235-40, CD1235-40Q Remove Yes Yes
Photon™ DR V-230HV Remove No Yes
Photon™ μ DR V-232 Remove No Yes
Photon™ μ SR V-194 Remove No Yes
Promote™ 3107-30, 3107-36, 3107-36Q, 3109-30, 3109-36, CD3207-36Q
Remove Yes Yes
Promote Accel™ CD3215-30, CD3215-36, Remove Yes Yes

5
Table 2. Tachycardia devices supported by the Merlin PCS
Device Model Number Magnet MerlinConduct™ Feature Capability
MerlinReflect™ Feature Capability
CD3215-36Q
Promote™ LAP CD3223-36P Remove Yes Yes
Promote™ RF 3207-30, 3207-36, 3213-30, 3213-36
Remove Yes Yes
Promote™ Q CD3221-36, CD3227-36 Remove Yes Yes
Promote Quadra™ CD3237-40, CD3237-40Q, CD3239-40, CD3239-40Q
Remove Yes Yes
Promote™+ CD3211-36, CD3211-36Q Remove Yes Yes
Quadra Assura™ CD3265-40, CD3265-40Q, CD3267-40, CD3267-40Q, CD3367-40, CD3367-40C, CD3367-40Q, CD3367-40QC
Remove Yes Yes
Quadra Assura MP™ CD3271-40, CD3271-40Q, CD3371-40, CD3371-40C, CD3371-40Q, CD3371-40QC
Remove Yes Yes
Unify™ CD3234-40, CD3234-40Q, CD3235-40, CD3235-40Q
Remove Yes Yes
Unify Assura™ CD3257-40, CD3257-40Q, CD3261-40, CD3261-40Q, CD3361-40, CD3361-40C CD3361-40Q, CD3361-40QC
Remove Yes Yes
Unify Quadra™ CD3249-40, CD3249-40Q, CD3251-40, CD3251-40Q
Remove Yes Yes
Unify Quadra MP™ CD3253-40, CD3253-40Q, CD3255-40, CD3255-40Q
Remove Yes Yes
Table 3. Monitoring devices supported by the Merlin PCS
Device Model Number Magnet MerlinConduct™ Feature Capability
MerlinReflect™ Feature Capability
SJM Confirm™ DR DM2100, DM2102 Remove No Yes
Start-Up Screen
Figure 1. Start-Up screen
The Start-Up screen provides access to a number of functions, including:
1. ? Button (page 6). Opens a window that provides access to the Help manual.

6
2. RF Telemetry Status Icon (page 6). Reports the RF communication status for RF-capable devices.
3. Tools (page 7) button. Opens a menu for the PSA application, preferences, and other programmer functions.
4. Waveform Control (page 13) buttons. Open controls for the Rhythm Display's gain and configuration.
5. Rhythm Display (page 12)
6. Adjust Display (page 13) button. Opens controls for the Rhythm Display's vector, sweep speed, and filter settings.
7. Freeze button. Freezes the Rhythm Display and opens the Freeze Capture (page 13) window.
8. Print Settings button. Opens the Print Settings window. An icon without a cord indicates the programmer is using the internal printer. An icon with a cord indicates the programmer is connected to an external printer (see below). The “PDF” icon indicates that paperless (PDF) printing is selected. See PDFs (page 10). To change printers, select Tools > Preferences > Printer (Printer Preferences (page 11)).
9. Printer Status panel
10. Interrogate button
11. Wired and Wireless Connection Icon (page 7). Reports the status of the current wired or wireless connection.
Figure 2. Printer icons: 1. (left) internal printer in use; 2. (center) external printer connected; 3. (right) paperless (PDF) printing selected
? Button The ? button opens a window that provides context-sensitive help. You can also get help if you select Tools (page 7) > Educational Materials > Help.
Accessed From: Help button
RF Telemetry Status Icon For more information on RF communication, consult the Merlin User's Manual or select the ? button after you interrogate an RF-capable device.
Table 4. RF telemetry start-up screen icons
Location RF Telemetry Status Icon
Start-Up Screen Icons Disconnected RF Base Station/Not Working
Ready to connect to device
Table 5. RF telemetry application icons
Location RF Telemetry Status Icon
Application Icons
Active RF telemetry connection
Inactive RF telemetry connection

7
Table 5. RF telemetry application icons
Location RF Telemetry Status Icon
Only wand telemetry is available
Wired & Wireless Connection Icons For more information on wired and wireless connections, consult the Connectivity Manual or select the ? button.
Table 6. Wired and Wireless Connection icons
Wired and Wireless Status Icon
Low connection strength
Medium connection strength
High connection strength
Network available but no active session
Tools The Tools menu opens a number of programmer tools, including:
PSA. Opens the PSA application. See the Merlin PCS PSA Wand Reference Manual. Session Records:
- Session Records. Opens archived data (for tachycardia devices only). - PDFs (page 10). Opens the PDFs window to manage the reports stored as PDFs on the programmer's hard disk.
Connections.
- MerlinConduct™ Settings (page 8). Opens the Connections window for connection to enable the MerlinConduct feature. - MerlinReflect™ Settings. Opens the Connections window to enable the MerlinReflect feature. (See the Merlin Connectivity
manual for more information.) - Administration. Opens a window to add, create or delete new locations for connections to the Merlin PCS. (See the Merlin
Connectivity manual for more information.) - Location & Networks. Locations and Networks. Opens the Opens the Connections window to select locations, check the
connection strength, and list recent transmissions. (See the Merlin Connectivity manual for more information.) Educational Materials:

8
- Help. Opens links for on-line Help for all supported devices. - Demos. Opens device demonstrations.
Maintenance. Opens utilities for programmer maintenance (for use by St. Jude Medical personnel only). Clinical Studies. Opens information for studies (for use by St. Jude Medical personnel only). Preferences (page 11). Opens the Merlin PCS settings for language, date, format, audio, etc. Customer Support. Provides contact information for Technical Support. (page 13) Print Screen (page 12). Prints an image of the screen. Export Screen (page 12). Exports an image to a USB flash drive or floppy drive.
Accessed From: Tools Button
Session Records The Session Records window allows you to search, review, and export programming session records that are recorded on the programmer's hard disk. Each session record contains one or more snapshots of the session captured during programming, measurement, and testing. Each snapshot is a representation of the programmer screen performed when the operation took place. The records can be exported to an external media device or a PC in a format for an external PC database or for Merlin.net.
The programmer does not maintain Session Records for all devices. For more information on a specific device, select Educational Materials > Help, and select the device you are interested in.
CAUTION
Session Records and PDF Reports are erased from the Merlin PCS after the number of days specified in the Data Management Preferences (page 11). Make sure you select the time limit from the Start-Up Screen > Tools >Preferences > Data Management.
Accessed From: Tools menu > Session Records > Session Records
MerlinConduct™ Settings From the MerlinConduct™ Settings window you can enable the MerlinConduct feature on the programmer and select Advanced MerlinConduct™ Settings (page 9). The programmer and the tablet must be in close proximity to each other when the MerlinConduct feature is in use.
CAUTION Emergency operations are not available from the MerlinConduct™ application on the tablet. Emergency operations must be initiated from the programmer. See the Merlin™ PCS User’s Manual for additional information
NOTE
The tablet is non-sterile.
See also:
Connect to the Tablet (page 8) Wireless Connection (page 8) Set up a Wireless Connection (page 9) Launch the MerlinConduct™ Application on the Tablet (page 9) Advanced MerlinConduct™ Settings (page 9) Disconnect from the Tablet (page 9)
Accessed From: Tools menu > Connections > MerlinConduct Settings
Connect to the Tablet To connect the programmer to the tablet with the MerlinConduct™ feature:
1. Enable the MerlinConduct™ Feature on the Programmer (page 8).
2. Enable the Wireless Connection (page 8) between the tablet and the programmer.
3. Launch the MerlinConduct™ Application on the Tablet (page 9).
Enable the MerlinConduct™ Feature on the Programmer 1. Select Tools > Connections > MerlinConduct™ Settings.
2. Select the MerlinConduct button to enable the MerlinConduct feature.
The button shows the current state of the feature.
Wireless Connection A wireless connection is needed to connect the programmer and the tablet. A wireless accessory must be installed in the Merlin™ PCS before you can set up a wireless connection or launch the MerlinConduct™ feature. For wireless accessory set up see the Merlin™ PCS User’s Manual for additional information.
Wireless connection options:
Set up a Wireless Connection (page 9). Each programmer requires a wireless connection. You will also need to re-establish the wireless connection after the wireless password expires. See Advanced MerlinConduct™ Settings (page 9).
Confirm the Merlin PCS network is selected. A wireless connection for the programmer has been set up.

9
NOTE
If you have previously connected to the wireless network as indicated in Set up a Wireless Connection (page 9), then you should only need to Confirm the Merlin PCS network is selected. 1) Select Settings > Select Wi-Fi2 > Select the Merlin PCS network name, 2) Launch the MerlinConduct application on the tablet.
Set up a Wireless Connection On the tablet:
1. Select Settings > Select Wi-Fi3 > Select Other Network.
2. Enter the Network Name and select the Security type:
The network name and security type are shown on the MerlinConduct™ Settings (page 8) window on the programmer when the button is enabled.
3. Select the Other Network button.
4. Enter the password.
The password is shown on the MerlinConduct Settings window. The password is case sensitive.
5. Select the Join button.
A check appears next to the network name once the connection is established. 6. Return to the home screen on the tablet.
Launch the MerlinConduct™ Application on the Tablet On the tablet:
1. Select the MerlinConduct™ application.
2. Enter the session code.
The session code is shown on the programmer screen. 3. Select the Start button.
The programmer shows the connection status between the programmer and the tablet. If no connection is made, see Troubleshooting the MerlinConduct™ Application (page 10).
NOTE
If you return to the home screen on the tablet, the programmer screen on the tablet is only hidden from view. This does not end the MerlinConduct™ session between the tablet and the programmer, or end the programmer session.
NOTE
The MerlinConduct™ feature on the programmer is disabled after 4 hours of inactivity.
Advanced MerlinConduct™ Settings From the Advanced MerlinConduct™ Settings window you can set the password duration and the session code length.
Disconnect from the Tablet On the programmer:
1. Select Tools > Connections > MerlinConduct™ Settings.
2. Select the MerlinConduct button to disable the connection between the programmer and the tablet.
The button shows the current state of the feature.
Loss of Wireless Network Connection If your wireless network connection is lost, check the message on the tablet and follow the instructions.
Table 7. Behavior after Wireless Network connection is lost
Session Type System Behavior
Merlin PSA session Programmer delivers emergency VVI (high output) pacing. A connection lost message is shown on the tablet.
Device Session If temporary programming is in effect on the programmer (such as during a threshold test) the device reverts to permanent settings and the test is canceled. A connection lost message is shown on the tablet.
2 Wi-Fi is a trademark of the Wi-Fi Alliance. 3 Wi-Fi is a trademark of the Wi-Fi Alliance.

10
Notifications To reduce tablet pop up distractions while using the MerlinConduct™ application, it is recommended to set the notifications to Banner or Off.
Troubleshooting the MerlinConduct™ Application If no wireless connection was made, you may have entered an incorrect session code, wireless password, or selected another wireless network. Check the message on the tablet and follow the instructions.
No Wireless or Network Selected The programmer was unable to connect to the tablet because the programmer's wireless network was not selected.
You may have selected an incorrect wireless network or a wireless network has not been selected. Check the tablet to verify that you selected the correct wireless network.
NOTE
To ensure a stable wireless connection, keep the tablet away from other electronic equipment. For example, avoid placing the tablet on the Merlin printer, even when the printer is not in use.
Invalid Session Code An invalid session code or no session code was entered when the MerlinConduct™ feature was launched. See Launch the MerlinConduct™ Application on the Tablet (page 9). If there is more than one programmer, verify you are using the correct session code and connected to the correct programmer.
Additional Information
NOTE
Only use the MerlinConduct™ application for its intended use. See the Merlin™ PCS User's Manual for additional information.
System Requirements iPad4 tablet, generation 2 or greater iOS 5.1 or greater
CAUTION Any modifications to the tablet or its operating system may impair the functionality of the MerlinConduct™ feature. Do not incinerate, crush, short-circuit, modify, or disassemble the tablet.
Precautions Always end the MerlinConduct™ feature on the programmer when not in use Do not use the MerlinConduct application if the tablet is damaged Do not use the MerlinConduct application if the tablet's operating system has been compromised or tampered with Never share the programmer's network name or password Always use the MerlinConduct application in close proximity to the Merlin™ PCS programmer Do not use the MerlinConduct application when insufficient battery life remains on the tablet Do not use the MerlinConduct application in an area where the wireless connection is low
PDFs Every time you select any Print button to create a report, the Merlin PCS programmer saves the report as a PDF (portable document file5). This file can be exported to a flash drive connected to one of the programmer's USB ports. You must install Adobe™ Acrobat™ Reader or Adobe Reader™ on your PC to view the PDF6.
From the PDFs window, you can:
Check the number of PDFs stored on the programmer's hard disk that have not been exported Export all the stored PDFs. Export the Most Recent PDFs (created in the last actual session or demo session, including your current session. Delete all PDFs.
When you select one of the Export buttons, the Export Data (page 12) screen appears.
The file naming and storing of the PDFs are as follows:
All PDFs are stored in a folder entitled "PDFs."
Subfolder Name: "Date of PDF creation" Sub-subfolder Name: "Patient Name_Model Number_Device Serial Number" (read from the Patient Data) File Name: "Device name_Device Model Number_Device Serial Number_Reportname.pdf"
Example: In the PDF folder is a subfolder called "2008-03-22." In this subfolder is a sub-subfolder called "John Smith_PromoteRF_3207-36_201399." Inside the sub-subfolder is the PDF titled: "PromoteRF_3207-36_201399_TestResults.pdf "containing the test results for John Smith on 3/22/2008.
4 iPad is a trademark of Apple Inc., registered in the US and other countries. 5 The programmer does not create a PDF for Freezes printed from the Start-Up screen, the Print Screen function, real-time printing, or on-screen Help. 6 Adobe, Acrobat, and Adobe Reader are trademarks of Adobe Systems Incorporated.

11
The Merlin PCS can store a total of 30 "Date of PDF creation" subfolders containing PDFs. When 30 subfolders are stored on the programmer, the oldest subfolder is erased when a newer subfolder is created.
CAUTION Session Records and PDF Reports are erased from the Merlin PCS after the number of days specified in the Data Management Preferences (page 11). Make sure you select the time limit from the Start-Up Screen > Tools >Preferences > Data Management.
Accessed From: Tools menu > Session Records > PDFs
Preferences The Preferences window contains the following tabs for setting the Merlin PCS options:
Date & Time. Sets the year, date, and local time Language & Formats. Sets the:
- Display and Help Language - Date Format - Time Format - Number Format - ECG Notch Filter. The ECG Notch Filter Frequency reduces ECG interference from the programmer's AC power line
frequency. Check with your local authorities for your power line frequency. Audio (page 11) Printer (page 11) Wireless. Sets the wireless communications on or off. Data Management. Sets the time limit for the oldest Session Records (page 8) and PDF Reports stored on the Merlin PCS.
After the time setting selected, the programmer erases all Session Records and PDF Reports older that the Data Management setting.
Accessed From: Tools menu > Preferences button
NOTE
It is important to set an accurate date and time because the device's diagnostic tests and other functions use the date and time from the programmer.
Audio Preferences This screen contains two panels:
General Audio. Select the On button to allow audio cues for programmer activity. You can also select a volume level. The Off button turns all sounds off (except Charging Audio).
Charging Audio (Tachy devices only). Select the On button for an audio cue when the capacitors charge during a programming session.
NOTE
An audio cue is always emitted during charging for an Emergency Shock, regardless of the Charging Audio setting.
Accessed From: Tools menu > Preferences button > Audio tab
Printer Preferences Every time you select any Print button to create a report, the Merlin™ PCS programmer saves the report as a PDF (portable document file)7. This file can be exported to a flash drive connected to one of the programmer's USB ports. You must install Adobe™ Acrobat™ Reader or Adobe Reader™ on your PC to view the PDF.
To view the number of stored PDFs and to export or delete PDFs, select Tools > Session Records > PDFs (page 10).
The Printer Preferences window contains two panels:
Selected Printer. You have three choices:
- PDF Only (Paperless). Sends reports to the programmer's hard disk as a PDF (paperless printing) with no paper documents.
- Internal & PDF. Sends the report to the programmer's internal printer and simultaneously creates a PDF on the hard disk. - External & PDF. Sends the report to an external USB printer and simultaneously creates a PDF on the hard disk. Before
reports can be sent to an external printer, you must first connect the external printer to any one of the USB ports on the programmer. For more information on connecting an external printer, see the Merlin PCS User's Manual.
Number of Paper Copies. This selects how many reports are printed by the internal or external printer whenever a Print button is selected.
To view the number of stored PDFs and to export or delete PDFs, select Tools > Session Records > PDFs (page 10).
NOTE
Supported Printers. The Merlin PCS can print to many laser jet printers. For a list of compatible printers, contact your St. Jude Medical Representative or Technical Support (page 13).
Accessed From: Tools menu > Preferences > Printer tab
7 The programmer does not create a PDF for Freezes printed from the Start-Up screen, the Print Screen function, real-time printing, or on-screen Help.

12
Wireless Radio The wireless radio turns the wireless transmission On and Off in the Merlin™ Connectivity software. Both the Connectivity software or the MerlinConduct™ application can use the wireless radio, but not simultaneously.
If you are setting up a wireless network in the Connectivity software but the wireless radio is already in use by the MerlinConduct application, the Wireless Network button in the Administration > New Location window is disabled.
If you are uploading session records in the Connectivity software but the wireless radio is already in use by the MerlinConduct application, the session records upload when the wireless radio becomes available.
If the wireless radio is not available and you have a Wired Network Setup, the Connectivity software automatically uses the wired network.
If the wireless radio is Off but not in use by the MerlinConduct application, it turns On automatically when you open the Wireless Network Setup window.
If the wireless radio is Off when you change your wireless location setting, it remains Off for your new location setting.
If your wireless location setting is connected to a network, the wireless radio is On.
Manually turn the wireless radio On or Off
To turn the wireless radio On or Off:
1. Select Tools>Preferences.
2. Select the Wireless tab.
3. Select Off or On.
4. Select the Close "X" button.
For more information, see the Merlin™ Connectivity Software Help Manual (Tools>Educational Materials>Help).
Print Screen The Print Screen button prints an image of the current screen. To send the image to an external printer, go to the Tools Menu > Preferences > Printer tab and select the External & PDF button.
This function does not create a PDF.
For more information on printing, see Print Menu Settings (page 13).
Accessed From: Tools menu > Print Screen
Export Screen The Export Screen button opens the Export Data (page 12) window, which allows you to save the current screen as an electronic (.png) file and send the file to any storage device (flash drive or floppy drive) connected to one of the programmer's USB ports. The Merlin PCS detects all connected devices and asks you to select the device to receive the data.
Accessed From: Tools menu > Export Screen
Export Data The Export Data window lists the devices that are currently connected to the programmer so that you can export device and session data for certain patient-tracking software programs.
To export data:
1. Insert the USB connector from a device into one of the three USB ports on the programmer.
The device can be a USB floppy drive, a USB flash drive, or a PC connected to the Merlin™ PCS through a 9-pin serial to USB connector cable. The floppy or flash drive must be powered through the USB drive, not by an external power source.
2. Select the Export Data button.
The programmer lists all connected devices. 3. Select the desired device. If a device hasn't been detected, select Redetect Media.
4. Select Export.
The programmer checks the device and writes data to it. Select the Close button to return to the previous window.
Rhythm Display The Rhythm Display on the Start-Up screen shows up to five ECG waveforms before you interrogate the device. On the left side are up to five Waveform Control (page 13) buttons that are used to adjust each waveform.
EGMs and Markers do not appear on the Start-Up screen.
The Rhythm Display allows you to:
Drag and drop a waveform to a different position. Configure the waveform to show a certain vector, change the sweep speed from the Adjust Display (page 13) window and apply
the ECG Filter to all waveforms. Increase or decrease the waveform Gain setting using the Waveform Control (page 13) buttons. Take a snapshot of the Rhythm Display (see Freeze Capture (page 13)).
13
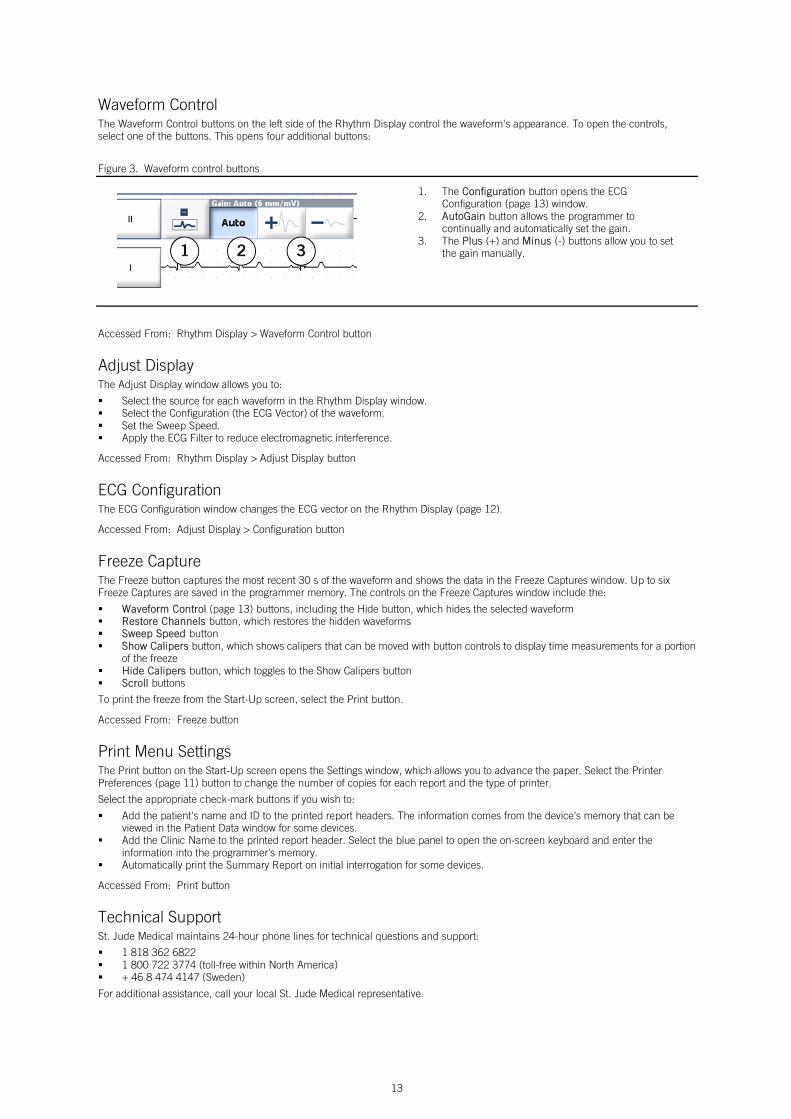
Waveform Control The Waveform Control buttons on the left side of the Rhythm Display control the waveform's appearance. To open the controls, select one of the buttons. This opens four additional buttons:
Figure 3. Waveform control buttons
1. The Configuration button opens the ECG Configuration (page 13) window.
2. AutoGain button allows the programmer to continually and automatically set the gain.
3. The Plus (+) and Minus (-) buttons allow you to set the gain manually.
Accessed From: Rhythm Display > Waveform Control button
Adjust Display The Adjust Display window allows you to:
Select the source for each waveform in the Rhythm Display window. Select the Configuration (the ECG Vector) of the waveform. Set the Sweep Speed. Apply the ECG Filter to reduce electromagnetic interference.
Accessed From: Rhythm Display > Adjust Display button
ECG Configuration The ECG Configuration window changes the ECG vector on the Rhythm Display (page 12).
Accessed From: Adjust Display > Configuration button
Freeze Capture The Freeze button captures the most recent 30 s of the waveform and shows the data in the Freeze Captures window. Up to six Freeze Captures are saved in the programmer memory. The controls on the Freeze Captures window include the:
Waveform Control (page 13) buttons, including the Hide button, which hides the selected waveform Restore Channels button, which restores the hidden waveforms Sweep Speed button Show Calipers button, which shows calipers that can be moved with button controls to display time measurements for a portion
of the freeze Hide Calipers button, which toggles to the Show Calipers button Scroll buttons
To print the freeze from the Start-Up screen, select the Print button.
Accessed From: Freeze button
Print Menu Settings The Print button on the Start-Up screen opens the Settings window, which allows you to advance the paper. Select the Printer Preferences (page 11) button to change the number of copies for each report and the type of printer.
Select the appropriate check-mark buttons if you wish to:
Add the patient's name and ID to the printed report headers. The information comes from the device's memory that can be viewed in the Patient Data window for some devices.
Add the Clinic Name to the printed report header. Select the blue panel to open the on-screen keyboard and enter the information into the programmer's memory.
Automatically print the Summary Report on initial interrogation for some devices.
Accessed From: Print button
Technical Support St. Jude Medical maintains 24-hour phone lines for technical questions and support:
1 818 362 6822 1 800 722 3774 (toll-free within North America) + 46 8 474 4147 (Sweden)
For additional assistance, call your local St. Jude Medical representative.


15
Error and Informational Messages
No PSA Wand Communication or Merlin™ PSA is not Functioning If the error message appears after you have verified the connection, there may be a mechanical problem in the PSA Wand Model 3150 or adapter, Merlin PSA Model EX3100, a programmer malfunction, a software problem, or electromagnetic interference. If you have another PSA Wand or adapter or Merlin PSA, connect the replacement and select the Retry button. If the problem continues, contact your St. Jude Medical Representative or Technical Support (page 13).
No PSA Detected If the error message appears, verify that the Merlin PSA Model_EX3100 is connected. If the problem continues, contact your St. Jude Medical Representative or Technical Support (page 13).
Help The Help function provides context-sensitive information on programmer and device functions.
When you select the ? button during a session, a Small Help window containing context-sensitive information appears. You can:
Scroll down the page Select the "See More" button to view the information in the large Help window with a Table of Contents, Index, and Search
function Select the "Search" button to open the Search function in the large Help window
The Large Help window contains:
Icons for three navigation buttons (Back, Forward, Home) and a Print button Tabs for a Table of Contents, an Index, and a Search function A topic window with active hyperlinks to other topics.
Print. Select the Print icon to print entire topic.
Search. To search for a specific term, select the Search tab. Then, select the on-screen keyboard icon on the Search button. Type the search term and select the Done button. The Search tab opens with a list of all the entries containing the term.
Table of Contents and Index. Select an entry to display the topic.
Problem with Media Device The media device is not functioning properly because the device is damaged, is not recognized by the programmer, or is busy.
The programmer can communicate only with USB flash drives, floppy drives, and serial port adapters. Contact your St. Jude Medical representative or Technical Support (page 13) for a list of devices that are compatible with the Merlin™ PCS.
No Media Detected Reasons for this error message include:
The media device is not supported by the programmer. Contact your St. Jude Medical representative or Technical Support (page 13) for a list of supported devices.
The USB port is not functioning. Use another port. The device connector is not fully inserted into the port.
Media Invalid or Not Present Reasons for this error message include:
The device connector is not fully inserted into the port. The media device is full. Select another device or erase enough data to allow room for the file and try again. The media device is write-protected or lacks proper read/write permission. Select another device or remove the write-protection
or obtain permission and try again. The patient-tracking software or the destination PC is not operating. Reboot the PC and restart the patient-tracking software. The USB port is not functioning. Use another port. The cable for the floppy drive or serial connection is not functioning. Check or replace the cable.
Sustained Interruption The programmer has tried unsuccessfully to interrogate the device for 15 minutes and has stopped interrogation.
Reasons for this message include:
The wand is out of range of the device. The wand was removed from the programmer. Other electronic equipment in the area is interfering with the telemetry.
Either select the End Session button correct any problem and select the Continue Session button.
Older Device The programmer was unable to communicate with the device because the device may require a magnet.

16
Other possible reasons for this message include:
The wand is out of range of the device. The wand was removed from the programmer. Other electronic equipment in the area is interfering with the telemetry. The Model 3530 wand (for the Model 3510/3500 programmer) is connected to the programmer.
Correct any problem and select the Interrogate button.
Device Not Supported The programmer was unable to communicate with the device because it is not supported or could not be identified.
Attempt to interrogate the device with a Model 3510/3500 programmer.
Telemetry Interruption Telemetry between the device and the programmer was interrupted.
Reasons for this message include:
The wand is out of range of the device. The wand was removed from the programmer. Other electronic equipment in the area is interfering with the telemetry. The Model 3530 wand (for the Model 3510/3500 programmer) is connected to the programmer. A magnet has been placed in the wand.
Correct any problem and select the Interrogate button.
Invalid Parameters Detected The programmer detected invalid parameter(s), which also invalidates the recorded diagnostics and episodes. Selecting the Program Nominals button institutes standard or nominal settings in the device.
On-Screen Keyboard Use the On-Screen Keyboard to enter data.
Special Char key. Select this key and then select the key to display the special character (labeled in green on the key). Inactive Keys. If the device memory does not support a character, the key may be displayed on the keyboard but it is not
active. Repeating Keys. If you press and hold most keys on the on-screen keyboard, they are not continually typed. The exceptions
are the arrow keys, the Space key, the Enter key, and the Backspace key. External Keyboard. You can use an external keyboard connected to the programmer through any of its USB ports. Both
keyboards can operate simultaneously.
Emergency VVI Programming Interrupted Emergency VVI programming cannot start because the telemetry between the device and the programmer was interrupted.
Reasons for this message include:
The wand is out of range of the device. The wand was removed from the programmer. Other electronic equipment in the area is interfering with the telemetry. The Model 3530 wand (for the Model 3510/3500 programmer) is connected to the programmer. A magnet has been placed in the wand.
Correct any problem and select the Continue Session button or contact Technical Support (page 13) for more information.
Backup VVI Procedure Interrupted The Backup VVI procedure could not complete because the telemetry between the device and the programmer was interrupted.
Reasons for this message include:
The wand is out of range of the device. The wand was removed from the programmer. Other electronic equipment in the area is interfering with the telemetry. The Model 3530 wand (for the Model 3510/3500 programmer) is connected to the programmer. A magnet has been placed in the wand.
Correct any problem and select the Continue button or contact Technical Support (page 13) for more information.
Help Not Provided The Merlin™ PCS does not provide context-sensitive help for this topic. Select the See More button to view the Help Table of Contents.
Requires Connection to Computer Before you can export the data to a computer database, you must connect the computer's serial port to a USB port on the Merlin™ PCS using a USB-to-serial adapter. Contact Technical Support (page 13) for more information.

17
BVVI Session Must Be Ended You have chosen to cancel the Backup VVI procedure. If you wish to attempt the procedure again, re-interrogate the device. Do not remove the wand until all error messages have been removed. Contact Technical Support (page 13) for more information.
Unable to Restore Original Parameters An error has occurred during the restoration of new pacer software, and the Backup VVI procedure cannot be completed. Contact Technical Support (page 13) for more information.


19
Index
B
Backup VVI Procedure Interrupted .................................. 16
C
Clinic Name ................................................................... 13
D
Devices Supported by Merlin............................................. 1
E
Emergency VVI Programming Interrupted ........................ 16 Export Data .................................................................... 12
F
Freeze Button .................................................................. 5
H
Help .............................................................................. 15
L
Lead Type Uncoded ....................................................... 16
M
Media Device Media Invalid or Not Present ..................................... 15 No Media Detected .................................................. 15 Problem with Media Device ...................................... 15
MerlinConduct Settings ..................................................... 8
O
On-Screen Keyboard ...................................................... 16
P
Patient-Tracking Software ............................................... 12 Print Menu ..................................................................... 13 Print Settings.................................................................. 13 Printer Icon ...................................................................... 5 Printer Preferences ......................................................... 11 Problem ......................................................................... 15 PSA Wand Application
PSA Wand, No Communication ................................. 15
R
RF Telemetry Status Icon .................................................. 6
S
Start-Up Screen ............................................................... 5 Supported Devices ........................................................... 1
T
Telemetry, Sustained Interruption .................................... 15
W
Wireless Connection .......................................................... 9


Cardiac Rhythm Management Division Manufacturer: St. Jude Medical Cardiac Rhythm Management Division 15900 Valley View Court Sylmar, CA 91342 USA +1 818 362 6822
European Authorized Representative: St. Jude Medical Coordination Center BVBA The Corporate Village Da Vincilaan 11 Box F1 1935 Zaventem Belgium +32 2 774 68 11
Australian Sponsor: St. Jude Medical Australia Pty. Limited 17 Orion Road Lane Cove NSW 2066 Australia
Manufacturing Site: St. Jude Medical Puerto Rico LLC Lot A Interior - #2 Rd Km. 67.5 Santana Industrial Park Arecibo, PR 00612 USA
Manufacturing Site: St. Jude Medical Operations (M) Sdn. Bhd. Plot 102, Lebuhraya Kampung Jawa, Bayan Lepas Industrial Zone 11900 Penang Malaysia
sjm.com
April 2015 Art 60066359/A


