Page 1
1
Herzog Keyboarding Grades 3 through 5
Overarching Essential Questions
How will learning to keyboard help me with my academics today and my career
tomorrow?
Introduction
The lessons in the Herzog Keyboarding material have been piloted and reviewed within
the district.
Unit Overview
Big Ideas Essential Questions Lessons
Basics Why is it essential to learn how to keyboard? 1
Learning Keys What is the importance of keyboarding using
consistent technique? 2-6
Reinforcement Why are correct keyboarding skills important in
relation to productivity and accuracy? 7-10
Boosters How can I improve my keyboarding skills?
Page 2
2
Unit Standard Overview
Grade Level Standard Standard
Grade 3
Common Core
W.3.6. With guidance and support from adults,
use technology to produce and publish writing
(using keyboarding skills) as well as to interact
and collaborate with others.
Technology
IT-A.4.1.5 Use common media and technology
terminology and equipment: develop touch
keyboarding techniques using both hands
IT-A.4.3.2 Use a computer and productivity
software to organize and create information:
produce a document using a word processing
program
Grade 4
Common Core
W.4.6. With some guidance and support from
adults, use technology, including the Internet,
to produce and publish writing as well as to
interact and collaborate with others;
demonstrate sufficient command of
keyboarding skills to type a minimum of one
page in a single sitting.
Technology
IT-A.4.1.5 Use common media and technology
terminology and equipment: develop touch
keyboarding techniques using both hands
IT-A.4.3.2 Use a computer and productivity
software to organize and create information:
produce a document using a word processing
program
Grade 5
Common Core
W.5.6. With some guidance and support from
adults, use technology, including the Internet,
to produce and publish writing as well as to
interact and collaborate with others;
demonstrate sufficient command of
keyboarding skills to type a minimum of two
pages in a single sitting.
Technology
IT-A.8.1.3 Use common media and technology
terminology and equipment: demonstrate
touch keyboarding skills at acceptable speed
and accuracy levels
IT-A.8.3.6 Use a computer and productivity
software to organize and create information:
compose a class report using advanced text
formatting and layout styles
Page 3
3
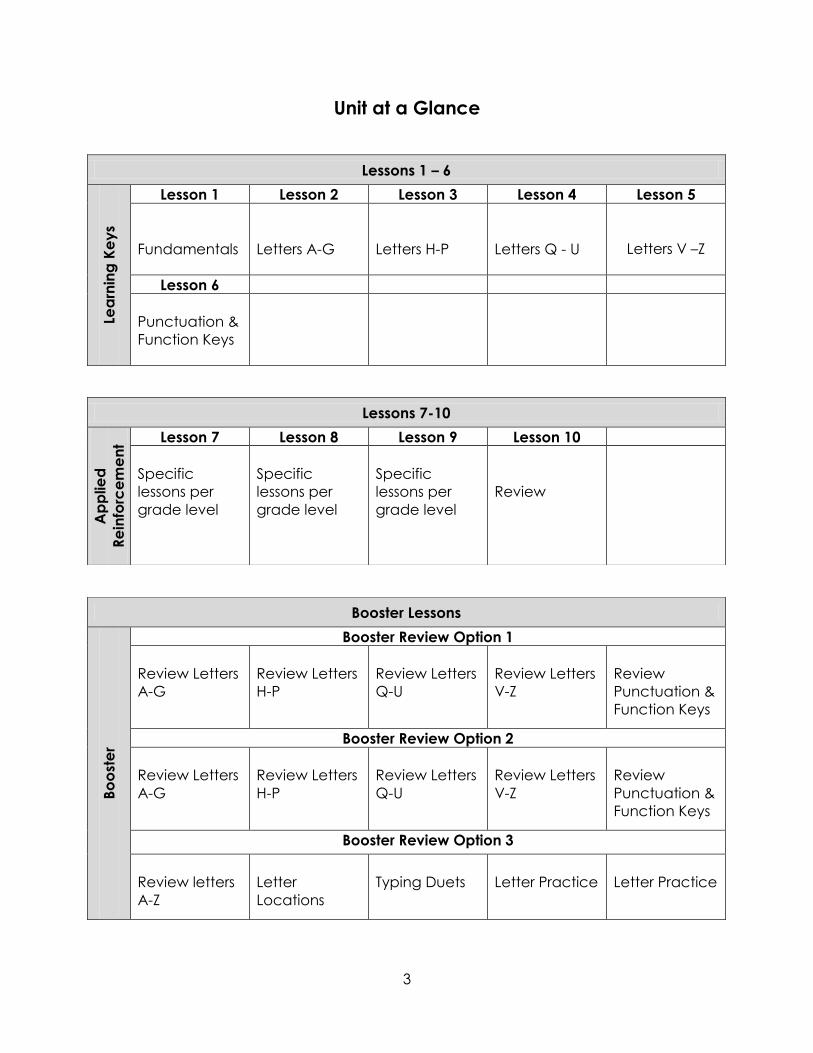
Unit at a Glance
Lessons 1 – 6
Lea
rnin
g K
ey
s
Lesson 1 Lesson 2 Lesson 3 Lesson 4 Lesson 5
Fundamentals
Letters A-G
Letters H-P
Letters Q - U
Letters V –Z
Lesson 6
Punctuation &
Function Keys
Lessons 7-10
Ap
plie
d
Re
info
rce
me
nt Lesson 7 Lesson 8 Lesson 9 Lesson 10
Specific
lessons per
grade level
Specific
lessons per
grade level
Specific
lessons per
grade level
Review
Booster Lessons
Bo
ost
er
Booster Review Option 1
Review Letters
A-G
Review Letters
H-P
Review Letters
Q-U
Review Letters
V-Z
Review
Punctuation &
Function Keys
Booster Review Option 2
Review Letters
A-G
Review Letters
H-P
Review Letters
Q-U
Review Letters
V-Z
Review
Punctuation &
Function Keys
Booster Review Option 3
Review letters
A-Z
Letter
Locations
Typing Duets
Letter Practice
Letter Practice
Page 4
4
Things to Consider Prior to Teaching Keyboarding Unit…
Microsoft Word – Preferred program to use for the keyboarding unit. Be sure you can
locate the program prior to the students entering the lab.
Here are some tips:
Look in Microsoft Office folder on desktop
Click on “Start”, then type “Microsoft Word” in the search box, Select
program from pop-up list
Saving Documents – For accountability purposes you may wish to have students save
their work daily.
Saving Options: (ALWAYS SAVE TO THEIR M: DRIVE)
Have students save their keyboarding work daily in a separate document.
Document names can vary. Example: Date of lesson, Lesson Number,
etc…
Have students open the same document and add the new lesson to that
document. Students can separate lessons within that document by keying
the date or lesson number. Save initial document as Herzog or
Keyboarding Lessons.
Capital Letters – The Herzog student book shows all lessons in capital letters. Therefore,
you may wish to show your students the “Caps Lock” key on the keyboard during the
first lesson. For consistency allow students to key using “Caps Lock” while learning the
keys in Lessons 1-6. After Lesson 6 students should be following the rules of capitalization
using the “Shift Keys”.
Finger Gymnastics - Before each lesson you may choose to have students perform
finger gymnastics. This is a great way to get your students into typing mode and have a
little fun. Use the “Finger Gymnastics” video to lead your students in these exercises.
Wall Chart – A Herzog wall chart will be located in each computer lab for
teacher/student reference. You may use this chart to introduce letters within the lesson.
Be sure to reference the column number when learning each letter key.
Assignment Completion – Keyboarding lessons can be long for some students. Reassure
your students that their goal is to type using the Herzog method to become faster and
more accurate. If students do not get done with a lesson on that specific day they
should not be penalized. Students will realize a connection between the amount of
keyboarding practice and the gradual building of speed. We recommend that
Page 5
5
students who are on-task but unable to complete an assignment not be required to
complete it at a later time.
Typing Speed – Initially, typing speed is not the main focus of the learning process. The
main goal for the student is to focus on the Herzog technique. The more practice/time
on the computer typing, using this technique, the faster the student will become.
DPI Typing Speed Recommendation *Formula for recommended speed = grade level x 5 words per minute
3rd Grade 3 x 5 = 15 words per minute
4th Grade 4 x 5 = 20 words per minute
5th Grade 5 x 5 = 25 words per minute
Following Lines – If students are having difficulties following the typing lines on the
lessons/activities have them try one of the following options:
Place a Post-It under the line they are currently typing.
Have a long slip of paper cut out and two paper clips. Paper clip the piece of
paper under the line they are currently typing. (Colored Construction paper
works great!)
Instructional Time
Instruction can be done within the computer lab or through the use of minis or ipads
within the classroom.
Trimester Days and Minutes Notes
1 10 Days - 30 minutes each lesson Instructional days need to be close
together
2 5 Days – 30 minutes each lesson Instructional days need to be close
together
3 5 Days – 30 minutes each lesson Instructional days need to be close
together
Page 6
6
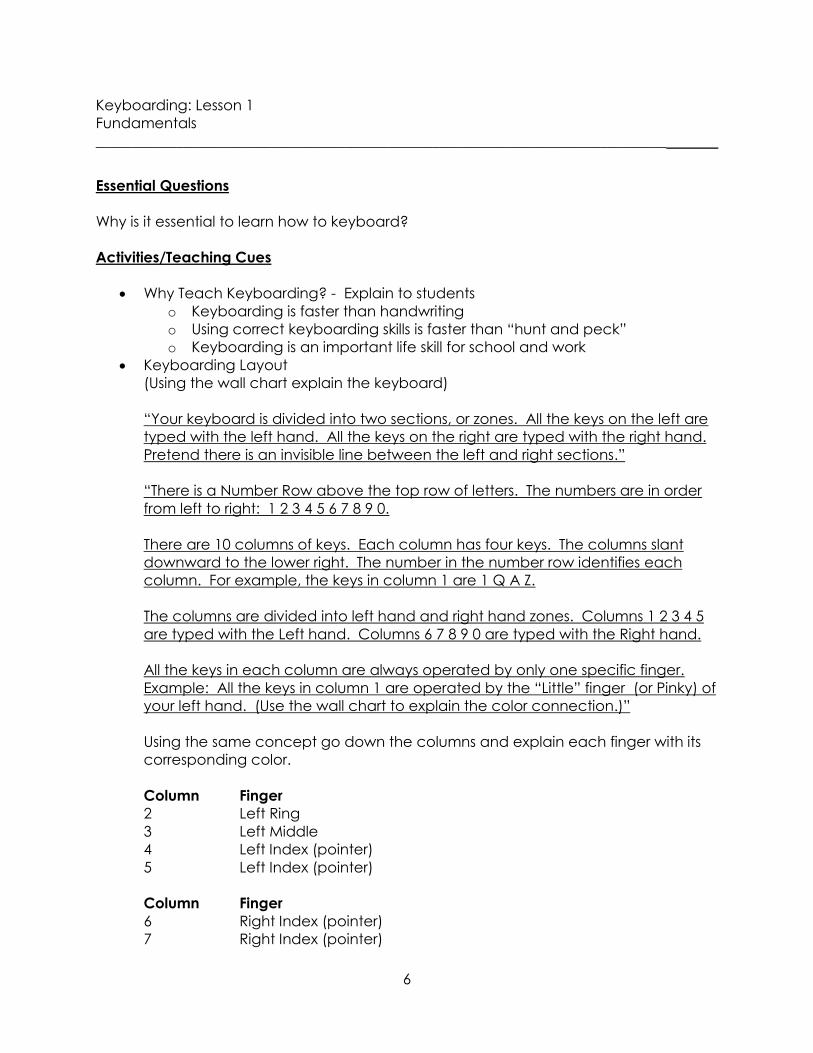
Keyboarding: Lesson 1
Fundamentals
______________________________________________________________________________ Essential Questions
Why is it essential to learn how to keyboard?
Activities/Teaching Cues
Why Teach Keyboarding? - Explain to students
o Keyboarding is faster than handwriting
o Using correct keyboarding skills is faster than “hunt and peck”
o Keyboarding is an important life skill for school and work
Keyboarding Layout
(Using the wall chart explain the keyboard)
“Your keyboard is divided into two sections, or zones. All the keys on the left are
typed with the left hand. All the keys on the right are typed with the right hand.
Pretend there is an invisible line between the left and right sections.”
“There is a Number Row above the top row of letters. The numbers are in order
from left to right: 1 2 3 4 5 6 7 8 9 0.
There are 10 columns of keys. Each column has four keys. The columns slant
downward to the lower right. The number in the number row identifies each
column. For example, the keys in column 1 are 1 Q A Z.
The columns are divided into left hand and right hand zones. Columns 1 2 3 4 5
are typed with the Left hand. Columns 6 7 8 9 0 are typed with the Right hand.
All the keys in each column are always operated by only one specific finger.
Example: All the keys in column 1 are operated by the “Little” finger (or Pinky) of
your left hand. (Use the wall chart to explain the color connection.)”
Using the same concept go down the columns and explain each finger with its
corresponding color.
Column Finger
2 Left Ring
3 Left Middle
4 Left Index (pointer)
5 Left Index (pointer)
Column Finger
6 Right Index (pointer)
7 Right Index (pointer)
Page 7
7
8 Right Middle
9 Right Ring
0 Right Little (pinky)
Hub Keys
“To type accurately and fast, you must have your hands and fingers in accurate
position on the keyboard. “The D key in column 3 and the K key in column 8 are
called the Hub keys. If your Middle fingers are on D and K, then your hands and
fingers are in accurate position, and you can type fast and accurately without
looking at the keyboard. You should always have your middle fingers resting
very lightly on these Hub keys. Then you are always in correct position to type
accurately. With your middle fingers resting on these two keys, you can swing
your hands around freely. We call that pivoting. Try it. “
Position Pointers - Top 6 countdown
o Using the position pointers Top 6 count down document go over the
following:
# 6 – Keyboard at edge of table
# 5 – Good Posture (note: sit up straight in chair)
# 4 – Good Distance away from the desk (Hint: Draw bridge)
# 3 – Middle fingers on hub keys D and K
# 2 – Wrists off the keyboard
# 1 - Ready, type
Speed Test
o Have students navigate to http://www.freetypinggame.net/
o Select Tests tap at the top
o Go to the section that says “Free Certificate Tests”
o Select #9 Letters Only for 1 minute
o Select Start Test
o Upon completion have students print a certificate.
Color Coding Activity (this can be done outside of the lab)
o Pass out the keyboard document.
o Have students color the keyboard following the color coding from the
poster.
o Optional - Have students trace their hands onto a sheet of paper and
then color the fingers in with the appropriate color coding from the poster.
After the fingers are colored, have students write the names of the key’s
they tap with each finger onto the paper.
Page 8
8
Keyboarding: Lesson 2
Letters A through G
______________________________________________________________________________ Essential Question
What is the importance of keyboarding using consistent technique?
Activities/Teaching Cues
Review Position Pointers from Lesson 1 (Top 6)
Have the students turn to page 5 in the Herzog book.
“Today we are learning A B C D E F G which are all LEFT hand keys.
Find the letter A on your keyboard
A is in the first column and is red (point to the wall chart)
What finger do we use to tap the letter A?
Tap A with your pinky finger on your left hand.”
Have students tap the letter and the space bar after the letter. Go around and check
that students are doing this correctly.
“Find the letter B on your keyboard
B is in the fifth column and is yellow (point to the wall chart)
What finger do we use to tap the letter B?
Tap B with your pointer finger on your left hand.”
Have students tap the letter A, space bar, B, space bar and repeat. Go around and
check that students are doing this correctly.
“Find the letter C on your keyboard
C is in the third column and is green (point to the wall chart)
What finger do we use to tap the letter C?
Tap C with your middle finger on your left hand.”
Have students tap the letter A, space bar, B, space bar, C, space bar and repeat. Go
around and check that students are doing this correctly.
“Find the letter D on your keyboard
D is in the third column and is green (point to the wall chart)
What finger do we use to tap the letter D?
Tap D with your middle finger on your left hand.”
Have students tap the letter A, space bar, B, space bar, C, space bar, D, space bar,
and repeat. Go around and check that students are doing this correctly.
Page 9
9
“Find the letter E on your keyboard
E is in the third column and is green (point to the wall chart)
What finger do we use to tap the letter E?
Tap E with your middle finger on your left hand.”
Have students tap the letter A, space bar, B, space bar, C, space bar, D, space bar, E,
space bar, and repeat. Go around and check that students are doing this correctly.
“Find the letter F on your keyboard
F is in the fourth column and is yellow (point to the wall chart)
What finger do we use to tap the letter F?
Tap F with your pointer finger on your left hand.”
Have students tap the letter A, space bar, B, space bar, C, space bar through F. Go
around and check that students are doing this correctly.
“Find the letter G on your keyboard
G is in the fifth column and is yellow (point to the wall chart)
What finger do we use to tap the letter G?
Tap G with your pointer finger on your left hand.”
Have students tap the letter A, space bar, B, space bar, C, space bar through G. Go
around and check that students are doing this correctly.
Have the students turn to page 5 in the Herzog book. Ask students to type the
online section lines 1 through 9.
Other suggested activities to do with this lesson:
Dictated short words - Call out words that utilize only the letters learned to this
point. Use the bank of words from the lesson book located in the online section.
Visualize words - have students close eyes and visualize key locations as teacher
calls out words to have students key.
Page 10
10
Keyboarding: Lesson 3
Letters H through P
______________________________________________________________________________ Essential Question
What is the importance of keyboarding using consistent technique?
Activities/Teaching Cues
Review Position Pointers from Lesson 1 (Top 6)
Warm-up - Once students are logged in have them turn to page 6. Have them type
the alphabet review at the top of the page. Repeat it if they finish early. Challenge
option: Have them type it backwards as this will improve concentration and accuracy.
“Today we will be learning letters H through P which are all Right hand keys
Find the letter H on your keyboard
H is in the sixth column and is yellow (point to the wall chart)
What finger do we use to tap the letter H?
Tap H with your pointer finger on your right hand.”
Have students tap the letter A, space bar, B, space bar, C, space bar through H. Go
around and check that students are doing this correctly.
Find the letter I on your keyboard
I is in the eighth column and is green (point to the wall chart)
What finger do we use to tap the letter I?
Tap I with your pointer finger on your right hand.”
Have students tap the letter A, space bar, B, space bar, C, space bar through I. Go
around and check that students are doing this correctly.
Find the letter J on your keyboard
J is in the seventh column and is yellow (point to the wall chart)
What finger do we use to tap the letter J?
Tap J with your pointer finger on your right hand.”
Have students tap the letter A, space bar, B, space bar, C, space bar through J. Go
around and check that students are doing this correctly.
Find the letter K on your keyboard
K is in the eighth column and is green color (point to the wall chart)
What finger do we use to tap the letter K?
Tap K with your middle finger on your right hand.”
Have students tap the letter A, space bar, B, space bar, C, space bar through K. Go
around and check that students are doing this correctly.
Page 11
11
Find the letter L on your keyboard
L is in the ninth column and is blue (point to the wall chart)
What finger do we use to tap the letter L?
Tap L with your ring finger on your right hand.”
Have students tap the letter A, space bar, B, space bar, C, space bar through L. Go
around and check that students are doing this correctly.
Find the letter M on your keyboard
M is in the seventh column and is yellow (point to the wall chart)
What finger do we use to tap the letter M?
Tap M with your pointer finger on your right hand.”
Have students tap the letter A, space bar, B, space bar, C, space bar through M. Go
around and check that students are doing this correctly.
Find the letter N on your keyboard
N is in the sixth column and is yellow (point to the wall chart)
What finger do we use to tap the letter N?
Tap N with your pointer finger on your right hand.”
Have students tap the letter A, space bar, B, space bar, C, space bar through N. Go
around and check that students are doing this correctly.
Find the letter O on your keyboard
O is in the ninth column and is blue (point to the wall chart)
What finger do we use to tap the letter O?
Tap O with your ring finger on your right hand.”
Have students tap the letter A, space bar, B, space bar, C, space bar through O. Go
around and check that students are doing this correctly.
Find the letter P on your keyboard
P is in the zero column and is red (point to the wall chart)
What finger do we use to tap the letter P?
Tap P with your pinky finger on your right hand.”
Have students tap the letter A, space bar, B, space bar, C, space bar through P. Go
around and check that students are doing this correctly.
Turn to page 6 in the Herzog book. Have students type lines 1 through 14.
Other suggested activities to do with this lesson:
Dictated short words - Call out words that utilize only the letters learned to this
point. Use the bank of words from the lesson book located in the online section.
Visualize words - have students close eyes and visualize key locations as teacher
calls out words to have students key.
Dictation with partner – Have students pair up and dictate a practice line from
the book to their partner. Have the partner observe student fingerings and
provide constructive feedback/reinforcement.
Page 12
12
Keyboarding: Lesson 4
Letters Q through U
______________________________________________________________________________ Essential Question
What is the importance of keyboarding using consistent technique?
Activities/Teaching Cues
Review Position Pointers from Lesson 1 (Top 6)
Warm-up - Once students are logged in have them turn to page 7. Have them type
the alphabet review at the top of the page. Repeat it if they finish early. Challenge
option: Have them type it backwards as this will improve concentration and accuracy.
“Today we will be learning letters Q through U which are both right and left handed
letters.
Find the letter Q on your keyboard
Q is in the first column and is red (point to the wall chart)
What finger do we use to tap the letter Q?
Tap Q with your pinky finger on your left hand.”
Have students tap the letter A, space bar, B, space bar, C, space bar through Q. Go
around and check that students are doing this correctly.
Find the letter R on your keyboard
R is in the fourth column and is yellow (point to the wall chart)
What finger do we use to tap the letter R?
Tap R with your pointer finger on your left hand.”
Have students tap the letter A, space bar, B, space bar, C, space bar through R. Go
around and check that students are doing this correctly.
Find the letter S on your keyboard
S is in the second column and is blue (point to the wall chart)
What finger do we use to tap the letter S?
Tap S with your ring finger on your left hand.”
Have students tap the letter A, space bar, B, space bar, C, space bar through S. Go
around and check that students are doing this correctly.
Find the letter T on your keyboard
T is in the fifth column and is yellow (point to the wall chart)
What finger do we use to tap the letter T?
Tap T with your pointer finger on your left hand.”
Have students tap the letter A, space bar, B, space bar, C, space bar through Q. Go
around and check that students are doing this correctly.
Page 13
13
Find the letter U on your keyboard
U is in the seventh column and is yellow (point to the wall chart)
What finger do we use to tap the letter U?
Tap U with your pointer finger on your right hand.”
Have students tap the letter A, space bar, B, space bar, C, space bar through U. Go
around and check that students are doing this correctly.
Turn to page 7 in the Herzog book. Have students type lines 1 through 14.
Other suggested activities to do with this lesson:
Dictated short words - Call out words that utilize only the letters learned to this
point. Use the bank of words located in the lesson book from the online section.
Visualize words - have students close eyes and visualize key locations as teacher
calls out words to have students key.
Dictation with partner – Have students pair up and dictate a practice line from
the book to their partner. Have the partner observe student fingerings and
provide constructive feedback/reinforcement.
Page 14
14
Keyboarding: Lesson 5
Letters V through Z
______________________________________________________________________________
Essential Question
What is the importance of keyboarding using consistent technique?
Activities/Teaching Cues
Review Position Pointers from Lesson 1 (Top 6)
Warm-up - Once students are logged in have them turn to page 8. Have them type
the alphabet review at the top of the page. Repeat it if they finish early. Challenge
option: Have them type it backwards as this will improve concentration and accuracy.
“Today we will be learning letters V through Z which are both right and left handed
letters.
Find the letter V on your keyboard
V is in the fourth column and is yellow (point to the wall chart)
What finger do we use to tap the letter V?
Tap V with your pointer finger on your left hand.”
Have students tap the letter A, space bar, B, space bar, C, space bar through V. Go
around and check that students are doing this correctly.
Find the letter W on your keyboard
W is in the second column and is blue (point to the wall chart)
What finger do we use to tap the letter W?
Tap W with your ring finger on your left hand.”
Have students tap the letter A, space bar, B, space bar, C, space bar through W. Go
around and check that students are doing this correctly.
Find the letter X on your keyboard
X is in the second column and is blue (point to the wall chart)
What finger do we use to tap the letter X?
Tap X with your ring finger on your left hand.”
Have students tap the letter A, space bar, B, space bar, C, space bar through X. Go
around and check that students are doing this correctly.
Find the letter Y on your keyboard
Y is in the sixth column and is yellow (point to the wall chart)
What finger do we use to tap the letter Y?
Tap Y with your pointer finger on your right hand.”
Have students tap the letter A, space bar, B, space bar, C, space bar through Y. Go
around and check that students are doing this correctly.
Page 15
15
Find the letter Z on your keyboard
Z is in the first column and is red (point to the wall chart)
What finger do we use to tap the letter Z?
Tap Z with your pinky finger on your left hand.”
Have students tap the letter A, space bar, B, space bar, C, space bar through Z. Go
around and check that students are doing this correctly.
Turn to page 8 in the Herzog book. Have student’s type lines 1 through 14.
Other suggested activities to do with this lesson:
Dictated short words - Call out words that utilize only the letters learned to this
point. Use the bank of words located in the lesson book from the online section.
Visualize words - have students close eyes and visualize key locations as teacher
calls out words to have students key.
Dictation with partner – Have students pair up and dictate a practice line from
the book to their partner. Have the partner observe student fingerings and
provide constructive feedback/reinforcement.
Page 16
16
Keyboarding: Lesson 6
Punctuation
______________________________________________________________________________ Essential Question
What is the importance of keyboarding using consistent technique?
Activities/Teaching Cues
Review Position Pointers from Lesson 1 (Top 6)
Warm-up - Once students are logged in have them turn to page 9. Have them type
the alphabet review at the top of the page. Repeat it if they finish early. Challenge
option: Have them type it backwards as this will improve concentration and accuracy.
NOTE: In today’s lesson you are only covering some of the punctuation marks covered
within the book.
“Today we will be learning punctuation which are right handed keys.
Find the comma key (,) on your keyboard
Comma key is in the eighth column and is blue color (point to the wall chart)
What finger do we use to tap the comma?
Tap comma with your middle finger on your right hand.”
Have students tap the comma key on the keyboard.
Find the period key (.) on your keyboard
period is in the ninth column and is blue (point to the wall chart)
What finger do we use to tap the period key with?
Tap period with your ring finger on your right hand.”
Have students tap the period key on the keyboard.
Find the quotation mark (?) on your keyboard
Question mark is in the tenth column and is red (point to the wall chart)
What finger do we use to tap the question mark ?
Tap question mark with your pinky finger on your right hand.”
Have students tap the question mark key on the keyboard.
Page 17
17
Turn to page 10 in the Herzog book.
Find the apostrophe (‘) key on your keyboard
apostrophe is in the eleventh column and is red (point to the wall chart)
What finger do we use to tap the apostrophe ?
Tap apostrophe with your pinky finger on your right hand.”
Have students tap the apostrophe key on the keyboard.
“Find the shift key on your keyboard
Shift is on the left and right side of the keyboard.
It is red (point to the wall chart)
What finger do we use to tap the shift?
We tap the shift key with our pinky finger on both hands. Always use the opposite shift
from the hand you are typing a letter with. Never hit two keys with the same hand.”
Have student tap the Shift key on the keyboard to capitalize letters. Practice by typing
there name in all caps. Watch that they are using the correct shift key.
Find the quotation mark(“) key on your keyboard
quotations is in the eleventh column and is red (point to the wall chart)
What finger do we use to tap the quotations mark ?
Tap quotations with your pinky finger on your right hand while holding down the left shift
key”
Have students tap the quotations key on the keyboard. Practice putting words in
quotations.
Turn to page 9 in the Herzog book. Have student’s type lines 1 through 14.
Page 18
18
Keyboarding: Lessons 7, 8, 9
Applied Reinforcement
______________________________________________________________________________ Essential Question
Why are correct keyboarding skills important in relation to productivity and accuracy?
Activities/Teaching Cues
The focus of these lessons will be to reinforce the keys learned. Listed below each
grade level there are three activities to choose from. It is the teacher’s choice which
activities the students complete for your grade level. Students should complete two of
the three activities within the grade level by the end of the three days.
Grade 3
Recess
Meet ______
A Day At The Zoo
Grade 4
Sentence Completion
Wisconsin Facts
Mad Libs
Grade 5
Mad Libs
English is a Pain
Screen Scenes
Page 19
19
Keyboarding: Lesson 10
Review
______________________________________________________________________________ Essential Question
Why are correct keyboarding skills important in relation to productivity and accuracy?
Activities/Teaching Cues
Review Position Pointers from Lesson 1 (Top 6)
Speed test
Students will take a speed test to see how they have improved throughout
the year. Students may take the test more than once. Have students print a
certificate.
o Have students navigate to http://www.freetypinggame.net/
o Select Tests tap at the top
o Go to the section that says “Free Certificate Tests”
o Select #9 Letters Only for 1 minute
o Select Start Test
o Upon completion have students print a certificate.
Practice
After students have finished the practice test they can play the typing games
located on the website (www.freetypinggame.net) These games allow
students to practice typing words while also building speed.
Page 20
20
Boosters:
______________________________________________________________________________ In Trimesters 2 and 3 a booster that involves a full re-teaching of letters should be taught. Boosters are designed to reteach keyboarding technique and skill along with building proficiency. The booster will be conducted over five thirty minute instructional time periods. Below are three options for booster re-teaching. Based on your students’ needs, select the most appropriate grouping of boosters.
Booster Series Option 1
Booster Lessons Content Key emphasis A-G Reteach lesson 2 from initial instruction
Key emphasis H-P Reteach lesson 3 from initial instruction
Key emphasis Q-U Reteach lesson 4 from initial instruction
Key emphasis V-Z Reteach lesson 5 from initial instruction
Key emphasis Punctuation
Reteach lesson 6 from initial instruction
Booster Series Option 2
Booster Lessons Content Key emphasis A-G See lesson plan with directions
Key emphasis H-P See lesson plan with directions
Key emphasis Q-U See lesson plan with directions
Key emphasis V-Z See lesson plan with directions
Key emphasis Punctuation
See lesson plan with directions
Booster Series Option 3
Booster Lessons Content All Keys Review Letters A-Z
All Keys Letter Locations
All Keys Typing Duets
All Keys Letter Practice
All Keys Letter Practice
Page 21
21
Keyboarding: Boosters Option 1
__________________________________________________________________________ Essential Question
How can I improve my keyboarding skills?
Activities/Teaching Cues
This booster series is divided into five lessons. Each lesson reviews specific keyboarding
letters.
Lesson Content Page Number
1 Key emphasis A-G 8-9
2 Key emphasis H-P 10-11
3 Key emphasis Q-U 12-13
4 Key emphasis V-Z 14-15
5 Key emphasis Punctuation 16-17
Below is a general outline for each lesson:
Step 1: Review the Top 6 countdown each day. Variations – Have students introduce
and explain the countdown.
Top 6 countdown:
#6 – Keyboard at edge of table
#5 – Good distance away from the desk
#4 – Good posture (note: sit upright in chair)
#3 – Middle fingers on hub keys D and K
#2 – Wrists off the keyboard
#1 – Ready, type
Step 2: Each day go back to the original lesson series and re-teach the letters for the
day. See above chart for letter breakdown per lesson.
Step 3: Select one of the below options to work on keyboarding review:
Herzog Book - Select a section from the Herzog book on pages 11 thru 21 to
have students type. Each day select a different section.
Content text - Select appropriate text related to current learning content to
have students discuss.
Page 22
22
Keyboarding: Boosters Option 2
__________________________________________________________________________ Essential Questions
How can I improve my keyboarding skills?
Activities/Teaching Cues
This booster series is divided into five lessons. Each lesson reviews select keyboarding
letters.
Lesson Content
1 Key emphasis A-G
2 Key emphasis H-P
3 Key emphasis Q-U
4 Key emphasis V-Z
5 Key emphasis Punctuation
Below is a general outline for each lesson:
Step 1: Review the Top 6 Countdown each day. Variations – Have students introduce
and explain the countdown.
Top 6 Countdown:
#6 – Keyboard at edge of table
#5 – Good distance away from the desk (hint: Draw Bridge)
#4 – Good posture (note: sit upright in chair)
#3 – Middle fingers on hub keys D and K
#2 – Wrists off the keyboard
#1 – Ready, type
Step 2: Review the correct finger placement for letters of the day. (example: lesson
one – letters A – G, lesson two – letters H-P) Options would include showing finger
graphic completed, or fill in the finger graphic via individual, partner, or large group
sharing/discussion.
Step 3: Have students type the review lines. Teacher description of any combination of
the following to accomplish this practice—dictation, individual practice, or a
combination of these are options.
A
B
F
G
D
C
E
Page 23
23
Keyboarding: Boosters Option 3
__________________________________________________________________________ Essential Question
How can I improve my keyboarding skills?
Activities/Teaching Cues
This booster series is divided into five lessons. Each lesson reviews all letters learned.
Lesson Content/Activity
1 Review Letters A-Z
2 Letter Locations
3 Typing Duets
4 Letter Practice
5 Letter Practice
Day 1 –
Step 1: Review all keys & Top 6 Countdown technique
Step 2: Have students fill in keyboard online utilizing the online activity:
http://www.abcya.com/keyboard.htm
Step 3: When students complete filling out the keyboard have them move to practice
typing utilizing one of the games below. The goal of this activity is to work on accuracy
and speed while using correct technique.
o http://www.abcya.com/keyboard_invasion.htm
o http://www.abcya.com/keyboarding_chase.htm
o http://www.abcya.com/retro_typer.htm
o http://www.abcya.com/typing_race_cars.htm
o http://www.abcya.com/typing_rocket.htm
Day 2 –
Step 1: Review all keys & Top 6 Countdown technique
Step 2: Have students practice individual letters using one of the following games:
o http://funschool.kaboose.com/fun-
blaster/games/game_super_hyper_spider_typer.html
o http://www.abcya.com/cup_stack_typing_game.htm
The goal of this activity is to work on individual letter locations.
Step 3: Create Alphabet cards (a piece of paper or index cards can be used) with one
letter on each card. You can also create punctuation cards if desired. Divide students
into groups and hand each group a set of alphabet and punctuation cards. Using the
floor, without looking at any keyboards, have students put the letters and punctuation
marks in the order of the keyboard.
Page 24
24
Day 3 –
Select a poem or content text from your classroom that students can type for this
activity. You could also select a piece of text from the Herzog book.
For this activity students will type in Duets. Have each student choose a partner and sit
next to him or her (or even share a chair if they prefer). One person is the right hand the
other is the left and they have to type sentences in a book or activity together.
(Lines/Paragraphs can be used from the Herzog book) This is a great drill to get them to
type with a sense of rhythm. At first they will want to call the letters out loud to help tell
each other where they are in the word. After a few times, tell them they have to do it
silently and watch them start tapping their feet or bobbing their heads!
Day 4 and 5 –
The goal of Day 4 and 5 is to work on mastery of key locations which will gradually help
students to increase speed. This work can be done utilizing any text. Options for the
days:
Have students type using the online typing games
o http://www.abcya.com/keyboard_invasion.htm
o http://www.abcya.com/keyboarding_chase.htm
o http://www.abcya.com/retro_typer.htm
o http://www.abcya.com/typing_race_cars.htm
o http://www.abcya.com/typing_rocket.htm
Have students type a nursery rhyme
Select other text that is appropriate for students to type.