10
www.ht-rc.com MADE IN CHINA www.ht-rc.com 规格:280 * 140mm HT100AC/DC HT100AC/DC

www.ht-rc.com
MADE IN CHINA
www.ht-rc.com
规格:280*140mm
HT100AC/DCHT100AC/DC

PROGRAM OF SMART BATTERY
tion
0116
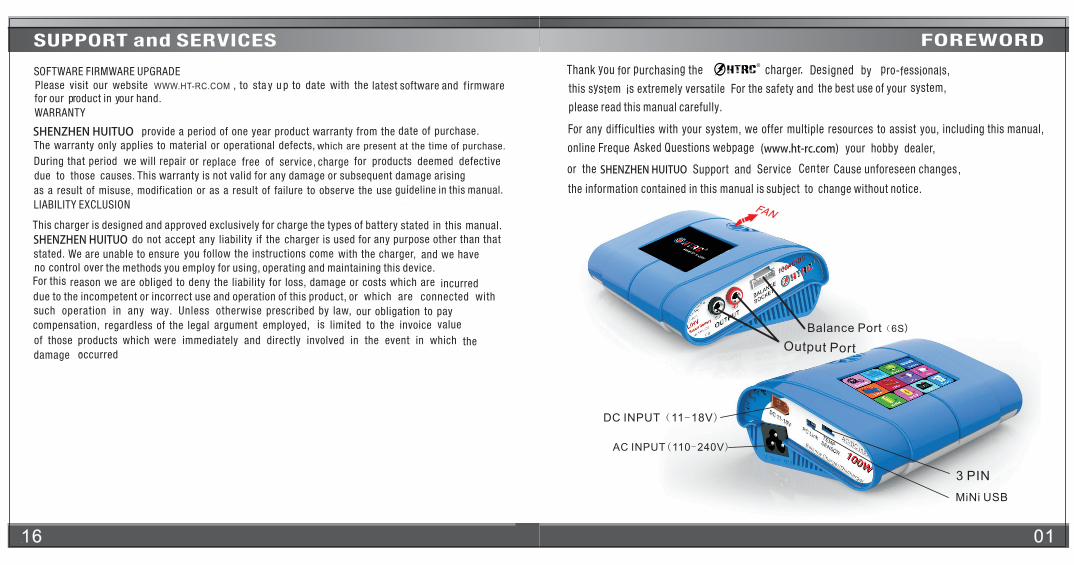
DC INPUT(11-18V)
AC INPUT(110-240V)
3 PIN
Output Port
Balance Port 6S)(
FAN
MiNi USB
WWW.HT-RC.COM

02 15
Accessories
Adapter Board 1SET
Extra Cable x1pc
AC Cord x1pc
DC Cord x1pc
ERROR INFORMATION <NOTE>
The charger will send out an alert and pop-up window
if the battery packs’setting is incorrect (Image 38).
Image 38
HT100AC/DC
110-240V
DC 11-18V
LiPo,Lilon,LiFe,LiHV 1-6 cells
NiCd,NiMH 1-15 cells
Pb(Lead Acid) 2-20V
100W
0.1-10A
10W
0.1-2.0A
400mA
—
6 memories
L122*W139*H53mm
481g
5-27V,0.1-10A
Smart Battery I/II/III/IV
TFT LCD
DC
Batteries
0314
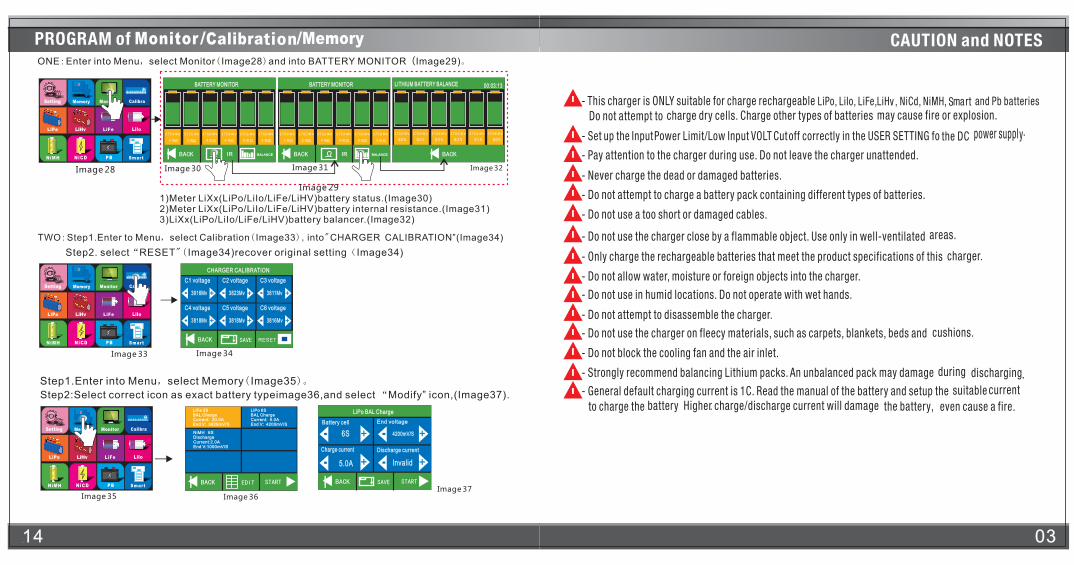
Step2. select“RESET"( Image34)recover original setting(Image34)
TWO:Step1.Enter to Menu,select Calibration( Image33), into"CHARGER CALIBRATION”(Image34)
Step2:Select correct icon as exact battery typeimage36,and select Modify” icon,(Image37).“
LiFe 3SBAL ChargeCurrent: 20.0AEnd V: 3629mV/S
NiMH 6SDischargeCurrent:2.0AEnd V:1000mV/S
EDIT
LiPo 6SBAL ChargeCurrent: 5.0AEnd V: 4200mV/S
Image 33
Image 35
Step1.Enter into Menu,select Memory( Image35)。
Image 36
ONE:Enter into Menu,select Monitor( Image28)and into BATTERY MONITOR(Image29)。
Image 28 Image 30 Image 31 Image 32
1)Meter LiXx(LiPo/LiIo/LiFe/LiHV)battery status.(Image30)2)Meter LiXx(LiPo/LiIo/LiFe/LiHV)battery internal resistance.(Image31)3)LiXx(LiPo/LiIo/LiFe/LiHV)battery balancer.(Image32)
LITHIUM BATTERY BALANCE 00:03:13
3754 mv 3755 mv 3756 mv 3754 mv 3756 mv 3758 mv
80% 80% 82% 82% 81% 80%
BATTERY MONITOR
3754 mv 3755 mv 3756 mv 3754 mv 3756 mv 3758 mv
BALANCEIR
2 m 4 m 4 m 5 m 3 m3 m
BATTERY MONITOR
3754 mv 3755 mv 3756 mv 3754 mv 3756 mv 3758 mv
3 m 2 m 4 m 4 m 5 m 3 m
BALANCEIR
Image 29
Image 34
Image 37
CHARGER CALIBRATION
+
RESET
C1 voltage
3816Mv- +
C2 voltage
3823Mv- +
C3 voltage
3811Mv- +
+ C4 voltage
3818Mv- +
C5 voltage
3818Mv- +
C6 voltage
3816Mv- +
LiPo BAL Charge
Battery cell End voltage
6S 4200mV/S
Charge current Discharge current
5.0A Invalid
+ -
- +
+ - + -
tion

USER SETTINGS (1/2)
Touch sound
on middle 100W
Buzzer volume Max power
Bal.Speed
standard
Delay time
5min
NEXTRESET
- + - + - +
- + - +
USER SETTINGS (2/2)
10.0V 10.0Ah 240min
Low Input Max Capacity Safety time
E.Temp cut-off
60 C
I.Temp cut-off
80 C
PREVRESET
- + - + - +
- + - +
USER SETTINGS (2/2)
10.0V 10.0Ah 240min
Low Input Max Capacity Safety time
E.Temp cut-off
60 C
I.Temp cut-off
80 C
PREVRESET
- + - + - +
- + - +
USER SETTINGS (1/2)
Touch sound
on middle 100W
Buzzer volume Max power
Bal.Speed
standard
Delay time
5min
NEXTRESET
- + - + - +
- + - +
1304
Image 24
Step1.Enter to Menu, Select Setting( Image24),into set interface
( Image25)。
Image 26
In this menu,you can set the cutoff Internal temperature to protect your battery.The charger will cutoff working when the Internal temperature is higher than the setting valuerange from 30-85 C,Default:80 C
60
6
Low/Middle/High/Off optional
-100watt watt
Image 27Image 25
HVNormal slow
slowNormal
Normal
slow
Delay
65.0 10.0
Middle,
1112
22.0
24.0
LiHV
LiHV
3.8
7.6
11.4
15.2
19.0
22.8
0.1-10.0A
0.1-10.0A
0.1-10.0A
0.1-10.0A
0.1-10.0A
0.1-10.0A
0.1-10.0A
0.1-10.0A
0.1-10.0A
0.1-10.0A
0.1-10.0A
0.1-10.0A
0.1-10.0A
0.1-10.0A
0.1-10.0A
0.1-10.0A
0.1-10.0A
0.1-10.0A
0.1-10.0A
0.1-10.0A
0.1-10.0A
0.1-10.0A
0.1-10.0A
0.1-10.0A
0.1-10.0A
0.1-10.0A
0.1-10.0A
0.1-10.0A0.1-10.0A
0.1-10.0A0.1-10.0A
0.1-10.0A
0.1-10.0A
0.1-10.0A
0.1-10.0A
0.1-10.0A
0.1-10.0A
0.1-10.0A0.1-10.0A
0.1-10.0A
0.1-10.0A
0.1-10.0A
0.1-10.0A0.1-10.0A
0.1-10.0A
0.1-10.0A
0.1-10.0A
0.1-10.0A
0.1-10.0A
0.1-10.0A
0.1-10.0A

12
PROGRAM OF SMART
Image 21 Image 22
Image 23
Example 3 :Choose a set of SMART battery charging ,please follow the below steps :
Next step will be example at “MODE 4"
Step1.Enter to Menu,Select Battery Type( Image21)。 Such as:SMART,Enter into“ ”( Image22)。SMART BATTERY POWER SUPPLY
Step 2. Select START(Image20)to charging(Image23).
MODE1:SMART IMODE2:SMART IIMODE3:SMART IIIMODE4:User set
SMART BATTERY POWER SUPPLY
Voltage12.6V
Current1.0A
SMART ISMART IISMART IIIUser set
- +
- +
SMART BATTERY POWER SUPPLY
Input Vol 14.73V
00:06:44
Ext.Temp No Sens
Int.Tem 40 C
Voltage 22.53V
Current 4.03A
Capacity 137mAh
STOP
Main Menu
NOTE: Please read carefully before doing anything !!
Touch System Controller 3.2 Inch Touch screen
security settings
Battery Management, Checking Battery Capacity, Voltage, Balancer
Memory: Save Six operation data
Calibrate Charger
NOTE:Image23 show the graphic photo for the current and voltage for the smart charge.
05

LiPo BAL Charge
Battery cell End voltage
6S 4200mV/S
Charge current Discharge current
5.0A Invalid
+ -
- +
+ - + -
WORKING INTERFACE
06 11
Example 1 :Choose a set of LiPo battery charging ,please follow the below steps :
Image 1 Image 2
Step1.Enter to Menu,Select Battery Type( Image1)。 Such as:LiPo,Enter into“SELECT WORK MODE”( Image2)。
MODE1:BALANCE CHARGEMODE2:CHARGEMODE3:STORAGEMODE4:DISCHARGE
Step2.Select“BAL CHARGE "MODE ,And enter into Lipo balance charge( Image3)
Step 3: If you often use the same battery , please touch Save icon ( Image 3 ) to enter
into Save interface . Touch Unused icon to save the data and it will be easy for you to
charge next time . ( Image 4 )
Image 5Image 4
Image 3
Next step will be example at “MODE 1"
Note:6 groups data can be saved
SELECT WORK MODE
HOME
LiPo
LiFe 3SBAL ChargeCurrent: 20.0AEnd V: 3629mV/S
NiMH 6SDischargeCurrent:2.0AEnd V:1000mV/S
LiPo 6SBAL ChargeCurrent: 5.0AEnd V: 4200mV/S
LiFe 3SBAL ChargeCurrent: 20.0AEnd V: 3629mV/S
NiMH 6SDischargeCurrent:2.0AEnd V:1000mV/S
LiPo 6SBAL ChargeCurrent: 5.0AEnd V: 4200mV/S
1
2
Image 20
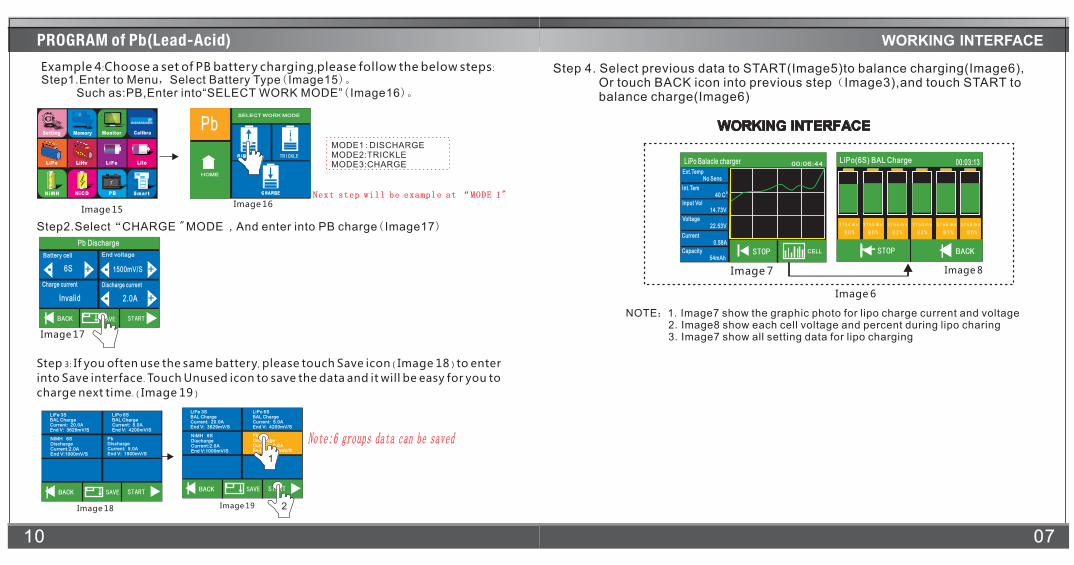
Step 4. Select previous data to START(Image19)to balance charging(Image6), Or touch BACK icon into previous step(Image17),and touch START to balance charge(Image20)
Pb (10S) Discharge
Input Vol 15.5V
00:06:44
Ext.Temp No Sens
Int.Tem 40 C
Voltage 22.88V
Current 0.43A
Capacity 1mAh
STOP
Hv
NOTE:1. Image20 show the graphic photo for charge current and voltage 2. Image20 show all setting data for charging
PBPB
Pb Discharge
Battery cell End voltage
6S 1500mV/S
Charge current Discharge current
Invalid 2.0A
+ - + - + -
SELECT WORK MODE
HOME
Pb
TRICKLE
WORKING INTERFACE
0710
Image 7 Image 8
Image 6
LiPo(6S) BAL Charge 00:03:13
3754 mv 3755 mv 3756 mv 3754 mv 3756 mv 3758 mv
80% 80% 82% 82% 81% 80%
STOP
LiPo Balacle charger
Input Vol 14.73V
00:06:44
Ext.Temp No Sens
Int.Tem 40 C
Voltage 22.53V
Current 0.58A
Capacity 54mAh
CELLSTOP
Image 15Image 16
Image 19Image 18
Image 17
Next step will be example at “MODE 1"
Note:6 groups data can be saved
LiFe 3SBAL ChargeCurrent: 20.0AEnd V: 3629mV/S
NiMH 6SDischargeCurrent:2.0AEnd V:1000mV/S
LiPo 6SBAL ChargeCurrent: 5.0AEnd V: 4200mV/S
Pb DischargeCurrent: 5.0AEnd V: 1500mV/S
LiFe 3SBAL ChargeCurrent: 20.0AEnd V: 3629mV/S
NiMH 6SDischargeCurrent:2.0AEnd V:1000mV/S
LiPo 6SBAL ChargeCurrent: 5.0AEnd V: 4200mV/S
1
2
Step2.Select“CHARGE "MODE ,And enter into PB charge( Image17)
Example 4 :Choose a set of PB battery charging ,please follow the below steps :
Step1.Enter to Menu,Select Battery Type( Image15)。 Such as:PB,Enter into“SELECT WORK MODE”( Image16)。
Step 3: If you often use the same battery , please touch Save icon ( Image 18 ) to enter
into Save interface . Touch Unused icon to save the data and it will be easy for you to
charge next time . ( Image 19 )
MODE1:MODE2:TRICKLEMODE3:
DISCHARGE
CHARGE
Pb DischargeCurrent: 5.0AEnd V: 1500mV/S
Step 4. Select previous data to START(Image5)to balance charging(Image6), Or touch BACK icon into previous step(Image3),and touch START to balance charge(Image6)
NOTE:1. Image7 show the graphic photo for lipo charge current and voltage 2. Image8 show each cell voltage and percent during lipo charing 3. Image7 show all setting data for lipo charging

Battery cell End voltage
15S 800mV/S
Charge current Discharge current
0.3AInvalid
+ - + - + -
SELECT WORK MODE
HOME
NiMH
CYCLE
08 09
Image 9 Image 10
Image 13Image 12
Image 11
Next step will be example at “MODE 1"
Note:6 groups data can be saved
Image 14
NiMH(15S) Discharge
Input Vol 15.49V
00:06:44
Ext.Temp No Sens
Int.Tem 44 C
Voltage 22.89V
Current 0.29A
Capacity 6mAh
STOP
Example 2 :Choose a set of NiMH battery charging ,please follow the below steps :
Step1.Enter to Menu,Select Battery Type( Image9)。 Such as:NiMH,Enter into“SELECT WORK MODE”( Image10)。
MODE1:MODE2:CYCLEMODE3:
DISCHARGE
CHARGE
Step2.Select“CHARGE "MODE ,And enter into NiMH charge( Image11)
Step 3: If you often use the same battery, please touch Save icon ( Image 12 ) to enter
into Save interface. Touch Unused icon to save the data and it will be easy for you to
charge next time. ( Image 13 )
Step 4. Select previous data to START(Image13)to Discharge (Image14), Or touch BACK icon into previous step(Image11),and touch START to charge(Image14)
NOTE:1. Image14 show the graphic photo for charge current and voltage 2. Image14 show all setting data for charging
NiMHNiMH
LiFe 3SBAL ChargeCurrent: 20.0AEnd V: 3629mV/S
NiMH 6SDischargeCurrent:2.0AEnd V:1000mV/S
LiPo 6SBAL ChargeCurrent: 5.0AEnd V: 4200mV/S
NiMH 15SDischargeCurrent:5.0AEnd V:800mV/S
LiFe 3SBAL ChargeCurrent: 20.0AEnd V: 3629mV/S
NiMH 6SDischargeCurrent:2.0AEnd V:1000mV/S
LiPo 6SBAL ChargeCurrent: 5.0AEnd V: 4200mV/S
NiMH 15SDischargeCurrent:5.0AEnd V:800mV/S
1
2


