44
Instruction Manual HI 84431 TOTAL ALKALINITY MINITITRATOR & pH METER for Water Analysis www.hannainst.com

1
Instruction Manual
HI 84431TOTAL ALKALINITY
MINITITRATOR & pH METERfor Water Analysis
www.hannainst .com

2
Dear Customer,Thank you for choosing a Hanna product. This manual will provide you with the necessaryinformation for the correct use of the instrument. Please read it carefully before using the meter.If you need additional technical information, do not hesitate to e-mail us at [email protected].

3
All rights are reserved. Reproduction in whole or in part is prohibited without the written consentof the copyright owner, Hanna Instruments Inc., Woonsocket, Rhode Island, 02895, USA.
TABLE OF CONTENTS
PRELIMINARY EXAMINATION................................................................................................. 4GENERAL DESCRIPTION ........................................................................................................ 4SPECIFICATIONS ................................................................................................................... 7PRINCIPLE OF OPERATION .................................................................................................... 8FUNCTIONAL AND PHYSICAL DESCRIPTION ............................................................................. 9TITRATOR STARTUP ........................................................................................................... 12SETUP CONFIGURATION MENU .......................................................................................... 13ELECTRODE PREPARATION .................................................................................................. 18ELECTRODE CALIBRATION PROCEDURE ................................................................................. 19pH BUFFER TEMPERATURE DEPENDENCE ............................................................................ 23PUMP TUBE INSTALLATION ................................................................................................. 24PURGE .............................................................................................................................. 24PUMP CALIBRATION PROCEDURE ........................................................................................ 26TITRATION PROCEDURE ..................................................................................................... 29pH MEASUREMENT ............................................................................................................ 34TEMPERATURE CALIBRATION PROCEDURE (for technical personnel only) ............................... 38TROUBLESHOOTING GUIDE ................................................................................................ 40ELECTRODE CONDITIONING & MAINTENANCE ...................................................................... 41ACCESSORIES ..................................................................................................................... 42WARRANTY ........................................................................................................................ 43

4
Please examine this product carefully. Make sure that the instrument is not damaged. If anydamage occurred during shipment, please notify your Dealer.Each HI 84431 minititrator is supplied complete with:
• HI 1131B pH electrode• HI 7662-M Temperature probe• HI 84431-50 Titrant low range (100 mL)• HI 84431-51 Titrant high range (100 mL)• HI 84431-55 Pump calibration solution (100 mL)• HI 70004 pH 4.01 buffer solution (2 x 20 mL)• HI 700083 pH 8.30 buffer solution (2 x 20 mL)• HI 70010 pH 10.01 buffer solution (2 x 20 mL)• Two 100 mL beakers• Tube set with dispensing tip• Stir bars (medium 2 pcs.)• 12 Vdc power adapter• Instruction manual
Note: Save all packing material until you are sure that the instrument works correctly.Any defective item must be returned in its original packing.
PRELIMINARY EXAMINATION
The HI 84431 is an easy to use microprocessor-based automatic minititrator and pH meter designedfor the rapid and accurate analysis of Total Titratable alkalinity in water. By eliminating subjectivefactors including color indicators, errors in mathematical calculations or erratic titrant additions fromthe measurement, the HI 84431 makes Total Titratable alkalinity analysis precisely. This willquickly become a valuable alkalinity analysis tool of waters and wastewaters.The instrument benefits from Hanna’s many years of experience as manufacturer of quality analyticalinstruments. A clear and well-designed user interface makes the instrument intuitive and simple touse. A dedicated HELP key aids in set-up, calibration, status and troubleshooting.
GENERAL DESCRIPTION

5
By simply pressing START key, the HI 84431 automatically starts pump operation and titrates thesample to the end point. The HI 84431 has a simple and accurate peristaltic pump to ensure the bestaccuracy and repeatability. By performing pump calibration with the Hanna standard provided, theinstrument accuracy is assured.The instrument employs a powerful and effective built-in algorithm to analyze the pH response todetermine the exact pH endpoint, then uses this to make the necessary calculations. The TitratableAlkalinity determination is instantaneously displayed in selected measurement units on the largedot matrix display. The instrument is ready for the next analysis immediately.
Other features:
• Log on demand up to 100 samples (50 for pH measurement; 50 for titration results)• GLP feature, to view last calibration data for pH electrode and pump
MEASUREMENT SIGNIFICANCEWater alkalinity is expression of a waters acid-neutralizing capacity and it is determined bytitration with standard acid solutions.Alkalinity is an important parameter for control and treatment of potable and wastewaters, becauseit indicates the water buffering capacity (ability to resist at pH change, primarily because ofbicarbonate/ carbonate content). A low water alkalinity signifies that the water is susceptible to pHchange and high alkalinity indicates that water is able to resist a major change of pH. Alkalinity canbe used to estimate water hardness or to determine water corrosive capacity.Alkalinity of surface water, quantified by mg/L as CaCO3 or meq/L, may be caused by carbonate,bicarbonate, hydroxide, phosphates, borates, silicates or organic acids salts.Conventionally, the water alkalinity is approximated as sum of components. Three types of alkalinitiesexist together to form total alkalinity:
TA = OH¯ + CO32¯ + HCO
3¯
OH¯ – hydroxide alkalinityCO
32¯ – carbonate alkalinity
HCO3¯ – bicarbonate alkalinity
TA – total alkalinityDifferent tests can be performed to determine the quantity of different alkalinities present. Atitration to pH 8.3 is considered Strong Alkalinity (SA) and to pH 4.5 Total Alkalinity (TA).

6
The results of a titration provide a means to classify the principle forms of alkalinity.Relationship of titrant volumes for alkalinity calculations:
According to the Standard Methods of Waters and Wastewaters Analysis, there are two options todetermine water alkalinity:
1) Strong alkalinity determination by titration of the water sample with strong acid solutionto 8.3 pH (known as phenolphtalein alkalinity).
2) Total alkalinity determination by titration of the water sample with strong acid solutionto 4.5 pH (known as bromcresol green alkalinity).
Potentiometric end point detection using a pH electrode is more objective than using visual endpoint determinations with color changing indicators. The HI 84431 minititrator is a potentiometrictitrator. The instrument also can be used as a pH meter. The volume of titrant dispensed necessaryto reach the end point is then used to calculate the water alkalinity expressed in mg/L as CaCO3
meq/L as CaCO3.
Interferences:• dissolved gases, lost or gained during samples storage or transport can modify the
alkalinity of the samples;• presence in the samples of the: precipitates, solid suspensions, oils, soaps can coat a pH
electrode;
To eliminate or diminish the interference effects, it is recommended:• to protect the samples against the atmospheric action (store in an airtight vessel);• to avoid vigorous shaking or mixing: stir gently;• maintenance of the pH electrode (see section Electrode Conditioning and Maintenance)
stlusernoitartiT H ordy edix C obra etan etanobraciB
0=AS 0 0 AT
AT=AS AT 0 0
AT2/1<AS 0 AS2 AS2-AT
AT2/1=AS 0 AT 0
AT2/1>AS AT-AS2 )AS-AT(2 0

7
SPECIFICATIONSTitrator Range Titratable alkalinity (low range)
mg/L : 15.0 - 500.0 mg/L as CaCO3
meq/L : 0.3 - 10.0 meq/L as CaCO3
Titratable alkalinity (high range)mg/L : 400 - 4000 mg/L as CaCO3
meq/L : 8 - 80 meq/L as CaCO3
Resolution Titratable alkalinity (low range):0.1 mg/L0.1 meq/LTitratable alkalinity (high range):1mg/L1meq/L
Accuracy 5% of readingTitration method Acid-base titration (total alkalinity / strong alkalinity)Principle End point titration: 4.50 pH / 8.30 pHPump debit 0.5 mL/minStirring speed 600 rpmLog data Up to 50 samples
pH meter pH meter -2.0 to 16.0 pH / -2.00 to 16.00 pHpH Resolution: 0.1 pH / 0.01 pHpH Accuracy: ± 0.01 pHpH Calibration: 1, 2 or 3 calibration points;
3 available buffers (4.01; 8.30; 10.01)Temperature manual or automatic fromcompensation: -20 to 120 °C (-4 to 248 °F)Log data Up to 50 samples
Temperature Range -20.0 to 120.0 °C (-4.0 to 248.0 °F)Resolution 0.1 °CAccuracy ±0.4 °C without probe error
Electrode HI 1131B (included)Temperature Probe HI 7662-M (included)Environment 0 to 50 °C (32 to 122 °F); max 95% RH non-condensingPower supply 12 Vdc power adapterDimensions 208 × 214 × 163 mm (8.2×8.4×6.4”) (with beaker)Weight 2200 g (77 oz.)

8
PRINCIPLE OF OPERATION
Water alkalinity determination is performed by titration with acid reagent to pH end point.Alkalinity is expressed as:
• Strong alkalinity (phenolphtalein alkalinity) determination by titration at 8.3 pH (in thisreaction hydroxide ions are converted to water and carbonate ions to bicarbonate ions):
2HO¯ + H2SO4 → 2H2O + SO42¯
2CO32¯ + H2SO4 → 2HCO3 + SO4
2¯
Since bicarbonate ions can be converted to carbonic acid with additional sulfuric acid, thephenolphtalein alkalinity measure total hydroxide ions and one half of the bicarbonateions contribution.
• Total alkalinity determination by titration at 4.5 pH (completly convert of the bicarbonate ions):2HCO3
¯ + H2SO4 → 2H2CO3 + SO42¯
It is important that the samples are protected against atmospheric factors (store them in sealedbottles that are completely filled) and avoid vigorous shaking, mixing and long exposure to air.The HI 84431 minititrator is designed to determine the alkalinity of waters by potentiometrictitration in a low range (10-500mg/mL as CaCO3) and in a high range (400-4000mg/mL as CaCO3).Selection of the alkalinity range is limited by the pH sample: if the measured pH is greater than 8.3both total and strong alkalinity can be determined. If the sample pH is lower than 8.3 only totalalkalinity can be determined.The HI 84331 utilizes two different titration solutions to cover the entire measurement range. If therange is changed, the titrant must be changed and the peristaltic pump must be primed andrecalibrated.HI 84431-55 is used for pump calibration; the volume used will vary for the selected range.Titratable Alkalinity in waters, as performed on the HI 84431 minititrator, utilizes a simple samplepreparation, a high quality peristaltic dosing pump for titrant, potentiometric endpoint detector andinstantaneaous computations. To maintain the high precision of the titrator, a simple pump calibrationprocedure is required. The calibration involves the analysis of a known volume of a known solution(standard provided) and compensates for changes in pump dosing that may occur due to many factorsincluding tube stretching or aging. This procedure should be performed regularly.
REQUIRED REAGENTSCode Description Quantity/TestHI 84431 - 50 Titrant (Low Range) 1 mLHI 84431 - 51 Titrant (High Range) 1 mLHI 84431 - 55 Pump Calibration Solution 2 mL for low range
20 mL for high range
9
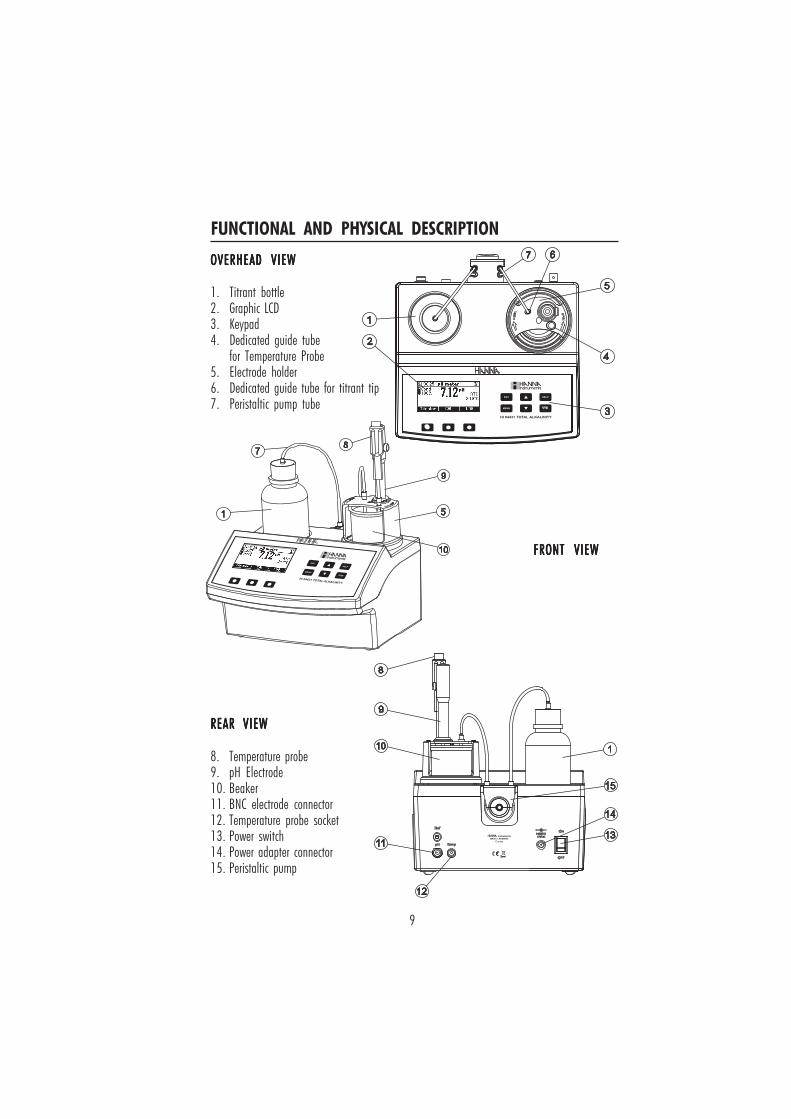
FUNCTIONAL AND PHYSICAL DESCRIPTION
OVERHEAD VIEWOVERHEAD VIEWOVERHEAD VIEWOVERHEAD VIEWOVERHEAD VIEW
1. Titrant bottle2. Graphic LCD3. Keypad4. Dedicated guide tube
for Temperature Probe5. Electrode holder6. Dedicated guide tube for titrant tip7. Peristaltic pump tube
FRONT VIEWFRONT VIEWFRONT VIEWFRONT VIEWFRONT VIEW
REAR VIEWREAR VIEWREAR VIEWREAR VIEWREAR VIEW
8. Temperature probe9. pH Electrode10. Beaker11. BNC electrode connector12. Temperature probe socket13. Power switch14. Power adapter connector15. Peristaltic pump

10
ESC - used to leave the current screen and to return either to the previous screen or to themain screen. When pressed while modifying a parameter within the SETUP menu,exits parameter without changing it.
/ - used to modify the parameters’ values, to scroll the information displayed whileviewing a help or to move between the options from the instrument’s SETUP
HELP - used to access/leave the instrument’s contextual helpMENU - used to enter SETUP, Recall or GLP selection menu, while instrument is in pH or
Titration main screenSTIR - used to start/stop the stirrer.Note: The stirer starts automatically during pump calibration and titration and cannot be
stopped by pressing STIR key.
KEYPAD FUNCTION AND INDICATORS

11
PERISTALTIC PUMPPeristaltic pumps are self priming. Liquid never contacts the pump components. The titrant tubingis pressed along the rotating rollers of the pump. The rollers compress the tubing, driving thetitrant to the dispensing tip.
1. Current time and instrument mode information (pH meter or Titrator)2. pH electrode condition information3. Main reading information4. Instrument status information5. Functional key area6. Indicates that the displayed value can be changed using ARROW keys7. Temperature value (°C, °F)8. pH temperature compensation mode (Manual or Automatic)9. Stirrer and reading status area
GUIDE TO INDICATORSDuring the instrument’s operation information is displayed on the LCD.Displayed icons:
1
5
2
3
4
9
6
8
7
Unstable reading.Stirrer on.
Pump running.
Parameter can be changed.

12
TITRATOR STARTUP
This is a general outline of the steps required to make a titration. The following sections expandupon each section.• Place the instrument on a flat table. Do not place the instrument in direct sun light.• Connect the power adapter to the instrument.• Turn the instrument ON using the power switch from the rear panel of the instrument.• Set up the instrument. See the “Setup Configuration Menu” section for details.• Connect the pH sensor and temperature probe to the instrument.• Calibrate the pH electrode. At least a single point calibration is necessary for titration.• Place the peristaltic pump tube on the pump (inlet tube is connected with the reagent bottle,
outlet tube is connected with the dosing tip). See the “Pump Tube Replacement” section forthe procedure.
• Remove the reagent bottle cap and replace the bottle cap with the tubes. Place the reagentbottle in the appropriate place on the titrator top (pay attention to the titration range).
• Purge the titrant.• Calibrate the pump.• Prepare the sample.• Run a titration and log sample results.

13
From your knowledge of expected concentrations, use the table below to determine whichsettings and solutions are appropriate:
Use Total LR or Strong LR for waters alkalinity in the 10 - 500 mg/L range.Use Total HR or Strong HR for waters alkalinity in the 400 - 4000 mg/L range.Use the appropriate titrant for each range.Also, the pump must be recalibrated when the measurement range is changed (see table above).
Alkalinity type
SETUP CONFIGURATION MENU
Options: mg/L, meq/L.Press the corresponding function key to change theoption.
Concentration unit
The titrator’s setup configuration menu may be accessed from the pH or titration screens bypressing the MENU key, then Setup.A list of setup parameters will be displayed with currently configured setting.While in the setup menu it is possible to modify the instrument’s operation parameters. TheARROW keys permit the user to scroll the setup parameters.Press HELP to view the contextual help.Press ESC to return to the main screen.
Options: Total LR (total alkalinity low range)Total HR (total alkalinity high range)Strong LR (strong alkalinity low range)Strong HR (strong alkalinity high range)
Press the corresponding function key to change theoption.
A tinilakl epyTy RLlatoT latoT RH RLgnortS RHgnortS
L/gmegnartnemerusaeM OCaC 3 005-01 0004-004 005-01 0004-004
L/qem 3OCaC 0 01-2. 0. 08-8 0 1-2. 0.0 08-8
)M55-13448IH(noitulosnoitarbilacpmuP Lm2 20 Lm Lm2 Lm02
deriuqertnartiT 05-13448IH 15-13448IH 05-13448IH 15-13448IH
)Lm(eziselpmaS 05 Lm 05 Lm 05 Lm 05 Lm
elpmasfoHpmuminiM 5.4> 5.4> 3.8> .8> 3
noitartitfotniopdnE Hp5.4 Hp5.4 Hp3.8 Hp3.8

14
Use the ARROW keys in order to increase/decreasethe value.Press Accept to confirm or ESC to return to thesetup menu without saving the new value.
pH resolution
Options: 0.1, 0.01.Press the displayed function key in order to changethe pH resolution.
Options: °C, °F.Press the function key in order to change thetemperature unit.
Temperature unit
Options: 0 to 8.Press Modify to access the backlight level.
Backlight
Calibration timeout
Options: Disabled or 1 to 7 days.This option is used to set the number of daysbefore the pH calibration expired warning messageis flagged.Press Modify to access the calibration timeoutvalue modify parameter.

15
Press / to highlight the value to be modified(year, month, day, hour, minute or second). Usethe ARROW keys to change the value.Press Accept to confirm the new value or ESC toreturn to the setup.
This option is used to set the instrument’s dateand time.Press Modify to change the date/time.
Use the ARROW keys or / in order toincrease/decrease the value.Press Accept to confirm the value or ESC to returnto the setup menu.
Option: 0 to 20.This option is used to set the display’s contrast.Press Modify to change the display’s contrast.
Use the ARROW keys or / in order toincrease/decrease the displayed constrast.Press Accept to confirm or ESC to return to thesetup menu.
Contrast
Date / Time

16
Press the corresponding function key to change thelanguage.If the new selected language cannot be loaded,the previously selected language will be reloaded.
Language
Use the ARROW keys to select the desired format.Press Accept to confirm the value or ESC to returnto the setup menu.
Date format
Press Modify to change the Date Format.
This option is used to enable/disable tutorial mode.If enabled this option will provide the user shortguides on the screen.Press the function key to select this option.
Tutorial
Option: AM/PM or 24 hours.Press the functional key to select the new value.
Time format
If no language can be loaded at startup the instrument will work in the “safe mode”. In “safemode” all the messages are displayed in English and tutorial and help information are notavailable.
17
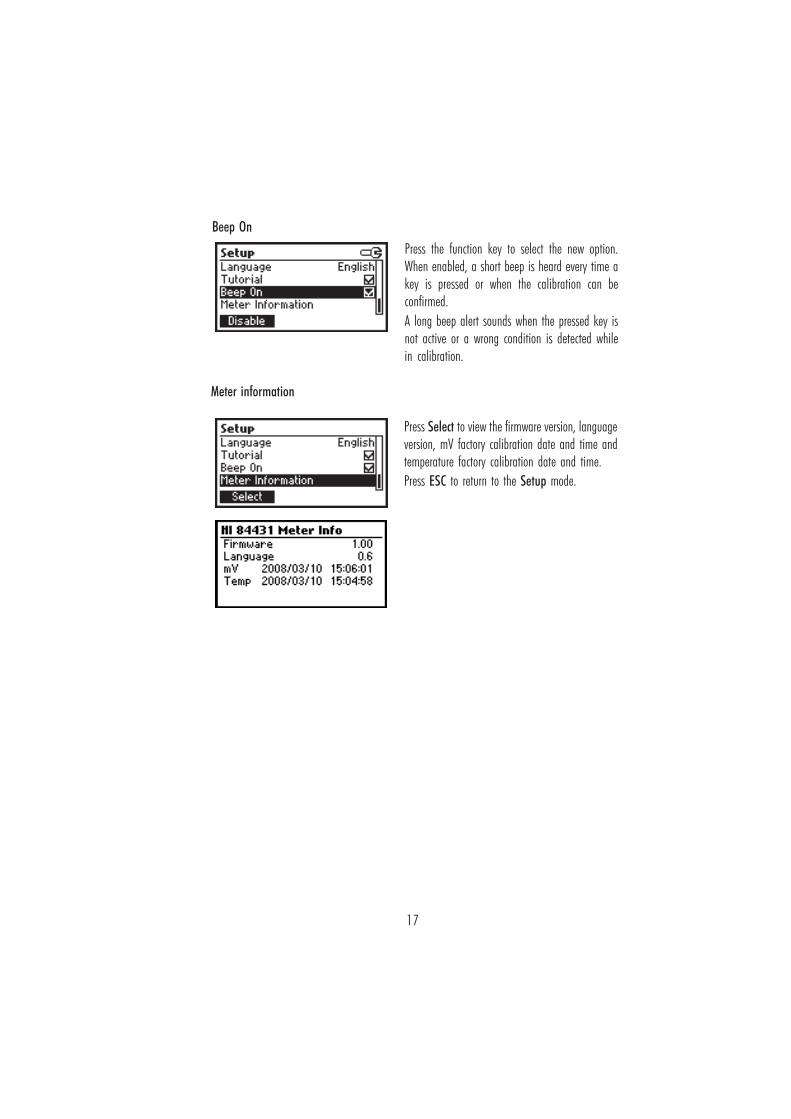
Press Select to view the firmware version, languageversion, mV factory calibration date and time andtemperature factory calibration date and time.Press ESC to return to the Setup mode.
Meter information
Press the function key to select the new option.When enabled, a short beep is heard every time akey is pressed or when the calibration can beconfirmed.A long beep alert sounds when the pressed key isnot active or a wrong condition is detected whilein calibration.
Beep On

18
ELECTRODE PREPARATION
PREPARATION PROCEDURERemove the electrode protective cap.DO NOT BE ALARMED IF ANY SALT DEPOSITS ARE PRESENT. This is normal with electrodes andthey will disappear when rinsed with distilled water.During transport tiny bubbles of air may have formed inside the glass bulb. The electrode cannotfunction properly under these conditions. These bubbles can be removed by "shaking down" theelectrode as you would do with a glass thermometer.If the bulb is dry, soak the electrode in HI 70300 Storage Solution for at least one hour.

19
ELECTRODE CALIBRATION PROCEDURE
It is recommended to calibrate the instrument frequently, especially if high accuracy is required.The pH electrode should be recalibrated:
a) Whenever the pH electrode is replacedb) At least once a weekc) After testing aggressive chemicals and after electrode is cleanedd) When high accuracy is requirede) If the pH calibration expired warning is displayed during measurement. Every time
you calibrate the instrument clean the electrode (see the “pH Cleaning Procedure” section) anduse fresh buffers.
PROCEDUREA single, two or three-points calibration can be performed, using the three predefined buffers4.01, 8.30 and 10.01 pH. For a single point calibration any of the three buffers may be used,but using 8.30 pH is recommended.Note: The HI 84431 will not accept other pH buffers for calibration.• Pour small quantities of selected buffer solutions into clean beakers. For accurate calibration use two
beakers for each buffer solution, the first one for rinsing the electrode and the second one for calibration.• Put a magnetic stir bar in each beaker with the calibration buffer solution.• Remove the protective cap and rinse the electrodes with some of the buffer solution to be
used for the first calibration point. Open fill hole on electrode.• Put the first beaker with calibration buffer in the beaker holder.• Place the electrode holder on the top of the beaker and secure it by turning clockwise.• Immerse the pH electrode and the temperature probe approximately 2 cm (0.8”) into the
buffer paying attention not to touch the stir bar.To select Electrode calibration screen follow the next steps:• From pH meter screen press CAL function key then Electrode.• From Titrator screen press CAL function key then Electrode.• The electrode calibration screen will be displayed.
Point 1 calibration• The 8.30 buffer will be selected by default. If necessary press the ARROW keys in order to
select a different buffer value.

20
• The (unstable measurement) symbol will be shown on the display until the reading becomes stable.• When the reading is stable and close to the selected buffer, the (unstable measurement)
symbol will disappear and the Confirm key will become active.
• Press Confirm to confirm the calibration.• Press ESC to exit calibration.Notes: • To clear a previous calibration and to return to the default value, press Clear at any
time after entering calibration mode. The “Calibration cleared” message will beshown for a few seconds on the display. If Clear is invoked during the first calibrationpoint the instrument returns to the measurement mode.
• The Clear key is displayed only if a previous calibration exists.
Point 2 calibration• The calibrated value will be shown on the display and the second expected buffer value will
be displayed.• Remove the electrode holder with electrodes from the top of the beaker.• Place the second buffer into beaker and place in beaker holder. Rinse the electrodes in a
beaker containing the second buffer rinsing solution.• Place the electrode holder (with electrodes) on the top of the beaker, lock cap by turning.• If necessary press the ARROW keys in order to select a different buffer value.• The (unstable measurement) symbol will be shown on the display until the reading
becomes stable.• When the reading is stable and close to the selected buffer, the (unstable measurement)
symbol will disappear and the Confirm key will become active.
• Press Confirm to confirm the calibration.• The calibrated value will be shown on the display and the third expected buffer value will be
automatically selected.

21
• After the second calibration point has been confirmed, press ESC to exit without performingthe third calibration point.
Point 3 calibration• Remove the electrode holder with electrodes from the top of the beaker.• Place the third buffer solution in a beaker and place in beaker holder. Rinse the probes in a
beaker with third buffer rinsing solution.• Place the electrode holder (with electrode) in the beaker with third buffer and secure top by
locking.• The (unstable measurement) symbol will be shown on the display until the reading
becomes stable.• When the reading is stable and close to the selected buffer, the (unstable measurement)
symbol will disappear and the Confirm key will become active.• Press Confirm to confirm the calibration. The instrument stores the calibration value and
returns to pH meter/titrator calibration menu, where the date and time for the last pHcalibration will be updated.
Notes: • A buffer confirmed during the calibration process is removed from the list of calibrationbuffers available for further calibration points.
• If the value measured by the instrument is not close to the selected buffer a “WrongBuffer” error message will be shown on the display.Check if the correct buffer has been used or regenerate the pH electrodes by following
the Cleaning Procedure (see the “pH Cleaning Procedure” section). If necessarychange the buffer or the electrode.
22
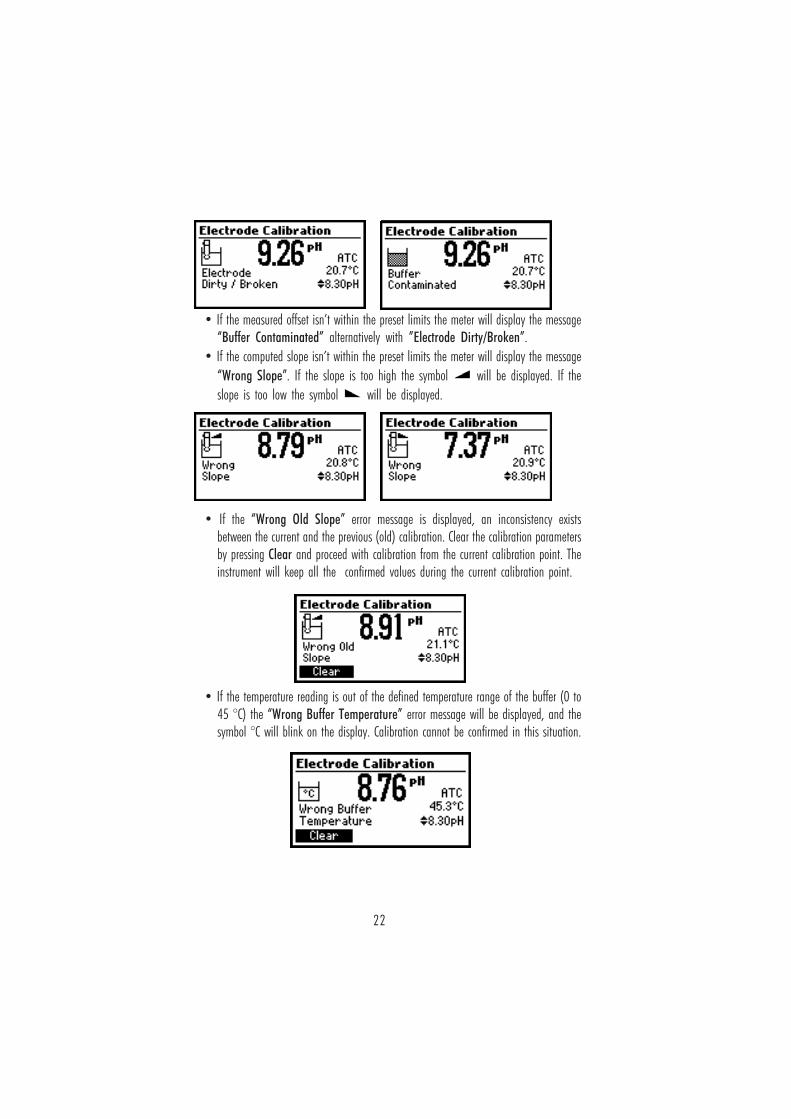
• If the measured offset isn’t within the preset limits the meter will display the message“Buffer Contaminated” alternatively with ”Electrode Dirty/Broken”.
• If the computed slope isn’t within the preset limits the meter will display the message“Wrong Slope”. If the slope is too high the symbol will be displayed. If theslope is too low the symbol will be displayed.
• If the “Wrong Old Slope” error message is displayed, an inconsistency existsbetween the current and the previous (old) calibration. Clear the calibration parametersby pressing Clear and proceed with calibration from the current calibration point. Theinstrument will keep all the confirmed values during the current calibration point.
• If the temperature reading is out of the defined temperature range of the buffer (0 to45 °C) the “Wrong Buffer Temperature” error message will be displayed, and thesymbol °C will blink on the display. Calibration cannot be confirmed in this situation.

23
The temperature has an effect on pH. The calibration buffer solutions are affected by temperaturechanges to a lesser degree than normal solutions. During calibration the instrument willautomatically calibrate to the pH value corresponding to the measured or set temperature.
During calibration the instrument will display the pH buffer value at 25 °C.
pH BUFFER TEMPERATURE DEPENDENCE
PMET SREFFUBHp
C° F° 10.4 03.8 10.01
0 23 10.4 84.8 23.01
5 14 00.4 44.8 42.01
01 05 00.4 14.8 81.01
51 95 00.4 73.8 21.01
02 86 00.4 33.8 60.01
52 77 10.4 03.8 10.01
03 68 20.4 72.8 69.9
53 59 30.4 42.8 29.9
04 401 40.4 12.8 88.9

24
PURGEPurging should be performed:• whenever the tube of the peristaltic pump is replaced;• whenever the titrant is changed or a new bottle is used;• before starting a pump calibration;• before starting a lot of titrations.In order to start purging press the Purge key from the titrator main screen. The purging stopsautomatically after 5 minutes.To access the Purge key follow the next steps.• From the instrument main screen (pH meter screen) press “Titrator” function key.
The instrument will display the next screen if any of the following conditions exist:- the meter hasn’t been calibrated in 8.30 pH buffer- the pH calibration has expired
PUMP TUBE INSTALLATIONTo mount the new peristaltic pump tube follow next steps:• Position one peristaltic pump fixing ring on its location.• Stretch the tube over the peristaltic pump rolls.• Fix the second pump fixing ring on its location.• Determine which titrant is required for the expected
alkalinity range selected (see table in Alkalinity Type).• Attach the tube to the reagent bottle.
Note: Purge the peristaltic pump until drops of reagent appears on the dosing tip by pressing thePURGE key from the titrator main screen.
To remove the tube of the peristaltic pump follow next steps:Caution: Purge line with water to remove titrant solution from tube.• Detach the tubes system from the reagent bottle.• Grasp one fixing ring of the peristaltic pump tube.• Pull the tube until the fixing rings are taken out from their location.• Remove the other side of the tube.

25
- a pump calibration hasn’t been performed or more than 3 days have passed since the lastpump calibration.
• Press CAL to access the titration calibration menu where electrode and pump calibration maybe accessed.
• Press HELP to view the contextual help.• Press Continue or ESC to skip the message and enter Titrator main screen.
• Press Purge to begin a purge cycle.
The purging stops automatically after 5 minutes.To stop purging at any time and return to the main screen press ESC or Stop.During a purge, the remaining time until the purge process will be completed is shown on thelower right side of the display.Press Pause to interrupt the purge process.Press Pause or Stop (by pressing the corresponding function key in the purge screen)• after the first drops of fresh titrant appear at the dosing tip• in case of error conditions (empty titrant, bottle, tubes or dosing tip disconected, pump error)• if you want to resume at a later timeIf Pause is pressed the next screen is displayed:
Press Resume to continue purging.

26
Verify: The electrode has been calibrated in 8.30 pH buffer.
• Sample prepar.ation: Add a precisely measured amount ofHI 84431-55 Pump Calibration Solution to a clean beakeras indicated below:
Fill the beaker up to the 50 mL mark with the distilled ordeionized water. Place the stir bar into the beaker and then placethe beaker into the appropriate place on the instrument top.
• Place the electrode holder on the top of the beaker and secureit by turning clockwise.
• Immerse the calibrated pH and the temperature electrodesapproximatively 2 cm (0.8”) into the sample to be testedpaying attention not to touch the stir bar.
• Verify if the titrant correspondes to selected titration range.For Low Range (Strong LR, Total LR) use the HI 84431-50.For High Range (Strong HR, Total HR) use the HI 84431-51.
After the 5 minutes purging interval has elapsed the “Completed” message is displayed.Another purge period can be initiated by pressing Restart or press ESC to return to main titratorscreen.
PUMP CALIBRATION PROCEDURESETUP alkalinity type and purge unit with titrant before performing the pump calibration.• Select the corresponding range according to the table below.
The pump calibration must be performed each time the alkalinity type, pump tube, titrant bottleor the pH electrode is changed. It is recommended the pump calibration be performed beforeeach set of titrations.
TINUegnaRwoL
)elpmasLm05(egnaRhgiH
)elpmasLm05(
L/gm 0.005ot0.01 0004ot004
L/qem 0.01ot2.0 08ot8
Low Range (Strong LR, Total LR) - 2 mlHigh Range (Strong HR, Total HR) -20 ml

27
• Press Pump.The next screen will be displayed.
• Press Start.• After the pump calibration is started, on the upper right side of the display two animations
will be shown in order to indicate that the pump and the stirrer are working. On the lowerright side of the display is shown the amount of time that has passed since beginning of thecalibration.
• Insert the dosing tip in the appropriate guide tube holder place and insert it in the solution.Note: The chemical reagents may be hazardous if improperly handled. Read the Material
Safety Data Sheets (MSDS) before performing the test.• From the titrator main screen press CAL.
The instrument displays the date and time of the last electrode calibration, and the date andtime of the last pump calibration, or calibration expired messages.
28
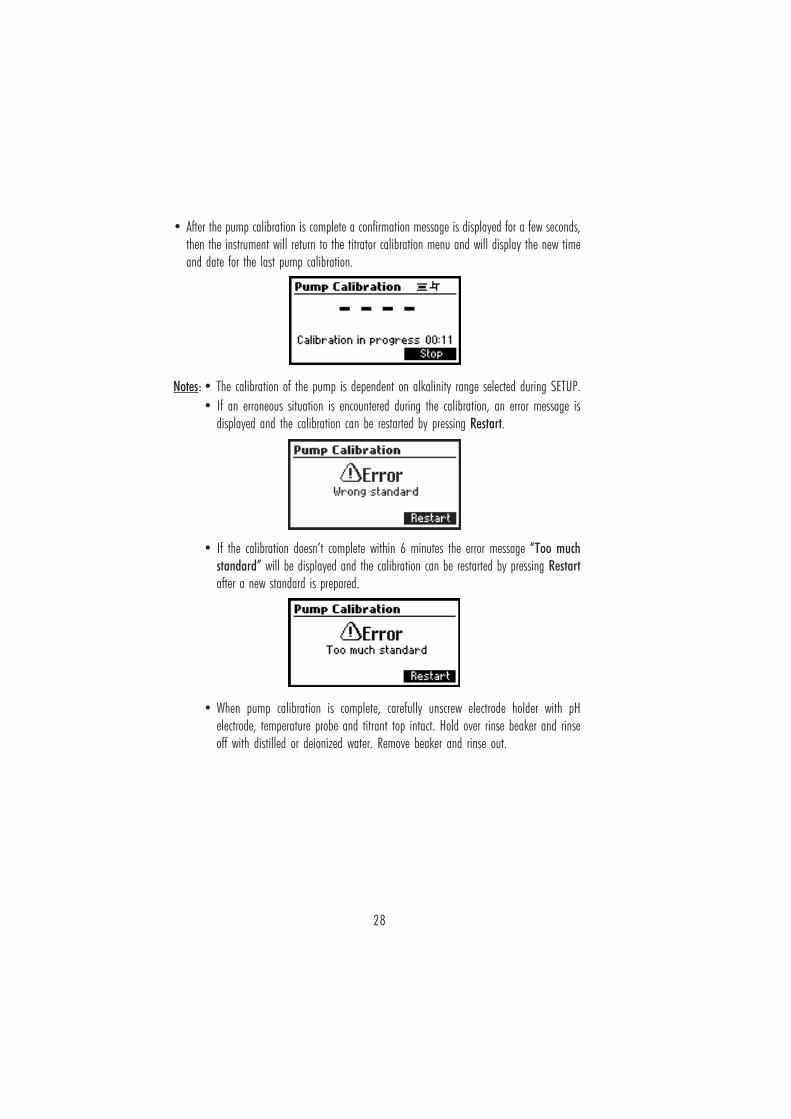
• After the pump calibration is complete a confirmation message is displayed for a few seconds,then the instrument will return to the titrator calibration menu and will display the new timeand date for the last pump calibration.
Notes: • The calibration of the pump is dependent on alkalinity range selected during SETUP.• If an erroneous situation is encountered during the calibration, an error message is
displayed and the calibration can be restarted by pressing Restart.
• If the calibration doesn’t complete within 6 minutes the error message “Too muchstandard” will be displayed and the calibration can be restarted by pressing Restartafter a new standard is prepared.
• When pump calibration is complete, carefully unscrew electrode holder with pHelectrode, temperature probe and titrant top intact. Hold over rinse beaker and rinseoff with distilled or deionized water. Remove beaker and rinse out.
29
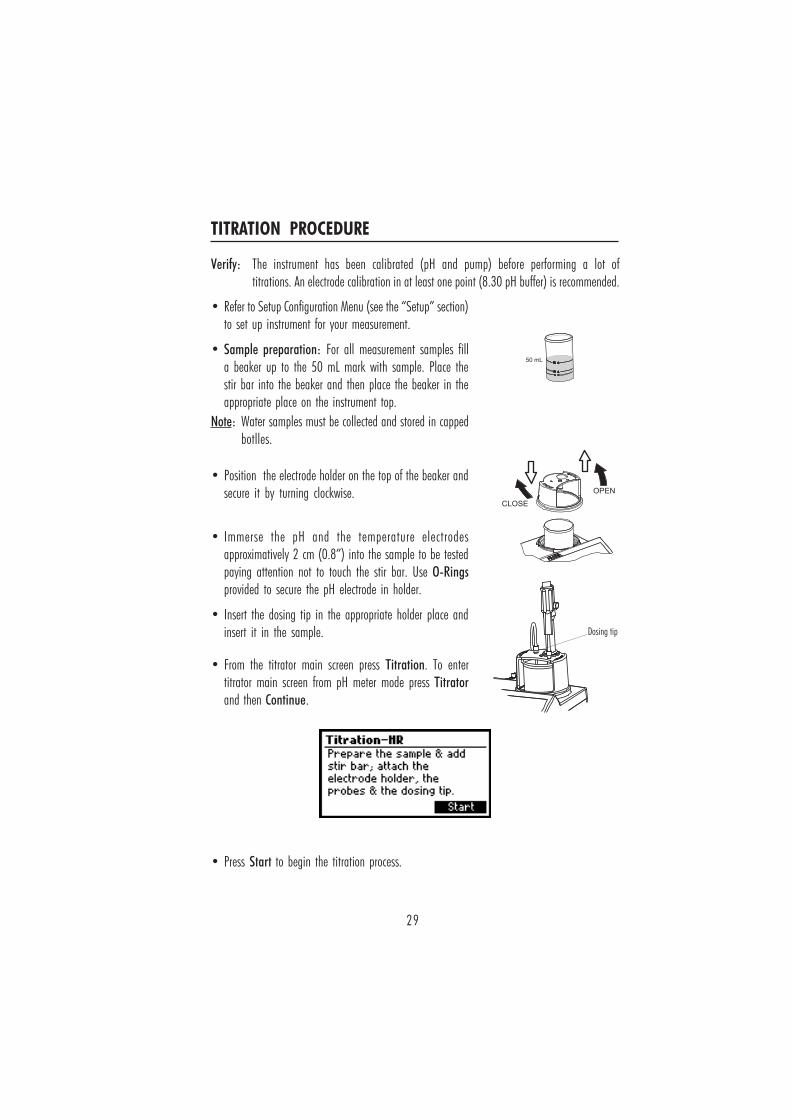
Verify: The instrument has been calibrated (pH and pump) before performing a lot oftitrations. An electrode calibration in at least one point (8.30 pH buffer) is recommended.
• Refer to Setup Configuration Menu (see the “Setup” section)to set up instrument for your measurement.
• Sample preparation: For all measurement samples filla beaker up to the 50 mL mark with sample. Place thestir bar into the beaker and then place the beaker in theappropriate place on the instrument top.
Note: Water samples must be collected and stored in cappedbotlles.
• Position the electrode holder on the top of the beaker andsecure it by turning clockwise.
• Immerse the pH and the temperature electrodesapproximatively 2 cm (0.8”) into the sample to be testedpaying attention not to touch the stir bar. Use O-Ringsprovided to secure the pH electrode in holder.
• Insert the dosing tip in the appropriate holder place andinsert it in the sample.
• From the titrator main screen press Titration. To entertitrator main screen from pH meter mode press Titratorand then Continue.
• Press Start to begin the titration process.
TITRATION PROCEDURE

30
• After the titration is started on the upper right side of the display two animations will beshown in order to indicate that the pump and the stirrer are running. On the lower right sideof the display is shown the period of time since the titration has been started.
• After the titration is complete, the concentration value is displayed in the selected unit.
• Press Unit to change the display unit.• Press LOG to record the concentration value into the instrument’s memory.
A message will be displayed for a few seconds indicating the amount of the free log space.50 log samples can be recorded in the instrument’s memory. When the titrator free log spaceis under 12% the message will be shown permanently.
• If the concentration is out of limits an exceeded range limit message will be displayedblinking and the message “Out of range” will be shown. Another titration can be initiatedby pressing Restart.
• Remove electrode holder. Rinse the electrode into waste container.

31
VIEW/DELETE LOGGED SAMPLES
Press MENU key while in Titrator main screen.
Press Recall to access the titrator logged data.The instrument will display a list of all the titration records stored in the titration log.Use the ARROW keys to scroll the stored records list.If the saved concentration was out of range the “!” symbol is displayed in front of the reading.
• Prepare a fresh sample and place on titrator. Place the temperature probe and the electrodein appropriate guides.
• Immerse the titrant tip and use care not to dislodge titrant from dispensing tip.Note: If the end-point is not reached or it is not recognized or the input reading is out of range,
an error message will be displayed. The titration can be restarted after a new sample isprepared by pressing Restart.
TIPS FOR AN ACCURATE MEASUREMENT• Calibrate the instrument in 8.30 pH buffer solution at least once a day, before you start to
perform measurements.• Purge the peristaltic pump to have the fresh titrant when starting a new calibration.• Calibrate the peristaltic pump daily before performing a set of analyses.• Clean the electrode in order to remove the possible coating from bulb.• Precision of the measurement can be improved by using volumetric pipettes for standard and
sample additions.

32
Press Delete to enter delete record screen.Press Delete All to enter delete all records screen.Press More to view additional information of the measurement.
Press Unit to convert the result between meq/L and mg/L.Press ESC to return to the previous screen.Use the ARROW keys when is displayed to scroll between the log records.
If Delete was pressed the instrument will ask for confirmation.Use the ARROW keys to focus on the record to be deleted.Press Confirm to delete the record or ESC to return to the previous screen.Deleting a record will renumber the list of records.If Delete All was pressed the instrument will ask for confirmation.
Press Confirm to delete all the records or ESC to return to the previous screen.If the titrator log is empty the message “No Records!” will be displayed.

33
GLP contains a set of information regarding electrode calibration. The following items areincluded in electrode GLP: the time and date of the last calibration, offset, slope, calibrationtimeout and the calibration buffers. The buffers displayed in video inverse mode are from theprevious calibration.If a calibration hasn’t been performed the message “Not Calibrated” will be displayed.
TITRATOR GLP INFORMATION
Press MENU while in Titration mode and then GLP.
From this screen it is possible to select between viewing the electrode GLP or the pump GLP.Press GLP elec. to view the electrode’s last calibration parameters and date.Press GLP pump to view the pump’s last calibration time and date.If GLP elec. is pressed one of the next screens will be displayed.
If GLP pump is pressed, one of the next screens is displayed.

34
If a calibration hasn’t been performed the message “Not Calibrated” will be displayed.The pump GLP displays the Time and Date of the last pump calibration.
pH MEASUREMENTThe HI 84431 may be used as a pH meter for direct measurements.Verify that the instrument has been calibrated before taking pH measurements. Set theinstrument to pH meter. At power up the instrument enters pH meter mode. From titrator modepress ESC until pH units are displayed.If an electrode calibration hasn’t been performed, or the number of days exceeds calibrationtimeout value set, the displayed message “CAL DUE” will blink on the left side of the display(see Calibration timeout option in Setup for details).Place pH electrode into electrode holder and connect it to the instrument.Rinse the pH tip with distilled or deionized water. Immerse the pH (bottom 2 cm / 0.8”) inthe sample and stir gently for a few seconds.For a faster response and to avoid cross-contamination of the samples, rinse the electrode tipwith a few drops of the solution to be tested, before taking measurements.If CAL DUE is displayed perform an electrode calibration.
Press MENU to access the instrument’s menu.Press HELP to view the contextual help, every time you need supplementary information. Thehelp is customized for every situation that can appear during instrument usage.Press STIR to start/stop the stirrer.Press Titrator to enter titrator mode.Press CAL to access the calibration menu.

35
Press LOG to memorize the current reading. A message indicating the free log space will bedisplayed for a few seconds.
In order to take pH measurements follow the next steps:• Submerge the pH bulb 2 cm (0,8’’) and the temperature probe into the sample to be tested
and stir gently. Allow time for the electrode to stabilize. When the reading becomes stablethe (unstable measurement) symbol will disappear.
• If the pH readings are less than -2.00 or greater than 16.00 pH the closest full-scalevalue (-2.00 pH or 16.00 pH) will be displayed blinking.
If measurements are taken successively in different samples, it is recommended to rinse theelectrodes thoroughly with deionized water or distilled water and then with some of the nextsample to prevent cross-contamination.pH measurements are affected by temperature. In order to have accurate pH measurements, thetemperature effect must be compensated for. To use the Automatic Temperature Compensation(ATC) feature, connect and submerge the HI 7662-M temperature probe into the sample in thededicated guide tube and wait for a few seconds. The “ATC” message will be shown on thedisplay. Automatic Temperature Compensation will provide pH corrected values at the temperatureof measurements. If Manual Temperature Compensation (MTC) is desired, the temperature probemust be disconnected from the instrument. The default temperature of 25 °C (77 °F) or the lasttemperature reading will be displayed preceded by the symbol and the “MTC” message.The manually set temperature can now be adjusted with the ARROW keys (from -20.0 to 120.0 °C).

36
Press Confirm to delete the record or ESC to return to the previous screen without deleting.Deleting a record will renumber the list of records.
VIEW OR DELETE PREVIOUSLY LOGGED RECORDS
Press MENU key while in pH meter screen.
Press Recall to access the pH recall.A list of records is stored in the pH log.
Use the ARROW keys to scroll the list of records.
If More is pressed a complete set of data is displayed.
Use ARROW keys when is displayed to scroll between the records.
Press More to see detailed information about the highlighted record.Press Delete to enter record deleting mode.Press Delete All to enter all records deleting mode.
If Delete was pressed the instrument will ask for confirmation.
Use the ARROW keys to focus on the record to be deleted.

37
If the pH log is empty the message “No Records!” will be displayed.
pH METER GLP INFORMATION
The following items are included in electrode GLP: the time and date of the last calibration,offset, slope, electrode condition, calibration timeout and the calibration buffers. The buffersdisplayed in video inverse mode are from the previous calibration.If a calibration hasn’t been performed the message “Not Calibrated” will be displayed.
The pH meter GLP information references the last pH calibration data.To view this information press MENU key while in pH meter mode then GLP.A set of information regarding electrode calibration is displayed.
If Delete All was pressed the instrument will ask for confirmation.
Press Confirm to delete all records or ESC to return to the previous screen without deleting.

38
TEMPERATURE CALIBRATION PROCEDURE (for technical personnel only)
All the instruments are factory calibrated for temperature.HANNA’s temperature probes are interchangeable and no temperature calibration is needed whenthey are replaced.If the temperature measurements are inaccurate, temperature recalibration should be performed.For an accurate recalibration, contact your dealer or the nearest HANNA Customer Service Center,or follow the instructions below.• Prepare a vessel containing ice and water and another one containing hot water (at a
temperature of around 50 °C). Place insulation material around the vessels to minimizetemperature changes.
• Use a calibrated thermometer with a resolution of 0.1 °C as a reference.• To enter user calibration screen press and hold down the ARROW keys simultaneously, then
power on the instrument. After a few seconds the User calibration screen is displayed.
• Press Temp function key to enter temperature calibration.• Immerse the temperature probe in the vessel with ice and water as near as possible to the
reference thermometer. Allow a few seconds for the probe to stabilize.• Use the ARROW keys to set the calibration point value to that of the ice and water measured
by the reference thermometer.• The (unstable measurement) symbol will be shown on the display until the reading
becomes stable.• When the reading is stable and close to the selected calibration point, the (unstable
measurement) symbol will disappear and the Confirm key will become active.
• Press Confirm to confirm the calibration point.• The meter will be automatically move to the second calibration point, and will display 50 °C
for the buffer value.

39
• Immerse the temperature probe in the second vessel as near as possible to the referencethermometer. Allow a few seconds for the probe to stabilize.
• Use the ARROW keys to set the calibration point value to that of the hot water, measured bythe reference thermometer.
• The (unstable measurement) symbol will be shown on the display until the readingbecomes stable.
• When the reading is stable and close to the selected calibration point, the (unstablemeasurement) symbol will disappear and the Confirm key will become active.
• Press Confirm to confirm the calibration point. The instrument will return to the pH meter/titrator main screen.
Note: If the reading is not close to the selected calibration point, the “Wrong” message will bedisplayed. Change the temperature probe and restart the calibration.
If the temperature probe is disconnected or the measured temperature is out of the - 20 to120 °Crange the instrument will display “----”. The calibration point value can be changed using theARROW keys.

40
SMOTPMYS SMOTPMYS SMOTPMYS SMOTPMYS SMOTPMYS MELBORP MELBORP MELBORP MELBORP MELBORP NOITULOS NOITULOS NOITULOS NOITULOS NOITULOS
evissecxe/esnopserwolS.tfird .edortceleHpytriD
pitedortceleehtkaoS1607IH gninaelc noitulos
htiwllifeR.setunim03rof.noitulosllif
pusetautculfgnidaeR.)esion(nwoddna
ytrid/deggolCwoL.noitcnuj
leveletylortceleHpelballifer(
.)ylnosedortcele.noitcennocelbaC
llifeR.sedortceleehtnaelCkcehC.noitulosllifhserfhtiw
retemotnoitcennocelbacsipacevitcetorpyfirevdna
.devomer
gnidaerHpnielihW00.61ro00.2-,edom
deyalpsidsiHp.gniknilb
fotuognidaeR.egnar
otnoitcennocelbackcehCevitcetorpyfirevdnaretem
.devomersipacehtfoytilauqehtkcehC
.sedortceleehtnaelC.elpmas.noitulosllifhserfhtiwllifeR
tonseodretemehTreffubHpehttpecca
.noitarbilacrofnoitulos
HpnekorB.edortcele
roedortceleehtecalpeR.rodnevehttcatnoc
noitarbilacpmupehTdemrofrepebt'nac
pmupgnorW.noitulosnoitarbilac
pmupnekorB.gnibut
.sedortcelenekorB
dnatcatnisignibutyfireVnehwsessaptnartitdna
edortceleehtyfireV.degrupyltnecerdetarbilacneebsah
ehtkcehC.sreffubHphserfni.noitulosnoitarbilacpmup,dradnatsrehtonaeraperPtnartithserfevahotegrup.noitarbilacehttratserdna
sieborperutarepmetehTretemehttub,detcennoc
."CTM"syalpsid
erutarepmetnekorB.eborp .eborperutarepmetecalpeR
ninoitartitaretfA woLegnaR tnemurtsnieht
roL/gm005syalpsidgnidrocca(L/qem01
)tinudetcelesehthtiw.gniknilb
gnorwputesreteM.elpmasrof
fotuonoitartnecnoC.egnar
rednuepytytinilaklaegnahCotunemPUTES hgiH
egnaR egnahcdnadnaemirP.tnartitdetaicossa
tnemurtsniehtetarbilacer.)pmup(
ninoitartitaretfA hgiHegnaR tnemurtsnieht
roL/gm004syalpsidhtiwgnidrocca(L/qem8
)tinudetceleseht.gniknilb
derugifnocreteMelpmasrofgnorw
.dezylanafotuonoitartnecnoC
.egnar
rednuepytytinilaklaegnahCotunemPUTES egnaRwoL
detaicossaegnahcdnaetarbilacerdnaemirP.tnartit
.)pmup(tnemurtsnieht
TROUBLESHOOTING GUIDE

41
ELECTRODE CONDITIONING AND MAINTENANCE
pH CLEANING PROCEDURE
• General Soak in Hanna HI 7061 or HI 8061 General Cleaning Solution forapproximately ½ hour.
IMPORTANT: After performing any of the cleaning procedures, rinse the electrode thoroughlywith distilled or deionized water and soak the electrode in HI 70300 or HI 80300 StorageSolution for at least 1 hour before use. Recalibrate electrode before using..
STORAGE PROCEDURE
To assure a quick response time, the glass bulb should be kept moist and not allowed to dry out.Replace the solution in the protective cap with a few drops of HI 70300 or HI 80300 StorageSolution. Follow the Preparation Procedure section before taking measurements.Note: NEVER STORE THE pH ELECTRODE IN DISTILLED OR DEIONIZED WATER.
PERIODIC MAINTENANCEInspect the electrodes and the cables. The cable used for connection to the instrument must beintact. There should be no cracks on the electrode stem or bulb. Connectors must be perfectlyclean and dry. If any scratches or cracks are present, replace the electrode. Rinse off any saltdeposits with water.
SMOTPMYS SMOTPMYS SMOTPMYS SMOTPMYS SMOTPMYS MELBORP MELBORP MELBORP MELBORP MELBORP NOITULOS NOITULOS NOITULOS NOITULOS NOITULOS
ninoitartitaretfA hgiHegnaR tnemurtsnieht
roL/gm0004syalpsidgnidrocca(qem008
)tinudetcelesehthtiw.gniknilb
.sedortcelenekorBtontnemurtsnI
gnorW.detarbilac.elpmas
fotuonoitartnecnoC.egnar
ehtnaelc/kcehCetarbilaceR.sedortcelepmup(tnemurtsnieht
eracesU.)Hpdnaelpmasgnirud
.noitaraperp
retemehtputratstAANNAHehtsyalpsid
.yltnenamrepogol
sisyekehtfoenO.dekcolb
rodraobyekehtkcehC.rodnevehttcatnoc
siegassem"xxrorrE".deyalpsid .rorrelanretnI
dnaretemehtfforewoP.niaganotirewopneht
,stsisreprorreehtfI.rodnevehttcatnoc

42
REAGENTS
HI 84431-50 Titrant solution for low range (100mL)HI 84431-51 Titrant solution for high range (100mL)HI 84431-55 Pump calibration solution (100mL)HI 84431-70 Reagents kit for low and high range (about 150 titrations)HI 84431-71 Reagents kit for low range (about 150 titrations)HI 84431-72 Reagents kit for high range (about 150 titrations)
pH CALIBRATION SOLUTIONS
HI 7004M Buffer solution pH 4.01 (230mL)HI 70083M Buffer solution pH 8.30 (230mL)HI 7010M Buffer solution pH 10.01 (230mL)HI 7004M-6 Buffer solution pH 4.01 (6 x 230mL)HI 70083M-6 Buffer solution pH 8.30 (6 x 230mL)HI 7010M-6 Buffer solution pH 10.01 (6 x 230mL)
ELECTRODES
HI 1131B pH ElectrodeHI 7662-M Temperature probe
ELECTRODE FILL SOLUTION
HI 7071 Filling solution (4x30 mL) for HI 1131B
ELECTRODE STORAGE SOLUTION
HI 70300M Storage Solution, 230 mL bottle
CLEANING SOLUTION
HI 7061M Electrode Cleaning Solution, 230 mL bottle
OTHER ACCESSORIES
HI 70483M Tube set with cap and tip for titrant bottleHI 731319 Stir bar 25 x 7 mm (10 pcs)HI 731342 2000μL fixed volume pipetteHI 731352 Tip for 2000μL fixed pipette (4 pcs)HI 731341 1000μL fixed volume pipetteHI 731351 Tip for 1000μL fixed pipette (25 pcs)
ACCESSORIES

43
HI 84431 is warranteed for two years against defects in workmanship and materials when used for itsintended purpose and maintained according to the instructions.This warranty is limited to repair or replacement free of charge.Damage due to accident, misuse, tampering or lack of prescribed maintenance is not covered.If service is required, contact your dealer. If under warranty, report the model number, date of purchase,serial number and the nature of the failure. If the repair is not covered by the warranty, you will benotified of the charges incurred.If the instrument is to be returned to Hanna Instruments, first obtain a Returned Goods AuthorizationNumber from the Customer Service Department and then send it with shipment costs prepaid. Whenshipping any instrument, make sure it is properly packaged for complete protection.To validate your warranty, fill out and return the enclosed warranty card within 14 days from the date ofpurchase.
WARRANTY
Hanna Instruments reserves the right to modify the design, construction and appearance of itsproducts without advance notice.
Before using this product, make sure that it is entirely suitable for your specific application and for theenvironment in which it is used.Operation of this instrument may cause unacceptable interferences to other electronic equipments, thisrequiring the operator to take all necessary steps to correct interferences.Any variation introduced by the user to the supplied equipment may degrade the instrument EMCperformance.To avoid damages or burns, do not put the instrument in microwave ovens. For yours and the instrumentsafety do not use or store the instrument in hazardous environments.
RECOMMENDATION FOR USERS

44
Printed in Romania, EU MAN84431 08/09
Hanna Instruments Inc.Highland Industrial Park584 Park East DriveWoonsocket, RI 02895 USA
Local Sales and Customer Service office
Hanna Instruments United States Inc.Highland Industrial Park
584 Park East DriveWoonsocket, RI 02895 USA
Tel. (800) 426 6287Fax (401) 765 7575
www.hannainst.com/usa
Technical Support for customersTelephone (800) 426 6287
Fax (401) 765 7575E-mail [email protected]


