Americas Headquarters Cisco Systems, Inc. 170 West Tasman Drive San Jose, CA 95134-1706 USA http://www.cisco.com Tel: 408 526-4000 800 553-NETS (6387) Fax: 408 527-0883 Configuration Guide for High Availability Distributed System on Oracle Text Part Number: OL-24625-01
Transcript
Configuration Guide for High Availability Distributed System on Oracle
Americas HeadquartersCisco Systems, Inc.170 West Tasman DriveSan Jose, CA 95134-1706 USAhttp://www.cisco.comTel: 408 526-4000
THE SPECIFICATIONS AND INFORMATION REGARDING THE PRODUCTS IN THIS MANUAL ARE SUBJECT TO CHANGE WITHOUT NOTICE. ALL STATEMENTS, INFORMATION, AND RECOMMENDATIONS IN THIS MANUAL ARE BELIEVED TO BE ACCURATE BUT ARE PRESENTED WITHOUT WARRANTY OF ANY KIND, EXPRESS OR IMPLIED. USERS MUST TAKE FULL RESPONSIBILITY FOR THEIR APPLICATION OF ANY PRODUCTS.
THE SOFTWARE LICENSE AND LIMITED WARRANTY FOR THE ACCOMPANYING PRODUCT ARE SET FORTH IN THE INFORMATION PACKET THAT SHIPPED WITH THE PRODUCT AND ARE INCORPORATED HEREIN BY THIS REFERENCE. IF YOU ARE UNABLE TO LOCATE THE SOFTWARE LICENSE OR LIMITED WARRANTY, CONTACT YOUR CISCO REPRESENTATIVE FOR A COPY.
NOTWITHSTANDING ANY OTHER WARRANTY HEREIN, ALL DOCUMENT FILES AND SOFTWARE OF THESE SUPPLIERS ARE PROVIDED “AS IS” WITH ALL FAULTS. CISCO AND THE ABOVE-NAMED SUPPLIERS DISCLAIM ALL WARRANTIES, EXPRESSED OR IMPLIED, INCLUDING, WITHOUT LIMITATION, THOSE OF MERCHANTABILITY, FITNESS FOR A PARTICULAR PURPOSE AND NONINFRINGEMENT OR ARISING FROM A COURSE OF DEALING, USAGE, OR TRADE PRACTICE.
IN NO EVENT SHALL CISCO OR ITS SUPPLIERS BE LIABLE FOR ANY INDIRECT, SPECIAL, CONSEQUENTIAL, OR INCIDENTAL DAMAGES, INCLUDING, WITHOUT LIMITATION, LOST PROFITS OR LOSS OR DAMAGE TO DATA ARISING OUT OF THE USE OR INABILITY TO USE THIS MANUAL, EVEN IF CISCO OR ITS SUPPLIERS HAVE BEEN ADVISED OF THE POSSIBILITY OF SUCH DAMAGES.
Cisco and the Cisco logo are trademarks or registered trademarks of Cisco and/or its affiliates in the U.S. and other countries. To view a list of Cisco trademarks, go to this URL: www.cisco.com/go/trademarks. Third-party trademarks mentioned are the property of their respective owners. The use of the word partner does not imply a partnership relationship between Cisco and any other company. (1110R)
Any Internet Protocol (IP) addresses and phone numbers used in this document are not intended to be actual addresses and phone numbers. Any examples, command display output, network topology diagrams, and other figures included in the document are shown for illustrative purposes only. Any use of actual IP addresses or phone numbers in illustrative content is unintentional and coincidental.
• NCM Internal Monitoring: Oracle Advanced Replication on page 6
• NCM Internal Monitoring: Inter-NCM Core Communication on page 7
Terminology
The following terms are used throughout this guide:
• NCM Core — A single NCM Management Engine, associated services (Syslog and TFTP), and a single database. An NCM Core can manage multiple Partitions.
• Partition — A set of devices with unique IP addresses. A Partition is managed by one (and only one) NCM Core. Multiple Partitions can be managed by a single NCM Core. For information about segmenting devices, see the User Guide for CiscoWorks Network Compliance Manager 1.7.
• Multimaster replication — Replication where all data is kept consistent across all database servers.
• Master Definition Site — Oracle replication requires that one database in a multimaster replication NCM Mesh hold the definition of the replication setup. This database is called the Master Definition Site.
Overview
The NCM Distributed System on Oracle is a multimaster system where the data from each NCM Core in an NCM Mesh is accessible to all other NCM Cores. This provides a comprehensive view of your data and allows for redundant data and failover in the event of a problem with a single NCM Core. The multimaster features include both database data and certain file system data, such as software images and device driver packages. Keep in mind that software images and device driver packages are also replicated across the NCM Mesh.
Getting Started 3
The following comprises the NCM Distributed System:
• A NCM Core and a Site:
— A device is associated with a single Site.
— A Site is associated with a single NCM Core.
— A task is associated with a specific NCM Core.
• Multimaster replication on Oracle:
— Conflict resolution in the event that the same piece of data is modified almost simultaneously on two separate NCM Cores. This conflict is typically resolved using the latest timestamp method.
— Replication monitoring and conflict notification is built into NCM. You can manage Oracle replication conflicts and view replication job statuses from within the NCM UI.
— The NCM scheduler is multi-core aware. You can schedule group tasks containing devices that are associated with different NCM Cores. The system will run these tasks on the correct NCM Core. You do not have to schedule tasks on the appropriate NCM Core.
System setup requires a thorough understanding of Oracle and NCM. Installation includes number of steps that must be performed on the various servers. In addition, certain network changes may be necessary to allow connections between the servers. Once setup is complete, you will need to partition your devices into Sites to ensure proper NCM Core access to devices. For information about segmenting devices, see the User Guide for CiscoWorks Network Compliance Manager 1.7.
4 Chapter 1
Architecture
The following figure shows a typical two-NCM Core Multimaster Distributed System installation. The installation enables failover from one NCM Core to another, while the remaining NCM Core continues to manage all devices.
Keep in mind that some installations might have two separate network device collections that are inaccessible from the non-managing NCM Core. These installations still provide data redundancy and scaling benefits, however.
Note that the database data transport uses standard Oracle Advanced Replication. For details on how replication works, see System Administration on page 45.
The communication between the NCM Cores is done using Java’s Remote Method Invocation (RMI). RMI is used to ensure:
• Certain file system objects, such as software images and driver packages, are in sync.
• NCM tasks are scheduled and run on the correct NCM Core.
NCM does not replicate NCM Core specific options, including:
• TFTP server information
• TACACS server information
• Scripting language settings
• Hop Box definitions
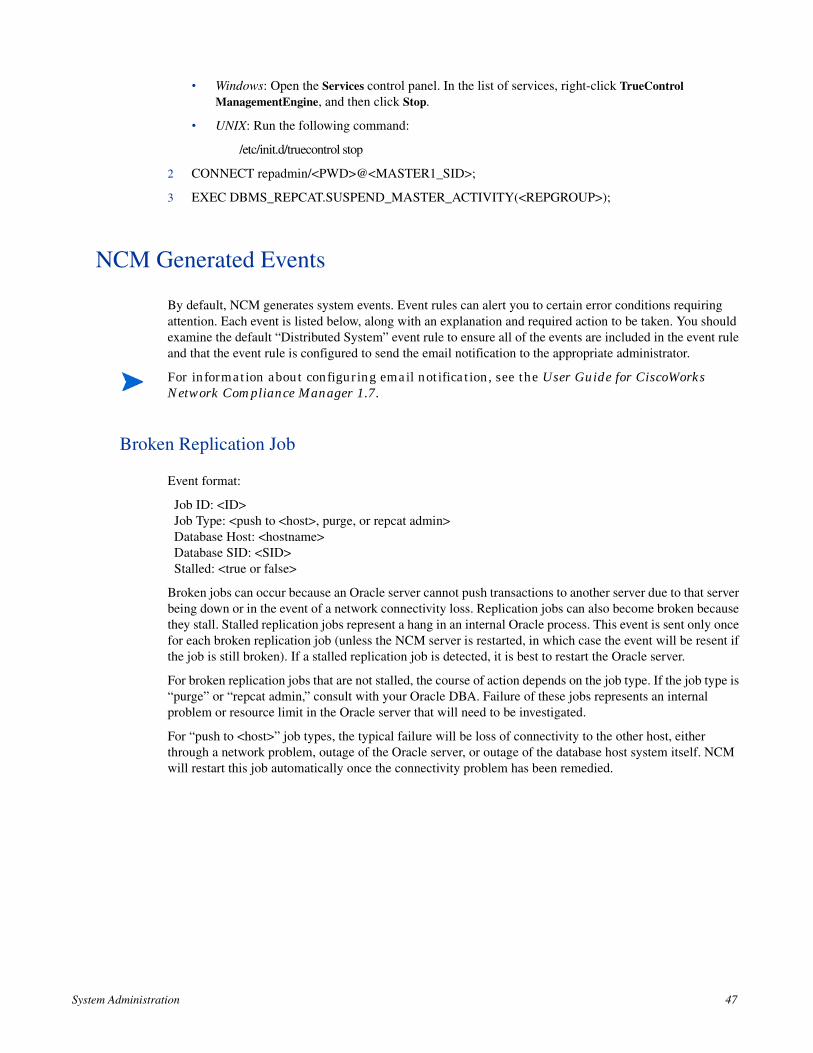
Network Devices
File System ReplicationInter-NCM SchedulerCommunicationHTTP/HTTPS
80/443NCM Core
1 RMI: TCP Ports 1098,1099, 4444, 8083
NCM Core2
HTTP/HTTPS
80/443
Communication withDevices via Telnet, SSH,SNMP, etc.
JDBCTCP Port 1521
JDBCTCP Port 1521
Database1
Database2
Oracle Advanced Replication
TCP Port 1521
Getting Started 5
• Driver directory
• Install directory
• Local Gateway information
• SWIM proxy server
• Active Directory settings
• Scheduler (concurrent task limits)
What is Horizontal Scalability?
Horizontal Scalability is the ability to combine multiple NCM Cores with a single database so that they work as a single logical unit to improve the performance of the overall system. NCM Horizontal Scalability can be configured in different ways, depending on how you use your system and where bottlenecks are apt to occur. For installation and configuration information, see the Configuration Guide for High Availability Distributed System on Oracle.
Oracle Advanced Replication can be configured to automatically handle certain types of conflicts. Where possible, NCM uses Oracle’s built-in conflict handling software. For example, for most tables with update/update conflicts, NCM installs the default Oracle “latest timestamp wins” handler.
When it is not possible to use Oracle’s default handler, NCM either adds a stored procedure to handle the conflict (in particular, for update/delete conflicts), or adds additional code inside the application with logic that attempts to correct the error. If the error is uncorrected through that logic, NCM alerts the NCM administrator to the issue using NCM' standard event notification emailing functionality. For information about configuring email notification, see the Configuration Guide for High Availability Distributed System on Oracle
For detailed information about NCM monitors, see Understanding Oracle Replication on page 45.
In addition, in Oracle, NCM monitors on a regular schedule the following on each NCM Core for the database transport (i.e., replication):
• Push jobs that handle moving data from one NCM Core to another. If the monitor check fails and the Push job is found to be broken, NCM will attempt to restart it.
• Purge jobs that successfully clear pushed data from the push queue, and attempts to restart the Push queue each time the check fails.
• The deferred transaction queue for any transactions that could not be applied to the local database due to a conflict. NCM applies additional application logic to attempt to correctly apply the transaction. If unsuccessful, NCM alerts the NCM administrator via email notification.
• Unrecoverable uniqueness conflicts. NCM alerts the NCM administrator in the event of unrecoverable uniqueness conflicts. Typically, there is no way to automatically correct these types of issues.
When a second NCM Core is used as a standby for failover and not for normal operation, you should not encounter update/update conflicts.
6 Chapter 1
• Both the DEFTRAN and DEFLOB queue size. These queues hold pending data that needs to be pushed to other servers. Typically, if replication is working, but is beginning to backup, these queues will begin to grow. This can occur if the connection between databases is congested. NCM alerts the NCM administrator to this issue via email notification. The system will continue to push data. However, it could take a long time to catch up depending on network conditions.
NCM Internal Monitoring: Inter-NCM Core Communication
In addition to replication monitoring, NCM also monitors the following between each NCM Core:
• RMI connectivity
• NCM server timestamp differences
These monitors generate events during error conditions. The events can be emailed to the NCM administrator or Oracle DBA using a standard event rule in NCM. For information about configuring email notification, see the User Guide for CiscoWorks Network Compliance Manager 1.7. For detailed information about NCM system events, see NCM Generated Events on page 47.
For information about configuring email notification, see the User Guide for CiscoWorks Network Compliance Manager 1.7.
NCM includes an example event rule that can be updated as necessary.
Getting Started 7
8 Chapter 1
2 Installation, Setup, and Upgrading
The chapter contains the following topics:
• System Requirements on page 9
• Prepare for Initial Replication on page 9
• Oracle 11g: Set Up Initial Replication on page 13
• Oracle 10g: Set Up Initial Replication on page 23
• Oracle 11g: Adding a New NCM Core to an Existing NCM Mesh on page 27
• Oracle 10g: Adding a New NCM Core to an Existing NCM Mesh on page 29
• Removing a NCM Core from an Existing NCM Mesh on page 33
• Removing Replication Across the Entire NCM Mesh on page 35
• Upgrading from NCM 1.3/1.3.1 to NCM 1.5 on page 36
For information about troubleshooting a NCM Mesh, see Troubleshooting on page 59.
System Requirements
For information about database version and server hardware requirements for the NCM Multimaster Distributed System on Oracle software, see the NCM.
Prepare for Initial Replication
To properly install the Distributed System software, you must first complete:
• Device partitioning planning across NCM Cores
• Network configuration planning for connectivity between NCM servers and devices. For example, what network connectivity is required to support failover for device access? The ability of an NCM Mesh to failover for device access depends in part on proper network setup to ensure access to devices. In some cases, you might not want to have failover work for complete device access, but instead have it ensure access to data while corrective action is taken to restore the network connectivity to the affected NCM Core.
• Network configuration planning for connectivity and bandwidth between the different servers (NCM and database) that comprise the NCM Mesh and between the NCM Management Engines and devices. The NCM Cores in the NCM Mesh will also need bandwidth between them equal to the bandwidth provided between a single NCM server and its database in a single NCM Core. For more information, see Architecture on page 5.
Installation, Setup, and Upgrading 9
• Network configuration planning for bandwidth usage by the NCM Mesh. The bandwidth required between an NCM Management Engine and its database depends on the size of the deployment, including the number of devices, average configuration size, and the number of concurrent users. The bandwidth available between the Oracle databases should be as large as between the NCM Management Engine and the database. For a deployment of 14,000 devices with an average 10K configurations that change once a week, the bandwidth requirements could conservatively be on the order of 1Mb/s. Peak bandwidth requirements could be higher, depending on usage.
• Oracle server setup planning. Keep in mind that the database properties required for replication can be set on initial database creation. You do not need to wait until replication setup to set these parameters.
Keep in mind that during setup, data is dumped from an existing NCM server. This could take time and use disk space as the database is copied. In addition, when data is copied from one database to another, there must be ample bandwidth between the two (or more) servers. It will also take time to import the exported database into the other NCM Cores.
You can estimate the time it will take to copy data from server to server given the bandwidth between the servers. You can also calculate the disk space requirements for the export (and subsequent import) operations by knowing the size of your database. Note that if you want to export or import data from the same server as the database, the disk space requirement is twice the size of your database.
You will also have to ensure:
• Time synchronization setup for the NCM servers in the NCM Mesh
• Users are instructed to login to their “closest” NCM Core
• Access to an Oracle DBA to support the NCM Distributed System installation
To assist in planning, please note the following limitations and suggestions concerning the NCM Distributed System:
• The NCM database user name must be a custom value (not SYSTEM).
• NCM currently does not support joining multiple existing NCM installations into an NCM Mesh. You can only create an NCM Mesh from a single existing NCM server, adding new NCM Cores as appropriate. You can also create an NCM Mesh from scratch.
• Users should not share logon accounts. Due to the replication system used to share data across NCM Cores, two users should never use the same login name to connect to two different NCM Cores at the same time. If they do so, the system will likely require additional work by the system administrator to ensure that the affected user’s profile is properly synchronized across the NCM Mesh.
• NCM currently assumes that all servers in the Mesh (NCM and database) share a single timezone.
• Future NCM upgrades will take longer and require more downtime due to the need to both update the replication setup and to update all servers in the NCM Mesh. NCM does not support rolling upgrades where one part of the NCM Mesh is running a version of NCM while the rest of the NCM Mesh is running a different version.
• The ReplicationScript.sql script updates the RN_CORE table. When the replication script runs, the RN_CORE table changes. There is no need for it to UPDATE and INSERT into the RN_CORE table on both Cores because replication is already running. The database changes will be pushed via replication to the second database. The contents of the RN_CORE tables on both databases should match whatever is set up in ReplicationScript.sql.
Estimating time for the import and export operations could be difficult. You should allocate a lengthy time frame to complete this work. In addition, the NCM server(s) must be off during the export and import steps. A sufficiently long maintenance window should be planned for.
10 Chapter 2
Planning
This section includes information for initial replication setup on a Master Definition Site (Master 1) and one additional Master Site (Master 2). NCM will be offline during initial replication. It is recommended that you carefully read the following sections so as to streamline the replication process. A new database instance on Master 2 is manually created when running initial replication setup.
When initially setting up replication, complete the following table before starting. Be sure to save this information. You will need it each time you upgrade in the future.
Table 1 Distributed System Server Information
Information to Collect NCM Core 1 NCM Core 2
Replication User (default: repadmin)
Replication User Password
Timezone Offset from UTC Same for all servers in the NCM mesh
Application Server Data NCM Application Server 1 NCM Application Server 2
NCM App Server FQDN
NCM App Server RMI Port
Database Server Data Master 1 (Database Server 1) Master 2 (Database Server 2)
Database Server FQDN
Oracle Listening Port
Database SID
Database User Same as for Master 1
Database Password Same as for Master 1
Installation, Setup, and Upgrading 11
Protocols, Databases, and Ports
NCM communicates with devices using a combination of the following protocols, databases, and ports. If you use a given protocol, NCM requires access to the corresponding port. Specifically, if NCM communicates with devices protected by firewalls, these ports must be open. For more information, see Architecture on page 5.
Protocol/Database/Port From/To
NCM server (running the Mgmt Engine, Syslog, TFTP) and network devices
Telnet (port 23) From the NCM server to network devices.
SSH (port 22) From the NCM server to network devices.
TFTP (port 69/udp) From network devices to the NCM server.
Syslog (port 514/udp) From network devices to the NCM server.
SNMP (port 161/udp) From the NCM server to network devices.
Between the database servers
Oracle (port 1521) In a Distributed System configuration, the Oracle processes connect to each other on port 1521.
Between the NCM servers
JNDI (ports 1098, 1099) NCM server to NCM server. You can change this by editing the NCM configuration files. Please contact Customer Support for assistance.
RMI (ports 4444 and 8083) NCM server to NCM server. You can change this by editing the NCM configuration files. Please contact Customer Support for assistance.
Between the NCM server and the database server
Oracle (port 1521) From the NCM server to an Oracle database server.
NCM server and NCM users
HTTPS (port 443) From the NCM server to NCM users. You can change this by editing the NCM configuration files. Please contact Customer Support for assistance.
Telnet (port 23 - Windows or 8023 - Solaris/Linux)
From the NCM client to the NCM server. This can be changed from the Administrative Settings option.
SSH (port 22 - Windows or 8022 - Solaris/Linux)
From the NCM client to the NCM server. This can be changed from the Administrative Settings option.
12 Chapter 2
Unpacking the Replication Script Installation Bundle
The setup files for the NCM Multimaster Distributed System are the standard setup files for a normal NCM installation, with the addition of the OracleReplicationScriptToolBundle.zip file. This file should be unzipped onto a standard NCM application server. The setup files include a Java program that you run to generate a replication setup SQL script. This program uses the Java runtime that is available on the NCM application server.
Oracle 11g: Set Up Initial Replication
Oracle 11g introduces a change that requires recreation of the database schema after exporting that schema for use on another database server. This procedure accomodates the new behavior of Oracle 11g.
NCM can already be installed on one application server and database server (a single NCM core). Alternatively, you can complete the first NCM core installation as part of setting up initial replication.
This procedure uses the following identifiers:
• NCM application servers: NCM1 and NCM2
• Oracle database SIDs:
— SID1 on database server Master 1
— SID2 on database server Master 2
• NCM database user for both databases: nauser
• Password for the NCM database user: napass
• NCM tablespace: NAORA
• Script to create the NCM database user: create_nauser.sql
• NCM schema export file: NAEXP.dmp
To use a different identifier, substitute the actual value for each instance of the example value within the procedure.
To set up initial replication between two NCM cores, complete the following tasks:
• Task 1: Verify Prequisites (Oracle 11g)
• Task 2: (New Installations Only) Create the NCM Schema on Master 1 (Oracle 11g)
• Task 3: Prepare Master 1 for Replication (Oracle 11g)
• Task 4: Prepare Master 2 for Replication (Oracle 11g)
• Task 5: Configure Replication (Oracle 11g)
• Task 6: Configure the NCM Application Servers for Replication
Installation, Setup, and Upgrading 13
Task 1: Verify Prequisites (Oracle 11g)
Prepare two database servers and two application servers. For best performance, each application server-database server pair should be co-located. Additionally, the application server-application server link and the database server-database server link should each be a high-speed connection.
Verify that the following prerequisites have been met:
• The two database servers are running Oracle 11g with the following configuration:
— Unique SIDs
— The following parameters:
– global_names = TRUE
– open_links = at least 4 (increase this by 1 for each additional server in the NCM Mesh beyond 2)
– open_links_per_instance = at least 4 (same as open_links)
– parallel_min_servers = 2
– shared_pool_size = increase current value by 40m to support replication
– job_queue_processes = at least 2
• The two application servers that will run NCM have working hostnames. Note the following:
— Each application server should have a high-speed connection to one of the database servers.
— For application server hardware and operating system requirements, see the NCM Support Matrix.
• It is recommended that the host names of both database servers and both application servers are in the hosts file on each application server. This file is located as follows:
• All database servers and application servers are set to use the same time and timezone.
• If NCM is already installed on one NCM core, verify that the database user in place for this core has at least the permissions listed in NCM Database User Creation Script (Oracle 11g) on page 22.
Task 2: (New Installations Only) Create the NCM Schema on Master 1 (Oracle 11g)
If NCM has not yet been installed, create the NCM schema on the Master 1 database server by following these steps:
1 Log on to Master 1 as the SYS user, and then create a new tablespace dedicated to NCM on Master 1.
For example, create the NAORA tablespace for SID1 by using the following command:
• Windows:
One SID cannot be a subset of the other SID, for example NARp and NARpBU. Instead, use SIDs that stand alone, for example NARp1 and NARp2.
The parameters must be set on each database in the NCM Mesh. The parameters could be set up when the database is first created. If not, they must be modified at this point. You can view the current value of these parameters using Oracle Enterprise Manager or SQLPlus with the "SHOW PARAMETERS" or "SELECT NAME, VALUE FROM v$parameters" commands (where NAME = <parameter_name>, for example, global_names).
14 Chapter 2
CREATE TABLESPACE NAORA DATAFILE 'C:\APP\ADMINISTRATOR\ORADATA\SID1\ NAORA.DBF' SIZE 200M REUSE AUTOEXTEND ON NEXT 50M;
• UNIX:
CREATE TABLESPACE NAORA DATAFILE '/u01/app/oracle/oradata/SID1/NAORA.DBF' SIZE 200M REUSE AUTOEXTEND ON NEXT 50M;
2 Create a script for creating the NCM database user as follows:
a Using a text editor such as WordPad or vi, copy the text in NCM Database User Creation Script (Oracle 11g) on page 22 into a new text file, for example create_user.sql.
b Customize the script to your environment by making the following changes:
— Replace NAORA with the tablespace name created in step 1.
— Replace each instance of nauser with the desired NCM database user name.
— Replace napass with the desired password for the NCM database user.
c Place a copy of the script on Master 1 and Master 2.
— Windows: Place the file in C:\.
— UNIX: Place the file in the $ORACLE_HOME/bin directory, for example /u01/app/oracle/product/11.2.0/dbhome_1/bin.
3 On Master 1, create a new NCM database user with the privileges listed in NCM Database User Creation Script (Oracle 11g) on page 22 that uses the tablespace name created in step 1:
a Log on to Master 1 as the SYS user.
b At the sqlplus prompt, run the user creation script.
For example: do @create_user.sql
4 Install NCM on the first application server (NCM1).
During installation, supply the following database credentials:
• For the database IP address or hostname, enter the hostname of Master 1.
• For the database port, enter the port of Master 1 that NCM will use to communicate with the database.
• For the database SID, enter the SID on Master 1 (for example, SID1).
• For the database user name and password, enter the name and password of the NCM database user created in step 3, for example, nauser and napass.
5 After NCM installation is complete, log on to NCM (as user nauser) to ensure that it works as expected.
Installation, Setup, and Upgrading 15
6 Stop the NCM management engine on NCM1:
• Windows: Open the Services control panel. In the list of services, right-click TrueControl ManagementEngine, and then click Stop.
• UNIX: Run the following command:
/etc/init.d/truecontrol stop
Task 3: Prepare Master 1 for Replication (Oracle 11g)
To create the database export and finish preparing the database on Master 1, follow these steps:
1 On Master 1, create a directory to receive the tablespace export. For example, C:\NCM_data1 or /tmp/NCM_data1.
• Ensure that the database user, for example nauser, has read-write access to this directory.
• If NCM was running prior to beginning this configuration procedure, ensure that this directory has more available disk space than the NCM tablespace consumes.
2 Log on to Master 1 as the NCM database user, and then associate the new directory with the datapump directory in preparation for the tablespace export. For example:
• Windows:
sqlplus nauser/napass@SID1create DIRECTORY datapump AS 'C:\NCM_data1';exit
• UNIX:
sqlplus nauser/napass@SID1create DIRECTORY datapump AS '/tmp/NCM_data1';exit
3 Log on to Master 1 as the SYS user, and then grant the NCM database user read-write access to the datapump directory. For example:
sqlplus / as sysdbaGRANT READ,WRITE ON DIRECTORY datapump to nauser;exit
4 On Master 1, verify that $ORACLE_SID is set to the SID for the NCM database (for example, SID1).
5 With the NCM management engine on NCM1 shut down, on Master 1 and outside of SQLPlus, use the Oracle Data Pump Utility to export the NCM database schema. For example:
6 Examine the export log file, for example NAEXP.log in the NCM_data1 directory.
• If the export was successful, continue to step 8 of this task.
• If the export was not successful, resolve the problems causing the failure, and then repeat step 5 of this task.
7 If you did not run the user creation script to create the database user, identify this user’s complete set of permissions. You will use this information to re-create the user in step 10 of this task.
8 With the NCM management engine on NCM1 shut down, log on to Master 1 as the SYS user, and then delete the NCM database user while retaining the NCM tablespace.
For example, in the Oracle Enterprise Manager (preferred), delete nauser, or at the sqlplus prompt, enter the following command:
16 Chapter 2
DROP USER nauser CASCADE;
9 Verify that the NCM tablespace is now empty.
10 Log on to Master 1 as the SYS user, and then recreate the NCM database user:
• To use the user creation script, run commands similar to the following example:
sqlplus / as sysdbado @ create_user.sqlexit
• Otherwise, recreate the user with the permissions collected in step 7 of this task.
The newly-created NCM database user connects to the existing NCM tablespace. You might see an RMI error during the connection process. This error should clear after a few minutes, and the user-tablespace connection should occur without intervention.
11 On Master 1, outside of SQLPlus, use the Oracle Data Pump Utility to import the NCM database schema for the NCM database user. For example:
12 Examine the import log file, for example NAIMP1.log in the NCM_data1 directory.
• If the import was successful, continue to Task 4: Prepare Master 2 for Replication (Oracle 11g).
• If the import was not successful, do the following:
— Resolve the problems causing the failure.
Verify that the permissions for the user created in step 10 of this task match the user permissions collected in step 7 of this task.
— Drop the NCM database user as described in step 8 of this task.
— Repeat step 11 of this task.
Task 4: Prepare Master 2 for Replication (Oracle 11g)
To import the Master 1 database onto Master 2, follow these steps:
1 Log on to Master 2 as the SYS user, and then create the NCM tablespace with the same name and parameters as the NCM tablespace on Master 1. For example:
• Windows:
sqlplus nauser/napass@SID2CREATE TABLESPACE NAORA DATAFILE 'C:\APP\ADMINISTRATOR\ORADATA\SID2\ NAORA.DBF' SIZE 200M REUSE AUTOEXTEND ON NEXT 50M;exit
Use the cascade delete option to completely delete the user and empty its tablespace.
UNIX only: Verify that the export file permissions are at least 755.
Installation, Setup, and Upgrading 17
• UNIX:
sqlplus nauser/napass@SID2CREATE TABLESPACE NAORA DATAFILE '/u01/app/oracle/oradata/SID2/NAORA.DBF' SIZE 200M REUSE AUTOEXTEND ON NEXT 50M;exit
2 Log on to Master 2 as the SYS user, and then create the NCM database user:
• To use the user creation script, copy the script to Master 2 and then run commands similar to the following example:
sqlplus / as sysdbado @ create_user.sqlexit
• Otherwise, create the user with the permissions collected in step 7 on page 16.
The newly-created NCM database user connects to the existing NCM tablespace. You might see an RMI error during the connection process. This error should clear after a few minutes, and the user-tablespace connection should occur without intervention.
3 On Master 2, create a directory to hold the tablespace export. For example, C:\NCM_data2 or /tmp/NCM_data2.
Ensure that the database user, for example nauser, has read-write access to this directory.
4 Copy the tablespace export file (for example, NAEXP.dmp) to the new directory on Master 2.
Ensure that the export file owner and group are those for the Oracle user for the operating system.
5 Log on to Master 2 as the NCM database user, and then associate the new directory with the datapump directory in preparation for the tablespace export. For example:
• Windows:
sqlplus nauser/napass@SID2create DIRECTORY datapump AS 'C:\NCM_data2';exit
• UNIX:
sqlplus nauser/napass@SID2create DIRECTORY datapump AS '/tmp/NCM_data2';exit
6 Log on to Master 2 as the SYS user, and then grant the NCM database user read-write access to the datapump directory. For example:
sqlplus / as sysdbaGRANT READ,WRITE ON DIRECTORY datapump to nauser;exit
7 On Master 2, verify that $ORACLE_SID is set to the SID for the NCM database (for example, SID2).
8 On Master 2, outside of SQLPlus, use the Oracle Data Pump Utility to import the NCM database schema for the NCM database user. For example:
9 Examine the import log file, for example NAIMP2.log in the NCM_data2 directory.
UNIX only: Verify that the export file permissions are at least 755.
18 Chapter 2
• If the import was successful, continue to Task 5: Configure Replication (Oracle 11g).
• If the import was not successful, do the following:
— Resolve the problems causing the failure.
— Drop the NCM database user as described in step 8 of Task 3: Prepare Master 1 for Replication (Oracle 11g).
— Repeat step 8 of this task.
Task 5: Configure Replication (Oracle 11g)
To configure replication between the Master 1 and Master 2 databases, follow these steps:
1 On Master 1, add the Master 2 database information to the local TNSNAMES.ora. Verify that the Master 1 database information also exists in the TNSNAMES.ora. If the Master 1 database information does not exist, add it in the same format as the other entries.
2 On Master 2, add the Master 1 database information to the local TNSNAMES.ora. Verify that the Master 2 database information also exists in the TNSNAMES.ora. If the Master 2 database information does not exist, add it in the same format as the other entries.
3 On NCM1, unpack the OracleReplicationScriptToolBundle.zip file to a known location, for example the NCM_data directory used earlier in this procedure.
4 From the known location of step 3, customize the ReplicationScriptTool.properties file for your environment:
a In a text editor such as WordPad or vi, open the ReplicationScriptTool.properties file.
b Search for and replace the text README with the appropriate value for that variable.
— Use the fully-qualified hostnames to identify the database and application servers.
You might also need to make modifications to the LISTENER.ora and SQLNET.ora files depending on how the Oracle servers are configured. In particular, in certain environments the NAMES.DEFAULT_DOMAIN property needs to be commented out in SQLNET.ora. For more information, contact your Oracle DBA.
You might also need to make modifications to the LISTENER.ora and SQLNET.ora files depending on how the Oracle servers are configured. In particular, in certain environments the NAMES.DEFAULT_DOMAIN property needs to be commented out in SQLNET.ora. For more information, contact your Oracle DBA.
On Windows systems, unpack the replication bundle to a location with low security, for example, C:\tmp.
c Set timezone_offset to the value that matches the time zone setting for all servers in the distributed system.
d Verify that mode is set to initial.
5 From the known location of step 3, run the ReplicationScriptTool:
java -classpath . ReplicationScriptTool
This command creates a script for starting replication. By default, the script is named ReplicationTool.sql.
6 On Master 1, ensure that SQLPlus that can access all NCM Cores in the NCM Mesh. To verify this, connect to one database with SQLPlus and issue the CONNECT <USER>/<PASSWORD>@<SID> command for each different SID in the Mesh. This is necessary because the script issues CONNECT commands to change which database it is running procedures against.
7 Copy the replication script created in step 5 (for example, ReplicationScript.sql) from the known location to the server indentified in step 6.
— Windows: Place the file in C:\.
— UNIX: Place the file in the $ORACLE_HOME/bin directory, for example /u01/app/oracle/product/11.2.0/dbhome_1/bin.
8 On Master 1, open two SQLPLus windows.
• In one window, connect as the NCM database user (for example, nauser).
• In the other window, connect as the SYS user.
9 On Master 2, open a SQLPlus window connected as the SYS user.
10 In the SQLPlus window for the NCM database user, run the replication script. For example:
do @ReplicationScript.sql
11 Follow the instructions provided by the script at several points as it runs. This will involve running other commands in the SQLPlus windows for the SYS user to verify that certain operations necessary for later steps in the script have completed.
At the first and second pauses, run the same command in each of the SYS user windows to verify the configuration for both of the databases.
The following error message can mean that Java does not have permission to run the replication tool:
Could not find the main class: ReplicationScriptTool.
Move all files from the replication bundle to a directory with lower security, and then run the java command from that directory.
Make sure that files named *_spool.txt do not exist in the directory. When run, the script will log its actions to a file with that suffix.
20 Chapter 2
At the third pause, run the command in the SYS user window on Master 1 only. When the SELECT STATUS,REQUEST,ONAME FROM DBA_REPCATLOG; statement returns “0 rows selected,” replication setup is almost completed. Finish the process in the NCM database user window.
12 After the replication script completes, close both SQLPlus windows to ensure that all actions are logged to the spool file.
13 Verify that the replication is working correctly. Make sure:
• The spool file generated by running the replication SQL script contains no errors.
• The RN_CORE table in each database contains the appropriate list of servers in the NCM Mesh. To check the RN_CORE table, using SQLPlus, enter the following command on each server: SELECT * FROM RN_CORE;
• Verify (using the Oracle Enterprise Manager) that each database in the NCM Mesh has replication set up, is in the NORMAL state, and has purge, push, and repcat_admin jobs installed correctly. Contact your Oracle DBA for assistance.
• Verify that the replication of data is working correctly. To verify that replication is working between all NCM Cores in the NCM Mesh, enter the following commands: CONNECT <USER>/<PASSWORD>@<MASTER1_SID>; UPDATE RN_CORE SET COMMENTS = ‘Test from sid1 to sid2’ where CoreID=1; COMMIT; wait 10 to 30 seconds CONNECT <USER>/<PASSWORD>@<MASTER2_SID>; SELECT Comments from RN_CORE where CoreID=1;
Enter this from every NCM Core in the NCM Mesh. Check the values each time on all of the other NCM Cores to ensure that the links between each database in the system are working correctly.
• The following command must return 'no rows selected' and not 'ready':
SELECT STATUS,REQUEST,ONAME FROM DBA_REPCATLOG;
14 Install NCM on the second application server (NCM2).
During installation, connect NCM to the database on Master 2. When prompted for the database credentials, choose: use existing database.
Task 6: Configure the NCM Application Servers for Replication
1 Stop the NCM management engine on NCM2:
• Windows: Open the Services control panel. In the list of services, right-click TrueControl ManagementEngine, and then click Stop.
• UNIX: Run the following command:
/etc/init.d/truecontrol stop
If you see errors during replication setup, before performing initial replication setup again, see Removing Replication Across the Entire NCM Mesh on page 35.
Installation, Setup, and Upgrading 21
2 Copy the distributed.rcx file from the known location of step 3 of Task 5: Configure Replication (Oracle 11g) to the following directory on both application servers, NCM and NCM2:
• Windows: <NCM_HOME>\jre
• UNIX: <NCM_HOME>/jre
3 Start the NCM management engines on both application servers, NCM1 and NCM2:
• Windows: Open the Services control panel. In the list of services, right-click TrueControl ManagementEngine, and then click Start.
• UNIX: Run the following command:
/etc/init.d/truecontrol restart
4 Connect to the NCM console on both application servers, NCM1 and NCM2, (as user nauser), and ensure that there are no issues.
5 Verify the NCM installation:
a Edit an object on one NCM server (for example, a Comments field for a device).
b Wait a minute and then verify that the updated comment exists on the second server.
c Check the status of the Oracle Distributed Monitor in the NCM console to ensure that no problems are being reported. (For information, see Distributed Monitor Results Page on page 51.) It could take up to five minutes for this monitor to initially run.
NCM Database User Creation Script (Oracle 11g)
set echo onspool NCM_User_Creation.txt
/*Create a new user with a default tablespace*/CREATE USER nauser IDENTIFIED BY napass DEFAULT TABLESPACE NAORA;
/*grant Role equivalent to a system user (only choose public if you choose to provide basic privileges)*/GRANT DBA to nauser WITH ADMIN OPTION;
/*grant permissions for normal NCM operation*/GRANT CREATE SEQUENCE, CREATE SESSION, CREATE TABLE, CREATE PROCEDURE, SELECT ANY DICTIONARY, CONNECT, CREATE VIEW TO nauser;GRANT EXECUTE ON SYS.DBMS_REPCAT_ADMIN TO nauser;GRANT EXECUTE ON SYS.DBMS_DEFER_SYS TO nauser;GRANT CREATE PUBLIC DATABASE LINK TO nauser;GRANT CREATE DATABASE LINK TO nauser;GRANT CREATE USER TO nauser;GRANT CREATE ANY PROCEDURE TO nauser;
/*For normal operation of a NCM Core in a replication environment:*/GRANT EXECUTE ON SYS.DBMS_REPUTIL TO nauser;GRANT SELECT ON SYS.DBA_CONSTRAINTS TO nauser;GRANT SELECT ON SYS.DBA_CONS_COLUMNS TO nauser;GRANT SELECT ON SYS.DBA_REPCOLUMN TO nauser;
/*For replication deletion:*/GRANT DROP USER TO nauser;GRANT DROP PUBLIC DATABASE LINK TO nauser;GRANT DROP ANY PROCEDURE TO nauser;
/*grant permissions for system level*/
An RMI error message at this point can mean that NCM is unable to identify the localhost. For more information, see RMI Errors in the NCM Console on page 59.
22 Chapter 2
GRANT CREATE MATERIALIZED VIEW, GLOBAL QUERY REWRITE, SELECT ANY TABLE to nauser;GRANT UNLIMITED TABLESPACE to nauser WITH ADMIN OPTION;commit;
Oracle 10g: Set Up Initial Replication
1 Be sure you have the following:
a A current NCM 1.7 database.
b A NCM application server (NCM Core 1) connected to the database.
c A database with no data or NCM schema setup (Master 1).
d A database with no data or NCM schema setup (Master 2). The database identifier (SID) needs to be different from the database on Master 1.
e A network connection from the Master 1 servers to the Master 2 servers (and vice-versa) that enables ports 1521 (Oracle only), 1098, 8083, 1099, and 4444 (or appropriate variations) to be connected between these servers. Port 1521 must be open between the Oracle servers. The remaining ports must be open between the NCM servers.
f The ReplicationScriptTool bundle files installed on a Java-capable system (such as NCM Core 1).
2 Obtain the following information (see Planning on page 11):
a Login/password/database identifier for NCM into the two databases (on Master 1 and Master 2).
b Decide on a replication password. The user “repadmin” will be created and assigned this password by default. You can use a different replication username if needed. This user will be used to manage replication in your system.
c NCM application server hostname, NCM application server RMI listening port, database server hostname, and database listening port for Master 1 and Master 2.
d The timezone offset (integer from UTC) for the entire NCM Mesh. This must be a constant across the NCM Mesh. Do not consider daylight savings time when setting this value.
3 Set (or verify) the following database parameters on each Master database:
• global_names = TRUE
• open_links = at least 4 (increase this by 1 for each additional server in the NCM Mesh beyond 2)
• open_links_per_instance = at least 4 (same as open_links)
• parallel_min_servers = 2
• shared_pool_size = increase current value by 40m to support replication
• job_queue_processes = at least 2
One SID cannot be a subset of the other SID, for example NARp and NARpBU. Instead, use SIDs that stand alone, for example NARp1 and NARp2.
The parameters must be set on each database in the NCM Mesh. The parameters could be setup when the database is first created. If not, they must be modified at this point. You can view the current value of these parameters using Oracle Enterprise Manager or SQLPlus with the "SHOW PARAMETERS" or "SELECT NAME, VALUE FROM v$parameters" commands (where NAME = <parameter_name>). For example, <parameter_name> could be global_names from the list above.
Installation, Setup, and Upgrading 23
4 Ensure that all database server and NCM server systems are set to use the same time and time zone.
5 Unpack the OracleReplicationScriptToolBundle.zip file on NCM Core 1 (or any NCM installation).
6 Update the following variables for Master 1 and Master 2 in the ReplicationScriptTool.properties file located in the directory where OracleReplicationScriptToolBundle.zip was unpacked.
• Replication user
• Password
• Replication group name
• Timezone offset
Ensure that you modify all “REPLACEME” text entries in the ReplicationScriptTool.properties file with the appropriate values for your environment. For the app.server values, specify the IP address of the appropriate NCM application server. In addition, make sure the mode property is set to “initial”. These properties are described in detail in the ReplicationScriptTool.properties file.
7 If you want to run NCM servers under a non-SYSTEM user on Oracle, run the scripts listed in Oracle 10g Setup and Upgrade Permissions on page 26.
8 Run the ReplicationScriptTool via the following command: java -classpath . ReplicationScriptTool
9 Create the database on Master 2. This database should have a different database identifier (SID) from the database on Master 1. It should also have the same schema name and database user login name as the database on Master 1.
10 Add Master 2's database information to the local TNSNAMES.ora on Master 1. Verify that Master 1's database information exists in the local TNSNAMES.ora on Master 1. If Master 1’s database information does not exist, add it same way as other entries.
11 Add Master 1’s database information to the local TNSNAMES.ora on Master 2. Verify that Master 2’s database information exists in the local TNSNAMES.ora on Master 2. If Master 2’s database information does not exist, add it same way as other entries. (Refer to the note above.)
12 Ensure that you have a server and a directory (typically on one of the database system), where you can run a copy of SQLPlus that can access all NCM Cores in the NCM Mesh. To verify this, connect to one database with SQLPlus and issue the CONNECT <USER>/<PASSWORD>@<SID> command for each different SID in the Mesh. This is necessary because the script issues CONNECT commands to change which database it is running procedures against.
13 Copy the newly generated SQL file (typically named ReplicationScript.sql depending on what value was set in the ReplicationScriptTool.properties file), from the ReplicationScriptTool working directory to the server and directory where you plan to run SQLPlus.
if you are setting up Replication on a Oracle 11g database, you also need to create a database for Master 1.
You may need to make modifications to the LISTENER.ora and SQLNET.ora files depending on how your Oracle servers are configured. In particular, in certain environments the NAMES.DEFAULT_DOMAIN property needs to be commented out in SQLNET.ora. Consult with your Oracle DBA, if needed.
Make sure that files named *_spool.txt do not exist in the directory. When run, the script will log its actions to a file with that suffix.
24 Chapter 2
Implementation (Oracle 10g)
1 Stop the NCM Management Engine that is accessing the database on Master 1.
2 Dump the Master 1 database using the following command on the database server for Master 1:
EXP <USER>/<PASSWORD>@<MASTER1_SID> TABLES=RN_% FILE=<filename> where <USER>, <PASSWORD>, and <MASTER1_SID> were collected in Step 2.
3 Copy the file from Step 2 to the database server for Master 2.
4 Import into the Master 2 database using the following command on the database server for Master 2:
where <USER>, <PASSWORD>, and <MASTER2_SID> were collected in Step 2.
5 On either Master 1 or Master 2, ensure that you have two SQLPLus windows open before running the script: One connected as the NCM user and one connected as the SYSTEM user.
6 Run the replication script in the SQLPlus window connected as the NCM user using @ReplicationScript.sql.
7 Follow the instructions provided by the script at several points as it runs. This will involve running other commands in the second SQLPlus window to verify that certain operations necessary for later steps in the script have completed.
8 Exit from SQLPlus once the script completes. This ensures that all actions are logged to the spool file.
On Oracle 10g, steps 2 to 4 below could be done more efficiently by using Oracle’s Data Pump Utility. For information, see Oracle 10g Data Pump Utility on page 75.
Log the output of this command to a file for examination later if there are errors.
If you skipped or misconfigured any of the above steps, and as a result see errors during replication setup, before performing initial replication setup again, see Removing Replication Across the Entire NCM Mesh on page 35.
Installation, Setup, and Upgrading 25
9 Verify that the replication is working correctly. Make sure:
• The spool file generated by running the replication SQL script contains no errors.
• The RN_CORE table on each database contains the appropriate list of servers in the NCM Mesh. To check the RN_CORE table, using SQLPlus, enter the following command on each server: SELECT * FROM RN_CORE;
• Verify (using Oracle's Enterprise Manager) that each database in the NCM Mesh has replication set up, is in the “Normal” state, and has purge, push, and repcat_admin jobs installed correctly. Consult your Oracle DBA for assistance.
• Verify that the replication of data is working correctly. To verify that replication is working between all NCM Cores in the NCM Mesh, enter the following commands: CONNECT <USER>/<PASSWORD>@<MASTER1_SID>; UPDATE RN_CORE SET COMMENTS = ‘Test from sid1 to sid2’ where CoreID=1; COMMIT; wait 10 to 30 seconds CONNECT <USER>/<PASSWORD>@<MASTER2_SID>; SELECT Comments from RN_CORE where CoreID=1;
You should enter this from every NCM Core in the NCM Mesh. Be sure to check the values each time on all of the other NCM Cores to ensure that the links between each database in the system are working correctly.
10 Install an NCM server, pointing it to an existing database on Master 2.
11 Stop the NCM Management Engine running on Master 2.
12 Copy the distributed.rcx file to each NCM server in the NCM Mesh (in the same location as appserver.rcx).
13 Start the NCM Management Engine on NCM Core 1.
14 Start the NCM Management Engine on NCM Core 2.
15 Verify the NCM installation:
a Edit an object on one NCM server (for example, a Comments field for a device).
b Wait a minute and then verify that the updated comment exists on the second server.
c Check the status of the Oracle Distributed Monitor in the NCM console to ensure that no problems are being reported. (For information, see Distributed Monitor Results Page on page 51.) It could take up to five minutes for this monitor to initially run.
Oracle 10g Setup and Upgrade Permissions
The following permissions are required for the NCM Distributed System setup process and operation if you are running the NCM servers under a non-SYSTEM user on Oracle 10g.
In this list of commands to grant permissions, NAUSER is the Oracle username that NCM uses to access the database, typically the Oracle schema name. This name must be the same on all NCM Cores in the NCM Mesh. Replace NAUSER with the username your NCM server uses to access the database.
For replication setup and upgrade:
The standard user account used to access NCM cannot be used for replication. The user "repadmin" is created by default to manage replication in your system.
26 Chapter 2
GRANT EXECUTE ON "SYS"."DBMS_REPCAT_ADMIN" TO "NAUSER"; GRANT EXECUTE ON "SYS"."DBMS_DEFER_SYS" TO "NAUSER"; GRANT CREATE PUBLIC DATABASE LINK TO "NAUSER"; GRANT CREATE DATABASE LINK TO "NAUSER"; GRANT CREATE USER TO "NAUSER"; GRANT CREATE ANY PROCEDURE TO "NAUSER";
For normal operation of a NCM Core in a replication environment:
GRANT EXECUTE ON "SYS"."DBMS_REPUTIL" TO "NAUSER"; GRANT SELECT ON "SYS"."DBA_CONSTRAINTS" TO "NAUSER"; GRANT SELECT ON "SYS"."DBA_CONS_COLUMNS" TO "NAUSER"; GRANT SELECT ON "SYS"."DBA_REPCOLUMN" TO "NAUSER";
For replication deletion:
GRANT DROP USER TO "NAUSER"; GRANT DROP PUBLIC DATABASE LINK TO "NAUSER"; GRANT DROP ANY PROCEDURE TO "NAUSER";
For normal NCM operation:
GRANT CREATE SEQUENCE TO "NAUSER"; GRANT CREATE SESSION TO "NAUSER"; GRANT CREATE TABLE TO "NAUSER"; GRANT CREATE PROCEDURE TO "NAUSER"; GRANT SELECT ANY DICTIONARY TO "NAUSER"; GRANT CONNECT TO "NAUSER";
Oracle 11g: Adding a New NCM Core to an Existing NCM Mesh
Master 1 is the existing Master Definition Site and Master 3 is the new NCM Core being added.
To add a NCM core to an existing NCM mesh, follow these steps:
1 System Setup:
• A current NCM 1.7 database on Master 1.
• NCM application server of NCM Core 1 connected to the database on Master 1.
• A database with no data or NCM schema setup on Master 3. The database identifier (SID) needs to be different from the existing databases in the NCM Mesh.
• A network connection from the Master 1 servers to the Master 3 servers (and vice-versa) that enables ports 1521 (Oracle only), 1098, 8083, 1099, and 4444 (or appropriate variations) to be connected between these servers. Port 1521 must be open between the Oracle servers. The remaining ports must be open between the NCM servers.
• The ReplicationScriptTool bundle files installed on a Java-capable system.
• All database servers and application servers are set to use the same time and timezone.
2 Obtain the following information:
• Login/password/database identifier for NCM into the two databases (on Master 1 and Master 3).
• The replication password for the existing repadmin user.
• NCM server hostname, NCM server RMI listening port, database hostname, and database listening port for Master 3.
Installation, Setup, and Upgrading 27
• The timezone offset (integer from UTC) for the entire NCM Mesh. This must be a constant across the NCM Mesh.
• The existing replication group name.
3 Set (or verify) the following database parameters for Master 3:
• global_names = TRUE
• open_links = at least 5 (increase this by 1 for each additional server in the NCM Mesh beyond 2)
• open_links_per_instance = at least 5 (same as open_links)
• parallel_min_servers = 2
• shared_pool_size = increase current value by 40m to support replication
• job_queue_processes = at least 2.
4 Stop the NCM management engine on all NCM application servers:
• Windows: Open the Services control panel. In the list of services, right-click TrueControl ManagementEngine, and then click Stop.
• UNIX: Run the following command:
/etc/init.d/truecontrol stop
5 As the repadmin user, enter the following command using SQLPlus on Master 1 to quiesce the replication group:
6 Wait for the replication group to quiesce. Do this by executing the SELECT GNAME,STATUS FROM DBA_REPGROUP; command to check on the status. Wait until the status is listed as QUIESCED.
7 Create the Master 1 database export and finish preparing the database on Master 1 as described in Task 3: Prepare Master 1 for Replication (Oracle 11g) on page 16.
8 Import the Master 1 database onto Master 3 as described in Task 4: Prepare Master 2 for Replication (Oracle 11g) on page 17.
Substitute “Master 3” for each reference to “Master 2.”
9 Configure replication between the Master 1 and Master 3 databases as described in Task 5: Configure Replication (Oracle 11g) on page 19 and Task 6: Configure the NCM Application Servers for Replication on page 21.
Note the following differences:
• Substitute “Master 3” for each reference to “Master 2.”
• For step 4 on page 19, if you still have the ReplicationScriptTool.properties file from setting up initial replication you can use it. Otherwise, use the file from the most recent unpacking of the OracleReplicationScriptToolBundle.zip file.
— Verify or edit the server information for the initial core and second master site.
The parameters must be set on each database in the NCM Mesh. The parameters could be set up when the database is first created. If not, they must be modified at this point. You can view the current value of these parameters using Oracle Enterprise Manager or SQLPlus with the "SHOW PARAMETERS" or "SELECT NAME, VALUE FROM v$parameters" commands (where NAME = <parameter_name>, for example, global_names).
28 Chapter 2
— Uncomment the Additional Master site configuration area, and replace the text README with the appropriate value for that variable. Use the fully-qualified hostnames to identify the database and application servers. For example:
— For step 13 on page 21, the spool file contains the following acceptable warning that occurs after the DBMS_REPCAT.SUSPEND_MASTER_ACTIVITY command: 'ORA-23326: object group <yourgroup>.<your_replication_ group> is quiesced'
• Carry out step 3 on page 22 and step 4 on page 22 on all NCM application servers in the NCM mesh.
Oracle 10g: Adding a New NCM Core to an Existing NCM Mesh
Master 1 is the existing Master Definition Site and Master 3 is the new NCM Core being added.
1 System Setup:
• A current NCM 1.7 database on Master 1.
• A NCM server of NCM Core 1 connected to the database on Master 1.
• A database with no data or NCM schema setup on Master 3. The database identifier (SID) needs to be different from the existing databases in the NCM Mesh.
• A network connection from the Master 1 servers to the Master 3 servers (and vice-versa) that enables ports 1521 (Oracle only), 1098, 8083, 1099, and 4444 (or appropriate variations) to be connected between these servers. Port 1521 must be open between the Oracle servers. The remaining ports must be open between the NCM servers.
• The ReplicationScriptTool bundle files installed on a Java-capable system.
Installation, Setup, and Upgrading 29
2 Obtain the following information:
• Login/password/database identifier for NCM into the two databases (on Master 1 and Master 3). This is necessary for Steps 5, 6, 11, 13, and 14 below.
• The replication password for the existing repadmin user. This is necessary for Steps 9 and 14 below.
• NCM server hostname, NCM server RMI listening port, database hostname, and database listening port for Master 3. This is necessary for Step 14 below.
• The timezone offset (integer from UTC) for the entire NCM Mesh. This must be a constant across the NCM Mesh. This is necessary for Step 14 below.
• The existing replication group name. This is necessary for Steps 9 and 14 below.
3 Set (or verify) the following database parameters for Master 3:
• global_names = TRUE
• open_links = at least 5 (increase this by 1 for each additional server in the NCM Mesh beyond 2)
• open_links_per_instance = at least 5 (same as open_links)
• parallel_min_servers = 2
• shared_pool_size = increase current value by 40m to support replication
• Job_queue_processes = at least 2.
4 Increase the open_links and open_links_per_instance on existing databases in the NCM Mesh.
5 Add Master 3's database information to the local TNSNAMES.ora on Master 1. Verify that Master 1's database information exists in the local TNSNAMES.ora on Master 1. If Master 1’s database information does not exist, add it same way as other entries.
6 Add Master 1’s database information to the local TNSNAMES.ora on Master 3. Verify that Master 3’s database information exists in the local TNSNAMES.ora on Master 3. If Master 3’s database information does not exist, add it same way as other entries. (Refer to the note above.)
7 Ensure that all database server and NCM server system are set to use the same time and timezone.
8 Turn off all NCM servers in the existing NCM Mesh.
These parameters could have been be set up when the database is first created. If not, they must be modified at this point.
You may need to make modifications to the LISTENER.ora and SQLNET.ora files depending on how your Oracle servers are configured. In particular, in certain environments, the NAMES.DEFAUL_DOMAIN property needs to be commented out in SQLNET.ora. Consult with your Oracle DBA, if needed.
You may need to make modifications to the LISTENER.ora and SQLNET.ora files depending on how your Oracle servers are configured. Consult with your Oracle DBA.
30 Chapter 2
9 As the repadmin user, enter the following command using SQLPlus on Master 1 to quiesce the replication group:
EXEC DBMS_REPCAT.SUSPEND_MASTER_ACTIVITY('<replication_group_name>'); where <replication_group_name> is from Step 2.
10 Wait for the replication group to quiesce. Do this by executing the SELECT GNAME,STATUS FROM DBA_REPGROUP command to check on the status. Wait until the status is listed as QUIESCED.
11 Dump the Master 1 database using the following command on the database server for Master 1:
EXP <USER>/<PASSWORD>@<MASTER1_SID> TABLES=RN_% FILE=<filename> where <USER>, <PASSWORD>, and <MASTER1_SID> were collected in Step 2.
12 Copy the file <filename> to the database server for Master 3.
13 Import into the Master 3 database using the following command on the database server for Master 3:
Where <USER>, <PASSWORD>, and <MASTER3_SID> were collected in step 2.
14 Update the variables for all masters in the ReplicationScriptTool.properties file. Ensure that you modify all “REPLACEME” text entries in the ReplicationScriptTool.properties file with the appropriate values for your environment.
15 Run the ReplicationScriptTool via the following command: java -classpath . ReplicationScriptTool
16 Ensure that you have a server and a directory (typically on one of the database system), where you can run a copy of SQLPlus that can access all NCM Cores in the NCM Mesh. To verify this, connect to one database with SQLPlus and issue the CONNECT <USER>/<PASSWORD>@<SID> command for each different SID in the NCM Mesh. This is necessary because the script issues CONNECT commands to change which database it is running procedures against.
17 Copy the newly generated SQL file (typically named ReplicationScript.sql depending on what value was set in the ReplicationScriptTool.properties file), from the ReplicationScriptTool working directory to the server and directory where you plan to run SQLPlus.
18 Ensure that you have two SQLPLus windows open before running the script: One connected as the NCM user and one connected as the SYSTEM user.
19 Run the replication script copied in the previous step in the SQLPlus window connected as the NCM user using @ReplicationScript.sql.
On Oracle 10i, steps 11 to 13 below could be done more efficiently by using Oracle’s Data Pump Utility. For information, see Oracle 10g Data Pump Utility on page 75.
The master being added must be the last master entry and Master Definition Site must be the first entry. In addition, be sure to update the replication user, password, replication group name, and timezone offset in the ReplicationScriptTool.properties file if needed. Make sure the “mode” property is set to “add_server”. All other masters should also be listed.
Make sure that files named *_spool.txt do not exist in the directory. When run, the script will log its actions to a file with that suffix
Installation, Setup, and Upgrading 31
20 Follow the instructions provided by the script at several points as it runs. This will involve running other commands in the second SQLPlus window to verify that certain operations necessary for later steps in the script have completed.
21 Exit from SQLPlus once the script completes. This ensures that all actions are logged to the spool file.
22 Verify that the replication is working correctly. Make sure:
• The spool file generated by running the replication SQL script contains no errors, other than the following warning: 'ORA-23326: object group <yourgroup>.<your_replication_ group> is quiesced' that occurs after the DBMS_REPCAT.SUSPEND_MASTER_ACTIVITY command.
• The RN_CORE table on each database contains the appropriate list of servers in the NCM Mesh. To check the RN_CORE table, using SQLPlus, enter the following command on each server: SELECT * FROM RN_CORE;
• Verify (using Oracle's Enterprise Manager) that each database in the NCM Mesh has replication set up and is in the “Normal” state, and has purge, push, and repcat_admin jobs installed correctly. Consult your Oracle DBA for assistance.
• Verify that the replication of data is working correctly. To verify that replication is working between all NCM Cores in the NCM Mesh, enter the following commands: CONNECT <USER>/<PASSWORD>@<MASTER1_SID>; UPDATE RN_CORE SET COMMENTS = ‘Test from sid1 to sid3’ where CoreID=1; COMMIT; wait 10 to 30 seconds CONNECT <USER>/<PASSWORD>@<MASTER3_SID>; SELECT Comments from RN_CORE where CoreID=1; You should enter this from every NCM Core in the NCM Mesh. Be sure to check the values each time on all of the other NCM Cores to ensure that the links between each database in the system are working correctly.
23 Install an NCM server. Be sure to point it to an existing database on Master 3.
24 Add the distributed.rcx file to the new NCM server in the NCM Mesh (in the same location as appserver.rcx).
25 Start all of the NCM servers in the NCM Mesh.
26 Verify the NCM installation. To do this:
• Edit an object on one NCM server (for example, a Comments field for a device).
• Wait a minute and then verify that the updated comment exists on the second server.
• Check the status of the Oracle Distributed Monitor in the NCM UI to ensure that no problems are being reported. (For information, see Distributed Monitor Results Page on page 51.)
If you skipped or misconfigured any of the above steps, and as a result see errors during replication setup, before performing initial replication setup again, see Removing Replication Across the Entire NCM Mesh on page 35.
32 Chapter 2
Removing a NCM Core from an Existing NCM Mesh
To remove an NCM Core from an NCM Mesh:
1 If the NCM core you want to remove is the Master Definition Site, change the Master Definition Site to be another NCM Core as described in Changing the Master Definition Site on page 34.
2 Install the ReplicationScriptTool bundle files on a Java-capable system.
3 Ensure that all NCM devices belong to Sites on NCM Cores that are not going to be removed.
4 Modify all Sites to point to an NCM Core that is not going to be removed. (Alternatively, you can remove those Sites.)
5 Turn off the NCM server from the NCM Core that is being removed.
6 Delete the RN_CORE entry that was removed using the following commands using SQLPlus:
7 Update the variables for all masters in the ReplicationScriptTool.properties file. Ensure that you modify all “REPLACEME” text entries in the ReplicationScriptTool.properties file with the appropriate values for your environment.
8 Run the ReplicationScriptTool via the following command: java -classpath . ReplicationScriptTool
9 Ensure that you have a server and directory (typically on one of the database systems) where you can run a copy of SQLPlus that can access all NCM Cores in the NCM Mesh. To verify this, connect to one database with SQLPlus and issue the CONNECT <USER>/<PASSWORD>@<SID> command for each different SID in the NCM Mesh. This is necessary because the script issues CONNECT commands to change which database it is running procedures against.
10 Copy the newly generated SQL file (typically named ReplicationScript.sql depending on what value was set in the ReplicationScriptTool.properties file), from the ReplicationScriptTool working directory to the server and directory where you plan to run SQLPlus.
11 Ensure that you have two SQLPLus windows open before running the script: One connected as the NCM user and one connected as the SYSTEM user.
After you remove an NCM Core from an NCM Mesh, the data in that NCM Core's database will no longer remain in sync with the data in the rest of the NCM Mesh. The data cannot be merged back into the NCM Mesh.
To identify the Core ID of the NCM Core to delete, enter the SELECT*FROM RN_CORE command. UPDATE RN_SITE SET OwningCoreID = 1 WHERE OwningCoreID = <coreID>; UPDATE RN_SITE SET ManagingCoreID = 1 WHERE ManagingCoreID = <coreID>; UPDATE RN_SCHEDULE_TASK SET CoreID = 1 WHERE CoreID = <coreID>; DELETE FROM RN_CORE WHERE CoreID = <coreID>; COMMIT;
The master being deleted must be the last master entry and the Master Definition Site must be the first entry. In addition, update the replication user, password, and replication group name in the ReplicationScriptTool.properties file if needed. Make sure the “mode” property is set to “delete_server”.
Make sure that files named “*_spool.txt” do not exist in that directory. When run, the script will log its actions to a file of that suffix.
Installation, Setup, and Upgrading 33
12 Run the replication script copied in the previous step in the SQLPlus window connected as the NCM user using @ReplicationScript.sql.
13 Follow the instructions provided by the script at several points as it runs. This will involve running other commands in the second SQLPlus window to verify that certain operations necessary for later steps in the script have completed.
14 Exit from SQLPlus once the script completes. This ensures that all actions are logged to the spool file.
15 Verify that the replication is working correctly. Make sure:
— The spool file generated by running the replication SQL script contains no errors.
— The RN_CORE table on each database contains the appropriate list of servers in the NCM Mesh. To check the RN_CORE table, using SQLPlus, enter the following command on each server: “SELECT * FROM RN_CORE;”
— Verify (using Oracle's Enterprise Manager) that each database in the NCM Mesh has replication set up, is in the “Normal” state, and has purge, push, and repcat_admin jobs installed correctly. Consult your Oracle DBA for assistance.
— Verify that the replication of data is working correctly. To verify that replication is working between all NCM Cores in the NCM Mesh, enter the following commands: CONNECT <USER>/<PASSWORD>@<MASTER1_SID>; UPDATE RN_CORE SET COMMENTS = ‘Test from sid1 to sid2’ where CoreID=1; COMMIT; wait 10 to 30 seconds CONNECT <USER>/<PASSWORD>@<MASTER2_SID>; SELECT Comments from RN_CORE where CoreID=1;
You should enter this from every NCM Core in the NCM Mesh. Be sure to check the values each time on all of the other NCM Cores to ensure that the links between each database in the system are working correctly.
16 Uninstall the NCM server from the NCM Core that was removed.
17 Restart the NCM servers in the NCM Mesh.
Changing the Master Definition Site
It may be necessary to change the Master Definition Site in the event of failure of that Site or when you want to remove an NCM Core from the NCM Mesh. To change the Master Definition Site:
1 If the old Master Definition Site is accessible (for example in the case where it is being removed from the NCM Mesh), as the “repadmin” user on the existing Master Definition Site, enter the following command using SQLPlus:
2 If the old Master Definition Site is not accessible (for example in the case of failure of the Master Definition database server), as the “repadmin” user on the existing Master Definition Site, enter the following command using SQLPlus on any other NCM Core in the NCM Mesh:
BEGIN DBMS_REPCAT.RELOCATE_MASTERDEF ( gname => '<REPLICATION GROUP NAME>', old_masterdef => '<OLD MASTERDEF SID>', new_masterdef => '<NEW MASTERDEF SID>', notify_masters => TRUE, include_old_masterdef => FALSE); END / COMMIT;
3 For both cases, as the NCM database login user, modify the RN_CORE table entries:
UPDATE RN_CORE SET IsMasterDef = 0 WHERE CoreID = <ID OF OLD MASTERDEF>; COMMIT; UPDATE RN_CORE SET IsMasterDef = 1 WHERE CoreID = <ID OF NEW MASTERDEF>; COMMIT;
Removing Replication Across the Entire NCM Mesh
To remove replication across the entire NCM Mesh:
1 Make sure that the ReplicationScriptTool bundle files are installed on a Java-capable machine.
2 Turn off the NCM server on all NCM Cores.
3 Update the variables for all masters in the ReplicationScriptTool.properties file. Ensure that you modify all “REPLACEME” text entries in the ReplicationScriptTool.properties file with the appropriate values for your environment.
4 Run the ReplicationScriptTool via the following command: java -classpath . ReplicationScriptTool
5 Ensure that you have a server and directory (typically on one of the database systems) where you can run a copy of SQLPlus that can access all NCM Cores in the NCM Mesh. To verify this, connect to one database with SQLPlus and issue the CONNECT <USER>/<PASSWORD>@<SID> command for each different SID in the NCM Mesh. This is necessary because the script issues CONNECT commands to change which database it is running procedures against.
6 Copy the newly generated SQL file (typically named ReplicationScript.sql depending on what value was set in the ReplicationScriptTool.properties file), from the ReplicationScriptTool working directory to the server and directory where you plan to run SQLPlus.
All NCM servers participating in the NCM Mesh will now operate as independent NCM installations. The data cannot be merged once they are no longer in sync.
The Master Definition Site must be the first entry. In addition, update the replication user, password, and replication group name in that file if needed. Make sure the “mode” property is set to “delete”.
Make sure that files named “*_spool.txt” do not exist in that directory. When run, the script will log its actions to a file of that suffix.
Installation, Setup, and Upgrading 35
7 Ensure that you have two SQLPLus windows open before running the script: One connected as the NCM user and one connected as the SYSTEM user.
8 Run the replication script copied in the previous step in the SQLPlus window connected as the NCM user using @ReplicationScript.sql.
9 Follow the instructions provided by the script at several points as it runs. This will involve running other commands in the second SQLPlus window to verify that certain operations necessary for later steps in the script have completed.
10 Exit SQLPlus after the script completes (this ensures that all actions are logged to the spool file).
11 Verify that the replication has been removed correctly. Make sure:
• The spool file generated by running the replication SQL script contains no errors.
• Verify (using Oracle's Enterprise Manager) that each database in the NCM Mesh does not have replication setup. Consult your Oracle DBA for assistance.
12 For each server, ensure that devices are deleted or associated with Sites that map to the local NCM Core as needed.
13 Remove the distributed.rcx file from each NCM application server.
14 Restart the NCM servers.
15 For each database, remove all entries from RN_CORE except for the local NCM Core system’s entry.
16 Restart each NCM server to enable the NCM Core changes to take effect.
Upgrading from NCM 1.3/1.3.1 to NCM 1.5
During the NCM upgrade process, the NCM Cores must be completely offline. You will be upgrading the:
• NCM application servers
• NCM database schema
• Replication between the database cores
Note the following:
• The NCM mesh upgrade path is as follows:
(NCM 1.3 or NCM 1.3.01) to NCM 1.4 to NCM 1.5 to NCM 1.7 to NCM 1.7.1
Enter this path at your current version of NCM.
• At each step on the NCM mesh upgrade path, upgrade all NCM cores in the NCM mesh before moving to the next step in the upgrade path.
• For instructions for upgrading from NCM 6.0 to NCM 1.3, see the NCM 1.3 Configuration Guide for High Availability Distributed System on Oracle.
For upgrade instructions, see the following topics:
• Upgrading from NCM 1.3/1.3.01 to NCM 1.4 on page 37
• Upgrading from NCM 1.4x to NCM 1.5 on page 38
• Upgrading from NCM 1.5 to NCM 1.7 on page 40
• Upgrading from NCM 1.7 to NCM 1.7.1 on page 43
36 Chapter 2
Upgrading from NCM 1.3/1.3.01 to NCM 1.4
To upgrade from NCM 1.3/1.3.01 to NCM 1.4, be sure that:
• A current NCM 1.3/1.3.01 database is installed on all Masters.
• The ReplicationScriptTool bundle files for NCM 1.4 are installed on a Java-capable system (on one of the NCM systems).
• You have the following information:
— Login/password/DatabaseIdentifier (SID) for NCM into all databases in the NCM Mesh
— Replication password for the existing repadmin user
— DatabaseIdentifier (SID), NCM server hostname, NCM server RMI listening port, database server hostname, and database listening port for all Masters
— The timezone offset (integer from UTC) for the entire NCM Mesh (This must be a constant across the NCM Mesh.)
— The existing replication group name
1 Shut down all NCM Management Engines in the NCM Mesh.
2 Update the variables for all Masters in the ReplicationScriptTool.properties file. Ensure that you modify all “REPLACEME” text entries in the ReplicationScriptTool.properties file with the appropriate values for your environment.
3 Run the ReplicationScriptTool. Enter: java -classpath . ReplicationScriptTool
4 Ensure that you have a server and a directory (typically on one of the database systems), where you can run a copy of SQLPlus that can access all NCM Cores in the NCM Mesh. To verify this, connect to one database with SQLPlus and issue the CONNECT <USER>/<PASSWORD>@<SID> command for each unique SID in the NCM Mesh. This is necessary because the script issues CONNECT commands to change which database it is running procedures against.
5 Copy the newly generated SQL file (typically named ReplicationScript.sql, depending on what value was set to in the ReplicationScriptTool.properties file), from the ReplicationScriptTool working directory to the server and directory where you plan to run SQLPlus.
6 Ensure you have two SQLPLus windows open before running the script: One window connected as the NCM user and the other window connected as the SYSTEM user.
7 Run the replication script copied in the previous step in the SQLPlus window connected as the NCM user using @ReplicationScript.sql.
All servers should be listed in the ReplicationScriptTool.properties file. Make sure the mode property is set to the appropriate value for the upgrade you want to perform. For example, if you are upgrading from NCM 1.3 to NCM 1.4, this value should be set to "upgrade_from_7_0". If you are upgrading from NCM 1.3.01 to NCM 1.4, this value should be set to "upgrade_from_7_2".
Make sure that files named *_spool.txt do not exist in the directory. When run, the script will log its actions to a file with that suffix.
Installation, Setup, and Upgrading 37
8 Follow the instructions provided by the script at several points as it runs. This will include running other commands in the second SQLPlus window to verify that certain operations necessary for later steps in the script have completed.
9 Exit from SQLPlus once the script completes. This ensures that all actions are logged to the spool file.
10 Verify that the replication is working correctly. Make sure:
• The spool file generated by running the replication SQL script contains no errors, other than the following warning: 'ORA-23326: object group <yourgroup>.<your_replication_ group> is quiesced' that occurs after the DBMS_REPCAT.SUSPEND_MASTER_ACTIVITY command.
• Verify (using Oracle's Enterprise Manager) that each database in the NCM Mesh has replication set up and is in the “Normal” state, and has purge, push, and repcat_admin jobs installed correctly. Consult your Oracle DBA for assistance.
• Verify that the replication of data is working correctly. To verify that replication is working between all NCM Cores in the NCM Mesh, enter the following commands: CONNECT <USER>/<PASSWORD>@<MASTER1_SID>; UPDATE RN_CORE SET COMMENTS = ‘Test from sid1 to sid2’ where CoreID=1; COMMIT; wait 10 to 30 seconds CONNECT <USER>/<PASSWORD>@<MASTER2_SID>; SELECT Comments from RN_CORE where CoreID=1;
You should enter this from every NCM Core in the NCM Mesh. Be sure to check the values each time on all of the other NCM Cores to ensure that the links between each database in the system are working correctly.
11 Upgrade each NCM server using the NCM 1.4 Service Pack Installer. The NCM 1.4 Service Pack Installer upgrades the NCM server to NCM 1.4. The scripts for the database upgrade have already been handled by running the replication script in Step 7.
12 Verify the NCM installation:
a Edit an object on one NCM server (for example, a Comments field for a device).
b Wait a minute and then verify that the updated comment exists on the second server.
c Check the status of the Oracle Distributed Monitor in the NCM UI to ensure that no problems are being reported. (For information, see Distributed Error List on page 52.)
Upgrading from NCM 1.4x to NCM 1.5
To upgrade from NCM 1.4x to NCM 1.5, be sure that:
• A current NCM 1.5x database is installed on all Masters.
• The ReplicationScriptTool bundle files for NCM 1.5 are installed on a Java-capable system (on one of the NCM systems).
• You have the following information:
— Login/password/DatabaseIdentifier (SID) for NCM into all databases in the NCM Mesh
If you skipped or misconfigured any of the above steps, and as a result see errors during replication setup, before performing the upgrade, see Removing Replication Across the Entire NCM Mesh on page 35.
38 Chapter 2
— Replication password for the existing repadmin user
— DatabaseIdentifier (SID), NCM server hostname, NCM server RMI listening port, database server hostname, and database listening port for all Masters
— The timezone offset (integer from UTC) for the entire NCM Mesh (This must be a constant across the NCM Mesh.)
— The existing replication group name
1 Shut down all NCM Management Engines in the NCM Mesh.
2 Update the variables for all Masters in the ReplicationScriptTool.properties file. Ensure that you modify all “REPLACEME” text entries in the ReplicationScriptTool.properties file with the appropriate values for your environment.
3 Run the ReplicationScriptTool. Enter: java -classpath . ReplicationScriptTool
4 Ensure that you have a server and a directory (typically on one of the database systems), where you can run a copy of SQLPlus that can access all NCM Cores in the NCM Mesh. To verify this, connect to one database with SQLPlus and issue the CONNECT <USER>/<PASSWORD>@<SID> command for each unique SID in the NCM Mesh. This is necessary because the script issues CONNECT commands to change which database it is running procedures against.
5 Copy the newly generated SQL file (typically named ReplicationScript.sql, depending on what value was set to in the ReplicationScriptTool.properties file), from the ReplicationScriptTool working directory to the server and directory where you plan to run SQLPlus.
6 Ensure you have two SQLPLus windows open before running the script: One window connected as the NCM user and the other window connected as the SYSTEM user.
7 Run the replication script copied in the previous step in the SQLPlus window connected as the NCM user using @ReplicationScript.sql.
8 Follow the instructions provided by the script at several points as it runs. This will include running other commands in the second SQLPlus window to verify that certain operations necessary for later steps in the script have completed.
9 Exit from SQLPlus once the script completes. This ensures that all actions are logged to the spool file.
10 Verify that the replication is working correctly. Make sure:
• The spool file generated by running the replication SQL script contains no errors, other than the following warning: 'ORA-23326: object group <yourgroup>.<your_replication_ group> is quiesced' that occurs after the DBMS_REPCAT.SUSPEND_MASTER_ACTIVITY command.
• Verify (using Oracle's Enterprise Manager) that each database in the NCM Mesh has replication set up and is in the “Normal” state, and has purge, push, and repcat_admin jobs installed correctly. Consult your Oracle DBA for assistance.
All servers should be listed in the ReplicationScriptTool.properties file. Set the mode property to “upgrade_from_7_5”.
Make sure that files named *_spool.txt do not exist in the directory. When run, the script will log its actions to a file with that suffix.
If you skipped or misconfigured any of the above steps, and as a result see errors during replication setup, before performing the upgrade, see Removing Replication Across the Entire NCM Mesh on page 35.
Installation, Setup, and Upgrading 39
• Verify that the replication of data is working correctly. To verify that replication is working between all NCM Cores in the NCM Mesh, enter the following commands: CONNECT <USER>/<PASSWORD>@<MASTER1_SID>; UPDATE RN_CORE SET COMMENTS = ‘Test from sid1 to sid2’ where CoreID=1; COMMIT; wait 10 to 30 seconds CONNECT <USER>/<PASSWORD>@<MASTER2_SID>; SELECT Comments from RN_CORE where CoreID=1;
You should enter this from every NCM Core in the NCM Mesh. Be sure to check the values each time on all of the other NCM Cores to ensure that the links between each database in the system are working correctly.
11 Upgrade each NCM server using the NCM 1.5 Service Pack Installer. The NCM 1.5 Service Pack Installer upgrades the NCM server to NCM 1.5. The scripts for the database upgrade have already been handled by running the replication script in Step 7.
12 Verify the NCM installation:
a Edit an object on one NCM server (for example, a Comments field for a device).
b Wait a minute and then verify that the updated comment exists on the second server.
c Check the status of the Oracle Distributed Monitor in the NCM UI to ensure that no problems are being reported. (For information, see Distributed Error List on page 52.)
Upgrading from NCM 1.5 to NCM 1.7
To upgrade from 1.5 to NCM 1.7, be sure that:
• A current NCM 1.5 database is installed on all Masters.
• The ReplicationScriptTool bundle files for NCM 1.7 are installed on a Java-capable system (on one of the NCM systems).
• You have the following information:
— Login/password/DatabaseIdentifier (SID) for NCM into all databases in the NCM Mesh
— Replication password for the existing repadmin user
— DatabaseIdentifier (SID), NCM server hostname, NCM server RMI listening port, database server hostname, and database listening port for all Masters
— The timezone offset (integer from UTC) for the entire NCM Mesh (This must be a constant across the NCM Mesh.)
— The existing replication group name
1 Shut down all NCM Management Engines in the NCM Mesh.
2 Update the variables for all Masters in the ReplicationScriptTool.properties file. Ensure that you modify all “REPLACEME” text entries in the ReplicationScriptTool.properties file with the appropriate values for your environment.
3 Run the ReplicationScriptTool. Enter: java -classpath . ReplicationScriptTool
All servers should be listed in the ReplicationScriptTool.properties file. Set the mode property to “upgrade_from_7_6”.
40 Chapter 2
4 Ensure that you have a server and a directory (typically on one of the database systems), where you can run a copy of SQLPlus that can access all NCM Cores in the NCM Mesh. To verify this, connect to one database with SQLPlus and issue the CONNECT <USER>/<PASSWORD>@<SID> command for each unique SID in the NCM Mesh. This is necessary because the script issues CONNECT commands to change which database it is running procedures against.
5 Copy the newly generated SQL file (typically named ReplicationScript.sql, depending on what value was set to in the ReplicationScriptTool.properties file), from the ReplicationScriptTool working directory to the server and directory where you plan to run SQLPlus.
6 Ensure you have two SQLPLus windows open before running the script: One window connected as the NCM user and the other window connected as the SYSTEM user.
7 Run the replication script copied in the previous step in the SQLPlus window connected as the NCM user using @ReplicationScript.sql.
8 Follow the instructions provided by the script at several points as it runs. This will include running other commands in the second SQLPlus window to verify that certain operations necessary for later steps in the script have completed.
9 Exit from SQLPlus once the script completes. This ensures that all actions are logged to the spool file.
10 Verify that the replication is working correctly. Make sure:
• The spool file generated by running the replication SQL script contains no errors, other than the following warning: 'ORA-23326: object group <yourgroup>.<your_replication_ group> is quiesced' that occurs after the DBMS_REPCAT.SUSPEND_MASTER_ACTIVITY command.
• Verify (using Oracle's Enterprise Manager) that each database in the NCM Mesh has replication set up and is in the “Normal” state, and has purge, push, and repcat_admin jobs installed correctly. Consult your Oracle DBA for assistance.
• Verify that the replication of data is working correctly. To verify that replication is working between all NCM Cores in the NCM Mesh, enter the following commands: CONNECT <USER>/<PASSWORD>@<MASTER1_SID>; UPDATE RN_CORE SET COMMENTS = ‘Test from sid1 to sid2’ where CoreID=1; COMMIT; wait 10 to 30 seconds CONNECT <USER>/<PASSWORD>@<MASTER2_SID>; SELECT Comments from RN_CORE where CoreID=1;
You should enter this from every NCM Core in the NCM Mesh. Be sure to check the values each time on all of the other NCM Cores to ensure that the links between each database in the system are working correctly.
11 Upgrade each NCM server using the NCM 1.7 Service Pack Installer. The NCM 1.7 Service Pack Installer upgrades the NCM server to NCM 1.7. The scripts for the database upgrade have already been handled by running the replication script in Step 7.
12 Verify the NCM installation:
a Edit an object on one NCM server (for example, a Comments field for a device).
Make sure that files named *_spool.txt do not exist in the directory. When run, the script will log its actions to a file with that suffix.
If you skipped or misconfigured any of the above steps, and as a result see errors during replication setup, before performing the upgrade, see Removing Replication Across the Entire NCM Mesh on page 35.
Installation, Setup, and Upgrading 41
b Wait a minute and then verify that the updated comment exists on the second server.
c Check the status of the Oracle Distributed Monitor in the NCM UI to ensure that no problems are being reported. (For information, see Distributed Error List on page 52.)
42 Chapter 2
Upgrading from NCM 1.7 to NCM 1.7.1
To upgrade from NCM 1.7 to NCM 1.7.1, be sure that:
• A current NCM 1.7 database is installed on all Masters.
• The ReplicationScriptTool bundle files for NCM 1.7.1 are installed on a Java-capable system (on one of the NCM systems).
• You have the following information:
— Login/password/DatabaseIdentifier (SID) for NCM into all databases in the NCM Mesh
— Replication password for the existing repadmin user
— DatabaseIdentifier (SID), NCM server hostname, NCM server RMI listening port, database server hostname, and database listening port for all Masters
— The timezone offset (integer from UTC) for the entire NCM Mesh (This must be a constant across the NCM Mesh.)
— The existing replication group name
1 Shut down all NCM Management Engines in the NCM Mesh.
2 Update the variables for all Masters in the ReplicationScriptTool.properties file. Ensure that you modify all “REPLACEME” text entries in the ReplicationScriptTool.properties file with the appropriate values for your environment.
3 Run the ReplicationScriptTool. Enter: java -classpath . ReplicationScriptTool
4 Ensure that you have a server and a directory (typically on one of the database systems), where you can run a copy of SQLPlus that can access all NCM Cores in the NCM Mesh. To verify this, connect to one database with SQLPlus and issue the CONNECT <USER>/<PASSWORD>@<SID> command for each unique SID in the NCM Mesh. This is necessary because the script issues CONNECT commands to change which database it is running procedures against.
5 Copy the newly generated SQL file (typically named ReplicationScript.sql, depending on what value was set to in the ReplicationScriptTool.properties file), from the ReplicationScriptTool working directory to the server and directory where you plan to run SQLPlus.
6 Ensure you have two SQLPLus windows open before running the script: One window connected as the NCM user and the other window connected as the SYSTEM user.
7 Run the replication script copied in the previous step in the SQLPlus window connected as the NCM user using @ReplicationScript.sql.
8 Follow the instructions provided by the script at several points as it runs. This will include running other commands in the second SQLPlus window to verify that certain operations necessary for later steps in the script have completed.
9 Exit from SQLPlus once the script completes. This ensures that all actions are logged to the spool file.
All servers should be listed in the ReplicationScriptTool.properties file. Set the mode property to “upgrade_from_9_5”.
Make sure that files named *_spool.txt do not exist in the directory. When run, the script will log its actions to a file with that suffix.
If you skipped or misconfigured any of the above steps, and as a result see errors during replication setup, before performing the upgrade, see Removing Replication Before Upgrading the Database on page 67.
Installation, Setup, and Upgrading 43
10 Verify that the replication is working correctly. Make sure:
• The spool file generated by running the replication SQL script contains no errors, other than the following warning: 'ORA-23326: object group <yourgroup>.<your_replication_ group> is quiesced' that occurs after the DBMS_REPCAT.SUSPEND_MASTER_ACTIVITY command.
• Verify (using Oracle's Enterprise Manager) that each database in the NCM Mesh has replication set up and is in the “Normal” state, and has purge, push, and repcat_admin jobs installed correctly. Consult your Oracle DBA for assistance.
• Verify that the replication of data is working correctly. To verify that replication is working between all NCM Cores in the NCM Mesh, enter the following commands: CONNECT <USER>/<PASSWORD>@<MASTER1_SID>; UPDATE RN_CORE SET COMMENTS = ‘Test from sid1 to sid2’ where CoreID=1; COMMIT; wait 10 to 30 seconds CONNECT <USER>/<PASSWORD>@<MASTER2_SID>; SELECT Comments from RN_CORE where CoreID=1;
You should enter this from every NCM Core in the NCM Mesh. Be sure to check the values each time on all of the other NCM Cores to ensure that the links between each database in the system are working correctly.
11 Upgrade each NCM server using the NCM 1.7.1 Service Pack Installer. The NCM 1.7.1 Service Pack Installer upgrades the NCM server to NCM 1.7.1. The scripts for the database upgrade have already been handled by running the replication script in Step 7.
12 Verify the NCM installation:
a Edit an object on one NCM server (for example, a Comments field for a device).
b Wait a minute and then verify that the updated comment exists on the second server.
c Check the status of the Oracle Distributed Monitor in the NCM UI to ensure that no problems are being reported. (For information, see Distributed Error List on page 52.)
44 Chapter 2
3 System Administration
This chapter contains the following topics:
• Getting Started on page 45
• How NCM Removes In-Memory and Database Information on page 46
• Suspending Replication for Database Maintenance on page 46
• NCM Generated Events on page 47
• Using the NCM Distributed System Pages on page 51
Getting Started
In general, an NCM server that is part of a Distributed System NCM Mesh should be transparent to users. However, there are a number of operations that the system administrator may need to do to keep the Distributed System NCM Mesh functioning properly.
Understanding Oracle Replication
Oracle replication uses three types of jobs:
• Transaction Push Job — Each NCM Core will have a Transaction Push job for each of the other NCM Cores in the NCM Mesh. For example, if you have two NCM Cores, each NCM Core has one Transaction Push job. If you have three NCM Cores, each NCM Core has two Transaction Push jobs for the two destination NCM Cores. These jobs are identified in Oracle’s Enterprise Manager or from DBA_JOBS by the DBMS_DEFER_SYS.PUSH() command string.
• Transaction Purge Job — Each NCM Core will have one Transaction Purge job for cleaning out successfully pushed transactions. These jobs can be identified in Oracle’s Enterprise Manager or from DBA_JOBS by the DBMS_DEFER_SYS.PURGE () command string.
• Replication Administration Job — Each NCM Core will have one Replication Administration job. These jobs are not used in normal NCM operation. It is used if the replication setup is changed. These jobs can be identified in Oracle’s Enterprise Manager or from DBA_JOBS by the DO_DEFERRED_REPCAT_ADMIN() command string.
NCM automatically monitors all three jobs and attempts to restart any job that fails. You can monitor the jobs using Oracle’s Enterprise Manager or by viewing DBA_JOBS. Using SQLPlus, enter: SELECT * FROM DBA_JOBS;
To view specific job IDs and if they are broken, enter: SELECT JOB, BROKEN, WHAT FROM DBA_JOBS;
System Administration 45
On Oracle, NCM monitors on a regular schedule the following on each NCM Core for the database transport (i.e., replication):
• Push jobs that handle moving data from one NCM Core to another. If the monitor check fails and the Push job is found to be broken, NCM will attempt to restart it.
• Purge jobs that successfully clear pushed data from the push queue, and attempts to restart the Push queue each time the check fails.
• The deferred transaction queue for any transactions that could not be applied to the local database due to a conflict. NCM applies additional application logic to attempt to correctly apply the transaction. If unsuccessful, NCM alerts the NCM administrator via email notification.
• Unrecoverable uniqueness conflicts. NCM alerts the NCM administrator in the event of unrecoverable uniqueness conflicts. Typically, there is no way to automatically correct these types of issues.
• Both the DEFTRAN and DEFLOB queue size. These queues hold pending data that needs to be pushed to other servers. Typically, if replication is working, but is beginning to backup, these queues will begin to grow. This can occur if the connection between databases is congested. NCM alerts the NCM administrator to this issue via email notification. The system will continue to push data. However, it could take a long time to catch up depending on network conditions.
In addition to replication monitoring, NCM also monitors the following for each of the NCM Cores:
• RMI connectivity between each NCM Core
• NCM server timestamp differences between each NCM Core
These monitors will generate events during error conditions. The events can be emailed to the NCM administrator or Oracle DBA using a standard event rule in NCM.
How NCM Removes In-Memory and Database Information
There could be a delay in removing or cancelling a task because NCM must communicate with the appropriate owning NCM Core to perform this operation. To ensure proper removal of all in-memory and database information, and to avoid replication conflicts due to matching timestamps, NCM active tasks are automatically deleted on the NCM Core with which they are associated. An active task is any task that does not have the “Succeeded,” “Failed,” “Duplicate”, “Skipped”, or “Warning” status.
Keep in mind that deleted tasks could be displayed in task lists for a few moments while the replication process pushes the deletes to other NCM Cores in the system. In addition, if the NCM Core from which the task originated is not accessible, the delete will fail.
Suspending Replication for Database Maintenance
To suspend replication because you are bringing down one or both database servers for maintenance, complete the following procedure as user repadmin from the masterdef database site:
1 Shut down the NCM managment engine on all NCM application servers:
For information about configuring email notification, see the User Guide for CiscoWorks Network Compliance Manager 1.7.
NCM includes an example event rule that can be updated as necessary.
46 Chapter 3
• Windows: Open the Services control panel. In the list of services, right-click TrueControl ManagementEngine, and then click Stop.
By default, NCM generates system events. Event rules can alert you to certain error conditions requiring attention. Each event is listed below, along with an explanation and required action to be taken. You should examine the default “Distributed System” event rule to ensure all of the events are included in the event rule and that the event rule is configured to send the email notification to the appropriate administrator.
Broken Replication Job
Event format:
Job ID: <ID> Job Type: <push to <host>, purge, or repcat admin> Database Host: <hostname> Database SID: <SID> Stalled: <true or false>
Broken jobs can occur because an Oracle server cannot push transactions to another server due to that server being down or in the event of a network connectivity loss. Replication jobs can also become broken because they stall. Stalled replication jobs represent a hang in an internal Oracle process. This event is sent only once for each broken replication job (unless the NCM server is restarted, in which case the event will be resent if the job is still broken). If a stalled replication job is detected, it is best to restart the Oracle server.
For broken replication jobs that are not stalled, the course of action depends on the job type. If the job type is “purge” or “repcat admin,” consult with your Oracle DBA. Failure of these jobs represents an internal problem or resource limit in the Oracle server that will need to be investigated.
For “push to <host>” job types, the typical failure will be loss of connectivity to the other host, either through a network problem, outage of the Oracle server, or outage of the database host system itself. NCM will restart this job automatically once the connectivity problem has been remedied.
For information about configuring email notification, see the User Guide for CiscoWorks Network Compliance Manager 1.7.
System Administration 47
To troubleshoot this problem, make sure:
1 The host that the server cannot connect to is up and running.
2 The Oracle instance on that host is running.
3 From a command line enter ping <host> to ensure that network connectivity exists between servers.
4 From a command line enter tnsping <OTHER_SID> to ensure that Oracle is accepting connections.
5 Ensure that database links are working:
• Using SQLPlus, enter SELECT CURRENT_TIMESTAMP FROM DUAL@<OTHER_SID>;
• Using SQLPlus, enter SELECT DBLINK FROM DBA_REPSITES;
Failures of any of these steps will point to corrective actions needed.
Fixed Replication Job
Event format:
Job ID: <ID> Job Type: <push to host, purge, or repcat admin> Database Host: <hostname> Database SID: <SID>
This event is sent when the system detects that a previously broken job is now working correctly. This could happen when network connectivity is restored between two database servers, allowing data to be replicated. No action is required when this happens.
NCM sends this event when it encounters a replication error that it cannot resolve on its own. In general, NCM attempts to resolve conflicts automatically. Certain conflict types cannot be resolved using Oracle's built-in methods, but can be resolved by NCM after they occur. In particular, UPDATE conflicts due to out-of-order transactions, causing a primary key or foreign key constraint violation, can be resolved by re-executing the transaction after a short wait.
Additionally, conflicts due to UPDATES of items that have already been deleted can by resolved by removing the failed transaction. These two actions are taken by NCM during its regular replication monitoring run, which happens at several minute intervals. If these corrective actions do not fix the problem, an event is sent.
Typically, to fix an UPDATE error requires editing the object in question to set its values to those expected by the transaction, and then re-executing the transaction (also known as retrying the error). To do this:
1 Open the View Distributed Error page and click the Details option in the Actions column. All of the database attributes of the affected object are displayed. See Distributed Conflict List on page 53.
This event is only sent when the correction occurs while NCM is running. If NCM is stopped while the problem is corrected, when NCM is restarted no event is sent.
48 Chapter 3
2 Locate the object in the NCM system (or simply update the database directly using SQLPlus or some other tool), and change all of its attributes to those listed in the Original Value column on the View Distributed Error Details page.
3 Retry the error.
Uniqueness Conflict
Event format: Server: <host> Object: <Object> Conflicting Value: <value> Refer to the replication documentation for instructions on correcting this conflict.
This event is sent when NCM detects a conflict in a uniqueness constraint. You will receive an event per NCM Core, since the conflicts are local to each NCM Core. To correct a naming conflict, go to one NCM Core and update the names for the affected objects. Both the renamed <NAME>.<SID> and <NAME> should be edited to force an update on the other NCM Cores.
To correct a rule priority conflict, go to the Device Password Rule Priority Reset page click the Reset Priority button. See Device Password Rule Priority Reset Page on page 55.
If this does not solve the problem, you will need to manually edit the rules on each NCM Core, setting the priority order correctly and verifying existence of correct rules. When finished, return to the Device Password Rule Priority Reset page and click the Reset Priority button.
Time Synchronization Warning
Event format:
Time difference: <N> seconds Local Core: <hostname> Remote Core: <hostname>
NCM replication conflict resolution depends on a latest timestamp method. To work correctly, this requires different NCM servers' clocks to differ by only a small amount. To correct this problem, make sure that the time is synchronized on the NCM server systems across the NCM Mesh.
System Administration 49
RMI Error
Event format:
Local Core: <hostname> Remote Core: <hostname> Error: <Exception text>
This error typically occurs when there are network problems between the NCM servers. To troubleshoot this problem, make sure:
1 The host that the server cannot connect to is up and running.
2 The NCM instance on that host is running.
3 From a command line, enter ping <host> to ensure that network connectivity exists between servers.
4 From a command line, enter telnet <host> to port 1099 (or whatever your RMI listen port is set to) to ensure that RMI connections are being accepted. If working correctly, you should get back some data that includes the text string “java.rmi.MarshalledObject”.
Failures of any of these steps will point to corrective actions needed, such as updating the RMI port being used in the Edit NCM Core page, or restarting NCM to make sure that the RMI port has been bound correctly and is not being used by another application.
Deferred Transactions Exceed Threshold
Event format:
Exceeded number of deferred transactions in threshold.
This event occurs when NCM determines that the deferred transaction queue, as reported by the DEFTRAN view, exceeds a certain threshold. This typically means that the NCM Core reporting this event cannot push transactions quickly enough to other NCM Cores.
To troubleshoot this issue:
1 Verify that network connectivity exists between the database servers in the NCM Mesh.
2 Verify that the network connections between the database servers in the NCM Mesh are not experiencing bandwidth congestion or other network issues.
Correcting these issues should enable the databases to catch up with their transaction pushes. In addition, reducing the amount of tasks or other operations on the NCM Cores can help the system recover more quickly.
Deferred LOBs Exceed Threshold
Event format:
Exceeded number of deferred LOBs in threshold.
This event is identical to Deferred Transactions Exceed Threshold event, except the view being monitored is the DEFLOB view.
50 Chapter 3
Using the NCM Distributed System Pages
When you install the Distributed System software, the NCM user interface includes specific Distributed System pages to help you monitor and administer the system.
Distributed Monitor Results Page
The Distributed Monitor Results page displays the overall health of the Distributed System. By default, the Distributed monitor runs every five minutes.
To open the Distributed Monitor Results page, on the menu bar under Admin select Distributed and click Monitor Results. The Distributed Monitor Results page opens.
NCM monitor several properties necessary for proper functioning of the Distributed System, including:
• RMI Connections — RMI (Remote Method Invocation) is Java's remote procedure call protocol. The distributed system makes RMI calls between NCM servers in the NCM Mesh to transfer information about scheduled tasks, system settings, software images, and so on.
• Scheduled Jobs — Oracle contains a job scheduler. Replication requires certain jobs be setup using that job scheduler. In particular, there are jobs on each NCM Core database that:
— Push transactions
— Purge previously pushed transactions from the log
— Handle administrative commands for replication
• Error Transactions — Error transactions are transaction that have been pushed from a remote server and for some reason were not able to execute correctly on the local server.
• Uniqueness Conflicts — Certain NCM database constraints restrict columns to unique values. In a distributed environment, these constraints can be violated when updates are made on two different NCM Cores where the unique column is set to the same value. These conditions are captured by the Replication Conflict Resolution System and logged. NCM cannot automatically resolve these conflicts. They must be resolved manually.
• Local NCM Core Definition — The local NCM Core must be able to determine which entry in the RN_CORE table it is. If the “The local core for this system is undefined.” error message is displayed, the CoreHostname property needs to be updated for the NCM Core. This can be done using the Edit Core page. For information, see Edit Core Page on page 54.
The CoreHostname value can be either the DNS, etc/hosts value, or an IP address. If you are using an NCM server with multiple IP addresses, you might need to tell NCM which IP address to use. This is done by adding the following setting to the distributed.rcx file:
The value A.B.C.D should be replaced with the appropriate NAT IP address for the NCM server and should match the RN_CORE table’s CoreHostname value for that NCM Core.
When this condition occurs, the NCM Management Engine’s log file will contain the following text: “Fatal error - could not assign local core.”
The distributed.rcx file is located in the same location as the appserver.rcx file. For the location of the files, see Oracle 11g: Adding a New NCM Core to an Existing NCM Mesh on page 27 or Oracle 10g: Adding a New NCM Core to an Existing NCM Mesh on page 29.
System Administration 51
Distributed Error List
The Distributed Error List page displays distributed transaction errors on the current NCM Core. This information is useful for finding error conditions that require administrative action. Keep in mind that all conflicts are displayed until they are:
• Manually resolved
• Automatically resolved by NCM
• Manually deleted without resolution (not recommended)
To open the Distributed Error List, on the menu bar under Admin select Distributed and click Error List. The Distributed Error List opens.
Distributed Error List Page Fields
View Distributed Error Page
The View Distributed Error page displays the detail for a particular distributed transaction error. This information is useful for providing the details necessary to correct the error.
Field Description
Transaction ID The ID of the transaction that was placed in the deferred error queue due to the conflict.
Call No. A transaction can update more than one row in the database. Each row will have a separate call number. For example, for a transaction that updates seven rows, there will be seven entries with the same Transaction ID, but different call numbers.
Package Name The name of the table on which the conflict occurred.
Proc Name The type of transaction, for example UPDATE or DELETE.
Source The database from which the transaction originated.
Status Statuses can include:
•new — This is a new error. The system has not attempted to deal with it yet. Keep in mind that certain types of errors require waiting for other transactions to complete before they can be retried.
•alert_sent — The system has sent an alert.
•to_retry — The system has noted this error and is waiting before retrying.
•old — The system noted the error and retried it. However, the retry did not work.
Actions You can select the following options:
•Detail — Opens the View Distributed Error page, where you can view details about the transaction in that row.
•Delete — Deletes the error from the database.
•Retry — Re-execute the transaction.
52 Chapter 3
To open the View Distributed Error page:
1 On the menu bar under Admin select Distributed and click Error List. The Distributed Error List opens.
2 In the Actions column, click the Detail option. The View Distributed Error page opens. The Details section displays the column(s) from the table named in the Package Name field that contains conflicting data.
Distributed Conflict List
The Distributed Conflict List page displays the uniqueness constraint conflict list. This provides information about uniqueness conflicts that will need to be manually corrected to ensure that the databases in the NCM Mesh are in sync.
To open the Distributed Conflict List, on the menu bar under Admin select Distributed and click Conflict List. The Distributed Conflict List opens.
Distributed Conflict List Page Fields
Field Description
Object The database table on which the conflict occurred.
Site Name The core in the NCM Mesh for which the conflict occurred (actually the database SID).
Value The value of the column for which there was a uniqueness conflict. Keep in mind that NCM does not automatically resolve uniqueness conflicts. NCM simply appends the name of the NCM Core from which the transaction originated to the conflicting value so that the transaction can complete.
Create Date The Date the conflict occurred.
Status Statuses include:
•new — This is a new conflict. The system has not yet alerted the system administrator.
•alert_sent — The system has sent an alert.
Actions You can select the following options:
•Detail — Opens the View Distributed Conflict page, where you can view details on an individual uniqueness constraint. See View Distributed Conflict Page on page 54.
•Delete — Deletes the conflict from the database.
System Administration 53
View Distributed Conflict Page
The View Distributed Conflict page provides details on a specific uniqueness constraint.
To open the View Distributed Conflict page:
1 On the menu bar under Admin select Distributed and click Conflict List. The Distributed Conflict List opens.
2 In the Actions column, click the Detail option. The View Distributed Conflict page opens.
Table Name is the name of the database table on which the uniqueness conflict occurred. Object IDs are the primary keys of the objects in the database.
If a key has only one column, it is displayed in Object ID 1 field. Some keys are formed from multiple columns. Consequently, those values are displayed in the Object ID 1, Object ID 2, and Object ID 3 fields.
Site Reassignment Page
The Site Reassignment page allows the Site-to-NCM Core mapping to be modified. This is useful for failover of Sites from one NCM Core to another and for restoring Sites back to their original NCM Core.
To open the Site Reassignment page, on the menu bar under Admin select Distributed and click Site Reassignment. The Site Reassignment opens. You can select NCM Cores from the drop-down menu.
List Cores Page
The List Cores page lists all NCM Cores in the NCM Mesh. This page provides information to properly manage the Distributed System.
To open the List Cores page, on the menu bar under Admin select Distributed and click Core List. The List Cores page opens.
List Cores Page Fields
Edit Core Page
The Edit Core page enables you to edit the NCM Core definition.
Field Description
Name The NCM Core’s name.
Core Hostname The hostname of the NCM Core's NCM server.
Is Master? Is the NCM Core the Master Definition? (Yes or No)
Timezone Offset The timezone offset of the actual NCM Core server.
Status Currently, there is only Normal status.
Realm The default Realm for the NCM Core.
Actions You can select the following option:
•Edit — Open the Edit Core page. See Edit Core Page on page 54.
54 Chapter 3
To open the Edit Core page:
1 On the menu bar under Admin select Distributed and click Core List. The List Cores page opens.
2 In the Actions column, click the Edit option. The Edit Core page opens.
You can complete the following fields:
• Name — Enter the NCM Core name.
• Database Identifier — Enter the Database Identifier. This is the name of the NCM Core’s database as it appears in the tnsnames.ora file. The Database Identifier is corresponds to Oracle's SID (System Identifier). This information is needed to make connections to a particular Oracle instance on a server. Multiple instances may be running on any given server, but each will have different SIDs.
• Core Hostname - Enter the hostname of this NCM Core’s server.
• RMI Port — Enter the RMI port. RMI (Remote Method Invocation) is Java's remote procedure call protocol. The distributed system makes RMI calls between NCM servers in the NCM Mesh to transfer information about scheduled tasks, system settings, software images, and so on.
• Database hostname — Enter the Database hostname.
• Database Port — Enter the port on the database server with which NCM communicates with the database.
• Timezone Offset — Select a Timezone offset from the drop-down menu.
• Replication Admin User — Enter the name of the Replication Admin user. The Replication Admin user is created and used by the Oracle database to manage replication.
• Replication Password — Enter the Replication Admin user’s password.
• Realm Name — Enter the Realm in which the NCM Core resides. For information about segmenting devices, see the User Guide for CiscoWorks Network Compliance Manager 1.7.
Device Password Rule Priority Reset Page
The Device Password Rule Priority Reset page enables you to reset device password rule priorities in the event that a uniqueness constraint conflict occurs for those objects.
To open the Reset Password Priority page, on the menu bar under Admin select Distributed and click Device Password Rule Priority Reset. The Device Password Rule Priority Reset page opens.
Click the Reset Priority button to reset the device password rule priorities.
Renew Configuration Options Page
The Renew Configuration Options page enables you to reset the configuration options when the configuration options on an NCM Core become out-of-sync with other servers in the NCM Mesh.
To open the Renew Configuration Options page, on the menu bar under Admin select Distributed and click Renew Configuration Options. The Renew Configurations Options page opens.
Click the Renew Config Options button to ensure that all options on the NCM Core are in sync with the rest of the NCM Mesh.
System Administration 55
56 Chapter 3
4 Failover and Recovery
This chapter contains the following topics:
• Failover on page 57
• Recovery on page 57
Failover
When the network has been configured to failover, if an NCM Core fails, users can continue to access all data in the system using a different NCM Core. All Sites that were originally managed by the failed NCM Core can be pointed to a new NCM Core using the Site Reassignment page. For information, see Site Reassignment Page on page 54. Procedures for system recovery will vary depending on how the remote server failed.
Recovery
There are three basic recovery scenarios:
• Loss of network connectivity
• Loss of an NCM server
• Loss of a Database server
Loss of Network Connectivity
In the case of lost network connectivity, failover occurred due to network issues. No problems occurred with the NCM server or with the Oracle database server. Recovery consists of the following steps:
1 Resolve the network issues.
2 Reset Sites that had been reassigned back to their original NCM Core. This can be accomplished in NCM. See Site Reassignment Page on page 54.
3 If any drivers have been added to the system during the outage, click the “Reload Drivers” button on the Start/Stop Services page. This action reloads the driver files and pushes them across to other NCM Cores in the NCM Mesh. This action should be performed on the NCM server where the drivers were added. For information, see the User Guide for CiscoWorks Network Compliance Manager 1.7.
4 If any system settings have been modified during the outage, use the “Renew Config Options” page to make sure options are synced across the NCM Mesh. See Renew Configuration Options Page on page 55.
Failover and Recovery 57
5 If any NCM Cores have lost connectivity for a long period of time, restart the NCM Core server that lost connectivity after data sync so as to reload certain Site data and avoid exception errors due to obsolete data.
Once the network issues are resolved, the system should recover as replication syncs data between the databases.
Loss of an NCM Server
In cases where the NCM server suffers a failure that requires re-installation of the server, recovery consists of the following steps:
1 During NCM installation, select the “Use existing database” option. In addition, the database selected should be the one the failed server was previously using.
2 Add the distributed.rcx file from the ReplicationScriptToolBundle to the directory where the appserver.rcx file resides.
3 Re-add any NCM Core-specific special case options for patches and support issues.
4 Restart NCM.
5 Reset Sites that had been re-assigned back to their original NCM Core. This can be accomplished in NCM. See Site Reassignment Page on page 54.
6 If any drivers have been added to the system during the outage, click the “Reload Drivers” button on the Start/Stop Services page. This action reloads the driver files and pushes them across to other NCM Cores in the NCM Mesh. This action should be performed on the NCM server where the drivers were added. For information, see the User Guide for CiscoWorks Network Compliance Manager 1.7.
7 If any system settings have been modified during the outage, use the “Renew Config Options” page to make sure options are synced across the NCM Mesh. See Renew Configuration Options Page on page 55.
8 Edit the original NCM Core to modify any parameters that may be different (perhaps the installation happened on a new server with a different hostname).
9 Copy the software images repository from a good NCM Core to the recovered NCM Core.
Loss of a Database Server
In the case of a lost database server, the NCM server is still running but cannot access the database. The database will need to be rebuilt and replication setup again on the database. Recovery consists of the following steps:
1 Pause or delete any tasks that appear to be stuck waiting or pending and not running because they are associated with the lost server. You can perform this action on another NCM server in the NCM Mesh.
2 If the server that was lost is the Master Definition server for replication, the procedure described for relocating the Master Definition server should performed. See Changing the Master Definition Site on page 34.
3 For instructions on adding a new NCM Core, see Oracle 11g: Adding a New NCM Core to an Existing NCM Mesh on page 27 or Oracle 10g: Adding a New NCM Core to an Existing NCM Mesh on page 29.
4 Reset Sites that had been reassigned back to their original NCM Core. This can be accomplished in NCM. See Site Reassignment Page on page 54.
5 In NCM, edit the NCM Core that was recovered to make sure all information is correct for the new setup. For information, see the User Guide for CiscoWorks Network Compliance Manager 1.7.
58 Chapter 4
5 Troubleshooting
This chapter contains the following topics:
• RMI Errors in the NCM Console on page 59
• Oracle Replication Setup on page 60
• Replication Tools and Commands on page 60
• Common Errors on page 61
RMI Errors in the NCM Console
An RMI error that prevents NCM console logon or inhibits use of the NCM console can mean that NCM is unable to identify the localhost. To correct the problem, update the localhost section of the hosts file on each NCM application server as follows:
1 In a text editor such as WordPad or vi, open the following file:
3 For each NCM application server, add a line in the following format:
<xx.xx.xx.xx> <NCM.example.com> <NCM>
• Replace <xx.xx.xx.xx> with the IP address of the NCM application server.
• Replace <NCM.example.com> with the fully-qualified domain name of the NCM application server.
• Replace <NCM> with the short hostname of the NCM application server.
4 Repeat step 3 until the hosts file includes all NCM application servers in the distributed system environment.
5 To use the updated hosts information, restart the NCM application server.
This solution is for static IP environments only.
Troubleshooting 59
Oracle Replication Setup
The Oracle replication setup process is complicated. The following guidelines help prevent problems with replication setup.
• Ensure that the tnsnames.ora file is setup correctly on each system. You can verify correct setup by running SQLPlus on each system to make certain that you can connect to other databases. For example, if you have two systems (A and B), run SQLPlus on A to connect to the database on B using the following command: sqlplus USER/PWD@DATABASE_B.
• It may be necessary to remove or comment out the NAMES.DEFAULT_DOMAIN property entry from the sqlnet.ora file for the appropriate connections to work. Consult with your Oracle DBA if you have questions.
• If the replication setup process fails at any step, it is recommended that you follow the process for removing replication from the entire NCM Mesh (see Removing Replication Across the Entire NCM Mesh on page 35), and then follow the replication setup sets again (see Oracle 10g: Set Up Initial Replication on page 23).
Replication Tools and Commands
The following tools and commands can help to isolate problems with replication setup.
To ensure that database links are working:
• Using SQLPlus, enter: SELECT CURRENT_TIMESTAMP FROM DUAL@<OTHER_SID>;
• Using SQLPlus, enter: SELECT DBLINK FROM DBA_REPSITES;
• From a command line, enter: tnsping <OTHER_SID>
• From a command line, enter: ping <HOST>
To ensure the replication group is working:
• Using SQLPlus, enter: SELECT GNAME,STATUS FROM DBA_REPGROUP;
To ensure there are no errors for replication admin requests:
• Using SQLPlus, enter: SELECT STATUS,REQUEST,ONAME FROM DBA_REPCATLOG;
60 Chapter 5
Common Errors
Some errors can occur during replication setup. Ones that have been reported are noted below, with suggested corrective action. In some cases, it might be necessary to remove replication across the NCM Mesh and re-setup replication. For information, see Removing Replication Across the Entire NCM Mesh on page 35.
ORA-23419: regenerate replication support before resuming master activity
...
Corrective Action
An internal Oracle error has prevented replication support from being generated correctly for one or more objects. To correct this, it will be necessary to remove and re-setup replication for the NCM Mesh.
Error
ORA-23374: object group "PUBLIC"."REPLNA" already exists ORA-06512: at "SYS.DBMS_SYS_ERROR", line 95 ORA-06512: at "SYS.DBMS_REPCAT_MAS", line 798 ORA-06512: at "SYS.DBMS_REPCAT", line 548
Corrective Action
An internal Oracle error has prevented replication support from being generated correctly for one or more objects. To correct this, it will be necessary to remove and re-setup replication for the NCM Mesh. For information, see Removing Replication Across the Entire NCM Mesh on page 35.
Error
BEGIN DBMS_REPCAT.DROP_MASTER_REPOBJECT('SYSTEM', 'RN_DEVICE_VIEW','TABLE',FALSE) ; END;
*
ERROR at line 1:
ORA-00060: deadlock detected while waiting for resource
...
Corrective Action
Rerun the deletion script you were running when this occurred. You may see other errors due to certain actions already having been done, but that is expected.
Troubleshooting 61
Error
BEGIN DBMS_REPCAT.DROP_MASTER_REPOBJECT('SYSTEM',' RN_DEVICE_VIEW','TABLE',FALSE) ; END;
*
ERROR at line 1:
ORA-23308: object SYSTEM.RN_DEVICE_VIEW does not exist or is invalid
...
Corrective Action
Rerun the deletion script you were running when this occurred. You may see other errors due to certain actions already having been done, but that is expected.
62 Chapter 5
6 Restoring NCM Replication After Upgrading to Oracle 11g
This appendix describes the process for upgrading the database of an CiscWorks Network Compliance Monitor (NCM) Multimaster Distributed Sytem from Oracle 10g to Oracle 11g, including how to restore NCM replication after the upgrade. At a high level, the process involves the following steps:
1 Remove replication, which creates standalone NCM cores.
2 Upgrade the database.
3 Set up replication using the database from only one of the NCM cores.
Prerequisites
Before upgrading the Oracle database in a NCM Multimaster Distributed System, verify that the following prerequisites have been met:
• The existing NCM database user name is a custom value (not SYSTEM). If the NCM schema is currently owned by the SYSTEM user, consider doing a fresh installation of the NCM Multimaster Distributed System on Oracle 11g.
• NCM database replication is correctly configured and working with Oracle 10g for all cores in the NCM mesh.
• The ReplicationScriptTool bundle files are installed on a Java-capable system.
• The information listed in Table 1 on page 11 is available. If the NCM mesh is larger than two cores, also collect the information for the additional cores.
Database Upgrade Process
To upgrade the database from Oracle 10g to Oracle 11g within a NCM mesh, follow this process:
1 Stop the NCM management engine on all NCM application servers:
• Windows: Open the Services control panel. In the list of services, right-click TrueControl ManagementEngine, and then click Stop.
• UNIX: Run the following command:
/etc/init.d/truecontrol stop
If you also plan to upgrade the NCM software, do not mix that upgrade with the database upgrade. Upgrade NCM to version 1.7.1 and verify that replication works correctly before upgrading the database.
Restoring NCM Replication After Upgrading to Oracle 11g 63
2 Remove all replication from the NCM mesh.
a If the NCM mesh consists of three or more cores, remove the additional cores as described in Removing a NCM Core from an Existing NCM Mesh on page 33.
Note the following:
— On each NCM application server, move the distributed.rcx file to a location outside of <NCM_HOME>.
— Do not uninstall the NCM application.
b Remove replication from the final two cores in the NCM mesh as described in Removing Replication Across the Entire NCM Mesh on page 35.
Note the following:
— On each NCM application server, move the distributed.rcx file to a location outside of <NCM_HOME>.
— Do not uninstall the NCM application.
3 Verify that each NCM core behaves as a standalone instance of NCM:
Enter the following commands: CONNECT <USER>/<PASSWORD>@<MASTER1_SID>; UPDATE RN_CORE SET COMMENTS = ‘Test2 from sid1’ where CoreID=1; COMMIT; wait 10 to 30 seconds CONNECT <USER>/<PASSWORD>@<MASTER2_SID>; SELECT Comments from RN_CORE where CoreID=1;
Enter this from every NCM Core in the NCM Mesh. Check the values each time on all of the other NCM Cores to ensure that no replication exists among the databases that were formerly in the system.
4 Upgrade each database server to a supported version of Oracle 11g.
5 Prepare Master 1 for replication as described in Task 3: Prepare Master 1 for Replication (Oracle 11g) on page 16.
6 Prepare Master 2 for replication as follows:
a With the NCM management engine on NCM2 shut down, log on to Master 2 as the SYS user, and then delete the NCM database user while retaining the NCM tablespace.
For example, in the Oracle Enterprise Manager (preferred), delete nauser, or at the sqlplus prompt, enter the following command:
DROP USER nauser CASCADE;
b On Master 2, verify that the NCM tablespace is now empty.
c Beginning with step 2 on page 18, complete the steps of Task 4: Prepare Master 2 for Replication (Oracle 11g).
7 Prepare additional database servers by repeating step 6 for each database server that was previously in the NCM mesh.
Use the cascade delete option to completely delete the user and empty its tablespace.
The NCM tablespace exists from the prior replication setup. Do not create it at this time.
64 Appendix 6
8 Configure replication between Master 1 and Master 2 as described in Task 5: Configure Replication (Oracle 11g) on page 19.
In the ReplicationScriptTool.properties file, mode should be set to initial.
9 With the NCM management engines on NCM1 and NCM2 shut down, on each of NCM1 and NCM2, move the distributed.rcx file from the known location outside of <NCM_HOME> to the following directory:
• Windows: <NCM_HOME>\jre
• UNIX: <NCM_HOME>/jre
10 Start the NCM management engines on both application servers, NCM1 and NCM2:
• Windows: Open the Services control panel. In the list of services, right-click TrueControl ManagementEngine, and then click Start.
• UNIX: Run the following command:
/etc/init.d/truecontrol restart
11 Connect to the NCM console on both application servers, NCM1 and NCM2, (as user nauser), and ensure that there are no issues.
12 Verify the NCM installation:
a Edit an object on one NCM server (for example, a Comments field for a device).
b Wait a minute and then verify that the updated comment exists on the second server.
c Check the status of the Oracle Distributed Monitor in the NCM console to ensure that no problems are being reported. (For information, see Distributed Monitor Results Page on page 51.) It could take up to five minutes for this monitor to initially run.
13 For each additional database server that was previously in the NCM mesh, configure replication as described in Task 5: Configure Replication (Oracle 11g) on page 19.
Note the following differences:
• Substitute “Master 3” for each reference to “Master 2.”
• For step 4 on page 19, use the ReplicationScriptTool.properties file from setting up replication between Master 1 and Master 2.
— Verify the server information for the initial core and second master site.
— Uncomment the Additional Master site configuration area, and replace the text README with the appropriate value for that variable. Use the fully-qualified hostnames to identify the database and application servers. For example:
An RMI error message at this point can mean that NCM is unable to identify the localhost. For more information, see RMI Errors in the NCM Console on page 59.
Restoring NCM Replication After Upgrading to Oracle 11g 65
— Set the mode to add_server.
— For step 13 on page 21, the spool file contains the following acceptable warning that occurs after the DBMS_REPCAT.SUSPEND_MASTER_ACTIVITY command: 'ORA-23326: object group <yourgroup>.<your_replication_ group> is quiesced'
14 With the NCM management engine on the newly added NCM application servers shut down, on each newly added NCM application server, move the distributed.rcx file from the known location outside of <NCM_HOME> to the following directory:
• Windows: <NCM_HOME>\jre
• UNIX: <NCM_HOME>/jre
15 Start the NCM management engine on each newly added NCM application server:
• Windows: Open the Services control panel. In the list of services, right-click TrueControl ManagementEngine, and then click Start.
• UNIX: Run the following command:
/etc/init.d/truecontrol restart
16 Connect to the NCM console on each newly added application server (as user nauser), and ensure that there are no issues.
17 Verify the NCM installation:
a Edit an object on one NCM server (for example, a Comments field for a device).
b Wait a minute and then verify that the updated comment exists on the other servers in the NCM mesh.
c Check the status of the Oracle Distributed Monitor in the NCM console to ensure that no problems are being reported. (For information, see Distributed Monitor Results Page on page 51.) It could take up to five minutes for this monitor to initially run.
18 Optional. Add new cores (up to the supported limit) to the NCM mesh as described in Oracle 11g: Adding a New NCM Core to an Existing NCM Mesh on page 27.
An RMI error message at this point can mean that NCM is unable to identify the localhost. For more information, see RMI Errors in the NCM Console on page 59.
66 Appendix 6
7 Restoring NCM Replication After Upgrading to Oracle 10g
This appendix includes the steps for upgrading from Oracle 9i (9.2.0.1) to Oracle 10g (10.2.0.4), including how to restore NCM replication after the upgrade.
Getting Started
Before upgrading from Oracle 9i (9.2.0.1) to Oracle 10g (10.2.0.4), do the following:
1 Make sure that a current NCM 1.3 Oracle 9i (9.2.0.1) database is running on all Masters.
2 Make sure that the ReplicationScriptTool bundle files are installed on a Java-capable system.
3 Obtain the following information:
• Login/password/SID for NCM into all databases in the NCM Mesh.
• The replication password for the existing ‘repadmin’ user.
• DatabaseIdentifier (SID), NCM server hostname, NCM server RMI listening port, database hostname, and database listening port for all Masters.
• The time zone offset (integer from UTC) for the entire NCM Mesh. This must be a constant across the NCM Mesh.
• The existing replication group name.
Removing Replication Before Upgrading the Database
To remove replication across the entire NCM Mesh, do the following:
1 Modify all NCM Sites to point to a NCM Core that is the Master Definition Site.
2 Shut down all NCM management engines so as to remove replication across the entire NCM Mesh.
3 Update the variables for all Masters in the ReplicationScriptTool.properties file. Ensure that you modify all “REPLACEME” text entries in the ReplicationScriptTool.properties file with the appropriate values for your environment.
4 Run the ReplicationScriptTool using the following command: java -classpath . ReplicationScriptTool.
The Master Definition Site must be the first entry. In addition, be sure to update the replication user, password, and the replication group name as needed. Also, make sure the “mode” property is set to “delete”.
Restoring NCM Replication After Upgrading to Oracle 10g 67
5 Make sure that you have a server and directory (typically on one of the database systems) where you can run a copy of SQLPlus that can access all NCM Cores in the NCM Mesh. To verify this, connect to a database with SQLPlus and issue the CONNECT <USER>/<PASSWORD>@<SID> command for each unique SID in the NCM Mesh. This is necessary because the script issues CONNECT commands to change which database it is running procedures against.
6 Copy the newly generated SQLPlus file (typically named ReplicationScript.sql, depending on what value was set in the ReplicationScriptTool.properties file), from the ReplicationScriptTool working directory to the server and directory where you plan to run SQLPlus.
7 Ensure that you have two SQLPlus windows open before running the script: One SQLPlus window connected as the NCM user and one connected as the SYSTEM user.
8 Run the replication script copied in Step 6 above in the SQLPlus window connected as the NCM user using @ReplicationScript.sql.
9 Follow the instructions provided by the script at several points as it runs. This includes running other commands in the second SQLPlus window to verify that certain operations necessary for later steps in the script have completed.
10 Exit SQLPlus once the script completes. This ensures that all actions are logged to the Spool file.
11 Verify that the replication has been removed correctly. Make sure:
• The Spool file generated by running the replication SQLPlus script contains no errors.
• Verify (using the Oracle Enterprise Manager) that each database in the NCM Mesh does not have replication setup. If needed, consult your Oracle DBA for assistance.
12 Remove the distributed.rcx file from each NCM server.
13 Restart the NCM servers that point to the Master Definition Site. Make sure all of the NCM Core changes are complete. Check to see that the devices are associated with NCM Sites that map to the NCM Core, as needed.
14 Once again, shut down the NCM management engines that point to the Master Definition Site.
15 Upgrade the Oracle database from 9i (9.2.0.1) to 10g (10.2.0.4), including the database for the Master Definition Site. If needed, consult your Oracle DBA for assistance.
Restoring NCM Replication After Upgrading to Oracle 10g
To restore NCM replication, do the following:
1 Dump the Master Definition Site database using the following command: EXP <USER>/<PASSWORD>@<MASTER1_SID> TABLES=RN_% FILE=<filename> where <USER>, <PASSWORD>, and <MASTER1_SID> were collected in Step 3 in the “Getting Started” section. For information, see Getting Started on page 67. (For information about the Data Pump Utility, see Oracle 10g Data Pump Utility on page 75.)
Make sure any files named “*_spool.txt” do not exist in the directory. When run, the script will log its actions to a file with that suffix.
Only the Master Definition Site database is used for restoring replication.
Log the output of this command to a file for examination later if needed.
68 Appendix 7
2 Set up replication again with the existing data from Step 1 above. For instructions on how to set up initial replication, see Oracle 10g: Set Up Initial Replication on page 23.
3 After finishing initial replication setup, update the RN_CORE table on one of the NCM Cores to make sure it includes the correct information in all columns regarding the new replication system. If needed, consult your Oracle DBA for assistance.
Create a NCM 1.3 database on Oracle 10g (10.2.0.4) so as to have an up-to-date NCM 1.3 database for replication. This is an added step in Prepare for Initial Replication on page 9. You could receive an error message regarding the RN_CORE table during initial replication setup. You can ignore this error message. However, you will need to manually update the RN_CORE table after restoring replication. Use the following command to create a NCM 1.3 database on Oracle 10g (10.2.0.4): IMP <USER>/<PASSWORD>@<MASTER2_SID> TABLES=RN_% FILE=<filename> where <USER>, <PASSWORD>, and <MASTER2_SID> were collected in the initial replication setup.
Restoring NCM Replication After Upgrading to Oracle 10g 69
70 Appendix 7
8 Extracting Data from the NCM Database
This appendix includes the steps for extracting information about the Multimaster Mesh from the NCM database.
To extract this data from the NCM database, run the following SQL queries against the NCM database. The query will return multiple rows, one row for each database core.
For the NCM application server hostname, run the following:
SELECT CoreHostname FROM RN_CORE;
For the NCM application server RMI listening port, run the following:
SELECT CoreRMIPort FROM RN_CORE;
For the Database Identifier (SID), run the following:
SELECT DatabaseIdentifier FROM RN_CORE;
For the NCM database server hostname, run the following:
SELECT DatabaseHostname FROM RN_CORE;
For the NCM database server listening port, run the following:
SELECT DatabasePort FROM RN_CORE;
For the Timezone offset, run the following:
SELECT TimezoneOffset FROM RN_CORE;
For the Replication User Name, run the following:
SELECT ReplicationAdminUser FROM RN_CORE;
For example, in a two NCM Core Multimaster Mesh, run the following queries: SELECT CoreHostname FROM RN_CORE; SELECT CoreRMIPort FROM RN_CORE; SELECT DatabaseIdentifier FROM RN_CORE; SELECT DatabaseHostname FROM RN_CORE; SELECT DatabasePort FROM RN_CORE; SELECT TimezoneOffset FROM RN_CORE; SELECT ReplicationAdminUser FROM RN_CORE;
This information is also available on the appropriate Edit Core page. For information, see Edit Core Page on page 54.
Extracting Data from the NCM Database 71
You will receive the following:
SQL> SELECT CoreHostname FROM RN_CORE; COREHOSTNAME ---------------------------- 10.255.132.177 10.255.136.203 SQL> SELECT CoreRMIPort FROM RN_CORE; CORERMIPORT ---------------------------- 1099 1099 SQL> SELECT DatabaseIdentifier FROM RN_CORE; DATABASEIDENTIFIER ----------------------------- core1 core2 SQL> SELECT DatabaseHostname FROM RN_CORE; DATABASEHOSTNAME ----------------------------- 10.255.55.30 10.255.56.30 SQL> SELECT DatabasePort FROM RN_CORE; DATABASEPORT ----------------------------- 1521 1521 SQL> SELECT TimezoneOffset FROM RN_CORE; TIMEZONEOFFSET ----------------------------- -8 -8 SQL> SELECT ReplicationAdminUser FROM RN_CORE; REPLICATIONADMINUSER ----------------------------- repadmin repadmin
72 Appendix 8
From this data, you can start filling out the ReplicationScriptTool.properties file as follows:
# This .0 server will be the master definition site, and is the default # initial core installed. db.server.0=10.255.55.30 db.port.0=1521 db.name.0=core1 db.username.0=admin db.password.0=rendition app.server.0=10.255.132.177 app.rmiport.0=1099 app.corename.0=Core 1
# Second Master site db.server.1=10.255.56.30 db.port.1=1521 db.name.1=core2 db.username.1=admin db.password.1=rendition app.server.1=10.255.136.203 app.rmiport.1=1099 app.corename.1=Core 2
# From UTC timezone_offset=-8 replication_user=repadmin replication_password=<YOU WILL NEED TO GET THIS FROM YOUR DBA> replication_group_name=<YOU WILL NEED TO GET THIS FROM YOUR DBA>
Extracting Data from the NCM Database 73
74 Appendix 8
9 Oracle 10g Data Pump Utility
For Oracle 10g databases, Oracle supports the Data Pump Utility. You can use the Data Pump Utility to transfer data from one database to another without staging the data on the disk. This improves performance dramatically over the Export/Import Utility.
To transfer data between two NCM Cores and two Oracle 10g databases:
1 Edit the tnsnames.ora files for two databases in two NCM Cores to include database information to the other NCM Core. Run the following commands: sqlplus SYSTEM/<SYS_PASSWORD>@<MASTER2_SID> CREATE DIRECTORY <DIR_NAME> AS ’<DIR_PATH>’; GRANT ALL ON DIRECTORY <DIR_NAME> TO PUBLIC; CREATE DATABASE LINK <DBLINK> CONNECT TO <USER> IDENTIFIED BY <PASSWORD> USING ’<CONNECTSTRING>’; Where:
• <DIR_NAME> and <DIR_PATH> is a directory for logs.
• <USER> is the user NCM uses to connect the database.
• <MASTER2_SID> is the SID of the destination NCM Core.
• <SYS_PASSWORD> and <PASSWORD> are the appropriate passwords.
2 Run the Data Pump Utility on the destination database where you want to import data. $ IMPDP <USER>/<PASSWORD>@<MASTER2_SID> TABLES='<USER>.RN_%' DIRECTORY=<DIR_NAME> NETWORK_LINK=<DBLINK>
Be sure to check the logging information under the directory <DIR_NAME> for any Data Pump Utility error messages.
3 To complete the setup, return to Installation, Setup, and Upgrading on page 9.
The connect string can be found with Oracle Net Manager.
<DBLINK> is the name of the remote database link to the source system that you created with CREATE DATABASE LINK in Step 1.