22
High Definition Satellite Receiver الوضوح عاليةHD بتقنيةستقبال ا جهازOperating Manual Humax HD-1000S تشغيــل اليــل دلHumax HD-1000S
| Date post: | 13-Jul-2018 |
| Category: |
Documents |
| Upload: | nguyenduong |
| View: | 235 times |
| Download: | 2 times |

High Defi nition Satellite Receiver جهاز استقبال بتقنية HD عالية الوضوح
Operating ManualHumax HD-1000S
دليــل التشغيــلHumax HD-1000S
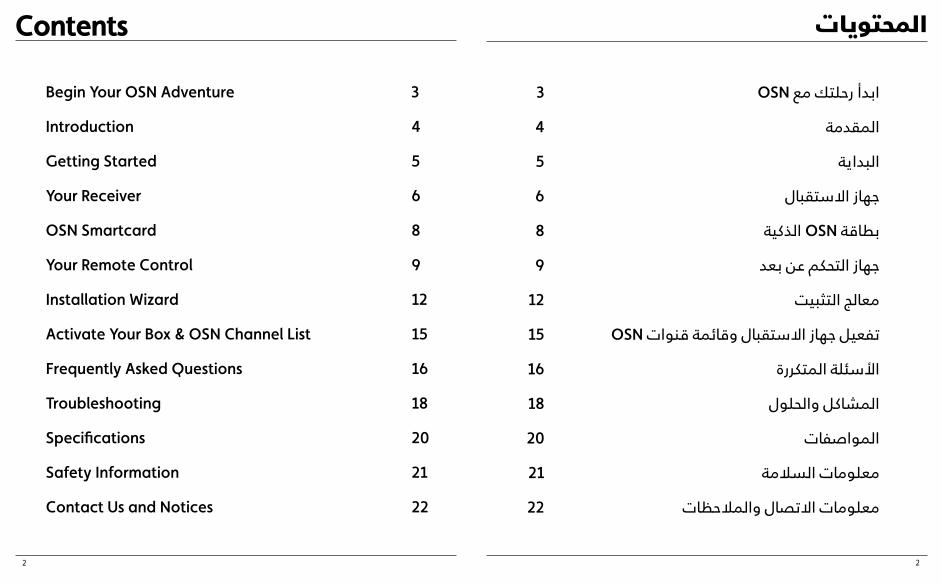
Begin Your OSN Adventure 3
Introduction 4
Getting Started 5
Your Receiver 6
OSN Smartcard 8
Your Remote Control 9
Installation Wizard 12
Activate Your Box & OSN Channel List 15
Frequently Asked Questions 16
Troubleshooting 18
Specifications 20
Safety Information 21
Contact Us and Notices 22
Contents
3 OSN ابدأ رحلتك مع
4 المقدمة
5 البداية
6 جهاز االستقبال
8 بطاقة OSN الذكية
9 جهاز التحكم عن بعد
12 معالج التثبيت
15 OSN تفعيل جهاز االستقبال وقائمة قنوات
16 األسئلة المتكررة
18 المشاكل والحلول
20 المواصفات
21 معلومات السالمة
22 معلومات االتصال والمالحظات
المحتويات
2 2

OSN ابدأ رحلتك معBegin your OSN AdventureWelcome to the wonderful world of OSN Entertainment. Follow the instructions in this booklet to get your new OSN HD box installed and activated to receive OSN channels.
If you need expert help a fully trained OSN technicians can provide a full installation and setup service including a dish. To book a technician see the Contact us page for your local number.
Once you’ve got your new box installed don’t forget to activate it to get the most out of your OSN entertainment experience. Activating is quick and easy, simply visit osn.com/activate or if you have any problems call our customer service centre for help.
Enjoy!
3 3
أهاًل بك في عالم الترفيه األروع من OSN. اتبع التعليمات الموجودة في هذا الدليل للقيام بتركيب وتفعيل جهاز .OSN للحصول على قنوات OSN HD استقبال
إذا كنت تحتاج إلى مساعدة سيقوم أحد خبرائنا الفنيين الخاضعين لتدريب شامل بتركيب وإعداد خدمة جهازك باإلضافة إلى الصحن الالقط. لحجز موعد مع خبير فني اذهب إلى صفحة معلومات االتصال للحصول على الرقم المحلي.
.OSN عند االنتهاء من تركيب وإعداد جهاز استقبالك ال تنس تفعيله لتستمتع بأفضل تجربة ترفيهية من
إن إجراء التفعيل سهل وسريع، تفضل بزيارة osn.com/activate أو إذا واجهتك أي مشكلة اتصل على مركز خدمة العمالء لطلب المساعدة.
OSN نتمنى لك أحلى األوقات مع
البيئة:
التغليف:عند التخلص من حزمة تغليف
هذا المنتج، الرجاء إعادة تدويرها.
مع إعادة التدوير سينقص الطلب على لّب المواد الخشبية الخام،
وبالوقت ذاته يتم تحويل هذه المواد الستعمالها مرة أخرى بداًل من
استخدامها كمواد لردم األرض.
المنتج والبطاريات:
الرجاء إعادة التدوير- ال تقم برمي هذا الجهاز أو بطاريات
جهاز التحكم في نفاية منزلك.
بعد انتهاء المنتج والبطاريات من عملهم المفيد، يمكن االستفادة من المواد التي تكونها إذا تمت معالجتها
بشكل صحيح إلعادة تصنيعها وتدويرها. وبإعادة تدوير هذا المنتج والبطاريات، سيتم إنقاص الحاجة
لمواد خام جديدة باإلضافة إلنقاص كمية المواد التي قد تنتهي في ردم األرض. وبهذه العملية يتم المساعدة
في منع احتمالية حدوث نتائج سلبية للبيئة وصحة البشرية.
Introduction
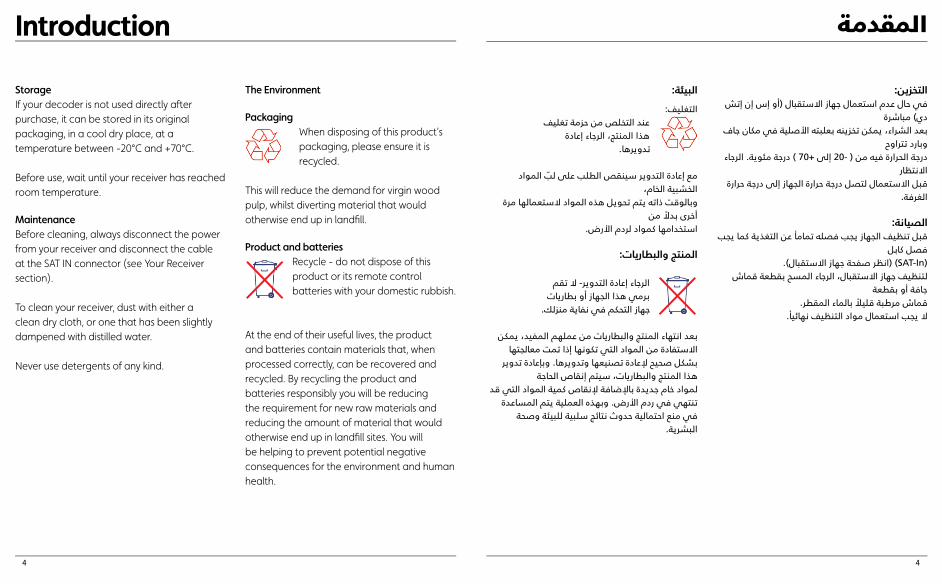
StorageIf your decoder is not used directly aft er purchase, it can be stored in its original packaging, in a cool dry place, at a temperature between -20°C and +70°C.
Before use, wait until your receiver has reached room temperature.
Maintenance Before cleaning, always disconnect the power from your receiver and disconnect the cable at the SAT IN connector (see Your Receiver section).
To clean your receiver, dust with either a clean dry cloth, or one that has been slightly dampened with distilled water.
Never use detergents of any kind.
The Environment
PackagingWhen disposing of this product’s packaging, please ensure it is recycled.
This will reduce the demand for virgin wood pulp, whilst diverting material that would otherwise end up in landfi ll.
Product and batteries Recycle - do not dispose of this product or its remote control batteries with your domestic rubbish.
At the end of their useful lives, the product and batteries contain materials that, when processed correctly, can be recovered and recycled. By recycling the product and batteries responsibly you will be reducing the requirement for new raw materials and reducing the amount of material that would otherwise end up in landfi ll sites. You will be helping to prevent potential negative consequences for the environment and human health.
المقدمة
التخزين:في حال عدم استعمال جهاز االستقبال )أو إس إن إتش
دي( مباشرةبعد الشراء، يمكن تخزينه بعلبته األصلية في مكان جاف
وبارد تتراوحدرجة الحرارة فيه من ) -20 إلى +70 ( درجة مئوية. الرجاء
االنتظارقبل االستعمال لتصل درجة حرارة الجهاز إلى درجة حرارة
الغرفة.
الصيانة:قبل تنظيف الجهاز يجب فصله تمامأ عن التغذية كما يجب
فصل كابل)SAT-In( )انظر صفحة جهاز االستقبال(.
لتنظيف جهاز االستقبال، الرجاء المسح بقطعة قماش جافة أو بقطعة
قماش مرطبة قلياًل بالماء المقطر.ال يجب استعمال مواد التنظيف نهائيأ.
4 4
البداية
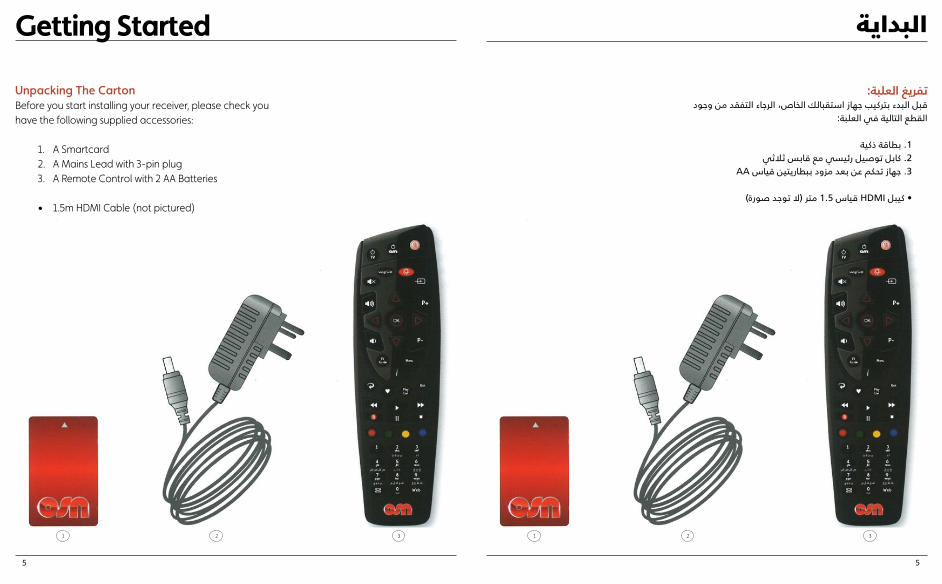
تفريغ العلبة:قبل البدء بتركيب جهاز استقبالك الخاص، الرجاء التفقد من وجود
القطع التالية في العلبة:
1. بطاقة ذكية 2. كابل توصيل رئيسي مع قابس ثالثي
AA 3. جهاز تحكم عن بعد مزود ببطاريتين قياس
• كيبل HDMI قياس 1.5 متر )ال توجد صورة(
1 2 3
Getting Started
Unpacking The CartonBefore you start installing your receiver, please check you have the following supplied accessories:
1. A Smartcard2. A Mains Lead with 3-pin plug3. A Remote Control with 2 AA Batteries
• 1.5m HDMI Cable (not pictured)
1 2 3
5 5
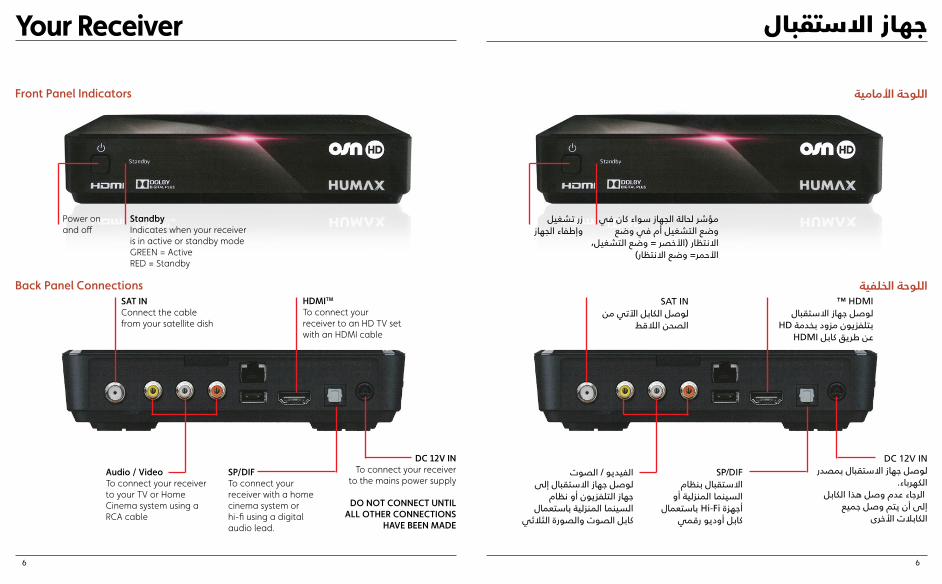
Front Panel Indicators
Power on and off
StandbyIndicates when your receiver is in active or standby mode GREEN = ActiveRED = Standby
Audio / VideoTo connect your receiver to your TV or Home Cinema system using a RCA cable
HDMITM
To connect your receiver to an HD TV set with an HDMI cable
SP/DIFTo connect your receiver with a home cinema system or hi-fi using a digital audio lead.
DC 12V INTo connect your receiver
to the mains power supply
DO NOT CONNECT UNTIL ALL OTHER CONNECTIONS
HAVE BEEN MADE
SAT INConnect the cable from your satellite dish
Back Panel Connections
Your Receiver
اللوحة األمامية
زر تشغيل وإطفاء الجهاز
مؤشر لحالة الجهاز سواء كان في وضع التشغيل أم في وضع
االنتظار )األخصر = وضع التشغيل، األحمر= وضع االنتظار(
الفيديو / الصوتلوصل جهاز االستقبال إلى
جهاز التلفزيون أو نظام السينما المنزلية باستعمال
كابل الصوت والصورة الثالثي
™ HDMIلوصل جهاز االستقبال
HD بتلفزيون مزود بخدمةHDMI عن طريق كابل
SP/DIFاالستقبال بنظام
السينما المنزلية أو أجهزة Hi-Fi باستعمال
كابل أوديو رقمي
DC 12V INلوصل جهاز االستقبال بمصدر
الكهرباء. الرجاء عدم وصل هذا الكابل
إلى أن يتم وصل جميع الكابالت األخرى
SAT INلوصل الكابل اآلتي من
الصحن الالقط
اللوحة الخلفية
جهاز االستقبال
6 6
وصل جهاز االستقبال
3. وصل الصحن الالقطقم بوصل الكابل مباشرًة من الصحن الالقط من
نايل سات إلى وصلةSAT-IN الموجودة في جهاز االستقبال الخاص بك.
4. وصل وحدة التغذيةقم بوصل كابل وحدة تزويد التغذية 12 فولت في
مقبسDC- 12V الموجود في جهاز االستقبال.
قم بوصل كابل التوصيل الرئيسي بوحدة تزويد التغذية 12
فولت.
قم بوصل القابس الرئيسي من وحدة التغذية 12 فولت
إلى مقبس الكهرباء الموجود في الحائط.
Your Receiver
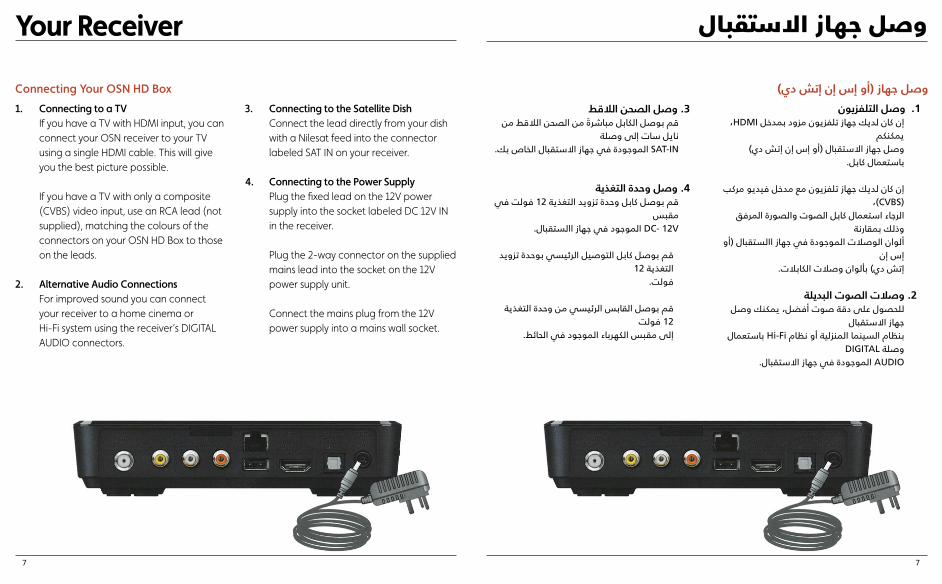
1. Connecting to a TV If you have a TV with HDMI input, you can connect your OSN receiver to your TV using a single HDMI cable. This will give you the best picture possible. If you have a TV with only a composite (CVBS) video input, use an RCA lead (not supplied), matching the colours of the connectors on your OSN HD Box to those on the leads.
2. Alternative Audio Connections For improved sound you can connect your receiver to a home cinema or Hi-Fi system using the receiver’s DIGITAL AUDIO connectors.
3. Connecting to the Satellite Dish Connect the lead directly from your dish with a Nilesat feed into the connector labeled SAT IN on your receiver.
4. Connecting to the Power Supply Plug the fixed lead on the 12V power supply into the socket labeled DC 12V IN in the receiver. Plug the 2-way connector on the supplied mains lead into the socket on the 12V power supply unit. Connect the mains plug from the 12V power supply into a mains wall socket.
Connecting Your OSN HD Box
7 7
1. وصل التلفزيون ،HDMI إن كان لديك جهاز تلفزيون مزود بمدخل
يمكنكموصل جهاز االستقبال )أو إس إن إتش دي(
باستعمال كابل.
إن كان لديك جهاز تلفزيون مع مدخل فيديو مركب ،)CVBS(
الرجاء استعمال كابل الصوت والصورة المرفق وذلك بمقارنة
ألوان الوصالت الموجودة في جهاز االستقبال )أو إس إن
إتش دي( بألوان وصالت الكابالت.
2. وصالت الصوت البديلةللحصول على دقة صوت أفضل، يمكنك وصل
جهاز االستقبالبنظام السينما المنزلية أو نظام Hi-Fi باستعمال
DIGITAL وصلةAUDIO الموجودة في جهاز االستقبال.
وصل جهاز )أو إس إن إتش دي(
OSN Smartcard
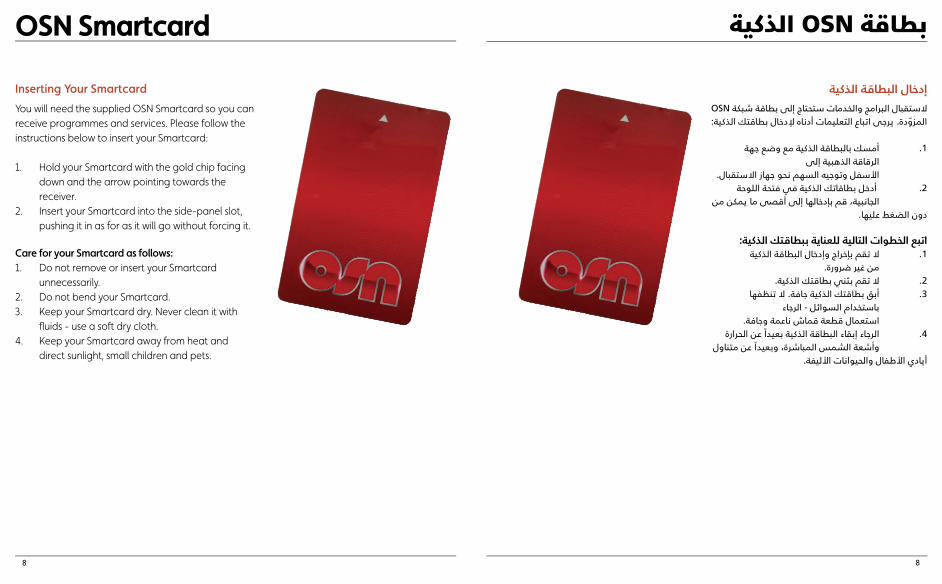
You will need the supplied OSN Smartcard so you can receive programmes and services. Please follow the instructions below to insert your Smartcard:
1. Hold your Smartcard with the gold chip facing down and the arrow pointing towards the receiver.
2. Insert your Smartcard into the side-panel slot, pushing it in as for as it will go without forcing it.
Care for your Smartcard as follows:1. Do not remove or insert your Smartcard
unnecessarily.2. Do not bend your Smartcard.3. Keep your Smartcard dry. Never clean it with
fl uids - use a soft dry cloth.4. Keep your Smartcard away from heat and
direct sunlight, small children and pets.
Inserting Your Smartcard
بطاقة OSN الذكية
OSN الستقبال البرامج والخدمات ستحتاج إلى بطاقة شبكةالمزّودة. يرجى اتباع التعليمات أدناه إلدخال بطاقتك الذكية:
أمسك بالبطاقة الذكية مع وضع جهة .1الرقاقة الذهبية إلى
األسفل وتوجيه السهم نحو جهاز االستقبال. 2. أدخل بطاقاتك الذكية في فتحة اللوحة الجانبية، قم بإدخالها إلى أقصى ما يمكن من
دون الضغط عليها.
اتبع الخطوات التالية للعناية ببطاقتك الذكية:ال تقم بإخراج وإدخال البطاقة الذكية .1
من غير ضرورة. ال تقم بثني بطاقتك الذكية. .2
أبق بطاقتك الذكية جافة. ال تنظفها .3باستخدام السوائل - الرجاء
استعمال قطعة قماش ناعمة وجافة. الرجاء إبقاء البطاقة الذكية بعيدًا عن الحرارة .4وأشعة الشمس المباشرة، وبعيدًا عن متناول
أيادي األطفال والحيوانات األليفة.
إدخال البطاقة الذكية
8 8

تشغيل أو إيقاف جهاز OSN HD
اختصار لقائمة القنوات
التنقل بين مخارج القنوات على التلفاز
الصعود في قائمة القنوات أو الصفحات
التنقل بين خيارات دليل التلفزيون اإللكتروني
اختيار لالئحة الخياراتمعلومات حول البرنامج
الذهاب إلى البث المباشر
أزرار ملونة الستعماالت متعددة اعتمادًا على الئحة القوائم
OSN الدخول إلى رسائل شبكة
اختصار لقائمة القنوات المفضلة
الرجوع أو التنقل بين آخر قناتين تمت مشاهدتهما
اختصار لدليل التلفاز
تأكيد الخيار
رفع الصوت
تشغيل أو كتم الصوت
تغيير اللغة واختيار الترجمة النصية)إن كانت متاحة(
تشغيل أو إيقاف التلفاز
جهاز التحكم عن بعد
النزول في قائمة القنوات
خفض الصوت
أزرار األرقام الختيار أرقام القنوات وخيارات األرقام األخرى
Switch OSN HD BoxOn / Off
Shortcut to channels list
Switch between output channels on your TV
Channels or pages UP
Use the arrow buttons to Navigate through EPG options
Shortcut to MENU
Programme information
Go to Live TV
Colour buttons have various uses depending
on menu screen
Access OSN messages
Shortcut to favourites
Go back / toggle between last 2 viewed channels
Shortcut to TV Guide
Confi rm selection
Volume UP
Turn sound ON / OFF
Change Language / Select subtitles (where available)
Switch TV On / Off
Your Remote Control
Channels or pages DOWN Volume DOWN
Use number buttons for selecting channel numbers of other numeric entries
9 9
Your Remote Control
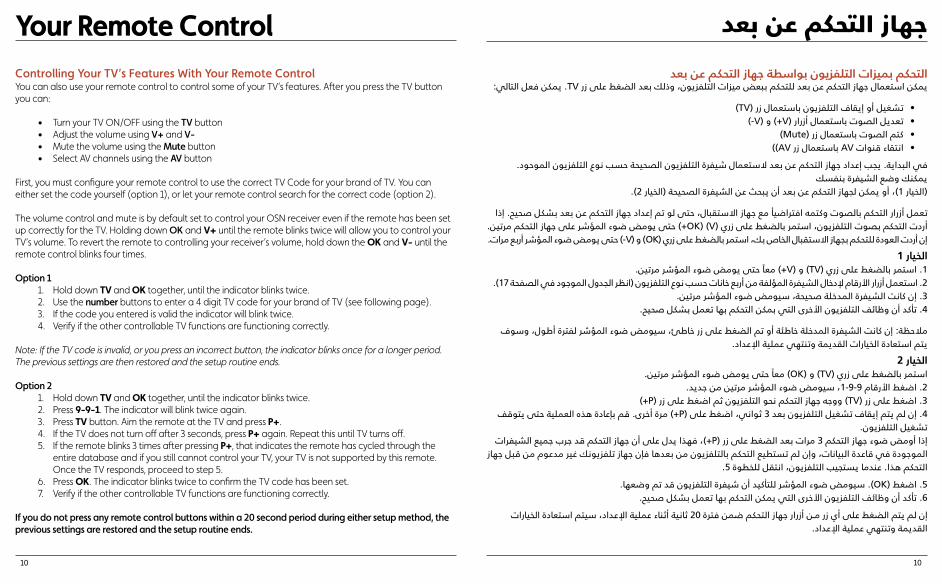
You can also use your remote control to control some of your TV’s features. After you press the TV button you can:
• Turn your TV ON/OFF using the TV button• Adjust the volume using V+ and V-• Mute the volume using the Mute button• Select AV channels using the AV button
First, you must configure your remote control to use the correct TV Code for your brand of TV. You can either set the code yourself (option 1), or let your remote control search for the correct code (option 2).
The volume control and mute is by default set to control your OSN receiver even if the remote has been set up correctly for the TV. Holding down OK and V+ until the remote blinks twice will allow you to control your TV’s volume. To revert the remote to controlling your receiver’s volume, hold down the OK and V- until the remote control blinks four times.
Option 11. Hold down TV and OK together, until the indicator blinks twice.2. Use the number buttons to enter a 4 digit TV code for your brand of TV (see following page).3. If the code you entered is valid the indicator will blink twice.4. Verify if the other controllable TV functions are functioning correctly.
Note: If the TV code is invalid, or you press an incorrect button, the indicator blinks once for a longer period. The previous settings are then restored and the setup routine ends.
Option 21. Hold down TV and OK together, until the indicator blinks twice.2. Press 9-9-1. The indicator will blink twice again.3. Press TV button. Aim the remote at the TV and press P+.4. If the TV does not turn off after 3 seconds, press P+ again. Repeat this until TV turns off. 5. If the remote blinks 3 times after pressing P+, that indicates the remote has cycled through the
entire database and if you still cannot control your TV, your TV is not supported by this remote. Once the TV responds, proceed to step 5.
6. Press OK. The indicator blinks twice to confirm the TV code has been set.7. Verify if the other controllable TV functions are functioning correctly.
If you do not press any remote control buttons within a 20 second period during either setup method, the previous settings are restored and the setup routine ends.
Controlling Your TV’s Features With Your Remote Control
جهاز التحكم عن بعد
يمكن استعمال جهاز التحكم عن بعد للتحكم ببعض ميزات التلفزيون، وذلك بعد الضغط على زر TV. يمكن فعل التالي:
•)TV( تشغيل أو إيقاف التلفزيون باستعمال زر •)-V( و )+V( تعديل الصوت باستعمال أزرار •)Mute( كتم الصوت باستعمال زر • ) )AV باستعمال زر AV انتقاء قنوات
في البداية. يجب إعداد جهاز التحكم عن بعد الستعمال شيفرة التلفزيون الصحيحة حسب نوع التلفزيون الموحود.يمكنك وضع الشيفرة بنفسك
)الخيار 1(، أو يمكن لجهاز التحكم عن بعد أن يبحث عن الشيفرة الصحيحة )الخيار 2(.
تعمل أزرار التحكم بالصوت وكتمه افتراضيأ مع جهاز االستقبال، حتى لو تم إعداد جهاز التحكم عن بعد بشكل صحيح. إذا أردت التحكم بصوت التلفزيون، استمر بالضغط على زري )OK( )V+( حتى يومض ضوء المؤشر على جهاز التحكم مرتين.إن أردت العودة للتحكم بجهاز االستقبال الخاص بك، استمر بالضغط على زري )OK( و )V-( حتى يومض ضوء المؤشر أربع مرات.
الخيار 11. استمر بالضغط على زري )TV( و )V+( معًا حتى يومض ضوء المؤشر مرتين.
2. استعمل أزرار األرقام إلدخال الشيفرة المؤلفة من أربع خانات حسب نوع التلفزيون )انظر الجدول الموجود في الصفحة 17(.3. إن كانت الشيفرة المدخلة صحيحة، سيومض ضوء المؤشر مرتين.
4. تأكد أن وظائف التلفزيون األخرى التي بمكن التحكم بها تعمل بشكل صحيح.
مالحظة: إن كانت الشيفرة المدخلة خاطئة أو تم الضغط على زر خاطئ، سيومض ضوء المؤشر لفترة أطول، وسوف يتم استعادة الخيارات القديمة وتنتهي عملية اإلعداد.
الخيار 2استمر بالضغط على زري )TV( و )OK( معًا حتى يومض ضوء المؤشر مرتين.
2. اضغط األرقام 9-9-1، سيومض ضوء المؤشر مرتين من جديد.)+P( ووجه جهاز التحكم نحو التلفزيون ثم اضغط على زر )TV( 3. اضغط على زر
4. إن لم يتم إيقاف تشغيل التلفزيون بعد 3 ثواني، اضغط على )P+( مرة أخرى. قم بإعادة هذه العملية حتى يتوقف تشغيل التلفزيون.
إذا أومض ضوء جهاز التحكم 3 مرات بعد الضغط على زر )P+(، فهذا يدل على أن جهاز التحكم قد جرب جميع الشيفرات الموجودة في قاعدة البيانات، وإن لم تستطيع التحكم بالتلفزيون من بعدها فإن جهاز تلفزيونك غير مدعوم من قبل جهاز
التحكم هذا. عندما يستجيب التلفزيون، انتقل للخطوة 5.
5. اضغط )OK(. سيومض ضوء المؤشر للتأكيد أن شيفرة التلفزيون قد تم وضعها.6. تأكد أن وظائف التلفزيون األخرى التي يمكن التحكم بها تعمل بشكل صحيح.
إن لم يتم الضغط على أي زر مـن أزرار جهاز التحكم ضمن فترة 20 ثانية أثناء عملية اإلعداد، سيتم استعادة الخيارات القديمة وتنتهي عملية اإلعداد.
التحكم بميزات التلفزيون بواسطة جهاز التحكم عن بعد
10 10
جهاز التحكم عن بعد
LG 0001 0178 1993 1663 0037 0556 0370 0377 0032 0009 0714 0644 1539 0056 0060 0217 0108 0216
0431 0290 0163 1934 0606 0109 1637 0698 0715 0823 0829 1146 1148 1191 1252 0247 0361 1718 1681
Amstrad 0009 0177 0037 0516 0264 0354 0362 0371 0075 0412 0218 0433 0556 1037 0648 0581 1904 1324
1982
Grundig 0195 0535 1223 0037 0070 0191 0487 0554 0556 0587 0672 1037 0706 0443 0205 0237 0215 0009
0036 0077 0370 0740 1935 1908 0260 0630 0757 1916 1308 0178 1376 0343 1981 1667
Hitachi 0145 1576 0481 0009 0578 0719 0225 0349 0032 0036 0744 1585 0737 0039 0043 1037 0044 0056
1484 1481 0109 1667 0157 1225 0163 0634 1045 0178 0179 0473 0186 0563 0217 0343 0196 1163 0576
0508 0548 1194 0499 1149 0797 1170 0194 0777 0480 0276 0516 0075 0072 0037 1156 0469 0556 1137
0105 0492 0359 0361 0512 0629 0877
KTV 0039 0217
JVC 0653 0069 1253 0731 0036 1153 0606 0190 1653 0371 1053 0508 0683 0192 0193 0218 0418 0093 0650
Panasonic 0650 0226 1636 1650 1310 0037 0556 1210 1510 0163 0340 0208 0214 0508 0890 0361 0853 0237
1930 0850 0367 0368 0516 0075 0548 0771 0001
Philips 0037 0556 0056 1506 0639 0605 1495 0012 0690 0772 1246 0186 0013 0178 0323 0108 1304 0554
0032 0043 0087 0193 0374 0721 0423 0343 0009 0200 0361 1521
Pioneer 1260 0109 0679 0163 0166 0037 0556 1398 0423 0428 0370 0343 0361 0486 0512
Samsung 0644 0766 0060 0056 0814 0618 0587 0009 1619 1458 0482 0556 1249 0032 1584 0150 1235 0178
0037 0179 0217 0264 0329 0448 0370 0039 0208 0226 0072 0682 0216 0290 0821 0519 0163
Sharp 0093 0009 1193 1586 0032 0036 1393 0818 0039 0157 0491 0256 1587 0650 0294 0653 0412 0193
0180 0516 0200
Sony 1505 0011 1651 1317 0036 0650 1010 0353 1551 0834 0102 0742 0157
Thomson 0625 0560 0343 0109 0501 0753 0399 0471 0335 0196 0205 0237 0037 0556 0568 0490 0320 0349
0216
Toshiba 1508 0508 0650 0009 1704 1164 0036 0060 1656 0714 0070 0093 0145 1945 0502 0204 0264 19350412 0102 0241 0618 0644 0821 1156 0217 0109 0490 0077 0195 0191 1916 1908 0698 0037 07360832 1556 1037
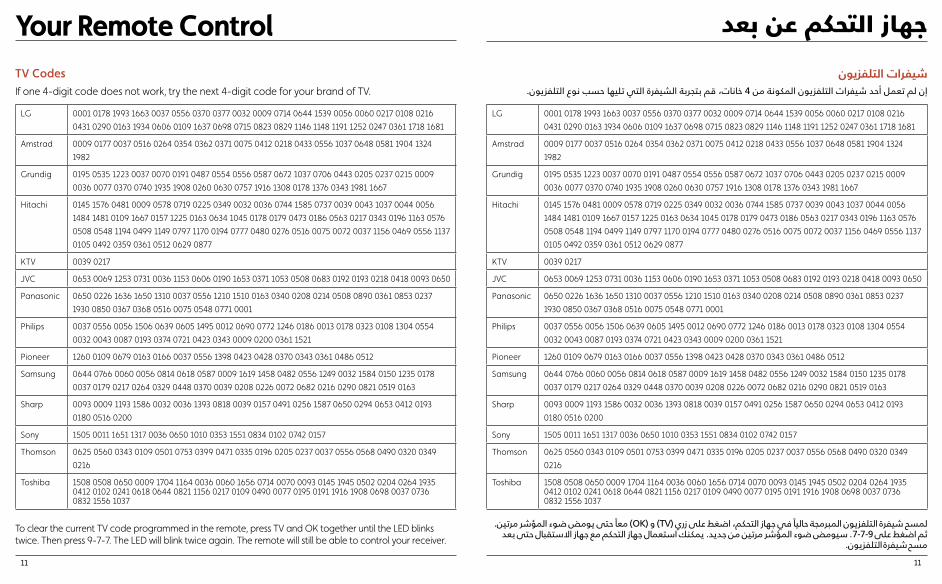
شيفرات التلفزيونإن لم تعمل أحد شيفرات التلفزيون المكونة من 4 خانات، قم بتجربة الشيفرة التي تليها حسب نوع التلفزيون.
لمسح شيفرة التلفزيون المبرمجة حاليًا في جهاز التحكم، اضغط على زري )TV( و )OK( معًا حتى يومض ضوء المؤشر مرتين. ثم اضغط على 9-7-7. سيومض ضوء المؤشر مرتين من جديد. يمكنك استعمال جهاز التحكم مع جهاز االستقبال حتى بعد
مسح شيفرة التلفزيون.
Your Remote Control
LG 0001 0178 1993 1663 0037 0556 0370 0377 0032 0009 0714 0644 1539 0056 0060 0217 0108 0216
0431 0290 0163 1934 0606 0109 1637 0698 0715 0823 0829 1146 1148 1191 1252 0247 0361 1718 1681
Amstrad 0009 0177 0037 0516 0264 0354 0362 0371 0075 0412 0218 0433 0556 1037 0648 0581 1904 1324
1982
Grundig 0195 0535 1223 0037 0070 0191 0487 0554 0556 0587 0672 1037 0706 0443 0205 0237 0215 0009
0036 0077 0370 0740 1935 1908 0260 0630 0757 1916 1308 0178 1376 0343 1981 1667
Hitachi 0145 1576 0481 0009 0578 0719 0225 0349 0032 0036 0744 1585 0737 0039 0043 1037 0044 0056
1484 1481 0109 1667 0157 1225 0163 0634 1045 0178 0179 0473 0186 0563 0217 0343 0196 1163 0576
0508 0548 1194 0499 1149 0797 1170 0194 0777 0480 0276 0516 0075 0072 0037 1156 0469 0556 1137
0105 0492 0359 0361 0512 0629 0877
KTV 0039 0217
JVC 0653 0069 1253 0731 0036 1153 0606 0190 1653 0371 1053 0508 0683 0192 0193 0218 0418 0093 0650
Panasonic 0650 0226 1636 1650 1310 0037 0556 1210 1510 0163 0340 0208 0214 0508 0890 0361 0853 0237
1930 0850 0367 0368 0516 0075 0548 0771 0001
Philips 0037 0556 0056 1506 0639 0605 1495 0012 0690 0772 1246 0186 0013 0178 0323 0108 1304 0554
0032 0043 0087 0193 0374 0721 0423 0343 0009 0200 0361 1521
Pioneer 1260 0109 0679 0163 0166 0037 0556 1398 0423 0428 0370 0343 0361 0486 0512
Samsung 0644 0766 0060 0056 0814 0618 0587 0009 1619 1458 0482 0556 1249 0032 1584 0150 1235 0178
0037 0179 0217 0264 0329 0448 0370 0039 0208 0226 0072 0682 0216 0290 0821 0519 0163
Sharp 0093 0009 1193 1586 0032 0036 1393 0818 0039 0157 0491 0256 1587 0650 0294 0653 0412 0193
0180 0516 0200
Sony 1505 0011 1651 1317 0036 0650 1010 0353 1551 0834 0102 0742 0157
Thomson 0625 0560 0343 0109 0501 0753 0399 0471 0335 0196 0205 0237 0037 0556 0568 0490 0320 0349
0216
Toshiba 1508 0508 0650 0009 1704 1164 0036 0060 1656 0714 0070 0093 0145 1945 0502 0204 0264 19350412 0102 0241 0618 0644 0821 1156 0217 0109 0490 0077 0195 0191 1916 1908 0698 0037 07360832 1556 1037
TV CodesIf one 4-digit code does not work, try the next 4-digit code for your brand of TV.
To clear the current TV code programmed in the remote, press TV and OK together until the LED blinks twice. Then press 9-7-7. The LED will blink twice again. The remote will still be able to control your receiver.
11 11
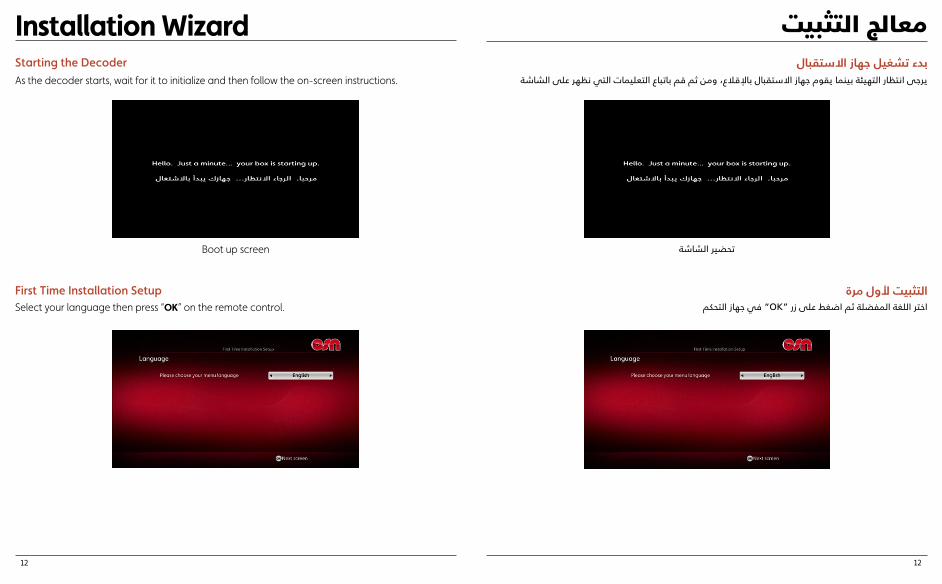
Installation WizardStarting the DecoderAs the decoder starts, wait for it to initialize and then follow the on-screen instructions.
Boot up screen
First Time Installation SetupSelect your language then press “OK” on the remote control.
معالج التثبيتبدء تشغيل جهاز االستقبال
يرجى انتظار التهيئة بينما يقوم جهاز االستقبال باإلقالع، ومن ثم قم باتباع التعليمات التي نظهر على الشاشة
تحضير الشاشة
التثبيت ألول مرةاختر اللغة المفضلة ثم اضغط على زر “OK” في جهاز التحكم
12 12

”OK“ في جهاز التحكم تبعًا لجهاز تلفزيونك، ومن ثم اضغط على زر HD اختر دقة
قم بالتحقق من أن جهاز استقبالك OSN HD يشمل على اتصال بقمر نايل سات ومن ثم اضغط على “OK” في جهاز التحكم.
اضغط على زر “OK” في جهاز التحكم للمتابعة D أو C أو B أو A إلى إما ”DiSEgCport“ في حال كنت تمتلك عده صحون القطة، قد تحتاج إلى تحويل
معالج التثبيت
Select your HD resolution based on your TV set. Then press “OK” on the remote control.
Verify your OSN HD Box has a Nilesat feed connected then press “OK” on the remote control.
Press “OK” on the remote control to continue.If you have multiple satellite dishes you may need to modify “DiSEqC Port” to either A, B, C or D
Installation Wizard
13 13
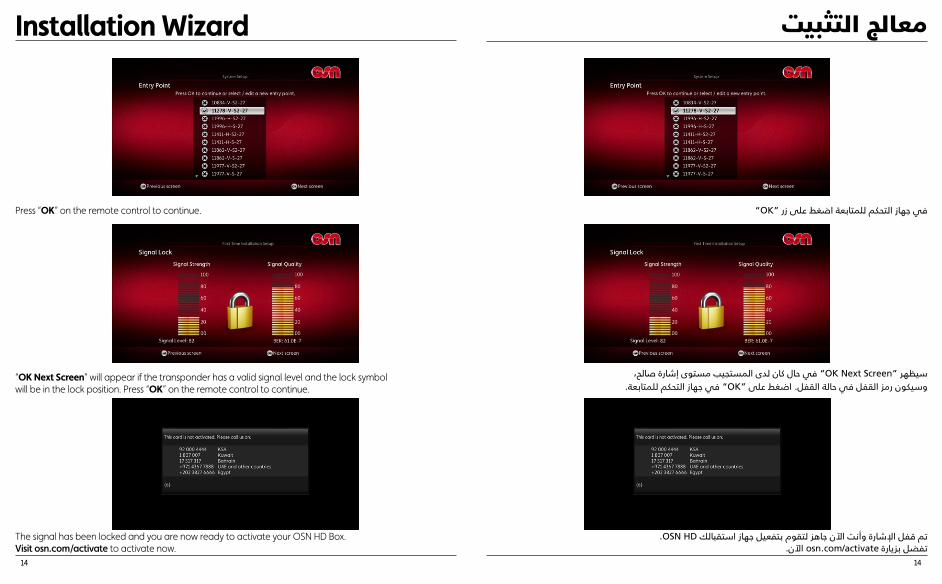
Press “OK” on the remote control to continue.
“OK Next Screen” will appear if the transponder has a valid signal level and the lock symbol will be in the lock position. Press “OK” on the remote control to continue.
The signal has been locked and you are now ready to activate your OSN HD Box. Visit osn.com/activate to activate now.
Installation Wizard
”OK“ في جهاز التحكم للمتابعة اضغط على زر
سيظهر “OK Next Screen” في حال كان لدى المستجيب مستوى إشارة صالح،وسيكون رمز القفل في حالة القفل. اضغط على “OK” في جهاز التحكم للمتابعة.
.OSN HD تم قفل اإلشارة وأنت اآلن جاهز لتقوم بتفعيل جهاز استقبالكتفضل بزيارة osn.com/activate اآلن.
معالج التثبيت
14 14
OSN HD تفعيل جهاز استقبالقم بتفعيل جهاز االستقبال الخاص بك اآلن واستعد لمغامرات رائعة.
للحصول على أفضل تجربة ترفيهية ممكنة من OSN قم بتفعيل جهاز استقبال OSN HD بكل سهولة وسرعة اآلن. osn.com/activate للتفعيل تفضل بزيارة
اسم القناة رقم القناة37 Star Movies HD83 Star Gold
100 OSN Ya Hala Al Oula HD101 OSN Ya Hala Al Oula HD +2
107 OSN Ya Hala HD140 AD Drama+ HD210 Star World HD 212 TLC HD221 Food Network HD230 Travel Channel283 ARY Digital308 Trace350 Disney Channel HD354 Disney Junior
355 Nickelodeon HDاسم القناة رقم القناة
356 Nick Jr404 BBC World 437 Dunya News438 ARY News441 Geo News442 Times Now443 Aaj Tak450 Sky News Arabia HD502 Discovery Family HD508 History Channel HD515 Nat Geo Wild HD 604 OSN Sports 4 HD
623 - 626 AD Sports 3 HD - 6HD
OSN قائمة قنواتبعد تفعيل جهاز استقبال OSN HD لديك شهرين على األقل لمشاهدة تشكيلة من قنوات OSN والتي تتضمن العديد
من القنوات التالية*:
* أسماء القنوات واألرقام خاضعة للتغيير
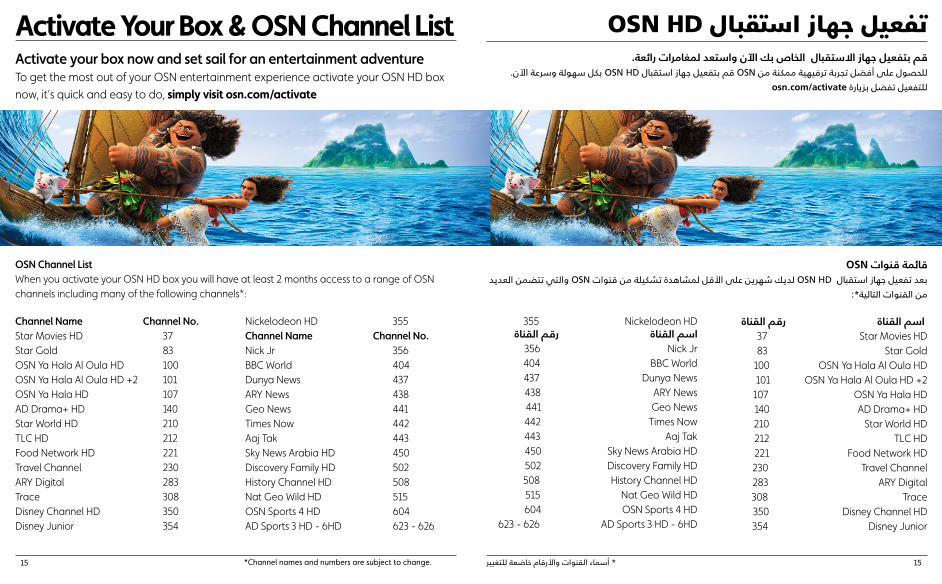
Activate Your Box & OSN Channel ListActivate your box now and set sail for an entertainment adventureTo get the most out of your OSN entertainment experience activate your OSN HD box
now, it’s quick and easy to do, simply visit osn.com/activate
Channel Name Channel No.Star Movies HD 37Star Gold 83OSN Ya Hala Al Oula HD 100OSN Ya Hala Al Oula HD +2 101OSN Ya Hala HD 107AD Drama+ HD 140Star World HD 210TLC HD 212Food Network HD 221Travel Channel 230ARY Digital 283Trace 308Disney Channel HD 350Disney Junior 354
Nickelodeon HD 355Channel Name Channel No.Nick Jr 356BBC World 404Dunya News 437ARY News 438Geo News 441Times Now 442Aaj Tak 443Sky News Arabia HD 450Discovery Family HD 502History Channel HD 508Nat Geo Wild HD 515OSN Sports 4 HD 604AD Sports 3 HD - 6HD 623 - 626
OSN Channel ListWhen you activate your OSN HD box you will have at least 2 months access to a range of OSN channels including many of the following channels*:
*Channel names and numbers are subject to change.15 15
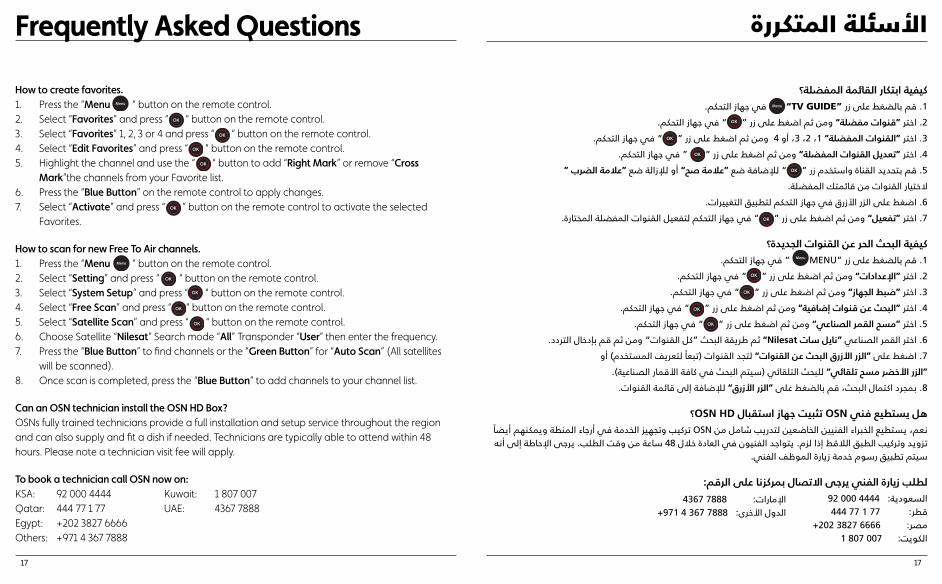
How to use the TV guide.1. Press “TV Guide “ button on the remote control.2. Press the “Green Button” on the remote control.3. The “Genre Bar” will be highlighting the categories at the top of the table.4. Select the “Category” and press “ “ on the remote control.
How to search for a channel.1. Press the “Channel List “ button on the remote control.2. Press the yellow button on the remote control to “Organize”.3. Select “Alphabetical” and press “ ” on the remote control.
How to change language to Arabic or English.1. Press the “Menu “ button on the remote control.2. Select “Setting” and press “ ” on the remote control.3. Select “User Preferences” and press the “ ” button on the remote control.4. Enter your 4 digit pin code “0000”.5. Select “Language Setup” and press “ ” on the remote control.6. Choose Menu Language Arabic or English and press the “Blue Button” on the remote control
to Apply changes.
How to change your PIN and setup Parental Control.1. Press the “Menu “ button on the remote control.2. Select “Setting” and press “ ” on the remote control.3. Select “Parental Control” and press “ ” on the remote control.4. Enter your 4 digits pin code “0000”.5. Select “Change Menu Pin” and press “ “ on the remote control.6. Enter Current pin then enter New PIN.7. “Confirm PIN” and press the “Blue Button” on the remote control to apply changes.
OK
OK
OK
OK
OK
OK
ChList
Frequently Asked Questions
Menu
Menu
OK
OK
كيفية استخدام دليل التلفزيون؟1. قم بالضغط على زر “TV GUIDE” في جهاز التحكم.
2. قم بالضغط على “الزر األخضر” في جهاز التحكم.3. سيتم إضاءة “شريط المعلومات” على الفئات في الجزء العلوي من الجدول.
” في جهاز التحكم. OK 4. قم باختيار “الفئة” ثم اضغط على “
كيفية البحث عن قناة؟” في جهاز التحكم. Ch
List 1. قم بالضغط على زر قائمة القنوات “2. قم بالضغط على الزر األصفر في جهاز التحكم “تنظيم”.
” في جهاز التحكم. OK 3. قم باختيار “الترتيب األبجدي Alphabetical” ومن ثم اضغط على زر “
كيفية تغيير اللغة إلى العربية أو اإلنجليزية؟” في جهاز التحكم. Menu 1. قم بالضغط على زر قائمة القنوات “
” في جهاز التحكم. OK 2. اختر “اإلعدادات” ومن ثم اضغط على زر “” في جهاز التحكم. OK 3. اختر “خيارات المستخدم” ومن ثم اضغط على زر “
4. أدخل رقمك السري المؤلف من أربع خانات “0000”.” في جهاز التحكم. OK 5. اختر “ضبط اللغة” ومن ثم اضغط على زر “
6. اختر اللغة العربية أو اإلنجليزية ومن ثم اضغط على الزر األزرق في جهاز التحكم لتطبيق التغييرات.
كيفية تغيير رقمك السري؟Menu ” في جهاز التحكم. MENU“ 1. قم بالضغط على زر
” في جهاز التحكم. OK 2. اختر “اإلعدادات” ومن ثم اضغط على زر “” في جهاز التحكم. OK 3. اختر “اإلشراف العائلي” ومن ثم اضغط على زر “
4. أدخل رقمك السري المؤلف من أربع خانات “0000”.” في جهاز التحكم. OK 5. اختر “قائمة تغيير الرقم السري” ومن ثم اضغط على زر “
6. أدخل رقمك السري الحالي ومن ثم أدخل رقمك السري الجديد.7. “قم بتأكيد” رقمك السري الجديد ومن ثم اضغط على الزر األزرق في جهاز التحكم لتطبيق التغييرات.
األسئلة المتكررة
16 16
كيفية ابتكار القائمة المفضلة؟Menu في جهاز التحكم. ”TV GUIDE“ 1. قم بالضغط على زر
” في جهاز التحكم. OK 2. اختر “قنوات مفضلة” ومن ثم اضغط على زر “” في جهاز التحكم. OK 3. اختر “القنوات المفضلة” 1، 2، 3، أو 4 ومن ثم اضغط على زر “
OK “ في جهاز التحكم. 4. اختر “تعديل القنوات المفضلة” ومن ثم اضغط على زر “” لإلضافة ضع “عالمة صح” أو لإلزالة ضع “عالمة الضرب “ OK 5. قم بتحديد القناة واستخدم زر “
الختيار القنوات من قائمتك المفضلة.6. اضغط على الزر األزرق في جهاز التحكم لتطبيق التغييرات.
” في جهاز التحكم لتفعيل القنوات المفضلة المختارة. OK 7. اختر “تفعيل” ومن ثم اضغط على زر “
كيفية البحث الحر عن القنوات الجديدة؟Menu ” في جهاز التحكم. MENU“ 1. قم بالضغط على زر
” في جهاز التحكم. OK 2. اختر “اإلعدادات” ومن ثم اضغط على زر “” في جهاز التحكم. OK 3. اختر “ضبط الجهاز” ومن ثم اضغط على زر “
” في جهاز التحكم. OK 4. اختر “البحث عن قنوات إضافية” ومن ثم اضغط على زر “” في جهاز التحكم. OK 5. اختر “مسح القمر الصناعي” ومن ثم اضغط على زر “
6. اختر القمر الصناعي “نايل سات Nilesat” ثم طريقة البحث “كل القنوات” ومن ثم قم بإدخال التردد.7. اضغط على “الزر األزرق البحث عن القنوات” لتجد القنوات )تبعًا لتعريف المستخدم( أو
“الزر األخضر مسح تلقائي” للبحث التلقائي )سيتم البحث في كافة األقمار الصناعية(.8. بمجرد اكتمال البحث، قم بالضغط على “الزر األزرق” لإلضافة إلى قائمة القنوات.
هل يستطيع فني OSN تثبيت جهاز استقبال OSN HD؟نعم، يستطيع الخبراء الفنيين الخاضعين لتدريب شامل من OSN تركيب وتجهيز الخدمة في أرجاء المنطة ويمكنهم أيضًا تزويد وتركيب الطبق الالقط إذا لزم. يتواجد الفنيون في العادة خالل 48 ساعة من وقت الطلب. يرجى اإلحاطة إلى أنه
سيتم تطبيق رسوم خدمة زيارة الموظف الفني.
لطلب زيارة الفني يرجى االتصال بمركزنا على الرقم: السعودية: 4444 000 92قطر: 77 1 77 444
مصر: 6666 3827 202+ الكويت: 007 807 1
األسئلة المتكررة
OK
OK
Frequently Asked Questions
How to create favorites.1. Press the “Menu “ button on the remote control.2. Select “Favorites” and press “ “ button on the remote control.3. Select “Favorites” 1, 2, 3 or 4 and press “ “ button on the remote control.4. Select “Edit Favorites” and press “ “ button on the remote control.5. Highlight the channel and use the “ “ button to add “Right Mark” or remove “Cross
Mark”the channels from your Favorite list.6. Press the “Blue Button” on the remote control to apply changes.7. Select “Activate” and press “ ” button on the remote control to activate the selected
Favorites.
How to scan for new Free To Air channels.1. Press the “Menu “ button on the remote control.2. Select “Setting” and press “ “ button on the remote control.3. Select “System Setup” and press “ “ button on the remote control.4. Select “Free Scan” and press “ “ button on the remote control.5. Select “Satellite Scan” and press “ “ button on the remote control.6. Choose Satellite “Nilesat” Search mode “All” Transponder “User” then enter the frequency.7. Press the “Blue Button” to find channels or the “Green Button” for “Auto Scan” (All satellites
will be scanned).8. Once scan is completed, press the “Blue Button” to add channels to your channel list.
Can an OSN technician install the OSN HD Box?OSNs fully trained technicians provide a full installation and setup service throughout the region and can also supply and fit a dish if needed. Technicians are typically able to attend within 48 hours. Please note a technician visit fee will apply.
To book a technician call OSN now on:KSA: 92 000 4444 Kuwait: 1 807 007Qatar: 444 77 1 77 UAE: 4367 7888Egypt: +202 3827 6666Others: +971 4 367 7888
Menu
Menu
OK
OK
OK
OK
OK
OK
OK
17 17
اإلمارات: 7888 4367الدول األخرى: 7888 367 4 971+
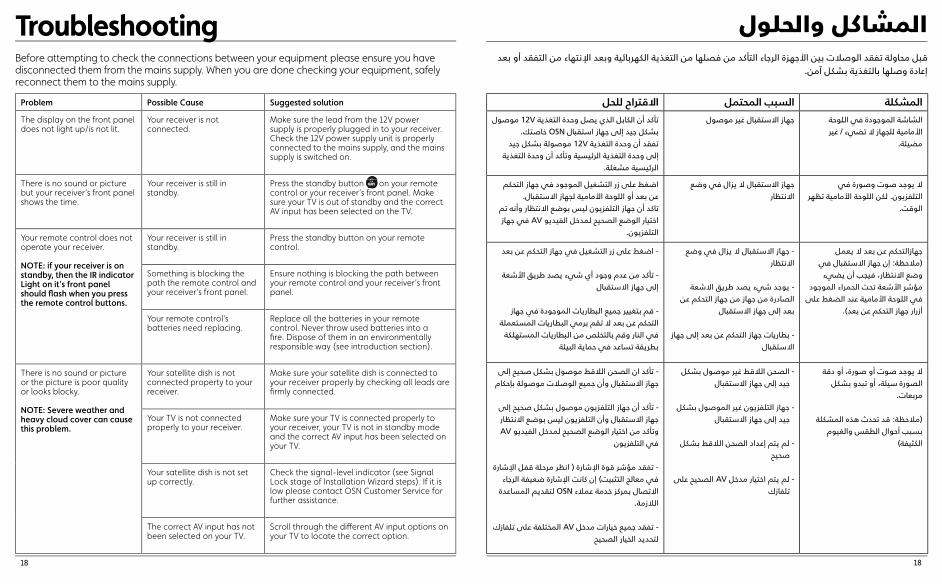
Before attempting to check the connections between your equipment please ensure you have disconnected them from the mains supply. When you are done checking your equipment, safely reconnect them to the mains supply.
Problem Possible Cause Suggested solution
The display on the front panel does not light up/is not lit.
Your receiver is not connected.
Make sure the lead from the 12V power supply is properly plugged in to your receiver. Check the 12V power supply unit is properly connected to the mains supply, and the mains supply is switched on.
There is no sound or picture but your receiver’s front panel shows the time.
Your receiver is still in standby.
Press the standby button on your remote control or your receiver’s front panel. Make sure your TV is out of standby and the correct AV input has been selected on the TV.
Your remote control does not operate your receiver.
NOTE: if your receiver is on standby, then the IR indicator Light on it’s front panel should fl ash when you press the remote control buttons.
Your receiver is still in standby.
Press the standby button on your remote control.
Something is blocking the path the remote control and your receiver’s front panel.
Ensure nothing is blocking the path between your remote control and your receiver’s front panel.
Your remote control’s batteries need replacing.
Replace all the batteries in your remote control. Never throw used batteries into a fi re. Dispose of them in an environmentally responsible way (see introduction section).
There is no sound or picture or the picture is poor quality or looks blocky.
NOTE: Severe weather and heavy cloud cover can cause this problem.
Your satellite dish is not connected property to your receiver.
Make sure your satellite dish is connected to your receiver properly by checking all leads are fi rmly connected.
Your TV is not connected properly to your receiver.
Make sure your TV is connected properly to your receiver, your TV is not in standby mode and the correct AV input has been selected on your TV.
Your satellite dish is not set up correctly.
Check the signal-level indicator (see Signal Lock stage of Installation Wizard steps). If it is low please contact OSN Customer Service for further assistance.
The correct AV input has not been selected on your TV.
Scroll through the diff erent AV input options on your TV to locate the correct option.
Troubleshooting
Press the standby button on your remote
قبل محاولة تفقد الوصالت بين األجهزة الرجاء التأكد من فصلها من التغذية الكهربائية وبعد اإلنتهاء من التفقد أو بعد إعادة وصلها بالتغذية بشكل آمن.
المشاكل والحلول
18 18
االقتراح للحلالسبب المحتملالمشكلة الشاشة الموجودة في اللوحة األمامية للجهاز ال تضيء / غير
مضيئة.
تأكد أن الكابل الذي يصل وحدة التغذية 12V موصول جهاز االستقبال غير موصولبشكل جيد إلى جهاز استقبال OSN خاصتك.
تفقد أن وحدة التغذية 12V موصولة بشكل جيد إلى وحدة التغذية الرئيسية وتأكد أن وحدة التغذية
الرئيسية مشغلة.
ال يوجد صوت وصورة في التلفزيون. لكن اللوحة األمامية تظهر
الوقت.
جهاز االستقبال ال يزال في وضع االنتظار
اضغط على زر التشغيل الموجود في جهاز التحكم عن بعد أو اللوحة األمامية لجهاز االستقبال.
تاكد أن جهاز التلفزيون ليس بوضع االنتظار وأنه تم اختيار الوضع الصحيح لمدخل الفيديو AV في جهاز
التلفزيون.
جهازالتحكم عن بعد ال يعمل )مالحظة: إن جهاز االستقبال في وضع االنتظار، فيجب أن يضيء
مؤشر األشعة تحت الحمراء الموجود في اللوحة األمامية عند الضغط على
أزرار جهاز التحكم عن بعد(.
- جهاز االستقبال ال يزال في وضع االنتظار
- يوجد شيء يصد طريق االشعة الصادرة من جهاز من جهاز التحكم عن
بعد إلى جهاز االستقبال
- بطاريات جهاز التحكم عن بعد إلى جهاز االستقبال
- اضغط على زر التشغيل في جهاز التحكم عن بعد
- تأكد من عدم وجود أي شيء يصد طريق األشعة إلى جهاز االستقبال
- قم بتغيير جميع البطاريات الموجودة في جهاز التحكم عن بعد ال تقم برمي البطاريات المستعملة
في النار وقم بالتخلص من البطاريات المستهلكة بطريقة تساعد في حماية البيئة
ال يوجد صوت أو صورة، أو دقة الصورة سيئة، أو تبدو بشكل
مربعات.
)مالحظة: قد تحدث هذه المشكلة بسبب أحوال الطقس والغيوم
الكثيفة(
- الصحن الالقط غير موصول بشكل جيد إلى جهاز االستقبال
- جهاز التلفزيون غير الموصول بشكل جيد إلى جهاز االستقبال
- لم يتم إعداد الصحن الالقط بشكل صحيح
- لم يتم اختيار مدخل AV الصحيح على تلفازك
- تأكد ان الصحن الالقط موصول بشكل صحيح إلى جهاز االستقبال وأن جميع الوصالت موصولة بإحكام
- تأكد أن جهاز التلفزيون موصول بشكل صحيح إلى جهاز االستقبال وأن التلفزيون ليس بوضع االنتظار AV وتأكد من اختيار الوضع الصحيح لمدخل الفيديو
في التلفزيون
- تفقد مؤشر قوة اإلشارة ) انظر مرحلة قفل اإلشارة في معالج التثبيت( إن كانت اإلشارة ضعيفة الرجاء
االتصال بمركز خدمة عمالء OSN لتقديم المساعدة الالزمة.
- تفقد جميع خيارات مدخل AV المختلفة على تلفازك لتحديد الخيار الصحيح
المشاكل والحلول
* إذا واجهت أي مشاكل حتى بعد تفقد الجدول أعاله الرجاء االتصالل بمركز خدمة عمالء شبكة أو أس أن للحصول على المساعدة الالزمة.
Troubleshooting
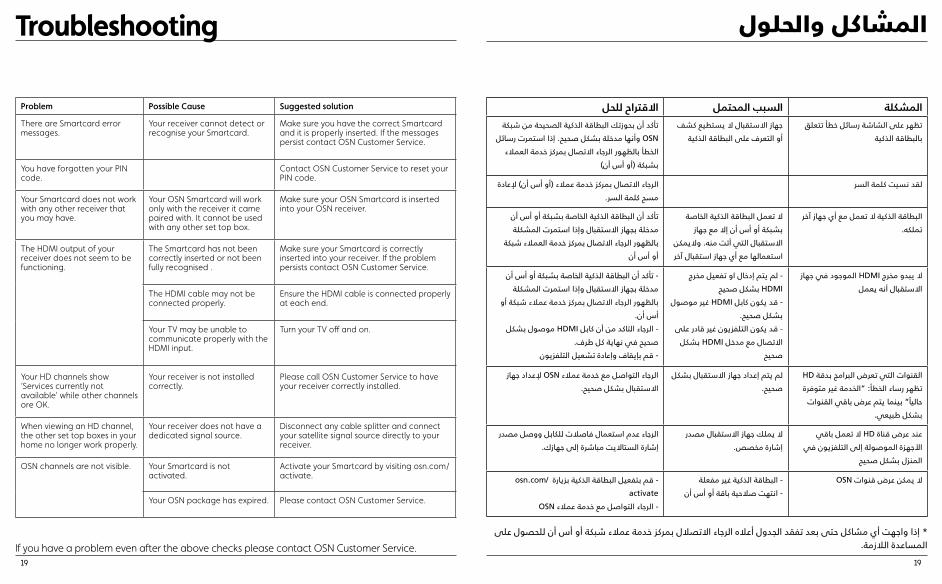
Problem Possible Cause Suggested solution
There are Smartcard error messages.
Your receiver cannot detect or recognise your Smartcard.
Make sure you have the correct Smartcard and it is properly inserted. If the messages persist contact OSN Customer Service.
You have forgotten your PIN code.
Contact OSN Customer Service to reset your PIN code.
Your Smartcard does not work with any other receiver that you may have.
Your OSN Smartcard will work only with the receiver it came paired with. It cannot be used with any other set top box.
Make sure your OSN Smartcard is inserted into your OSN receiver.
The HDMI output of your receiver does not seem to be functioning.
The Smartcard has not been correctly inserted or not been fully recognised .
Make sure your Smartcard is correctly inserted into your receiver. If the problem persists contact OSN Customer Service.
The HDMI cable may not be connected properly.
Ensure the HDMI cable is connected properly at each end.
Your TV may be unable to communicate properly with theHDMI input.
Turn your TV off and on.
Your HD channels show ‘Services currently not available’ while other channels ore OK.
Your receiver is not installed correctly.
Please call OSN Customer Service to have your receiver correctly installed.
When viewing an HD channel, the other set top boxes in your home no longer work properly.
Your receiver does not have a dedicated signal source.
Disconnect any cable splitter and connect your satellite signal source directly to your receiver.
OSN channels are not visible. Your Smartcard is not activated.
Activate your Smartcard by visiting osn.com/activate.
Your OSN package has expired. Please contact OSN Customer Service.
If you have a problem even after the above checks please contact OSN Customer Service.19 19
االقتراح للحلالسبب المحتملالمشكلةتظهر على الشاشة رسائل خطأ تتعلق
بالبطاقة الذكيةجهاز االستقبال ال يستطيع كشف
أو التعرف على البطاقة الذكيةتأكد أن بحوزتك البطاقة الذكية الصحيحة من شبكة
OSN وأنها مدخلة بشكل صحيح. إذا استمرت رسائل الخطأ بالظهور الرجاء االتصال بمركز خدمة العمالء
بشبكة )أو أس أن(
الرجاء االتصال بمركز خدمة عمالء )أو أس أن( إلعادة لقد نسيت كلمة السرمسح كلمة السر.
البطاقة الذكية ال تعمل مع أي جهاز آخر تملكه.
ال تعمل البطاقة الذكية الخاصة بشبكة أو أس أن إال مع جهاز
االستقبال التي أتت منه. واليمكن استعمالها مع أي جهاز استقبال آخر
تأكد أن البطاقة الذكية الخاصة بشبكة أو أس أن مدخلة بجهاز االستقبال وإذا استمرت المشكلة
بالظهور الرجاء االتصال بمركز خدمة العمالء شبكة أو أس أن
ال يبدو مخرج HDMI الموجود في جهاز االستقبال أنه يعمل
- لم يتم إدخال او تفعيل مخرج HDMI بشكل صحيح
- قد يكون كابل HDMI غير موصول بشكل صحيح.
- قد يكون التلفزيون غير قادر على االتصال مع مدخل HDMI بشكل
صحيح
- تأكد أن البطاقة الذكية الخاصة بشبكة أو أس أن مدخلة بجهاز االستقبال وإذا استمرت المشكلة
بالظهور الرجاء االتصال بمركز خدمة عمالء شبكة أو أس أن.
- الرجاء التاكد من أن كابل HDMI موصول بشكل صحيح في نهاية كل طرف.
- قم بإيقاف وإعادة تشعيل التلفزيون
HD القنوات التي تعرض البرامج بدقةتظهر رساء الخطأ: “الخدمة غير متوفرة حاليًا” بينما يتم عرض باقي القنوات
بشكل طبيعي.
لم يتم إعداد جهاز االستقبال بشكل صحيح.
الرجاء التواصل مع خدمة عمالء OSN إلعداد جهاز االستقبال بشكل صحيح.
عند عرض قناة HD ال تعمل باقي األجهزة الموصولة إلى التلفزيون في
المنزل بشكل صحيح
ال يملك جهاز االستقبال مصدر إشارة مخصص.
الرجاء عدم استعمال فاصالت للكابل ووصل مصدر إشارة الستااليت مباشرة إلى جهازك.
OSN البطاقة الذكية غير مفعلةال يمكن عرض قنوات -- انتهت صالحية باقة أو أس أن
osn.com/ قم بتفعيل البطاقة الذكية بزيارة - activate
OSN الرجاء التواصل مع خدمة عمالء -
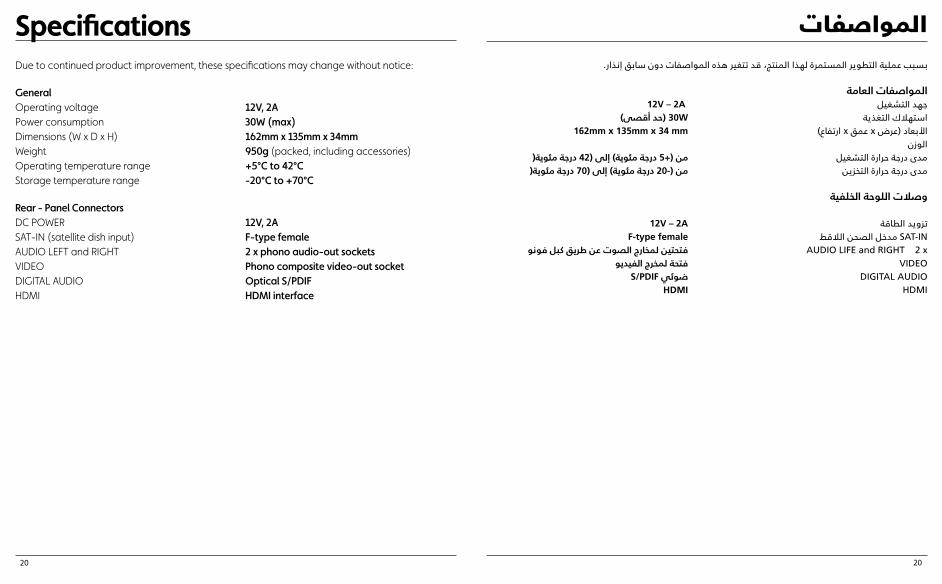
المواصفاتDue to continued product improvement, these specifications may change without notice:
GeneralOperating voltage 12V, 2APower consumption 30W (max)Dimensions (W x D x H) 162mm x 135mm x 34mmWeight 950g (packed, including accessories)Operating temperature range +5°C to 42°CStorage temperature range -20°C to +70°C
Rear - Panel ConnectorsDC POWER 12V, 2ASAT-IN (satellite dish input) F-type femaleAUDIO LEFT and RIGHT 2 x phono audio-out socketsVIDEO Phono composite video-out socketDIGITAL AUDIO Optical S/PDIFHDMI HDMI interface
Specifications
20 20
بسبب عملية التطوير المستمرة لهذا المنتج، قد تتغير هذه المواصفات دون سابق إنذار.
المواصفات العامة12V – 2A جهد التشغيل
30W )حد أقصى( استهالك التغذية 162mm x 135mm x 34 mm األبعاد )عرض x عمق x ارتفاع(
الوزن من )+5 درجة مئوية( إلى )42 درجة مئوية) مدى درجة حرارة التشغيل
من )-20 درجة مئوية( إلى )70 درجة مئوية) مدى درجة حرارة التخزين
وصالت اللوحة الخلفية
12V – 2A تزويد الطاقة F-type female SAT-IN مدخل الصحن الالقط
فتحتين لمخارج الصوت عن طريق كبل فونو AUDIO LIFE and RIGHT 2 xفتحة لمخرج الفيديو VIDEO
S/PDIF ضوئي DIGITAL AUDIOHDMI HDMI
تحذير:ال تقم بتخزين جهاز استقبال OSN في األماكن
الحارة أو الباردة أو الرطبة أو المليئة بالغبار.
ال تقم بسد فتحات التهوية في جهاز االستقبال الخاص بك. الرجاء ترك فجوة بمسافة ٥ سم على
األقل فوق وحول الجهاز للسماح بمرور التهوية الالزمة. وال تقم بوضع الجهاز على قطع األثاث
الناعمة.
الرجاء عدم وضع أي شيء يمكن أن يقطر أو يمكن سكبه فوق جهاز استقبال OSN. الرجاء عدم وضع أغراض مليئة بالسوائل )كآنية الزهور( فوق
.OSN جهاز استقبال
الرجاء عدم وضع جهاز استقبال OSN في خزانة ال تصلها التهوية أو فوق وحدة تقوم بإصدار
الحرارة )كجهاز مسجل الفيديو).
ال تقم بوضع مصادر اللهب )كالشموع المضاءة( .OSN فوق أو بجوار جهاز استقبال
ال تلمس قابس التيار الكهربائيبأيد مبتلة.
ال تستخدم الجهاز عندما يكون معطاًل. قد يؤدياالستمرار في استخدام المنتج رغم وجود أعطال به إلى حدوث أضرار بالغة. يرجى االتصال بمركز
خدمة العمالء في حالة حدوث أي مشاكل بالجهاز.
استعمال المعدات بشكل آمنتم تصنيع جهاز استقبال OSN بما يناسب المعايير
العالمية للسالمة لكن عليك أخذ الحذر لتشغيله بشكل آمن.
من الضروري قراءة تعليمات السالمة التالية.تحذير: تذكر أن مالمسة مأخذ الكهرباء الرئيسي
قد تكون مميتة أو قد تؤدي إلى صدمة كهربائية حادة. لتجتب الخطر:
ال تقم بنزع الغطاء العلوي لوحدة التغذية الكهربائية 12V ألنه يحتوي بداخله على قطع
تصدر تيارأ عالي الجهد. ال تحتوي وحدة التغذية على قطع يمكن للمستخدم أن يستعملها.
ال تقم بنزع الغطاء العلوي لجهاز استقبالOSN. ال يحتوي الجهاز على قطع يمكن
للمستخدم أن يستعملها.
تأكد أن الوصالت الكهربائية موصولة بشكل صحيح.
ال تقم بوصل أي جهاز إلى مأخذ الكهرباء الرئيسي إال
بعد التأكد أن جميع الكابالت األخرى موصولة بشكل صحيح.
قبل فصل أي أداة من اللوحة الخلفية لجهاز االستقبال OSN الرجاء وقف تشغيل الجهاز ثم االنتظار ٦٠ ثانية ثم فصل جهاز االستقبال من
وحدة تغذية الكهرباء )وذلك عن طريق نزع وصلة تغذية الكهرباء 12V من قابس الكهرباء األساسي
الموجود في الحائط).
الرجاء عدم دفع أو وضع أي غرض في أي من الفتحات الموجودة في الجهاز وغطائه )باستثناء
البطاقة الذكية التي يتم وضعها في الفتحة المخصصة لها فقط(.
رقم الموديل والرقم التسلسلي والتصنيف الكهربائيلجهاز استقبال OSN موجودة في رقعة بقاعدة الجهاز.
معلومات السالمةUsing Equipment SafelyYour OSN receiver has been manufactured to meet international safety standards, but you must take care to operate it safely.
It is important you read these safety instructions.WARNING: Remember that contact with AC mains can be lethal or can cause severe electric shock. To avoid the risk of electric shock:
Do not remove the top cover from the12V power supply unit as there are high-voltage live parts inside and no user-serviceable parts inside it.
Do not remove the top cover from your OSN receiver. There are no user-serviceable parts inside it.
Make sure all electrical connections are properly made.
Do not connect any equipment to the mains supply until you have properly connected all the other leads.
Before you disconnect any other equipment from your OSN receiver’s rear panel, put your OSN receiver into standby, wait 60 seconds, then disconnect your OSN receiver from the power supply (by disconnecting the 12V power supply unit from the mains socket on the wall).
Never push anything into holes, slots or other openings in the case (except aSmartcard into the slot provided).
The model number, serial number and electrical rating of your OSN receiver are on a label on its base.
Safety InformationCaution:
Do not use or store your OSN receiver in hot, cold, damp, or dusty places.
Do not block the ventilation holes of your OSN receiver. Leave a gap of at least 5cm above and around it to allow for adequate ventilation. Never stand it on soft furnishings.
Do not put anything on your OSN receiver which might drip or spill into it. Never stand objects fi lled with liquids, such as vases, on top of your OSN top box.
Do not place your OSN receiver in an unventilated cabinet or on top of a unit that emits heat (e.g. a VCR).
Never place naked fl ame sources, such as lighted candles, on or adjacent to your OSN receiver.
Do not touch the power plug with wet hands.
Do not use the product when it is out of order. If you continue to use the product when defective, this may cause serious damage. Make sure to contact the customer service centre if the product is out of order.
21 21
Contact UsPlease contact OSN Customer Service on:KSA: 9 2000 4444 Kuwait: 1 807 007Qatar: 444 77 1 77 UAE: 4 367 7888Egypt: 02 3827 6666 Jordan: 06 5511615Bahrain: 17 317 317 Others: +971 4 367 7888
or to activate your OSN HD box visit osn.com/activate
Notices
This product incorporates copyright protection technology that is protected by U.S. patents and other intellectual property rights. Use of this copyright protection technology must be authorized by Macrovision, and is intended for home and other limited pay-per-view uses only unless otherwise authorized by Macrovision. Reverse engineering or disassembly is prohibited.
Macrovision
HDMI, the HDMI logo and High-Defi nition Multimedia Interface are trademarks or registered trademarks of HDMI Licensing LLC.Other trademarks listed herein are the property of their respective owners.
Manufactured under licence from Dolby Laboratories. Dolby and the double-D symbol are trademarks of Dolby Laboratories.
Dolby
معلومات االتصالالرجاء التواصل مع خدمة عمالء OSN على األرقام التالية:
1 807 007 الكويت: 9 2000 4444 السعودية: اإلمارات: 7888 367 4 444 77 1 77 قطر: األردن: 5511615 06 02 3827 6666 مصر:
الدول األخرى: 7888 367 4 971+ 17 317 317 البحرين:
osn.com/activate تفضل بزيارة OSN HD أو لتفعيل جهاز استقبال
مالحظات
22 22
يتضمن هذا المنتج تقنية حماية حقوق التأليف والنشر التي تخضع لحماية حقالمطالبة بموجب بعض براءات االختراع األمريكية ومالكي الحقوق اآلخرين. يحظر
Macrovi- استخدام تقنية حماية حقوق التأليف والنشر هذه إال بموجب تصريح من شركةsion كما أنها مصممة خصيصًا لالستخدام المنزلي واستخدامات العرض المحدود األخرى
ما لم تصرح Macrovision. يحظر إجراء الهندسة العكسية أو التفكيك.
تعد HDMI وشعار HD و High-Definition Multimedia Interfaceعالمات تجارية مسجلة لشركة HDMI Licensing LLC. وجميع العالمات التجارية المذكورة هنا هي ملكية
خاصة ألصحابها.
Dolby وإن شعارات .Dolby Laboratories تم تصنيع هذا المنتج تحت ترخيص من شركة.Dolby Laboratories المزدوجة هي عالمات تجارية خاصة بشركة-D و
Macrovision
Dolby


![Index []290 Social Media Metrics For Dummies Analytics service (Google) (continued) Dashboard/Website Profi les, 40 Data Feed API, 206 defi nition and measurement spreadsheet, 206–215](https://static.documents.pub/doc/80x56/604ad35bfd3f9e41bd360e1a/index-290-social-media-metrics-for-dummies-analytics-service-google-continued.jpg)

![Industry Issues and wellness. ... Bill, your organization, Rite Aid, is doing some great things [around wellness]. What is your defi nition, and how do we align around a defi nition](https://static.documents.pub/doc/80x56/5b2f745e7f8b9a594c8e4bc9/industry-issues-and-wellness-bill-your-organization-rite-aid-is-doing-some.jpg)


